What is DirX Directory Manager?
DirX Directory Manager is a Java application that provides a configurable, platform-independent administrative graphical user interface for local and remote management of DirX Directory. DirX Directory Manager is a plug-in that adds functionality to the core component. This functionality consists of:
-
LDAP-based functionality
This functional area consists of features that are designed to work (at least to some extent) with both DirX Directory and non-DirX Directory LDAP servers (note, however, that although LDAP is an Internet standard, different servers behave differently in certain details).
The LDAP-based functionality includes: -
Managing ordinary LDAP entries (this functional area is part of the core component)
-
Managing the schema
Note that the schema and database related functionality is provided by separate plug-ins that may or may not be present in your deployment.
See "Schema Management" for details about these functions.*
Schema*
Allows you to view and manage the schema.*
Database/Indices*
If the plug-in "Database" is installed, the schema view also allows viewing and managing indices. -
DirX Directory-specific functionality
This functional area consists of features that are solely available with DirX Directory. It includes: -
Displaying the LDAP Root subentry
-
Displaying Access Control Subentries
-
Managing Collective Attribute Subentries
-
Managing LDAP Configuration Subentries
-
Managing LDAP SSL Configuration Subentries
-
Managing LDAP Audit Subentries
-
Managing Password Policy Subentries
-
Managing Replication
-
Monitoring administrative information provided by the LDAP Server
Note that the monitoring functionality is provided by a separate plug-in that may or may not be present in your deployment.
See "Monitoring Information" for details about these functions. -
A script manager that allows you to manage scripts and run dirxcp and dirxadm from within DirX Directory Manager, provided dirxcp/dirxadm are available locally. Moreover, you can have the script manager decode and view audit log files based on the dirxauddecode command (must be locally available, too).
For details on dirxcp, dirxadm and dirxauddecode please refer to the documentation shipping with DirX Directory.
The script manager-related functionality may be absent because it is a separate plug-in. If present, it should be found in DirX Directory Manager’s Welcome View Group. -
Finally, a "Trace Window" (which is also a separate plug-in) may allow you to enable, disable and configure trace information and display it in a window.
Getting Started
When you start DirX Directory Manager for the first time, DirX Directory Manager displays a "Welcome" view such as this one:
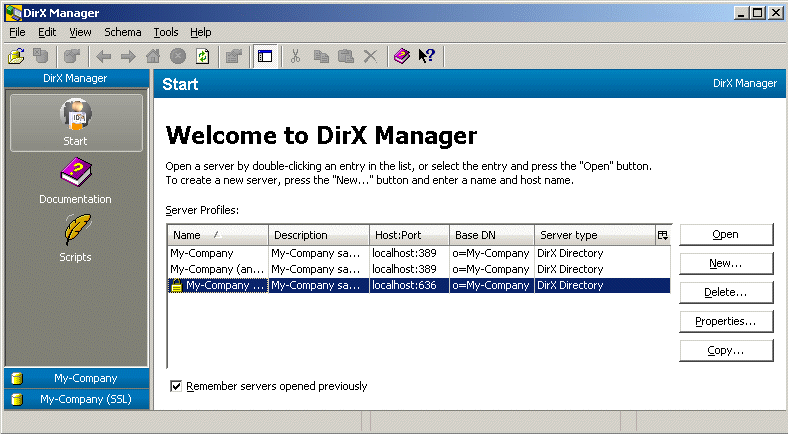
In the example shown here, some servers are pre-configured. Click Properties to modify the settings of the currently selected server according to your needs or click New to create a new server profile. When you opt for creating a new server profile, DirX Directory Manager opens a "Server" dialog like this one:
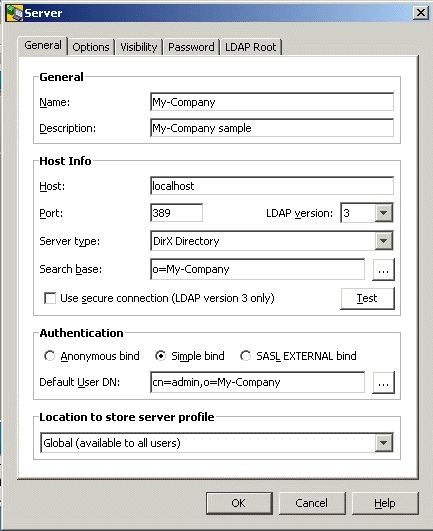
The Server type field (choices are DirX Directory or Other) determines the views that are offered for the server defined by this profile. The "Basic Patterns" topics (Standard Dialogs: Server) provide further details about this dialog. Once you successfully complete this dialog, your new server profile should appear as the first entry in the Welcome dialog or as an additional entry in the list.
Now select the server profile you want to work with and click Open or double-click it. Unless you have decided to try anonymous access, you must now complete a "Login" dialog like this one:
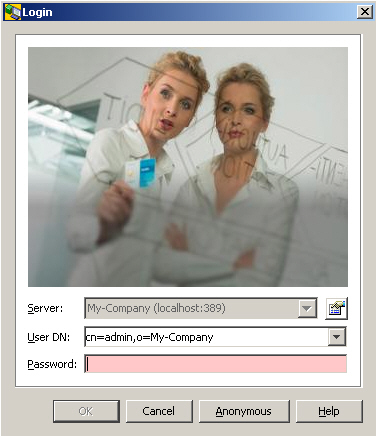
The "Basic Patterns" topics (Standard Dialogs: Login) provide details on the Login dialog. Once you complete this dialog, DirX Directory Manager displays its main window in a way that shows a "View group" with a number of "views". (See the Basic Patterns: Main Window topic for more information about views and view groups.) Here is an example:
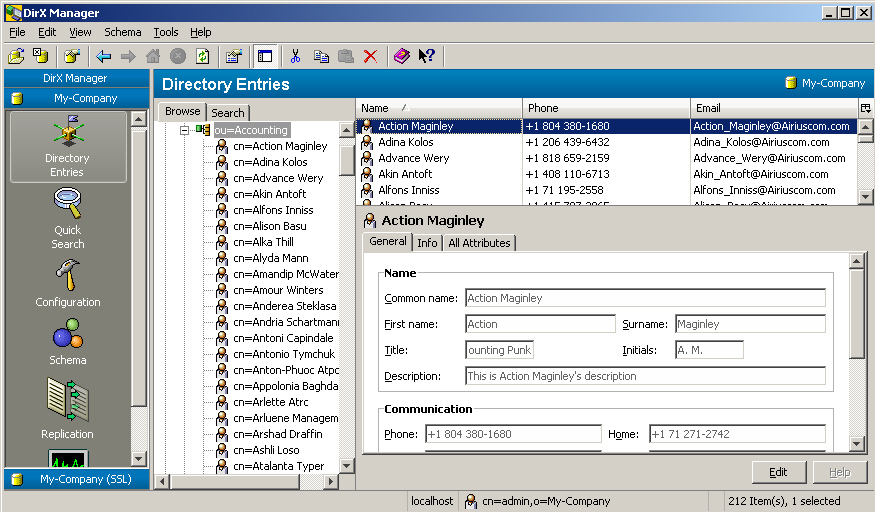
In this example, you can see the following views:
-
Directory Entries (the view that is currently active in the above screen shot)
-
Quick Search
-
Configuration (only available with server type DirX Directory)
This view allows you to view and manage subentries such as access control, LDAP configuration and password policy subentries.
See the "Configuration" topic for details about these functions. -
Schema (only available with server type DirX Directory)
This view allows you to manage the schema. (See "Schema Management" for details.) -
Replication (only available with server type DirX Directory)
This view allows you to view and manage shadowing and LDIF agreements. -
Monitoring (only available with server type DirX Directory)
This view allows you to get monitoring and diagnostic information provided through extended operations. (See "Monitoring Information Provided by the LDAP Server" for details.)
If you want to work with several servers, you can repeat the steps described here as often as you need.
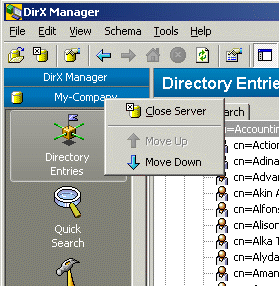
By applying the right mouse button to a view group, you can close it or move it up or down:
Directory Entries View, Quick Search View
These views come with the core component.
Directory Entries
This view allows you to browse, search and manage ordinary LDAP entries. The "Core Component" topics provide details about these functions.
Quick Search
This view features a convenient, yet powerful way to find information stored in the directory. The "Core Component" topics provide details about this function.
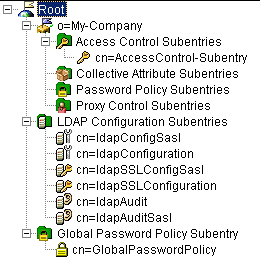
Configuration View
The configuration view gathers various types of subentries into a virtual tree. Subentries in the narrower sense have been conceived to allow for structuring administrative information that belongs to an administrative point. In other words, they are conceptually part of the administrative entry to which they belong. This is why these subentries can only occur immediately below their administrative point. These subentries are: Access Control Subentries, Collective Attribute Subentries, Password Policy Subentries and Proxy Control Subentries.
The first level of the virtual configuration tree shows two branches:
-
The context prefix(es). This branch is for the subentries in narrower sense. Below each context prefix are:
-
A virtual node called Access Control Subentries
Below this node, all access control subentries are subsumed. -
A virtual node called Collective Attribute Subentries
Below this node, all collective attribute subentries are subsumed. -
A virtual node called Password Policy Subentries
Below this node, all password policy subentries are subsumed. The password policy specified in this sunbentry applies to their administrative point. -
A virtual node called Proxy Control Subentries
Below this node, all proxy control subentries are subsumed.
Note that you can edit the context prefixes here as well as in the "Directory Entries" view.
-
You can create subentries by selecting the New … subentry… operation from the context-sensitive menu of the virtual node or of the subentry. Note that when creating such subentries, there is no DirX Directory Manager support regarding creation of administrative points.
-
You can read and edit subentries when displaying their properties in the right-hand property pane.
-
The root node of the virtual tree itself provides the data that are stored in the LDAP Root.
Just click at "Root" to display the LDAP root in the right-hand property pane. Alternatively, you can use the server dialog which you should find in the file menu. -
A virtual node called LDAP configuration subentries. LDAP configuration subentries can be managed.
Below this node, you’ll find the following types of subentries: -
LDAP Configuration
-
LDAP Audit
-
LDAP SSL Configuration
-
A virtual node called Global Password Policy Subentry.
Below this node, you’ll find the global password policy subentry. The global password policy subentry specifies the password policy that applies to the DSA.
Access Control
For in-depth information on this topic, refer to the server documentation.
Access control information controls whether a user is authorized to perform particular access to the directory. The access control implementation of DirX Directory largely conforms to the respective ITU X.500 specifications (http://www.itu.int/ITU-T).
DirX Directory conforms to the general principles introduced there.
DirX Directory allows defining the scope to which an access control definition is to apply. In other words, it allows defining what collections of entries are to be affected by what access control definitions.
The items that can be protected range from attributes to collections of entries. There are also quite a number of possible permissions such as add, read, remove, etc.
Access control information (ACI) is held in ACI items, each item storing information about what users are granted/denied what types of access to what protectable items.
Initially - that is, after the installation of a server - no access control is in place. Bootstrapping the server implies establishing some primary access control definitions.
ACI Items can be contradictory. The access control decision function decides whether an access attempt is to be granted or to be denied.
General Principles
The general principles that guide access control according to the ITU X.500 specifications (http://www.itu.int/ITU-T).are:
-
Information hiding
Information in the Directory is not revealed to the user as being present unless he has permission to access it (the default result of a read operation e.g. is “no such entry” rather than “insufficient access rights”, if the access rights are actually insufficient. However, it is possible for the user to be granted the right to be told the “truth”. In order to avoid telling a “lie” and not to have to tell the truth, the Standard would also allow configuring a result like “no information”).
The basic idea behind this principle is to keep the unauthorized user from being able to find out information on the DIT by trial and error. -
Precedence
There may be several access control items in a list that apply to a particular user trying to access the Directory. Each access control item is given a precedence, and high precedence items overrule low precedence items. Thus if one access control item with a precedence of 50 states that everyone is denied read access to a particular attribute, and another access control item with a precedence of 51 says that Bill can read this particular attribute, the second item takes precedence over the first item and Bill will be granted read access to the attribute. -
Specificity
Specificity means that more specific access control items overrule less specific access control items of the same precedence. Thus if one access control item says that Bill is denied read access to all attributes, but another item of the same precedence says that Bill can read the telephone number attribute, then Bill will have read access to the telephone number attribute (the protected item “telephone number” is more specific than “all attributes”). Similarly, if one access control item says that everybody is denied read access to the telephone number, but another item of the same precedence says that Bill can read the telephone number attribute, then Bill will have read access to the telephone number attribute (the user class “Bill” is more specific than the user class “anybody”). -
If in doubt, deny
Denial beats Grant: A denied access overrules a granted access if both have the same precedence and specificity. Denial is the default: access that is not granted explicitly is denied.
Scope of Access Control Definitions
See also Administrative Authority Model.
While EntryACI items apply only to the single entry in which they are held and SubentryACI items apply only to the subentries that are immediately below the administrative point to which they belong, PrescriptiveACI items cover Access Control Areas. Access Control Areas include
-
A complete autonomous administrative area (AAA)
or
-
A fraction of it; possible fractions are:
-
An “access control specific area” (ACSA);
that is, the AAA can be partitioned into a number of non-overlapping access control specific areas, each of them comprising a subtree. The start of an ACSA is defined through the value “Access Control Specific Area” of the operational attribute “Administrative Role”. Leaf entries or new ACSAs mark the end of an ACSA. -
An “access control inner area” (ACIA);
that is, the AAA or ACSA can contain a number of nested access control inner areas, each of them comprising a subtree – the lower nesting level may alter some rules imposed by an upper level for its own subtree (however, only for the subtree to which the inner area applies).
The start of an ACIA is defined through the value “Access Control Inner Area” of the operational attribute “Administrative Role”. Leaf entries or new ACSAs mark the end of an ACIA. -
A “Directory Access Control Domain” (DACD, also called “entry collection”)
which forms a subset of an ACSA or ACIA that is determined by a “subtree specification”.
The X.500 standard specifies two levels of complexity (per access control specific area):
-
The quite powerful “basic access control” (BAC) scheme
-
The rather simple “simplified access control” (SAC) scheme
DirX Directory treats SAC in the same way as BAC, however. According to the X.500 standard, the simplified SAC scheme would work by ignoring the existence of Entry ACI attributes and access control inner areas (ACIAs). This means that all entries in an administrative area would be protected solely by the Prescriptive ACI attributes held in the subentries below their Administrative Point, and subentries would be protected by the single Subentry ACI attribute in their administrative entry.
Doing without Entry ACIs and access control inner areas is possible with BAC, too, of course.
Protectable Items
The following items can be subject to access control:
-
All entries within the scope of the ACI item (yes/no)
-
All user attribute types of all those entries (yes/no)
-
All user attribute values of all those entries (yes/no)
-
All attribute types specified in a list of attribute types
-
All values of all attributes specified in a possibly different list of attribute types
Permissions
Permissions may be granted or denied. The following permissions are possible:
-
Add
For entries: controls the ability to create an entry in the DIT (subject to the access controls on all attributes and values to be placed in the new entry). In order to add an entry, permission to add its mandatory attributes and their values must at least be granted.*
For attributes*: controls the ability to add an attribute (subject to the ability to add all specified attribute values).*
For attribute values*: controls the ability to add an attribute value to an existing attribute -
Browse
For entries only: controls whether directory operations (i.e. list and search operations) can access entries that they do not specifically name -
Compare (for attributes and their values only)*
For attributes and their values*: controls whether attributes and values can be used in compare operations -
Disclose on Error
For entries: controls whether the entry’s name can be returned in an error or empty result. If not granted, the Directory returns an error as if the entry did not exist.*
For attributes*: controls whether the attribute’s presence can be disclosed in attribute or security errors. If not granted, the Directory returns an error as if the attribute did not exist.*
For attribute values*: controls whether the attribute value’s presence can be disclosed in attribute or security errors. If not granted, the Directory returns an error as if the attribute did not exist. -
Export
For modify DN operations only: controls whether an entry can be moved (with its subordinates, if any) from its present position in the DIT to another position in which it has a different superior entry. The Export permission must be held by the old superior entry. If the last RDN of the entry being moved is changed, the entry must also possess the Rename permission. -
FilterMatch
For attributes and their values only: controls whether the attributes and values can be matched with corresponding values in a search filter. If the cannot, the filter must be evaluated as if the a -
Import
For modifyDN operations only: applies when an entry is being moved (with its subordinates, if any) to another position in the DIT where it has a different superior entry: The Import permission must be held by the new superior entry. The entry must itself grant Export permissions for success. -
Modify
For entries only: controls whether the information contained in an entry can be modified using a modify operation. Note that appropriate attribute and value permissions must also be granted in order to modify any attributes and values in the entry. (Modifying the RDN is no affected by the Modify permission.) -
Read
For entries: controls whether Directory read or compare operations that specifically name an entry can read that entry. Further permissions are required to access the attributes and their values:*
For attributes and their values*: controls whether read or search operations can return attributes and values as entry information.*
Note: Since LDAP does not know a read operation (in LDAP, a read is done thru a "base object search"), you need to grant browse permission.* -
Remove
For entries: controls the ability to remove an entry from the DIT regardless of controls on attributes or attribute values within the entry.*
For attributes*: controls the ability to remove an attribute and all of its values.*
For attribute values*: controls the ability to remove an attribute value from an existing attribute. -
Rename
For entries only: controls whether an entry can be renamed with a new RDN subject to the consequential changes to the distinguished names of subordinate entries. (It may not be possible to rename an entry when there is a subordinate reference that is subordinate to the entry.) Note, however, that permissions within subordinate entries are not taken into account when evaluating permissions for this operation. -
ReturnDN
For entries only: controls whether an entry’s distinguished name can be returned in an operation result. If this permission is not granted, an alias name can in some cases be returned; if it is not possible to return an alias, information about the entry is withheld.
Permissions vs. LDAP or DAP Operations
Normally there is more than one permission required in order to be able to perform a single directory operation; for example, attribute value-related permissions do not imply the belonging attribute type permissions and entry-related permissions alone are not necessarily sufficient to access any information in the entry. The following table gives an overview of what permissions are required for what directory operation. The table does not contain the permission DiscloseOnError, which is not really required for any directory operation:
| Directory Operation (LDAP/DAP) |
Permissions that need to be granted for 'Entry' Protected Item | Permissions that need to be granted for Attribute Type Protected Items |
|---|---|---|
Compare/Compare |
Read |
Compare for attribute type |
-/Read |
Read ReturnDN (only if an alias name is not available) |
Read for each attribute type returned (note that it is possible to just request attribute types in a read operation) |
One-level search/List |
Browse and ReturnDN for each subordinate |
None |
Base object search or subtree search/Search |
Browse for each entry in scope of Search. Note that reading entries through LDAP requires Browse permission, since LDAP reads entries through base object searches! ReturnDN for each entry (only if an alias name is not available) |
FilterMatch for each attribute type and value used to evaluate the filter Read for each attribute type returned (note that it is possible to just request attribute types in a search operation) |
Add/AddEntry |
Add |
Add for each attribute type |
Delete/RemoveEntry |
Remove |
None |
Modify/ModifyEntry |
Modify |
Add for all attribute types added Add for all attribute values added Remove for all attribute types removed |
Rename/ModifyDN |
Rename if operation only modifies RDN else Export at old name and Import at new name |
None |
Access Control Information (ACI)
The information stored in an ACI item includes:
-
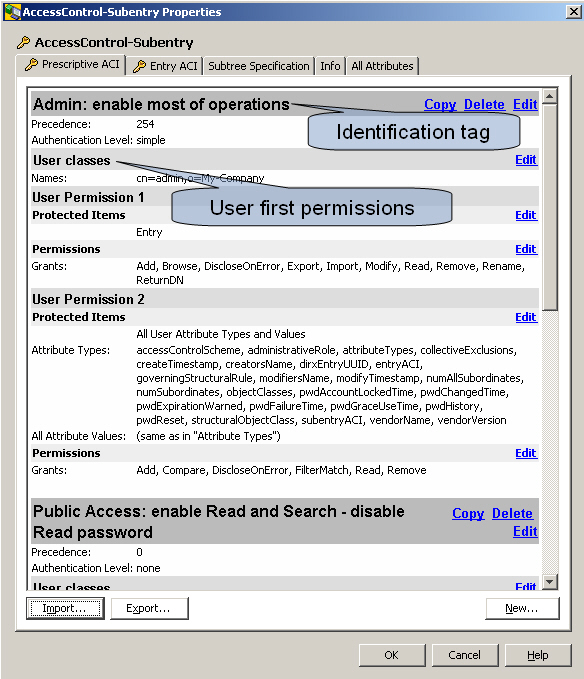
An identification tag, which is a text string assigned by the creator of the item, and which serves to uniquely identify the item
-
The precedence level, which is an integer, and is used by the Access Control Decision Function when evaluating a set of ACI items. Higher precedence items override lower precedence items. The precedence level ranges from 0 to 255, zero being the lowest one. If a type of access was denied at precedence 100, but granted at precedence 200, access would be granted. This way administrators can use the precedence level when delegating authority to an “access control inner area” ACIA (see below). They may set low precedence defaults that the inner authority may selectively override, or they may set high precedence policies that cannot be overridden (except thru higher specificity)
-
The authentication level, which specifies the minimum level of authentication that the user must have undergone before this ACI item may grant him access. It takes one of three values, strong, indicating that strong authentication must have been performed on the user, simple, indicating that a name and password or protected password must have been presented by the user, or none, indicating that no authentication is needed (identification only is classified as none). The authentication level is optionally qualified by an integer, which if present in the ACI item, must be exceeded by the user when he is authenticated (how this is done, or what it means, is not specified in the Standard - and it is not supported by DirX Directory)
and either
-
“Item first” permissions which lists a set of protected items, and the set of users, all potentially with varying permissions, who may or may not access these items (note that a given user has the same permissions for all the protected items)
or
-
“User first” permissions which lists a set of users, and the protected items, all potentially with varying permissions, that the users may or may not access (note that a given protected item grants or denies the same permissions to all the users)
User first and Item first are equivalent; in some cases the administrator may find User first to be the more convenient way to put an access control information, in others he may prefer Item first.
Here is an example of an ACI item:
Access control information is held in so-called “ACI operational attributes” (multi-valued, the values being called ACI items). There are three types of ACI attributes:
-
Access control operational attributes protecting ordinary entries
-
EntryACI
EntryACI operational attributes control access to the single entries in which they are held. It is also possible to control access to collective attributes that appear to be held in the same entry. -
PrescriptiveACI
PrescriptiveACI attributes can only be held in subentries. They control access to the entries (and their attributes) that are within the scope of the subtree specification held in the same subentry. This scope is also referred to as ”Directory access control domain” (DACD). PrescriptiveACI attributes thus hold the access control policies that apply to the access control domain, but they do not protect the attributes held in the subentry itself. EntryACI or SubentryACI attributes have to be used for this. -
Access control attributes protecting subentries
-
SubentryACI
SubentryACI operational attributes are access control attributes that can only be held in administrative entries. They control access to the subentries immediately below the administrative entry in which they reside (they actually control access to the subentries and to the operational and user attributes held in the subentries)
PrescriptiveACI attributes can protect EntryACI attributes. SubentryACI attributes can protect PrescriptiveACI attributes.
[.indexref][.indexref]##Prescriptive ACI
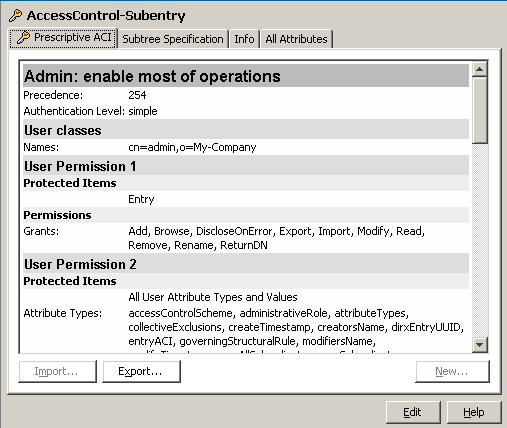
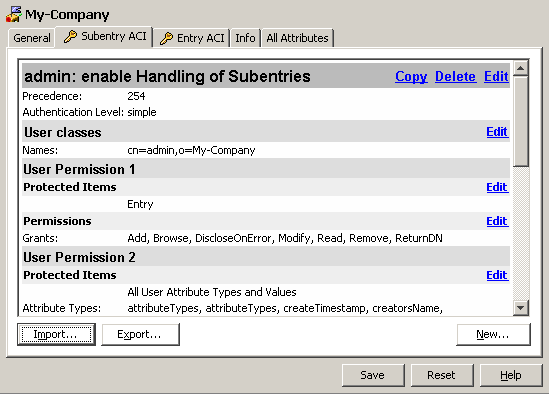
Access control subentries display panes like these:
Variant1, read-only (property pane):
Variant 2, editable (property pane after clicking the Edit button at the bottom of the pane (shown here) or property dialog (not shown)):
Notes:
-
In order to be able to manage an access control item in a pane, you first need to click the Edit button at the bottom of the pane. This action reveals various links such as Copy, Delete and Edit. Also, if no Prescriptive ACI has been specified yet, an additional Tab "Prescriptive ACI" will appear (otherwise this tab is visible in the first place). The respective online help is incorporated directly into the various property dialogs that apply to the Copy, Edit and Delete links as depicted in above sample. You can also create new access control subentries.
-
Prescriptive ACI operational attributes can only be held in subentries. They control access to the entries (and their attributes) that are within the scope of the subtree specification held in the same subentry. Subentries holding prescriptive ACI operational attributes can occur only immediately below the administrative point they belong to. This administrative point must be an entry marked as ACSA or ACIA
-
You use access control subentries to define access control information that is not intended to apply to just one single entry. When you double-click an access control subentry, DirX Directory Manager will display a dialog like the pane depicted above.
-
The tab Subtree Specification is described in a separate chapter.
[.indexref]##Entry ACI
Entry ACI operational attributes control access to the single entries in which they are held. It is also possible to control access to collective attributes that appear to be held in the same entry.
Entries that have an Entry ACI display an additional tab like this one:
Variant1, read-only (property pane):
Variant 2, editable (property pane after clicking the Edit button at the bottom of the pane (shown here) or property dialog (not shown)):
Notes:
-
In order to be able to manage an access control item in a pane, you first need to click the Edit button at the bottom of the pane. This action reveals various links such as Copy, Delete and Edit. Also, if no Entry ACI has been specified yet, the Tab "Entry ACI" will appear (otherwise this tab is visible in the first place). The respective online help is incorporated directly into the various property dialogs that apply to the Copy, Edit and Delete links as depicted in above sample.
-
When you double-click an entry that has an Entry ACI, DirX Directory Manager will display a dialog like the pane depicted above.
[.indexref]##Subentry ACI
Subentry ACI operational attributes are access control attributes that can only be held in "administrative entries". They control access to the subentries immediately below the administrative entry in which they reside (they actually control access to the subentries and to the operational and user attributes held in the subentries).
Entries having a Subentry ACI display an additional tab like this one:
Variant1, read-only (property pane):
Variant 2, editable (property pane after clicking the Edit button at the bottom of the pane (shown here) or property dialog (not shown)):
Notes:
-
In order to be able to manage an access control item in a pane, you first need to click the Edit button at the bottom of the pane. This action reveals various links such as Copy, Delete and Edit. Also, if no Subentry ACI has been specified yet, the Tab "Subentry ACI" will appear (otherwise this tab is visible in the first place). The respective online help is incorporated directly into the various property dialogs that apply to the Copy, Edit and Delete links as depicted in above sample.
-
When you double-click an entry that has a Subentry ACI, DirX Directory Manager will display a dialog similar the pane depicted above.
Setting up Access Control
Initially, a DirX Directory server has no data and thus no access control information. In this stage, an anonymous user who is accessing the server is granted full control. Once the server has been bootstrapped, access control will take effect.
When installing a server and then loading the sample database that ships with DirX Directory using the dirxload command, you should find an administrator cn=admin, o=My-Company or similar. The subentryACI attribute of the context prefix is should say something like: "cn=admin,o=My_Company is granted pretty much everything, while anonymous users are only granted read access". If you delete this entry, which is the only one that has administrative rights, you can no longer administer the server and must reinstall it. So, provided this entry is there, logging in as cn=admin,o=My-Company entitles you to create:
-
New ACSAs, ACIAs and DACDs (not supported with the current release of DirX Directory Manager)
-
New administrators with varying access rights (including identical ones)
Note that - once the server has been bootstrapped - using the DirX Directory Administration Program dirxadm is only possible for administrators whose entry is administered in the DADM attribute of the root DSE.
The Access Control Decision Function (ACDF)
The access control items that actually apply to an entry are derived from the access control information that is stored within the entry (as EntryACI attributes), plus the PrescriptiveACI attributes from all the enclosing access control domains (DACDs). In order to locate the latter, the server software must logically traverse up the DIT from the entry towards the root, searching for inner and specific administrative points which have an 'administrative role' attribute value of 'access control inner area' or 'access control specific area' respectively, and stopping when the first specific administrative point is encountered. Each access control subentry below these administrative points is then checked to see if the entry is included within scope of the subtree specification.
The ACDF works according to the following principles:
-
All non-relevant access control items are discarded. This includes items that do not include the user, either directly or indirectly, in his user class, and items that do not include the desired protected item or the requested permission. Note that items that grant access to the user, but which require a higher authentication level than that possessed by the user are discarded. Conversely, items denying access to the user, but requiring a higher authentication level than that possessed by the user are kept.
-
Only keep those remaining item that have the highest precedence level.
-
Keep the item(s) with the most specific user class, according to the precedence: name = thisEntry > userGroup > subtree > allUsers.
-
Keep the item(s) with the most specific protected item, for example, attributeValue > allAttributeValues.
Access is granted only if all the remaining items grant access. If there are no items remaining, or at least one of them denies access, then access is denied.
Collective Attribute Subentry
You use collective attribute subentries to define attributes that are common to multiple entries. You can
-
Create a collective attribute subentry (right-click any collective attribute subentry or the virtual node above it)
-
Delete a collective attribute subentry (right-click the collective attribute subentry to be deleted)
-
View and modify a collective attribute subentry (right-click or double-click the collective attribute subentry to be viewed/modified)
When you double-click a collective subentry, DirX Directory Manager displays a dialog like this (a pane that looks almost the same is likely to be configured, too):
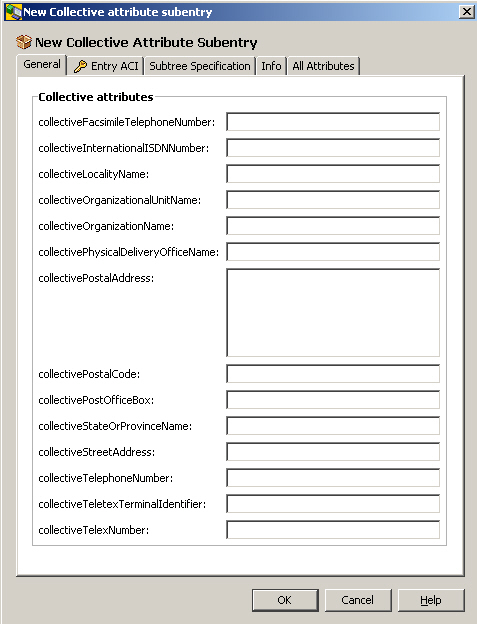
Notes:
-
The fields offered by this dialog vary depending on what attributes are administered collective in the directory schema. If the Schema plug-in is present, you can manage collective attributes using DirX Directory Manager’s schema management functionality.
-
The example dialog shows the context-sensitive menu that pops up when you right-click a field that is recognized as a phone number (Check Number, Cut, …).
-
The tab Subtree Specification is described in a separate chapter.
-
Subentries holding collective attributes can occur only immediately below the administrative point to which they belong.
Proxied Authorization Control
For in-depth information on this topic, please refer to the server documentation.
DirX Directory Mananger’s functionality on proxy authorization is provided through the right mouse key applied to the respective nodes: Configuration view -> Root -> Context prefix (for example, o=my-company) -> proxy control subentries (and nodes below).
You can find more information in these topics:
-
General Principles
-
Administering the Policy for Proxy Control
General Principles
Proxy authorization allows a client to request that an operation be processed under a provided authorization identity instead of under the current authorization identity associated with the authentication Identity, i.e. with the DN provided in the context of the bind operation. The Proxy Authorization Control provides a mechanism for specifying an authorization identity on a per-operation basis, benefiting that need to perform operations efficiently on behalf of multiple users. The model of trust in such a proxy environment is a Single-Sign-On scenario: The ldap client – typically service like applications – has performed the authentication of the end user and uses the proxy authorization control to transport the authID to the DSA
DirX Directory V8.0 and newer supports this feature according to RFC4370 and also supports the non-standard Proxied Authorization method as defined by draft-weltman-ldapv3-proxy-XX.txt which is implemented as the default Proxy Authentication by several LDAP client libraries (for example, Netscape LDAP-C-API and JDKs) The differences are automatically detected and handled by the servers and need no further configuration. The feature itself is completely controlled and configured via attribute settings in special proxy-authorization-subentries that define which users are entitled to act as a proxy and for which users he can play the role of the assumed identities.
Although it is not necessary for the server to accept and handle Proxy-Auth controls it is recommended to signal the ability of the feature to the LDAP clients by setting the following OIDs in the 'supportedControls' attribute of the LDAP root subentry:
-
2.16.840.1.113730.3.4.18 (support for RFC4370)
-
2.16.840.1.113730.3.4.12 (support for the 'old' Weltman draft)
To support the RFC4370 Proxy Authorization the following technical requirements are fulfilled:
-
The DirX Directory LDAP Server understands the LDAP V3 Control defined by the OID 2.16.840.1.113730.3.4.18
For compatibility with old implementations the OID 2.16.840.1.113730.3.4.12 is recognized as well and the corresponding controlValue is handled (see below) -
The Control is accepted in search, compare, modify, add, delete, or modifyDN or extended operation request message.
-
The criticality flag in the request must be present and must be set to TRUE (if the flag is absent or set to FALSE the LDAP Server returns a 'protocolError' error.
-
The ControlValue must be present. DirX Directory supports only the dnAuthID form of the authzId as defined by RFC2829 as
authzId = dnAuthzId / uAuthzId
; distinguished-name-based authz id.
dnAuthzId = "dn:" dn
dn = utf8string ; with syntax defined in RFC 2253 -
The uAuthzId is not supported. An error 123 is returned in this case.
-
If the server recognizes the requested authorization identity, and the client is authorized to adopt the requested authorization identity, the request will be executed as if submitted by the proxy authorization identity; otherwise, the result code 123 is returned.
Administering the Policy for Proxy Control
When performing an operation initiated by an LDAP request carrying a Proxy Authorization Control, the DSA must decide whether the use of the control is allowed for the operation.
There are two terms used to describe this permission:
-
The proxyControlOwner is the user that performed the bind operation initiating the session in which’s context the operation containing the proxyControl occurs.
-
The proxiedUser is the user that is named in the proxyControl value of the operation; on behalf of this user the operation shall be performed.
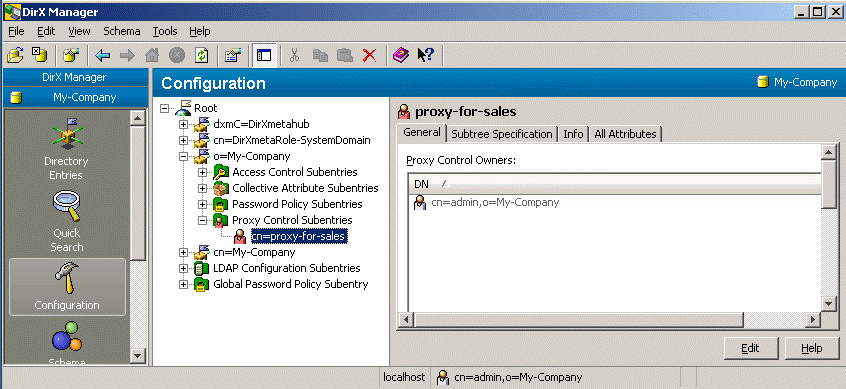
The control of these permissions is achieved with a Subentry - the proxyControl Subentry - The attributes of this subentry define who (the entry that performs the bind operation to the directory service. i.e.the proxyOwner) may perform directory operations on behalf of whom (the entry named in the proxy authorization Control, i.e.the proxiedUser):
A proxyControl Subentry may be created below an ADM-Point, if the Administrative Role of the ADMP carries the value ProxyAuthenticationSpecificArea (PASA).
The proxyControlUser Attribute of proxyControl Subentries defines the “who is allowed to use the proxy Control”. The semantic is a full DN, i.e. the proxyControlOwner has to name an individual entry and only this entry is allowed to use the control.
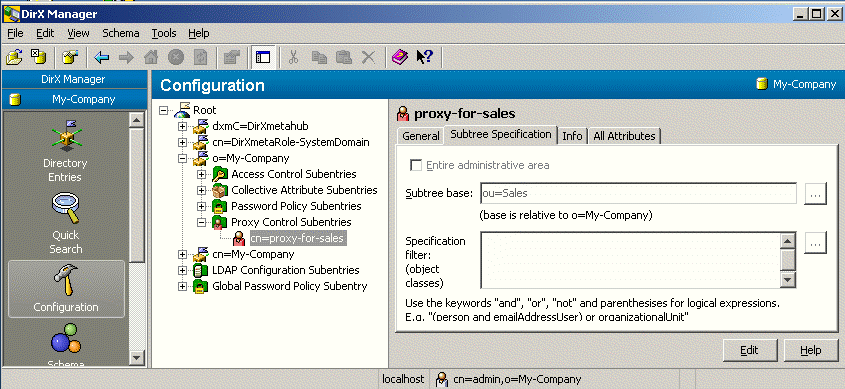
ProxyControl Subentries inherit the Subtree Specification attribute from the subentry definition. This Subtree Specification defines the "for whom is proxyControlOwner allowed to use the control". The proxiedUser contained in the Control value has to match the Subtree Spec of the Subentry for the given proxyOwner.
Several users may be listed as proxyControlOwners as the attribute is defined as multi-valued, however all these proxyControlOwners are permitted to use the same set of proxiedUsers.
If no the proxyControl Subentry exists, no user is allowed to use the proxyControl.
Users that have performed an anonymous bind are never allowed to use the proxyControl.
Example: the following proxy Control Subentry cn=proxy-for-sales,o=my-company defines the user cn=proxyadmin,ou=usermanagement,o=my-company as a Proxy Control Owner; that is, as a user who is allowed to use the proxyAuthorization Control in LDAP operations. Given that the subtree specification of this subentry is set to “entire administrative area”, there is no restriction concerning the UserDN contained in the Control values of the LDAP operations.
If the permission to use the proxyAuthorization Control should be restricted, the subtree specification of the subentry cn=proxy-for-sales,o=my-company needs to be set to the respective subtree. In the example below, the subtree specification carries the value ou=sales. The effect is that the Proxy Control Owner cn=proxyadmin,ou=usermanagement,o=my-company may use the control, but the Control value in the LDAP operations must match the subtree ou=sales,o=my-company. If an LDAP operation initiated by the Proxy Control Owner carries, for example, the authorization ID “dn:cn=abele,ou=development,o=my-company”, the DSA rejects the operation.
LDAP Audit Subentry
The LDAP Audit Subentry stores audit parameters for a DirX Directory LDAP server. You can
-
Add an LDAP audit subentry (right-click any LDAP audit subentry or the virtual node above)
-
Delete an LDAP audit subentry (right-click the LDAP audit subentry to be deleted)
-
View and modify an LDAP audit subentry (right-click or double-click the LDAP audit subentry to be viewed/modified)
DirX Directory Manager organizes the information in an LDAP audit subentry into the following tabs:
-
General
-
Operations
-
All Attributes
Tab: General
Use the LDAP audit subentry’s General tab to configure audit startup/shutdown, audit log file generation, and enabling or disabling session tracking.
Note that a missing property value means that the server default is effective for that property. As server defaults can vary between different builds of the server, please refer to the LDAP server documentation for the defaults applying to the server you are contacting currently.
The available fields are:
Startup Status
Specifies whether LDAP server auditing is to be enabled at LDAP server startup. The available fields are:
-
On
Enables LDAP server auditing. -
Off
Disables LDAP server auditing.
Audit path
Specifies the initial pathname of the directory in which the LDAP server’s audit log file with the name audit.log is located.*
Note: if uncertain, leave this field empty*
Max. records per file
Specifies the maximum number of audit records of the LDAP server’s audit log file. The value of 0 allows files with an unlimited number of records. If the limit is exceeded, the Overflow strategy specifies the action to take.
Max. audit file size
Allows limiting the file size in order to make reasonably sure the decoded file does not exceed 2 Gigabyte (otherwise it could not be handled).
Notes:
-
This limitation adds to the limitation of Max. records per file: the first limit reached (size or number) will trigger the overflow action.
-
As a rule of thumb, the ASCII output is about 5-10 times as big as the binary file.: It’s impossible to calculate the output size easily from the input size because the requests can vary from small to very big.
-
Do not use undersize limits (wrapping or moving the audit file is rather expensive compared to normal audit record writing).
Internal buffer size
Specifies whether audit information is buffered internally before it is written to the audit log file. A value of 0 specifies that all audit information is written to the audit log file when an operation is completed. A value greater than 0 specifies the buffer size in number of bytes. The audit information is written to the audit log file when the buffer size is exceeded.
Overflow strategy
Specifies the action to take when the number specified in Max. records per file is reached. Specify one of the following values:
-
Stop service
Shut down the LDAP server. An exception message is written. The LDAP server is not re-started automatically. -
Stop audit
Stop the auditing process. An exception message is written. -
Wrap around
Begin writing at the top of the log file, overwriting the old content. (Default value) -
Move file
Close and rename the audit file currently in use. A new audit log file is created, and auditing is continued using the current configuration settings. You can use the dirxauddecode command to evaluate the renamed audit file. See the DirX Directory Administration Reference for details. -
Multi wrap, Max number of wrap files
If the wrap around mode is configured, this setting allows specifying more than one wrap files
Start time
Specifies the time at which the LDAP server starts recording of audit information. A value of none specifies no start time and does not affect the audit.
Stop time
Specifies the time at which the LDAP server stops recording of audit information. A value of none specifies no stop time and does not affect the audit behavior.
Specify the times in the format DD*.MM.YYYY hh:*mm*:*ss, where
-
DD specifies the day of month (01 up to 31)
-
MM specifies the month (01 up to 12)
-
YYYY specifies the year
-
hh specifies the hour (00 up to 23)
-
mm specifies the minutes (00 up to 59)
-
ss specifies the seconds (00 up to 59)
Cron Job
The intention is to allow configuring audits for several servers at the same time interval. Note that Start/Stop time (see above) and Cron job cannot be enabled at the same time.
-
Start time
Defines an absolute time for the cron job to start for the first time. When the cron job runs for the first time it applies the action defined by the overflow strategy -
Cron Job Interval
Defines the seconds to wait before the next cron job is run after the previous one.
Encryption type
Specifies whether or not the audit log file is encrypted. Specify one of the following values:
-
No encryption
The audit log file is not encrypted. -
Scramble
The audit log file is encrypted using the scramble mechanism.
Encryption Key File
Specifies the full pathname of the file that contains the key material to encrypt the audit information to be saved in the audit log file. This key material may be a password that is used as a cipher key, a pass phrase, or a PIN that is used by Personal Security Environment to access the current encryption key. If the key material is incorrect or the specified file does not exist or cannot be read, the LDAP server terminates.*
Note: if uncertain, leave this field empty*
Session tracking
Specifies whether session tracking is enabled. The available fields are:
-
On
Enables session tracking. -
Off
Disables session tracking. -
Max. info length … characters
Specifies the maximum number of characters that are written for session tracking.
Tab: Operations
Use the LDAP audit subentry’s Operations tab to configure the level of detail audited and the operations that are audited.
The available fields are:
Attribute detail level
Specifies the level of detail of audit information to be logged for attribute values of the request parameters of add, modify, compare operations and of the LDAP v3 control parameters. You can use this field to limit the amount of audit information collected. Specify one of the following values:
-
maximum
The object name, all attribute types, and the attribute values are logged: If the value length exceeds the length specified in the Limit for attribute values field, only the length of the value is logged. If the value contains unprintable characters, dirxauddecode delivers a hex dump format of the value. See the DirX Directory Administration Reference for further details about dirxauddecode. -
medium
The object name, all attribute types, and the length of the attribute values are logged. (default value) -
minimal (no attributes)
Only the object name is logged. No attribute information is logged. -
Limit for attribute values
Specifies the maximum length of an attribute value that is logged. If the length of the attribute value exceeds this limit, only the value’s length is logged. The value of 0 allows the logging of values with a length of an unlimited number of bytes. The default value is 64.
Include operations
Lists the operations that can be logged. Select one or more of:
-
All
All operations (default). -
None
No operation. Note that you still can have Audit errors (see below) enabled. -
LDAP
All LDAP server operations except other and unknown operations. -
Abandon
All abandon operations. -
Add
All add operations. -
Bind
All bind operations. -
Compare
All compare operations. -
Extended
All LDAPv3 extended operations; for example, unsolicited notification or start_TLS. -
Modify DN
All moddn operations. -
Modify
All modify operations. -
Remove
All remove operations. -
Search
All search operations. -
Unbind
All unbind operations. -
Other
All other unexpected client operations. -
RPC
All RPC operations. -
Unknown
All unexpected client operations that indicate client misbehavior; for example, closing the socket layer without initiating an LDAP unbind. operation
Audit errors
Enables auditing of erroneous operations.
LDAP Configuration Subentry
The LDAP configuration subentry stores configuration attributes for a DirX Directory LDAP server. You can
-
Add an LDAP configuration subentry (right-click any LDAP configuration subentry or the virtual node above it)
-
Delete an LDAP configuration subentry (right-click the LDAP configuration subentry to be deleted)
-
View and modify an LDAP configuration subentry (right-click or double-click the LDAP configuration subentry to be viewed/modified)
DirX Directory Manager provides the information contained in an LDAP configuration subentry in the following tabs:
-
General
-
Cache
-
User Filtering
-
IP Filtering
-
Flow Control
-
LDAP V2 Settings
-
Service Controls
-
ExtOp Users
-
ExtOp Groups
-
User Policies
-
Group Policies
-
All Attributes
Notes:
-
Exercise care in administering LDAP subentries. Incorrect values may cause the server to be unavailable for some or even all users (including yourself!). If you lock yourself out, use the DirX Directory command dirxadm to correct the problem.
-
Values in gray are the defaults used by the LDAP server if no specific value is supplied.
Tab: General
Use the LDAP configuration subentry’s General tab to define general configuration parameters for a DirX Directory LDAP server.
Note that a missing property value means that the server default is in effect for that property. As server defaults can vary between different builds of the server, please refer to the server documentation for the defaults applying to the server you are currently contacting.
The available fields are:
Port number
Specifies the port number on which the LDAP server is to listen. The default port number is 389.
Unbind delay time
Controls the LDAP server’s re-use of authenticated DAP binds. Possible values are:
-
0 or <0
Directs the LDAP server to close an authenticated DAP bind right after the last shared client has closed the LDAP connection to the backend (DSA). -
n>0
Directs the LDAP server to close an authenticated DAP bind n seconds after the last shared client has closed the LDAP connection to the back end (DSA).
Secure port number
Specifies the port number on which the LDAP server is to listen for Secure Socket Layer (SSL) secured LDAP protocol requests. The default port number is 636. Note that secure port number 0 means that the LDAP server does not accept secure connections. You can read more about secure connections in the topics about SSL/TLS ("Using LDAP").
Connection idle time
Specifies the number of seconds of inactivity after which the LDAP server is to close an LDAP connection to an LDAP client.
Max. connection number
Specifies the maximum number of simultaneous connections an LDAP server maintains with its clients. The maximum is 4000. Do not confuse this number with the maximum number of connections the LDAP server maintains with the backend (DSA).
Thread pool size
Specifies the maximum number of operation threads available to operate LDAP client requests in parallel. This pool size is static and cannot be modified without restarting the server. If the value is set too high for your system there might be the effect of permanent re-scheduling of threads for the cost of lowered LDAP performance.
Anonym DAP pool size
Specifies the number of simultaneous DAP connections that the LDAP server establishes to the DSA for anonymous binds.
Additionally the LDAP server establishes one DAP connection for internal operations. This attribute is an optional, single-valued attribute.
Increasing the value of this attribute can improve the performance of anonymous binds. However, the maximum number of connections established for authenticated binds decreases. The maximum number of simultaneous connections that can be established is determined by system resources, by the maximum number of connections specified in the LDAP Max Connection number attribute, and by the behavior concerning LDAP Backend Sharing.
SSL conf. subentry name
Specifies the common name attribute of the LDAP SSL configuration subentry. This attribute is an optional single-valued attribute. When this attribute is omitted, the LDAP server reads the LDAP SSL configuration subentry with the default common name value LdapSSLConfiguration.
Audit conf. subentry name
Specifies the common name attribute of the LDAP Audit configuration subentry. This attribute is an optional single-valued attribute. When this attribute is omitted the LDAP server reads the LDAP audit configuration subentry with the default common name value ldapAudit
Backend sharing
Directs the LDAP server to share connections to the directory server among all users using identical credentials.
Max. DAP share count
Specifies how many LDAP users can share the same DAP connection when they authenticate with the same credentials if LDAP backend sharing is enabled.
Read-only server
Specifies whether the LDAP server accepts or refuses update operations.
Anonymous access
Specifies whether anonymous access is allowed or denied. This field is only available if present in the schema. When "deny" is selected, any kind of anonymous access is denied. Note that this behavior is not LDAP-compliant since the schema is always supposed to be readable anonymously.
Simple Auth access
Specifies whether simple authenticated access is allowed or denied. When simple authenticated access is denied:
-
If a user tries to bind using simple authentication, the operation is rejected and an implicit anonymous bind is not established (differs from the RFC).
-
If anonymous access is also denied (Anonymous access set to Deny), the server becomes unavailable for LDAP clients (only RPC calls are possible).
Listen IP address
Specifies the IP address on which the LDAP server is to listen for client connection requests. If a server machine happens to provide more than one IP address, it might be make sense to select just one IP address to allow clients to connect to the LDAP server rather than having the LDAP server listen to all IP addresses.
Notes:
-
If an invalid IP address is specified, the LDAP server will not start.
-
If 127.0.0.1 is specified, the server is only accessible from collocated local clients (might be useful for administrative tasks).
-
This setting has no impact on RPC or the OSI/IDM connections from the LDAP server to the DSA. These ports are still bound to all IP addresses.
Start TLS
Specifies whether or not the LDAP extended operation startTLS is allowed. This operation allows a client to enable the SSL/TLS security layer for an LDAP connection that was created as a normal (plain) LDAPv3 connection.
Max. request attributes
Specifies the maximum number of requested attributes that a client is allowed to specify in an LDAP search request. A value of 0 specifies that an unlimited number of requested attributes is allowed.
Max. filter items
Specifies the maximum number of filter Items that a client is allowed to specify in the filter of an LDAP search request. A value of 0 specifies that an unlimited number of filter items is allowed.
Tab: Cache
Use the LDAP configuration subentry’s Cache tab to enable and disable LDAP server result caching and configure result caching operations. You can use the fields in the Cache tab to adjust an LDAP server’s result cache to your local memory requirements and update frequency. When the LDAP server’s result cache is enabled, the LDAP server searches the cache for a query before it sends the query on to the DSA for processing. Caching results can significantly improve performance in scenarios where LDAP clients send frequent identical search requests, at a cost of extra memory. On the other hand, it can be counterproductive, if identical search results happen never or only occasionally, particularly if in addition a high modification rate enforces frequent removals of search results from cache.
If the cache is full, a new search result will cause existing search results to be removed from the cache based on their present hit rate. In order to avoid too much overhead, the LDAP server tries to clear a "decent" amount of space at once. At first, all search results with the lowest present hit rate will be removed. If this action does not provide "enough" available space, all search results with the second lowest hit rate will be removed and so on. Note that Min. time to cache (see below) may prohibit or at least defer any removal of search results from the cache.
Another cause for removing a search result is when the directory database is updated in a way that affects that search result (see Cache update strategy below).
Note that a missing property value means that the server default is in effect for that property. As server defaults can vary between different builds of the server, please refer to the server documentation for the defaults applying to the server you are currently contacting.
The available fields are:
Cache
Enables or disables the LDAP result cache. The available fields are:
-
Enabled
Enables the LDAP result cache. -
Disabled
Disables the LDAP result cache.
Max. cached results
Specifies the maximum number of LDAP search results that can be stored in the LDAP result cache. An LDAP search result consists of one or more LDAP result messages. Each result message describes one resulting entry. The last result message contains the result code of the search. If the search results in no entry, the LDAP search result consists only of the last result message containing the result code. The value of this component shall be chosen in accordance with the Size of cache table field and the available system memory. Each cache entry requires about 1KB.
Max. memory size
Specifies the maximum memory size in MB used for the LDAP result cache.
Min. time to cache
Specifies the minimum number of seconds that an LDAP search result is stored in the LDAP cache (unless it must be removed earlier because that search result is affected by an update of the directory database, see also below "Cache update strategy").
Max. time to cache
Specifies the maximum number of seconds that an LDAP search result is stored in the LDAP cache. The LDAP server will automatically remove search results from cache as soon as they exceed Max. time to cache - regardless of which fill factor the cache has at that point of time.
Min. cache entries
Specifies the minimum number of entries that an LDAP search result must have in order to be stored in the LDAP cache.
Max. cache entries
Specifies the maximum number of entries that an LDAP search result can have to be stored in the LDAP cache.
Min. cache attributes
Specifies the minimum number of attributes that an LDAP search result must have in order to be stored in the LDAP cache.
Max. cache attributes
Specifies the maximum number of attributes that an LDAP search result can have to be stored in the LDAP cache.
Min. cache values
Specifies the minimum number of attribute values that an LDAP search result must have in order to be stored in the LDAP cache.
Max. cache values
Specifies the maximum number of attribute values that an LDAP search result can have to be stored in the LDAP cache.
Size of cache table
Specifies the size of the internal cache table. For best performance, the value of this field should be at least (Max. cache values/ 3). It must be at least 128. Note that the LDAP server may tacitly cut down your setting to its hard-coded internal upper limit.
Cache update strategy on modifications of the directory database
Specifies how the LDAP cache is to be updated when the directory database is modified. The available fields are:
-
Clean whole cache
Any add, modify, delete or rename operation in the directory database causes the entire cache to be emptied. -
Clean cache applying DN+scope strategy
The cache is emptied partially based on what can be inferred from a comparison of the base DNs and scopes of the cached searches with the DN of the entry currently being modified, added or deleted. If, for example, the entry cn=Smith, ou=sales, o=my-company is to be modified, there is no need to remove a search with base DN ou=development, o=my-company from the cache. -
Clean cache applying attribute strategy
The cache is emptied partially based on what can be inferred from a comparison of the requested attribute types in the cached searches and the attribute type of the entry currently being modified. If the attribute that is to be modified is not among the requested ones of a search, there is no need to remove that search form the cache. -
Clean cache applying DN+scope+attribute strategy
This option combines the "DN" and "attribute" strategy. This option is the default, since it is expected to be the best trade-off in typical usage scenarios.
Tab: User Filtering
Use the LDAP configuration subentry’s User Filtering tab to control access to an LDAP server by clients communicating over specific user DNs and specific group DNs.
Be careful not to lock yourself and your users out with inappropriate settings, or you may be prevented from using DirX Directory Manager to undo your settings. If this situation occurs, you’ll need to try to undo them from a different, still "allowed" and not "denied" user or use the DirX Directory command line program dirxcp via DAP.
The available fields are:
Allowed users
Check one of
-
All users
-
No users
-
Users specified below and specify the distinguished names of the users and groups to which the LDAP server grants access.
Denied users
Check one of
-
All users
-
No users
-
Users specified below and specify the distinguished names of the users and groups for which the LDAP server denies access.
See also: IP Filtering
Tab: IP Filtering
Use the LDAP configuration subentry’s IP Filtering tab to control access to an LDAP server by clients communicating over specific IP addresses.
Be careful not to lock yourself and your users out with inappropriate settings, or you may be prevented from using DirX Directory Manager to undo your settings. If this situation occurs, you’ll need to try to undo them from a different, still "allowed" and not "denied" user or use the DirX Directory command line program dirxcp via DAP.
The available fields are:
Allow IP addresses
Lists the IP addresses to which access is to be granted (unless the address matches the deny field, too; access is granted only if the IP address matches the Allow list and does not match the Deny list).
Deny IP addresses
Lists the IP addresses for which access is to be denied.
Use the value *.*.*.* or the keyword all to specify all possible IP addresses.
Use the value 0.0.0.0 or the keyword none to specify no IP address.
Use the wildcard (*) character to specify subnets.
See also: User Filtering
Tab: Flow Control
Flow control basically intends to allow making sure the server is not occupied by load that can be avoided.
The available fields are:
TCP keep alive
Directs the LDAP server to prompt the TCP system to send 'alive' packets periodically to the peer in order to check whether the peer is still connected. Otherwise, the TCP system (and so the LDAP server) would not recognize a LAN cable being non-functional. Note that the default intervals for keep-alive packets are rather large (e.g., two hours) on some OSes; in such cases, a cable drop would not be detected until two hours have elapsed. So it might be reasonable to reduce these timers).
Async. sockets
Blocking ("sync") sockets can cause a thread created by the LDAP server to be lost. Note, however, that asynchronous (non-blocking) sockets can be slightly slower than blocking ones.
Max. send timeout for async sockets, Max. receive timeout for async sockets
If asynchronous sockets are used, these settings limit the amount of time the LDAP server concedes for a send or receive operation, if an error condition occurs.
Max. incomplete ops per connection
Though unlikely to occur, a client can conduct a denial of service attack by sending requests without collecting any result. This setting limits the number of operations per connection. If the client reaches the limit, the socket will be disabled for new incoming events until the number of outstanding operations goes below the limit.
Op stack size limit
This setting allows limiting the willingness of the server to accept incoming requests in an overload condition by limiting the number of requests that are queued. Instead, the client will be informed that the DSA is currently busy.
Number of overflow threads
If Op stack size limit is set to a value other than 0 (no limit), there must be at least one overflow thread that will handle overflow requests. Note that this number cannot exceed the thread pool size.
Tab: LDAP V2 Settings
Use the LDAP configuration subentry’s LDAP V2 settings tab to specify how an LDAP server is to handle requests from LDAP v2 clients, if the LDAP server is configured to allow requests from LDAP v2 clients.
The available fields are:
Character Conversion Request
Specifies the character set encoding to use when converting printable-string attribute values supplied in LDAP v2 requests. Choose one of the following:
-
LATIN1
To select ISO 8859-1 format. -
T61
To select T61 format. -
UTF8
To select UTF-8 format.
Character conversion result
Specifies the character set encoding to use for search results generated by LDAP v2 operations. Choose one of:
-
UTF8
To select UTF8 as format. -
LATIN1
To select ISO 8859-1 format. -
NONE
To select no conversion.
X.509 attribute presentation
Specifies the representation to use when returning X.509 certificates to LDAP v2 clients. Choose one of:
-
Binary ASN1 encoding
To return X.509 certificates in binary ASN1 encoding format. -
Hexdump of ASN1 encoding
To return X.509 certificates as a hexdump of ASN1 encoding.
Tab: Service Controls
Use the LDAP configuration subentry’s Service Controls tabs to set LDAP operation service controls for a new LDAP configuration subentry and to change LDAP operation service controls for an existing subentry.
-
Use the Add tab to define service controls for LDAP create operations
-
Use the Compare tab to define service controls for LDAP compare operations
-
Use the Modify tab to define service controls for LDAP modify operations
-
Use the ModifyDN tab to define service controls for LDAP modifyDN operations
-
Use the Remove tab to define service controls for LDAP delete operations
-
Use the Search tab to define service controls for LDAP search operations
The available fields in each tab are:
Don’t deference alias
Controls whether or not aliases found in the path of a query are dereferenced to the entries to which they refer. Alias dereferencing is not supported for modify operations.
Partial copy OK
Controls whether or not the operation can be completed using a partial copy of the entry.
Don’t use copy
Controls whether or not an object’s shadow entry can be used to satisfy a request.
Subentries returned
Controls whether or not a list or search operation returns subentries and normal entries become inaccessible.
Priority
Sets the priority of a request. Choose one of the following:
-
Low
To set a low priority -
Medium
To set a medium priority -
High
To set a high priority
Time limit
Sets the maximum elapsed time in seconds for completion of an operation. If a list or search operation does not complete by the specified limit, the operation returns an arbitrary selection of results accumulated before it exceeded the time limit. Type the number of seconds.
Size limit
Sets the maximum number of objects returned in list and search operations. Type the number of objects.
Attribute size limit
Sets the maximum size (in octets) of any attribute (the type and all its values) to be returned. If an attribute exceeds this limit, all of its values are omitted.
Local scope
Controls whether or not an operation is limited to the objects in the DSA to which DirXmanage is currently bound, or whether other DSAs can be contacted.
Prefer chaining
Controls whether or not the preferred behavior of the LDAP server is chaining rather than referrals.
Chaining prohibited
Controls whether or not chaining and other methods of distributing a request around the Directory are prohibited.
Scope of referral
Sets the scope for the return of DSA referrals. Choose one of:
-
Within country only
Only referrals to DSAs within the country scope are returned. -
Within management domain only
Only referrals to DSAs within the domain management scope are returned. -
Unlimited
Tab: ExtOp Users
Use this tab to specify the distinguished names of the administrators that are allowed to perform LDAP extended operations. For details, see the DirX Directory Administration Reference -> "DirX Directory Attributes" chapter -> "Attributes for LDAP Server Configuration" section -> "Attributes Controlling LDAP Extended Operations" subsection.
Tab: ExtOp Groups
Use this tab specify the distinguished names of the groups whose members are allowed to perform LDAP extended operations. For details, see the DirX Directory Administration Reference -> "DirX Directory Attributes" chapter -> "Attributes for LDAP Server Configuration" section -> "Attributes Controlling LDAP Extended Operations" subsection.
Tab: User Policies
Use the LDAP configuration subentry’s User Policies tab to display, modify, add or delete user policies. You can use user policies to specify policies that apply to a single user or a set of users.
The User Policies Tab displays a list of all user policies. It provides the class, the user’s distinguished name or the keywords all or anonymous, and the priority for each user policy.
Select a user policy and press the Delete-button to delete the policy.
Press the Add-button to add a new user policy or select a policy and press the button to display or modify a user policy. The LDAP User Policy Properties page opens.
The available fields are:
User Class
Specifies the user(s) for which the policies apply. Check one of the following keywords:
-
User Entry
Specifies that the policies apply to a single user. This policy cannot be overruled by policies of any other class. -
All
Specifies that the policies apply to all users. If there are multiple policies, the user policies for all have the lowest priority. Anonymous users belong to all if there are no policies for anonymous. -
Anonymous
Specifies that the policies apply to all users bound anonymously to the LDAP server; that is, to all users that performed an anonymous bind, to all LDAP clients that did not perform a bind, or to users that performed a bind with an invalid credentials error code. -
User Subtree
Specifies that the policies apply to all users below a node in the DIT. Policies of this class are not applied to users bound with SASL EXTERNAL authentication. -
User Wildcard
Specifies that the policies apply to all users matching the regular expression syntax string according to Linux/Perl standards in the field Choose DN. A colon (:) is not allowed in the distinguished name; for example, ^cn=Digger.*.
Choose DN
Specify the user’s full qualified distinguished name in LDAP format or press the Choose DN-button to select a node from the DIT. For details about distinguished names in LDAP format see the section "Distinguished Names" in the chapter "DirX Directory String Representation for LDAP Binds" in the DirX Directory Adminsistration Reference.
For binds with SASL EXTERNAL authentication, specify the distingushed name in DAP format preceded by the prefix X500DN:; for example, X500DN:/o=my-company/cn=admin. For details about distinguished names in DAP format, see the section "Distinguished Names" in the chapter "DirX Directory String Representation for DAP Binds" in the DirX Directory Adminsitration Reference for details. The LDAP server does not convert user names specified in DAP format to LDAP format or vice versa.
Priority
Specifies the priority of policies in the same class. Specify a positive integer. The highest priority is 0. The default priority is 1. The lower the priority value, the higher is the priority. Only one value can be specified.
If there are multiple policies for the same user, the policies with the highest priority (the lowest priority value) apply.
If there are multiple policies for the same user with the same priority, the first policies found apply. It is not predictable which policies are the first ones found.
Connection Limit
Specifies the maximum number of concurrent LDAP connections a user can open. Specify a positive integer; for example, 5. Only one value can be specified.
Size Limit
Specifies the maximum number of objects returned for a list or search operation. Specify a positive integer; for example, 100. Only one value can be specified.
This value overrides the value of the LDAP Search Service Controls attribute. However, it cannot increase the size limit configured for the DSA.
Time Limit
Specifies the maximum elapsed time in seconds for completion of an operation. Specify a positive integer; for example, 10. Only one value can be specified
This value overrides the value of the LDAP Search Service Controls attribute. However, it cannot increase the size limit configured for the DSA.
Maximum Operations
Specifies the maximum number of operations that a user is allowed to perform in the specified time interval. Enter a positive integer specifying the maximum number of operations in the first field. Enter a positive integer in the second field and select seconds, minutes, hours or days from the drop down menu to specify the time interval.
The operations abandon and unbind do not increase the number of operations.
Only one value can be specified.
Maximum Result Bytes
Specifies the maximum number of bytes that a user is allowed to receive from search operations in the specified time interval. Enter a positive integer specifying the maximum number of bytes in the first field. Enter a positive integer in the second field and select seconds, minutes, hours or days from the drop down menu to specify the time interval.
Only one value can be specified.
Minimum Search Base Level
Specifies the minimum level starting at the root object at which a base object must exist for a search request. Specify a positive integer; for example, 3. Only one value can be specified.
TLS required
Indicates whether or not a bind over SSL/TLS is required. Check TLS required to indicate that a bind over SSL/TLS is required. The default value is that any bind is allowed.
Disclose violation
Indicates whether or not detailed information about the specified limit is provided in the error message if the limit is exceeded. Check Disclose violation to indicate that detailed information is provided. The default value is that detailed information is provided. This flag affects violations of Connection Limit, Maximum operations and Maximum result bytes.
Must contact DSA
Specifies the DSA that must be contacted in a multiple contact DSA configuration. (See "Using Multiple Contact DSAs" in the DirX Directory Administration Guide for details.) Specify the name of the DSA as specified in the LDAP server configuration file; for example, /CN=DSA1. (See "LDAP Server Configuration File" in the DirX Directory Administration Reference for details.)
If the Must contact DSA is not available and no Preferred contact DSA is specified, the operation fails.
If the Must contact DSA is not available and a Preferred contact DSA is specified, the LDAP server continues with contacting the Preferred contact DSA.
If the Preferred contact DSA is also unavailable, the LDAP server starts a round-robin selection to contact a DSA.
Only one Must contact DSA can be specified.
Preferred contact DSA
Specifies the DSA that is preferred to be contacted in a multiple contact DSA configuration. (See "Using Multiple Contact DSAs" in the DirX Directory Administration Guide for details.) Specify the name of the DSA as specified in the LDAP server configuration file; for example, /CN=DSA3. (See "LDAP Server Configuration File" in the DirX Directory Administration Reference for details.)
If the Preferred contact DSA is unavailable, the LDAP server starts a round-robin selection to contact a DSA.
Only one Preferred contact DSA can be specified.
Forbidden Search Bases
Specifies a base object that is not allowed in search requests. Enter the full qualified distinguished name of a leaf or a node in the DIT in LDAP format; for example, ou=finance,o=my-company. For details about distinguished names in LDAP format, see the section "Distinguished Names" in the chapter "DirX Directory String Representation for LDAP Binds" in the DirX Directory Administration Reference. Multiple values can be specified.
Press the Add-button to enter a new value.
Select a value and press the Delete-button to remove the value.
Forbidden Targets
Specifies an entry that is not allowed in update operations. Enter the full qualified distinguished name of a leaf or a node in the DIT in LDAP format; for example, ou=finance,o=my-company. For details about distinguished names in LDAP format, see the section "Distinguished Names" in the chapter "DirX Directory String Representation for LDAP Binds" in the DirX Directory Administration Reference. Multiple values can be specified.
Press the Add-button to enter a new value.
Select a value and press the Delete-button to remove the value.
Inherit
Indicates whether or not policies are inherited. Press the Inherit-button to indicate that policies are inherited. The default value is that policies are not inherited. This flag can only be checked for the all class policies.
Tab: Group Policies
Use the LDAP configuration subentry’s Group Policies tab to display, modify, add or delete group policies. You can use group policies to specify policies that apply to a group of users.
The Group Policies Tab displays a list of all group policies. It provides the group’s distinguished name and the priority for each group policy.
If a user is member of several groups, the policies with the highest priority apply. (See Priority for details.) If the priority is also the same, the LDAP server randomly selects the policies.
A Group Policies can only be specified for groups with a maximum of one million members. The LDAP server discards groups with more than one million members.
Select a group policy and press the Delete-button to delete the policy.
Press the Add-button to add a new group policy or select a policy and press the button to display or modify a group policy. The LDAP Group Policy Properties page opens.
The available fields are:
Choose DN
Specify the group’s (an entry with object class groupOfNames (GON)) full qualified distinguished name in LDAP format or press the Choose DN-button to select a node from the DIT. For details about distinguished names in LDAP format see the section "Distinguished Names" in the chapter "DirX Directory String Representation for LDAP Binds" in the DirX Directory Adminsistration Reference.
Priority
Specifies the priority of policies in the same class. Specify a positive integer. The highest priority is 0. The default priority is 1. The lower the priority value, the higher is the priority. Only one value can be specified.
If there are multiple policies for the same user, the policies with the highest priority (the lowest priority value) apply.
If there are multiple policies for the same user with the same priority, the first policies found apply. It is not predictable which policies are the first ones found.
Connection Limit
Specifies the maximum number of concurrent LDAP connections a user can open. Specify a positive integer; for example, 5. Only one value can be specified.
Size Limit
Specifies the maximum number of objects returned for a list or search operation. Specify a positive integer; for example, 100. Only one value can be specified.
This value overrides the value of the LDAP Search Service Controls attribute. However, it cannot increase the size limit configured for the DSA.
Time Limit
Specifies the maximum elapsed time in seconds for completion of an operation. Specify a positive integer; for example, 10. Only one value can be specified
This value overrides the value of the LDAP Search Service Controls attribute. However, it cannot increase the size limit configured for the DSA.
Maximum Operations
Specifies the maximum number of operations that a user is allowed to perform in the specified time interval. Enter a positive integer specifying the maximum number of operations in the first field. Enter a positive integer in the second field and select seconds, minutes, hours or days from the drop down menu to specify the time interval.
The operations abandon and unbind do not increase the number of operations.
Only one value can be specified.
Maximum Result Bytes
Specifies the maximum number of bytes that a user is allowed to receive from search operations in the specified time interval. Enter a positive integer specifying the maximum number of bytes in the first field. Enter a positive integer in the second field and select seconds, minutes, hours or days from the drop down menu to specify the time interval.
Only one value can be specified.
Minimum Search Base Level
Specifies the minimum level starting at the root object at which a base object must exist for a search request. Specify a positive integer; for example, 3. Only one value can be specified.
TLS required
Indicates whether or not a bind over SSL/TLS is required. Check TLS required to indicate that a bind over SSL/TLS is required. The default value is that any bind is allowed.
Disclose violation
Indicates whether or not detailed information about the specified limit is provided in the error message if the limit is exceeded. Check Disclose violation to indicate that detailed information is provided. The default value is that detailed information is provided. This flag affects violations of Connection Limit, Maximum operations and Maximum result bytes.
Must contact DSA
Specifies the DSA that must be contacted in a multiple contact DSA configuration. (See "Using Multiple Contact DSAs" in the DirX Directory Administration Guide for details.) Specify the name of the DSA as specified in the LDAP server configuration file; for example, /CN=DSA1. (See "LDAP Server Configuration File" in the DirX Directory Administration Reference for details.)
If the Must contact DSA is not available and no Preferred contact DSA is specified, the operation fails.
If the Must contact DSA is not available and a Preferred contact DSA is specified, the LDAP server continues with contacting the Preferred contact DSA.
If the Preferred contact DSA is also unavailable, the LDAP server starts a round-robin selection to contact a DSA.
Only one Must contact DSA can be specified.
Preferred contact DSA
Specifies the DSA that is preferred to be contacted in a multiple contact DSA configuration. (See "Using Multiple Contact DSAs" in the DirX Directory Administration Guide for details.) Specify the name of the DSA as specified in the LDAP server configuration file; for example, /CN=DSA3. (See "LDAP Server Configuration File" in the DirX Directory Administration Reference for details.)
If the Preferred contact DSA is unavailable, the LDAP server starts a round-robin selection to contact a DSA.
Only one Preferred contact DSA can be specified.
Forbidden Search Bases
Specifies a base object that is not allowed in search requests. Enter the full qualified distinguished name of a leaf or a node in the DIT in LDAP format; for example, ou=finance,o=my-company. For details about distinguished names in LDAP format, see the section "Distinguished Names" in the chapter "DirX Directory String Representation for LDAP Binds" in the DirX Directory Administration Reference. Multiple values can be specified.
Press the Add-button to enter a new value.
Select a value and press the Delete-button to remove the value.
Forbidden Targets
Specifies an entry that is not allowed in update operations. Enter the full qualified distinguished name of a leaf or a node in the DIT in LDAP format; for example, ou=finance,o=my-company. For details about distinguished names in LDAP format, see the section "Distinguished Names" in the chapter "DirX Directory String Representation for LDAP Binds" in the DirX Directory Administration Reference. Multiple values can be specified.
Press the Add-button to enter a new value.
Select a value and press the Delete-button to remove the value.
LDAP SSL Configuration Subentry
The LDAP SSL configuration subentry stores security configuration parameters for a DirX Directory LDAP server. Modifications to an LDAP SSL configuration subentry become effective after a restart of the LDAP server. The LDAP server SSL configuration subentry is only read at startup when SSL is enabled (when the value of the LDAP Secure port number attribute is greater than zero).
You can
-
Add an SSL configuration subentry (right-click any LDAP SSL configuration subentry or the virtual node above)
-
Delete an SSL configuration subentry (right-click the LDAP SSL configuration subentry to be deleted)
-
View and modify an SSL configuration subentry (right-click or double-click the LDAP SSL configuration subentry to be viewed/modified)
DirX Directory Manager provides the information contained in an LDAP SSL configuration subentry in the following tabs:
-
General
-
Cipher Suite Details for TLS lower 1.3
-
Cipher Suite Details TLS 1.3
-
Client Authentication
-
All Attributes
Notes:
-
Exercise care in administering LDAP subentries. Incorrect values may cause the server to be unavailable for some or even all users (including yourself!). If you lock yourself out, use the DirX Directory command dirxadm to correct the problem.
-
Values in gray are the defaults used by the LDAP server if no specific value is supplied.
Tab: General
Use the LDAP SSL configuration subentry’s General tab to define general SSL configuration parameters for a DirX Directory LDAP server.
The available fields are:
Security Protocols
Specifies the supported security protocols:
Minimum level: select the lowest protocol version accepted by the LDAP server from the drop-down list provided.
Maximum level: select the highest protocol version accepted by the LDAP server from the drop-down list provided.
For each of the protocol version levels one of the following values is possible:
-
TLSv1.0
-
TLSv1.1
-
TLSv1.2
-
TLSv1.3
The LDAP server accepts all security protocol versions between Minimum level and Maximum level.
Security Levels
The security levels refer to the OpenSSL security levels:
Security level A: minimum security level for own key-material - see OpenSSL function 'SSL_set_security_level' for details. If the level does not match the provided own server key-material, the server does not start.
Security level B: minimum security level for client key-material - see OpenSSL function 'SSL_set_security_level' for details. If the level does not match the client key-material, the SSL-handshake fails.
Personal Security Environment (PSE)
Specifies the LDAP server’s PSE. This PSE comprises the following items:
Own key material
The LDAP server’s own key material, which consists of the public key certificate and the private key.
Own key material password file
The password that is used to protect the private key in the PEM file. Specifies the full pathname to the file that contains this password is stored in the LDAP PKCS12 Password File attribute.
Trace path
Specifies the full pathname of the directory where the SSL-specific log files are located. Log file names use the format: ipl*PID.log*, where PID is the process ID of the LDAP server process that created the log file.
Samples:
(Windows): C:\Program Files\DirX\Directory\ldap\log
(Linux): /opt/dirx/ldap/ldap/log
Note: if uncertain, leave this field empty
Trace level
Specifies the level of SSL internal logging. 0 indicates that SSL logging is turned off.
Personal Security Environment (PSE) in files
These fields are obsolete and are supported only for compatibility reasons. It is not allowed to use these fields to store key material for DirX Directory V8.2B LDAP servers and newer. The Personal Security Environment (PSE) must be used instead.
Tab: Cipher Suite Details for TLS lower 1.3
Use the Cipher Suite Details for TLS lower 1.3 tab to display and manage the cipher suite details either by specifying cipher suite shortcuts and / or by specifying explicitly the accepted cipher suites.
Cipher Suite Shortcuts
Specifies the cipher suites that are accepted in the SSL handshake protocol. Cipher suites are algorithms for signing, encryption, and hashing. Valid values for cipher suite shortcuts are:
-
All
The LDAP server accepts all cipher suites specified. -
High
The LDAP server accepts only cipher suites for high encryption strength. -
Medium
The LDAP server accepts only cipher suites for medium encryption strength. -
Low
The LDAP server accepts only cipher suites for low encryption strength. -
RSA
The LDAP server accepts only cipher suites that use RSA algorithms.
Cipher Suites
Specifies individual cipher suites. Check or un-check individual cipher suites.
Tab: Cipher Suite Details for TLS 1.3
Use the Cipher Suite Details for TLS 1.3 tab to display and manage the cipher suites that are supported in a TLS 1.3 handshake. TLS 1.3 supports a set of five cipher suites.
Tab: Client Authentication
Use the Client Authentication tab to display and manage the client authentication.
The available fields are:
Client Authentication
Specifies whether the LDAP server requires SSL client authentication for SSL-protected connections. When a client performs SSL client authentication, he/she requires a user certificate and a private key.
-
Not required
The client does not authenticate itself to the SSL layer. -
Required
The client authenticates itself to the SSL layer.
SASL Authorization ID Mapping
Specifies how a client entity authenticated by an SASL-authenticated bind over SSL-protected LDAPv3 protocol (ldap sasl bind) with the mechanism EXTERNAL is mapped onto an Authorization ID.
Trusted CA certificates
The list of Certification Authority (CA) certificates the LDAP server trusts to issue user certificates, if SSL/TLS client authentication is required.
Personal Security Environment (PSE) in files
These fields are obsolete and are supported only for compatibility reasons. It is not allowed to use these fields to store key material for DirX Directory V8.2B LDAP servers and newer. The Personal Security Environment (PSE) must be used instead.
Certificate Revocation List Checking
Enables or disables certificate revocation list checking in the context of an LDAP SASL EXTERNAL bind. If enabled an LDAP SASL EXTERNAL bind is also checked against a certificate revocation list (CRL).
Once CRL checking is enabled, at least one CRL file must be specified. If no proper CRL file is configured, the server does not start.
CRL file list
The name(s) of the files containing the PEM-formatted certificate revocation lists (CRLs) that are to be used to check the certificate for revocation in the context of an LDAP SASL bind with the mechanism type EXTERNAL. DirX Directory does not support delta CRLs.
Specify the filename values either as fully-qualified pathnames or as filenames without any path. If a filename without any path is specified, the LDAP server expects the file to reside in the directory install_path*/ldap/conf*.
See "LDAP SSL CRL Filenames" in "DirX Directory Attributes" in the DirX Directory Administration Reference for details.
If CRL checking is enabled, the following fields control the check procedure:
Tolerate missing CRL
Controls whether or not a client certificate presented in the context of an LDAP SASL bind with the mechanism EXTERNAL is rejected if a suitable CRL cannot be found in the given CRL list.
Allow not yet valid CRL
Controls whether or not a client certificate presented in the context of an LDAP SASL bind with the mechanism EXTERNAL is rejected if the corresponding CRL is not yet valid.
Allow expired CRL
Controls whether or not a client certificate presented in the context of an LDAP SASL bind with the mechanism EXTERNAL is rejected if the corresponding CRL has expired.
The DirX Directory LDAP server uses CRLs stored locally in Privacy Enhanced Mail (PEM)-formatted files that are read during LDAP server process startup or when explicitly required. Press the Refresh CRLs button if it is necessary to load the updated CRLs to the LDAP server. Note that this action puts heavy load on the server.
LDAP Root Subentry
The LDAP root subentry stores information that describes the capabilities and supported features of an LDAP server. The properties of the Root node in the tree pane of the configuration view show the properties of the LDAP root subentry tailored for DirX Directory (the core component of this application displays the LDAP Root, too, but in a different, generic form that is supposed to work for non DirX Directory servers, too (see File->Server->Tab: LDAP Root).
DirX Directory Manager displays the information contained in the LDAP root subentry in two tabs: the General tab and the Supported tab.
Note that the values stored in LDAP subentries are not effective for LDAP servers that haven’t read them. LDAP servers read LDAP subentries on restart; for additional options through dirxadm, please refer to the server manual.
Tab: General
Use this tab to specify the general properties of the LDAP server.
The available fields are:
-
Vendor name
The name of the vendor of the server software. -
Vendor version
The version of the server software. -
Naming contexts
The distinguished names of the naming contexts that a contact DSA masters or shadows. -
Subschema subentry
The distinguished name of the LDAP subschema subentry. -
Alternate server
The URLs of other LDAP servers that can handle client requests.
Tab: Supported
Use this tab to specify the features that the LDAP server supports.
The available fields are:
-
Supported LDAP versions
Specifies the LDAP protocol versions that the LDAP server described by this subentry supports. This is a mandatory field. Check the protocols that apply: -
Version 2
To indicate that the LDAP server supports LDAP v2. -
Version 3
To indicate that the LDAP server supports LDAP v3. -
Supported profiles
Lists the names of Open Group profiles that an LDAP server can support. -
Supported controls
Lists the controls that an LDAP server can support, in case of DirX Directory typically the ones that are depicted above and listed subsequently: -
Simple Paged Results (Request & Response Control)
Used implicitly by this application in functions such as export, delete and in clipboard operations -
Server Side Sorting (Request Control)
Not used by this application -
Server Side Sorting (Response Control)
Not used by this application -
Password Policy (Request & Response Control)
Used implicitly by this application in functions such as login, add entry, modify entry -
Subentries (Request Control)
Used implicitly by this application when reading subentries
Note that the user of this application is not offered by this application to specify "Supported controls" himself.
-
Supported extensions
Lists the LDAP protocol extensions that an LDAP server can support. Typically empty. -
Supported features
Lists the LDAP features that an LDAP server can support. Typically empty. -
Supported SASL mechanism
The Supported SASL Mechanism attribute specifies the names of the SASL authentication mechanisms that the LDAP server supports. The LDAP server supports the EXTERNAL SASL (attribute value EXTERNAL) mechanism, which indicates that the LDAP server supports SSL/TLS certificate-based client authentication.
Password Policy Subentry
A password policy is a set of rules that controls how passwords are used and administered. Password policies are designed to improve the security of directories and make it difficult for password cracking programs to break into them. You use password policy subentries to establish password policies in a DirX Directory server. The global password policy subentry is located directly under "Root" and affects the user password attribute of all entries that are within its scope (which is the entire DSA). The global password policy subentry is the only subentry that specifies the password storage scheme.
The available settings are organized into two tabs:
-
General
This tab provides password syntax, hashing algorithm related settings and an exclusion list. For the global password policy, this tab provides the fields for defining the password storage scheme. -
Aging & Account Lockout
This tab provides password aging and account lockout related settings.
Subtree-specific password policy subentries are located under the password policies subentries node under the context prefix. These subentries do not provide the password storage scheme related fields on their general tab. Use the subtree specification tab to configure which entries this password policy subentry affects.
Notes
-
It is up to the client, how it deals with the password policy related information returned by the server. Some clients may e.g. display a message such as "invalid credentials", where the adequate message would rather be something like "password has expired". Others may display a combination of both messages. Clients like DirX Directory Manager that to a large extent conform to https://tools.ietf.org/html/draft-behera-ldap-password-policy-07 are supposed to react adequately.
-
If you managed to lock yourself out (e.g. your password expired or you exceeded the maximum number of failures), the DirX Directory administration program dirxadm is supposed to help you out.
-
Since the password policy entry is a subentry, it has a subtree specification; if the password policy is intended to apply globally, its subtree specification is inoperative.
-
The complete functionality presumes for an object that is supposed to do binds (i.e. that has the attribute "userPassword") that it has also the respective password policy related attributes such as
pwdAccountLockedTime, pwdChangedTime, pwdExpirationWarned, pwdExpiryTime, pwdFailureTime, pwdGraceLoginsLeft, pwdGraceUseTime, pwdHistory, pwdReset.
Tab: General
For general remarks on password policy refer to the chapter Password Policy Subentry.
Additional settings are described in Aging & Lockout Settings.
Use this tab to specify the general properties of the password policy.
The available fields are:
User Password Storage Scheme
-
No hashing
The server does not apply a secure hashing algorithm. The hashing support level is insignificant in this case.
With this setting, the DSA is not able to handle user passwords that are available hashed or salted hashed, that is a bind operation with correct credentials will still fail if the password is stored in a hashed or salted hashed format in the DSA. -
Hashed
The server applies the secure hashing algorithm according to the hashing support level and the hashing algorithm selected. -
Salted Hashed (recommended)
The server applies the salted secure hashing algorithm according to the hashing support level and the hashing algorithm selected. A salt is a random number added to and stored with the hash value. The salted hashed format is even more secure than the hashed format, since it makes it drastically more expensive to detect passwords by generating pairs of clear text and corresponding hashed passwords and search these pairs as soon as a hash value becomes known.
These properties are provided for global password policies only.
Hashing support level
-
Basic (level 1)
The DSA can handle user passwords available in clear text as well as user passwords available in the hashed or salted hashed format, that is a bind operation with correct credentials will complete successfully, no matter how the relating password is stored in the DSA (clear text, hashed or salted hashed, regardless of the used hash algorithm). This setting presumes that hashed or salted hashed has been selected. -
DSA converts for read (level 2)
Same as level 1, but the DSA also returns user passwords that are stored in clear text in hashed or salted hashed format (depending upon the SHA selected). A user password that is already stored in hashed or salted hashed format will be returned as is. -
DSA converts for read and write (level 3) (recommended)
Same as level 2, but the DSA also automatically applies hashing or salted hashing (depending on the SHA selected) to any user passwords that are available in clear text when importing them. A user password that is already provided in hashed or salted hashed format will be imported as is.
These properties are provided for global password policies only.
Hashing algorithm
Check the variant of the secure hash algorithm to be applied. The default algorithm for hashing user passwords is SHA-1; furthermore the DSA supports the algorithms SHA-224, SHA-256, SHA-384 and SHA-512.
These properties are provided for global password policies only.
Check password syntax
-
Syntax check is disabled
The syntax of passwords is not checked for minimum and maximum password length and minimum number of lower case characters, upper case characters, digits and special characters (the settings in minimum password length, maximum password length, minimum number of lower case characters, upper case characters, digits and special characters are ignored). -
Check if in cleartext, accept otherwise (recommended)
If present in cleartext, passwords are syntax checked.
If not present in cleartext (this is typically the case if they are hashed or salted hashed), password are accepted regardless of their syntax (syntax check is impossible for passwords in hashed or salted hashed format)).
Note that while the bind operation always expects the password in clear text, other operations like add entry or modify entry can take passwords in hashed and salted hashed format as well. -
Check if in cleartext, reject otherwise
If present in cleartext, passwords are syntax checked.
If not present in cleartext (this is typically the case if they are hashed or salted hashed), password are rejected regardless of their syntax (syntax check syntax check is impossible for passwords in hashed or salted hashed format)).
Note that while the bind operation always expects the password in clear text, other operations like add entry or modify entry can take passwords in hashed and salted hashed format as well. -
Minimum password length
Specifies the minimum number of characters that can make up a password. A value of 0 indicates that there is no minimum. -
Maximum password length
Specifies the maximum number of characters that can make up a password. A value of 0 indicates that there is no maximum.
If the password is propagated to other systems that have a password length limit, this setting can help users avoid assigning invalid passwords. -
Minimum number of lower case characters
Specifies the minimum number of lower case characters (a-z) that a password must contain. A value of 0 indicates that there is no minimum. -
Minimum number of upper case characters
Specifies the minimum number of upper case characters (A-Z) that a password must contain. A value of 0 indicates that there is no minimum. -
Minimum number of digits
Specifies the minimum number of digits (0-9) that a password must contain. A value of 0 indicates that there is no minimum. -
Minimum number of special characters
Specifies the minimum number of special characters (any character outside the range of A-z and 0-9) that a password must contain. A value of 0 indicates that special character use in passwords is unrestricted. -
Exclude Name
Specifies that a password is rejected if it contains a substring of the user’s name. A value of 0 indicates no restriction. Specify one of the following values: -
0 - No restriction.
-
1 - Passwords are rejected, if the value is a case-ignored substring of the user’s distinguished name (DN) in LDAP format; for example the user cn=abele,ou=sales,o=my-company cannot set his password to Bele,Ou.
-
2 - Passwords are rejected, if the user’s relative distinguished name (RDN) is a case-ignored substring of the password; for example the user cn=abele,ou=sales,o=my-company cannot set his password to Abele1.
-
3 - Passwords are rejected, if either the condition for value 1 or the condition for value 2 applies.
Exclusions
Allows specifying a number of DNs the global password policy is not supposed to apply at.
Tab: Aging & Lockout
For general remarks on password policy refer to the chapter Password Policy Subentry.
Additional settings are explained in General Settings.
Use this tab to specify the properties for aging and account lockout of the password policy.
The available fields are:
Aging
-
Minimum Age
Specifies the minimum elapsed time between two password modifications.
The main intention of this setting is to prevent users from trying to circumvent a password History mechanism by quickly performing a series of password changes having in mind to kick their favorite password out of the history list.
Makes sense without a password history mechanism, too, as it may keep users from quickly switching back to their favorite password after it has expired. -
Maximum Age
Specifies the maximum elapsed time 'till a password expires if not changed in between. Can’t be smaller than Minimum Age. -
Expire Warning
Specifies the period of time from when authenticating users - due to imminent password expiration - are getting warning messages such as "Warning: Your password will expire at…". If this attribute has no value, or if its value is 0, no warnings will be issued. If not 0, the value must be smaller than Maximum Age (see above).
Sample: Let Maximum Age be 30 days and Expire Warning be 5 days. This means that a user authenticating after 25 days at the earliest is supposed to receive an Expire Warning. A noteworthy effect of the Expire Warning is that the user can let elapse more than Maximum Age, i.e. 30 days and is still able to authenticate. Once he has received the first Expire Warning however, he must change his password within Expire Warning, i.e. 5 days - unless Logins after expiration allows him a number of additional "grace" logins. -
Logins after expiration
Specifies the number of times an expired password can be used to authenticate (also known as "grace logins"). If this attribute has no value or if the value is 0, authentication will fail.
Note that the number of grace logins may be "nibbled" undiscernibly, since times of inactivity may cause implicit disconnects and re-logins. -
History
Specifies the maximum number of used passwords stored in the password history list of each user. A password cannot be reused, as long as it is found in the password history list. If this attribute has no value, or if the value is 0, used passwords are not stored in the password history list and thus may be reused.
Account Lockout
There are two reasons that can cause a DN to get locked out (till expiration of the Lockout duration, see below):
-
Explicitly: The administrator locks the DN out thru the according entry related context menu item
-
Implicitly: The server locks the DN out according to the settings described in this section
You can find out the currently locked out DNs by searching for "pwdAccountLockedTime is present"
-
Enable Account Lockout
Implicit lockout:
Indicates, when checked, that the password may not be used to authenticate after a specified number of consecutive failed bind attempts. The maximum number of consecutive failed bind attempts is specified in Number max. Failure (see below). If Enable Account Lockout is not checked, the password may be used to authenticate even if the number of failed bind attempts has been reached.
Explicit lockout:
Entries that have been locked out explicitly by an administrator are still able to login, as long as Enable Account Lockout has not been checked off. -
Number max. Failure
Specifies the number of consecutive failed bind attempts after which the password may not be used to authenticate (provided Enable Account Lockout is checked). -
Failure count interval
Holds the period of time after which the password failures are purged from the failure counter, even though no successful authentication occurred. If this attribute has no value, or if its value is 0, the failure counter is only reset by a successful authentication. -
Lockout duration
Holds the period of time that the password cannot be used to authenticate due to too many failed bind attempts. If this attribute has no value or if the value is 0 the password cannot be used to authenticate until reset by an administrator.
Increasing the lockout duration afterwards will usually apply to existing lockouts as well. However, for those, whose lockout duration has expired and that had logged in successfully in between, the lockout duration has no effect any more. -
Must Change after first Login
Specifies when checked that users must change their passwords when they first bind to the directory after a password is set or reset by the administrator. If this attribute is not checked users are not required to change their password upon binding after the administrator sets or resets the password.
Replication View
For in-depth information on replication, refer to the server documentation.
Replication of directory information among various directory servers is a way to make the directory service fail-safe, since data replicated e.g. from server 1 to server 2 may still be accessible through one server even if the other one shuts down for whatever reason. Besides, replication can be used to optimize communication traffic.
DirX Directory provides two mechanisms for replicating directory information:
-
Shadowing
-
LDIF file synchronization
As opposed to the LDAP based functionality, DirX Directory Manager contacts the DSA directly when administering replication. For this reason, it may - though it is successfully connected to an LDAP server - be unable to contact the DSA. In this case, a dialog pops up that gives you the opportunity to specify the appropriate connection data:
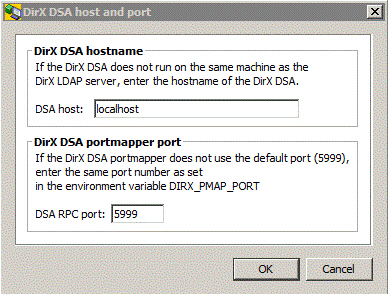
Shadowing
Shadowing automates the replication of directory information. What information is when to be shadowed among what servers must be configured by means of "shadowing agreements". For details about the functionality, see the topic "Shadowing Functions".
Shadowing should work between DirX Directory servers and non-DirX Directory servers provided they conform to the respective specifications put forth in the X.500 1993 Directory standard.
Pre-conditions
-
The communication between two DSAs that are involved into a shadowing agreement is based on their "PSAP" addresses. Each DSA provides its PSAP address in a system environment variable called "DIRX_OWN_PSAP" on installation. This address contains the IP address as an essential part. Make sure that it is the one that is to be used by other DSAs that want to connect.
-
The environment variable "DIRX_DSA_NAME" must contain a unique identification of the local DSA in LDAP DN syntax. Each DSA provides a presumably unique default DSA name on installation.
DSAs that are affected by a shadowing agreement
-
In the narrower sense:
-
A "Supplier"
A supplier DSA masters the entire or a well-defined subset of the entire directory information; disjoint subsets can be mastered by different supplier DSAs. The supplier replicates changes of some or all of the data it masters to one ore - through several shadowing agreements - more consumers. -
A "Consumer"
A DSA that consumes some directory information cannot at the same time master the same information for another DSA (no "secondary shadowing"). However, a consumer for one subset can be a supplier for another one. -
In the broader sense, in addition to supplier and consumer:
-
The "Master of the cooperating DSAs table"
There is one distinguished DSA that is the "master of the cooperating DSAs table". This table stores all shadowing agreements between all participating DSAs. It is created and maintained automatically by the DSA you are bound to when creating the first shadowing agreement.*
Note that this is the DSA you must be bound to when administering shadowing agreements.*
The concept of the master of the cooperating DSAs table disburdens you from the task of having to separately administer the suppliers and the consumers in a consistent way.
The cooperating DSAs table can be viewed at as sort of a set of implied shadowing agreements. The context prefix is "cn=Cooperating-DSAs-Subentry" in any case. There are separate agreements between the DSA that masters the cooperating DSAs table and each consumer DSA.
Though one single Supplier will possibly do and the Master of the cooperating DSAs table will possibly coincide with this Supplier in many deployments, you are not prevented from locating the mastership of the cooperating DSAs table at a separate DSA. -
All other participating DSAs
The cooperating DSAs table implies individual shadowing agreements that are automatically shadowed to all participating DSAs immediately on change (unless this feature has been disabled).
Floating DSAs
Floating DSAs can take over the supplier role completely or on a per-shadowing area basis (context prefix + subtree base) either in a controlled way without loss of any data or through an "emergency switch" with the risk of losing the latest changes. A floating DSA becomes the master of the cooperating DSAs table when taking over the supplier role and
-
Making an emergency switch
-
Globally switching all context prefixes mastered by the DSA that also masters the cooperating DSAs table to another DSA
Functionality
The administration of shadowing agreements is (along with the administration of LDIF agreements) offered in an separate view called Replication.
The Replication view is organized into these panes:
-
A tree pane
-
A graph pane (applies to shadowing agreements only, not to LDIF agreements)
-
A property pane
A number of functions are available by clicking the right mouse button in a node in the tree pane or in an element in the graph pane.
Shadowing Functions
For shadowing agreements, tree pane and graph pane offer the following functions through the right mouse button:
-
Create a new shadowing agreement
Presents the property dialog in an editable form.*
Note* that once you have confirmed your data by clicking the OK button, you can no longer modify it. What you can do is to delete the agreement and then create a new one. -
*Establish an existing shadowing agreement
Terminate an existing shadowing agreement
Enable an existing shadowing agreement
Disable an existing shadowing agreement*_
Establish_ makes a shadowing agreement effective as long as it is not disabled. It is also called "Activated" or "Cooperative" at this point._
Terminate_ makes it ineffective (also called "Not activated" or "Non cooperative"). A terminated shadowing agreement stops collecting information that is needed to perform the shadowing. Re-establishing a terminated agreement requires a total update.
A disabled shadowing agreement continues collecting that information and executes it as soon as it gets re-enabled. Note that a DSA may also disable an agreement itself due to certain error conditions.
Notes -
You cannot terminate a cooperating DSAs agreement.
-
Enabling or disabling a shadowing agreement affects one single DSA.
That is, if you are bound to a supplier, disabling a respective agreement will keep the supplier from trying to send update information to its consumer. If you are bound to a consumer, disabling a respective agreement will keep the consumer from accepting update information, while the supplier will still be sending updates -
Enabling/Disabling DSAs for agreements are the exceptions to the rule that you must be bound to the master of the coordinating DSAs table when administering shadowing agreements. Instead, you must be bound to the DSA you want to enable/disable for a shadowing agreement. This DSA can be the master of the coordinating DSAs table; for example, if you want to enable/disable a shadowing agreement where it is the master of the data to be shadowed, or if you want to prevent the coordinating DSAs table from being shadowed to a certain consumer for some reason.
-
Switch supplier DSA
Changes a current supplier to a consumer and a current consumer to a supplier for the respective shadowing agreement(s). A consumer that can become a supplier is also called "Floating DSA". The respective box in the "General" tab of the shadowing agreement property dialog must be checked in order for a DSA to be considered able to float. When switching DSAs, you must be bound to the DSA that masters the cooperating DSAs table. What exactly will be switched depends on your current selection: -
If a supplier DSA is selected: All respective shadowing agreements.
-
If a consumer DSA is selected: The respective shadowing agreements.
-
If an agreement is selected: that agreement
-
If the node "Cooperating DSAs subentry agreements" is selected: Switches the master of the cooperating DSAs table.
If the affected supplier is the master of the cooperating DSA table and if all respective shadowing agreements are to be switched, the floating DSA will also become the new master of the cooperating DSAs table.
-
Delete an existing shadowing agreement.
Affected implied shadowing agreements are implicitly removed from the cooperating DSAs table. -
Show the properties of an existing shadowing agreement (read-only, see also the very top of this topic).
Shadowing Tree Pane
The tree pane basically displays the information stored in the "cooperating DSAs table" in a tree-like manner where the suppliers form the first level below the node presenting the "shadowing agreements" and the consumers are arranged below their suppliers.
All the functionality is available through the right mouse button applied at those nodes.
The tree pane also gives you access to the LDIF File Sync. Functions.
Shadowing Graph Pane
Alternatively to the Shadowing Tree Pane, the Shadowing Graph pane presents the shadowing relations among the participating DSAs.
The Master of the cooperating DSAs table is colored orange, while the others are colored blue.
Shadowing Property Pane
Due to the similarity between shadowing agreement properties and LDIF agreement properties, they are treated together here for the most part.
The properties shown depend on the type of shadowing- or LDIF-related node currently selected in the Replication Tree Pane.
-
Root node
-
Supplier node
-
Shadowing or LDIF agreement node
-
General
-
Update Mode
-
Attribute Selection
-
Shadowing Policies or LDIF Policies
Shadowing/LDIF Root Properties
Shows all shadowing or LDIF agreements in a multi-column list. Double-clicking an agreement leads to the property dialog for agreements.
Shadowing/LDIF Supplier Properties
Shows:
-
Supplier DSA name.
-
Supplier PSAP address.
-
All belonging shadowing agreements in a configurable multi-column list.
Double-clicking an agreement leads to the property dialog for agreements.
Shadowing Agreement Properties
The properties of shadow or LDIF agreements are shown when you:
-
Click an involved consumer node in the tree pane (shadowing agreements only).
-
Right-click on a consumer node in the tree pane and then select "Properties" (shadowing agreements only).
-
Double-click a shadow or LDIF agreement in the list of shadowing/LDIF agreements that is displayed in the Shadowing/LDIF Supplier Properties pane.
-
Double-click a shadow or LDIF agreement in the list of shadowing/LDIF agreements that is displayed in the Shadowing/LDIF Root Properties pane.
The agreement properties are organized in a dialog or pane with the following tabs:
-
General
-
Update Mode
-
Attribute Selection
-
Shadowing Policies or LDIF Policies
Tab: General
This tab allows you to specify the basic settings:
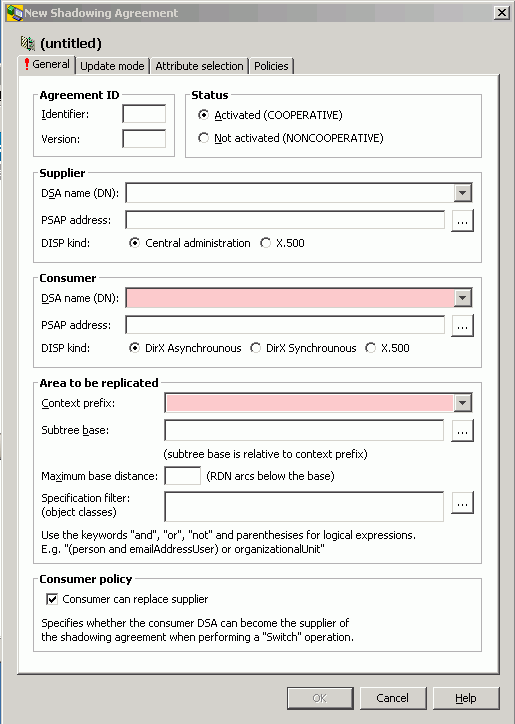
Agreement Id
Each shadowing agreement must be uniquely identified by an agreement id. You can leave it to the DSA to allocate an identifier or you can allocate one yourself. The version is always allocated by the server. It starts with 0 and is incremented by 1 each time the agreement is re-established.
Status
The Establish function sets the status to "Activated (COOPERATIVE)", the Terminate function sets it to "Not activated (NONCOOPERATIVE). The Update status (shown in the tooltip) is affected by Enable or Disable.
Supplier or Consumer (Consumer: not shown for LDIF replication)
The supplier or the consumer is identified by its DSA name and its PSAP address. You can leave the supplier fields empty, if you do, the values are implicitly acquired from the DSA to which you are bound.
DSA name
The DSA name must coincide with the one that is found in the environment variable DIRX_DSA_NAME, as illustrated for Windows in the following screen shot (by default, the DSA name is supposed to be *cn=DIRX-DSA-*hostname):
Note: If you leave the DSA field empty and proceed with providing the PSAP address in the subsequent field, the DSA field will take on the value *DIRX-DSA-*hostname_as_specified_PSAP_address
PSAP address
The PSAP address must coincide with the one that is found in the environment variable DIRX_OWN_PSAP. This variable is implicitly set when installing DirX Directory. You can leave it unchanged, as long as the IP address and the port number are correct and you agree to communicate through the IDM stack. 21200 is the default port.
T selector
By default, the T-selector specified in the environment variable DIRX_OWN_PSAP is "DSA1". You can usually leave the default as it is. All participating DSAs can use it at the same time. Be sure, however, to choose the one that is used in the corresponding environment variable DIRX_OWN_PSAP. You can take the default value from the combo box adjacent to the T selector field.
Use DNS
Check this box if you want to use the name service for resolving the IP address of the communication partner. This option is only supported for the IDM and secure IDM stack.
Host name or IP address
When typing a host name rather than an IP address, you might be asked in a subdialog to choose one of two or more IP addresses that were found to be assigned to that host. You must choose the one that is used in the corresponding environment variable DIRX_OWN_PSAP. If the preceding field (DSA name) is empty while you type in the host name here, it will be implicitly set to *DIRX-DSA-*hostname_as_specified_here.
Port
Choose the one that is used in the corresponding environment variable DIRX_OWN_PSAP. If DIRX_OWN_PSAP says "localhost" or the like, change it in the environment variable DIRX_OWN_PSAP to the real IP address and specify the same IP address here.
Secure Port
Specify the secure port number here if you checked Secure IDM stack. Choose the one that is used in the corresponding environment variable DIRX_OWN_PSAP. If DIRX_OWN_PSAP says "localhost" or the like, change it in the environment variable DIRX_OWN_PSAP to the real IP address and specify the same IP address here.
Communication
The DirX Directory DSA supports the X.500 DAP, DSP, and DISP directory protocols directly over TCP/IP through the Internet Directly Mapped (IDM) protocol, as specified in ISO/IEC 9594-5: 2001 (E). The communication can be performed either directly over plain IDM or over a secure connection over TLS/SSL (secure IDM stack). For interworking scenarios the DirX Directory DSA also supports Open Systems Interconnection (OSI) communications.
IP stack version
Check the IP stack version for the IDM communication. DirX Directory supports IPv4 and IPv6.
Disp. kind (not shown for LDIF replication)
Check "Central Administration" or "DirX Asynchronous", if the participating DSAs are DirX Directory DSAs. In this case, you can benefit from the convenience of being able to centrally administer the shadowing. LDAP/DAP client update requests are returned immediately after commitment by the master DSA.
Check "DirX Synchronous", if the participating DSAs are DirX Directory DSAs. In this case, you can benefit from the convenience of being able to centrally administer the shadowing. LDAP/DAP client update requests are returned only after commitment by the master DSA and by all synchronous-configured consumer DSAs in the network.
Check "X.500" for non-DirX Directory DSAs. In this case, you must administer the shadowing agreements locally.
Area to be replicated
Specifies the area that is to be replicated in terms of context prefix and subtree base:
Context Prefix: Select the context prefix or - if there is more than one - select one of the available context prefixes.
Subtree base: Specify a subtree base relative to the context prefix.
Maximum base distance: Specify the maximum distance from the subtree base expressed in number of RDNs that are replicated.
Specification filter: Specify a filter that must match for the replicated entries.
Consumer Policy (not shown for LDIF replication)
If not checked, the consumer cannot become a supplier through the "Switch supplier DSA" function.
If checked, the field Subtree base must be left empty.
Tab: Update mode
This tab allows you to specify details regarding the update mode:
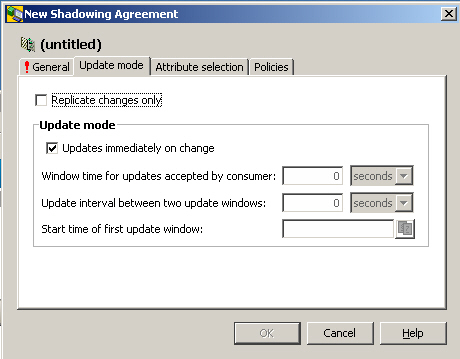
Replicate changes only (if shown, this check box is inoperative for LDIF agreements). Note that Tab "LDIF Policies" provides an appropriate check box called "Save changes only").
A boolean value that specifies whether only updates are replicated (checked) or the total content is replicated (unchecked). By default, the latter is only done initially; to allow total updates on errors, you must check the box "Automatic total update" in Tab "Shadowing policies".
Update immediately on change
"Checked" means that replicated entries are updated immediately when the master entries are modified or created. "Unchecked" means that no updates will be performed automatically. Default is "checked".
Window time for updates accepted by consumer
Only of interest if "Update immediately on change" is unchecked. Defines the time period during which the shadow consumer will accept updates from the shadow supplier. A shadow window allows updates to occur at anytime within the window time. It is useful if for some reason the updates are unable to start at the exact scheduled moment or for a retry if some update failure occurs.
Update interval between two update windows
Only of interest if "Update immediately on change" is unchecked. Specifies the interval between the opening of the update windows. For example, if "Update interval between two update windows" is set to 30 minutes and "Window time for updates accepted by consumer" is set to 5 minutes, the update cycle is 35 minutes. Updates of up to five minutes in duration can occur every 30 minutes.
Start time of first update window
Only of interest if "Update immediately on change" is unchecked. The start time of the first update window in Generalized Time format. When this start time is after the validity of the shadowing agreement, the update cycle begins at this time. Once started, the update cycle begins until the shadow agreement is terminated. The default is the time the shadowing agreement was activated.
Tab: Attribute selection
This tab allows you to specify the attributes you do not want to be shadowed.
Here is an example of the Attribute selection tab:
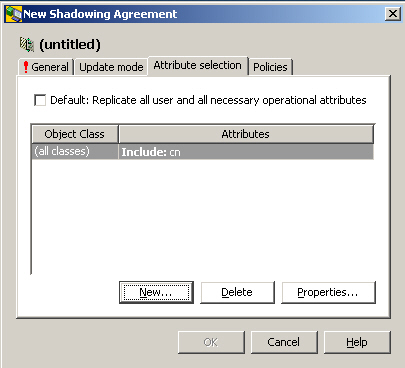
It is possible to specify conflicting settings. In this case, the following rules apply:
-
Explicit Include takes priority over explicit Exclude
-
Explicit Exclude takes priority over implicit include
Tab: Policies
For policies of LDIF agreements, see LDIF policies.
This tab allows you to control the behavior in case of errors:
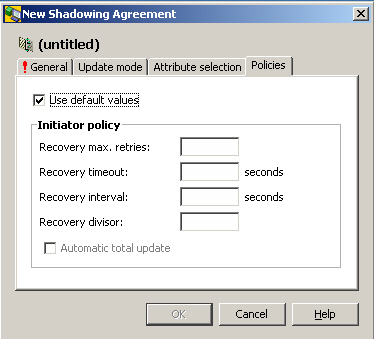
Use default values
Specifies if checked that default policies should be used. See the other components for a description of the default policies.
Initiator policy
Recovery max. retries
The maximum number of retries of recovery for shadowing agreements where the local DSA is the initiator. The default is 20. If recovery timeout and recovery max. retries are equal to 0, recovery is configured as unlimited (that is, there is no limitation by timeout or by number of retries, and recovery never stops). If either recovery timeout or recovery max. retries is equal to 0 (and the other one is equal to a non-zero value), no recovery will be done. If recovery timeout and recovery max. retries are equal to a non-zero value, recovery will be attempted until both values have been exceeded.
Recovery timeout
The timeout in seconds of a recovery attempt for shadowing agreements where the local DSA is the initiator. The default is 1200 (that is, 20 minutes). If recovery timeout and recovery max. retries are equal to 0, recovery is configured as unlimited (that is there is no limitation by timeout or by number of retries, and recovery never stops). If either recovery timeout or recovery max. retries is equal to 0 (and the other one is equal to a non-zero value) no recovery will be done. If recovery timeout and recovery max. retries components are equal to a non-zero value, recovery will be attempted until both values have been exceeded.
Recovery interval
The time interval in seconds between the end of a recovery attempt and the start of the next attempt for shadowing agreements. Relevant only for shadowing agreements where the local DSA is the initiator and the update mode is checked ("on change"). The default is 240 (that is, 4 minutes).
Recovery divisor
The time interval between two recovery attempts for shadowing agreements is the window time divided by the recovery divisor. This component is relevant only for the shadowing agreements where the local DSA is the initiator and update mode is not "Immediately on change". The default is 16.
Automatic total update
Specifies whether the initiator DSA performs a total update automatically if it is required by the cooperating DSA (box is checked) or the administrator must trigger off the total update by performing an establish operation (box is unchecked). The default is FALSE (box is unchecked).
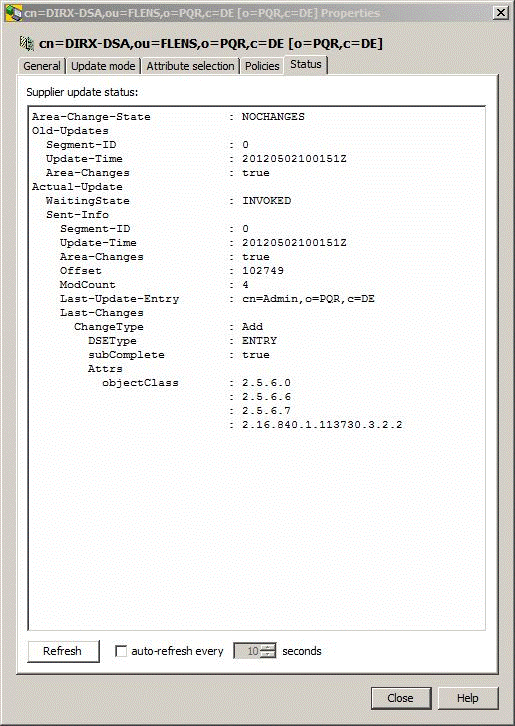
LDIF File Synchronization
While shadowing covers both the export of data from one server and import of this data into another server, LDIF file synchronization only deals with the first step: it exports data into LDIF files (LDIF = LDAP Data Interchangeable Format, specified in RFC 2849) and allows associating triggers to initiate further processing.
The server should write the resulting LDIF files to install_path*\Server\Ldif*.
LDIF files can be used to replicate changes to a DirX Directory DSA’s directory database with DirX Identity to non-DirX Directories such as Windows Active Directory, NDS and Lotus Notes; this process is called directory synchronization and is described in detail in the DirX Identity documentation set. DirX Directory administrators can also use LDIF file generation as part of an overall backup strategy.
What information is when to be exported must be configured by means of so-called LDIF-agreements. For details about the functionality, see "LDIF File Sync. Functions".
Note that you must be bound to the master of the cooperating DSAs table when administering LDIF agreements.
LDIF file synchronization is should work between DirX Directory servers and with any LDAP-conformant non-DirX Directory servers.
LDIF File Synchronization Functions
For LDIF agreements, the tree pane and graph pane offer the following functions through the right mouse button:
-
Create a new LDIF agreement
Presents the property dialog in an editable form.*
Note* that once you have confirmed your data by clicking the OK button, you can no longer modify it. What you can do is to delete the agreement and then create a new one. -
*Establish an existing LDIF agreement
Terminate an existing LDIF agreement
Enable an existing LDIF agreement
Disable an existing LDIF agreement*_
Establish_ makes an LDIF agreement effective as long as it is not disabled. It is also called "Activated" or "Cooperative" then._
Terminate_ makes it ineffective (also called "Not activated" or "Non cooperative"). A terminated LDIF agreement stops collecting information
A disabled LDIF agreement continues collecting that information and executes it as soon as it gets re-enabled. Note that a DSA may also disable an agreement itself due to certain error conditions.
Note
Enabling/Disabling DSAs for agreements are the exceptions to the rule that you must be bound to the master of the coordinating DSAs table when administering agreements. Instead, you must be bound to the DSA you want to enable/disable for an LDIF agreement. -
Delete an existing LDIF agreement.
-
Show the properties of an existing LDIF agreement (read-only, see also the very top of this topic).
LDIF File Synchronization Tree Pane
The tree pane basically displays the information stored in the "cooperating DSAs table" in a tree-like manner where the suppliers form the first level below the node presenting the "shadowing agreements" and the consumers are arranged below their suppliers.
All the functionality is available through the right mouse button applied at those nodes.
The tree pane gives you also access to the Shadowing Functions.
LDIF File Synchronization Property Pane
See Shadowing Property Pane.
LDIF Agreement Properties
See Shadowing Agreement Properties.
Tab: General
This tab shows the same information as Tab: General in Shadowing Agreement Properties but without Consumer and Consumer policy.
Tab: Update Mode
This tab shows the same information as Tab: Update mode in Shadowing Agreement Properties but without the checkbox "Replicate changes only" (if present, the field is inoperative for LDIF agreements). Note that Tab "LDIF Policies" provides an appropriate checkbox called "Save changes only".
Tab: Attribute selection
This tab shows the same information as Tab: Attribute selection in Shadowing Agreement Properties.
Tab: LDIF Policies
For policies of shadowing agreements, see Shadowing policies.
This tab allows you to specify some additional constraints:
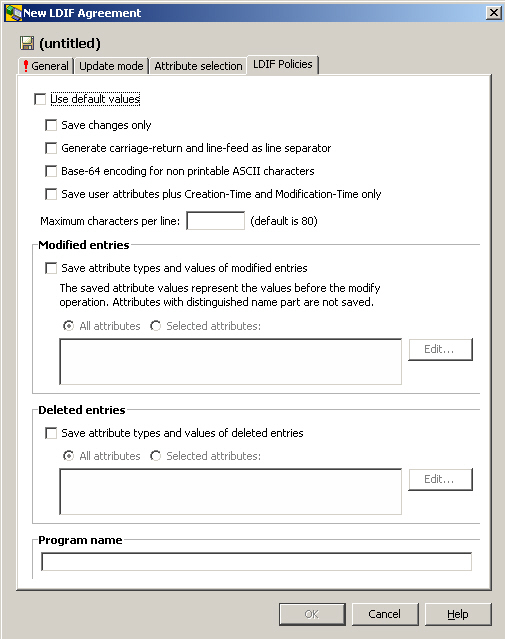
Save changes only
There is no initial total.
Generate carriage return and line feed as line separator
By default, only line feed is used (appropriate for Linux; Carriage return/line feed is appropriate for Windows).
Base-64 encoding for non printable ASCII characters
Base64 (see also RFC 2045) regulates how to transform binary data into printable data using nothing but the 64 characters "A-Z, a-z, 0-9, +, /". Base64 increases the original size by 33%; it is not an encryption.
Save user attributes plus Creation-Time and Modification-Time only
Causes mandatory attributes other the createTimestamp and modifyTimestamp to be omitted.
Maximum characters per line
Limits the number of characters per line in the LDIF file.
Modified entries: Save attribute types and values of modified entries
Deleted entries: Save attribute types and values of deleted entries
LDIF agreements cause LDIF change files to be created with the minimum necessary information; in particular, attribute values of modified or deleted entries will not appear in the LDIF file by default. If you want the LDIF file to be more informative, specify the details here.
Program name
Specifies a command string to be performed after the LDIF file has been created.
Subtree Specification
In subentries such as Access Control Subentry or Collective Attribute Subentry, a subtree specification may restrict the collection of entries to which the subentry applies.
Note that despite its name, a subtree specification does not necessarily define a subtree but may also define more or less scattered partitions of a subtree (therefore also referred to as “entry collections”); this is because subtree specifications allow filtering for object classes and limiting the number of RDNs).
Here is an example of the Subtree Specification tab:
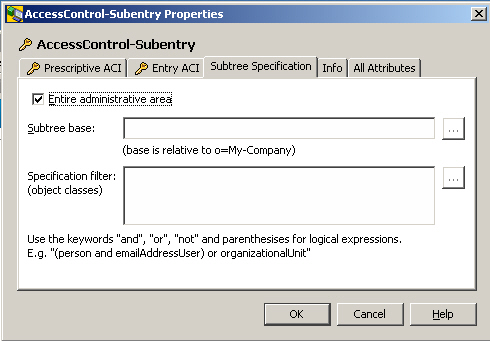
The available fields are:
Entire administrative area
Subentry applies to the entire administrative area. The remaining fields are only relevant if this field is not checked.
Subtree Base
The real subtree specification.
Specification filter
Subentry applies to all entries below the subtree base matching this filter. Note that this filter must be composed of a logical association of object classes.
Examples:
-
Subtree base:
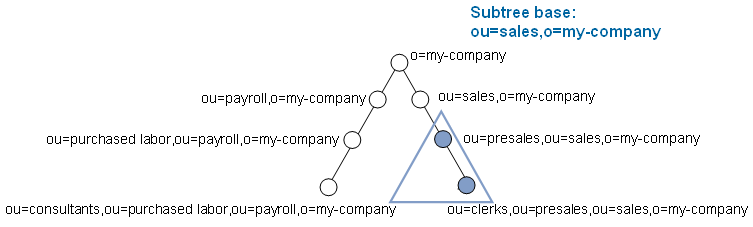
-
Specification filter:
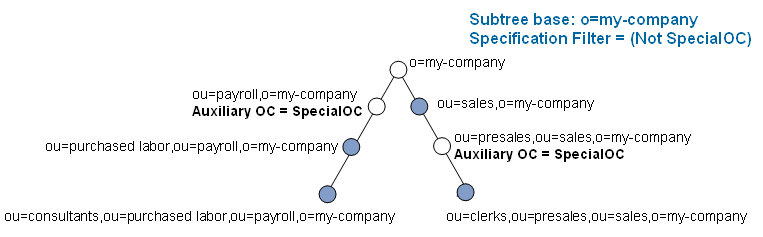
About the Administrative Authority Model
The administrative authority model aims at enabling different parts of the DIT to be managed by different authorities. This can be achieved by structuring the DIT into administrative areas. There are two types of administrative areas, autonomous administrative areas (AAA, aka AA for "autonomous area") and inner administrative areas (IAA)
An autonomous administrative area starts at an AAP - an "autonomous administrative point" (see more below) - and continues downwards until either leaves or other autonomous administrative points are encountered.
An inner administrative area starts at an IAP - an "inner administrative point" (see more below) - that is within an autonomous administrative area. IAPs are always subordinate to AAPs. Inner administrative areas continue downwards until the end of the autonomous administrative area is reached. Entries within an inner administrative area are still under the overall control of the autonomous administrative authority, but some degree of control is also exercised over them by the administrator of the inner administrative area. Inner administrative areas may be nested, but the bottom of all inner areas is always the bottom of the enclosing AAA.
An entry is called administrative entry or administrative point if it forms the starting point of an administrative area. Analogous to the administrative areas, there are two types of administrative points: autonomous administrative points (AAP) and inner administrative points (IAP).
Here is an example with four autonomous administrative areas AAP 1 through AAP4. AAP 1 through AAP 3 do not have an inner administrative area, while AAP 4 has three inner administrative areas, where IAP1 and IAP3 are nested:
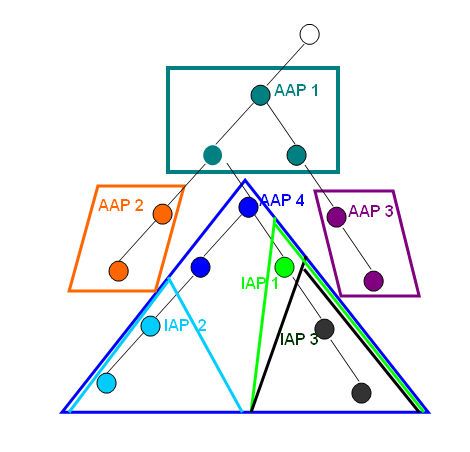
According to X.500, administrative areas control three specific aspects of administration:
-
Subschema administration
is concerned with administrating the Directory subschema that is in operation in this part of the DIT
Support discontinued by DirX Directory. -
Access control administration
is concerned with administrating the security policy that is in force in this part of the DIT -
Collective attribute administration
is concerned with administrating the collective attributes in this part of the DIT
Access control and collective attributes may need to be partitioned into administrative areas according to different requirements. That’s why it is possible to further partition an AAA into access control specific administrative areas (ACSAs) and collective attribute specific administrative areas (CASAs). Accordingly the IAAs can be further partitioned into access control inner areas (ACIAs) and collective attribute inner areas.(CAIAs).
Here is an example with one AAA partitioned into two ACSAs:
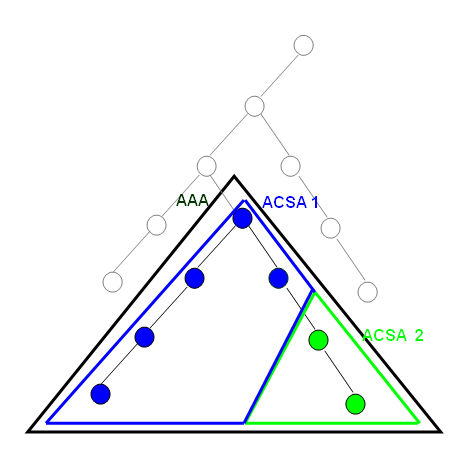
In order to administer this, an operational attribute called Administrative Role is available (use the DirX Directory Administration Program dirxadm for this purpose).
Since Administrative Role is an operational attribute, it is subject to access control (attribute type administrativeRole). Administrative Role is recurring and can take any reasonable combination of these values:
-
Autonomous administrative area (AAA)
Dispensable. Marks the affected entry as an autonomous administrative point, i.e. as starting point of an AAA. However, in order to effect something, you need to set ACSA or CASA. -
Access control specific area (ACSA)
Marks the affected entry as starting point of an ACSA. This implicitly makes the entry as an AAP for access control.
Entries representing the starting point of an ACSA have also an operational attribute called "access control scheme" possible values: BAC oder SAC). This attribute has no effect, since DirX Directory always assumes "BAC". -
Collective attribute specific area (CASA)
Marks the affected entry as starting point of a CASA. This implicitly makes the entry as an AAP for collective attributes. -
Access control inner area (ACIA)
Marks the affected entry as starting point of an ACIA. This implicitly makes the entry as an IAP for access control. -
Collective attribute inner area (CAIA)
Marks the affected entry as starting point of a CIA. This implicitly makes the entry as an IAP for collective attributes. -
Subschema administrative area (SASA)
Has no effect at all, since DirX Directory has discontinued supporting subschemata in favor of solely supporting the "global schema".
There is in addition a DSE type called "administrative point", which is implicitly set and removed by the server depending on what administrative roles the entry has. An administrative point is insignificant anyway, as long as the administrative role operational attribute is absent.
Specify access control related directives in access control subentries. Specify collective attribute related directives in collective attribute subentries.