Schema Management
A directory schema specifies the types of objects ("object classes") the directory can contain and the types of attributes that objects must have and may have. It also specifies quite a number of properties that object classes and attribute types must have and may have. Read more about schema in the topic What is the Schema?.
The schema-related functionality that this application provides is based on LDAP. It may work to some extent with a variety of LDAP servers, but has been tailored to DirX Directory.
The functionality available for schema management includes:
-
Available from a special schema view
-
Managing the schema, including viewing, modifying, adding, deleting and searching for schema elements.
-
Available from Menu
-
Exporting the schema in place at application startup, or parts of it, into an LDIF file.
To export the entire schema, right-click the top node in the tree pane "Export Schema…" or choose from the main menu. To export part of the schema, right-click a node other than the top level node. Note that the application automatically exports the schema in place when it starts up unless it has not changed since the previous startup. -
Importing an LDIF schema file, which merges the selected file (change file or content file) into the current schema.
To import an LDIF schema file, right-click "Schema" in the tree pane "Import Schema…" or choose from the main menu. Note that servers usually impose restrictions regarding schema modifications. -
Comparing two schemata, which allows you to save the differences into an LDIF file.
To compare two schema files, right-click "Schema" in the tree pane "Compare Schema…"or choose from the main menu. -
Opening LDIF content files that contain schema elements.
Note that most of this functionality is only accessible while the schema view is selected.
What is the Schema?
Databases typically have a schema. A schema is the collection of provisions that regulate the content of a database more or less rigidly. Since a directory is a kind of specialized database, it has a schema, too. A directory schema is configurable rather than fixed. However, directory servers typically come with a built-in schema that can be extended but which supports either restricted modification or no modification at all.
A directory contains entries. Entries are composed of a "Distinguished Name" (DN) and a number of attributes. An entry is uniquely identified by its DN. DNs are composed of relative DNs (RDNs). RDNs must be derived from attributes. Entries must have a special recurring attribute that stores object classes. Object classes typically define the attributes that an object must have and may have. However, some directory servers allow you to switch off the "schema check" function. In this case, the object class is not much more than another possible search filter (read more about this in the "Using LDAP" topics).
A directory schema, then, basically consists of:
-
The supply of available attributes
-
The supply of available object classes
Attributes
Attributes have or may have
-
A name
A list of short names (meaningful names, if possible) of the attribute. In this application, name is split up into "Name" (the first one) and "Aliases" (any remaining ones). -
A description
A short descriptive string. -
An object identifier
A numeric object identifier ("OID").
An object identifier is a dot-separated sequence of numbers that should uniquely identify the attribute. Numerous attributes have already been assigned a registered object identifier (for details, refer to the DirX Directory Administration Reference). Registration authorities own particular disjoint sets of object identifiers. -
Optional: a superior
Superiors allow for a kind of grouping of attributes. For example, if the attributes "commonName" and "surname" both have the same superior "name", requesting "name" to be returned in a search implicitly includes commonName and surname to be returned as well. Searching for "name contains Smith" matches all entries with "commonName contains Smith" or "surname contains Smith" as well.
Note that the subtypes share the syntax and matching rules of their supertype (=superior). -
A [.indexref]##Syntax
Examples of possible syntaxes are: Boolean, Country String, Certificate, DN, Directory String, Generalized Time, IA5, Integer, JPEG, Numeric String, Postal Address, Telephone Number. -
Optional: Single-value
By default, attributes are multi-valued (also referred to as "recurring"). -
Optional: Collective
Indicates that the attribute type is collective. Collective attributes provide a means by which many entries can share a single attribute that is administered in a single place. Collective attributes are not necessarily supported by the server. -
Optional: No user modification
Indicates that the attribute is not user modifiable. -
Optional: Obsolete
Indicates that the attribute type is not active; that is, you can no longer assign it when creating new entries or modifying existing ones. -
Optional: [.indexref]##Matching rules
What is returned as search result depends upon the conditions under which the software considers a value presented by a user to correctly match a value stored in the directory. This is where matching rules come into play. Matching rules must be compatible with the corresponding attribute syntax. A matching rule specifies how attribute values are to be matched for equality, for ordering, and for substring comparison. Note that attributes that do not have a matching rule assigned to them cannot be used in search filters. -
Optional: Usage
Indicates the application of the attribute type: -
userApplication means it is a user attribute
-
directoryOperation means it is a directory operational attribute
-
distributedOperation means it is a DSA-shared usage operational attribute
-
dSAOperation means it is a DSA-specific operational attribute
Object Classes
Object classes have or may have
-
A name
A short name (which is meaningful, if possible) of the object class. -
A description
A short descriptive string. -
An object identifier
A numeric object identifier ("OID").
An object identifier is a dot-separated sequence of numbers that should uniquely identify the object class. Numerous object classes have already been assigned a registered object identifier (for details refer to the DirX Directory Administration Reference). Registration authorities own particular disjoint sets of object identifiers. -
Optional: a superior
Object classes inherit the mandatory and optional attributes from their superiors. -
Kind
There are three possible kinds of object classes: -
Abstract
Abstract object classes are used only to derive other object classes. Top is an abstract object class from which every structural object class is directly or indirectly derived (auxiliary object classes are usually derived from Top, too, but this is not mandatory). In many real world schemata, it is the only abstract object class you will encounter. -
Structural
Each entry must have at least one structural object class. If an object class happens to be derived from another object class, the affected entry has both object classes and inherits all attribute types from the parent object class. However, not counting "parent classes", each entry has one and only one structural object class. -
Auxiliary
In addition to structural object classes, entries may have one or more auxiliary object classes. As opposed to structural object classes, auxiliary object classes can be added to and removed from an entry at any time. Auxiliary attributes are associated with a (possibly empty) set of attribute types. Auxiliary classes provide a convenient means to add attribute types (the ones that are associated with that auxiliary object class) dynamically to entries that are already defined by a structural object class. So, auxiliary object classes allow you to dynamically extend the permissible attribute set of entries beyond the one defined by their structural object classes. If the set of associated attribute types is empty, the auxiliary object class is an object class that at the same time is sort of an ordinary attribute. It may however serve as a filter for access control definitions in case the access control provided by the server follows the X.500 specification -
Optional: Obsolete
Indicates that the object class is not active; that is, you can no longer assign it when creating new entries or modifying existing ones. -
Mandatory Attributes
A list of all attributes any entry with the object class must have. -
Optional: Optional Attributes
A list of all attributes an entry with the object class may have.
Core Functionality
The core functionality allows to you manage schema elements. Particularly, you can:
-
View, modify, add and delete attribute types
Note that the server may refuse the operation -
Add: Right-click "Attributes" in the tree or list pane "New attribute" (or choose from the main menu).
-
Delete: The delete function just causes the attribute to be marked "obsolete".
-
Undelete: Causes to undo a previous delete, i.e. the attribute is no longer marked "obsolete".
-
View/Modify:
-
Double-click the attribute in question in the tree or list pane or
-
Right-click it in a field within a property pane or property dialog and select "Properties"
-
View, modify, add and delete object classes
Note that the server may refuse the operation -
Add: Right-click "Object classes" in the tree or list pane "New object class" (or choose from the main menu).
-
Delete: Apply the Delete function (right mouse button) to the object class in question in order to mark that attribute obsolete. Deleting means this object class can no longer be assigned but remains visible in existing entries that already have it. Object classes marked obsolete are displayed grayed out and cannot be modified unless the Undelete function (right mouse key) has been applied.
-
View/Modify
-
Double-click the object classes in question in the tree or list pane or
-
Right-click it in a field within a property pane or property dialog and select "Properties"
Additionally, the application provides some convenience functionality:
-
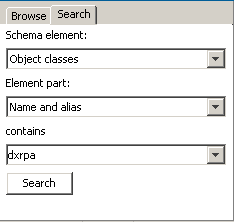
Search
A search tab offers diverse ways to find all object classes and/or attributes matching a given search filter.*
Note that the preferable way to find out to what object classes a particular attribute is assigned is by clicking the attribute in question in the list pane and finding the object classes listed in the corresponding property pane (or property dialog).* -
Associated object classes
The property dialogs/panes of attributes offer a tab ("Associated object classes") that displays the object classes to which the actual attribute is currently assigned. -
Column headers
As in many lists throughout this application, right-clicking a column header allows you to choose what properties you can see in a list of attributes and/or object classes and sort them according to your needs.
The schema management plug-in typically presents the schema in a combination of a tree pane, a list pane and a property pane.
Here is an example of the tree pane:
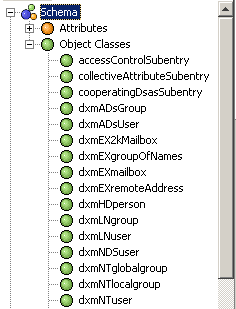
Notes:
-
As opposed to the list pane, when you expand attributes or object classes, the tree pane displays the hierarchy that is defined by the "superior" attribute.
-
Obsolete attributes/object classes are displayed grayed out and italic.
Here is an example of the search pane:
Here is an example of the list pane:
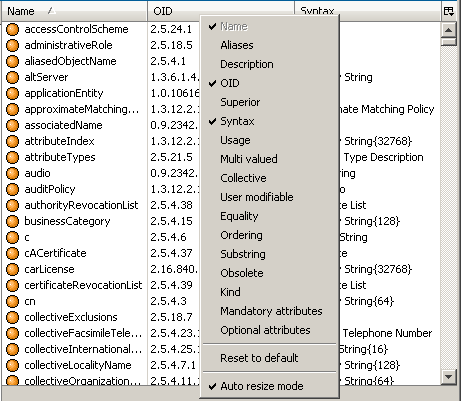
The list pane does not show any hierarchies. The list pane displayed when you click "Attributes" or "Object Classes" comprises all attributes resp. all object classes, while the list displayed when you click lower-level nodes in the tree only displays the respective entries.
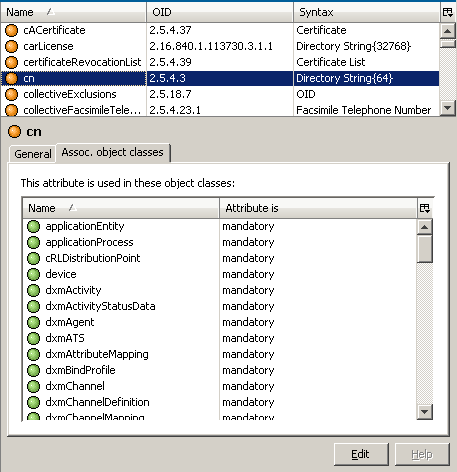
Here is an example of the property dialog that displays the associated object classes of the attribute "cn":
Refer to the topics Managing Attribute Types or Managing Object Classes for more information about the property pane/property dialog.
Managing Attribute Types Overview
This functional area allows you to manage the attribute types that are to be known by the server.
In addition to the ordinary functionality of managing the attribute types, you can directly view, in which object classes a currently selected attribute is used.
Managing Attribute Types
When managing a schema that is stored in a file system file rather than in a directory server, pay regard to the respective note on the property panels provided within the function "Open LDIF Schema File".
To create a new attribute type, right-click "Attributes" or an entry representing an attribute in a tree or list pane and select "New Attribute". A dialog like the one shown in the following figure is displayed:
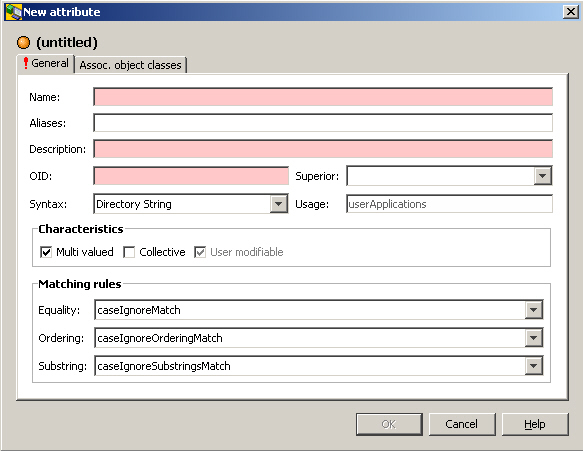
Notes (also see the topic What is the schema? -> Attributes):
-
Attribute names must not contain blanks nor must they contain special characters like umlauts. They must begin with a letter.
-
Name/Aliases
If an LDAP server returns more than one name, the first one is displayed in the "Name" field, the other ones are displayed in the "Aliases" field (blank, comma or semicolon separated). As a result, you must separate any names you specify in the aliases field.
Note that although the name is optional according to LDAP, this application treats it as mandatory. -
Description
Note that although the description is optional according to LDAP, this application treats it as mandatory -
OID (Object Identifier; mandatory)
The OID should comply with a registration authority. Even if it does not, you may still be required to conform with certain rules imposed by the server. -
Superior
If you select a superior, you can no longer select a syntax, since the syntax is now inherited from the superior. -
Syntax
Note that although the syntax is optional according to LDAP, this application treats it as mandatory. The available choice of syntaxes varies depending on the server. -
Usage
You can only create attributes with "usage" is "userApplications". Other usages are subject to server-specific attributes only. -
Multivalued
Specifies that the attribute can get multiple values. -
Collective
Specifies that the attribute is a collective attribute valid for a number of entries. -
User modifiable
An attribute marked as "user modifiable" states that users can (within the bounds of their access rights) add/delete/modify values of that attribute. Server specific attributes like createTimestamp are typically not user modifiable. Attributes created by this application are implicitly marked user modifiable. This application does not support changing this attribute characteristic. -
Obsolete
Setting this flag usually means the attribute can no longer be assigned but remains visible in existing entries that already have the attribute assigned. Setting this flag is only possible when modifying an attribute; you cannot set it when creating one.
To make an attribute obsolete, apply the Delete function (right mouse button) to it.
Attributes marked obsolete are displayed grayed out and cannot be modified unless the Undelete function (right mouse key) has been applied. -
Matching rules
Specifies the matching rules for the attribute type.
To view or modify an attribute type, right-click or double-click the attribute in a tree or list pane. A dialog like the one shown here is displayed (if a property pane has been configured, too, it looks almost the same):
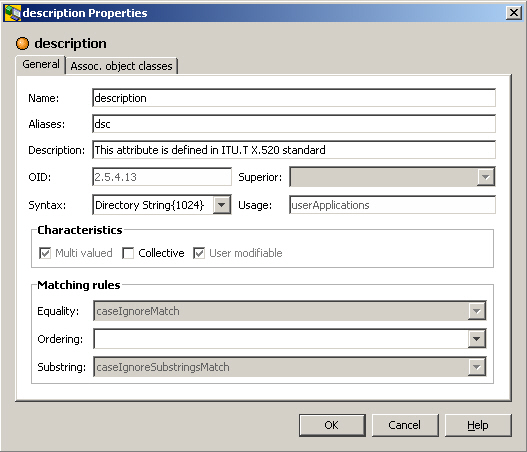
Attributes whose usage is dSAOperation cannot be modified at all.
As for existing attributes whose usage is other than dSAOperation, you can only modify:
-
Name/Aliases
-
Description
-
Multivalued
Note that you cannot clear the check button, only check it off. Once an attribute is marked multivalued, it cannot be changed to single-valued. -
Collective
-
Matching rules
Note that you can only provide a yet missing equality matching rule or - provided an equality matching rule is specified - a yet missing ordering and/or substring matching rule.
Click the tab "Assoc. object classes" to see quickly the object classes to which the attribute is assigned.
By right-clicking an attribute in a tree or list panel you can "delete" it, which means that it will be marked "obsolete".
Object Classes that Use a Particular Attribute
To determine the object classes to which a particular attribute is assigned, click the attribute in the list pane. The object classes that have the attribute assigned to them are listed in the corresponding property pane (or property dialog).
Here is an example that shows all object classes that have the attribute cn assigned.
Managing Object Classes
When managing a schema that is stored in a file system file rather than in a directory server, pay regard to the respective note on the property panels provided within the function "Open LDIF Schema File".
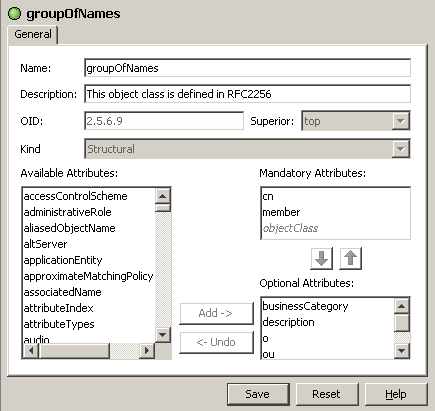
To create a new object class, right-click "Object Classes" or an entry representing an object class in a tree pane and select "New Object Class". A dialog like the one shown here is displayed:
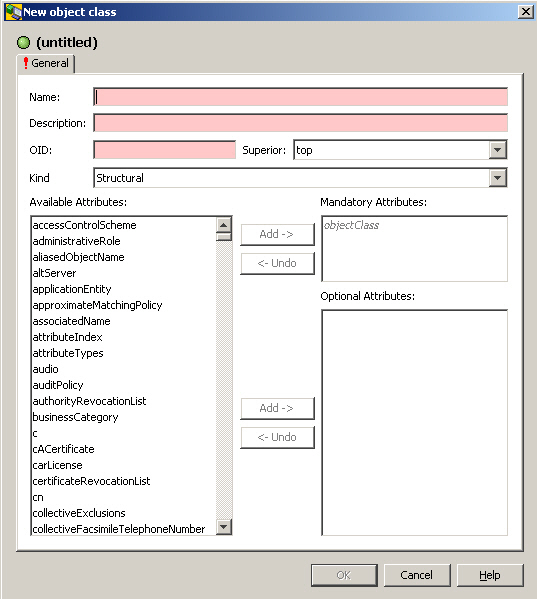
Notes (see also What is the Schema? → Object Classes):
-
Object class names must not contain blanks nor must they contain special characters like umlauts. They must begin with a letter.
-
Name
Note that although the name is optional according to LDAP, this application treats it as mandatory. -
Description
Note that although the description is optional according to LDAP, this application treats it as mandatory. -
Superior
If you select a superior, that superiors’s attributes are inherited. Inherited attributes are displayed grayed out and italic. Attributes that at the same time are inherited and directly assigned are displayed in the normal color and font. -
OID (Object Identifier; mandatory)
The OID should comply with a registration authority. Even if it does not, you may still be required to conform with certain rules imposed by the server.
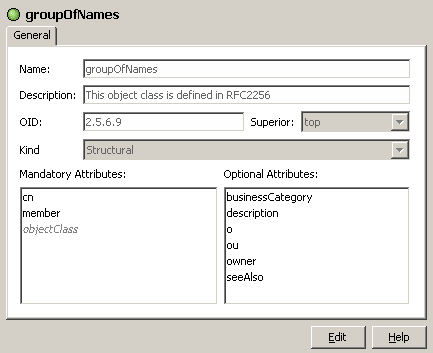
To view or modify an object class, right-click or double-click the attribute in a list or tree pane. A dialog like the one shown here is displayed:
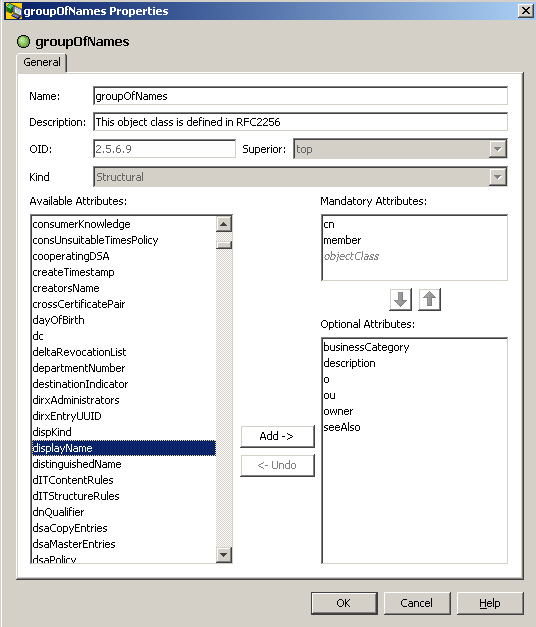
Once you have created an object class, you can only change
-
Name
-
Description
-
Attributes from mandatory to optional. Not possible for derived attributes and for attribute "object class".*
Note that moving an optional attribute to mandatory is not possible. Particularly, if you have moved an attribute from mandatory to optional, you can only undo this as long you haven’t saved your modification.* -
Optional attributes (may be extended, i.e. must contain all existing attributes and may contain new values)
You can undo an attribute assignment, so long as you haven’t confirmed the assignment by clicking OK.
By right-clicking an object class in a tree or list panel you can "delete" it, which means that it will be marked "obsolete".
If a property pane is configured, panes like the ones shown in here are displayed:
Property pane (read mode):
Property pane (edit mode):
Complementary Functionality
Beyond managing the schema in narrower sense, you can
-
Export a schema
-
Import a schema
-
Compare schemata
-
Open a file containing a schema in LDIF format
Exporting a Schema
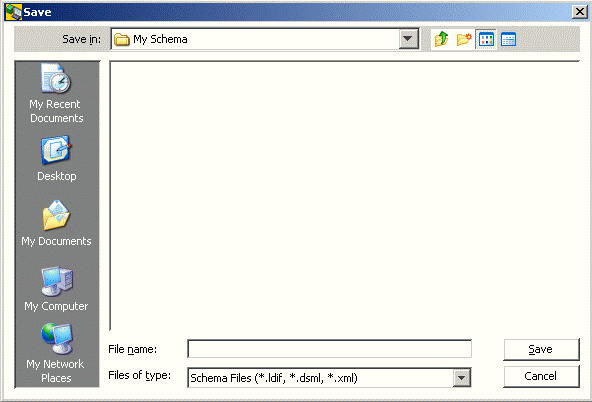
When you export the schema, a dialog like this one appears:
Notes:
-
If you click Save and nothing happens, check whether you forgot to specify a file name.
-
You can export parts of the schema by selecting one or more attributes or object classes and right-clicking them.
Importing a Schema
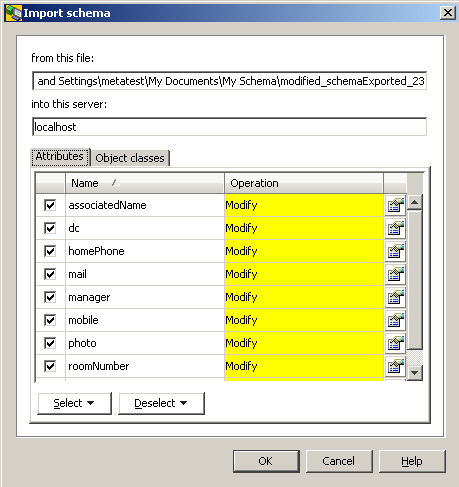
When you import a schema contained in an LDIF schema, a regular file selection dialog appears, followed by a dialog that indicates the operations that are to be applied to the server’s schema object on a per attribute/object class basis in order to import the schema from the LDIF file into the server. Note that most directory servers impose fairly rigid restrictions on schema imports, particularly on schema modifications.
The LDIF file that contains the schema to be imported can be an LDIF content file or an LDIF change file. When operating on an LDIF change file:
-
Delete operations are ignored.
-
Modify operations use only the "add" element from the file, while the current value in the server takes the place of the "delete" element in the file.
-
Add operations are implicitly turned into modify operations for attributes that are already present in the server’s schema.
When operating on an LDIF content file, "add" and/or "modify" operations are created and executed based on a comparison between the schema currently in place at the server and the schema in the LDIF file.
In the dialog that indicates the operations to be applied to the server’s schema, you can:
-
Uncheck attributes and/or object classes you do not want to import
-
Click the details button adjacent to the "Operation" column to examine the details of the corresponding attribute or object class
Comparing two Schemata
This functional area allows you to compare two schemata from various sources.
You also can save all or some of the differences - if you want after editing some schema information - into an LDIF file.
Comparing two Schemata
The "Compare schema" function allows you to compare two given schemata. Here is an example of the "Compare schema" dialog:
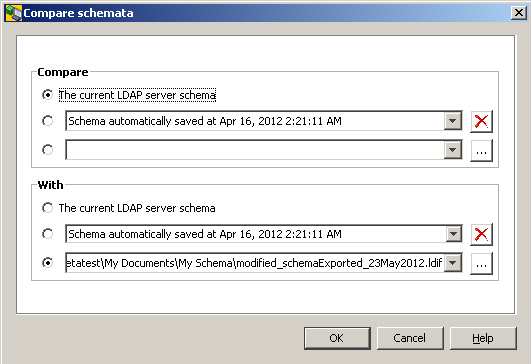
Notes
-
Schemata that are available in files can only be compared, if the format is LDIF content.
-
As kind of side effect, the dialog allows you to automatically delete exported schemata by clicking the
 button.
Click OK to run the schema comparison. The application displays a dialog that indicates the schema differences:
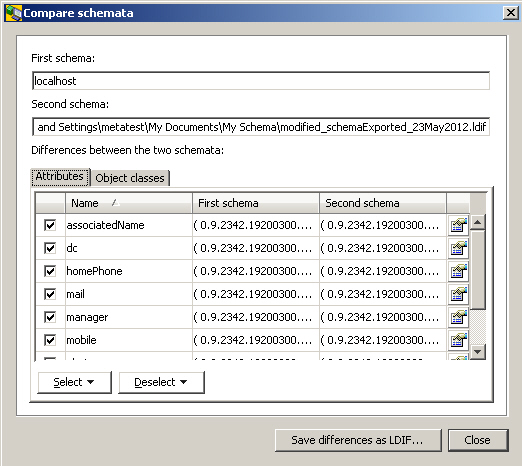
You can use this dialog to save the differences into an LDIF file. Before saving the differences, you can:
-
Uncheck any attributes and/or object classes that you do not want to save (or use the Select and De-select buttons)
-
Edit values by clicking the Details button
Saving Schema Differences
Here is an example of the dialog that allows you to save the differences between two schemata:
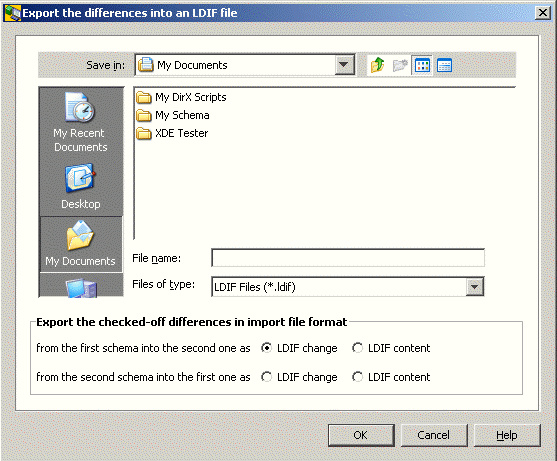
There are several ways you can save the differences:
-
You can generate an import file from the first schema into the second one as an LDIF change file. In this case:
-
If an item (attribute or object class) is present in the first schema and missing in the second one, an "add" operation is generated.
-
If an item (attribute or object class) is present in the second schema and missing in the first one, the item is omitted.
-
If an item (attribute or object class) is present in the first schema and (with differences) also present in the second one, a "modify" operation is generated.
-
You can generate an import file from the second schema into the first one as an LDIF change file. In this case:
-
If an item (attribute or object class) is present in the first schema and missing in the second one, the item is omitted.
-
If an item (attribute or object class) is present in the second schema and missing in the first one, an "add" operation is generated.
-
If an item (attribute or object class) is present in the first schema and (with differences) also present in the second one, a "modify" operation is generated.
-
You can generate an import file from the first schema into the second one as an LDIF content file. In this case:
-
If an item (attribute or object class) is present in the first schema and missing in the second one, the item is saved.
-
If an item (attribute or object class) is present in the second schema and missing in the first one, the item is omitted.
-
If an item (attribute or object class) is present in the first schema and (with differences) also present in the second one, the item is saved.
-
You can generate an import file from the second schema into the first one as an LDIF content file. In this case:
-
If an item (attribute or object class) is present in the first schema and missing in the second one, the item is omitted.
-
If an item (attribute or object class) is present in the second schema and missing in the first one, the item is saved.
-
If an item (attribute or object class) is present in the first schema and (with differences) also present in the second one, the item is saved.
Opening an LDIF Schema File
This function allows you to view and manage schemata stored in an LDIF content file rather than in a server. The interface is the nearly same as the one for managing schema elements, but the LDIF schema is displayed in an own window and can be edited almost unlimitedly, while the editing capabilities of the server schema are rather limited by server-side constraints.
Note that the "Save" button found in the property panels - while typically saving changes in the directory server - saves your changes only tentatively in main memory. To persistently store them on disk, subsequently click "Save in (different) file" (or "Close" and confirm the question that is popping up).