Core Component
This application’s functionality is primarily furnished by one or more plug-ins that are based on a core component.
The core component is composed of two subcomponents:
-
A component called LDAP that provides a Java GUI for plain LDAP functionality.
-
A component called Framework that provides a framework for a customizable and extensible Java GUI. Its main focus is on managing hierarchically-structured nodes, particularly LDAP nodes.
"Extensible" refers to the plug-ins. Although plug-ins are in no way restricted to this feature, they typically deal with advanced LDAP functionality like schema management or with functionality for rather sophisticated data models that are based on LDAP (like privilege-based access management or synchronization workflows).
Refer to the About dialog in the Help menu to see what plug-ins you have installed.
This chapter provides information about the core component, including:
-
Information about LDAP in general.
Note that this section is not intended to supersede the comprehensive literature that is available on this topic. -
The basic patterns the core component makes available to the plug-ins and uses itself for the LDAP functionality it provides.
-
Some hints on possible pitfalls.
Using LDAP
(a brief introduction)
LDAP specifies a "directory access protocol". A directory accessible through LDAP stores information about users (for example, their names, their email addresses, their phone numbers, the department they belong to, and so on) and groups of users in many cases, but can also be used to store any other kind of information you can think of. There are two main reasons that explain why you frequently encounter LDAP directories in the Internet and extranet environments:
-
LDAP means that the information in the directory can be accessed and managed through a standardized method specified in a series of internet standards, e.g. http://www.ietf.org/rfc/rfc2251.txt.
-
LDAP directories are optimized for fast read access by numerous concurrent applications in large distributed environments.
LDAP stands for Lightweight Directory Access Protocol. As the name suggests, the original intention was to provide a simplified Directory Access Protocol (DAP). DAP is the subject of another series of international standards (known as X.500 (http://www.itu.int/ITU-T), which is also - with rather insignificant deviations - available as an ISO standard (http://www.iso.org; ISO/IEC 9594). Over the course of time, however, LDAP has evolved from a simple protocol to one that favors more X.500-like capabilities.
An LDAP directory contains entries. An entry is uniquely identified by its "Distinguished Name" (DN). DNs are structured hierarchically. Here are some examples of DNs:
-
c=BY (c normally stands for country, BY is a country name complying with ISO 3166 (http://www.iso.org))
-
o=composers, c=BY (o normally stands for organization)
-
cn=Igor Stravinsky, o=composers, c=BY (cn normally stands for common name)
-
cn=Marc Chagall, ou=modern painters, o=painters, c=BY (ou normally stands for organizational unit))
-
cn=Distribution List Sales, l=Thessaloniki (l normally stands for locality)
-
cn=Fedor Dostoevsky+fathersname=Mikhailovich, o=writers, c=BY
-
cn=Alexander Green, o=writers, c=BY
Here is a sample showing how as this application might present those entries in its so-called tree pane:
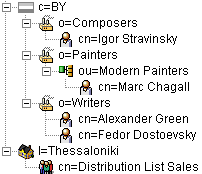
Entries are composed of a DN and a number of attributes. For example, an entry with DN
cn=Alexander Green, o=writers, c=BY might have the attributes:
-
objectclass:
-
top
-
person
-
organizationalPerson
-
inetOrgPerson
-
commonName:
-
Alexander Green
-
Aliaksander Gryneusky
-
sn: Green
-
givenName: Alexander
-
telephoneNumber: +375 99 99999-99
DNs are composed of relative DNs (RDNs). For example, cn=Alexander Green, o=writers, c=BY is composed of three RDNs. RDNs must be derived from attributes. It is possible to compose an RDN of multiple attributes joined by “+” as in cn=Fedor Dostoevsky+fathersname=Mikhailovich,o=writers,c=BY. RDNs like this are called multiple naming attributes (or multiple attribute value assertion).
Since RDNs must be derived from attributes, the last RDN (Alexander Green in the previous example) is always available as an attribute of a given entry, too. As opposed to the last RDN however, the underlying attribute may be recurring. In the example used here, it has two values: "Alexander Green" and "Aliaksandr Gryneusky". One of them must be identical to the last RDN. "Alias" entries represent an exception to this rule: An Alias has only the two attributes objectClass and aliasedObjectName, but can use for its DN almost any sort of attribute but attributes with DN syntax.
The hierarchy starts from "Root" (commonly marked "/"). If you consult the previous examples, one level below "/", you will find "BY" and "Thessaloniki", one level below "BY" there is "composers", "painters" and "writers" and so on.
LDAP servers have at least one root node (also called a suffix or a context prefix), often unequal to "/" (o=painters, c=BY for example). LDAP servers only store their naming context; that is, their own root node and the entries that are subordinate to their root node. LDAP servers may be able to be configured to contact other servers automatically (chaining) or to return referrals that point to other servers when they are handling requests outside the scope of their suffix. This application can be configured to follow referrals (to some extent) or ignore them.
Attributes may be recurring, also called multi-valued (like object class and cn in the previous example) or single-valued. Attributes have an attribute syntax. Here are some examples: Boolean, Country String, Certificate, DN, Directory String, Generalized Time, IA5, Integer, Jpeg, Numeric String, Postal Address, Telephone Number - and there are many more.
Attributes can be classified into
-
User Attributes
User attributes are all attributes except for operational attributes. -
Operational Attributes
Operational attributes are predefined attributes that are used for administrative purposes. For example, creatorsName is an operational attribute that stores the DN of the user who added the entry. -
Collective Attributes
Collective attributes are attributes that are common to multiple entries. These attributes are stored only once.
As specified by LDAP, entries must have a special recurring attribute that stores object classes (see the previous example). Object classes typically define the attributes that an object must have and may have. However, some LDAP servers allow you to switch off the "schema check" function. In this case, the object class is not much more than another possible search filter. Some LDAP servers do not use the object class recurring attribute at all.
There are several types of object classes:
-
Abstract Object Classes
Abstract object classes are used only to derive other object classes. Top is an abstract object class from which every structural object class is directly or indirectly derived (auxiliary object classes are usually derived from Top, too, but this is not mandatory). In many real world schemata, it is the only abstract object class you will encounter. -
Structural Object Classes
Each entry must have at least one structural object class. If an object class happens to be derived from of another object class, the affected entry has both object classes and inherits all attribute types from the parent object class. However, not counting "parent classes", each entry has one and only one structural object class. -
Auxiliary Object Classes
In addition to structural object classes, entries may have one or more auxiliary object classes. As opposed to structural object classes, auxiliary object classes can be added to and removed from an entry at any time. Auxiliary attributes are associated with a (possibly empty) set of attribute types. Auxiliary classes provide a convenient means to add attribute types (the ones that are associated with that auxiliary object class) dynamically to entries that are already defined by a structural object class. So, auxiliary object classes allow you to dynamically extend the permissible attribute set of entries beyond the one defined by their structural object classes. If the set of associated attribute types is empty, the auxiliary object class is an object class that at the same time is sort of an ordinary attribute. It may however serve as a filter for access control definitions in case the access control provided by the server follows the X.500 specification.
In the previous example, you can find the object classes top, person, organizationalPerson (usually derived from person), inetOrgPerson (usually either derived from organizationalPerson or an auxiliary object class).
LDAP provides several ways of searching:
-
Subtree search (an "all level" search)
Searches within the whole subtree rooted at the current entry.
If you refer to the previous example, a subtree search below c=BY with the search filter cn contains chag returns the entry cn=Marc Chagall, ou=modern painters, o=painters, c=BY as the search result. -
One level search
Searches among the "children" of the current entry (disregarding "grand children" and their "descendants"). If you refer to the previous example, a one-level search below c=BY with the search filter cn contains chag returns "successful" with the search result being empty. -
Base object search (a "zero level" search)
A base object search is not really a search. It can be used to read the current entry or to check for its existence.
Searches, particularly subtree searches, allow you to pass a more or less complex search filter in order to restrict the number of entries returned by the server. You may also pass a size limit and/or a time limit to save the server’s resources and to avoid slow reaction times and too many entries in the search result. Note, however, that LDAP servers usually use their own limits; LDAP clients cannot exceed these limits.
What is returned as search result depends upon the conditions under which the software considers a value presented by a user to correctly match a value stored in the directory. This is where matching rules come into play. Matching rules are assigned to attribute types and must be compatible with the corresponding attribute syntax. A matching rule specifies how attribute values are to be matched for equality, ordering, or substring comparison. You cannot use attributes with no matching rule assigned (like fax in the examples to follow) in search filters.
Here are some examples of matching rules:
| Attribute | Matches for | |||
|---|---|---|---|---|
Type |
Syntax |
Equality |
Substring |
Ordering |
department |
DirectoryString |
Case-Ignore-Match |
Case-Ignore-Substring-Match |
— |
createTimeStamp |
GeneralizedTime |
Generalized-Time-Match |
— |
Generalized-Time-Ordering-Match |
jpegPhoto |
OctetString |
Octet-String-Match |
— |
— |
headCount |
Integer |
Integer-Match |
— |
Integer-Ordering-Match |
userCertificate |
Certificate |
Certificate-Exact-Match |
— |
— |
facsimileTelephoneNumber |
facsimileTelephoneNumber |
— |
— |
— |
There are many more possible matching rules.
What is returned in a search result also depends on the attributes that are requested to be returned:
-
Requesting All attributes means all user attributes of all entries matching the search filter are requested to be returned
-
Requesting All operational attributes means all operational attributes are requested to be returned. Note that this option is not necessarily recognized by all LDAP servers
-
It is also possible to request exactly those attributes that are listed in a list of requested attributes passed with the search request. This is normally the most resource-saving way, since it avoids transferring unneeded data
Moreover, missing access rights (see below) may cause a search result to be incomplete.
At last, what is returned in a search result depends on the data that can be accessed: As mentioned above, a server does not necessarily store all the data itself. If not, in order to still be able to return complete search results, it relies on configuration provisions such as "Chaining" (i.e. the server "chains" to other servers, to get additional information) or "Referrals" (i.e. the server does not provide the complete search result itself, but leaves it to the client to complete it by providing referrals to it; the client may or may not "follow referrals").
Because this application is written in Java, the characters of string attributes assumed by this application are based on Unicode (http://www.unicode.org; Java specifies the character encoding form "UTF-16", which is one of a number of possible Unicode encoding forms); Unicode includes Latin, Cyrillic, Middle East, Far East characters and much more. Note however that some - not necessarily significant - issues still remain open:
-
Your computer may be missing the installation of respective fonts and therefore be unable to render the corresponding characters. E.g. to have characters like these
 displayed on an operating system installed for English usually requires some additional provisions.
 -
Unicode is still evolving and - since new characters are continuously being invented - may never stop evolving. The Unicode support of the Java version you are using may be more or less behind the latest version of Unicode, e.g.
Java 1,4 supports Unicode 3.0
Java 1.5 supports Unicode 4.0 -
In LDAP, Unicode support has been "officially" introduced with LDAP protocol version 3, i.e. running LDAP protocol version 2 might cause problems with certain characters. Again, the Unicode version the LDAP server supports is not necessarily the latest one. As opposed to Java, LDAP specifies the character encoding form "UTF-8", which is automatically converted to UTF-16 and back without loss.
Other - occasionally used - search options include:
-
"Types only"
You can have the search return only attribute types rather than types and values (which is the default). -
Dereference Aliases
Indicates how alias objects are to be handled in searching. The semantics of the possible values of this field are: -
neverDerefAliases (default)
Do not dereference aliases. -
derefInSearching
Dereference aliases in the search result. -
derefFindingBaseObj
The search base is de-referenced if it happens to be an alias. -
derefAlways
Dereference aliases both in the search result and in the search base.
Other requests specified in LDAP include:
-
Add entry
-
Modify entry
-
Rename entry
-
Delete entry
LDAP controls provide a mechanism for extending an LDAP operation. A control is a way to specify additional information as part of an LDAP request and an LDAP response.
A control specifies the following information:
-
A unique object identifier (OID), as defined by the creator of this control
The OID identifies the control. If you plan to use a control, you need to make sure that the server supports the control. Servers usually list all or some of the controls they support in the supportedControl attribute in the root DSE. You can acquire the root DSE by doing a search where the scope is "Base", the base DN is "" (empty string) and the search filter is (objectclass=*). Alternatively, you can have tools like DirX Directory Manager display the root DSE including its supportedControl attribute. -
An indication of whether or not the control is critical to the operation
-
Optional data related to the control (for example, for the server-side sorting control, the attribute to be used for sorting search results)
If an LDAP request contains a control, the server may respond in one of the following ways:
-
If the server supports this control and if the control is appropriate to the operation, the server should make use of the control when performing the operation
-
If the server does not support the control type or if the control is not appropriate, the server is supposed to do one of the following:
-
If the control is marked as critical to the operation, the server should not perform the operation and should instead return the result code "Unavailable critical extension".
-
If the control is marked as not critical to the operation, the server should ignore the control and should perform the operation.
Servers can react to some sorts of controls by sending controls back to clients. Example: "Server Side Sorting" is provoked thru the "Server Side Sorting Request Control", which specifies details such as the attribute type to use for sorting. The server is to send back a "Server Side Sorting Response Control", which tells whether the result is sorted or not - and if not why not.
This application inspects the LDAP Root subentry to find out what controls the server supports and implicitly makes use of all or some of the available controls. Details are available in the section "LDAP Root Subentry" (provided the DirX Directory Manager plug-in is installed).
The LDAP server may refuse to handle a request because of missing access rights. Access rights depend on the user’s authentication. A user authenticates himself through a bind (called login in this application). The default bind "Anonymous" is implied. The LDAP server usually configures an anonymous bind to permit read access for anyone to a well-defined subset of the data stored in the server’s database. More comprehensive access rights typically require a DN and a password to be passed (basic authentication). Particularly for access from the Internet or an extranet, it might be a good idea to use secure authentication by combining basic authentication with SSL (secure socket layer) or its designated successor TLS (transport layer security). Note that the LDAP server does not necessarily reveal the fact that it did not handle a particular request due to missing access rights. Instead, it might return an error code like "not found", for instance.
The hierarchical structure of the DN suggests that you consider the directory to be a tree. Also, the tree-like collection of all DNs that comprise a particular, possibly distributed directory is called the Directory Information Tree (DIT). This is justified to some extent; however, alias entries allow the tree structure to be circumvented.
Available LDAP Functions
Unless disabled, the core component typically makes its LDAP functionality available in one or more view groups which you can access through:
-
The menu
-
The toolbar
-
The right mouse button
These functions include:
-
Browsing the LDAP directory tree
-
Creating new LDAP directory entries
-
Deleting LDAP directory entries
-
Exporting/Importing LDAP directory entries
-
Displaying administrative information on the server (the so-called LDAP root DSE, where "DSE" stands for directory-specific entry)
-
Logging in/out to/from an LDAP directory
-
Moving LDAP directory entries to a different parent
-
Copying LDAP directory entries
-
Showing and modifying properties of LDAP directory entries
Note that some rather uncommon properties (like MHS OR address) are not or not fully supported. -
Changing passwords (your own password as well as somebody else’s password)
-
Renaming LDAP directory entries
-
Searching the LDAP directory by specifying simple or complex search conditions
(see the Search pane and search dialog topics) -
Abandoning an in-process, but uncompleted search operation.
In order to be able to access an LDAP directory, you must provide some information like the address and port number (default: 389) of the LDAP directory server. This information may already be pre-configured, but you may also be able to edit this information by right-clicking on the top node of a tree and selecting "Server" (alternatively, you may find this functionality in the tool bar/menu bar).
Additional administrative functionality (e.g. schema management) may be available in addition to the functionality the core component provides, depending on what plug-ins are installed.
The core component’s LDAP access functionality can be generic or customized.
-
Generic LDAP access means that the core component has no built-in knowledge about the LDAP directories to be accessed. If the core component is unable to retrieve the schema from an LDAP server, the functionality that is based on the knowledge of schema information - like objects classes and attributes - is unavailable unless the missing information is supplied in the application’s configuration files. In particular, searching may become unusable.
-
Customized LDAP access means that the core component has pre-configured information about the objects and attributes of one or more LDAP directories to be accessed.
LDAP directories are organized in a tree-like manner. This organization may or may not be visible in a particular view.
SSL/TLS
For in-depth information on this topic please refer to https://docs.oracle.com/javase/8/docs/technotes/guides/security/ (search for appropriate key words, e.g. "keytool").
SSL stands for Secure Socket Layer. It is a common technique to have TCP/IP network communication encrypted based on "trusted" certificates. TLS stands for Transport Layer Security; it is a not overly significant, evolutionary advancement over SSL and has de facto replaced SSL. What is used in a particular connection (TLS or SSL) is the result of a negotiation between client and server. Possibly more important, the key length is negotiated, too.
There are two security stages:
-
Stage 1 ("certificate-based server authentication"): if you want to make sure the server you are talking to is actually the one you think it is. This application supports Stage 1.
Stage 1 implies encryption -
Stage 2 ("certificate-based client authentication"): if the server asks you to authenticate yourself through a certificate.
In order to get SSL/TLS working, you must
-
Ensure the server supports it and is configured appropriately
-
Ensure that a suitable certificate is available in your local "keystore". By "suitable", we mean that the certificate transmitted by the LDAP server must be trusted by at least one of the certificates stored in the keystore that is assigned in the function "Options" (menu "Tool"). Note that
-
This application ships with a keystore file called cacerts that contains a demonstration certificate that is aligned with the demonstration certificate DirX Directory brings along. With this demonstration certificate you are able to run SSL/TLS out-of-the-box in conjunction with DirX Directory by way of trial.
-
The Java Runtime Environment, too, ships with a keystore (also a file called "cacerts") containing a number of root Certificate Authority (CA) certificates in its keystore.
-
You can assign only one keystore for all secure connections within this application, i.e. it is not possible to assign one keystore for server A and another one for server B. Choosing a different keystore requires this application to be exited and started again to get the new keystore effective.
-
The function "Options" allows for managing keystores. Alternatively, you can use the keytool command that ships with the Java Runtime Environment. If your certificate is stored in a file called, for example, myCA.der and you want to know it from other certificates stored in the same keystore by the name myName and if your keystore resides in, for example, C:\jre\lib\security\cacerts, you use it like this:*
keytool -import -file myCA.der -keystore C:\jre\lib\security\cacerts -alias myName*
You will be asked for a password. The default password for the keystore shipping with this application is "dirx". The default password for the keystore shipping with Oracle’s JRE is "changeit".
You may find the command keytool -help useful, too.
For more detailed information on the keytool command, please refer to the URL given at the beginning of this topic. -
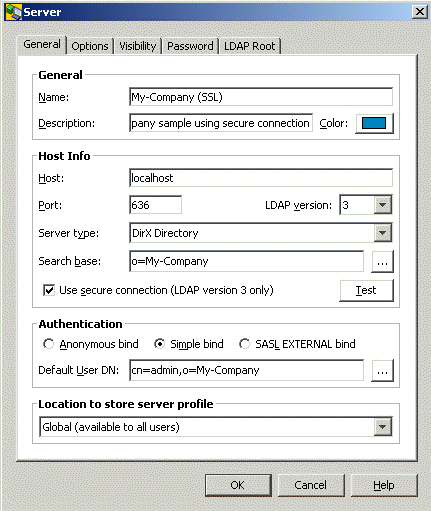
Activate SSL/TLS in this application. Note that the default port for secure connections is 636. To activate SSL/TLS (more exactly, certificate-based server authentication), check
 in the Server dialog as shown in the following example of the server dialog. Note that this checkbox is not available if the Java Runtime Environment you are using does not support SSL/TLS.
Here is an example:
Smart Card Login
From the LDAPv3 protocol view Smart Card Login (SCL) maps onto an LDAP SASL bind with the mechanism type EXTERNAL. This means the security services of the underlying TLS/SSL layer is used to perform the client authentication that is based on strong cryptography.
After a successful bind the DSA determines the Authorization Identity of the user. This is the basis for the Access Control decisions made in all subsequent operations. By default, the Authorization Identity is mapped to the DN specified in the subjectDN from the user’s certificate.
The following sections describe how to set-up Smart Card login with DirX Directory Manager.
Software Requirements
SCL requires that the software product Eviden CardOS API (64-bit) is installed. After a successful default installation of CardOS API the PKCS#11 library named "cardos11_64.dll" is in the folder
-
C:\Windows\System32
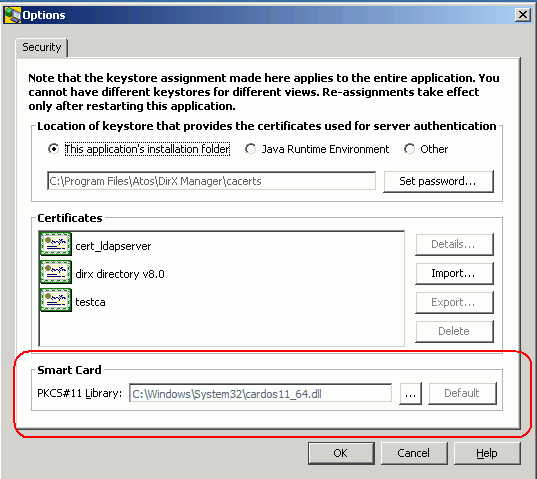
Configuring the PKCS#11 Library for DirX Directory Manager
In order to successfully perform SCL logins the path to the PKCS#11 library cardos11_64.dll must be specified in DirX Directory Manager. In menu Tools -> Options specify the path in the Smart Card frame:
Setting up the LDAP Server and the DSA for Smart Card Login
In order to successfully perform a sasl EXTERNAL bind the LDAP server must meet the following preconditions additionally to those that are required for SSL binds without client authentication:
-
The LDAP server must request from the client to perform client authentication when SSL/TLS is used. This behavior is specified in the LDAP SSL Client Authentication Required attribute.
-
The value of the LDAP SASL Authz Id Mapping (LSAIM, ldapSaslAuthzIdMapping) must specify how the DSA determines the requestor used for all operations following the bind. The default is Use subjectDN from Certificate as the bind initiator.
-
The LDAP server must trust the CA that issued the clients userCertificates; that is the CA certificate must be added to the LDAP Trusted CA Certs (LSTCC, ldapTrustedCACerts) attribute.
-
Depending on the value of the LDAP SASL Authz Id Mapping attribute an INITIAL index must be created for the attribute that the mapping is based on.
-
The SSL-External-DAP bind between the LDAP server and the DSA that the ldap sasl bind is mapped upon must be a local one, that is the LDAP server and DSA must run on the same host. Otherwise the environment variable DIRX_SSL_HOSTS can be used to specify the IP address that the DSA accepts as initiator hosts for LDAP SASL bind with the mechanism type EXTERNAL.
Perform the following steps to prepare the LDAP server and the DSA for Smart Card login:
Configuring the LDAP Server:
-
In the Configuration View, edit the LDAP SSL configuration subentry to specify the values for the attributes:
-
LDAP SSL Client Authentication Required
-
LDAP SASL Authz Id Mapping
-
LDAP Trusted CA Certs
-
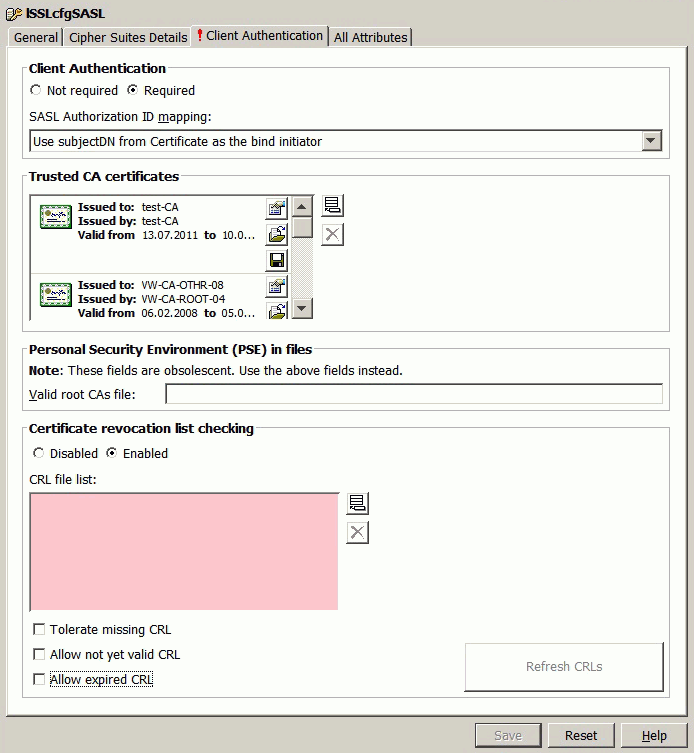
In the Client Authentication tab check Client Authentication Required to set the LDAP SSL Client Authentication Required (LSCAR, requireSSLClientAuth) attribute to TRUE. The LDAP server now requests from the client to perform client authentication when SSL/TLS is used.
-
The value of the LDAP SASL Authz Id Mapping attribute is managed together with the Client Authentication. In our example the DSA uses the subject name of the userCertificate that the client provides in the context of the sasl bind operation. So leave the value Use subjectDN from Certificate as the bind initiator for SASL Authorization ID mapping unchanged.
-
Finally add the CA certificate to the LDAP Trusted CA Certs (LSTCC, ldapTrustedCACerts) attribute that the LDAP server trusts the CA that issued the clients userCertificates. In the Client Authentication tab -> Trusted CA certificates, press
 and import the CA certificates.
 -
Press the Save button to save the changes to the LDAP SSL configuration subentry.
The following figure illustrates the relevant settings of the LDAP SSL Configuration subentry:
Configuring the DSA:
-
Recall from the settings of the LDAP SSL configuration subentry that the LDAP SASL Authz Id Mapping attribute specifies how the DSA determines the DN of the bind requestor from the sasl bind credentials:
-
For the default Use SubjectDN from Certificate of the bind requestor no additional index is necessary.
-
For Use the directory entry that owns the Certificate as bind initiator an initial index for the userCertificate Attribute is required.
-
For Use the directory entry that owns the email attribute of the Certificate Extension altName as bind initiator an initial index for the email Attribute is required.
In our example it is not necessary to create an additional index because the default value is used.
-
If the LDAP server and the DSA are not colocated add the IP address to the environment variable DIRX_SSL_HOSTS. (See "Environment Variables" in the DirX Directory Administration Reference for details.)
Now the DSA and the LDAP server are prepared to accept LDAP SASL binds with the mechanism type EXTERNAL.
Setting up the Client
From the LDAP client perspective SCL is one flavor of SASL EXTERNAL binds. In the General tab of the Server properties -> Authentication check SASL EXTERNAL bind and select Smart Card (PKCS#11) for Client Keystore:
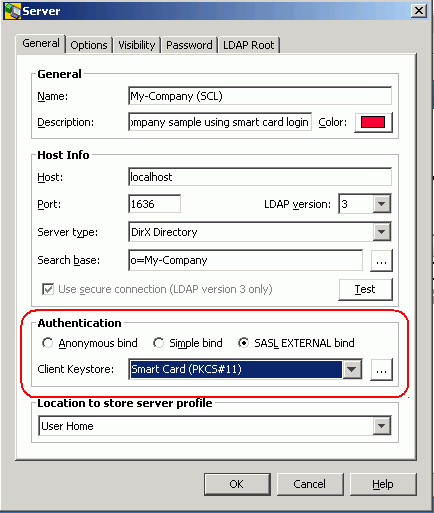
Now DirX Directory Manager and the DirX Directory service are prepared to accept smart card logins.
See the Release Notes for information about supported smart card types.
Basic Patterns/LDAP Functionality
This chapter provides information on the basic patterns supplied by the core component of this application. It also covers the "core" LDAP functionality that forms an integral part of the core component. Note that some advanced LDAP features like schema management or subentry management are not supplied by the core component; they are only available, if the corresponding plug-ins are installed.
It is divided into the sub chapters
-
Main Window
-
Special Mouse Operations
-
Positioning
-
Abandoning an in Process Search
-
View Panes
-
Property Editors
-
Standard Dialogs
Main Window
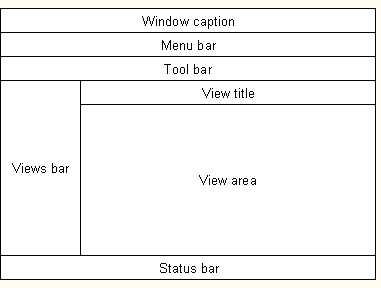
The main window typically contains:
-
The Window caption. The window caption is configurable. By default, it displays the name of the profile and the name this application has been given.
-
The menu bar
-
The tool bar
-
The view title. The view title repeats the name of the view that is currently selected in the views bar
-
The views bar
-
The view area. The view area consists of view panes.
-
The status bar
Menu Bar
The menu is configured in a file called menubar.xml. Plug-ins can modify and extend the menu.
Example:
The core menu typically includes:
-
File
-
Edit
-
View
-
Schema (requires an additional plug-in, as it is shipped by DirX Directory Manager)
-
Tools
-
Help
Note that:
-
Some menu items are available through
-
The right mouse button, too
-
The right mouse button only
-
Drag and Drop is a way to move/copy entries you may find more convenient than the clipboard functions cut/copy/paste.
-
Plug-ins may refine the behavior of certain menu items to their requirements.
-
Menu items may be gray if they are available but do not apply to or are not implemented for the actual context.
-
Certain menus or menu items, although implemented, may be absent because they have been disabled.
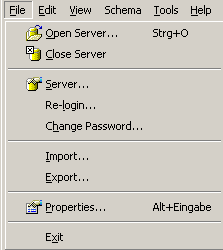
File Menu
Here is an example of the file selection:
-
Open Server/Manage Server Profiles
-
Server
-
Login/Logout/Re-login
-
Change Password
-
Import/Export
-
Properties
-
Exit
Open Server/Manage Server Profiles
These two functions offer nearly the same functionality. For details refer to the description of the "Standard Dialog" Open Server.
Allows you to add, delete, and change server profiles.
There can be several server profiles per server. Server profiles can - depending on configuration data - apply to
-
An entire view group
-
A particular view
-
A particular node in a tree pane
-
A particular search pane
Note that the server profiles you need may come pre-configured with your installation.
For details refer to the description of the "Standard Dialog" Server.
Server
Allows you to enter the data required to connect to an LDAP server, especially the host name and port number of the server to be addressed.
For details refer to the description of the "Standard Dialog" Server.
Login/Logout/Re-login
Allows you to bind/unbind from the LDAP server currently addressed. You are likely to come across one of these alternatives:
Re-login
Disconnects from the LDAP server and does another bind then.
Login/Logout
Another Login assumes a preceding Logout and vice versa.
Logout disconnects from the LDAP server.
For details refer to the description of the "Standard Dialog" Login.
Change Password
Allows you to change the password that belongs to the distinguished name that was used for the currently active login. The topic "Changing Your Own Password" provides details.
Changing or deleting somebody else’s password is possible, too, provided you have the required access rights. See the topic User Password in Basic GUI Functions for details.
See also: Property Tab "All Attributes", Server, Reset Password, User Password
Import/Export
Allows you to export data from the LDAP server that is currently addressed into a file or import data from a file into the LDAP server currently addressed.
Export
Export files can be:
-
LDIF content files (http://www.ietf.org/rfc/rfc2849.txt)
-
DSML v1 files (http://www.oasis-open.org/)
Values only containing ordinary ASCII letters (with minor exceptions) are exported as is, while others get base64 encoded. Exception: In case of DSML v1, DNs are always exported in "native" UTF-8. Base64 (see also RFC 2045) regulates how to transform binary data into printable data using nothing but the 64 characters "A-Z, a-z, 0-9, +, /". Base64 increases the original size by 33%; it is not an encryption.
Notes
-
The export of collective attributes is to be taken with a grain of salt, since it is impossible to find out beyond all doubt whether an attribute is collective or not. So, as a substitute, all attributes whose type starts with "collective", are taken as collective attributes.
-
Access Control may keep you from getting certain entries or certain attribute values.
-
Administrative restrictions configured at the LDAP server may cause the export function to terminate uncompleted.
The advance button offers additional options.
Import
Import files can be:
-
LDIF change files (http://www.ietf.org/rfc/rfc2849.txt)
-
LDIF content files (http://www.ietf.org/rfc/rfc2849.txt)
-
DSML v1 files (http://www.oasis-open.org/)
-
DSML v2 files (http://www.oasis-open.org/)
As for the character encoding, the same regulations as with export apply; additionally, "native" UTF-8 is recognized for attributes, too.
The advance button offers additional options.
See also:
-
Exporting/importing certificates
-
Exporting/importing JPEG images
Properties
Allows you to display the attributes of the entry currently selected in a separate window.
May also allow you to edit them. In edit mode, the layout of this window may or may not change considerably. Push buttons explained through tool tips simplify the handling and make it more convenient.
For details refer to Property Dialog, Property Editors, Property Pane and All Attributes/Right Mouse Button.
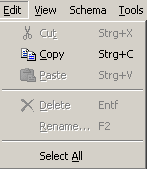
Edit Menu
Here is an example of the edit selection:
-
Cut/Copy/Paste
-
Delete
-
Rename
-
Select All
Cut/Copy/Paste
Allows you to use typical clipboard functions on currently selected entries. Works in list panes and tree panes (crosswise, too). Works also between different instances of this application.
See also: Drag&Drop.
Delete Entry
Allows you to perform standard "delete" functions:
-
Deletes the entry/entries currently selected
-
Checking off the "with all children" check button will cause all children to be deleted, too (recursively)
-
Note that a delete operation may fail due to the existence of administrative children that are invisible to the client
Rename
Allows you to rename the object that is currently selected.
Notice the special LDAP feature "Retain old name". It allows you to let the old name survive in the attribute that stores the last RDN. For the DN itself, however, only the new name counts. Repeated execution of the rename function with "Retain old name" checked leads to a number of values in that attribute.
For details refer to the description of the "Standard Dialog" Renaming
View Menu
Here is an example of the view selection:
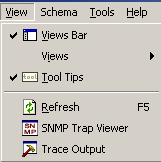
-
Views Bar

-
Views
-
Tool Tips

-
Refresh

-
SNMP Trap Viewer

-
Trace Output

Views Bar
Allows you to display a window that offers access to views that are grouped into view groups.
The views bar shows the available views and allows you to switch between views. In simple configurations (for example, when there is only one view group that contains one view), the views bar is not very useful. Selecting this menu item alternately checks the views bar (the views bar becomes visible) or unchecks it ( the views bar is absent).
Views
Provides a cascading menu that allows you to select a view group and then a view. You can also select a view in the views bar (if it is not hidden).
Tools: Options
This dialog allows for
-
Locating the keystore that is to use for authenticating a server, if the client-server communication is to be run based on a secure connection. By specifying a keystore that doesn’t yet exist, you can cause an empty keystore to be created.
-
Managing keystores.
You can view details of certificates, delete certificates from, export certificates from, import certificates into the keystore currently selected. You can change the password that is required for managing the keystore. -
Managing the smart card library.
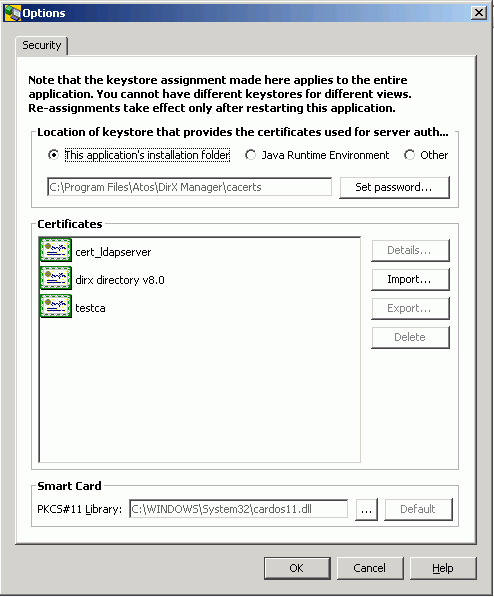
See also: SSL/TLS.
Help Menu
Here is an example of the help selection:

The help menu gives you access to:
-
Help system
-
Contextual Help
-
About box
Help
Gives you access to the Help System. It may take a little while to display help information the first time you use it because it needs to perform some initialization tasks.
Contextual Help
Allows you to display contextual help information. When you use this function, the cursor changes to ![]() . Now you can right-click anywhere within this application to display pop-up help information that is specific to the context you selected by right-clicking on it. For example, you can right-click an empty spot next to the toolbar to display pop-up help information on the tool bar. If there is no context-sensitive help available for the selected context, the cursor returns to its original shape.
. Now you can right-click anywhere within this application to display pop-up help information that is specific to the context you selected by right-clicking on it. For example, you can right-click an empty spot next to the toolbar to display pop-up help information on the tool bar. If there is no context-sensitive help available for the selected context, the cursor returns to its original shape.
About
Allows you to obtain information about:
-
The version of the core component ("Framework")
-
The versions of the installed plug-ins
-
The version of the Java Runtime Environment (JRE) that started this application
-
Additional data that is primarily used for maintenance purposes
Plug-ins may extend the about dialog.
Tool Bar
The tool bar is configured in a file called toolbar.xml. Plug-ins can change and extend the toolbar and add additional toolbars.
Example:
Tool tips describe the menu items that a tool represents. Tools may be gray if they are available, but do not apply to or are not implemented for the actual context. The tools provided by the core component typically include:
-
History buttons

-
Back

Steps back one step in the history recorded for the currently selected view. The number of steps you can go back is limited to avoid excessive memory consumption. -
Forward

Steps forward one step in the history recorded for the currently selected view. -
Stop button

Cancels the operation currently in progress. Not every potentially time-consuming operation may offer to be cancelled. A plug-in may or may not support this feature, or it may support it to some extent. Dialogs may block the main window. In this case, the stop button is not accessible in the main window while the dialog is being displayed. However, dialogs may offer their own stop buttons, typically a button like this one . Note that the button
  may automatically change to each time a search is initiated.
 -
Additional buttons, which are typically available both as tools and as menu bar selections. Just take a look at the button’s tool tip.
Views Bar
Here is an example of the views bar:
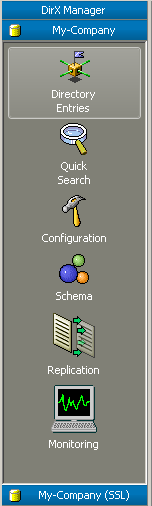
The views bar is a window that offers access to views. You can also switch to a different view with the view menu (unless this menu has been disabled).
In the sample shown here (which, by the way, comes from a plug-in), you can see the view groups called "DirX Manager", "My-Company" and "My-Company (SSL)", and the views of view group "My-Company", called "Directory Entries", "Quick Search", "Configuration", "Schema", "Replication", and "Monitoring". Possible differences between different views include:
-
Access to different LDAP servers
-
Different restrictions, like different search bases, visibility of objects/attributes
-
Different presentation (tree browsing, searching, …)
A view is organized in
-
a view title and in a
-
view area made up of view panes.
View Area
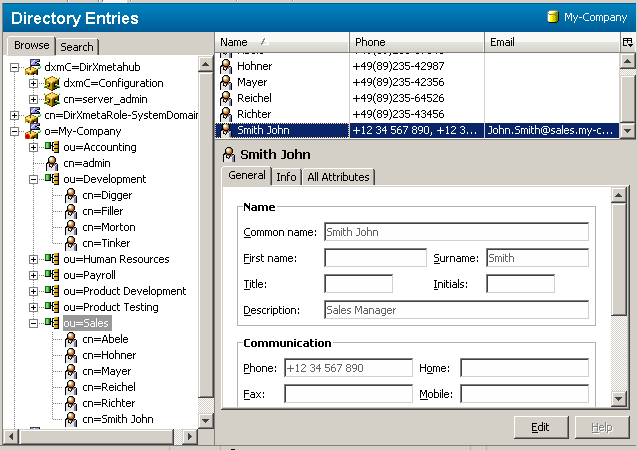
The view area presents the view that is currently selected in the views bar. The view area consists of a "view title" and of "view panes".
A particular view typically offers a search pane or a tree pane, or a combination of both (as shown in the previous screen shot), with an associated search result list pane and/or property pane (also shown in the previous screen shot).
Status Bar
Here is an example of the status bar selection:
The status information provided by the core component includes:
-
Context-dependent transient information such as the number of entries copied, upon copying entries
-
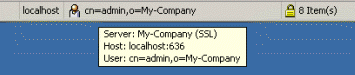
Connection information, such as the server currently accessed and the DN used for login.
Use the tool tip mechanism to display server name and port number:
-
An indication of a secure connection:

-
The number of entries displayed in the currently selected pane
-
The number of selected entries displayed in the currently selected pane
Plug-ins may provide additional information in the status bar.
Special Mouse Operations
Some functionality is available through special mouse operations:
-
Drag & Drop
-
Tooltips
-
Right Mouse button
-
In tree and list panes
-
In text fields
-
In the All Attributes Tab of property dialogs/panes
-
In the column headers of list panes
Drag&Drop
Drag and drop allows you to copy or move currently selected entries to different nodes. Drag and drop works in list panes and tree panes (crosswise, too); and it works also between different instances of this application.
See also: Clipboard functions in the Edit menu and in the property pane/dialog.
Tool Tips
This application makes extensive use of tool tips. Tool tips are contextual annotations that are briefly displayed when the mouse cursor remains on a context-sensitive spot, for example, on a property value.
Right Mouse Button
The places where the right mouse button is functional include
-
Tree and list panes
-
Text fields
-
The All Attributes Tab of property dialogs/panes
-
The column headers of list panes
Tree & List Panes
Some menu items are additionally available through the right mouse button.
Some functions are solely available through the right mouse button:
-
Copy to
-
Filter (not implemented)
-
Lock Account/Unlock Account
-
Move to
-
New
-
Reset Password
-
Search
Plug-ins can add menu items to the right mouse button and modify right mouse button menu items.
Here is an example of the right mouse button selection (right-clicking the mouse on an entry):

Copy To
Copies a node including all its children to a different parent. Note that if the LDAP server does not support simple paging, restrictions like time/size limit may keep this operation from completing.
Filter
Filter (not implemented)
Displays a dialog that permits you to specify search restrictions for a one level search. Some fields already contain contextual data taken from the currently selected entry. The search result will appear in the tree as children of the actual node. That node is marked “(…)” to indicate that the list of children is likely to be incomplete.
Move To
Moves a node including all its children to a different parent. Note that not all LDAP servers support this feature.
New
Creates a new entry in the server currently addressed below the node to which the right mouse button has been applied. Note that this operation may fail for several reasons, for example:
-
You do not have the required access rights.
-
The LDAP server is configured so that it does not permit you to create a DN like the one you have chosen.
Usually, the function offers a limited selection of possible types of objects:
-
Non-specific entry
-
Customized object classes:
-
Group
-
Internet Organizational Person
-
Organizational Person
-
Organizational Unit
Depending on the number of possible types of objects, the core component provides four variants (which plug-ins may or may not use).
Entry
If the type of object is not pre-specified, you must first complete a dialog like this:
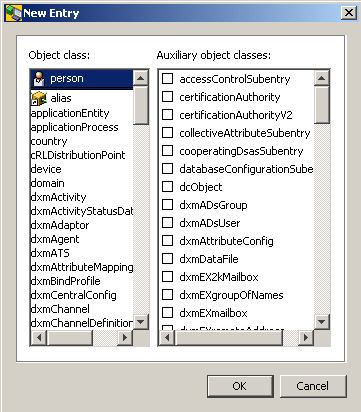
It allows you to specify (based on information provided by the server):
-
One structural object class and (left half of dialog)
-
A number of auxiliary object classes (right half of dialog)
For your convenience, the last recently used structural object classes are repeated in the upper part of the left half of the dialog.
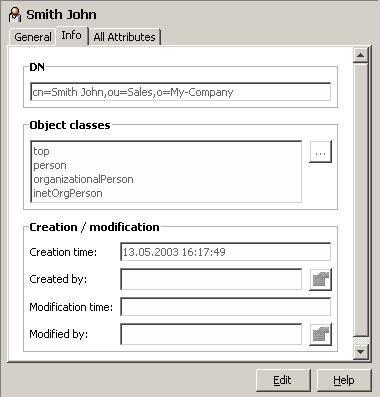
After you complete this dialog, you can complete the creation of the entry in a dialog like this:
Tab: Info:
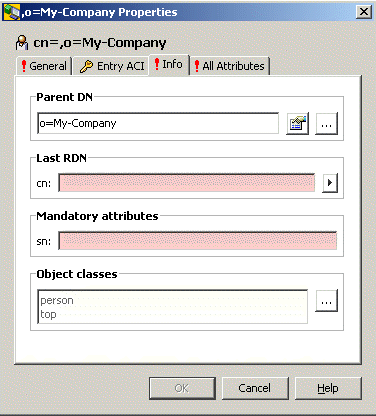
This tab displays
-
The Parent DN (read-only)
-
The last RDN (red shadowed)
-
All additional mandatory attributes (red-shadowed; there are no additional mandatory attributes in the screenshot above)
-
All Object Classes (read-only)
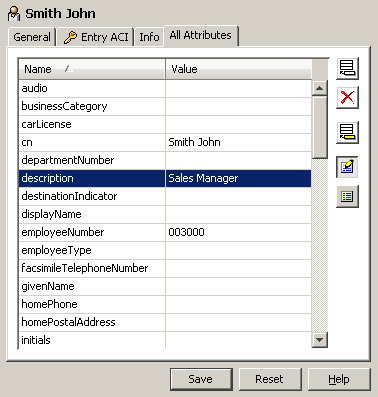
Tab All Attributes:
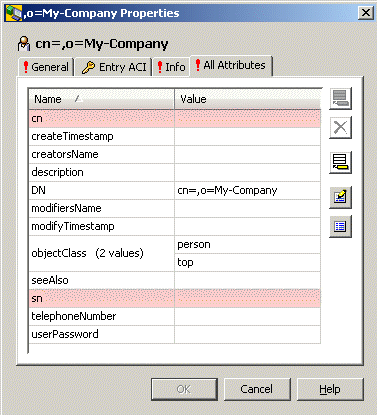
This tab displays all attributes. The mandatory ones are highlighted in red.
You can assign multiple naming attributes, too. For details refer to "Renaming".
Group
If the object class "Group" is pre-configured, the dialog should look like this:
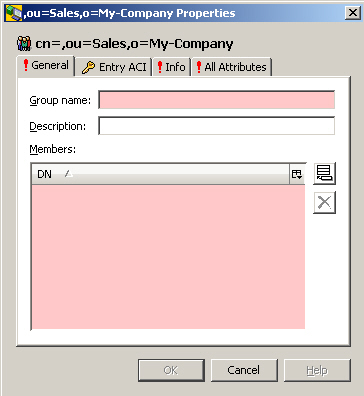
The "Info" and "All Attributes" tabs have the same meanings as the Info and All Attributes tabs of the "Entry" dialog.
Internet Organizational Person
If the object class "Internet Organizational Person" is pre-configured, the dialog should look like this:
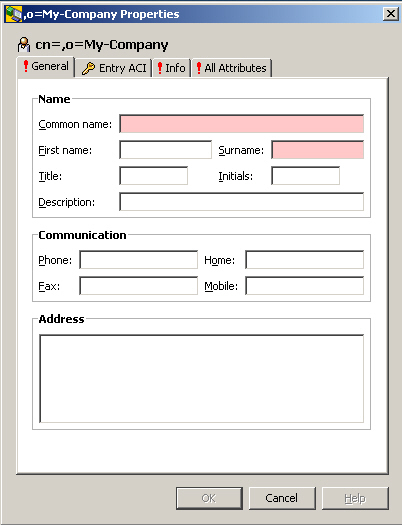
The "Info" and "All Attributes" tabs have the same meanings as the Info and All Attributes tabs of the "Entry" dialog.
Organizational Person
If the object class "Organizational Person" is pre-configured, the dialog should look like this:
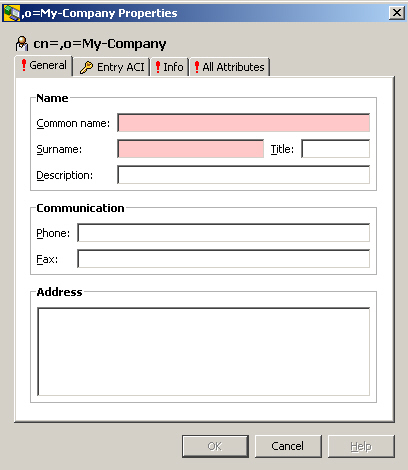
The "Info" and "All Attributes" tabs have the same meanings as the Info and All Attributes tabs of the "Entry" dialog.
Organizational Unit
If the object class "Organizational Unit" is pre-configured, the dialog should look like this:

The "Info" and "All Attributes" tabs have the same meanings as the Info and All Attributes tabs of the "Entry" dialog.
Variants
Depending on the number of possible types of objects, the core component provides four variants (which plug-ins may or may not use):
-
Objects of only one type can be created below the current node.
Here is an example (only persons can be created):
-
A limited selection of object types can be created.
Here is an example (only four types of objects can be created):
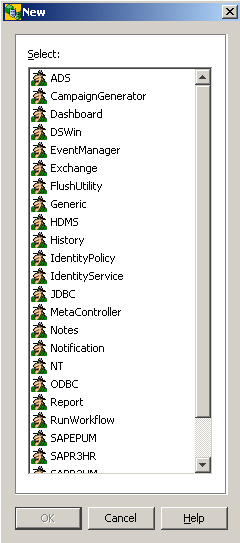
-
A large selection of object types can be created.
Here is an example
-
The type of the new object can be entered via the keyboard.
Lock/Unlock Account
Allows to prevent logins with the distinguished name (DN) of the currently selected entry or - if the entry is locked out already - to re-admit logins with that DN. Note that the server may lockout the DN as well implicitly, e.g. after a configured number of incorrect logins.
Here is an example of the context menu:
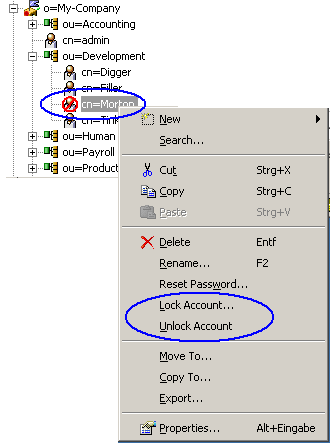
In this example, the entry cn=Morton is marked (see note below!) locked out (visualized through the prohibitory sign). Note that in a network being comprised of several DSAs (supplier and consumers) the entry might be locked or marked locked at some DSA(s) other than the one, this application is currently bound to. An entry being locked out at some different DSA(s) only is not visualized through the prohibitory sign!
The context menu provides two items of interest here: Lock Account… and Unlock Account….
-
Both items are grayed out and not selectable, if the server does not appear to support this functionality (more precisely: if the operational attribute pwdAccountLockedTime is missing in the schema).
-
Unlock Account… is offered even if the entry appears to be unlocked anyway, since it cannot be excluded that the entry is locked out at some other DSA(s) (see above). The chaining and shadowing mechanisms of DirX Directory are supposed to propagate the unlock operation to all participating DSAs, particularly to the ones that are affected (if any).
-
Lock Account…
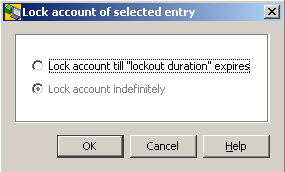
You can lock an account indefinitely or you can lock it till the "lockout duration" expires. The lockout duration is an attribute of the "Password Policy" subentry that is supported by DirX Directory. You also can revise your decision and switch between these choices anytime.
Here is an example of your choices, when the entry is currently locked out indefinitely:
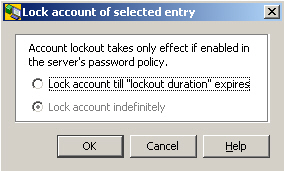
Same situation, but account lockout is not enabled or it is uncertain, whether account lockout is enabled or not (because e.g. the password policy subentry could not be read):
-
Click Lock account till "lockout duration" expires, if you want to lock out the entry temporarily for the time specified as Lockout duration; Lockout duration is one of the settings the password policy subentry provides (find more about this in the chapter "Password Policy").
-
Click Lock account indefinitely, if you want to lock out the currently selected entry till you possibly decide to re-admit logins by this entry or to lock it till the lockout duration expires.
Notes:
-
The functionality described here presupposes that (as DirX Directory do) the server supports a password policy subentry that provides a number of settings to control how passwords are used and administered, particularly a setting named "Lockout duration" (more exactly: an operational attribute named pwdLockoutDuration). If the DirX Directory Manager plug-in is installed, you are supposed to find more information on the password policy subentry in the according chapter within this help. Moreover, you may also have a look at the server documentation.
-
Since Lock Account… and Unlock Account… only mark the DN to be" locked" or "unlocked", in order to get your setting effective, make sure, that another password policy subentry setting, namely the "Enable account lockout" (pwdLockout) flag is checked off.
-
You are supposed to find the operational attribute pwdAccountLockedTime in the "All attributes" tab of the Properties dialog of the entries of interest. pwdAccountLockedTime being
-
absent means "not locked"
-
set to the 1st of January 1970 00:00:00 means "locked indefinitely"
-
set to any other time/date means "locked, till this time/date + lockout duration has expired". So, changing the lockout duration in the password policy subentry affects all temporarily locked-out entries. A successful login after lockout expiry causes pwdAccountLockedTime to be removed by the server, which means the entry is not affected by modifications of Lockout durations any more
Reset Password
Allows an administrator to reset a user’s password. Causes a dialog like this one to pop up:
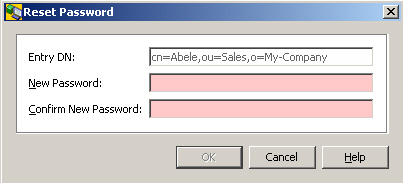
Note that there is a subtle difference between this function and the modify password functionality that is available as an ordinary attribute modification in all properties dialog/pane:
When changing a user’s password with the reset password functionality, the server will be informed of this modification being a "reset". The server will in turn - depending on the password policy currently in place - force the user to update his password before granting him any "productive" operation.
Note that this function is only available if the server indicates its support in the LDAP Root DSE ("Password Policy Control"; Object Identifier, displayed directly or through tooltip: 1.3.6.1.4.1.42.2.27.8.5.1) and if an operational attribute named pwdReset can be set.
Furthermore, if the server keeping the DirX Identity users is set up, the mirrored administrator user must be present in the Connectivity under the RDN dxmC=Users,dxmC=DirXmetahub.
See also: Property Tab "All Attributes", Change Password, Server, User Password
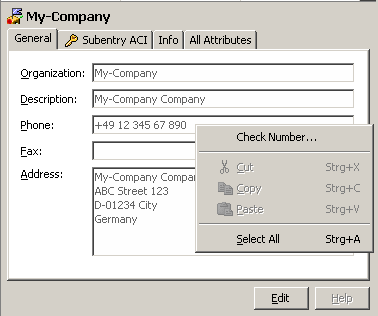
Text Fields
The right mouse button applied to a text field offers:
-
Select all
Selects the entire content of the text field -
Clipboard functions like Cut, Copy, Paste
-
Occasionally, property-specific additional functions like "Check Number" in the example to follow
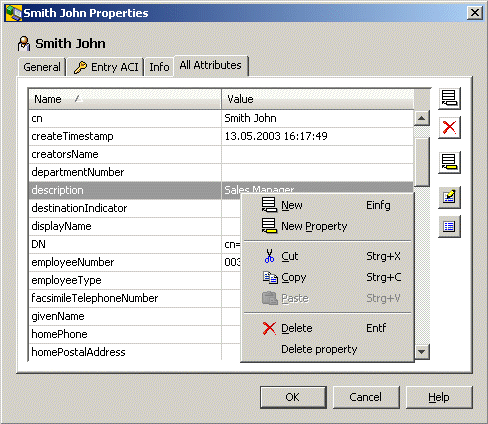
All Attributes Tab
The all attributes tab that is available at some property panes and property dialogs has a number of functions on the right mouse button:
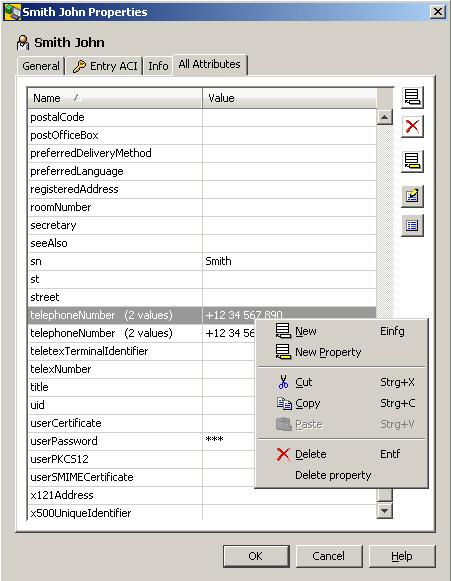
-
Click "New" to insert a new value into a property.
-
Click "New Property" to create a new property.
-
Click "Cut"/"Copy"/"Paste" for clipboard operations that affect the selected property value.
-
Click "Delete" to delete the selected property value.
-
Click "Delete Property" to delete the entire property (same as "Delete", if property is single-valued)
Note the menu changes to the text field menu if you click in the value field of a property that is a text field.
Column Headers of Lists
Applying the right mouse button to a column header in (most) lists allows you to configure the columns that are to be presented. Here is an example:
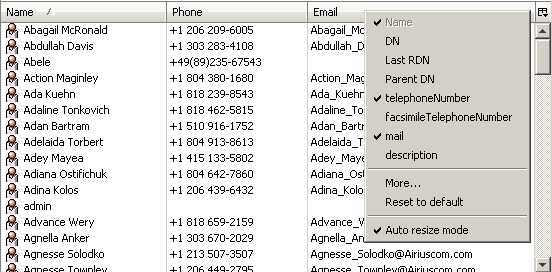
If the number of possible columns exceeds a certain limit, the option "More…" is offered. This option leads to a dialog that offers the complete choice available for the current list.
Recurring (=multi-valued) attributes display no more than the 10 values.
Note that the attribute value(s) can also be viewed thru the related tool tip.
The "Auto resize mode" automatically resizes all other columns, if you resize one column. If switched off, only the column to the left of your mouse cursor resizes.
Positioning
A significant number of GUI elements present large enumerations of items, like entries in tree or list panes or elements of combo boxes. The larger the list, the more tedious it can be to scroll down or up to a particular position. In these cases, you can use this application’s positioning abilities to make it easier to handle these enumerations: in tree panes, in list panes and in many non-editable combo boxes, you can position just by typing in one or more characters. A tool tip briefly indicates your typing. When using positioning:
-
Make sure the GUI element in question has the focus.
-
Type, for example,. "j" to position to the first item beginning with "j". Repeatedly typing "j" will position to the subsequent items starting with "jjj.." .
-
Type, for example, "joe" to position to the first item beginning with "joe". Don’t pause when typing "joe". Otherwise you will position to "j" then to "o" and finally to "e".
Abandoning an In-process, yet Uncompleted Operation
Searching
There are several ways to initiate an abandon operation, depending on the context:
-
By clicking
in the Toolbar: 
-
By clicking
Note that the button may automatically change to each time a search is initiated.
Browsing
Browsing the tree can be abandoned by clicking ![]() in the Toolbar:
in the Toolbar: ![]()
Properties
Reading the properties of an entry is usually not an operation that lasts for too long. However, there are exceptions:
-
Network problems or server overload may occasionally prevent the server from reacting as usual.
-
Bulky entries (for example, entries having recurring attributes with numerous values) may take a while to get transferred.
For those reasons, you can abandon read property operations by clicking "Cancel" in a dialog-box displayed. Note that this dialog-box is not displayed if the server returns the result rather quickly; and it automatically disappears as soon as the result arrives.
View Panes
View panes are the major building blocks for defining the overall appearance of this application. Their arrangement is defined in a number of configuration files.
Plug-ins may include their own view panes.
This application’s core component provides a number of view panes (note that views normally use only varying subsets of the panes provided), including:
-
The tree pane
-
The search pane (closely related to the search dialog)
-
The list pane
-
The simple list pane
-
The property pane (closely related to the property dialog)
-
Container panes, which organize the layout of other panes and do not display any data. The core component provides the following container panes:
-
The border pane
-
The split pane
-
The tabbed pane
-
The titled pane
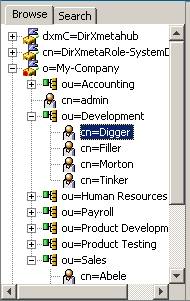
Tree Pane
The tree pane allows you to browse hierarchical structures contained in the LDAP directory in a tree-like manner. The tree view is typically accompanied by a list pane or a property pane or a combination of both.
Here is an example of a tree pane:
If the server has implemented operational attributes such as "numSubordinates" and "numAllSubordiates" and if access control grants read access to those attributes, the tree pane may look like this:
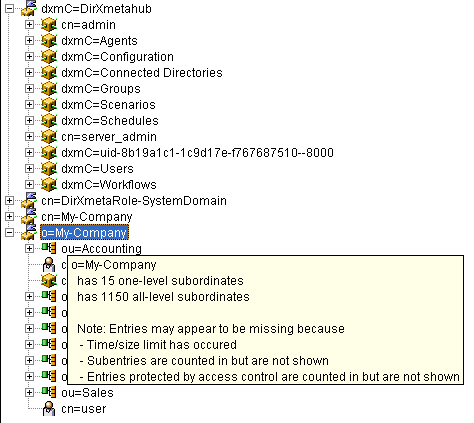
-
Some entries (like cn=admin in the example above) do not show
 in the first place, since the server tells that there are no subordinates (do a refresh, if you expect that one or more entries have been added below)
 -
Tool tips show how many direct subordinates and how many overall subordinates an entry has
-
A sort of a pseudo entry may indicate in red that not all entries are available (which typically happens due to a time or size limit or due to access control restrictions)
In combination with searching, you can use the tree for determining a search base - depending on how it is configured - either automatically or by clicking a button located next to the search base field.
To make a multiple selection:
-
Click the first entry, press the shift key and click the last entry while keeping the shift key pressed.
-
Click any - not necessarily adjacent - entries while keeping the ctrl key pressed
Click a selected entry while keeping the ctrl key pressed to de-select it.
A problem of “flat” trees is that size or time limit typically prevents all "children" from being displayed. On the other hand, with unlimited size and time, the number of entries returned by the LDAP server may just be too big to be handled reasonably. This problem can be approached in several ways:
-
There is a search function available on the right mouse button
-
There is a filter function available on the right mouse button
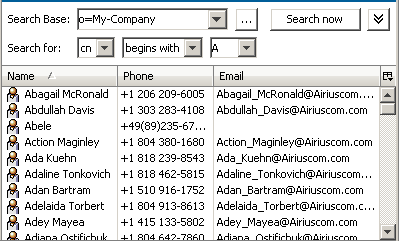
Search Pane
The search pane allows you to specify a search filter and initiate a search causing the server to return all entries (or a subset if there are too many) that match your search filter.
Here is an example of a search pane and a Tree (=Browse) pane combined through a tabbed pane:
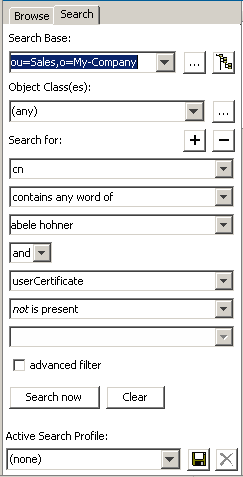
This example shows three panes:
-
A search pane
If the search pane is combined with a tree pane (like in this example), a special feature is available: you can take over the search base from the currently selected entry in the tree pane by clicking the button ("Get search base form tree"). Alternatively, the search base may be configured to take the current selection automatically from the related tree pane. In any case, you can overwrite this by clicking the button
  (the one to the left of the button); this button opens a window offering to select a value from a tree.
The optional server selection field is not configured.
Read about the other search options in section Standard Dialogs: "Searching". -
A tabbed pane, which allows you to switch between browsing and searching
-
A tree pane (indicated)
Here is an example of a "slimmed down" search pane:
Note that the button ![]() may automatically change to
may automatically change to ![]() each time a search is initiated.
each time a search is initiated.
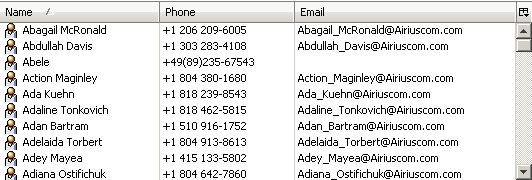
List Pane
The list pane allows having entries (typically search results), more detailed: your choice of their attributes, listed in a table and sorted by the attribute(s) of your choice.
Here is an example of a list pane:
-
Double-click an entry to display a details dialog for the entry.
-
Click an entry in the list with the left mouse button and (without releasing it) draw it downwards or upwards in order to make a multiple selection. This way of making a multiple selection is not available in the tree pane. Other ways (that are available in the tree pane, too) of making a multiple selection include:
-
Click the first entry, press the shift key and click the last entry while keeping the shift key pressed.
-
Click any - not necessarily adjacent - entries while keeping the ctrl key pressed.
-
Click a selected entry while keeping the ctrl key pressed to de-select it.
-
Right-click a column header to redefine what columns are to be displayed.
-
Click a column header to sort the list according to that column.
-
Click several column headers while pressing the shift or ctrl key to sort by multiple columns in the order you select them:

In the example shown here, the list is sorted by three columns in this priority:
-
Priority: Name
-
Priority: Email
-
Priority: Phone
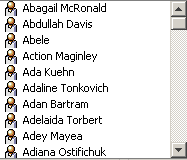
Simple List Pane
A simple list pane is like a list pane, but has only one column.
Here is an example of a simple list pane:
Property Pane
The property pane allows you to read and edit the properties of an entry.
Double-click an entry to display a property dialog (as opposed to a property pane that is embedded into the main window: A property dialog is a separate window that you can resize up to the full screen).
The property pane usually has two modes (read and edit). In read mode, you cannot edit any data.
The clipboard functions cut/copy/paste (cut and paste only in edit mode) are available on a per attribute value basis. These functions also work between different instances of this application. Note that (in tree and list panes) clipboard (and drag and drop) functions are also available for currently selected entries.
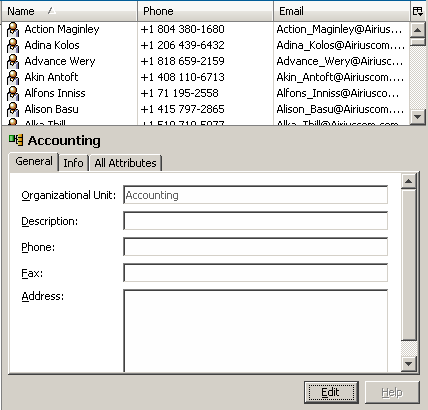
Here is an example of a property pane in read mode:
For information about the buttons shown on the right-hand side in the figure, see the topic Property Editors: Summary. This topic also describes how to view property values that do not fit into the value field.
Click Edit to change to edit mode. Click Save or Reset (these buttons appear when you click Edit) to change back to read mode. The property pane may change its appearance significantly between edit mode and read mode.
Read-only mode: ![]() (you cannot change to edit mode)
(you cannot change to edit mode)
Read mode: ![]()
Edit mode: ![]() Note that in edit mode the rest of the GUI is blocked.
Note that in edit mode the rest of the GUI is blocked.
Note that plug-ins may add additional buttons here.
Here is an example of a property pane in edit mode:
For Password modifications, see also "Reset Password".
Container Panes
Container panes, which organize the layout of other panes and do not display any data. The core component provides the following container panes:
-
Border
-
Split
-
Tabbed
-
Titled
Border Pane
Border panes are used when the size of a pane is to dynamically extend/shorten, as soon as one or more other panes need less/more room due to some action performed on them.
Here is an example of the use of a border pane:

In this example, the border pane (which is invisible) separates a search pane ("Search for …") from a list pane so that the space that the search pane is to occupy is minimized. The next screen shot shows what happens when you fade-in the search base by clicking the button ![]() : A new line appears in the search pane causing it to expand automatically just as much as needed, while the list pane automatically shrinks accordingly.
: A new line appears in the search pane causing it to expand automatically just as much as needed, while the list pane automatically shrinks accordingly.
Clicking the button again (in this situation it looks like ![]() ) makes the search base disappear, the size of the search pane automatically shrinks while the size of the list pane expands; that is, the layout returns to the one previously shown.
) makes the search base disappear, the size of the search pane automatically shrinks while the size of the list pane expands; that is, the layout returns to the one previously shown.
Split Pane
A split pane separates two other panes and allows you to increase the size of one pane at the expense of the size of the other one.
Here is an example of a split pane:
This example shows three panes:
-
Above: a list pane
-
In the middle: the split pane (the horizontal bar)
If the mouse button hovers above a split pane, it changes its appearance like this or like this
  . If you left-click the split pane with this appearance of the cursor, you can resize the related panes (enlarging one at the cost of the other one).
 -
Below: a property pane
Tabbed Pane
A tabbed pane allows you to switch between two or more other panes thru clicking tabs.
Here is an example of a tabbed pane:
This example shows three panes:
-
On top: a tabbed pane
The tabbed pane allows you to switch between two or more different panes by clicking the tab for the pane you want to display. -
Below: a tree pane
-
Another pane (indicated)
Clicking the search tab causes the search pane to be displayed while the tree pane currently on display is hidden.
Titled Pane
A titled pane adds a title to another pane, usually on top of the other pane.
Here is an example of a titled pane:
This example shows two panes:
-
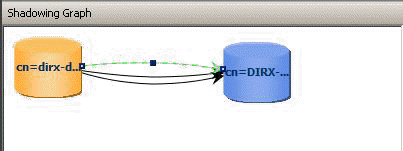
On top: a titled pane: "Shadowing Graph"
Titled panes serve just for descriptive purposes. -
Below: the shadowing graph of a shadowing agreement.
Property Editors
When you click a property value in the edit mode of a property dialog or a property pane, this application will show one of the following responses:
-
No response at all, because the property cannot be changed this way.
Here are some examples: -
DN (Distinguished Name)
Use the Rename and/or MoveTo function to change a distinguished name -
cn (Common Name)
Use the Rename function to change a common name -
CreateTimeStamp; CollectiveTelephoneNumber
Changing operational or collective attributes is usually not possible -
The affected property becomes editable. The core component provides property editors for the following attribute types:
-
Attribute with DN Syntax
-
Boolean
-
Country String
-
The default: Directory String
-
Generalized Time
-
Fax Number
-
IA5
-
Integer
-
Jpeg Photo
-
Numeric String
-
Object Class
-
Postal Address
-
Printable String
-
Telephone Number
-
User Certificate
-
User Password
There is a number useful buttons located on the right-hand side of the property dialogs, as shown in the following figure (also indicated are the operations available at the right mouse key):
Use these buttons to:
-
Insert a value
(also available through the right mouse button). This function may not be present, depending on what type of node is currently selected. -
Delete the selected property value
 (also available through the right mouse button)
 -
Create a new property
 (also available through the right mouse button)
 -
Display only editable properties

-
Exclude empty properties from being displayed

If a property value is too long to be displayed in the visible part of the display field, you can resize the column or the entire window, or just position the cursor in the value field and wait for the tool tip to appear:
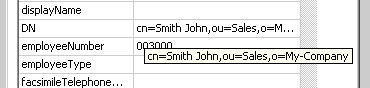
Note that the tooltip will be on display only for a while. Alternatively, properties with directory syntax typically offer to view/edit lengthy values in a re-sizeable dialog.
Attribute with DN Syntax
The attribute with DN syntax editor allows you to assign a DN to an attribute with DN syntax:
Click "![]() " to open a dialog that offers searching and browsing facilities for the DN of interest. Alternatively, you can just type the DN into the value field.
" to open a dialog that offers searching and browsing facilities for the DN of interest. Alternatively, you can just type the DN into the value field.
Click "![]() " to display the referenced entry.
" to display the referenced entry.
Boolean
The boolean attribute editor allows you to edit boolean attributes. A boolean attribute shows one of the following appearances:

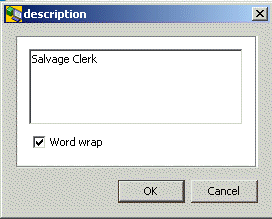
Directory String
The directory string property editor is the default editor. It applies to attributes with syntax Directory String and to all attributes with a syntax that does not have a corresponding dedicated property editor.
This editor provides a simple editable text field. In order to make reading and editing lengthy directory strings more convenient, the context menu offered through the right mouse button typically includes an "Edit" function that pens a re-sizeable dialog:

Generalized Time
The generalized time editor allows you to edit the date and (local) time.
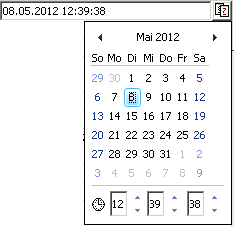
Click ![]() to use your mouse to edit the date/time. Alternatively, you can just type the date/time in the value field.
to use your mouse to edit the date/time. Alternatively, you can just type the date/time in the value field.
The line that allows you to edit the time is not available under all conditions.
IA5
The IA5 editor provides a simple editable text field that is restricted to the character set defined by IA5 (http://www.itu.int/rec/recommendation.asp?type=folders&lang=e&parent=T-REC-T.50).
Hex 20 to hex 7E, including “@”.
Integer
The integer editor provides a simple editable text field that does not take any characters other than digits that comply with a number in the range 0 to 232 -1 (=4294967295).
Jpeg Photo
Use the Jpeg editor to perform the following actions on JPEG images:
-
View

-
Export

-
Import

-
Delete
Here is an example of a Jpeg editor:
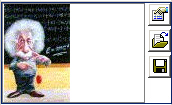
Figure : Jpeg Editor
Numeric String
The numeric string editor provides a simple editable text field that does not take any characters other than digits (0 to 9) and space.
Object Class
The object class editor allows you to edit object classes:
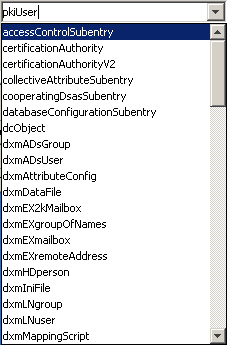
Note that you cannot add, delete or change structural object classes; only auxiliary object classes can be added, deleted or modified.
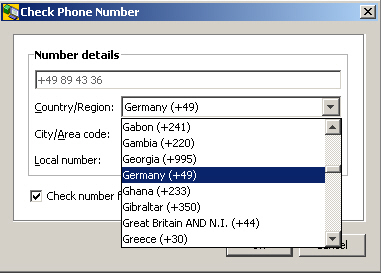
Phone/Fax
The phone/fax editor allows you to edit a phone/fax attribute. Click the value field to change it to inline edit mode. Right-click the value field and select "check number…" to have a dialog displayed like the one shown in the following figure:
Postal Address
The postal address editor allows you to edit a Postal Address (6 lines à 30 characters):

Printable String
The printable string editor provides a simple editable text field that is restricted to the character set known as printable string (http://www.itu.int/rec/recommendation.asp?type=folders&lang=e&parent=T-REC-X.208):
A to Z, a to z, 9-0, <space>, ‘)(+,-./:=?
This editor cannot be applied to email addresses, because the "at" character (@) is not available.
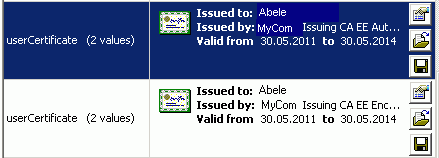
User Certificate
Use the user certificate editor to perform the following actions on user certificates:
-
View
-
Import
-
Export
-
Delete
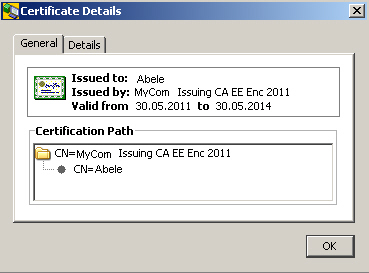
Here is an example of a user certificate editor:
When clicking the view button ![]() the Certificate Details are displayed:
the Certificate Details are displayed:
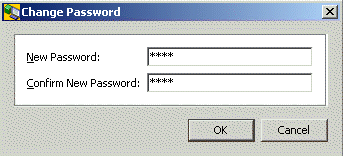
User Password
The user password editor allows you to change your own or someone else’s password (depending on the selected entry). Click the value field to display the editor, which is shown in the following figure :
Deleting a password works the same way as deleting any other property.
Note that multivalued user passwords are not supported by this application.
See also: Reset Password.
Standard Dialogs
The core component provides the following standard dialogs:
-
Binary Attributes
-
Changing Your Own Password
-
Choosing a Distinguished Name
-
Exporting
-
Importing
-
Login
-
Naming
-
Properties
-
Renaming
-
Searching
-
Server
Binary Attributes
Binary attributes other than certificates and jpeg photos are indicated in the all attributes tab like this ("audio"):
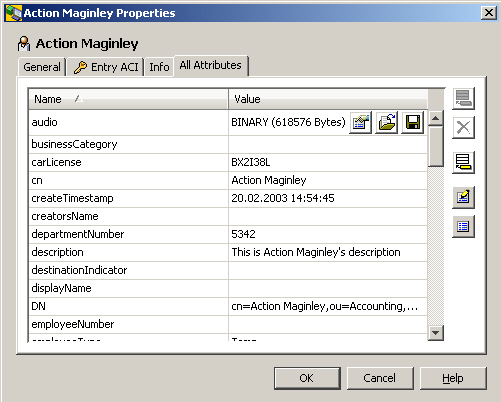
Clicking the ![]() button allows to save the currently selected value in a file.
button allows to save the currently selected value in a file.
Clicking the ![]() button allows to import a binary value from a file.
button allows to import a binary value from a file.
Clicking the ![]() button displays a window that shows the value as hexdump:
button displays a window that shows the value as hexdump:
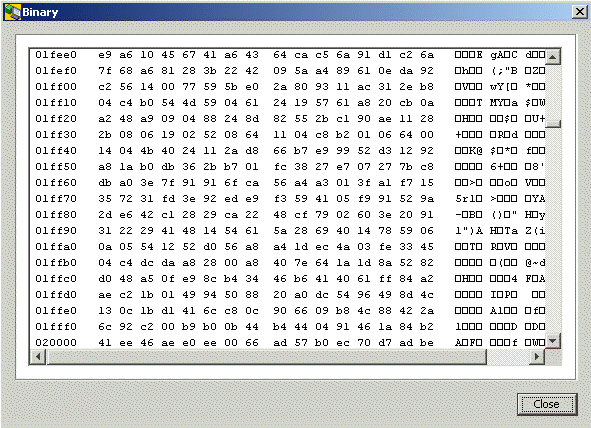
Changing Your Own Password
(To change somebody else’s password, see the topic User Password).
This dialog allows you to change your own password; that is, the password that was used in the previous Login.
Here is an example:
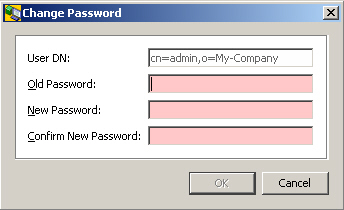
Note that multivalued user passwords are not supported by this application.
Choosing a Distinguished Name
This dialog allows you to choose a distinguished name that contains all valid values, either by browsing a tree or by searching. Here is an example:
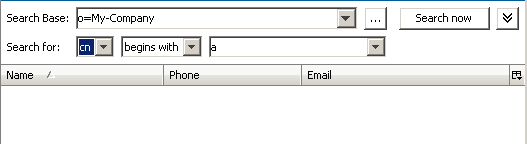
Figure : Choosing a Distinguished Name Dialog
Exporting
The Export dialog allows you to specify details regarding the current export, including the file format for the export, the name of the export file, and the entries to be exported. Here is an example of the Export dialog:
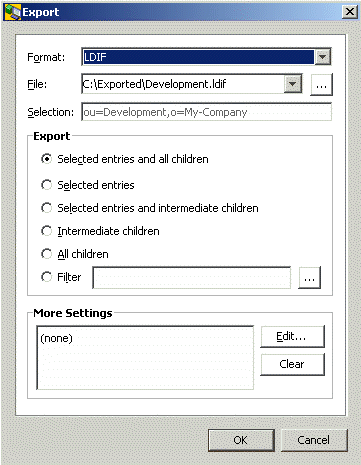
More settings are available through the "Advanced Export Options" dialog. This dialog is composed of two tabs: the General tab and the Attribute Restriction tab. Here is an example of the General tab.
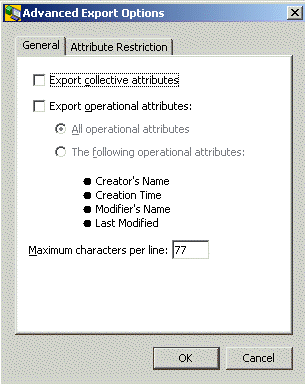
The available selections are:
-
Export collective attributes
-
Export all operational attributes
Note that, apart from access control restrictions, the server may decide not to return certain operational attributes, e.g. operational attributes that are expensive to locate. Some servers do not support this option at all. -
Export a named set of operational attributes
-
Limit the number of characters per line (default is 77)
Here is an example of the Attribute Restrictions dialog:
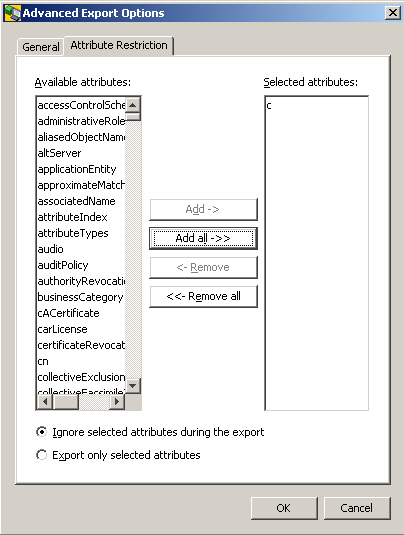
Importing
This dialog allows you to specify details regarding the current import:
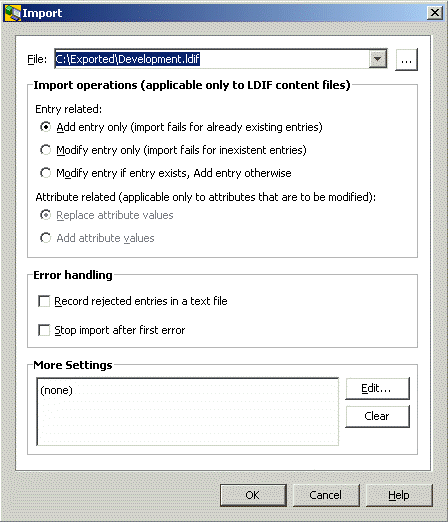
-
The radio buttons "Add entry only", "Modify entry only", "Modify entry if entry exists, Add entry otherwise" apply to LDIF content files only and are ignored otherwise ( if the file is recognized as a DMSL v1 file, which is sort of a DMSL content file, only Add entry is possible). In case of modify entry, the affected attribute values, as they exist in the servers' database, will be replaced by the ones found in the file. Attributes that are missing in the import file do not affect the corresponding attributes in the server’s database at all, particularly they do not cause those attributes to be deleted.
-
The radio buttons Replace attribute values and Add attribute values apply only to entries that are to be modified. Add attribute values fails with error
-
For attributes that are single-valued and have already a value in the server’s database
-
For attributes that are multi-valued and the set of values possibly stored already in the server’s database and the set of values found in the import file are not disjoint.
-
Check Record rejected entries in a text file if you want to save rejected entries together with the associated error message in an LDIF file. The error messages pre-pend the respective entries in the form of comment lines. Just before it completes, the import function pops up a file selection dialog if there is at least one erroneous entry. If you do not check off this check button, erroneous entries are only displayed in the progress dialog.
-
Check Stop import after first error, if you want to have the import operation discontinue as soon as the first error occurs.
-
More settings are available through the push button More settings…
-
A progress dialog like the one depicted below displays the DNs of the rejected entries and the belonging error messages and allows you to cancel the import any time.
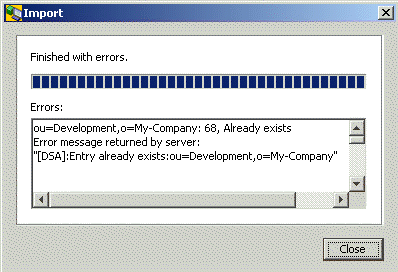
Note: If the file that is to be imported does not appear to be LDIF or DSML compliant, the import will be refused with an error message. There is one exception: multi-line attributes in LDIF files must be base64 encoded; however, they are also accepted here, if they appear as text with the individual lines being separated by hex "01".
More Import Settings
This dialog allows you to restrict the import operation to a specified set of attributes (the ones that appear or - depending on the radio button at the bottom of the dialog - do not appear in the Selected attributes field)
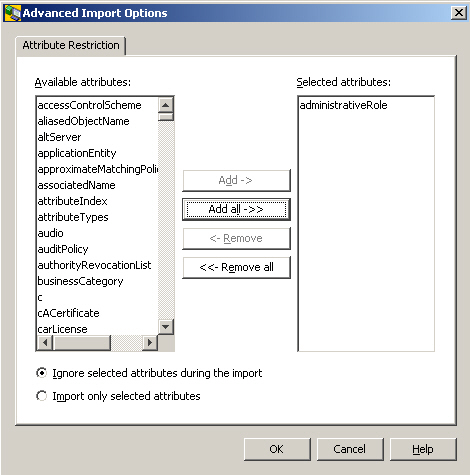
Login
The login dialog allows you to exchange authentication information between you and the LDAP server.
Here are examples for the Login dialog:
-
Performing a simple authenticated or anonymous bind:
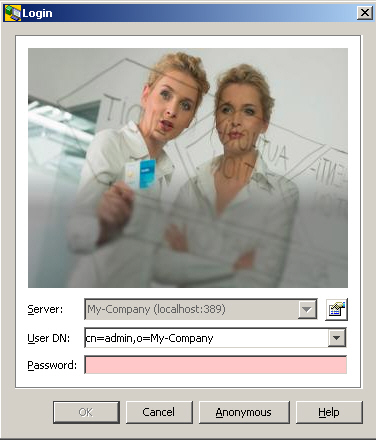
-
Performing a smart card login:

-
Performing a file based SASL EXTERNAL bind:
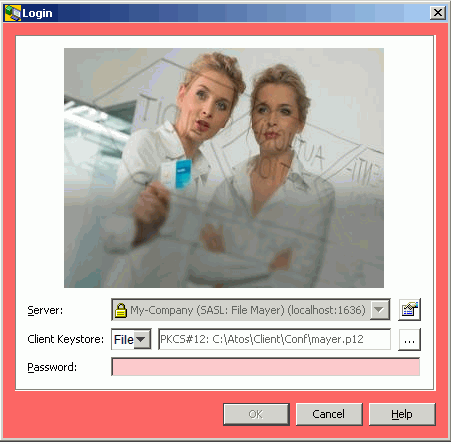
In order for this application to be able to connect to a server, you must:
-
Specify a server
Click the button in the Manage Server Profiles dialog to create a server profile, if no suitable profile is available, or click the button to edit the currently selected profile.
 -
Specify login information
-
Specify a DN (Distinguished Name) and a password for a simple authenticated bind or alternatively log in "anonymously"
If "anonymous" is checked in the selected server profile, the DN and password fields should be grayed out and are not editable. -
For smart card logins, insert the smart card into the reader and specify the PIN.
-
For file based SASL EXTERNAL binds, press the
button and browse to the file location of the JavaKeyStore (.jks) or PKCS#12 formatted container (.p12) with your private key and public key certificate(s) and specify the local passphrase (the password) that protects the .jks or .p12 file.
Note that you may be offered read access only, or read and write access- depending on the access policy settings in the server dialog.
Naming
Use the naming dialog to assign a name to an object that you are creating.
Here is an example:
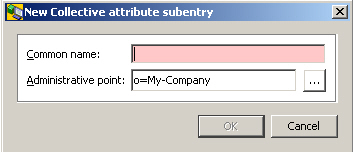
Properties
Summary Properties
Properties are typically displayed and edited in
-
A property pane (embedded into this applications main window)
and/or -
A properties dialog (popping up in an own window you can resize up to the full screen, when right-clicking an entry and selecting "Properties" or when double clicking an entry).
For the functionality provided for properties, it does not really matter, if you work with property panes or prefer property dialogs. The use, however, may be different in details: while the property pane typically distinguishes between a read mode and an edit mode, the property dialog usually knows only one mode.
By default, a generic property dialog/pane has these tabs:
-
An Info tab
-
An "All Attributes" tab
The properties dialog/pane may be "generic" (i.e. it has the default tabs mentioned above) or customized. It displays details of the currently selected entry and may allow you to edit some of them (editable fields are ones that are not grayed out). A Close button in place of the OK and Cancel buttons indicates that the entry itself is not editable. Alternatively, the property dialog may make a distinction between view mode and edit mode. In this case you are to face buttons like the ones described in property pane.
The clipboard functions cut/copy/paste (cut and paste only in edit mode) are available on a per attribute value basis. Note that (in tree and list panes) clipboard (and drag and drop) functionality is also available for currently selected entries.
The properties dialog is usually available by:
-
Right-clicking the entry of interest
-
Double clicking the entry of interest
-
Using the menu
See the topic Property Editors:Summary to learn about the buttons shown in the right-hand side of the properties dialog, as shown in the figure here.
Also see the topic Property Editors:Summary to learn how to view property values that do not fit into the value field.
Customized tabs
This application provides a customized tab for some types of objects (Group, Internet Organizational Person, Organizational Person, Organizational Unit) that adds to the Info and all attributes tab. Plug-ins may provide property panes/dialogs that are even more customized.
See also: Property editors.
Property Tab "General"
For a number of common object classes, additionally a "General" tab is shown accommodating the attributes considered most interesting. If more than one object class applies, the most specific one wins.
Examples:
-
Person
-
organizationalPerson
-
inetOrgPerson
-
organization
-
organizationalUnit
-
groupOfNames
-
groupOfUniqueNames
Person
The pre-configured "General" tab for entries whose object class is "Person" looks like this (unless the entry has additional object classes like organizationalPerson):
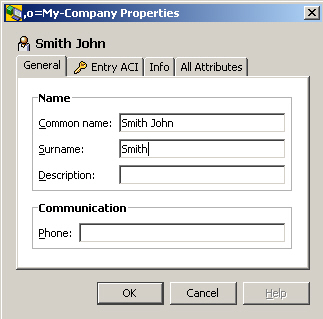
organizationalPerson
The pre-configured "General" tab for entries whose object class is "organizationalPerson" looks like this:
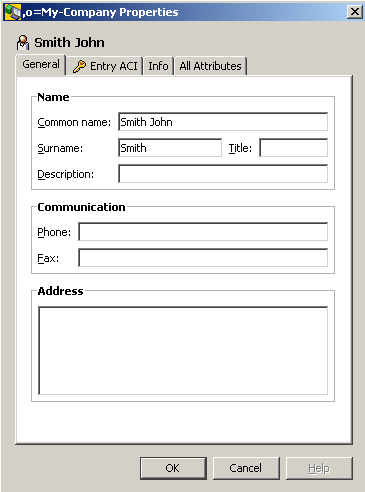
inetOrgPerson
The pre-configured "General" tab for entries whose object class is "inetOrgPerson" looks like this:
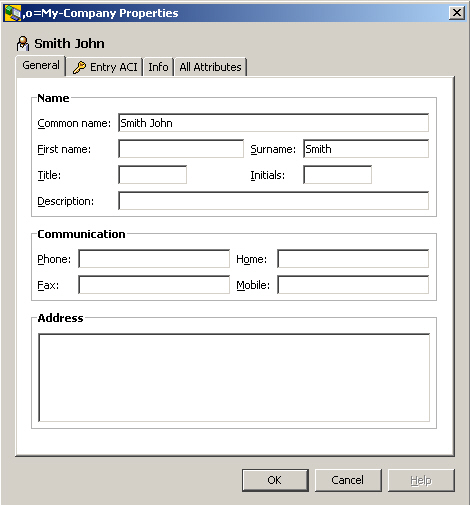
organization
The pre-configured "General" tab for entries whose object class is "organization" looks like this:
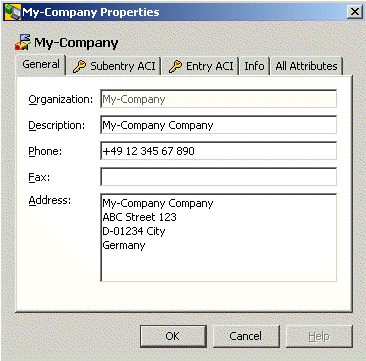
organizationalUnit
The pre-configured "General" tab for entries whose object class is "organizationalUnit" looks like this:
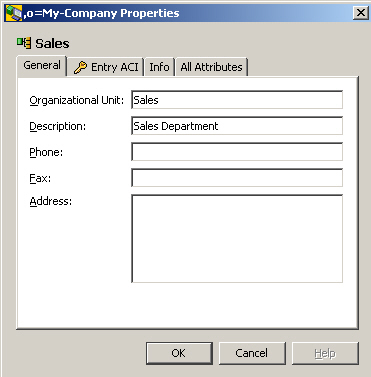
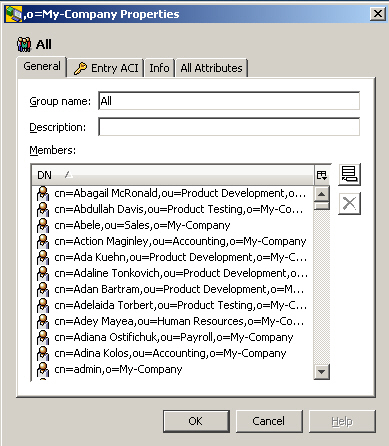
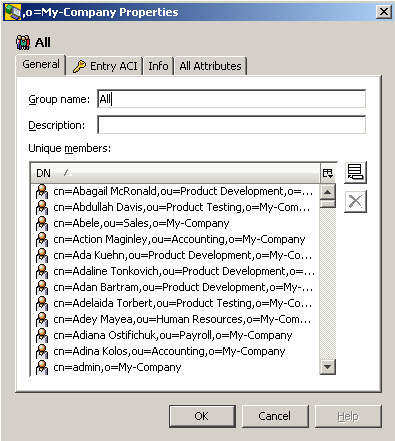
Property Tab "All Attributes"
The "all attributes" tab displays all attributes including the ones that are shown on the other tab(s).
Example:
See also Property Editors (for a description of the right-hand convenience buttons), Property Pane, Property Dialog and All Attributes/Right Mouse Button.
For Password modifications, see also: Change Password, Reset Password, User Password, Server.
If the name column is selected, it is possible to position to a particular attribute by typing the initial letter(s).
For attributes with more than one value, the number is displayed in the name column - usually the first column - to the right of the attribute name (administrativeRole (4 values)):
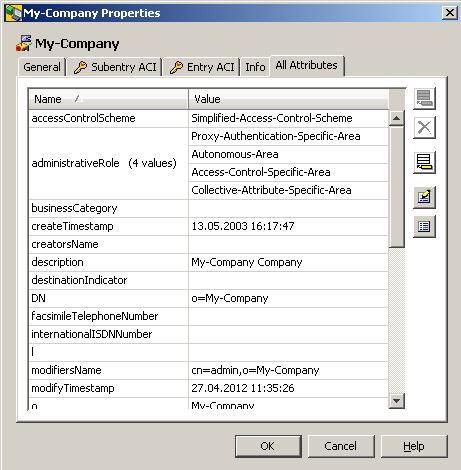
If the attribute name is outside of the currently visible part of the pane/dialog the number of values is displayed as tool tip:

Property Tab "Info"
In the following example the "Info" tab of a new entry with object class person is displayed:
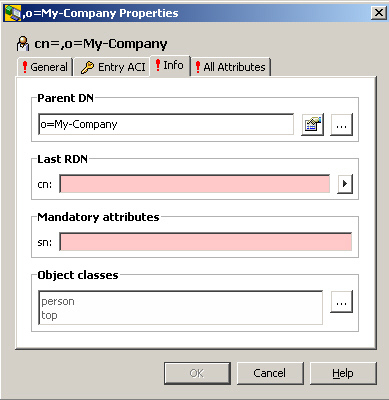
This tab displays
-
The Parent DN
-
The last RDN (pink, if missing because this is a mandatory field)
-
All additional mandatory attributes (pink, if missing; there is just the mandatory attribute surname (sn) in the screen shot above). Mandatory attributes get additionally inserted automatically, as soon as another auxiliary object class with mandatory attributes is added.
-
All Object Classes
See also Property Dialog, Property Editors and Property Pane.
Renaming
The renaming dialog allows you to rename the currently selected object. Note that the checkbox "Retain old name" does not appear unless you are renaming an LDAP entry. The same holds true for the button ![]() , which allows you to assign additional naming attributes.
, which allows you to assign additional naming attributes.
Here is an example (which illustrates renaming an LDAP entry):
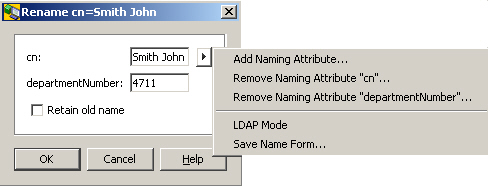
The menu item contains the following selections (the menu appears when you right-click the ![]() button)
button)
-
Add Naming Attribute
Adds an additional line that is to pick up an additional naming attribute (in the example dialog, the line "l: Atlantis" resulted from a previous use of this function) -
Remove Naming Attribute "…"
Only present if there is more than one naming attribute on display -
LDAP Mode
Changes the appearance of this dialog according to the screen shot shown next. -
Save Name Form…
Stores the current name form locally for reuse when another object of the same type is to be created.
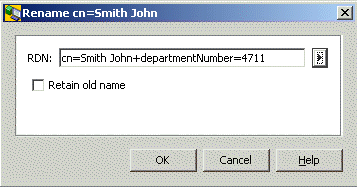
This is the same menu item as the previous example, but in LDAP notation. In this mode, there is only one function available through the right mouse button. This function changes the appearance of the dialog back to the look shown in the previous example.
Searching
There are two sorts of search dialogs available (may occur combined, too):
-
The rather simple search that is supposed to be sufficient for most cases
This dialog has a sub dialog that allows you to specify "compound object classes" -
The full featured advanced search that allows you to express quite complex searches
Simple Search
This dialog is displayed for example by the search function that is usually available on the right mouse button. The elements used in this dialog may likewise show up in a search pane (except for the search result, which is shown separately in an associated list pane).
Here is an example:
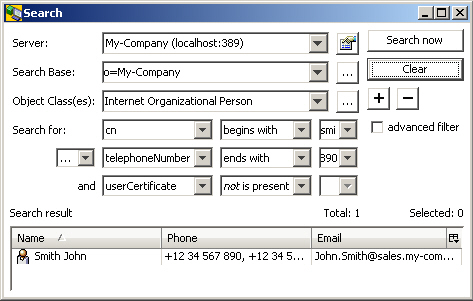
This dialog contains all or a subset of the following elements:
-
A field to select the server to be addressed (suggested: the current server)
-
A field to define the search base (suggested: the current entry)
Click (the one located to the right of the search base field) to display a dialog that allows you to choose a value from a tree.
As opposed to the dialog, the search pane has an additional feature: If combined with a tree browsing pane, the search base may be taken from the entry currently selected in an associated tree pane - either automatically after switching back to the search tab or by explicitly clicking a button like -
A field to choose the object class(es) the returned entries must have
The choice of filter attributes offered in the "Search for" combo boxes that follow beneath depend on the object class(es) chosen here. If only one object class is selected, all filter attributes are offered that are (directly or indirectly) assigned to this object class (disregarding that attributes may generally be disabled). If more than one object class is selected (like in the example above), all filter attributes are offered that are (directly or indirectly) assigned to at least one of those object classes. Regarding to the sample, all filter attributes are offered that are assigned to object class "InetOrgPeron" or to object class "pkiUser" (or both).
If the object classes are associated with "AND", a corresponding search result contains only entries having each of those object classes. If they are associated with "OR", a corresponding search result contains only entries having at least one of those object classes.
Not really an object class is "(any)": Choosing "(any)" causes all available filter attributes to be offered. The object class used behind (any) is "*" (LDAP jargon). Note that this means that only entries having an object class can be found. LDAP entries must have at least one object class anyway, violations of this rule are rather uncommon.
By default, the object class(es) combo box allows you to choose one single object class (or the pseudo object class "(any)"). However, you can define kind of "compound object classes" after pressing the button that is located to the right of the object class field. The object class compositions you define this way are sorted ahead of the ordinary object classes in the object class combo box. You can assign a name to your definition. In this case, you can check how you have defined the current compound object class by looking at the tooltip of the object class(es) combo box. Regarding the sample above, the name is "People", the tooltip shows "inetOrgPerson OR pkiUser"
Auxiliary object classes are identified by a suffix such as "(aux)", whereas structural object classes lack any characteristic suffix. -
Fields to specify a filter attribute, filter type and filter value, e.g. Common name begins with Smith Jo
This element may appear several times (controlled by two buttons that enable you to expand or collapse the number of these elements: ). You can associate these elements by either logical "and" or logical "or". Mixing "and" and "or" is not possible. Filter types usually also offer negations (indicated thru a prefixed "not") as shown in the picture below:
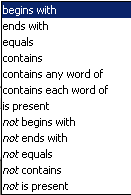
-
Buttons to initiate a search or to cancel a search that has not yet completed:
or . Note that the button may automatically change to each time a search is initiated. -
A button that causes the attribute filter elements to collapse to one element and delete its filter value:

The dialog depicted above is technically a "frame", not a "dialog" (for example, it has no OK, Cancel or Close button), a differentiation that is generally ignored in this help. Alternatively, it can also occur as a real dialog; in that case, the search result field would be missing.
Compound Object Classes
A dialog like the one depicted below is popping up after pressing the ![]() button that is located to the right of the object class(es) field in the simple search dialog or in the search pane. It allows you to define a logical association (AND or OR) of several object classes to be used as a filter element in a search.
button that is located to the right of the object class(es) field in the simple search dialog or in the search pane. It allows you to define a logical association (AND or OR) of several object classes to be used as a filter element in a search.
The main idea is that you compose one structural object class with one or more related auxiliary object classes. For example, you could specify "inetOrgPerson AND pkiUser". In this case, you would search for entries having both object classes and you would only be offered the filter attributes that are (directly or indirectly) assigned to inetOrgPerson or to pkiUser, e.g. you would be offered "telephoneNumber" (which is commonly assigned directly to organizationalPerson and - by way of inheritance - indirectly to inetOrgPerson) as well as "userCertificate" (which is commonly assigned to pkiUser). This would otherwise only be possible with object class "(any)".
You can also compose two or more auxiliary object classes or two or more structural object classes, respectively. The latter makes sense at most if you associate them with "OR" (otherwise all object classes but one would be superfluous (if they are all in one inheritance line) or you would never get a search result (if not)).
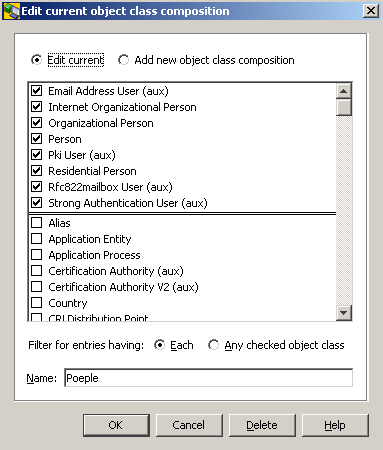
Auxiliary object classes are identified by a suffix such as "(aux)", whereas structural object classes lack any characteristic suffix.
Check the Edit current check box if you want to edit a previously defined compound object class. Check the Add new object class composition check box if you want to create a new one.
Check the Each check box if you want to associate the checked object classes with "AND". Check the Any checked object class if you want to associate them with "OR"
Click the Delete-button if you want to delete the currently selected object class definition (note that you cannot delete an "ordinary" object class that was not defined by yourself but was obtained from the schema).
You may or may not assign a name to your object class definition that is to be shown in the object class(es) combo box of the search dialog or the search pane instead of a list of the checked object classes. The tool tip will still provide you with information concerning the involved object classes and their logical association.
Advanced Search
At appropriate places, a search dialog like the one depicted below may be present; it is intended to allow for both, composing filters complex enough to meet even the most sophisticated needs as well as for comfortably composing rather ordinary filters. Unlike this filter type, the simple filter is somewhat restricted in order to be able to satisfy the majority of use cases particularly conveniently.
Example of an advanced search (without supplementary simple search tab):

The advanced search allows to:
-
Associate attributes with values thru operators like "begins with", "ends with", "equals", "contains", "is present"
-
Combine such associations with "not", "and", "or", "and not", "or not" (use the "inner"
 buttons)
 -
Group such associations and combine those groups analogously (use the "outer"
buttons) -
Recursively nest groups (use the "outer"
buttons) -
Delete the current row or group row (use the
buttons)
Use the button ![]() to undo and
to undo and ![]() to redo your previous action.
to redo your previous action.
The tab completes with a preview field that shows the resulting logical expression is intended to help you keep track.
The text entered in the Value field is treated as the search value itself. If the value contains the special characters backslash "\", left parenthesis "(" or right parenthesis ")" they are internally changed to the corresponding escape sequences "\5c", "\28" or "\29". However, if a backslash is followed by two hexadecimal digits, it is treated as a valid escape sequence and the backslash is kept as it is.
For example:
-
"\abc" will be kept as "\abc" because "\ab" is a valid escape sequence. The filter will then search for a two-character text beginning with a character with hexadecimal code AB followed by the character "c".
-
"\a\b\c" will be replaced with "\5ca\5cb\5cc" since none of "\a\", "\b\" or "\c" is a valid escape sequence. The "\" character will then be replaced with "\5c".
The Attribute field can also contain virtual attributes; for example, “dxrOptions(location)”. When converting these attributes to the LDAP search expression, the name part in the parenthesis is converted to the attribute value.
When parsing the virtual attributes from the LDAP search expression to the Attribute combo, it is first verified whether the search expression matches some of the virtual attributes in the Attribute combo list. If the LDAP search expression matches a virtual attribute, it is treated as a virtual attribute. If the LDAP search expression doesn’t match any virtual attribute, it is treated as standard attribute.
For example:
-
If the search expression is "dxrOptions(location) equals Munich", the resulting LDAP search expression is "(dxrOptions=location Munich)".
-
Parsing the LDAP search expression "(dxrOptions=location Munich)" results in "dxrOptions(location) equals Munich" since the "dxrOptions(location)" is present in the combo box selection list and thus recognized as a virtual attribute.
-
Parsing the LDAP search expression "(dxrOptions=locate Munich)" results in "dxrOptions equals locate Munich" since the "dxrOptions(locate)" is not present in the combo box selection list. Thus, the attribute is recognized as pure "dxrOptions" without any further specification.
The dialog also offers a tab addressing those who are accustomed to genuine LDAP syntax. This tab allows you to enter the filter in the LDAP filter expression format. The search expression is taken "as is" and you are fully responsible for its correctness.

When switching from the LDAP tab to the Advanced tab, the search structure in the Advanced tab is reconstructed from the LDAP filter expression in the LDAP tab.
When switching from the Advanced tab to the LDAP tab, the LDAP search expression is created from the search structure only if some modifications were made - the "undo" button in the Advanced tab is enabled. If the "undo" button is disabled, no changes were made and the LDAP search expression in the LDAP tab remains unchanged. This feature allows you to enter any search expression without overwriting from the Advanced tab.
Server
The server dialog allows you to specify server-specific information in a "Server Profile", particularly information needed to connect to an LDAP server. Server profiles often correspond to view groups or views. However, it is also possible to address different servers (or the same server with different server profiles settings) within a single tree pane.
Plug-ins may categorize server profiles; that is, they can ensure that you can only see server profiles of a certain category within the view groups, views, nodes in tree panes under control of a plug-in. Category names are not displayed. New server profiles you create in a context where a category is in effect already, implicitly inheriting that category.
The settings you can make here are organized into these tabs:
General
Deals with LDAP connection related settings
Options
Primarily deals with controls that are to be passed to the LDAP server along with respective LDAP operations
Visibility
Deals with the visibility of attributes and object classes in search panes and search dialogs
Password
Allows you to specify, if
-
the additional password of DirX Identity users should be managed
-
affected users should be notified by mail on password reset
LDAP Root
Displays what the server returns if asked for "LDAP Root".
General
Here is an example of the dialog’s "General" tab:
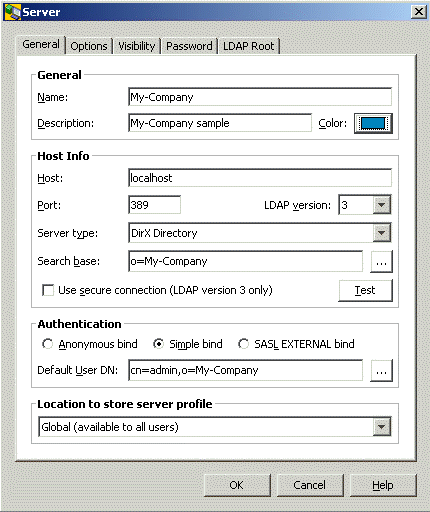
This tab deals with LDAP connection related settings and contains the following fields:
Name: name of this server profile
Description: any additional information you might consider helpful
Color: the color for this server profile
Host: host name or IP address
Also possible: a blank-separated list of hosts with or without complemental port number, e.g. "localhost:389 111.222.333.444 666.777.888.999:636"
In this case, this application will connect to the first address it can successfully connect to, starting with the first one. If the port number is missing, the value specified in the following field (Port) will be used.*
Note: when changing Host or Port here, the settings related settings in the password tab may need to be changed as well.*
Port: port number
By default, the server listens to port 389 or - if SSL is enabled - to port 636.
Note that
-
The designated port may be occupied by a different program. In this case, the LDAP server cannot start up with that port and must be assigned a different one.
-
The server side configuration may have been changed to correct a conflicting port problem or for another reason. In this case, the LDAP server should be able to start up, but you need to specify the corresponding port number here.
LDAP version: LDAP protocol version (normally: 3)
Server Type
This field is only present, if the "DirX Manager" plug-in is in place. There are two possible values: "DirX Directory" and "Other". The functionality DirX Directory Manager offers depends on this selection:
-
The subsequent field is called "Base DN", if server type is "Other" and "Search Base" otherwise.
-
Several functional areas work only with suitable versions of DirX Directory. These functional areas include:
-
Database (found in the DirX Directory Manager "Schema" view)
-
LDAP cache configuration (found in the Dirx Directory Manager "Configuration" view)
-
Password Policy (found in the DirX Directory Manager "Configuration" view)
-
Replication (DirX Directory Manager "Replication" view)
-
Schema is editable (DirX Directory Manager "Schema" view)
What functional areas ("features") are mapped to what vendor versions is specified in the file config\DirX.policy. Note that this release of DirX Directory Manager is not necessarily able to interwork with future releases of DirX Directory particularly regarding the functional areas mentioned above.
-
Also affected by the server type is the following field (Search Base/Base DN).
Search Base (displayed if server type is "DirX Directory") resp. Base DN (displayed, if server type is "Other" or if the DirX Directory Manager plug-in is absent)
-
Browsing
Ineffective, if Server type is "DirX Directory": Regardless of what is specified here, the tree panes always display the context prefixes as top nodes.
Server type is "other": The DN specified here is used as (only) top node in tree panes. -
Searching
The DN specified here is used as the default search base.
Use secure connection
In order for a secure connection to work, you must ensure that a suitable certificate is available in a local key store. By default, a test certificate is used that matches the default the DirX Directory LDAP server uses. Note that this certificate is only meant for demonstration. Read more about this in the chapter SSL/TLS.
Anonymous bind: to have this application try to connect without credentials (anonymously)
Simple bind: to have this application try to connect over a simple authenticated bind with credentials
SASL_EXTERNAL bind: to have this application try to connect over a SASL-authenticated external bind. If you select this option you must specify the client keystore. The client keystore is either stored in a File or on a Smart Card (PKCS#11). Using a file is intended for demonstration or testing purposes. For details on how to perform a smart card login with DirX Directory Manager, see "Smart Card Login" above.
Default User DN: The DN you typically use to log in
Location to store server profile: the choice of locations may vary depending on the plug-in that is behind this dialog. Generally, the available choices should be all or a subset of:
-
User Home: This profile is to be used only by you
(the profile will be stored in your home directory) -
Global: This profile is to be offered all users using the same machine
Options
Here is an example of the dialog’s "Options" tab:
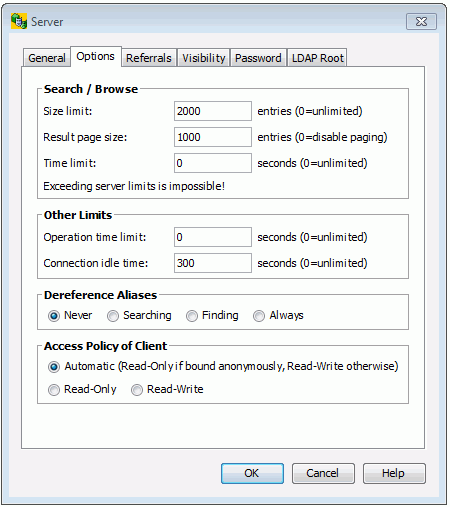
This tab primarily deals with controls that are to be passed to the LDAP server along with respective LDAP operations:
Limits
-
Size limit: the maximum number of entries the LDAP server is to return as the result of a search or browse operation. The value 0 is unlimited number of entries. Note that the server may return fewer entries, since it may have a more restricted server-side size limit. As for DirX Directory, specify a size limit for the LDAP server in the LDAP configuration subentry, for the X.500 server in the user policy attribute(s).
-
Result page size: the maximum number of entries of one page of the search result. The value 0 disables paging.
-
Time limit: the maximum period of time granted to the LDAP server to complete a search or browse operation. The value 0 is unlimited number of seconds. Note that the LDAP server may have a more restricted server-side time limit. Also, the server may not observe this limit strictly.
-
Note that if a size or time limit takes effect, the remaining (unread) entries can come from anywhere within the range of entries on display; that is, in the result that the server returns, some existing entries may be omitted, while others that are alphabetically behind may be present.
-
Operation time limit: under rare conditions, a server may fail to return any result within a reasonable amount of time, even if other limits have been set. The operation time limit limits this application’s "patience" with the duration of an LDAP operation. If the patience is exhausted, this application, in order to avoid getting blocked, displays a message and discards the result. Once the operation time limit has been reached, a corresponding result that arrives late will be disregarded. The value 0 is unlimited number of seconds.
-
Connection idle time limit: Limits the amount of time this application is to maintain a connection with the server when there is no traffic on the connection. The value 0 is unlimited number of seconds. Note that the server may have a more restrictive connection idle time limit and cancel the connection on its own.
Note that if a connection has been cancelled and the user initiates another operation, this application will normally try to implicitly re-establish that connection.
De-referencing aliases. Possible values are:
-
Never: specifies that aliases are never de-referenced
-
Searching: specifies that possible aliases are de-referenced in the search result
Note that when intending to manage (particularly delete) alias entries, you should not have checked Searching or Always, since then the server does not return any alias entries. Otherwise you run the risk of mistakenly deleting the original entry rather than the alias with the alias pointing to an entry that no longer exists. -
Finding: specifies that the search base is to be de-referenced if it happens to be an alias
-
Always: specifies that aliases are always de-referenced
Note that when intending to manage (particularly delete) alias entries, you should not have checked Searching or Always, since then the server does not return any alias entries. Otherwise you run the risk of mistakenly deleting the original entry rather than the alias with the alias pointing to an entry that no longer exists.
Access Policy
An LDAP server primarily grants and denies access rights based on access control information stored at the server side. This application normally cannot determine a particular user’s access rights. By default, the GUI does not offer any add/modify operations to users logging in anonymously and does offer those operations to users logging in with credentials. This behavior is not always appropriate and can therefore be changed. Possible values are:
-
Automatic: Apply the default policy.
-
Read-only: Do not offer add/modify operations no matter how the user has been logging himself in.
-
Read-Write: Offer add/modify operations even if the user has been logging himself in anonymously.
Referrals
Here is an example of the dialog’s "Referrals" tab:
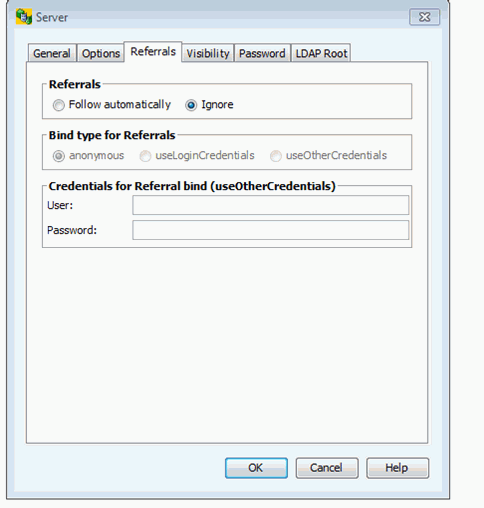
This tab deals with the handling of referrals.
Referrals
A server may return referrals pointing to other servers as part of a search result, thus indicating that one or more other servers should be consulted in order to complete a search operation.
-
Follow automatically: the application automatically follows any referrals returned by the server that points to a different server until the "referral hop" limit is exceeded. The referral hop limit defaults to 10. This application does not support modifying the referral hop. Note that following referrals automatically does not work unless the server to which the request is referred accepts anonymous binds.
-
Ignore: Referrals returned by the server are discarded.
Bind type for Referrals
Here you specify which bind you want to use for following the referrals.
-
anonymous: an anonymous bind is used for following referrals. This is the default.
-
useLoginCredentials: The same credentials you used for login to DirX Directory Manager are used.
-
useOtherCredentials: the credentials defined in “Credentials for Referral bind” are used.
Credentials for Referral bind (useOtherCredentials)
Here you specify the credentials used for bind to follow the referrals. Only active if useOtherCredentials is selected in “Bind type for Referrals”
-
User: the user for bind to follow referrals.
-
Password: the password for bind to follow referrals.
Visibility
Here is an example of the dialog’s "Visibility" tab:
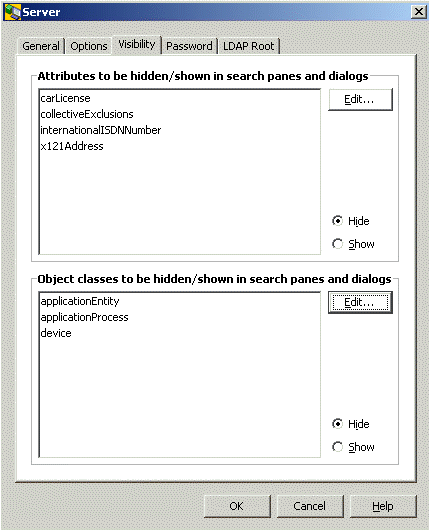
This tab deals with the visibility of attributes and object classes in search panes and search dialogs.
The schema usually provides quite a number of object classes and attributes you never intend to use in searches - and whose appearance in the respective combo boxes of search panes and search dialogs you may find bothersome. This dialog along with the subdialogs that pop up when you click one of the "Edit…" buttons allows you to hide unwanted object classes and attributes in those combo boxes. You can either select all elements you want to have hidden (which means that all remaining ones are shown) or you can select all elements you want to have shown (that means all remaining ones are hidden).
Notes:
-
Certain object classes, particularly object classes of subentries, are a priori hidden in search panes and search dialogs and cannot be made visible.
-
Hiding all attributes of an object class (exactly: all attributes but the attribute "object class" that every object class has, at least if derived from object class "top") implicitly causes that object class to be hidden, too.
Password
Here is an example of the dialog’s "Password" tab:
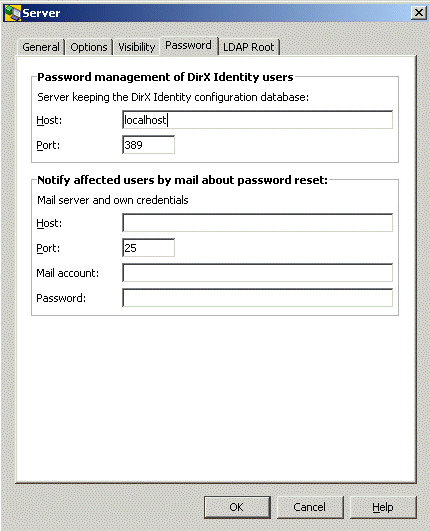
Password management of DirX Identity users
Only of interest if the server addresses a DirX Identity database. Among many other things, DirX Identity deals with DirX Identity users that are characterized by an additional password stored in the attribute dxmPassword. This password must - depending on the DirX Identity configuration - either be scrambled or two-way encrypted. If you modify the ordinary attribute userPassword through DirX Identity functionality, dxmPassword will be implicitly modified, too.
The core component of this application has generic password management functionality that is originally not DirX Identity aware. However, by completing the settings you can do here, you can have the core component behave like DirX Identity when modifying userPassword. The Host/Port fields relating to the password management of DirX Identity users are editable, if the schema contains the attribute dxmPassword (note that this can only be found out, if the schema can be read). In this case, the core component will consider this server a DirX Identity database. To be able to do so, the core component must enquire the DirX Identity configuration to find out, whether dxmPassword is to be scrambled or to be encrypted; in the latter case, also the key must be picked up. Note that the DirX Identity configuration may reside in a different server. By default, the server storing the DirX Identity database is assumed to also store the DirX Identity configuration.
If you leave the respective Host/Port fields empty or if dxmPassword cannot be detected in the schema, the core component will not implicitly deal with the attribute dxmPassword.
Furthermore, if the server keeping the DirX Identity users is set up, the mirrored administrator user must be present in the Connectivity under the RDN dxmC=Users,dxmC=DirXmetahub.
Mail notification on password reset
If the affected users are to be notified by mail on password resets, you must specify host and port of the mail server as well as your credentials, i.e. your mail account and the belonging password. Note that the format of the mail account varies depending on the mail server in use. Common formats include: "<your domain/your name>", <your email address>, <a number>.
Note that the reset password functionality is only available, if the server indicates its support in the LDAP Root DSE ("Password Policy Control"; Object Identifier, displayed directly or thru tooltip: 1.3.6.1.4.1.42.2.27.8.5.1) and if the operational attribute pwdReset can be set.
See also: Property Tab "All Attributes", Change Password, Reset Password, User Password.
LDAP Root
Here is an example of the dialog’s "LDAP Root" tab:
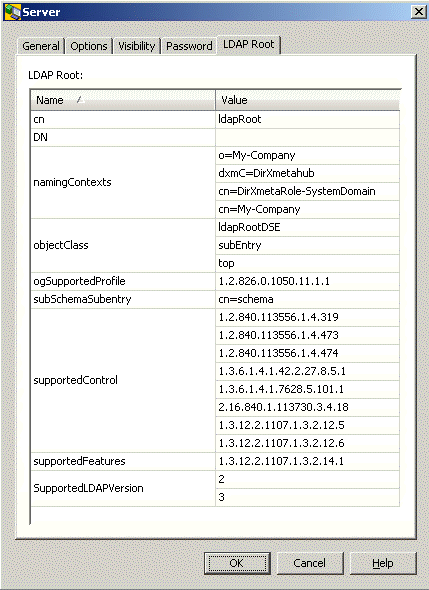
This tab displays what the server returns if asked for "LDAP Root" (which is done by reading an entry with its DN being empty, i.e. DN=""). Details may vary from server to server, mainly depending on the vendor. Refer to the server’s original documentation for properties that are not self-explanatory. Note that modifying the LDAP Root is not supported. This application uses LDAP Root itself for a number of purposes; for example, to:
-
Locate the server’s schema
-
Find out what controls the server supports
Open Server/Manage Server Profiles
The "Open Server" dialog may be configured in the menu (typically in the file menu). It allows you to open a pre-configured server profile. It also allows you to add new and delete/edit existing server groups profiles. New profiles can also be created based on existing ones ("Copy").
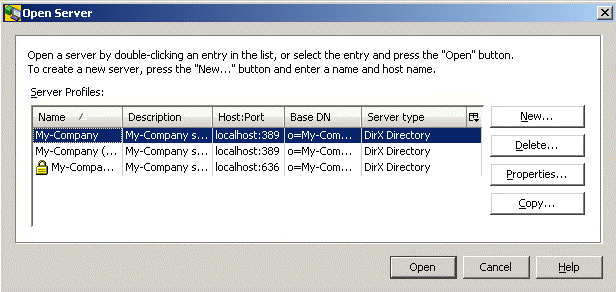
The slightly different "Manage Server Profiles" dialog may be available in the Login dialog. It has a "Close" button rather than an "Open" and a "Cancel" button, since an open button would not make sense in that context.
Pitfalls
If the reaction on an operation you have initiated is not as you expected, check if one of the following instances applies:
Login
-
IP filtering (to be configured in the LDAP configuration subentry) offers a powerful way to keep clients from connecting to the server from unwanted IP addresses. However, improper settings may lockout authorized users including yourself, too.
If the DirX Directory Manager plug-in is installed, you may have access to the LDAP configuration subentry from within this application (probably from a different IP address); otherwise use a tool provided by the server like dirxadm -
SSL is a powerful way to secure the client/server communication. It presumes however that a keystore with a suitable certificate is configured.
Retrieval operations
-
Access control may hide the existence of any subset of the directory information. So, not finding certain entries or attributes in a read/search/export operation does not necessarily mean that those entries or attributes are not there.
-
Access control may cause the entire search functionality to be unavailable. Typical reason: Schema cannot be read.
-
If tree browsing does not work, check, if the naming context is administered in the LAP Root DSE.
-
If an administrative limit like time or size limit restricts the search result, the entries returned are not necessarily the alphabetically leading ones. So, in this case it is absolutely normal if an entry you are expecting because it matches your search criteria does not appear in the search result list.
Administrative operations like Add/Modify/Rename/Delete
If you run your directory with shadowing in order to balance communications traffic and increase reliability, be aware of the following possible effects: when adding/modifying/renaming/deleting an entry while connected to a shadow DSA, the operation may appear to have failed, since the entry might be missing/out-dated/still there when searching for it later on. This is because administrative operations always affect the master, while the search operation may address a shadow that is not yet up to date
Moreover, if the server does not support simple paging, a delete subtree may have trouble completing at all within a reasonable period of time, since it has to search the shadow for entries to be deleted and might receive the same entries again and again, as long as the shadow is not updated.
These effects are mitigated if you:
-
Connect directly to the master (this may however not always be viable).
-
Have the master update the shadow "on change". In this case, the shadow should become synchronized rather quickly (this may not always be viable either).
-
Set up dedicated LDAP servers to be contacted by administrators and make sure they directly address the master DSA or the service control "Don’t use copy" (corresponding LDAP configuration subentry) is set to "true" for all operations.