Using the Source Workflows
Identity source workflows synchronize information from existing sources to the Identity Store.This chapter provides detailed information about source workflow features, configuration, and user hooks.The sections in this chapter describe:
-
Java-based source workflows
-
Tcl-based source workflows
Understanding the Java-based Source Workflows
DirX Identity’s Java-based source real-time workflows provided with the default Connectivity scenario include:
-
Creation workflows - workflows that extract user information from existing identity sources (for example, an HR or a CRM database, an Active Directory system or a file system) and populate the Identity Store with user information. The workflows either use the Full-Import controller, which works in "Replace" mode and deletes those users in DirX Identity that do not exist in the source system, or the SyncOneWay2Identity controller, which works in "Merge" mode and does not delete DirX Identity user entries that do not exist in the source.
-
Update workflows - workflows that transfer specific information from the Identity Store to the identity sources (for example, e-mail addresses or telephone numbers) to enable them to use the joined, high-quality information in the Identity Store. These workflows use the SyncOneWay2TS controller.
DirX Identity provides the following pre-configured creation and update workflows:
-
Import Users from Active Directory - imports Active Directory users to the Identity Store.
-
Import Users from Database - imports users from a relational database to the Identity Store.
-
Import Roles From Database - imports role data from a database to the role catalog of the Identity Store.
-
Import Users from LDIF - imports users from an LDIF content file to the Identity Store.
-
Export Users to LDIF - exports users from the Identity Store to an LDIF content file.
-
Import Users from CSV - imports users from a CSV file to the Identity Store.
-
Export Users from CSV - exports users from the Identity Store to a CSV file.
-
Import of External LDAP Users - imports users from an external LDAP to the Identity Store.
DirX Identity also provides the Remote AD workflow, which is intended for deployment with Atos Cloud Service Identity Management as a Service (IDMaaS).
Active Directory (ADS) User Import Workflow
The Active Directory (ADS) user import workflow operates between the users folder in the Identity Store and an Active Directory connected system. It uses the same APIs and component deployment as the Java-based Active Directory (ADS) Provisioning workflows. See the section "Active Directory (ADS) Workflows" in the chapter "Using the Target System (Provisioning) Workflows" in this guide for more details.
The workflow is based on Java real-time technology, with the ADS connector accessing an Active Directory via native LDAP protocol and the LDAP connector accessing a DirX Identity domain. The Full-Import controller is configured as the join engine. The controller exports all AD users from the source system and then imports them into the Identity domain user tree.
This workflow can also be used as a template for other Java-based source workflows for user objects. Other user data sources instead of ADS can be connected.
The connected directory UserADS represents the Active Directory containing the users and the connected directory Identity Store represents the Identity domain.
The next sections describe
-
Workflow prerequisites
-
How to configure the workflow
-
The workflow and its activities
-
Ports
-
Channels
The workflow allows you to import Identity users from source ADS user entries. The workflow needs only one channel for users and a set of attributes to be imported.
The workflow handles these common objects:
Users - the user represents in this workflow a common account in an ADS connected system. It typically holds the demographic data and ADS account control attributes.
The delivered workflow is:
-
Import Users from ADS - the source Java-based workflow exports all specified ADS users and then imports them into Identity Store.
ADS User Import Workflow Prerequisites
The workflow can be used only with supported versions of Active Directory server.
ADS User Import Workflow Configuration
The ADS User Import workflow configuration on the Connectivity side is described in detail in "Active Directory (ADS) Workflows" in the section "Using the Target System (Provisioning) Workflows".
ADS User Import Workflow and Activities
The workflow Import Users from ADS is a Java-based source workflow with two activities:
-
Join activity - implements the user import
-
Error activity - receives update requests that failed despite retries and issues notifications
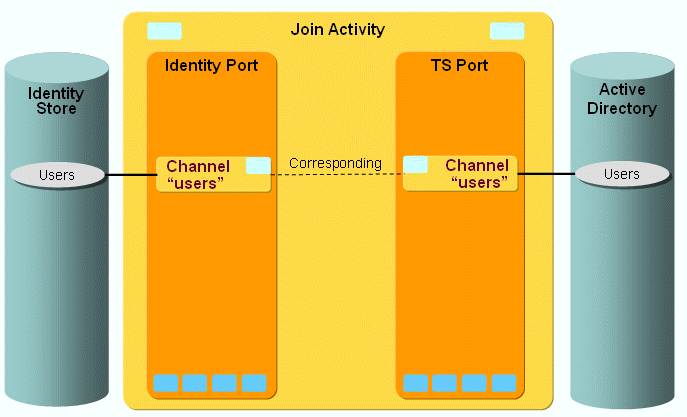
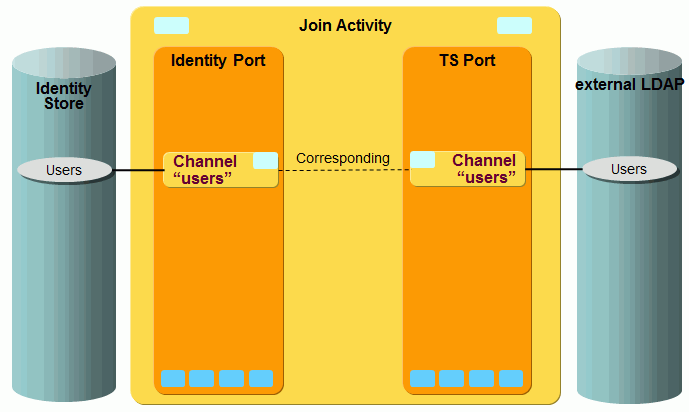
The join activity is controlled by the Full-Import controller. It exports ADS user entries via the connector configured in the TS port and performs updates via the connector configured in the IdentityDomain port, as illustrated in the following figure:
You can start the workflow either manually or via a schedule.
There are no global user hooks and no filters necessary.
ADS User Import Workflow Ports
The workflow supports the following ports:
-
TS port - represents the ADS that contains the users (accounts). The ADS connector is used to access the Active Directory.
-
IdentityDomain port - represents the DirX Identity domain and is accessed via the LDAP connector.
-
Event - used for sending change events.
-
Notify - used for sending e-mails.
ADS User Import Workflow Channels
The workflow needs only one channel per port. It represents the user objects.
TS Port
This port represents the connection to ADS. It is only used for exporting users and attributes from the ADS. The users are expected to be stored in the organizational unit OU=Users,OU=BRQH,OU=CZ.
Export:
Filter is set to &(objectClass=user)(objectCategory=person).
Identity Port
This port represents the connection to the Identity Store. It is used for importing users into an Identity domain.
Export:
For exporting, the search base is taken from the environment property role_ts_account_base (in the connected directory Provisioning tab). The filter is needed to only export users from an Identity domain.
Mapping:
The SPML identifier must be set when a user is created. The id is composed by exchanging the base of source ADS identifier (full DN containing DCs and OUs) through the role_ts_account_base. The base of the ADS user is set as the concatenation of the Relative User Base (user_base_rel) settings and Domain.
The associated user for a source entry is first searched using the mapped dxmADsGuid attribute value and then via the dxmADsSamAccountName attribute value.
The attribute dxrState is mapped specially by a Java class. The resulting values are ENABLED, DISABLED or TBDEL. The states ENABLED and DISABLED are set according to the attribute flag userAccountControl, which controls the account state in ADS. The TBDEL state is set when the source entry in ADS no longer exists. When a change of the dxrState attribute is detected, an appropriate date attribute of the user entry is set with the current date and time. The dxrStartDate attribute is set for newly imported user objects (ENABLED). Deleted entries (TBDEL) have the attribute dxrEndDate set. The change of state ENABLED to DISABLED (DISABLED to ENABLED resp.) is tracked in the attribute dxrDisableStartDate (dxrDisableEndDate resp.).
Relational Database User Import Workflow
The Import Users from Database workflow imports users and their role assignments from a relational database into a DirX identity domain. It uses the Identity domain connector to access the DirX Identity domain and the JDBC connector to access the relational database. The connected directory UserDB represents the relational database containing the users and their role assignments and the connected directory Identity Store represents the Identity domain.
The Full-Import controller is configured as the join engine. The controller exports all users from the database table, adds the assignments from the role assignment table and then imports them into the DirX Identity domain user tree. The Identity domain connector resolves and stores the users along with changed accounts and groups. If a privilege requires approval, the connector starts a request workflow.
Relational Database User Import Workflow Prerequisites
The sample workflow configuration expects a Microsoft Access database new-hr. It uses the open source JDBC Java driver UCanAccess; the jar file ucanaccess.jar with this driver is deployed with the IdS-J Server in its subfolder confdb/jobs/framework/lib/.
The relational database must contain two tables: the EMPL table with a list of users and the EmplRoles table with a list of user-role assignments. They reference the user with their PersonalNr and the role with their roleID.
Relational Database User Import Workflow Configuration
The Import Users from Database workflow configuration conforms to the standard real-time workflow structure: it is composed of a join activity and an error activity. The following figure illustrates this configuration:
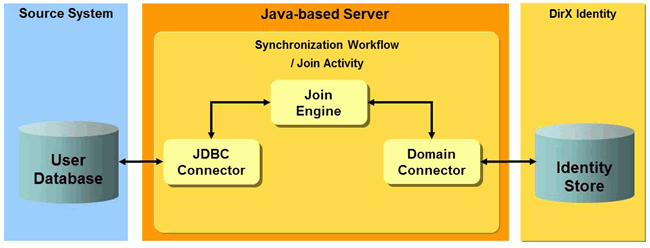
As shown in the figure, the JDBC connector accesses the relational database, while the Identity domain connector accesses the Identity domain.
JDBC Connector and Connected Directory Configuration
The JDBC connector configuration obtains its properties from the referenced bind profile (user, password) and the JDBC connected directory’s driverDBType, type and url attributes. In the sample, driverDBtype is the JDBC-ODBC driver (class name: siemens.dxm.connector.jdbc.AccessOverJdbcOdbcDriver) and type is the class name of the driver (net.ucanaccess.jdbc.UcanaccessDriver).
TS Port Filter Configuration
The TS port represents the relational database accessed by the JDBC connector. You need to configure a real-time filter for the TS port that adds the user-role assignments from the EmplRoles table as an attribute to the user. The sample configuration uses the filter class net.atos.dirx.dxi.connector.svclayer.workflow.JdbcRoleAsgFilter, which evaluates the following configuration options:
-
assignmentTable - the filter needs to know the name of the table that contains the user-role assignments. As it sees all requests and responses between the join engine and the JDBC connector, it also receives the requests to the users table and must leave them untouched.
-
roleAsgAttribute - the attribute under which the role assignments should be returned to the join engine. If the option is empty, the filter uses the rolesassigned attribute.
-
userIdColumn - the column name of the user-role table that holds the ID of the user. The filter expects the search result to be ordered by this column. All consecutive records with the same user ID are considered to belong to the same user and added as multiple values (one record = one assignment = one value) to the role assignment attribute of the user.
-
roleIdColumn - the column name of the user-role table that holds the identifier of the role.
-
paramIDColumn - the column name of the user-role table that holds the identifier of the role parameter.
-
paramValueColumn - the column name of the user-role table that holds the value of the role parameter.
The filter only intersects search requests for the assignment table. It collects all search result entries for the same user and adds them as a multi-value attribute to the first entry for this user. The join engine then adds this attribute to the user attributes list it has obtained by reading from the user’s table.
Note that the column names that contain the end date of an assignment, the role parameter UID and the role parameter value are hard-coded in the filter. For a custom workflow, the filter needs to be changed and adapted.
The sample filter implementation can be used as a template for custom filters. See the source code in the folder Additions/ServiceLayerConnector and the Javadoc in the folder Documentation/DirX identity/ServiceLayerConnector of the product media.
Relational Database User Import Workflow Channel Configuration
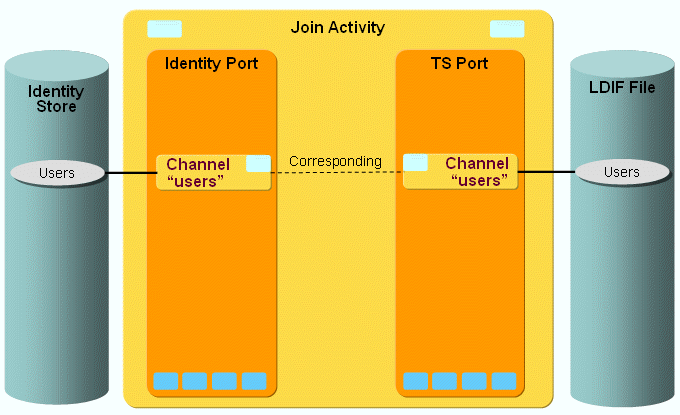
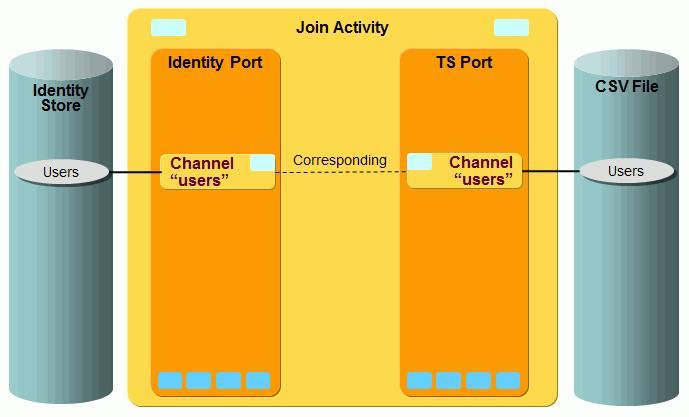
The following figure illustrates the workflow’s ports and their channels:
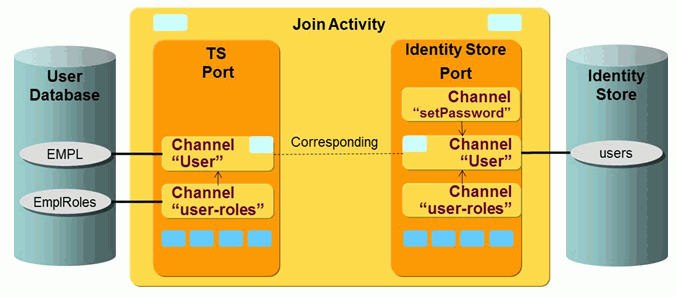
As shown in the figure, the TS port represents the access to the relational database, while the Identity Store port represents the access to the DirX Identity domain.
You need to configure two channels for the relational database:
-
User - the primary channel for reading the user attributes.
-
user-roles - the secondary channel that represents the table holding the user-role assignments.
Here is a snippet of the EMPL table with the user attributes, including the PersonalNr column, which uniquely identifies the user in this table:

Here is a snippet of the EmplRoles table showing its columns:

| Especially the PersonalNr column, which contains the ID of the user and acts as a type of foreign key into the EMPL table in the database. |
You need to configure three channels for the Identity domain:
-
User - the primary channel that represents the users in the domain.
-
user-roles - the secondary channel that represents the user-role assignments.
-
setPassword - the password channel that defines the password-related attributes.
User Channel at the TS Port
This port is only used for searching, so there is nothing to be configured for the import. The Export tab needs to contain the table name in DN format; in the sample, it is Table=EMPL.
The mapping lists all the columns of the table that are to be synchronized to the Identity domain. Note that the identifier is in DN format and should be populated with the EmployeeID, which is considered to be unique.
User-roles Channel at the TS Port
This secondary channel needs to refer to the primary channel User in its Primary Channel tab. For joining an assignment record to the user record, you need to select the user ID column in the assignment table (in the sample, EmplRoles.PersonalNr) and in the users table (in the sample, PersonalNr).
The Export tab needs to contain the table name in DN format; in the sample, it’s Table=EMPL.
The mapping lists the columns to be exported. As the workflow only reads from the database, you don’t need to configure a mapping.
User Channel at the Identity Store Port
In the Export tab, make sure to sort the entries according to the same attribute as in the database; in the sample, it is the employeeNr, because the personalNr in the database is mapped to it.
In the Export tab, configure the parent folder of the users to be exported and imported as the search base. It is taken from the environment variable role_ts_account_base. This variable is set in the connected TS directory (that is, the user database). For simplicity, the folder cn=system under the users folder is selected for the sample because it exists by default and it is empty.
The joining of a database user to the user in LDAP is also performed using the unique employeeNr (Join tab).
The user-privilege assignments are configured in the separate channel user-roles. As a result, you need to add a reference to this channel to the Member Channel field in the General tab.
User-roles Channel at the Identity Store Port
The user-roles channel represents the privilege assignments of the user.
As the sample covers only role assignments, you only need to configure the rolesassigned attribute in the mapping section. You need to configure the attributes permissionsassigned and groupsassigned for permissions and groups. You also need to implement and configure a mapping function for these attributes; in the sample, it is net.atos.dirx.dxi.connector.svclayer.workflow.MapRolesAssigned. This function expects the assignments in the attribute rolesassigned of the source entry in structured JSON format; for details, see the chapter on the Identity Domain Connector in the DirX Identity Connectivity Reference. The mapping replaces the ID of the role that is known in the database with the DN of the role in LDAP. For this purpose, it retrieves a reference to the connector from the environment and requests it to search the role by its role ID.
You can use the sample mapping function implementation as a template for custom mappings. See the source code in the folder Additions/ServiceLayerConnector and the Javadoc in the folder Documentation/DirX identity/ServiceLayerConnector of the product media.
setPassword Channel at the Identity Store Port
The setPassword channel represents the password-related attributes of the user. This is expressed by setting a reference to the Password Primary Channel field (in the sample, User) in the General tab.
By default, the connector does not store the password itself. Instead, it sends it encrypted within a password change event to the workflow UserPasswordEventManager. This workflow changes the password at the user and initiates an update in corresponding accounts. You don’t need to configure other password-related attributes such as dxrPwdReset explicitly. They are handled automatically by the password change workflows.
If you want the connector to store the password as is directly in LDAP and not send a password change event, you must set the configuration attribute suppressPwdEvent to true. You can do this in the port IdentityDomain under the join activity of the workflow and select the tab Target System.
Importing Database Users without their Role Assignments
The sample workflow imports users and their role assignments. If you want to import users but not their assignments, you can re-use the workflow configuration by making the following changes to it:
-
Delete the channels for the assignments: navigate to the user-roles channel of the connected TS directory (in the sample, this is UserDB), select Go to DataView and then delete the LDAP channel entry in the Data View. Now perform the same actions on the corresponding user-roles channel under the Identity Store connected directory. To find its parent channel, select the IdentityDomain port under the workflow join activity and then navigate to the channel parent.
-
Delete the references from the User channels: under both connected directories, select the User channel. In the General tab, clear the Member Channel field.
-
Delete the role-assignment filter in the TS port: navigate to the join activity in the workflow and then to its TS port. Select the child role-assignment filter. From the context menu, select Go to DataView and then delete the LDAP filter entry in the Data View.
-
Select the workflow wizard wf-UserImportFromDB: In the Wizard field of the workflow entry, select the other wizard from the folder Configuration → Connector Types → SvcLayerConnector → Wizards.
Role Import Workflow
The workflow Import Roles from database imports roles from a JDBC database using DirX Identity Provisioning Web Services. The following figure illustrates this workflow.

The role import workflow is based on Java real-time technology, with the JDBC connector accessing the database and the SPMLV1ToV2 connector accessing DirX Identity domain. The Full-Import controller is configured as the join engine. Full-Import is a one-way controller that exports all roles from the source system and then imports them into the target system; in this case, the Identity domain.
This workflow can also be used as a template for normal provisioning workflows to SPMLv2 target systems by setting the SPMLV1ToV2 connector for the target system port, the LDAP connector for the Identity port and the synchronization or validation controller as the join engine.
The connected directory RoleDB represents the database containing the roles and the connected directory SPMLv2WebServices represents the Identity domain accessed via the Provisioning Services.
The workflow needs only one channel for roles and a minimal set of attributes to be synchronized.
The next sections describe
-
Workflow prerequisites
-
How to configure the workflow
-
The workflow and its activities
-
Ports
-
Channels
Role Import Workflow Prerequisites
The workflow configuration expects a Microsoft Access database registered as new-hr using the URL "jdbc:odbc:new-hr" (see connected directory, tab Configuration).
At the Identity side, the Identity Web Services must be deployed. Configure its port at the service associated with the connected directory and then configure the server name at the server object associated with the service. The URL path ProvisioningService/services/Spmlv2RequestService reflects the default path of the Web Services' Provisioning Services deployed with the IdS-J server.
Role Import Workflow Configuration
The default Connectivity scenario’s Import Role From Database workflow synchronizes role entries from a relational database table to the role catalog in the Identity Store.
To run the Import Role From Database workflow successfully, you must perform these steps:
-
Configure the JDBC source.
-
Configure the Role Import workflow.
-
Deploy the Identity Web Services.
Configuring the JDBC Source
The example database used for this scenario is delivered with DirX Identity and has the pathname install_path*/data/extension/new-hr.mdb*. It is protected with the password dirx to show the JDBC connector’s password feature.
-
Copy this database to C:/MetahubData (or another location, if you prefer). It is a good idea to make a copy of the new-hr.mdb database, so that you can restore the original later on if the working copy becomes corrupted.
-
Define this HR database to be an ODBC database:
-
On Windows 32bit:
-
Go to Start → Settings → Control Panel and then double-click Administrative Tools
-
Click on Data Sources (ODBC).
-
On Windows 64bit:
-
Run C:/windows/sysWOW64/odbcad32.exe.
-
If you installed DirX Identity with the system account, select the System DSN tab and then click Add… or use the User DSN tab.
-
Select Driver to Microsoft Access (*.mdb) and then click Finish.
-
Enter new-hr into the field Data Source Name.
-
Click Select….
-
Navigate to the location where you have copied new-hr.mdb, select it and then click OK. A new ODBC source is created.
-
Click OK again.
Configuring the Role Import Workflow
In the activity, select the Full-Import controller, which imports all source entries into the Identity Store and also discovers deleted source entries.
In the Identity domain port, specify the following options:
-
URL path: the path of the URL that denotes the Provisioning Web Service. Normally this is: ProvisioningService/services/Spmlv2RequestService.
-
Specify roles as the SPMLv2 PSO Target ID.
-
The reference attributes are dxrPermissionLink and dxrRoleLink. For the reference handler class, specify the default com.siemens.dxm.connector.spmlv1tov2.handler.SimpleReferenceHandler or leave it empty.
Only one channel is used per connected directory. The default mapping considers only very few attributes for importing a role into the Identity domain:
-
The identifier is concatenated from the role root entry, configured as role_ts_account_base in the connected directory and the attribute "name" of the source entry.
-
The primary key of the source ("pk") is mapped to "dxrRoleId" and is therefore also used as one of the join conditions.
Deploying the Identity Web Services
See the chapter "Web Services → Runtime Operation" in the DirX Identity Integration Framework Guide for information on how to deploy the Identity Web Services. You can deploy them to the built-in Tomcat in the IdS-J server or set up an additional Tomcat instance for the deployment.
Role Import Workflow and Activities
The workflow Import Roles from database is a real-time workflow with two activities:
-
Join activity - implements the role import
-
Error activity - receives update requests that failed despite retries and issues notifications
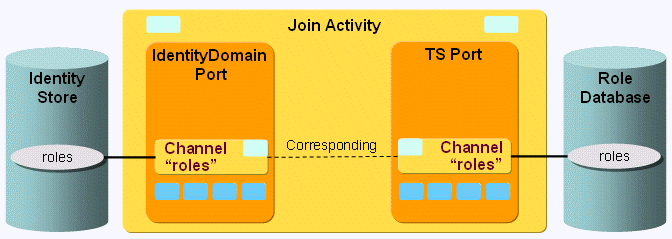
The join activity is controlled by the Full-Import controller. It exports entries via the connector configured in the TS port and performs updates via the connector configured in the IdentityDomain port, as illustrated in the following figure:
The workflow is not intended to be started on events, since we do not expect change events from the database.
There are no global user hooks and no filters necessary.
Role Import Workflow Ports
The role import workflow supports the following ports:
-
TS port - represents the database that contains the roles. The JDBC connector is used to access the database.
-
IdentityDomain port - represents the DirX Identity domain and is accessed via the SPMLV1ToV2 connector. The SPMLv2 target identifier roles tell the SPMLv2 Web service to manage role objects. For roles, the references dxrRoleLink and dxrPermissionLink are supported. These items are simple references without attributes, so the simple reference handler is sufficient for the corresponding protocol elements. This workflow does not support any other SPMLv2 capabilities and it does not support passwords.
Role Import Workflow Channels
The workflow needs only one channel per port. It represents the roles.
TS Port
Direction: Identity Store → Database
This channel is only used for exporting roles from the database. The roles are expected to be stored in the table roles. No filter is required.
The column pk contains the primary key of a role and is expected to be created by the database on creation. Therefore this attribute must not be updated and the SPML identifier need not be set when a role is created. In addition, the table contains the columns name and description.
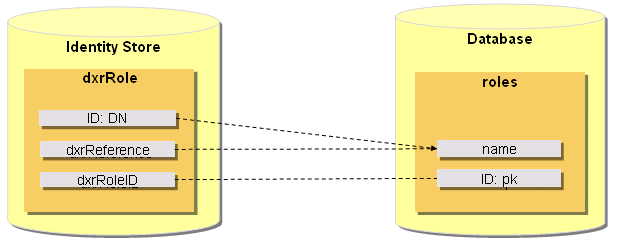
Although mapping is not needed, it is configured. It is very simple with only one-to-one mappings. Especially the SPML identifier (table name + primary key) is expected in the attribute dxrRoleID in the corresponding Identity channel.
There are two join conditions:
-
The first join condition expects an existing primary key and uses the SPML identifier as its search base.
-
The second join condition tries to join using the mapped value of the name column, assuming that the name is unique in the table.
Identity Port
Direction: Database → Identity Store
This channel is used for importing roles into an Identity domain.
Since only simple references are used, no user hook is necessary.
Export:
For exporting, the search base is taken from the environment property role_ts_account_base (in the connected directory Provisioning tab). The filter is needed to only export roles and no containers. Since the Web Services by default work with paged read, the appropriate flag is set to active (but can be omitted, since this is not configurable in the connector).
Mapping:
The SPML identifier must be set when a role is created. It is calculated using the name attribute of the source entry and the role_ts_account_base as the parent folder.
This name attribute is also stored in the attribute dxrReference, the primary key is stored in dxrRoleId. The following figure illustrates the channel mapping.
Join:
The associated role for a source entry is first searched using the mapped SPML identifier and then via the primary key stored in dxrRoleID.
LDIF User Import Workflow
The LDIF user import workflow operates between the Users folder in the Identity Store and an LDIF content file as a connected system that contains user entries.
The workflow is based on Java real-time technology, with the LDIF connector accessing an LDIF file and the LDAP connector accessing a DirX Identity domain. The SyncOneWay2Identity controller is configured as the join engine. The controller exports all users from the source file system and then imports them into the Identity domain user tree. It works in "merge" mode, which means that it doesn’t delete users in the Identity Store that do not exist in the source file. If "Replace" mode is desired, you can easily switch to the Full-Import controller in the Controller tab of the workflow’s Join activity.
This workflow can also be used as a template for other Java-based source workflows for user objects. Other user data sources instead of LDIF content file may be connected.
The connected directory LDIFfile represents the connected file system containing the users and the connected directory Identity Store represents the Identity domain.
The next sections describe
-
Workflow prerequisites
-
How to configure the workflow
-
The workflow and its activities
-
Ports
-
Channels
The workflow needs only one channel for users and a set of attributes to be imported.
The delivered workflow is:
-
Import Users from LDIF - exports all users from the LDIF file found under the specified search base and filter and then imports them into the Identity Store.
LDIF User Import Workflow Prerequisites
After performing the following steps, you can run the workflow without changing any configuration parameters:
-
Copy it with the Global View from the default scenario to your domain.
-
Copy the sample source data file install_path/*data/data.ldif* to C:/MetahubData.
LDIF User Import Workflow Configuration
Start the LDIF User Import workflow configuration wizard from the Global View domain-specific Source Realtime Scenario by right-clicking on the workflow line between the LDIFfile and the Identity Store or from the Expert View by right-clicking on the workflow under your domain and then selecting the configuration wizard. By stepping through the wizard, you can activate or deactivate auditing, choose another controller for the join engine, change the export search conditions, adapt the mapping or change the target join criteria.
LDIF User Import Workflow and Activities
The workflow Import Users from LDIF is a Java-based source workflow with two activities:
-
Join activity - implements the user import.
-
Error activity - receives update requests that failed despite retries and issues notifications.
The join activity is controlled by default by the SyncOneWay2Identity controller. It exports LDIF file user entries via the LDIF connector configured in the TS port and then performs updates via the LDAP connector configured in the IdentityDomain port, as illustrated in the following figure:
You can start the workflow either manually or via a schedule.
There are no global user hooks and no filters necessary.
LDIF User Import Workflow Ports
The workflow supports the following ports:
-
TS port - represents the LDIF file that contains the users (accounts). The LDIF connector is used to access the LDIF file.
-
IdentityDomain port - represents the DirX Identity domain and is accessed via the LDAP connector.
-
Event - used for sending change events.
-
Notify - used for sending e-mails.
LDIF User Import Workflow Channels
The workflow needs only one channel per port. It represents the user objects.
Users Channel at TS Port
This port represents the connection to LDIF. This workflow uses it for exporting users and attributes from the LDIF file.
Export:
Searchbase:
CN=Users,CN=My-Company.
Filter:
&(objectClass=inetOrgPerson)(employeeNumber=*)(ou=Procurement).
Searching only users from the organizational unit Procurement is just a sample configuration and can be changed to search and import all users from the delivered sample source file data.ldif.
Mapping:
Mainly used by the LDIF User Export workflow, which performs the configured mapping from Identity to the configured LDIF data export file. This workflow only reads the selected attributes from the import data file as the source for the mapping to Identity.
Join:
Only used by the LDIF User Export workflow.
Specific Attributes:
export_file = C:/MetahubData/data_out.ldif
Only used by the LDIF User Export workflow as the data output file.
Import_file = C:/MetahubData/data.ldif
Used by this workflow as the data input file.
Used by an LDIF Change (not Content) User Export workflow as the source connected system user data base for search operations of the join engine to calculate add, modify and delete requests as usual depending on those search results representing the existing user data.
Users Channel at Identity Port
This port represents the connection to the Identity Store. This workflow uses it for importing users into an Identity domain.
Export:
This workflow uses the export settings for joining entries. The search base is composed of the environment property role_user_base (in the connected directory Provisioning tab) and the preceding subfolder “OU=Procurement,O=My-Company” resulting in the complete search base “OU=Procurement,O=My-Company,CN=Users,CN=My-Company”. As mentioned above, reducing the search on the organizational unit Procurement is just a sample and can be changed to search all users in the domain. It should correspond to the search base defined in the Export tab of the Users Channel at TS port.
The filter is needed to only export users from an Identity domain.
Mapping:
The SPML identifier must be set when a user is created. The id is mapped in a java source mapping, which just takes the id of the source entry and assigns it to the target id.
The attribute dxrState is set to “NEW” in case an entry is created, otherwise it is not changed (flag onAddOnly=true).
Join:
The associated user for a source entry is searched using the mapped employeeNumber attribute.
LDIF User Export Workflow
The LDIF user export workflow operates between the Users folder in the Identity Store and an LDIF content file as the connected system that contains user entries.
The workflow is based on Java real-time technology, with the LDIF connector accessing an LDIF file and the LDAP connector accessing a DirX Identity domain. The SyncOneWay2TS controller is configured as the join engine. The controller exports all users from the Identity domain user tree and then imports them into the connected file system.
The connected directory LDIFfile represents the connected file system containing the users and the connected directory Identity Store represents the Identity domain.
The next sections describe
-
Workflow prerequisites
-
How to configure the workflow
-
The workflow and its activities
-
Ports
-
Channels
The workflow needs only one channel for users and a set of attributes to be exported.
The delivered workflow is:
Export Users to LDIF - exports all users from the Identity Store found under the specified search base and filter and then writes them into the LDIF content file.
LDIF User Export Workflow Prerequisites
After performing the following steps, you can run the workflow without changing any configuration parameters:
-
Copy it with the Global View from the default scenario to your domain.
LDIF User Export Workflow Configuration
Start the LDIF User Export workflow configuration wizard from the Global View domain-specific Source Realtime Scenario by right-clicking on the workflow line between the LDIFfile and the Identity Store or from the Expert View by right-clicking on the workflow under your domain and then selecting the configuration wizard. By stepping through the wizard, you can activate or deactivate auditing, change the export search conditions, adapt the mapping or change the target join criteria.
LDIF User Export Workflow and Activities
The workflow Export Users to LDIF is a Java-based workflow with two activities:
-
Join activity - implements the user export.
-
Error activity - receives update requests that failed despite retries and issues notifications.
The join activity is controlled by the SyncOneWay2TS controller. It exports Identity Store user entries via the LDAP connector configured in the IdentityDomain port and then performs updates via the LDIF connector configured in the TS port, as illustrated in the following figure:
You can start the workflow either manually or via a schedule.
There are no global user hooks and no filters necessary.
LDIF User Export Workflow Ports
The workflow supports the following ports:
-
IdentityDomain port - represents the DirX Identity domain and is accessed via the LDAP connector.
-
TS port - represents the LDIF file that contains the users (accounts). The LDIF connector is used to access the LDIF file.
-
Event - used for sending change events.
-
Notify - used for sending e-mails.
LDIF User Export Workflow Channels
The workflow needs only one channel per port. It represents the user objects.
Users Channel at Identity Port
This port represents the connection to the Identity Store. This workflow uses it for exporting users from the Identity domain.
Export:
This workflow uses the export settings for searching the entries to be exported. The search base is composed of the environment property role_user_base (in the connected directory Provisioning tab) and the preceding subfolder “OU=Procurement,O=My-Company” resulting in the complete search base “OU=Procurement,O=My-Company,CN=Users,CN=My-Company”. Reducing the search on the organizational unit Procurement is just a sample and can of course be extended to search all users in the domain. It should correspond to the search base defined in the Export tab of the Users Channel at TS port.
The filter is needed to only export users from an Identity domain.
Mapping:
Mainly used by the LDIF User Import workflow, which performs the configured mapping from the LDIF data import file to Identity. This workflow only reads the selected attributes from Identity as the source for the mapping to the LDIF content data export file.
Join:
Only used by the LDIF User Import workflow.
Users Channel at TS Port
This port represents the connection to LDIF. This workflow uses it for exporting users and attributes from the LDIF file.
Export:
Searchbase:
CN=Users,CN=My-Company.
Filter:
&(objectClass=inetOrgPerson)(employeeNumber=*)(ou=Procurement).
Searching only users from the organizational unit Procurement is just a sample configuration and can be changed to search and import all users from the delivered sample source file data.ldif.
Mapping:
The SPML identifier must be set when a user is created. The id is mapped in a simple expression mapping from the source id, $\{source.id}, to the target id.
Join:
The associated user for a source entry is searched using the mapped target id as first join criteria and then the source employeeNumber attribute as second join criteria.
Specific Attributes:
export_file = C:/MetahubData/data_out.ldif
Used by this workflow as the data output file.
Import_file = C:/MetahubData/data.ldif
Only used by the LDIF User Import workflow as the data input file.
CSV Workflows
DirX Identity delivers Export and Import CSV workflows. This section describes the workflows features that are common to both types of workflow.
Rows of a CSV file do not usually have an identifier. The Specific Attribute namingAttr describes which column is used as the identifier. This column should contain a distinguished name. For searches, this column is evaluated for the base object and scope part of the search.
The columns and their order are defined by the mapping.Technical attribute. The columns are defined by the dxmselectedAttributes LDAP attribute.
You can also define which separator should be used in the CSV file and whether or not the CSV file should include a header line.
CSV User Import Workflow
The CSV user import workflow operates between the Users folder in the Identity Store and a CSV file as the connected system that contains user entries.
The workflow is based on Java real-time technology, with the CSV connector accessing a CSV file and the LDAP connector accessing a DirX Identity domain. The SyncOneWay2Identity controller is configured as the join engine. The controller exports all users from the source file system and then imports them into the Identity domain user tree. It works in "Merge" mode, which means that it doesn’t delete users in the Identity Store that do not exist in the source file. If you want to run in "Replace" mode, you can switch to the Full-Import controller in the Controller tab of the workflow’s Join activity.
The connected directory CSV file represents the connected file system containing the users and the connected directory Identity Store represents the Identity domain.
The next sections describe
-
Workflow prerequisites
-
How to configure the workflow
-
The workflow and its activities
-
Ports
-
Channels
The workflow needs only one channel for users and a set of attributes to be imported.
The delivered workflow is:
-
Import Users from CSV - exports all users from the CSV file found under the specified search base and filter and then imports them into the Identity Store.
CSV User Import Workflow Prerequisites
After performing the following steps, you can run the workflow without changing any configuration parameters:
-
Copy it with the Global View from the default scenario to your domain.
-
Copy the sample source data file install_path/*data/datatest.csv* to C:/MetahubData.
CSV User Import Workflow Configuration
Start the CSV User Import workflow configuration wizard from the Global View domain-specific Source Realtime Scenario by right-clicking on the workflow line between the CSVFile and the Identity Store or from the Expert View by right-clicking on the workflow under your domain and then selecting the configuration wizard. By stepping through the wizard, you can activate or deactivate auditing, choose another controller for the join engine, change the export search conditions, adapt the mapping or change the target join criteria.
CSV User Import Workflow and Activities
The workflow Import Users from CSV is a Java-based source workflow with two activities:
-
Join activity - implements the user import.
-
Error activity - receives update requests that failed despite retries and issues notifications.
The join activity is controlled by default by the SyncOneWay2Identity controller. It exports CSV file user entries via the CSV connector configured in the TS port and then performs updates via the LDAP connector configured in the IdentityDomain port, as illustrated in the following figure:
You can start the workflow either manually or via a schedule.
There are no global user hooks and no filters necessary.
CSV User Import Workflow Ports
The workflow supports the following ports:
-
TS port - represents the CSV file that contains the users (accounts). The CSV connector is used to access the CSV file.
-
IdentityDomain port - represents the DirX Identity domain and is accessed via the LDAP connector.
-
Event - used for sending change events.
-
Notify - used for sending e-mails.
CSV User Import Workflow Channels
The workflow needs only one channel per port. It represents the user objects.
1. Users Channel at TS Port
This port represents the connection to CSV. This workflow uses it for exporting users and attributes from the CSV file.
Export:
Searchbase:
CN=Users,CN=My-Company.
Filter:
&(employeeNumber=*)(ou=Procurement).
Searching only users from the organizational unit Procurement is just a sample configuration and can of course be changed to search and import all users from the delivered sample source file datatest.csv.
Mapping:
Mainly used by the CSV User Export workflow, which performs the configured mapping from Identity to the configured CSV data export file. This workflow only reads the selected attributes from the import data file as the source for the mapping to Identity. Mapping includes all columns of the CSV file. The order in the mapping (technical the dxmSelectedAttributes) represents the order in the CSV file. The column specified by namingAttribute defines the identifier. Here a column dn is specified which contains a distinguished name. The value of this column is returned as SPML Id for the row.
Join:
Only used by the CSV User Export workflow.
Specific Attributes:
export_file = C:/MetahubData/datatest_out.csv
Only used by the CSV User Export workflow as the data output file.
Import_file = C/MetahubData/datatest.csv
Used by this workflow as the data input file.
Naming_attr = dn
The column containing the identifier.
The has_header attribute is not specified; that is, there is no header line in the CSV file. Define true if the CSV file contains a header line
The separator attribute is not specified; that is, the comma is the separator. Define | if the CSV file uses the pipe symbol as a separator
Comment: Not specified. When reading, no comment lines are skipped. If specified (for example, #”) every line containing this value is treated as a comment and is skipped during read. Sometines comments are used even though the CSV specification does not support comment lines.
2. Users Channel at Identity Port
This port represents the connection to the Identity Store. This workflow uses it for importing users into an Identity domain.
Export:
This workflow uses the export settings for joining entries. The search base is composed of the environment property role_user_base (in the connected directory Provisioning tab) and the preceding subfolder "OU=Procurement,O=My-Company" resulting in the complete search base "OU=Procurement,O=My-Company,CN=Users,CN=My-Company". As mentioned above reducing the search on the organizational unit Procurement is just a sample and can of course be extended to search all users in the domain. It should correspond to the search base defined in the Export tab of the Users Channel at TS port.
The filter is needed to only export users from an Identity domain.
Mapping:
The SPML identifier must be set when a user is created. The id is mapped in a Java source mapping, which just takes the id of the source entry and assigns it to the target id.
The attribute dxrState is set to "NEW" when an entry is created; otherwise, it is not changed (flag onAddOnly=true).
Join:
The associated user for a source entry is searched using the mapped employeeNumber attribute.
Customizing the Workflow to Handle Files without a DN Column
This section provides an example of how to customize the CSV User Import workflow to import users from CSV files that do not provide a DN column. In our example, we have a CSV file named Users.csv with user entries. We want to import these entries using the Java-based source workflows.
In Users.csv:
-
The first line is the header with the name of the fields. The separator is the semicolon (;).
-
The second line is a user entry
Here is an example:
sn;givenName;cn;employeeNumber;employeeType;c;l;o;street;telephoneNumber;mail;ou;description;preferredLanguage;dxmOprMaster;dxrSalutation;postalCode;facsimileTelephoneNumber;dxrState
Muster;Henry;Muster Henry;5208;Internal;DE;My-Company Munich;My-Company;Teller Str. 1113;+49 89 323-42111;;Sales;Manager of Sales department;de;HR;Hr.;80157;+49 89 323-58564;NEW
To customize the workflow to import users from our example CSV file:
-
Copy Users.csv to C:/MetahubData.
-
In DirX Identity Manager, go to Connectivity → Global View → Scenarios → My-Company → Main.
-
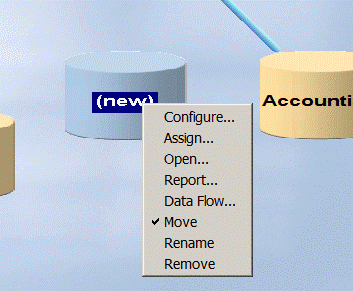
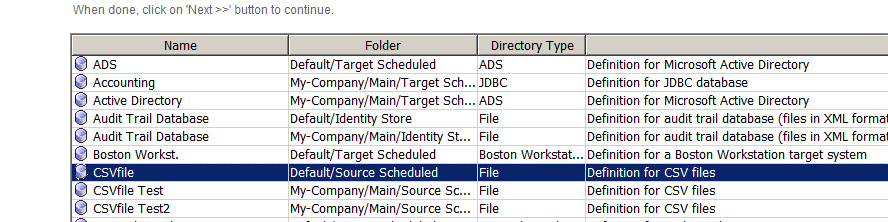
Right click and then select New Connected Directory.
-
Right click the new directory and then select Configure.
-
Select CSVfile and click Next.
-
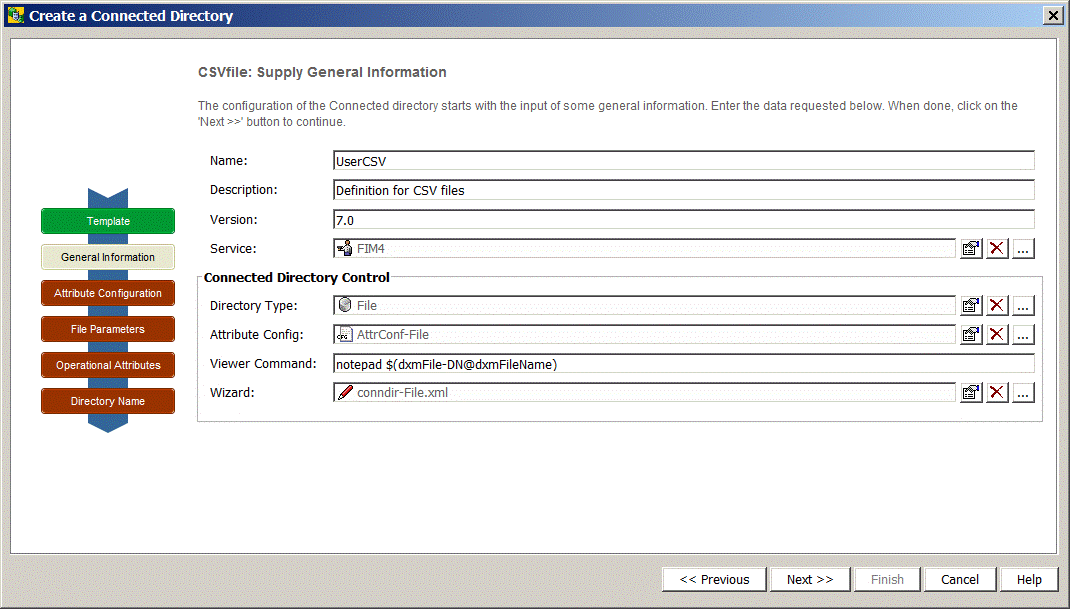
In Name, enter UserCSV and then click Next.
-
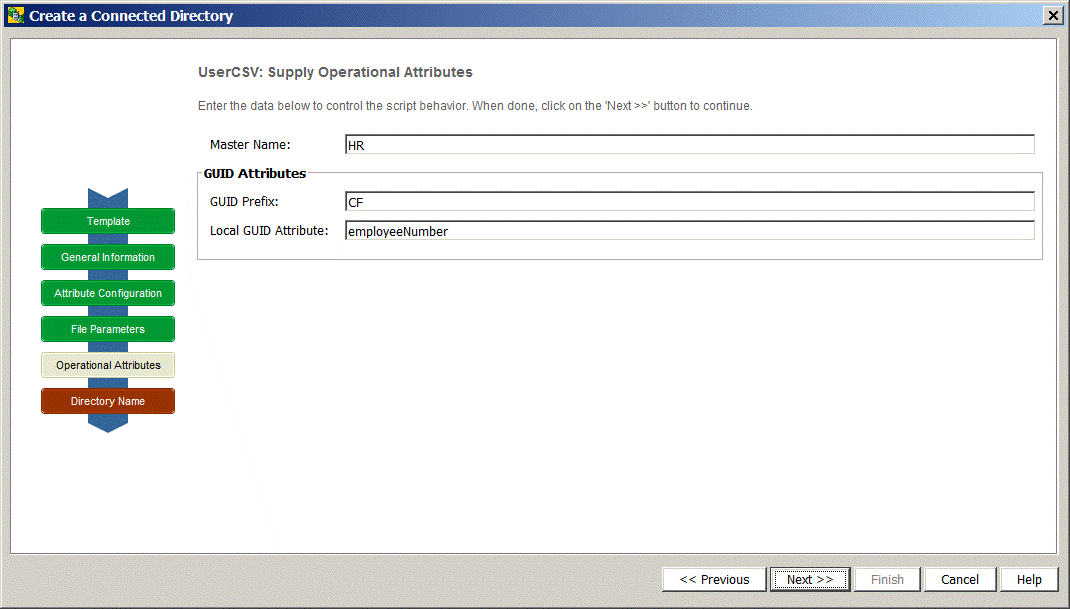
Step through the next configuration dialogs without changing anything until you arrive at the Supply Operational Attributes dialog.
-
Define the unique identifier field in your CSV file. In our example, it is employeeNumber.
-
Click Next and then Finish.
-
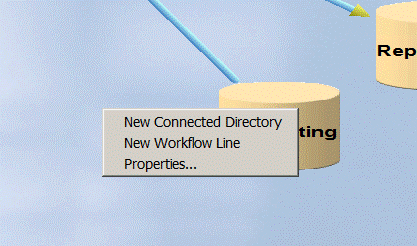
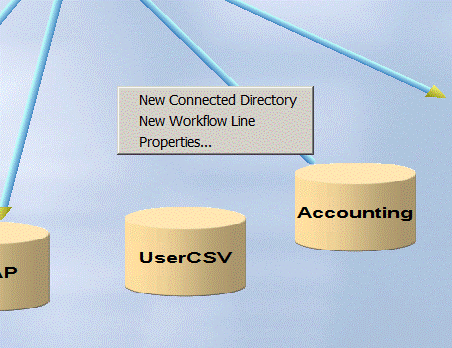
Right click and select New Workflow Line.
-
Draw a line between UserCSV and IdentityStore. Select the line, right click and select New.
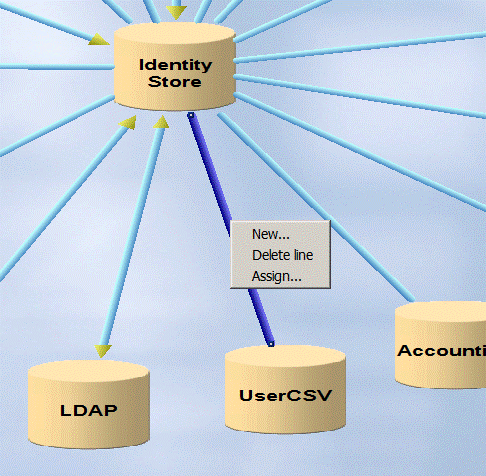
-
Select Import Users from CSV and click Next.
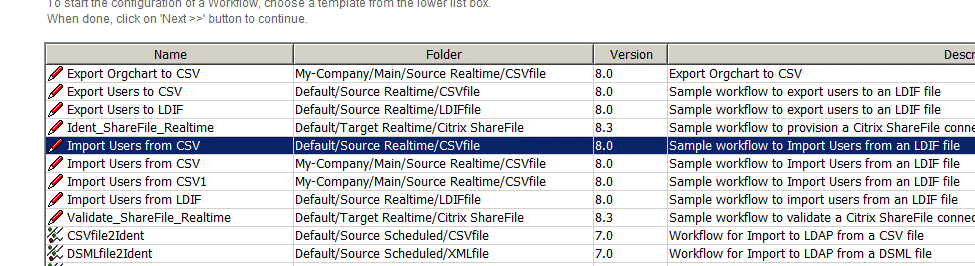
-
In Name, enter Import Users from UserCSV. Click Next to step through the remaining dialogs. Click Finish.
-
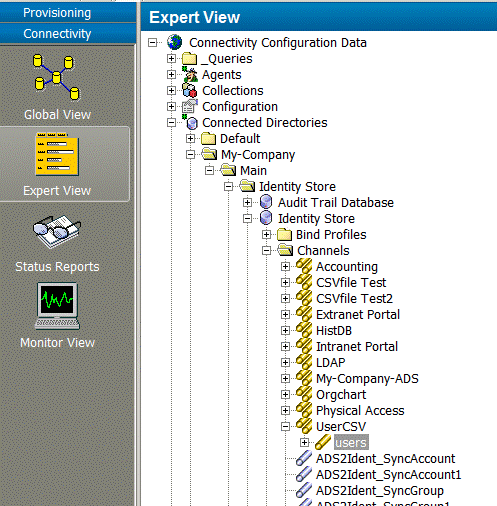
In the Expert View, navigate to the Identity Store users channel as shown in the following figure:
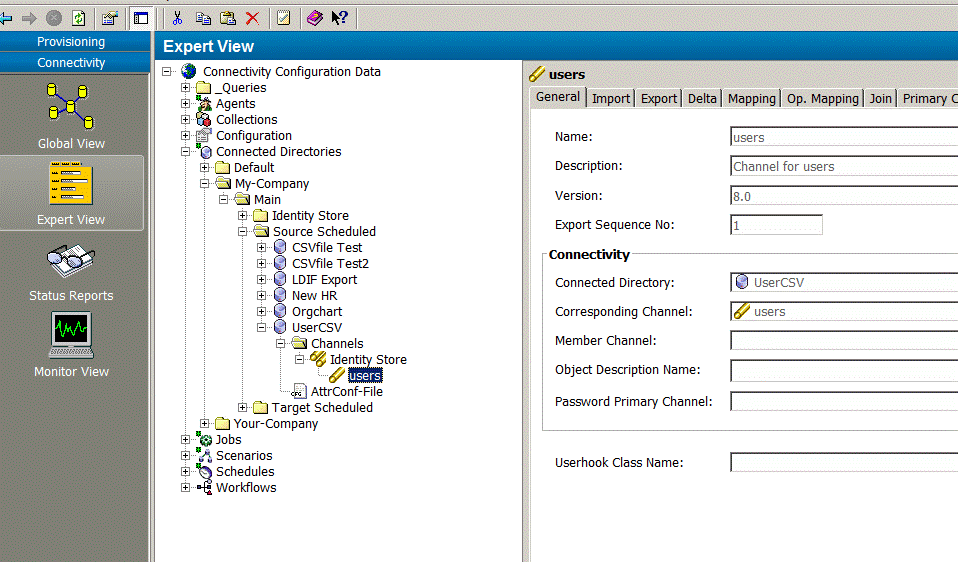
-
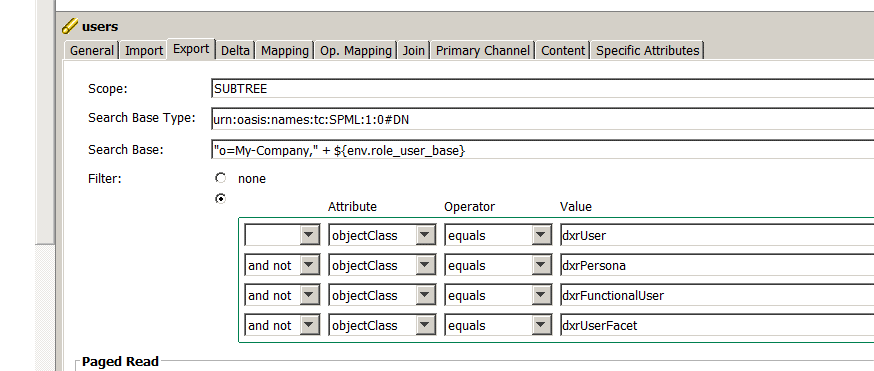
Select the Export tab. Delete the contents of Search Base and set Filter to none:
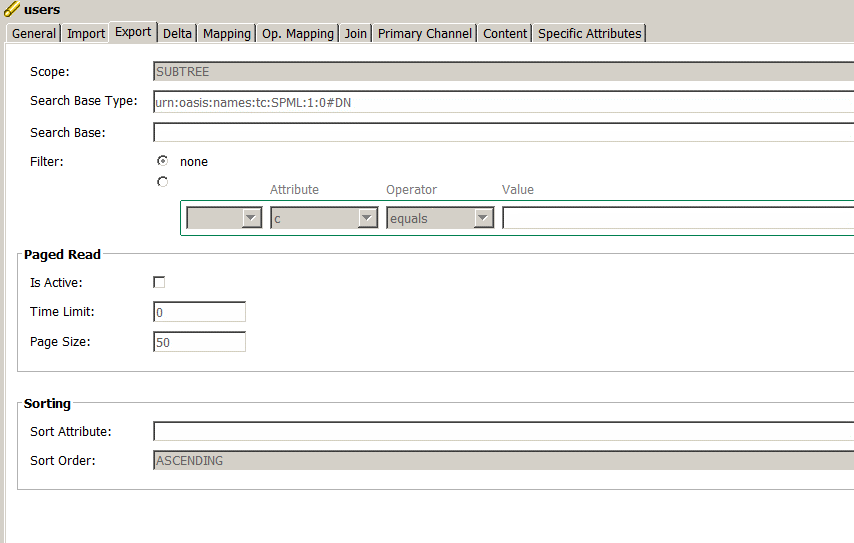
-
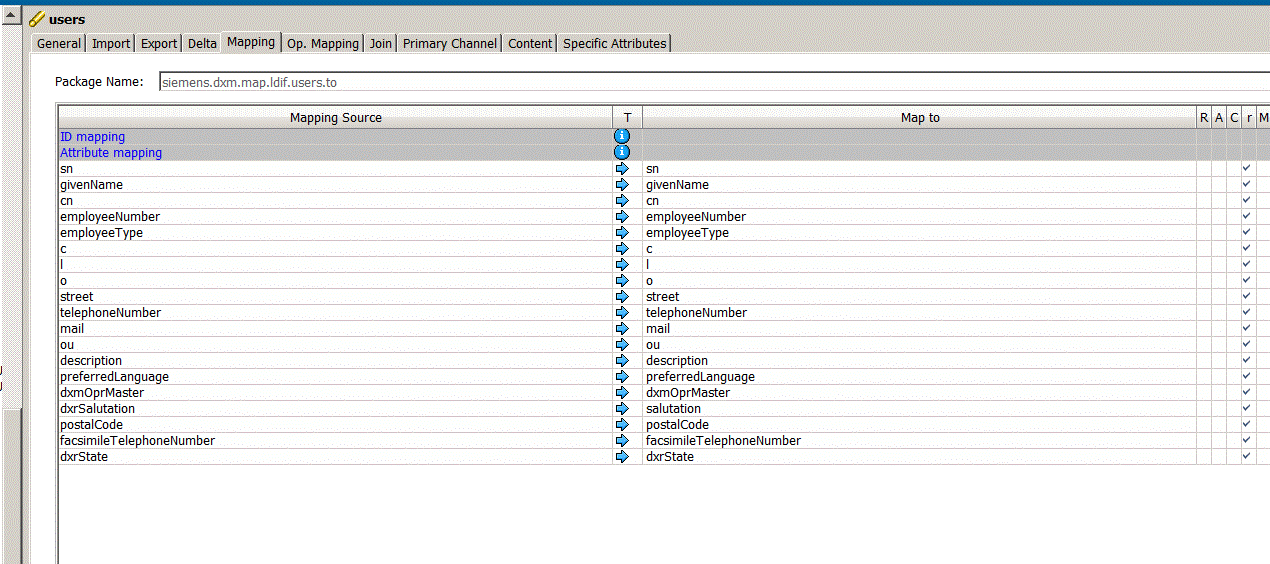
Select the Mapping tab and then click Edit. Deselect ID mapping and delete the line with Mapping Source dummy.
-
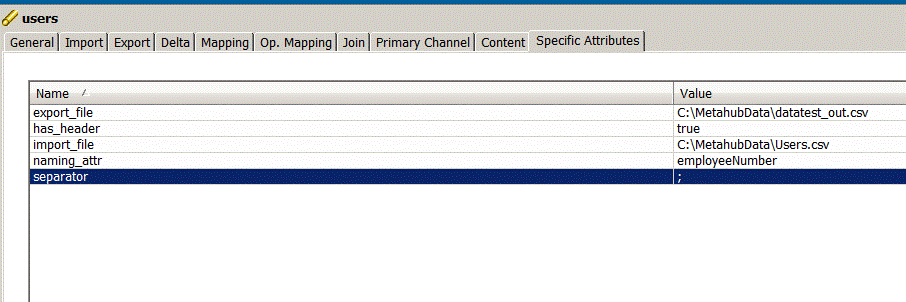
In the Specific Attributes tab, add the following values to the following fields:
-
import_file - C:/MetahubData/Users.csv
-
naming_attr - employeeNumber
-
has_header - true
-
separator - ;
-
Click Save.
-
Select the corresponding UsrCSV user channel as shown in the next figure:
-
Select the Export tab and change Search Base to "o=My-Company," + $\{env.role_user_base}.
-
In the Mapping tab, change the value in the first line of the Mapping Source column that corresponds to Identifier:DN to the following:
"cn=" + ${source.givenName} + " " + ${source.sn} + "," + "ou=" + ${source.ou} + "," + ${env.user_base}"
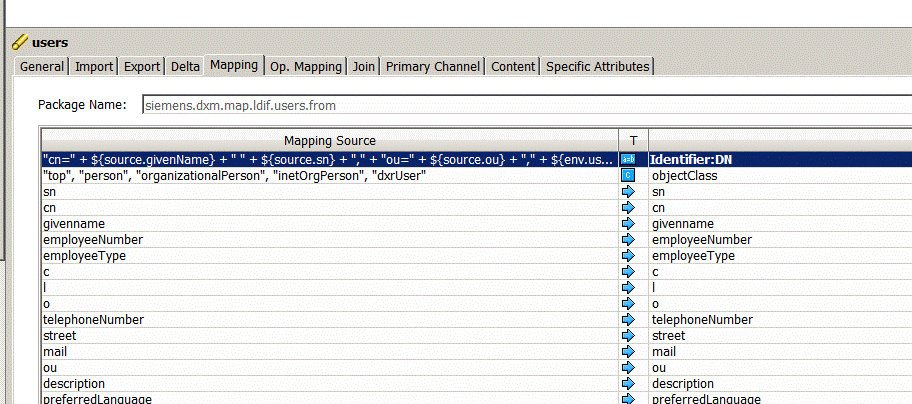
-
In the Specific Attributes tab, add the following parameter and save:
user_base : o=My-Company,cn=Users,cn=My-Company
-
Go to the Import Users from UserCSV workflow as shown in the next figure. Click Edit and check Is Active.
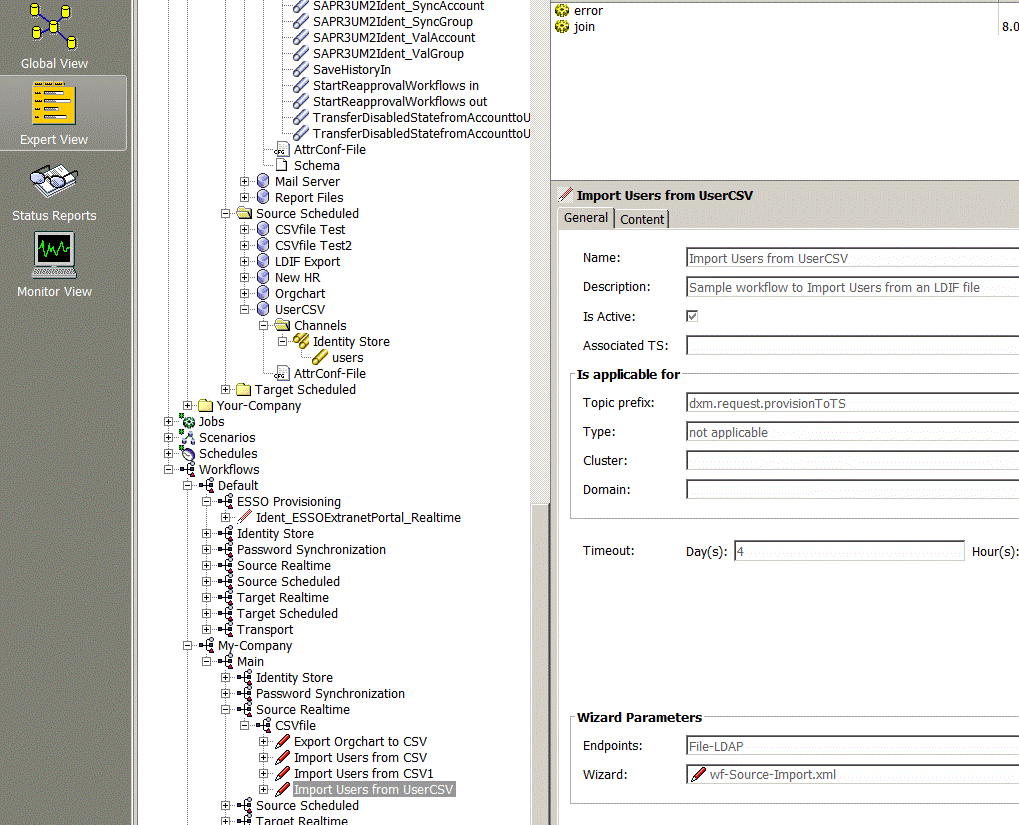
-
Right-click on Import Users from UserCSV and then select Load IDS-J Configuration from the context menu.

-
Select Import Users from UserCSV and run the workflow.
-
Check to see if the user was created.
CSV User Export Workflow
The CSV user export workflow operates between the Users folder in the Identity Store and a CSV file as the connected system that contains user entries.
The workflow is based on Java real-time technology, with the CSV connector accessing a CSV file and the LDAP connector accessing a DirX Identity domain. The SyncOneWay2TS controller is configured as the join engine. The controller exports all users from the Identity domain user tree and then imports them into the connected file system.
The connected directory CSVfile represents the connected file system containing the users and the connected directory Identity Store represents the Identity domain.
The next sections describe
-
Workflow prerequisites
-
How to configure the workflow
-
The workflow and its activities
-
Ports
-
Channels
The workflow needs only one channel for users and a set of attributes to be exported.
The delivered workflow is:
-
Export Users to CSV - exports all users from the Identity Store found under the specified search base and filter and then writes them into the CSV file.
CSV User Export Workflow Prerequisites
After performing the following steps, you can run the workflow without changing any configuration parameters:
-
Copy it with the Global View from the default scenario to your domain.
CSV User Export Workflow Configuration
Start the CSV User Export workflow configuration wizard from the Global View domain-specific Source Realtime Scenario by right-clicking on the workflow line between the CSVfile and the Identity Store or from the Expert View by right-clicking on the workflow under your domain and then selecting the configuration wizard. By stepping through the wizard, you can activate or deactivate auditing, change the export search conditions, adapt the mapping or change the target join criteria.
CSV User Export Workflow and Activities
The workflow Export Users to CSV is a Java-based workflow with two activities:
-
Join activity - implements the user export.
-
Error activity - receives update requests that failed despite retries and issues notifications.
The join activity is controlled by the SyncOneWay2TS controller. It exports Identity Store user entries via the LDAP connector configured in the IdentityDomain port and performs updates via the CSV connector configured in the TS port as illustrated in the following figure:
You can start the workflow either manually or via a schedule.
There are no global user hooks and no filters necessary.
CSV User Export Workflow Ports
The workflow supports the following ports:
-
IdentityDomain port - represents the DirX Identity domain and is accessed via the LDAP connector.
-
TS port - represents the CSV file that contains the users (accounts). The CSV connector is used to access the CSV file.
-
Event - used for sending change events.
-
Notify - used for sending e-mails.
CSV User Export Workflow Channels
The workflow needs only one channel per port. It represents the user objects.
1. Users Channel at Identity Port
This port represents the connection to the Identity Store. This workflow uses it for exporting users from the Identity domain.
Export:
This workflow uses the export settings for searching the entries to be exported. The search base is composed of the environment property role_user_base (in the connected directory Provisioning tab) and the preceding subfolder "OU=Procurement,O=My-Company" resulting in the complete search base "OU=Procurement,O=My-Company,CN=Users,CN=My-Company". Reducing the search on the organizational unit Procurement is just a sample and can be changed to search all users in the domain. It should correspond to the search base defined in the Export tab of the Users Channel at TS port.
The filter is needed only to export users from an Identity domain.
Mapping:
Mainly used by the CSV User Import workflow, which performs the configured mapping from the CSV data import file to Identity. This workflow only reads the selected attributes from Identity as the source for the mapping to the CSV data export file.
Join:
Only used by the CSV User Import workflow.
2. Users Channel at TS Port
This port represents the connection to CSV. This workflow uses it for exporting users and attributes from the CSV file.
Export:
Searchbase:
CN=Users,CN=My-Company.
Filter:
&(employeeNumber=*)(ou=Procurement).
Searching only users from the organizational unit Procurement is just a sample configuration and can be changed to search and import all users from the delivered sample source file datatest.csv.
Mapping:
The SPML identifier must be set when a user is created. The id is mapped in a simple expression mapping from the source id, $\{source.id}, to the target id.
Join:
The associated user for a source entry is searched using the mapped target id as first join criteria and then the source employeeNumber attribute as second join criteria.
Specific Attributes:
export_file = C:/MetahubData/datatest_out.csv
Used as data output file by this workflow.
Naming_attr = dn
The column that contains the identifier. The generated identifier is written to this column
The has_header attribute is not specified; that is, there is no header line in the CSV file. Define true if the CSV file contains a header line
The separator attribute is not specified; that is, the comma is the separator. Define | if the CSV file uses the pipe symbol as the separator
Import_file = C:/MetahubData/datatest.csv
Only used by the CSV User Import workflow as the data input file.
Remote AD Workflow
The Remote AD workflow is not a typical source workflow: it is a combination of workflows (AD export and LDIF import) with special data transfer (Web service).
DirX Identity can be deployed as part of the Atos Cloud Service Identity Management as a Service (IDMaaS). Provisioning targets can be in the provider’s (Atos) cloud infrastructure, in a public cloud or on customer premises outside of any cloud. The Remote AD workflow is intended for use at customer sites outside of a cloud.
The Remote AD connector must be able to work without online (LDAP) connection to the DirX Identity configuration database. On the customer side, a standard framework-based job implements the export to file function. The job obtains its configuration from XML files: one for the job and one for the search request with the filter conditions. An LDIF import workflow imports the file to DirX Directory.
The following figure illustrates the Remote AD connector operation:
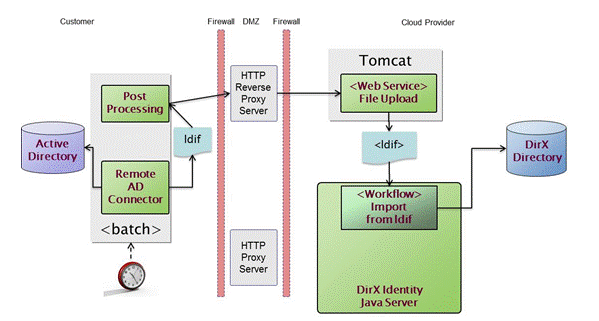
See the Remote AD Connector description in the DirX Identity Connectivity Reference for more details.
External LDAP User Import Workflows
DirX Identity delivers two workflows for importing users from an external LDAP to the Identity Store. They are:
-
Full Import of external LDAP Users - the workflow is started from DirX Identity Manager (either manually or by a schedule) and performs either the initial load of users from an external LDAP directory or the complete re-synchronization of the external LDAP directory. In complete re-synchronization, users may be deleted or marked as to-be-deleted in the Identity Store.
-
Import Users from external LDAP - The workflow is normally started by an event and imports a user (or updates a user or deletes a user or marks a user as to-be-deleted) depending on the incoming event and the existence of that user in the Identity Store. If the workflow is started by DirX Identity Manager manually or triggered by the scheduler, it performs a re-synchronization of the external LDAP users (without deleting users or marking users as deleted).
The next sections describe the configuration of the two workflows and how to send events using metacp to trigger the synchronization of an external user.
External LDAP User Full Import Workflow
The Full Import of external LDAP Users workflow operates between the Users folder in the Identity Store and an external LDAP directory accessing organizational persons in that directory.
The workflow is based on Java real-time technology, with two LDAP connectors accessing the external LDAP directory and the Identity Store. The FullImport controller is configured as the join engine. The controller exports all users from the external LDAP directory and then imports them into the user tree of the Identity Store. It performs the following operations:
-
Adds a user if the entry does not exist in the Identity Store.
-
Modifies a user if the user exists in the Identity Store but has different attribute values.
-
Marks a user as to-be-deleted (dxrState=“TBDEL”) if the user is no longer available in the external LDAP directory (this is the default behavior of the workflow)
-
Deletes a user if it is no longer available in the external LDAP directory. (This mode for external users that have been deleted requires changes to the workflow configuration; specifically, mapping of the dxrState attribute and post mapping)
This workflow can also be used as a template for other Java-based source workflows for synchronization of objects other than users.
The next sections describe
-
Workflow prerequisites
-
How to configure the workflow
-
The workflow and its activities
-
Ports
-
Channels
The workflow needs only one channel for users and a set of attributes to be imported.
External LDAP User Full Import Workflow Prerequisites
If you did not create a new Connected Directory when you configured the workflow, you need to create one as follows:
-
Go to the Global View and configure a new Connected Directory by choosing the template UserLDAP from the default folder.
-
In General Parameters, configure LDAP External Service by entering values for IP Address and Data Port. You can also set the SSL, Secure Port and Client Authentication fields if necessary.
-
In Provisioning, define the search bases for searching the users:
-
In Identity → Account Base, define the search bases for searching the users in the Identity Store.
-
In Target System → UserBase, define the search bases for searching the users in the external LDAP directory.
-
In Bind Profile, define the credentials of LDAPAdmin (the administrator of the external LDAP directory). Set at least User, Password, Authentication and Protocol.
-
In Set Directory Name, set the name of the Connected Directory (if you have not yet already done so).
Create a new workflow line between the Connected Directory and the Identity Store.
External LDAP User Full Import Workflow Configuration
Start the Full Import of external LDAP Users workflow configuration wizard: right-click on the workflow line (select New) and then select the Full Import of external LDAP Users template of the default folder. Alternatively you can select the workflow in the Expert View by right-clicking on the workflow under your domain and then selecting the configuration wizard. By stepping through the wizard, you can activate or deactivate auditing, choose another controller for the join engine (not recommended), change the export search conditions, adapt the mapping or change the target join criteria. Keep in mind that you don’t need to set Cluster and Domain in Is Applicable for when defining the General Info parameters.
External LDAP User Full Import Workflow and Activities
The Full Import of external LDAP Users workflow is a Java-based source workflow with two activities:
-
Join activity - implements the user import.
-
Error activity - receives update requests that failed despite retries and issues notifications.
The join activity is controlled by default by the FullImport controller. It exports user entries of the external LDAP directory via the LDAP connector configured in the TS port and then performs updates via the LDAP connector configured in the IdentityDomain port, as illustrated in the following figure:
You can start the workflow either manually or via a schedule.
External LDAP User Full Import Workflow Ports
The workflow supports the following ports:
-
TS port - represents the external LDAP directory that contains the users. The LDAP connector is used to access that LDAP directory.
-
IdentityDomain port - represents the DirX Identity domain and is accessed via the LDAP connector.
-
Event - used for sending change events.
-
Notify - used for sending e-mails.
External LDAP User Full Import Workflow Channels
The workflow needs only one channel per port. It represents the user objects.
1. Users Channel at TS Port
This port represents the connection to the external LDAP directory. This workflow uses it for exporting users and attributes.
Export:
Searchbase:
$\{env.user_base} matches the definition in the new Connected Directory.
Filter:
(objectClass=organizationalPerson)
Searching all organizational persons below the search base.
Mapping:
Mainly used by the workflow to perform the mapping to an entry in the Identity Store. The following attributes are defined here (with the ReadOnly flag): cn, description, employeeNumber, facsimileTelephoneNumber, gn, postalCode, postalAddress, sn, st, street, telephoneNumber, title and userCertificate;binary.
Join:
Not used by the workflow.
2. Users Channel at Identity Port
This port represents the connection to the Identity Store. This workflow uses it for importing users into an Identity domain.
Channel Userhook:
The following user hook (as part of dxmJoin.jar) is used: net.atos.dxm.join.userhook.ldap.UserHookLdapUsers.
The user hook has implemented two interfaces:
-
preUpdate:
If entries should be marked as deleted (state TBDEL) then additionally the attribute dxrDeleteDate is set. Therefore the domain value of Maximum time in days to delete an object needs to be evaluated first.
-
postUpdate:
After successful execution of the update operation in the Identity Store, the attribute businessCategory is set at the user object of the external LDAP directory. The value is updated at time stamp. That interface should be adapted according to your requirements. If you don’t need any information in the external LDAP directory about successful execution of the operation in Identity Store, then simply drop postUpdate.
Export:
Searchbase:
${env.role_ts_account_base} matches the definition in the new Connected Directory.
Filter:
((objectClass=derUser)(!(objectClass=dxrPersona)) (!(objectClass=dxrPersona)) (!(objectClass=dxrFunctionalUser))(!(objectClass=dxrUserFacet))
The workflow searches all organizational persons below the search base. Consequently, you should carefully adapt your workflow to your requirements. If you import the users to an existing subtree, you should mark these users with an additional attribute and use that attribute in the filter. Otherwise the FullImport controller will delete users (or mark the users as deleted) that already exist in that subtree and which have not been imported from the external LDAP directory.
Mapping:
The SPML identifier is mapped by a simple expression as follows:
${joinedEntry.id}
"cn=" + ${source.cn} + ",o=LDAP-External,cn=Users,cn=My-Company"
If the entry is already available, then the DN of the existing entry is used. If it is a new entry, then the second expression applies.
The workflow uses several 1:1 mappings for the attributes cn, description, employeeNumber, facsimileTelephoneNumber, gn, postalCode, postalAddress, sn, st, street, telephoneNumber, title and userCertificate;binary.
The dxrPrimaryKey attribute is set be the expression “$\{source.id}. Note that dxrPrimaryKey is also used in the join conditions.
The dxrState attribute is either set to NEW for new entries or TBDEL if the entry no longer exists in the external LDAP directory. For state TBDEL, the attribute dxrEndDate is set to now and the dxrDeleteDate is set according to the domain value of Maximum time in days to delete an object. If you want to delete the object directly, then you should adapt the mapping for “dxrState” and/or the post mapping (by changing the operation from MODIFY to DELETE).
Join:
The associated user for a source entry is searched, first with dxrPrimaryKey matching the dn of the external LDAP user and then if not found with the mapped cn attribute.
External LDAP User Import Workflow
The Import Users from external LDAP workflow operates between the Users folder in the Identity Store and an external LDAP directory accessing organizational persons in that directory.
The workflow is based on Java real-time technology, with two LDAP connectors accessing the external LDAP directory and the Identity Store. The SyncOneWay2Identity controller is configured as the join engine. The controller exports all users from the external LDAP directory and then imports them into the user tree of the Identity Store if it is started manually in DirX Identity Manager or triggered by the scheduler. It processes just one user if the workflow is triggered by an event.
The workflow performs the following operations:
-
Adds a user if the entry does not exist in the Identity Store.
-
Modifies a user if the user exists in the Identity Store but has different attribute values.
-
Marks a user as to-be-deleted (dxrState=”TBDEL”) if the user is no longer available in the external LDAP directory (this is the default behavior of the workflow).
-
Deletes a user if it is no longer available in the external LDAP directory. (This mode for external users that been deleted requires changes to the workflow configuration; specifically, mapping of the attribute dxrState and post mapping.)
This workflow can also be used as a template for other Java-based source workflows for synchronization of objects other than users.
The next sections describe
-
Workflow prerequisites
-
How to configure the workflow
-
The workflow and its activities
-
Ports
-
Channels
The workflow needs only one channel for users and a set of attributes to be imported.
External LDAP User Import Workflow Prerequisites
If you did not create a new Connected Directory when you configured the External LDAP User Full Import Workflow, you need to create one as follows:
-
Go to the Global View and configure a new Connected Directory by choosing the template UserLDAP from the default folder.
-
In General Parameters, configure LDAP External Service by entering values in IP Address and Data Port. You can also set SSL, Secure Port and Client Authentication if necessary.
-
In Provisioning, define the search bases for searching the users:
-
In Identity → Account Base, define the search bases for searching the users in the Identity Store.
-
In Target System → UserBase, define the search bases for searching the users in the external LDAP directory.
-
In Bind Profile, define the credentials of LDAPAdmin (the administrator of the external LDAP directory). Set at least User, Password, Authentication and Protocol.
-
In Set Directory Name, set the name of the Connected Directory (if you have not yet already done so).
Create a new workflow line between the Connected Directory and the Identity Store.
External LDAP User Import Workflow Configuration
Start the Import Users from external LDAP workflow configuration wizard: right-click on the workflow line (select New) and then select the Import Users from external LDAP template of the default folder. Alternatively you can select the workflow in the Expert View by right-clicking on the workflow under your domain and then selecting the configuration wizard. By stepping through the wizard, you can activate or deactivate auditing, choose another controller for the join engine (not recommended), change the export search conditions, adapt the mapping or change the target join criteria. Keep in mind that you need to set Cluster and Domain in Is Applicable for when defining the General Info parameters.
External LDAP User Import Workflow and Activities
The workflow Import Users from external LDAP is a Java-based source workflow with two activities:
-
Join activity - implements the user import.
-
Error activity - receives update requests that failed despite retries and issues notifications.
The join activity is controlled by default by the SyncOneWay2Identity controller. It exports user entries of the external LDAP directory via the LDAP connector configured in the TS port and then performs updates via the LDAP connector configured in the IdentityDomain port, as illustrated in the following figure:
You can start the workflow either manually or via a schedule or set it up to be triggered by an incoming event.
External LDAP User Import Workflow Ports
The workflow supports the following ports:
-
TS port - represents the external LDAP directory that contains the users. The LDAP connector is used to access that LDAP directory.
-
IdentityDomain port - represents the DirX Identity domain and is accessed via the LDAP connector.
-
Event - used for sending change events.
-
Notify - used for sending e-mails.
External LDAP User Import Workflow Channels
The workflow needs only one channel per port. It represents the user objects.
1. Users Channel at TS Port
This port represents the connection to the external LDAP directory. This workflow uses it for exporting users and attributes.
Export:
Searchbase:
${env.user_base} matches the definition in the new Connected Directory.
Filter:
(objectClass=organizationalPerson)
Searching all organizational persons below the search base.
Mapping:
Mainly used by the workflow to perform the mapping to an entry in the Identity Store. Consequently, the following attributes are defined here (with the ReadOnly flag): cn, description, employeeNumber, facsimileTelephoneNumber, gn, postalCode, postalAddress, sn, st, street, telephoneNumber, title and userCertificate;binary.
Join:
Not used by the workflow.
2. Users Channel at Identity Port
This port represents the connection to the Identity Store. This workflow uses it for importing users into an Identity domain.
Channel Userhook:
The following user hook (as part of dxmJoin.jar is used: net.atos.dxm.join.userhook.ldap.UserHookLdapUsers.
The user hook has implemented two interfaces:
-
preUpdate
If entries should be marked as deleted (state TBDEL) then additionally the attribute dxrDeleteDate is set. Therefore the domain value of Maximum time in days to delete an object needs to be evaluated first.
-
postUpdate
After successful execution of the update operation in the Identity Store, the attribute businessCategory is set at the user object of the external LDAP directory. The value is updated at time stamp. Adapt this interface according to your requirements or simply drop it if you don’t need any information in the external LDAP directory about successful execution of the operation in Identity Store.
Export:
Searchbase:
${env.role_ts_account_base} matches the definition in the new Connected Directory.
Filter:
((objectClass=derUser)(!(objectClass=dxrPersona)) (!(objectClass=dxrPersona)) (!(objectClass=dxrFunctionalUser))(!(objectClass=dxrUserFacet))
The workflow searches all organizational persons below the search base. Therefore you should carefully adapt your workflow to your requirements.
Mapping:
The SPML identifier is mapped by a simple expression as follows:
${joinedEntry.id}
"cn=" + $\{source.cn} + ",o=LDAP-External,cn=Users,cn=My-Company"
If the entry is already available, the DN of the existing entry is used. If it is a new entry, the second expression applies.
The workflow uses several 1:1 mappings for the attributes cn, description, employeeNumber, facsimileTelephoneNumber, gn, postalCode, postalAddress, sn, st, street, telephoneNumber, title and userCertificate;binary.
The attribute dxrPrimaryKey is set be the expression “$\{source.id}. Note that dxrPrimaryKey is also used in the join conditions.
The attribute dxrState is either set to ENABLED for new entries or TBDEL if the entry no longer exists in the external LDAP directory. For state TBDEL, the attribute dxrEndDate is set to now and the dxrDeleteDate is set according to the domain value of Maximum time in days to delete an object. If you want to delete the object directly, then you should adapt the mapping for dxrState and/or the post mapping (by changing the operation from MODIFY to DELETE).
Join:
The associated user for a source entry is searched first with dxrPrimaryKey matching the DN of the external LDAP user and then if not found with the mapped cn attribute.
Sending Events to Synchronize External Users
This section describes how to use metacp to send events that trigger the synchronization of an external user.
Event Types
An event is an XML document compliant with the XML namespace "urn:siemens:dxm:EVENT:1:0". This namespace is proprietary and extends the standard namespace SPML v1 "urn:oasis:names:tc:SPML:1:0". There are three types of events according the change it wants to notify: entry was created (<addEvent>), changed (<modifyEvent>) or deleted (<deleteEvent>). Each event extends the corresponding SPML request: <addRequest>, <modifyRequest> or <deleteRequest>. For details about SPML v1, see the standard specification; for example, https://www.oasis-open.org/committees/download.php/4137/os-pstc-spml-core-1.0.pdf.
Each event document should contain the necessary XML namespaces at the beginning of the document in its first element. These are:
xmlns:dsml="urn:oasis:names:tc:DSML:2:0:core"
xmlns:spml="urn:oasis:names:tc:SPML:1:0"
xmlns:event="urn:siemens:dxm:EVENT:1:0"
The remainder of this section assumes the namespace prefixes event, spml and dsml.
Identifier and requestID
Each SPML request and the corresponding events contain an <identifier> element that represents the identifier of the changed entry in the source system. For an LDAP or Active Directory source - as expected in these workflows - it is of type DN. Here is a sample:
<spml:identifier type="urn:oasis:names:tc:SPML:1:0#DN">
    <spml:id>cn=Abele,ou=Sales,o=My-Company</spml:id>
</spml:identifier>
Normal SPML add and modify requests need to contain the list of attributes or modifications. They are not needed here; the identifier is sufficient. The import workflow uses it to read the entry and all configured attributes from the source system.
SPML requests and the events can contain a requestID parameter. It is not necessary and might occur in some debug logs.
Name and Source
In addition to SPML requests, events contain a mandatory name attribute and an optional <source> element. Both are used for identifying the appropriate workflow that is started to handle the event.
The name attribute has the following structure:
<domain>.dxm.request.importToIdentity.<type>.cluster='<cluster>'.resource='<resource>'.Here is an example:
my-company.dxm.request.importToIdentity.LDAP.cluster='External'.resource='External'.The part that follows the domain is the queue name to which to send the event and also characterizes the workflow type. Type, cluster and domain normally identify the target system and here identify the workflow. Think about importing users from different sources or importing users and roles. Make sure that these values match the corresponding ones in the Is applicable for section of the workflow definition.
The <source> element gives some information about the source of the event. It contains the application as a separate XML attribute as well as type, cluster and resource, which contain the same values as described for the name attribute. The application contains the name of the sending application. When sending the event with metacp, please use the name metacp.
A Complete Sample Event
The following example shows an add event:
<event:addEvent xmlns:spml="urn:oasis:names:tc:SPML:1:0"
    xmlns:event="urn:siemens:dxm:EVENT:1:0"
    requestID="svc.add.uid-123"
    name="my-company.dxm.request.importToIdentity.LDAP.cluster='External'.resource='External'">
  <spml:identifier type="urn:oasis:names:tc:SPML:1:0#DN">
    <spml:id>cn=Abele,ou=Sales,o=My-Company</spml:id>
  </spml:identifier>
  <event:source application="metacp" type="LDAP" resource="external" cluster="external"/>
</event:addEvent>
Sent Event with metacp
For sending an event with metacp, you should prepare a template with the event analogous to the example shown in the previous section. Use placeholders for the event type and "DN of changed entry" variables.
For a specific entry, replace the placeholders and send them with a Tcl script such as the following:
set topic "my-company.dxm.request.importToIdentity.LDAP.cluster='External'.resource='External'"
set event …

ats init
ats send -topic $topic -message "$event"
ats term
Understanding the Tcl-based Source Workflows
DirX Identity’s Tcl-based source scheduled workflows provided with the default Connectivity scenario include:
-
Creation workflows - workflows that extract user information from existing identity sources (for example, an HR or CRM database) and populate the Identity Store with user information.
-
Update workflows - workflows that transfer specific information from the Identity Store to the identity sources (for example, e-mail addresses or telephone numbers) to enable them to use the joined, high-quality information in the Identity Store.
The creation workflows described here all work the same way. They:
-
Extract identity information from the identity source.
-
Merge the extracted information into the Identity Store (the merge mode of the meta controller is used).
-
Use the employeeNumber as join criteria.
-
Create a local GUID for each identity (into the attribute dxmGuid) that is composed of a fixed string and the employeeNumber.
-
Mark all created and modified user entries in the Identity Store for privilege resolution (dxrTBA=TRUE).
-
Set the start and end dates of the identities (setting the end date prepares an identity to be deleted).
-
Set the dxmOprMaster attribute that indicates which identity source controls this identity. This avoids additionally that the same identity is controlled by several masters which would lead to oscillating identity information and to confusion.
DirX Identity provides the following pre-configured creation and update workflows:
-
LDIFfile2Ident - imports data from an LDIF content file to the Identity Store and creates or updates the corresponding identities (this file acts as identity master for all German persons from Munich).
-
Ident2LDIFfile - exports all German persons from Munich from the Identity Store to an LDIF content file. Use this information to update the identity source (for example the e-mail addresses or telephone numbers).
-
CSVfile2Ident - imports data from a CSV file to the Identity Store and creates or updates the corresponding identities (this file acts as identity master for all German persons from Berlin).
-
dent2CSVfile - exports all German persons from Berlin from the Identity Store to a CSV file. Use this information to update the identity source (for example the e-mail addresses or telephone numbers).
-
XMLfile2Ident - imports data from an XML file to the Identity Store and creates or updates the corresponding identities (this file acts as identity master for all German persons from Frankfurt). Please note that the DDN must be the first attribute in the Selected Attributes list for this workflow to function properly.
-
Ident2XMLfile - exports all German persons from Frankfurt from the Identity Store to an XML file. Use this information to update the identity source (for example the e-mail addresses or telephone numbers). Please note that the DDN must be the first attribute in the Selected Attributes list for this workflow to function properly.
-
Ident2XSLT - exports all German persons from Frankfurt from the Identity Store to an XML file. Use this information to update the identity source (for example the e-mail addresses or telephone numbers). In contrast to the Ident2XMLfile workflow, an additional XSLT conversion is possible. Please note that the DDN must be the first attribute in the Selected Attributes list for this workflow to function properly.
-
DSMLfile2Ident - imports data from a DSML V1 file to the Identity Store and creates or updates the corresponding identities (this file acts as identity master for all German persons from Frankfurt). Please note that the DDN must be the first attribute in the Selected Attributes list for this workflow to function properly.
-
Ident2DSMLfile - exports all German persons from Frankfurt from the Identity Store to a DSML file. Use this information to update the identity source (for example the e-mail addresses or telephone numbers). Please note too that the DDN must be the first attribute in the Selected Attributes list for this workflow to function properly.
-
CorpDir2Ident - copies all entries that were imported by the LDIFfile2Ident workflow to the tree ou=newTree in the Identity Store. Note that this workflow can only run after a successful run of the LDIFfile2Ident workflow.
-
DirXLDIF2Ident - imports entries in an LDIF content or change file generated by the DirX directory service into the Identity Store.
-
SAP-R3-HR2Ident - imports data from an LDIF file that was generated by DirX Identity’s SAP HR agent to the Identity Store and creates or updates the corresponding identities (this file acts as identity master for all persons from Rome).
-
SAP-R3-OM2Ident - imports organizational data from an LDIF file that was generated by DirX Identity’s SAP HR agent from the SAP OM subsystem to the identity store. It creates a structure of organizational units.
-
LDIFfile2CSVfile - transfers information from an LDIF file to a CSV file. This is an example of a workflow that works without any intermediate Identity Store.
Configuring the Corporate Directory Workflow
The default Connectivity scenario’s CorpDir2Ident workflow synchronizes user entries from an LDAP-enabled corporate directory into the Identity Store. By default, the workflow processes only new and modified users. Users that have been physically deleted from the corporate directory are not recognized, but you can extend the workflow if the deleted users in the source directory are marked with a special attribute. The workflow consists of a metacp activity that exports users from the corporate directory and creates or modifies users in the Identity Store. The workflow performs delta synchronization based on modification time stamps.
To run the CorpDir2Ident workflow successfully, you must perform these steps:
-
Go to the connected directory icon CorpDir.
-
In the wizard window, open the Service object and set the correct address and port information.
-
Click the Bind Profiles step. Open the bind profile and set the correct user and password information.
-
Click OK, and then click Finish.
Now you must define an LDIF agreement before this workflow can run. See the section "Configuring the DirXdelta Provisioning Workflow" for details.
Configuring the DirX LDIF Directory Workflow
The default Connectivity scenario’s DirXLDIF2Ident workflow synchronizes LDIF content and change files supplied by the DirX directory service into the Identity Store. The workflow processes new, deleted and modified users. The workflow consists of one metacp activity that processes all LDIF files supplied in a specific location and creates or modifies users in the Identity Store. All created and modified user entries in the Identity Store are marked for role resolution (dxrTBA=TRUE). The workflow performs delta synchronization based on LDIF change files.
To run the DirXLDIF2Ident workflow successfully, you must perform these steps:
-
Go to the connected directory icon DirXLDIF.
-
In the wizard window, click LDIF Agreement Parameters.
-
Change the LDIF Agreement Folder path to suit your DirX installation and the related LDIF agreement (normally the LDIF Agreement Folder should be dirx_install_path*/server/ldif*).
-
Click OK, and then click Finish.
Now you must define an LDIF agreement before this workflow can run. For details, see the section "Configuring the DirXdelta Workflow".
Configuring the DirXdelta Workflow
The DirX Identity DirXdelta synchronization workflow DirXdelta2Ident handles synchronization between a DirX LDAP directory that creates LDIF change files based on an LDIF agreement and imports this information into an LDAP directory. Before you can run this workflow, you must set up a DirX LDIF agreement. The following sections describe the rules you need to follow for DirXdelta LDIF agreements and describes how to set up an agreement. The workflow checks the defined directory to which the LDIF change files are written and processes all files with the correct LDIF agreement identifier (by default, 88).
DirXdelta LDIF Agreement Rules
In general, you must observe the following rules when creating an LDIF agreement suitable for the pre-configured DirXdelta workflow:
-
The replication area (context prefix + subtree base) must match the workflow’s input base object. Job → Input Channel → Import/Export contains by default a setting "base_obj ou=Sales, o=PQR" which is suitable for the samples described in the previous section.
Note: It is essential to decide whether or not to place a blank space after the comma in the setting. Place a blank if the LDIF content/change files are generated by the DirX Server (via LDIF agreements). Don’t place a blank if the LDIF change files are written by metacp.
For example, you must change this setting to "base_obj ou=Controlling, o=PQR" if the related LDIF agreement is designed to process changes of subordinates of "ou=Controlling, o=PQR" -
If your LDIF agreement is configured for both full and incremental refresh, the LDIF policy of this agreement must be "Save user attributes plus Creation-Time and Modification-Time only".
-
The LDIF agreement must be specified so that the LDIF files are generated in Latin-1 (ISO 8859-1) format.
-
The workflow is designed to synchronize persons only. Where necessary, intermediate nodes like organizational units are created with dummy attribute values according to the workflow’s superior_info setting. As a result, the LDIF agreement should be defined with a refinement filter to an object class representing a person (as in the sample script create-iper.adm - see the next section "Setting Up the LDIF Agreement"). This action prevents confusing “naming violation” error messages during the creation of intermediate nodes. If you intend to synchronize objects other than persons, you must change the mapping so that it is consistent for all objects (for example, one-to-one mapping using lStringEscapeLDIF for all attributes to be synchronized).
Setting Up the LDIF Agreement
You can create LDIF agreements with dirxadm scripts or with DirXmanage. For details, see the DirX documentation.
The default DirXdelta2Ident workflow requires an LDIF agreement that matches the workflow’s default settings. Our sample agreement writes an LDIF file every hour and has the agreement ID 88.
See the section "DirXdelta LDIF Agreement Rules" for information about how to set up LDIF agreements correctly.
Note: Be sure that the directory to which the DirX server writes the LDIF change files grants read and write access to the DirXdelta workflow (metacp).
To create the sample agreement with DirXmanage:
-
Start DirXmanage
-
Open Policies → Shadow Operational Bindings
-
Perform Local Operations → Add → Primary → LDIF agreement
Input Data:
General: Shadowing Status=Activated, Identifier=88
Shadowing Agreement: Context prefix=/o=pqr
Update mode: Window time … = 10 sec
Update interval … = 3600 sec
Replication Area: Subtree base=/ou=mthb/ou=Sales
Refinement=Internet-Organizational-Person
LDIF policy: Click Save user attributes plus Creation-Time and Modification-Time only.
-
Click OK
The LDIF agreement is now active and running. You can start the workflow to process the initial LDIF content file.
To edit the agreement again:
-
Start DirXmanage
-
Click Policies → Shadow Operational Bindings
-
Click the line with the agreement number 88
-
Click Local Operations → Terminate
-
Now you can edit the agreement.
Sample Scripts to Handle the Sample Agreement
The following sample scripts illustrate how to create, activate, deactivate and delete the sample agreement:
-
agrenv.tcl - contains the central definition of the agreement identifier (in DirX terminology, this is an operational binding identifier)
-
create.adm - creates the agreement.
-
create-iper.adm - similar to create.adm with the scope of the agreement limited to objects of class inetOrgPerson
-
establish.adm - activates the agreement
-
show.adm - displays the agreement
-
terminate.adm - script for deactivating the agreement
-
delete.adm - script for deleting the agreement
Assumptions: Administrator cn=admin,o=pqr with Password dirx
Instructions for use:
-
Copy the scripts from the folder install_path*/data/ldifagr/dirx* or install_path*/data/ldifagr/dirx-ee* into a folder of your choice.
-
Open an MS/DOS Command Prompt window or a UNIX shell and navigate to the script folder.
-
Change agreement identifier in agrenv.tcl if necessary. If you change the identifier, don’t forget to update the agreement number in the workflow definition.
Create the agreement:
dirxadm create-iper.adm (or dirxadm create.adm)
-→ An agreement will be created that writes an LDIF change file every hour
Activate the agreement:
dirxadm establish.adm
Display the agreement:
dirxadm show.adm
Deactivate the agreement:
dirxadm terminate.adm
Delete the agreement:
dirxadm delete.adm
Configuring the File-Based Source Workflows
The default Connectivity scenario provides a set of creation and update workflows that allow for connectivity to various systems that support data exchange via LDIF, CSV or XML/DSML V1 file formats. Other structured file formats are possible but are not pre-configured.
Before you can run these workflows successfully, you need to copy some sample data files to a default location:
-
Open the file directory data in the DirX Identity installation path.
-
Copy the files data.ldif, sapr3_full.ldif, sapr3_om.ldif, data.csv, dsml_data.xml, xml_data.xml to the location C:/ MetahubData.
The following file-based source workflows are available and can run without any further configuration steps:
-
LDIFfile2Ident
-
Ident2LDIFfile
-
CSVfile2Ident
-
Ident2CSVfile
-
XMLfile2Ident
-
Ident2XMLfile
-
Ident2XSLT
-
DSMLfile2Ident
-
Ident2DSMLfile
-
SAP-R3-HR2Ident
-
SAP-R3-OM2Ident
-
LDIFfile2CSVfile
Configuring the Relational Database Workflows
The relational database workflows provided with the default Connectivity scenario can synchronize user entries from a relational database that is either accessible via ODBC or JDBC into the Identity Store. By default, the workflows process only new and modified users. Users that have been physically deleted from the relational database are not recognized, but you can extend the workflows if the deleted users in the source directory are marked with a special attribute.
The import workflows consist of a JDBC or ODBC agent activity that exports the information from the source and a metacp activity that creates or modifies users in the Identity Store.
The default Connectivity scenario ODBC/JDBC workflows are:
-
ODBC2Ident
-
Ident2ODBC
-
ODBC_Ident (a sequential combination of the two previous workflows)
-
JDBC2Ident
-
Ident2JDBC
To complete and use these workflows, Microsoft Access 20xx must be installed on your computer.
The example HR database used in the default scenario is delivered with DirX Identity and has the pathname install_path*/data/personal.mdb*. It is protected with the password dirx to show the ODBC agent’s password feature.
-
Copy this database to C:/MetahubData (or another location, if you prefer). It is a good idea to make a copy of the personal.mdb database, so that you can restore the original later on if the working copy becomes corrupted.
-
Define this HR database to be an ODBC database:
-
Go to Start → Settings → Control Panel and double-click Administrative Tools
-
Click on Data Sources (ODBC).
-
If you installed DirX Identity with the system account, select the System-DSN tab and click Add… otherwise use the User DSN tab.
-
Select Driver to Microsoft Access (*.mdb) and then click Finish.
-
Enter personal into the field Data Source Name.
-
Click Select….
-
Navigate to the location where you have copied personal.mdb, select it and click OK. A new ODBC source is created.
-
Click OK again.
Your ODBC workflows should now run.
Note: The password of the Access 20xx database provided with DirX Identity is dirx. To change it, perform these steps:
-
Start Microsoft Access.
-
Click File → Open.
-
Select the database.
-
Click Open Exclusive.
-
Click Tools → Security → Set Database Password.
Don’t forget to change the relevant bind profile to the same value.