SAP NetWeaver UM Agent
SAP NetWeaver UM Agent is the DirX Identity agent that handles the import and export of users and user to role assignments as well as the export of portal roles from an SAP NetWeaver/Enterprise portal.
The SAP NetWeaver UM agent is implemented in Java, uses the Identity Connector Integration Framework and uses a SOAP service to bind to the portal server.
The SAP NetWeaver UM Agent or Connector requires SAP NetWeaver '04 SPS 14 or SAP NetWeaver Portal or higher.
SAP NetWeaver UM Agent can:
-
Perform a full export of portal roles and groups from an SAP NetWeaver portal using SPML search filters.
-
Perform a delta import of users into an SAP NetWeaver portal, including the creation of new users, creation of user-to-role assignments, modification of users and user-to-role assignments and deletion of users.
-
Perform a full export of users from an SAP NetWeaver portal using SPML search filters.
-
Generate a trace file (for tracing, reporting which objects were processed and the operations that failed).
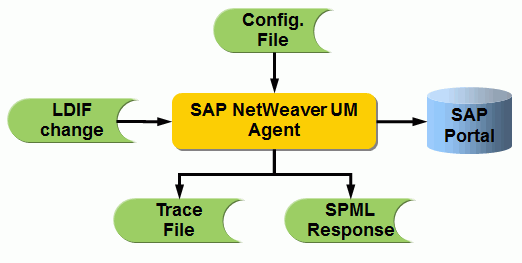
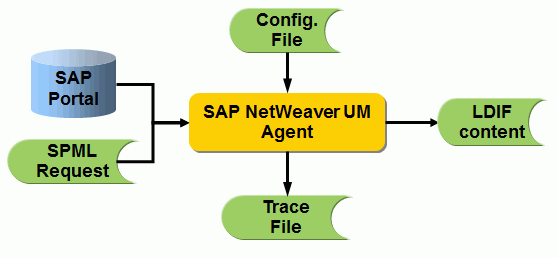
The following figures illustrate the components of the SAP NetWeaver UM Agent export and import operations.
During startup, the agent reads its configuration file that defines the internal structure and parameters. Next, it reads the SPML request file that defines the amount of entries to be read from the SAP Enterprise portal, reads it and writes it to an LDIF content file. In parallel, it creates a trace file.
During startup, the agent reads its configuration file that defines the internal structure and parameters. Next, it reads an LDIF change file and imports it to the SAP NetWeaver portal database. In parallel, it creates a trace file and an SPML response file. The response file contains information about whether an entry operation was successful. This information can be used for example to update the state information in DirX Identity.
This section describes:
-
SAP NetWeaver UM Agent configuration files for export and import operations
-
The export data file format that SAP NetWeaver UM Agent generates
-
The import data file format that SAP NetWeaver UM Agent recognizes
Configuration File Formats
SAP-NetWeaver-UMAgent uses the following configuration files:
-
NetWeaver UM export configuration file - controls the export of data from a SAP NetWeaver Portal
-
NetWeaver UM import configuration file - controls the import of data into an a SAP NetWeaver Portal
Templates of these configuration files are provided with the Agent installation. The filenames are:
-
Configuration.xml (to import and export objects)
-
SearchRequest.xml (contains the search request to select the objects for export)
In general, you must customize these files to support the requirements of your SAP NetWeaver Portal import and export operations.
The following sections describe the extensions to the standard file formats.
Configuration File Extensions
The standard parameters are described in the Configuration File Formats section of the Framework-based Agents chapter. This section describes only the extra parameters.
The SOAP connection is configured by the attributes
-
Url - The URL of the Web service, in the format http://host:port/spml/spmlservice
-
user - The user password (basic authentication only)
-
password - The password for basic authentication
-
trustStore - the path to the trust store file containing the certificate of the server to be used for SSL/TLS server side authentication.
-
trustStorePassword - the password that is needed to read the server certificate from the trust store.
-
keyStore - the path to the key store file containing the private key or certificate to be used for SSL/TLS client authentication.
-
keyStorePassword - the password that is needed to read the key from the key store.
-
keyStoreAlias - the alias name to identify the private key in the key store.
The following attributes control internal dummy password generation:
-
minLength - specifies the minimum number of characters. The default value is 8.
-
maxLength - specifies the maximum number of characters. The default value is 8.
-
minUpperChar - specifies the minimum number of capital letters. The default value is 4.
-
minNumeric - specifies the minimum number of digits. The default value is 1.
-
minNonAlphaNum - specifies the minimum number of non alpha numeric characters. The default value is 1.
-
minSpecialChar - specifies the minimum number of special characters. The default value is 0.
SSL connection is defined by the protocol value https. In this case you must provide the public certificate of the SAP NetWeaver server in the truststore as mentioned above (see trustStore, keyStore).
| A successful authentication requires that the user is assigned the UME action MANAGE_ALL_COMPANIES. Only this type of users is allowed to call the SAP SPML provider. The assignment must be done now via the UME admininistration UIs (useradmin webapplication). Use a role already containing the action or create a new one and assign the action MANAGE_ALL_COMPANIES. Then assign this role to all users shall be able to use the SPML provider. |
Search Request Format
The standard parameters are described completely in the Search Request File Format section of the Framework-based Agents chapter. There are no extra parameters to configure.
Hints to configure the parameters for SAP NetWeaver UM:
searchBase - specifies the base object for the search, for example “USER.PRIVATE_DATASOURCE.un:” for users.
filter - for example set it to 'objectclass' and 'sapuser'.
Data File Formats
The next sections describe the used data file formats for import and export of data.
Import Data File Format
The SAP NetWeaver UM agent recognizes import data files in LDIF change file format. The supported change types are add, modify, and delete; modifyDN is not supported.
User Marco Bellosa is added to the portal.
version:1
dn:mbello75
changetype:add
firstname:Marco
islocked:False
lastname:Bellosa
logonname:mbello75
password:x#mb7564
objectclass:sapuser
User mbello75 is modified. Its description is changed, and the user gjx32406 is removed from the role.
dn: mbello75
changetype: modify
delete: title
-
add: title
title: Big boss
-
User mbello75 is deleted from the portal.
dn: mbello75
changetype: delete
Setting Up a Secure Connection to SAP NetWeaver
This section describes in more detail how to set up a secure SSL/TLS connection to the SAP NetWeaver Portal based on server or client side authentication.
-
Server Authentication
This type of connection requires
-
a key store located at the server containing the servers private-key / certificate pair
-
a trust store located at the client containing the server’s certificate.
Follow the instructions below to accomplish this.
Server-side actions
Open the "Visual Administrator" (this is a command line tool provided by the SAPEP6 portal) and select the "Key Storage" service (left pane, tree-view).
Select the view "service_ssl" which shows a list of ssl-entries in the "Entries" pane. By default, the entry "ssl-credentials-cert" holds the server certificate being used in SSL handshake negotiations. Note that the certificate’s "common name" MUST be the name of the host where the portal is installed. Otherwise, the client will NOT accept this certificate (SSL checks if the certificate’s "common name" matches the host name).
If there is no suitable certificate available, create a SSL credential pair by pressing the "create" button. As mentioned above, the "common name" MUST be the host name.
Export the certificate to the filesystem (see "export" button).
If you have created a new (self signed) SSL credential, select the Service "SSL Provider). The property page "Server Identity" shows the currently active SSL credential. Add your credential (see "add" button).
Client-side actions
Trust store:
To import the server’s certificate into the trust store, copy this certificate to the SOAP-client’s file system. If the server’s certificate is self-signed, this can be accomplished in two ways:
-
copy the formerly exported certificate (see 1.1) or
-
open the Internet Explorer (Window platform only), browse to https://<HOST>:53001.
The browser will warn you about the untrusted (self-signed) certificate and provide an "install certificate" button. Install the certificate in one of Window’s certificate stores and copy it to your file system (drag&drop!).
Now go to the DirX Identity installation directory (for example C:\Program Files\DirX\Identity) and open the subfolder security/java. Open a DOS window and enter the command:
keytool -import -noprompt -trustcacerts -alias sapep6 -file portal.cert -keystore truststore -storepass changeme
where "portal.cert" contains the server’s certificate.
DirX Identity configuration:
Open the DirX Identity Manager, select the Connectivity pane, and go to the Expert View.
Navigate to the service object which describes your portal service (for example, configuration/services/my-company/SAPEPUM).
Change the server name from "http://*host:53000/spml/spmlservice*" to "https://*host:53001/spml/spmlservice*". Note that the port may differ. In general, if your http-port is PORT, the https-port will be PORT*+1*.
Open the associated "System" object in Expert View → configuration/systems folder). In the security property page, add the path to the trust store (for example, C:\Program Files\Atos\DirX Identity\java\security\truststore) and provide the password (for example, changeme).
Eventually, go to the respective password synchronization workflow (for example, workflows/my-company/password synchronization /setPassword in SAP) and check the SOAP SSL-Button in the Set Password Activity property page.
-
-
Client Authentication
This type of connection requires
-
a key store located at the server containing the servers private-key / certificate pair
-
a trust store located at the server containing the clients’s CA authority
-
a key store located at the client containing the client’s private-key / certificate pair
-
a trust store located at the client containing the server’s certificate
Follow the instructions below to accomplish this.
Server-side actions
If your client certificate had been issued by a trusted CA (certification authority), you should have the CA’s certificate. Open the "Visual Administrator", navigate to the service "SSL Provider" and open the "Client Authentication" property page. Select "Require client certificate" and add the CA’s certificate to the list of "Trusted Certification Authorities.
If you don’t have a trusted client certificate, things get a little bit more complicated:
-
Navigate to the service "Key Storage", select the view "TrustedCAs".
-
Create a new "trusted" private-key / certificate entry.
-
Go to the "service_ssl" view and create a SSL credential using this trusted certificate (see "select CA key" button).
-
Export this ssl credential (i.e. private-key / certificate pair) to a PKCS12 key store (see export, type p12).
-
Copy the PKCS12 file (usually ending with .p12) to the client machine.
-
Navigate to the service "SSL Provider" and open the "Client Authentication" property page.
-
Select "Require client certificate" and add the trusted CA certificate (see above) to the list of "Trusted Certification Authorities.
Client-side actions
Trust store:
See above.
Key store:
Typically, a CA authority provides the client’s private-key / certificate along with its own certificates in a PKCS12 file.
To import this PKCS12 file into the key store, copy it to the SOAP client’s file system.
Now go to the DirX Indentity installation directory (for example, C:\Program Files\Atos\DirX Identity) and open the subfolder security/java. Open a DOS window and enter the command:
keytool -import -noprompt -alias sapep6 -file portal.p12 -keystore keystore -storepass changeme
DirX Identity configuration
Open the DirX Identity Manager, select the Connectivity pane, go to the Expert View.
Navigate to the service object which describes your portal service (for example, configuration/services/my-company/SAPEPUM).
Open the associated "System" object (see Expert-View, configuration/systems folder). In the "security" property page, add the path to the key store (for example C:\Program Files\Atos\DirX Identity\java\security\keystore) and provide the password (for example, changeme).
Navigate to the "Connected Directory" representing your SAPEP6 Portal (for example, Connected Directories/my-company/Provisioning/SAPEPUM)
Select the bindprofile SAPEPUMprofile and provide the "Key Store Alias" (for example, sapep6, see keytool command, -alias).
-
Password Synchronization
The SPML add request only sets an initial password. The agent has been extended to set a “productive” password. If a password has to be set, the agent first sends a SPML add request to set an internally generated dummy password and then sends a SPML modify request to set the “productive” password.
| Either one or both function calls can fail. If the first fails no change has been made. If the second fails the user is protected by an unknown password. Only an administrative person can resolve the issue. |
A modify should use the attributes oldpassword and password. No password is generated therefore in this case.
Password Reset
The agent supports an administrative password reset and change password at next log on. The agent uses the boolean (pseudo-)attribute dxrPwdReset to decide if a productive or initial password must be set. The attribute works only in case of creating a user (SPML add request) in conjunction with the attribute password.
If dxrPwdReset is TRUE then only an initial password is set. If dxrPwdReset is FALSE or not set (default behavior) then the productive password is set as described above.
Example for an administrative password reset:
dxrPwdReset: TRUE
PASSWORD.BAPIPWD: Administrator_Password
Example for a change password at next log on:
dxrPwdReset: TRUE
PASSWORD.BAPIPWD: value_of_dxmPassword
The attribute dxmPassword holds the current password of the user.