Installing and Configuring the DirX Identity Business User Interface
The DirX Identity Business User Interface is an application with a responsive Web design approach aimed at allowing Web page content to be viewed according to the size of the device being used to access the content. The application provides a fast and easy way to carry out approval tasks from a user’s mobile device or desktop. The application communicates with DirX Identity services over the Internet through the HTTPS protocol.
The Business User Interface is available in the DirX Identity installation package and can be configured with the DirX Identity Configurator application. It requires the deployment of the DirX Identity REST Services.
This document describes the Business User Interface installation and configuration. It describes how to:
-
Install the Business User Interface
-
Configure the Business User Interface
-
Customize the Business User Interface
Installing the Business User Interface
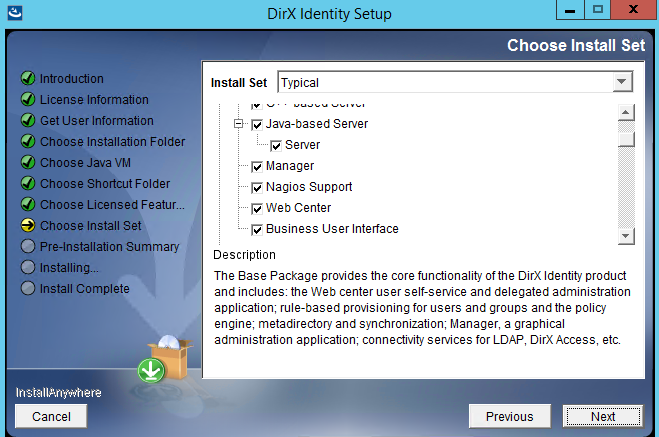
The DirX Identity Business User Interface is selected by default within the DirX Identity installation.However, you should make sure that this component is checked activated during installation, as shown in the following figure.
The Business User Interface requires the DirX Identity REST Services, which are installed by default.
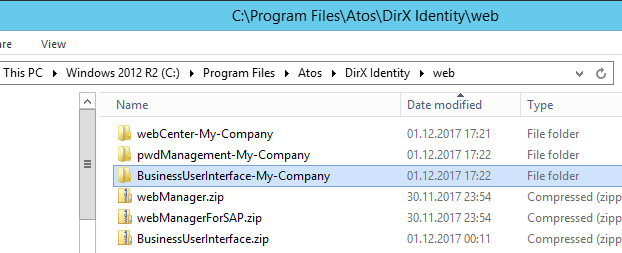
The application is installed in the web subfolder of the DirX Identity installation path - next to the DirX Identity Web Center - as a template archive BusinessUserInterface.zip on Microsoft Windows or BusinessUserInterface.tar on Linux.This file is the base for the DirX Identity Configurator application to create different instances depending on the configured domain.
Deploying the Business User Interface
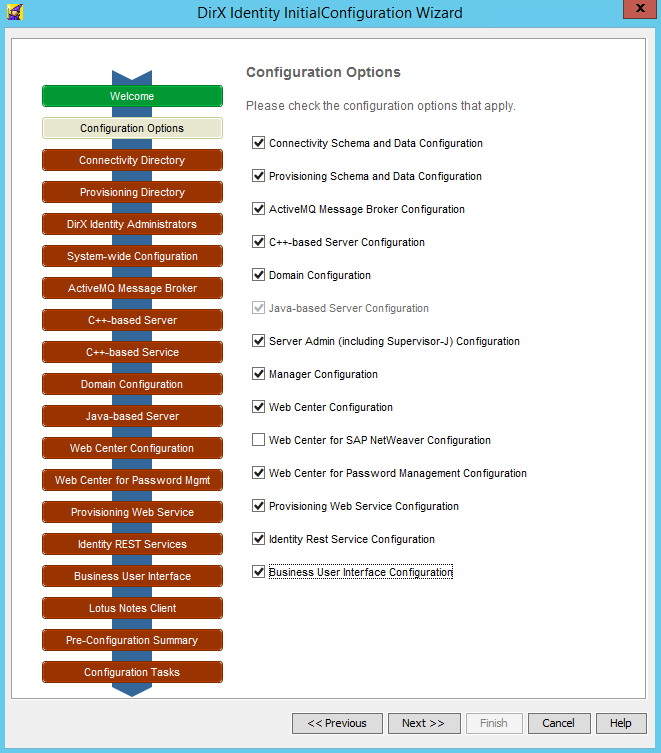
Use the DirX Identity Configurator application to configure the DirX Identity Business User Interface.You need to check the configuration option Business User Interface Configuration.You also need the Identity Rest Services Configuration to be configured as the interface to DirX Identity back end.
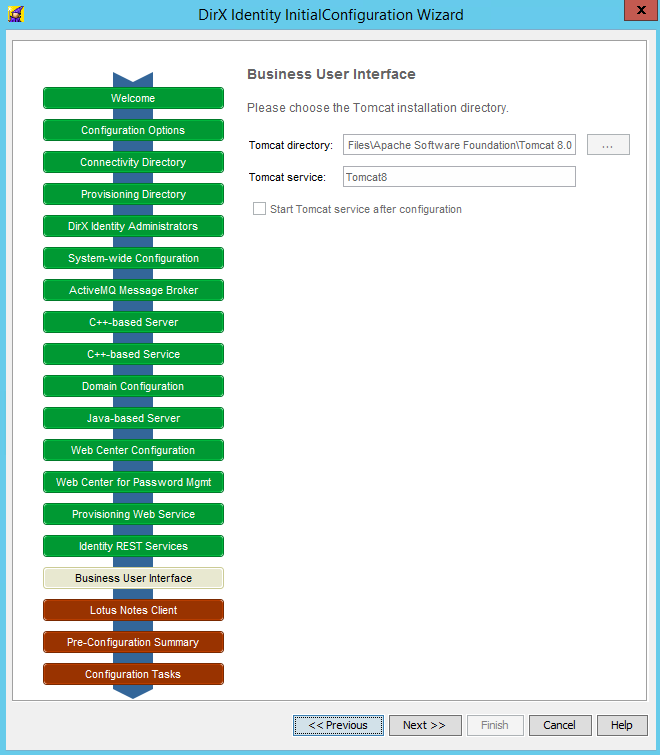
When you run the DirX Identity Configurator to install the DirX Identity Business User Interface, it creates a domain-specific deployment of the DirX Identity Business User Interface in the web folder of the DirX Identity installation folder.In our example, we configure the DirX Identity sample domain named My-Company.
In addition, a domain-specific file called a context descriptor is deployed in the Tomcat server folder, which contains only the path to the Business User Interface deployment.The file is located at tomcat_install_path/conf/Catalina/localhost/BusinessUserInterface-My-Company.xml.
The DirX Identity Configurator automatically configures the Business User Interface for using the DirX Identity REST Services, which will be deployed in the same Tomcat server.
If you want to use a Web server other than Tomcat, you can easily copy the folder BusinessUserInterface-My-Company from the web folder to the place where you need it.
Updating the Business User Interface with a Service Pack
It is good practice to back up the folder:
install_path/web/BusinessUserInterface-domain
particularly the assets subfolder - which contains your current configuration and customizations - to a safe place before installing a Service Pack or hotfix.After installing the Service Pack, you must start the configuration again as described in “Deploying the Business Unit Interface” to deploy the updated Business User Interface with the new features.This configuration step moves the previous installation of the Business User Interface to the folder:
install_path/web/BusinessUserInterface-domain.OLD
which is overwritten by every successive configuration.After configuration, you need to re-customize your installation as described in the following sections.This task is easier if you merge your backed-up assets folder with the newly created one.
Configuring and Customizing the Business User Interface
Configuring the Business User Interface consists of the following tasks:
-
Configuring access to the DirX Identity REST Services (mandatory)
-
Disabling the risk feature (optional)
-
Adding a new language (optional)
-
Exchanging images and graphics (optional)
You can also make the following customizations to the Business User Interface:
-
Customize tables using configuration files and/or user hooks
-
Add new widgets to the default home page
-
Configure access policies for BUI elements
-
Customize user profiles using dynamic forms
The next sections describe these configuration and customization tasks.
Configuring Access to the DirX Identity REST Services
Configuration settings are available in the config.json file, located in the Business User Interface installation folder install_path/web/BusinessUserInterface-domain/assets/config/. The content of this file is case-sensitive. The configuration includes:
- “basicAuthServer”
-
the connectivity URL to the DirX Identity REST Services for login with username and password. The username you must use is configured with the DirX Identity REST Services, not with the Business User Interface. For details, see the section "Configuring User Authentication" for the DirX Identity REST Services in the DirX Identity Integration Framework Guide. In the Business User Interface, you must configure the following parameters:
- “protocol”
-
the protocol, either http or https. If the Business User Interface is accessed through HTTPS, you can only use HTTPS to access the DirX Identity REST Services.
- “host”
-
the name of the server on which the DirX Identity REST Services is running. If you use HTTPS, you must use the same name as one of the Subject alternative names of the server certificate.
- “port”
-
the port on which the DirX Identity REST Services is accessible via HTTP or HTTPS. Configure 80 for the standard HTTP port. Configure 443 for the HTTPS standard port.
- “domain”
-
the base path to the DirX Identity REST Services, which also configures the domain for which the Business User Interface is used.
| The domain field contains the DirX Identity REST services context path and the DirX Identity domain; for example: /DirXIdentityRestService-My-Company. See the chapter “DirX Identity REST Services” in the DirX Identity Integration Framework Guide for more information. |
- “x509AuthServer”
-
- the connectivity URL to the DirX Identity REST Services for login with a PKI client certificate. You must configure the following parameters:
- “protocol”
-
the protocol must be https.
- “host”
-
the name of the server on which the DirX Identity REST Services is running. You must use the same name as one of the Subject alternative names of the server certificate.
- “port”
-
the port on which the DirX Identity REST Services is accessible via HTTPS and on which the secure client authentication is configured on the Web server (Apache Tomcat).
- “domain”
-
the base path to the DirX Identity REST Services, which also configures the domain for which the Business User Interface is used.
- “kerberosAuthServer”
-
the connectivity URL to DirX Identity REST Services for login with Windows username and password. You must configure the following parameters:
- “protocol”
-
the protocol must be https.
- “host”
-
the name of the server on which the DirX Identity REST Services is running.
- “port”
-
the port on which the DirX Identity REST Services is accessible via HTTPS and on which the secure client authentication is configured on the Web server (Apache Tomcat).
- “domain”
-
the base path to the DirX Identity REST Services, which also configures the domain for which the Business User Interface is used.
- “dxapepAuthServer”
-
the connectivity URL to DirX Identity REST Services for login with DirX Access Policy Enforcement Point (PEP). You must configure the following parameters:
- “protocol”
-
the protocol must be https.
- “host”
-
the name of the server on which the DirX Identity REST Services is running under DirX Access PEP configuration.
- “port”
-
the port on which the DirX REST Services is accessible via HTTPS.
- “domain”
-
the base path to the DirX Identity REST Services, which also configures the domain for which the Business User Interface is used.
|
These settings are for communication between Business User Interface and DirX Identity REST Services. Settings for DirX Access PEP are stored in the file: tomcat_install_path*/conf/server.xml* Settings from server.xml are generated by DirX Access and must be transferred manually to Apache Tomcat. |
Here is a Tomcat configuration snippet:
<Valve ClientId="Tomcat 9.0 - My-Company BUI"
       ClientKeystoreFilename=
"c:\Atos\Tomcat9PEP\conf\sec-comm.client.p12"
       ClientKeystorePassphrase="OfCHCMAQ10unQGnR"
       ServerPrimaryHost="my-server.my-company.example"
       ServerPrimaryPort="11111"
       ServerPrimaryPortSSL="11112"
       className="com.siemens.dxa.pep.tomcat9.DXAValve" />
</Engine>
<Connector SSLEnabled="true"
           acceptCount="100"
           clientAuth="want"
           debug="0"
           disableUploadTimeout="true"
           enableLookups="false"
           keystoreFile="conf/my-server.jks"
           keystorePass="dirxaccess"
           keystoreType="JKS"
           maxSpareThreads="75"
           maxThreads="150"
           minSpareThreads="25"
           port="8443"
           scheme="https"
           secure="true"
           sslProtocol="TLS"
           truststoreFile="conf/my-server.jks"
           truststorePass="dirxaccess"
           truststoreType="JKS" />
The most important parameters are:
-
“ClientId” - the name of the DirX Access PEP configuration.
-
“ServerPrimaryHost” - the DirX Access server name.
-
“ServerPrimaryPort” and “ServerPrimaryPortSSL” - the DirX Access server ports.
- “oauth2AuthServer”
-
the connectivity URL to DirX Identity REST Services for data and connectivity URL to OAuth2 Identity Providers. You must configure the following parameters:
DirX Identity REST parameters:
- “protocol”
-
the protocol, either http or https. If the Business User Interface is accessed through HTTPS, you can only use HTTPS to access the DirX Identity REST Services.
- “host”
-
the name of the server on which the DirX Identity REST Services is running. If you use HTTPS, you must use the same name as one of the subject alternative names of the server certificate.
- “port”
-
the port on which the DirX Identity REST Services is accessible via HTTP or HTTPS. Configure 80 for the standard HTTP port. Configure 443 for the HTTPS standard port.
- “domain”
-
the base path to the DirX Identity REST Services, which also configures the domain for which the Business User Interface is used.
The domain field contains the DirX Identity REST services context path and the DirX Identity domain; for example: /DirXIdentityRestService-My-Company. See the chapter “DirX Identity REST Services” in the DirX Identity Integration Framework Guide for more information.
OAuth2 parameters:
- “clientId”
-
the application ID used in OAuth2 Identity Provider configuration. The Business User Interface application must be registered to Identity Provider with this ID.
- “issuer”
-
the URL to the OAuth2 provider. Here are issuer examples for different OAuth2 providers:
For DirX Access:
https://my-server.my-company.example:11115/authFor RedHat Keycloak:
http://localhost:8180/auth/realms/my-company - “timeoutFactor”
-
optional - the refresh token acquisition rate. For example, with a value of 0.75, a new access token will be automatically requested when 75% of the access token validity time has passed.
Token expiration time is configured on Identity Provider settings.
- "security" - “sessionTimeout”
-
the number of seconds after which a session is invalidated after the idle state has been detected.
- "security" - “sessionIdle”
-
the number of seconds after which the idle state is indicated.
- "security" - “authentication”
-
the login methods to be displayed in the login dialog:
- [“BASIC”]
-
shows only the username/password login method using the REST interface configured in “basicAuthServer”.
- [“X509”]
-
shows only the PKI login method using the REST interface configured in “x509AuthServer”.
- [“KERBEROS”]
-
shows only the Windows Authentication login method using the REST interface configured in “kerberosAuthServer”.
- [“DXAPEP”]
-
shows only the DirX Access Policy Enforcement Point login method.
- [“OAUTH2”]
-
shows only the OAuth2 OpenID login method using configuration from “oauth2AuthServer”.
- [“BASIC”, “X509”, “KERBEROS”]
-
shows the username/password login method with the ability to switch to the PKI login method or Windows Authentication login method.
- [“X509”, “BASIC”]
-
shows the PKI login method with the ability to switch to the username/password login method or Windows Authentication login method.
- [“KERBEROS”, “BASIC”, “X509”]
-
shows the Windows Authentication login method with the ability to switch to the username/password login method or PKI login.
- [“BASIC”, “OAUTH2”, “X509”, “KERBEROS”, “DXAPEP”]
-
shows all supported authentication methods with default selection to basic authentication method.
- []
-
disables any login method (useful for maintenance mode).
- “security” - “authenticationAttributeNames”
-
shows the attribute names used for authentication. These attributes are used to display information in the home page (emails, name) and attributes used to configure the application (preferredLanguage, dxrpreferences).
If the feature “enforce change password on next login” is used, add the following line to the security entry: “passwordResetAttributeName”: “dxrPwdReset”.
| We strongly recommend that you do not change this attribute names list. Incorrect or missing attribute names may interfere with the authentication process. |
These settings must correspond to the settings made in the Tomcat server and the DirX Identity REST Services.
The Tomcat server is responsible for accepting PKI client authentications.
The DirX Identity REST Services are responsible for mapping the PKI client certificate to a valid DirX Identity user and/or for mapping the username and password to a valid DirX Identity user.
The Tomcat server must be configured for this function in the file:
tomcat_install_path/conf/server.xml
The DirX Identity REST Services must be configured for this function in the file:
install_path/restServices/DirXIdentityRestServices/DirXIdentityRestService-domain/WEB-INF/security.properties
Your server is named myserver.mycompany.net and your DirX domain is named My-Company.
Tomcat configuration 1: Tomcat accepts username and password requests over HTTPS on port 443.
Tomcat configuration snippet:
<Connector port="443" protocol="org.apache.coyote.http11.Http11NioProtocol"
maxThreads="150" SSLEnabled="true" scheme="https" secure="true"
clientAuth="false" sslProtocol="TLS"
keystoreFile="install_path\ssl\identity-keystore" keystorePass="changeme" />
The keystoreFile must contain a valid server certificate for the Web service and the server name myserver.mycompany.net, which must be trusted by the browser in use.
Tomcat configuration 2: Tomcat accepts PKI client authorization requests over HTTPS on port 8443.
Tomcat configuration snippet:
<Connector port="8443" protocol="org.apache.coyote.http11.Http11NioProtocol"
maxThreads="150" SSLEnabled="true" scheme="https" secure="true"
clientAuth="true" sslProtocol="TLS"
truststoreFile=" install_path\ssl\identity-truststore" truststorePass="changeme"
keystoreFile="install_path\ssl\identity-keystore" keystorePass="changeme" />
The keystoreFile must contain a valid server certificate for the Web service and the server name myserver.mycompany.net, which must be trusted by the browser in use.
The truststoreFile must contain the root certification authority (CA) certificate and perhaps the intermediate CA chain, which has signed the client certificates to be used to access the service.
Tomcat configuration 1 and configuration 2 can be used in parallel inside one Tomcat instance.
Your Business User Interface configuration for basic and x509 authentication methods snippet should look like this:
"basicAuthServer": {
        "protocol": "https",
        "host": "myserver.mycompany.net",
        "port": "443",
        "domain": "/DirXIdentityRestService-My-Company"
    },
    "x509AuthServer":{
        "protocol": "https",
        "host": "myserver.mycompany.net",
        "port": "8443",
        "domain": "/DirXIdentityRestService-My-Company"
    },
    "security": {
        "authentication": ["X509","BASIC"],…
and you can access the Business User Interface with this URL in your browser:
https://myserver.mycompany.net/BusinessUserInterface-My-Company/
DirX Identity REST Services example for PKI login:
If using PKI client authentication, the DirX Identity REST Services are configured by default to map the first appearance of a CN=-part inside the client certificates subject field to the user’s cn field inside the DirX Identity LDAP directory.
DirX Identity REST Services configuration snippet:
auth.userFilter     = (cn={0})
auth.valueSelectRDN = cn:1
If you want to map the SERIALNUMBER part of a client certificates subject field to the employeeNumber of the DirX Identity LDAP user entry, you can use the following snippet:
auth.userFilter     = (employeeNumber={0})
auth.valueSelectRDN = SERIALNUMBER:1
Adding a New Language
Adding a new language consists of two steps:
-
Configuring the new language in the configuration file
-
Preparing a new language file
Configuring the New Language in the Configuration File
You need to add the language to the config.json file located in the Business User Interface installation folder install_path/web/BusinessUserInterface-domain/assets/config/.
In the “languages” section, you’ll find the two preconfigured languages English and German (“Deutsch (DE)”). Let’s add a new language “Français (FR)”. To do this, add a new section between the English and the German section:
  {
      "displayName": " Français (FR)",
      "code": "fr"
  },
The language definitions must be separated from each other by a comma.
The code keyword defines the name of the language file you need to prepare. In our example, the value is fr.
You can also define different language flavors for the same base language. For example, you can add the language flavor “English (GB)” with the code en_GB.
Preparing the Language File
The language filename must be in the format code*.json* and must be located in install_path/web/BusinessUserInterface-domain/assets/i18n/.
For our French example, the filename is fr.json, for the British example, it is en_GB.json.
The best way to prepare a new language file is to take the en.json file from the deployment as a template and then translate all of the values (not the parameter names!) into the new language. The values are always the part behind the colon (:). In some cases, the values contain dynamic parts, which can be recognized as \{\{…}}. The dynamic part is not to be translated if used inside a value.
Exchanging Images and Graphics
You can replace some of the graphics of the Business User Interface according to your requirements. The base path of the graphics is:
install_path/web/BusinessUserInterface-domain/assets/.
You can change the following graphics and images (you must keep the filename and just replace the default image or graphic):
- img/company-logo-contrast.svg
-
vector image (svg); blue on transparent;aspect ratio 1.41/1; company logo for header information.
- img/company-logo.svg
-
vector image (svg); white on transparent; aspect ratio 1.41/1; company logo in burger menu and for busy animation at startup.
- img/company-logo.png
-
png file; white on blue; 211*149 pixels; company logo for login.
- img/company-background.jpg
-
jpg file; colored and non-transparent; 1920*1244 pixels (recommended); background image for login.
Other graphics/images include:
- img/anonymous.svg
-
vector image (svg); white on transparent; aspect ratio 1/1.
- Img/company-logo.svg
-
vector image (svg); white on transparent; aspect ratio 1.41/1.
You can replace the icon install_path/web/BusinessUserInterface-domain/assets/icon/favicon.ico with one of your company’s icons.
Customizing Tables
These settings are available in the tables.json file located in the Business User Interface installation folder:
install_path/web/BusinessUserInterface-domain/assets/config/.
This section contains three main subsections: “my” ,“myTeam” and “userManagement”. Each subsection describes the table content for the “my” section of the application (for example, “My Tasks”, “My Access Rights”), and the “myTeam” and “userManagement” sections (for example, “Manage access rights”, “Manage requests”.).
Each subsection contains entries for each table that are available in that page. The general format contains entries for the default columns provided by the Business User Interface, optional custom columns entries, and a list of table attributes.
Table attributes are described by the following parameters:
- rowsLimits
-
a number that specifies the number of visible rows per table page. The default value is “5”.
- columnMode
-
a constant that specifies the column mode width calculation. Available options are force – distributes proportionally, flex – uses flex grow, and standard – distributes based on width parameter. The default value is “standard”.
Default columns are described by the following parameters:
- id (mandatory)
-
a string that specifies the ID of the column.
- visible (mandatory)
-
whether (true) or not (false) the custom column is visible.
- width (optional)
-
the width of the table column, can be entered with any CSS type values. For example, rem, px, or %.
- sortable (optional)
-
whether (true) or not (false) the column is sortable.
Custom columns are optional and are described by the following parameters:
- type (mandatory)
-
a string whose value is always custom.
- id (mandatory)
-
a string that specifies the ID of the column.
- attributeName (mandatory)
-
a string that specifies the name of the attribute assigned to the column. This field is a reference for implementation in the Business User Interface hook. It should provide sufficient information for hook to read the value for the custom column from the model (for example, “attribute”: “assignment.mode”). See the section “Using Hooks to Extend the Business User Interface” for details.
- visible (mandatory)
-
whether (true) or not (false) the custom column is visible.
- width (optional)
-
the width of the table column, can be entered with any CSS type values. For example, rem, px, or %.
- sortable (optional)
-
whether (true) or not (false) the column is sortable.
Here is an example:
"tables": {
	“my”: {
"tasks": {
“tasks”: {
	“rowLimit”: 5,
	“columnMode”: “standard”,
“columns”:[
    				{
    	    			"id": "avatar",
        			"visible": true,
						“width”: 75,
						“sortable”: true
    },{
        "type": "custom",
        "id": "description",
        "attributeName": "description",
        "visible": false,
			 "width": "30%"
    }]
}
Default column values for "tasks" are:
-
"tasks": name, dueDate, operation, endDate, roleParameters, sod, risk, action, summary
Default column values for "accessRights" are:
-
"roles": name, startDate, endDate, roleParameters, mode, state, action, summary
-
"permissions": name, startDate, endDate, mode, state, action, summary
-
“groups": name, startDate, endDate, mode, state, action, summary
Default column values for "privilegeRequest" are:
-
"roles": name, startDate, endDate, roleParameters, action, summary
-
"permissions": name, startDate, endDate, action, summary
-
"groups": name, startDate, endDate, action, summary
Default column values for "requests" are:
-
“roles”: reqType, display, initiator, subject, nextApprovalDate, currentParticipants, operation, startDate, endDate, roleParameters, hasSODViolations, actions, summary
-
"permissions": reqType, display, initiator, subject, nextApprovalDate, currentParticipants, operation, startDate, endDate, hasSODViolations, actions, summary
-
"groups": reqType, display, initiator, subject, nextApprovalDate, currentParticipants, operation, startDate, endDate, hasSODViolations, actions, summary
-
"profileChanges": reqType, display, initiator, subject, nextApprovalDate, currentParticipants, operation, startDate, endDate, roleParameters, hasSODViolations, actions, summary
Default column values for "myTeam" are:
-
“users”: avatar, name, emails, phones, riskLevel, state, userHome
Default column values for “userManagement” are:
-
“users”: avater, name, emails, phones, risk, state, action, username
Default column values for “myDelegations” are:
-
“delegations”: name, operation, assignTo, startDate, endDate, futherDelegations, action
-
“assignedDelegations”: name, operation, assignFrom, startDate, endDate, futherDelegations, action
Default column values for “myCampaigns” are:
-
“campaigns”: type, name, startDate, dueDate, owner, ownerMail, ownerTelephoneNumber, numberOfCerifications, gotoCertifications
Defalut column values for “myCampaign” are:
-
“users”: username, dueDate, completed, gotoTasks
-
“privileges”: privilegeName, folder, dueDate, completed, gotoTasks
Default column values for “certify” are:
-
“users”: approveState, rejectState, reason, name, department, startDate, endDate, roleParameters, sod, summary
-
“roles”: approveState, rejectState, reason, name, startDate, endDate, roleParameters, sod, summary
-
“permissions”: approveState, rejectState, reason, name, startDate, endDate, sod, summary,
-
“groups”: approveState, rejectState, reason, name, targetSystem, startDate, endDate, sod, summary,
Adding a New Widget
These settings are available in the config.json file in the section “customWidgets” located in the Business User Interface installation folder:
install_path/web/BusinessUserInterface-domain/assets/config/.
This section can be used to extend the default home page with additional widgets. These widgets support only external links to other websites.
Here is an example:
{
"id": "home-my-atos-id",
    "title": "My Atos",
    "label1": "My Atos",
    "label2": "external link",
    "customIcon": "./assets/img/home-atos.png",
    "link": "https://atos.net"
}
Enabling and Disabling Different Features
These settings are available in the config.json file located in the Business User Interface installation folder:
install_path/web/BusinessUserInterface-domain/assets/config/.
Using the Localization Feature
This feature allows the Business User Interface application to adapt displayed content (currency, date, time) to different languages, regional peculiarities, and technical requirements of a target locale.
The Business User Interface configuration inside the “ui” section: “localeStrategy” sets the order of locale strategy usage:
- “ui” - “localeStrategy” - “profileAttribute”
-
the Business User Interface application uses the LDAP attribute name set in this section. If DirX Identity does not use this attribute, set this field to “null” or remove this key.
- “ui” - “localeStrategy” - “browser”
-
the Business User Interface application uses the internet browser settings for displaying localized content. To disable this strategy, set the value to false or remove this key.
- “ui’ – localeStrategy” – “fallback”
-
if none of the strategies listed above are used or enabled, the Business User Interface uses this key. This key is the same for all Business User Interface users.
| These localization settings do not affect internationalization settings. |
Disabling the Risk Feature
If you have not enabled the risk governance feature in your DirX Identity domain, you must disable it in the Business User Interface.
To disable this feature, set the parameter “showRiskLevel” Inside the “ui” - section to “false”. The default value is “true”.
Enabling/Disabling the Display of Privileges
You can choose which kind of privileges (roles, permissions, groups) are displayed.
To suppress the display of different kinds of privileges, set the parameters “showRoles”, “showPermissions”, “showGroups” and/or “showProfileChanges” Inside the “ui” - section to “false”. The default value for all three is “true”.
Enabling/Disabling the Profile Panels
You can choose to display the name initials instead of the profile photo. To enable this feature, set the parameter “showAlwaysInitials” Inside the “ui” - section to “true”. The default value is “false”.
You can also choose to prevent the display of the name initials. To enable this feature, set the parameter “showInitials” Inside the “ui” - section to “false”. The default value is “true”.
| The “My Team” and “User Management” pages show initials in the users list. |
You can also select which panels should be displayed in Profile pages:
- “show<My|User>ProfileAvatar’
-
display or hide the user avatar panel. The default value is “true”.
- “show<My|User>ProfileOperational’
-
display or hide the user operational attributes panel. The default value is “true”.
- “show<My|User>ProfileCertificates”
-
display or hide the user certificates panel. The default value is “true”.
- “showClosedRequests”
-
display or hide closed authenticated user requests. The default value is “true”.
- “showWorkflowRequestsAsInitiator”
-
display or hide requests where the authenticated user acts as the initiator. The default value in “true”.
- “showTicketRequestsAsInitiator”
-
display or hide tickets where the authenticated user acts as the initiator. The default value is “true”.
- “showPersonas”
-
display or hide users of type persona. The default value is “true”.
- “showUserFacets”
-
display or hide users of type user facet. The default value is “true”.
- “showFunctionalUsers”
-
display or hide users of type functional user. The default value is “true”.
Enabling/Disabling Home Page Counts
To improve home page performance, you can disable home page counts: the values displayed on every widget, such as the number of tasks, the number of access rights, and so on. The list of home page counts is available in the “home_counts_ids.txt” file in the folder install_path/web/BusinessUserInterface-domain/assets/config/.
Defining Color Schemes in the “themes” Subsection
You can create new color schemes for the Business User Interface. To use these new schemes, you must register them in the configuration by providing the following parameters:
- name
-
the name of the theme (string).
- file
-
the name of the CSS file that contains the theme (string). This file must be placed in the folder install_path*/web/BusinessUserInterface-domain/assets/config/styles/*.
- colors
-
the colors to be displayed in the Business User Interface Settings page as the representation of the theme (the primary colors).
Configuring Visible Widgets
The visible widgets available in the Business User Interface can be configured with the following parameters:
- accessPolicyId
-
the access policy ID assigned to the current widget. Available access policy IDs are defined in the policy.json file and are prefixed with the home-*string (for example, *home-my-profile-id).
- displayName
-
the translation ID for the current widget. Available translation IDs are defined in the file code*.json* in the translation folder and are prefixed with HOME.*string (for example, *HOME.MY_PROFILE_TITLE).
- i18n
-
the translation ID for the current widget. Available translation IDs are defined in the file code*.json* in the translation folder and are prefixed with HOME.*string (for example, *HOME.MY_PROFILE_TITLE).
- visible
-
whether (true) or not (false) the widget is visible. This value can be overwritten by DirX Identity access policies.
- section
-
the sections to which the widget belongs. Available values are “my”, “myTeam”, and “userManagement”. These values are only for information and cannot be changed.
Configuring Access Policies in the Business User Interface
The access policies configuration file policy.json for the Business User Interface is located in the folder install_path/web/BusinessUserInterface-domain/assets/config/ and is applied to all users.
Access policies actions are executed on the Tomcat server. In the Business User Interface, they exist to present to the user when a field can be visible, when it can be read and when it can be modified. This file contains information from DirX Identity Manager and should be updated when changes are made to access policies in DirX Identity.
| JSON file content is case sensitive. Make sure that you follow the correct JSON syntax and case format for keys and values. |
The file contains one entry: “access-policies-map”. This map contains entries for each menu (a Business User Interface widget) and each entry (a Business User Interface page or panel).
Each entry from “access-policies-map” contains the following fields:
- disabled (mandatory)
-
whether (false) or not (true) access policies are applied in the Business User Interface. If access policies are disabled in DirX Identity, this parameter must be set to true.
- component_id (mandatory)
-
a string that specifies the ID of a Business User Interface component, such as a page or an action button. For example, "my-profile-edit-id": \{ … } - specifies the ID of the “my-profile” page for the edit button.
| The “access-policies-map” contains all of the IDs from the Business User Interface application. An access policy ID is not the same as the HTML component ID. |
- type (mandatory)
-
a string that specifies the type of access policy to be applied to the component. Supported values are menus, entry and <empty> (<empty> is JSON syntax for an empty string “ ”).
- menus
-
the component is linked to an access policy item in the “menus” section of the DirX Identity Manager GUI’s “Policy” section.
- entry
-
the component is linked to an access policy item in the “entry” section of DirX Identity Manager GUI’s “Policy” section.
- <empty>
-
the component is not linked to a DirX Identity Manager access policy item.
- menu-key (mandatory)
-
a string that specifies the access policy’s context of execution: a menu or an entry. For example, "menu-key": "my-profile" specifies that the policy is assigned to the “my-profile” panel entry context. Possible values are “my-profile” and “user-profile”.
For possible values for type “menus”, see the “ResourceTypes” entry from the resource.json file available in the REST Services configuration folder.
menu-item (mandatory) - a string that specifies the operation to be executed.
The possible values are “read” and “modify”. For type “menus”, see the DirX Identity Manager “Policies” section for supported operations.
display (mandatory) - whether (true) or not (false) the entry is visible. This field can be used to hide the component even if the access policy allows the component to be displayed.
Using Dynamic Forms to Customize User Profiles
You can use the dynamic form framework Angular Formly (https://github.com/ngx-formly/ngx-formly/) to customize the “My Profile” and “Manage User Profile” pages. This framework allows you to add input fields in a form at runtime and additional entries to the user profile presentation. This section describes how to extend the Business User Interface with additional user attributes.
Configuration and description files for dynamic forms are available in install_path/web/BusinessUserInterface-domain/assets/config/forms/my-profile.json for the “My Profile” page and user-profile.json for “Manage User Profile”. By default, these files are identical and can be changed and customized to your requirements.
The content of a dynamic form is described in a JSON file. The JSON file contains two sections: “attributeNames” and “fields”. Fields of the form are described in the “fields” section and referenced in the “attributeNames” section. Each field contains a list of mandatory and optional Formly and BUI attributes. BUI attributes are identified by the prefix bui and are described in this document. For information about the Formly attributes, see the Formly product documentation available on the Formly website.
| JSON file content is case sensitive; please make sure that you follow correct syntax and case format for keys and values. |
The “attributeNames” Section
The “attributeNames” section contains one entry that consists of a simple array of SCIM and/or LDAP attribute names. To extend a user profile with an attribute, add the attribute name to this section and then describe it in the “fields” section. You can also supply an attribute name in this section that does not participate in the profile visual presentation; for example, the dxrUID attribute. This attribute is part of the profile data model but does not have a visual representation in the user profile page, so it does not need a corresponding entry in the “fields” section.
Here is an example of the “attributeNames” section:
"attributeNames": [ "emails", "c", "meta", "schemas", "name", "emails", "phonenumbers"]The “fields” Section
The “fields” section describes how the attributes are represented in the page. Each field must have a corresponding entry in the “attributeNames” section.
A field contains following entries:
- key (mandatory)
-
a string that represents the name of the SCIM/LDAP attribute assigned to the dynamic field. This is a Formly attribute. For example, "key": "manager" specifies that this field is assigned to the “manager” SCIM attribute.
In some cases, the SCIM/LDAP attribute can contain multiple subattributes. In this case, use the character “#” to specify a particular subattribute. For example, "key": "emails#work" assigns this field to the “emails” SCIM attribute, and from this attribute only the “work” attribute is used.
- type (mandatory)
-
a string that specifies the HTML component type: select, textarea, and so on; for example, "type": "select". See the Formly website for a complete list of the supported HTML component types.
The Business User Interface provides a custom type “buiselect” that allows you to perform searches to LDAP and retrieve complex attributes. Mandatory entries for the buiselect type in the templateOptions subsection are bui_displayAttributes, bui_displayKey, bui_search_action and bui_searchAttributes.
- templateOptions (mandatory)
-
a subsection required for each field (Angular Formly configuration syntax).
- bui_i18n (mandatory)
-
a string that specifies the corresponding key from the translation file available in the install_path*/web/BusinessUserInterface*-domain*/assets/i18n/* folder. For example, the field "bui_i18n": "PROFILE.MANAGER_LABEL" has the translation from the “PROFILE.MANAGER_LABEL" key from the translation file.
- bui_displayAttributes (mandatory for “buiselect” type)
-
a subsection that describes which attributes will be used to display search results. It contains two entries: title and subtitle. Here is an example:
"bui_displayAttributes": {
    "title": "name.formatted",
    "subtitle": "ou"
},
In this example, for a “buiselect” type component and the “manager” key, the search results are visually represented in the dialog by “name.formatted” as the main title and “ou” as the subtitle.
- bui_displayKey (mandatory for “buiselect” type)
-
a string that describes which entry for the model is used for display by the component.
- bui_searchAction (mandatory for “buiselect” type)
-
a string that describes the type of search to be executed by the REST Services. For a complete list of the supported search actions, consult the file resources.json in the REST Services location. For example,
"bui_searchAction": "managers"directs the REST Service to execute a search for “managers” and return the results. - bui_searchAttributes (mandatory for “buiselect” type)
-
a subsection that describes the expected attributes in a result entry from a search action. For example,
"bui_searchAttributes": [ "id", "name", "ou" ]indicates that the result should contain the attributes id, name, and ou. - bui_valueKey (mandatory for “buiselect” type)
-
a string that describes the attribute used which contains the value of the entry. For example, the bui_displayKey represents the visual representation of the entry (Olivier Hungs) and bui_valueKey represents the data (00014281).
- bui_options (mandatory for “select” type)
-
a string that specifies a reference to a list of JSON subsections in the config.json file with “key” as the handler and “name” as the display value. Here is an example from the “isoLanguages” entry in config.json:
"isoLanguages" : { "af": { "name": "Afrikaans", "nativeName": "Afrikaans" }, … } - bui_masterAttribute (mandatory for indirect attributes)
-
a string that specifies an LDAP attribute name to be used to store the date at which the profile is saved. For example, the SCIM attribute “ou” is an indirect attribute; the information is stored in the “dxrOULink” LDAP attribute. When the field “ou” is saved, the value which is described in “bui_valueKey” is stored to the LDAP attribute described in “bui_masterAttribute”.
- bui_readonly (optional)
-
whether (true) or not (false) the attribute is read only. You can use this field to display an attribute that is not to be modified.
- bui_separator (optional)
-
a string to be used instead of the “new line” control character (<ENTER>) for the “textarea” field type.
Using Hooks to Extend the Business User Interface
| Internet Explorer 11 requires an old JavaScript syntax. If IE11 is used, make sure you use the proper syntax for JavaScript code used in hooks. Some features and syntax format may be supported with polyfills in BUI. Test your hooks code with IE11 (Edge engine) to validate the code from hooks. |
The Business User Interface application provides custom extensions to the following tables:
| Page | Hook Entry |
|---|---|
My Tasks |
tasksComponentHook |
My Access Rights |
accessRightsComponentHook |
Privilege Request |
privilegeRequestComponentHook |
My Requests |
requestsComponentHook |
My Team |
myTeamComponentHook |
Manage Access Rights |
accessRightsComponentHook |
Manage Requests |
requestsComponentHook |
My Delegations |
myDelegationsComponentHook |
My Campaigns |
myCampaignsComponentHook |
My Campaign |
myCampaignComponentHook |
Certify |
certifyComponentHook |
User Management – Privilege Request |
userMgmtPrivilegeRequestComponentHook |
Profile Service |
profileServiceHook |
Privileges Service |
privilegesServiceHook |
Certificates Service |
certificatesServiceHook |
My Team Service |
myTeamServiceHook |
Certification Campaigns Service |
certificationCampaigsnServiceHook |
Request Service |
requestServiceHook |
User Management Service |
userManagementServiceHook |
These extensions are available in the file install_path/web/BusinessUserInterface-domain/extern/hook.js.
| JSON file content is case-sensitive. Make sure you follow correct syntax and case format for functions. |
Each extension provides the following functions:
-
search: function(entry, text) - use this function to extend the search capabilities for a table. If the table contains custom columns, you can use this function to extend the search for custom entries. Parameters are:
- entry
-
specifies the data model to search. Use this parameter to search for specific content and/or the text provided by the text parameter.
- text
-
specifies the text to search.
This function returns true if the search in the model has results, false if the search has no results and undefined if the search is not relevant for current entry.
-
sort: function(field, a, b, direction) - use this function to sort a column from a table by comparing two entries for the model (a and b parameters). Parameters are:
- field
-
a string that specifies the column name
- a
-
specifies the first entry
- b
-
specifies the second entry
-
customContent: function(entry, customColumn) - use this function to format custom attributes. The expected result from this function is a string that may contain HTML tags.
The customColumn parameter contains attributes defined in the “tables” section of the config.json file. From this entry, you can use the id and attribute entries to retrieve information from the entry data model. For example, the “attribute” entry may contain a “description” value. You can use this value to extract the value from the model and return a formatted string. Here is an example:
In config.json, “tables” section:
{
"type": "custom",
    "id": "description",
    "title": "Desc",
    "tooltip": "Description",
    "attribute": "description",
    "visible": true
}
In hook.js, “tasksComponentHook” section:
customContent: function (entry, customColumn) {
var value = entry[customColumn[‘attribute’];
value = ‘<b>’+value+’</b>’ // format text to bold style
    return value;
}
Customizing Attributes from Requests
Note: Be careful when changing the values in these sections.
In the section “requests”, “delegations”, “myTeam”, “userManagement”, “search”, “certificationCampaigns”, “accessRights”, “privilegeRequests”, “domainObjects” in config.json:
-
“requests” - “searchParticipantAction” - string – shows the action name used for the “change participants” feature for “requests” pages. This entry must contain an action defined in the REST service configuration file (resources.json). By default, this value is set to “managers”.
-
section - “attributeNames” - string – contains a list of attribute names (SCIM or LDAP) that can be added to a BUI request to REST services. The REST service can reject these attributes so that they are not available in the REST response. These attributes can be used in user hooks implementations combined with custom columns in data tables.
Debugging Customizations
The Business User Interface does not write information in DirX Identity log files. You can find information about access requests inside Apache Tomcat in the access logs (domain-name*access_log._timestamp.txt*).
To get more information about the triggered DirX Identity REST Service requests, you can use the debugging feature of your browser (Key F12) in your Business User Interface session.
From Chrome
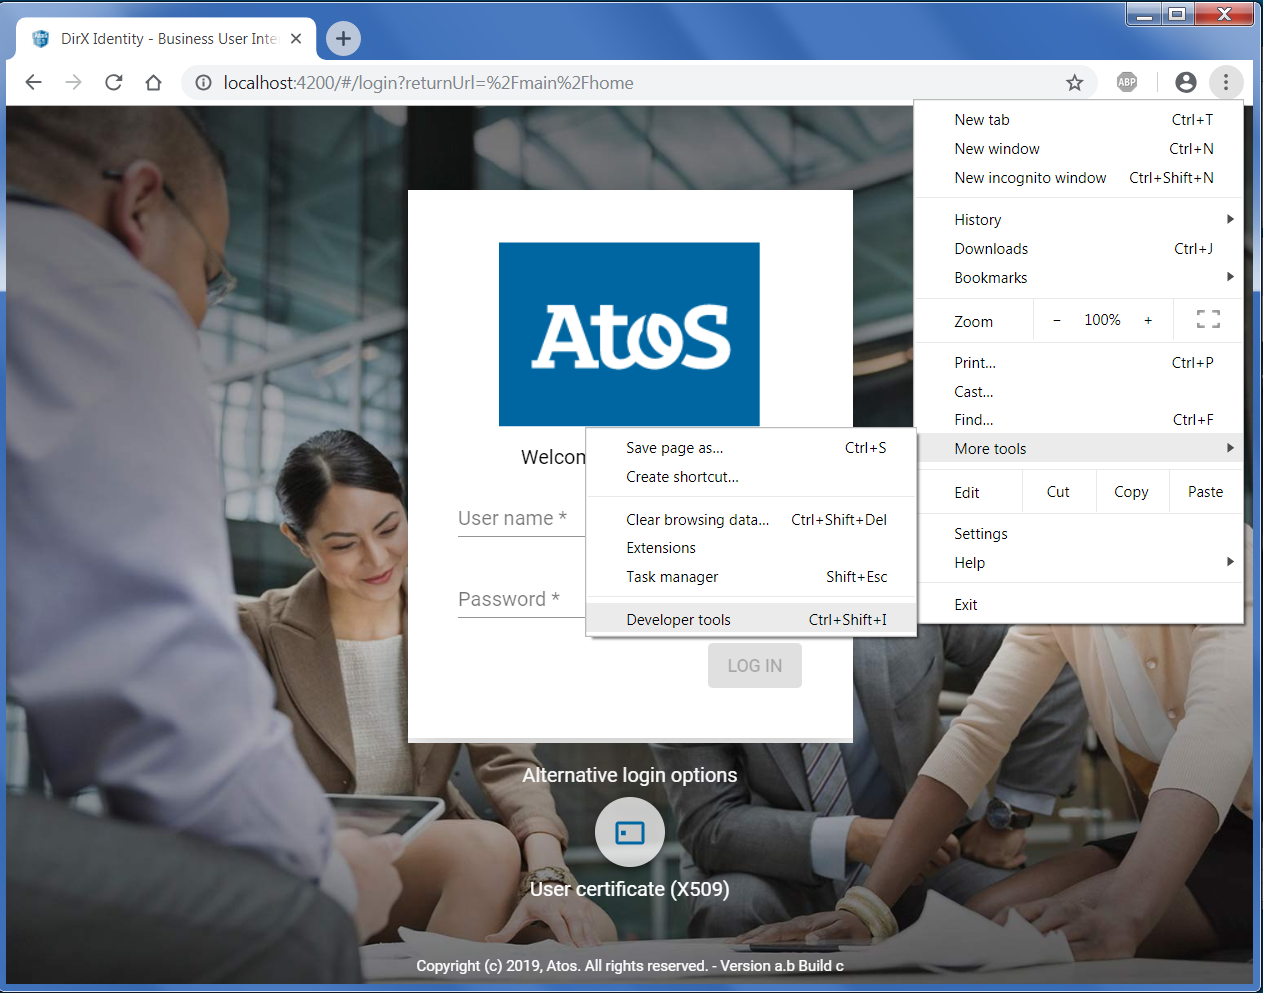
From the Chrome menu, select “More tools” > “Developer tools” or press the shortcut keys combination “Ctrl+Shift+I” or press the F12 key.
A new page is displayed either attached to the current page or as an individual page:
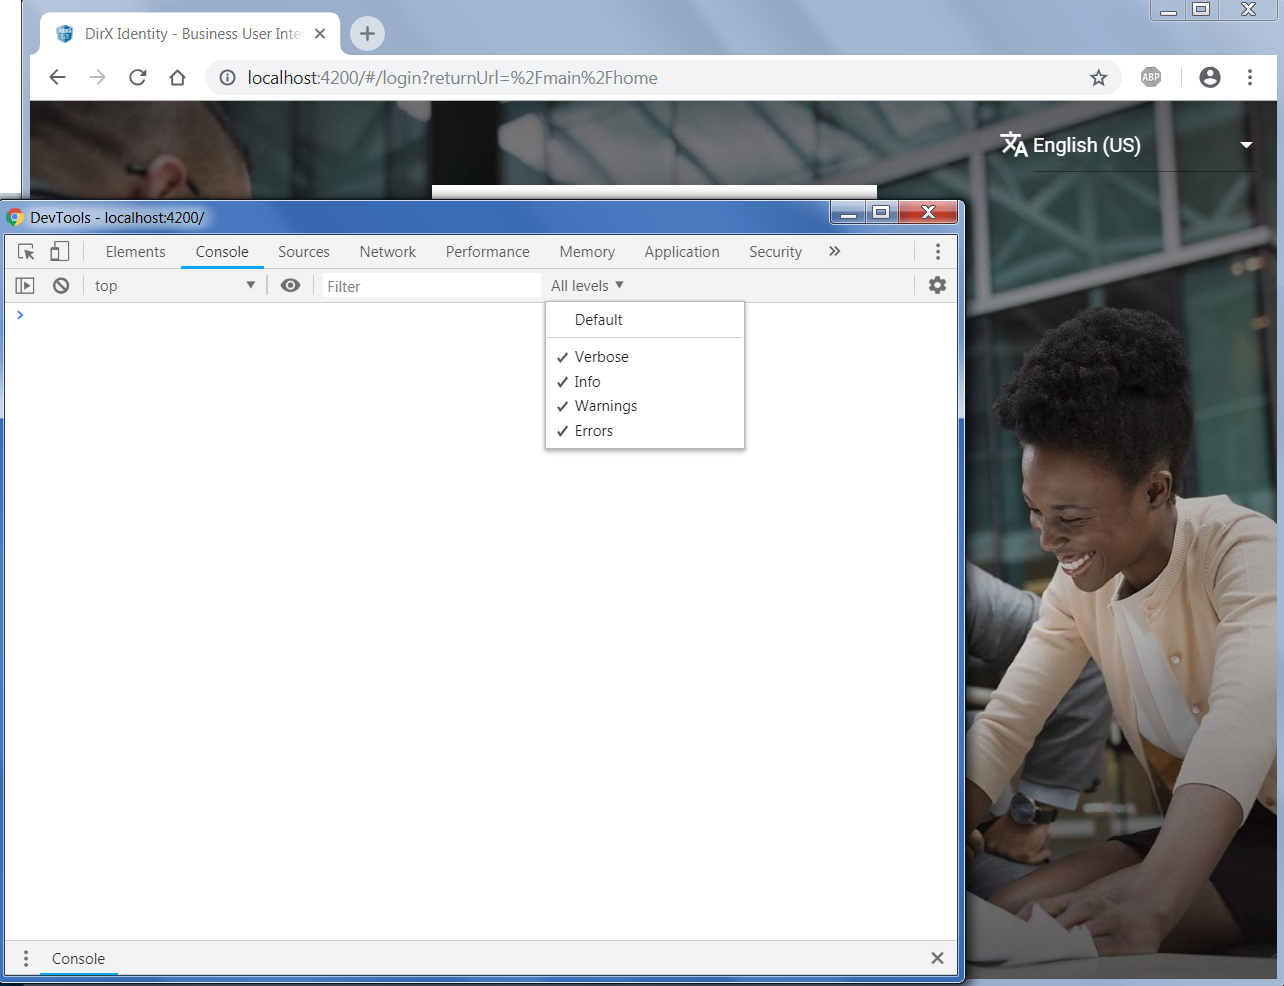
Select the “Console” tab. From the toolbar entry “All level”, select an appropriate debug level (Verbose - high detail debug information, Errors - displays only error information).
Clear the console (Ctrl+L) and execute actions in the application window until the error is reproduced. Return to the “Developer tools” window and copy and paste the content into a text file. This content contains the execution logs from the Business User Interface application.
From Firefox

From the Firefox menu, select “Web Developer” – “Web Console” or press shortcut keys combination “Ctrl+Shift+K” or press key F12 and select the Console tab.
A new page is displayed either attached to the current page or as an individual page.

Select the tab “Console”. From the toolbar, select an appropriate debug level (check or uncheck options: Errors, Warnings, Logs, Info, Debug).
Clear the Web console output and execute actions in the application window until the error is reproduced. Return to the “Developer tools” window and copy and paste the content into a text file. This content contains the execution logs from the Business User Interface application.
From Internet Explorer
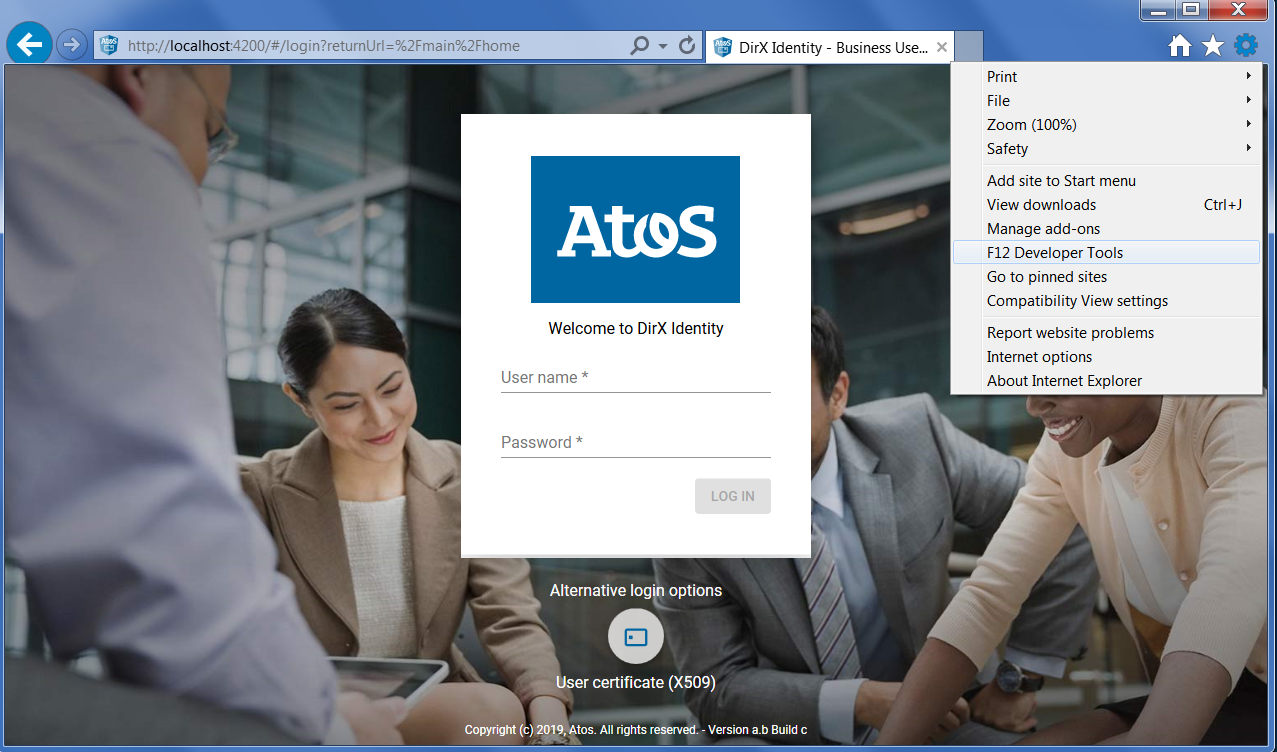
From the Internet Explorer menu, select “F12 Developer Tools” or press the F12 key and select the Console tab.
A new page is displayed either attached to the current page or as an individual page.

Select the “Console” tab and then select an appropriate debug level (check or uncheck icons).
Clear the Web console output and execute actions in the application window until the error is reproduced. Return to the “F12 Developer tools” window and copy and paste the content into a text file. This content contains the execution logs from Business User Interface application.
DirX Identity REST Services logging is described in the DirX Identity Integration Framework Guide. See the section “Configuring Application Logging” in the section “Configuring the DirX Identity REST Services” in the chapter “DirX Identity REST Services”.
Customizing Login Information
Administrators have the option of prompting users with a system-relevant message such as scheduled maintenance. For example:
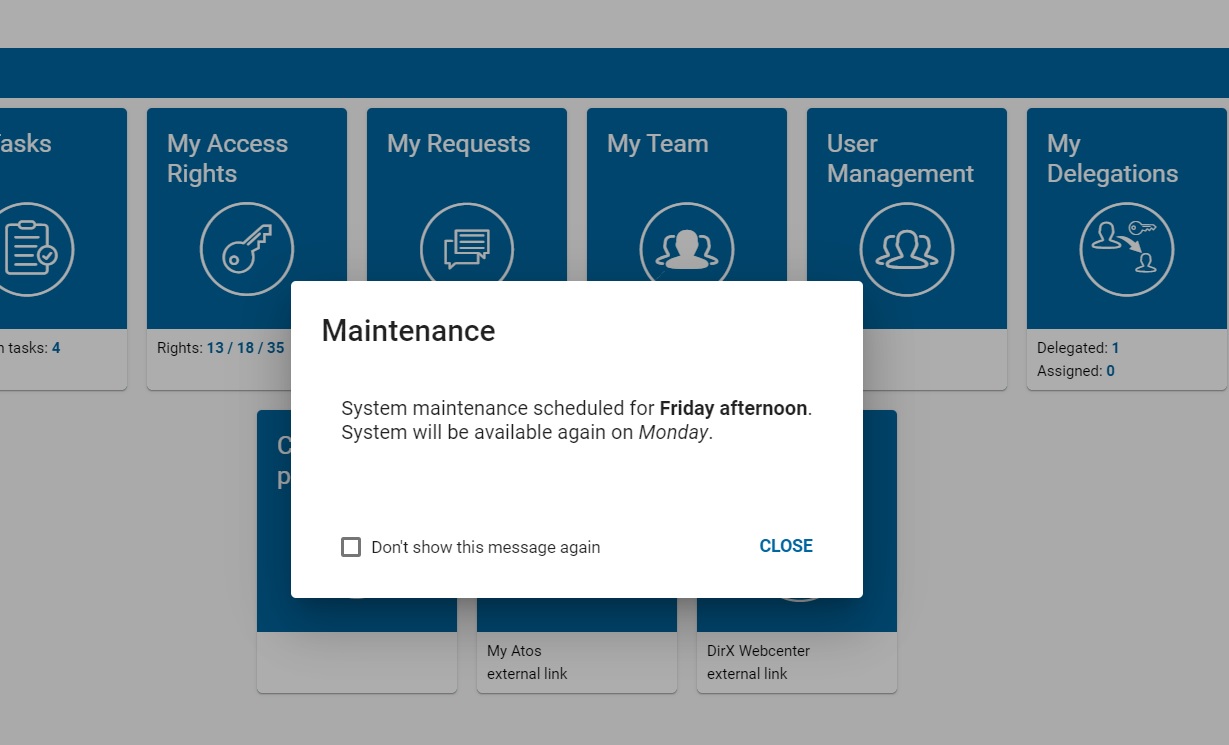
The message can be entered in the login-message.json file, which can be found in the config folder with the config.json file.
Here is an example of login-message.json:
{
    "title": "Maintenance",
    "title_DE": " Wartungsarbeiten",
    "message": "System maintenance scheduled for the end of the week.”,
    "message_DE": Am Freitagnachmittag finden Wartungsarbeiten statt.",
    "valid-from": "2020-05-01",
    "valid-until": "2020-07-30"
}
It is possible to enter different language translations by appending the corresponding country code next to the title and message fields. Users will be shown the message in the preferred language selected in the application.
Messages can have defined periods in which they are active through the valid-from and valid-to fields. These values are not required; limitations are applied only if they exist.
Users have the option of hiding viewed messages and their choice will be saved in DirX Identity under the dxrPreferences parameter as shown in the following example:
{"BUI":{"1.0":{"preferredThemeFilename":"styles-brown.css","hideLoginMessage":-2084090855}}}The hideLoginMessage value stores a hash ID of the title and message. This value is then compared to a computed one from the login-message.json file, and if it has changed, the users will be notified again.