Using Audit Analysis
The Audit Analysis page allows you to work directly with audit events stored in the DirX Audit Database, unlike the Dashboards, which displays aggregated data from OLAP cubes.
This chapter describes how to:
-
Navigate the Audit Analysis page.
-
Filter audit events.
-
Manage audit events filter views.
-
View the audit events search results.
-
Use the page navigator.
-
View audit event details.
-
View related audit events.
-
Export audit events.
Navigating the Audit Analysis Page
The layout of the Audit Analysis page is shown in the following figure.
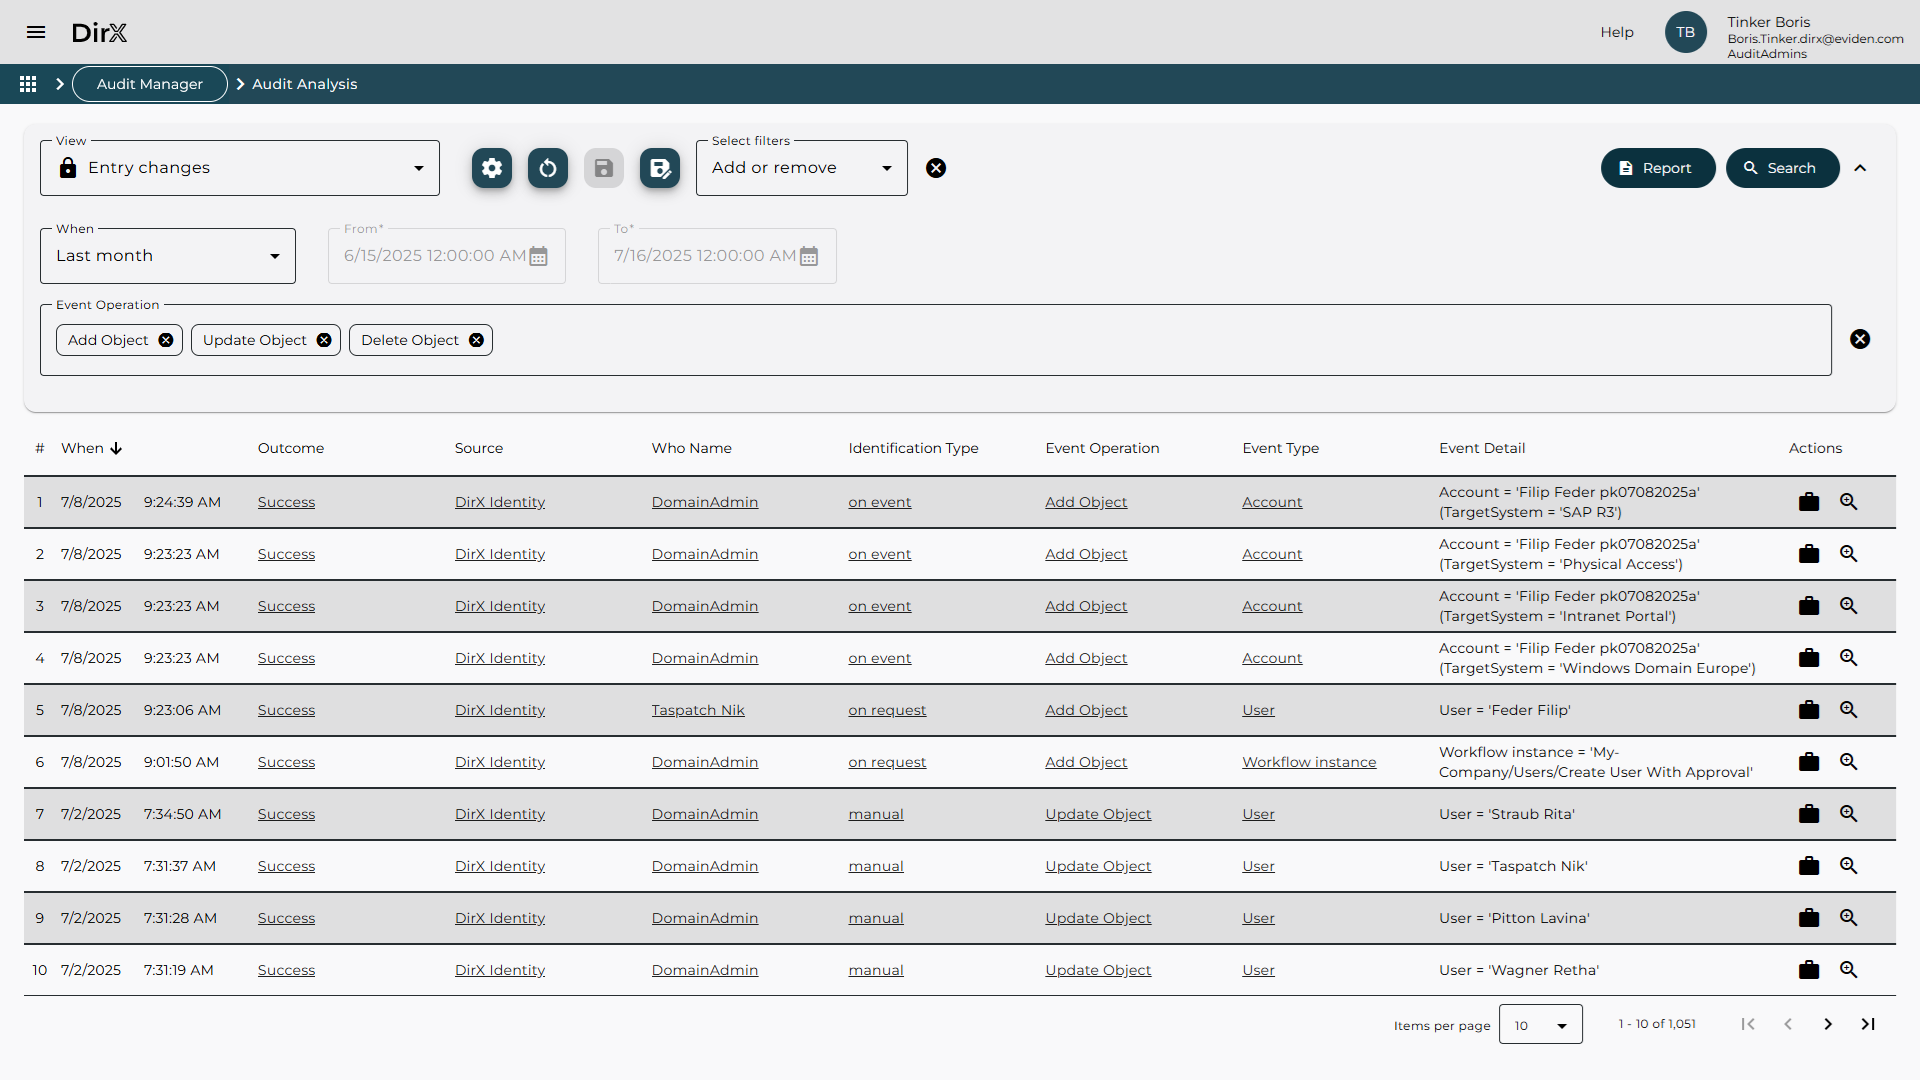
As shown in the figure, the Audit Analysis page consists of two main areas:
-
Filter definition area allows you to define the criteria used to search for and retrieve audit events. For details on how to use this area, see “Filtering Audit Events”.
-
Search results display area presents the audit events returned by your search operation in a table format. A page navigator below the table allows you to browse through multi-page results. For more information, refer to “Viewing the Audit Events Search Results”.
Filtering Audit Events
The filter definition area allows you to define search criteria for retrieving audit events from the DirX Audit Database. You can filter events based on various attributes. To exclude an attribute from the filter, simply leave its field empty.
Start by selecting a view, which loads a predefined set of filters. The default view is Last 24 hours (Default), which filters events from the last 24 hours. For more on managing views, see “Managing Audit Events Filter Views”.
The default view contains the following filter fields:
-
When – filters audit events by time period:
-
Relative: Previous Year, Previous Month, Month to date and so on.
-
Absolute: Custom Time to define a specific range using the From and To fields. Timestamps are rounded to the nearest second. For example, to find an audit event at 4/4/2025 2:24:18.408 PM, set To to at least 4/4/2025 2:24:19 PM.
-
Any time: No time filter applied. The fields From and To are not visible in this case.
-
-
Event Operation – filters by the type of operation, for example, Set Password, Add Assignment, Delete Object. Supports “Starts with” matching.
-
Event Type – filters by the object type involved, for example, User, Account, Account to Group. Supports “Starts with” matching.
Use the Select filters to add more filter fields. The following additional filter fields are available:
-
Source – filters by the audit producer, for example, DirX Identity, or DirX Access. Leave empty to include all sources.
-
Event Detail – filters by specific details, for example, a user account or target system. This field supports full-text search if enabled in the configuration. Only full words are matched. With Microsoft SQL Server as the DirX Audit Database, you can use an asterisk (*) as a wildcard.
-
Outcome – filters by event outcome: Success, Minor Failure, Serious Failure, Major Failure.
-
Identification Type – filters by how the operation was initiated, for example, manually, on event, on schedule, on request.
-
Who Name – filters by the user who initiated the operation. Supports “Starts with” matching.
-
What Name – filters by the name of the object involved, such as a user or account. Also supports “Starts with” matching.
-
UID – filters by the unique identifier of the audit message.
-
Event Dimension – filters by a specific audit event dimension, for example, Approval, Policy, Target system. Selecting a dimension reveals a value field.
-
Message Dimension – filters by a specific audit message dimension, for example, Activity, Who – Organizational unit. Selecting a dimension reveals a value field.
For better readability, you can collapse the filter definition area by clicking the Collapse ![]() icon in the upper-right corner.
icon in the upper-right corner.
For the Source, Event Operation, Event Type, Outcome, and Identification Type filter fields, you can either select values from a predefined list or begin typing to search for matching values. As you type, DirX Audit Manager queries the database and displays a list of matching attribute values, from which you can select.
These fields support multiple values, allowing you to add several filter criteria for a single field.
To remove a value, simply click the Remove
![]() icon next to it.
If you no longer want to use a particular filter, you can remove it entirely from the list.
icon next to it.
If you no longer want to use a particular filter, you can remove it entirely from the list.
In the Event Operation, Event Type, Who Name, and What Name fields, you can search using a “Starts with” comparison.
For example, entering Account in the Event Type field will return events related to Account and Account to Group memberships.
These fields also support multiple values.
Simply type a value and press Enter to add it.
To remove a value, click the Remove
![]() icon next to it.
If you no longer wish to use the filter, you can delete it from the list.
icon next to it.
If you no longer wish to use the filter, you can delete it from the list.
For the Event Dimension and Message Dimension filter fields, you can select a dimension from the available list. Once a specific dimension is selected, an additional field appears where you can choose a corresponding value. If you prefer not to filter by a specific value, simply select the empty line from the list. In this case, the search will return all events that include the selected dimension, regardless of its value.
To remove all values from a specific filter field, click the Remove all ![]() icon at the end of the line.
This action deletes both the filter values and the filter field itself.
To use the filter again, reselect it from the Select filters list.
icon at the end of the line.
This action deletes both the filter values and the filter field itself.
To use the filter again, reselect it from the Select filters list.
To remove all filter fields from the filter definition area, click the Remove all ![]() icon next to the Select filters dropdown.
You can re-add any filters as needed from the same list.
icon next to the Select filters dropdown.
You can re-add any filters as needed from the same list.
Click Search to execute your query. DirX Audit Manager will populate the search results area with audit events that match your criteria. For details on working with the results table, see “Viewing the Audit Events Search Results”.
You can also refine your search directly from the results: click on a value in the table to add it as a filter, then click Search again to update the results.
To export the search results to a file, click the Report button. For more information, see “Exporting Audit Events”.
Managing Audit Events Filter Views
You can name and save your custom filter views to the configuration database for future use. This allows you to quickly reapply commonly used filters without redefining them each time. Simply select a stored view from the View list and click Search.
Audit Analysis views are organized similarly to other views in DirX Audit Manager. For more details on using and modifying the views, see “Managing and Understanding Views”.
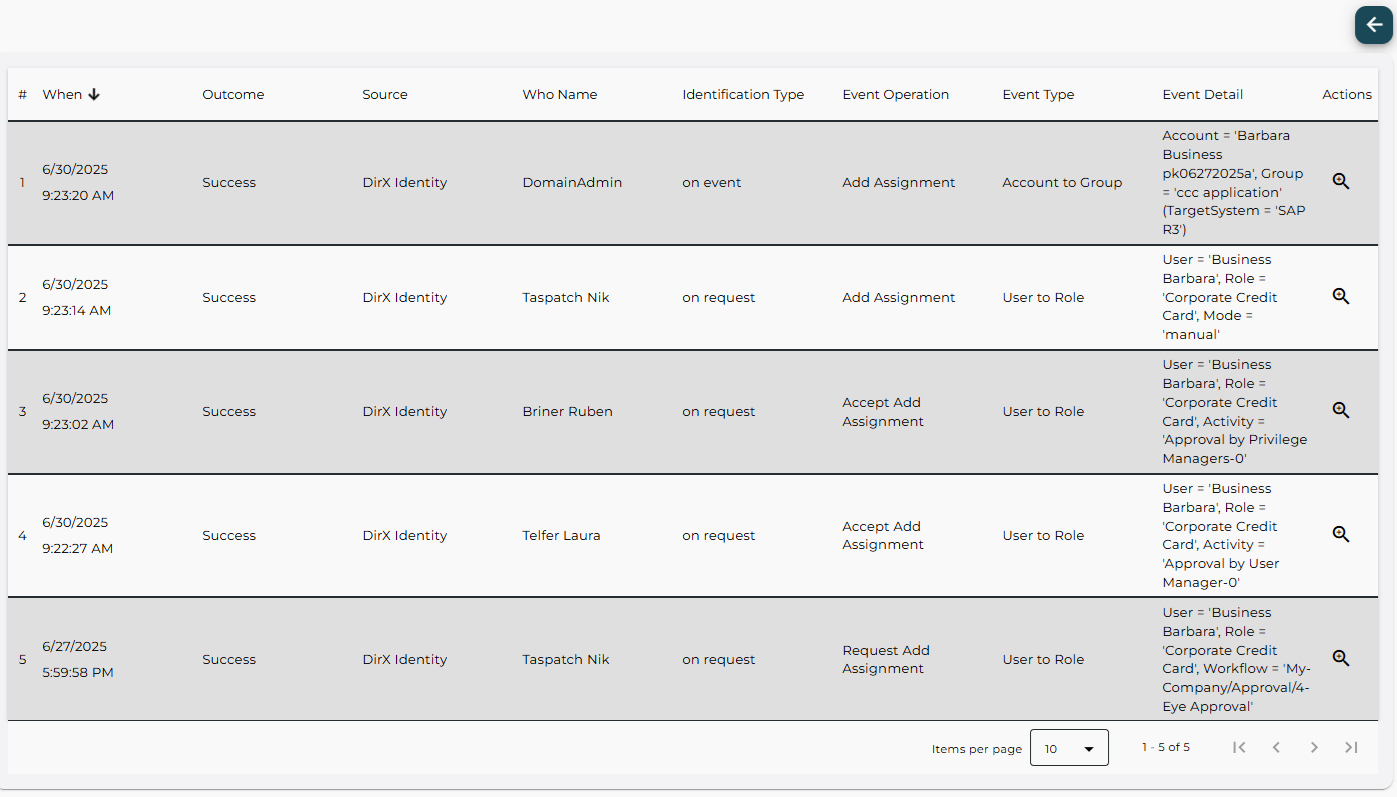
Viewing the Audit Events Search Results
The search results display area presents audit events in a table format based on the criteria defined in the filter definition area.
Each search result includes the following features:
-
Columns – Each column corresponds to an attribute of the audit event. You can sort the data in ascending or descending order using the sort controls in the column headers.
-
Rows – Each row represents a single audit event retrieved from the DirX Audit Database.
-
Show Related Events – Click the Show related events
 icon in the Actions column to display a list of audit events related to the selected one.
For details, see “Viewing Related Audit Events”.
icon in the Actions column to display a list of audit events related to the selected one.
For details, see “Viewing Related Audit Events”. -
Show Details – Click the Show details
 icon in the Actions column to view additional information about the audit event in a separate window.
For details, see “Viewing Audit Event Details”.
icon in the Actions column to view additional information about the audit event in a separate window.
For details, see “Viewing Audit Event Details”.
-
-
Page Navigator – Located at the bottom of the results area. It allows you to navigate through multiple pages of results. For details, see “Using the Page Navigator”.
Note: If audit message data has been purged from the DirX Audit Database, some additional information or the original message may no longer be available in the Event Details window. Similarly, if related audit messages have been purged, the list of related events may be incomplete.
Using the Page Navigator
The page navigator, located at the bottom of the search results display area, allows you to control how results are displayed and navigate through multiple pages of items.
It includes the following elements:
-
Items per page – A dropdown menu for selecting the maximum number of items displayed per page.
-
Item count – Displays the total number of items found based on your search criteria.
-
Navigation buttons – Use these buttons to move between pages of results:
-
First page
 – Jumps to the first page of results.
 -
Previous page
 – Moves to the previous page of results.
 -
Next page
 – Moves to the next page of results.
 -
Last page
 – Jumps to the last page of results.
-
Viewing Audit Event Details
The results table in the Audit Analysis view displays only a subset of the available audit event data.
To view the full details of an audit event, click the Show details ![]() icon in the Actions column of the corresponding row.
This action opens a window displaying all available information related to the selected audit event.
The following figure illustrates an example of the detailed audit event view.
icon in the Actions column of the corresponding row.
This action opens a window displaying all available information related to the selected audit event.
The following figure illustrates an example of the detailed audit event view.
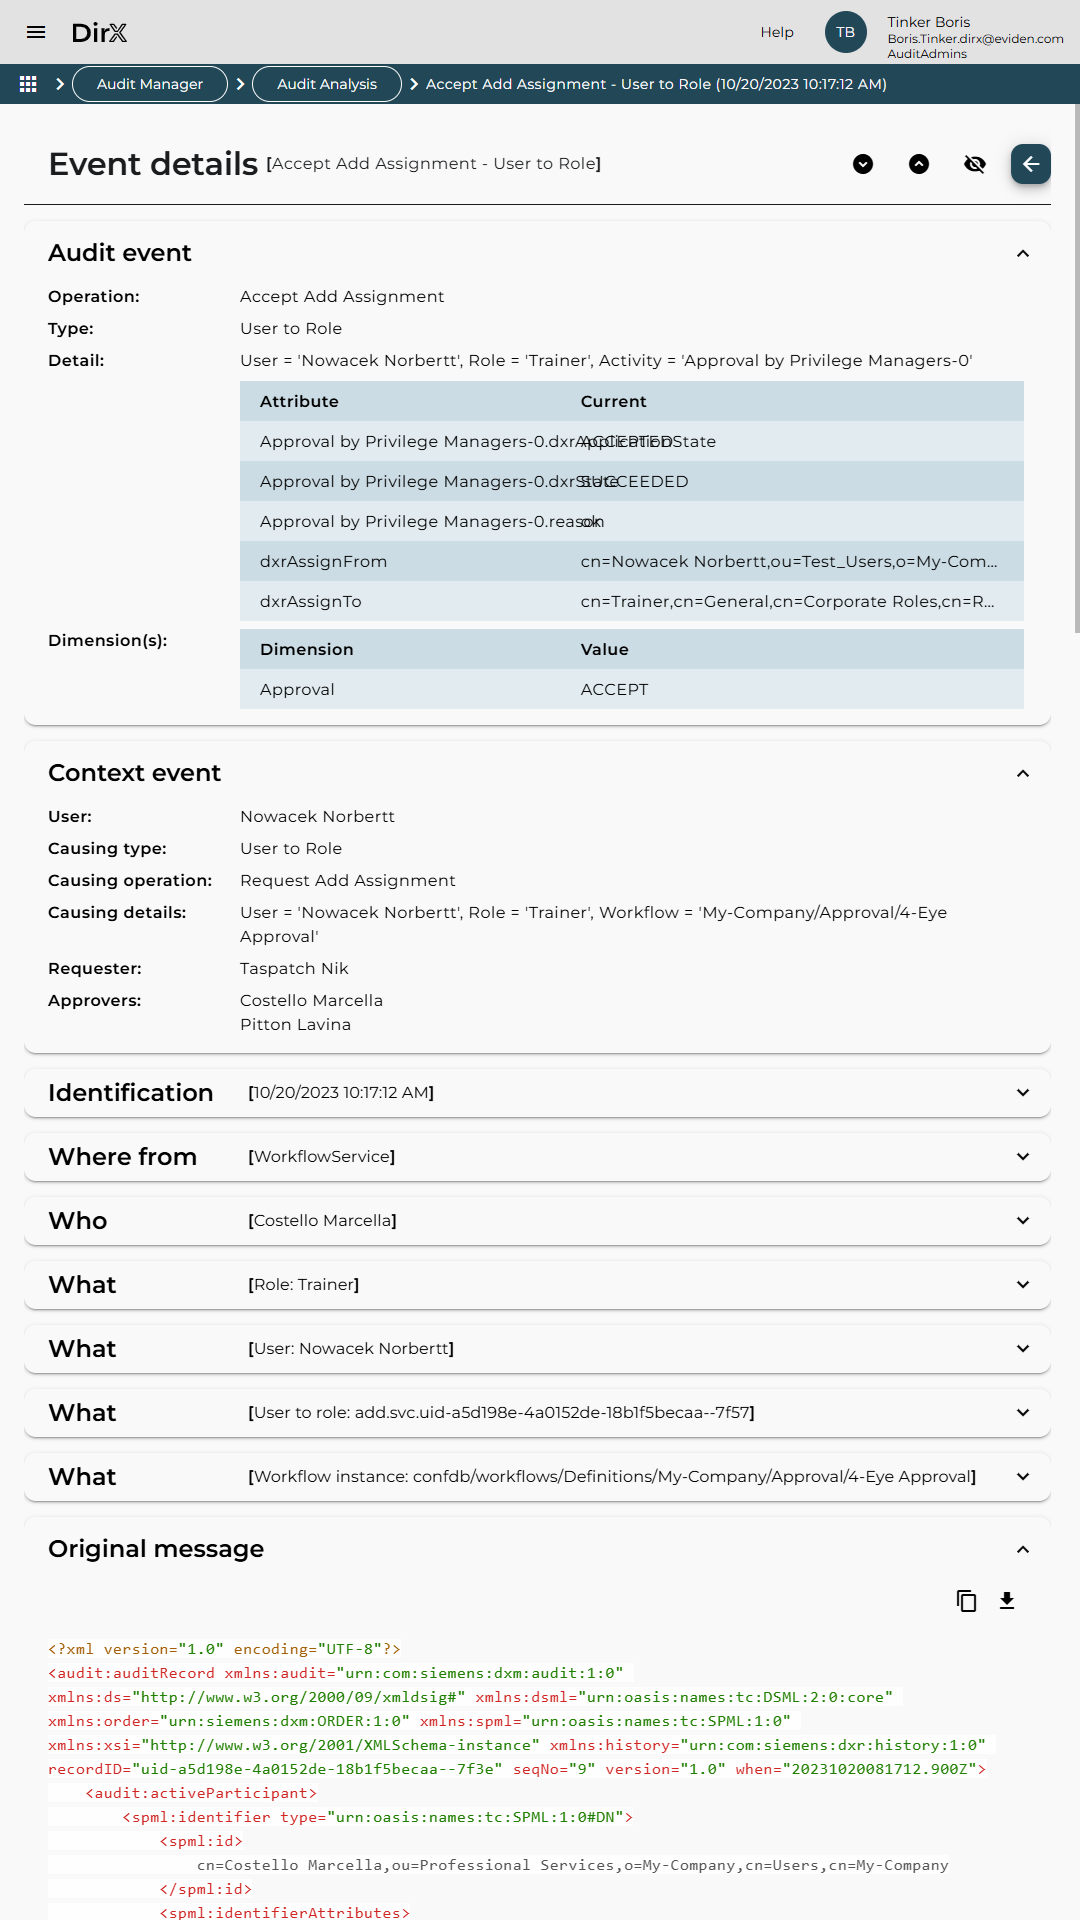
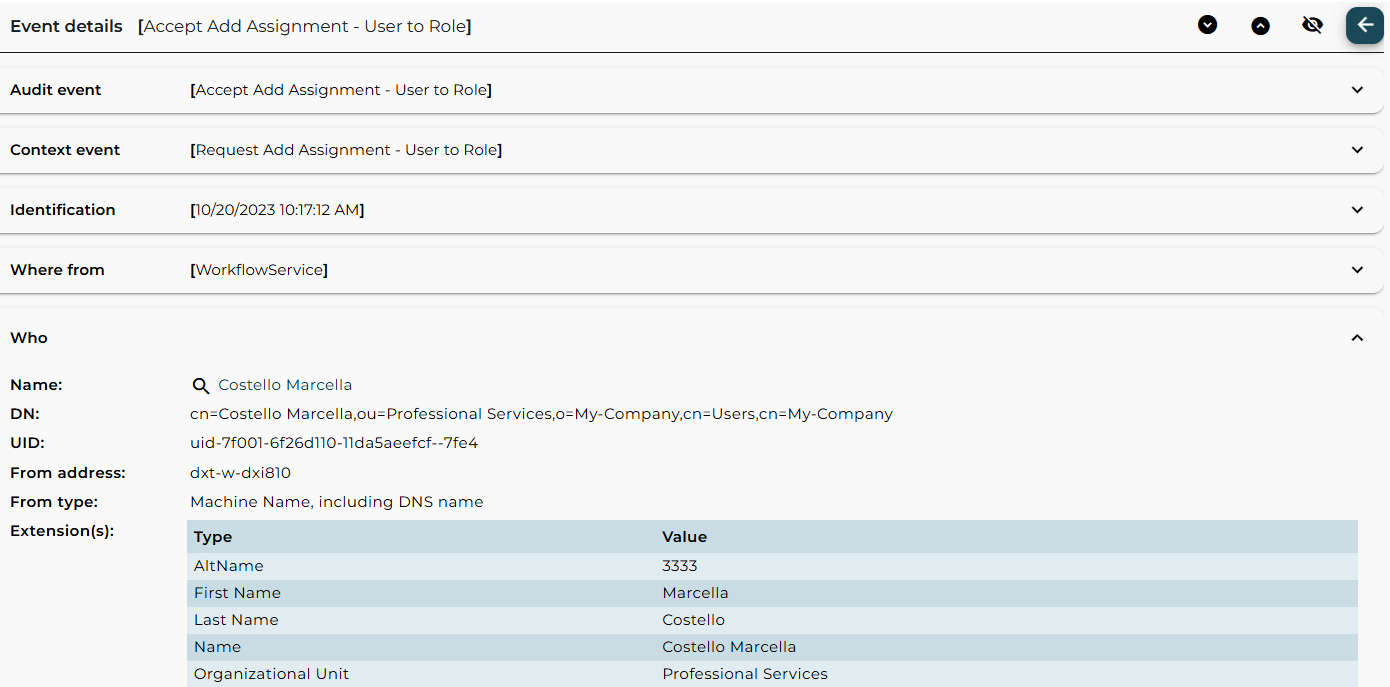
The detailed view includes several expandable sections, each providing specific information about the selected audit event:
-
Audit event bar – Provides a summary of the audit event and its associated tags. Example: The event represents the approval of a role assignment (Trainer) to user Nowacek Norbertt by Marcella Costello, the role’s privilege manager. This action was triggered by a DirX Identity approval workflow. The suffix in the activity name (for example, "Activity='Approval by Privilege Managers'-0") indicates the approver’s position in the approval sequence: -0 = first approver; -1, -2, etc. = escalation path approvers. If multiple role assignments or membership changes are involved, the summary may describe only one of them. Tags (for example, ACCEPT_REJECT) provide additional context. In this example, the value ACCEPT indicates that the request was approved.
-
Detail – Displays a table of attribute changes related to the event. Columns include:
-
Attribute – name of the changed attribute,
-
Previous – previous value, if applicable,
-
Current – new value, if applicable.
-
-
-
Context Event – Summarizes related events, including the causing event, the requester, and the approver.
-
Identification bar – Provides metadata about the operation, including timestamp, operation, type and category, audit message UID, outcome (success or failure), and associated audit message tags, for example, ACTIVITY with the name of the workflow activity. For more details on the database schema, refer to the DirX Audit Administration Guide.
-
Where from bar – Identifies the source application or component that generated the event, for example, DirX Identity workflow service. Includes the source address and optional properties.
-
Who bar – Identifies the user who performed the operation, for example, Marcella Costello. The Extensions area lists identifying attributes of the user.
-
What bars – Represents an object involved in the operation: the user assigned the role, for example, Nowacek Norbertt, the user-to-role assignment, the workflow instance that triggered the activity.
-
Original Message bar – Displays the original audit message received from the source system.
The Audit Event bar is expanded by default for readability. Click any title bar to expand or collapse its section. Use the following icons in the upper-right corner:
-
Expand all
 to expand all bars.
 -
Collapse all
 to collapse all bars.
 -
Show empty values
 to show empty values.
 -
Hide empty values
 to hide empty values.
To return to the Audit Analysis results, click the Back ![]() button or use the breadcrumb navigation.
button or use the breadcrumb navigation.
Some audit events include links to related history entries, marked with the See in history ![]() icon.
Clicking the link, for example, on Costello Marcella, opens the corresponding history entry for further inspection.
icon.
Clicking the link, for example, on Costello Marcella, opens the corresponding history entry for further inspection.
Viewing Related Audit Events
To view audit events related to the selected one, click the Show related events ![]() icon in the Actions column of the results table.
icon in the Actions column of the results table.
DirX Audit Manager will search for and display all related audit events on a new page. These related events may include:
-
parent – causing events,
-
child – dependent events,
-
sibling events – other child events of the same parent,
-
indirectly related events.
The related audit events are presented in the same format as the Audit Analysis results.
To view more details about a specific related event, click the Show details ![]() icon. To return to the previous results list, click the Back
icon. To return to the previous results list, click the Back ![]() button in the top-right corner of the page.
button in the top-right corner of the page.
Note: If audit message data has been purged from the DirX Audit Database, some additional information or the original message may no longer be available in the Event Details window. Similarly, if related audit messages have been purged, the list of related events may be incomplete.
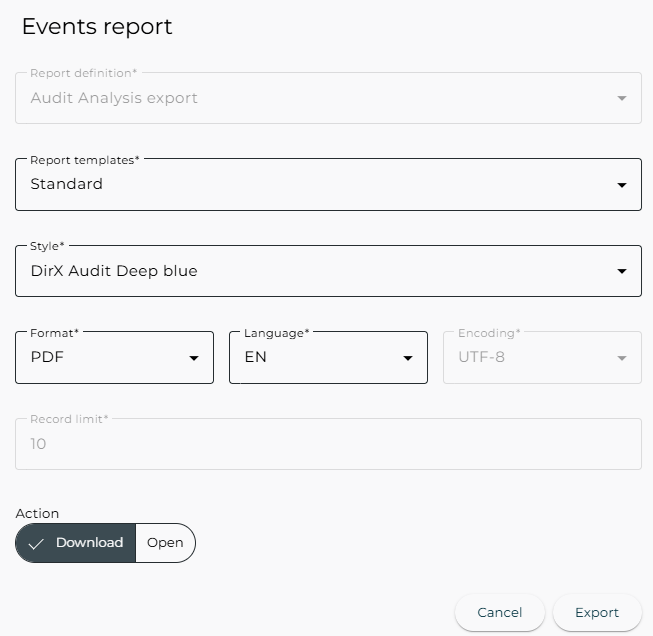
Exporting Audit Events
To export audit events displayed in the search results table into a report-formatted file, click Report button in the filter definition area. The Events report dialog appears, allowing you to configure the export settings:
-
Report definition – Select a predefined report definition to structure the exported data.
-
Report templates – Choose a report template that defines the layout and formatting of the report.
-
Style – Select the visual style to apply to the report.
-
Format – Choose the file format, such as: PDF, CSV, Microsoft Word formats (DOCX, RTF), and others.
-
Language – Select the language for the report content.
-
Encoding – Choose the character encoding, for example, UTF-8, Big5, EUC-JP.
-
Record limit – Defines the number of rows to include in the report.
-
Action – Choose what to do with the report file:
-
Download – Save the file directly.
-
Open – Open the report in a new browser tab.
-
Click Export to generate the report. Click Cancel to close the dialog without exporting. After clicking Export, your browser may prompt you to open, save, or cancel the download of the report file.