Using Reports
The Reports page is a configuration interface for setting up scheduled reports. The DirX Audit Server automatically generates these reports based on a defined schedule and sends them via email to specified recipients.
A report set defines:
-
one or more report files to be sent, each report file contains one or more individual reports,
-
the schedule for sending the report set,
-
the conditions under which the report set is generated,
-
the recipients of the report set.
This chapter describes how to:
-
Navigate the Reports page.
-
Create a report set.
-
Edit a report set.
-
Delete a report set.
-
Activate and deactivate report sets.
-
Synchronize report set updates to the DirX Audit Server.
Navigating the Reports Page
The Reports page consists of:
-
a toolbar at the top of the page,
-
a table displaying the current report set definitions.
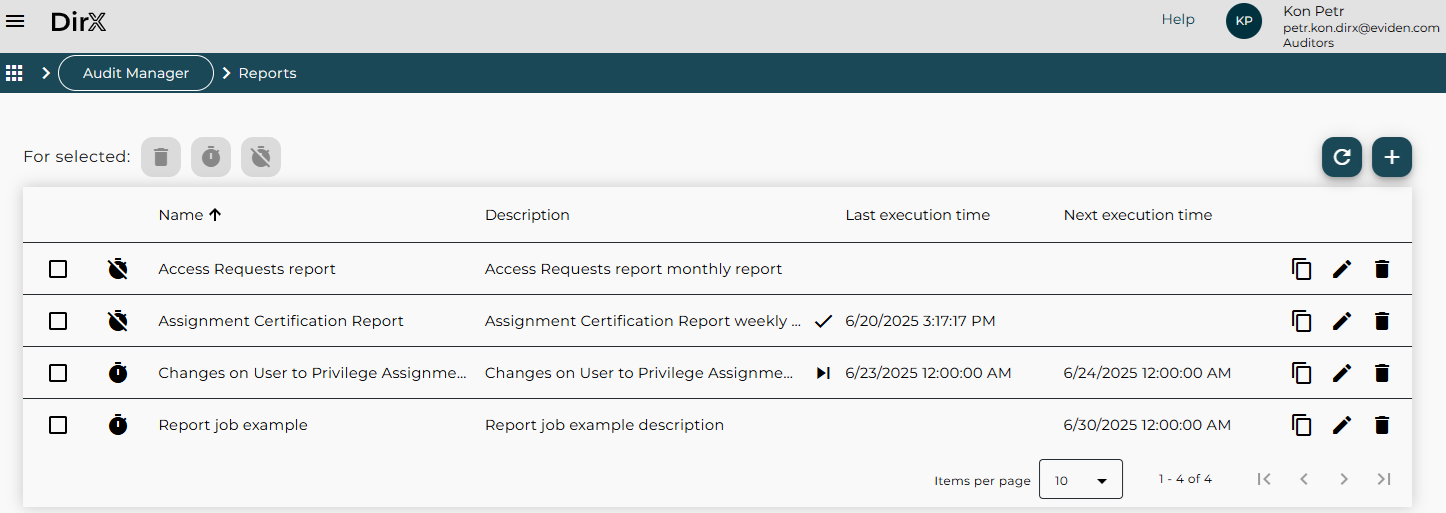
The toolbar provides a set of actions for managing report sets efficiently. These are divided into actions for selected report sets and general functions.
Actions for selected report sets:
-
Delete selected
 – removes the selected report sets from both the table and the configuration database.
 -
Activate selected
 – enables scheduled report generation for the selected report sets.
 -
Deactivate selected
 – pauses scheduled execution for the selected report sets.
General Functions:
-
Reload
 – refreshes the definitions and statuses of all report sets stored in the configuration database.
 -
Add a report set
 – opens a form to create a new report set from scratch.
The report set table displays a list of report set definitions, including the following columns:
-
Name – the name of the report set.
-
Description – a brief description of the report set.
-
Last execution time – the date and time, and result of the most recent report run.
-
Next execution time – the scheduled date and time for the next report run.
You can perform the following actions directly in the table:
-
Select / Unselect – Use the checkbox in the first column to select or unselect report sets. This is useful for applying toolbar functions to multiple selected report sets at once.
-
Activate report
/ Deactivate report – Use the corresponding icons to enable or pause scheduled execution for a specific report set. -
Clone
 , Edit
  , or Delete – Duplicate, modify, or remove an existing report set.
In the Last execution time column, the result of the last report run is indicated by an icon:
-
Success
 – The report was generated successfully.
 -
Skipped
 – The report conditions were not met, and the report was not generated.
Users with the Restricted Auditor application role have limited access:
-
They can only view the Reports page within the DirX Audit Manager.
-
They are restricted to using report templates tagged with Restricted, as described later in this section.
Users with the Audit Aministrator application role have extended access:
-
They are extended access to using report templates tagged with Administrative, as described later in this section.
Creating a Report Set
To define a new report set, click the Add a report set ![]() icon in the Reports page toolbar.
This action opens the Report set page, as illustrated in the following figure:
icon in the Reports page toolbar.
This action opens the Report set page, as illustrated in the following figure:
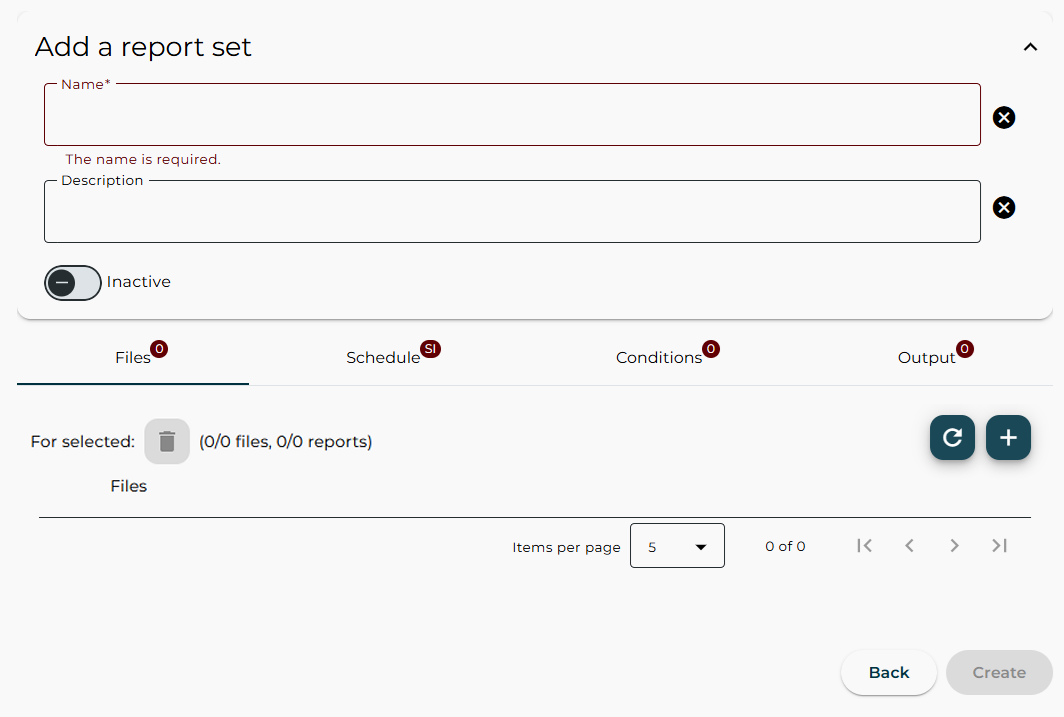
The Report set page allows you to define a new report set. It contains the following fields and configuration tabs:
-
Name – a name for the report set. This is a mandatory field.
-
Description – a brief description of the report set.
-
Active / Inactive checkbox – select to activate or deactivate the report set.
-
Files tab – specifies the report files to be sent via e-mail and the reports included in each file.
-
Schedule tab – defines when the reports should be generated.
-
Conditions tab – configures the conditions under which the report will be generated.
-
Output tab – specifies the e-mail settings for sending the generated report (sender, recipients, message content).
-
Back – cancels the operation and closes the dialog.
-
Create – saves the report set definition.
To create a new report set:
-
Enter a Name and Description for the report set.
-
Open the Files tab to define one or more report files and add them to the report set.
For details, see "Creating a Report File". -
Open the Schedule tab to define when the report set should be executed.
For details, see "Defining the Schedule". -
Open the Conditions tab to configure the conditions for report generation.
For details, see "Conditioning the Report Set Execution". -
Open the Output tab to define the e-mail recipients and message content.
For details, see "Defining the E-mail Message". -
Click Create to save the new report set definition.
Creating a Report File
To create a new report file for a report set, click the Add a new report file ![]() icon in the Files tab header of the Report set page.
icon in the Files tab header of the Report set page.
This action opens the Report set > Report file page, where you can:
-
Set the report file’s name and format.
-
Select a report definition and configure the scope and output format for selected report.
-
Add one or more reports to the report file and configure the report file format.
The following sections describe these steps in more detail:
To add additional report files to the report set, use the Add a new report file ![]() icon in the Files tab of the Report set page.
icon in the Files tab of the Report set page.
Use the Reload ![]() icon in the Files tab header to refresh the report set definition stored in the configuration database.
icon in the Files tab header to refresh the report set definition stored in the configuration database.
Once all report files are defined for your report set, proceed with the Schedule, Conditions, and Output tabs to complete the report set configuration.
Once your report set is completed use the Create button to save the report set to the configuration database.
To activate the report set, click the Activate report ![]() icon in the report set definitions table.
icon in the report set definitions table.
Defining the Report File Name and Format
Enter a Name and Description for your report file, and specify its file format. The following options are available:
-
Format – defines the output format of the report file. You can choose from formats such as PDF, DOCX, HTML, or XLSX. Note: If you combine multiple reports into a single report file, only the PDF format is supported. In this case, PDF is automatically selected and cannot be changed.
-
Language – specifies the language for localized reports. Available options are English and German.
-
Encoding – sets the character encoding for report generation. If only one encoding is supported, it is preselected and cannot be modified.
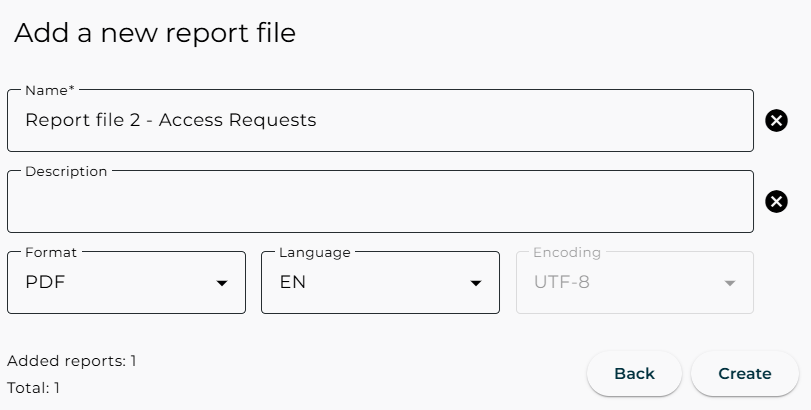
Continue with selecting a report definition from a list of existing templates.
Selecting a Report Definition
The Select definition section on the Report set > Report file page contains list of existing report templates. Each item in the list displays the report definition’s name, description, and associated tags. Use the page navigator at the bottom of the table to browse through the list.
Use the Filter by name and Filter by tags fields to narrow down the list:
-
To search by name, enter a string in the Filter by name field. The list updates to show all report definitions whose names contain the entered string.
-
To search by tag, click in the Filter by tags field to display available tags and select one or more. You can also click a tag shown in the report definitions list to add it to the filter. The list updates to show only report definitions that match:
-
All selected tags, or
-
Any selected tag.
-
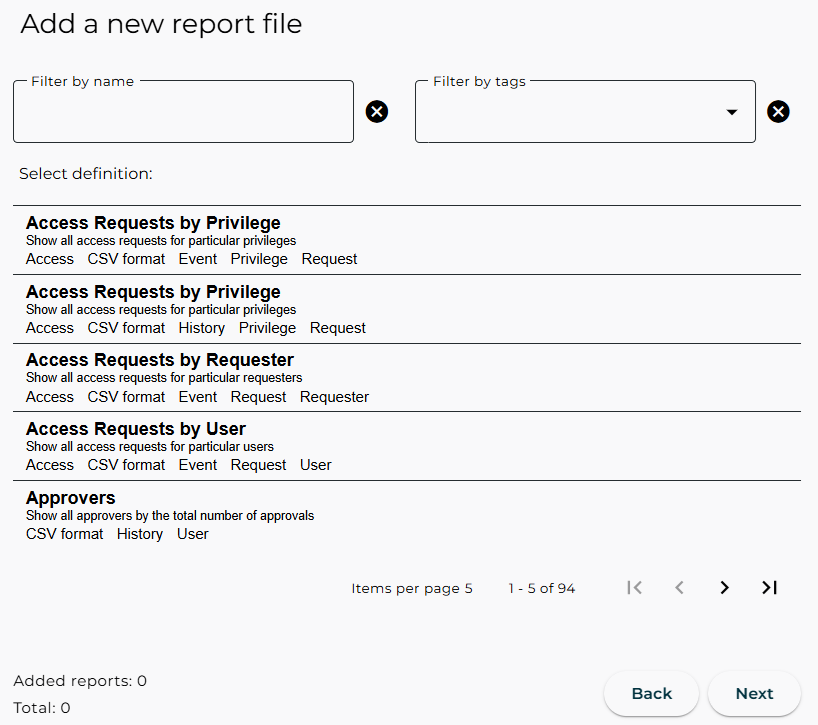
Note: Some report definitions include the Restricted tag. Users with the Restricted Auditor application role can only view and use reports with this tag. Also some report definitions include the Administrative tag. Only users with the Audit Administrator application role can view and use reports with this tag.
To select a report definition, click it. This opens a Report page for configuring the scope and output format of the selected report. Continue with "Setting the Report Scope".
Once you have selected and configured all reports for this report file, click Create to generate the report file and continue configuring your report set. Or click Back to cancel the selection and return to the previous dialog.
Once all report files are defined, proceed with the Schedule, Conditions, and Output tabs to complete the report set configuration.
Setting the Report Scope
The Report page allows you to provide input parameter values required for the report definition selected on the Report file page.
At the top of the page, the name, description, and tags of the report definition are displayed followed by a list of available report templates. Some reports offer multiple templates, allowing you to choose the one that best fits your needs. The selected template determines which sections are shown in the scope definition dialog. For example, if you select a Spreadsheet (CSV) template, the Select columns section is displayed, allowing you to choose which columns will be included in the resulting report. On the other hand, the Create short report checkbox is not available when a CSV template is selected.
Now you can continue with setting parameter values for the selected report. Some input parameters are mandatory, while others are optional, depending on the report definition.
In the Style section, you can choose a predefined color scheme for the generated report to match your visual preferences or organizational standards.
In the When section, define the time range or time point for the report:
-
The time range options for audit events or history entries:
-
Previous day, Previous week, Previous month, Previous year;
-
Week to date, Month to date, Year to date;
-
Last hour, Last 24 hours, Last 7 days, Last 30 days, Last month, Last 3 months;
-
Today;
-
Custom time – fixed start and end date and time;
-
Any time.
-
-
The time point options for history entries:
-
End of previous day, End of previous week, End of previous month, End of previous year;
-
Custom time point.
-
Other sections in the dialog allow you to configure the following:
-
A list of entries, such as users, privileges, target systems.
-
Filter attributes, such as organizational units and organizations.
If no value is specified for an optional variable, the report will include all matching entries.
Additional options may be available as checkboxes:
-
Create short or regular output. Short output shows key information in one line. Regular output uses multiple lines per entry.
-
Include only orphaned, imported, or disabled accounts.
-
Include only failed events, such as failed logins.
The Pseudonymize option determines whether sensitive user data is displayed in the report.
The Record limit parameter allows you to restrict the number of records in the final report. A value of 0 means no limit.
The following figure shows an example of the dialog used to select a list of identification source, groups, roles, permissions, privileges, certification campaigns, users, user attributes, target systems, history entry types, organizational units or attribute names.
To open this dialog, click
the Edit ![]() icon at the end of the field.
icon at the end of the field.

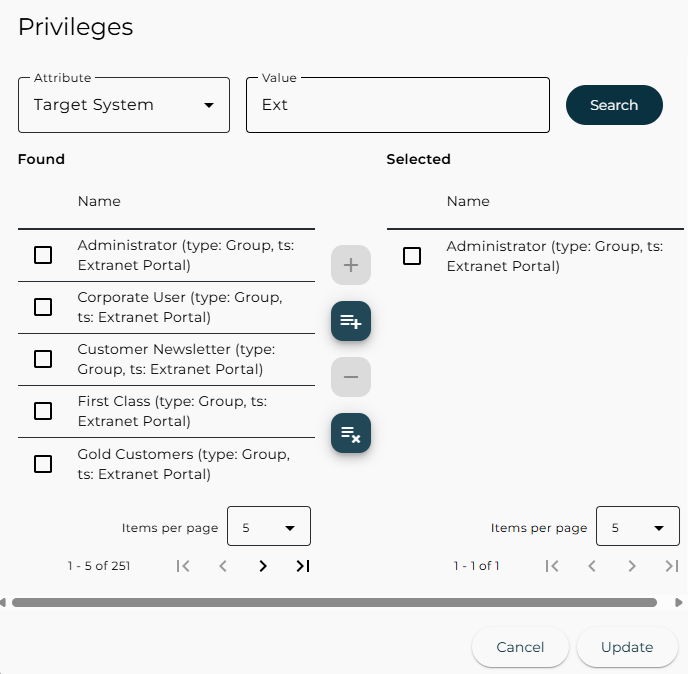
In this dialog, define the values you want to search for, then click Search:
-
In the first field, choose an identifying attribute from the list to search by:
-
Name, First Name, Last Name, Organization, UserUid or other attributes for a user or requestor;
-
cn, Name, AltName or other attributes for a privilege;
-
cn, ou, dxrtype, dxrtsdomainname or other attributes for other parameters.
-
In case there is only one attribute, it is already selected and cannot be changed.
-
In the second field, define the attribute value you want to search for or leave it empty to search all values.
The Found table displays matching entries with the number of results at the bottom, and you can:
-
Select one or more entries and click the Add
icon
to add them to the Selected table. -
Use the Add all
 icon
to insert all found entries displayed on current page into the Selected table.
icon
to insert all found entries displayed on current page into the Selected table.
The Selected table lists chosen entries, and you can:
-
Select one or more entries and click the Remove
 icon to delete them from the list.
 -
Use the Remove all
 icon
to delete all entries displayed on current page in the Selected table.
icon
to delete all entries displayed on current page in the Selected table.
Change the Items per page setting to show more or fewer entries in each list.
Click the Update button to save your selection to the report definition values.
In the Select columns section, available if you select a Spreadsheet (CSV) template, choose which columns will be included in the resulting report. To modify the column list, use the
Edit ![]() icon mentioned above, or simply remove a column from the list.
icon mentioned above, or simply remove a column from the list.
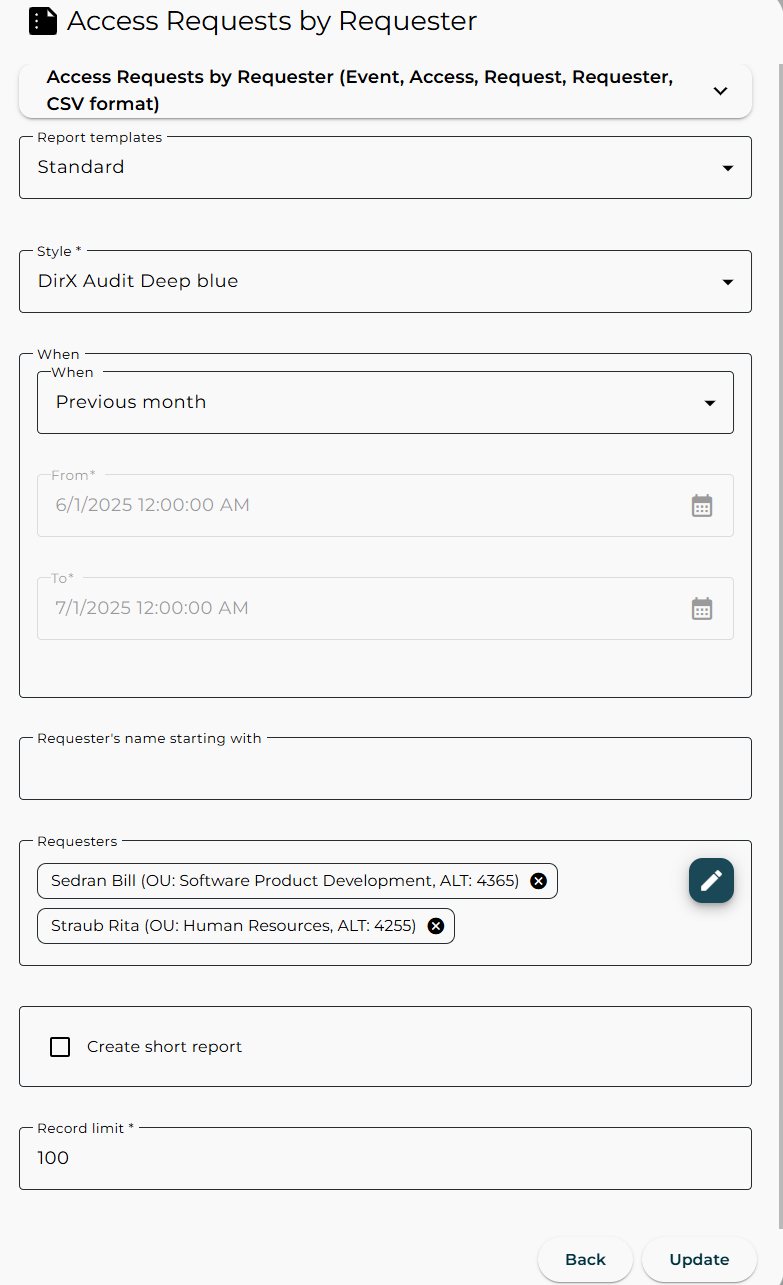
If available in the selected report template, use the Requester’s name starting section to specify the initial letters of requesters' names to filter the resulting report by requester name. It can be useful if you have a long-term scheduled report, but your list of users can change, for example, with new employees. In this case, you fill in the Requester’s name starting field initial letters of interested names and leave the subsequent selection list empty, the filter will only be used directly in the resulting report.
The following figure shows an example of the dialog with a list of requesters, filtered by the identifying attribute Last Name.
Click Back to cancel the report scope definition and return to the previous dialog. Click Create to save the report scope definition and add the report to the report file.
Once a report is added, a summary is displayed. At the top of the Report file page, next to the report name, the number of reports added and the total reports in the report file are shown.
You can continue adding more reports to the same report file.
When you have finished defining the scope for all reports you want to include in the report file, check if you define the report file name and format and use Create button to generate the report file.
Once all report files are defined, proceed with the Schedule, Conditions, and Output tabs to complete the report set configuration.
Defining the Schedule
On the Report set page, use the Schedule tab to configure when report files should be generated. You can choose from the following scheduling options:
-
Simple – runs the report set once at a specified date and time.
-
Recurring – allows the report set to run repeatedly on a daily, weekly, or monthly basis:
-
Specify a Start date and, optionally, an End date.
-
If no end date is set, the schedule continues indefinitely.
-
For weekly schedules, select the days of the week.
-
For monthly schedules, select a specific day or choose Last day of month.
-
-
Expert – uses a cron expression to define a custom schedule.
-
Specify a Start date and, optionally, an End date.
-
Enter a valid cron expression to define the schedule.
For guidance, refer to the CronTrigger tutorial:
https://www.quartz-scheduler.org/documentation/quartz-2.3.0/tutorials/tutorial-lesson-06.html
For example, to run a report daily at 3:01 AM, use:0 1 3 * * ?
-
-
As Soon As Possible – executes the report set immediately after it is read by the DirX Audit Server.
-
If the DirX Audit Server is not running, you can limit the execution window using the End date. If the request is read after the end date, it will be silently ignored.
-
Once the schedule is defined, proceed with the Conditions and Output tabs to complete the report set configuration.
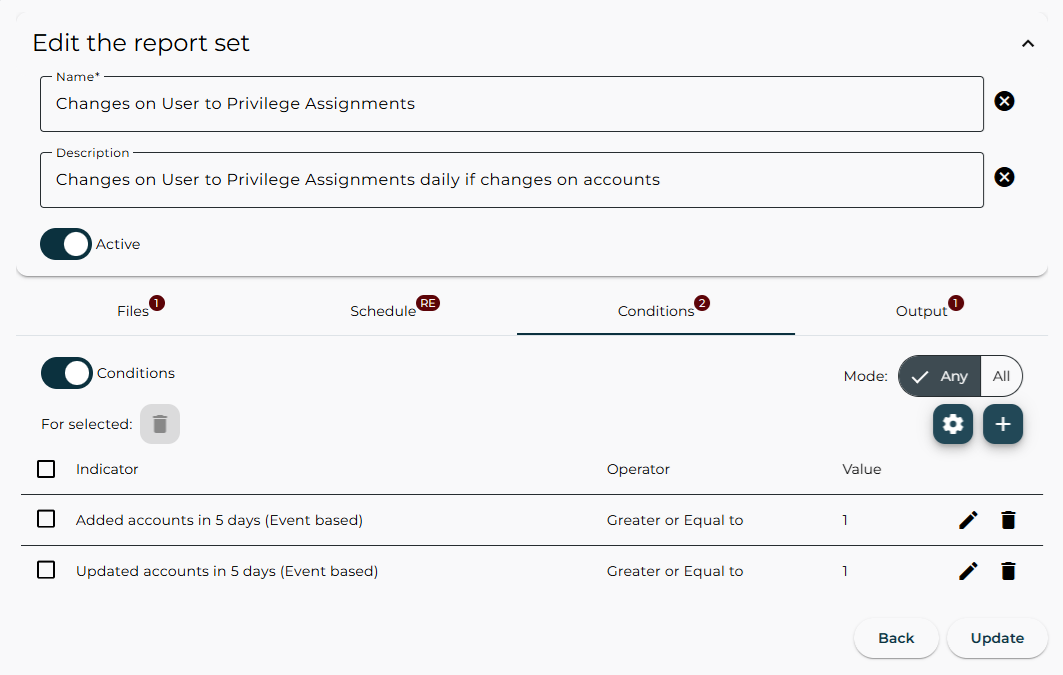
Conditioning the Report Set Execution
The Conditions tab allows you to configure conditions that determine whether a report set should be generated at the scheduled time. These conditions are evaluated by the DirX Audit Server when the report schedule is triggered. If configured conditions are met, the report set is generated and sent; otherwise, it is skipped.
To use conditions:
-
Activate the Conditions toggle.
-
Click the Add condition
icon to define a new condition.
Note: You can only add conditions if at least one indicator is marked as a favorite. If no indicators are marked, the Add condition icon will be disabled.
Click the Settings ![]() icon to view all available indicators, organized under the Favorites, Public, and Product tabs.
icon to view all available indicators, organized under the Favorites, Public, and Product tabs.
-
To mark an indicator as a favorite, click the Mark as favorite
 icon in the Actions column of the Public or Product tab.
 -
Marked indicators appear in the Favorites tab and become available in the Add condition dialog.
-
To remove a favorite, click the Remove from favorites
 icon.
icon. -
You can reorder indicators in the Favorites tab using drag and drop.
For more information on creating public indicators and customizing them, see the DirX Audit Customization Guide.
Click the Add condition ![]() icon to open the condition editor:
to select and add an indicator that will be evaluated to run the report.
icon to open the condition editor:
to select and add an indicator that will be evaluated to run the report.
-
Indicator – Select a favorite indicator.
-
Operator – Choose a comparison operator such as Greater than, Less or Equal to, Not equal to.
-
Value – Enter the value to compare against.
Click Create to save the condition, or Back to cancel.
Example: Generate the report only if the number of added groups in the last 30 days is greater than or equal to 5.

You can define multiple conditions for a report set. Use the Mode setting to control how they are evaluated:
-
All – All conditions must be met.
-
Any – At least one condition must be met. Conditions are evaluated sequentially. Once one is satisfied, the rest are skipped.
You can reorder conditions using drag and drop.
Note: Conditions do not need to be directly related to the report content. For example, you can trigger a report on failed logins based on a condition involving deleted user accounts.
Once the conditions are defined, proceed with the Output tab to complete the report set configuration.
Defining the E-mail Message
Use the Output tab of the Report set page to configure the e-mail settings used to deliver the generated report.
-
Enter a valid e-mail address in the To field and press Enter.
-
The CC and BCC fields are also available.
-
You can add multiple addresses to each field.
-
At least one valid e-mail address is required.
-
To remove an address, simply delete it from the list.
Once your report set is completed:
-
Click Create to save the report set to the configuration database.
-
To activate the report set, click the Activate report
icon in the report set definitions table.
Editing a Report Set
To edit an existing report set, click the Edit ![]() icon in the row of the desired report set in the table displaying all report sets.
This opens the Report set page:
icon in the row of the desired report set in the table displaying all report sets.
This opens the Report set page:
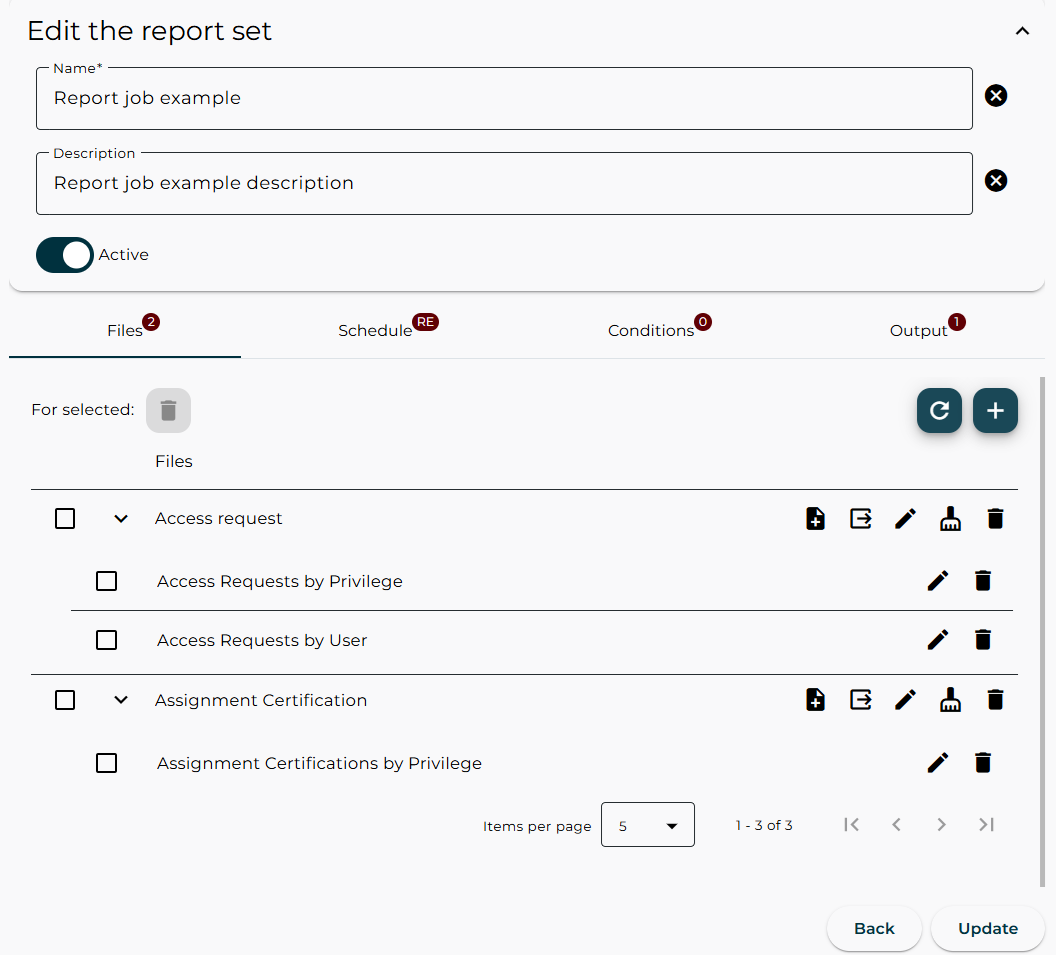
In the Files tab, you can view and manage the report files included in the report set, along with the individual reports within each report file.
Managing the report files list:
-
To refresh the report files list, click the Reload
icon in the Files tab header. -
To add a new report file to the edited report set, click the Add a new report file
icon.
For details, see “Creating a Report File”.
Managing report files:
-
To add a report to a report file, click the Add reports
 icon next to the desired report file to open the Report file page.
For details, see “Selecting a Report Definition” and select, configure and save a new report to your report file.
icon next to the desired report file to open the Report file page.
For details, see “Selecting a Report Definition” and select, configure and save a new report to your report file. -
To export a report file, click the Export
 icon.
This is useful for previewing the report file before scheduling the report set.
icon.
This is useful for previewing the report file before scheduling the report set. -
To edit report file properties, click the Edit
icon to open the Report file page with report file’s properties.
For details, see “Defining the Report File Name and Format”. -
To clear all reports from a report file, click Clear
 icon.
icon. -
To delete a report file, click the Delete
icon.
Managing reports within a report file:
-
To edit report properties, click the Edit report
icon next to the desired report listed under a report file.
For details, see “Setting the Report Scope”. -
To delete a report from a report file, click the Delete report
icon.
Managing the report set:
-
To reconfigure the report set schedule, use the Schedule tab. See “Defining the Schedule”.
-
To reconfigure the report set conditions, use the Conditions tab. See “Conditioning the Report Set Execution”.
-
To reconfigure the report set output, use the Output tab. See “Defining the E-mail Message”.
-
You can also change the report set’s name, description, and active/inactive status.
Deleting Report Sets
You can delete a single report set, multiple selected report sets, or all report sets from the table displaying all report sets:
-
To delete a single report set, click the Delete
icon in the corresponding row. -
To delete multiple report sets, select the checkboxes in the first column for the report sets you want to remove, then click the Delete selected
icon in the toolbar.
To delete a report file from a report set or remove a report from a report file, click the Edit ![]() icon in the row of the selected report set and continue in the Report set page.
For details, see “Editing a Report Set”.
icon in the row of the selected report set and continue in the Report set page.
For details, see “Editing a Report Set”.
Activating and Deactivating Report Sets
You can activate or deactivate a report set in the following way:
-
Edit a report set and on the Report set page use the Active / Inactive toggle.
You can activate or deactivate a single report set, multiple selected report sets, or all report sets from the table displaying all report sets:
-
To activate or deactivate a single report set, click the Activate report
or Deactivate report icon in the corresponding row of the report set in the report sets table. -
To activate or deactivate multiple report sets, select the checkboxes in the first column for the report sets you want to remove, then click the Activate selected
or Deactivate selected icon in the toolbar.
Synchronizing Report Set Updates to the DirX Audit Server
Any changes made in the Reports page must be synchronized with the DirX Audit Server.
This synchronization is handled automatically by the DirX Audit Server, which checks for updates at regular intervals. The process typically completes within a few seconds.
If synchronization does not complete within one minute, verify with the application administrator that the DirX Audit Server service is running.