Customizing Wizards
This section describes how to customize and design new Provisioning and Connectivity wizards.
Customizing the Provisioning Target System Wizard
The target system wizard configuration depends on two XML descriptions:
-
The basic Target System wizard XML description
-
The target system type-specific XML description
The next sections provide customization information about these XML descriptions.
Basic Target System Wizard Description
The basic target system wizard definition is located in the following XML file:
Provisioning View → Configuration → Wizards → newTS.xml
This file contains a set of variables that define, for example, the name of the Identity Store, the name of the relevant workflow templates (for example, the Policy Execution workflow) and the names of the relevant scenarios for Tcl-based, password and real-time workflows. It also contains the definitions of all workflow steps.
This file is only visible in the Data View and cannot be customized.
Target System Type-Specific Wizard Description
All target system-specific wizard definitions are located in the following XML file:
Connectivity View → Configuration → Connected Directory Types → type → Wizards → TSWizardConfig.xml
You are allowed to customize the following definitions in this file:
-
Connected directory type specific attribute definitions, for example:
<cdtypespecific header="Connected Directory Type Specific">
<specificattribute label="User base" name="user_base" dxroption="AccountRootInTS" />
<specificattribute label="Group base" name="group_base" d />
</cdtypespecific>which means that dxmSpecificAttributes(group_base) is displayed as a field with the name 'GroupRelative User Base'. The value is stored as specific attribute at the connectivity connected directory. User_base is also stored there. Additionally the same value is stored in the dxrOptions attribute of the Provisioning Target System.
You can customize the following attributes:
-
label: displayname
-
name: the attribute name in the Connectivity connected directory-specific attribute
-
dxroption: the attribute name in the Provisioning target system dxrOptions attribute
-
editor: the editor to be used
These attributes appear in the CD Configuration step in the Connected Directory Type Specific section.
-
-
Attribute visibility definitions, for example:
<service header="Service" ipadress="true"/>
which means that the ipaddress attribute is requested by the target system wizard. It is shown in the CD Configuration step in the Service section.
The following table shows the attributes you can customize, where:
-
Name specifies the name of the XML attribute
-
LDAP Name specifies the name of the corresponding LDAP attribute
-
Label specifies the text that appears in the wizard
-
Default specifies whether the attribute is displayed if nothing is defined (true) or not (false).
Name LDAP Name Label Default ipadress
dxmadress
IP Address:
false
dataport
dxmdataport
Data Port:
true
servername
DxmServerName
Server Name:
false
-
-
Additional wizard steps, for example:
<cdadvancedstep reference="Configuration" />
which triggers the Target System wizard to display this additional step.Configuration is the reference to a property page defined for this connected directory type.
-
Bind profile definitions, for example:
<bindprofile header="Bind Profile" anchor="Domain_Admin" />
which selects the bind profile where the anchor attribute is set to "Domain_Admin".As an alternative to using the anchor attribute, you can specify name=”my-name” to select the bind profile via the dxmdisplayname attribute.
Customizing a Connectivity Wizard
Wizards provide one way to hide parts of the complexity of DirX Identity and allow you to concentrate on the essential issues when configuring or reconfiguring workflows.XML descriptions allow you to define Connectivity wizards that help to create and maintain connected directories and workflows at the DirX Identity Manager Global View.
To design a Connectivity wizard, you:
-
Write the XML description of the wizard.
-
Give this file the correct name.
-
Link this wizard from the workflow or connected directory object.
Now you can configure the workflow or connected directory object with the wizard. The next sections describe these steps in more detail.
Defining Connectivity Wizards
Connectivity wizards always start with a template that the user must select from the configuration database. The wizard derives the new object from this template and cannot create a new object without having an existing template to use as a base
The DirX Identity configuration database does not contain any special templates for this task. All objects that fit can be used as templates. For example:
-
The connected directory configuration wizard presents all existing connected directory objects (the default objects and any connected directories you have copied or created).
-
The workflow configuration wizard presents all workflow objects that have the same type of endpoints (regardless of the direction of the workflow).
Connectivity wizards can be configured via XML and are simply a selection of forms (property dialogs) that are necessary to configure a connected directory or a workflow. The wizard designer can heavily influence the level of detail that is presented to the user.
Example: If a workflow can be configured with 20 property dialogs in the Expert View, then a wizard could select 5 of these dialogs to reduce the level of detail. It is even possible to extract specific fields from a property dialog and to hide other fields.
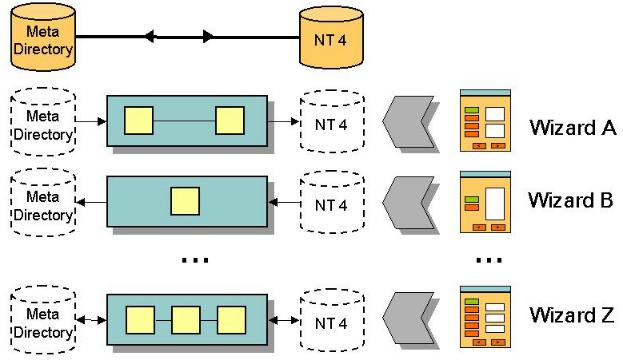
It is also important to understand that workflow wizards may vary depending on the complexity of the workflow. You can use a simple wizard to configure a workflow with one activity (Wizard B in the following figure) or a complex wizard to configure a workflow with three or more activities (Wizard Z in the following figure).
The workflow wizard names (which you can view in the field Wizard Type in the workflow object) are constructed in the following way (we recommend using this convention):
source_type-specifier-target_type
where source_type stands for the type of the source connected directory, target_type for the target connected directory, and specifier allows you to distinguish between different implementations of the workflow between two connected directories (for example, a one-step workflow or a two-step workflow, which must be configured differently).
Examples: LDAP-oneStep-FILE, LDAP-twoStep-FILE, LDAP-twoStep-ADS
Because DirX Identity cannot automatically detect whether a workflow works in both directions (a Tcl script or a custom agent can both read and write via its channels to connected directories) you can use the Bidirectional attribute in the workflow object to define this case.
Connectivity wizard objects are normally located in the Configuration → Agent Types → agenttype → Wizards folder for workflow wizards and Configuration → Connected Directory Types → conndirtype → Wizards folder for connected directory wizards. You can add your own wizards there or add new agent and connected directory types together with wizard descriptions.
Connectivity Wizard Naming Rules
The naming rules are different for Java-based and Tcl-based workflows. Note that these naming rules are not mandatory but it is good style to use them.
Naming Rules for Java-based Workflows
The naming rules for Connectivity wizards of Java-based workflows are as follows:
wf-wftype-Specifier.xml
where wftype defines the workflow type. Possible values are:
EventBased - for wizards that handle event-based workflows that work on the Identity Store.
Password - for wizards that manage password information within the Identity Store.
Provisioning - for wizards for provisioning between the Identity Store and the connected system.
Source - for wizards that manage workflows between a source system and the Identity Store.
and where Specifier defines a specific wizard type.
For example:
wf-Provisioning-Synchronize.xml - a standard wizard for synchronization from the target system in the Identity Store to the connected system and backwards.
Naming Rules for Tcl-based Workflows
The naming rules for Connectivity wizards of Tcl-based workflows are as follows:
wf-SourceType-TargetType.xml
where SourceType defines the type of the source connected directory, TargetType defines the type of the target connected directory and Specifier allows to distinguish between several types of wizards between these two connected directories.
Note: When you use the Copy functionality of the Global View (Configure) to create a new workflow from a template. The workflow template needs a wizard definition otherwise the copy cannot be performed. You can use the wf-standard.xml wizard template for your workflow. Copy it in the Expert View, rename it to your workflow (for example: wf-LDAP-MyDir.xml) and use it in your workflow. This standard wizard only contains a naming step.
Examples:
wf-LDAP-FILE.xml
A wizard that allows for configuring a workflow between an LDAP directory and a FILE directory.
wf-LDAP-2step-EXCHANGE.xml
This wizard allows the configuration of a two-step workflow between an LDAP directory and an EXCHANGE directory.
Connectivity Wizard XML Description
A Connectivity wizard’s XML description has the following structure:
<wizard name=" name" title="title " >
<illustrator name=" illustrator" title="title" />
...
<step illustrator>
<node nodeDefinition/>
<description>
... DESCRIPTIVE TEXT ...
</description>
<propertypage pageDefinition/>
<prestep class="javaClass" />
<poststep class="javaClass" />
</step>
...
</wizard>
The wizard description consists of two parts:
-
The definition of the illustrator steps (this is the sequence of steps that is displayed on the left side of the wizard)
-
The related step descriptions (this is the step content that is displayed on the right side of the wizard)
At the beginning, two properties can be defined:
-
name - the internal name of this element (not the display name!), Example: name="CDwizard"
-
title - the display name in the header of the wizard window. Example:
title="Create or Maintain a Connected Directory"
The next sections provide details about illustrator and step descriptions and also about node references.
Illustrator Description
This section consists of one or more illustrator sections. These sections contain the following properties:
-
name - the internal name of this element (not the display name!). This name is used to link the step to the illustrator element. Example: name="attrconfig"
-
title - the display name in the illustrator element. Example:
title="Set Attribute Configuration"
The sequence of illustrator definitions defines the sequence of the wizard steps.
Example:
Open Configuration → Connected Directories → LDAP → Wizards → connDir-LDAP.xml and click the Content tab. Select New Window from the context menu in the editor window.
<illustrator name="General" title="General Information" />
<illustrator name="Schema" title="Schema Information" />
<illustrator name="AttrConfig" title="Attribute Configuration" />
<illustrator name="BindProfiles" title="Bind Profiles" />
<illustrator name="OperAttr" title="Operational Attributes" />
<if var="wizard.templatechooser" value="*" >
<illustrator name="Naming" title="Set Directory Name" />
</if>
This example shows a five-step wizard (General Information, Schema Information, Attribute Configuration, Bind Profiles and Operational Attributes). The last step is only used as naming step when a new object has to be created during a copy operation in the global view. In this case the template-chooser step and eventually a direction selection step is automatically added as first steps. These must not be defined in the wizard definition.
Step Description
This section consists of one or more step sections. These sections contain the following attributes:
-
name - the internal name of this element (not the display name!).
Example: name="attrconfig" -
title - the display header in the step element.
Example: title="Attribute Configuration" -
illustrator - the link to the illustrator to identify the corresponding illustrator.
Example: illustrator="attrconfig" -
description - a textual description what to do in this step. Example:
<description> Check and maintain the attribute configuration. Then click Next. </description> -
node - the path to the element to be displayed (starting with the actual object).
Example: node="dxmAttrConfigFile-DN" or node="dxmActivity". See below for a detailed description of this point (node references). -
<propertypage reference … - a reference to the property page to be displayed (the reference is based on the node definition).
Example: reference="general" -
<propertypage … - a definition of the property page to be displayed (with all the features of property pages described in the object descriptions).
Node References
The default parameter for a node is Connected Directory or Workflow (depending on the type of wizard you are defining). Thus, if you need a tab from the connected directory or workflow object, you do not need to specify this parameter.
Alternatively you can specify other objects. The reference mechanism is similar to the reference mechanism used for configuration files (see "Connectivity References" for details). The features are:
-
Specify another object by defining the link path beginning from the workflow object.
Example: "dxmActivity-DN"
This works only if the workflow has only one activity. Otherwise, DirX Identity does not know which Activity to take.
-
Define a specific object when there are multiple ones with a filter expression.
Example: "dxmActivity-DN[dxmIsStartActivity=true]"
-
Define a child object. This definition is especially useful for Java-based workflows.
Example: [cn=error]
In this case the child object (the activity) with the name 'error' in the cn attribute is referenced.
-
Specify a path to a child object. This definition is especially useful for Java-based workflows.
Example: [cn=join]@[cn=TS]@dxmSpecificAttributes[channelParent]@[dxmDisplayName=accounts]
This example selects the activity 'join' and from there the port 'TS'. Next it follows the link to the channel parent and selects there the object with the display name 'accounts', which is a channel object.
-
Follow the path to an object.
Example: "dxmActivity-DN@dxmRunObject-DN@dxmTCLFurtherScript-DN[dxmDisplayName=Abc]"
This example shows that you must always build unique references. You can use any attribute that distinguishes the objects at one level. Examples are the "dxmStartActivity" or "dxmEndActivity" attributes of an activity object or the display name of any object. In the last case, a change of the display name would of course break the reference, which means that your wizard will no longer work in this part.
A reference to the common name of an object is secure because this name will never change. On the other hand, this reference will no longer work when the common name is changed (which happens during the copy operations in DirX Identity).
The only secure way that is resistant to copy operations and other changes is to use a special property that does not change. We introduced dxmAnchor attributes at some objects to provide such capabilities.
Example:
Open Configuration → Connected Directories → LDAP → Wizards → connDir-LDAP.xml and click the Content tab. Select New Window from the context menu in the editor window and scroll down to the step definitions.
<step name="General" title="Supply General Information" illustrator="General" >
<description>
  The configuration of the Connected directory starts with the input of some general information.
  Enter the data requested below. When done, click on the 'Next >>' button to continue.
</description>
<propertypage reference="general" />
<prestep  class="siemens.dxm.wizard.PreStepImpl" />
<poststep class="siemens.dxm.wizard.PostStepImpl" />
</step>
This first step named "General" is displayed as "Supply General Information" in the window’s title bar and linked to the illustrator step "General". Note that it is good style to name the step and illustrator the same. The description informs the user what to do in this step.
The propertypage reference points to "general". This is the name of the property sheet definition in the object description. Because we reference the connected directory object directly this must not be specified here.
The next two definitions implement the next and previous buttons in the wizard. Therefore, do not change it!
Now let’s look at this definition:
<step name="AttrConfig"  title="Check Attribute Configuration" illustrator="AttrConfig"
node="dxmAttrConfigFile-DN" >
<description>
  The system built up a set of attributes used for synchronization. Check for completeness.
  The attribute properties beyond the name are mainly used for the description of export and
  import file formats. See the documentation for details. Update the attribute set if necessary.
  When done, click on the 'Next >>' button to continue.
</description>
<propertypage reference="attrconfdetails" />
<prestep  class="siemens.dxm.wizard.PreStepImpl" />
<poststep class="siemens.dxm.wizard.PostStepImpl" />
</step>
It is very similar to the previous one. The node definition is new. In this case, we use the propertypage "attrconfdetails" from a referenced object of the connected directory. This referenced object is defined via a distinguished name reference (node="dxmAttrConfigFile-DN"). This type of reference is very resistant to structural changes. It does not matter where the Attribute Configuration object resides - it will always be found via the DN reference.