Configuration
This chapter provides an overview of required and optional configurations for Web Center for Password Management. Details common to both Web Centers are described in the DirX Identity Web Center Reference Guide.
Installation
The DirX Identity Installation Guide provides a detailed description of the installation procedure. This section lists only the items you should take care of when installing for Password Management.
Choose Licensed Feature Set Dialog:
Make sure that you select Password Management. If you want to use other features of DirX Identity in addition to Password Management, such as User Management, then you should also select Business Suite. If you want to work with roles or need to have approval workflows, then you must also select Professional Suite.
Choose Install Set Dialog:
For Password Management, you need at a minimum: Connectivity Schema, Provisioning Schema, C++-based Server, Message Broker, Java-based Server, Manager and Web Center.
For Password Management, you need at a minimum:
-
From the Base Package: Connectivity Schema, Provisioning Schema, C++-based Server, Message Broker, Java-based Server and Manager. If you want to have User Management via Web Center or other features not supported by Web Center for Password Management, select also Web Center.
-
From the Password Management Package: Web Center for Password Management.
-
From the Connectivity Packages, you will most probably need Active Directory. Make sure you have selected the packages for all the other types of target systems for which you want to change passwords.
Initial Configuration Wizard
After the installation, the deployment must be configured using the Initial Configuration Wizard. For details on this task, see the DirX Identity Installation Guide, chapter Configuration.
For Password Management, you need to select and configure the following items at least once (see the Configuration Options dialog): Connectivity Schema, Domain Configuration, C++-based Server, Java-based Server, Manager, Web Center for Password Management.
If you also want to have User Management or other features, deploy a full Web Center in addition to Web Center for Password Management.
In the Domain Configuration dialog, you should select to configure a customer domain and provide an appropriate name such as the name of your company or your organization. You can also choose to create a sample domain for testing and learning purposes. The sample domain contains a set of users, roles, business objects and policies that are ready to use. These items are the basis for the DirX Identity Tutorial, which guides you through important features.
In order to encrypt passwords in transit and in the DirX Identity domain, you should provide an RSA key pair for the account cn=server_admin,dxmC=DirXmetahub in the Connectivity database; otherwise the passwords are only hashed. See the chapter "Managing Connectivity Security" in the DirX Identity Connectivity Administration Guide for details.
Login Configuration
A login to Web Center for Password Management involves two steps:
-
Finding the DirX Identity user that matches the user identification data entered into the login form.
-
Authenticating the user by validating the entered password against the DirX Identity database and/or the selected external system.
The login is accepted if the identification step finds exactly one user and the subsequent authentication succeeds.
User Identification
The login form includes an optional authentication domain, a name field, and a password field.
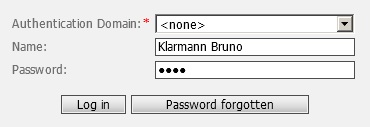
The user is identified by authentication domain and name, while the password is only relevant for user authentication.
Web Center tries to identify the user in two ways. First, it searches for a matching DirX Identity user. If the search returns a single user, the identification has succeeded. If, on the other hand, the search yields more than one user or no user at all, Web Center checks if an authentication domain has been selected. If so, it searches again for a matching DirX Identity target system account. If that results in exactly one account, Web Center follows the account’s dxrUserLink attribute to find the user. Otherwise, the identification has failed.
Notes
-
The user identification is independent of the user authentication mode (see below).
-
Web Center for Password Management does not support multiple name fields (like first name and last name) in the login form.
Searching for a DirX Identity User
By default, Web Center searches for the user in the users tree of the DirX Identity domain “cn=Users,cn=<DXI-Domain>”.
The search filters for all users with state ENABLED, whose login form attribute match the value entered into the name field of the login form. The login form attribute is the one assigned to the name field in the login form definition.
Base object and filter can be customized in file web.xml via initialization parameters “com.siemens.webMgr.auth.userBase“ and “com.siemens.webMgr.auth.userFilter“, respectively.
Both, search base and filter, support the following placeholders:
-
%USER_ID – is replaced with the value entered into the name field of the login form.
-
%LOGIN_ATTR – is replaced with the attribute name assigned to the name field of the login form in file forms-config.xml.
-
%MASTER_TS – is replaced with the authentication domain selected in the login form.
| There’s no placeholder for the DirX Identity domain; you must enter it explicitly. |
In any case, whether default or customized, the filter is extended to find users in state ENABLED only.
Sample:
With login attribute cn and default search base and filter for the My-Company domain, the data entered into the login form shown above result in a search for users below
-
cn=Users,cn=My-Company
with filter
-
(&(objectclass=dxrUser)(cn=Klarmann Bruno)(dxrState=ENABLED)).
The filter corresponding to the data in the login form shown below is
-
(&(objectclass=dxrUser)(cn=bklarm12)(dxrState=ENABLED)).
Searching for a DirX Identity Account
The search base for the account search is the selected target system. If no target system is selected, the search is skipped.
The search filters for all accounts with state in target system ENABLED and whose login form attribute matches the value entered into the name field of the login form. The login form attribute can be configured per target system. The default attribute is dxrName for target systems of type AD and cn for type LDAP.
| The attribute name assigned to the login form field in file forms-config.xml is ignored here. |
Sample:
With login form attribute dxrName and default search base and filter for the My-Company domain, the following login data
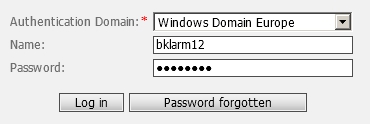
result in a search for accounts below
-
cn=Windows Domain Europe,cn=TargetSystems,cn=My-Company
with filter
-
(&(objectclass=dxrTargetSystemAccount)(dxrName=bklarm12)(dxrTSState=ENABLED))
User Authentication
Web Center for Password Management can combine two ways of authentication.
-
Internal (DirX Identity) authentication
The user is authenticated as usual with his DN and password against the DirX Identity provisioning directory. There is no additional configuration necessary. -
External authentication
The user is authenticated against an external system like an LDAP or AD target system. The target system must be defined and configured as a password master via the Identity Manager’s Provisioning view. You can define more than one target system for external authentication.
Authentication can work in four different modes to combine external and internal authentication:
-
DXI – perform the internal authentication only. DirX Identity authentication must succeed – no other system is involved in the authentication procedure.
-
EXTERNAL – perform the external authentication only.
-
ONE – at least one authentication (either internal or external) must succeed, whereas both authentications are configured.
-
BOTH – both authentications (internal and external) must succeed. If one of both authentications fails, the user is not successfully authenticated.
The authentication mode is configured in file web.xml (section of authentication modes) of Web Center for Password Management. The default mode is “DXI” (internal authentication only).
External Authentication
External authentication requires that you have defined one or more target systems as password masters.
A user is successfully authenticated against a target system if
-
The user has an account in the target system.
-
The account’s state in the target system is ENABLED.
-
Authenticating against the connected system succeeds.
Otherwise authentication against the target system fails.
When a user logs in, Web Center performs external authentication by following the first step that applies:
-
If the user has explicitly selected an authentication domain in the login form, he is authenticated against the selected target system. If the authentication succeeds, external authentication succeeds. If it fails, external authentication fails.
-
If a preferred authentication domain is assigned to the user, he is authenticated against the assigned target system. If the authentication succeeds, external authentication succeeds. If it fails, external authentication fails.
-
Web Center for Password Management tries to authenticate the user sequentially against all master target systems in which the user has an account. On first success external authentication succeeds. If all authentications fail, external authentication fails.
-
If the user doesn’t have any account in a master target system, external authentication fails.
Configuring External Authentication
In external authentication, one of the target systems must act as a password master system – it performs external authentication for Web Center for Password Management.
There are two locations to configure:
-
DirX Identity Manager → Provisioning → target system → Advanced tab → Password Management
-
File system folder of Web Center for Password Management
The sample configurations described in this section provide setups of external authentication for Active Directory and the LDAP target system Intranet as master target systems for external authentication.
This section also describes how to configure Web Center for Password Management’s login page for external authentication.
Configuration in Identity Manager
The configuration of an external system as password master must be done by the administrator. The configuration is located in the target system’s Advanced tab under the Password Management section, as shown in the following figure.
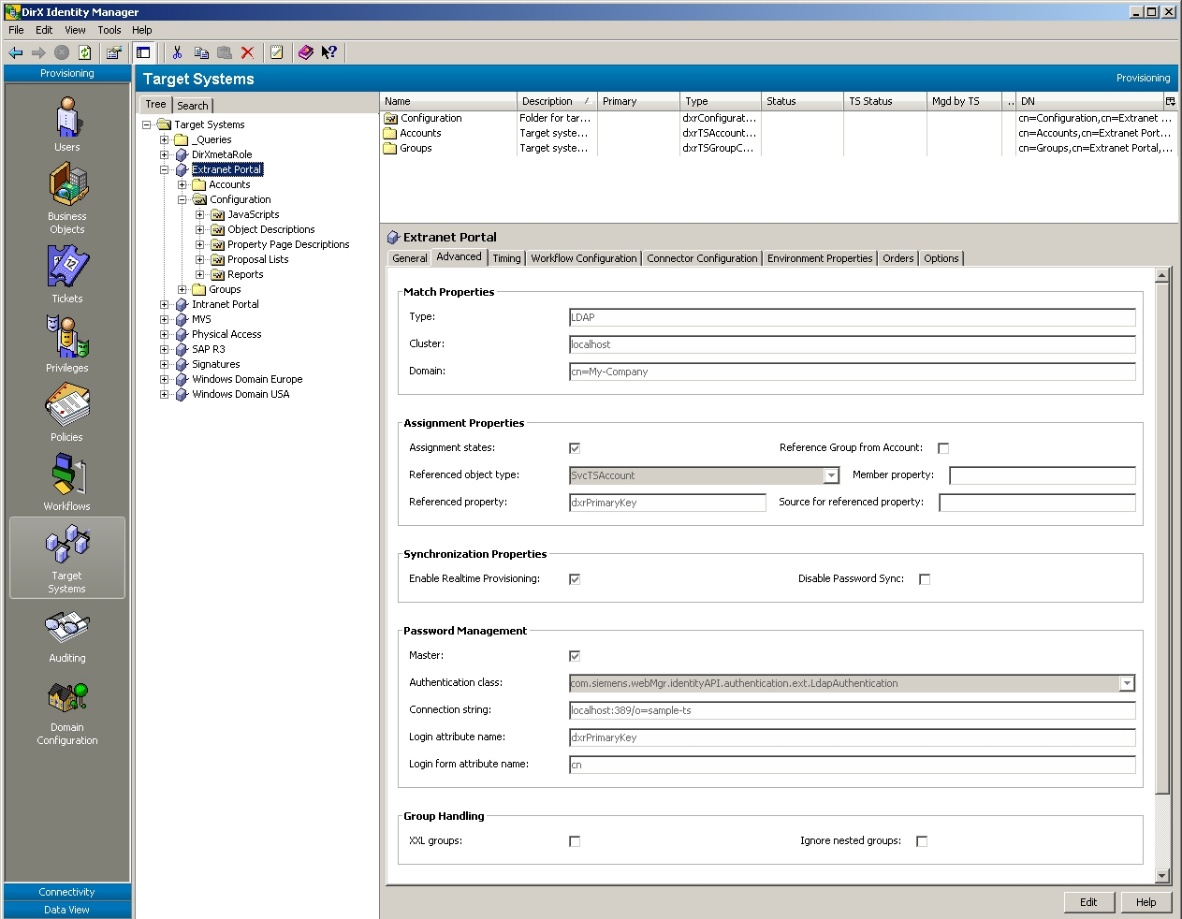
The following parameters must be specified in DirX Identity Manager at the corresponding target system in the Advanced tab:
-
Master - if checked, it enables external authentication. The target system is considered as the master for user authentication. Password synchronization must be enabled (Disable Password Sync unchecked).
-
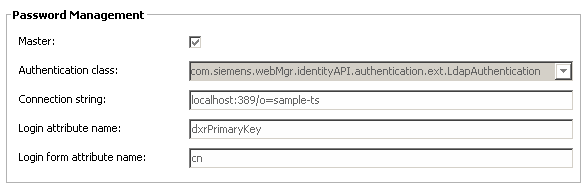
Authentication class - the class used for external authentication. The class must implement the interface com.siemens.webMgr.identityAPI.authentication.ext.Authentication and has to be deployed in the WEB-INF/lib directory of Web Center. There are the following built-in classes for LDAP and Active Directory authentication that can be used out-of-the-box:
-
com.siemens.webMgr.identityAPI.authentication.ext.AdAuthentication
-
com.siemens.webMgr.identityAPI.authentication.ext.LdapAuthentication
-
Connection string - the connection string (domain) for external authentication. For the built-in classes LDAP and Active Directory the syntax is [protocol://]host[:_port_][/dn], for example localhost:389 or ad.my-company.com or, for SSL connections, ldaps://ad.my-company.com. The default protocol is ldap, the default ports are 389 for ldap and 636 for ldaps. For other connected systems the custom authentication class defines the syntax. The string is passed to the authentication class before authentication of a user.
-
Login attribute name – the name of the DirX Identity account attribute that holds the login in the connected system with respect to the authentication class. This overrides the defaults in the implementation of the authentication class. Default for AD and LDAP is dxrPrimaryKey.
-
Login form attribute name – the name of the DirX Identity account attribute that holds the user identification entered into the login form. This overrides the defaults in the implementation of the authentication class. Default for AD is dxrName, default for LDAP is cn.
Configuration in Web Center for Password Management Folder
You need to edit the following files:
-
WEB-INF/web.xml
-
Authentication mode
-
-
WEB-INF/config/webCenter.properties
-
Number of questions for challenge/response
-
-
WEB-INF/configPwd/identity/forms-config.xml
-
Password master selection list on login page
-
User login attribute name
-
Sample Configurations
The following sample configurations describe how to set up external authentication for Active Directory, the LDAP target system Intranet Portal and a custom target system as master target systems for external authentication.
Active Directory as Master TS
Perform the following steps to set up Active Directory as the master target system for external authentication:
-
Set up external authentication for the target system Active Directory:
In DirX Identity Manager → Provisioning, create a target system for Active Directory.
In the Advanced tab, check the Master box of Password Management to enable external authentication. Enter the authentication class com.siemens.webMgr.identityAPI.authentication.ext.AdAuthentication in the Authentication class field. Enter your Active Directory domain in the Connection string (domain) field. For LDAP over SSL to Active Directory, enter “ldaps://”, followed by the domain, and copy the certificate of the Active Directory server or an appropriate CA Root certificate into the SSL trust store of the Tomcat server. This is by default the cacerts truststore of the Java installation used to run Tomcat. You may define a different trust store by setting the Java system properties javax.net.ssl.trustStore and javax.net.ssl.trustStorePassword in the Tomcat configuration user interface or the Tomcat start script. -
Set up Provisioning:
Set up Java validation and password workflows for this target system. If you install the Active Directory controller on the same machine, change the LDAP ports of DirX Directory (for example 1389 instead of 389 and 1636 instead of 636) and re-configure DirX Identity.
Set up a user import workflow to import the Active Directory users into the DirX Identity users folder.
Ensure that the DirX Identity users have the Active Directory login value in the uid or another attribute. The attribute name is configured in web.xml and forms-config.xml. -
Service Desk Operators:
Add the Service Desk operators to the DirXmetaRole group ServiceDeskOperators.
LDAP as Master TS
This section describes the steps to set up the target system Intranet Portal in the sample domain My-Company as the master target system for external authentication:
-
Create the domain sample-ts:
For this sample, the domain sample-ts represents the LDAP server used for external authentication. In order to populate it with users, update the passwords in the file install_path/basic.input.tcl and run Setup.bat under install_path*/data/schema/dirx*. Specify the userPassword for the accounts in sample-ts/Intranet. -
Set up Provisioning:
Set up Java validation and password workflows for this target system.
In DirX Identity Manager, run the synchronization workflows for the target systems Intranet (Ident_Intranet_Realtime) and Extranet (Ident_Extranet_Realtime).
Set up a user import workflow to import the users from the sample-ts folder into the DirX Identity users folder. Ensure that the DirX Identity users have the LDAP DN in the uid or another attribute. The attribute name is configured in web.xml and forms-config.xml. -
Set up external authentication for the target system Intranet Portal:
In the Advanced tab, check the Master box of Password Management to enable external authentication. Enter com.siemens.webMgr.identityAPI.authentication.ext.LdapAuthentication in the Authentication class field. Enter localhost:389/o=sample-ts in the Connection string (domain) field. For LDAP over SSL to the target system enter “ldaps://localhost:636/o=sample-ts” and copy the certificate of the LDAP server or an appropriate CA Root certificate into the SSL trust store of the Tomcat server. This is by default the cacerts truststore of the Java installation used to run Tomcat. You may define a different trust store by setting the Java system properties javax.net.ssl.trustStore and javax.net.ssl.trustStorePassword in the Tomcat configuration user interface or the Tomcat start script. -
Service Desk Operators:
Add the Service Desk operators to the DirXmetaRole group ServiceDeskOperators.
Configuring the Login Page
For external authentication, the login page for Web Center for Password Management can be configured in two modes - with or without the master target system list “Authentication Domain”. The following figure shows the login page:
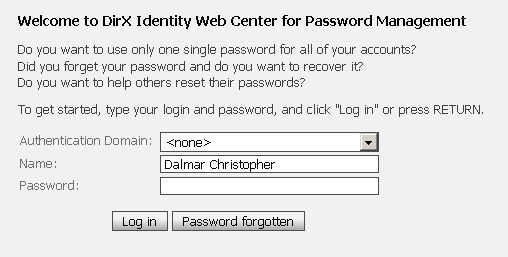
The current mode is configured in the WEB-INF/configPwd/identity/forms-config.xml file in the loginForm element. Follow the instructions in that file to show or hide the selection list and to enable or disable the various options.
When the list is visible, the user can select the Authentication Domain (master target system). You can define a default domain that is preselected when the login form is displayed (form property attribute “value”).
The first value in the list is <none>. If the user selects <none> the target system for external authentication is automatically determined by some other means (see the section on External Authentication above). To get the <none> option set renderer property “omitNoneOption” to false in the form property configuration. A functionally equivalent alternative to the <none> option is the empty option (renderer property “omitEmptyOption”).
The name field matches either a user attribute or an account attribute. It is used to identify the user trying to login. For details see section “User Identification” above.
Finally, the user enters a Password and then clicks Log in. If the authentication fails a couple of times, login with password is locked and the user is automatically redirected to a page prompting him to answer authentication questions. This behavior is independent of the specified authentication mode.
When a user has successfully logged in, Web Center checks if he has already entered his authentication questions. If not, Web Center displays a page where he can do that. If the user does not specify any questions, Web Center will ask him again at the next log in.
Configuring Preferred Authentication Domains
You may assign a preferred authentication domain to a user. If the user then tries to log in without specifying a domain, Web Center performs external authentication against his preferred domain only. It ignores the user’s accounts in other master domains.
Since “$pwdMasterTS” cannot be used as name of a real user attribute, you have to replace the property name “$pwdMasterTS” with the real user attribute name in some configuration files:
-
Object description *user.xml
-
<property name="$pwdMasterTS” …>
-
-
Deployment descriptor web.xml
-
Value of context parameter “com.siemens.webMgr.auth.masterTsAttr”
-
-
Forms configuration file *WEB-INF/configPwd/identity/forms-config.xml
-
Login form property "$pwdMasterTS”
-
Configuring Access to the Request Workflow Service
When using external authentication, access to the request workflow service usually doesn’t work out of the box since Web Center authenticates to the service with user name and password. The service verifies the presented password against the DirX Identity database. If the user has logged in against an external target system, however, the password will not match the one in the DirX Identity database and the authentication against the request workflow service will fail.
To make this feature work, set up the connection from Web Center to the request workflow server following the procedure used for single sign-on. See the DirX Identity Web Center Reference for details.
Synchronizing Passwords
In authentication mode “ONE”, a user is authenticated against the DirX Identity database first. If that fails, external authentication is attempted.
If a user’s DXI password is different from his password in a master target system and the user logs in with his external password, the DXI authentication will fail while the external authentication will succeed. In this case, the external password is propagated back to his DirX Identity user entry and from there to all his master and non-master accounts (via a user password change event).
You can disable password synchronization in file webCenter.properties:
passwordManagement.login.syncUserPassword = false
| Password synchronization does not apply to authentication modes other than “ONE“. |
Locking Authentications
Locking authentications is a feature shared by all DirX Identity Web applications: Web Center for Password Management, standard Web Center and the Provisioning Web Services.
Locking Logins with Password
A user can authenticate to Web Center with some user name and password, or to a Provisioning Web Service application with DN and password. For security reasons, the number of attempts should be limited to prevent automated attacks. DirX Identity supports a maximum number of failed attempts after which further attempts are rejected for some period of time. Responses to password logins can also be delayed for a period of seconds depending on the number of attempts that have failed so far.
The lock mechanism is configured per domain via the following attributes:
-
dxrPwdResponseDelays – the maximum number of failed attempts and response delays.
-
dxrPwdLockDuration – the period of time a lock is in effect.
The following user attributes keep track of a user’s password login lock status:
-
dxrPwdFailureCount – the number of failed attempts.
-
dxrPwdFailureTime – the time of the last failed attempt.
-
dxrPwdAccountLockedTime – the end time of the lock period.
A user’s lock is set if his number of failed attempts hits the maximum number.
While the lock is in effect, any attempt to login with password is rejected.
The lock is released
-
If a password login request is received and the lock duration has expired.
-
If the user successfully logs in via another authentication mechanism, like challenge response authentication.
-
Explicitly by an administrator over the Web Center for Password Management user interface.
Failure count and last failure time are cleared
-
If the lock is released.
-
If a password login request succeeds.
-
If a password login request is received and the failure time has expired (is older than the lock duration.)
Notes:
We do not recommend defining response delays since they unnecessarily prolong request processing time on the server.
From a security point of view, defining a maximum number of attempts is sufficient. Delays add nothing to security.
The lock attributes described here are also used when a user logs in to a standard Web Center application or to the Provisioning Web Services.
Locking Challenge Response Authentications
A user can authenticate to a Web Center or Provisioning Web Service application by answering challenge response questions. For security reasons, the number of attempts should be limited to prevent automated attacks. DirX Identity supports a maximum number of failed attempts after which further attempts are rejected for some period of time. Responses to challenge response authentication requests can also be delayed for a period of seconds depending on the number of attempts that have failed so far.
The lock mechanism is configured per domain via the following attributes:
-
dxrChallResponseDelays – the maximum number of failed attempts and response delays.
-
dxrChallLockDuration – the period of time a lock is in effect.
The following user attributes keep track of a user’s challenge response authentication status:
-
dxrChallFailureCount – the number of failed attempts.
-
dxrChallFailureTime – the time of the last failed attempt.
-
dxrChallLockTime – the end time of the lock period.
A user’s lock is set if his number of failed attempts reaches the maximum defined.
While the lock is in effect, any attempt to authenticate by answering challenge response questions is rejected.
The lock is released
-
If a challenge response authentication request is received and the lock duration has expired.
-
If the user successfully logs in via another authentication mechanism, like user name and password.
-
Explicitly by an administrator over the Web Center for Password Management user interface.
Failure count and last failure time are cleared
-
If the lock is released.
-
If a challenge response authentication request succeeds.
-
If a challenge response authentication request is received and the failure time has expired (is older than the lock duration.)
Notes:
We do not recommend defining response delays since they unnecessarily prolong request processing time on the server.
From a security point of view, defining a maximum number of attempts is sufficient. Delays add nothing to security.
The lock attributes described here are also used when a user performs a challenge response authentication against a standard Web Center application or the Provisioning Web Services. They are also used for logins to the Provisioning Web Services via one-time password. This is why these attributes are grouped under general titles like “Secondary authentications” or “Other logins” in user interfaces.
Configuring Lock Parameters
You can view and edit the lock configuration parameters in the DirX Identity Manager Provisioning View. Select the domain object and open the “Authentication” tab:
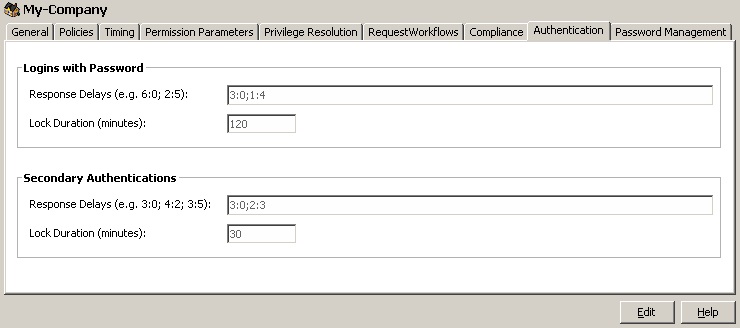
This tab shows domain-wide settings that apply to authentications in Web Center and Provisioning Web Services applications. The configuration parameters are the same for both locks.
-
Response Delays – A semicolon-separated list of response delays. Each delay defines the number of failed authentication attempts it applies to, and a delay time in seconds, separated by a colon. The delay “4:2”, for example, applies to 4 attempts and delays each attempt by 2 seconds. The delay time 0 means no delay. The first delay in the list applies to the first number of failed attempts, the second to the next ones, and so on. Finally, if the total number of failed attempts is exceeded, further authentication attempts will be blocked for some time which means any further attempt will simply fail no matter whether it would succeed or not. To set no limit on failed attempts, leave the value for response delays empty.
-
Lock Duration (minutes) – The period of time that a lock is valid. If the lock duration has expired, the response delay handling starts anew. Also, a user’s failure count is cleared if his last failure time is older than the lock duration. The default value is 120, which means 2 hours.
Samples:
With response delays “3:0; 4:2; 5:3” and a lock duration of 60,
-
The first 3 attempts are processed without any delay.
-
The next 4 attempts are delayed by 2 seconds each.
-
The next 5 attempts are delayed by 3 seconds each.
-
After 12 (= 3+4+5) failed attempts, further attempts will be blocked for an hour.
The recommended delay configuration defines a maximum number of failed attempts without any delay, like “10:0“.
Monitoring the Status Attributes
The Web Center for Password Management application displays the status attributes for both locks on the user summary page:
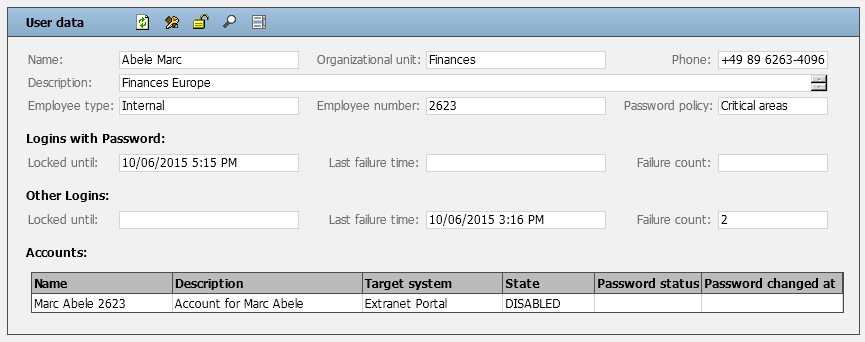
Releasing the Locks
The Web Center for Password Management application provides the functionality to release the locks for a user. The functionality can be invoked from the user menu, the user list context menu and a tool on the user summary page (the middle tool in the toolbar of the above picture.) Note that the function releases both locks. It also clears the last failure times and the failure counts. A user can only release the locks of those users he is allowed to reset their passwords.
Workflows
The following workflows must be configured to enable the password synchronization:
-
For each target system:
-
A provisioning workflow for regular validation of accounts
-
A provisioning workflow for password synchronization
-
-
A Password Event Manager workflow for handling user password changes
-
A consistency workflow to delete the password history attributes in the Identity domain
Optionally, an "import user workflow from master source" can be configured. End user entries can be imported by a user import workflow from a master source such as Active Directory or an LDAP directory. Alternatively, they can be managed completely within DirX Identity.
Provisioning Workflows
This section describes the provisioning workflows that can be configured for password management.
Importing Users from a Password Master System
The standard user import workflow can be used to import the users from an Active Directory domain. For importing users from an LDAP directory, adapt the import workflow for ADS. For associating later on users and their accounts, you should store the login name of the external master system to a user attribute, e.g. uid.
After the workflow configuration is completed, define a schedule so that the users are regularly (typically: daily) imported. See the chapter on "Scheduled Workflows" in the DirX Identity Application Development Guide.
Validation and Password Synchronization of a Target System
If you do not manage the accounts and groups of the external system within DirX Identity and use it solely as target to change passwords, you need to make sure that the accounts in the external system are never disabled by any privilege resolution process. To do this, set the following options when running the Target System creation wizard:
-
Target System Selection dialog - select the appropriate template from the list and DO NOT check Accounts and Groups in common subtree at the bottom of the dialog. Leaving this flag unchecked instructs the wizard to create separate folders for accounts and for groups (this is the default).
-
Target System Advanced dialog - in Assignment Properties, check Reference Group from Account. As a result, the account-group references (links) are stored at the account and you can easily set them later on in the import validation workflow. Make sure that you have NOT checked Disable Password Sync so that password changes are performed in real time.
If you want to use a given target system for external authentication, check the Master checkbox and specify the Authentication class and the Connection string (domain). See the section "Configuring External Authentication" for details. -
Connectivity Scenario dialog - this dialog is displayed when you are creating your first target system. Select the Consistency Check and Reports workflows.
-
Provisioning Workflows dialog - select the Java-based workflows for validation and password setting. Typically they are named Validate_*type_Realtime* and Set Password in type. When adapting the attribute mapping in the validation workflow, make sure the login name is mapped to the account attribute that is defined as login attribute for the master target system; the default for AD is dxrName, the default for LDAP is cn.
Password Management Workflows
This section describes the password management workflows.
User Password Event Manager
The User Password Event Manager workflow (UserPasswordEventManager) processes all password change events resulting from the Windows Password Listener and those of Web Center when it requests to change a user password. If the event references a user, the workflow performs the password change itself.
If the event is sent from Windows Password Listener, it refers to an account in the Windows target system. The account in the event is identified by the domain and its login name. The Password Event Manager searches for a target system with this domain name and finds the account in that target system by searching for the account name in the LDAP attribute dxrName. Make sure that the mapping in the validation workflow is appropriate.
Account Password Manager
The Account Password Manager workflow (AccountPasswordManager) processes password change requests for accounts from Web Center or from the Provisioning Web Services.
When started by a schedule, it searches for accounts with expired passwords and generates a new one. For more details, see the DirX Identity Application Development Guide.
User Password Expiration Notification
The User Password Expiration Notification workflow is optional for Password Management. It regularly checks for user passwords that are about to expire and informs the affected users by an e-mail.
The default configuration can be applied. For more details, see the DirX Identity Application Development Guide.
Consistency Workflow
To make sure that your consistency rules are applied, you need to set up a Policy Execution workflow and an appropriate schedule. The configuration options for this workflow contain a search base for the rules and a filter. Make sure that the search finds consistency rules with the object class dxrConsistencyRule and especially includes the rules to
-
Remove the password history entries (RemoveAccountPasswordChangeHistory).
-
Associate accounts to users (assocAccount2User). Adapt the parameter joinFilter so that it can find the user for a given account. Assuming the login name is stored in attribute dxrName of the account and in uid of the user the filter would be: (&(objectclass=dxrUser)(uid=$(subject.dxrName))).
Roles, Password and Access Policies
The administrator also needs to make sure that the appropriate policies are in place – in particular, password and access policies. Service desk members need to be allowed to reset the password for other users.
Users need to have appropriate rights to change their own or other passwords. There are two types of users in Web Center for Password Management:
-
Regular end users who can only change their own passwords
-
Service desk users who need to be allowed to change the password for other users.
User Rights
There are two kinds of users that usually work with Web Center for Password Management.
-
Service Desk operators – they can list other users and reset their passwords, display reports and manage password policies. Users in the predefined DirXmetaRole group ServiceDeskOperators get these additional rights.
-
Regular end users – they can only change their own passwords and define questions and answers for challenge response authentications. The users must have the right to change own passwords. This is ensured by the specific access policy.
The additional access and menu policies for password management are defined in Password Management folder in AccessPolicies subtree. The access and menu policies are subject of customizations. See access policies documentation for more details.
Service Desk Group
To define the appropriate access policies, service desk members should be identified, preferably by a group membership. We suggest that you create a group (for example, ServiceDeskOperators) in the DirXmetaRole target system (which represents the DirX Identity domain itself) and then populate this group with all service desk members.
Proposal Lists for Menu Operations
Proposal lists for menu operations help to reduce the set of operations provided in Web Center so that users see only those operations that they are allowed to use. These operations are configured in the Menus folder of the Proposal Lists section in the Domain Configuration.
For Password Management:
-
End users should be able to access the operations for Self Service (especially "changePassword" and "addChallengeResponse").
-
Service desk members should be able to access the operations for User Management (especially "resetPassword") and report generation ("display", "reports", "saveAsFile").
Make sure that you enable menu policies in the Domain configuration.
Consistency Rules
The password change workflows store the status of password changes in multi-value LDAP attributes of the respective accounts. This information must be regularly removed, which is the task of the default consistency rule RemoveAccountPasswordChangeHistory. Make sure this rule is active.
For external authentication, accounts have to be associated with user entries. Copy, adapt and activate the default rule assocAccount2User as mentioned above (2.6.3).
Password Policies
You should define the password policies in the DirX Identity domain so that they match the policies defined in Active Directory and the other applications you want to synchronize.
Access Policies
You need several types of access policies for Password Management. The following policies allow end users and service desk members to change passwords and allow service desk members to generate reports:
-
Users can handle themselves – users are allowed to read and modify their own entries.
-
Users handle their passwords – all users are allowed to read and set their own passwords.
-
Users handle their accounts – all users are allowed to read and modify their accounts.
-
Users handle passwords of their accounts – all users are allowed to read and set the passwords of their accounts.
-
ServiceDesk can handle all users – the service desk is allowed to read and modify all user entries.
-
ServiceDesk handles all passwords – the service desk is allowed to read and set all user passwords.
-
ServiceDesk handles all accounts – the service desk is allowed to read and modify all accounts. This policy is needed for assisted password reset. Service desk members are identified as members of a service desk group (e.g. ServiceDeskOperators)
-
ServiceDesk can execute user reports – the service desk can create Password Management reports that are located in the folder for user report definitions.
The following access policies define the menu and operations that end users and the service desk can see in Web Center:
-
Users have the Self-service menu items – all users can manage their own data, especially change their passwords.
-
ServiceDesk menus – the service desk has menus for assisted Password Management and for report generation.
Note: menu policies only control the visibility of menu operations in Web Center! Only access policies control the actions users can perform when they are authenticated with a DirX Identity application. Therefore, the appropriate access policies must be defined.
Windows Password Listener
The Windows Password Listener captures changed passwords on Active Directory domain controllers and sends them to the Password Event Manager workflow. For details on this workflow, see the chapter "Managing Passwords" in the DirX Identity Connectivity Administration Guide. The Listener needs to be installed for all domains whose users are imported into the DirX Identity domain.
This setup allows users to change their passwords in their Windows desktop and update them on all the target systems on which they have an account and which are configured to update passwords in the DirX Identity domain. See the section "Validation and Password Synchronization of a Target System" for details.