Managing Domains
Domain management consists of the following tasks:
-
Performing the initial configuration of a newly created domain
-
Using object collections
-
Monitoring workflows
Configuring a Domain
Configuring a domain consists of the following tasks:
-
Specifying the administrators who are to manage the Provisioning users, the privilege structure, and the target systems and define their access rights.
-
Customizing the standard object descriptions for users, roles, permissions, target systems and folders and (optionally) customizing their presentation in DirX Identity Manager (Provisioning) - this task is only necessary if you want to use different attributes or default values for these Provisioning objects.
-
Managing critical attributes / parameters that influences via policies or match rules the assignment of privileges.
-
Specifying the user attributes that can be used as permission parameters.
-
Setting up role parameters.
-
Adjusting domain-specific parameters such as the maximum time that an object in the "to be deleted" state can remain in the DirX Identity store (Provisioning Configuration).
-
Setting up the report templates for the domain
-
Setting up and adjusting the links between the Provisioning and Connectivity domain.
Defining the Administrators
Defining the administrators means defining the domain administrator(s), user administrator(s), role administrator(s) target system administrator(s), informational user(s) and auditors for the domain. For each person who is to perform one or more of these administrative tasks, you must:
-
Create a user account
-
Specify the administrative roles assigned to the person
Pre-configured Administrative Roles and Access Rights
DirX Identity Provisioning sets up each domain with several user groups that represent roles for DirX Identity Provisioning domain administration. DirX Identity Provisioning creates an entry for the domain administrator (*cn=DomainAdmin,cn=*domain_name) and the administrator group entries shown in the following table in *cn=DirXmetaRole,cn=TargetSystems,cn=*domain_name.
| Administrator Group | RDN |
|---|---|
Domain Administrators (DA) |
cn=DomainAdmins |
User Administrators (UA) |
cn=UserAdmins |
Role Administrators (RA)* |
cn=RoleAdmins |
Target System Administrators (TA) |
cn=TSAdmins |
Informational Users (IU) |
cn=InformationalUsers |
Auditors |
cn=Auditors |
| The role administrator is the privilege administrator. The name has not been changed for compatibility with earlier DirXmetaRole versions. |
These administrator groups exist in the DirX Identity Provisioning target system that is provided in each DirX Identity Provisioning domain and are ready for assignment to users (the DirX Identity Provisioning target system acts as a virtual target system for the storage and maintenance of DirX Identity Provisioning administrators).
DomainAdmin is a member of all groups. This user must make the other Provisioning users members of these administrator groups according to their responsibilities.
Anonymous users do not have access rights to read entries or attributes in the domain. Every user that has authenticated with name and password (simple authentication) is permitted to change his password.
Members of the administrator groups that have authenticated with name and password are permitted to read all entries and attributes. For modify rights to entries and attributes, the group members are granted access rights according to the following table.
| Directory object | DA | UA | RA | TA | IU | AU |
|---|---|---|---|---|---|---|
Users subtree |
all/*1 |
all/all |
all/all |
all/all |
- |
- |
Assignments subtree |
all/*1 |
all/all |
all/all |
- |
- |
- |
Role catalogue subtree |
all/*1 |
- |
all/all |
- |
- |
- |
Permissions subtree |
all/*1 |
- |
all/all |
- |
- |
- |
Target systems subtree |
all/*1 |
- |
- |
all/all |
- |
- |
Configuration subtree |
all/all |
- |
- |
- |
- |
- |
dxrTargetSystemAccount object class |
all/*1 |
all/all |
all/all |
all/all |
- |
- |
dxrTargetSystemGroup object class |
all/all |
all/all |
all/all |
all/all |
- |
- |
In the table:
-
The notation all/all means all access rights for all entry operations and all access rights for all attributes
-
The notation all/*1 means all access rights for all entry operations and all access rights for all attributes excluding the rights for making assignments (user-role, user-permission, user-group, role-role, role-permission, permission-group, account-user)
You use the DirX Identity Manager Provisioning users view to create the users that correspond to DirX Identity Provisioning administrators. You use DirX Identity Manager Provisioning Data view to set passwords for users. You then grant them the necessary access rights to the objects in the Identity Store (Provisioning Configuration) by making them members of the defined administrator groups. You assign the administrator groups to the users either directly, by creating user-group assignments, or indirectly, with the DirX Identity Provisioning user-role-permission assignment process. For example, you can create a target system administrator permission and assign it the target system administrator group, then create a target system administrator role and assign the target system administrator permission to it, and then assign the target system administrator role to one or more users, who are then granted the access rights represented by the target system administrator group in the Identity Store (Provisioning Configuration).
Domain Super Administrators
The DirX Identity Provisioning administrators just described are only allowed to access and modify Provisioning objects. The DirX Identity Provisioning system also requires an administrator role that is allowed to modify the schema and access rights in the domain; this type of administrator is called the Domain Super Administrator. DirX Identity Provisioning provides the following accounts for Domain Super Administrators:
-
cn=DomainAdmin,cn=domain_name (rights are restricted to domain_name)
-
cn=SystemAdmin,cn=DirXmetaRole-SystemDomain (rights for all domains)
Customizing Object Descriptions
DirX Identity Provisioning provides template descriptions, in Extensible Markup Language (XML) format, of all Identity Store (Provisioning Configuration) objects: users, roles, permissions, target systems, folders, accounts, groups, and so on. DirX Identity Provisioning allows you to customize these descriptions to the requirements of your domain. For example, you may want to use a customer-specific attribute in the description of a user object, or you may want to specify your own default values for attributes of these objects.
DirX Identity Provisioning also provides template property page descriptions for Provisioning objects, in Bean Markup Language (BML) format, that control the objects' presentation (tabs and properties) within DirX Identity Manager (Provisioning). You can also customize these templates to your requirements.
Viewing and Editing Template Descriptions
You can use DirX Identity Manager (Provisioning) to modify the DirX Identity Provisioning template object and property page descriptions that are specific to the domain. The description of each object is split into two parts: a system part and a customer extension part. The system part is likely to be replaced on upgrade installations. Therefore, enter your modifications into the customer extension parts. Use the Domain Configuration view and find these templates in the following folders underneath the entry cn=Customer Extensions,cn=<domain root>:
-
Object Descriptions folder - stores the domain-specific object descriptions (users, roles, permissions, target systems and so on)
-
Property Page Description folder - stores the domain-specific property page descriptions for users and group objects
-
JavaScripts folder (optional) - stores the Java scripts that are referenced from within the object descriptions
The templates for target system objects (accounts, groups and the target system entries themselves) are located underneath each target system’s Configuration folder in subfolders with the same names as used for the domain.
To open a description for editing with DirX Identity Manager (Provisioning):
-
Select it in the subtree to display its properties.
-
Select the Object Descriptions tab, and then click Edit.
Now you can use the object description editor to make changes to the description. The document DirX Identity Customization Guide describes the structure of object and property page descriptions and how to customize them.
Alternatively, you can use DirX Identity Manager (Provisioning) to write the description to a file, and then use your favorite XML editor to edit it within the file system. You must then import the file back into the Identity Store (Provisioning Configuration) (with DirX Identity Manager (Provisioning)) to update the template.
| If you are adding domain-specific user or other attributes to the Provisioning object descriptions, you will also need to add these attribute types to the default LDAP directory schema supplied with DirX Identity Provisioning. You use the schema modification tools of the particular LDAP directory to accomplish these tasks. For example, if you are using the DirX LDAP directory, you use the DirX administration tools for modifying the schema. The DirX Identity Customization Guide provides more information about these tasks. |
Upgrading Customized Descriptions
Each upgrade installation of DirX Identity typically supplies new versions of the standard domain (and target system) object and property page descriptions. It overwrites the system specific descriptions located underneath the folders Object Descriptions, Property Page Descriptions and Target Systems direct underneath the domain root, but keeps the entries underneath Customer Extensions un-changed.
Hence, if you haven’t modified the system entries, you need not adapt your configuration after upgrade installations.
Managing Critical Parameters
You can use user attributes in DirX Identity in different context. If a user attribute influences via policies or match rules the assignment of privileges, this attribute must be seen as critical attribute. Changing such an attribute changes the access rights in the provisioned target systems.
Attributes of this type are used:
-
In the matching rules of permission.
-
As role parameters for a role. These attributes are used as permission parameters during the privilege resolution process.
-
In a provisioning rule.
Note: these attributes are currently named "Permission Parameters". In the future, this name will be changed to "Critical Parameters".
The domain administrator must specify these user attributes at the domain object.
We recommend handling these attributes as follows:
-
Extend the relevant object descriptions for the user object with these parameters.
-
Define these attributes at the domain object in the Permission Parameters tab.
-
You can handle these attributes in a special way if you set up a User Attribute Policy. It allows you to control changes of these attributes via request workflows.
-
You can set up matching rules in roles or permissions that use these parameters (see the next chapters for more information). Setup of matching rules requires extensions to the corresponding group objects (adjust the object descriptions).
-
You can set up filters in provisioning rules that use these parameters.
Specifying Permission Parameters
The domain administrator must specify the user attributes that can be used as permission parameters. Use the Permission Parameter tab of the domain object to set up this list. The attributes selected will be valid throughout the domain (not just in some administrative area of the permissions subtree).
To manage the domain’s list of permission parameters:
-
Select the domain root of the Domain Configuration tree. DirX Identity Manager (Provisioning) displays the list of user attributes that are currently defined as permission parameters.
-
Click Edit.
Now you can:
-
Add new user attributes to the permission parameter list
-
Remove previously selected user attributes from the permission parameter list
When you click Save, DirX Identity Manager (Provisioning) validates that all user attributes that have been removed as permission parameters are not still in use in the matching rule fields of permission objects in the domain. Manager returns an error if de-selected permission parameters are still in use in permission matching rules.
When you add a user attribute as a permission parameter, you (or the responsible administrator) must:
-
Define the matching rules that use the permission parameter in the permission or role objects
-
Ensure that the new permission parameter is visible in the Provisioning user object (only if used in permission match rules)
-
Ensure that the permission parameter values are set for the users (only if used in permission match rules)
-
Extend the object description of target system groups to contain the permission parameter
-
Extend the property page description of the target system groups to display the permission parameter
-
Supply permission parameter values in the target system groups
The DirX Identity Customization Guide describes this process in more detail.
Setting up Role Parameters
Role parameters are a powerful mechanism for reducing the number of roles in your Identity system. See the chapter "Managing the Privilege Resolution Process" for a basic description of how role parameters work. See also the section "Access Policies for Hierarchical Role Parameters" for another aspect of this mechanism.
You can use various types of role parameter objects:
-
String - a list of role parameter values. The source for such a role parameter object can either come from a fixed list of values or from a proposal list.
-
Text - a pure text string. Can be used for comments or additional non-structured information.
-
Integer - a list of integer values.
-
DN (distinguished name) - a list of DNs.
-
Hierarchical DN (distinguished name) - a list of hierarchical DNs that can be used as hierarchical ordered tree of values.
The DN and Hierarchical DN types are particularly powerful options. The differences are:
-
At the Web Center assignment user interface (Assign Privileges) DNs are presented as a linear list, Hierarchical DNs as tree.
-
Hierarchical DN values can be protected via access policies.
You can specify single-valued or multivalued role parameters. Parameters of type Text you can set either for mandatory or optional input. All other types are always mandatory. You can also set an optional default value.
Setting Domain Parameters
One task of setting up a domain is to establish values for the parameters that control DirX Identity Provisioning operation for the domain. To display these parameters, select the root of the domain configuration subtree, then click the Options tab. Click Edit to change the values.
You can set the following parameters:
-
Global parameters like the domain type or information about the corresponding Connectivity domain.
-
Numerous feature flags that influence the operation of services that work for this domain, for example the segregation of duties flag or various flags to enable or disable policies.
-
Permission parameters that are used within this domain.
-
Global timing parameters.
-
Parameters to configure auditing.
For a detailed description of these parameters, see the context-sensitive help of the domain object.
Setting up the Report Templates
DirX Identity Provisioning allows you to generate the following types of reports:
-
For DirX Identity Provisioning users, their assigned privileges; this type of report is called the "User" report
-
For roles:
-
Their authorized users, which are the users directly assigned to the roles (not all the affected users of a role); this type of report is called the "Authorized Users" report
-
Their junior roles and permissions, including aggregated permissions; this type of report is called the "Roles" report
-
-
For permissions, their assigned groups; this type of report is called the "Permissions" report
-
For each target system:
-
Its accounts, including assigned groups (the "Account" report)
-
Its groups, including account members (the "Group" report)
-
DirX Identity Provisioning provides templates for each type of report in the following locations:
-
In the Reports folder within the domain configuration subtree of the domain root
-
In the Reports folder within the Configuration subtree of each target system
You (the domain administrator) are permitted to customize these report templates to the requirements of your domain. For example, you can change the search base parameter for a report type to reduce the volume of information generated, or you can select different object attributes to be output for the report. You can also create your own report types. The DirX Identity Customization Guide provides more information about how to customize the standard DirX Identity Provisioning reports and how to create your own report types.
You can use DirX Identity Provisioning to make your customizations directly to the templates in the Identity Store (Provisioning Configuration), or you can export the template data to a file in the file system, and use an XML editor to edit it in the file system. You must then import the file back into the Identity Store (Provisioning Configuration) (with DirX Identity Provisioning) to update the templates.
We recommend that you follow this procedure when customizing the standard report templates:
-
Create new report template objects
-
Copy the contents of the standard templates into the new objects
-
Customize the new objects
Relationship to the Connectivity Domain
DirX Identity is designed for multi-tenant operation within a single domain or by setting up multiple domains. The following figure illustrates the multi-domain scenario:
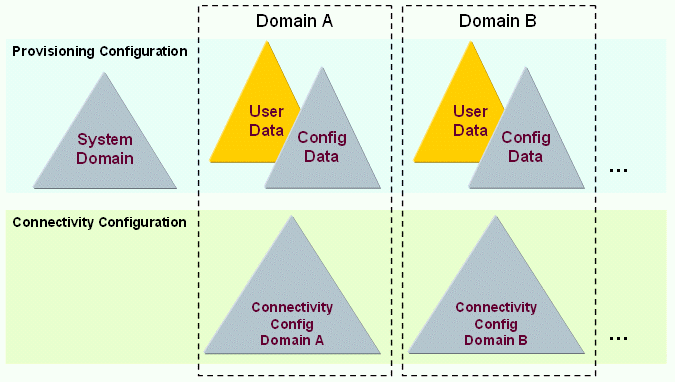
As shown in the figure, the Provisioning Configuration consists of a System Domain and one or more domains (called customer domains). All domains are located in one physical directory server. The System Domain contains all templates for target systems and other non-domain specific data. The customer domains contain clearly separated data that is not accessible from other domains. It contains user (identity) data as well as configuration data. Configuration data consists of, for example, the role structure, policies and domain data.
Each customer domain in the Provisioning view is related to a Connectivity domain in the Connectivity Configuration. The connectivity domain contains all data necessary for synchronization from source systems and to target systems, such as IP addresses, bind profiles and other system-specific data. To separate this data between domains, we recommend separating it into different directory servers.
If you run only one domain, you can keep the Provisioning Configuration and the Connectivity Configuration in one server. If you intend to run several domains, you can keep the Provisioning Configuration and the Connectivity Configuration for one domain in one server. For an additional domain, you need an extra server for Connectivity Configuration data.
To allow separation of the domain parts, the relationship between the Provisioning Configuration and the Connectivity Configuration must be defined in the configuration data. The following figure illustrates this relationship:
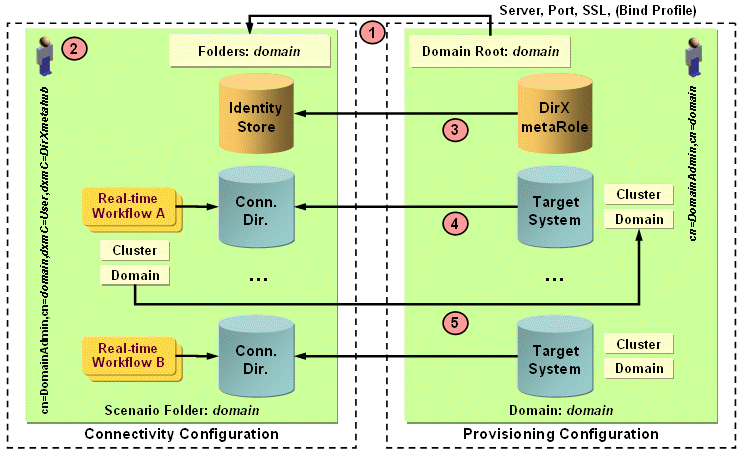
The relationship between the domain parts is as follows:
-
The Domain object of each Provisioning Domain points to the corresponding Connectivity Domain. See the Connectivity Configuration Database definition that defines the Server, Port and SSL parameters.
The target system wizard creates domain specific folders (with the name of the domain) where necessary in the Connectivity Configuration, for example under Connected Directories, Jobs, Workflows and Schedules. This eases automatic management by the target system wizard and also other components like the Java-based Server. Do not change these folder structures by hand! -
The software uses the user cn=DomainAdmin,cn=domain as the bind account in the Provisioning Configuration. For the Connectivity Configuration, the software uses another fixed user that is located in this domain:
cn=DomainAdmin,cn=domainName,dxmC=Users,dxmC=DirXmetahubIf you change the password of the DomainAdmin, don’t forget to change the password of this entry accordingly. See the section "Managing Administrative Accounts" in the DirX Identity Connectivity Administration Guide for more information. -
The DirXmetaRole target system object on the Provisioning side points to the corresponding Identity Store on the Connectivity side. This relationship is defined via the Connected Directory field in the General tab of the target system definition.
-
Each target system object on the Provisioning side points to the corresponding connected directory on the Connectivity side.This relationship is defined via the Connected Directory field in the General tab of the target system definition.
-
Real-time synchronization workflows contain a Type, Cluster and Domain field that must be identical to the definition of the corresponding fields at the target system object.
All these relationships are handled by the target system wizard on the Provisioning side as well as during copying real-time workflows.You can also adjust and change the data manually.
Additional Hints
-
The scenario object in the Connectivity Configuration contains a link to the Identity Store that must be set correctly.Otherwise, the target system wizard does not work.
-
You can also set up multiple tenants within a single Provisioning domain; see the DirX Identity Use Case Document Using Domains for details.
Using Object Collections
Object collections are an easy way to define a set of objects that you want to transfer between DirX Identity Provisioning domains.Object collections allow you to define a set of objects to be frequently exchanged between domains; for example, between a test environment and a productive environment or only once between two different domains.
For more information, see the chapter "Transporting Data" in the DirX Identity User Interfaces Guide.
Monitoring the Workflows
You use the DirX Identity Manager (Connectivity) to monitor the workflows described in section "Default Connectivity Applications" in the DirX Identity Application Development Guide.The workflows generate status entries into a status area within the Identity Store.You can view these entries using DirX Identity Manager (Connectivity) Monitor View.
A domain administrator is responsible for handling the following errors:
-
DirX Identity Connectivity failed to start either the entire workflow or a single activity within the workflow.
-
The workflow or an activity within it failed to complete.
-
An activity failed to add, modify, or delete an object or an object attribute.
The administrator can take one of the following actions, depending on the information contained in the error report:
-
Do nothing, and wait for the next scheduled workflow run. This action especially makes sense if the problem cause was a temporary error.
-
Start the workflow by hand with DirX Identity Manager (Connectivity).
-
Try to repair data inconsistencies using DirX Identity Manager (Provisioning) or the LDAP directory tools.
-
Request that the responsible administrator corrects the problem.