SPML Provisioning Web Services
DirX Identity provides Web services that offer a wide range of operations to provision users, privileges, target system objects and business objects to a DirX Identity domain. For an overview of the DirX Identity object model and its basic concepts, see the DirX Identity Introduction. For more details, see the DirX Identity Provisioning Administration Guide.
The services are deployed into a (Tomcat) Web container, which can be a separate Web container or the container embedded into the IdS-J server. Note that when you deploy them into the IdS-J server container, they are started and stopped together with the server. The Web Service interface is provided as a Web Service Description Language (WSDL) file along with a number of imported XML schemata in the WEB-INF/etc subfolder.
Using the WSDL and the XML schemata, it is easy to implement clients in various technologies (for example, Java, C#, PHP, and so on). A variety of tools exist to generate client stubs from the WSDL description and XML schemata. DirX Identity delivers a ready-to-run Java SOAP client and Java classes that represent the data entities exchanged at the WSDL interface.
This chapter describes the SPML Provisioning Web Services operations and provides information about other aspects of their operation, like authentication and authorization.
About the Provisioning Operations
The SPML Provisioning Web Services operations are structured according to the entity types of the DirX Identity model.For each entity type, at a minimum the operations add, modify, delete, lookup and search are supported.
The provisioning operations adhere to the OASIS SPMLv2 standard (see http://www.oasis-open.org/committees/provision/docs/).For a formal definition of the operations and their types, see the WSDL file provisioning-service.wsdl and imported files.DirX Identity supports the SPMLv2-DSMLv2 profile (see http://www.oasis-open.org/committees/provision/docs/, document pstc-spml2-dsml-profile-os.pdf).For information about SPMLv2 concepts, see the SPMLv2 standard document (pstc-spml2-os.pdf) and its associated XML schemata.
SPMLv2 requires the following mandatory requests: add, modify, delete, lookup and listTargets.The listTargetsResponse contains the object types (targets), the associated schema and capabilities.In addition to the mandatory requests DirX Identity typically supports the search and reference capabilities for all its objects.For some object types DirX Identity supports further capabilities, such as the match rule capability for roles.See the chapters for the specific object types for more details.
The DirX Identity schema is open for customer extensions.The customer can extend each object type with custom attributes transparent for DirX Identity services.Except when extending the LDAP schema and the object descriptions, nothing special needs to be done for the provisioning services.In contrast to the SPMLv2 concept, the services do not check the attributes against the schema defined in the respective listTargets response.
While the attributes are open, the target identifiers are not.The DirX Identity target identifiers denote the object types (currently users, roles, permissions, targetSystems, accounts, groups and all business objects).See the object type-specific sections for the appropriate target identifier.
If you need to manage additional custom object types via the Provisioning Web Services, you can deploy custom handlers to extend the Web Service Spring configuration files and leverage existing generic handler Java classes.See the section on "Custom Objects" for details.
For details about the operations, see the subsequent sections, which are organized according to the object types and their specifics.
Authentication
The SPML Provisioning Web Services support HTTP basic authentication, proprietary authentication based on asymmetric key cryptography or digest authentication based on SSL/TLS protocol and Single Sign-On (SSO) authentication via HTTP header.They also support XML signature verification.The next sections describe how to configure this support in more detail.
Proprietary Authentication
SPML clients can use a proprietary authentication scheme based on asymmetric key cryptography.In this scheme, an SPML client authenticates itself to the SPML Provisioning Web Services servlet with its private key and then forwards only the name of the current user.The servlet verifies that it has a valid certificate of the presented private key and if so, accepts the username without further validation.This scheme is also used for Web Center with a setup of SSO to the Request Workflow server.See the DirX Identity Web Center Reference for details.In this case, you need a private key for a client, which is a key generated solely for this purpose; see the section "Creating a Keystore and a Truststore" below for details.
The sample client available in install_path/provisioningServices can use this type of authentication.The keystore access and the alias of the private key must be configured as a part of the configuration for a special authenticator class (see the sample configuration file install_path/provisioningServices/spmlv2/conf-proprietary-auth.xml):
<!-- Proprietary authentication -->
<authenticator handler="com.siemens.dxm.provisioning.framework.soap.authentication.ProprietaryAuthentication" >
  <property name="username" value="cn=Morton Gabriela,o=My-Company,cn=Users,cn=My-Company"/>
  <property name="keyStore" value="C:/Program Files/Atos/DirX Identity/ssl/provisioningservices-keystore-localhost"/>
  <property name="keyStoreAlias" value="localhost"/>
  <property name="keyStorePassword" value="<password>"/>
</authenticator>
The value of the username property is used as an authenticated user at the server side and will be used as an effective user for any invoked operation.
The properties keyStore and keyStorePassword are used by the test client to access the keystore with the private key used during authentication.
The keyStoreAlias property is the alias of the private key stored in the configured keystore. This property allows the client to identify the correct private key within the keystore. For details about the sample client provided with DirX Identity, see the section "Using the Sample Client".
You need to import a certificate that corresponds to the client’s private key into the Provisioning servlet truststore named as provisioningservices-truststore. The truststore password must match the one with the truststore key in the password.properties file. Note that the truststore key can be missing if the servlet is being redeployed or upgraded. Check to see if the truststore key in the password.properties exists and add it manually if necessary. Both files must be placed in the following directory:
-
install_path/provisioningWebServices/provisioningServlet-technical-domain-name/WEB-INF for the servlet deployed to the stand-alone Tomcat.
-
install_path/provisioningWebServices/provisioningServlet-embedded-technical_domain_name/WEB-INF for the servlet deployed to the IdS-J server.
If the client and the SPML Provisioning Web Services run on different hosts, the keystore must reside on the machine with the client and the truststore on the one hosting the servlet.
You can share the same key for each client, or one key per client, or anything in between. When using different keys, choose a unique alias for each key and add a certificate for each key to the servlet’s provisioningservices-truststore.
The use of proprietary authentication does not require any special steps except for creating key material for the client and server sides and configuring the password.properties file. The authentication itself is already enabled by default when the servlet configuration file config.xml located in the folder WEB-INF contains following section under the element authenticators:
<!-- Default Authentication (performs HTTP basic and proprietary authentication) -->
<default>
  <class>com.siemens.idm.service.provisioning.auth.DefaultAuthenticator</class>
  <trustStore>provisioningservices-truststore</trustStore>
  <trustStorePassword>${password:truststore}</trustStorePassword>
</default>
Creating a Keystore and a Truststore
The batch file install_path/ssl/generate_ProvSvcKeystore.bat (or .sh) provides a convenient way to:
-
Create a keystore with a private key for a client install_path/ssl/provisioningservices-keystore-alias.
-
Export a self-signed certificate of that key to the file install_path/ssl/provisioningservices-alias.crt.
-
Add the certificate to the truststore install_path/ssl/provisioningservices-truststore.
If the truststore doesn’t exist, it is created. The keystore and the certificate file are overwritten if they already exist.
Before you run the batch file, open it and set the following values:
-
dname - a distinguished name intended to identify the client instance(s) the key is generated for.
-
alias - a unique name for the key. Since the alias gets part of the keystore file name, don’t use any special characters in the alias.
-
keystorePassword - the keystore password; any password you like. The client needs to be configured to use it for access to the keystore.
-
truststorePassword - the truststore password; any password you like. The servlet needs to be configured to use it for access to the truststore.
Next, move the created keystore to the machine hosting the client and then adapt the client’s configuration as described in this section.
Move the truststore to the servlet’s WEB-INF directory and adapt the password.properties file accordingly.
When using the batch file again to generate a key for another client, choose a different dname and alias.
SSO Header File Configuration
The SSOHeaderFilter is a servlet filter that extracts SSO credentials from an HTTP header and stores them in a session-scoped variable.
The filter can act as a stand-alone SSO module if the client provides unencrypted credentials via an HTTP header. Its other purpose is to copy credentials provided by another SSO module (for example, a Tomcat valve) to session-scope.
Note that the filter does not validate the source of the credentials. So deploying it as a stand-alone SSO module may cause a security breach if untrusted clients can access the Provisioning Web Services directly.
The filter must be defined in the application’s deployment descriptor web.xml as a filter, as shown in the following example:
<filter>
   <filter-name>
            SSOHeaderFilter
   </filter-name>
   <display-name>
            SSO Header Filter
   </display-name>
   <filter-class>
            com.siemens.idm.service.provisioning.sso.filter.SSOHeaderFilter
    </filter-class>
    ... initialization parameters ...
</filter>
The filter can be customized via the filter initialization parameters as in this sample:
<!-- where to find the authenticated user -->
<init-param>
    <param-name>headerName</param-name>
    <param-value>MyAuthenticatedUser</param-value>
</init-param>
<!--defines what headername contains: user / account -->
<init-param>
    <param-name>type</param-name>
    <param-value>user</param-value>
</init-param>
The parameter “headerName” denotes the HTTP header field from where the filter takes the identifier. The value of the header is obtained by calling
-
request.getUserPrincipal().getName(), if the header name is UserPrincipal
-
request.getRemoteUser(), if the header name is Authorization or RemoteUser
-
request.getHeader(headerName), otherwise
Depending on the given “type” parameter, the filter either searches for a user or for an account with the appropriate filters defined in the context parameters in the deployment descriptor. Here is an example:
<context-param>
<param-name>com.siemens.provisioning.auth.userFilter</param-name>
<param-value>(&(objectclass=dxrUser)(sn=%USER_ID))</param-value>
</context-param>
<context-param>
<param-name>com.siemens.provisioning.ldap.baseDN</param-name>
<param-value>cn=My-Company</param-value>
</context-param>
<context-param>
<param-name>com.siemens.provisioning.auth.targetSystemFilter</param-name>
<param-value>(&(objectclass=dxrTargetSystem)(dxrTSDomainName=%DOMAIN))</param-value>
</context-param>
<context-param>
<param-name>com.siemens.provisioning.auth.accountFilter</param-name>
<param-value>(&(objectclass=dxrTargetSystemAccount)(dxmADsSamAccountName=%ACCOUNT))</param-value>
</context-param>
If the header identifies a user, the filter takes the userFilter search expression. Otherwise, it searches for an account in the configured target system with the accountFilter. It finds the corresponding user DN via the account’s dxrUserlink attribute.
XML Signature Verification Configuration
For password reset scenarios, clients can sign some requests - especially setPassword or checkChallengeResponses - with the end user’s private key. This mechanism serves not only to authenticate, but also to ensure that the new password is for the same user as the one who produced the signature.
To use this Provisioning Web Services feature, a Web Service Security Trust handler needs to be configured. This handler is responsible for verifying the signature and for comparing the attributes found in the certificate with those attributes in the request that identify the user. The trust handler is based on the Apache WSS4J module. For more details on identifying attributes, see the subsection "Identifying Attributes" in the section "Common SPML Aspects".
The handler is activated by adding a <handler> element into the Axis Web Service Description file WEB-INF/server-config.wsdd. The default file contains the following handler snippet, which you only need to uncomment:
<handler type="java:com.siemens.idm.service.provisioning.wssecurity.WsTrustHandler" >
       <parameter name="signatureIsOptional" value="false"/>
       <parameter name="action" value="Signature Timestamp"/>
       <parameter name="signaturePropFile" value="crypto.properties" />
</handler>
Set the signatureIsOptional parameter to true if you expect and accept both signed and non-signed requests. If it is set to false, the handler rejects non-signed requests; if set to true, it leaves the proper handling to the corresponding Web Service operation. This setting is especially important for challenge/response scenarios, where the user authenticates with their challenges rather than with a certificate. See the sub-section "Authentication by Challenge/Response" (in the section "Accounts Management") for details.
The <handler> element references the file crypto.properties. In a default deployment, this file is located in the WEB-INF/classes folder. The file format is defined by Apache WSS4J. It especially sets the class name of the Crypto provider (in this example: MyMerlin) and the location of the server key store. Here are the relevant sample snippets:
org.apache.ws.security.crypto.provider=com.siemens.idm.service.provisioning.wssecurity.MyMerlin
org.apache.ws.security.crypto.merlin.file=C:\\DirXIdentity\\ssl\\server-keystore
You need to adapt the path to the server key store.
When the XML signature verification is successful, the trust handler checks that the certificate matches the identifying attributes in the request. You need to configure the attribute names in the certificate that must be compared with the identifying attributes in the setPassword request. This information is stored in the file WEB-INF/identifierMatcherConfig.xml. The element <identifyingAttributes> contains a XPATH expression to the sub-element in the request, which contains the identifying attributes. There is no need to change the default "identifyingAttributes". The attribute names need to be configured in <matchRule> elements, as shown in the following snippet:
<matchRules>
        <matchRule op="equals" subset="all">
              <op1 source="cert"  name="rfc822name" extract="(.*)"/>
              <op2 source="psoID" name="user.mail" extract="(.*)"/>
  </matchRule>
        <matchRule op="equals" subset="all">
              <op1 source="cert"  name="subject.serialnumber" extract="(.*)"/>
              <op2 source="psoID" name="serialnumber" extract="(.*)"/>
        </matchRule>
 </matchRules>
Enter a <matchRule> for each attribute.The XML attribute op sets the comparison operator, typically "equals".Alternatives are: "startsWith", "endsWith" and "contains".In <op1>, configure the attribute name in the certificate and a Java regular expression for extracting the required value - typically all.In <op2>, do the same thing for the identifying attribute in the SPML request.Note the prefix (here: user) that indicates to the Web Service that this attribute identifies the user.
Authorization
An SPML Provisioning Web Service processes the request on behalf of the authenticated user.It especially applies the access policies of the Identity domain.The domain administrator needs to make sure that access policies exist that entitle the client user to modify the requested users and to grant the privileges.
Runtime Operation
This section describes the SPML Provisioning Web Services runtime, including how to:
-
Deploy the Web Services runtime
-
Adapt Web Services Runtime Configuration
-
Customize the Web Services runtime
Deploying the Provisioning Servlet
This section describes how to deploy the Provisioning Servlet.There are the following deployment options:
-
Deployment into Tomcat - use this deployment type in productive environments.
-
Deployment into the DirX Identity IdS-J server - this type of deployment can cause memory consumption conflicts regarding joint operation with the Java-based Server. Do not use this deployment type in production environments!
Understanding the Deployment Concept
The Provisioning Servlet installation includes these template folders in the folder install_path/provisioningWebServices:
-
provisioningServlet.org - for creating a domain-specific Provisioning Servlet instance and then deploying this instance into a Tomcat server.
-
provisioningServlet-embedded.org - for creating a domain-specific Provisioning Servlet and then deploying this instance into the DirX Identity IdS-J Server.
These folders contain files with placeholders in the WEB-INF subfolder:
-
application.xml contains the placeholder @DOMAIN@.
-
config.xml contains the placeholders @DOMAIN@, @HOST@, @PORT@, @SSL@.
-
web.xml contains the placeholder @DOMAIN@.
-
password.properties contains the placeholder @TECHNICAL_PW@.
The placeholders and their meanings are:
-
@DOMAIN@ - the domain name
-
@HOST@ - the host for accessing the Provisioning store
-
@PORT@ - the port number for accessing the Provisioning store
-
@SSL@ - the SSL flag (true or false)
-
@TECHNICAL_PW@ - the password of the technical user.
To deploy the servlet for a domain domain, with technical domain name technical-domain:
-
Create a deployment instance folder in install_path/provisioningWebServices. For deployment into Tomcat, this is a copy *provisioningServlet-technical_domain of *provisioningServlet.org. For deployment into the IdS-J Server, this is a copy provisioningServlet-embedded-technical_domain of the folder provisioningServlet-embedded.org.
-
Replace the placeholders in the relevant files - not in the template folders, but in the deployment instance folder.
Deployment into Tomcat
Create the folder structure tomcat_install_path/conf/Catalina/localhost (case sensitive) if it does not yet exist. For UNIX platforms, ensure that the related folders have the appropriate permissions (755). The file WEB-INF/password.properties must be readable and writable for Tomcat (and the password administrators) but should not be readable by anyone else.
Run the Initial Configuration wizard, selecting Provisioning Web Service Configuration as a step. The domain name domain is then obvious from the subsequent configuration dialog. For complete details on this task, see the "Configuration" chapter in the DirX Identity Installation Guide. The Configurator:
-
Stops Tomcat (on Windows only).
-
Creates a deployment instance folder install_path/provisioningWebServices/provisioningServlet-technical-domain-name.
-
Replaces relevant placeholders in the relevant files according to the deployment concept, storing the relevant password in a safe way.
-
Creates a copy tomcat_install_path/conf/Catalina/localhost/ProvisioningService-technical_domain_name.xml of ProvisioningService.xml and replaces the placeholder @DOCBASE@ in that copy with the full path of the instance folder, using forward slashes as pathname separators for all platforms.
-
Runs the pre-processed script postInstallPSV.bat (postInstallPSV.sh for UNIX) in the subfolder endorsed of the deployment instance folder and checks the output in postInstallPSV.log.
If you intend to use SSL connections (server-side SSL) between Web Service clients and the Web Services, perform the related steps described in "Establishing Secure Connections with SSL" in the DirX Identity Connectivity Administration Guide.
To test your deployment:
-
Restart Tomcat.
-
A WSDL should be displayed when requesting the URL
http://tomcat_host:tomcat_port/ProvisioningService-technical_domain_name/services/Spmlv2RequestService?wsdl (or https://tomcat_host:tomcat_secure_port/ProvisioningService-technical_domain_name/services/Spmlv2RequestService?wsdl for SSL connections, respectively)
Deployment into DirX Identity IdS-J Server
To deploy the Provisioning Servlet into the IdS-J server:
-
Stop the IdS-J server.
-
Copy the folder install_path/provisioningWebServices/provisioningServlet-embedded.org to the folder install_path/provisioningWebServices/provisioningServlet-embedded-technical_domain_name.
-
Replace the placeholders in the files applicationContext.xml, config.xml and web.xml in the folder WEB-INF as described in "Understanding the Deployment Concept".
-
Define the password file to use. There are two options:
-
Configure the parameter passwordFile in the file WEB-INF/web.xml so that its value references the password file of the Java-based Server. Specify the file’s absolute path name like install_path/ids-j-domain-Sn/private/password.properties and then ensure that the <init-param> definition for the password file is no longer enclosed in XML comments. Change the password placeholder in the file WEB-INF/config.xml from ${password.ldap} to ${password:domain} since the Java-based Server stores the password with the key domain.
-
Set the password in the file WEB-INF/password.properties. In this case, the password placeholder in the file WEB-INF/config.xml is ${password.ldap}.
-
Copy the file ProvisioningService.xml to the file install_path/ids-j-domain-Sn/tomcat/conf/StandAlone/localhost/ ProvisioningService-technical_domain_name.xml. Replace the placeholder @DOCBASE@ in the copy with the full path of the instance folder, using forward slashes as pathname separators for all platforms.
If you intend to use SSL connections (server-side SSL) between Web Service clients and the Web Services, perform the related steps described in the section "Establishing Secure Connections with SSL" in the DirX Identity Connectivity Administration Guide.
To test your deployment:
-
Restart the IdS-J server.
-
A WSDL should be displayed when requesting the URL http://tomcat_host:tomcat_port/ProvisioningService-technical_domain_name /services/Spmlv2RequestService?wsdl (or https://tomcat_host:tomcat_secure_port/ProvisioningService-technical_domain_name/services/Spmlv2RequestService?wsdl for SSL connections, respectively)
| Due to an Axis bug, the wsdl file is incomplete. If you want to generate your client stack out of the wsdl description, please use the wsdl- and xsd-files in the WEB-INF/etc folder of the Web application. |
Configuring the Web Services Deployment
In this step, you adapt the files in your deployment instance folder to your requirements. In this section, relative file locations are relative to the deployment instance folder. To configure a Web Services deployment:
-
Stop Tomcat or the Java-based Server, respectively.
-
If the Identity Store is based on DirX Directory, the number of pagedReads per Directory installation is limited. This limit is configurable, as are the paging policies with respect to paging timeout. Consult the DirX Directory documentation for information about paging policies and supported controls for further details.
-
Configure log level and bind parameters in the file config.xml. It is located in the folder WEB-INF.
-
Configure the file web.xml with respect to these initialization parameters:
-
Parameter cleanupInterval - controls the periodic cleanup of paged search results overhead for the Web Services.
-
Parameter pageTimeout - specifies the maximum lifetime in seconds of paged result overhead by the Web Services. If a paged result has not been accessed for a period longer than pageTimeout, the related overhead will be cleaned up during the next cleanup cycle (see also cleanupInterval).
-
Parameter listTargetsResponseFile - this parameter is no longer evaluated. Instead, the list of file names is stored in the Spring configuration file applicationContext.xml.
-
Parameter spmlv2.defaultpagesize - specifies the maximum number of entries to be returned in a page of a paged search result. This parameter is only valid for SPMLv2 search requests.
-
Parameter passwordFile - specifies the properties file containing the passwords. To use a file from within the Provisioning Servlet folder, specify the file name relative to the folder, like WEB-INF/password.properties or /WEB-INF/password.properties (which is also the default location). To use a file located outside the Provisioning Servlet folder, specify the absolute path name. This way, you can use a common password file with the IdS-J server or Web Center. When specifying a non-default location, ensure that the <init-param> definition for the password file is no longer enclosed in XML comments. The following sample would reference the IdS-J file install_path/ids-j-domain-Sn/private/password.properties.
-
Configure the file config.xml so that the password placeholder in the technical bind section is consistent with the passwordFile specification in web.xml. For the default or a Web Center password file, the correct placeholder is ${password.ldap}. For an IdS-J password file, the correct placeholder is ${password.domain}.
| We recommend creating backup copies of the config.xml and web.xml files outside any template folder or deployment instance folder so that they are not overwritten on an update installation or a repeated deployment. |
To test the deployment, start Tomcat or the Java-based Server and then test the deployment as indicated in the section "Deploying the Provisioning Servlet".
Customizing the Runtime
This section describes how to customize Web Services runtime to:
-
Provide a subset of the offered services
-
Extend the LDAP schema with your attributes
Providing a Service Subset
A default deployment of the Provisioning Web Services provides all implemented operations on all supported object types or Provisioning Service targets. In some circumstances, you might want to provide only a subset of the functionality to the Web Service clients, for example:
-
Allow changing of only a subset of the object types.
-
Allow only some of the operations per object type.
The following figure illustrates the configuration files:
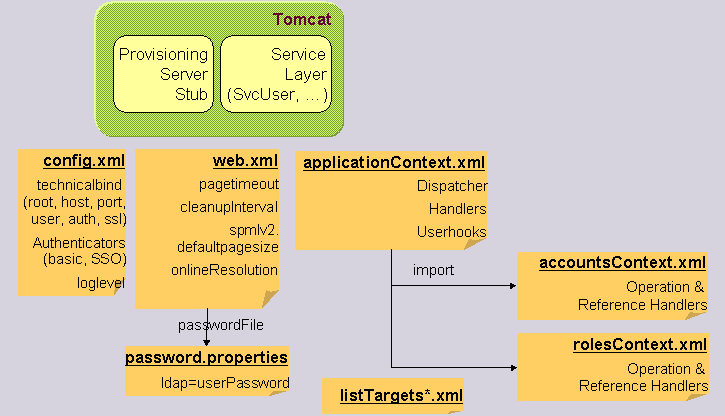
The options in the files config.xml and web.xml are described in the section "Configuring the Web Services Deployment".
The supported object types and their handlers are configured in the applicationContext.xml and the other context files, which it imports. This configuration is based on the Open Source dependency injection framework "Spring". It defines the request dispatchers and operation handlers as Spring beans. Dispatching an incoming request is realized in 2 stages:
-
The SPMLv2 dispatcher forwards the request according the operation; for example, an addRequest is forwarded to the AddDispatcher, a modifyRequest is forwarded to the ModifyDispatcher, and so on.
-
The operation specific dispatcher forwards the request according the target identifier; that is, the object type. As an example, the AddDispatcher inspects the targetID of the request and if this equals "users", it forwards the request to the "AddUser" handler.
The dispatcher beans are configured in the context files. The main source for dispatching are tables (or Java maps). The Spmlv2Dispatcher works on a handler map with the operation as key and the name of the associated handler as value. The operation dispatchers work on a handler map with the target identifier as key and the handler bean name as value. All handlers responsible for an object type are configured in a context file for this object type. For example, the handlers for user management are defined in the file usersContext.xml.
The only exception to this is the handler for the listTargets request. This is the only request without a target identifier. Its handler is configured in the handler map for the SPMLv2 dispatcher, and it contains a map for all listTargets response files. In case of a listTargets request, the handler concatenates the content of all configured response files and returns it in one huge listTargets response.
Restricting Object Types
Suppose, for example, that you want to provide services only for the management of users and not for any other objects types such as roles or business objects. You can achieve this by simply reducing the list of list target response files in the Spring bean configuration file applicationContext.xml in the deployment instance.
This list is configured for the bean “ListTargetsHandler” in the property “target2ResponseMap”. The key for each entry in the map is the target identifier, the value is the corresponding name of the listTargets response file. In response to a SPMLv2 listTargetsRequest, the Web Service returns the accumulated targets of these responses. Each pathname is relative to the deployment folder instance. The related file must exist, and it must be syntactically correct - otherwise the Web Service will fail when starting up.
Optionally, you can also remove the target-specific context files and their references from within applicationContext.xml. But be careful to remove all references to the skipped files.
Restricting Operations per Object Type
Suppose you do not want to support all available operations for an object type; for example, you do not allow the password capability for users. Then you must remove the associated handlers from the dispatcher map(s). If you do not want to support password management at all, you can remove the respective handlers from the SPMLv2Dispatcher’s handler map: these are the dispatchers for "setPasswordRequest" and "validatePasswordRequest".
If you want to support password updates for accounts, but not for users, you need to change the handler map for the "SetPasswordDispatcher": remove the line for the "users" key.
Extending the LDAP Schema
If you extend the LDAP schema with your custom attributes, make sure that these extensions are reflected in the corresponding object description and list targets response.
In the following example, the role objects are extended with an attribute "myAttribute":
-
In the element "target/schema/schema" of the file listTargetsRspRoles.xml specify the new attribute with the following XML element:
<spmldsml:attributeDefinition name="myAttribute"/>
-
Then add the attribute to the object class definition of “dxrRole” with the following XML element:
<spmldsml:attributeDefinitionReference name="myAttribute"/>
Common SPML Aspects
The next sections describe aspects that are common to the Provisioning Web Services' use of SPML.
Identifiers
The identifiers in all requests are interpreted as the DNs (LDAP distinguished names) of the objects or containers.
If the add request provides an identifier (element <psoID>), the service tries to create the object or container with this DN.If the add instead contains a <containerID>, the service takes it as the DN of the parent container and creates an object beneath it.The RDN (relative DN) must either be passed as an attribute in the request or the object description must calculate a default value.
Identifying Attributes
In some cases, the identifying DN is not known; this is especially true when the user has forgotten the password. In this case, you can set up to pass a list of identifying attributes as a sub-element of the psoID. Here is a sample snippet as part of a setPasswordRequest:
<pass:psoID targetID="accounts">
    <idattr:identifyingAttributes>
           <dsml:attr name="user.uid"><dsml:value>user’s GID</dsml:value></dsml:attr>
           <dsml:attr name="user.mail"><dsml:value>…</dsml:value></dsml:attr>
           <dsml:attr name="dxrName"><dsml:value>…</dsml:value></dsml:attr>
           <dsml:attr name="ts.dxrTSDomainName"><dsml:value>…</dsml:value></dsml:attr>
      </idattr:identifyingAttributes>
</pass:psoID>
In this sample, the attributes are used to identify an account within a target system. The account is identified by the attribute "dxrName", the target system by "dxrTSDomainName" – for Active Directory, the domain name.
Prefixes in the attribute names are used to identify related entries. For accounts, the prefix "ts." denotes a target system. The prefix "user." denotes the associated user of an account.
For cases where the client does not know about the LDAP attribute names, the Web Service provides an attribute name mapping. This mapping is configured in the Spring bean definition of the accounts handlers. Because a couple of handlers need them, the mapping is separated into an extra bean, which is referenced by all the handlers that need it.
The section "Customizing the Runtime" gives an overview of the Web Service customization. The settings for changing an account password are configured in the file accountsContext.xml. The bean AttributeNameMapping defines the attribute mapping, as shown in this example:
<bean id="AttributeNameMapping" class="java.util.HashMap">
     <constructor-arg>
           <map>
                 <!--
                 key: name in request excluding prefix in lower case (!!!),
                 value: name in LDAP without prefix
                 -->
                <entry key="gid" value="uid"/>
                <entry key="domain" value="dxrTSDomainName"/>
                <entry key="logonname" value="dxrName"/>
           </map>
     </constructor-arg>
</bean>
The mapping is configured as a Java map. For the key, you enter the attribute name as sent by the client, but in lowercase format. For the value, you enter the name of the attribute in LDAP format. Note that the names in the map must not contain the prefixes. So "ts.domain" in the request is translated to a target system attribute “dxrTSDomainName”.
Beans that need this mapping reference it as shown here for the setPassword handler:
<bean id="SetPasswordAccountsHandler"
class="com.siemens.idm.service.provisioning.spmlv2.accounts.SetPasswordHandler"
scope="prototype" parent="BasicAccountsHandler">
        <property name="attributeNameMapping" ref="AttributeNameMapping"/>
</bean>
Add, Modify and Delete
Besides the normal list of attributes or modifications, add and modify requests may contain the reference capabilities.
To simplify deployment, attribute names are not cross-checked with the definitions made in the respective listTargets response. Hence - not in line with the OASIS SPMLv2 specification - you don’t have to change the listTargets response file, once you extend the LDAP schema and add new attributes or object classes.
For the management of completely new entry types not supported by the DirX Identity domain, see the section "Custom Objects".
You may want to define additional custom object descriptions that extend existing default object descriptions. A sample might be to distinguish between several types of users. In this case keep in mind that the Provisioning Service uses the default object description for creating a new object. For users, this is the "dxrUser" object description. This means that you can create your custom extended user entry, if you provide the appropriate object classes and attributes. Rules for calculating default attribute values are only taken from this default object description, not from your custom one.
When the Service processes a modify or delete, it obtains the appropriate object description the same way as Web Center or Identity Manager by applying the matching rules defined in the object description. This means especially, it associates the proper object description and its rules for attribute values.
Search
Search requests are always processed as LDAP simple paged search requests. The default page size may be changed in the web application’s initial parameters.
Iterate
The iterate request allows requesting the next pages of a search result.The prerequisite is an initial search having returned a search response that contains an iterator identifier.The request must contain the iterator identifier obtained from a previous search or iterate response.
As it is for a search response, a successful iterate response contains the entries of the next page and - optionally - an iterator identifier for requesting the next pages.Absence of the iterator identifier indicates that no more pages are available and the initial search result can no longer be iterated upon.
SPMLv2 Close Iterator
The SPMLv2 closeIterator request allows you to inform the Web Services that the related search result is no longer needed.On receipt of such a request, the Web Services will delete the internal overhead related to this result.It is good style for a client to send a closeIterator request when a search result is no longer needed.
The closeIterator response returns success or an error message in case of failure.
User Management
Users of a DirX Identity domain can be managed by SPMLv2 requests using the target identifier "users".In addition to the mandatory operations add, modify, delete and lookup the provisioning service supports the following capabilities for users:
-
Search, namespaceURI = “urn:oasis:names:tc:SPML:2.0:search”.The SPMLv2 search capability applies both to users and users containers.As user containers you can have: organizations, organizational units, countries, locations.
-
Reference capability.The user service supports a lot of reference types:
-
Simple references; for example, to organizations, manager.See the listTargets response file for a complete list.
-
dxrRoleLink: user-role assignments.They include attributes such as start and end date and also role parameters.
-
dxrPermissionLink: user-permission assignments with start and end date.
-
dxrGroupLink: user-group assignments with start and end date.
-
Password capability.This capability allows setting and validating passwords.
-
Suspend capability. This capability allows activating and disabling users.
DirX identity provides samples for requests and responses in the folder:
install_path/provisioningServices/spmlv2/users.
You must provide appropriate DirX Identity access policies for the requesting user.
Add, Modify and Delete
Add
Besides the normal attributes and references to other entities (see the sections on references), the add request supports a sub-element <operationalAttributes>. The operational attributes are defined for the XML namespace "urn:siemens:dxm:provisioning:operAttrs:1:0" in the schema file "operAttrs.xsd". As in SPMLv1 they define a list of DSML attributes that have to be evaluated by the addressed web service.
The user web service evaluates the attribute "timeout":
<spml:addRequest returnData="identifier" requestID="usAdd-01" targetID="users">
<opat:operationalAttributes>
<dsml:attr name="timeout"><dsml:value>300</dsml:value></dsml:attr>
</opat:operationalAttributes>
<spml:containerID  ID="o=testOrg,cn=Users,cn=My-Company"/>
...
</spml:addRequest>
It is of interest when the user creation is delegated to a request workflow. In case a timeout is given, the service waits a maximum of "timeout" seconds until the end of the workflow. If the workflow is not yet finished, the service returns the status "PENDING". Note that - in contrast to the SPMLv2 specification - the client cannot ask for the status of the request or cancel it. In other words: the operations "cancel" and "status" are not supported.
A user can be created without passing its DN, parent DN or a naming attribute. By default, this user will be put into the users subtree (cn=Users,cn=<domain>) with the generated dxrUid as the naming attribute. The folder where the user should be created can be changed in the Spring configuration: in the file usersContext.xml, set the defaultRelUserBase property of the AddUser bean to the required relative DN (DN omitting the domain root), as shown in the following snippet:
<property name="defaultRelUserBase">
      <value>cn=Users</value>
</property>
You can override the default value for the naming attribute by configuring a naming rule in the user’s object description. Here is an example:
<property name="cn" mandatory="true" type="java.lang.String" dependson="sn, givenName" >
   <extension>
       <namingRule>
           <reference baseObject="SvcUser" attribute="givenName" />
               <fixedValue value=" "/>
               <reference baseObject="SvcUser" attribute="sn" />
               <fixedValue value=" "/>
               <reference baseObject="SvcUser" attribute="dxrUid" />
        </namingRule>
   </extension>
</property>
For the definition of the naming rule, keep in mind that a temporary value is set when the entry is created in memory and before the other attributes are set. Therefore, the property must depend on all the attributes that are used in the rule.
Delete
The delete operation can be applied both to users and to containers. If a container is not empty, you have to supply the attribute "recursive" with a value of "true". Otherwise the request is rejected. If auditing is enabled for users, the user entry is not immediately deleted. Instead its state is set to DELETED, the delete date is set and an audit record is stored in its history attribute. Only when the history attribute is read and cleared, a subsequent consistency rule will delete the entry physically.
The following gives an example of a delete request for a non-empty container:
<spml:deleteRequest requestID="usDelOrg-01" recursive="true">
<spml:psoID ID="o=testOrg,cn=Users,cn=My-Company"  targetID="users"/>
</spml:deleteRequest>
Attributes
There are no mandatory attributes anymore; even the naming attribute cn and the object class can be omitted. The object class attribute helps to distinguish users and containers in add requests. An object class value of "dxrUser" identifies a user. Otherwise the object is expected to become a container. If no object class is given, the entry is supposed to be a user.
Other attributes are optional. Standard attributes are given in the listTargets response. If you extend the LDAP schema with your custom user attributes, make sure you also extend the user’s object description. Then you will be able to update and read them via the provisioning Web Services.
An important standard attribute is dxrState. For the supported values and their meaning, see the overview in the DirX Identity Provisioning Administration Guide.
References
All SPML operations support the reference capability. References cover relationships to other objects in the DirX Identity domain.
Most of the references are simple ones. They consist simply of the DN link to the other object. In most cases the name of the reference type equals the LDAP attribute where it is stored.
Some of the references are attributed and support specific reference data. The most important are the user-privilege assignments with their start and end date and account-group memberships with their state. See the respective sections for more information.
In order to search for users with a specific reference, use the <hasReference> clause within a search query:
<spmlsearch:query scope="subTree" targetID="users">
<spmlsearch:basePsoID ID="cn=Users,cn=My-Company"/>
<spmlsearch:and>
   <dsml:filter>
       <dsml:equalityMatch name="objectclass">
           <dsml:value>dxrUser</dsml:value>
       </dsml:equalityMatch>
   </dsml:filter>
   <spmlref:hasReference typeOfReference="dxrSecOrganizationLink">
       <spmlref:toPsoID ID="o=My-Company,cn=Companies,cn=BusinessObjects,cn=My-Company"/>
   </spmlref:hasReference>
</spmlsearch:and>
<dsml:attributes>
   <dsml:attribute name="cn"/>
</dsml:attributes>
</spmlsearch:query>
The above query searches for users with a reference to the organization "My-Company".
If you want to see reference data in the lookup or search response you have to supply the element <includeDataForCapability> for the reference capability.
Reference dxrRoleLink
The reference "dxrRoleLink" controls user-role assignments. The role assignment supports the attributes start and end date and role parameters.
When you want to add a start or end date within the reference data you just have to supply them as a normal DSML attribute. See the following snippet for a sample:
<dsml:attr name="dxrStartDate"><dsml:value>20071231230000Z</dsml:value></dsml:attr>
If you want to modify a start or end date, provide a DSML modification in the reference data as in the following snippet:
<modification modificationMode="replace">
<capabilityData capabilityURI="urn:oasis:names:tc:SPML:2:0:reference">
<spmlref:reference xmlns:asgpar="urn:siemens:dxm:provisioning:asg:param:1:0"
         typeOfReference="dxrRoleLink">
<spmlref:toPsoID ID="cn=Signature Level 2,cn=General,cn=Corporate Roles,cn=RoleCatalogue,cn=My-Company"/>
         <spmlref:referenceData>
             <dsml:modification name="dxrStartDate" operation="delete">
             </dsml:modification>
             <dsml:modification name="dxrEndDate" operation="add">
                 <dsml:value>29991231235959Z</dsml:value>
             </dsml:modification>
         </spmlref:referenceData>
</spmlref:reference>
</capabilityData>
</modification>
Note that role assignments with role parameters might not always be uniquely identified by the distinguished name of the assigned role, so it might be necessary to add a "uid" attribute identifying the assignment. You can find an example in the following snippet:
<modification modificationMode="replace">
<capabilityData capabilityURI="urn:oasis:names:tc:SPML:2:0:reference">
<spmlref:reference xmlns:asgpar="urn:siemens:dxm:provisioning:asg:param:1:0"
        typeOfReference="dxrRoleLink">
<spmlref:toPsoID ID="cn=Project Member,cn=Project Specific,cn=Corporate Roles,cn=RoleCatalogue,cn=My-Company"/>
        <spmlref:referenceData>
            <dsml:modification name="dxrStartDate" operation="delete">
            </dsml:modification>
            <dsml:modification name="dxrEndDate" operation="add">
                <dsml:value>29991231235959Z</dsml:value>
            </dsml:modification>
            <ns1:paramAsg xmlns:ns1="urn:siemens:dxm:provisioning:asg:param:1:0"
                uid="uid-a5c14a4-7888ad42-152b222a1ac-7e7f">
            </ns1:paramAsg>
        </spmlref:referenceData>
</spmlref:reference>
</capabilityData>
</modification>
In this case, the value of the "uid" is the value of the "cn" attribute of the assignment object containing the assignment data in LDAP.
The reference data of role parameters follow the XML schema with the namespace "urn:siemens:dxm:provisioning:asg:param:1:0". You’ll find the schema in the list targets response file for users and in "paramAsg.xsd".
In an add request, you supply a role parameter in a <paramAsg> element as in this sample. Note that "asgpar" is the namespace prefix for the above mentioned schema namespace, which you have to define in the XML document somewhere before:
<paramAsg>
   <asgpar:paramValue dn="cn=Project,cn=My-Company,cn=RoleParams,cn=Customer Extensions,cn=Configuration,cn=My-Company"
                 uid="uid-7f001-cee271-fed935aa6d--7eb4">
                 <asgpar:value>cn=OptimizeIT,cn=Projects,cn=BusinessObjects,cn=My-Company</asgpar:value>
    </asgpar:paramValue>
</paramAsg>
The "dn" attribute denotes the distinguished name of the role parameter, the "uid" its "dxrUid" attribute. Only one of the two attributes is necessary to identify the role parameter. Add one or more values in <asgpar:value> elements.
Modifications to a role parameter must be supplied in <paramAsgModification> elements as in the following sample:
<asgpar:paramAsgModification uid="uid-a5c14a4-7888ad42-152b222a1ac-7e7f">
  <asgpar:paramValueModification uid="uid-7f001-cee271-fed935aa6d--7eb4" operation="add">
          <asgpar:value>cn=MoreCustomers,cn=Projects,cn=BusinessObjects,cn=My-Company</asgpar:value>
  </asgpar:paramValueModification>
</asgpar:paramAsgModification>
The "uid" attribute identifies the assignment (attribute "cn" in LDAP), whereas the "uid" attribute of the element <paramValueModification> identifies the role parameter (that is, its attribute "dxrUid"). As with normal SPML / DSML modifications, the "operation" attribute tells the service whether to add, replace or delete the value(s). Note that a delete operation without any value deletes all existing values.
| a delete modification with only the <toPsoID> element given deletes all assignments for this role: |
<modification modificationMode="delete">
<capabilityData capabilityURI="urn:oasis:names:tc:SPML:2:0:reference">
<spmlref:reference typeOfReference="dxrRoleLink">
         <spmlref:toPsoID  ID="cn=Project Member,cn=Project Specific,cn=Corporate Roles,cn=RoleCatalogue,cn=My-Company"/>
</spmlref:reference>
</capabilityData>
</modification>
The modification shown above deletes all assignments for the role "cn=Project Member".
The modification of dxrRoleLink with the replace operation has a special semantic. It can be used either for update operation of an existing role assignment defined by the "dn" or "uid" attribute or for creation of a new role assignment if supplied with common attributes as shown in the following snippet:
<modification modificationMode="replace">
<capabilityData capabilityURI="urn:oasis:names:tc:SPML:2:0:reference">
<spmlref:reference xmlns:asgpar="urn:siemens:dxm:provisioning:asg:param:1:0"
        typeOfReference="dxrRoleLink">
<spmlref:toPsoID ID="cn=Marketing Tasks,cn=Department Specific,cn=Corporate Roles,cn=RoleCatalogue,cn=My-Company"/>
        <spmlref:referenceData>
            <dsml:attr name="dxrEndDate">
                <dsml:value>29991231235959Z</dsml:value>
            </dsml:attr>
        </spmlref:referenceData>
</spmlref:reference>
</capabilityData>
</modification>
The replace operation for dxrRoleLink does not delete any existing role assignments.
To search for users with a specific permission assignment, use the <hasReference> clause within a search query:
<spmlsearch:query scope="subTree" targetID="users">
<spmlsearch:basePsoID ID="cn=Users,cn=My-Company"/>
<spmlsearch:and>
    <dsml:filter>
        <dsml:equalityMatch name="objectclass">
            <dsml:value>dxrUser</dsml:value>
        </dsml:equalityMatch>
    </dsml:filter>
    <spmlref:hasReference typeOfReference="dxrRoleLink">
        <spmlref:toPsoID ID="cn=Project Member,cn=Project Specific,cn=Corporate Roles,cn=RoleCatalogue,cn=My-Company"/>
    </spmlref:hasReference>
</spmlsearch:and>
<dsml:attributes>
    <dsml:attribute name="cn"/>
</dsml:attributes>
</spmlsearch:query>
The filter shown above searches for users who have the role "cn=Project Member". Note that reference data such as start or end date are not supported.
For complete samples of how to manage role references, see especially the file "sampleRequestRoleLink.xml".
Reference dxrPermissionLink
The reference "dxrPermissionLink" controls user-permission assignments. The permission assignment supports the attributes start and end date.
When you want to add a start or end date within the reference data, you just need to supply them as normal DSML attributes. See the following snippet for a sample:
<dsml:attr name="dxrStartDate"><dsml:value>20071231230000Z</dsml:value></dsml:attr>
If you want to modify a start or end date, provide a DSML modification in the reference data as in the following snippet:
<modification modificationMode="replace">
<capabilityData capabilityURI="urn:oasis:names:tc:SPML:2:0:reference">
<spmlref:reference  typeOfReference="dxrPermissionLink">
<spmlref:toPsoID ID="cn=Signature Level 2,cn=General,cn=Corporate Permissions,cn=Permissions,cn=My-Company"/>
           <spmlref:referenceData>
               <dsml:modification name="dxrStartDate" operation="delete">
               </dsml:modification>
               <dsml:modification name="dxrEndDate" operation="add">
                   <dsml:value>29991231235959Z</dsml:value>
               </dsml:modification>
           </spmlref:referenceData>
</spmlref:reference>
</capabilityData>
</modification>
The modification shown above replaces the assignment to the permission "cn=Signature Level 2". It deletes the previous start date and sets the end date to the end of the year 2999.
The modification of dxrPermissionLink with the replace operation has a special semantic. It can be used either for update operation of an existing permission assignment defined by the "dn" attribute or for creation of a new permission assignment if supplied with common attributes, as shown in the following snippet:
<modification modificationMode="replace">
<capabilityData capabilityURI="urn:oasis:names:tc:SPML:2:0:reference">
<spmlref:reference xmlns:asgpar="urn:siemens:dxm:provisioning:asg:param:1:0"
        typeOfReference="dxrPermissionLink">
<spmlref:toPsoID ID="cn=Standard Class,cn=Suppliers,cn=B2B Permissions,cn=Permissions,cn=My-Company"/>
        <spmlref:referenceData>
            <dsml:attr name="dxrEndDate">
                <dsml:value>29991231235959Z</dsml:value>
            </dsml:attr>
        </spmlref:referenceData>
</spmlref:reference>
</capabilityData>
</modification>
The replace operation for dxrPermissionLink does not delete any existing permission assignments.
To search for users with a specific permission assignment, use the <hasReference> clause within a search query:
<spmlsearch:query scope="subTree" targetID="users">
<spmlsearch:basePsoID ID="cn=Users,cn=My-Company"/>
<spmlsearch:and>
       <dsml:filter>
           <dsml:equalityMatch name="objectclass">
               <dsml:value>dxrUser</dsml:value>
           </dsml:equalityMatch>
       </dsml:filter>
       <spmlref:hasReference typeOfReference="dxrPermissionLink">
           <spmlref:toPsoID ID="cn=Signature Level 2,cn=General,cn=Corporate Permissions,cn=Permissions,cn=My-Company"/>
       </spmlref:hasReference>
</spmlsearch:and>
   <dsml:attributes>
       <dsml:attribute name="cn"/>
   </dsml:attributes>
</spmlsearch:query>
The filter shown above searches for users with the permission "cn=Signature Level 2". Note that reference data such as start or end date are not supported.
For complete samples of how to manage role references, see especially the file "sampleRequestPermissionLink.xml".
Reference dxrGroupLink
The reference "dxrGroupLink" controls user-group assignments. The group assignment supports the attributes start and end date.
When you want to add a start or end date within the reference data, supply them as normal DSML attributes. See the following snippet for a sample:
<dsml:attr name="dxrStartDate"><dsml:value>20071231230000Z</dsml:value></dsml:attr>
If you want to modify a start or end date, provide a DSML modification in the reference data, as shown in the following snippet:
<modification modificationMode="replace">
<capabilityData capabilityURI="urn:oasis:names:tc:SPML:2:0:reference">
<spmlref:reference  typeOfReference="dxrGroupLink">
<spmlref:toPsoID ID="cn=Internal,cn=General,cn=Accounts and Groups,cn=Windows Domain Europe,cn=TargetSystems,cn=My-Company"/>
         <spmlref:referenceData>
             <dsml:modification name="dxrStartDate" operation="delete">
             </dsml:modification>
             <dsml:modification name="dxrEndDate" operation="add">
                 <dsml:value>29991231235959Z</dsml:value>
             </dsml:modification>
         </spmlref:referenceData>
</spmlref:reference>
</capabilityData>
</modification>
The above modification replaces the assignment to the group "Internal" in the target system "Windows Domain Europe". It deletes the previous start date and sets the end date to the year end 2999.
The modification of dxrGroupLink with the replace operation has a special semantic. It can be used either for update operation of an existing group assignment defined by the "dn" attribute or for creation of a new group assignment if supplied with common attributes, as shown in the following snippet:
<modification modificationMode="replace">
<capabilityData capabilityURI="urn:oasis:names:tc:SPML:2:0:reference">
<spmlref:reference xmlns:asgpar="urn:siemens:dxm:provisioning:asg:param:1:0"
        typeOfReference="dxrGroupLink">
<spmlref:toPsoID ID="cn=Auditors,cn=Groups,cn=DirXmetaRole,cn=TargetSystems,cn=My-Company"/>
        <spmlref:referenceData>
            <dsml:attr name="dxrEndDate">
                <dsml:value>29991231235959Z</dsml:value>
            </dsml:attr>
        </spmlref:referenceData>
</spmlref:reference>
</capabilityData>
</modification>
The replace operation for dxrGroupLink does not delete any existing group assignments.
To search for users with a specific permission assignment, use the <hasReference> clause within a search query:
<spmlsearch:query scope="subTree" targetID="users">
<spmlsearch:basePsoID ID="cn=Users,cn=My-Company"/>
<spmlsearch:and>
     <dsml:filter>
         <dsml:equalityMatch name="objectclass">
             <dsml:value>dxrUser</dsml:value>
         </dsml:equalityMatch>
     </dsml:filter>
     <spmlref:hasReference typeOfReference="dxrGroupLink">
         <spmlref:toPsoID ID="cn=Internal,cn=General,cn=Accounts and Groups,cn=Windows Domain Europe,cn=TargetSystems,cn=My-Company"/>
     </spmlref:hasReference>
</spmlsearch:and>
 <dsml:attributes>
     <dsml:attribute name="cn"/>
 </dsml:attributes>
</spmlsearch:query>
The above filter searches for users who have the group "Internal" of the target system "Windows Domain Europe". Note that reference data such as start or end date are not supported.
For complete samples of how to manage role references, see especially the file "sampleRequestGroupLink.xml".
Suspend Capability
The suspend capability allows enabling and disabling a user.
The capability updates the attributes dxrState, dxrDisableStartDate and dxrDisableEndDate. But note that the state is also affected by other operations and attributes, namely by the dxrStartDate and dxrEndDate. A suspend request sets the user’s state to DISABLED, a resume request to ENABLED. A user is considered active if his state is ENABLED.
In suspend or resume requests you can provide the attribute "effectiveDate". The effective date in a suspend request denotes the disable start date. As default, the service takes the day before. The effective date in a resume request denotes the disable end date. If it is not given, the service deletes both disable start and end date.
The following sample shows a suspend request with an effective date of January 1st, 1990:
<spmlsuspend:suspendRequest  effectiveDate="1990-01-01T00:00:00+00:00">
<spmlsuspend:psoID ID="cn=John Doe 9876,o=testOrg,cn=Users,cn=My-Company"  targetID="users"/>
</spmlsuspend:suspendRequest>
The service accepts a number of formats for the date representation; especially it supports the IETF standard.Internally it uses the parse method of the JDK class "java.util.Date".See there for more details on the formats.
In a search request you can use the <isActive> query clause to search for enabled users: Simply include the following element into your query filter: <spmlsuspend:isActive/>.
Password Capability
The password capability implementation only supports the requests “validatePassword” and “setPassword”.Reset and ExpirePassword are answered by an error response.
The password is not only stored in the attribute userPassword but also in the attribute dxmPassword.It is encrypted if the service has a certificate; otherwise, it is hashed.To read the certificate from the connectivity configuration tree, the service needs to authenticate as domain administrator.It derives the user name from its own bind credentials.Make sure that the service is bound as domain administrator!
Role Management
This section assumes that you are familiar with the SPMLv2 standard.It presents only aspects that are specific for DirX Identity.
Roles and role containers can be managed by SPMLv2 requests.The target ID “roles” identifies them.The service supports the following capabilities:
-
Search, namespaceURI = “urn:oasis:names:tc:SPML:2.0:search”.The SPMLv2 search capability applies both to roles and role containers.
-
Reference, namespaceURI = “urn:oasis:names:tc:SPML:2.0:reference”.The SPMLv2 reference capability only applies to roles.
-
Matchrule, namespaceURI = “urn:siemens:dxm:provisioning:role:matchrule:1:0”.The matchrule capability only applies to roles.The content adheres to the DirX Identity proprietary schema, which you find in the file “rpmatchrule.xsd”.See below for more details.
Identifiers
The identifiers in all requests are interpreted as the DNs (LDAP distinguished names) of the objects. An add request may, but need not contain an identifier.
If the add request provides an identifier (element <psoID>) the service tries to create an object with this DN. If the add instead contains a <containerID>, the service takes it as the DN of the parent node and creates an object beneath it. The RDN (relative DN) must either be passed as an attribute in the request or the object description has to calculate a default value. If neither a <psoID> nor a <containerID> are provided, the service creates the new object direct beneath the roles root (cn=rolecatalogue,cn=<your domain>).
Attributes
Mandatory attributes are the naming attribute cn and the object class. In add requests, roles and role containers can only be distinguished by the object class attribute. A value of “dxrRole” identifies a role, the value “dxrContainer” a role container.
Other attributes are optional and have to be among the list given in the listTargets response. Note that the operational links to junior roles and permissions and the role parameter related attributes are treated as capabilities and are silently ignored, when provided in simple attributes.
References
All role links to other objects within the Identity domain must be provided as SPMLv2 references. A role object supports the following references:
-
dxrRoleLink: DN link to a junior role.
-
dxrPermissionLink: DN link to a permission.
-
dxrWorkflowLink
-
dxrDelWorkflowLink
-
dxrModWorkflowLink
-
dxrPrivAssDelWorkflowLink
-
dxrPrivAssWorkflowLink
-
dxrReappWorkflowLink
-
dxrSODWorkflowLink
For role parameter links, see the following match rule section.
Here is a sample snippet for a dxrPermission reference within an addRequest:
<capabilityData capabilityURI="urn:oasis:names:tc:SPML:2.0:reference">
    <spmlref:reference typeOfReference="dxrPermissionLink">
        <spmlref:toPsoID ID="cn=Project Manager,cn=Project Specific,cn=Corporate Permissions,cn=Permissions,cn=My-Company" targetID="permissions"/>
    </spmlref:reference>
</capabilityData>
If these links are among the attribute list, they are silently ignored.
Multivalued References
To replace the values of a reference attribute with multiple new values, specify the new value references as children of the same capabilityData element. You may put values of different reference attributes below a common capabilityData element, as shown in the following example:
<spml:modification modificationMode="replace">
   <capabilityData capabilityURI="urn:oasis:names:tc:SPML:2:0:reference">
       <spmlref:reference typeOfReference="dxrGroupLink">
           <spmlref:toPsoID  ID="cn=Users,…,cn=TargetSystems,cn=My-Company"/>
       </spmlref:reference>
       <spmlref:reference typeOfReference="dxrGroupLink">
           <spmlref:toPsoID  ID="cn=Admins,…,cn=TargetSystems,cn=My-Company"/>
       </spmlref:reference>
       <spmlref:reference typeOfReference="owner">
           <spmlref:toPsoID  ID="cn=Abele Marc,cn=Users,cn=My-Company"/>
       </spmlref:reference>
       <spmlref:reference typeOfReference="owner">
           <spmlref:toPsoID  ID="cn=Dalmar Christopher,cn=Users,cn=My-Company"/>
       </spmlref:reference>
   </capabilityData>
</spml:modification>
Or you may have one capabilityData element per attribute, as shown in the next example:
<spml:modification modificationMode="replace">
   <capabilityData capabilityURI="urn:oasis:names:tc:SPML:2:0:reference">
       <spmlref:reference typeOfReference="dxrGroupLink">
           <spmlref:toPsoID  ID="cn=Users,…,cn=TargetSystems,cn=My-Company"/>
       </spmlref:reference>
       <spmlref:reference typeOfReference="dxrGroupLink">
           <spmlref:toPsoID  ID="cn=Admins,…,cn=TargetSystems,cn=My-Company"/>
       </spmlref:reference>
   </capabilityData>
   <capabilityData capabilityURI="urn:oasis:names:tc:SPML:2:0:reference">
       <spmlref:reference typeOfReference="owner">
           <spmlref:toPsoID  ID="cn=Abele Marc,cn=Users,cn=My-Company"/>
       </spmlref:reference>
       <spmlref:reference typeOfReference="owner">
           <spmlref:toPsoID  ID="cn=Dalmar Christopher,cn=Users,cn=My-Company"/>
       </spmlref:reference>
   </capabilityData>
</spml:modification>
Role Parameter Links and Match Rules
If a role requires a role parameter, the DN of the role parameter and the corresponding match rule must be provided in the matchrule capability. Here is a sample for a match rule capability:
<capabilityData capabilityURI="urn:siemens:dxm:provisioning:role:matchrule:1:0">
    <matchrule xmlns="urn:siemens:dxm:provisioning:role:matchrule:1:0">
        <uid>uid-7f001-cee271-fed935aa6d--7eb4</uid>
        <roleparamDN>cn=Project,cn=My-Company,cn=RoleParams,cn=Customer Extensions,cn=Configuration,cn=My-Company</roleparamDN>
        <operator>=</operator>
        <type>Group</type>
        <attribute>dxrproject</attribute>
    </matchrule>
</capabilityData>
The <roleparamDN> and the <uid> denote the referenced role parameter object. Within a request one of them is sufficient. The <uid> refers to the dxrUid attribute of the role parameter. It is automatically generated with the role parameter object and does not change when the parameter is moved. Currently, the <type> value has to be “Group” and the <attribute> refers to the group attribute, which in the role resolution process is matched according the <operator> with the DN of the selected role parameter value. For more details see the appropriate section in the manual.
The following sample gives the modification for a match rule within a modify request:
<spml:modification modificationMode="replace">
    <capabilityData capabilityURI="urn:siemens:dxm:provisioning:role:matchrule:1:0">
        <matchrule xmlns="urn:siemens:dxm:provisioning:role:matchrule:1:0">
            <uid>uid-7f001-cee271-fed935aa6d--7eb4</uid>
            <operator>=</operator>
            <type>Group</type>
            <attribute>dummy</attribute>
        </matchrule>
    </capabilityData>
</spml:modification>
The given value replaces all existing role parameter links and match rules in the role.
Permission Management
Permissions of a DirX Identity domain can be managed by SPMLv2 requests using the target identifier "permissions".In addition to the mandatory operations add, modify, delete and lookup the provisioning service supports the following capabilities for permissions:
-
Search, namespaceURI = “urn:oasis:names:tc:SPML:2.0:search”.The SPMLv2 search capability applies both to permissions and permission containers.
-
Reference capability, namespace URI = "urn:oasis:names:tc:SPML:2:0:reference".The permission service supports the following simple reference types:
-
dxrGroupLink: permission-to-group reference.
-
dxrProject: reference to a project.
-
dxrWorkflowLink
-
dxrDelWorkflowLink
-
dxrModWorkflowLink
-
dxrPrivAssDelWorkflowLink
-
dxrPrivAssWorkflowLink
-
dxrReappWorkflowLink
-
dxrSODWorkflowLink
-
Permission match rule capability. It is identified by the namespace URI "urn:siemens:dxm:provisioning:permission:matchrule:1:0" and allows to manage the match rules of a permission.
DirX identity provides samples for requests and responses in the folder:
install_path/provisioningServices/spmlv2/permissions.
You must provide appropriate DirX Identity access policies for the requesting user.
Attributes
Mandatory attributes are the naming attribute "cn" and the object class. The object class attribute distinguishes permissions and containers in add requests. An object class value of “dxrPermission” identifies a permission. Otherwise the object is expected to become a container.
Other attributes are optional. Standard attributes are given in the listTargets response. If you extend the LDAP schema with your custom permission attributes, make sure you also extend the permission’s object description. Then you will be able to update and read them via the Provisioning Web Services. You don’t need to extend the list targets response.
Add, Modify and Delete
Add
Besides the normal attributes and simple references to other entities, the add request supports the capability for match rules. For a detailed explanation of the XML schema see the separate chapter on match rules.
Here’s the excerpt of a sample add request containing a reference capability to a group and the match rule capability:
    <spml:addRequest returnData="identifier" requestID="permAdd-01" targetID="permissions">
  <spml:containerID ID="cn=wsTestPermissions,cn=Permissions,cn=My-Company"/>
  <spml:data>
      <dsml:attr name="cn">
          <dsml:value>Permission1</dsml:value>
      </dsml:attr>
...
  </spml:data>
  <capabilityData mustUnderstand="true" capabilityURI="urn:oasis:names:tc:SPML:2:0:reference">
      <spmlref:reference typeOfReference="dxrGroupLink">
          <spmlref:toPsoID ID="cn=Development Portal,cn=Group Portals,cn=Accounts and Groups,cn=Intranet Portal,cn=TargetSystems,cn=My-Company"/>
      </spmlref:reference>
  </capabilityData>

        <capabilityData mustUnderstand="true" capabilityURI="urn:siemens:dxm:provisioning:permission:matchrule:1:0">
       <permMatchrules or="true" xmlns="urn:siemens:dxm:provisioning:permission:matchrule:1:0">
          <permMatchrule>
              <userAttr>c</userAttr>
              <operator>=</operator>
              <groupConst>Group</groupConst>
              <groupAttr>c</groupAttr>
          </permMatchrule>
      </permMatchrules>
  </capabilityData>

    </spml:addRequest>
| The request can only contain one capability for a match rule! This capability contains exactly 1 <permMatchrules> element, which in turn can contain 1 or more <permMatchrule> elements. |
Modify
The modify operation can be applied both to permissions and to containers. In addition to normal attributes and simple references it can also modify match rules. As with the add request, the match rule capability contains at most 1 <permMatchrules> element.
A "replace" modification replaces the previous content with the one specified in the capability.
The same does the "add" modification, since a permission can contain at most 1 <permMatchrules>. Note that a <permMatchrules> element contains a list of simple <permMatchrules>, which are combined using "and" or "or" according the attribute "or" in <permMatchrules>.
The "delete" modification deletes the old match rule irrespective of the one that might be passed in the request. In other words, it does not check, if the passed match rule matches the existing one.
Here is a sample of a modify request, which replaces the attribute "description" and especially an existing match rule with a new one provided in the capability:
    <spml:modifyRequest requestID="permMod-01" returnData="identifier">
  <spml:psoID ID="cn=Permission1,cn=wsTestPermissions,cn=Permissions,cn=My-Company" targetID="permissions"/>
  <spml:modification modificationMode="replace">
      <dsml:modification name="description" operation="replace">
          <dsml:value>description for Permission1 (modified)</dsml:value>
      </dsml:modification>
  </spml:modification>

        <spml:modification modificationMode="replace">
      <capabilityData mustUnderstand="true" capabilityURI="urn:siemens:dxm:provisioning:permission:matchrule:1:0" xmlns:mr="urn:siemens:dxm:provisioning:permission:matchrule:1:0">
          <mr:permMatchrules or="false">
              <mr:permMatchrule>
                  <mr:userAttr>c</mr:userAttr>
                  <mr:operator>=</mr:operator>
                  <mr:groupConst>Group</mr:groupConst>
                  <mr:groupAttr>c</mr:groupAttr>
              </mr:permMatchrule>
          </mr:permMatchrules>
      </capabilityData>
  </spml:modification>

    </spml:modifyRequest>
Delete
The delete operation can be applied both to permissions and to containers. If a container is not empty, you must supply the attribute "recursive" with a value of "true", or the request is rejected. If auditing is enabled for permissions, the permission entry is not immediately deleted. Instead, its state is set to DELETED and an audit trail is stored in its history attribute. Only when the history attribute is read and cleared will a subsequent consistency rule physically delete the entry.
The following snippet gives an example of a delete request for a non-empty container:
<spml:deleteRequest requestID="permDelCont-03" recursive="true">
  <spml:psoID ID="cn=wsTestPermissions,cn=Permissions,cn=My-Company" targetID="permissions"/>
</spml:deleteRequest>
Permission Match Rules
The content of the match rule capability is controlled by the XML schema with the namespace "urn:siemens:dxm:provisioning:permission:matchrule:1:0". You find the schema in the file "perm-matchrule.xsd" and embedded in the list target response for permissions "listTargetsRspPermissions.xml". This schema makes use of some common definitions for role parameters, which are defined in the file "rpmatchrule.xsd" and again in the list targets response for permissions.
A match rule is represented by the XML element <permMatchrules>. Here is a sample:
<permMatchrules or="false" xmlns="urn:siemens:dxm:provisioning:permission:matchrule:1:0">
   <permMatchrule>
        <userAttr>dxrProject</userAttr>
        <operator>=</operator>
        <groupConst>Group</groupConst>
        <groupAttr>dxrProject</groupAttr>
    </permMatchrule>
    <permMatchrule>
        <userAttr>c</userAttr>
        <operator>contains</operator>
        <groupConst>Group</groupConst>
        <groupAttr>c</groupAttr>
    </permMatchrule>
</permMatchrules>
This sample contains a combined match rule that compares the user attributes "dxrProject" and "c" with the according group attributes.The project values must be the same, the country value of the user must contain that of the group.
A <permMatchrules> contains 1 or more single attribute comparisons, which are represented by elements <permMatchrule>.They are combined by "and" or "or" depending on the boolean XML attribute "or" in <permMatchrules>.
The element <userAttr> specifies the user attribute, the element <operator" the compare operation ("=", "contains", "!=", "<=", etc).
The element <groupConst> specifies whether the user attribute must be compared to a group attribute or a constant allowing the values "Group" or "Const".The element <groupAttr> contains either the group attribute or the constant value.
For handling of match rule modifications, see the section on "Add, Modify and Delete".
Business Objects Management
The term “business objects” refers to object types such as organizations or companies, context objects, location and alike.The Provisioning Web Services for their management have very much in common.Therefore, they are covered in a common section.
Identifiers
The identifiers in all requests are interpreted as the DNs (LDAP distinguished names) of the organizations or containers.
If the add request provides an identifier (element <psoID>), the service tries to create the business object or container with this DN.If the add instead contains a <containerID>, the service takes it as the DN of the parent container and creates an object beneath it with the value of the naming attribute as its RDN (relative DN).
Search
All business objects support the search capability with the namespaceURI “urn:oasis:names:tc:SPML:2.0:search”.
Attributes
Standard attributes are given in the appropriate listTargets response. But in order to simplify extension with further custom attributes, DirX Identity does not check them. Make sure that the attributes are defined in the respective object description of the domain.
References
The business objects references are all simple, that is without attributes. In most cases they refer to other business objects (context, category, location) or users (approver).
Samples
DirX Identity provides samples for requests and responses in the folder:
install_path/provisioningServices/spmlv2/type_of_business_object.
| For simplicity all the requests and responses in the samples are children of a <test> root element. This is not supported by the SPML standard. |
Organization Management
Organizations or companies can be managed by SPMLv2 requests using the target identifier “organizations”.
Organizations support the following simple references: dxrApprover, dxrContextLink, dxrCategoryLink, dxrLocationLink, dxrOULink, dxrPrivilegeLink.
Attributes
Mandatory attributes are the naming attribute o and the object class. The object class attribute distinguishes organizations and containers in add requests. An object class value of “dxrOrganization” identifies an organization. Otherwise the object is expected to become a container.
Organizational Unit Management
Organization Units can be managed by SPMLv2 requests using the target identifier "organizationalUnit".
Organizational units support the following simple references: dxrApprover, dxrContextLink, dxrCategoryLink, dxrLocationLink, dxrCostUnitLink, dxrPrivilegeLink.
Attributes
Mandatory attributes are the naming attribute "ou" and the object class. The object class attribute distinguishes organizational units and containers in add requests. An object class value of “dxrOrganizationalUnit” identifies an organizational unit. Otherwise the object is expected to become a container. One special container may be an organization identified by object class "dxrOrganization" (with target identifier "organizations").
Context Management
Context objects can be managed by SPMLv2 requests using the target identifier “context”.
They support the following simple references: dxrApprover, dxrContextLink, dxrCategoryLink, dxrPrivilegeLink.
Attributes
Mandatory attributes are the naming attribute cn and the object class. The object class attribute distinguishes context objects and containers in add requests. An object class value of “dxrContext” identifies a context object. Otherwise the object is expected to become a container.
Location Management
Location objects can be managed by SPMLv2 requests using the target identifier “location”.
They support the following simple references: dxrApprover, dxrContextLink, dxrCategoryLink, dxrLocationLink.
Attributes
Mandatory attributes are the naming attribute l and the object class. The object class attribute distinguishes locations and containers in add requests. An object class value of “dxrLocation” identifies a location and “dxrCountry” a country container. Otherwise the object is expected to become a container.
Cost Unit Management
Cost Units can be managed by SPMLv2 requests using the target identifier “costUnit”.
Cost units support the following simple references: dxrApprover, dxrContextLink, dxrCategoryLink.
Attributes
Mandatory attributes are the naming attribute "cn" and the object class.The object class attribute distinguishes cost units and containers in add requests.An object class value of “dxrCostUnit” identifies a cost unit.Otherwise the object is expected to become a container.
Creating and Deleting Target Systems
SPMLv2 requests can create, modify, and delete target systems and target system containers.The corresponding requests need to set the target identifier “targetSystems”.In addition to the mandatory operations add, modify, delete, and lookup the provisioning service supports the following capabilities:
-
Search, namespaceURI = “urn:oasis:names:tc:SPML:2.0:search”.The SPMLv2 search capability applies both to target systems and target system containers.
-
Create Options: Allows defining if accounts and groups must be stored in the same container or in separate ones.With the child element <templateTS> the DN of the template Target System can be selected.
-
Connection Options: This capability allows setting attributes that are used as connection parameters in realtime provisioning workflows.They typically contain the address of the target system, the DN of the bind account, and options and flags such as SSL and keystore.They are stored at the target system and only evaluated by special types of workflows (“cluster enabled workflows”).
-
Environment Properties: This capability allows to set attributes that are used as environment properties in realtime provisioning workflows.They typically contain parameters such as account or group root in target system.They are stored at the target system and only evaluated by special types of workflows (“cluster enabled workflows”).
-
Options: This capability allows setting the target system options that are typically used for automatic account and group creation.They are stored in tag/value format in the LDAP attribute dxrOptions.Attributes typically used in this context are "Account Root in TS" and "Group Root in TS".
The product delivers samples for requests and responses in the folder:
install_path/provisioningServices/spmlv2/ts
| You must provide appropriate DirX Identity access policies for the requesting user. |
Identifiers
The identifiers in all requests are interpreted as the DNs (LDAP distinguished names) of the objects. An add request may, but need not contain an identifier.
If the add request provides an identifier (element <psoID>) the service tries to create the target system or container with this DN. If the add instead contains a <containerID> the service takes it as the DN of the parent node and creates an object beneath it. The RDN (relative DN) must either be passed as an attribute in the request or the object description has to calculate a default value. If neither a <psoID> nor a <containerID> is provided the service creates the new object direct beneath the target systems root (cn=targetSystems,cn=your_domain).
Attributes
Mandatory attributes are the naming attribute cn and the object class. The values of the object class or the dxrType attribute distinguish target systems, cluster, and (cluster-) containers in add requests. Specify the following values:
-
For Object class:
-
dxrTargetSystem - to indicate a target system
-
dxrContainer - to indicate a target system container
-
For the dxrType attribute:
-
dxrCluster - to indicate a cluster
-
dxrClusterContainer - to indicate a cluster container
Other attributes are optional and must be specified in the list provided in the listTargets response. By default the DirX Identity provides the file “listTargetsRspTSMgmt.xml”.
Connection Options
The namespace URI “urn:siemens:dxm:provisioning:ts:connectionOptions:1:0” identifies the capability for custom connection options. It is evaluated for target systems (not for containers) in add, modify, lookup and search operations.
The options are stored at the target system and are only evaluated by a special type of workflows: cluster-enabled realtime workflows. Note that the target system already supports default connection parameters as normal attributes: dxmAddress, dxmDataPort, dxmSecurePort (if SSL enabled), dxmSSL, dxmBindProfile-DN (link to bind account), dxmKeyStore, dxmKeyStoreAlias, dxmTrustStore, dxmTrustStoreAlias, dxmAuthenticationMode.
With the “connectionOptions” capability the client can pass an arbitrary list of additional connection parameters. Before an account or group of this target system is provisioned, the workflow sets these and the default connection options in the connection configuration of the target system connector. Use the following default option names as far as possible: filename, driverDBType, url.
The parameters are passed as DSMLv2 <attr> elements within the capability. See the following XML snippet for a sample:
<capabilityData xmlns:dsml="urn:oasis:names:tc:DSML:2:0:core" capabilityURI="urn:siemens:dxm:provisioning:ts:connectionOptions:1:0">

    <dsml:attr name="driverDBType">
        <dsml:value>siemens.dxm.connector.jdbc.AccessOverJdbcOdbcDriver</dsml:value>
    </dsml:attr>

    <dsml:attr name="url">
        <dsml:value>jdbc:odbc:personal</dsml:value>
    </dsml:attr>

    <dsml:attr name="myConnectionOption">
        <dsml:value>someValue</dsml:value>
    </dsml:attr>

</capabilityData>
Environment Properties
The namespace URI “urn:siemens:dxm:provisioning:ts:environmentProperties:1:0” identifies the capability for environment properties. It is evaluated for target systems (not for containers) in add, modify, lookup and search operations.
The properties are stored at the target system and are only evaluated by a special type of workflows: cluster-enabled realtime workflows.
With the “environmentProperties” capability the client can pass an arbitrary list of environment parameters. The provisioning workflow sets them before an account or group of this target system is provisioned.
The parameters are passed as DSMLv2 <attr> elements within the capability. See the following XML snippet for a sample:
<capabilityData mustUnderstand="true" xmlns:dsml="urn:oasis:names:tc:DSML:2:0:core"  capabilityURI="urn:siemens:dxm:provisioning:ts:environmentProperties:1:0">

    <dsml:attr name="accountrootints">
        <dsml:value>cn=Accounts</dsml:value>
    </dsml:attr>

    <dsml:attr name="grouprootints">
        <dsml:value>cn=Groups</dsml:value>
    </dsml:attr>

</capabilityData>
Options
The namespace URI “urn:siemens:dxm:provisioning:ts:options:1:0” identifies the capability for target system options. It is evaluated for target systems (not for containers) in add, modify, lookup and search operations.
Like the environment or connection options the attributes are passed as DSMLv2 <attr> elements.
Add
The add request supports the following capabilities: connection options, environment properties and create options.
The create options contain two optional child elements:
<accountsAndGroupsSeparate>: This flag specifies whether the accounts and groups are stored in the same or in separate folders. This decision cannot be changed later on in a modify request!
<templateTS>: This element contains the DN of the template target system. If it exists, it overrules the “type/cluster” approach to select the template system (see below).
The XML format is conveyed by the schema “urn:siemens:dxm:provisioning:TScreateOptions:1:0“, which is delivered in the file “tsCreateOptions.xsd”. Here a sample snippet for the capability:
<capabilityData capabilityURI="urn:siemens:dxm:provisioning:TScreateOptions:1:0">
    <accountsAndGroupsSeparate xmlns="urn:siemens:dxm:provisioning:TScreateOptions:1:0">false</accountsAndGroupsSeparate>
<templateTS xmlns="urn:siemens:dxm:provisioning:TScreateOptions:1:0">cn=LDAP,cn=TargetSystems,cn=DirXmetaRole-SystemDomain</templateTS>
</capabilityData>
How to select the target system template?
The web service searches a template target system in the system domain (cn=TargetSystems,cn=DirXmetaRole-SystemDomain) in the following sequence:
If the create options capability contains an element <templateTS>, it uses this DN to read the target system.
Then it searches a target system matching the attributes “dxrType” and “dxrCluster” contained in the request.
If this search does not yield exactly one target system, it searches a target system matching the given “dxrType” alone.
Note that you can import appropriate target system sub-trees into the system domain for each cluster you need. This allows you to select the correct template simply by providing the “dxrCluster” and “dxrType” attributes.
By default, the target system configurations (which are the object descriptions, Java scripts and obligations) are stored directly beneath the target system entry. If you want to deploy many target systems into a common cluster, you should reduce the number of object descriptions by providing only one set of object descriptions that is shared between all the target systems of that cluster. In this case, you need to specify the destination folder for the configuration sub-tree in the normal attribute “dxmTSConfigurationLink”. Set it to the cluster folder to which the new target system belongs. If this attribute is set, the service stores the configuration folder beneath the designated entry. If the configuration folder already exists, the service does not change it.
Please note that the attribute “dxmTSconfigurationLink” is exclusively used by the Web Services when configuring target systems. It’s not used or evaluated by any other component (such as DirX Identity Manager, Services, and so on). You should not create the object descriptions, Java scripts, and so on in any other folder, because other components (such as DirX Identity Manager, Services, etc.) will not evaluate the attribute “dxmTSconfigurationLink”; these components expect the objects descriptions, Java scripts and so on to reside below the target system folder or below the cluster folder in parallel with the target systems of which the cluster consists, but nowhere else.
Modify
A modify request supports the capabilities “connectionOptions” and “environmentProperties”, but no others. This means especially that you cannot switch how to store accounts and groups: in the same or in separate folders.
Delete
The delete request allows deleting a target system or a target system container.
You must set the XML attribute recursive=”true” if you want to delete a non-empty target system container.You do not need to set the flag if you want to delete a target system.
The provisioning service supports a “tombstone” feature.It is realized as a user hook and activated in the default configuration.For more details see the section on user hooks.
Accounts Management
Accounts in target systems can be managed by SPMLv2 requests using the target identifier “accounts”.In addition to the mandatory operations add, modify, delete and lookup, the SPML Provisioning Web Services support the following capabilities for accounts:
-
Search, namespaceURI = “urn:oasis:names:tc:SPML:2.0:search”.The SPMLv2 search capability applies both to accounts and account containers.
-
Reference capability.The accounts service supports the following reference types:
-
dxrUserlink: a simple reference to the associated user.
-
dxrUsedBy: simple references from functional accounts to users.
-
dxrPwdPolicyLink: a simple reference to a password policy.
-
dxrGroupMember: state-full references to groups of which the account is a member.
-
Password capability.This capability allows setting and validating passwords.
-
Suspend capability. This capability allows activating accounts.
-
Async capability. The services support only the status request from this capability.
For the support of password reset scenarios, the services provide operations around challenge/response and for reading the password policy related to an account.
DirX identity provides samples for requests and responses in the folder:
install_path/provisioningServices/spmlv2/accounts.
You must provide appropriate DirX Identity access policies for the requesting user.
Attributes
Mandatory attributes are the naming attribute cn and the object class. The object class attribute distinguishes accounts and containers in add requests. An object class value of “dxrTargetSystemAccount” identifies an account. Otherwise the object is expected to become a container.
Other attributes are optional. Standard attributes are given in the listTargets response. Each target system will have its own set of proprietary attributes that DirX Identity does not check. Make sure that the attributes are defined in the respective object description of the domain.
Important standard attributes are dxrState and dxrTSState. The dxrTSState reflects the state of the account in the remote target system, i.e. as requested by the Web Service client.
The dxrState reflects the state of the account as requested by DirX Identity. Thus the resulting state may be different from the requested, since it considers also the state of the associated user and user-group assignments. Note that the account state is also controlled by the suspend capability.
Reference dxrUserlink
This reference is simply mapped to the account attribute “dxrUserlink” and contains the DN of the associated user.
Reference dxrUsedBy
This reference is simply mapped to the account attribute “dxrUsedBy”. It is intended for functional accounts and denotes the users that are allowed to work with this account.
Reference dxrPwdPolicyLink
This reference is simply mapped to the account attribute “dxrPwdPolicyLink”. It references a password policy and is only applicable for functional accounts, for which a separate password is managed different from that of the associated user.
Reference dxrGroupMember
This reference controls the group memberships of the account. The account-group memberships are associated with their state and stored in the attributes “dxrGroupMember*”. Valid states are: OK, ADD, DELETED, IMPORTED, IGNORE, REMOTE. (See the respective documentation on account states for details.)
The resulting member state might be different from the requested state. It is set by DirX Identity considering the previous state, the states of the account and the associated user, and the user-group assignments.
The XML format of the membership is conveyed by the schema file "accountGroupMembership.xsd" with the namespace "urn:siemens:dxm:provisioning:account:groupmember:1:0" (see also the file listTargetsRspAccounts.xml). See the following request snippet for a sample:
<capabilityData capabilityURI="urn:oasis:names:tc:SPML:2:0:reference">
<spmlref:reference xmlns="urn:oasis:names:tc:SPML:2:0:reference"            xmlns:ag="urn:siemens:dxm:provisioning:account:groupmember:1:0"            typeOfReference="dxrGroupMember">
    <toPsoID  ID="cn=Software Tests,cn=Groups,cn=ts01,cn=testSystemsWebService,cn=TargetSystems,cn=My-Company"/>
    <referenceData>
        <ag:accountGroupMembership state="IMPORTED"/>
    </referenceData>
</spmlref:reference>
</capabilityData>
A missing state is interpreted as "OK".
Add, Modify and Delete
Besides the normal list of attributes or modifications, add and modify requests may contain the reference capabilities.
To simplify deployment, attribute names are not cross-checked with the definitions made in the respective listTargets response. Hence - not in line with the OASIS SPMLv2 specification - you don’t have to change the listTargets response file, once you extend the LDAP schema and add new attributes or object classes.
For the management of completely new entry types not supported by the DirX Identity domain, see the section "Custom Objects".
You may want to define additional custom object descriptions that extend existing default object descriptions. A sample might be to distinguish between several types of users. In this case keep in mind that the Provisioning Service uses the default object description for creating a new object. For users, this is the "dxrUser" object description. This means that you can create your custom extended user entry, if you provide the appropriate object classes and attributes. Rules for calculating default attribute values are only taken from this default object description, not from your custom one.
When the Service processes a modify or delete, it obtains the appropriate object description the same way as Web Center or Identity Manager by applying the matching rules defined in the object description. This means especially, it associates the proper object description and its rules for attribute values.
Lookup and Search
If you want to see reference data in the lookup or search response you must pass the element <includeDataForCapability> for the reference capability.
The search request supports the suspend capability and its <isActive> query clause. Here a sample of a query element asking for active accounts being an imported member in the group “Firmware Tests”:
<spmlsearch:query scope="subTree" targetID="accounts">
 <spmlsearch:basePsoID ID="cn=test,cn=Accounts,cn=ts01,cn=testSystemsWebService,cn=TargetSystems,cn=My-Company"/>
 <spmlsearch:and>
     <dsml:filter>
         <dsml:equalityMatch name="objectclass">
             <dsml:value>dxrTargetSystemAccount</dsml:value>
         </dsml:equalityMatch>
     </dsml:filter>
     <spmlsuspend:isActive/>
     <spmlref:hasReference typeOfReference="dxrGroupMember">
         <spmlref:toPsoID ID="cn=Firmware Tests,cn=Groups,cn=ts01,cn=testSystemsWebService,cn=TargetSystems,cn=My-Company" targetID="groups"/>
         <spmlref:referenceData xmlns:ag="urn:siemens:dxm:provisioning:account:groupmember:1:0">
             <ag:accountGroupMembership state="IMPORTED"/>
         </spmlref:referenceData>
     </spmlref:hasReference>
 </spmlsearch:and>
 <dsml:attributes> … </dsml:attributes>
</spmlsearch:query>
Suspend Capability
The suspend capability allows enabling and disabling an account.
The capability controls the attribute dxrTSState and partly dxrState. It sets dxrState only if the account has no associated user. An account is considered active if its state is “ENABLED” or if it is IMPORTED with dxrTSState “ENABLED”.
In requests, the attribute effectiveDate is ignored. The state is always set immediately. The reason is that such a feature does not make sense for DirX Identity accounts: their state in Identity is mainly controlled by the associated user.
Password Capability
The password capability implementation only supports the requests "validatePassword" and "setPassword". Reset and ExpirePassword requests are answered with an error response.
For normal accounts, the password is not stored in the Identity domain. The Web Service sends an event to change the password of the account. The applicable workflow(s) perform the change at the connected system. Only if the account is privileged, the workflow stores the password also at the account in the Identity domain in the attributes userPassword and encrypted in the dxmPassword. For details, see the section "Password Capability" in "User Management".
For reset password scenarios, the Web Service supports identifying the account by using identifying attributes of the account itself, the target system and optionally the associated user. For details, see the section "Identifying Attributes" in "Common SPML Aspects". Especially in this case, normal basic authentication will not be possible. It can be replaced by either signing the request with the user’s certificate or by challenge/response authentication.
The Web Service delivers the password policy associated with the identified account either in the response to an explicit getPasswordPolicy request or implicitly in the response for checking the challenge responses. For details, see the section "Authentication by Challenge/Response".
Authentication by User Certificate
The client application needs to read attributes from the certificate that identify the user and then insert them into the <identifyingAttributes> element of the request. Next, it needs to produce an XML signature of the SPML request and then put it in the request‘s SOAP header.
When configured properly, the Web Service verifies the signature and compares it to the identifying attributes. For details on how to configure the Web Service for this use case, see the section "XML Signature Verification Configuration".
To identify the account and optionally the associated user in a setPassword request, the service accepts identifying attributes instead of the normal DN identifier. These attributes must be sub-elements of the PSO ID, as shown in the following snippet:
<pass:psoID targetID="accounts">
    <idattr:identifyingAttributes>
         <dsml:attr name="ts.dxrTSDomainName">
              <dsml:value>WinEurope</dsml:value></dsml:attr>
         <dsml:attr name="dxrName">
              <dsml:value>agerbe66</dsml:value>
         </dsml:attr>
         <dsml:attr name="user.mail">
              <dsml:value>Alexander.Gerber@My-Company.com</dsml:value>
         </dsml:attr>
    </idattr:identifyingAttributes>
</pass:psoID>
The element <identifyingAttributes> is part of the XML namespace “urn:com:dirxcloud:dxi:provisioning:identAttrs:1:0”. See the XML schema file identifyingAttrs.xsd for the exact definition.
The attribute names can contain prefixes followed by a dot (.):
-
ts - the attribute identifies the target system.
-
user - the attribute identifies the user associated to the account. If the account has no user (that is, attribute dxrUserLink is empty), the Web Service expects the attribute at the account.
An attribute name without a prefix is expected to identify the account itself.
When no DN is given but identifying attributes, the Web Service searches the account using the attributes identifying the account (that is, attributes without any prefix). It then checks whether the account belongs to the target system identified by the attributes with the prefix ts.. Finally, it verifies the given user attributes with prefix user: if it finds an associated user, it checks them with the user, otherwise with the account. The given identifying values only need to be contained in the corresponding user or account values; an exact match is not necessary
The attribute names provided in the request can be mapped to LDAP names. This method supports scenarios where the client does not know about the correct LDAP attributes. It configured in the Spring bean definition of the SetPassword handler for accounts in the file accountsContext.xml in the folder WEB-INF of the servlet deployment:
<bean id="SetPasswordAccountsHandler"
class="com.siemens.idm.service.provisioning.spmlv2.accounts.SetPasswordHandler"
scope="prototype" parent="BasicAccountsHandler">

     <property name="attributeNameMapping">
        <map>
            <entry key="serialNr" value="uid"/>
            <entry key="domain" value="dxrTSDomainName"/>
            <entry key="logonname" value="dxrName"/>
        </map>
   </property>
</bean>
The map attributeNameMapping contains the attributes as sent by the clients as keys and the corresponding LDAP attribute names as values. Note that the keys must be lowercase and do not contain the prefix. As a result, if the client sends an identifying attribute ts.domain:
<dsml:attr name="ts.domain">
    <dsml:value>WinEurope</dsml:value></dsml:attr>
<dsml:attr name="dxrName">
The service will map it to ts.dxrTSDomainName.
Authentication by Challenge/Response
Without a certificate, users must authenticate by answering the challenges they have previously set up. If there is no certificate, the user must enter some data to identify the account – typically the Active Directory domain name and the account name. With these items wrapped in the psoID section, the client application requests the challenges for the associated user from the Web Service. See the section "Identifying Attributes" for details.
After the user has answered the challenges, the client can send them immediately to the Web Service for authentication, or the user can enter the new password and the client then sends this data together – password and challenge responses – to the Web Service. In either case, the setPassword request needs to contain the challenge responses for authentication even when they have been previously checked separately. In addition, all requests need to contain the attributes identifying the account. For details on these operations, see the section "Challenge/Response and Password Policy".
Async Capability - Status Request
The SPML Provisioning Web Services implement only a subset of the Async capability defined in SPMLv2: the status request, but not the cancel request. The status request serves only one purpose in the context of password reset:
The setPassword request indirectly triggers a workflow to change the password in the related connected system. The Web Service indicates this action by sending the status "pending" in the response. This response always contains the attribute "requestID". The client can use this ID to ask for the status of the password change. It must send a status request and pass the ID in the attribute "asyncRequestID".
The Web Service checks an account attribute for obtaining the result of the setPassword workflow. If the workflow is finished, it updates its state in the account. In this case, the Web Service returns the result (success or failure). Otherwise, it returns the state "pending".
Challenge/Response and Password Policy
If end users have forgotten their passwords, they can set new ones after authenticating themselves by answering their challenges. The Web Service provides the following operations to support this scenario:
-
getChallenges
-
checkChallengeResponses
-
getPasswordPolicy
The next sections provide more detail about these operations.
getChallenges Operation
The getChallenges operation must contain a psoID with the identifying attributes for the end user’s account. Typically, these items are the login name and the name of the Active Directory domain.
The response contains a subset of the user’s challenges. The number of returned challenges is configured in the property numberOfChallenges of the GetChallengesAccountsHandler bean (see the file accountsContext.xml):
<bean id="GetChallengesAccountsHandler"
class="com.siemens.idm.service.provisioning.spmlv2.accounts.GetChallengesHandler"
scope="prototype" parent="BasicAccountsHandler">
             <property name="attributeNameMapping" ref="AttributeNameMapping"/>
             <property name="numberOfChallenges" value="3"/>
            <property name="includeChallengeKeys" value="false"/>
</bean>
The boolean property includeChallengeKeys defines whether the response includes the challenge keys in addition to the challenge questions. If requested, each challenge is returned as key/question pair where key and question are separated by a semicolon. Keys are assigned to challenges in the challenge proposal list. If no key is assigned to a challenge, the question is taken instead.
<getChallengesResponse requestID="chall-01" status="success">
   <challenge>Mandatory-PIN;My PIN</challenge>
   <challenge>My-Birthday;My birthday<challenge>
   <challenge>My favorite response;My favorite response</challenge>
<getChallengesResponse>
Keys starting with "Mandatory-" denote questions that must always be answered when authenticating via challenge/response. Note that questions for challenges with keys might vary with the requestor’s language.
checkChallengeResponses Operation
The checkChallengeResponses operation contains the psoID and a list of challenges along with their responses:
<chall:checkChallengeResponsesRequest requestID="chall-01">
    <chall:psoID targetID="accounts">
         <idattr:identifyingAttributes>
              <dsml:attr name="ts.domain"><dsml:value>WinEurope</dsml:value></dsml:attr>
             <dsml:attr name="logonname"><dsml:value>agerbe66</dsml:value></dsml:attr>
         </idattr:identifyingAttributes>
    </chall:psoID>
    <chall:challengeResponse>
         <chall:challenge>My favorite film star</chall:challenge>
         <chall:response>George Clooney</chall:response>
    </chall:challengeResponse>
…
</chall:checkChallengeResponsesRequest>
The psoID is the same item as described in the section "getChallenges Operation".
If the Web Service successfully verifies the responses, it returns the associated password policy in the corresponding response:
<chall:checkChallengeResponsesResponse status="success" requestID="chall-01">
    <passwordPolicy>
         <policy name="dxrPwdExpireWarning">0</policy>
…
    </passwordPolicy>
</chall:checkChallengeResponsesResponse>
The element <passwordPolicy> contains a list of <policy> elements. Each <policy> reflects one of the LDAP attributes in the password policy associated with the account. Name and value of the policy are the name and value of the LDAP attribute correspondingly.
The algorithm for finding the associated password policy of an account operates as follows:
-
If the account has a password policy link: take this one.
-
Otherwise take the policy that is referenced by the target system.
-
For (personal) accounts with a user: take the policy linked with the user.
-
If no policy can be found this way: take the default for the domain.
-
If no password policy exists in the domain: error.
The minimum number of responses is configured in the bean CheckChallengeResponsesAccountsHandler:
<bean id="CheckChallengeResponsesAccountsHandler"
class="com.siemens.idm.service.provisioning.spmlv2.accounts.CheckChallengeResponsesHandler"
scope="prototype" parent="BasicAccountsHandler">
         <property name="attributeNameMapping" ref="AttributeNameMapping"/>
         <property name="minimumNumberOfResponses" value="3"/>
         <property name="includePasswordPolicyInResponse" value="true"/>
</bean>
If you set the property includePasswordPolicyInResponse to false, the Web Service does not put the password policy into the response.
getPasswordPolicy Operation
The getPasswordPolicy operation allows a client to obtain the password policy associated with an account.This action is unnecessary in challenge/response scenarios because the policy is automatically contained in the checkChallengeResponses response.However, it can be helpful in scenarios where the client can authenticate itself via a certificate.In this case, the client needs to ask for the password policy explicitly.
The request needs the psoID with the attributes identifying the end user.
If the service successfully finds the account, it returns the list of attributes of the associated password policy.
One-Time Password
If an end user has forgotten his password, he can request a one-time password that is sent to his mobile phone via a Short Message Service (SMS) message.He can then authenticate against the Web Service with the one-time password in order to reset his password.
The Web Service provides the following operations to support this scenario:
-
sendOTP
-
setPassword
These operations support customized error messages.The next sections provide more detail about these operations and error messages.
sendOtp Operation
The sendOtp operation generates a one-time password and sends it to the requestor’s mobile phone via an SMS message.
The sendOtp request must contain a psoID with the identifying attributes for the end user’s account. Typically, these items are the login name and the name of the Active Directory domain.
<chall:sendOtpRequest requestID="otp-01">
   <chall:psoID targetID="accounts">
        <idattr:identifyingAttributes>
            <dsml:attr name="ts.domain">
                <dsml:value>WinEurope</dsml:value>
            </dsml:attr>
            <dsml:attr name="logonname">
                <dsml:value>agerbe66</dsml:value>
            </dsml:attr>
        </idattr:identifyingAttributes>
   </chall:psoID>
</chall:sendOtpRequest>
The status attribute in the sendOtp response indicates whether the operation succeeded or failed. On success, the response includes:
-
The time until which the one-time password is valid.
-
The destination type.
-
The mobile phone number, partially scrambled.
-
The user’s password policy.
| The one-time password is not part of the response. |
<chall:sendOtpResponse status="success" requestID="otp-01">
   <otpTtlEnd>20151008122615Z</otpTtlEnd>
   <otpDestinationType>mobile</otpDestinationType>
   <otpDestination>0198 56XXXX</otpDestination>
   <passwordPolicy>
        <policy name="dxrPwdExpireWarning">0</policy>
        …
   </passwordPolicy>
</chall:sendOtpResponse>
The format and validity period of the generated one-time password, the SMS message format and the name of the account or user attribute with the mobile phone number are configured in properties of the SendOtpAccountsHandler bean (see the file accountsContext.xml):
<bean id="SendOtpAccountsHandler"
class="com.siemens.idm.service.provisioning.spmlv2.accounts.SendOtpAccountsHandler"
scope="prototype" parent="BasicAccountsHandler">
        <property name="attributeNameMapping" ref="AttributeNameMapping"/>
        <property name="otpTimeToLive" value="15"/>
        <property name="otpDestinationAttributeName" value="mobile"/>
        <property name="otpDestinationType" value="mobile"/>
        <property name="otpPasswordLength" value="8"/>
        <property name="otpPasswordPolicy" value="0123456789"/>
        <property name="checkUserIdentifiers" value="false"/>
        <property name="otpMessageBody" value="#{'#{Common Text.OTPSMSText}'}"/>
</bean>
setPassword Operation
The setPassword request must contain the psoID for the end user’s account as in the sendOtp request. For authentication, the request must include the one-time password the user received via SMS. And finally, the request includes the new account password.
<pass:setPasswordRequest requestID="set-otp-01">
   <pass:psoID targetID="accounts">
        <idattr:identifyingAttributes>
            <dsml:attr name="ts.domain">
                <dsml:value>WinEurope</dsml:value>
            </dsml:attr>
            <dsml:attr name="logonname">
                <dsml:value>agerbe66</dsml:value>
            </dsml:attr>
        </idattr:identifyingAttributes>
   </pass:psoID>
   <chall:otpPassword>(otpPassword)</chall:otpPassword>
   <pass:password>(new password)</pass:password>
</pass:setPasswordRequest>
The status attribute in the setPassword response indicates whether the operation succeeded or failed. On error, the error attribute and the errorMessage element give more details.
<pass:setPasswordResponse status="success" requestID="set-otp-01"/>
Custom Error Messages
On failure, the sendOtp and setPassword request may return custom errors to indicate the cause of the failure; for example:
<pass:setPasswordResponse status="failure" error="customError" requestID="set-otp-01">
   <errorMessage>otpMismatch</errorMessage>
</pass:setPasswordResponse>
The list of custom error messages includes:
otpGenerationFailed - generating the one-time password failed.
otpNoAddress - neither the account nor the user have a mobile phone number.
otpSendFailed - sending the one-time password via SMS to the end user failed.
otpMismatch - the one-time password presented in a setPassword request doesn’t match.
otpTtlReached - the one-time presented in a setPassword request has expired.
otpLocked -the account is locked from authenticating via one-time password.
pwdPolicyMismatch - the new password presented in a setPassword request doesn’t comply with the password policies.
Groups Management
Groups in target systems can be managed by SPMLv2 requests using the target identifier “groups”.In addition to the mandatory operations add, modify, delete, and lookup, the provisioning service supports the following capabilities for groups:
-
Search, namespaceURI = “urn:oasis:names:tc:SPML:2.0:search”.The SPMLv2 search capability applies both to groups and group containers.
-
Reference capability.The groups service supports the following reference types:
-
dxrFunctionalAccount: simple references to privileged accounts.
-
dxrRoleParamLink: simple references to role parameters.
-
dxrObligationLink: simple references to obligations.
-
DirX Identity provides samples for requests and responses in the folder:
install_path/provisioningServices/spmlv2/groups.
You must provide appropriate DirX Identity access policies for the requesting user.
Identifiers
The identifiers in all requests are interpreted as the DNs (LDAP distinguished names) of the groups or containers.
If the add request provides an identifier (element <psoID>) the service tries to create the group or container with this DN. If the add instead contains a <containerID>, the service takes it as the DN of the parent container and creates an object beneath it. The RDN (relative DN) must either be passed as an attribute in the request or the object description has to calculate a default value.
Attributes
Mandatory attributes are the naming attribute cn and the object class. The object class attribute distinguishes groups and containers in add requests. An object class value of “dxrTargetSystemGroup” identifies a group. Otherwise the object is expected to become a container.
Other attributes are optional. Standard attributes are given in the listTargets response. Each target system will have its own set of proprietary attributes that DirX Identity does not check. Make sure that the attributes are defined in the respective object description of the domain.
References
| Account-group memberships are only managed via the accounts service! |
The reference values are simply mapped to the respective attributes with the same name.
The following references are supported:
-
dxrFunctionalAccount
-
dxrRoleParamLink
-
dxrObligationLink
-
dxrProject
-
dxrWorkflowLink
-
dxrDelWorkflowLink
-
dxrModWorkflowLink
-
dxrPrivAssDelWorkflowLink
-
dxrPrivAssWorkflowLink
-
dxrReappWorkflowLink
-
dxrSODWorkflowLink
The capability "urn:siemens:dxm:provisioning:group:RPValues:1:0" supports the management of role parameter values, which are modelled as specific properties.
Custom Objects
Sometimes DirX Identity customers not only need to extend standard DirX Identity domain objects like the user with custom attributes but to work with completely new objects.This task can be accomplished by creating new object descriptions.To manage these objects with the SPML Provisioning Web Services, they need to extend the Web Services configuration with custom target identifiers.
The Web Services provide generic classes to manage custom object types.These classes allow you to create, modify, delete, lookup and search such objects.In addition, standard capabilities - especially the reference capability - are supported out of the box.They must be enabled and configured analogous to the standard object types such as the user.
The following files must be adapted:
- applicationContext.xml:
-
This Spring bean configuration file contains the dispatcher configurations for the SPML operations: add, modify, etc.For each custom object the appropriate handler must be added to the dispatcher.
- customContext.xml:
-
This Spring bean configuration file is imported into the applicationContext.xml and should contain the custom bean configurations. They should be kept separate from the product configuration files in order to ease version upgrades.
- listTargetsRspCustom.xml:
-
For each entity, type one listTargets response file must be supplied and referenced from the applicationContext. It describes the schema and capabilities of entities associated with a target identifier.
The "Custom Objects Operations" section describes how the custom handler processes the SPMLv2 requests. For sample requests and responses, see the folder install_path/provisioningServices/spmlv2/custom. You’ll also find templates for the configuration files in this location.
Custom Objects Custom Context
The custom bean configurations for one entity type should be configured in a separate Spring bean configuration file: one file per entity type. This file is to be imported into applicationContext.xml. These configuration items should be kept separate from the standard product configuration files in order to minimize migration effort for version upgrades.
Copy the file customContext.xml delivered with the product in the spmlv2/custom folder to the WEB-INF folder of your Web Services application. Optionally rename it to myEntity*Context.xml*. In this file, define your custom handlers and adjust their properties. If you need to support more than one custom entity type, you must rename the sample bean names (not the Java class names).
You need to configure a handler for each operation and each capability supported by your custom entity types. The following section explains your changes for the handlers needed for one custom entity type.
CustomReferenceHandler Bean
Enter the references you want to support. Let’s assume you have only the contextLink as a reference. You need to enter this as an element of the refType2HandlerMap property. This property is a map with the reference type as the key and the reference handler bean as its value.
Standard reference handlers are already configured in the application context and you can simply use them here. Only if you have a new attribute (that is, a reference type) you need to define the handler bean analogous to the existing ones.
Here is the sample:
<property name="refType2HandlerMap">
        <map>
            <!--  key: reference type,  value: IReferenceHandler -->
            <entry key="dxrContextLink"><ref bean="ContextLink"/></entry>
        </map>
    </property>
Object Type Meta Data Beans
You need to define the meta data of your custom entity type and of the associated containers. For each type, you need to configure the following meta data: object class, entity type, object description name, naming attribute. You do this by configuring one bean of class ObjectTypeMetaData. Here is an example for dxrContext:
<bean id="objectTypeContext" class="com.siemens.idm.service.provisioning.spmlv2.custom.ObjectTypeMetaData">
        <property name="objectClass" value="dxrContext"/>
        <property name="entityType" value="dxrContext"/>
        <property name="odName" value="dxrContext"/>
        <property name="namingAttribute" value="cn"/>
</bean>
Make sure the object description with the given name exists and that it is associated with your custom entity when it is read from LDAP (the <mapping> section in the object description).
BasicCustomHandler Bean
The basic handler bean defines a bean of class BasicCustomHandler and contains maps with references to the before configured reference handlers and meta data. The object description name for your custom entity type (not for any containers) must be configured in an extra property:
<property name="objectDescriptionName" value="dxrContext"/>
The map objectTypeMap contains the references to object type meta data beans with the object description name as the key:
<property name="objectTypeMap">
     <map>
          <!--  key: OD name;  value: ObjectTypeMetaData -->
           <entry key="dxrContext" value-ref="objectTypeContext"/>
           <entry key="dxrContainer" value-ref="objectTypeContainer"/>
           <entry key="dxrCustomContainer" value-ref="objectTypeCustomContainer"/>
      </map>
</property>
The map capability2HandlerMap contains the capability handlers with the entity type as the key. Typically you will only have the reference handler as in the following sample:
<property name="capability2HandlerMap">
      <map>
           <!--  key: capability URI,  value: handler class -->
                   <entry key="urn:oasis:names:tc:SPML:2:0:reference">
                <ref bean="CustomReferenceHandler"/>
           </entry>
      </map>
</property>
Operation Handler Beans
For each of the operations you want to support, you must configure the appropriate bean. As the operations add, modify, delete and lookup are mandatory and you most probably want to support a search, you need to define at a minimum the following beans:
<bean id="AddMyEntity" class="com.siemens.idm.service.provisioning.spmlv2.custom.AddCustom" scope="prototype" parent="BasicCustomHandler"></bean>

<bean id="DeleteMyEntity" class="com.siemens.idm.service.provisioning.spmlv2.custom.DeleteCustom" scope="prototype" parent="BasicCustomHandler"></bean>

<bean id="LookupMyEntity" class="com.siemens.idm.service.provisioning.spmlv2.custom.LookupCustom" scope="prototype" parent="BasicCustomHandler"></bean>

<bean id="ModifyMyEntity" class="com.siemens.idm.service.provisioning.spmlv2.custom.ModifyCustom" scope="prototype" parent="BasicCustomHandler"></bean>

<bean id="SearchMyEntity" class="com.siemens.idm.service.provisioning.spmlv2.custom.SearchCustom" scope="prototype" parent="BasicCustomHandler"></bean>
If you have only one custom entity, you can leave the bean names "*Custom" of the sample files. Do not change the Java class names and make sure the parent reference matches your basic handler bean name!
Custom Objects ListTargets
You only need to provide a listTargets response file to comply with the SPMLv2 specification. It requires the implementation of a listTargets request, which returns a definition of all supported target identifiers. The Web Service creates the listTargets response by composing the content of all configured listTargets response files into one single response document.
The custom handler does not evaluate the entity and schema definitions so you don’t need to ensure the correct attribute names and entity schema definitions in the response file.
For each entity type, one listTargets response file must be supplied and referenced from the applicationContext. It describes the schema and capabilities of entities associated with a target identifier.
Copy the file listTargetsRspCustom.xml and optionally rename it according your entity type; for example, listTargetsRspMyEntity.xml.
In the element <target> replace the value of the attribute 'targetID' with your entity type, for example:
<spml:target ... targetID="myEntity">
As the schema information is not evaluated by the Web Service, you can leave the attribute and object class definitions as they are. Just for clarity, change the objectClassDefinition name from "dxrContext" to a name that reflects your entity; for example, 'myEntity'.
<spmldsml:objectClassDefinition name="myEntity">
Next, adapt the supportedSchemaEntity accordingly:
<spml:supportedSchemaEntity entityName="myEntity" isContainer="false"/>
Make sure that the capabilities are correct: Typically references to other objects are modeled as reference capabilities. The sample in listTargetsRspCustom.xml has 2 references: dxrContextLink and dxrCategoryLink. Adapt these parts as you need. Typically the reference names equal the LDAP attribute names. The attribute 'entityName' in <appliesTo> and <schemaEntity> has to refer to your entity, e.g. entityName="myEntity".
Application Context
The SPMLv2 Web Services are configured using Spring beans. The root configuration file needs to be the applicationContext.xml file in the WEB-INF folder of the deployed Web Service. This file mainly contains the configuration of the dispatcher beans for the SPML operations (add, modify, and so on) and imports entity type-specific configurations from corresponding files.
To enable the management of custom entity types, the handlers for this entity type must be added to the central dispatchers. This task must be performed in the one-and-only applicationContext.xml. For a template on how to do this, see the file customApplicationContext.xml delivered in the spmlv2/custom folder of the product installation.
This Spring bean configuration file contains the dispatcher configurations for the SPML operations: add, modify, and so on. The appropriate handler for each custom object must be added to the dispatcher.
Make sure to import your handler bean configurations from your custom context file (see the section “Custom Objects Custom Context” for a description of how to generate this):
<import resource="myEntityContext.xml"/>
There is one dispatcher for each operation. Mandatory operations are: add, modify, delete, lookup and most often you will want to search. In these cases, you need to extend the handler map of the following dispatchers.
ListTargetsHandler
Enter your basic handler bean and your listTargets response file into the respective maps:
<property name="target2HandlerMap">
    <map>
        <!--  key: target id,  value: ITargetHandler bean ref -->
        <entry key=...</entry>
        <entry key="myEntity"><ref bean="BasicMyEntityHandler"/></entry>
    </map>
</property>
 <property name="target2ResponseMap">
    <map>
        <!--  key: target id,  value: name of file with list targets response -->
        <entry key=.../>
        <entry key="myEntity" value="WEB-INF/listTargetsRspMyEntity.xml"/>
    </map>
</property>
Custom Objects Operations
This chapter gives information on how the operations (add, modify, etc) are implemented in the generic handlers.
Add
The AddCustom handler class supports creation of object types including containers. It expects it is responsible for one object type (such as a context object) and a number of container objects that can contain that object type.
The addRequest needs to contain an attribute "objectClass" whose values allow for determining the appropriate object description. The algorithm is based on the configuration of the Object Meta Data beans. See the chapter on custom context for more details. The handler uses the values of the objectClass as a key to get an object Meta Data object. This object contains the name of the corresponding object description.
The addRequest also needs to contain either the DN of the new object or its parent container.
If an approval workflow has been started rather than creating the object in the LDAP domain, the handler returns the state "PENDING".
Modify
The modifyCustom handler performs the requested modifications using the Service class configured in the object description.
Delete
In case the object to be deleted is a container, the deleteCustom handler first deletes its child objects, if the recursive flag has been set in the request. The object is considered a container, if its object description name is not the one of the entity as configured in the property "objectDescriptionName" of the BasicCustomHandler. See the configuration of the custom context for more details on this.
Lookup and Search
The lookup- and searchCustom handlers use the normal read and search functionality to retrieve the matching objects.Search is done using LDAP paging in the same way as for the other entity types.
Attributes
The handler processes the attributes transparently.In particular, it does not evaluate the listTargets response configured in the appropriate file (see the section on listTargets response).You only need to make sure that the properties are configured in the corresponding object descriptions.
User Hooks
The SPML Provisioning Web Services support custom code before and after a request is processed.Note that this feature is only available for SPMLv2 based requests.
User Hook Interface
When receiving a SPMLv2 request the request processor checks if a user hook is configured.If a user hook is configured the processor performs the user hook before and after processing the request.
A user hook must implement the interface “ISpmlv2Userhook” and it can optionally also implement “ISpmlv2UserhookSetContext”.For a Java documentation see the folder Documentation/DirXIdentity/ProvisioningWebServices of your installation media.
The interface “ISpmlv2Userhook” defines two methods:
- beforeRequest(…)
-
DirX Identity performs this method before it processes the request itself. It passes the request and the authenticated LDAP connection that the service uses itself. The user hook may perform any operation including reading and writing in the Identity domain. It may change the request and return it back to the request processor. In case of errors it should throw an exception. In this case DirX Identity returns an error response to the client.
- afterRequest(…)
-
DirX Identity performs this method after it has processed the request itself. The user hook receives the request, the response produced by DirX Identity, and the LDAP connection. This allows the user hook to perform any operations after the request was processed. It may even react on failed requests.
The method must return a SPMLv2 response that is then returned to the client.
The interface “ISpmlv2UserhookSetContext” defines one method:
- setContext (…)
-
With this method DirX Identity passes a request context. This context implements the interface “ISpmlv2UserhookContext”. It especially provides a method to read the DN of the authenticated user.
DirX Identity returns the response from the user hook to the web service client.
For a sample implementation see the folder Additions/ProvisioningWebServices/samples on your installation media. It contains the class “TombstoneUserhook”. This class considers only delete requests for target systems. In its method “beforeRequest” it copies the target system subtree to the subtree denoted by the configured root DN.
User Hook Configuration
User hooks are configured using Spring dependency injection. In the file
servlet-home/WEB-INF/applicationContext.xml
a bean “DispatcherWithUserhooks” is defined with a map of references to user hook beans. The target identifiers are used as keys for the user hooks. Thus, you can define a different user hook for each target identifier.
The following sample shows how to configure the user hook “TombstoneUserhook” for the target identifier “targetSystems”:
<bean id="TombstoneUserhook" class="com.siemens.idm.service.provisioning.spmlv2.ts.TombstoneUserhook" scope="prototype">
  <property name="tombstoneDN" value="l=tombstone,cn=My-Company"/>
</bean>
<bean id="DispatcherWithUserhooks" class="com.siemens.idm.service.provisioning.spmlv2.BasicDispatcher" scope="prototype">
 <property name="userhookMap">
     <map>
         <!--  key: target id,  value: ISpmlv2Userhook implementation bean ref -->
         <entry key="targetSystems">
             <ref bean="TombstoneUserhook"/>
         </entry>
     </map>
 </property>
</bean>
The relevant key for user hooks in Iterate operations is calculated from the initial searchRequest related to the Iterate operation.
Configuring the user hook as a Spring bean allows a very flexible configuration.In the sample above, the user hook class has got a public field named “tombstoneDN” that is set with the value “l=tombstone,cn=My-Company”.
Using the Sample Client
The library com.siemens.dxm.provisioning.jar contains a Java-based SOAP client and the classes that represent all the requests and responses.You can use this client as the basis for a quick client implementation.It is configured the same way as the other agents based on the Java Connector Integration Framework.
This section describes how to:
-
Get started with the sample client
-
Test the sample client’s functionality
An additional convenience class is provided as a sample and simplifies instantiating and configuring the client.See the section "Using the Sample SOAP Connector" for more details.
Getting Started with the Test Client
A test client is available in install_path/provisioningServices/spmlv2. It is based on the DirX Identity Connector Integration Framework and can be used for initiating sample requests and obtaining sample responses. Perform these steps to get started:
-
Use a command prompt or shell and navigate into install_path/provisioningServices/spmlv2.
-
If you intend to use client-SSL for the connection between the Web Services and the Java-based Server, perform the steps described in the DirX Identity Connectivity Administration Guide, chapter "Server SSL Connections" for Java-based Server, section "HTTP/SOAP Connection to DirX Identity SOAP Clients”.
-
Verify and, if necessary, customize the file conf.xml with respect to the parameter url, the authentication parameters, and the SSL parameters of the SOAP connector configuration section. We recommend creating a backup copy before you start to customize. The following cases must be considered:
-
If Non-SSL-connections to the Web Services have been deployed into the Java-based Server. The file conf.xml as shipped with the product is suitable for the demo domain only and for Tomcat/IdS-J port 40000 and non-SSL connections to the Java-based Server. Here is sample of the related connector configuration:
<connection type="Soap" url="http://localhost:40000/ProvisioningService-My-Company/services/Spmlv2RequestService" />
Customize the url parameter of the connector configuration so that it is correct regarding host, port and the technical domain name in the URL.
-
If Non-SSL-connections to Web Services have been deployed into a native Tomcat. In this case, the port 40000 is inappropriate and must be replaced by the Tomcat port.
-
For SSL connections, see the subsection "Securing Connections between Web Services Clients and Web Services with SSL" of the section "Establishing Secure Connections with SSL" in the DirX Identity Connectivity Administration Guide and ensure that the url parameter of above connector configuration starts with https:.
-
If the use of proprietary authentication based on asymmetric key cryptography is required, a key material must be generated and correctly deployed. Use the sample configuration file install_path*/provisioningServices/spmlv2/conf-proprietary-auth.xml* as a sample for your configuration file. See the section "Proprietary Authentication" for more details.
-
-
Check the file name for the file reader in the configuration conf.xml. The file reader is configured in the <connector> element with name "in". Ensure that the contents of the "filename" attribute is "request.xml". This is typically true for the shipped with the project.
-
Launch the fireSpmlv2-Request.bat sample (or the ./fireSpmlv2-Request.bat sample for UNIX) with an additional parameter that identifies the operation to be tested. The possible values for the sample are case-sensitive and described below. The operations to be executed are specified in sample-request.xml. The related response file on execution is sample-responseOut.xml. Response and trace of the last launch of a sample are responseOut.xml and trace.txt, respectively. For example, to run the sample for creating a role container for Windows platforms, enter the command fireSpmlv2-Request.bat addRoleCont.
To get started, we recommend running the test client with the samples in following order:
-
Value listTargets - specifies a listTargets operation, using the request listTargets-request.xml and creating a response file listTargets-responseOut.xml.
-
Value addRoleCont - specifies adding a role container, using the request addRoleCont-request.xml and creating a response file addRoleCont-responseOut.xml.
-
Value addRole - specifies adding a role, using the request addRole-request.xml and creates a response file addRole-responseOut.xml.
-
Value lookupRoleCont - specifies lookup for a role container.
-
Value lookupRole - specifies lookup for a role.
-
Value searchRole - specifies searching for roles and role containers. In addition to the found entries, an iterator identifier is returned in the response. For the very first search request after restart of IdS-J or Tomcat, its value is 1. The current identifier can be found by searching for the pattern iterator in the response file.
-
Value iterate - specifies getting the next page of the search result associated with the iterator identifier 1. Note that this identifier is suitable only for the very first search request after restarting the IdS-J or Tomcat, respectively. In all other cases, the identifier in the request file must be changed according to the search result for paging.
-
Value closeIterator - specifies client-side termination of paging through the search result associated with iterator identifier 1. Note that this identifier is suitable only for the very first search request after restarting the IdS-J or Tomcat, respectively. In all other cases, the identifier in the request file must be changed according to the search result for paging.
-
Value delRole - specifies deletion of the role created by running the addRole sample.
-
Value delRoleCont - specifies deletion of the role container created by running the addRoleCont sample.
Testing the Sample Client Functionality
Before you can test the sample client functionality, make sure you have performed the steps described the section "Getting Started with the Test Client", including at a minimum the successful execution of the operations listTargets, adding role container and deleting role container.
Perform these steps to test other functions using the related samples; for example, the samples delivered for users:
-
Use a command prompt or shell and navigate into install_path/provisioningServices/spmlv2.
-
Create a backup copy of the file conf.xml.
-
Change the file name for the file reader in the configuration conf.xml. The file reader is configured in the <connector> element with name in. Exchange the contents of the filename attribute with another one; for example, users/sampleRequests.xml.
-
Remove the files responseOut.xml and trace.txt if they still exist from a previous test client launch.
-
Launch the command fireSpmlv2-Request.bat (or ./fireSpmlv2-Request.bat for UNIX).
-
View the related response responseOut.xml and trace.txt.
-
Finally, restore the file conf.xml from your backup.
Generating a Client from the WSDL
Typically you obtain a client for the Web Service by using some tool, which generates the Java (or .Net or …) classes from the wsdl and XML schema files. In order to do this you should be aware of the wsdl component model shown in the next diagram:
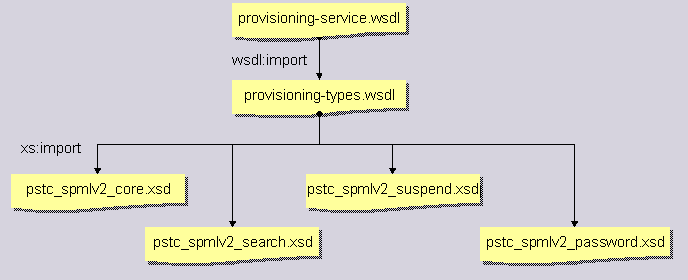
The subfolder WEB-INF/etc of a deployment instance contains a file provisioning-service.wsdl which in turn contains the wsdl description for the Web Service. It imports the services types in the file provisioning-types.wsdl, which in turn imports the necessary SPML schemata. But for implementing a client you need to generate classes from one or more other XML schemata:
-
pstc_spmlv2_reference.xsd: SPMLv2 definitions for reference data. They are used for practically all object types.
-
DSMLv2_SPMLv1.xsd: Since the Provisioning Web Services support the SPMLv2-DSMLv2 profile, the client needs the DSMLv2 schema plus some additions required and defined later on for SPMLv2. These are contained in the given file, but could also be obtained via the official OASIS links.
For selected features, the Web Services need some proprietary XML schemata:
-
operAttrs.xsd: operational attributes that can be passed with some requests; for example, the timeout parameter for creation of a user.
-
paramAsg.xsd: role parameter values in user-role assignments.
-
rpmatchrule.xsd: role parameter match rules in roles.
-
perm-matchrule.xsd: match rules in permissions.
-
tsCreateOptions.xsd: options useful when creating a target system.
-
tsDeleteOptions.xsd: options useful when deleting a target system.
-
accountGroupMembership.xsd: states of account-group memberships managed with accounts (not groups!).
| Because of a bug in the Axis1 toolkit used for SOAP processing, the wsdl returned upon the "<patch>?wsdl" URL only contains part of the wsdl definition: only the elements defined in the file provisioning-service.wsdl, but not the content of the imported files. Therefore, we recommend using the wsdl and xsd files delivered with the product. Note, too, that some tools have some deficiencies with respect to wsdl and xsd imports and with handling <xsd:any> definitions. We have had good experience using the JAXWS tools of the JEE development kit. |
Using the Sample SOAP Connector
To support easy implementation of a SPMLv2 SOAP client, a convenience class com.siemens.dxm.provisioning.framework.client.SampleSpmlv2Client is delivered as part of the Web Services client library. It provides a method for sending SPMLv2 requests via the SOAP connector and accepts configuration options in a variety of ways.
You can simply instantiate the class from your Java application, pass the connector’s configuration via one of the open() methods, create SPMLv2 requests using the classes of the library and pass them to the client’s processSpmlv2Request() method. The client sends the appropriate SOAP request to the configured URL of the provisioning web service and hands the response back as a SPML ResponseType class.
Providing Configuration Data
The client requires some configuration properties in order to send SOAP requests to the web service: URL (or port, host, path and ssl), user, password and optionally key store and trust store. For more details, see the SPML SOAP connector of the Java Integration Framework.
The client provides a number of open methods that accept configuration data:
- open(DxmConnectorConfig connectorConfig)
-
The Java interface DxmConnectorConfig represents a Java Bean with getter and setter methods for connector and connection properties. The corresponding classes are generated from a XML schema that describes the configuration of a connector within the Java Integration Framework.
You can either insert the configuration properties using the appropriate setter methods or unmarshall the class from a file or string holding the correct XML document. The following snippet shows how to unmarshall the class from a file:
FileReader r = new FileReader(conffilename);
DxmConnectorConfig connectorConfig = Connector.unmarshalConnector(r);
- open(String conffilename)
-
If you have the XML configuration document stored in a file, it is sufficient to pass the file name to the client. It then creates the configuration class as described above.
- open(Properties props)
-
The simplest way is to pass the configuration in a Properties class, i.e. a list of properties. You simply need to provide values for the following properties: url (or alternatively port, host, path and ssl), user, password and optionally keystore, keystorePassword, keystoreAlias, truststore, truststorePassword, timeout, maintainSession.
The JUnit class test.spmlv2.client.TestSpml2SampleClient shows how to create and use the sample connector. It also shows how to build requests and evaluate responses. The sources of both classes are provided in the Additions folder of your product DVD.