Using DirX Identity Web Center
Identity Web Center is a set of applications that supply identity management functions for use on the web. The applications run on Apache Tomcat and can be accessed by standard Internet browsers.
The DirX Identity product offers two separately licensable versions of Web Center:
-
A full-function version that provides the complete set of self-service and management features for end users and administrators.
-
A "password management" version that provides a specialized subset of services that allows end users and service desk members to change end user passwords.
Both versions of the Web Center application are delivered with a default configuration so that they can be used right away.
This chapter describes the features and services delivered with the full Web Center package, including general information about:
-
Configuring Web Center
-
The Web Center page layout
-
How to start and log in to Web Center
-
Using details pages
This chapter also provides information on how to use the following Web Center services:
-
Self Service - permits you to modify your own user data and subscription of services.
-
Delegation - allows you to display and delegate your access rights. DirX Identity currently provides an older and a newer implementation and supports them both.
-
Work List - allows you to handle approval and certification tasks.
-
User Management - allows you to display and manage other users' data.
-
Role Management - allows you to display and manage roles.
-
Permission Management - allows you to display and manage permissions.
-
Group Management - allows you to display and manage groups.
-
Account Management - allows you to display and manage accounts.
-
Rule Management - allows you to display and manage provisioning rules and password policies.
-
Tools - allows you manage reports.
-
Help - opens a help file in a separate browser window.
-
Logout - allows you to log out from Web Center.
-
Business Object Management - allows you to manage business objects.
The chapter "Web Center for Password Management" describes the specific features and functions provided with the "password management" version of Web Center.
Configuring Web Center
The topics in this section describe Web Center configuration options, including information about:
-
Using the Web Center configuration file web.xml
-
Configuring Web Center bind passwords
-
Configuring single sign-on
-
Configuring heap size
-
Setting the default language
Using the Web Center Configuration File
The DirX Identity configurator normally sets login parameters. You should use it to change the relevant parameters at any time.
You can also use the web.xml configuration file to configure the most important parameters for Web Center by hand. The pathname is:
install_path\web\webCenter-domain\webCenter\WEB-INF\web.xml
The following sections describe the most important web.xml parameters. For detailed descriptions of all web.xml parameters, see the section "Deployment Descriptor web.xml" in the DirX Identity Web Center Reference.
Login Parameters
You can set the following login parameters in the Login Parameters section (these parameters are set by the DirX Identity configurator):
-
com.siemens.webMgr.ldap.anyone - the user that is used for self-registration workflows (Provisioning Configuration). This user has fixed access rights defined by access policies.
-
com.siemens.webMgr.ldap.baseDN - the base DN to access the domain (for example, "cn=My-Company").
-
com.siemens.webMgr.ldap.host - the name of the server that contains the Identity Store (Provisioning Configuration).
-
com.siemens.webMgr.ldap.port - the port of the server that contains the Identity Store (Provisioning Configuration) (per default 389).
-
com.siemens.webMgr.ldap.ssl (false) - the switch that allows accessing the Identity Store (Provisioning Configuration) via SSL.
-
com.siemens.webMgr.ldap.user - the technical user that is used to access the Identity Store (Provisioning Configuration). The specific user’s access rights are calculated by access policies.
For example, you may want to set the Login parameter section to the correct parameters for your customer domain.
Request Workflow Service Parameters
This section comprises parameters for the connection from Web Center to the request workflow service.
-
com.siemens.webMgr.requestworkflow.keystoreName - the location of the key store for single sign-on from Web Center to the request workflow server.
-
com.siemens.webMgr.requestworkflow.keyAlias (WebCenter) - the alias of the key entry in this key store.
-
com.siemens.webMgr.requestworkflow.updateTimeout (0) - the amount of time (in milliseconds) to wait for a response from the request workflow engine (for example, the list of allowed workflows or the next activity to be performed).
Session Configuration
This section comprises standard configuration parameters for session handling:
-
session-timeout - the time (in minutes) after which the session for a logged in user times out if no action is taken.
-
tracking-mode - the way in which the browser sends the session ID to the server with each request. For security reasons, we strongly recommend setting the mode to COOKIE.
Log Level Parameters
-
com.siemens.webMgr.log.level - allows you to set the amount of logging for the Web Center application:
-1 - OFF: disables logging
-2 - Uses the log4j configuration file WEB-INF/classes/log4j.properties
0 - SEVERE: displays only severe errors
1 - INFO: displays additional information
2 - FINEST: shows the most detailed level of information (this selection can be useful for viewing JMS message content or for performing Struts debugging).
Configuring Web Center Bind Passwords
Web Center must perform a login to the Identity Store as part of a user login. The necessary passwords for this action must be present in the Web Center configuration file. Web Center can read passwords in clear text or in encrypted format.
If you enter a password in clear text, the server reads it during the next startup, encrypts it and writes it back to the configuration file. From now on, the password information is no longer readable. If you are in doubt that the right password is set or if you need to set a new password, simply replace the encrypted value with the clear text value. During the next Web Center startup, the server will encrypt the new password (or pin value).
You can set the passwords in the file:
install_path*\web\webCenter-domain\webCenter\WEB-INF\password.properties*
This file contains the following passwords:
ldap - the technical password used by Web Center for all accesses. The individual accesses of users are protected via access policies. For details about access policies, see the DirX Identity Provisioning Administration Guide.
ANYONE - the password used for self-registration processes with restricted functionality.
pin - the PIN for the private key used to encrypt passwords.
previousPin - the PIN for the private key previously used to encrypt passwords.
Configuring Challenge/Response Authentications
This section describes how to set up challenge/response authentications in Web Center.
Configuring Challenge Proposal Lists
A proposal list is a set of predefined questions from which users can select when editing their authentication questions. You can define a proposal list for each language that Web Center supports. If there is no proposal list defined for a specific language, Web Center uses the default list.
The proposed questions for one language are independent of the questions for another language and the number of questions can vary with each language. The following example shows a set of four English questions, while the German set includes only three questions.
Language “en“
-
My PIN
-
My favorite DNA sequence
-
My favorite random number
-
My favorite response
Language “de”
-
Meine PIN
-
Meine Lieblings-DNS-Sequenz
-
Mein Lieblingstier
In its simplest form, a proposal defines the text of the question displayed in Web Center whenever a user edits his authentication questions or attempts to authenticate via challenge/response. When editing, the proposed questions are available for selection in the section “Questions from Proposal List“. Questions that have previously been answered are also displayed in this section, provided they match one of the proposed questions. If not, they are displayed in section “Other Questions“. The latter case occurs not only for free text questions but also for questions selected from a proposal list for a different language.
Identifying Questions from Different Languages
In the above example, the English question “My PIN“ is considered to be different from the German question “Meine PIN“ although both questions are just translations of the same question.
Suppose a user edits his questions in English and defines an answer for “My PIN”. Later on, he edits his questions again, this time in German. Question “My PIN” is then shown in section “Other Questions” while the proposal list section allows selecting “Meine PIN”. The user could then enter a different answer for “Meine PIN” than for “My PIN”.
Usually, however, both questions are considered identical and should just specify different labels for the same question. A response assigned to “My PIN” should be also a response to “Meine PIN”, and vice versa.
You can achieve this by assigning the same key to both questions, for example, the key “PIN”:
Language “en“
-
PIN;My PIN
-
DNA;My favorite DNA sequence
-
My favorite random number
-
My favorite response
Language “de”
-
PIN;Meine PIN
-
DNA;Meine Lieblings-DNS-Sequenz
-
Mein Lieblingstier
Separate the key and label with a semicolon (;). Assign the key to the corresponding label in each proposal list containing the question.
Defining Mandatory Questions
You can mark one or more questions from a proposal list as mandatory. Users must then define answers to these questions when editing their authentication questions. And if a user attempts to authenticate via challenge/response, s/he must give the correct answers to all mandatory questions.
A question marked as mandatory for one language must also be marked as mandatory for all other languages. Otherwise a user having entered the mandatory questions for one language might fail to authenticate in a different language since he hasn’t answered the mandatory questions for this language. Or he might be able to authenticate in another language without answering mandatory questions if the other language has no mandatory questions defined. Issues might also arise when editing authentication questions in different languages with different sets of mandatory questions.
A question is mandatory if its key starts with “Mandatory-”. For example:
Language “en”
-
Mandatory-PIN;My PIN
-
DNA;My favorite DNA sequence
-
My favorite random number
-
My favorite response
Language “de”
-
Mandatory-PIN;Meine PIN
-
DNA;Meine Lieblings-DNS-Sequenz
-
Mein Lieblingstier
If a service desk member is asked by a user to reset his password (via Web Center for Password Management), he usually checks the user’s identity by asking him to give the answers to one or more of his authentication questions. In this case, Web Center for Password Management indicates to the service desk member which questions are mandatory. The service desk member, however, can decide whether the questions must be answered for a successful identification.
Relevant DirX Identity Manager Objects
In DirX Identity Manager, open the Provisioning view → Domain Configuration and change to folder Customer Extensions → Proposal Lists → Nationalization → Challenges. This folder contains a proposal list for each supported language. The name of a proposal list is identical to the corresponding language name (like en or de), or to language and country name (like en_US or de_AT).
Each proposal list is of type String and specifies the proposed questions in Proposed Values.
The default language can be assigned to Default Language in the Challenges folder.
Other Configuration Options
You can customize challenge/response in the file webCenter.properties by changing the following parameters:
-
editableChallenges - Allow (true) or prohibit (false) free text questions. Default: true.
-
minEnteredChallenges - The minimum number of questions to define and answer. Default: 6.
-
challengeResponses.minimumResponseLength - The minimum response length. Default: no minimum length.
-
challengeResponses.duplicateResponsesAllowed - Allow (true) or prohibit (false) identical answers to different questions. Default: true.
-
challengeResponses.trimOnAnswering - Whether to remove (true) leading and trailing white spaces from responses during challenge/response authentication. Default: true.
-
challengeResponses.trimOnEditing - Whether to remove (true) leading and trailing white spaces from free text questions and responses when editing authentication questions. Default: true.
Configuring Single Sign-on
DirX Identity Web Center can use single sign-on (SSO) methods to authenticate users. In addition to the usual DirX Identity default authentication, the Web Center supports the following single sign-on methods:
-
Authentication via HTTP header, providing either
-
A target system domain and account that uniquely identifies a user
-
An attribute value uniquely identifying a user
-
A user’s distinguished name
HTTP header authentication subsumes authentication with a user certificate and via a request-scoped attribute (instead of an HTTP header).
-
Windows single sign-on via the SPNEGO authentication module
-
SAP logon ticket
A single sign-on request is first processed by one or more modules that extract the user credentials from the request and optionally validate the credentials.
On success, the request is forwarded to the Web Center authentication module which maps the credentials to a DirX Identity user identity used for control decisions in subsequent operations. The following figure illustrates the process.
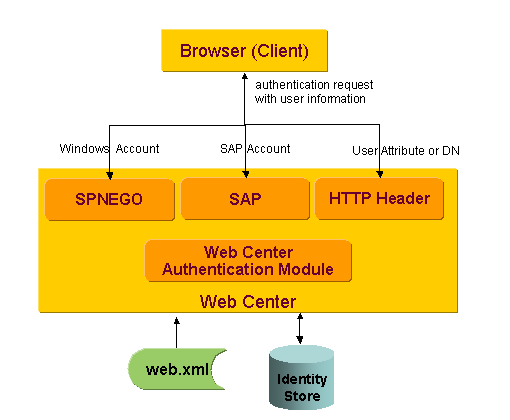
As shown in the figure, Web Center checks an incoming authentication request against local configuration information contained in the configuration file web.xml to determine if the authentication request matches the pre-requisites for single sign-on specified in the file. Web Center then authenticates the request locally according to the DirX Identity default authentication procedure - by checking the credentials transmitted in the authentication request against the DirX Identity store - or forwards the user information to the corresponding internal authentication module. Web center maps the user information onto the DirX Identity user identity after successful single sign-on authentication.
The following sections describe the supported methods and how to configure them.
| When using single sign-on, you must set up the connection from Web Center to the request workflow server (a component of the Java-based server) for single sign-on as well. (See the DirX Identity Web Center Reference for details.) |
About the Web Center Authentication Module
This section provides an overview of the configuration options and the resolution algorithms of the Web Center authentication module.
Configuration Options
To perform single sign-on authentication specify the following context initialization parameters in the configuration file web.xml.
General LDAP Parameters
The names of the general LDAP parameters start with the prefix com.siemens.webMgr.ldap. DirX Identity automatically assigns the appropriate values while performing initial configuration. The following table lists the relevant general LDAP parameters:
| Parameter Name | Default | Description |
|---|---|---|
baseDN |
cn=My-Company |
General LDAP search base for DirX Identity Provisioning |
Module-Specific Parameters
The names of the SSO module specific parameters start with the prefix com.siemens.webMgr.auth. The following table lists the parameters:
| Parameter Name | Default | Description |
|---|---|---|
varName |
com.siemens.webMgr.ssoUserInfo |
Session-scoped variable name of the credentials |
userBase |
cn=Users,LDAP_search_base |
Search base for user entries |
userFilter |
(&(objectclass=dxrUser)(sn=%USER_ID)) |
Search filter for user entries |
targetSystemBase |
cn=TargetSystems,LDAP_search_base |
Search base for target system entries |
targetSystemFilter |
(&(objectclass=dxrTargetSystem) |
Search filter for target system entries |
accountFilter |
(&(objectclass=dxrTargetSystemAccount) |
Search filter for account entries |
accountUserLink |
dxrUserLink |
Attribute name of the attribute storing the user’s DN in an account entry |
Resolution Algorithm
The Web Center authentication module uses the SSO credentials from the session-scoped variable to find a matching user in the DirX Identity database. The module supports the following resolution algorithms:
-
Find a user with a given DN.
-
Find a user that matches a given user attribute value.
-
Find a user that is linked to a given account in a given target system.
The first two options only differ in the configuration options.
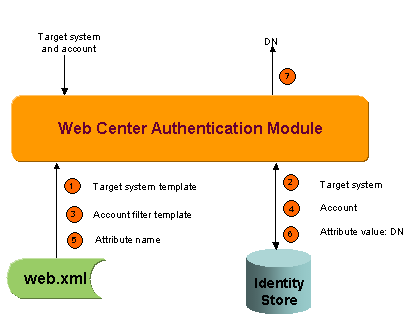
Resolution Algorithm with Given DN or Attribute Value
The Web Center authentication module performs the following steps:
-
Reads the templates for user search base and filter from the configuration file web.xml and replaces all occurrences of %USER_ID in both templates with the given user DN or attribute value.
-
Performs a search in the DirX Identity store below the resulting search base with the resulting filter.
-
If the search returns exactly one user, the authentication module returns success and the user’s DN; otherwise, it returns an error.
The following figure illustrates this resolution algorithm.

Resolution Algorithm with Target System and Account
The Web Center authentication module performs the following steps:
-
Reads the templates for target system search base and filter from the configuration file web.xml and replaces all occurrences of %ACCOUNT, %DOMAIN, and %CLIENT in both templates with the specified account, domain, and client values.
-
Performs a search in the DirX Identity store below the resulting search base with the resulting filter.
-
If the search returns exactly one target system, the authentication module reads the account filter template from the configuration file web.xml and replaces all occurrences of %ACCOUNT, %DOMAIN, and %CLIENT in the template with the specified account, domain, and client values; otherwise, it returns an error.
-
Performs a search in the DirX Identity store below the target system found in step 2 with the resulting filter.
-
If the search returns exactly one account, the authentication module reads the attribute name that links accounts to their users from the configuration file web.xml; otherwise, it returns an error.
-
Reads the attribute value (a user DN) of the account found in step 4.
-
On success, the authentication module returns the user DN; otherwise, it returns an error.
The following figure illustrates this resolution algorithm.
Using SSOHeaderFilter
The SSOHeaderFilter is a servlet filter that extracts SSO credentials from an HTTP header and stores them in a session-scoped variable.
The filter can act as a stand-alone SSO module in case the client provides unencrypted credentials via an HTTP header. Its other purpose is to copy credentials provided by another SSO module (for example, a Tomcat valve) to session-scope.
Note that the filter does not validate the source of the credentials. As a result, deploying it as a stand-alone SSO module may cause a security breach if untrusted clients can access WebCenter directly.
Filter Definition
The filter definition must be inserted in the configuration file web.xml after the SessionFilter definition as follows:
<!-- SSO header filter definition -->
<filter>
     <filter-name>
               SSOHeaderFilter
</filter-name>
<display-name>
   SSO Header Filter
</display-name>
<description
    Evaluates single sign-on information passed in HTTP headers
</description>
<filter-class>
   com.siemens.webMgr.filter.SSOHeaderFilter
</filter-class>
Initialization parameters
<filter>
Initialization Parameters
The following table lists the initialization parameters:
| Parameter Name | Default | Description |
|---|---|---|
headerName |
none |
HTTP header name, or name of a request-scoped variable |
authType |
none |
Expected authorization type (for example, BASIC) |
type |
account |
Type of credentials: user or account |
userRegExpr |
(.*) |
Regular expression to extract the user attribute value or DN from the header value |
domainRegExpr |
[^@]*@(.*) |
Regular expression to extract the domain from the header value |
clientRegExpr |
- |
Regular expression to extract the client from the header value |
accountRegExpr |
([^@]*)@.* |
Regular expression to extract the account from the header value |
varName |
com.siemens.webMgr.ssoUserInfo |
Session-scoped variable name of the credentials |
Notes
This section provides information about SSOHeaderFilter operation.
headerName
The header or variable value is obtained as follows:
-
If the header name is UserPrincipal:
Call request.getUserPrincipal().getName(). -
If the header name is Authorization or RemoteUser:
Call request.getRemoteUser(). -
If the header name starts with ClientCertificate.:
Call request.getAttribute(“javax.servlet.request.X509Certificate”) to get the certificate and extract the data identifying a user from the certificate as described below. -
Otherwise, call request.getHeader(<headerName>). If the header value is empty, call request.getAttribute(<headerName>).
To extract data from a certificate, the filter proceeds as follows:
-
If the header name starts with ClientCertificate.Principal.:
Call cert.getSubjectX500Principal() to get the principal DN and extract data from the DN as described below. -
If the header name starts with ClientCertificate.AltName.DirectoryName.:
Get the directory name from the certificate subject’s alternative names and extract data from the DN as described below. -
If the header name is ClientCertificate.AltName.rfc822Name:
Get the mail address from the certificate subject’s alternative names.
To extract data from a certificate subject’s DN, the filter proceeds as follows:
-
If the header name ends with dn:
Take the entire DN as value. -
If the header name ends with rdn:
Take the attribute value of the last RDN as value. -
If the header name ends with <RDN attribute type>:
Take the attribute value of the last RDN with that attribute type as value.
Header name comparison is done ignoring case.
authType
The current authorization type is obtained by calling request.getAuthType(). If an authorization type is not configured, the current type is arbitrary and may be missing.
userRegExpr
The default expression extracts the entire header value.
domainRegExpr and accountRegExpr
The default expressions are suited for header values in the format account*@*domain.
Regular Expressions
For the syntax of regular expressions, refer to the API specification of the standard Java package java.util.regex.
Filter Mapping
The filter must be mapped to the URL pattern *.do and *.jsp. The mappings must be inserted in the configuration file web.xml after the SessionFilter mappings.
<!-- SSOHeaderFilter mappings -->
<filter-mapping>
   <filter-name>SSOHeaderFilter</filter-name>
   <url-pattern>*.do</url-pattern>
<filter-mapping>
<filter-mapping>
   <filter-name>SSOHeaderFilter</filter-name>
   <url-pattern>*.jsp</url-pattern>
<filter-mapping>
<filter-mapping>
   <filter-name>SSOHeaderFilter</filter-name>
   <url-pattern/saveFile</url-pattern>
<filter-mapping>
Authentication via HTTP Header
This section provides information about the authentication process via HTTP header.
Authentication Process with User Attribute
This section provides information on how to administer the configuration file web.xml when performing authentication with a user attribute in the HTTP header and how the authentication is processed.
SSOHeaderFilter Configuration
For configuring the SSOHeaderFilter, the following rules apply:
-
The header name is use case specific.
-
The credential type is user.
-
All other parameters are not relevant or can be left to their default values.
Example:
When the header name is SCGID the configuration is as follows:
<init-param>
     <param-name>headerName</param-name>
     <param-value>SCGID</param-value>
</init-param>
<init-param>
     <param-name>type</param-name>
     <param-value>user</param-value>
</init-param>
Web Center Authentication Module Configuration
For configuring the Web Center authentication module, the following rules apply:
-
The attribute name in the user filter must be set to the appropriate value.
-
All other parameters are either not relevant or can be left to their default values.
When the attribute name is gid the configuration is as follows:
<context-param>
<param-name>
com.siemens.webMgr.auth.userFilter
</param-name>
<param-value>
(&(objectclass=dxrUser)(gid=%USER_ID))
</param-value>
</context-param>
Authentication Process
The following figure illustrates the authentication process with a user attribute given in the HTTP header identifying the user.
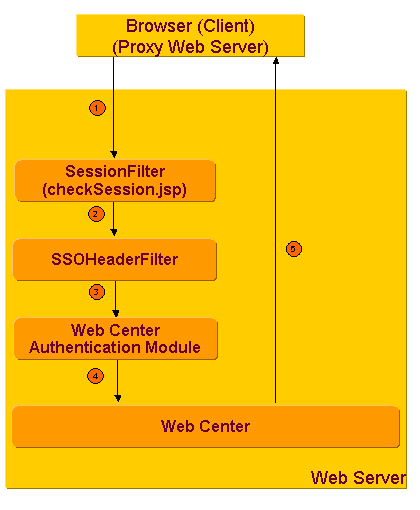
As illustrated in the figure:
-
The browser sends a request that includes an HTTP header with a user attribute value, for example, a unique user id. In real life, the header is usually not set by the browser directly. Instead, the request is preprocessed by a proxy web server that authenticates the client and adds the header to the request.
-
The SessionFilter preprocesses the request to check for invalid session cookies.
-
The SSOHeaderFilter extracts the attribute value from the header and copies it to session-scope.
-
The Web Center authentication module searches for a DirX Identity user matching the attribute value, and skips the login page. Note that the module is not called if the session already includes DirX Identity login data from a previous request. In this case, the new request is processed on behalf of the DirX Identity user stored in the session.
-
If a matching user is found, the request is processed and the appropriate page is returned to the browser. Otherwise, Web Center displays its login page and prompts the client to log in.
Security
The SSOHeaderFilter does not validate the source of the header value, which causes a security breach if untrusted clients can access Web Center directly. Direct access to Web Center should, for instance, be restricted to the proxy server generating the header.
Authentication Process with User DN
This section provides information on how to administer the configuration file web.xml when performing authentication with a user DN in the HTTP header and how the authentication is processed.
SSOHeaderFilter Configuration
For configuring the SSOHeaderFilter, the following rules apply:
-
The header name is use case specific.
-
The credential type is user.
-
All other parameters are not relevant or can be left to their default values.
Example:
For HTTP basic authentication with DN and password, the configuration is as follows:
<init-param>
     <param-name>authType</param-name>
     <param-value>BASIC</param-value>
</init-param>
<init-param>
     <param-name>headerName</param-name>
     <param-value>Authorization</param-value>
</init-param>
<init-param>
       <param-name>type</param-name>
       <param-value>user</param-value>
</init-param>
Web Center Authentication Module Configuration
For configuring the Web Center authentication module, the following rules apply:
-
The user search base is the supplied user DN.
-
The user search filter is just (objectclass=dxrUser).
-
All other parameters are either not relevant or can be left to their default values.
<context-param>
   <param-name>
       com.siemens.webMgr.auth.userBase</param-name>
   <param-value>%USER_ID</param-value>
</context-param>
<context-param>
   <param-name>
       com.siemens.webMgr.auth.userFilter
   </param-name>
        <param-value>(objectclass=dxrUser)</param-value>
</context-param>
Authentication Process
The following figure illustrates the authentication process for HTTP basic authentication with user DN.
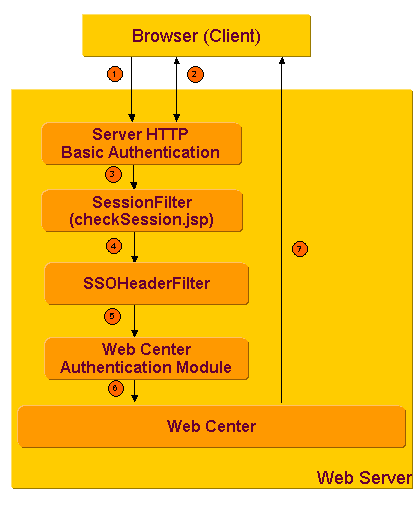
As illustrated in the figure:
-
The browser sends a request to Web Center.
-
Web Center is configured to require HTTP basic authentication. Therefore, the web server handles the necessary protocol to get and validate the client credentials.
-
The credentials, in this case the user’s DN, are stored in the HTTP Authorization header.
-
The SessionFilter preprocesses the request to check for invalid session cookies.
-
The SSOHeaderFilter extracts the DN from the header and copies it to session-scope.
-
The Web Center authentication module searches for a DirX Identity user with the given DN, and skips the login page. Note that the module is not called if the session already includes DirX Identity login data from a previous request. In this case, the new request is processed on behalf of the DirX Identity user stored in the session.
-
If a matching user is found, the request is processed and the appropriate page is returned to the browser. Otherwise, Web Center displays its login page and prompts the client to log in.
Security
The solution is secure because each request to Web Center must pass through Tomcat’s HTTP basic authentication module which sets the header. HTTPS must be used to prevent clear text passwords being transmitted over the network.
Windows Single Sign-On via SPNEGO
This section provides information about Windows single sign-on authentication via Simple and Protected GSSAPI Negotiation Mechanism (SPNEGO). The first part provides information about the configuration data that must be specified in the configuration file web.xml. The second part provides information about the authentication process.
See the appendix "Windows SSO" in the DirX Identity Installation Guide for instructions on how to install and set up Windows single sign-on.
Authentication Process
This section provides information on how to administer the configuration file web.xml when performing Windows single sign-on via SPNEGO and how the authentication is processed.
SSOHeaderFilter Configuration
For configuring the SSOHeaderFilter, the following rules apply:
-
The combined <account>@<domain> value must be obtained from the Authorization header via request.getRemoteUser ().
-
The expected authorization type is SPNEGO/Kerberos.
-
All other parameters are not relevant or can be left to their default values.
<init-param>
    <param-name>headerName</param-name>
    <param-value>RemoteUser</param-value>
</init-param>
<init-param>
    <param-name>authType</param-name>
    <param-value>SPNEGO/Kerberos</param-value>
</init-param>
Web Center Authentication Module Configuration
The SPNEGO authentication method is the default case for the authentication module. Therefore, all parameters are either not relevant or can be left to their default values.
Authentication Process
The following figure illustrates the authentication process via SPNEGO.
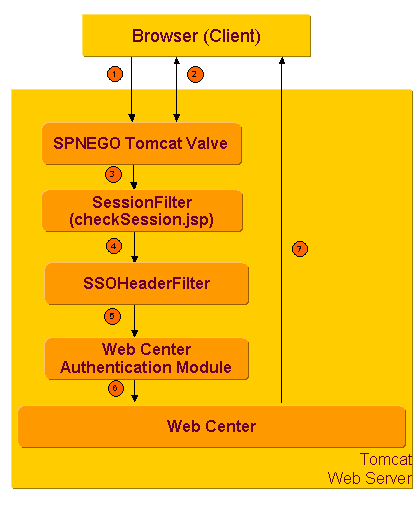
As illustrated in the figure:
-
The browser sends a request to Web Center.
-
Web Center is configured to require SPNEGO authentication; as a result, the SPNEGO Tomcat valve handles the proper protocol to get and validate the client credentials.
-
The credentials, in this case the user’s Windows account and Windows domain name, are stored in the HTTP Authorization header.
-
The SessionFilter preprocesses the request to check for invalid session cookies.
-
The SSOHeaderFilter extracts account and domain from the header and copies them to session-scope.
-
The Web Center authentication module searches for a DirX Identity user associated with the given account in the given domain, and skips the login page. Note that the module is not called if the session already includes DirX Identity login data from a previous request. In this case, the new request is processed on behalf of the DirX Identity user stored in the session.
-
If a matching user is found, the request is processed and the appropriate page is returned to the browser. Otherwise, Web Center displays its login page and prompts the client to log in.
Security
The solution is secure because each request to Web Center must pass through the SPNEGO valve which runs in the Tomcat web server.
Authentication via User Certificate
A user may authenticate to Web Center with his certificate. The authentication process involves the following steps:
-
The user starts Web Center in his browser.
-
As Web Center is configured to require client certificate authentication, Tomcat asks the client to identify accordingly.
-
The browser gets the requested credentials from its certificate store or a card reader and sends them to the server. During this step, the browser may ask the user to enter a PIN or password required to read the credentials.
-
Tomcat verifies the presented certificate. For this action, Tomcat’s trust store must contain the presented certificate or one of the certificates in its certification path.
-
Tomcat assigns the certificate to the request-scoped variable javax.servlet.request.X509Certificate, and forwards request processing to Web Center.
-
The SSOHeaderFilter extracts data identifying the user from the certificate and sets the session-scoped variable com.siemens.webMgr.ssoUserInfo accordingly.
-
The Web Center login procedure maps the data to a user in the DirX Identity database.
Note that the authentication only works with HTTPS.
Configuring User Certificate Authentication
When finished, restart Tomcat, and don’t forget to put a card into the reader.
Setting up Key Store and Trust Store for Tomcat
Use the Java keytool utility to perform the following tasks:
-
Create a key store with a private key for Tomcat.
-
Create a trust store for Tomcat and import the certificate of any certificate authority that’s in the certification path of every user’s certificate into the trust store (or add every user’s certificate).
Configuring Tomcat
In the file TOMCAT_HOME/conf/server.xml, go to the SSL connector definition, add key store and trust store attributes and change the clientAuth attribute:
<Connector port=”8443” ...
    clientAuth="want"
    keystorePass="<keystore password>"
    keystoreFile="<full path name of keystore file>"
    truststorePass="<truststore password>"
    truststoreFile="<full path name of truststore file>" .../>
Configuring Web Center SSO Handlers
To configure the Web Center SSO handlers:
-
Activate the SSOHeaderFilter and set the value for its initialization parameter headerName, for example:
<filter> <filter-name>SSOHeaderFilter</filter-name> ... <init-param> <param-name>headerName</param-name> <param-value>ClientCertificate.Principal.RDN</param-value> </init-param> ... </filter> -
Activate the filter mappings for the SSOHeaderFilter.
-
Activate and set a user filter context parameter, for example:
<context-param> <param-name>com.siemens.webMgr.auth.userFilter</param-name> <param-value> (&(objectclass=dxrUser)(cn=%USER_ID)) </param-value> </context-param>
Single Sign-on With DirX Access
This section gives some hints for running Web Center behind a DirX Access PEP.
-
Web Center’s home page might require re-configuring the CSRF filter in order to work properly. In file WEB-INF/config/webCenterCustom.properties, add all actions linked to the home page to the CSRF configuration parameters as in the following sample:
# --------------------------------------------------------------- # CSRF token # --------------------------------------------------------------- csrf.allowPostForEntryPoints = true csrf.entryPoints = /login.do,/index.jsp,/error.do,/logout.do,\ /homeTasks.do,/homeSummary.do,\ /homeRoles.do,/homeCampaigns.do -
This hint applies to DirX Identity versions prior to 8.9 only:
You might encounter character encoding issues when entering data containing non-ASCII characters. In that case, use a Tomcat filter to inform the server that the character encoding to be used for processing incoming Web Center requests is "UTF-8".
Add the filter definition to file WEB-INF/web.xml:
<filter>
   <filter-name>SetCharEncodingFilter</filter-name>
   <filter-class>
       org.apache.catalina.filters.SetCharacterEncodingFilter
   </filter-class>
   <init-param>
       <param-name>encoding</param-name>
       <param-value>UTF-8</param-value>
   </init-param>
</filter>
Map the filter to all incoming requests:
<filter-mapping>
   <filter-name>SetCharEncodingFilter</filter-name>
   <url-pattern>/*</url-pattern>
</filter-mapping>
Insert the filter mapping before all other filter mappings, including the ones for the DirX Access PEP filter.
-
This hint applies to DirX Identity versions prior to 8.6 only:
Remove jaxws-rt.jar and jaxws-tools.jar from folder WEB-INF/lib. Otherwise, access to the request workflow service might fail.
Single Sign-on via SAP Logon Ticket
This section provides information about single sign-on authentication with SAP Logon Ticket. The first part provides information about the configuration data that must be specified in the configuration file web.xml. The second part provides information about the authentication process.
SAPSSOFilter
The SAPSSOFilter integrates Web Center into SAP NetWeaver. It is a servlet filter that gets an SAP logon ticket from an HTTP cookie, validates the ticket, and stores the provided credentials in session-scope for further evaluation by the Web Center authentication module.
In addition to evaluating the ticket, the filter checks the following:
-
Whether the credentials have changed since the previous request.
-
Whether the user’s language is specified in the request parameters.
The check results are included in the session-scoped variable for further evaluation by subsequent JSP pages.
Prerequisites
In order to validate the provided credentials, the filter needs a certificate of the ticket-issuing SAP system. The certificate can either be provided in a file or in a key store. The certificate can be easily downloaded from the NetWeaver Portal administration.
The filter also requires that the library dxmMySap.jar is copied from install_path*/web/webManagerForSAP-domain/shared* to the TOMCAT_HOME/lib folder.
Filter Definition
The filter definition must be inserted in the configuration file web.xml after the SessionFilter definition as follows:
<!-- SAPSSOFilter definition -->
<filter>
   <filter-name>SAPSSOFilter</filter-name>
   <display-name>
       SAP SSO Evaluation Filter
   </display-name>
   <description
       Verifies and evaluates SAP logon tickets
   </description>
   <filter-class>
       com.siemens.webMgr.filter.SAPSSOFilter
   </filter-class>
   Initialization parameters
<filter>
Initialization Parameters
The following table lists the initialization parameters:
| Parameter Name | Default | Description |
|---|---|---|
certFile |
none |
Name of certificate file |
keyStore |
none |
Name of key store containing the certificate |
keyStorePassword |
none |
The key store password |
certAlias |
none |
The alias for the certificate in the key store |
ssoCookieName |
MYSAPSSO2 |
Name of logon ticket cookie |
decoderCharset |
ISO-8859-1 |
Character set for decoding the logon ticket cookie |
languageParamName |
language |
Name of the request parameter providing the user language |
varName |
com.siemens.webMgr.ssoUserInfo |
Name of session-scoped variable for credentials |
logLevel |
error |
Log level: error or debug |
Notes
This section provides information about SAPSSOFilter operation.
certFile
Specify the file name as an absolute path name or relative to Tomcat’s current working directory. The file name may start with @CATALINA_BASE@ which is replaced by Tomcat’s installation directory at runtime.
keyStore, keyStorePassword, and certAlias
Specify the key store name as an absolute path name or relative to Tomcat’s current working directory. The file name may start with @CATALINA_BASE@ which is replaced with Tomcat’s installation directory at runtime.
The options are ignored if the certificate can be obtained from the certificate file.
decoderCharset
The value of the logon ticket cookie is URL encoded. The decoderCharset option specifies the character set to be used to URL decode the cookie value.
logLevel
The filter uses the logging interface of the Java Servlet API. With Tomcat’s default log settings enabled, the output is written to Tomcat’s standard output.
Filter Mapping
The filter must be mapped to the URL patterns *.do and to the Web Center start page. The mappings must be inserted in the configuration file web.xml after the SessionFilter mappings.
<!-- SAPSSOFilter mappings -->
<filter-mapping>
   <filter-name>SAPSSOFilter</filter-name>
   <url-pattern>*.do</url-pattern>
<filter-mapping>
<filter-mapping>
   <filter-name>SAPSSOFilter</filter-name>
   <url-pattern>/index.jsp</url-pattern>
<filter-mapping>
Authentication Process
This section provides information on how to administer the configuration file web.xml when performing single sign-on with SAP Logon ticket and how the authentication is processed.
SAPSSOFilter Configuration
In the simplest case, it is sufficient to specify the certificate file name. The configuration is as follows:
<init-param>
   <param-name>certFile</param-name>
   <param-value>
       @CATALINA_BASE@/sap/verify.der
   </param-value>
</init-param>
Web Center Authentication Module Configuration
For single sign-on with SAP logon tickets to work, you must
-
Assign the name of the ticket-issuing SAP system to the attribute dxrTSDomainName of a target system in the DirX Identity store.
-
Assign each NetWeaver user login to an attribute of an account below this target system.
The name of the ticket-issuing system is the value of the certificate’s issuer field; for example, F31.
If the account attribute name is sapUsername, the authentication module configuration is as follows:
<context-param>
<param-name>
com.siemens.webMgr.auth.accountFilter
</param-name>
<param-value>
(&(objectclass=dxrTargetSystemAccount)
(sapUsername=%ACCOUNT))
</param-value>
</context-param>
Authentication Process
The following figure illustrates the authentication process with SAP logon ticket.
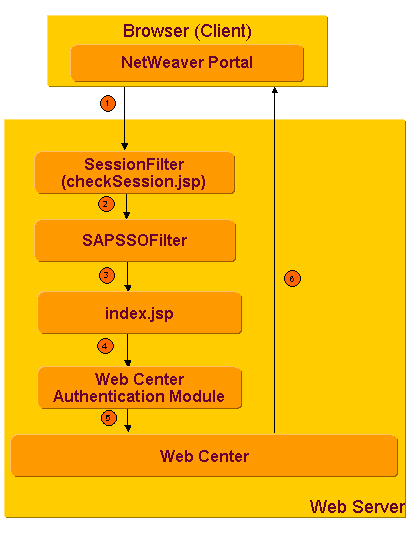
As illustrated in the figure:
-
NetWeaver sends an HTTP request to Web Center. The request includes the current user’s logon ticket in an HTTP cookie. The request may for instance be initiated when the user logs in to NetWeaver, or when he selects a menu item.
-
The SessionFilter preprocesses the request to check for invalid session cookies.
-
The SAPSSOFilter validates the logon ticket and copies the credentials to session-scope.
-
A JSP that checks for inappropriate session cookies preprocesses the request.
-
The Web Center authentication module searches for a DirX Identity user matching the credentials. Note that the module is not called if the session already includes DirX Identity login data from a previous request. In this case, the new request is processed on behalf of the DirX Identity user stored in the session.
-
If a matching user is found, the request is processed and the appropriate page is returned to the browser. Otherwise, Web Center displays its login page and prompts the client to log in.
Security
An unauthorized client is unable to send a valid logon ticket because the logon ticket must be validated against the certificate of the ticket-issuing system.
| Single sign-on with SAP logon tickets works only for user names up to 12 characters. |
The URL to start NetWeaver must include the fully-qualified host name, for example http://myHost.myDomain.com:53000/irj/portal.
Configuring Heap Size
Productive operation of Web Center requires Tomcat to be configured so that it uses a heap of sufficient size, at least 256 MB.
For example, to set initial and maximum heap size to 256MB for Tomcat 8.5 on Windows platforms:
-
Activate the Tomcat Configuration Menu (Start → Programs → Apache Tomcat 8.5 → Configure Tomcat). If you have installed Tomcat without start menu entries, run the file TOMCAT_HOME/bin/tomcat8w.exe.
-
Click the Java tab.
-
Enter 256 into the Initial Memory Pool and Maximum Memory Pool.
To do the equivalent setting for UNIX platforms, your environment for starting Tomcat must be set so that JAVA_OPTS includes the related Java Virtual Machine options. Here is an example:
JAVA_OPTS="-Xms256M -Xmx256M"
export JAVA_OPTS
Setting the Default Language
Web Center supports by default German and English.The default language of your Web Center session depends on your preferred language setting as defined in your browser.The default language is German if the browser’s preferred language is set to German; otherwise, it is English.
Setting the preferred language is browser-dependent:
-
In Edge, open the Settings and more menu and select Settings.In the Languages section, move your preferred language to the top (if not available, click Add languages and select it).
-
In Firefox, open the Applications menu and select Settings.In the Language section, click Set Alternatives… and move your preferred language to the top.(If not yet added, select it from the list of available languages and add it.)
-
In Chrome, select the Customize and control Google Chrome menu and open Settings.In the Advanced/Languages section, move your preferred language to the top.(If not yet added, select it from the list of available languages and add it.)
About the Web Center Page Layout
Web Center is presented in a default layout that is highly customizable.For details about customizing the page layout, refer to the DirX Identity Web Center Customization Guide.The remainder of this section describes the default layout for Web Center.
Default Page Layout
The following figure illustrates the default page layout.Note that because Nik Taspatch has logged in and has administrator privileges, all the available information and most of the menus are displayed; since he is not a business administrator, the business object menus are not visible.If you log in as another user with restricted functionality, you may see only a part of the menus.See the DirX Identity Provisioning Administration Guide to learn how to manage menu restrictions.
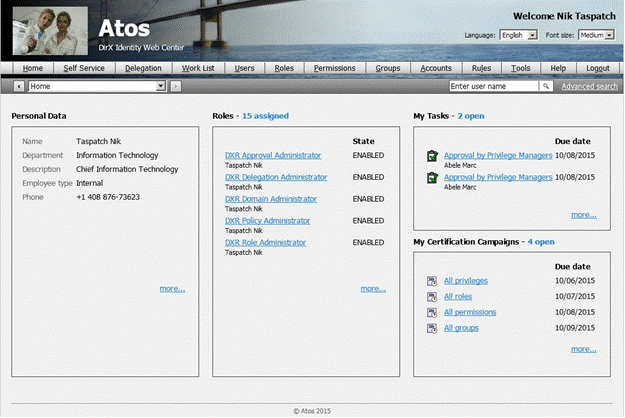
The default page layout consists of a header at the top, a menu bar below the header and a footer at the bottom. The rest of the page is application-specific.
All pages contain the same header, which consists of the following items:
A company logo area that displays the company’s logo and its name.
A welcome message that identifies the logged-in user.
A navigation history chooser that allows you to return to pages you’ve previously displayed. Click the down arrow and then choose a page from the list. The browser redirects to the page with the parameters you previously selected.
A language chooser that allows you to display the page in a specific language. Click the down arrow and choose your language. The browser then displays the page in the language you have selected.
A font size chooser that allows you to display the page in a specific font size. Click the down arrow and choose the font size. The browser then displays the page in the font size you have selected.
The menu bar displays all menus and operations that the logged-in user is allowed to perform. You can use shortcut keys. In Edge and Chrome, type the ALT + s keys to open the Self Service menu, and then type the c key to perform a password modification; in Firefox, type SHIFT +ALT + s to open the menu. You can browse through the menus with mouse movements and cursor keys (up, left and so on).
The footer of the page displays information like the application version number, copyright information, and installation information. Note that version number and installation information are not visible by default.
The middle of the page is application-specific. The above sample page displays four panels:
-
Personal Data - displays some of the logged-in user’s personal data. Clicking more … in this pane displays detailed personal data provided in the User Summary for the logged-in user. See the section "Display Summary" in "Using the Self Service Menu" for details.
-
Roles - lists the logged-in user’s assigned roles and their state. Clicking more … in this pane opens the Role tab in the User Summary for the logged-in user. See the section "Display Summary" in "Using the Self Service Menu" for details.
-
My Tasks - lists the outstanding tasks (if any) that the logged-in user needs to perform. Clicking more … in this pane displays the task list for the logged-in user. See the section "Task List" in "Using the Work List Menu" for details.
-
My Certification Campaigns - lists up to five certification campaigns with open tasks for the logged-in user. Clicking more … in this pane leads to the complete list. See the section "Certification Campaign List" in "Using the Work List Menu" for details.
Clicking Home in the menu bar displays this part of the default page.
Common Features for All Pages
This section describes common features for all pages:
-
How to work with forms.
-
How to search and select specific items.
-
How to work with item lists.
-
How to use special widgets like the calendar widget and tab panels.
Working with Forms
Forms are comprised of up to three components:
-
The form heading
-
The form content
-
Form buttons
About the Form Heading
Form headings appear only on summary pages. They display a form title and a toolbar. The tools in the toolbar perform actions that are applied to the displayed entry:
-
The refresh tool
 refreshes the summary page.
 -
The other tools serve as shortcuts for corresponding menu items. For example, the edit tool
 opens the page to edit the entry.
The tools in a form toolbar vary with the type of the displayed entry and the access rights of the logged-in user.
Move the mouse over a tool to get a tool tip.
You can navigate to the toolbar with the “tab” key. Then use the keys “left” and “right” to browse through the tools. To select a tool, press “space” or “enter”.
About Form Content
Web Center displays editable fields with a black border and non-editable fields with a light gray border. Mandatory input fields are indicated by an asterisk following their label. Empty mandatory fields and fields with invalid input are displayed with a pink background.
Use the tab key to navigate through the fields.
In drop-down lists, enter a character to jump to the first list entry starting with this character. Or use the keys “up”, “down”, “home”, “end”, “page up” and “page down” to browse through the list.
Click the  button to search for and select a specific object or item, for example, a workflow or a manager. A page displaying the search panel opens.
Using the Form Buttons
Web Center forms may include one or more of the following buttons to submit changes to the server or to cancel an operation:
-
Save to submit and save the modifications.
-
Save and finish to submit the modifications and then start the operation.
-
Save current state to submit the modifications without starting the operation.
-
Reset to discard the modifications.
-
Cancel to abort the operation.
-
Cancel selection. Back to main page to abort a select operation and to return to the main page; for example, to return from the page to select a user’s manager to the modify user page without selecting a new manager.
-
Do later to discard any changes and postpone a task.
Clicking one of these buttons locks the form.
Specifying Due Dates
The form buttons section often includes a field to specify a due date for a create, modify, delete or assignment operation. If you set a due date, the requested operation is not performed immediately. Instead, a ticket with the order to perform the action on the specified date is created. See "Using the Tickets View" in the section "Using the Provisioning Views" in the chapter "Using DirX Identity Manager" for information about tickets.
Using the Search Panel
When searching for items, a search panel is displayed to specify the search base and the filter items for the search request. The following figure illustrates the search panel:
Figure 9: Search Panel
The Search base field specifies the node in the directory tree at which the search operation starts. Use the tree browser button  to browse to a node in the directory tree - for example, when specifying the search base in the Select User dialog - instead of specifying the user’s common name.
The Search for row specifies the filter expression for the search request:
-
In the first field, click the down arrow to display the list of available search attributes. Select the attribute from the drop-down list. The default attribute is Name (the common name cn).
-
In the second field, click the down arrow button to display the available search operators. Select the operator from the drop-down list.
-
In the third field, type or select the search filter value. The field varies with the selected attribute and is either a text input field, a date field or a drop-down list.
-
Use the
 button to display an additional line for specifying a filter-item for the search request; use the
  button to delete the last filter-item of the filter-item list; and use the Search-button to start the search operation.
The search result is displayed in an item list below the search panel.
If too many items are found, a message is displayed indicating that the size limit has been exceeded. Try to refine your search by specifying additional filter items.
| all Web Center menus provide two quick search fields for finding users: the Enter user name field, where you can type in the common name in the space provided and an Advanced Search button, which takes you to the user search panel. |
Working with Item Lists
Item lists are comprised of up to four components:
-
The paging bar
-
The list heading
-
The list headers
-
The list items
Using the Paging Bar
The paging bar displays the index range of the currently displayed items, the total number of items in the list and the number of selected items. Buttons allow you to navigate to the first, the previous, the next and the last page. You can also enter the index of a page in order to directly go to that page. The paging bar is usually displayed on top of each list and repeated below the list. Some lists, however, display the bar only on top or below in order to avoid crammed pages. Item lists that fit on a single page display only the number of selected items.
Using the List Heading
The list heading displays a toolbar and a page size selector.
The tools in the toolbar perform actions that are applied to all entries in the list:
-
The delete button
 deletes all the listed items (not available for Users or Accounts). When you click this button, Web Center displays a dialog asking you to confirm the operation.
 -
The run report button
 runs a report on the listed items. See the section "Run Reports" in "Using the Tools Menu" and also the Run Report sections in the Users, Roles, Permissions, Groups, Accounts, Rules and Business Objects menu descriptions in this chapter for a description of this operation.
 -
The export button
 exports the listed items to a file. When you click this button, the browser opens a dialog that allows you to save the list (in HTML format) to a file on your computer. You can then, for example, drag the file onto an open Excel sheet in order to process the data further with Excel.
Some lists display only partial toolbars (usually without the delete tool), while some others do not display a toolbar at all.
Move the mouse over a tool to display a tool tip.
You can navigate to the toolbar with the “tab” key. Then use the keys “left” and “right” to browse through the tools. To select a tool press “space” or “enter”.
The page size selector allows you to control the number of entries displayed on one list page:
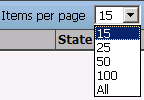
Using List Headers
The list header row displays the column titles, a sort column indicator and some flags.
You can sort the listed entries in any displayed table by most columns. An arrow in the column header indicates the column by which the table entries are currently sorted; a down-arrow indicates a descending sort order, while an up-arrow indicates an ascending sort order.
A small red triangle in the upper left corner of a header indicates that you can modify the data in this column. A small green triangle indicates that you can select a list item by clicking the item’s cell in this column.
Some column headers display a checkbox instead of a title. The checkbox allows you to check or uncheck all checkboxes in the column with a single click.
Using List Items
At many places where objects or links are displayed, you can display the details by clicking the object or link. You can also use the follow-link button  .
.
To select an item in an item list, check the checkbox at the beginning of the list item row, if one is provided. To select all list items, check the corresponding checkbox in the header row.
Right-click a list item to display a context-sensitive menu, if one is available. The context-sensitive menu provides operations for the following categories:
-
Entry - provides all operations that can be performed for the highlighted list item. Usually this is a subset of the operations that the entry type specific menu provides, for example Display Summary, Modify Data, and so on for entry type user. You may not be allowed to perform all displayed operations for all list items.
-
Selected entries - provides all operations that can be performed for all manually selected list items, for example Delete and Run Report for entry type location.
-
List - provides all operations that can be performed on the complete list. (No extra selection is necessary.) Usually these are the operations Run Report and Export.
See the operation descriptions for details.
Using Special Widgets
This section describes how to use special Web Center widgets for specifying dates, browsing and making assignments.
Specifying Dates
The calendar widget lets you select a date, for example a start date or an end date. Editable form fields of type date display the  button to their right. Click the button to open the calendar widget. Editable table cells of type date initially just display the date (if any). To edit the value, click on the cell. The cell content changes to an input field displaying the date, followed by the button. Again, click the button to open the calendar widget.
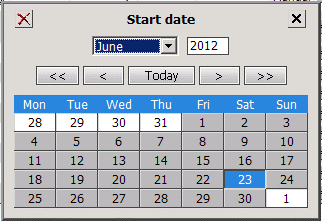
The widget contains a button for each day of the selected month and some days of the adjacent months. Click on a day button to select the day. To select the current day, click Today.
Use the << and >> buttons to switch to the previous and the next year, respectively, or enter a year directly in the corresponding input field. Use the < and > buttons to switch to the previous and the next month, or select a month from the selection field.
Click  to delete the date and close the calendar. Click
  to close the calendar without changing the date.
You can navigate to each field using the tab key. In the day button panel, you can also move around with the “left”, “right”, “top” and “down” keys. To close the widget, press the escape (Esc) key.
Specifying Date and Time
A variant of the calendar widget lets you enter the time in addition to the date.
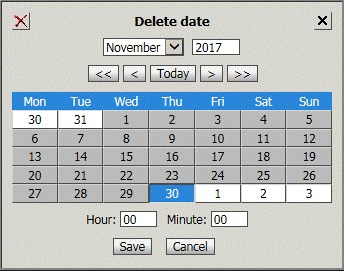
The widget includes input fields for hour (0 - 23) and minute (0 - 59). Click Save to save your input. Click Cancel to close the widget without changing the current date and time.
Using the Tree Widget
The tree widget allows you to select an entry by navigating to it in the hierarchical object tree. Use the tree, for example, to select the search base in search panels or to select values for role parameters of type hierarchical DN. You open the tree by clicking on the icon.
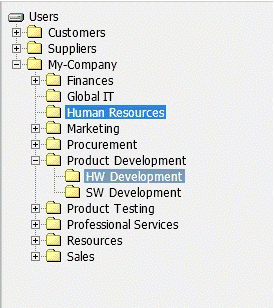
The tree highlights the currently selected item with a bright blue background. Click the icon preceding an entry to open an entry; that is, to list its children. Click the icon to close the subtree below it. To select an entry, just click on it. The tree will close.
The currently focused item is highlighted with a pale blue background. It is used when navigating the tree with keys. You can use the “right” key to open the focused entry and “left” key to close the subtree below it. To move the focus to another item, press “up”, “down”, “page up”, “page down”, “home” or “end”. To select an entry, press “enter”.
Using Tab Panels
Some summary pages do not display all available data at once. They show a basic set of properties and one or more tab panels that let you request additional data if needed. For example, the user summary page displays a privilege tab panel to request the user’s assigned roles, permissions, groups and accounts, and another tab panel to get his photo and certificates. Click on a button in the tab panel to load the respective additional information.
Each tab panel is accompanied by an icon bar with some or all of the following icons:
 - displays all tabs one below the other. Downloads each tab not yet downloaded. Does not refresh already downloaded tabs.
- refreshes all currently visible tabs (except for account groups, when displaying a summary of user data). Does not refresh or download any tab currently not visible.
 - hides the visible tabs or shows the last recently visible tabs.Does not refresh or download any tab.
 - displays all tabs already downloaded one below the other.Does not refresh or download any tab.
Using the Assignment Widget
Some pages let you assign objects to another object; for example, roles to a user.The assignment widget contains two lists.The upper list of available items shows items that you may assign, while the lower list of assigned items shows the items that are already assigned.The list of available items is accompanied by a search panel that lets you search for items that you want to assign.You can select items in both lists.
The two lists are separated by buttons that specify what to do with the selected items.If two item lists are displayed, use the arrow-down button  to move selected list items from the upper list to the lower list.Use the arrow-up button
  to move selected list items from the lower list to the upper list.If available, use the double arrow-down button
  to move all list items from the upper list to the lower list.Use the double arrow-up button
  to move all list items from the lower list to the upper list.Note that the arrow buttons do not save the assignments and unassignments.When finished, click Save to persist your changes.
Logging In to Web Center
Working with the Web Center application is straight-forward and very easy.Open your Internet browser and type the URL for the application:
-
http://someserver:_port_/webCenter-technicalDomainName
where
- someserver
-
Specifies the Web server address.
- port
-
Specifies the Web server port number.
- technicalDomainName
-
Specifies the technical domain name that you administered when configuring your system. (See section "Domain Configuration" in chapter "Configuring DirX Identity" in the DirX Identity Installation Guide for details.)
Example:
Tomcat usually uses the port number 8080.
The Web Center next displays the login page, which contains the following fields:
Name - your common name (usually your last name followed by your first name). If configured, you can also specify only a part of the common name.
Password - your password to log in to the directory service.
On this page, you can click:
Log in - to submit the login values in Name and Password to the server.
If the subsequent search for a DirX Identity user matching the entered name returns a unique user and if his password matches, Web Center accepts the login request.
If the password you supply is incorrect, a page is displayed that allows you to reenter it.
Password Forgotten - to display a dialog with challenge / response questions that allows you to set a new password.
Web Center displays a configurable random selection of the challenge questions you have set up with the Self-Service dialog Add Authentication Questions.If you answer it correctly, you are allowed to change your password.
Register - to use the self-registration dialog to create a login account with Web Center.The register button is shown only if self registration is enabled.
If you are not yet registered, click this button and follow the instructions.
Using the Self Service Menu
This section describes how to use Web Center’s Self-Service operations, including:
-
Display Summary - displays a summary of your data and assignments
-
Change Password - changes your password
-
Authentication Questions - manages your challenge / response questions and answers
-
Modify User Data - changes selected attributes of your user data
-
Modify Photos and Certificates - upload or delete your photos and certificates
-
Subscribe Privileges - self-assign services
-
Show Subscription Status - displays the status of approval workflows running on your behalf
-
Show SoD Violations - displays approved and pending segregation of duty (SoD) violations
Display Summary
This operation displays a summary of your user data, including general data, your assigned roles (only if the DirX Identity Provisioning package is installed), permissions, groups and accounts. All the fields displayed in this page are read-only. See the context-sensitive help in the DirX Identity Manager or in the DirX Identity Connectivity or Provisioning Administration Guide for a description of the fields displayed in this page.
Click User Facets, Personas or Functional Users to display your related user facets, personas or functional users. Click Roles, Permissions, Groups, or Accounts to display your assigned privileges and your accounts. Click Photos or Certificates to display your photos and certificates. When you click one of these buttons, the corresponding tab is displayed, which hides the currently visible tabs. If the tab has already been downloaded, it is re-displayed but not refreshed.
If you have displayed your personas, you can select Exchange persona and identity from the context menu to switch the roles of persona and user. If you have displayed your accounts, you can click the button to display the account’s groups.
You can also click one of the shortcut buttons to display this information. (See section "Using Shortcut Buttons" in the section "About the Web Center Page Layout" for details.)
Change Password
Use this operation to change your password. The Password policy section shows the password policies that apply to your entry. When you change your password, the password you choose must comply with these policies. If there is no password policy, this part of the page is empty.
The Enter password section provides fields for entering the old password and entering a new password twice. Click in the space provided in Old password and then enter your old password. Next, click the space provided in New password and enter the new password according to the criteria (if any) shown in Password policy. Click in Repeat password and then enter the new password again.
Click Save to start the password change process or click Cancel to exit the operation and return to your user summary.
Authentication Questions
Use this operation to manage the authentication (challenge/response) questions to be displayed if you have forgotten your password.
The authentication questions are separated in up to three sections:
-
Mandatory Questions - Your system administrator may define some questions that must be answered when authenticating via challenge/response. If so, you must define answers for these questions here.
-
Questions from Proposal List - If your system administrator has defined a list of questions suitable for challenge/response authentications, you can select and answer questions from that list here. Click the down-arrow to open the list.
-
Other Questions - You can enter and answer any question you like here provided your system administrator has not disabled free text questions.
To add challenge/response pairs to a section, click  at the end of the section. To remove a challenge/response pair, click
  in the corresponding row.
Click Submit to store your data. Click Cancel to return to the user summary without saving your changes.
Notes:
-
Answers are case-sensitive. When authenticating via challenge / response later on, you must specify the answers exactly as entered here.
-
Questions are always displayed in clear text, while answers are always hidden. On input, you see only the number of characters you entered. Since the answers are stored in hashed format, it is impossible to recover and display them later. However, you can overwrite your answers at any time.
-
Your system administrator can define some requirements and restrictions on challenge/response pairs, including:
-
The minimum number of questions to define and answer.
-
The minimum response length.
-
Whether identical answers to different questions are permitted.
Modify User Data
Use this operation to make changes to your user data. Web Center displays many of your user attributes but allows you to edit only those attributes that have been configured to be modifiable.
Modify Photos and Certificates
Use this operation to upload a new photo or a new certificate from a file or to delete existing photos and certificates.
Subscribe Privileges
This operation displays all privileges that you can assign to yourself. The column Requires Approval shows whether an approval is necessary to obtain the service. If the field is checked, an approval workflow is started. You can view the status of this workflow with Show subscription status.
Check the boxes of all services to which you want to subscribe and then click Save. Use the Cancel button to discard the changes and return to the user summary.
Show Subscription Status
Use this operation to display all running, succeeded or failed approval workflows for privilege assignments to you or for modifications of your user data.Click a workflow in the list to display its approval details.(See also the section "Show Initiated Workflows" for details.)
Show SoD Violations
Use this operation to display all pending or approved segregation of duty (SoD) violations.
Approved SoD violations lists the violations that have already been approved. Pending SoD violations lists the SoD violations that are still awaiting approval.Click "Show subscription status" to view the status of the approval workflows and to find out who must approve.
Using the Old Delegation Menu
As of DirX Identity Version 8.9, the delegation feature has been completely redesigned and re-implemented.Web Center supports both the old and the new implementation.This chapter describes the user interface for the old implementation.It is only displayed if the old delegation implementation is enabled.
This section describes how to use Web Center’s older Delegation operations, including:
-
Show Access Rights - displays your current access rights and the access rights granted to you by others.
-
Delegate Access Rights - delegates the access rights that you are permitted to delegate.
-
Show Delegated Access Rights - displays the access rights that you have delegated.
Show Access Rights
Use this operation to display your current access rights and the access rights that others have delegated to you.
Your Current Access Rights provides a summary of all active access rights. The information displayed provides:
-
The operation that you are allowed to perform. (See section "Managing Access Policies" in the DirX Identity Provisioning Administration Guide for details.)
-
The object type for these access rights.
-
A description for the access right.
Click an access right or the follow-link button to display the access right details.
Access Rights Delegated to You displays the access rights that are currently delegated to you. Delegated access rights can include delegations that are not yet active (the time frame is either in the past or in the future); these access rights are not included in the list. See the context-sensitive help in the DirX Identity Manager or in the DirX Identity Connectivity or Provisioning Administration Guide for details on the information displayed.
Click a delegation or the follow-link button to display the delegation details.
Delegate Access Rights
You can use this operation to delegate your own access rights to other persons.
First, you must select the person to whom you want to delegate your access rights. The operation displays the Select a User for Delegation dialog, which allows you to search for and select a user.
Next, the Modify Delegation dialog opens. In the upper part of the page, specify the delegation properties. See the context-sensitive help in the DirX Identity Manager or in the DirX Identity Connectivity or Provisioning Administration Guide for details on the delegation properties displayed.
Below the delegation properties, the list of "Non-granted access rights" is displayed. This list contains all your access rights. You have obtained these rights either from access policies or from delegations by other persons. See the context-sensitive help in the DirX Identity Manager or in the DirX Identity Connectivity or Provisioning Administration Guide for details on the access right properties displayed.
You can click the follow-link button to display the access right details. Here you can modify the access right as necessary.
To delegate access rights:
-
Select the access rights you want to delegate. (Check the checkbox of these access rights.)
-
Click the arrow down-button
to move the selected access rights to the "Permanent access rights" list below the "Non-granted access rights" list. -
Click Save to save your modifications. The access rights of the "Permanent access rights" list are delegated to the user you selected. The operation displays a message and then opens the "Show delegated access rights" page, which displays a list of all access rights you have delegated.
Show Delegated Access Rights
Use this operation to display all delegated access rights.See the context-sensitive help in the DirX Identity Manager or in the DirX Identity Connectivity or Provisioning Administration Guide for details on the information displayed.
You can click a row to modify this delegation at any time.You cannot change the user, but you can change any of the other details (for example, you can extend the time period for the delegation because your vacation duration is longer).
When you have finished, click Save to save your modified delegation or click Cancel to abort the modification process.
You can also select delegations and delete them.Click Delete Selected Delegations to perform this task.
Using the New Delegation Menu
As of DirX Identity Version 8.9, the delegation feature has been completely redesigned and re-implemented.Web Center supports both the old and the new implementation.This section describes the user interface for the new implementation, which is only displayed if the new delegation implementation is enabled.It describes how to use Web Center’s new Delegation operations, including:
-
List Delegations – lists the delegations assigned by you and the delegations assigned to you.
-
Create New Delegation – creates a new delegation assigned by you.
It also describes how to modify, forward, and delete delegations.
Listing Delegations
Use this operation to display the delegations you have assigned to someone else and the delegations someone else has assigned to you.
Delegations assigned by you provides the list of delegations you have assigned to someone else. The information displayed provides:
-
The delegation name and description.
-
The operation, either Assign privileges or Approve requests.
-
The name and department of the substitute.
-
The delegation start date and end date.
Click an access right or the follow-link button to display the access right details.
Delegations assigned to you provides the list of delegations someone else has assigned to you. The information displayed provides:
-
The delegation name and description.
-
The operation, either Assign privileges or Approve requests.
-
The name and department of the delegator.
-
The delegation start date and end date.
Click a delegation or the follow-link button to display the delegation details.
Creating New Delegations
Use this operation to delegate your own access rights to other users.
To create a new delegation, enter the name and description of the new delegation and then select the substitute and the operation. Set the start date and end date as appropriate. If the substitute is allowed to forward the new delegation to another user, check Forwarding permitted. Finally, click Save to save the new delegation.
Modifying Delegations
To modify a delegation, select the menu item List Delegations. In the list Delegations assigned by you, click the delegation you want to modify. The delegation details page is displayed. Click Modify delegation in the toolbar and then change the delegation data as appropriate. You cannot change the substitute.
Forwarding Delegations
To forward a delegation, select the menu item List Delegations.In the list Delegations assigned to you, click the delegation you want to forward to a new substitute.The delegation details page is displayed.Click Forward delegation in the toolbar.Select the new substitute and change the other attributes as appropriate.You cannot change the operation.
| Forwarding a delegation creates a new delegation while retaining the original one. |
Using the Work List Menu
This section describes how to use Web Center’s Work List operations, including:
-
Task list - shows all tasks that you must execute.
-
Certification campaign list - shows certification campaigns with open tasks for you.
-
Show initiated workflows - shows all running workflows that you initiated.
Task List
This operation displays all tasks you must handle.For each task in the list, the following properties are provided:
Subject - the workflow display name.
Task - the activity to perform.
For - the object to be handled.
Privilege - the privilege to assign (optional, may be empty).
From - the initiator of the workflow.
Due - the date by which you must complete this task. If you do not complete it in time, the activity will send an email notification to the initiator or escalate this issue.
SoD - whether assigning the privilege would be an SoD violation.
Click one of the tasks in the list to display the details. After completing the task, Web Center displays the details of the next task.
If only one task is pending, the details of this task are displayed (instead of a task list consisting of one item). (See "Task List Details" for more information.)
When displaying the context-sensitive menu select one of the following operations:
Complete one by one - completes the selected tasks one by one.
Change participant - delegates the completion of the selected tasks to another user.
Approve in one step - bulk approval: Approves the selected approval tasks in one step. Tasks not eligible for bulk approval are ignored. A task is eligible for bulk approval if it is an approval task which would not create an SoD violation.
Restrict selection - deselects all tasks that are not eligible for bulk approval.
Select all - selects all tasks that are eligible for bulk approval.
Certification Campaign List
This operation displays the certification campaigns with open tasks for you. For each campaign, the list displays:
Name - the campaign name.
Due date - the date by which you must complete the certification tasks.
Number of certifications - the number of certification tasks assigned to you.
Owner - the campaign owner.
Description - the campaign description.
Click on a campaign in the list to open its details page. If there’s only one campaign with open tasks for you, the operation skips the list and directly opens the campaign’s details page.
Campaign Details Page
The campaign details page displays:
Name - the campaign name.
Description - the campaign description.
Type - the campaign type, either User Certification or Privilege Certification.
Owner - the campaign owner.
Due date - the date by which you must complete the certification tasks.
Start date - the date the campaign was started.
User Certifications
For user certification campaigns, the page also includes:
Users to be certified - the list of users you must certify. The list does not include the users you’ve already completely certified.
For each user, the list displays:
Name - the user’s name.
Department - the user’s department.
Phone - the user’s phone number.
Due date - the date by which you must complete the subtasks for this user.
Completed - the number of your completed and total subtasks for this user.
Click on a user to open a page that lets you certify the user’s privileges.
Privilege Certifications
For privilege certification campaigns, the page also includes up to three lists:
Roles to be certified - the list of roles you must certify.
Permissions to be certified - the list of permissions you must certify.
Groups to be certified - the list of groups you must certify.
The lists do not include the privileges you’ve already completely certified. Each list is displayed only if you still have corresponding unfinished certification tasks.
For each privilege, the list displays:
Name - the privilege name.
Folder - the role or permission folder.
Target system - the target system of groups.
Description - the privilege description.
Due date - the date by which you must complete the subtasks for this privilege.
Completed - the number of your completed and total subtasks for this privilege.
Click on an item to open a page that lets you certify the privilege users.
Certify User Privileges Page
The page first displays the campaign name and some properties of the user. Already certified by lists the approvers that have already certified the user’s privileges during the campaign.
The privileges to be certified by you are listed on the Roles, Permissions, Groups tabs and the Automatically assigned privileges tab.
To save any changes, click Save changes. You can then view and revise your changes later on. If you’ve taken all your decisions, click Save changes and finish certification. This action closes the task; you can no longer view or revise it.
Roles, Permissions and Groups Tabs
Each tab lists the corresponding privileges to be certified by you. For each privilege, the list displays:
Accept - accept the assignment. To accept all assignments, click the checkbox in the column header.
Reject - reject the assignment. To reject all assignments, click the checkbox in the column header.
Reason - an optional explanation for your decision.
Name - the privilege name.
Folder - the privilege folder (Roles and Permissions tabs only).
Target system - the group’s target system (Groups tab only).
Description - the privilege description.
Start date - the assignment’s start date. If the start date lies in the future, you can change it. You cannot move it beyond the end date.
End date - the assignment’s end date. You can change the end date, but you cannot shift it into the future.
Parameters - the role parameters (Roles tab only). You can remove role parameter values. You cannot remove the last value from a parameter with mandatory value.
Mode - the assignment mode; for example, Manual, BO, Rule.
SoD - whether the assignment constitutes an SoD violation.
When opening a tab, it displays the current certification state of the assignments. The initial certification state on campaign start-up is the state of the actual assignment, with empty Accept and Reject fields and an empty Reason field. The current certification state is the initial state, or the most recent change made by a previous approver or by you. There’s no history of changes available.
Automatically Assigned Privileges Tab
The tab displays the same data as the Roles, Permissions, Groups tabs for privileges automatically assigned to the user; for example, by privilege or business object inheritance, rule or user facets. You can choose to reject an assignment and enter a reason for the rejection. You cannot, however, explicitly accept an assignment or change assignment attributes like start date, end date or role parameters.
Note that rejections of automatically assigned privileges are usually treated differently from rejections of manual assignments at campaign end.
Certify Privilege Users Page
The page first displays the campaign name and some properties of the privilege. Already certified by lists the approvers that have already certified the privilege users during the campaign.
The list Users to be certified displays the users to be certified by you.
Accept - accept the assignment. To accept all assignments, check the box in the column header.
Reject - reject the assignment. To reject all assignments, check the box in the column header.
Reason - an optional explanation for your decision.
Name - the username.
Risk - the user’s risk level.
Department - the user’s department.
Phone - the user’s telephone number.
Start date - the assignment’s start date. If the start date lies in the future, you can change it. You cannot move it beyond the end date.
End date - the assignment’s end date. You can change the end date, but you cannot shift it into the future.
Parameters - the role parameters (Roles tab only). You can remove role parameter values. You cannot remove the last value from a parameter with a mandatory value.
Mode - the assignment mode; for example, Manual, BO, Rule.
SoD - whether the assignment constitutes an SoD violation.
To save any changes, click Save changes.You can then view and revise your changes later.If you’ve made all your decisions, click Save changes and finish certification.This action closes the task; you can no longer view or revise it.
Show Initiated Workflows
This operation displays all subscriptions (running approval workflows) the logged-in user has initiated.(See the section "Workflow List" for details.)
Use the Succeeded Workflows button to display all succeeded workflows.Use the Failed Workflows button to display all failed workflows.When you click one of these buttons, the corresponding tab is displayed, which hides the currently visible tabs.If the tab has already been downloaded, it is re-displayed but not refreshed.
You can also click one of the shortcut buttons to display this information.(See the section "Using Shortcut Buttons" in the section "About the Web Center Page Layout" for details.)
Using the Users Menu (User Management)
This section describes how to use Web Center’s operations for user management, including:
-
Select user - allows you to select a user, user facet, persona, or functional user for a management task.
-
Last selection list - displays the result of the last recently performed search query for users.
-
Create new user - creates a new user entry.
-
Display summary - shows the general data and all assignments of the previously selected user.
-
Modify user data - allows you to change the selected user’s data.
-
Modify photos and certificates - allows you to upload or delete photos and certificates.
-
Reset password - allows you to reset the password of the selected user (administrative reset).
-
Move user to new destination - changes the folder for the user entry.
-
Create new functional user - creates a new functional user for the selected user.
-
Create new persona - creates a new persona for the selected user.
-
Create new user facet - creates a new user facet for the selected user.
-
Assign privileges - allows you to assign privileges to or remove privileges from the selected user.
-
Copy privileges - allows you to copy privileges from another user.
-
Show subscription status - shows all subscriptions (running approval workflows) for the selected user.
-
Task list - shows all tasks of the selected user.
-
Certification campaign list - shows the certification campaigns with open tasks for the selected user.
-
Show SoD violations - displays all pending or approved segregation of duty (SoD) violations.
-
Run report - allows you to run a report on the selected user.
Select User
This operation provides a search utility for user, user facets, persona and functional user entries and displays the list of the entries the search operation returns. The result list contains only the entries you are allowed to view or modify. After you have performed the search, sort the list if necessary and then click one of the entries to work on it.
If user facets, personas and functional users are enabled at the domain level, the search panel includes the check boxes Include user facets, Include personas and Include functional users. Check these boxes to search for user facets, personas and functional users in addition to user entries. Many of the operations for a selected user (like Display Summary and Assign Privileges) also apply to selected user facets, personas and functional users.
For information on how to use the search utility, see the section "Using the Search Panel" in "Common Features for All Pages".
Last Selection List
Use this operation to display the user result list of your most recent search. This page displays the most recently specified search filter.
Create New User
Use this operation to create a new user entry. The process you follow depends on your DirX Identity license (Business or Professional).
Professional License:
User creation request workflows define the user creation process. Web Center displays a list of the available user creation workflows that the logged-in user is allowed to run. You must specify the allowed workflows for a user with access policies. If no workflow is available, an error message is displayed.
Select one of the workflows in the list. The sequence of pages displayed next depends on the workflow. When all pages for the logged-in user are completed, the workflow tasks for this user are completed.
Business License:
Use this operation to create a new user at a specific location in the directory. If you do not have the access rights to create a new user, an error message is displayed.
This page contains the following fields
Folder - the path where the new user entry is to be created.
The drop-down list allows you to select several possible locations for the new user creation (depending on your access rights). Select the correct root node.
Use the tree browser button to the right of this field to select a specific node under the root node at which to create the new user.
The page displays a set of attributes that can be specified. Enter the necessary values.
Important attributes that you should set (within the sample domain) include:
-
All parameters that affect automatic assignment of privileges (policy parameters). In the sample domain, these parameters include EmployeeType, Location, Country.
-
The Manager link. It may affect who can change the user later on if the appropriate access policy is set up (as in the sample domain).
-
The Password policy to specify special password policies for this user. If you do not specify a password policy, the default policy is used.
After creating the new user, you are automatically forwarded to a page on which to set the initial password for this user: (See the section "Reset Password" for details.)
If necessary, assign or copy privileges.
Display Summary
Use this operation to display a summary of the selected user’s, user facet’s, persona’s or functional user’s data. For details, see the section "Display Summary" in the section "Using Self Service".
Modify User Data
Use this operation to modify the selected user’s data. You can view all the user’s attributes, but you can only edit the attributes that have been configured for modification.
Modify Photos and Certificates
Use this operation to upload a new photo or a new certificate from a file or to delete existing photos and certificates.
Reset Password
Use this operation to reset a user’s password.
In the Enter password section, enter a new password in the space provided in New password according to the password policy (if any) displayed in the Password policy section, or click Generate to allow Web Center to create a new password according to the password policy.
Click Save to start the reset password operation, or click Cancel to exit the operation.
Create New Functional User
The Create New Functional User operation is available with the DirX Identity Professional license and is enabled when Enable Functional User Handling is checked at the domain.
Like the Create New User operation under the Professional license, the functional user creation process is defined by a creation workflow. The workflow starts with an automatic activity that creates default values (especially for the new functional user’s sponsor) for the functional user. All other aspects correspond to the creation of a new user with the Professional license.
Create New Persona
The Create New Persona operation is available with the Professional license and is enabled when Enable Persona Handling is checked at the domain.
Like the Create New User operation under the Professional license, the persona creation process is defined by a creation workflow. The workflow starts with an automatic activity that creates default values for the new persona (especially for the new persona’s owner) using the selected user as a template. All other aspects correspond to the creation of a new user with the Professional license.
Create New User Facet
The Create New User Facet operation is available with the DirX Identity Professional license and is enabled when Enable User Facet Handling is checked at the domain.
Like the Create New User operation under the Professional license, the user facet creation process is defined by a creation workflow. The workflow starts with an automatic activity that creates default values for the new user facet (especially for its owner) using the selected user as a template. All other aspects correspond to the creation of a new user with the Professional license.
Assign Privileges
This page displays the identifying user attributes at the top and below them four tabs for role, permission and group assignments and accounts.
-
Roles - tab page for assignment modification showing the user’s role assignments and a list of all roles that can still be assigned. This tab is only available when the role package is installed.
-
Permissions - tab page for assignment modification showing the user’s permission assignments and a list of all permissions that can still be assigned.
-
Groups - tab page for assignment modification showing the user’s group assignments and a list of all groups that can still be assigned.
-
Accounts - tab page showing the user’s assigned accounts.
Each privilege assignment page provides a search utility for searching for all privileges that you are allowed to assign. See the section "Using the Search Panel" in "Common Features for All Pages" for a description of this utility.
In the upper pane, Web Center displays the privileges that are available for assignment. In the lower pane, Web Center displays all privileges that are already assigned to the user. To select a privilege, click its checkbox and then use the arrow buttons ( or ) to move it between the upper and lower panes. The double-arrow buttons or allow you to move all privileges without having to select them first.
In the Roles tab page, a checked box in the Parameter column in the upper pane indicates that this role requires parameters to be specified during assignment. If you select this type of role, Web Center displays additional pop-up pages in which to specify these parameters.
If roles with parameters have been assigned (assigned roles are listed in the lower pane), you can modify the parameter settings at any time by clicking the  button. The page that opens can support a variety of different parameter types. Most types are easy and straightforward to handle. If hierarchical role parameters need to be entered, the control consists of a drop-down list and a tree browser button. Select one of the start nodes from the drop-down list (the start nodes are defined via role parameter access policies). Open the tree browser and navigate to the value you want to assign. Select it. Close the page.
After assignment, the Parameter column displays the assigned parameters. If you violate any rules (for example, integer ranges), an error message is visible as a tool tip.
Click Save to save your changes. Click Cancel to stop the operation and return to the user summary.
Copy Privileges
Use this operation to copy the directly assigned privileges from another user.
This page contains the following fields:
(identification) - identification fields for the selected user (by default, Name, Department and Phone).
(search) - search fields for locating users whose privileges you can copy.
(table) - the users whose privileges you are allowed to copy. Select one of these users.
The next page is identical to the page displayed with the assign privileges operation described in "Assign Privileges". In this case, the page shows the user’s original privileges (the privileges that the user had before the copy operation) and the copied privileges, or a warning box that no privileges could be copied, which means that the user whose privileges you copied did not have directly assigned privileges.
You can add or remove privileges and then use Save to store the privileges or use Cancel to abort the copy operation.
The copy operation works as follows:
-
All privilege assignments (roles, permissions, groups) assigned by hand are copied. Privilege assignments with time restrictions (end date, start date) are only copied if the end date is not yet reached.
-
Role parameters in assignments are copied.
-
Assignments from groups in the IMPORTED state are not copied.
-
The privileges are merged: if the user already has a privilege assigned, he is not assigned the same privilege again.
-
If a privilege requires approval, an approval workflow is started.
Note: Privileges assigned by rules are not copied because the next execution of the rule would remove or change these rights. Set the permission parameters correctly and run the policy execution service to assign the rest of the privileges via rules.
Show Subscription Status
Use this operation to display the user’s subscription status. See the section "Show Subscription Status" in "Using the Self Service Menu" for details.
Task List
This operation displays all tasks of the selected user. See the section "Task List" in "Using the Work List Menu" for details.
Certification Campaign List
This operation displays the certification campaigns with open tasks for the selected user. See the section "Certification Campaign List" in "Using the Work List Menu" for details.
Show SoD Violations
Use this operation to display the user’s SoD violations.See the section "Show SoD Violations" in "Using the Self Service Menu" for details.
Run Report
Use this operation to display the reports that you can run on the selected user.The number of reports listed in the page depends on the number of reports configured for this domain and on the access policies that are configured for the logged-in user.If the report list is empty, you are not allowed to run reports on users.
To run a report, click it in the list and then review the displayed result.To download the report to a file, scroll to the bottom of the page and click Save as file.Select the correct location and name of the file.
Using the Roles Menu (Role Management)
This section describes how to use Web Center’s operations for role management, including:
-
Select Role - selects a role from the list to display its details and manage it.
-
Last selection list - displays the result of the last recently performed search query for roles objects.
-
Create new role - creates a new role.
-
Display summary - displays the summary of the selected role object.
-
List users - lists the users the selected role is assigned to.
-
Modify role - modifies the selected role object.
-
Delete role - deletes the selected role object.
-
Assign privileges - assigns or removes privileges (junior roles and permissions) to or from the selected role object.
-
Assign users - assigns the selected role to a set of users.
-
Remove users - removes the selected role from a set of users.
-
Show subscription status - shows all subscriptions (running approval workflows) for the selected role.
-
Run report - provides a report about the selected role.
Select Role
This operation provides a search utility for role objects and displays a list of the entries that the search operation returns. The operation displays only the entries you are allowed to view or modify.
After you have performed the search, sort the list if necessary and then click one of the entries to work on it.
For information on how to use the search utility, see the section "Using the Search Panel" in "Common Features for All Pages".
Last Selection List
Use this operation to display the roles object result list of your most recent search. This page displays the most recently specified search filter.
Create New Role
Use this operation to create a new role at a specific location in the directory. The process you follow depends on your DirX Identity license (Business or Professional).
Professional License:
Request workflows define the role creation process. Web Center presents all available workflows that the logged-in user is allowed to run. If no workflow is available, an error message is displayed.
Select one of the displayed workflows in the list. The sequence of pages displayed next depends on the workflow. If there is only one workflow, its pages for specifying input data are displayed.
Business License:
If you do not have the access rights to create a new role, an error message is displayed.
This page includes the following fields:
Folder - the path where the new role entry is to be created.
The drop-down list allows you to select several possible locations for the new entry creation (depending on your access rights). Select the correct root node.
Use the tree browser button to the right of this field to select a specific node under the root node at which to create the new role.
The page displays a set of attributes. Enter the necessary values.
After creating the new entry, assign the privileges (junior roles and permissions) to complete the role definition.
Display Summary
Use this operation to display a summary the selected role’s data. The page contains general data, operational attributes, role parameters and the privilege structure. See the context-sensitive help in the DirX Identity Manager or in the DirX Identity Connectivity or Provisioning Administration Guide for details on the fields displayed on this page.
All fields are read-only.
Modify Roles
Use this operation to modify the selected role’s data. You can view all the attributes, but you can only edit the attributes that have been configured for modification.
Assign Privileges
Use this operation to assign privileges to or remove privileges from a role object. This page displays the identifying role attributes at the top and below them two tabs for junior role and permission assignment.
-
Junior Roles - tab page for assignment modification showing the role’s junior role assignments and a list of all roles that can still be assigned.
-
Permissions - tab page for assignment modification showing the role’s permission assignments and a list of all permissions that can still be assigned.
Each privilege assignment page provides a search utility for searching for all privileges that you are allowed to assign. See the section "Using the Search Panel" in "Common Features for All Pages" for a description of this utility.
In the upper pane, Web Center displays the privileges that are available for assignment. In the lower pane, Web Center displays all privileges that are already assigned to the role. To select a privilege, click its checkbox and then use the arrow buttons ( or ) to move it between the upper and lower panes.
Assign Users
Use this operation to assign the selected role to a set of users. This page displays the identifying role attributes at the top. It provides a search utility to search for user entries in the directory. (See "Select User" in the "Using Users" section for details.) In the search result list, select the users by clicking them or checking the box at the beginning of the list item. Click Assign to assign the role to these users.
Remove Users
Use this operation to remove the selected role from users. This page displays the identifying role attributes at the top. It provides a search utility to search for user entries in the directory with this role. (See "Select User" in the "Using Users" section for details.) In the search result list, select the users by clicking them or checking the box at the beginning of the list item. Click Remove to remove the role from these users.
Show Subscription Status
Use this operation to display all subscriptions (running approval workflows) of the selected role.Click one of the list entries to display the approval details.(See the section "Show Initiated Workflows" for details.)
Run Report
Use this operation to display all reports you can run on the selected role.The number of listed reports depends on the number of reports configured for this domain and on the access policies that are configured for the logged-in user.If the report list is empty, you are not allowed to run any report on roles.
To run a report, click it in the list and then review the displayed result.To download the report to a file, scroll to the bottom of the page and click Save as file.Select the correct location and name of the file.
Using the Permissions Menu (Permission Management)
This section describes how to manage permission objects:
-
Select permission - selects a permission from the list to display its contents and manage it.
-
Last selection list - displays the result of the last recently performed search query for permission objects.
-
Create new permission - creates a new permission.
-
Display summary - displays the general data and all assignments of the previously selected permission.
-
List users - lists the users the selected permission is assigned to.
-
Modify permission - modifies the selected permission.
-
Delete permission - deletes the selected permission.
-
Assign groups - assigns groups to or removes groups from the selected permission.
-
Assign users - assigns the selected permission to users.
-
Remove users - removes the selected permission from users.
-
Show subscription status - shows all subscriptions (running approval workflows) for the selected permission.
-
Run report - provides a report about the selected permission.
Select Permission
This operation provides a search utility for permission entries and displays a list of the entries that the search operation returns. The operation displays only the entries you are allowed to view or modify.
After you have performed the search, sort the list if necessary and then click one of the entries to work on it.
For information on how to use the search utility, see the section "Using the Search Panel" in "Common Features for All Pages".
Last Selection List
Use this operation to display the permissions object result list of your most recent search. This page displays the most recently specified search filter.
Create New Permission
Use this operation to create a new permission at a specific location in the directory. Depending on your DirX Identity license (Business or Professional) the operation process is different.
Professional License:
Request workflows define the creation of new permissions. Web Center presents all available workflows the logged-in user is allowed to run. If no workflow is available, an error message is displayed.
Select one of the displayed workflows in the list. The sequence of pages displayed next depends on the workflow. If there is only one workflow, its pages for specifying input data are displayed.
Business License:
If you do not have the access rights to create a new permission, an error message is displayed.
This page contains the following fields:
Folder - the path where the new permission object entry shall be created.
The drop-down list allows you to select several possible locations for the new entry creation (depending on your access rights). Select the correct root node.
Use the tree browser button to the right of this field to select a specific node under the root node at which to create the new permission.
The page displays a set of attributes. Enter the necessary values.
After creating the new entry, assign the privileges (groups) to complete the permission definition.
Display Summary
Use this operation to display an overview of the selected permission’s data. This page displays general data, approval information, match rules, tasks, and privileges. See the context sensitive help in the DirX Identity Manager or in the DirX Identity Connectivity or Provisioning Administration Guide for details on the fields displayed.
All fields are read-only.
Modify Permission
Use this operation to modify the selected permission’s data. You can view all the attributes, but you can only edit the attributes that have been configured for modification.
Assign Groups
Use this operation to assign the selected permission to groups. This page displays the identifying permission attributes at the top and below them a tab for group assignment.
Groups - tab page for assignment modification showing the permission’s group assignments and a list of all groups that can still be assigned.
The Groups tab page provides a search utility for searching for all groups that you are allowed to assign. See the section "Using the Search Panel" in "Common Features for All Pages" for a description of this utility.
In the upper pane, Web Center displays the groups available for assignment. In the lower pane, Web Center displays all groups that are already assigned to the permission. To select a group, click its checkbox and then use the arrow buttons ( or ) to move it between the upper and lower panes.
Assign Users
Use this operation to assign the selected permission to a set of users. This page displays the identifying permission attributes at the top. It provides a search utility to search for user entries in the directory. (See "Select User" in the "Using Users" section for details.) In the search result list, select the users by clicking them or checking the box at the beginning of the list item. Click Assign to assign the permission to these users.
Remove Users
Use this operation to remove the selected permission from a set of users. This page displays the identifying role attributes at the top. It provides a search utility to search for user entries in the directory with this permission. (See "Select User" in the "Using Users" section for details.) In the search result list, select the users by clicking them or checking the box at the beginning of the list item. Click Remove to remove the permission from these users.
Show Subscription Status
Use this operation to display all subscriptions (running approval workflows) of the selected permission.Click one of the list entries to display the approval details.(See also the section "Show Initiated Workflows" for details.)
Run Report
Use this operation to display all reports you can run on the selected permission.The number of listed reports depends on the number of reports configured for this domain and on the access policies that are configured for the logged-in user.If the report list is empty, you are not allowed to run any report on permissions.
To run a report, click it in the list and then review the displayed result.To download the report to a file, scroll to the bottom of the page and click Save as file.Select the correct location and name of the file.
Using the Groups Menu (Group Management)
This section describes how to manage group objects:
-
Select group - selects a group from the list to display its contents and manage it.
-
Last selection list - displays the result of the last recently performed search query for group objects.
-
Create new group - creates a new group.
-
Display summary - displays the general data and all assignments of the previously selected group.
-
Modify group - modifies the selected group.
-
Delete group - deletes the selected group.
-
Assign users - adds users to the selected group.
-
Remove users - removes users from the selected group.
-
Show members - displays the list of members of the selected group.
-
Show subscription status - shows all subscriptions (running approval workflows) for the selected group.
-
Run report - provides a report about the selected group.
Select Group
This operation provides a search utility for group entries and displays a list of the entries that the search operation returns. The operation displays only the entries you are allowed to view or modify.
After you have performed the search, sort the list if necessary and then click one of the entries to work on it.
For information on how to use the search utility, see the section "Using the Search Panel" in "Common Features for All Pages".
Last Selection List
Use this operation to display the groups object result list of your most recent search. This page displays the most recently specified search filter.
Create New Group
Use this operation to create a new group at a specific location in the directory. Depending on your DirX Identity license (Business or Professional) the operation process is different.
Professional License:
Request workflows define the creation of new groups. Web Center presents all available workflows that the logged-in user is allowed to run. If no workflow is available, an error message is displayed.
Select one of the displayed workflows in the list. The sequence of pages displayed next depends on the workflow. If there is only one workflow, its pages for specifying input data are displayed.
Business License:
If you do not have the access rights to create a new group, an error message is displayed.
This page includes the following fields:
Folder - the path where the new group object entry is to be created.
The drop-down list allows you to select several possible locations for the new entry creation (depending on your access rights). Select the correct root node.
Use the tree browser button to the right of this field to select a specific node under the root node at which to create the new group.
The page displays a set of attributes. Enter the necessary values.
After creating the new entry, assign the users to complete the group definition.
Display Summary
Use this operation to display an overview of the selected group’s data. This page displays general data, approval information, operational attributes, tasks, permission parameters, and privileges. See the context-sensitive help in the DirX Identity Manager or in the DirX Identity Connectivity or Provisioning Administration Guide for details on the fields displayed on this page.
All fields are read-only.
Modify Group
Use this operation to modify the selected group’s data. You can view all the attributes, but you can only edit the attributes that have been configured for modification.
Assign Users
Use this operation to add a set of users to the selected group. This page displays the identifying group attributes at the top. It provides a search utility to search for user entries in the directory. (See "Select User" in the "Using Users" section for details.) In the search result list, select the users by clicking them or checking the box at the beginning of the list item. Click Assign to add these users to the group.
Remove Users
Use this operation to remove a set of users from the selected group. This page displays the identifying group attributes at the top. It provides a search utility to search for user entries in the directory that are member of this group. (See "Select User" in the "Using Users" section for details.) In the search result list, select the users by clicking them or checking the box at the beginning of the list item. Click Remove to remove these users from the group.
Show Subscription Status
Use this operation to display all subscriptions (running approval workflows) of the selected group.Click one of the list entries to display the approval details.(See the section "Show Initiated Workflows" for details.)
Run Report
Use this operation to display all reports you can run on the selected group.The number of listed reports depends on the number of reports configured for this domain and on the access policies that are configured for the logged-in user.If the report list is empty, you are not allowed to run any report on groups.
To run a report, click it in the list and then review the displayed result.To download the report to a file, scroll to the bottom of the page and click Save as file.Select the correct location and name of the file.
Using the Accounts Menu (Account Management)
This section describes how to use Web Center’s operations for account management:
-
Select account - allows you to select an account for a management task.
-
Last selection list - displays the result of the last recently performed search query for accounts.
-
Display summary - shows the general data and all assignments of the previously selected account.
-
Modify account - modifies the selected account.
-
Display password - displays the password of a privileged account.
-
Set password - sets the password of a privileged account.
-
Run report - allows you to run a report on the selected account.
Select Account
This operation provides a search utility for account entries and displays the list of the entries the search operation returns. The result list contains only the entries you are allowed to view or modify.
After you have performed the search, sort the list if necessary and then click one of the entries or use the context menu to work on it.
For information on how to use the search utility, see the section "Using the Search Panel" in "Common Features for All Pages".
Last Selection List
Use this operation to display the account result list of your most recent search. This page displays the most recently specified search filter.
Display Summary
Use this operation to display an overview of the selected account’s data. This page displays general data, user data, operational data, privileged account data, and groups data. See the context sensitive help in the DirX Identity Manager or in the DirX Identity Connectivity or Provisioning Administration Guide for details on the fields displayed on this page.
The fields are read-only.
Modify Account
Use this operation to modify the selected account’s data. You can view all the attributes, but you can only edit the attributes that have been configured for modification.
Display Password
Use this operation to display the password of a privileged account if you are allowed to read it.
All fields are read-only.
Set Password
Use this operation to set a privileged account’s password if you are allowed to perform this operation.
Run Report
Use this operation to display all reports you can run on the selected account.The number of listed reports depends on the number of reports configured for this domain and on the access policies that are configured for the logged-in user.If the report list is empty, you are not allowed to run any report on accounts.
To run a report, click it in the list and then review the displayed result.To download the report to a file, scroll to the bottom of the page and click Save as file.Select the correct location and name of the file.
Using the Rules Menu (Rule Management)
This section describes how to manage rules.It describes how to manage provisioning rules and password policies.
Managing provisioning rules comprises:
-
Select rule - selects a provisioning rule from the list to display its contents and manage it.
-
Last selection list - displays the result of the last recently performed search query for provisioning rule objects.
-
Create new rule - creates a new provisioning rule.
-
Display summary - displays the general data and all assignments of the previously selected provisioning rule.
-
Modify rule - modifies the selected provisioning rule.
-
Delete rule - deletes the selected rule.
-
Show subscription status - shows all subscriptions (running approval workflows) for the selected rule.
-
Assign privileges - assigns privileges to or removes privileges from the selected provisioning rule.
-
Run report - provides a report about the selected provisioning rule.
Managing password policies
-
Manage - manages password policies.
Select Rule
This operation provides a search utility for provisioning rule entries and displays a list of the entries that the search operation returns. The operation displays only the entries you are allowed to view or modify.
After you have performed the search, sort the list if necessary and then click one of the entries to work on it.
For information on how to use the search utility, see the section "Using the Search Panel" in "Common Features for All Pages".
Last Selection List
Use this operation to display the provisioning rule object result list of your most recent search. This page displays the most recently specified search filter.
Create New Rule
Use this operation to create a new rule at a specific location in the directory. The process you follow depends on your DirX Identity license (Business or Professional).
Professional License:
Request workflows define the creation of new rules. Web Center presents all available workflows that the logged-in user is allowed to run. If no workflow is available, an error message is displayed.
Select one of the displayed workflows in the list. The sequence of pages displayed next depends on the workflow. If there is only one workflow, its pages for specifying input data are displayed.
Business License:
If you do not have the access rights to create a new rule, an error message is displayed.
This page includes the following fields:
Folder - the path where the new rule object entry is to be created.
The drop-down list allows you to select several possible locations for the new entry creation (depending on your access rights). Select the correct root node.
Use the tree browser button to the right of this field to select a specific node under the root node at which to create the new rule.
The page displays a set of attributes. Enter the necessary values.
After creating the new entry, assign the privileges (roles, permissions, and groups) to complete the rule definition.
Display Summary
Use this operation to display an overview of the selected provisioning rule’s data. This page displays general data, operational attributes, more details, role parameters and the privilege structure. See the context-sensitive help in the DirX Identity Manager or in the DirX Identity Connectivity or Provisioning Administration Guide for details on the fields displayed on this page.
All fields are read-only.
Modify Rule
Use this operation to modify the selected provisioning rule’s data. You can view all the attributes, but you can only edit the attributes that have been configured for modification.
Show Subscription Status
Use this operation to display all subscriptions (running approval workflows) of the selected rule. Click one of the list entries to display the approval details. (See also the section "Show Initiated Workflows" for details.)
Assign Privileges
This operation displays the identifying provisioning rule attributes at the top and below them three tabs for role, permission and group assignments.
-
Roles - tab page for assignment modification showing the provisioning rule’s role assignments and a list of all roles that can still be assigned.
-
Permissions - tab page for assignment modification showing the provisioning rule’s permission assignments and a list of all permissions that can still be assigned.
-
Groups - tab page for assignment modification showing the provisioning rule’s group assignments and a list of all groups that can still be assigned.
Each privilege assignment page provides a search utility for searching for all privileges that you are allowed to assign. See the section "Using the Search Panel" in "Common Features for All Pages" for a description of this utility.
In the upper pane, Web Center displays the privileges that are available for assignment. In the lower pane, Web Center displays all privileges that are already assigned to the provisioning rule. To select a privilege, click its checkbox and then use the arrow buttons ( or ) to move it between the upper and lower panes.
Run Report
Use this operation to display all reports you can run on the selected provisioning rule. The number of listed reports depends on the number of reports configured for this domain and on the access policies that are configured for the logged-in user. If the report list is empty, you are not allowed to run any report on provisioning rules.
To run a report, click it in the list and then review the displayed result. To download the report to a file, scroll to the bottom of the page and click Save as file. Select the correct location and name of the file.
Managing Password Policies
Within this page you can create, modify or delete password policies.A table of existing password policies is displayed at the top.
Creating new password policies - click the Create Password Policy button to create a new password policy.For a description of the password policy parameters see the section "Password Policies" in the DirX Identity Provisioning Administration Guide context-sensitive help.
Modifying password policies - click one of the lines in the list of existing password policies to modify it.For a description of the password policy parameters see the section "Password Policies" in the DirX Identity Provisioning Administration Guide context-sensitive help.
Deleting password policies - click the checkbox at the end of line of an existing password policy to delete it.You can select several policies.Click the Delete password policies button to remove the selected policies.
Using the Certifications Menu
This section describes how to use Web Center’s operations for certification campaign management, including:
-
Select certification campaign - selects a certification campaign from the list to display its details and manage it.
-
Create new certification campaign - creates a new certification campaign.
-
Display summary - displays the summary of the selected certification campaign object.
-
Modify certification campaign - modifies the selected certification campaign object.
-
Reset state to "In Preparation" - Resets the state of a certification campaign from “Failed to Start” to “In Preparation”.
-
Delete certification campaign - deletes the selected certification campaign object.
-
Run report - provides a report about the selected certification campaign.
Select Certification Campaign
This operation displays the list of all certification campaigns you’re allowed to view. To view details of a campaign, click the corresponding entry in the list.
Create New Certification Campaign
Use this operation to create a new certification campaign. Define a unique name for the new campaign and assign an owner and then set the optional attributes as required. See the DirX Identity Manager context-sensitive help, the DirX Identity Connectivity Administration Guide or the DirX Identity Provisioning Administration Guide for a description of the fields on this page.
Display Summary
Use this operation to display a summary of the selected campaign’s data. The page contains general data, timing, filter and reminder notification attributes. See the DirX Identity Manager context-sensitive help, the DirX Identity Connectivity Administration Guide or the DirX Identity Provisioning Administration Guide for a description of the fields on this page.
Modify Certification Campaign
Use this operation to modify the selected certification campaign‘s data. You can view all the attributes, but you can only edit the attributes that have been configured for modification. Once a campaign is running, most of its attributes are read-only.
Reset State to "In Preparation"
If starting a certification campaign fails, its state is set to “Campaign failed to start”. Once you’ve fixed the problems, use this operation to reset the campaign’s state to “Campaign is in preparation” and then adjust the start and due date if necessary. The campaign is then restarted on the scheduled date.
Delete Certification Campaign
Use this operation to delete the selected certification campaign.You can delete only campaigns which are in preparation.
Run Report (Certifications)
Use this operation to display all reports you can run on the selected campaign.The number of listed reports depends on the number of reports configured for this domain and on the access policies that are configured for the logged-in user.If the report list is empty, you are not allowed to run any report on campaigns.
To run a report, click it in the list and then review the displayed result.To download the report to a file, scroll to the bottom of the page and then click Save as file.Select the correct location and name of the file.
Using the Tools Menu
This section describes how to use Web Center’s tools:
-
Reports - run reports on a specific number of selected objects.
-
Upload file - upload a file to the server.
-
Upload files - upload one or more files to the server.
-
Upload and process files - upload one or more files to the server and start a program to process the uploaded files on the server.
-
Show state of uploaded file processing - display state records that provide information about the progress and outcome of processing uploaded files.
This section describes how to use Web Center’s tools:
Reports
Use this operation to run a report on a specific object selection.
This page provides a search utility to specify the objects for the report. In Objects for the Report, specify the following search options:
Search base - specifies the search base at which to select the objects for the report. Click the tree browser button at the end of this field. A pop-up window displays the available object trees. Navigate to the objects you want to select (for example, Role Catalogue).
Scope - specifies the scope of the search. Select one of the following values from the drop-down list:
Subtree search - specifies all objects under this tree node.
One level search - specifies only the next level of objects under this node.
Base DN search - specifies only the node that is the object itself.
Templates lists the available reports for the selected objects. The number of reports displayed here depends on the list of pre-configured reports for this domain and on the access policies for the logged-in user. If the resulting list is empty, you are not allowed to run any report on this object selection.
Click a report in the list to run it. After some time, the report is displayed. To download the report to a file, scroll to the bottom of the page and then click Save as file. Select the correct location and name of the file.
Upload File
Use this operation to upload a single file to a specific folder on the server. The file may then be processed on the server by a periodically started background process, by a process watching for changes to the folder, or manually by an administrator.
Upload Files
Use this operation to upload one or more files to a specific folder on the server.The files may then be processed on the server by a periodically started background process, by a process watching for changes to the folder, or manually by an administrator.
Managing Business Objects
Web Center allows administrators to manage the following business objects:
-
Countries
-
Locations
-
Companies
-
Departments
-
Cost Units
-
Contexts
-
Projects
-
Numbering Plans
Web Center displays the business objects under the common menu line. Click on the business object to display the corresponding menu. You can perform the following operations:
-
Select business object - allows you to select a business object.
-
Last selection list - displays the result of the last recently performed search query for business objects.
-
Create new business object - creates a new business object.
-
Display summary - displays the general data and all assignments of the previously selected business object.
-
Modify business object - modifies the selected business object.
-
Delete business object - deletes the selected business object.
-
Show subscription status - shows all subscriptions (running approval workflows) for the selected business object.
-
Assign privileges - assigns privileges to or removes privileges from the selected business object
-
Run report - provides a report about the selected business object.
The following sections provide information about the operations administrators can perform on business objects.
Select Business Object
This operation provides a search utility for business objects and displays the list of the entries the search operation returns. The result list contains only the entries you are allowed to view or modify.
After you have performed the search, sort the list if necessary and then click one of the entries or use the context menu to work on it.
For information on how to use the search utility, see the section "Using the Search Panel" in "Common Features for All Pages".
Last Selection List
Use this operation to display the business object result list of your most recent search. This page displays the most recently specified search filter.
Create New Business Object
Use this operation to create a new business object at a specific location in the directory. The process you follow depends on your DirX Identity license (Business or Professional).
Professional License:
Creating new business objects is defined by request workflows. Web Center presents all of the available workflows that the logged-in user is allowed to run. If no workflow is available, an error message is displayed.
Select one of the displayed workflows in the list. The sequence of pages displayed next depends on the workflow. If there is only one workflow, its pages for specifying input data are displayed.
Display Summary
Use this operation to display an overview of the selected business object’s data. This page displays general data, address, operational data, and references. The displayed data depends on the business object type. See the context-sensitive help in the DirX Identity Manager or in the DirX Identity Connectivity or Provisioning Administration Guide for details on the fields displayed on this page.
All fields are read-only.
Modify Business Object
Use this operation to modify the selected business object’s data. You can view all the attributes, but you can only edit the attributes that have been configured for modification.
Show Subscription Status
Use this operation to display all subscriptions (running approval workflows) of the selected business object. Click one of the list entries to display the approval details. (See also the section "Show Initiated Workflows" for details.)
Assign Privileges
This operation displays the identifying business object attributes at the top and below them three tabs for role, permission and group assignments.
-
Roles - tab page for assignment modification showing the business object’s role assignments and a list of all roles that can still be assigned.
-
Permissions - tab page for assignment modification showing the business object’s permission assignments and a list of all permissions that can still be assigned.
-
Groups - tab page for assignment modification showing the business object’s group assignments and a list of all groups that can still be assigned.
Each privilege assignment page provides a search utility for searching for all privileges that you are allowed to assign.See the section "Using the Search Panel" in "Common Features for All Pages" for a description of this utility.
In the upper pane, Web Center displays the privileges that are available for assignment.In the lower pane, Web Center displays all privileges that are already assigned to the business object.To select a privilege, click its checkbox and then use the arrow buttons ( or ) to move it between the upper and lower panes.
Run Report
Use this operation to display all reports you can run on the selected business object.The number of listed reports depends on the number of reports configured for this domain and on the access policies that are configured for the logged-in user.If the report list is empty, you are not allowed to run any report on business objects.
To run a report, click it in the list and then review the displayed result.To download the report to a file, scroll to the bottom of the page and click Save as file.Select the correct location and name of the file.
Using the Details Pages
This section explains how to use the Web Center’s details pages, including:
-
Access rights details
-
Delegation details
-
Workflow details
-
Task list details
-
Workflow list
Access Right Details
This page displays the details of an access right. The upper pane provides the following information:
Name - the name of the access right. By default, the name is *Default_*operation when the access right was calculated from access policies. If it was delegated, the delegator could have changed the name.
Description - an explanation of the access right. The description given by default is Assembly of all current operation access rights obtained from access policies or delegations. If the access right was delegated, the delegator could have changed the description.
Operation - any of the values: approve, grant, modify, read.
Type - the object type for this operation.
The lower pane displays a list of assigned resources. Resources are Roles, Permissions, Groups or Users. For each resource in the list, Web Center displays the following information:
Name - the name of the resource.
Type - the type of the resource (role, permission, group or user).
Description - an explanation of the resource.
The user has the right to handle all resources contained in the list with the operation listed in Operation.
Delegation Details
Important: the delegation feature provided in the current version of DirX Identity has been completely redesigned and reimplemented. Web Center does not support this new design. The information provided in this section describes the old design, which is supported by Web Center, and applies only if you have not enabled the new implementation.
This page displays the details of a delegation. The upper pane provides the following information:
Name - the name of the delegation.
Description - an explanation of the delegation.
Delegator - the person who delegated.
Department - the department of the person who delegated.
Start date - (optional) the start date of the delegation.
End date - (optional) the end date of the delegation.
The lower pane displays a list of access rights. For each access right in the list, Web Center provides the following information:
Name - the name of the access right.
Description - an explanation of the access right.
Operation - the operation (approve, grant, modify, read).
Click an access right in the list to display its access right details.
Workflow Details
This page displays the details of a workflow instance. It comprises these fields:
(Type) - the type of workflow. Possible values are:
-
Add assignment - the assignment is waiting for approval. After successful approval, the privilege is assigned to the user.
-
Modify assignment - the assignment exists already and will be modified. After successful approval, the assignment is modified accordingly.
-
Delete assignment - the assignment is to be deleted. After successful approval, the assignment is removed from the user.
-
Reapprove assignment - the assignment is waiting for reapproval.
-
Create object - an object creation workflow.
-
Modify object - a modification approval workflow.
-
Delete object - an object deletion workflow.
Subject - the name of the workflow.
Operation - the operation to perform. Possible values are:
-
approve - an approval workflow
-
create - an object creation workflow
-
modify - an object modification workflow
From - the initiator of the workflow.
For - the object the workflow handles.
Start date - the date at which this workflow was started.
End date - the date at which this workflow finished.
State - the status of the workflow. See the section "Understanding Request Workflow States" in the DirX Identity Provisioning Administration Guide for more information.
Due - the date at which this workflow expires.
Is expired - an indication that this workflow is already expired.
Running activities - the next lines display the people activities of this workflow that are still running. The available fields in the activity list are:
Activity - the name of the activity.
Participants - the person who has to act.
Start Date - the start date of this activity.
Due - the date when this activity will expire. This causes either another notification dependent on the number of retries or an escalation.
Escalation Level - the current escalation level.
Retry Limit - the number of configured retries.
Finished activities - the next lines display the people activities of this workflow that are still running. The available fields in the activity list are:
End Date - the date when this activity ended.
Activity - the name of the activity.
Participants - the person that performed this activity.
State - the state of the finished activity. See the section "Understanding Request Workflow Activity States" in the DirX Identity Provisioning Administration Guide for more information.
Application State - the application state of the finished activity. See the section "Understanding Request Workflow Activity States" in the DirX Identity Provisioning Administration Guide for more information.
Reason - the entered reason of the participant.
Cancel workflow - click this button to cancel this workflow. If you are not allowed do cancel this workflow (this is dependent on the configured access policies).
Task List Details
This page displays the details of a task list entry. Its layout is different depending on the task type, but the following fields are common to all pages:
From - the initiator of the workflow. For a user self-registration, this field displays ANYONE.
Due - the due date of this request. It defines further action of workflow engine (either additional notifications or an escalation).
Folder - the location in the directory tree at which this object will be created after approval.
Reason - the reason for this approval. Providing a reason is good practice, especially if you reject the request. This field is not displayed during the confirmation step of a self-registration.
The actions on an approval page are:
-
The approver can change some of the values on this page before clicking Accept. This feature streamlines approval workflows because it is not necessary to reject the request to inform the initiating user and to wait for the corrected approval request. Note that the administrator can prohibit changing values in the domain configuration or in the workflow configuration. (See "Domain Properties" and "Activity - Activity" in the DirX Identity Provisioning Administration Guide for details.)
-
Accept - click this button to accept this approval request.
-
Reject - click this button to reject this approval request.
The next sections list specific fields for the different task list types.
Approval of Object Creation
The additional fields on this page depend on the specific object type and the workflow definition.
Approval of Attribute Modifications
Name - the user entry to be changed.
The next lines display the fields to be modified. The old and new values are listed. The approver can change the new value if it is incorrect.
Approval of a Privilege Assignment
The bold title under the From field defines the type of approval request for this privilege assignment. Available types are:
-
Add assignment - the assignment is waiting for approval. After successful approval, the privilege is assigned to the user.
-
Modify assignment - the assignment exists already and will be modified. After successful approval, the assignment is modified accordingly.
-
Delete assignment - the assignment is to be deleted. After successful approval, the assignment is removed from the user.
The next fields are:
Folder - the location in the directory tree at which this object will be created or is located.
For - the user to whom the privilege is assigned.
Privilege - the privilege that is assigned.
The next fields list the privilege parameters. For a modification, the new and the old values are displayed. The approver can change the new value if it is incorrect.
SoD violations - a list of segregation of duty violations the approver must take into account.
Workflow List
This page shows a list of workflows. The following fields are displayed:
(selection box) - click this box to select the workflow.
Subject - the display name of the workflow.
Operation - the operation to perform, for example:
-
Add assignment - an approval workflow
-
Create object - an object creation workflow
-
Modify object - an object modification workflow
For - the object the workflow handles.
Privilege - the privilege that is assigned. This field may be empty.
From - the initiator of the workflow.
State - the status of the workflow.
Click one of the displayed lines to see the workflow details.
Click Cancel selected workflows to cancel the marked workflows.