Using DirX Identity Server Admin
The DirX Identity Server Admin is a component of the High Availability suite. Use Server Admin to:
-
Display the Java-based Servers, C++-based-Servers and Message Brokers with their states and other attributes
-
Move adaptors from one Java-based Server to another Java-based Server
-
Move the request workflow engine or the Java scheduler from one Java-based Server to another Java-based Server
The topics in this chapter provide usage information about Server Admin.
Logging In to Server Admin
To log in to Server Admin in non-SSL mode, start your browser and then enter the following URL:
http://server:_port_/serverAdmin
For example:
where myserver is the machine where your Java-based Server runs and 40000 is the port that you entered during initial configuration.
If you have multiple Java-based Servers running, you may use any of these IdS-J servers, for example
If you selected SSL for the Java-based Server during configuration, use the following URL to log in securely to Server Admin:
https://server:_port_/serverAdmin
For example:
where myserver is the machine where your Java-based Server runs and 40443 is the port that you entered during initial configuration.
Server Admin displays a login dialog that requests a username and a password. It expects to receive your common name and your password in the LDAP data store. Only users who are members of the ServerAdmin group in the DirXmetaRole target system can successfully log in.
About the Page Layout
The default page layout consists of a header at the top, a footer at the bottom and an application-specific dialog area. All pages contain the same header, which consists of:
-
A company logo and company name.
-
Information about the user login status, which is either Not logged on or Welcome username.
-
A logout link (if a user is logged on). Click this link to log out of Server Admin.
The following figure shows the Server Admin header.

While Server Admin loads a new page from the server or updates the current page, an animated image is displayed in the upper left corner, as shown in the following figure:

If the animation is displayed but not started, check if you have disabled playing animations in your browser.
Using the Server Overview Page
After successful login, Server Admin displays the DirX Identity Server Overview page, which is shown in the following figure:
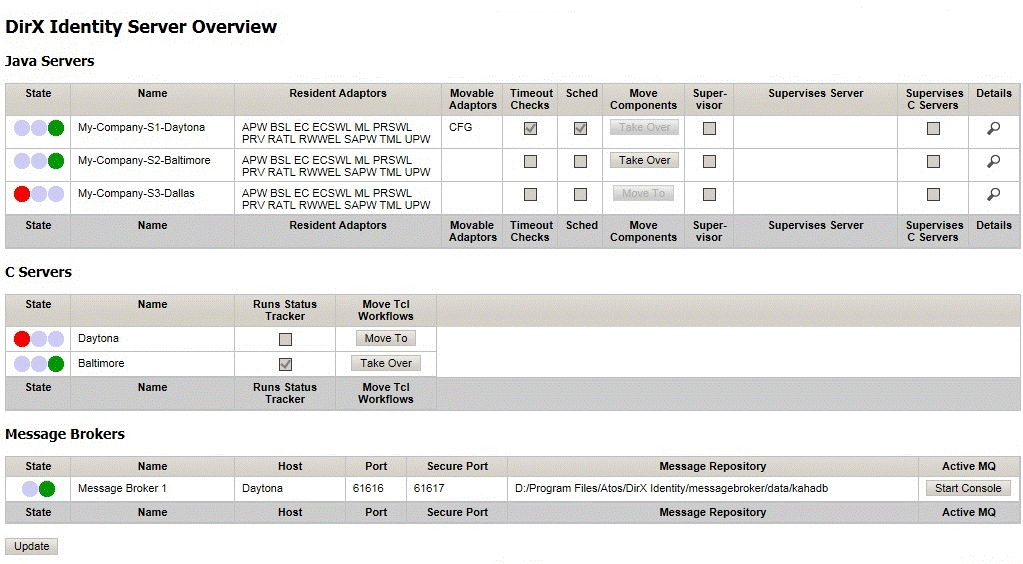
The Server Overview page displays tables of Java-based Servers, C++-based Servers and Message Brokers.
To update the display, click the Update button located below the tables.
Viewing Java-based Server Status
The DirX Identity Java Server table displays all Java-based servers that belong to the same domain as the server hosting Server Admin.
Each row contains status information about one server. In the figure shown in "Using the Server Overview Page", three Java-based Servers are shown. For each Java-based Server, the following information is displayed:
-
State - the server’s state, displayed as a traffic light. Possible states are:
 the server is down or is not responding.
 the server is running under heavy load (low on resources).
 the server is up and running.
 -
Name - the server’s name in the Connectivity database.
-
Resident Adaptors - the resident adaptors reside permanently on the server. They can be activated or deactivated. The field’s tooltip displays the full adaptor names. (See the Details page for details.)
-
Movable Adaptors - a movable adaptor can only run on one server of the domain. It can be moved from one server to another one. The field’s tooltip displays the full adaptor names.
-
Timeout Checks - a flag marking the Java-based Server that performs request workflow timeout checking. This component can be moved to another server.
-
Sched - a flag marking the Java server that hosts the Java scheduler. This component can be moved to another server.
-
Move Components - moves an adaptor, the request workflow timeout checker, or the Java scheduler.
-
Supervisor - whether (checked) or not (unchecked) a supervisor is running on the server.
-
Supervises Server - the Java-based Server under supervision.
-
Supervises C Servers - whether (checked) or not (unchecked) a supervisor is running on the server that supervises the C++-based Servers.
-
Details - displays the server details.
Viewing C++-based Server Status
The DirX Identity C Servers table displays all configured C++-based Servers.
Each row contains status information about one server. In the figure shown in "Using the Server Overview Page", two C++-based Servers are shown. The following information is displayed for each server:
-
State - the server’s state, displayed as a traffic light. Possible states are:
the server is down or is not responding.
the server is running under heavy load (low on resources).
the server is up and running. -
Name - the server’s name in the Connectivity database.
-
Runs Status Tracker - whether the status tracker runs on this server. The status tracker can be moved to another server.
-
Move Tcl Workflows - takes over or moves all Tcl workflows being hosted by the server from/to another server or moves the status tracker to another server
Viewing Message Broker Status
The Message Broker table displays all configured message brokers.
Each row contains status information about one server. In the figure shown in "Using the Server Overview Page", the following information is displayed:
-
State - the server’s state, displayed as a traffic light. Possible states are:
 - the server is down or is not responding.
 - the server is up and running.
 -
Name - the server’s name in the Connectivity database (also the service name on Windows).
-
Host - the server name with the installed Message Broker.
-
Port - the message port.
-
Secure Port - the message port for secure communication.
-
Message repository - the location of the database file. For more than one broker, a shared repository on a shared drive is required.
-
Active MQ - to access the Message Broker’s Web Console with more details.
Viewing Java-based Server Details
To display the Details page of a Java-based Server, click the Details button  in the Overview page. The server details are displayed in a new dialog, as shown in the following figure:
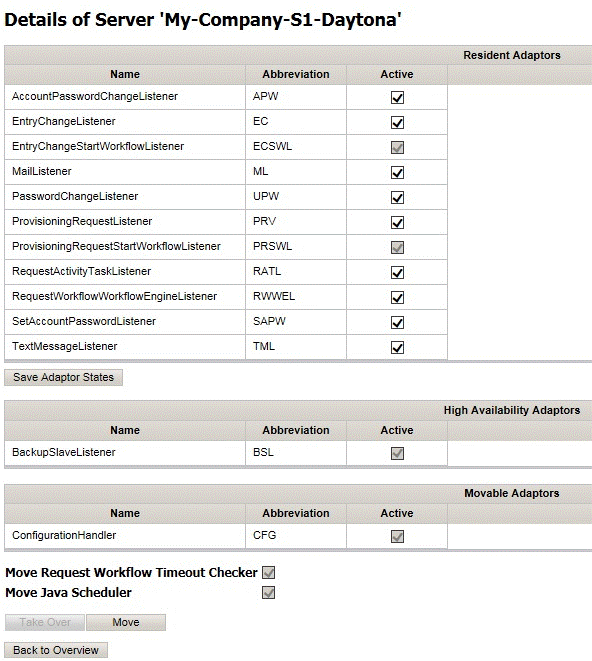
The Details page displays the name of the selected Java-based server in the header and some lists of adaptors below it. The Abbreviation column shows the abbreviations for the adaptor names used on the Server Overview page. Adaptors that are not active are assigned to another Java-based Server.
The Resident Adaptors are permanently assigned to a server. They can be active or inactive, as indicated by the flag in the Active row.
The High Availability Adaptors contain only one adaptor, the BackupSlaveListener. Its Active flag shows whether High Availability is configured for the server.
The Movable Adaptors contain only one adaptor, the ConfigurationHandler. In contrast to the Resident Adaptors, it can exist only on one of the Java based servers.
The Performs Request Workflow Timeout Checks check box displayed below the Movable Adaptors table indicates whether (checked) or not (unchecked) the selected Java-based Server performs the timeout check for request workflows.
The Hosts the Java Scheduler check box displayed below the Movable Adaptors table indicates whether (checked) or not (unchecked) the selected Java-based server hosts the scheduler for Java-based workflows.
On this page, you can take the following actions:
-
Click the checkboxes in the Active row of the Permanent Adaptors table and then click the Save Adaptor States button to configure the set of active Permanent Adaptors for the Java-based server. Note that some adaptors have a master adaptor. They are automatically activated or deactivated if their master is activated or deactivated.
-
Click Take Over to move the ConfigurationHandler, the Java scheduler, or the request workflow timeout checker from another Java-based Server to the selected server.
-
Click Move to move the ConfigurationHandler, the Java scheduler, or the request workflow timeout checker from the selected server to another Java-based Server.
| These two buttons are greyed out / disabled if there is nothing to move or take over. |
-
Click Back to Overview to return to the Server Overview page.
Moving Adaptors
You can move the ConfigurationHandler adaptor to and from servers by clicking the button in the Move Components column in the Server Admin Overview page. If a server is running, the direction is "take over", which means that the server will receive the additional adaptors. If a server is down, the direction is "move to", which means that the server will release the adaptor to another server.
The Move Components button is labeled with the related direction (Take Over or Move To) depending on the server’s state. If a move operation is not possible (because the server has already assigned all adaptors or has no adaptor to release), the button is greyed out/disabled.
You can also initiate an adaptor move from a Java-based Server’s Details page by clicking Take Over (for the "take over" direction) or Move (for the "move to" direction).
When you select to move an adaptor, Server Admin displays the Move Components dialog, as shown in the following figure:
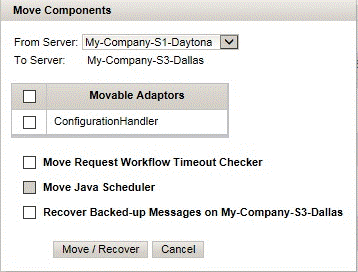
The Move Components dialog displays the names of the From Server and the To Server for the move. If there is more than one possible server, click the down-arrow to display the list of servers and then click one to select it.
The list of adaptors that are available for move is displayed below the servers. Check the box to the left of an adaptor to select it to be moved. To move the entire list, check the Adaptor heading box.
Check Move Request Workflow Timeout Checker to move the timeout checker for request workflows to the target server.
Check Move Java Scheduler to move the Java scheduler.
Check Recover Backed-up Messages on To Server to start the recovery of backed-up messages on the To Server.
Click Move / Recover to move the selected components from the From Server to the To Server or to start a message recovery. Click Cancel to exit the dialog without doing anything.
Moving the Request Workflow Timeout Checker
Moving the timeout checker for request workflows is done from the Move Components dialog, as described in "Moving Adaptors". To move the timeout checker, check Move Request Workflow Timeout Checker in the Move Components dialog. Note that this check box is only activated when the checks are currently performed on the From Server.
Moving the Java Scheduler
Moving the scheduler for the Java-based workflows is done from the Move Components dialog, as described in "Moving Adaptors". To move the Java scheduler, check Move Java Scheduler in the Move Components dialog. Note that this check box is only activated when the From Server is the current Java scheduler host.
Moving Tcl Workflows
You can move the Tcl Workflows by clicking the button in the Move Tcl Workflows column in the list of C-Servers on the Server Admin Overview page. If a C-server is running, the direction is "take over", which means that the server will receive the Tcl Workflows. If a server is down, the direction is "move to", which means that the C-server will release the Tcl Workflows to another C-server.
The Move button is labeled with the related direction (Take Over or Move To) depending on the server’s state.
When you select to move the Tcl Workflows, Server Admin displays the Move Tcl Workflows dialog, as shown in the following figure:
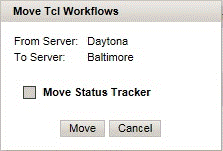
It shows source- and destination C-Server names.
Check Move Status Tracker to move the status tracker to the target server. This flag is selectable only if the status tracker resides on the source server.
Click Move to move the Tcl Workflows from the From Server to the To Server. Click Cancel to exit the dialog without moving anything.
Viewing Message Broker Details
To display the Message Broker’s Web Console, click the Start console button. The Message Broker details are displayed in a new tab, as shown in the following figure:
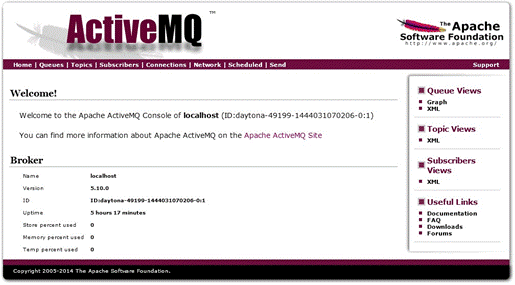
This is the standard Apache ActiveMQ Web Console. It provides all information about message broker operation; for example, a topic overview, as shown in the following figure:

The same information is available for queues and other details.