Planning Your Installation
The main conceptual task of planning your installation is to build the security model for your organization. You must construct this model with care, since the security level of your system, and therefore its compliance with your organization’s security policies, are determined directly by your results. In addition, the more accurately your security model matches the actual business structure and day-to-day needs of the organization, the easier your job of implementation and maintenance becomes.
The fundamental building blocks of a DirX Access security model are its roles, resources and access rights, as specified in the NIST RBAC specification. This approach uses concepts familiar to most users and managers, allowing you to include them in the process of building a working security model. In addition, role-based access control makes the system flexible enough to implement and maintain whatever particular strategies your organization may require.
This section describes the steps that you must follow in order to map your organization effectively within DirX Access. Each step is demonstrated with reference to a simple hypothetical health care facility called HealthCo.
Determining the Business Roles in your Enterprise
The first step in creating your security model is to determine the hierarchy of your enterprise and the business roles. In order to complete this step, and most of the following steps in the process of creating your security model, you or your role administrator must conduct a series of interviews with users and management staff. Enterprise artifacts such as organizational charts and human resources materials can also provide useful input.
The role administrator for our sample health care facility has come up with the following domains to represent its operation structure, tabulated with the roles that are carried out by users in each domain.
Domain |
Roles |
Patient Management |
Admission Clerk |
Facility Management |
Ward Scheduler |
Care Provider |
Registered |
Health Insurance |
Health Insurer |
Determining the Permissions for the Business Roles
The next step is to determine the business tasks associated with each role. Business tasks are broadly grouped here under the term “permissions”, each representing a distinct and separable conceptual area of job responsibility. Interviews with people working in each business unit will help you to determine the business tasks required for each role.
Roles may require one or many permissions, but each role should have at least one, and each permission should be associated with at least one role. A role with no permission is like a job without any responsibilities; a permission with no role is like a task assigned to no one.
The following table shows the permissions determined for each role in HealthCo:
Role |
Permission |
Admission Clerk |
Patient admissions |
Ward Scheduler |
Patient transfers |
Registered Nurse |
Lab orders |
Surgeon |
Interventions |
Health Insurer |
Care cost processes |
Determining the Resources for the Permissions
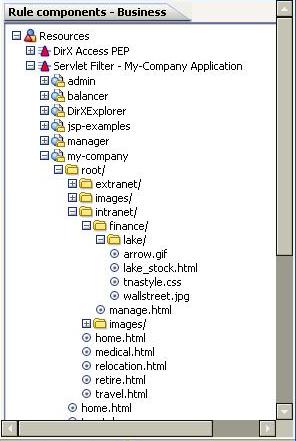
This step correlates the resources available to users on the organization’s IT network with the permissions, or business tasks, assigned to each role. To complete this step, you need to perform a detailed analysis of the Web applications, their structures and their deployment. Consult with the Web architects and system administrators as required. Directory listings obtained using dir or ls commands can be helpful, as can J2EE XML descriptors for application servers.
If a test system running a copy of the production applications is available, you can install a preliminary instance of the DirX Access server and deploy resource explorers on the Web and application servers in the test system. The resource explorers will enumerate the resources in a tree view within the DirX Access Manager.
Note that some permissions might not have associated resources, if the job responsibility is performed without a dedicated network application. On the other hand, some resources may apply to more than one permission, in cases where different job responsibilities require access to the same application. However, each resource you identify in your analysis of the organization’s IT network must be assigned to a permission. Otherwise, that resource will be unprotected by DirX Access.
HealthCo has the following fictional resources that correspond to each of the permissions defined in the previous step.
| Permission | Resource |
|---|---|
Patient admissions |
|
Patient discharge |
|
Patient transfers |
|
Interventions |
http://health.com/HL7_I05.jsp |
Lab orders |
|
Care cost processes |
When you define resources in DirX Access Manager, you can use wildcard strings to expand the scope of the resource. Wildcards are also supported by both the resource explorers and the PDP. For example, the Interventions permission above could have a single resource identified as http://health.com/HL7_I*.
Determining the Users and Groups using the Business Roles
In this step, you assign one or multiple roles to each user in the organization based on the job functions they perform.
Up to this point, you have been determining resource and security objects to form a stable basis for the security system. Organizational domains, job roles and job responsibilities are unlikely to change significantly moving forward, barring large-scale company reorganizations. However, user-to-role associations are far less stable, as users frequently come and go in the organization, and regularly change roles due to promotions.
The table below illustrates HealthCo’s user-to-role associations:
User |
Role |
John |
Admission Clerk |
Jane |
Ward Scheduler |
Amanda |
Registered Nurse |
Jennifer |
Surgeon |
Alistair |
Anesthetist |
Anna |
Facility Specialist |
Bob |
Health Insurer |
For the sake of simplicity, this example does not use groups. However, if your organization contains many users that can fulfill specific roles, you may choose to create groups and assign the roles to the groups instead of assigning the roles directly to the users themselves. This one-to-many relationship can further ease the on-going administration of the system.
Determining your Authentication Methods
The final step in planning your security model is to determine the authentication method or methods that must be used to identify users for each resource defined in your system. To set these authentication methods appropriately, consider the critical value of the resource.
Consider also the network or directory structure of your Web applications, as displayed by the resource tree view in DirX Access Manager. If you apply an authentication method to a given branch in your resource tree, all resources in subordinate branches will inherit that same method. You can, for example, set less secure authentication methods for the root of your resource tree, and stronger authentication methods for lower branches that contain confidential information.
The following authentication methods are available:
-
X.509-based authentication.
-
Password-based authentication (HTTP-Basic of form-based).
-
Windows (Kerberos/NTLM)-based authentication.
-
One-time password-based authentication.
-
SAML-based authentication.
For details on these authentication methods, see the chapter “Administrative Tasks” -> “Managing Configuration Data” -> “Managing Authentication Methods”.
Assurance Level
As an alternative to specifying the particular authentication method that must be used to access a resource, consider using assurance level conditions. You can assign a numeric assurance level to each authentication method, and require a given assurance level in order to access individual resources.
For example, if a resource is assigned an assurance level condition of 5, users can only access that resource if they have authenticated themselves using a method that has a configured assurance level of 5 or higher.
Implementing the Security Model with DirX Access Manager
At this point, your hardware and software has already been deployed, and your security model has been constructed in conceptual terms. You must now feed your security model into DirX Access.
The main DirX Access administrator is required to begin the process by creating all roles, policies and users. All tasks are performed using the DirX Access Manager administrative interface, described in the chapter “Administrative Tasks.”
The steps for configuring a security model are as follows, listed with their corresponding sections in the chapter “Administrative Tasks” for reference:
-
Create roles as needed. Use the Roles page in DirX Access Manager, described in the section “Managing DirX Access Roles.”
-
Create policies as needed to control access to resources according to certain conditions and criteria. Use the Policies page in DirX Access Manager, described in the section “Managing DirX Access Policies.”
-
Assign roles to the users. Use the User Assignment tab of the Roles page in DirX Access Manager, described in the section titled “User Assignment,” to assign multiple users or groups to a given role. Use the User Details and Group Details tabs of the Users page in DirX Access Manager, described in the sections “User Details” and “Group Details” respectively, to assign multiple roles to individual users and groups.
Deploying DirX Access for Domain Federation
DirX Access federation endpoints run in the DirX Access Services container and are responsible for dealing with other authentication and authorization systems by exchanging business roles and authentication tokens over a SAML or OAuth framework. DirX Access federation endpoints provide support for cross-domain single sign-on between your local applications and other applications on remote networks. It is possible to have multiple instances of DirX Access federation endpoints running in a single DirX Access Services container.
You must design your federation system in close collaboration with the administrators of your partner sites. There are three main issues to keep in mind when deploying DirX Access to create federations in your environment. You and your SAML partners must:
-
Exchange keying associations, unique identifiers (source IDs), connection parameters, and assertion processing details.
-
Agree on the attribute namespaces you require.
-
Determine which servers are responsible for sending authenticated users to partner sites, and/or receiving users from partner sites.
These details must be determined in advance for you to configure your federations.
The DirX Access federation endpoint is deployed within the DirX Access Services container.
The following diagram indicates a possible DirX Access federation deployment, in which the DirX Access system is the source site asserting users’ authentication when they visit a remote destination site. The remote destination site may use DirX Access or a third-party access management solution. Note that in actual deployments, DirX Access can act as the source site, the destination site, or both.
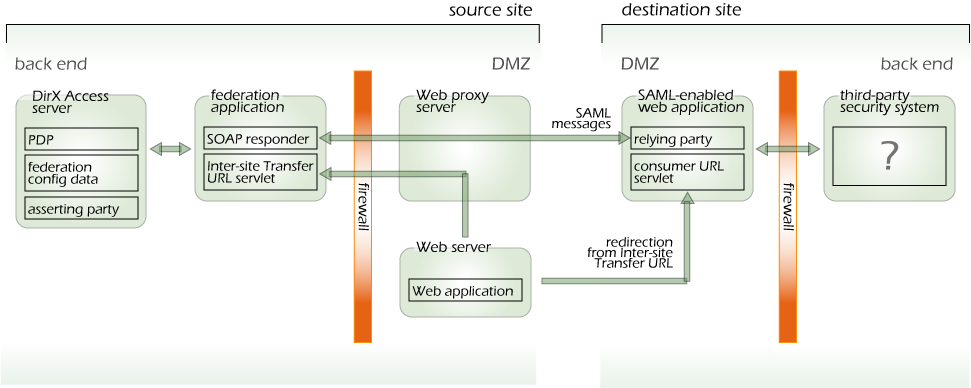
Although a DirX Access Services container with DirX Access federation endpoints can be located anywhere on the network, it is possible to locate it in a protected zone behind a firewall. You can locate Web proxy servers in a demilitarized zone (DMZ) on your extranet and allow access to your DirX Access federation endpoints through those proxies. You must set strict firewall rules to tighten security around the interactions required between your network components. These interactions are listed below:
-
Federation endpoints read security objects from DirX Access servers located in the intranet zone.
-
Local Web applications can invoke the Inter-Site Transfer Servlet located on a SAML federation endpoint through a Web proxy located in the DMZ.
-
Remote applications (relying parties) can invoke the SOAP Responder Servlet in the DMZ through the same Web proxy.
-
Federation endpoints can invoke the Artifact Consumer Servlet at the partner location, either directly on a SAML-enabled Web application as shown in the diagram above, or through another proxy giving limited access to an application on the intranet zone.
-
Federation endpoints can forward users to remote applications at the partner location.
-
Remote users can be forwarded to the authentication application at the source site.