Authentication Application
The Authentication Application is a DirX Access tier-2 component that enables execution of user authentication. It provides the initial authentication for single sign-on, however, it can also tightly cooperate with the PEP and FEP components to cover many advanced scenarios, such as risk-based and step-up authentication, support for identity federation process, and others.
The Authentication Application provides a well-defined HTTP API which can be called by components ranging from DirX Access PEPs and FEPs to third-party ones. Technologically, it is based on the Servlet API and relies on the DirX Access Services. The Authentication Application supports localization (and an easy localization extension process), and design customization.
The Authentication Application can challenge the user for credentials, verify them, and handle verification errors. Each HTTP request can consist of the following steps:
-
Determine authentication method. In this step, the Authentication Application determines the authentication method based on the HTTP request with respect to the Enabling Authentication Methods. See Authentication Method Finding Strategy for more details.
-
Read credentials. If the HTTP request contains enough data to authenticate the user, the Authentication Application reads out the credentials from the data and verifies them. The verification can result in an error page that prompts to retry if the credentials are not valid or in a successful login and redirection to the target URL.
-
Request credentials. If there are no credentials in the request, the Authentication Application sends an appropriate HTTP response to the client in order to request the credentials. The user is prompted only when the request does not contain sufficient credentials.
The layout of the Authentication Application is highly authentication method-dependent. From a high-level point of view, it can be divided into three categories according to the method in use:
-
Standalone authentication method - When this method is defined as a default method for an Authentication Application, the first HTTP request directly invokes it. For example, a form for user name and password is displayed, the user is requested to supply a USB authentication token, and so on.
-
Composite authentication method - This method enables combining user prompts from multiple standalone authentication methods to form, for example, a multi-factor authentication. In each step, one or more standalone authentication methods are invoked and the next step is determined based on their success or failure.
-
Selection of authentication methods - The layout consists of a pre-selected prompt from a single authentication method followed by a button which reveals a list of alternative authentication methods. The pre-selected authentication method can be defined by a user via a “Use always” checkbox.
Standalone Authentication Methods
A standalone authentication method is a method that is not sub-divisible and which, when performed, allows the system to accept or decline the user’s claim about its identity. DirX Access currently recognizes the following standalone authentication methods:
-
FIDO-based (WebAuthn, FIDO UAF, FIDO U2F)
-
Integrated Windows Authentication (SPNEGO, Kerberos, and NTLM)
-
OAuth 2.0 and OpenID Connect 1.0
-
One-time Password (Callback, RFC#4226, and RFC#6238)
-
Password-based (HTTP Basic, and Form)
-
SAML 2.0
-
X.509 Authentication
Composite Authentication Method
This Composite Authentication Method is described here: Composite Authentication Method
Selection of Authentication Methods
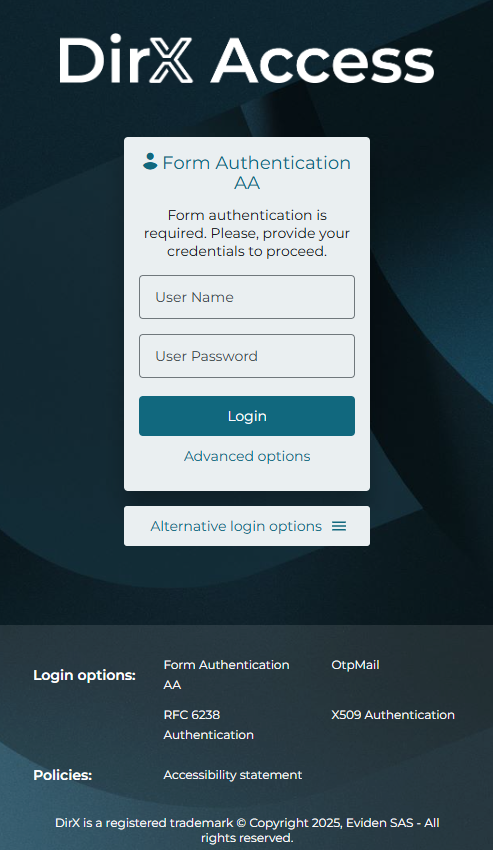
The selection of authentication methods uses the Authentication Application selection dialog. This dialog is a specific layout in which a pre-selected authentication method is displayed followed by a button (Alternative login options) which reveals a list of alternative authentication methods from which the user may choose. Figures 1 and 2 illustrates this concept:

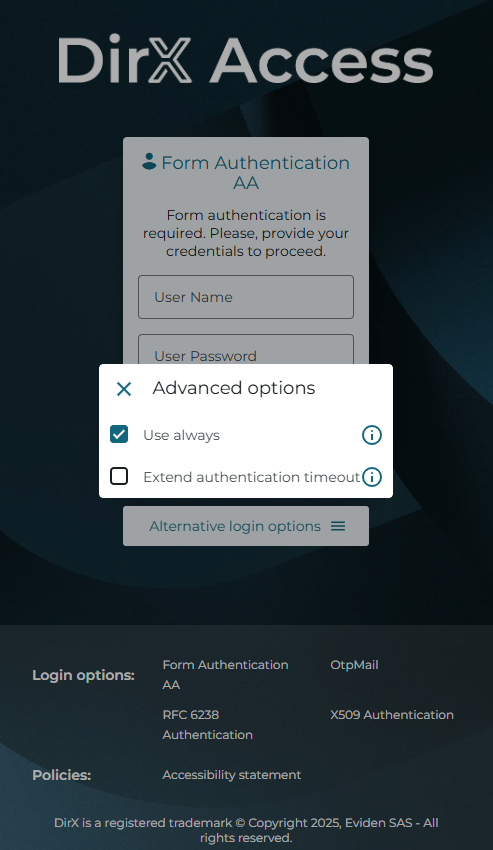
Within the selection dialog, the Authentication Application displays an Advanced options button that, when clicked, reveals a list of additional configuration (as seen in Figure 3). Namely:
-
Use always checkbox that allows the user to apply the current authentication method as its default one (after its successful use).
-
Extend authentication timeout that extends any timeout during any authentication process ten-times.
|
Internally, the checkboxes set up an HTTP cookie in the browser that contains the user’s choice. |
|
A somewhat specific possibility is to reference the Authentication Method of type “Authentication Application“ from the selection. In fact, this possibility enables to travers to different port and context path. The different port/context path can be configured with mutual SSL/TLS authentication, enforcing the user’s browser to prompt for the certificate. When the referenced Authentication Application has the X.509 authentication method as its default one, this effectively provides the X.509 authentication at any moment of the user’s interaction with the system. |
Configuration
Configuration of an Authentication Application is stored in the DirX Access configuration subsystem and can be exported and imported using standard configuration service interfaces.
Authentication Application configuration parameters and their use are described in: Authentication Application.
Integration with PEPs and FEPs
The Authentication Application can be invoked based on associating an authentication method of type "Authentication Application" with a resource via a DirX Access Authentication Policy. This is the common way to integrate an Authentication Application with PEPs and FEPs. To use an Authentication Application for the purposes of initial authentication at an IdP FEP, the URL of the SingleSignOnService needs to be assigned an authentication method of type "Authentication Application".
Use an Authentication Method of type "Authentication Application" to associate resources with an Authentication Application. Use the DirX Access Manager to define the method and assign it to an Authentication Policy just as any other authentication method. See the section Authentication Application for more details.
The typical use case is then:
-
Standalone and composite authentication methods are configured.
-
The "Selection" authentication method is configured and all relevant authentication methods are assigned to it.
-
The "Authentication Application" is configured and the "Selection" authentication method is chosen as its default method.
-
The "Authentication Application" is assigned to an authentication method of type "Authentication application".
-
The method of type "Authentication application" is employed by other system components as described.
For a further integration with SAML IdP FEPs, the Authentication Application can be configured to determine the authentication process according to the requirements contained in the element inside the .
Redirections from/to the Authentication Application
The Authentication Application may perform redirections to other components. For example, when using SAML-based authentication, the Authentication Application redirects to the SAML SP FEP to handle the SAML SP-initiated single sign-on. Within the set of DirX Access components, when the component-dependent processing ends, the browser is redirected back to the Authentication Application to handle the authentication state.
Furthermore, even in the case of a redirection scenario, the Authentication Application decides about issuing a single sign-on session. This is issued according to the correlated Web PEP configuration and represents a slight change in the behavior compared to previous versions, where the components skipped the redirection back to the Authentication Application. Thus, for example, the issued single sign-on session (cookie) parameters have been configured according to the Web PEP related to that component and not the Authentication Application.
As a component with a typically public HTTP API, the Authentication Application may be requested from any other component. The system administrator should be aware of the potential (yet atypical) necessity of cross-origin resource sharing if calling the Authentication Application from a different domain.
Localization
The Authentication Application supports standard localization. The localization files can be modified to guide users through the authentication process. Most text in the Authentication Application can be changed or hidden via the properties files.
From a user’s perspective, it means that the Accept-Language HTTP request header is examined.
The Authentication Application is then presented using the requested language as long as this language is supported.
If it is not supported or if there is no Accept-Language header, a default locale is used.
For example, if the Accept-Language header of the request is German, the application looks for the file AuthnAppLocale_de.properties.
If the localized file is not defined, the application defaults to using AuthnAppLocale.properties.
For more details about properties files, see Java documentation or guides of the class ResourceBundle.
The file location is within the installation directory: DirX Access\instances\{instance name}\webapps\authentication\WEB-INF\classes\AuthnAppLocale.properties.
Alternatively, the legacy method of using the properties within JAR files is still supported by placing the same files in dirx.access.application.web.authn module, path com.siemens.dxa.applications.web.authn.business.resources.AuthnAppLocale.properties.
The provided files contain values for elements such as buttons or error messages. All of these can be adjusted to fit the look and feel of the application. The following are specific to your configured authentication methods and must be added for all new methods.
|
The keys of the properties files are case-sensitive and spaces must be escaped with backslashes. The values can be left blank which hides the text. |
ID-specific localization
-
Heading - the heading generally refers to the title of the presented authentication method. It can be set by assigning the name of the authentication method, for example
Form\ Authentication=Authentication. If it is not set, the full name of the authentication method is displayed. -
Legend - instructions for users should be presented here. The format for a type of authentication is
{type}.legend, for exampleform.legend=Please provide your username and password. The generic legend can be overwritten for a specific authentication method by appending its ID, in which case the resulting format is{type}.legend.{id}. See examples below.
The following values are specific for composite authentication and are fully optional. They are ignored if the key is not set. As the key contains ID of both the composite and individual method, a single method can have different descriptions across different composite methods.
-
Composite subheading - in case of composite authentication methods, it is recommended to use subheading to visually separate steps if there are multiple on a single page, or indicate which page the user is on. This can be assigned with the key
{type}.subheading.\{composite ID\}.\{method ID\}. -
Composite legend - similarly to subheading, methods in composites can have individual descriptions with the format
{type}.legend.\{composite ID\}.\{method ID\}.
Example
# We set a shorter, more readable title
Composite\ Form\ OtpDualCodeMail\ One\ Page\ Authentication=Composite authentication

# A generic legend for demonstration only, we will see it is overwritten by the ID-specific legend
composite.legend=Composite authentication is required. Please, provide your credentials to proceed.

# We have descriptions for individual steps, so we disable the main legend
composite.legend.Composite\ Form\ OtpDualCodeMail\ One\ Page\ Authentication=

# Label the steps to structure the authentication form
composite.subheading.Composite\ Form\ OtpDualCodeMail\ One\ Page\ Authentication.Form\ Authentication=Step 1
composite.subheading.Composite\ Form\ OtpDualCodeMail\ One\ Page\ Authentication.OtpDualCodeMail=Step 2

# Descriptions for individual steps
composite.legend.Composite\ Form\ OtpDualCodeMail\ One\ Page\ Authentication.Form\ Authentication=Enter your username and password.
composite.legend.Composite\ Form\ OtpDualCodeMail\ One\ Page\ Authentication.OtpDualCodeMail=Enter the E-mail of a person to receive the second part of your OTP.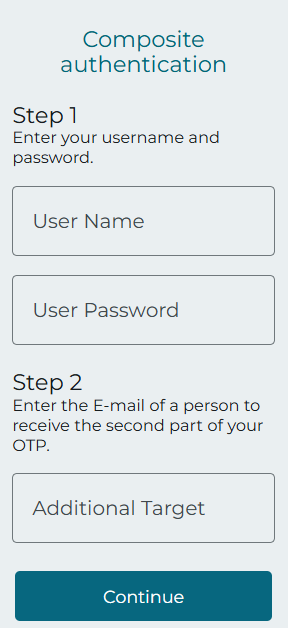
Validation errors
In Renderer.jsp we implement validation behaviour since the default error messages and localization are controlled by the browser.
These validations are performed client-side and inform users if the information they entered is invalid.
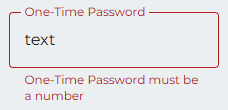
The default format in localization files is message.validity.{state}.
Depending on the implementation, more specific errors can be specified, such as expecting E-mail or numeric input, which both fall under patternMismatch.
The state corresponds to HTML standard ValidityState. See Mozilla Developer Network for a full list of states, or the list below.
Example: message.validity.patternMismatch.number is a patternMismatch error for a field where a number is required.
List of supported validation errors
-
valueMissing- the value is required and empty. -
patternMismatch- the value does not match the regular pattern of the field.-
numeric- does not match the regular pattern\d*.
-
-
patternMismatch- the value does not match the data type required. -
stepMismatch- the value does not fit thestepattribute. -
tooShort- the value does not meet the required amount of characters. -
tooLong- the value exceeds the maximum amount of characters. -
rangeUnderflow- the numeric value is too low. -
rangeOverflow- the numeric value is too high. -
badInput- generic input error.
FIDO- and WebAuthn-related Tasks
The Authentication Application also provides the endpoint to the FIDO-authentication-methods tasks, specifically:
-
Trusted Facet List Endpoint - the authentication method infrastructure requires having an endpoint that declares the trusted facets. This endpoint resides at the address {authentication_application_location}/facets?authnMethodId={authentication method identifier}.
-
Metadata Service Consumer - the FIDO Alliance Metadata Service enables the distribution of the official Authenticators metadata. The Authentication Application runs a client to this service internally.
The access policies of the system infrastructure (firewalls and other items) must be set up accordingly to allow appropriate communication flows. For more information regarding the semantics and configuration of these policies, see the section FIDO Authentication Methods.
Customizing the Authentication Application
The user interface of the Authentication Application is built using the JSP, JavaScript and CSS technologies. The main component of the interface is the “Renderer” JSP file the customization of which enables changing the layout. JSP is easy to modify without the need to change web.xml or to have deeper knowledge of the rest of the user interface API.
For small customizations, we recommend changing only the imported JavaScript and CSS files. Following this approach, the migration process is guaranteed to be very simple.
The user interface API is described in the
com.siemens.dxa.applications.web.authn.api package JavaDoc documentation dirxaccess-base-javadoc.zip, which is available on the DirX Access product DVD under Documentation\DirXAccess.
Accepting the Requests
The first application layer is the outer HTTP interface. It is handled by the default servlet and translates well-known HTTP parameters to the request attributes known to the application core API. We do not recommend customizing the outer HTTP interface by replacing the servlet.
Finding Applicable Authentication Methods
The application must determine the authentication methods to be applied.
Method discovery is delegated to implementations of AuthnMethodsFinder configured using the parameter name
com.siemens.dxa.applications.web.authn.business.finder.configuration
in web.xml; there is mapping from the finder types provided in the Authentication Application configuration object to the finder implementation classes (the instances are created via reflection).
See the Authentication Method Finding Strategy
drop down list for more details.
Processing Credentials
Credential processing is performed by callback handler builders that are created via specific processing classes. The mapping from the authentication method types to the processing classes is done in web.xml, the processing classes are constructed using reflection.
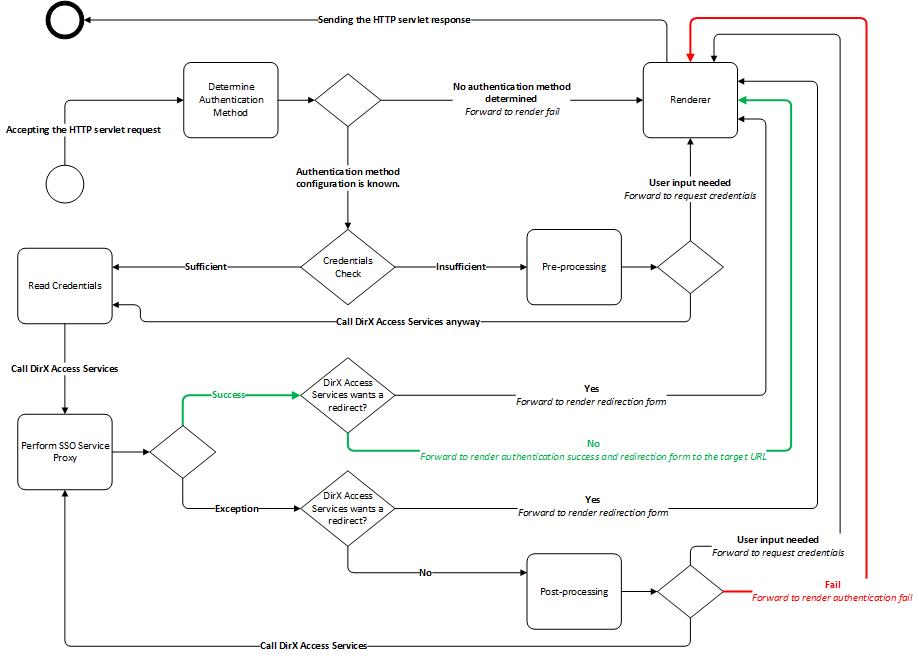
The callback handler builders are non-interactive components that can only check or read the credentials. The processing classes also contain interactive pre-processing and post-processing methods for handling of the authentication request. The following figure illustrates the complete authentication flow:
Using the Renderer Component
The user interface of the Authentication Application consists of one Renderer component to be invoked when the user is to provide the credentials if they are missing or invalid.
The component is also used to render the following items:
-
An error page with the possibility of retrying an authentication request
-
A redirection form that redirects the user to a different location
The component implementation is provided as a JSP page and can be easily customized without having to be completely replaced (see
WEB‑INF/jsp/extensions/Renderer.jsp file).
One JSP page cannot handle all authentication method specifics, so the authentication method specifics are included into the component according to the requested authentication method type.
The authentication method specifics are then covered in small JSP files (see WEB‑INF/jsp/extensions/authntypes
directory) and are mostly with no need to customize them.
All JSP files uses several Java include files from the DirX Access Authentication Application user interface API and DirX Access Shared package. For migration reasons, we recommend that you do not use any Java include files outside of these two areas in JSP files.
Not all authentication methods need to call the renderer component. For example, SAML and OAuth authentication do not call the renderer because the handling operation is immediately redirected outside of the Authentication Application.
The mapping from the authentication method types to the authentication method specifics is done in web.xml much like the mapping of the methods to processing classes, so adding a new authentication method is matter of adding a new processing class and the authentication method-specific JSP page if there is a need for user input.
Using the Context Root Handler
The context root path is handled by index.jsp, which is specifically dedicated to handling requests to the root path.
The problem with the root path is that it depends on how it is accessed.
When the path in the HTTP request is slash-terminated, the request is routed to the default servlet.
In the other case, the container responds automatically - without routing the request to the application - with a redirection response.
Unfortunately, the response is 302 Found, which causes the client to repeat the request, but with a GET method even if the original request was a POST.
This action leads to losing the parameters from the original POST request, which is fatal.
Bundling
The Authentication Application is currently deployed in an OSGi-based container that runs an embedded Web container. In this environment, incorrectly bundling or misplacing the application parts can easily lead to a malfunction because a required part might not be found and loaded.
JSP and any other resources underneath WEB-INF/classes are loaded by the Web container’s JSP engine with its own class-loading hierarchy.
It is safe to use the OSGi-bundled code and resources from the JSPs as long as they do belong to DirX Access Base bundles and its fragments.
Using the Parameter Sanitization Servlet Filter
The purpose of the parameter sanitization servlet filter is to prevent the possibility of cross-site scripting attacks. To accomplish this task:
-
The administrator chooses HTTP request parameters (sent via an HTTP URL query or an HTTP request body) that might be displayed at the Web page and lists them in the Web application’s configuration file.
-
The servlet filter removes potentially harmful characters without replacing them using a regular expression pattern to specify the filtered characters.
-
A custom filter can be set individually for each parameter or for a list of parameters.
-
For a single parameter use the following format:
filtered.keys.<parameter name>. -
For a list of parameters use the following format:
filtered.keys.[<parameter1 name>,<parameter2 name>].
-
-
A default filter can be used, to filter every other unlisted parameter, the configuration parameter to be used is
defaultFilter. -
If the default filter is empty or omitted, only the listed parameters will be filtered.
|
The parameters names are case-sensitive! |
To set up the servlet filter:
-
Uncomment the filter definition and the filter mapping in web.xml. Example filters can be found in the filter definition. Remove or change these to match your needs.
-
Customize the
defaultFilterparameter to filter all non-specified parameters. If the default filter is omitted or empty, only the listed parameters will be filtered. -
Customize the specific filter names, either one-by-one or as a list.
-
Restart the service for the changes to take effect.
Example
As noted above, the application is strictly modular: the supplied functionality is neither hard-wired nor built-in but provided as modules. Some customization may want to extend the application with entirely new modules. This approach is not a problem, but the supplied code would probably serve only as an example of how to use the application API.
A more probable customization scenario is adjusting the user interface only to have a specific brand look & feel, or to match better the other components of the system being integrated with. Let’s focus on this more common case.
It is recommended to adjust the appearance of all parts of the application. If you don’t want to customize some parts, because you don’t intend to use them, we rather suggest removing the entries relevant for those parts from web.xml to prevent confusion of maintainers and to enable better error diagnosis when an “unused” module is actually used by an accident.
Regarding the look & feel customization, DirX Access Client SDK offers a nice customization in the
ClientSDK\Integration\webapps\authentication folder under the DirX Access installation folder.
It is a good starting point for your own customization or an example how the minimalistic and very basic user interface, which is deployed by default, can be extended into a definitely usable presentation to the user.
Note that the DirX Access Client SDK customization is written with minimal JSP support required, thus avoiding some advanced constructs.
Changing the Layout
To change the layout, start modifying the main Renderer JSP source.
If this is not enough, find the relevant authentication method-specific JSP file according to web.xml.
You don’t usually need to do anything more than change the structure of the HTML code by adding suitable pieces of the code, or code generating the content, possibly some JavaScript, around the functional core.
The DirX Access Client SDK customization was built using this approach: the default JSP source was enriched with some additional HTML structure that was then decorated with CSS. You can use the comparison of the default and the customized JSP files to see the approach in action.
Changing the Skin
A well-designed layout allows you to achieve striking visual appearance change just by applying a different set of style sheets and graphics. JSP sources then need no additional modification.
The very basic renderers that are deployed by default do not provide a good base for visual enhancements, but the DirX Access Client SDK customization already provides good support for a statically-defined visual appearance. Nonetheless, it does not offer any dynamic look and feel selection.
If you are satisfied with the layout provided by the DirX Access Client SDK customization, including the limitation of the static skin selection, you may consider using it.
Then it is enough to prepare your own style sheets and adjust the appropriate context-param elements in
web.xml to point to the path where the stylesheets reside.