PEP for Internet Information Services
This page covers features that are specific to the Policy Enforcement Point written in C (CPEP) for IIS. For general properties describing PEP, please refer to the corresponding section. CPEP is built on a single shared codebase, which serves both IIS and Apache HTTP Server. However, each architecture has its own set of specific features and configurations. For information about Apache HTTP Server-specific features, please refer to the dedicated Apache HTTP Server CPEP page.
Installation
CPEP is distributed as a zip archive, where there is an installation guide (installation.txt).
The ZIP archive includes an installation.txt
file that contains detailed instructions for the installation process.
The content of the file is reproduced here for convenience and has been supplemented with additional illustrations and visual aids to make the process easier to follow.
The archive also includes a configuration file (dirxaccess.properties), CPEP binary (DirXAccess_IIS_PEP.dll), OpenSSL libraries (libcrypto-3-x64.dll and libssl-3-x64 and boost libraries (boost_context-<vc-version>-mt-x64-<boost-version>.dll and boost_url-<vc-version>-mt-x64-<boost-version>.dll), where <vc-version> and <boost-version> can differ depending on the version of the CPEP.
For a successful installation of this extension, following actions are necessary:
-
Stop the IIS service.
-
Copy the content of the “windows64\IIS\bin” to the desired installation directory on the Windows Server.
If the OpenSSL or Boost libraries files are already present in your system or the IIS folders, you do not need to copy them again. Otherwise, ensure these files are copied to the root IIS folder or the same directory as the main DLL.
The dirxaccess.properties configuration file must always be stored in the same directory as the main module DLL.
-
Add following configuration to the “dirxaccess.properties” file:
-
{client_id}
-
The configuration identifier of the “IIS” PEP type in the DirX Access configuration.
-
-
{primary_dirx_access_server_hostname}
-
The hostname of the DirX Access Server instance to fetch the PEP remote configuration for the first time, e.g my-server1.my-company.example.
-
-
{primary_dirx_access_server_port}
-
The port of the DirX Access Server instance to fetch the PEP remote configuration for the first time, e.g. 11111.
-
-
{primary_dirx_access_server_port_ssl}
-
The SSL port of the DirX Access Server instance to fetch the PEP remote configuration for the first time, e.g. 11112.
-
-
{secondary_dirx_access_server_hostname}
-
The secondary hostname of the DirX Access Server instance to fetch the PEP remote configuration, e.g my-server2.my-company.example.
-
-
{secondary_dirx_access_server_port}
-
The secondary port of the DirX Access Server instance to fetch the PEP remote configuration, e.g. 12111.
{secondary_dirx_access_server_port_ssl} -
The secondary SSL port of the DirX Access Server instance to fetch the PEP remote configuration, e.g. 12112.
-
-
A description of all configuration parameters is the same as for the Apache HTTP PEP and can be found in the Configuration section.
-
-
Generate the sec-comm.client.p12 keystore to enable secure communication between the PEP and DirX Access Server instances.a]
-
Find the dxaCryptoGenerateKeystoreSecCommClient.json template within the DirX Access <installation_directory>\Services\templates\instance\etc\templates\sysactions
b] -
Recall the issuer of the “Keystore Crypto Container” of the respective server port assignment of the {primary_dirx_access_server_port_ssl} and {secondary_dirx_access_server_port_ssl} SSL port of the server.A description of Port Assignment configuration can be found at:
-
Use the same issuer in the dxaCryptoGenerateKeystoreSecCommClient.json template.
-
Choose and remember the keystore password of the dxaCryptoGenerateKeystoreSecCommClient.json template. The same password will be applied at the step 5).
-
You can choose from two options:
-
(Preferred) Apply the template to the <installation_directory>\Services\instances\<instance_name>\startup directory of the running instance and restart the instance (sec-comm.client.p12
will be located in c:/Users/Administrator/Downloads) -
Go to the DirX Access Manager -> System actions -> Keystore management -> Generate keystore and apply the configuration of the template here.
-
-
-
Copy the generated sec-comm.client.p12 keystore to the desired location
-
open dirxaccess.properties file and set both {client.keystore.filename} and {sec-comm.client_keystore_password} accordingly.
-
-
Configure IIS to use the native module:
-
Open the IIS Manager.
-
In IIS Manager, navigate to the root webpage and go to the Modules section in IIS Manager.
-
Right click to module list and select Configure Native Modules…
-
Select Register…
-
Input a name for the module.
-
Select the correct path to DirXAccessDLL_IIS_PEP.dll
-
Press OK
-
Press OK
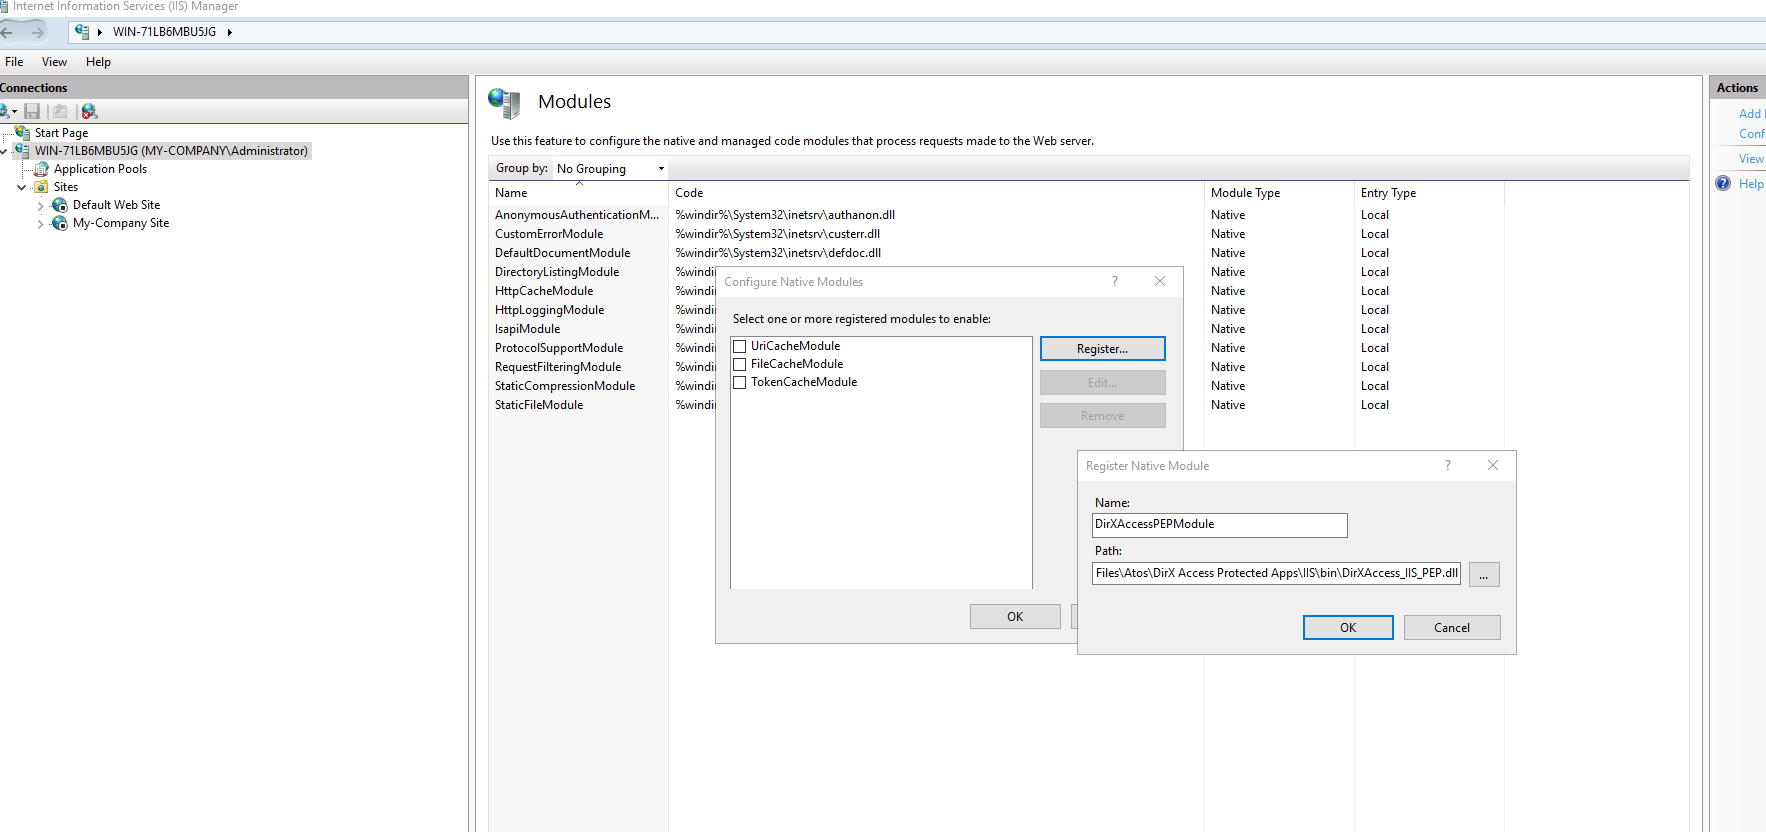 Figure 1. Registration of the module in IIS manager
-
-
If you use output caching please follow instructions here: HTTP Caching.
-
Install Microsoft Visual C++ RedistributableIf you don’t have the Microsoft Visual C++ Redistributable installed:
Download the latest supported Visual C++ Redistributable package from the Microsoft website.
Microsoft Visual C++ Redistributable latest supported downloads
Run the installer and follow the on-screen instructions to complete the installation. -
Start the IIS service.
Configuration
Same configuration parameters described here:
Configuration.
apply, but instead of the dirxaccess.conf file, they are specified in the dirxaccess.properties file.
You can also configure logging.
(please see Logging for more information).
)
Handling POST Requests for Static Files in IIS Version 7 and Above
Microsoft Internet Information Services Version 7 and above do not allow HTTP request by sending the POST method to a page that is configured to be handled by the StaticFile handler. Attempting this method results to the message “405 Method Not Allowed - The request is for static content and contains an HTTP verb other than GET or HEAD”. Some applications in DirX Access use the POST method (Authentication Application, SAML, OAuth) to redirect to the target URL. To work around this problem, set the target URL to a page that is configured to be handled by a handler other than the StaticFile handler (for example, the ASPClassic handler) or assign the IsapiModule instead of the StaticFileModule to the extension for the static file content.
HTTP Caching
The HTTP Caching feature is used for caching responses for static or semi-static[1] resources via the httpCacheModule.
IIS supports two modes of caching:
-
Kernel Mode Caching:
-
This provides caching at the operating system (kernel) level. Requests are intercepted and served directly from the cache without being forwarded to the IIS Worker Process. This makes it extremely fast but limited in configurability.
-
-
User Mode Caching:
-
This provides caching at the application (user) level. Here, the IIS Worker Process handles the caching and allows more advanced configuration. Responses can be cached based on query strings or headers, such as
VaryByQueryStringorVaryByHeader.
-
Key Considerations When Using DirXAccess CPEP with httpCacheModule
When combining DirXAccess CPEP with the httpCacheModule, special attention must be given to avoid critical security issues.
Misconfigurations can allow caching to bypass the CPEP module, potentially serving pages to users who should not have access.
Critical Recommendations:
-
Disable Caching for Protected Resources:
-
Both Kernel Mode Caching and User Mode Caching should be disabled for any resources protected by CPEP.
-
-
Avoid Relying on Varying by Headers like
Cookie:-
While it might seem feasible to use user-mode caching with a
VaryByHeaderconfiguration forCookie, this approach has significant risks. Consider the following scenario:-
A user logs in, and the server creates a new session token
<TokenA>. -
The user accesses a protected resource, e.g.,
webpage/<some_protected_resource>, withCookie :<TokenA>. The response for this resource is stored in the cache. -
The user logs out, invalidating
<TokenA>. -
The user (or an attacker) reuses
Cookie : <TokenA>to accesswebpage/<some_protected_resource>. -
Since the response is cached, the resource is returned directly from the cache without verifying the token’s validity, exposing protected content.
-
-
Specific features
URL Path Lowercasing for IIS PEP
For historical and consistency reasons, the DirX Access Server lowercases the URL path of every SSO request it receives from an IIS PEP.
This means that even if the original client request contains uppercase letters in the path (e.g., /MyApp/Protected/Resource.html), DirX Access processes it as /myapp/protected/resource.html when evaluating authentication and authorization policies.
|
Because DirX Access lowercases paths for IIS PEP requests, any resource URL paths that contain uppercase letters will not match resource definitions that use the original mixed-case spelling. Authentication and authorization policies will therefore not fire as expected unless the resource definitions are adjusted accordingly. |
Configuring DirX Access for IIS PEP with Mixed-Case Web Paths
Resources in DirX Access are scoped by the Authority configured on the PEP. Multiple PEPs that share the same Authority will all match the same set of resource definitions, regardless of to which specific PEP a resource is assigned.
If an IIS PEP and another type of PEP (e.g., Apache HTTP Server PEP) protect the same web application, their resource paths may differ in case: the Apache PEP preserves the original case of the incoming request path, while DirX Access lowercases paths for the IIS PEP. In this situation, sharing a single Authority across both PEPs would require every resource path to satisfy both forms simultaneously, which is not possible.
The recommended solution is:
-
Assign a dedicated Authority to the IIS PEP — Configure a unique Authority value (e.g.,
iis-app.example.com:443) for the IIS PEP that is not shared with any other PEP. This ensures that resources defined under that Authority are evaluated exclusively for IIS PEP requests. -
Define the IIS PEP resources in lowercase — Under the dedicated IIS PEP Authority, define all Resource URL paths in lowercase. For example, if the web application exposes
/MyApp/Protected, define the resource path as/myapp/protectedso that it matches the lowercased path that DirX Access receives from the IIS PEP.
|
This two-step approach — a dedicated Authority combined with all-lowercase resource paths — lets you maintain separate, correctly matching resource definitions for the IIS PEP without affecting the resource definitions and policies used by other PEPs. |
Architecture
Same as Apache HTTP Server PEP Architecture.
Logging
Logging can be directed to two possible outputs in DirX Access:
-
A log file specified by the
client.log.fileconfiguration parameter in thedirxaccess.propertiesfile. -
The Windows Event Viewer, if no file is specified.
Additionally, the logging level for the client.log.level parameter in the
dirxaccess.properties file can be configured using either a keyword name
or its corresponding numeric value.
The following logging levels are supported. Keyword names are case-insensitive and map to the numeric values shown:
-
debug(7) - Debug -
info(6) - Info -
notice(5) - Notice -
warning(4) - Warning -
error(3) - Error -
critical(2) - Critical -
alert(1) - Alert -
emergency(0) - Emergency