Using LDIF Files for Data Synchronization
As noted in the chapter “Introducing DirX Directory” in the DirX Directory Introduction, the DirX Directory DSA can export all or part of its DIT into LDIF content or change file format. DirX Directory administrators can use these LDIF files to replicate changes to a DirX Directory DSA’s directory database with DirX Identity to non-DirX Directory directories such as Windows, Active Directory, NDS, Oracle and Lotus Notes; this process is called directory synchronization and is described in detail in the DirX Identity documentation set. DirX Directory administrators can also use LDIF file generation as part of an overall backup strategy. For example, they can import a previously generated LDIF file with dirxmodify to restore parts of a DirX Directory DSA’s directory database to a previous state, should they become inconsistent.
This chapter describes how to set up a DirX Directory DSA to generate LDIF content and change files and how to import them into a DirX Directory DSA. It describes a sample LDIF file configuration in which the sample stand-alone DSA established in the chapter “Setting up the DirX Directory Service” is the LDIF file supplier. This chapter provides a brief description of LDIF content and change files. It continues to use the fictitious company “My-Company” to illustrate the planning decisions and administrative tasks necessary to set up the sample LDIF file configuration.
Tcl scripts for building this sample LDIF file configuration and adding the extensions to it can be found in install_path/scripts/LdifAgreements. These scripts contain all the commands and procedures discussed in this chapter.
Exporting Directory Data to LDIF Files
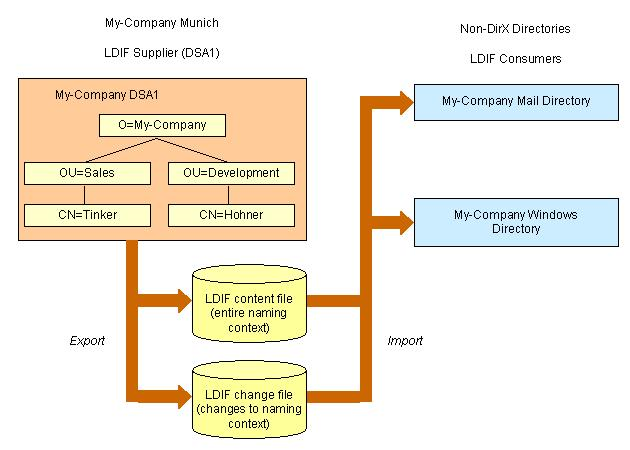
My-Company has established a single stand-alone DSA that contains general information about its employees.The DSA is the central repository for this employee data and is the site at which the latest changes are recorded.Each employee has a Windows account and a mailbox in the company’s mail system.General information about the employees is stored in Windows and the mail directory.The site administrators want to ensure that the employee data that is duplicated in the Windows and mail directories is periodically updated with the latest changes to the user information in the DSA employee database.It is not necessary that the information in the non-DirX Directory directories is always current with the DSA; the non-DirX Directory directories can be out of synchronization with the DSA for a day or so.
One solution that meets these criteria is to extract the information contained in the DSA that is relevant for directory synchronization into local LDIF content and change files.The administrators of the Windows and mail programs can then pick up and import these files into the non-DirX Directory directories at their convenience, using tools such as DirX Identity that can handle the import of LDIF-formatted files.The following figure illustrates this solution.
Building the LDIF Configuration
To build the LDIF configuration, the My-Company DSA administrator and the directory synchronization administrator must first define a directory synchronization process and determine what entries and entry attributes are to be written to the LDIF files. Next, the My-Company DSA administrator must create an LDIF agreement that meets the needs of the synchronization process.
An LDIF agreement is a type of Shadow Operational Binding (SOB) that is analogous to a shadowing agreement. A shadowing agreement establishes a shadow supplier and a shadow consumer. In an LDIF agreement, the DSA is the LDIF file supplier and the directory synchronization tool is the LDIF file consumer. An LDIF agreement has some restrictions:
-
In an LDIF agreement, there is only a supplier DSA that writes the information to be replicated into local LDIF-formatted files; there is no consumer DSA. Instead, the generated LDIF files are consumed by the directory synchronization tool.
So, for an LDIF agreement:
-
The supplier DSA is the DSA that is to write the information into local LDIF-formatted files; this process is always supplier-initiated
-
The unit of replication specifies what is to be written to the LDIF files
-
The update strategy can be "on change" or "scheduled". A scheduled update strategy must specify at least the agreed-upon interval at which updates are to be written into LDIF files.
The administrators must first negotiate the unit of replication, the update strategy, and the LDIF agreement ID. They can also decide to establish LDIF agreement policies. The administrator of DSA1 then uses the dirxadm lob object and operations locally to create and establish the LDIF agreement. When he completes this procedure, the following process occurs:
-
DSA1 writes an LDIF content file that contains a list of directory entries in the unit of replication and their attributes. Each entry consists of a distinguished name and a list of attributes, where each attribute has a prefix and one or more values. For My-Company, the LDIF content file consists of all the user information held by DSA1, but modified with an LDIF policy established in the LDIF agreement.
-
After the LDIF content file is created, the LDIF agreement remains active. At the agreed-upon scheduled update interval, the DSA writes any changes made to data within the unit of replication on DSA1 to an LDIF change file. Each entry in the LDIF change file contains a special "changetype" attribute that indicates the type of directory modification to be replicated in the non-DirX directory:
-
add a directory entry
-
delete a directory entry
-
modify one or more attributes of a directory entry
-
modify the distinguished name of a directory entry
The DSA continues to create new LDIF change files at the agreed-upon scheduled interval for as long as the agreement remains active. If the update strategy is "scheduled" and no changes to the unit of replication occur between update intervals, the DSA creates a change file that does not contain any directory information.
-
-
If the LDIF agreement is set to inactive on DSA1, the DSA stops creating LDIF change files.
To establish the LDIF agreement on DSA1, the DSA1 administrator must perform the following tasks:
-
Negotiate the LDIF agreement with the directory synchronization administrator.
-
Create the LDIF agreement on DSA1.
-
Activate the LDIF agreement on DSA1.
The next sections describe how to perform these tasks.
Negotiating the LDIF Agreement
First, the DSA1 administrator and the synchronization administrator must agree upon the details of the LDIF agreement over the phone, through email, or by meeting in person. These details include:
-
Determining the unit of replication. This decision affects the values supplied in the shadowing-subject (SS) attribute of the LDIF agreement; see the section "Creating the LDIF Agreement on DSA1" for further details.
-
Determining the update strategy. This decision affects the values supplied in the shadowing-subject’s update-mode (UM) component; see the section "Creating the LDIF Agreement on DSA1" for further details.
-
Determining the LDIF policies. This decision affects the values supplied in the sob-ldif-supplier-policies (LDSUPP) attribute of the LDIF agreement; see the section "Creating the LDIF Agreement on DSA1" for further details.
-
Determining the DSA’s partial entry shadowing policy.
-
Determining the LDIF agreement ID.
Determining the Unit of Replication
For My-Company, the unit of replication is the entire naming context /O=My-Company. The administrators plan to establish an LDIF policy that restricts what the DSA extracts from the naming context.
Determining the Update Strategy
The update strategy can be "on change" basis or "scheduled". A scheduled incremental update strategy can include a start time for generating the first total LDIF content file, a window during which the DSA will generate LDIF change files, and an update interval at which incremental updates are written to LDIF change files. The interval at which updates are to be created is the sum of the window (WS) and update interval (UI).
The DSA1 administrator and the directory synchronization administrator decide to define a scheduled update strategy in which the DSA creates the LDIF content file immediately upon the agreement’s activation (instead of selecting a specific start time for its creation) and creates subsequent LDIF change files every 24 hours.
Determining the LDIF Policy
Administrators can apply policies to an LDIF agreement that control various aspects of the LDIF file generation procedure. An LDIF policy controls three main areas of the LDIF file generation procedure:
-
The information to be extracted from the naming context
-
The format of the generated LDIF files
-
The procedure used to export the generated LDIF files
Policies for entry extraction can include:
-
Whether entries are extracted with only their user attributes and the operational attributes createTimestamp (CRT) and modifyTimestamp (MT), or whether all entry information is extracted, including all operational attributes, references, and subentries (controlled with the ENTRYO component of the LDSUPP attribute)
-
Whether modified and deleted entries and their attribute values are extracted (controlled with the MODAT and DELAT components of the LDSUPP attribute)
-
Whether the DSA creates an LDIF content file when the LDIF agreement is activated, or whether it creates only change files (controlled with the CHANGEO component of the LDSUPP attribute)
Policies for generated LDIF file format can include:
-
How attribute values are to be encoded (controlled with the BASE64 and CS components of the LDSUPP attribute). The choice of attribute value encoding depends upon how LDIF files are to be processed. The default codeset is UTF-8. However, some synchronization tools require attributes to be encoded in Latin-1, so the administrator can use the codeset (CS) component to specify Latin-1 encoding.
-
The characters used to separate entries in the file (the CRLF component of LDSUPP) and the maximum number of characters per line (the MAXROW component of LDSUPP). Administrators can use these components to control LDIF file readability on different operating systems. For example, specify only a carriage return to make files readable on Linux systems, specify carriage return and linefeed to make LDIF files readable on Windows systems.
Policies for controlling the export of LDIF files (controlled with the PROG component of the LDSUPP attribute) can include:
-
The name of an executable program to be invoked after an LDIF file is generated and to which the newly created LDIF file is to be redirected
-
The name of an executable program to be invoked before the LDIF agreement is activated that performs pre-processing functions such as LDIF file cleanup or switching from LDIF change file format to content format, and then activates the LDIF agreement
The DSA1 administrator and the directory synchronization administrator decide to define an LDIF policy that extracts only entries, their user attributes and their operational attributes createTimestamp (CRT) and modifyTimestamp (MT) into the LDIF content and change files.
Determining the DSA’s partial entry shadowing policy
If your DSA writes LDIF content files and contain huge entries that cannot be loaded as a whole in memory, for example entries with groups that contain more than 1000 members, you must specify the value TRUE for the Partial Entry Shadowing Policy attribute. (See section "Partial Entry Shadowing Policy" in the DirX Directory Syntaxes and Attributes for details.)
Determining the Agreement ID
An LDIF agreement requires the presence of an agreement ID that must be known by the LDIF file supplier DSA and the administrators who want to use the generated LDIF files. Administrators who want to import the LDIF files can use the agreement ID to determine which LDIF files belong to their LDIF agreement. It is up to the administrators to negotiate the value of an agreement ID before an LDIF agreement can be administered on supplier DSA.
An agreement ID is a sequence of two integers (an identifier value and a version number) separated by a comma. The version number is managed by the DSA. The DSA assigns the value 0 when the LDIF agreement is created (with dirxadm lob create); each time the agreement is established (with dirxadm lob establish), the DSA increments the version number by 1. The administrators choose the agreement ID 88 to represent this LDIF agreement.
Creating the LDIF Agreement on DSA1
The next step in building the LDIF configuration is for the My-Company administrator to bind to dirxadm and create the LDIF agreement on DSA1. To create the LDIF agreement on DSA1 (the local, or "bound to" DSA) with dirxadm, the administrator uses the command:
lob create
-agreementid agreement_id
-status coop_status
-agreement agreement
-pol sob_policies
For the agreement on DSA1, the administrator supplies the following values:
-
The agreement identifier 88 to the -agreementid option
-
The keyword NONCOOPERATIVE to the -status option, which postpones creation of the LDIF content file until the My-Company administrator explicitly establishes the LDIF agreement with the lob establish operation
-
The shadowing-subject (SS) operational attribute to the -agreement option, which should define at least the following:
-
The name of the context prefix (CP) to be replicated in the AREA component. For this LDIF agreement, it is My-Company DSA1’s context prefix, which is /O=My-Company.
-
The entries belonging to this naming context to be replicated in the replication-area (RA) subcomponent. For this LDIF agreement, the value should be DEF=TRUE, which means that the whole naming context must be replicated.
-
The attributes to be replicated in the ATT subcomponent. For this LDIF agreement, the value should be DEF=TRUE to indicate that all attributes are to be replicated.
-
A periodic-strategy (PS) in the update-mode (UM) that schedules the creation of LDIF change files every 24 hours (specified as 86400 seconds in the window-size (WS) subcomponent)
-
-
The sob-ldif-supplier-policies (LDSUPP) operational attribute to the –pol option, which specifies that entries, their user attributes, and their operational attributes createTimestamp (CRT) and modifyTimestamp (MT) are to be written to the LDIF files (ENTRYO=TRUE). Subentries, references, and other operational attributes are not to be written.
The following dirxadm command creates the LDIF agreement on DSA1:
   lob create -agreementid 88  \
              -status noncooperative         \
              -agreement {SS={AREA={CP={/O=My-Company},
                                    RA={DEF=TRUE}
                                   },
                              ATT={DEF=TRUE}},
                          UM={SI={S={PS={WS=86400,
                               UI=0}}}}
              -pol {LDSUPP={ENTRYO=TRUE}} \
If this command completes successfully, it displays the following information:
AGR={ID=88,VERS=0}
Activating the LDIF Agreement on DSA1
The final step in building the LDIF configuration is to bind to the DSA with dirxadm and activate the LDIF agreement so that DSA1 starts to generate the LDIF files.
To activate an LDIF agreement with dirxadm on a local ("bound to") DSA, use the command:
lob establish -agreementid agreement_id
This command sets the LDIF agreement to the status COOPERATIVE. The following dirxadm command activates the My-Company LDIF agreement on DSA1:
lob establish -agreementid 88 \
Because the scheduled update strategy for the My-Company LDIF agreement does not specify a start time at which the LDIF content file is to be generated, DSA1 creates an LDIF content file immediately. It creates LDIF change files every 24 hours for as long as the LDIF agreement remains enabled.
Exporting LDIF Content and Change Files
When an LDIF agreement is activated, the DSA writes an LDIF content file and subsequent LDIF change files to the directory dirx_install_path/server/ldif. It names LDIF files in the format:
agreement_id.timestamp
where agreement_id is the LDIF agreement ID without the version number that was specified in the -agreementid option to the lob establish operation (or the lob create operation, if the -status option was set to COOPERATIVE) and timestamp is the time at which the LDIF file was created. Both agreement_id and timestamp are supplied with leading zeros to establish a 14-digit string. For example, the My-Company LDIF agreement files are named:
00000000000088.00000936197500
When a DSA is in the process of creating an LDIF file, but has not completed it, the character p is appended to the filename. The filename then appears in the format:
agreement_id.timestampp
For example, while creating the My-Company LDIF file above the file is named:
00000000000088.00000936197500p
Unless a policy for exporting LDIF files has been specified in the LDIF agreement, administrators who want to obtain the LDIF files for import into their directories must explicitly check for newly created LDIF files and copy them to the target system or directory, or create an application that performs this task. In addition, the DSA does not delete LDIF files unless an LDIF policy for controlling the export of LDIF files (PROG) has been specified in the LDIF agreement. Consequently, it is the responsibility of the administrators to delete LDIF files once they are no longer useful, or create an application that deletes them.
In the case of My-Company, no LDIF policy for exporting LDIF files has been defined in the LDIF agreement. As a result, the My-Company DSA1 administrator and the administrators of the non-DirX Directory directories must ensure that the LDIF files are copied to the appropriate locations and that LDIF content and change files are removed from the DSA.
Managing LDIF Agreements
The dirxadm administration tool allows you to maintain LDIF agreements once they have been created and to remove them entirely from a DSA. The next sections describe how to display, modify, disable, enable, deactivate, and remove LDIF agreements with dirxadm. All sections assume that the administrator has already bound to the DSA.
Displaying LDIF Agreements
You can use dirxadm to view the properties of existing LDIF agreements.
To display an LDIF agreement with dirxadm on the local ("bound to") DSA, use the command:
lob show -agreementid agreement_id
For example, the My-Company administrator can issue the command:
lob show -agreementid 88 \
        -pretty
to display the contents of the LDIF agreement ID 88 on My-Company DSA1:
    Validity-Agreement
    Operational-Binding-State     : COOPERATIVE
    OprBindMngmnt-Validity
      Validity-From               : 990901152622Z
      Agreement
        Shadow-Subject
          Area-Specification
            Context-Prefix        : /O=My-Company
            Replication-Area
              Default-Value       : TRUE
          Attribute-Selection
            Default-Value         : TRUE
          Knowledge
        Update-Mode
          Supplier-Initiated
            Scheduled
              Periodic-Strategy
                Window-Size       : 86400
                Update-Interval   : 0
        Secondary-Shadows         : FALSE
    Update-Status
      Disabled                    : FALSE
      Update-Status
        Supplier-Update-Status
          Area-Change-State       : 1
          Old-Updates
            Segment-ID            : 0
            Update-Time           : 19990901152622Z
            Area-Changes          : TRUE
    Related-Policies
      LDIF-Supplier
        Entry-Only                : TRUE
Enabling and Disabling an LDIF Agreement
You can use dirxadm to disable and enable LDIF agreements. Disabling an LDIF agreement stops the DSA from creating any further LDIF change files, but does not change the agreement’s status (changes to the directory continue to be recorded). When the LDIF agreement is re-enabled, the DSA begins to generate LDIF change files again. You can only disable and enable activated LDIF agreements (agreements whose status is set to COOPERATIVE).
To disable an LDIF agreement with dirxadm, use the command:
lob disable –agreementid agreement_id [-supplier dsa_name]
For example, the DSA1 administrator can issue the following dirxadm command to disable the LDIF agreement on DSA1 (the "bound to" DSA):
lob disable -agreementid 88
To enable a disabled LDIF agreement with dirxadm, use the command:
lob enable -agreementid agreement_id [-supplier dsa_name]
For example, the DSA1 administrator can issue the following dirxadm command to enable the LDIF agreement on DSA1 that he has previously disabled:
lob enable -agreementid 88
Deactivating an LDIF Agreement
You can use dirxadm to deactivate an LDIF agreement. Deactivating an LDIF agreement changes the LDIF agreement’s status from COOPERATIVE to NONCOOPERATIVE and stops the DSA from creating any further LDIF change files.
Note that you must reactivate (establish) the agreement to change its status from NONCOOPERATIVE to COOPERATIVE. Each time a deactivated (terminated) LDIF agreement is reactivated (established), the DSA generates a new LDIF content file, unless the update strategy is "changes only" (CHANGEO=TRUE). With this strategy, a content file is not created.
To deactivate an LDIF agreement with dirxadm, use the command:
lob terminate -agreementid agreement_id [-supplier dsa_name]
The following dirxadm command deactivates the LDIF agreement on DSA1 (the "bound to" DSA):
lob terminate -agreementid 88
Removing an LDIF Agreement from a DSA
You can use dirxadm to remove the contents of an LDIF agreement completely from the DSA. Before you can remove an LDIF agreement, you must first deactivate it with dirxadm.
To remove an LDIF agreement from a DSA with dirxadm, use the command:
lob delete –agreementid agreement_id [-supplier dsa_name]
The following dirxadm command removes the My-Company LDIF agreement from DSA1 (the "bound to" DSA):
lob delete -agreementid 88
Importing Directory Updates from an LDIF File
You can use dirxmodify to update a populated DirX directory from an LDIF content or change file.For example, suppose My-Company acquires a small network switch manufacturing company in Stuttgart.My-Company plans to retain the employees of this company and wants to centralize the Stuttgart employee information in the stand-alone DSA in Munich.The Stuttgart company uses a non-DirX Directory LDAP directory; the DSA1 administrator in Munich asks the Stuttgart company’s directory administrator to create an LDIF content file of the company’s LDAP directory data and send it to him.
The structure of the LDAP directory’s schema is essentially the same as My-Company’s DSA schema, with the exception of the attribute type names for telephone and mobile phone.These attribute type names will need to be changed to the names used in My-Company’s DSA schema.The My-Company administrator also decides that he does not want to import the information given in the LDAP directory’s description and business category attributes.
To load the LDIF content file to DSA1 with dirxmodify, the administrator uses the command:
dirxmodify -f LDIF_file
-D bind_id
-w password
-s separator-old_type-separator-new_type
-i attribute_type […]
-e error_file
Where:
-
-f specifies the pathname or relative name of the content or change file to be imported
-
-D specifies the distinguished name part of the authentication credentials that dirxmodify is to use to bind to the DirX Directory LDAP server, in LDAP format
-
-w specifies the password part of the dirxmodify bind authentication credentials
-
-s replaces all occurrences of an attribute type name with a new type; a separator like a slash (/) or a colon (:) is used to separate the old name from the new one (for example, /handy/mobile).
-
-i specifies an attribute type that dirxmodify is to ignore when importing the contents of the LDIF file.
-
-e specifies the name of a file in which dirxmodify will record any LDIF file entries that it cannot process.
For the import to DSA1, the administrator supplies the following values:
-
The file name Stuttgart_Mfg.ldif to the -f option
-
The distinguished name cn=admin,o=My-Company to the -D option
-
The password dirx to the -w option
-
The attribute type telephone to replace phone and the attribute type mobile to replace handy to the -s option
-
The attribute types description and businessCategory to the -i option
The following dirxmodify command loads the Stuttgart_Mfg.ldif file into DSA1:
   dirxmodify -f Stuttgart_Mfg.ldif
              -D cn=admin,o=My-Company
              -w dirx
              -s /phone/telephone
              -s /mobile/handy
              -i description
              -i businessCategory
              -e Stuttgart_Mfg.err