Getting Started with DirX Directory Setup
Setting up the DirX Directory service consists of the following basic tasks:
-
Configuring the disk(s) for the DBAM database
-
Installing the DirX Directory service
-
Creating a profile for the DBAM database
-
Initializing the DBAM database
-
Loading the directory data into the DBAM database
-
Starting the service
This chapter takes you through a simple example setup scenario that introduces you to each task. The chapter provides a setup scenario for Windows Server and a setup scenario for Linux.
General Notes
DirX Directory allows you to use the directory service in a distributed environment.Several systems, each running a DSA, are connected for the purpose of shadowing parts of the DIT or distributing the DIT or both.
In a distributed environment, the system clocks on the different systems must be well synchronized.This can be achieved, for example, by using a time synchronization service on each system.If the system clocks are not well synchronized, it is possible that DSP or DISP binds using the simple protected authentication method can fail because credentials have become invalid.Note, however, that you can increase the credentials timeout limits to alleviate this effect.
Setting up the Sample Service on Windows
This section describes how to set up an example DirX Directory service on Windows.In the example scenario for Windows:
-
The target machine has two disks: Disk 0 is a populated disk.Disk 1 is an empty disk, which is 36GB and is configured as a basic disk.
-
We will use one directory data device to hold all of the DirX directory data types (there is always only one transaction device).
-
We will load sample directory data supplied in an LDIF file that is provided with the DirX Directory installation.
Configuring the Disks for the DBAM Database
On Windows systems, configuring disks for the DBAM database consists of two steps:
-
Optionally upgrading any basic disks to be used to store the database to dynamic disks. (See Windows Server Disk Management documentation to get more information on this topic.)
-
Creating the volumes on the disk(s) that will be used as raw devices for the DBAM directory data and transaction devices
We use the MMC Disk Management snap-in to perform these tasks.
Upgrading the Target Disk
In our example, we will use Disk 1 to contain the DBAM database. So, we need to start the MMC Disk Management snap-in and upgrade this disk:
-
Right-click the Start button.
-
Click Computer Management.
-
Click the Disk Management folder to start the Disk Management snap-in, as shown in the following figure.
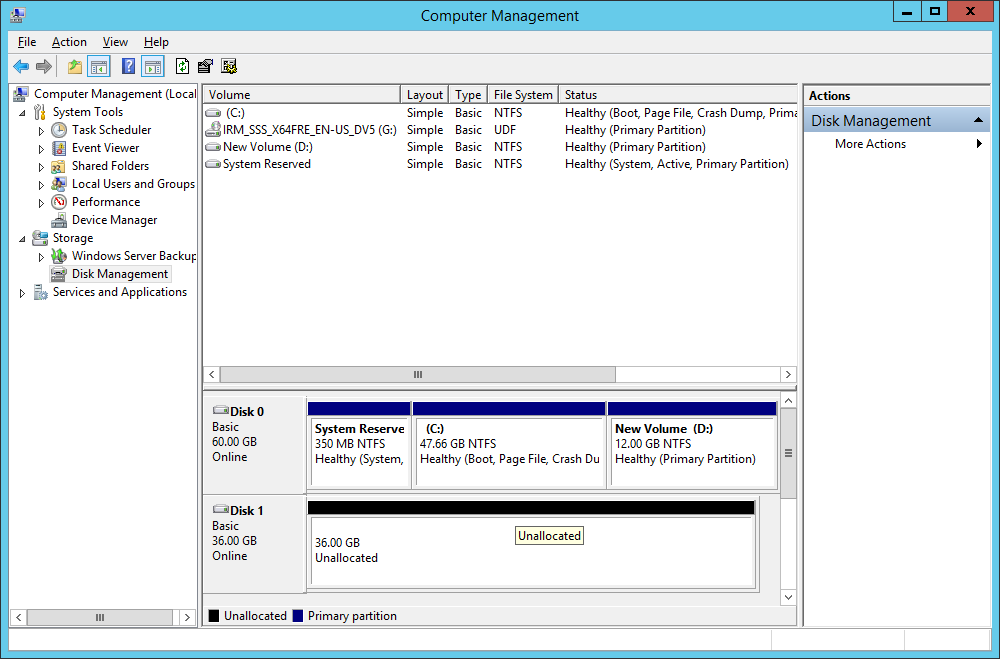 Figure 1. Disk Management Snap-In on Windows Server
 -
In the left-hand window of the Disk Management display, right-click Disk 1 and select Upgrade to Dynamic Disk. The service displays the following dialog:
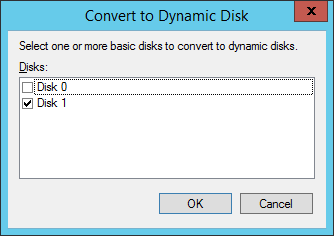 Figure 2. Upgrade to Dynamic Disk Dialog
 -
Check Disk 1, then click OK.
Now we have converted Disk 1 from a basic to a dynamic disk.
Creating the Volumes
Our example uses the simplest DBAM configuration: one volume for directory data and one volume for transaction data. So, we next use the snap-in Create Volume Wizard to split Disk 1 into two volumes: one for the directory data device and one for the transaction device. We will create both these volumes as simple volumes (the section “Dynamic Disks” in the chapter “Understanding DBAM and Storage Management for an explanation of the different Windows dynamic disk types).
Beforehand, however, we use the Windows file system to create two folders on C:\:
-
C:\DirXstorage\data
-
C:\DirXstorage\translog
We will use these folders later on for mounting the volumes.
Next, we use the snap-in to create the volume for the directory data device:
-
Right-click Disk 1 and select New Simple Volume. This action starts the New Simple Volume Wizard.
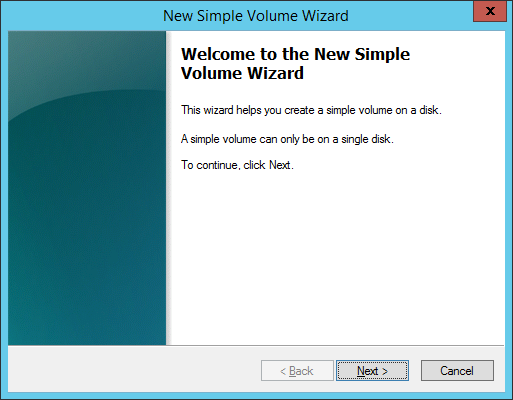 Figure 3. New Simple Volume Wizard
 -
The wizard displays the Select Disks dialog, where you can set the disk size for the volume. In Size for selected disk, select 32768 MB for the volume’s disk size; this amount of space can accommodate a directory service configuration of 13 million directory entries and 20 attribute indexes. After you have made this selection, click Next.
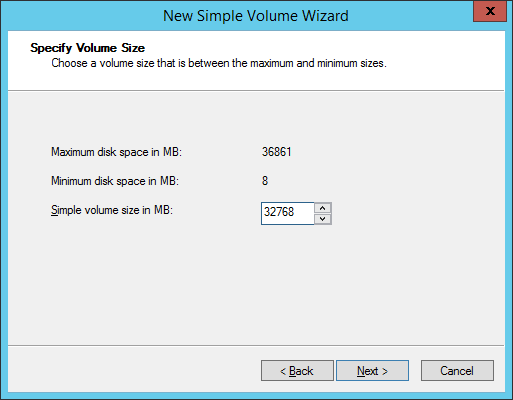 Figure 4. Select Disks Dialog
 -
The Wizard displays the Assign Drive Letter or Path dialog. Click Mount this volume at an empty folder that supports drive paths and browse to the directory C:\DirXstorage\data that we created earlier. Select this folder, then click Next.
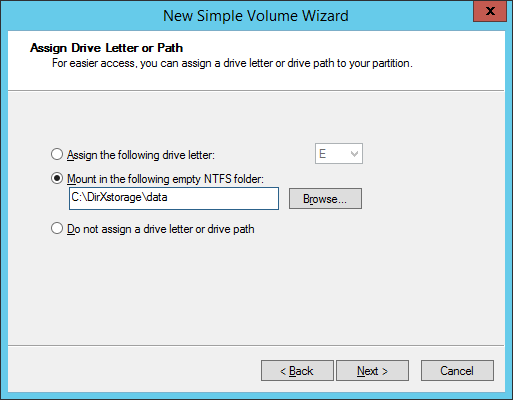 Figure 5. Assign Drive Letter or Path Dialog
 -
The Wizard displays the Format Volume dialog. Click Do not format this volume, then click Next.
 Figure 6. Format Volume Dialog
 -
The Wizard displays the volume settings you have selected. Review the settings to make sure they’re correct, then click Finish.
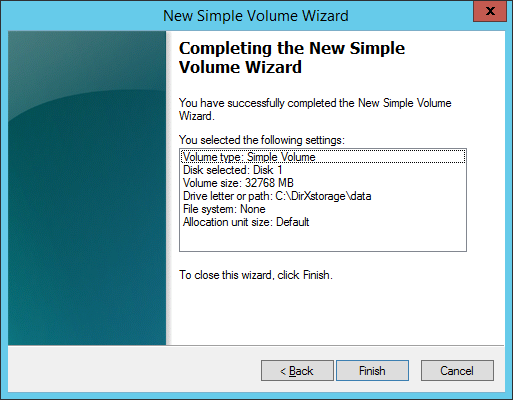 Figure 7. Volume Wizard Completion Dialog
Now we have created a Windows volume—in the DBAM database model, a raw device—for the directory data device. Next, we create another volume for the transaction device:
-
Right-click Disk 1 and select Create Volume. This action starts the Create Volume Wizard. Click Next.
-
In the Select Volume Type dialog, check Simple Volume, then click Next.
-
In the Select Disks dialog, the wizard displays the remaining amount of space left on Disk 1 in Size for selected disk. Use this size and click Next.
-
In the Assign Drive Letter or Path dialog, select Mount this volume at an empty folder that supports drive paths and browse to the directory C:\DirXstorage\translog that we created earlier. Select this folder, then click Next.
-
In the Format Volume dialog, click Do not format, then click Next.
-
The Wizard displays the volume settings you have selected. Review the settings to make sure they’re correct, then click Finish.
Now we have completed the configuration of Disk 1 for the DBAM data and transaction devices.
Installing DirX Directory
The next step is to install the DirX Directory software from the product CD. Follow the instructions given by the Setup Wizard. In our example, we install the software into the directory C:\Program Files\DirX\Directory. The DirX Directory installation requires approximately 100MB. You should also ensure that there is enough space to accommodate any files you create during your use of the directory service; for example, log files, LDIF content files, and LDIF change files. The amount of space you’ll need depends on how you plan to use the example set-up.
Creating a Profile for the DBAM Database
Now that we have created our volumes (DBAM raw devices) and installed the DirX Directory software, we next use the DirX Directory administration tool dbamconfig to create a profile for the DBAM database. The profile links the volumes we created earlier to the DBAM data device/transaction device format. To create the profile:
-
Start the Command Prompt window and run the following dbamconfig command:
dbamconfig
    -c -D“C:\DirXstorage\data”
    -T“C:\DirXstorage\translog”
    -Pprofile1
We use the double quotation marks to ensure that dbamconfig (and the other DirX Directory administrative commands used in this example) will be able to parse any space characters that may occur in the pathname (although there are none in this example).
The command should return the status:
Creation of profile ‘profile1’ was successful
-
Use the following dbamconfig command to display the profile you just created:
dbamconfig –sl
The command should display the profile, for example:
+
  ProfileName: profile1, ID=3
    DataDevice(s):
      Mountpoint: C:\DirXstorage\data\
      VolumeName: \\?\Volume{9fc2a96c-a374-11e3-80cb-000c293728b5}
      DeviceSize: 32.000 GB
        Logical device(s):
          BlockType(s): GENERAL | BITSTR | PSEUDO | TREE
          DeviceSize:   6.400 GB

          BlockType(s): REAL
          DeviceSize:   12.800 GB

          BlockType(s): AVIDX
          DeviceSize:   12.800 GB

    TransactionDevice:
      Mountpoint: C:\DirXstorage\translog\
      VolumeName: \\?\Volume{9fc2a9a8-a374-11e3-80cb-000c293728b5}
| When we used the dbamconfig command to create the profile, we did not specify how the space on the directory data device was to be allocated to the different data types. As a result, dbamconfig used a default allocation: 40% of the device to real directory data, 40% to attribute index data, and the remainder to the other types of data. |
Initializing the DBAM Database
The next step is to use the dbamboot command to initialize an empty database that corresponds to the database profile profile1 that we just created with dbamconfig.
From the Command Prompt, run the following dbamboot command
dbamboot -Pprofile1
The command should return the message:
DB successfully initialized
        DB-limits:
                 13418476 objects
                       20 attribute index(es)
Here you can see that the database you’ve initialized can accommodate approximately 12 million entries and 20 attribute index types.
You can use the dbamdevinfo command to view the empty database:
dbamdevinfo

DSA profile:               profile1, ID=1
Real object block size:    1 KB
AVIDX cluster size:        32 MB
Maximum number of indices: 880

Logical device:  GENERAL | BITSTR | PSEUDO | TREE
    In use:         0.00 %  (  0.130 MB of    6.398 GB)
    Fragmentation:  0.00 %
Logical device:  REAL
    In use:         0.00 %  (  0.000 MB of   12.797 GB)
    Fragmentation:  0.00 %
Logical device:  AVIDX
    In use:         0.00 %  (  0.000 MB of   12.800 GB)
    Fragmentation:  0.00 %

Attribute index specific device info:

        Number of indices: 0      (maximum 80)
        Cluster usage:     0.00 % (  0 of 895)
Here you can see how the default allocation for the different directory types has been applied to Disk 1.
Loading the Directory Data
Now we are ready to load directory data into the empty database. In this example, we use the dirxload administration tool to populate the empty database with sample directory data in an LDIF content file named Complete_DB.ldif, which is supplied with the DirX Directory installation in install_path\scripts\stand_alone\default.
-
In the Command Prompt window, change directory to C:\Program Files\DirX\Directory\scripts\stand_alone\default.
-
Use the following dirxload command to load the example database Complete_DB.ldif into the DBAM database:
dirxload –f Complete_DB.ldif

Attribute objectClass(0) INITIAL indexed, file C:\PROGRA~1\DirX\Directory\tmp\0-INITIAL-1796.iaf
Attribute cn(3) INITIAL indexed, file C:\PROGRA~1\DirX\Directory\tmp\3-INITIAL-1796.iaf
Attribute cn(3) FINAL indexed, file C:\PROGRA~1\DirX\Directory\tmp\3-FINAL-1796.iaf
Attribute sn(4) INITIAL indexed, file C:\PROGRA~1\DirX\Directory\tmp\4-INITIAL-1796.iaf
Attribute sn(4) FINAL indexed, file C:\PROGRA~1\DirX\Directory\tmp\4-FINAL-1796.iaf
Attribute c(6) INITIAL indexed, file C:\PROGRA~1\DirX\Directory\tmp\6-INITIAL-1796.iaf
Attribute c(6) FINAL indexed, file C:\PROGRA~1\DirX\Directory\tmp\6-FINAL-1796.iaf
Attribute o(13) INITIAL indexed, file C:\PROGRA~1\DirX\Directory\tmp\13-INITIAL-1796.iaf
Attribute o(13) FINAL indexed, file C:\PROGRA~1\DirX\Directory\tmp\13-FINAL-1796.iaf
Attribute collectiveOrganizationName(14) INITIAL indexed, file C:\PROGRA~1\DirX\Directory\tmp\14-INITIAL-1796.iaf
Attribute collectiveOrganizationName(14) FINAL indexed, file C:\PROGRA~1\DirX\Directory\tmp\14-FINAL-1796.iaf
Attribute ou(15) INITIAL indexed, file C:\PROGRA~1\DirX\Directory\tmp\15-INITIAL-1796.iaf
Attribute ou(15) FINAL indexed, file C:\PROGRA~1\DirX\Directory\tmp\15-FINAL-1796.iaf
Attribute collectiveOrganizationalUnitName(16) INITIAL indexed, file C:\PROGRA~1\DirX\Directory\tmp\16-INITIAL-1796.iaf
Attribute collectiveOrganizationalUnitName(16) FINAL indexed, file C:\PROGRA~1\DirX\Directory\tmp\16-FINAL-1796.iaf
1025 entries created
0 entries rejected
|
Step 1 is optional: you can supply the full path to the example database to dirxload, as follows: dirxload –f“C:\Program Files\DirX\Directory\scripts\stand_alone\default\Complete_DB.ldif” |
Now we have configured and initialized the DBAM database and have loaded directory content into it. We can then start the service and use any LDAP client to view the data. For example, we can use the command-line tool dirxcp to view the data in text format, or we can use DirX Directory Manager to view the data in a GUI format.
Starting the Service
To start the DirX Directory service use the Windows Administration Tool Services:
-
Start the Services Administration Tool.
-
Right-click DirX Service, then click Start.
Now the service is running.
Viewing the Directory Data with dirxcp
To use dirxcp to view the directory data you loaded into the DBAM database:
-
In the Command Prompt window, start dirxcp:
dirxcp
-
The dirxcp program requires that you first bind to the DirX Directory service before you can perform any further dirxcp operations. Use the following dirxcp operation to make an unauthenticated (anonymous) bind to the service:
dirxcp> bind
-
Now you can use dirxcp to examine the database. For example, you can use the following dirxcp operation to search the database:
dirxcp++>++ search / -sub -p
 1) /O_DUTF8=My-Company/CN_DUTF8=admin
 2) /O_DUTF8=My-Company/OU_DUTF8=Sales
 3) /O_DUTF8=My-Company/OU_DUTF8=Development
 4) /O_DUTF8=My-Company/OU_DUTF8=Accounting
 5) /O_DUTF8=My-Company/OU_DUTF8=Product Development
 6) /O_DUTF8=My-Company/OU_DUTF8=Product Testing
 7) /O_DUTF8=My-Company/OU_DUTF8=Human Resources
 8) /O_DUTF8=My-Company/OU_DUTF8=Payroll
 9) /O_DUTF8=My-Company/OU_DUTF8=Sales/CN_DUTF8=Smith John
10) /O_DUTF8=My-Company/OU_DUTF8=Sales/CN_DUTF8=Mayer
11) /O_DUTF8=My-Company/OU_DUTF8=Sales/CN_DUTF8=Hohner
12) /O_DUTF8=My-Company/OU_DUTF8=Sales/CN_DUTF8=Richter
13) /O_DUTF8=My-Company/OU_DUTF8=Sales/CN_DUTF8=Abele
14) /O_DUTF8=My-Company/OU_DUTF8=Sales/CN_DUTF8=Reichel
15) /O_DUTF8=My-Company/OU_DUTF8=Development/CN_DUTF8=Digger
16) /O_DUTF8=My-Company/OU_DUTF8=Development/CN_DUTF8=Filler
17) /O_DUTF8=My-Company/OU_DUTF8=Development/CN_DUTF8=Tinker
18) /O_DUTF8=My-Company/OU_DUTF8=Development/CN_DUTF8=Morton
19) /O_DUTF8=My-Company/OU_DUTF8=Accounting/CN_DUTF8=Dasya Linkletter
20) /O_DUTF8=My-Company/OU_DUTF8=Accounting/CN_DUTF8=Antonio Tymchuk
21) /O_DUTF8=My-Company/OU_DUTF8=Accounting/CN_DUTF8=Talia McKinnon
22) /O_DUTF8=My-Company/OU_DUTF8=Accounting/CN_DUTF8=Becky McCready
23) /O_DUTF8=My-Company/OU_DUTF8=Accounting/CN_DUTF8=Corly Wheatley
24) /O_DUTF8=My-Company/OU_DUTF8=Accounting/CN_DUTF8=Lilin Markham
:
The colon ( : ) at the end of the list indicates that there is more data to display (enter “q[uit]” to discard further output).
Viewing the Directory Data using DirX Directory Manager
You can view the DirX Directory database from any LDAP client. In this example, we use DirX Directory Manager
To start DirX Directory Manager:
-
Click Start.
-
Search for DirX Directory Manager, and then click DirX Directory Manager.
-
DirX Directory Manager displays its Welcome dialog. Click the My-Company (SSL) view group, then click Open and specify credentials or bind as anonymous.
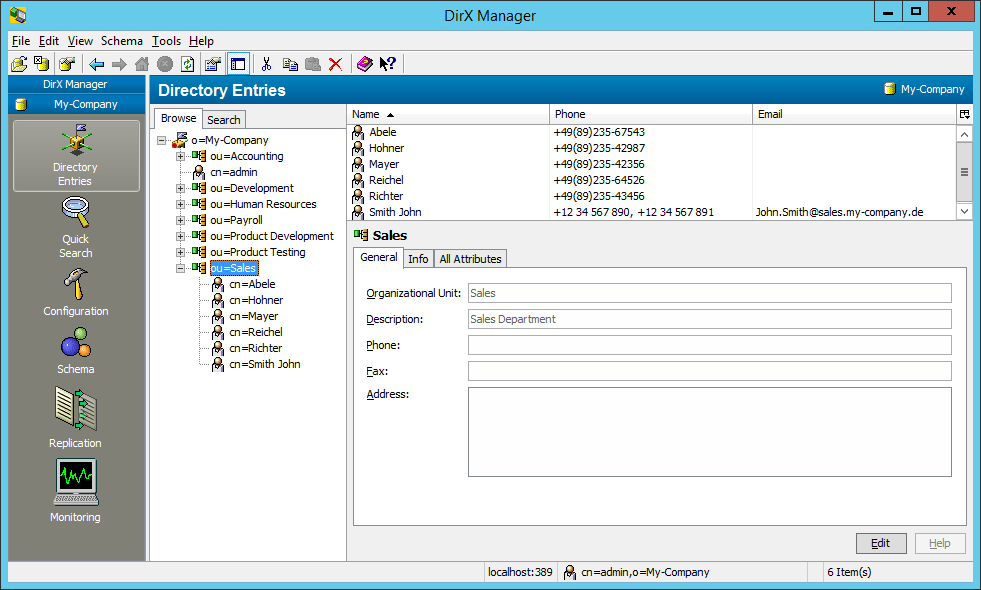
In the My-Company (SSL) view group, click the Directory Entries view. DirX Directory Manager displays a view pane from which you can browse and search for entries in the DirX Directory database. The following figure shows the Browse tab.
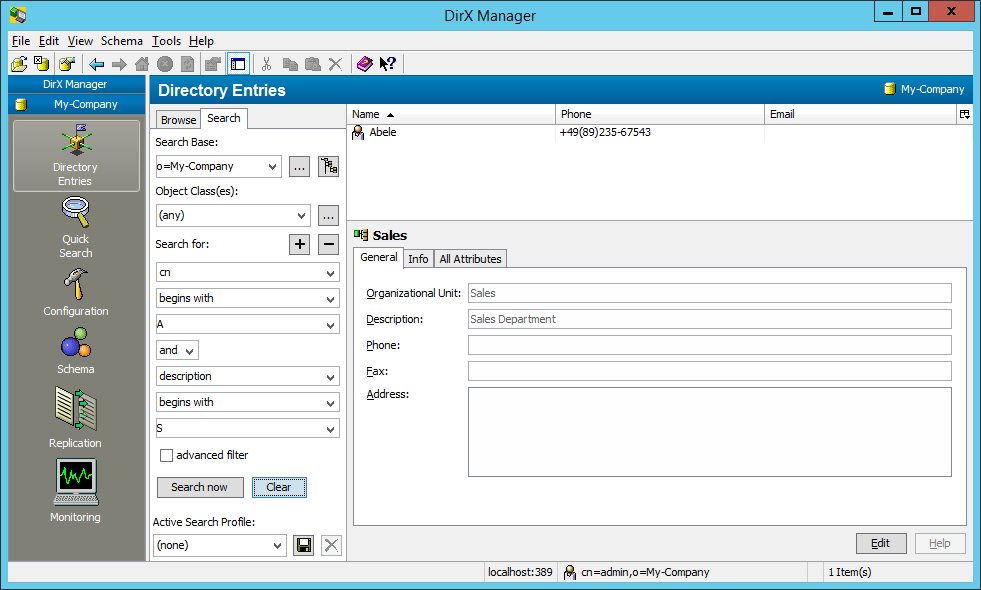
In this example, we search the whole subtree o=My-Company for directory entries whose Object Class is Person and whose Common Names begin with “A” and whose Description begins with “S”. The following figure illustrates the result.
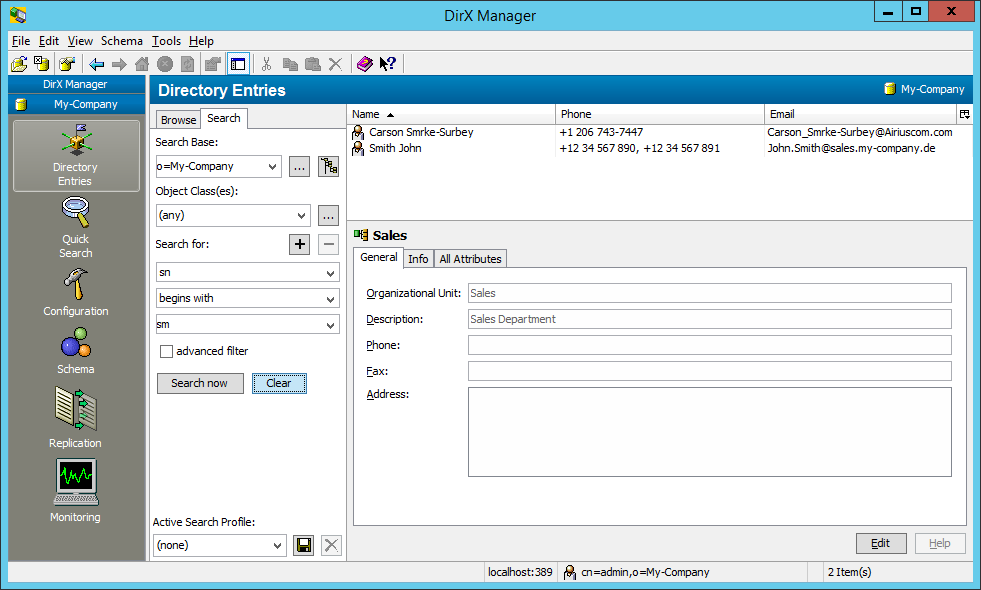
In this example, we search for directory entries whose Surname (sn) attribute begins with the string “sm”. Initially, the search base is supposed to be “o=My-Company”.
To view or edit the search base, click  .
.
The following figure illustrates the result.
Making Changes to the Example
If you want to re-load the example database or load your own directory data, you can use dbamboot to reinitialize the DBAM database. For example, the command:
dbamboot -Pprofile1
deletes all the data you loaded with dirxload.You can run dirxload again to re-load CompleteDB.ldif or another LDIF content file of your choice.
You can use dbamconfig to delete the database profile you created as long as it is not the active profile.For example, the command:
dbamconfig -d -Pprofile1
deletes the profile1 profile that we created earlier.
Setting up the Sample Service on Linux
This section describes how to set up an example DirX Directory service on Linux.In the example scenario:
-
The target machine has three disk groups of two physical disks each, managed by a hardware or software RAID system.The first disk group holds the root (system).The other two disk groups have been reserved for use as DBAM storage devices.
-
We will use one disk group to hold all of the DirX directory data types and the other disk group to hold the transaction data.We will use both disks exclusively for DBAM storage.
-
We will load sample directory data supplied in an LDIF file that is provided with the DirX Directory installation.
Configuring the Disks for the DBAM Database
On Linux systems, configuring disks for the DBAM database consists of the following steps:
-
Creating a group definition in the system for DirX Directory administration and adding a new user as a member of this group
-
Assigning symbolic links to the raw data slices or “raw devices” to be used for the DBAM directory data and transaction devices
-
Changing the permissions on the DBAM raw devices so that users in the DirX group can access them
You must be logged in as user root (superuser) to perform all of these steps.
Creating the DirX Group and User
In this procedure, you first create a new group that defines users who will perform DirX Directory administration tasks. You then create a new user as a member of this group. This procedure sets up a Linux account that you can use later on when creating and initializing the DBAM database (instead of having to use the root account).
You use the groupadd command to create the new group. For example, the command:
groupadd dirxadm
creates the group dirxadm. You can use the useradd command to create the new user. For example, the command
useradd -d /home/spdirx –g dirxadm -c “DirX admin” –s /bin/bash spdirx
creates the user spdirx whose home directory is /home/spdirx.
You then use Linux commands to create the DirX admin’s home directory, give ownership of the directory to this user, and add this user as a member of the DirX Directory administration group. For example:
mkdir -p /home/spdirx
chown spdirx /home/spdirx
chgrp dirxadm /home/spdirx
The last step is to unlock the new user “DirX admin” by establishing a password for the account. For example:
passwd spdirx
New password: xxxxxx
Re-enter new password: xxxxxx
passwd (SYSTEM): passwd successfully changed for spdirx
Now you have established a user account from which you can run the DirX Directory commands for configuring, initializing, and loading the database.
Assigning Symbolic Links
The next step is to use the assign symbolic links to the raw devices to be used as DBAM data and transaction devices. We carry out this step because it is easier to refer to the devices in subsequent administration commands with symbolic names than it is to use their logical device names.
On Linux, you can use the fdisk(8) command to determine the logical device names for the devices. When you use fdisk -l, it displays a numbered list of available disks.
Next, you use the ln command to create symbolic links to the raw data slices.
On Linux, for example after having created the partitions hda8 and hda9 with the fdisk command perform the following commands:
ln -s /dev/hda8 /home/spdirx/DBAMdev/DbamTrans1
ln -s /dev/hda9 /home/spdirx/DBAMdev/DbamData1
Changing Permissions
By default, only user root can access raw devices on Linux. The next step is to use the chgrp and chmod commands to change the permissions on the raw devices so that the members of the DirX Directory administration group can access them.
On Linux, perform the following commands:
chgrp dirxadm /dev/hda8
chgrp dirxadm /dev/hda9
chmod g{plus}w /dev/hda8
chmod g{plus}w /dev/hda9
| When you must install system updates or system patches on your machine you must check the permissions of your raw devices after having installed them. In the event that the installation has changed the permissions you must reset them to the correct values. |
Installing DirX Directory
The next step is to install the DirX Directory software from the product CD.
You should ensure that there is enough space to accommodate any files you create during your use of the directory service; for example, log files, LDIF content files, and LDIF change files. The amount of space you’ll need depends on how you plan to use the example set-up.
Installing DirX Directory on Linux
Use the dirxinst and dirxinst_root command. You must be logged in as user in order to run dirxinst. To run dirxinst_root you must be logged in as root. Follow the installation instructions for Linux given in the Release Notes, which you will find using the path Documentation > DirX → Readme.txt. We recommend that you install DirX Directory into a dedicated user account. In our example, this is spdirx, as shown in the following example command lines:
-
Login as user id:
mkdir /usr/tmp/dirx
cd /usr/tmp/dirx
tar xvf <CD-mount-point>/DirX/DirXServer/Linux/dirx*.tar
ksh ./dirxinst /usr/tmp/dirx /home/spdirx
-
Log in as root:
cd /usr/tmp/dirx
ksh ./dirxinst_root /usr/tmp/dirx /home/spdirx
Creating a Profile for the DBAM Database
Now that we have created our volumes (DBAM raw devices) and installed the DirX Directory software, we next use the DirX Directory administration tool dbamconfig to create a profile for the DBAM database. The profile links the volumes we created earlier to the DBAM data device/transaction device format. To create the profile:
-
Log in as user “DirX admin” (spdirx) and run the following dbamconfig command:
$DIRX_INST_PATH/bin/dbamconfig -c
                      -D “/home/spdirx/DBAMdev/DbamData1”
                      -T “/home/spdirx/DBAMdev/DbamTrans1”
                      -P myProfile
We use double quotation marks to ensure that dbamconfig (and the other DirX Directory administrative commands used in this example) will be able to parse any space characters that may occur in pathnames (although there are none in this example).
The command should return the status:
Creation of profile ‘myProfile’ was successful
-
Use the following dbamconfig command to display the profile you just created:
$DIRX_INST_PATH/bin/dbamconfig –sl –P myProfile
In the example scenario the output is as follows:
+
ProfileName: myProfile
DataDevice(s):
Mountpoint: /home/spdirx/DBAMdev/DbamData1
VolumeName: /dev/hda8
DeviceSize: 136.398 GB
Logical device(s):
BlockType(s): GENERAL | BITSTR | PSEUDO | TREE
DeviceSize:   27.273 GB
BlockType(s): REAL
DeviceSize:   54.546 GB
BlockType(s): AVIDX
DeviceSize:   54.546 GB
TransactionDevice:
Mountpoint: /home/spdirx/DBAMdev/DbamTrans1
VolumeName: /dev/hda8
DeviceSize: 136.398 GB
| When we used the dbamconfig command to create the profile, we did not specify how the space on the directory data device was to be allocated to the different data types. As a result, dbamconfig used a default allocation: 40% of the device to real directory data, 40% to attribute index data, and the remainder to the other types of data. |
Initializing the DBAM Database
The next step is to use the dbamboot command to initialize an empty database that corresponds to the database profile myProfile that we just created with dbamconfig. We perform this step as user “DirX admin” (spdirx).
Run the following dbamboot command
$DIRX_INST_PATH/bin/dbamboot –P myProfile
The command should return the message:
DB successfully initialized
DB-limits:
57188608 objects
20 attribute index type(s)
Here you can see that the database you’ve initialized can accommodate approximately 57 million entries and 20 attribute index types.
You can use the dbamdevinfo command to view the empty database:
$DIRX_INST_PATH/bin/dbamdevinfo
DSA profile:            profile1, ID=1
Real object block size: 1 KB
AVIDX cluster size:     32 MB

Logical device:  GENERAL | BITSTR | PSEUDO | TREE
    In use:         0.00 %  (  0.130 MB of   27.270 GB)
    Fragmentation:  0.00 %
Logical device:  REAL
    In use:         0.00 %  (  0.000 MB of   54.539 GB)
    Fragmentation:  0.00 %
Logical device:  AVIDX
    In use:         0.00 %  (  0.000 MB of   54.546 GB)
    Fragmentation:  0.00 %

Attribute index specific device info:

                Number of indices: 0       (maximum 80)
                Cluster usage:     0.00 %  (  0 of  95)
Here you can see how the default allocation for the different directory types has been applied to raw devices for the example scenario on Linux.
Loading the Directory Data
Now we are ready to load directory data into the empty database. In this example, we use the dirxload administration tool to populate the empty database with sample directory data in an LDIF content file named Complete_DB.ldif, which is supplied with the DirX Directory installation in install_path*/scripts/stand_alone/default*. We perform this task as user “DirX admin” (spdirx):
$DIRX_INST_PATH/bin/dirxload
         –f $DIRX_INST_PATH/scripts/stand_alone/default/Complete_DB.ldif
The command displays the output:
Attribute objectClass(0) INITIAL indexed, file /tmp/0-INITIAL-19058.iaf
Attribute cn(3) INITIAL indexed, file /tmp/3-INITIAL-19058.iaf
Attribute cn(3) FINAL indexed, file /tmp/3-FINAL-19058.iaf
Attribute sn(4) INITIAL indexed, file /tmp/4-INITIAL-19058.iaf
Attribute sn(4) FINAL indexed, file /tmp/4-FINAL-19058.iaf
Attribute c(6) INITIAL indexed, file /tmp/6-INITIAL-19058.iaf
Attribute c(6) FINAL indexed, file /tmp/6-FINAL-19058.iaf
Attribute o(13) INITIAL indexed, file /tmp/13-INITIAL-19058.iaf
Attribute o(13) FINAL indexed, file /tmp/13-FINAL-19058.iaf
Attribute collectiveOrganizationName(14) INITIAL indexed, file /tmp/14-INITIAL-19058.iaf
Attribute collectiveOrganizationName(14) FINAL indexed, file /tmp/14-FINAL-19058.iaf
Attribute ou(15) INITIAL indexed, file /tmp/15-INITIAL-19058.iaf
Attribute ou(15) FINAL indexed, file /tmp/15-FINAL-19058.iaf
Attribute collectiveOrganizationalUnitName(16) INITIAL indexed, file /tmp/16-INITIAL-19058.iaf
Attribute collectiveOrganizationalUnitName(16) FINAL indexed, file /tmp/16-FINAL-19058.iaf
1025 entries created
0 entries rejected
Now we have configured and initialized the DBAM database and have loaded directory content into it. We can now start the service and use any LDAP client to view the data. For example, we can use the command-line tool dirxcp to view the data in text format, or we can use DirX Directory Manager to view the data in a GUI format.
Starting the Service
To start the DirX Directory service, start the dirxadm program from the command line, then issue the following dirxadm operation:
dirxadm> sys start
This procedure starts the DirX Directory service. You can now use the following Linux command sequence to check that the service is running:
ps -ef | grep dirx
root    24365   469  0 16:00:19 ?  0:00 /home/spdirx/bin/dirxdsas -d/home/spdirx
spdirx  24366 24365  1 16:00:19 ?  0:00 /home/spdirx/bin/dirxdsa
root    24367 24365  1 16:00:19 ?  0:00 /home/spdirx/bin/dirxldapv3
The output shows that the DirX Directory service processes dirxdsa, dirxldapv3 and dirxdsas are all running on the system.
Viewing the Directory Data with dirxcp
To use dirxcp to view the directory data you loaded into the DBAM database:
-
Start dirxcp from the command line.
-
The dirxcp program requires that you first bind to the DirX directory service before you can perform any further dirxcp operations. Use the following dirxcp operation to make an unauthenticated (anonymous) bind to the service:
dirxcp> bind –protocol ldapv3
-
Now you can use dirxcp to examine the database. For example, you can use the following dirxcp operation to search the database:
dirxcp> search o=My-Company -sub -p
1) o=My-Company
2) cn=admin,o=My-Company
3) ou=Sales,o=My-Company
4) ou=Development,o=My-Company
5) ou=Accounting,o=My-Company
6) ou=Product Development,o=My-Company
7) ou=Product Testing,o=My-Company
8) ou=Human Resources,o=My-Company
9) ou=Payroll,o=My-Company
10) cn=Smith John,ou=Sales,o=My-Company
11) cn=Mayer,ou=Sales,o=My-Company
12) cn=Hohner,ou=Sales,o=My-Company
13) cn=Richter,ou=Sales,o=My-Company
14) cn=Abele,ou=Sales,o=My-Company
15) cn=Reichel,ou=Sales,o=My-Company
16) cn=Digger,ou=Development,o=My-Company
17) cn=Filler,ou=Development,o=My-Company
18) cn=Tinker,ou=Development,o=My-Company
:
The colon ( : ) at the end of the list indicates that there is more data to display (enter “q[uit]” to discard further output).