Managing Miscellaneous Scenarios
This chapter provides information on how to set up and manage a number of specialized scenarios, including how to:
-
Set up and manage nested groups
-
Set up and manage dynamic groups
-
Manage huge search results with size limits and simple paging
-
Set up NAT support in presentation addresses
-
Set up IPv6 support in presentation addresses
-
Set up encrypted X.500 protocols (IDMS support)
-
Change the host IP address of a DirX Directory server in an existing DirX Directory installation
-
Set up and manage time-based one-time password two-factor authentication (TOTP 2FA) for DirX Directory users
Working with Nested Groups
This section describes how to set up and maintain nested groups, which are hierarchies of imported groups.To create a nested group import hierarchy, you need to add the following items to your group definitions:
-
The dirxImportGroup auxiliary object class, which extends the group to support an imported group hierarchy
-
The dirxImportFrom attribute, which specifies the DN(s) of the groups to be imported
The DirX Directory DSA interprets the members of the imported groups as members of the importing group; as a result, they are also evaluated by the DirX Directory DSA’s access control decision operation and its user policy management function.
Note that nested groups can only be created for entries with the groupOfNames object class.
The following figure illustrates a nested group:
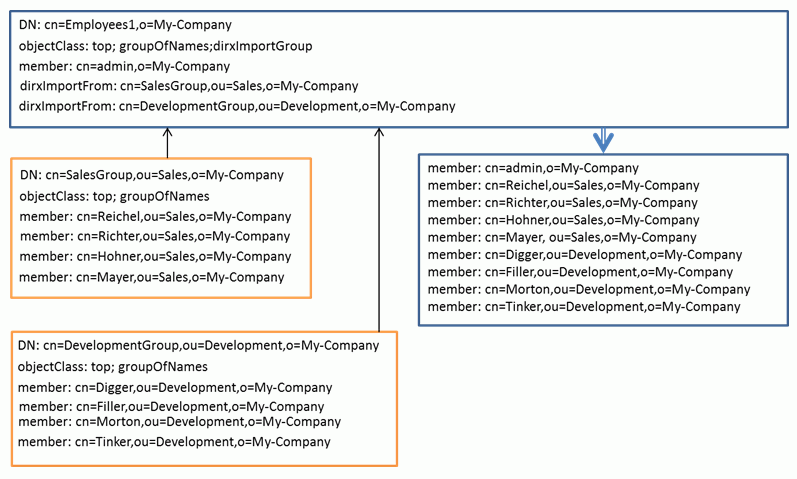
As shown in the figure, the nested group cn=Employees1,o=My-Company imports the groupOfNames entries cn=SalesGroup and cn=DevelopmentGroup. Importing the two groups has the same effect for the nested group cn=Employees1,o=My-Company as it would have if this group actually contained the member attributes of all three groups.
The DirX Directory DSA’s access control decision and user management functions calculate the membership of specific DNs in nested groups along with the direct memberships. For example, suppose the user with the DN cn=reichel,ou=sales,o=My-Company is bound to the DSA. When the DSA’s access control decision operation verifies the membership of this user, it determines that the user cn=reichel is a member of the group cn=SalesGroup and a member of the group cn=Employees1, because cn=Employees1 imports the members of the group cn=SalesGroup. The user policy management function calculates the same membership for the user cn=reichel as the access control decision operation does.
About the Nested Groups Object Class
The dirxImportGroup auxiliary object class extends a groupOfNames entry with the dirxImportFrom attribute to import member values by referencing other groupOfNames entries.
About the Nested Groups Attribute Types
The following attribute types are part of DirX Directory support for nested groups:
-
dirxImportFrom
-
dirxMember
-
dirxMemberOf
-
dirxImportedGroups
-
dirxExportTo
The next sections provide more information about these attribute types.
About the dirxImportFrom Attribute Type
The dirxImportFrom attribute specifies the DN(s) of a groupOfNames entry from which member attribute values are to be imported. To provide for complete nested group support, the imported group should be hosted on the same physical DSA as the importing group. If this is not the case, the DirX Directory DSA will ignore the imported group at evaluation time.
The dirxImportFrom attribute is a User Applications attribute and is maintained by a DirX Directory administrator. Since the imported groups themselves can in turn import other groups, the DirX Directory DSA interprets and evaluates the groups recursively through multiple levels. In a nested group import hierarchy, the maximum import hierarchy level is limited to 8 and the creation of loops is prohibited. If a cyclical reference is detected in a create- or modify-entry operation, the DSA rejects the operation with an “unwilling to perform” error and the LDAP message “[DSA]: #Loop in nested group import hierarchy detected#”.
About the dirxMember Attribute Type
The dirxMember attribute is a directory operational attribute. Its values are calculated at runtime. The dirXMember attribute is synonymous with the member attribute but is a required attribute for showing all member values of a nested group in one search operation. To facilitate migration from existing DirX Directory installations, the dirxMember attribute has the same access rights as the member attribute. Requesting the dirxMember attribute in a search operation shows all values from the member attribute of a groupOfNames entry plus all values which come from the imported groups referenced recursively by the dirxImportFrom attribute. The dirxMember attribute can’t be specified in update operations. To add or delete a value, you must specify the member attribute. You can specify the dirxMember attribute in a filter expression. The search result returns the groupOfNames entries where the dirxMember attribute virtually matches.
About the dirxMemberOf Attribute Type
The dirxMemberOf attribute is a directory operational attribute. Its values are calculated at runtime. Requesting the dirxMemberOf attribute in a search operation shows the DNs of groupOfNames entries where the resulting entry is either a direct member of this group or an indirect member by virtue of a nested group. Specifying dirxMemberOf in a filter expression returns the dirxMember of the specified group in the search result.
Configuring Permissions for Nested Group Attributes
To use the dirxMemberOf and dirxImportedGroups directory operational attributes, you need to specify explicit permissions in the access control policies; this step is not required for the dirxMember attribute. Since the DirX Directory DSA maintains the dirxExportTo directory operational attribute automatically, this step is also not required for this attribute.
Configuring the INITIAL Index for the Member Attribute
To implement complete nested group support, you must configure the INITIAL index for the member attribute; otherwise, search operations may return with error, return incorrect or empty results or last a long time. See the dirxadm db attrconfig operation in the DirX Directory Administration Reference for more information.
Creating a Nested Group
One way to build a nested group is to create a new one with dirxcp create. For example, suppose the following three groups exist as groupOfNames entries:
-
My-Company → Sales → SalesGroup
-
My-Company → Development → DevelopmentGroup
-
My-Company → AdministratorGroup
A dirxcp search operation on each group shows the following members:
dirxcp> search cn=SalesGroup,ou=Sales,o=My-Company -base -attr member –p
The sample output is as follows:
1) cn=SalesGroup,ou=Sales,o=My-Company
    member : cn=Reichel,ou=Sales,o=My-Company
           : cn=Richter,ou=Sales,o=My-Company
           : cn=Hohner,ou=Sales,o=My-Company
           : cn=Mayer,ou=Sales,o=My-Company
dirxcp> search cn=DevelopmentGroup,ou=Development,o=My-Company -base –attr \ member -p
The sample output is as follows:
1) cn=DevelopmentGroup,ou=Development,o=My-Company
    member : cn=Digger,ou=Development,o=My-Company
           : cn=Filler,ou=Development,o=My-Company
           : cn=Morton,ou=Development,o=My-Company
           : cn=Tinker,ou=Development,o=My-Company
dirxcp> search cn=AdministratorGroup,o=My-Company -base -attr member -p
The sample output is as follows:
1) cn= AdministratorGroup,o=My-Company
    member : cn=admin,o=My-Company
The following dirxcp create operation creates a new nested groupOfNames entry cn=Employees1,o=My-Company that imports the SalesGroup and DevelopmentGroup groups:
dirxcp> create cn=Employees1,o=My-Company \
-attr {objectclass=groupOfNames;dirxImportGroup} \
      {member=cn=non-existent-user,o=My-Company} \
      {dirxImportFrom=cn=SalesGroup,ou=Sales,o=My-Company;
       cn=DevelopmentGroup,ou=Development,o=My-Company}
Since the member attribute is a mandatory attribute for a group definition, a value for it must be specified. In our example, the DN cn=non-existent-user,o=My-Company is specified as a placeholder and an entry with this DN doesn’t exist.
Another way to build a nested group is to modify an existing groupOfNames entry by adding the dirxImportGroup auxiliary object class to it and optionally specifying one or more values for the dirxImportFrom attribute. (Since the dirxImportFrom attribute is an optional attribute, this step can be omitted.)
For example, the following dirxcp modify operation extends the existing group cn=AdministratorGroup,o=My-Company to support an imported group hierarchy and imports the group cn=DevelopmentGroup,ou=Development,o=My-Company:
dirxcp> modify cn=AdministratorGroup,o=My-Company \
-add {objectclass=dirxImportGroup} \
     {dirxImportFrom=cn=DevelopmentGroup,ou=Development,o=My-Company}
Listing All Members of a Nested Group
To view the members of a nested group, including all the members from the imported groups, specify the dirxMember attribute in the dirxcp search request. For example, to show all the members in the nested group cn=Employees1,o=My-Company, run the following dirxcp search operation:
dirxcp> search cn=Employees1,o=My-Company -base -attr dirxMember -p
The sample output is as follows:
1) cn=Employees1,o=My-Company
    dirxMember : cn=non-existent-user,o=My-Company
               : cn=Reichel,ou=Sales,o=My-Company
               : cn=Richter,ou=Sales,o=My-Company
               : cn=Digger,ou=Development,o=My-Company
               : cn=Filler,ou=Development,o=My-Company
               : cn=Morton,ou=Development,o=My-Company
               : cn=Tinker,ou=Development,o=My-Company
               : cn=Hohner,ou=Sales,o=My-Company
               : cn=Mayer,ou=Sales,o=My-Company
Specifying the dirxMember attribute also works for “normal” groups. For example:
dirxcp> search cn=SalesGroup,ou=Sales,o=My-Company -base -attr dirxmember -p
The sample output is as follows:
1) cn=SalesGroup,ou=Sales,o=My-Company
    dirxMember : cn=Reichel,ou=Sales,o=My-Company
               : cn=Richter,ou=Sales,o=My-Company
               : cn=Hohner,ou=Sales,o=My-Company
               : cn=Mayer,ou=Sales,o=My-Company
Searching for Group Membership in Groups and Nested Groups
To search for an entry’s membership in groups and nested groups, specify the dirxMember attribute in the dirxcp search filter. For example:
dirxcp> search o=My-Company -sub -fi (dirxmember=cn=Richter,ou=Sales,o=My-Company) -p
The sample output is as follows:
 1) cn=SalesGroup,ou=Sales,o=My-Company
 2) cn=Employees1,o=My-Company
Listing User Membership in Groups and Nested Groups
To list the groups and nested groups to which an entry belongs, specify the dirxMemberOf attribute in the dirxcp search request. For example:
dirxcp> search cn=Reichel,ou=Sales,o=My-Company -base -attr dirxMemberOf -p
The sample output is as follows:
1) cn=Reichel,ou=Sales,o=My-Company
    dirxMemberOf : cn=SalesGroup,ou=Sales,o=My-Company
                 : cn=Employees1,o=My-Company
Determining Specific Entry-Nested Group Membership
There are several ways to determine the membership of a specific entry in a specific group or specific nested group. One method is to perform a compare operation. For example:
dirxcp> compare cn=Employees1,O=My-Company –attr \
 {dirxmember=cn=reichel,ou=sales,o=my-company}
The sample output is as follows:
M=TRUE
The result M=TRUE indicates that the DN cn=reichel,ou=sales,o=my-company is a member of the nested group cn=Employees1,O=My-Company.
The compare operation also works for “normal” groups. For example:
dirxcp> compare cn=SalesGroup,ou=Sales,o=My-Company -attr \
{dirxmember=cn=reichel,ou=sales,o=my-company}
The sample output is as follows:
M=TRUE
The result M=TRUE indicates that the DN cn=reichel,ou=sales,o=my-company is a member of the group cn=SalesGroup,ou=Sales,o=My-Company.
Another way is to perform a base-level search and specify the dirxMember attribute in the filter. For example:
dirxcp> search cn=Employees1,O=My-Company -base –fi \
 {dirxmember=cn=reichel,ou=sales,o=my-company}
The sample output is as follows:
1) cn=Employees1,o=My-Company
If the DN of the group is returned, the filter has matched and indicates that the entry is a member of the nested group.
Searching for a Group’s DirxMember
To search for the dirxMember of a group, specify the dirxMemberOf attribute in the dirxcp search filter. For example:
dirxcp> search o=My-Company -sub -fi (dirxMemberOf= cn=Employees1,o=My-Company) -p
The sample output is as follows:
1)cn=Reichel,ou=Sales,o=My-Company
2)cn=Richter,ou=Sales,o=My-Company
3)cn=Digger,ou=Development,o=My-Company
4)cn=Filler,ou=Development,o=My-Company
5)cn=Morton,ou=Development,o=My-Company
6)cn=Tinker,ou=Development,o=My-Company
7)cn=Hohner,ou=Sales,o=My-Company
8)cn=Mayer,ou=Sales,o=My-Company
As you can see in this search example, the member with the DN cn=non-existing-user,o=My-Company is not part of the result, because a search result shows only the DNs of entries which really exist.
Determining a Nested Group’s Imported Groups
To return the complete import hierarchy of a nested group, specify the dirxImportedGroups attribute in the dirxcp search operation. For example:
dirxcp> search cn=Employees1,o=My-Company -base -attr dirxImportedGroups -p
The sample output is as follows:
1) cn=Employees1,o=My-Company
    dirxImportedGroups : 1- cn=Employees1,o=My-Company
                       : 2-- cn=SalesGroup,ou=Sales,o=My-Company
                       : 2-- cn=DevelopmentGroup,ou=Development,o=My-Company
Adding a Member to a Nested Group
To add a member to a nested group, either add a new value to the local member attribute or add a new value to the member attribute in one of the imported groups. No matter which method you choose, be aware that adding a new member value may change the membership of other nested groups.
The following dirxcp modify operation adds a new value to the member attribute locally in the nested group cn=Employees1:
dirxcp> modify cn=Employees1,o=My-Company \
-add {member=cn=Abele,ou=Sales,o=My-Company}
The following dirxcp modify operation adds a new value to the member attribute in the nested group cn=SalesGroup:
dirxcp> modify cn=SalesGroup,ou=Sales,o=My-Company \
-add {member=cn=Abele,ou=Sales,o=My-Company}
Independent of the method used, the nested group cn=Employees1 now incorporates the new member:
dirxcp> search cn=Employees1,o=My-Company -base -attr dirxMember -p
The sample output is as follows:
1) cn=Employees1,o=My-Company
    dirxMember : cn=non-existent-user,o=My-Company
               : cn=Reichel,ou=Sales,o=My-Company
               : cn=Richter,ou=Sales,o=My-Company
               : cn=Digger,ou=Development,o=My-Company
               : cn=Filler,ou=Development,o=My-Company
               : cn=Morton,ou=Development,o=My-Company
               : cn=Tinker,ou=Development,o=My-Company
               : cn=Hohner,ou=Sales,o=My-Company
               : cn=Mayer,ou=Sales,o=My-Company
               : cn=Abele,ou=Sales,o=My-Company
Removing a Member from a Nested Group
Removing a member from a nested group can be challenging in a complex nested group configuration because you may need to remove a member from multiple imported groups to delete the membership in the nested group.On the other hand, deletion of a member may also change the membership of other nested groups.
In this example, the member cn=Mayer,ou=Sales,o=My-Company is removed from the nested group cn=Employees1 by simply removing cn=Mayer,ou=Sales,o=My-Company as a member of the group cn=SalesGroup.For example:
dirxcp> modify cn=SalesGroup,ou=Sales,o=My-Company \
-rem {member=cn=Mayer,ou=Sales,o=My-Company}
Working with Dynamic Groups
This section describes how to set up and maintain dynamic groups.A dynamic group is defined as an entry with the structural object class dirxGroupOfURLs and zero or more dirxMemberUrl attribute values.Each dirxMemberUrl value describes a set of entries in the local DSA by its search expression.The set union of these entries build the members of the dynamic group.An entry is considered to be a member of the dynamic group if it falls within the search scope and matches the search filter of at least one dirxMemberUrl value.Only entries with DSE-Type ENTRY can be member of a dynamic group.
The DirX Directory DSA’s access control decision function and the user policy management function support dynamic groups.That is the DN of a dynamic group can be specified in the user group component of an ACI-Item respectively username component of a user policy and will be recognized as a dynamic group.At run time the attributes of the evaluated entry respectively user are evaluated against the dirxMemberUrl values of the dynamic group.Make sure that the attributes applied in the search filter cannot be modified by the users themselves.Otherwise, they could inadvertently become member of a dynamic group by modifying the attributes in their entries.
About the dirxGroupOfURLs Object Class
The dirxGroupOfURLs structural object class defines a dynamic group.A combination with the auxiliary nested group object class dirxImportGroup is not supported.
About the dirxMemberUrl Attribute
The dirxGroupOfURLs object class uses the multi valued attribute dirxMemberUrl to define the LDAP search expression. The members are specified by a base DN, the scope of the search and a search filter. There is no need to maintain a list of members manually. Group membership is calculated by the definition of LDAP search expression each time when group membership is evaluated. See the DirX Directory Syntaxes and Attributes for more details about the dirxMemberUrl attribute and its syntax. Also some restrictions may apply to the used attribute types and filter expressions. Please refer to the actual DirX Directory Release Notes of your deployed DirX Directory server.
Configuring Attribute Indices for the Attributes in the Search Filter
For searching and listing the members of a dynamic group it is highly recommended to perform appropriate index configuration for the attributes specified in the search filter. See the dirxadm db attrconfig operation in the DirX Directory Administration Reference for more information on how to optimize search filter operations with attribute indices.
Creating a Dynamic Group
The following dirxcp create operation creates a new dynamic group. The dirxMemberUrl value specifies o=My-Company as the search base, value sub as the search scope which will incorporate all entries below the search base and the search filter (&(l=sunnyvale)(title=senior*)).
dirxcp> create cn=DG1,o=My-Company
{objectClass=dirxGroupOfUrls}
{dirxMemberUrl=ldap:///o=My-Company??sub?(&(l=sunnyvale)(title=senior*))}
Listing all Members of a Dynamic Group
To display all members of a dynamic group, request the attribute dirxMember in the dirxcp show or search operation. For example to display all members of the dynamic group cn=DG1,o=My-Company, run the following search operation:
dirxcp> search cn=DG1,o=My-Company –base –attr dirxMember –pretty
The sample output is as follows:
1) cn=DG1,o=My-Company
    dirxMember : cn=Lilin Markham,ou=Accounting,o=My-Company
               : cn=Winston Yoakum,ou=Accounting,o=My-Company
               : cn=Arluene Management,ou=Accounting,o=My-Company
               : cn=Shandeigh Combaz,ou=Accounting,o=My-Company
               : cn=Ayn Skedelsky,ou=Product Development,o=My-Company
               : cn=Andrew Herring,ou=Human Resources,o=My-Company
               : cn=Les Dagg,ou=Payroll,o=My-Company
               : cn=Alfreda Swanston,ou=Payroll,o=My-Company
Please take into account that all members will be returned in one result and this fact may lead into memory shortage situations in the DirX Directory DSA and in the DirX Directory LDAP server if the list of dirxMember values becomes very large.
Searching for Members of a Dynamic Group
Another way to retrieve members of a dynamic group is to specify the attribute dirxMemberOf in the search filter. This method has the advantage that it can be combined with the simple paging mechanism and depending on the page size the result is delivered in multiple pages and thus reduces overall peak memory consumption.
The following example shows how to search for the members of dynamic group cn=DG1,o=My-Company by specifying attribute dirxMemberOf in the search filter.
dirxcp> search / -sub -fi {dirxMemberOf=cn=DG1,o=My-Company} -p
The sample output is as follows:
 1) cn=Lilin Markham,ou=Accounting,o=My-Company
 2) cn=Winston Yoakum,ou=Accounting,o=My-Company
 3) cn=Arluene Management,ou=Accounting,o=My-Company
 4) cn=Shandeigh Combaz,ou=Accounting,o=My-Company
 5) cn=Ayn Skedelsky,ou=Product Development,o=My-Company
 6) cn=Andrew Herring,ou=Human Resources,o=My-Company
 7) cn=Les Dagg,ou=Payroll,o=My-Company
 8) cn=Alfreda Swanston,ou=Payroll,o=My-Company
The next example shows how to search for the members of dynamic group cn=DG1,o=My-Company by specifying attribute dirxMemberOf in the search filter in combination with simple paging.
dirxcp> search / -sub -fi {dirxMemberOf=cn=DG1,o=My-Company} –p –vtype simple –vpagesize 4
The sample output displays the first page of the result:
 1) cn=Lilin Markham,ou=Accounting,o=My-Company
 2) cn=Winston Yoakum,ou=Accounting,o=My-Company
 3) cn=Arluene Management,ou=Accounting,o=My-Company
 4) cn=Shandeigh Combaz,ou=Accounting,o=My-Company
Incomplete operation:
    Partial-Outcome-Qualifier
      Query-Reference : \0x00\0x00\0x00\0x10
To display the next page of the result perform a nextpage operation:
dirxcp> nextpage –vpagesize 4 –p
dirxcp displays the next page of the sample output:
 1) cn=Ayn Skedelsky,ou=Product Development,o=My-Company
 2) cn=Andrew Herring,ou=Human Resources,o=My-Company
 3) cn=Les Dagg,ou=Payroll,o=My-Company
 4) cn=Alfreda Swanston,ou=Payroll,o=My-Company
Searching for Group Membership in Dynamic Groups
To search for an entry’s membership in dynamic groups specify the dirxMember attribute in the dirxcp search filter. For example:
dirxcp> search / -sub -fi {dirxMember=cn=Winston Yoakum,ou=Accounting,o=My-Company} -p
The sample output is as follows:
1) cn=DG1,o=My-Company
Listing User Membership in Dynamic Groups
To list the dynamic groups to which an entry belongs, explicitly request attribute dirxMemberOf in the dirxcp search or show request.
In the following example requesting the attribute dirxMemberOf shows in which dynamic group(s) the entry cn=Winston Yoakum,ou=Accounting,o=My-Company is member of:
dirxcp> search {cn=Winston Yoakum,ou=Accounting,o=My-Company} -base
-attr dirxmemberof -p
In the sample output you can see that Winston Yoakum belongs to the dynamic group cn=DG1,o=My-Company:
1) cn=Winston Yoakum,ou=Accounting,o=My-Company
    dirxMemberOf : cn=DG1,o=My-Company
Determining Specific Entry Dynamic Group Membership
There are several ways to determine the membership of a specific entry in a specific dynamic group. One method is to perform a dirxcp compare operation.
In the following example the result M=TRUE indicates that the DN cn=Winston Yoakum,ou=Accounting,o=My-Company is a member of the dynamic group cn=DG1,o=My-Company:
dirxcp> compare cn=DG1,o=My-Company -attr {dirxMember=cn=Winston Yoakum,ou=Accounting,o=My-Company}
The sample output is as follows:
M= TRUE
The compare operation can be arranged in another way. For example:
dirxcp> compare {cn=Winston Yoakum,ou=Accounting,o=My-Company} -attr {dirxMemberOf=cn=DG1,o=My-Company}
M= TRUE
An alternative way is to perform a base level search against the dynamic group and specify the dirxMember attribute in the filter. For example:
dirxcp> search cn=DG1,o=My-Company -base -fi {dirxMember=cn=Winston Yoakum, ou=Accounting, o=My-Company} –p
The sample output displays the name of the dynamic group cn=DG1,o=My-Company that Winston Yoakum belongs to:
1) cn=DG1,o=My-Company
If the DN of the group is returned, the filter matched and indicates that the entry is a member of the dynamic group as shown in the example above.
Another way to evaluate the group membership is to perform a base level search with attribute dirxMemberOf in the filter. For example:
dirxcp> search {cn=Winston Yoakum,ou=Accounting,o=My-Company} -base -fi {dirxMemberOf=cn=DG1,o=My-Company} –p
The sample output displays the name of member Winston Yoakum:
1) cn=Winston Yoakum, ou=Accounting, o=My-Company
If the DN of the entry is returned, the dirxMemberOf filter matched and indicates that the entry is a member of the dynamic group as shown in the example above.
Performance Considerations
This section discusses the performance of several operations for determining dynamic group membership.
Listing versus Searching Members of a Dynamic Group
Requesting the attribute dirxMember in a search operation from a dynamic group will internally perform a search operation using the filter from the dirxMemberUrl attribute; for example search DN-of-Dynamicgroup -base -attr dirxMember. The duration of the search, the CPU load and the main memory utilization depends on the number of dirxMemberUrl attribute values (each value launches a search operation), the size of your database, the attribute index configuration and the number of resulting dirxMember values. In case of a large number of resulting dirxMember values, it would be better to perform a search operation with dirxMemberOf specified in the filter and simple paging; for example *search / -sub -fi dirxMemberOf=*DN-of-Dynamicgroup -vtype simple -vpagesize Page-Size. This operation will not perform faster, but it will be easier - due to less memory consumption - to handle a very large number of members of the dynamic group.
Anyway avoid to request attribute dirxMember where multiple dynamic groups will show up in the search result; for example search / -sub -fi (objectclass=dirxGroupOfURLs) -attr dirxMember.
In case it is intended to obtain the list of dirxMember values for the purpose of dynamic group membership evaluation for a specific entry, then the compare operation is the better solution.
Searching for Group Membership in Dynamic Groups
The duration of a search request with the attribute dirxMember in the search filter increases with the number of dynamic groups; for example search / -sub -fi (dirxMember=cn=admin,o=My-Company). That is, for every known dynamic group the entry specified in the dirxMember assertion is checked explicitly for membership match against the dynamic group. The more dynamic groups are present the longer the search will last. If it is intended to list the number of dynamic groups an entry belongs to, then start a base level search and request attribute dirxMemberOf. Typically, this will perform better than search with dirxMember in the filter.
Listing User Membership in Dynamic Groups
Requesting attribute dirxMemberOf shows the membership in dynamic groups of the entry; for example search cn=admin,o=My-Company -base -attr dirxMemberOf. The duration of this operation will increase with the number of existing dynamic groups. That is, for every known dynamic group, membership is evaluated against every entry in the result. For base level searches the duration for this operation might be still acceptable. In tree searches with a large amount of resulting entries requesting attribute dirxMemberOf is not recommended.
Determining Specific Entry Dynamic Group Membership
All the operations to determine the membership of a specific entry in a specific dynamic group perform very well because they evaluate only one dynamic group and one entry. These operations are:
-
Compare dynamic group with attribute dirxMember; for example
compare cn=DG1,o=My-Company –attr {dirxMember=cn=Winston Yoakum, ou=Accounting, o=My-Company} -
Compare entry with attribute dirxMemberOf; for example
compare {cn=Winston Yoakum, ou=Accounting, o=My-Company} –attr {dirxMember=cn=DG1, o=My-Company} -
Base level search of dynamic group with attribute dirxMember in the filter; for example
search {cn=DG1, o=My-Company} -base -fi {dirxMember=cn=Winston Yoakum, ou=Accounting, o=My-Company} -
Base level search of an entry with the attribute dirxMemberOf in the filter; for example
search { cn=Winston Yoakum, ou=Accounting, o=My-Company } -base -fi {dirxMemberOf=cn=DG1, o=My-Company}
Dynamic Groups versus Static Groups
Static groups using the structural object class groupOfUniqueNames are not highly optimized.Determining group membership and modifications to the uniqueMember attribute increases with the number of values.As a result, we recommend avoiding this kind of static group if possible.In the following discussion and comparison, groupOfUniqueNames will not be considered.
Static groups using the object class groupOfNames are highly optimized.Even with millions of member attribute values, the time for determining group membership and updating values remains constantly low.Pure static groups perform best in determining group membership of an entry.The only drawback is bulk updates with thousands of value changes in one operation in combination with a member attribute index configuration.In the worst case, this operation can lead to main memory or DBAM cache bottlenecks.
Nested static groups using the object class groupOfNames plus the auxiliary class dirxImportGroup perform almost as well as pure static groups.There can be an advantage in updating the groups, because a smart construction of nested groups can reduce the overall number of required updates compared with a pure static group construction.But there is a slight disadvantage in the access time for determining group membership which increases with the depth of the nested group hierarchy.
In dynamic groups, membership is defined by the specification of one more LDAP search expressions consisting of a base DN, a scope and a search filter.The explicit maintenance of static lists of members is not necessary.Dynamic groups perform best in updating the member list because there is no effort at all to maintain a static list of members.The time for determining group memberships depends on many factors, including the complexity of the search filter, the matching rules of the attributes in the filter items, and the complexity and size of the entry under evaluation.Compared with nested static groups, dynamic groups can keep up with determining group membership if the search filter is simple and can even outperform nested static groups if the depth of the nested group hierarchy is too high.
Managing Huge Search Results
Huge search results can exhaust DirX Directory system resources.To avoid this situation, the size limit for search operations is set to 2048 result entries by default.(See the SL=size_limit component of the User Policy attribute in the DirX Directory Syntaxes and Attributes for details.)
You can also adjust the size limit of the search operation in the following ways:
-
For DAP binds, by performing a dirxcp args operation that specifies a size limit.(See the args (dirxcp) reference page in the DirX Directory Administration Reference for details.)
-
For LDAP binds, by performing a dirxcp ldapargs operation that specifies a size limit.(See the ldapargs (dirxcp) reference page in the DirX Directory Administration Reference for details.)
-
For LDAP binds, by specifying the size limit in the LDAP Search Service Controls attribute.(See the DirX Directory Syntaxes and Attributes for details.)
You can manage the return of huge search results with simple paging.For paged searches, the size limit for the maximum number of result entries is 16384 by default.(See the PRSL=paged_result_size_limit component of the User Policy attribute in the DirX Directory Syntaxes and Attributes for details.) The maximum number of result entries per page is 2048 by default.(See the SPL=single_page_limit component of the User Policy attribute in the DirX Directory Syntaxes and Attributes for details.)
If you expect huge search results, use dirxcp obj search and dirxcp obj nextpage in the following sequence to perform a paged search:
-
Perform an initial search operation with simple paging, for example
dirxcp> obj search o=My-Company –subtree
                        –vtype SIMPLE
                        –vpagesize 15
                        -vsortkey cn
(See the DirX Directory Administration Reference for details on the options of the obj search operation.)
-
Perform several subsequent obj nextpage operations to read all pages of the search result, for example:
dirxcp> obj nextpage –vpagesize 15
(See the DirX Directory Administration Reference for details on the obj nextpage operation.)
If the last entry of a page is the partial-outcome-qualifier, there is at least one follow-up page for this search result that can be read with an obj nextpage operation. (See the Partial-Outcome-Qualifier attribute syntax in the DirX Directory Syntaxes and Attributes for details.)
If the last entry of a page is a real search result entry (and not the partial-outcome-qualifier), all pages of the search result have been read.
After reading the last page of a paged search result, the server discards the entire search result.
-
Alternatively, you can abort reading the pages of the search result with the command:
dirxcp> obj nextpage –terminate
The server discards the entire search result.
The server also discards the entire simple page search result when:
-
The time period specified in the Paging Policy attribute has expired since the last recent obj search or obj nextpage operation.(See the Paging Policy attribute in the DirX Directory Syntaxes and Attributes for details.)
-
The client performs an obj unbind operation.
The DirX Directory Administration Reference provides detailed information about the dirxcp obj nextpage operation and the options for the dirxcp obj search operation performing simple paging.
The server uses the lowest limits when performing the search operation.
Enabling NAT Support in PSAP Addresses
In a distributed environment, it is necessary to store the presentation (PSAP) addresses of the DSAs participating in the network; for example, in the cooperating DSA table and knowledge attributes.The DSAs use these PSAP addresses to perform shadowing (DISP) and chaining (DSP).Usually these PSAP addresses are globally valid.However, it is possible that behind a firewall, the PSAP addresses are valid only locally.When communicating with a DSA behind such a firewall, Network Address Translation (NAT) must be taken into account.
The following example illustrates such a configuration.
Recall My-Company’s network configuration described in previous chapters:
-
Headquarters in Munich with DSA1 (My-Company Sales and Development department) and DSA2 (shadow consumer of DSA1).(See the chapter “Creating a Shadow DSA” for details.)
-
The manufacturing plant in Durach with DSA3 (My-Company Manufacturing department).(See the chapter “Distributing the DIT across Multiple DSAs” for details.)
-
The acquired sales partner, the STU Company in Boston (STU Sales department).(See the chapter “Multireplication” for details.)

As shown in the figure above, the internal networks at the locations Munich, Durach and Boston are protected by firewalls that perform network address translation. For example, DSA1 must be addressed from outside the My-Company local network in Munich using the IP address 139.25.13.10. The firewall redirects the IP packages to the address that is valid within the Munich network; that is, to 123.45.67.89. The firewall does not replace such IP addresses contained in application protocol data; for example, when transferring a referral or replicating the cooperating DSA table.
To resolve this issue, DirX Directory supports the optional use of DNS components in attributes with Presentation-Address attribute syntax (PSAP). If a DNS component is contained in a PSAP address, a DSA will use the name resolution provided by the system instead of using the network address (NA component) contained in the PSAP.
In My-Company’s network configuration, the administrators store the DNS component names “HQMUCDSA1” for DSA1, “DURDSA3” for DSA3 and “BOSDSA4” for DSA4 together with their connection data in a name service. It is not necessary to store the DNS component name of DSA2 in the name service because DSA2 just communicates with DSA1 inside the internal network. Thus DSA3 and DSA4 cannot communicate with DSA2. When performing DISP or DSP, DirX Directory automatically reads the correct IP address from the name service. See the section “Presentation-Address” in the chapter “String Representations for DAP Binds” in the DirX Directory Syntaxes and Attributes for information about how DirX Directory stores the DNS component of DSAs.
My-Company has stored the following values for the PSAP addresses in the cooperating DSA table and the knowledge references:
-
DSA1:
{TS=DSA1,NA='TCP/IP_IDM!internet=123.45.67.89+port=19999',DNS=HQMUCDSA1+19999} -
DSA2:
{TS=DSA2,NA='TCP/IP_IDM!internet=198.76.54.32+port=21111'} -
DSA3:
{TS=DSA3,NA='TCP/IP_IDM!internet=111.22.33.44+port=23333',DNS=DURDSA3+23333} -
DSA4:
{TS=DSA4,NA='TCP/IP_IDM!internet=111.22.33.55+port=24444',DNS=BOSDSA4+24444}
Recall from the chapter “Distributing the DIT across Multiple DSAs” that the employees’ master entries of the manufacturing department are stored at DSA3 in Durach:
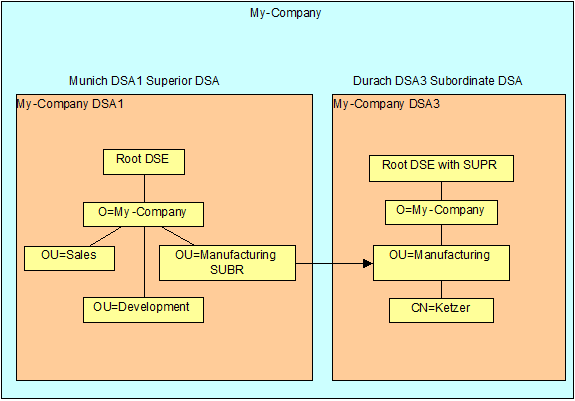
Now the administrator of DSA1 reads Mr.Ketzer’s entry.DSA1 performs the following steps to read Mr.Ketzer’s entry from DSA3:
-
DSA1 reads the PSAP address value of DSA3 in the specific knowledge attribute of the subordinate reference (SUBR) for the OU=Manufacturing.
-
DSA1 uses the DNS component name DURDSA3 to request the correct IP Address from the name service.
-
DSA1 uses the port number 23333 and the IP address (139.25.13.11) received from the name service to read Mr.Ketzer’s entry from DSA3 via DSP protocol (chaining).
Creating a Mixed IP Version Configuration
Starting with version V8.1, DirX Directory supports Internet Protocol version 6 (IPv6) for the IDM stack; that is, a DirX Directory DSA newer than DirX Directory V8.1 can communicate over IPv6 and Internet Protocol version 4 (IPv4) simultaneously.The following rules and restrictions apply for IPv4 and IPv6 communication:
-
Only the IDM stack provides IPv6 functionality.IPv6 functionality is not available for the OSI stack.
-
For IPv6 traffic, it is highly recommended to run all DSAs on dual-stack machines, which provide the IPv4 and IPv6 stacks on a single socket.This configuration ensures maximum flexibility concerning connecting different types of DSAs; for example, DSAs older than V8.1, with DSAs V8.1 or newer.
-
The setting of the environment variable DIRX_IP_STACK specifies for which IP version of incoming traffic the DirX Directory servers listen.Make sure that you do not set this environment variable to a value that your system does not provide.(See the chapter "Environment Variables" in the DirX Directory Administration Reference for details.)
-
The setting of the DNS component of the PSAP address attribute values specifies the IP version of outgoing traffic to other DSAs.(See the section "Presentation Address" in the chapter "DirX Directory String Representation for DAP Binds" in the DirX Directory Syntaxes and Attributes for details.)
-
You must ensure that the name service is configured correctly; that is, if two DSAs are to communicate via the IPv6 stack, the name service must return their IPv6 addresses correctly.If dual-stack communication is used, the name service must return the IPv4 and IPv6 addresses of all dual-stack machines.
You can check to see whether the name service is configured correctly by performing the command dirxhostinfo -I (this is an uppercase i) [hostname].This command queries the name service for all IPv4 and IPv6 addresses for the hostname specified.If the result does not deliver an IPv6 address, this host either does not have an IPv6 address or the name service is configured incorrectly.In both cases, IPv6 communication will fail.(See the dirxhostinfo reference page in the DirX Directory Administration Reference for more details.)
The following example illustrates how to set up and configure a mixed IPv4 and IPv6 communication environment.
Recall My-Company’s network configuration from the previous chapters:
-
Headquarters in Munich with DSA1 / DNS component name: HQMUCDSA1 (My-Company Sales and Development department) and DSA2 / DNS component name: HQMUCDSA2 (shadow consumer of DSA1). (See the chapter “Creating a Shadow DSA” for details.)
-
The remote manufacturing plant in Durach with DSA3 / DNS component name: DURDSA3 (My-Company Manufacturing department). (See the chapter “Distributing the DIT across Multiple DSAs” for details.)
-
The acquired sales partner, the STU Company in Boston (STU Sales department). (See the chapter “Multireplication” for details.)
Headquarters in Munich wants to add the new DSA in Boston DSA4 / DNS component name: BOSDSA4 to its configuration. Recall from the chapter "Multireplication" that My-Company and STU Company decide to replicate My-Company’s Sales and Development employee directory on the DSA in Boston, and to replicate the STU Company’s employee directory on the DSA in Munich.
While the connections between DSA1 (HQMUCDSA1) in Munich and the new DSA4 (BOSDSA4) in Boston will use the IPv6 protocol, the connections between DSA1 and DSA2 in Munich and DSA3 in Durach run over IPv4 protocol. The following figure illustrates this configuration:
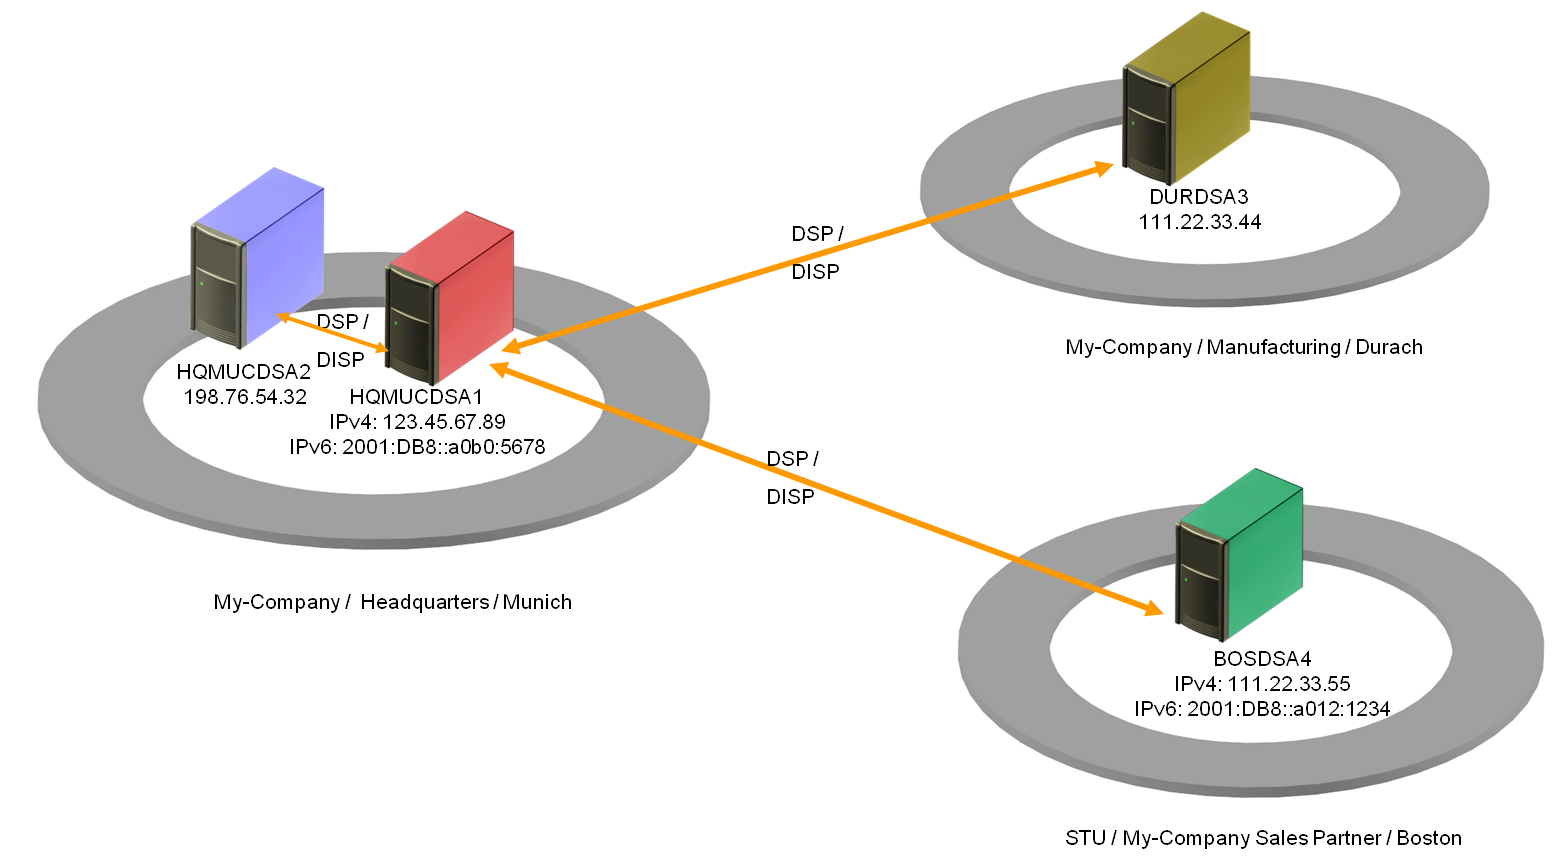
The administrators perform the following steps to connect the new BOSDSA4 to the existing My-Company network:
-
Upgrade HQMUCDSA1 to DirX Directory V8.1 or newer (dual-stack machine). The new BOSDSA4 must also install DirX Directory V8.1 or newer to use IPv6.
-
Set the environment variable DIRX_IP_STACK=all on both DSAs. This value enables HQMUCDSA1 and BOSDSA4 to accept incoming connections over IPv4 and IPv6 protocol.
-
Configure the name service:
On the machines running HQMUCDSA1 and BOSDSA4, the administrators must configure the name service so that the name resolution process returns all IPv6 and IPv4 addresses. (See your operating system documentation for instructions on how to configure the name service.) The administrators perform the dirxhostinfo command to check the name service configuration on both sides. (Both commands should return the IPv4 and IPv6 addresses. The addresses must be the same on both machines unless you have some NAT or proxy relays in between them.)
The administrators in Munich and Boston perform the commands:
dirxhostinfo -I hqmucdsa1
The command output is as follows:
CanonicalHostname: hqmucdsa1.mycompany.com
Found HostIP6: 2001:DB8::a0b0:5678
Found HostIP4: 123.45.67.89
dirxhostinfo -I bosdsa4
The command output is as follows:
CanonicalHostname: bosdsa4.stu.com
Found HostIP6: 2001:DB8::a012:1234
Found HostIP4: 111.22.33.55
The command output shows that the name service is configured correctly because it provides the IPv6 and the IPv4 addresses.
-
The administrators use the following values for the PSAP addresses in the cooperating DSA table (when creating shadowing agreements), the knowledge references, and their own PSAP in DIRX_OWN_PSAP:
-
HQMUCDSA1:
{TS=DSA1,NA='TCP/IP_IDM!internet=123.45.67.89+port=19999',DNS=HQMUCDSA1+19999:6} -
HQMUCDSA2:
{TS=DSA2,NA='TCP/IP_IDM!internet=198.76.54.32+port=21111'} -
DURDSA3:
{TS=DSA3,NA='TCP/IP_IDM!internet=111.22.33.44+port=23333',DNS=DURDSA3+23333} -
BOSDSA4
{TS=DSA4,NA='TCP/IP_IDM!internet=111.22.33.55+port=24444',DNS=BOSDSA4+24444:6}
-
The PSAP addresses of the DSAs HQMUCDSA2 and DURDSA3 remain unchanged.These DSAs are not upgraded and run older versions of DirX Directory.The communication from and to these DSAs uses IPv4 protocol.HQMUCDSA2 and DURDSA3 use the IPv4 address set up in the NA component of HQMUCDSA1 if their name service does not return a correct IPv4 address.
The upgraded HQMUCDSA1 and the new BOSDSA4 are able to handle the communication over IPv4 and IPv6 simultaneously.By specifying the IP version :6 in the PSAP address, the DSA is instructed to use IPv6 communication when establishing an outgoing connection to this partner DSA.Keep in mind that both of these DSAs should set up their correct IPv4 addresses in the NA component, because these addresses may be used to communicate over IPv4 protocol.
Encrypting X.500 Protocols
DirX Directory V8.2B and newer supports secure X.500 protocols by using SSL/TLS for the IDM stack.This variant of the communication stack is called IDMS within DirX Directory.All X.500 protocols—DAP, DSP and DISP—can be performed over IDMS between DirX Directory components of V8.2B and newer.
The DNS component of a PSAP address controls whether or not SSL/TLS is to be used for a particular X.500 communication.As a result, the internal content of the DNS component has changed in DirX Directory V8.2B (although the old DNS format continues to be supported for compatibility reasons).
To function properly, IDMS needs suitable key material to be installed and configured in the IDMS configuration files.Each entity that uses IDMS has its own configuration file located in the corresponding conf folder.For example, for the DSA process (dirxdsa), the file is located under install_path/server/conf, for the LDAP server process under install_path/ldap/conf and for dirxcp under install_path/client/conf.Note that the DirX Directory installation adds files with suitable key material in install_path/conf/IDMPSE.pem and testCA.der.The keys in these files are sufficient to perform IDMS based on the example key material.
The following rules apply for IDMS communication:
-
Only the IDM stack provides SSL/TLS functionality.Encrypted X.500 connections are not possible over the OSI stack.
-
The DNS subcomponent of the “own” address is used to initialize the IDMS security libraries. This address is defined by:
-
A DSA’s DIRX_OWN_PSAP environment variable
-
A DUA’s Self entry in dirxldap.cfg (for the DirX Directory LDAP Server) and dirxcl.cfg ( for the dirxcp command-line client).
-
If the DNS subcomponent contains an SSLPORT subcomponent with a value greater than 0, the IDM stack initializes the openssl libraries (read the key material and so on). In the DSA process, IDMS starts a communication listener on the port specified in SSLPORT. The DirX Directory processes can communicate over both variants: plain and encrypted IDM (IDMS). A DSA is can start listeners on two different ports: the port for plain IDM is always activated, the port for encrypted IDMS can optionally be activated.
-
To connect to a peer DSA, the initiator of the connection uses the DNS subcomponent of the remote DSA’s presentation address and its own initialization state. The remote address is defined by:
-
The PSAP address from a consumer-knowledge attribute for a shadow supplier DSA as an initiator
-
The PSAP address from a supplier-knowledge attribute for a shadow consumer DSA as an initiator
-
The PSAP address from references (XR, SUBR or SUPR) for a DSA in a distributed directory as an initiator
-
The contact DSA entry in dirxldap.cfg for the DUA in the LDAP server process
-
The named DSA entries in dirxcl.cfg for the DUA in dirxcp
-
The -psap option in a dirxcp bind operation
-
-
Secure X.500 protocols are only supported by DirX Directory components of version 8.2B and newer. However, because the PSAP addresses of all participating DSAs are distributed to all participating DSAs in a shadowing environment, all shadow consumer DSAs in a replication network must support the new DNS subcomponent structure introduced for IDMS. Apart from DirX Directory V8.2B and newer, this is the case only for DirX Directory V8.2A with patch level 8.6.351 or newer.
The following example illustrates how to set up and configure a mixed plain IDM and encrypted IDMS communication in an environment with DirX Directory V8.2A (build 8.6.351 or newer) and V8.2B and newer installations.
Planning the Encrypted X.500 Configuration
Recall My-Company’s network configuration from previous chapters:
-
My-Company’s headquarters is located in Munich. The site has two DSAs: DSA1’s DNS component name is HQMUCDSA1 (My-Company Sales and Development department) and DSA2’s DNS component name is HQMUCDSA2. DSA2 is a shadow consumer of DSA1. (See the chapter “Creating a Shadow DSA” for details.)
-
The remote manufacturing plant is located in Durach. The site has one DSA – DSA3 – with the DNS component name: DURDSA3 (My-Company Manufacturing department). (See the chapter “Distributing the DIT across Multiple DSAs” for details.)
-
The acquired sales partner, the STU Company in Boston (STU Sales department). This site has one DSA – DSA4 – with the DNS component name BOSDSA4 (See the chapter “Multireplication” for details.)
Headquarters in Munich wants to use the encrypted variant of the X.500 DISP replication protocol (IDMS) to BOSDSA4. Updates chained from the consumer BOSDSA4 to the supplier DSA HQMUCDSA1 via X.500 DSP are also required to be encrypted. Recall from the chapter "Multireplication" that the My-Company and STU companies decide to replicate My-Company’s Sales and Development employee directory on the DSA in Boston, and to replicate the STU Company’s employee directory on the DSA in Munich. While the connections between DSA1 (HQMUCDSA1) in Munich and DSA4 (BOSDSA4) in Boston will use IDMS, the connections between DSA1 and DSA2 in Munich and DSA3 in Durach will run over plain IDM. The following figure illustrates this configuration:
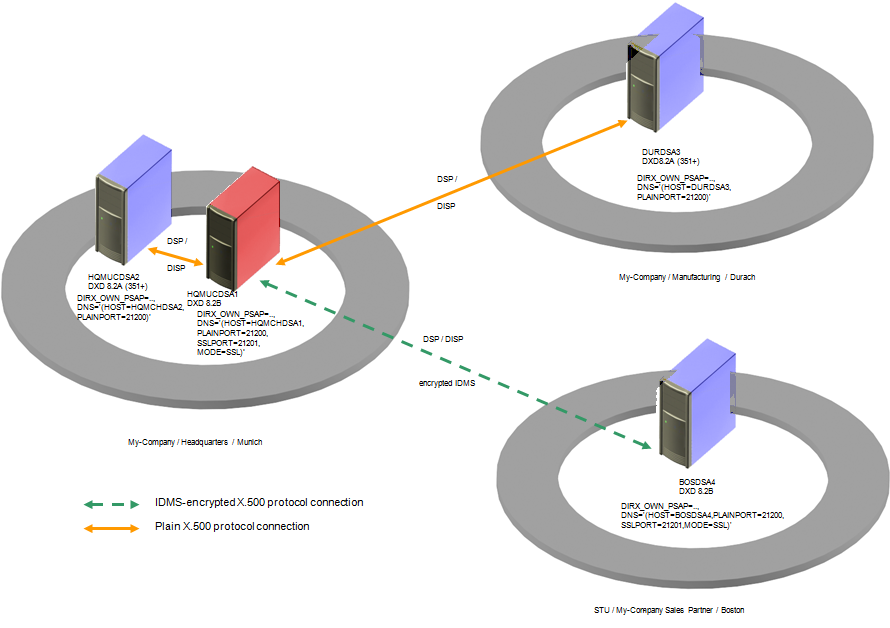
In the figure above, all DSAs contain the following values in their cooperating DSA attribute:
SUK: PSAP= ..., DNS='(HOST=HQMCHDSA1,PLAINPORT=21200,SSLPORT=21201,MODE=SSL)'
CK1: PSAP=..., DNS='(HOST=BOSDSA4,PLAINPORT=21200,SSLPORT=21201,MODE=SSL)'
CK2: PSAP=... ,DNS='(HOST=MUCDSA2,PLAINPORT=21200)'
CK3: PSAP=... ,DNS='(HOST=DURDSA3,PLAINPORT=21200)'
Setting up the Encrypted X.500 Configuration
To set up this configuration, the administrators must:
-
Upgrade the DirX Directory software on the DSAs to support IDMS
-
Set up the DSA presentation addresses
-
Create the shadowing agreements
The next sections describe these steps.
Upgrading the DirX Directory Software on the DSAs
The first step is for the administrators of the DSAs in Munich, Boston and Durach to upgrade their DSAs to DirX Directory software that supports IDMS:
-
The administrators of HQMUCDSA1 in Munich and BOSDSA4 in Boston upgrade their systems to DirX Directory V8.2B or newer.
-
The administrators of HQMUCDSA2 in Munich and DURDSA3 in Durach ensure that these DirX Directory V8.2A installations are upgraded to patch level 8.6.351 or newer to enable the DSAs on these hosts to be able to parse the DNS component syntax for IDMS communication contained in the PSAP addresses (keywords like HOST, SSLPORT, PLAINPORT, MODE and so on). The shadow supplier DSA distributes these PSAP addresses to all shadow consumer DSAs as part of the supplier and consumer knowledge values contained in the cooperating DSAs subentry. See the section Presentation-Address in the DirX Directory Syntaxes and Attributes for a complete description of DNS component syntax for IDMS.
Setting up the DSA Presentation Addresses
Next, the administrators set up each DSA’s DIRX_OWN_PSAP environment variable. DSA1 in Munich and DSA4 in Boston are to perform encrypted shadowing protocol.
On HQMUCDSA1 in Munich, the administrator sets the DIRX_OWN_PSAP environment variable to:
TS=DSA1,NA='TCP/IP_IDM!internet=1.2.3.4+port=1234', DNS='(HOST=HQMUCDSA1,PLAINPORT=21200,SSLPORT=21201,MODE=SSL)'
On BOSDSA4 in Boston, the administrator sets the DIRX_OWN_PSAP environment variable to:
TS=DSA1,NA='TCP/IP_IDM!internet=1.2.3.4+port=1234', DNS='(HOST=BOSDSA4,PLAINPORT=21200,SSLPORT=21201,MODE=SSL)'
These two values activate IDMS in the DSAs on HQMUCDSA1 and BOSDSA4 after the DSA processes are restarted. The DSAs on these hosts will start a listener for plain X.500 protocols over IDM on port 21200 and a listener for encrypted X.500 protocols over IDMS on port 21201 so that they are prepared to accept incoming secure X.500 protocols. Note that in DirX Directory, only the DNS component of the PSAP is used for addressing if it is contained in the PSAP address. The TS and NA components are ignored, but must be present due the X.500 attribute specification of the PSAP address. This is the reason that these examples have the NA value set to 1.2.3.4 with port 1234.
On HQMUCDSA2 in Munich and DURDSA3 in Durach, the DIRX_OWN_PSAP environment variable must not contain an SSLPORT subcomponent.
Creating the Shadowing Agreements
Now the administrator in Munich sets up the shadowing agreements on the shadow supplier DSA HQMUCDSA1.
First, he creates the encrypted shadow agreement to the consumer DSA in Boston with the dirxadm sob create command. In the supplierpsap option, he supplies the following value:
TS=DSA1,NA='TCP/IP_IDM!internet=1.2.3.4+port=1234', DNS='(HOST=HQMUCDSA1,PLAINPORT=21200,SSLPORT=21201,MODE=SSL)'
In the consumerpsap option, he supplies the following value:
TS=DSA1,NA='TCP/IP_IDM!internet=1.2.3.4+port=1234', DNS='(HOST=BOSDSA4,PLAINPORT=21200,SSLPORT=21201,MODE=SSL)'
These values result in encrypted X.500 DISP and DSP exchanges between the supplier and the consumer DSA as follows:
-
By specifying SSLPORT in the supplier PSAP address, all consumer DSAs receive the knowledge that the supplier DSA is listening on both IDM and IDMS ports.
-
By specifying MODE=SSL in the supplier PSAP address, all consumer DSAs receive the knowledge that the supplier DSA prefers communicating over IDMS. Therefore, a consumer DSA that supports IDMS (BOSDAS4 in the example) will connect to the IDMS port of the supplier DSA when initiating X.500 DSP connections for chaining.
-
By specifying MODE=SSL in the consumer PSAP address, the supplier DSA will connect to the IDMS port when initiating X.500 DISP connections.
The creation of this shadowing agreement - and any new shadowing agreements subsequently created on the supplier DSA - automatically distributes the updated cooperating DSAs subentry containing the DNs and the PSAPs of all DSAs that form the replication network to all DSAs listed as consumer DSAs in the subentry.
Next, the Munich DSA1 administrator creates the plain shadow agreements to the consumer DSAs in Munich headquarters (DSA2) and in Durach (DSA3).
In the supplierpsap option, he supplies the following value:
TS=DSA1,NA='TCP/IP_IDM!internet=1.2.3.4+port=1234', DNS='(HOST=BOSDSA4,PLAINPORT=21200,SSLPORT=21201,MODE=SSL)'
| The supplierpsap option can be omitted from the sob create command because the PSAP has already been associated with the supplier DSA’s distinguished name in the first shadowing agreement) |
In the consumerpsap option, he supplies the following value:
TS=DSA1,NA='TCP/IP_IDM!internet=1.2.3.4+port=1234', DNS='(HOST=MUCDSA2,PLAINPORT=21200)'
These values have the following effects:
-
The supplier DSA will connect to the IDM port when initiating X.500 DISP connections.
-
All consumer DSAs that do not support IDMS will ignore the specification of SSLPORT and SSL for MODE in the supplier’s PSAP address. These consumer DSAs (HQMUCDSA2 and DURDSA3 in the example) will connect to the IDM port of the supplier DSA when initiating X.500 DSP connections.
| All consumer DSAs in the replication network, regardless of whether they can support IDMS, must be able to parse the DNS component syntax for IDMS communication specified in the PSAP addresses/knowledge references given in the replicated cooperating DSA subentry. This is the reason why all DirX Directory installations that form a replication network must be at patch level 8.6.351 or newer. |
Switching Masters in the Encrypted X.500 Configuration
The DSA on host HQMUCDSA2 in the My-Company scenario can act as a standby master DSA: it has a full copy of the shadow supplier’s directory data and can be made the shadow supplier with the dirxadm sob switch operation. See the section “Switching Masters in a Running System” in the chapter “Creating a Shadow DSA” for details.
| Such a switch operation results in performing the replication to BOSDSA4 as plain X.500 DISP. If this is unacceptable for My-Company, the installation of HQMUCDSA2 must be upgraded to DirX Directory 8.2B or newer. |
Creating Customized Key Material
The DirX Directory installation creates IDMS configuration files and key material files that are sufficient to perform IDMS.However, if My-Company decides to use key material issued by its own Certification Authority to secure the DISP and DSP exchanges between HQMUCDSA1 and BOSDSA4, the following steps are required:
-
My-Company’s CA issues a PEM-formatted file with key material for each of the DSAs.These files contain the respective DSA’s private key, the DSA’s public key certificate and optionally the root CA certificate (see the installed key material file in install_path/server/conf/dirxIDM.pem as a template).These files are password-protected.
-
Copy the key material file to the machine and then configure the pathname in the idmssl.cfg file located in install_path/server/conf/idmssl.cfg.Enter the pathname of the key material file after the keyword idm_ssl_own_pse_file.
-
Create a new file, write the protection password into it and then configure the password file in the idmssl.cfg file located in install_path/server/conf/idmssl.cfg.Enter the pathname of the password file after the keyword idm_ssl_pwd_file.The password will be encrypted by the DSA after first use.
-
Copy the PEM-formatted root CA certificate of all CAs that issued key material for all communication peers to a trusted CA file on the machine.In this example, My-Company uses the same CA as the issuer for the keys for both peers; therefore, the trusted CA files on both machines must contain only this one Root CA certificate.Configure the Root CA Certificate pathname in the idmssl.cfg file located in install_path/server/conf/idmssl.cfg.Enter the pathname of the Root CA file after the keyword idm_ssl_trusted_ca_cert_file.
Changing Host IP Addresses of DirX Directory Servers
Changes to DirX Directory server host IP addresses – such as using a different DNS host name or using a different IP address or port number for a given host – that result from moving DirX Directory databases to new hardware or restructuring the network require administrative action to get the DirX Directory service up and running again in the new IP configuration.
The following elements of a DirX Directory installation contain DNS hostnames, IP addresses, and port numbers as PSAP addresses.These elements must be updated with new DNS names or target IP addresses should a change to a DirX Directory server host IP address become necessary:
-
The DIRX_OWN_PSAP environment variable
-
The LDAP server configuration file $DIRX_INST_PATH/ldap/conf/dirxldap.cfg
-
The dirxcp/dirxadm configuration file $DIRX_INST_PATH/client/conf/dirxcl.cfg
-
The My-Access-Point (MAC) attribute of the root DSE (/) (database content)
-
Supplier and consumer PSAP addresses in shadowing agreements (database content)
-
Reference entries (SUBR, SUPR, …) in a distributed DIT configuration (database content)
The DirX Directory Administration Reference and the DirX Directory Syntaxes and Attributes documents provide detailed information about these elements.
The next sections describe procedures for updating these elements in different DirX Directory service deployment scenarios. Before performing any of these procedures, a database backup should be created for all affected DSAs and the generated backup files should be verified and error free. See the description of the dirxbackup command in the DirX Directory Administration Reference for details on how to perform database backups.
Use DNS format as much as possible in PSAP addresses to make IP address changes easier in the future. When DNS format is used, the DirX Directory service calls the DNS resolver instead of using a hard-coded IP address.
The PSAP addresses of any reference entries (SUBR, SUPR, …) that are present in the database should also be updated with the new IP address information. This task can be performed any time since these entries are not affected by the procedures described below.
Changing IP Addresses in a Standalone DirX Directory Installation
To update a standalone DirX Directory installation with a changed IP address:
-
Stop the DirX Directory service. (See dirxadm sys stop in the DirX Directory Administration Reference for details.)
-
Start the dirxdsa process only, in administrative mode: call dirxdsa -a from a command shell.
-
Run the dirxadm remove_knowledges command (this command deletes all LOB and SOB agreements). This is a special command and only used in this case.
-
Stop the dirxdsa process: type <Ctrl>+C in its command shell.
-
Modify the DIRX_OWN_PSAP environment variable to add the new PSAP address with the new IP address.
-
Modify the LDAP server and client configuration files to add the new PSAP address with the new IP address.
-
Update the network configuration in the operating system to change to the required new host IP address.
-
Start the DirX Directory service as usual. (See dirxadm sys start in the DirX Directory Administration Reference for details.)
-
Run the dirxadm update_own_PSAP command to update the My-Access-Point (MAC) attribute of the root DSE (/). (This attribute is not automatically updated when the DIRX_OWN_PSAP environment variable is changed.) The dirxadm update_own_PSAP is a special command and only used in this case.
-
Check the My-Access-Point (MAC) attribute of the root DSE (/) by running the dirxadm show / -attr MAC command. The output should show a PSAP address that is identical to the DIRX_OWN_PSAP environment variable.
Changing Supplier IP Addresses in a Shadowing Scenario
To update a shadowing scenario when only the supplier IP address is changed:
-
Save all shadowing agreement data on the supplier.
-
Terminate and delete all shadowing agreements to all consumers on the supplier. Consumer DSAs must be up and running during these operations.
-
Perform all the steps described in the section "Changing IP Addresses in a Standalone DirX Directory Installation" on the supplier DSA. The supplier now has the new host IP configuration.
-
Recreate all necessary shadowing agreements with the new supplier PSAP address.
Changing Consumer IP Addresses in a Shadowing Scenario
To update a shadowing scenario when only a consumer IP address is changed:
-
Save the affected shadowing agreement data on the supplier.
-
Terminate and delete the shadowing agreements to this consumer on the supplier. The selected consumer must be up and running during these operations.
-
Stop the DirX Directory service on the selected consumer.
-
Modify the DIRX_OWN_PSAP environment variable on this consumer to add the new PSAP address with the new IP address.
-
Modify the LDAP server and client configuration files to add the new PSAP address with the new IP address.
-
Run dbamboot to reset the database on this consumer.
-
Update the network configuration in the operating system to change to the required new host IP address. The consumer now has the new host IP configuration and an empty database.
-
Start the DirX Directory service on the consumer.
-
Recreate all necessary shadowing agreements with the new consumer PSAP address.
Changing Supplier and Consumer IP Addresses in a Shadowing Scenario
To update a shadowing scenario when both supplier and consumer IP addresses are changed:
-
Save all shadowing agreement data on the supplier.
-
Terminate and delete all agreements to all consumers on the supplier.All consumers must be up and running during these operations.
-
Stop the DirX Directory service on the consumer(s).
-
Modify the DIRX_OWN_PSAP environment variable on the consumer(s) to add the new PSAP address with the new IP address.
-
Modify the LDAP server and client configuration files on the consumer(s) to add the new PSAP address with the new IP address.
-
Run dbamboot to reset the database on the consumer(s).
-
Update the network configuration in the operating system to change to the required new host IP address.The consumer(s) now has the new host IP configuration and an empty database.
-
Start the DirX Directory service on the consumer(s).
-
Perform all the steps described in the section "Changing IP Addresses in a Standalone DirX Directory Installation" on the supplier.The supplier now has the new host IP configuration.
-
Recreate all the necessary shadowing agreements with the new PSAP address.
Using Two-Factor Authentication (2FA)
Two-factor authentication (2FA) enhances service security by requiring two forms of identification for user access to a service.DirX Directory implements the time-based one-time password (TOTP) type of two-factor authentication for DirX Directory users.
In a TOTP-based 2FA DirX Directory configuration, TOTP 2FA-enabled DirX Directory users are expected to supply their passwords plus a 6-digit TOTP issued by a TOTP authenticator app on the user side when binding to a TOTP 2FA-configured DirX DSA.The user TOTP is based on the current time and a secret key (“TOTP secret”) shared between the DSA and the user. This TOTP secret is created by the DSA when a user is enabled for TOTP 2FA and is given to the user by the DirX Directory administrator because the user is not allowed to read/view the dirxTOTPSecret attribute from his own entry. The user in turn loads the received TOTP secret into the TOTP authenticator app, allowing the app to generate TOTPs for this user for TOTP 2FA authentication to the DirX Directory service.The authenticator app periodically updates the TOTP to be used for authentication; usually, every 30 seconds.
The next sections describe how to set up and manage the DirX Directory TOTP 2FA environment.For general information about TOTP 2FA, see RFC 6238: TOTP: Time-Based One-Time Password Algorithm.
Configuring the DirX DSA for TOTP 2FA
The steps to set up the DSA for TOTP 2FA are:
-
Configure the access control items (ACIs) for TOTP 2FA administrators to allow read/write access to TOTP 2FA-related object classes and attributes.
-
Ensure that the DSA’s TOTP validity period is the same as the TOTP validity period used by the authenticator app on the user side and adjust it on the DSA with the DIRX_DSA_TOTP_PERIOD environment variable as necessary.
-
Ensure that the clocks on the DirX DSA machine and TOTP 2FA user devices are closely synchronized (recommendation: to within 1-2 seconds difference), preferably via NTP server. For a 30-second TOTP validity period, even a 15-second difference between clocks can make TOTP 2FA binds impossible.
-
Use the environment variable DIRX_DSA_TOTP_ISSUER to specify the name of the provider associated with DSA TOTP secret generation if it is different from the default string DirX.
The next sections provide more detail.
Configuring TOTP 2FA Administrator ACIs
DirX Directory administrator(s) (DAP and LDAP) are responsible for enabling and disabling TOTP 2FA for DirX Directory users. To carry out their TOTP 2FA administration tasks, these administrators need read/write access to two TOTP 2FA-specific items in a user’s entry:
-
The dirxTOPUser object class, which the administrators add/remove to a user entry to enable/disable TOTP 2FA for the user
-
The dirxTOPSecret attribute, which the DSA creates and populates with a TOTP secret when a user is 2FA-enabled and which the administrator must read to get the TOTP secret and then send to the user
As a result, the ACI settings for DirX Directory administrators involved in TOTP 2FA management must be configured to allow read/write access to these items for all user entries. These administrators should be the only entities permitted this kind of access to these items.
The My-Company example database already contains the necessary access rights for the cn=admin,o=my-company user to configure TOTP 2FA for other users. Suppose this administrator wants to create a separate TOTP 2FA administrator
cn=admin2,o=my-company) and grant this administrator the necessary access rights for TOTP 2FA administration. To do this, he performs the following steps over DAP protocol:
-
Creates the user /o=my-company/cn=admin2 with dirxcp:
dirxcp> create /o=My-Company/cn=admin2 -attr OCL=ORP
SN=admin2 UP=dirx
-
Adds a new ACI item to the Prescriptive ACI attribute of the relevant Access Control Subentry (/o=My-Company/cn=AccessControl-Subentry) for the previously created admin2 entry:
dirxcp> modify /o=My-Company/cn=AccessControl-Subentry
-add {PACI={ID=Admin2: TOTP 2FA administrator rights,
       PR=254,
       AL={BL={L=SIMPLE}},
       UF={UC={N={DN={/O=My-Company/CN=admin2}}},
       UP={PI={E=TRUE}, GAD=grantRead+grantModify+grantReturnDN};
      {PI={AT=OCL;TOTPS,AAV=OCL;TOTPS},
           GAD=grantRead+grantAdd+grantRemove}}}}
Synchronizing the TOTP Period with the Authenticator App
Most TOTP authenticator apps change a user’s TOTP every 30 seconds. As a result, DirX Directory uses a default value of 30 seconds and specifies this default in the DirX environment variable DIRX_DSA_TOTP_PERIOD. If a TOTP authenticator in a DirX Directory TOTP 2FA scenario uses a different refresh period, you must modify the DIRX_DSA_TOTP_PERIOD environment variable to match the period used by the authenticator app.
Changing the TOTP Secret Issuer Name
The format for the TOTP secret used by the DirX DSA and recognized by most TOTP authenticator apps includes a parameter for specifying the provider associated with the TOTP secret. TOTP authenticator apps typically display this parameter along with the TOTP displayed for the user. By default, the DSA supplies the value DirX in this parameter when it creates the secret. To have the DSA supply a different value for subsequent display by an authenticator app, specify it in the environment variable DIRX_DSA_TOTP_ISSUER. For example, to have a TOTP authenticator app display My-Company along with user TOTPs for binding to a DSA, set the DSA’s DIRX_DSA_TOTP_ISSUER environment variable as follows:
DIRX_DSA_TOTP_ISSUER=My-Company
Setting up a QR Code Generator (Optional)
Administrators need to send the TOTP secret generated by the DSA to the 2FA-enabled user for loading into the user’s authenticator app. The app needs to have the user’s TOTP secret to be able to generate TOTPs for the user for binding to the DirX Directory service.
Most authenticator apps recognize the TOTP secret format used by the DSA and users can copy and paste this format into these apps without problems. However, we recommend setting up a QR code generator for converting DSA-generated TOTP secrets into QR codes for delivery to TOTP 2FA users. Although DirX Directory does not include a built-in QR code generator, there are many third-party options for generating QR codes available for use, and many of these options are free of charge.
Enabling TOTP 2FA for a User
To enable TOTP 2FA for a user, use the dirxcp [obj] modify command with the -add option to add the object class dirxTOTPUser to the user entry over DAP or LDAP. For example, the following command adds the object class dirxTOTPUser to the user entry cn=Tinker,ou=Sales,o=My-Company over LDAP:
dirxcp> modify cn=Tinker,ou=Sales,o=My-Company
-add objectClass=dirxTOTPUser
See the description of the dirxcp command in the DirX Directory Administration Reference for details on dirxcp command syntax and options.
When the DSA receives the modify request, it creates the attribute dirxTOTPSecret with a 32 byte, cryptographically-secure random secret value for the specified user. This value is encrypted in the database in AES-256 format.
Distributing the TOTP Secret to the User
Once you have enabled a user for TOTP 2FA, this user can no longer perform a simple bind with only his user password. Hence it is vital to share a user’s TOTP secret with them as soon as possible.
First, use the dirxcp [obj] search command to read the user’s dirxTOTPSecret attribute from the directory over DAP/LDAP. For example, over LDAP:
dirxcp> search cn=Tinker,ou=Sales,o=My-Company -base
-attr dirxTOTPSecret
This action returns the user’s TOTP secret decrypted into the format recognized by most authenticator apps (see the description of the DirX TOTPSecret attribute in the section “X.500 User Application Attributes” in the chapter “DirX Directory Attributes” in DirX Directory Syntaxes and Attributes for details on this format). For example, the result of the LDAP request above is:
{cn=Tinker,ou=Sales,o=My-Company
dirxTOTPSecret=otpauth://totp/cn=Tinker,ou=Sales,o=My-Company?issuer=DirX&secret=MGHBFTTMOWTS6FEKJ5PDXRXMAMRL2WJXA3SB2CJOPGQASD6GO4RQ====}
Now you can either send the secret to the user (for example, by email) in the format returned by the DSA, or (recommended) use the QR code generator you previously set up to convert the secret into a QR code and then send the QR code to the user.
The user then pastes or scans the received secret into the authenticator app, enabling it to generate TOTPs for the user and thus enabling the user to bind to the DirX Directory service with TOTP 2FA.
Binding with TOTP 2FA
A user can perform a TOTP 2FA bind with DAP or with LDAP. The password option format for a TOTP 2FA bind is:
-password password,totp
where password is the user’s password for simple binds and totp is the current TOTP that a TOTP authenticator app has generated for the user. For example, suppose the user cn=Tinker,ou=Sales,o=My-Company has the password dirx and the current TOTP issued by the authenticator app is 123456. The bind command over LDAP is:
dirxcp> bind -u cn=Tinker,ou=Sales,o=My-Company -proto ldapv3
-auth simple -password dirx,123456
The bind command over DAP is:
dirxcp> bind -user /O=My-Company/OU=Sales/CN=Tinker
-auth simple -password dirx,123456
See the description of the dirxcp command in the DirX Directory Administration Reference for details on command syntax and options.
Reusing a TOTP for a bind operation is not allowed; once a successful TOTP 2FA bind is made, the user must wait until the authenticator app displays a new TOTP.
Once a user makes a successful TOTP 2FA bind, they are authenticated at the strong ACI level.
Disabling TOTP 2FA for a User
To disable TOTP 2FA for a user, use the dirxcp [obj] modify command with the -rem option to remove the object class dirxTOTPUser from the user entry over DAP or LDAP. For example, the following command removes the object class dirxTOTPUser from the user entry cn=Tinker,ou=Sales,o=My-Company over LDAP:
dirxcp> modify cn=Tinker,ou=Sales,o=My-Company
-rem objectClass=dirxTOTPUser
The DSA automatically removes the dirxTOTPSecret attribute.
See the description of the dirxcp command in the DirX Directory Administration Reference for details on command syntax and options.
Generating a New TOTP Secret for a User
To generate a new secret for a user, remove the object class dirxTOTPUser and then add it again, as described earlier in this section. Be sure to send the new secret to the user after the DSA generates it.
Troubleshooting TOTP 2FA Bind Failures
Here are some common issues with TOTP 2FA bind failures and some possible solutions:
-
User TOTP 2FA configuration problems: Check the configured user password and TOTP secret for the user.
-
Clock synchronization problems: Make sure that the time difference between the user’s device and the server machine is very small. Recommendation is 1-2 seconds.
-
Problems with a TOTP secret: Try generating a new secret for the user by removing the object class dirxTOTPUser and then adding it again (see the sections above for details). Do not forget to distribute this new secret to the user.
-
User error: Check to make sure the user tried to authenticate using a TOTP. The user may have forgotten that they are a TOTP 2FA user and tried to authenticate without a TOTP.
-
TOTP period mismatch: Make sure the TOTP validity period in the user’s TOTP authenticator app is the same as the period specified in the DSA. Note that most TOTP authenticator apps only support a 30-second TOTP period.
-
Password option syntax error: Make sure the syntax used to supply the TOTP 2FA password option to dirxcp is correct (see the section on binding with TOTP 2FA for an example). See also the dirxcp [obj] bind operation description in the DirX Directory Administration Reference for details on command syntax and examples.
-
User TOTP 2FA configuration problems: Make sure that the user has both the object class dirxTOTPuser and the attribute dirxTOTPSecret.