Setting up the DirX Directory Service
Setting up a DirX directory service consists of three main tasks:
-
Installing the DirX Directory software
-
Setting up the DBAM database
-
Setting up the DirX Directory service software
The Release Notes describe how to install the DirX Directory software. The chapter "Getting Started with DirX Directory Setup" describes how to set up sample DBAM database configurations, one for Windows and one for Linux. This chapter describes how to set up the DirX Directory service after you have installed DirX Directory and set up the DBAM database.
Setting up the DirX Directory service software consists of the following tasks:
-
Setting up the DSA
-
Setting up the LDAP server
-
Loading directory data into the DSA
-
Starting the service
The chapter describes how to perform these tasks in the context of an example directory service configuration with the following characteristics:
-
The disk configuration for the DBAM database is the sample the Windows disk configuration described in the chapter "Getting Started with DirX Directory Setup".
-
The DSA is a stand-alone DSA—a DSA that has no superior or subordinate DSAs and manages the entirety of a DIT—with the following characteristics:
-
Its administrative point is at the organization level.
-
It only uses object classes and attribute types defined in the default DSA schema supplied with DirX Directory.
-
It uses simple access control policies for a default administrator and anonymous users.
-
-
The LDAP server has the following characteristics:
-
Its contact DSA is the sample stand-alone DSA.
-
It permits LDAP clients to make updates to the DBAM database.
-
It defines LDAP operation service controls that reflect a non-distributed environment.
-
The chapter uses a fictitious company called “My-Company” to illustrate the planning decisions and administrative tasks that are involved in setting up a DirX directory service. It discusses the planning considerations and decisions that My-Company must make before it can set up its service, and describes how to build My-Company’s service with the dirxadm, dirxcp, and dirxload programs.
Tcl scripts for building the sample stand-alone DSA and LDAP server can be found in the install_path/scripts/stand_alone directory. These Tcl scripts contain all the commands and procedures discussed in this chapter.
Setting up the DSA
Setting up the DSA consists of the following tasks:
-
Making the planning decisions that are necessary to define the DSA’s parameters and administrative framework
-
Bootstrapping the DSA
-
Initializing the DSA
The next sections describe these tasks.
Planning the DSA
My-Company is a German company that wants to set up a DSA that contains general information about its employees. All of the information about all of its employees can be stored in a single DSA. The company has no current plans to integrate this DSA into an existing DIT within Germany, but wants to ensure that it can do so in the future if company plans change. Consequently, My-Company chooses to set up its DSA as a stand-alone DSA with the appropriate mechanisms in place for future integration with other DSAs.
My-Company needs to make decisions in two areas before its administrators can begin to build their DSA:
-
It needs to define the schema
-
It needs to define a framework for DSA administration (DSA name, a default administrator, access rights, DUA configuration)
Defining the Schema
In order to define the DIT, the administrator must define:
-
The attribute types that will be used to store employee information
-
The object classes that will be used
The next question that the administrator must consider is:
Can I use the default DSA schema supplied with DirX Directory, or must I define my own attribute types and object classes?
The administrator determines that the default DSA schema is sufficient for the company’s use, and that he need not extend the DSA schema with custom attribute types and/or object classes. The administrator selects the following object classes from the default DSA schema to represent the company’s DIT structure:
-
The organization object class to represent the company
-
The organizational-unit object class to represent its departments
-
The organizational-person object class to represent the employees
The following figure illustrates this structure.
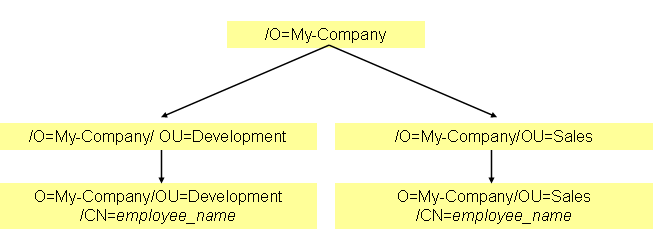
My-Company is represented as an object of object class organization (O) and is named by the organization-name My-Company, which results in the distinguished name O=My-Company.
Sales and Development are represented as objects of object class organizational-unit (OU). The two organizational units use the names Sales and Development as relative distinguished names (RDNs).
The employees are represented as entries of object class organizational-person (ORP). The entries for the employees are named by the common-name (CN) naming attribute type. Since a large number of employees are located within each organizational unit, My-Company must ensure that each employee is assigned a unique common-name within the organizational unit.
My-Company wants to store the following information in the DSA:
-
For the company as a whole, its name, a short description, a telephone number and the postal address
-
For either organizational unit, its name
-
For each employee, the name of the employee, a short description, the telephone number, an e-mail address and a user password
The standard object classes are associated with a set of standard attribute types that are allowed for the object class. These attribute types are sufficient to store all the information required by My-Company. The following table shows the attribute types of each object class that are used to store the required information in My-Company’s DSA.
| Object Class | Stored Information | Attribute Types | Stored Information |
|---|---|---|---|
organization |
company data |
organization-name |
company name |
description |
company description |
||
telephone-number |
company telephone no |
||
postal-address |
company address |
||
organizational-unit |
organizational unit data |
organizational-unit-name |
organizational unit name |
organizational-person |
employee data |
common-name |
employee name |
description |
employee description |
||
telephone-number |
employee telephone no |
||
user-password |
employee password |
||
e-mail address |
Defining the Administrative Framework
The next planning step for the administrator is to establish the administrative framework in which DSA administration will be performed. This planning process consists of the following tasks:
-
Defining a DSA name and presentation address
-
Defining the location of the first administrative point
-
Defining the default administrator
-
Defining access rights
Defining a DSA Name and Address
A DSA must be given a name and a presentation address in order for it to bootstrap successfully. Establishing a DSA’s presentation address is a requirement for network communication between DUA clients and DSAs. Correct administration of the DSA’s name and the presentation address is also a requirement for DSA-to-DSA communication if future integration with a superior DSA is planned. Incorrect administration of the DSA’s name for example will result in a DIRX_DSA_NAME conflict and the DSA will not be able to run.
The environment variables DIRX_DSA_NAME and DIRX_OWN_PSAP specify a DSA’s name and presentation address. A stand-alone DSA can work with the default values for these environment variables, which are:
DIRX_DSA_NAME=“CN=DirX-DSA-hostname“
DIRX_OWN_PSAP=”TS=DSA1,NA=’TCP/IP_IDM!internet=ip_address+port=21200’”
where hostname is the hostname of the own DSA and ip_address is the first IP address for IDM.
Defining the Location of the First Administrative Point
An administrative point establishes the root of an administrative area, which corresponds to the portion of the DIT owned by an organization. Consequently, for My-Company, defining the first administrative point defines the root of My-Company’s administrative area, which corresponds to the portion of the DIT that it owns and manages. In order for My-Company to define the location of its first administrative point, it must answer the following question:
Where does the part of the DIT held by my DSA start?
The topmost entry held by the DSA must be defined to be an autonomous administrative point, which defines the administrative area as an autonomous administrative area. Defining the area as autonomous means that administration policies of superior DSAs will not affect this DSA.
The first administrative point must also be defined to be access control-specific, which means that the necessary information concerning the access control policies within the company are defined at this level. If no access control policy is defined, then nothing is allowed.
A related question that My-Company must also answer is:
What names are superior to my DSA?
The topmost entry held by the My-Company DSA is O=My-Company. This is also its context prefix, which is the sequence of Relative Distinguished Names (RDNs) that lead from the root of the DIT to the starting point of a naming context. (A context prefix corresponds to the distinguished name of the starting point of a naming context). My-Company’s DIT starts at the organization level directly underneath the root DSE (/). Since it does not plan to integrate with DSAs at the country level or the DC naming scheme, it has no superior names.
Defining the Default Administrator
The process of setting up a DSA requires that a default administrator entry be created. To define a default administrator, the administrator must answer the following question:
What is the distinguished name for the default administrator, and what other attributes are required for the default administrator?
The administrator determines that the distinguished name of the default administrator entry is /O=My-Company/CN=admin. Since the administrator has planned to have extensive access rights (see the next section), he is expected to use simple authentication. As a result, the administrator must also define a password.
Defining Access Rights
The final planning step for the administrator is to define the access control policy to be applied to users of its DIT. The decisions made in this step determine the contents of the access control-specific subentry that is created as part of DSA initialization. The administrator defines two categories of user:
-
The administrator, who is responsible for the DSA administration and therefore needs wide access rights
-
All other users, who are allowed to use the DSA to read the information contained in the entries, but are not allowed to modify anything in the DSA.
The administrator will build the DSA and thus needs to be able to create all the information necessary to prepare the DSA for population. Consequently, the administrator must be allowed to
-
Modify all user and operational attributes of all entries including the administrative point entry
-
Create and modify schema and access control subentries with all their attributes
The administrator is also the only user who is allowed to change the DIT. Therefore, he must be allowed to
-
Create all entries with the necessary user and operational attributes
-
Delete all entries
-
Modify all user and operational attributes of all entries
-
Read all user and operational attributes of all entries
When the administrator binds to the DSA, he must identify himself with a name and a password (simple authentication). He is not allowed to read passwords that belong to the employees.
All other users can bind without a name and password (anonymous binding). They are allowed to read all user attributes except for user passwords. They cannot modify anything in the tree.
Bootstrapping the DSA
Bootstrapping the DSA means performing the steps that are necessary in order to make the DSA able to come up and understand the first incoming requests using the DAP protocol. These steps are:
-
Creating the first administrative point
-
Creating the default administrator entry
You must use dirxadm commands to perform these tasks. Because the dirxadm program requires that you perform an administrator bind to the DSA before you can use any other dirxadm commands, the first step in the bootstrapping process is to bind to the DSA with dirxadm.
Binding Anonymously to the DSA with dirxadm
Recall that the My-Company default administrator is to use simple authentication when binding to the DSA. However, since the DSA has not yet been bootstrapped and initialized, the DSA database does not yet exist, and so there is no authentication information available in the DSA. Consequently, the My-Company administrator needs to perform an unauthenticated (anonymous) bind to the DSA in order to use dirxadm to bootstrap it. To perform an anonymous bind to the default (and in this case the local) DSA, use the dirxadm command:
[dse] bind
The dirxadm object that is used to bind to the DSA is dse. Since dse is the default object for dirxcp, you can omit it in dirxadm commands that operate on dse. So, for My-Company, the command is:
bind
This command performs an anonymous bind to the DSA. An anonymous bind should only be used with dirxadm during the bootstrap process. The final step in the bootstrapping process should be to control who can use dirxadm. This procedure is described in the section “Controlling Access to dirxadm”.
Creating the First Administrative Point
The following questions must be answered before creating the first administrative point:
-
Is the standard DSA schema sufficient or is it necessary to create customized attribute types and object classes?
For My-Company, the standard DSA schema is sufficient.
-
Where does the part of the DIT held by this DSA start, and which superior names must be known?
For My-Company, the DIT begins at the organizational level below the root DSE (/). The topmost entry held by the DSA is O=My-Company.
-
Which access control scheme should be used: basic or simplified? What is the access control policy for the first administrative point? Who is allowed to create, read and modify subentries below the first administrative point?
For My-Company, the simplified access control scheme is sufficient and the administrator is the only user who is permitted to create, read, modify, and supply subentries to the administrative point.
-
What is the default administrator’s distinguished name and what other attributes are required for the administrator?
For My-Company, default administrator is named /O=My-Company/CN=admin and uses a password.
The administrator can now proceed to create the first administrative point and corresponding administrative entry.
The administrator must use the dirxadm program to create the glue and the first administrative point. Once DSA bootstrapping is complete and the appropriate access rights are set, he must create all other entries and subentries with the dirxcp program. The dirxadm object that is used to create glues and entries is dse. Since dse is the default object, it may be omitted in the command line.
To create the first administrative point, use the dirxadm command:
[dse] create distinguished_name -attribute attribute_list
Supply the DN of the first administrative point in the distinguished_name argument. The attribute list must contain the following attributes:
-
The object-class (OCL) user attribute with the names of all object classes of the entry
-
The DSET operational attribute with the following values:
-
ADM_POINT, which indicates that the entry is an administrative point
-
CP, which indicates that the administration point represents a context prefix of a naming context
-
ENTRY, which indicates that the administration point is an entry; this value permits the entry to hold user attributes and makes it visible to the DAP protocol
-
The access-control-scheme (ACS) operational attribute, which specifies whether basic access control (BACS) or simplified access control (SACS) is to be used
-
The administrative-role (AR) operational attribute with the following values:
-
Autonomous-area (AA), to define the entry as an administrative point of an autonomous administrative area
-
Access-control-specific-area (ACSA), to allow the creation of associated access control-specific subentries
-
The subentry-ACI (SACI) operational attribute, which specifies the access rights for the subentries of the first administrative point
If advanced access control policies will be used, additional attributes may be required.
The following dirxadm command creates a first administrative point for My-Company:
  create /O=My-Company -attr \
         {OCL=TOP;ORG} \
         {DSET=ENTRY+ADM_POINT+CP} \
         {AR=AA;ACSA}  \
         {ACS=SACS} \
         {SACI={ID=admin: enable Handling of Subentries,
                PR=254,
                AL={BL={L=SIMPLE}},
                UF={UC={N={DN={/O=My-Company/CN=admin}}},
                    UP={PI={E=TRUE},
                        GAD=grantRead+grantBrowse+\
                            grantDiscloseOnError+\
                            grantReturnDN+\
                            grantAdd+grantRemove+grantModify};
                       {PI={AT=SS;OC;AT;DSR;
                            DCR;MR;MRU;CRN;CRT;MN;MT;PACI;EACI,
                            AAV=SS;OC;AT;DSR;
                            DCR;MR;MRU;CRN;CRT;MN;MT;PACI;EACI,
                            AUATV=TRUE},
                        GAD=grantDiscloseOnError+\
                            grantRead+grantCompare+\
                            grantFilterMatch+\
                            grantAdd+grantRemove} } } } \
         "CRN={/O=My-Company/CN=admin}" \
         {PA={PA1=My-Company,PA2=ABC Street 123,\
              PA3=D-01234 City,PA4=Germany}} \
         {TN=+49 12 345 67 890} \
         {DSC=My-Company }
This command adds an administrative entry to the DIT with the distinguished name /O=My-Company and with the structural object class (OCL) organization (ORG). The entry specifies a set of operational attributes:
-
The DSET attribute defines the object to be an ordinary entry (ENTRY), an administrative point (ADM_POINT) and a context prefix (CP).
-
The AR of the administrative point is Autonomous Area (AA), Access Control Specific Area (ACSA).
-
The ACS attribute specifies that the simplified access control (SACS) shall be used
The SACI attribute is a multivalued structured attribute that defines the access rights to create and modify subentries of the first administrative point.
Each value of an SACI attribute must be assigned an Identification-Tag (ID) which is used to distinguish between attribute values. The tag should give a short description of the purpose of the value. For My-Company, the ID indicates that the value applies to the default administrator, who is permitted to handle subentries.
The Precedence (PR) of the value is relevant if more than one SACI attribute value applies to an entry. The values with higher precedence overrule values with lower precedence. The range of integer values used is 0 to 255. For My-Company, the value of PR=254 indicates nearly the highest possible precedence.
The Authentication-Level (AL) defines the minimum required level of authentication that the user must have undergone before this SACI attribute value is considered for granting access rights. The value of the Subentry-ACI attribute applies only to users who use at a minimum the specified authentication level. My-Company expects at a minimum simple authentication.
In the User-First (UF) component, access rights for individual users or groups of users are granted or denied. The example specifies in the User-Class (UC) component that the permissions are made for the default administrator.
The User-Permissions (UP) component defines two values as Protected-Item (PI). The parameter (E=TRUE) itself defines Grants-And-Denials (GAD) to read, browse (list and search), add, remove and modify the subentries of the first administrative point. Furthermore, all operational attribute types (AT) and values (AAV) which can occur in a subentry and all collective attribute types and values (AUATV) may be read and modified and are allowed to be used in search filters. All grants are valid for the specified user, the default administrator, and concern subentries of the first administrative point only. The grantDiscloseOnError ensures that a specific error message (insufficient access rights) is returned if the access rights are not sufficient for an operation. Otherwise, a general error message is returned.
The creators-name (CRN) attribute specifies the name of the default administrator as creator. This attribute is not required for correct directory operation but should be supplied for the consistency and completeness of the data. For My-Company, the default administrator is the only user authorized to add entries after DSA setup is complete. The default administrator must use dirxcp to add entries; dirxcp automatically names the administrator as creator of the entry. Therefore, the default administrator should also appear as the creator of the first entry that is created with dirxadm.
A set of user attributes is also specified for the first administrative point:
-
The Postal-Address (PA) and Telephone-Number (TN) attributes specify the address and telephone number of the My-Company
-
The description (DSC) attribute is used to give a more detailed description of the My-Company
Creating the Default Administrator Entry
To create the entry for the default administrator, use the dirxadm command:
[dse] create distinguished_name -attribute attribute_list
Supply the distinguished name of the default administrator determined during the administration framework planning process in the distinguished_name argument (see “Defining the Default Administrator”).
The attribute list must contain at a minimum the following attributes:
-
The object-class (OCL) user attribute with the names of all object classes of the administrator entry.
-
All mandatory non-naming user attributes of the object class of the administrator entry.
-
A user password should be supplied if the access control policy established during the administrative framework planning process requires it (see “Defining Access Rights”).
Additional attributes to the ones listed here can be provided; for example, an attribute can be supplied to give a description of the administrator.
For My-Company, an administrator with the distinguished name /O=My-Company/CN=admin must be created. The entry is of object class organizational-person, and a user password shall be used during authentication. The following dirxadm command creates the default administrator entry for My-Company:
     create  /O=My-Company/CN=admin \
         -attr   {OCL=TOP;PER;ORP} \
                 {DSET=ENTRY} \
                 {SN=admin} \
                 {DSC=Default Administrator} \
                 {UP=dirx} \
                 {CRN={/O=My-Company/CN=admin}}
The command adds the default administrator entry to the DIT with the distinguished name /O=My-Company/CN=admin and with the object classes (OCL) Person and Organizational-Person (ORP). (Since the organizational-person object class is derived from person, both must be named.) The object class requires that a surname (SN) be specified, for which the same value as for the common-name is used. As additional information, the description (DSC) attribute is specified to indicate that the entry specifies the default administrator. The user-password (UP) of the administrator is set to the value dirx. For consistency and completeness, the creators-name (CRN) attribute is also specified.
Controlling Access to dirxadm
During the DSA bootstrapping process, unauthenticated (anonymous) binds are permissible to permit the administrator to use dirxadm while there is not yet any authentication information in the DSA database. However, once a DSA has been bootstrapped, the use of dirxadm should be restricted to those users who are experienced DirX Directory administrators.
Consequently, the final step in the bootstrapping process is to enable access control for using dirxadm. The DirX Administrators (DADM) attribute in the root DSE specifies who can use dirxadm to bind to a DSA. The default administrator must add the distinguished name of his entry to the DirX Administrators attribute. To add an administrator entry to the DirX Administrators attribute, use the dirxadm command:
modify / -addattr DADM=administrator-entry-distinguished-name
For My-Company, the default administrator issues the dirxadm command:
modify / -addattr DADM={/O=My-Company/CN=admin}
The administrator can now use dirxadm to bind to the DSA with simple authentication and the password dirx; no one else is permitted to bind with dirxadm.
Initializing the DSA
The next step in building the DSA is to create subentries of the first administrative point. Subentries hold operational information that is valid for a specific subset of the entries in an administrative area. For this stand-alone DSA, the following subentry must be created:
-
An access-control-specific subentry, which defines the access control policy to be applied to the DIT
You use the dirxcp program to create these subentries. Because dirxcp is a DUA and uses DAP protocol to perform its operations on a DSA, you must first:
-
Define a DUA presentation address for dirxcp
-
Make the DUA presentation address and the DSA name and presentation address available to dirxcp
-
Bind with dirxcp to the DSA with the appropriate authentication
The section “Defining a DUA Presentation Address” describes how to establish a presentation address for a DUA. The next sections describe how to establish the DUA and DSA addresses in the client, how to bind to the DSA, and how to create the access-control specific subentry.
Establishing the DUA and DSA Addresses in the Client
The name of the DSA and its presentation address must be made available as the default DSA to the dirxcp program. The DUA presentation address must also be established.
The DUA presentation address and DSA name and presentation address are provided to the client in the file dirxcl.cfg, which is located in the install_path/client/conf subdirectory. The first non-commented line of the file specifies the DUA presentation address. Next, a list of DSA names and addresses is specified. The first DSA name in the list is the default DSA. To make the DSA available to dirxcp, you must modify this line to contain the DSA name and address.
In the case of My-Company, their administrator modifies the client configuration file to contain the name and presentation address of the DUA and the name and presentation address of DirX-DSA as the default DSA:
# File: dirxcl.cfg
# first non-comment line is the client address

Self TS=Client1,NA='TCP/IP_IDM!internet=192.168.19.129+port=2222';
'TCP/IP!internet=192.168.0.12+port=2222'
# first line is the default DSA
# the next two lines must be on one line in the file

/CN=DirX-DSA-MyHostname TS=DSA1,NA='TCP/IP_IDM!internet=192.168.19.129+port=21200'
Binding to the DSA with dirxcp
The dirxcp program requires that you first bind to a DSA before you can use any other dirxcp commands. Recall that the My-Company administrator is to use simple authentication for binding to the DSA. To bind to the default (and in this case the local) DSA using simple authentication, use the dirxcp command:
[obj] bind -authentication auth_method -user username
_*-password* _password
The dirxcp object that is used to bind to the DSA is obj. Since obj is the default object for dirxcp, you can omit it in dirxcp commands that operate on obj.
To bind to the bootstrapped DSA with simple authentication, the My-Company administrator uses the command:
bind -authentication SIMPLE -user /O=My-Company/CN=admin
     -password dirx
Creating the Access Control-Specific Subentry
The access control-specific subentry defines the access control policy for a subset of the administrative area with which it is associated. An access control specific subentry of the first administrative point must define the access control policy applicable in the DSA. By default, no user is granted any access right to any entry of the DIT.
To create an access control-specific subentry below the first administrative point, use the dirxcp command:
[obj] create distinguished_name -attribute attribute_list
Supply the name of the access control-specific subentry in the distinguished_name argument; in the case of My-Company, it is /O=My-Company/CN=AccessControl-Subentry. Note that you can create an access control-specific subentry only if the administrative-role defined in the administrative point is Access Control Specific Area (ACSA).
The attribute list must contain at a minimum the following attributes:
-
The object-class (OCL) user attribute, which specifies the Subentry (SUBE) and access-control-subentry (ACS) object classes.
-
The subtreeSpecification (SS) operational attribute, which should specify its default value, indicating that the subentry holds for the whole subtree.
-
The prescriptive-ACI (PACI) operational attribute, which lists the applicable access control items.
For My-Company, the access policy is simple: the administrator is allowed to execute operations on all entries except for reading user passwords. All other users are allowed to read and search the user attributes of ordinary entries. The following dirxcp command creates the access control-specific subentry for My-Company below the first administrative point:
     create /O=My-Company/CN=AccessControl-Subentry  -attr \
            {OCL=SUBE;ACS} \
            {SS={DEF=TRUE}} \
            {PACI={ID=admin: enable most of operations \
                      but no Rename,
                   PR=254,
                   AL={BL={L=SIMPLE}},
                   UF={UC={N={DN={/O=My-Company/CN=admin}}},
                       UP={PI={E=TRUE},
                       GAD=grantDiscloseOnError+\
                           grantRead+grantBrowse+\
                           grantReturnDN+\
                           grantAdd+grantRemove+grantModify};
                       {PI={AT=AR;ACS;SACI;CRN;
                            CRT;MN;MT;SOC;GSR;CE;EACI,
                            AAV=AR;ACS;SACI;CRN;
                           CRT;MN;MT;SOC;GSR;CE;EACI,
                           AUATV=TRUE},
                      GAD=grantDiscloseOnError+\
                          grantRead+grantCompare+\
                          grantFilterMatch+\
                          grantAdd+grantRemove}

 } };
                   {ID=Public Access: enable Read and Search - \
                       disable read password,
                    PR=0,
                    AL={BL={L=NONE}},
                    UF={UC={AU=TRUE},
                        UP={PI={E=TRUE},
                            GAD=grantDiscloseOnError+\
                                grantRead+\
                                grantBrowse+grantReturnDN};
                           {PI={AUATV=TRUE},
                            GAD=grantDiscloseOnError+\
                                grantRead+grantCompare+\
                                grantFilterMatch };
                           {PR=255,
                            PI={AT=UP},
                            GAD=denyRead} } } }
The prescriptive-ACI (PACI) attribute of the access control subentry specifies the access rights of the different users to the entries of the specified subtree. Two values of the attribute specify the access rights of the administrator and of anonymous users.
Each value of a PACI attribute is assigned an Identification-Tag (ID) that gives a short mnemonic reference to the value. The first ID indicates that the value is applicable to the administrator, who is enabled to execute most operations except for reading a user-password. The precedence (PR) and the authentication-level (AL) of the first PACI attribute value are handled as for the subentry-ACI attribute of the first administrative point.
In the user-first (UF) component, individual users or groups of users are granted access rights.The first user-first (UF) element specifies in the user-class (UC) that the permissions are made for the default administrator.The user-permissions (UP) define two values as Protected-Item (PI).As the first item, the entries (E) get grants-and-denials (GAD) to read, browse, add, delete and modify the entry.As the second item, all operational attribute types (AT) and values (AAV) of an entry and all user attribute types and values (AUATV) can be read, added or deleted.All these grants are valid for the specified user, the administrator, and concern all subordinate entries of the first administrative and the administrative point itself.
The second ID indicates that the value is applicable to anonymous users, who are enabled to read and browse entries.The precedence (PR) is set to 0 so that this access control is overruled by any other rule.The authentication-level (AL) of the second PACI attribute value specifies anonymous bind as the minimum level of authentication.
The second PACI user-first (UF) component specifies in the user-class (UC) that the permissions are made for all users (AU).The user-permissions (UP) define three groups of protected-items (PI).First, the entries may be read and browsed.Secondly, all user attribute types and values (AUATV) may be read and used in search filters.The third item protects the user-password from being read.
With the example setting, the reading of user passwords is denied to all users with the highest precedence (255).
Now the DSA is set up and the My-Company administrators can proceed to set up the LDAP server.
Setting up the LDAP Server
Setting up the LDAP server consists of the following steps:
-
Establishing the contact DSA for the LDAP server
-
Creating the LDAP server subentries in the contact DSA
-
Modifying the subentry ACI of the administration point on the contact DSA to permit the LDAP server to read the LDAP server subentries
Planning the LDAP Server
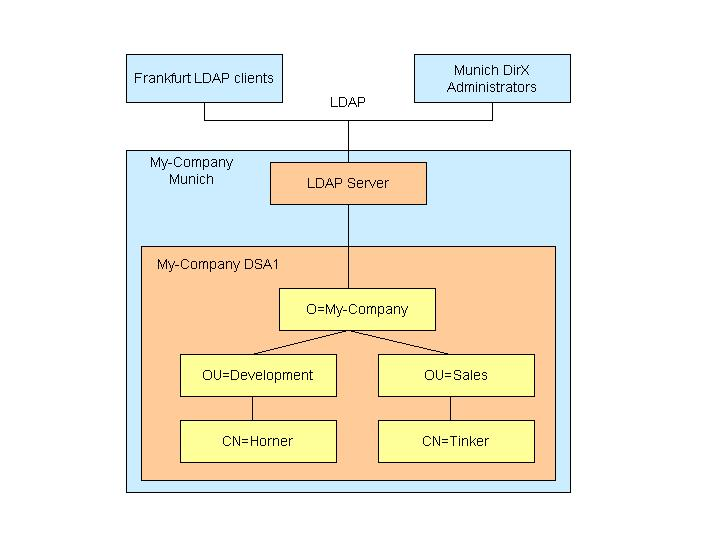
My-Company’s stand-alone DSA contains general information about its employees.This DSA is to be located at the company’s headquarters in Munich.My-Company also employs a travel agency in Frankfurt to handle its employee business travel arrangements.The travel agency needs to have access to the My-Company employee information, and the employees at the travel agency have access to the Internet and use a variety of browsers that contain built-in LDAP clients.The My-Company administrators need to set up the DirX Directory LDAP server to make LDAP access to the My-Company employee database available to the travel agency in Frankfurt.The administrators also want access to the DSA via the LDAP server so that they can use DirX Directory Manager for simple maintenance tasks.The following figure illustrates this scenario.
My-Company needs to make decisions in the following areas before its administrators can begin to build the LDAP server configuration:
-
It must define the capabilities of its LDAP server
-
It must define the framework for LDAP server administration (contact DSA, LDAP server port number, LDAP server administrator)
-
It must define the environment in which its LDAP server operates
Defining the LDAP Server Capabilities
My-Company must answer the following questions about its LDAP server capabilities:
-
Will old LDAP v2-only clients need to communicate with the LDAP server, and if so, how is the LDAP server to handle LDAP v2 requests?
The old LDAP v2 protocol has a number of limitations in comparison to LDAP v3 protocol. For example, it does not support X.509 (v3) certificates, and it supports only the printable-string character set encoding for attribute values that are strings. It also does not support sub-typing (for example, lang-de) and requires special mechanisms to handle binary values (for example no support of ;binary). However, many LDAP v2-only clients exist, and these clients may need access to the directory information made available through a DirX Directory LDAP server that supports both the LDAP v2 and v3 protocol.
If an LDAP server is to support LDAP v2 operations, it needs to know:
-
The character set encoding to use when converting printable-string attribute values supplied in LDAP v2 requests. This decision affects the value supplied in the LCCQ (ldapCharsetConvRequest) attribute of the LDAP configuration subentry; see the section "Creating the LDAP Configuration Subentry" for further details.
-
The character set encoding to use for search results generated by LDAP v2 operations This decision affects the value supplied in the LCCS (ldapCharsetConvResult) attribute of the LDAP configuration subentry; see the section "Creating the LDAP Configuration Subentry" for further details.
-
The representation to use when returning attribute values that are X.509 certificates to LDAP v2 clients This decision affects the value supplied in the LAHE (ldapASN1Header) attribute of the LDAP configuration subentry; see the section "Creating the LDAP Configuration Subentry" for further details.
My-Company determines that the Frankfurt travel agency has a number of LDAP v2-only clients that need to communicate with the My-Company LDAP server. It decides to use the universal-string UTF-8 character set encoding for v2 requests that contain directory-string attribute values and for encoding the search results of v2 operations. It decides to return X.509 certificates to LDAP v2 clients in binary ASN.1 format.
-
-
Is the LDAP server to allow updates to the DSA by LDAP clients?
If users who are accessing a directory through an LDAP server are to be prohibited from making updates to that directory, setting up the LDAP server as a read-only server will improve the performance of the directory service. However, in the case of My-Company, the My-Company administrators want to be able to use DirX Directory Manager to make administrative changes to My-Company’s DIT. It is also possible that the Frankfurt travel agency will need to modify My-Company’s DIT; for example, to include airline seating preferences and other employee-specific travel information. Consequently, My-Company decides to allow the LDAP server to permit updates to the My-Company DSA by travel agent LDAP clients. This decision affects the value supplied in the LROS attribute of the LDAP configuration subentry; see the section "Creating the LDAP Configuration Subentry" for further details.
Note, however, that regardless of an LDAP server’s status (read-only or read-write), the contact DSA performs access control verification using the selected access control scheme on all modification requests from LDAP clients.
-
What LDAP connection parameters should be established for the LDAP server?
LDAP connection parameters define the LDAP operating environment for the LDAP server. LDAP connection parameters include:
-
The maximum number of concurrent LDAP connections that the LDAP server can support; this value is specified in the LMCO (ldapMaxConnections) attribute of the LDAP configuration subentry. This parameter is closely related to the number of file descriptors on a system and should be adjusted accordingly. Note that each LDAP connection may require two socket descriptors—one for the LDAP client connection and one for the DAP connection to the DSA—if backend sharing is not possible.
-
The maximum amount of time that an idle LDAP connection can remain open before the server closes it; this value is specified in the LCIT (ldapConnectionIdleTime) attribute of the LDAP configuration subentry.
-
Whether the LDAP server closes authenticated DAP connections immediately when no more references are present; the LUDT (ldapUnbindDelayTime) attribute of the LDAP configuration subentry enables and disables this feature. Closing DAP connections immediately can save system resources (memory and socket descriptors) at the cost of performance.
-
Whether the LDAP server will use the same DAP connection for the same authenticated users to perform DSA operations; the LBS (ldapBackendSharing) attribute of the LDAP configuration subentry enables and disables this feature. If backend sharing is allowed, users with identical credentials will use the same backend connection. The value of this attribute affects the amount of system resources used.
-
Whether the LDAP server allows anonymous users access to the database. The LDAA (ldapDenyAnonymousAccess) attribute enables and disables this feature. Note that prohibiting anonymous access does not conform to RFC standards and may cause LDAP clients to malfunction when reading the LDAP root or the LDAP schema.
-
The hardware and software features and limitations of the machine (for example, file descriptors, socket connections already in use) on which the LDAP server is to run determine the LDAP connection parameters that need to be set up for an LDAP server. The My-Company administrators need to select LDAP connection parameters that match the capabilities of the machine on which they choose to install and run the LDAP server.
Defining the LDAP Server Administration Framework
My-Company must answer the following questions about its LDAP server administration environment:
-
What port will the LDAP server listen on for LDAP requests?
An LDAP server needs to be assigned a port on which to listen for incoming requests from LDAP clients. In general, LDAP servers are assigned the port number 389. In some cases, however, this port may be in use by another service, and so a different LDAP server port must be selected from the available ports. Since the machine on which the LDAP server is to run has nothing assigned to port 389, My-Company decides to use this port number for its LDAP server. This value will be specified in the LPNU (ldapPortNumber) attribute of the LDAP configuration subentry.
-
What will be the LDAP server’s contact DSA?
An LDAP server’s contact DSA is the DSA that can make available the portion of the DIT which LDAP clients need to access. Through the LDAP server, LDAP clients will have access to the attribute types and object classes in the contact DSA’s system schema and will have access to the naming contexts supported by the DSA. The selection of the contact DSA also defines who is allowed to set up the LDAP server configuration, because the LDAP server setup procedure involves administering the contact DSA (for example, creating new LDAP-specific subentries and modifying the subentry ACI)
In the case of My-Company, the travel agency needs access to the employee information contained in the stand-alone DSA CN=My-Company-DSA1. This DSA masters a single naming context, which is /O=My-Company. The administrator for this DSA is the default My-Company administrator /O=My-Company/CN=admin.
The file install_path*/ldap/conf/dirxldap.cfg* contains the setting for the contact DSA to which the LDAP server will try to forward the LDAP requests.
-
How many LDAP servers will the contact DSA support?
In some cases, it can be useful to set up more than one LDAP server process on the same system. In this configuration, each LDAP server supports different capabilities—for example, to handle a particular character set requirement of a group of LDAP clients—and listens on its own separate port for requests from these clients. The set of LDAP servers, however, shares the same contact DSA. My-Company decides that its initial LDAP configuration is to consist of one LDAP server, with the possibility of adding multiple servers later on.
-
Will the LDAP server support SSL/TLS connections?
The Secure Socket Layer (SSL) and Transport Layer Security (TLS) protocols allow for mutual authentication between clients and servers based on public key/private key cryptography and permit the transmission of encrypted messages between clients and servers. The SSL and TLS protocols provide clients and servers with a protection mechanism for the exchange of confidential data such as financial and medical information over untrusted TCP/IP networks. The DirX Directory LDAP server can support both SSL and TLS protocols. To use SSL/TLS, a special configuration subentry must be created in the database, and the clients must be provided with a Public/Private Key Infrastructure (PKI); for example, certificates.
Because My-Company does not expect its LDAP clients to be exchanging sensitive data with its LDAP server, it decides that its initial LDAP configuration will not support SSL/TLS connections, with the possibility that it may do so in the future.
-
Should the LDAP server’s audit facility be enabled?
Companies can sometimes require auditing of all requests that the LDAP server performs. The LDAP server provides auditing of every processed request and important data associated with each request. One audit record contains all the information necessary for billing purposes or for the administrator to determine whether clients are using the service correctly. To enable LDAP server auditing, an extra audit subentry must be created in the database.
Because My-Company’s directory is not managing sensitive data, the administrator decides not to use the LDAP server audit facility.
-
Should the LDAP server’s result cache be enabled?
Enabling the LDAP server’s result cache can significantly increase the performance of search operations in cases where many anonymous users or users using the same authentication perform the same search operations.
Because My-Company expects that each user authenticates with individual credentials and that a rather high percentage of modifications are performed, the administrator decides to disable the LDAP server’s result cache.
-
How many LDAP clients are working in parallel?
The number of clients that are issuing requests in parallel to the LDAP server may require a change to the internal thread pool size. This pool size limits the number of parallel operations in the LDAP server. (Note the difference between parallel connections, which can be idle, and parallel operations, which consume one thread from the pool). If the pool is exhausted, incoming new requests are queued. The LTPS (ldapThreadPoolSize) attribute specifies the maximum number of threads for the LDAP server thread pool.
Because My-Company owns a fast machine and expects no extraordinary peaks of LDAP requests, the administrator decides to keep the default thread pool size unless he experiences problems related to parallel LDAP requests.
Establishing the Contact DSA
The LDAP server cannot initialize successfully unless it knows which DSA is available to it. The name and presentation address of this contact DSA must be made available to the LDAP server as the default DSA. When the LDAP server initializes, it automatically performs an anonymous DAP bind to this contact DSA and reads its configuration information, which is stored in LDAP-specific subentries within the DSA.
The contact DSA’s name and presentation address are provided to the LDAP server in the file dirxldap.cfg, which is located in the install_path/ldap/conf directory. This file must also contain the LDAP server’s DUA presentation address, because the DUA presentation address contains the network type to be used for remote connections.
In the case of My-Company, their administrator modifies the LDAP server configuration file dirxldap.cfg to contain the name and presentation address of the stand-alone DSA My-Company-DSA1 as the contact DSA and the DUA presentation address of the LDAP server.
#File: dirxldap.cfg
#the first line is the contact (default) DSA

/CN=DirX-DSA-MyHostname TS=DSA1,NA='TCP/IP_IDM!internet=192.168.19.129+port=21200'
#the line starting with the keyword self is the LDAP server

Self TS=ldapServer,NA='TCP/IP_IDM!internet=192.168.19.129+port=2222'
Creating the LDAP Server Subentries
Three basic subentries are associated with a DirX Directory LDAP server:
-
The LDAP root subentry
-
The LDAP global schema subentry
-
The LDAP configuration subentry
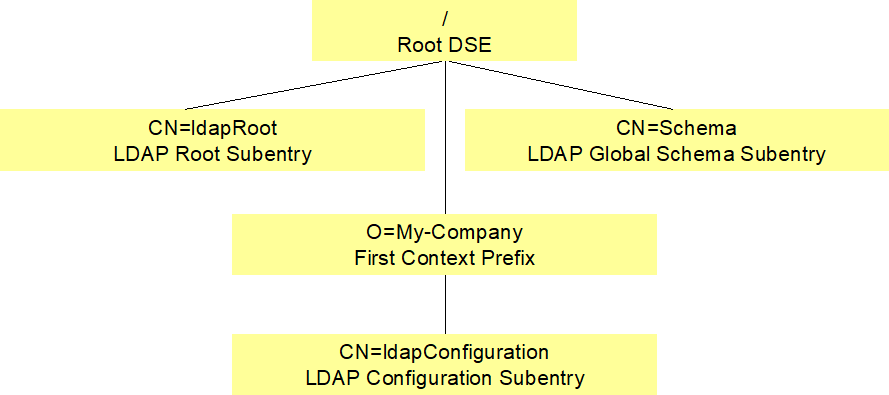
The LDAP root subentry is a read-only subentry that the DSA creates during its initialization procedure. The LDAP root subentry provides information about the contact DSA’s DIT and the supported features of the LDAP server, for example LDAP v3 control extensions like password policy control. LDAP clients read the LDAP root subentry to obtain the information contained within it. See the section "Attributes of the LDAP Root Subentry" in the DirX Directory Syntaxes and Attributes for complete details about the attributes of the LDAP root subentry.
The LDAP global schema subentry is a read-write subentry that the DSA creates during its initialization procedure. The LDAP global schema subentry defines the object classes and attribute types available to LDAP clients in an LDAP server. When it creates the LDAP global schema subentry, the DSA uses its system schema to build a list of available object classes and attribute types and stores these lists as values of the LDAP OC (LOC) and LDAP AT (LAT) attributes of the LDAP global schema subentry. The LDAP server reads the DSA’s LDAP global schema subentry to build its LDAP global schema. LDAP clients can read the LDAP global schema in order to retrieve information about attribute types and object classes. LDAP clients can also make updates to the DSA schema by issuing LDAP modify requests to the LDAP global schema; the LDAP server updates the LDAP global schema subentry and the DSA system schema. Note that LDAP clients can only update the schema if they have the appropriate access rights. The contact DSA automatically creates the LDAP root subentry and the LDAP global schema subentry below the root DSE when it is started for the first time. It creates the LDAP root subentry with the distinguished name /CN=ldapRoot and creates the LDAP global schema subentry with the distinguished name /CN=Schema.
The LDAP configuration subentry defines:
-
The port numbers that the LDAP server is to use (attributes LPNU and LSPN)
-
The LDAP connection parameters for the LDAP server (attributes LMCO, LCIT, and LUDT)
-
LDAP operation service controls
-
Whether the LDAP server is read-only or read-write (attribute LROS)
-
How to handle requests from LDAP v2-only clients (attributes LCCQ, LCCS, and LAHE)
-
Whether or not the LDAP server enables result caching (LCA, LCAP)
-
Whether to use a special thread pool size (LTPS)
There can be more than one LDAP configuration subentry per DSA; this is mandatory if the configuration is to support multiple LDAP server processes. The administrator of the contact DSA must create the LDAP configuration subentries below the first context prefix using dirxcp and must give it the common name ldapConfiguration.
The following figure illustrates the locations of the LDAP server subentries for My-Company’s stand-alone DSA.
Creating the LDAP configuration subentry on the contact DSA consists of the following steps:
-
Binding to the contact DSA
-
Creating the LDAP configuration subentry with dirxcp
In order to carry out these tasks, the administrator of the contact DSA must have access rights to create and modify subentries on the DSA and must be an authorized DirX Directory administrator.
In the case of My-Company, the stand-alone DSA setup process has established the My-Company default administrator with access rights to create and modify subentries and has also established him as an authorized DirX Directory administrator for the stand-alone DSA (by virtue of adding his distinguished name to the DADM attribute).
Creating the LDAP configuration subentry with dirxcp is most easily performed in two steps:
-
Creating the subentry with attributes for port numbers, connection parameters, LDAP v2 client management, and server type (read-only or read-write)
-
Adding the LDAP operation service control attributes to the subentry
Creating the Subentry
To create the LDAP configuration subentry below the first context prefix (which in the case of My-Company is also the first administrative point), use the dirxcp command:
[obj] create distinguished_name -attribute attribute_list
Supply the distinguished name of the LDAP configuration subentry in the distinguished_name argument; it is /O=My-Company/CN=ldapConfiguration in the case of My-Company. The attribute list parameter can contain one or more LDAP-specific attributes. These attributes are optional; if an LDAP-specific attribute is not supplied, the DirX Directory LDAP server uses a default value.
For My-Company, the attribute list contains the following LDAP-specific attributes:
-
The LDAP port number (LPNU) user attribute, which specifies the RPC port on which the LDAP server is to listen for LDAP client requests. For My-Company, it is 389 (which is the default value).
-
The LDAP secure port number (LSPN) user attribute, which specifies the port number on which the LDAP is to listen for Secure Socket Layer (SSL) LDAP protocol. For My-Company, this value is 0 because it has chosen not to enable SSL/TLS connections (the default value).
-
The LDAP Max Connections (LMCO) user attribute, which specifies the maximum number of simultaneous LDAP connections that the LDAP server supports. My-Company selects 1024 (the default value is 4000).
-
The LDAP Connection Idle Time (LCIT) user attribute, which specifies the number of seconds of inactivity after which the LDAP server is to close an LDAP connection to an LDAP client. My-Company chooses 300 seconds (which is the default value).
-
The LDAP Unbind Delay Time (LUDT) user attribute, which controls whether the LDAP server closes authenticated DAP connections. A value of 0 in this attribute directs the LDAP server to close the connections after the last LDAP client has performed an unbind for this connection; a positive integer value directs the LDAP server to close them that number of seconds after the last LDAP connection using this connection is closed. My-Company chooses to close authenticated DAP connections after the last LDAP client has unbound from this connection (which is the default value).
-
The LDAP ASN1 Header (LAHE) user attribute, which specifies whether X.509 certificates in attributes are returned in binary ASN1 (a value of FALSE) or hexdump ASN1 format (a value of TRUE) in the results of LDAP version 2 operations. My-Company selects to return X.509 attributes in binary ASN1 (which is the default value).
-
The LDAP Character Set Conversion Request (LCCQ) user attribute, which specifies the representation of string attributes in LDAP version 2 operations. The possible representations are LATIN-1, UTF8, and T61. My-Company chooses UTF8 (which is the default value).
-
The LDAP Character Set Conversion Result (LCCS) user attribute, which specifies the conversion that the LDAP server is to perform for search results of LDAP version 2 operations. The possible representations are LATIN-1, UTF8, and T61. My-Company chooses UTF8 (which is the default value).
-
The LDAP Read Only Server (LROS) user attribute, which controls whether the LDAP server allows update operations. The possible values are FALSE (allow updates) and TRUE (prohibit updates). Since My-Company has decided that its LDAP server will permit update operations on the stand-alone DSA, it selects FALSE (which is the default value).
The attribute list must also contain at least the following subentry-specific attributes:
-
The object class (OCL) user attribute that specifies the Subentry (SUBE) and LDAP configuration (LCFG) object classes.
-
The subtree-specification (SS) operational attribute, which must specify its default value, indicating that the subentry holds for the entire subtree.
The following dirxcp command creates an LDAP configuration subentry for My-Company:
  create /O=My-Company/CN=ldapConfiguration -attr \
         {OCL=SUBE;LCFG} \
         {SS={DEF=TRUE}} \
         {LPNU=389} \
         {LSPN=0} \
         {LMCO=1024} \
         {LCIT=300} \
         {LUDT=0} \
         {LAHE=FALSE} \
         {LROS=FALSE} \
         {LCCQ=UTF8} \
         {LCCS=UTF8}
Adding LDAP Operation Service Control Attributes
To add the attributes that define the service controls to be applied to each LDAP operation, use the dirxcp command:
[obj] modify distinguished_name -attribute attribute_list
Supply the distinguished name of the LDAP configuration subentry in the distinguished_name argument; it is /O=My-Company/CN=ldapConfiguration in the case of My-Company. The attribute list consists of one attribute for each type of LDAP operation; the attribute value consists of the service controls to be applied to that operation. The LDAP operation service control attributes are:
-
LDAP Search Service Controls (LSES)—specifies service controls for the search operation
-
LDAP Compare Service Controls (LCOS)—specifies service controls for the compare operation
-
LDAP Add (LADS)—specifies service controls for the add operation
-
LDAP Remove (LRES)—specifies service controls for the remove operation
-
LDAP Modify (LMOS)—specifies service controls for the modify operation
-
LDAP ModifyDN (LMDS)—specifies service controls for the modify DN operation
My-Company chooses the following service control strategy:
-
For search and compare operations, shadowed information can be used. For the other operations, shadowed information cannot be used.
-
The other service controls are the same for all operations
The following table specifies these service controls and the values selected by My-Company; see the section "LDAP Search Service Controls" in the DirX Directory Syntaxes and Attributes for more information about these controls.
| Service Control | Possible Values | My-Company Value |
|---|---|---|
PreferChaining |
T—prefer chaining |
T |
ChainingProhibited |
T—prohibit chaining |
F |
LocalScope |
T—limit to local scope |
F |
DontUseCopy |
T—do not use copies |
T (LADS, LRES, LMOS, LMDS) |
DontDereferenceAlias |
T—do not dereference |
F |
Subentries |
T—return only subentries |
F |
CopyShallDo |
T—permit partial results using shadowed information |
F (LADS, LRES, LMOS, LMDS) |
Priority |
0—low (service gets low priority) |
1 |
TimeLimit |
integer—sets a limit specified by integer |
0 |
SizeLimit |
integer—sets a limit specified by integer |
0 |
ScopeOfReferral |
0—scope is DMD |
0 |
AttributeSizeLimit |
integer—sets a limit specified by integer |
0 |
The following set of dirxcp commands defines the set of LDAP operation service controls for My-Company:
modify /O=My-Company/CN=ldapConfiguration -add {LSES='preferChaining=T:chainingProhibited=F:localScope=F:dontUseCopy=F:dontDereferenceAlias=F:subentries=F:copyShalldo=T:priori-ty=1:timelimit=0:sizelimit=0:scopeofreferral=0:attributesizelimit=0'}
modify /O=My-Company/CN=ldapConfiguration -add {LCOS='preferChaining=T:chainingProhibited=F:localScope=F:dontUseCopy=F:dontDereferenceAlias=F:subentries=F:copyShalldo=T:priori-ty=1:timelimit=0:sizelimit=0:scopeofreferral=0:attributesizelimit=0'}
modify /O=My-Company/CN=ldapConfiguration -add {LADS='preferChaining=T:chainingProhibited=F:localScope=F:dontUseCopy=T:dontDereferenceAlias=F:subentries=F:copyShalldo=F:priori-ty=1:timelimit=0:sizelimit=0:scopeofreferral=0:attributesizelimit=0'}
modify /O=My-Company/CN=ldapConfiguration -add {LRES='preferChaining=T:chainingProhibited=F:localScope=F:dontUseCopy=T:dontDereferenceAlias=F:subentries=F:copyShalldo=F:priori-ty=1:timelimit=0:sizelimit=0:scopeofreferral=0:attributesizelimit=0'}
modify /O=My-Company/CN=ldapConfiguration -add {LMOS='preferChaining=T:chainingProhibited=F:localScope=F:dontUseCopy=T:dontDereferenceAlias=F:subentries=F:copyShalldo=F:priori-ty=1:timelimit=0:sizelimit=0:scopeofreferral=0:attributesizelimit=0'}
modify /O=My-Company/CN=ldapConfiguration -add {LMDS='preferChaining=T:chainingProhibited=F:localScope=F:dontUseCopy=T:dontDereferenceAlias=F:subentries=F:copyShalldo=F:priori-ty=1:timelimit=0:sizelimit=0:scopeofreferral=0:attributesizelimit=0'}
Granting Read Access Rights to Subentries
When the LDAP server starts, it immediately performs a special DAP bind to the contact DSA and attempts to read its configuration information from the LDAP configuration subentry. Additionally, if not prohibited, it establishes an anonymous DAP connection. It can only perform this task successfully if it the administrative point contains a subentry ACI (SACI) operational attribute that grants it read access rights to subentries. In addition, anonymous or simple authenticated LDAP v3 clients should be able to read the LDAP root subentry and the global schema, and so they must be granted read access rights to subentries as well.
Recall from the section "Bootstrapping the DSA" that the My-Company administrator created a SACI attribute that enabled him to read and modify subentries when he created the first administrative point. The My-Company administrator must now modify the first administrative point to include a new SACI that grants read-only access to subentries by unauthenticated (anonymous) users, since the LDAP server and LDAP clients will not use authentication.
| The dirxadm and dirxcp stand-alone DSA setup scripts allow you to establish the SACI that grants read access rights to subentries for anonymous users when you set up the stand-alone DSA. The task is described here because it is a necessary pre-requisite for LDAP server setup and should be performed if it has not already been carried out during the stand-alone DSA setup process. |
To give the LDAP server and LDAP clients read access rights to subentries, the My-Company administrator binds to the DSA, and then issues the dirxcp command:
modify /O=My-Company -addattr \
         {SACI={ID=allow anonymous to read,
                PR=10,
                AL={BL={L=NONE}},
                UF={UC={AU=TRUE},
                    UP={PR=0,PI={E=TRUE,AUATV=TRUE},
                        GAD=grantRead+grantBrowse+\
                            grantDiscloseOnError+\
                            grantReturnDN+\
                            grantFilterMatch+\
                            grantAdd+grantRemove} } } }\
         {PA={PA=My-Company Company,PA=ABC Street 123,\
              PA=D-01234 City,PA=Germany}} \
         {TN=+49 12 345 67 890} \
         {DSC=My-Company Company}
Loading the Directory Data
Now that the My-Company administrators have initialized the DBAM database, the DSA, and the LDAP server, they can proceed to load their directory data into the DBAM database.The fastest method for loading large amounts of directory data into the database is to create an LDIF content file of the directory data, and then load this file into the database with dirxload.A number of different LDIF file-generation tools are available (including the DSA itself); the My-Company administrators use one of these tools to create an LDIF content file of the employee data they plan to make accessible through the DirX Directory service.They name this file Example_DB.ldif.
The dirxload command for loading an LDIF file into the database is:
dirxload –f LDIF_file
The My-Company administrators run the command:
dirxload -f Example_DB.ldif
Starting the Service
The final step in the DirX Directory service setup process is to start the DirX Directory service.DirX Directory administrators can start (and stop) a DirX Directory service either "locally"—that is, start it from the same machine on which the service has been set up—or remotely from other machines in the enterprise network.The example discussed here assumes that the My-Company administrators are starting the service locally.
Starting a Local DirX Directory Service on Windows
To start the DirX Directory service on a Windows system you must use the Administration Tool Services.
Starting a Local DirX Directory Service on Linux
To start the DirX Directory service on a Linux system, use the dirxadm start command without any options:
% dirxadm start
The dirxadm program starts the local service. Note that the dirxadm start command does not require you to bind to the DSA first; this is the only dirxadm command without this requirement.