Example Kubernetes Project
An example Kubernetes project that demonstrates the use and capabilities of the DirX Directory container image can be downloaded from the DirX support portal. The next sections describe the example project and how to use it.
Restrictions
This section describes restrictions that apply to the example DirX Directory Kubernetes project.
Prerequisites
Deploying and running the example DirX Directory Kubernetes project has the following prerequisites.
System Requirements
The host machine requires at least 8 GB RAM and 40 GB free disk space to deploy the DirX Directory Kubernetes example project.
Container Runtime
To run the example DirX Directory Kubernetes project, the Docker Container runtime must be installed and running on the host machine. Before any of the scenarios described below are executed, the following command must be able to run without errors on the host system:
docker container run --rm hello-world
Installation can be performed based on the distribution’s official documentation or the Docker Engine documentation. See https://docs.docker.com for details.
Local Cluster
To run the example DirX Directory Kubernetes project, the host system must have a configured minikube environment as described in the minikube installation instructions (see https://minikube.sigs.k8s.io/docs) and the minikube instance must be running. Use the following command to check it:
minikube status
The default-storageclass and storage-provisioner addons must be enabled. The status of the addons can be verified by executing the following command:
minikube addons list
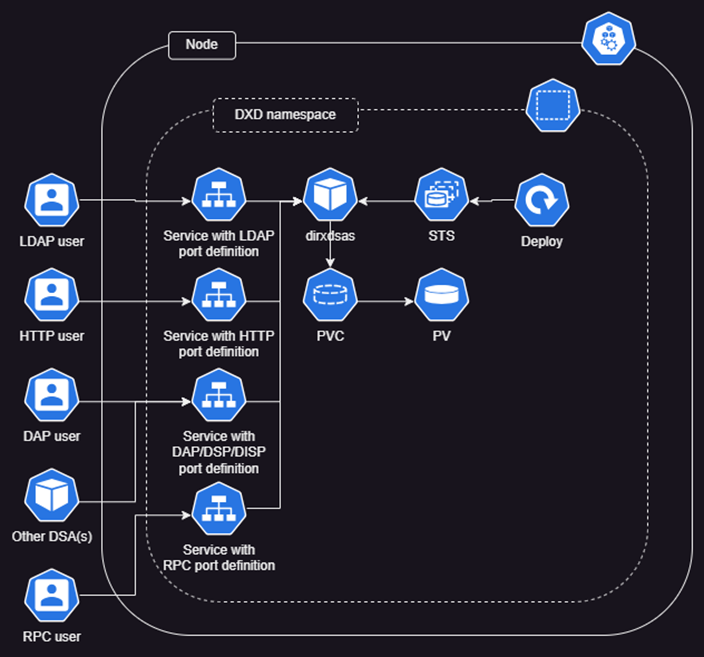
Architecture
The example DirX Directory Kubernetes project runs the DirX Directory service in a stateful set Kubernetes resource connected with the necessary resources to provide network connection and persistence. The simplified architectural diagram of the example project is shown below.
Configuration
The root of the example DirX Directory Kubernetes project contains a set of folders that are similar to a normal DirX Directory installation: client, conf, dsa, http, ldap, progsvr, tools and several other configuration files.
The content of these folders corresponds to a normal DirX Directory installation and contains several types of configuration files. The next sections describe these files in more detail.
init_scripts_config_map.yaml
As in Kubernetes, the example DirX Directory Kubernetes project has a resource called an init container. The database initialization is implemented using this resource instead of the entrypoint-init.d scripts. The init_scripts_config_map.yaml configuration file contains the initialization scripts to be executed before the DirX Directory container starts up. It handles initializing a database file and loading the o=My-Company example database. You can customize the initialize_db.sh script to set the DBAM profile to your requirements.
stateful_set.yaml
This configuration file contains the definition of the main stateful set resource. It defines the init container, the container, the container ports used and the mounted volumes. As the stateful set contains the definition of the container in use, the DirX Directory container image version to be used can be specified here. For this, the image property can be set in both the container and the init container definition.
service.yaml
The service.yaml configuration files define the service resources that are used to expose ports. There are multiple service.yaml files, one for each DirX Directory server. You can modify the exposed port numbers in these files.
*_pvc.yaml
These configuration files define the persistent volume claims that are used to persist the files used by the DirX Directory service. These files include the database files, log files, audit files, etc. You can adjust the size of the persistent volume claims by setting the storage parameter.
*config_map.yaml
Config maps are used to store the configuration files used by the DirX Directory service. There are several files with this naming structure, containing all configuration files used in a normal DirX Directory installation. You can modify these configuration files according to your requirements.
secret.yaml
Kubernetes secrets are used to store sensitive or binary data. In the example DirX Directory Kubernetes project, they are used to store, for example, client certificates, user certificates, the license files, etc. These secrets can be updated according to your requirements.
The .pwd files must be handled specially in secret.yaml configuration files. The DirX Directory services encrypt the .pwd files automatically. However, in Kubernetes, secrets are read-only resources and should not be modified once they are attached to a container. As a result, if the password file is set in the secret.yaml file without encryption, password file encryption will fail and the server will not be able to start. To solve this issue, the example DirX Directory Kubernetes project delivers an executable called dirxencryptpwd that can be used to encrypt the password. All .pwd files must contain the encrypted password.
Using the Example Kubernetes Project
This section describes example workflows you can use to experiment with the example DirX Directory Kubernetes project.
Loading the Container Image
The first step of executing a containerized application is to get and load the container image. Download the DirX Directory container image from the DirX support portal and then load it to the local registry using the command:
minikube image load dxd-9.7.138.tar
This command adds the dxd:9.7.138 container image to the local registry inside the minikube environment. DirX Directory delivers the container image with only a single label containing the full version.
However, as the DirX Directory container image and the DirX Directory Kubernetes example project configuration files are delivered separately, the example project cannot refer to a specific DirX Directory version. So, in both the container and the init container, the image "dxd" is referred to with the default "latest" tag.
To use a specific image version, you can specify the tag in the image property of the containers and initContainers section of the stateful set.yaml configuration file. Alternatively, you can tag the image with the specific version tag to the default tag, as shown in the following command:
minikube image tag dxd:9.7.138 dxd
Starting the Example Project
The provided Kubernetes configuration files and the container image make it easy to run the DirX Directory service in the Kubernetes environment with the default My-Company configuration. To start the project:
-
Get and load the DirX Directory container image as described in the section “Loading the Container Image”.
-
Extract the Kubernetes configuration files and then modify the parameters defined in the configuration section to your requirements; for example, DirX Directory version, port numbers, storage space, and so on. When preparing the configuration files, it’s recommended to create a new namespace using the command:
minikube kubectl — create ns namespace -
Apply the configuration files with the command:
minikube kubectl — apply -n namespace -Rf configuration_path
where configuration_path is the folder to which you have extracted the provided Kubernetes configuration yaml files. -
Check the status of the DirX Directory pod by running the command:
minikube kubectl — get pods -n namespace
Here is an example startup command sequence for a DirX Directory service dxd-standalone:
minikube kubectl -- create ns dxd-standalone
minikube kubectl -- apply -n dxd-standalone -Rf kubernetes
minikube kubectl -- get pods -n dxd-standalone
Please note that starting up a pod takes time, so the last command may be repeated several times until the pod comes up, showing a Running status.
Tunneling the Ports
The example Kubernetes project uses LoadBalancer Kubernetes resources to expose its ports. By default, these ports are only available inside the minikube environment. To expose these ports to a specified bind address, use the command:
minikube tunnel --bind-address=target_IP
where target_IP is the IP address of the network interface to which the exposed ports should be bound. For example, to make the LDAP ports available outside minikube on the host’s loopback interface, use the command:
minikube tunnel --bind-address=127.0.0.1
Customizing the Initialization
You can customize the example Kubernetes project by adjusting the delivered yaml configuration files and then applying the changes with the “apply” command described in the "Starting the Example Project" section.
Please note that the Kubernetes example project is tested and supported only as is. Kubernetes configuration changes other than the changes and procedures described in this document are outside the scope of DirX Directory support.
Executing Tools and Clients
The DirX Directory container image contains a full Linux installation. All tools and clients are included. You can use these tools by using kubectl’s exec functionality. For example, you can open an interactive shell into the DirX Directory pod with the command:
minikube kubectl — exec -it -n namespace dxd-0 — bash
In the interactive shell, you can manage the DirX Directory service as a normal Linux installation.
Deleting a Directory Instance
DirX Directory instances, if running in a separate namespace, can be deleted with the command:
minikube kubectl — delete ns namespace
Please note that this command will not clean up the persistent volumes. You should remove them manually.
Setting up Shadowing
This section describes how to implement a simple supplier-consumer scenario using the example Kubernetes project.
Create Master and Shadow Kubernetes Projects
As this shadowing scenario needs two DirX Directory instances with different configurations, the first step is to copy the example Kubernetes project files into two different folders called dxd-master and dxd-shadow. These folders will contain the necessary configuration for the supplier and the consumer respectively. To perform this task, run the following commands:
cp -R kubernetes dxd-master
cp -R kubernetes dxd-shadow
Set Master and Shadow DSA Identifiers
Next, set the DIRX_HOST_NAME, DIRX_DSA_NAME and DIRX_OWN_PSAP environment variables. Open the dxd-master/conf/config_map.yaml file and append the following rows to dirxenv.ini:
set DIRX_DSA_NAME=CN=DirX-k8s-master
set DIRX_HOST_NAME=dxd-service.dxd-master.svc.cluster.local
set DIRX_OWN_PSAP=TS=DSA1,NA='TCP/IP_IDM!internet=1.2.3.4+port=1234',DNS='(HOST=dxd-service.dxd-master.svc.cluster.local,PLAINPORT=21200)'"
Now open the dxd-shadow/conf/config_map.yaml file and append the following rows to dirxenv.ini:
set DIRX_DSA_NAME=CN=DirX-k8s-shadow
set DIRX_HOST_NAME=dxd-service.dxd-shadow.svc.cluster.local
set DIRX_OWN_PSAP=TS=DSA2,NA='TCP/IP_IDM!internet=1.2.3.4+port=1234',DNS='(HOST=dxd-service.dxd-shadow.svc.cluster.local,PLAINPORT=21200)'"
Adjust Duplicate LoadBalancer Resources
As both dxd-master and dxd-shadow are copied from the same source, they contain the same definitions for the LoadBalancer service resources. If multiple LoadBalancer resources are started with the same port, it will result in port collisions when the traffic is tunneled to an IP address. So as the next step, you should delete or modify these resources. If you would like to access only one of the nodes from an external IP, you can delete the dsa/service.yaml, ldap/service.yaml, progsvr/service.yaml and http/service.yaml files from one of the copied folders. If you would like to access both, you can modify the port numbers in these files to avoid port collision.
Start Master and Shadow Instances
When the configuration is finished, start the dxd-master instance with the following commands:
minikube kubectl -- create ns dxd-master
minikube kubectl -- apply -n dxd-master -Rf dxd-master/
minikube kubectl -- get pods -n dxd-master
Then start the dxd-shadow instance:
minikube kubectl -- create ns dxd-shadow
minikube kubectl -- apply -n dxd-shadow -Rf dxd-shadow/
minikube kubectl -- get pods -n dxd-shadow
Create the Shadowing Agreement
After these commands are executed, there are two separate standalone DirX Directory services running. Both are loaded with the o=My-Company example database. The next step is to create the shadowing agreement between the two standalone DSAs using the following commands:
minikube kubectl -- exec -it -n dxd-master dxd-0 bash
dirxadm -c "defbind; sob create -consumer {/CN=DirX-k8s-shadow} \
    -agreementid 15 \
    -consumerpsap {TS=DSA2,NA='TCP/IP_IDM!internet=1.2.3.4+port=1234',DNS='(HOST=dxd-service.dxd-shadow.svc.cluster.local,PLAINPORT=21200)'} \
    -supplier {/CN=DirX-k8s-master} \
    -supplierpsap {TS=DSA1,NA='TCP/IP_IDM!internet=1.2.3.4+port=1234',DNS='(HOST=dxd-service.dxd-master.svc.cluster.local,PLAINPORT=21200)'} \
    -consumerkind CENTRALADMIN  \
    -status cooperative \
    -agreement {SS={AREA={CP={/o=My-Company},\
        RA={DEF=TRUE}},\
        ATT={DEF=TRUE}},\
        UM={SI={OC=TRUE}},CHANGEO=FALSE} \
    -pol {CONS={REPLS=TRUE}}"
Setting up Crash Handling
By default, the DirX Directory watchdog (dirxdsas) handles all server crashes. However, the minikube environment does not allow ptrace calls by default, so the watchdog procedure is not allowed to generate core dumps.
To activate automatic core dump collection, install the systemd-coredump package and then disable the watchdog’s core dump handling by setting DIRX_WDOG_CRASH_HANDLER=0 in dirxenv.ini. These settings enable systemd to collect the core dumps.
Troubleshooting
All files (including log, audit, ldif, and others) in the DirX Directory container image are written as they are in a normal Linux installation, so files required for troubleshooting are written as files. In the example Kubernetes project, all paths used to store these files are mapped to a persistent volume claim provided by minikube’s hostpath-provisioner so that files needed for troubleshooting are persisted. The provisioner creates the persistent volumes in the
/var/lib/docker/volumes/minikube/_data/hostpath-provisioner/namespace folder. The log files of the currently running instance can be found in the separate folders. However, the logs of previous instances are copied to a special log folder called dxd-log-persistence-pvc. The log persistence folder is automatically cleaned up by deleting the log of all pods written more than 30 days ago.