Distributing the DIT across Multiple DSAs
This chapter describes how to set up a true distributed DIT, where different DSAs each hold pieces of an organization’s DIT and communicate with each other to present a “seamless” view of the DIT.
The chapter describes a sample distributed configuration with the following characteristics:
-
The superior DSA is the sample stand-alone DSA established in the chapter “Setting up the DirX Directory Service”.
-
The subordinate DSA has the following characteristics:
-
Its administrative point is at the organization-unit level and is an autonomous administrative point
-
The top level of its part of the DIT is at the organization-unit level
-
This chapter continues to use the fictitious company “My-Company” to illustrate the planning decisions and administrative tasks necessary to set up the sample distributed configuration.
Planning the Distributed Configuration
My-Company has established a stand-alone DSA that contains general information about the employees in its sales and development organizations and shadows this information on a DSA in Hamburg. My-Company now plans to extend its DIT with information about employees in its manufacturing organization.
The first DSA, called DSA1, is located in Munich at the company’s headquarters. This DSA stores the employee information about the company’s sales and development organizations. My-Company plans to set up a third DSA, called DSA3, at the manufacturing plant in Durach to store the information about the manufacturing employees. The following figure illustrates this configuration.
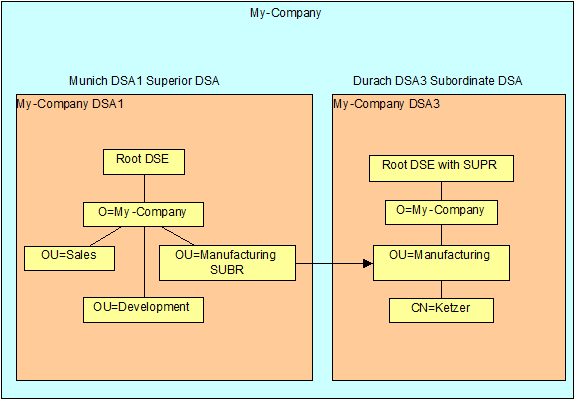
The Munich DSA1 is the superior DSA and the Durach DSA3 is the subordinate DSA.
Building the Distributed Configuration
Building My-Company’s distributed configuration consists of two steps:
-
Planning and building the new subordinate DSA
-
Establishing communications between the two DSAs so that they each have information about the other and the piece of the DIT each holds
The next sections describe these steps.
Planning the Subordinate DSA
Recall that when setting up their first DSA, My-Company needed to make decisions in two areas before building the DSA:
-
Defining what the DIT will be
-
Defining the framework for DSA administration (DSA name, a default administrator, access rights, DUA name and presentation address)
My-Company must evaluate these same issues before it can build its new DSA.
Determining the Subordinate DSA’s DIT
In order to define the DIT, My-Company must define:
-
The structure of this part of the DIT
The DIT held by DSA3 is an extension of the DIT held by DSA1. It consists of one organizational unit - Manufacturing - with employees underneath this level. Manufacturing is represented as an object of object class organizational-unit, and the employees are represented as entries of object class organizational-person.
-
The DIT names in the upper part of this DIT
The DIT on DSA3 begins at the organizational-unit level. Consequently, the topmost entry is /O=My-Company/OU=Manufacturing.
-
The attribute types that will be used to store employee information
The DIT held by DSA3 needs to store information about the Manufacturing organizational unit and the manufacturing employees. However, this DIT does not need to store the general information about My-Company. The information about the Manufacturing organizational unit and its employees has the same storage requirements as the information about the Sales and Development organizational-units and their employees. Consequently, this DIT will use the same attribute types for organizational-unit and organization-person object classes as does DSA1.
Determining the Administrative Framework
The next planning step for My-Company is to establish the administrative framework in which DSA3’s administration will be performed. This planning process consists of the following tasks:
-
Defining a DSA name and presentation address
The name for DSA3 is /CN=DirX-DSA-host3 (environment variable DIRX_DSA_NAME on DSA3). Its presentation address (environment variable DIRX_OWN_PSAP on DSA3) is:
Transport selector: DSA3 Network address:
Internet address:
111.22.33.44
port number:
23333
-
Defining the location of the first administrative point
The topmost entry held by DSA3 is /O=My-Company/OU=Manufacturing; this is the first administrative point and is also DSA3’s context prefix. DSA3’s first administrative point is an autonomous administrative point. Because autonomous administrative points are exempt from the policies of superior administrative areas and access control policies defined at the /O=My-Company level do not apply within the OU=Manufacturing and must be redefined during DSA3’s initialization.
All superior name parts of the context prefix of the first administrative point must be introduced to the DSA so that it can build complete distinguished names for all of its entries. In this case, /O=My-Company is a superior of DSA3’s context prefix, which is OU=Manufacturing. However, DSA1 masters the entry /O=My-Company, and so DSA3 cannot hold another master entry of /O=My-Company, because there is always only one master of one entry. Consequently, a "glue" must be established for /O=My-Company. A glue provides the name of a superior of the context prefix; it is not an entry, and is not accessible through the protocol.
-
Defining the default administrator
My-Company determines that the name of the default administrator entry for DSA3 is /O=My-Company/OU=Manufacturing/CN=admin.
-
Defining the access rights
My-Company decides that the default administrator for DSA3 will have the same access rights on DSA3 as the default administrator /O=My-Company/CN=admin has on DSA1. In addition, the DSA1 default administrator will have the same rights as the DSA3 default administrator /O=My-Company/OU=Manufacturing/CN=admin on DSA3.
Users on DSA3 will have the same access rights as the users on DSA1.
-
Defining a DUA Address
In order for DUAs, especially dirxcp, to bind to a DSA, a DUA must be assigned a presentation address. If the DUA runs on the same machine as the DSA, the DUA’s transport selector and the port number must be different from the DSA’s values.
My-Company uses a local client with the DSA with the following presentation address:
Transport selector: DUA3 Network address:
Internet address:
111.22.33.44
port number:
23456
With these planning decisions made, the administrator of DSA3 can now build the subordinate DSA.
Building the Subordinate DSA
The next step is to build DSA3 as a stand-alone DSA. To perform this task, the administrator follows the procedures for setting up a stand-alone DSA, which are:
-
Bootstrapping the DSA
-
Initializing the DSA
-
Populating the tree
Bootstrapping the DSA
To perform this task, the administrator of DSA3 follows the same procedures as described in the section “Bootstrapping the DSA” in the chapter “Setting up the DirX Directory Service”. The only differences for DSA3 are that:
-
The glue established for DSA3 is /O=My-Company
-
The DSA name for DSA3 is /CN=DirX-DSA-host3
-
The administrative point and default administrator are one level lower than for DSA1:
-
The first administration point is /O=My-Company/OU=Manufacturing
-
The default administrator is /O=My-Company/OU=Manufacturing/CN=admin
-
-
The default administrator of DSA1 /O=My-Company/CN=admin receives the same access rights within the subentry ACI as the DSA3 default administrator; that is, two distinguished names are given in the SACI attribute
-
The DirX Directory Administrators attribute for DSA3 contains the distinguished name of the administrator of DSA3
Establishing the DSA Name and Presentation Address in DSA3
Recall from the chapter “Setting up the DirX Directory Service” that a DSA will not bootstrap completely until it knows its own name and presentation address. The environment variables DIRX_DSA_NAME and DIRX_OWN_PSAP specify a DSA’s name and presentation address. The values for DSA3 are:
DIRX_DSA_NAME=“/CN=DirX-DSA-host3“
DIRX_OWN_PSAP=”TS=DSA3,NA=’TCP/IP_IDM!internet=111.22.33.44+port=23333’”
Creating the Glues for DSA3
To create a glue, use the command
[dse] create distinguished_name -attribute DSET=GLUE
Supply the distinguished name of the glue in the distinguished_name argument. The presence of the DSE-type (DSET) operational attribute indicates that the entry is a glue; do not specify any other attributes.
The following dirxadm command creates the glue /O=My-Company for DSA3:
bind
create /O=My-Company -attribute DSET=GLUE
Creating the First Administrative Point for DSA3
The following dirxadm command creates the first administrative point for DSA3:
create /O=My-Company/OU=Manufacturing -attr \
      {OCL=TOP;OU} \
      {DSET=ENTRY+ADM_POINT+CP} \
      {AR=AA;ACSA;SASA}  \
      {ACS=SACS} \
      {SACI={ID=admin: enable Handling of Subentries,
             PR=254,
             AL={BL={L=SIMPLE}},
        UF={UC={N={DN={/O=My-Company/OU=Manufacturing/CN=admin}};
                  {DN={/O=My-Company/CN=admin}}},
                 UP={PI={E=TRUE},
                     GAD=grantRead+grantBrowse+\
                         grantDiscloseOnError+\
                         grantReturnDN+\
                         grantAdd+grantRemove+grantModify};
                    {PI={AT=SS;OC;AT;DSR;NF;
                         DCR;MR;MRU;CRN;CRT;MN;MT;PACI;EACI,
                         AAV=SS;OC;AT;DSR;NF;
                         DCR;MR;MRU;CRN;CRT;MN;MT;PACI;EACI,
                         AUATV=TRUE},
                     GAD=grantDiscloseOnError+\
                         grantRead+grantCompare+\
                         grantFilterMatch+\
                         grantAdd+grantRemove} } } } \
      {CRN={/O=My-Company/OU=Manufacturing/CN=admin} } \
      {PA={PA1=My-Company,PA2=High Street 123,\
           PA3=D-23456 Durach,PA4=Germany}} \
      {TN=+49 68 345 67 890} \
      {DSC=My-Company}
Creating the Default Administrator Entry
For DSA3, an administrator with the distinguished name
/O=My-Company/OU=Manufacturing/CN=admin must be created. The entry is of object class organizational-person, and a user password will be used during authentication. The following dirxadm command creates the default administrator entry for DSA3:
create  /O=My-Company/OU=Manufacturing/CN=admin \
         -attr   {OCL=TOP;PER;ORP} \
                 {DSET=ENTRY} \
                 {SN=admin} \
                 {DSC=Default Administrator} \
                 {UP=dirx} \
                 {CRN={/O=My-Company/OU=Manufacturing/CN=admin}}
Controlling Access to dirxadm
To add the DSA3 administrator distinguished name to the DirX Directory Administrators attribute (DADM attribute) for DSA3, the DSA3 administrator issues the dirxadm command:
modify / -addattr \
         DADM={/O=My-Company/OU=Manufacturing/CN=admin}
The administrator must now use dirxadm to bind to DSA3 with simple authentication and the password dirx.
Initializing the DSA
To perform this task, the administrator of DSA3 follows the same procedures as described in the section “Initializing the DSA” in the chapter “Setting up the DirX Directory Service”. The only differences for DSA3 are that:
-
The default DSA specified in the client configuration file dirxcl.cfg is DSA3
-
The access control subentry is one level lower:
-
/O=My-Company/OU=Manufacturing/CN=AccessControl-Subentry
-
-
In the dirxcp bind operation, the local administrator is
/O=My-Company/OU=Manufacturing/CN=admin -
The PACI attribute in the access-control-subentry contains two distinguished names, giving the same rights as DSA3’s default administrator to the DSA1 administrator /O=My-Company/CN=admin
Establishing the DSA Name and Presentation Address in the Client
Recall from the chapter “Setting up the DirX Directory Service” that the name of the DSA and its presentation address must be made available to the dirxcp program. The DUA name and presentation address must also be established.
The DUA presentation address and DSA name and presentation address are provided to the client in the file dirxcl.cfg. The DSA3 administrator modifies this file to contain the presentation address of the DUA and the name and presentation address of My-Company-DSA3 as the default DSA:
# File: dirxcl.cfg
# first non-comment line is client address
self TS=DUA3,NA='TCP/IP_IDM!internet=111.22.33.44+port=23456'
# first line is default DSA
# the next two lines must be on one line in the file
/CN=DirX-DSA-host3 TS=DSA3,NA='TCP/IP_IDM!internet=111.22.33.44+port=23333'
Binding to the DSA with dirxcp
To bind to the bootstrapped DSA with dirxcp, the DSA3 administrator uses the command:
bind -authentication SIMPLE \
     -user /O=My-Company/OU=Manufacturing/CN=admin \
     -password dirx
Creating the Access Control-Specific Subentry
Recall from the chapter “Setting up the DirX Directory Service” that the access control-specific subentry defines the access control policy for a subset of the administrative area with which it is associated. An access control specific subentry of the first administrative point must define the access control policy applicable in the DSA. By default, no user is granted any access right to any entry of the DIT.
The DSA3 administrator uses the following dirxcp command to create the access control-specific subentry for My-Company’s Manufacturing organization below the first administrative point:
dirxcp> create \
         /O=My-Company/OU=Manufacturing/CN=AccessControl-Subentry \
         -attr \
            {OCL=SUBE;ACS} \
            {SS={DEF=TRUE}} \
            {PACI={ID=admin: enable most of operations \
                             but no Rename,
                   PR=254,
                   AL={BL={L=SIMPLE}},
         UF={UC={N={DN={/O=My-Company/OU=Manufacturing/CN=admin}};\
                   {DN={/O=My-Company/CN=admin}}},
                       UP={PI={E=TRUE},
                       GAD=grantDiscloseOnError+\
                           grantRead+grantBrowse+\
                           grantReturnDN+\
                           grantAdd+grantRemove+grantModify};
                       {PI={AT=AR;ACS;SACI;CRN;
                            CRT;MN;MT;SOC;GSR;CE;EACI,
                            AAV=AR;ACS;SACI;CRN;
                           CRT;MN;MT;SOC;GSR;CE;EACI,
                           AUATV=TRUE},
                      GAD=grantDiscloseOnError+\
                          grantRead+grantCompare+\
                          grantFilterMatch+\
                          grantAdd+grantRemove}} };
                   {ID=Public Access: enable Read and Search - \
                                      disable read password,
                    PR=0,
                    AL={BL={L=NONE}},
                    UF={UC={AU=TRUE},
                        UP={PI={E=TRUE},
                            GAD=grantDiscloseOnError+\
                                grantRead+\
                                grantBrowse+grantReturnDN};
                           {PI={AUATV=TRUE},
                            GAD=grantDiscloseOnError+\
                                grantRead+grantCompare+\
                                grantFilterMatch };
                           {PR=255,
                            PI={AT=UP},
                            GAD=denyRead} } } }
Populating the DIT
To perform this task, the administrator of DSA3 follows the same procedures as described in the section “Populating the DIT” in the chapter “Setting up the DirX Directory Service”. The only difference for DSA3 is the distinguished name of the administrator in the bind operation that occurs prior to creating the entries in the DIT. For example:
dirxcp> create {/O=My-Company/OU=Manufacturing/CN=Klein Mike} \
        -attr \
            {OCL=TOP;PER;ORP;IPER} \
            {SN=Klein} \
            {DSC=Plant Manager} \
            {TN=+49 68 567 890;+49 68 567 891} \
            {UP=mdk123}
Establishing DSA Communications
Now My-Company has another stand-alone DSA running that holds the entries of the manufacturing organizational unit. My-Company employees can bind to the DSA with dirxcp and read these entries.
However, at this point in the process, DSA1 and DSA3 are two stand-alone DSAs that cannot communicate with each other and which have completely separate naming contexts. DSA3 naming context extends from OU=Manufacturing until {/O=My-Company/OU=Manufacturing/CN=Klein Mike}. DSA1 contains /O=My-Company, but does not contain OU=Manufacturing. To create the distributed DIT, the administrators of the two stand-alone DSAs need to establish transition points between each DSA’s naming context. These transition points are called knowledge references, and contain information about the DSAs that hold the pieces of the distributed DIT.
In the case of My-Company, the naming context /O=My-Company on DSA1 contains the employee entries of the Sales and Development organizational units. Its lower border ends at these employee entries. The administrator on DSA1 needs to create a knowledge reference to include the naming context /O=My-Company/OU=Manufacturing on DSA3. This knowledge reference is called a subordinate reference. It marks the point where DSA1’s naming context ends and DSA3 joins it, enabling DSA1 to forward (chain) inquiries for the Manufacturing subtree to DSA3 using the DSP protocol.
The administrator of the subordinate DSA must also create a knowledge reference to the superior DSA. This knowledge reference is called a superior reference, and enables the subordinate DSA to communicate with the superior DSA if it does not have enough information to answer a query.
Furthermore, as discussed in the chapter “Creating a Shadow DSA”, DSAs must be protected from unknown or untrusted DSAs trying to connect to them for unknown purposes. Since the superior and subordinate DSAs will need to contact each other, each needs a mechanism to determine whether it is the appropriate DSA who is contacting it or whether it should reject the connection. As in shadowing, the mechanism used to screen connecting DSAs is the DSA policy.
Consequently, establishing DSA communications consists of these steps:
-
Creating a DSA policy for each DSA that permits communication with the other
-
Creating the superior and subordinate references on each DSA
These steps are performed in two stages:
-
Establish communication from the superior to subordinate DSA
-
Establish communication from the subordinate to the superior DSA
The next sections describe how to perform these tasks in the context of the sample distributed configuration.
Establishing Communications from Superior to Subordinate DSA
This procedure consists of the following tasks:
-
Creating the DSA policy on the subordinate DSA
-
Changing the DSA password on the superior DSA
-
Creating the subordinate reference on the superior DSA
-
Testing the chaining from superior to subordinate DSA
Creating the DSA Policy on the Subordinate DSA
The first step is for the administrator on DSA3 to create a DSA policy that contains the name and password of the DSA that is permitted to connect to DSA3, which in this case, is DSA1. This policy will enable DSA1 to chain to DSA3 if necessary.
Since chained operations can result in the modification of the subordinate DSA’s local DIT or in the display of sensitive information, the DSA policy established here must also define the level of trust to be given to the chaining DSA. The policy that My-Company establishes on DSA3 defines DSA1 as a trusted DSA for read operations, but not for modify operations.
To create a DSA policy, use the dirxadm command:
[dse] modify / -addattribute attribute_list
The modify operation is performed on the root DSE because the DSA-policy structured attribute (DSAP) is an attribute of the root DSE.
For the DSA policy established on DSA3, the attribute list must contain the DSA-policy (DSAP) attribute with the following components and values:
-
The DSA-name component (DSA) with the value /CN=DirX-DSA-host1, which is DSA1’s name.
-
The password (PWD) subcomponent of the authentication-policy (AP) component with the value M8921DSA1, which is DSA1’s password.
-
The authentication-method-trusted (AMT) subcomponent with the value AM=SIMPLE-WITH-PWD;SIMPLE-PROTECTED. This value means that if DSA1 uses a different authentication method when it contacts DSA3, for instance NONE or SIMPLE, DSA3 will not trust it. The connection, however, will be accepted. Not trusting DSA1 will result in operations being performed with the access rights of an anonymous user.
-
The trusted-degree (TD) subcomponent with the value READ. This value means that DSA1 will only be trusted for chained read operations and not for chained modify operations.
The administrator on DSA3 creates this DSA policy with the following dirxadm command:
modify / -addattr {DSAP={DSA={/CN=DirX-DSA-host1},
          AP={AMT={AM=SIMPLE-WITH-PWD;SIMPLE-PROTECTED},
                           TD=READ,
                           PWD=M8921DSA1
                           }
                      }
               }
This command permits the DSA with the name /CN=DirX-DSA-host1 and the user password M8921DSA1 to bind to DSA3. It also defines the authentication method for incoming trusted DSP binds to DSA3 so that only incoming DSP binds from DSA1 with simple credentials with password (protected or not) will be trusted, and defines the trust degree so that DSA1 is trusted for read operations but not for modify operations.
| This example uses the attribute component AMT (authentication-method-for-trust) and does not use the AMB (authentication-method-for-bind) component. Not using AMB means that DSA3 will accept any authentication level for incoming DSP associations (see the description of the DSA policy syntax in the DirX Directory Syntaxes and Attributes). |
Recall that the access control subentry on DSA3 gives the DSA1 administrator the same access rights on DSA3 as its local administrator. However, the level of trust established in DSA3’s DSA policy affects these access rights. For example, suppose the DSA1 administrator wants to view the operational attributes of an entry or a subentry held by DSA3. To do this, the administrator binds to his DSA, which is DSA1, and issues a dirxcp request, for example:
dirxcp> show /O=My-Company/OU=Manufacturing -alloperationalattr -p
The DSA1 administrator will receive the information because DSA1 will chain to the DSA3 and the request is a read operation, which the DSA policy allows.
However, should the DSA1 administrator try to modify the part of the DIT on DSA3, he will receive the message “insufficient access rights“ because DSA1 is not trusted for modify operations, even though the access control subentry in DSA3 gives him these rights.
Changing the Default DSA Password on the Superior DSA
Every DirX Directory DSA has after its installation the default password DSA; this value is hardcoded and not visible. Since My-Company has decided to use different passwords for its DSAs and the DSA policy for DSA3 has been set up to expect a password from DSA1 of M8921DSA1, the administrator on DSA1 needs to modify the DSA policy to contain this password.
To change a DSA password, use the dirxadm command:
[dse] modify / -addattribute attribute_list
For My-Company, the DSA1 administrator must specify the following:
-
The DSA-policy (DSAP) attribute in attribute_list with the following values:
-
The / character in the DSA-name (DSA) component. Recall from the chapter “Setting up the DirX Directory Service” that the DSAP attribute can contain several types of policies (it is a multivalued attribute). If the name of a DSA is explicitly specified, the policy applies only to the named DSA. If “/” is specified as the DSA name, this policy applies to all other DSAs; that is, those DSAs for which no specific policy exists.
-
The password (PWD) component contains the value M8921DSA1, which is the password for DSA1
-
The following dirxadm command establishes DSA1’s password:
modify / -addattr {DSAP={DSA={/},
                         AP={PWD=M8921DSA1}
                         }
                   }
Creating a Subordinate Reference on the Superior DSA
To create a subordinate reference, use the dirxadm command:
[dse] create distinguished_name -attribute attribute_list
Supply the distinguished name of the subordinate context prefix in the distinguished_name argument. The attribute list must contain the following attributes:
-
The DSET attribute with the value SUBR
-
The specific-knowledge (SK) attribute, which specifies the access point of the subordinate DSA and its category
For My-Company, the administrator on DSA1 supplies the following values:
-
The subordinate context prefix /O=My-Company/OU=Manufacturing in the distinguished_name argument
-
The DSA name for DSA3 in the AE subcomponent of the master-or-shadow-access-point (MOS) component of the SK attribute
-
The keyword MASTER in the category component of the SK attribute to indicate that DSA3 is not a shadow DSA but is the master for the entries in the Manufacturing portion of the DIT
The following dirxadm command creates the subordinate reference on DSA1:
create /O=My-Company/OU=Manufacturing  -attr \
                DSET=SUBR \
                {SK={MOS={MSAP={AE={/CN=DirX-DSA-host3},
                                PSAP={TS=DSA3,
                                NA='TCP/IP_IDM!internet=111.22.33.44+port=23333'}
                         },
                     CAT=MASTER}
                    }
                }
Testing Communications from the Superior to the Subordinate DSA
The procedures given in the previous sections establish communication from the superior to the subordinate DSA in the sample distributed configuration. A possible next step is to verify that the superior DSA can access the DIT held by the subordinate DSA by binding to the superior DSA and issuing dirxcp requests that cause chaining to the subordinate DSA.
For My-Company, the previous steps have established the conditions for communication from DSA1 to DSA3. The administrator on DSA1 can now test this with the following procedure:
-
Bind to DSA1 as the default administrator or as anonymous user. For example:
dirxcp> bind -auth SIMPLE -user /O=My-Company/CN=admin -password dirx -
Issue a dirxcp read operation on DSA3’s DIT. For example:
dirxcp> list /O=My-Company/OU=Manufacturing -pretty
dirxcp> show {/O=My-Company/OU=Manufacturing/CN=Klein Mike} -alla -p
| The DSA1 administrator has not defined a policy for the authentication method for outgoing DSP associations (AMB). Consequently, the default will be used, which is simple protected. For simple protected, the default validity time for the authentication credentials is 30 seconds. Since DSA1 and DSA3 are on different systems that each has its own clock, the administrators must ensure that both clocks are well synchronized. If the clocks’ time difference is more than 30 seconds, the DSP association will be rejected because the credentials have expired. |
Establishing Communications from the Subordinate to the Superior DSA
This procedure consists of the following tasks:
-
Creating the DSA policy on the superior DSA
-
Changing the DSA password on the subordinate DSA
-
Creating the superior reference on the subordinate DSA
Creating the DSA Policy on the Superior DSA
The administrator on DSA1 also needs to create a DSA policy that contains the name and password of the DSA that is permitted to connect to DSA1, which in this case, is DSA3. This policy will enable DSA3 to use DSP communications to DSA1 if necessary.
To create a DSA policy, use the dirxadm command:
[dse] modify / -addattribute attribute_list
The DSA1 administrator supplies the DSA-policy (DSAP) attribute in the attribute_list argument with the following components and values:
-
The DSA-name component (DSA) with the value /CN=DirX-DSA-host3, which is DSA3’s name.
-
The password (PWD) subcomponent of the authentication-policy (AP) component with the value YY4321DSA3, which is DSA3’s password.
The following dirxadm command creates the DSA policy on DSA1:
modify / -addattr {DSAP={DSA={/CN=DirX-DSA-host3},
                         AP={PWD=YY4321DSA3}
                        }
                  }
The DSA policy for DSA1 does not define a level of trust. All users who bind to DSA3 and want information from DSA1 will receive the same rights as anonymous users, independent of whether or not they are authenticated. As a result, the local administrator of DSA3 is permitted to read the user attributes of the entries held on DSA1 but not the operational attributes, because this is the access control policy for anonymous users that has been established on DSA1.
Changing the Default DSA Password on the Subordinate DSA
The administrator on DSA3 also needs to modify the DSA policy to contain the new DSA3 password. To change a DSA password, use the dirxadm command:
[dse] modify / -addattribute attribute_list
For My-Company, the DSA3 administrator must specify the following:
-
The DSA-policy (DSAP) attribute in attribute_list with the following values:
-
The / character in the DSA-name (DSA) component; this value means that the policy will be used for all partner DSAs for which no special DSA policy exists that contains the exact DSA name
-
The password (PWD) component contains the value YY4321DSA3, which is the password for DSA3
-
The following dirxadm command establishes DSA3’s password:
modify / -addattr {DSAP={DSA={/},
                         AP={PWD=YY4321DSA3}
                        }
                  }
Creating a Superior Reference on the Subordinate DSA
To create a superior reference, use the dirxadm command:
[dse] modify / -addattribute attribute_list
and supply:
-
The superior-knowledge (SPK) structured attribute in the attribute_list argument; this attribute specifies the access point and presentation address of the superior DSA. In the case of My-Company, this is the DSA name and presentation address of DSA1.
The modify operation is performed on the root DSE because the superior-knowledge (SPK) structured attribute is an attribute of the root DSE.
The following dirxadm command creates the superior reference on DSA3:
modify / -addattr \
         {SPK={AE={/CN=DirX-DSA-host1},
                   PSAP={TS=DSA1,
                  NA='TCP/IP_IDM!internet=123.45.56.89+port=19999'}
              }
         }
The DSA3 administrator can now bind to DSA3 and issue a dirxcp request for information about the entries in DSA1’s part of the DIT, for example:
dirxcp> show /O=My-Company/OU=Sales -alluserattr -pretty
DSA3, using the superior reference, will chain to DSA1 to retrieve the information. The previous note about time synchronization between the two DSA machines applies here as well.
Extending My-Company Distributed DIT Configuration
This section of the chapter explains how to modify the sample distributed configuration established in the previous sections. It describes how to:
-
Establish a DSA keep line policy
-
Increase the expiration time of credentials for simple protected binds
-
Use simple with password as authentication mechanism for DSP associations
The next sections describe the procedures to be followed to make these modifications to the sample configuration using as an example My-Company.
Establishing a Keep-Line Policy
By default, every chained request from a DirX Directory DSA creates a new DSP association which is closed after the chained result is returned. If chained requests are sent frequently, administrators may want to change this default so that associations remain open across multiple chained requests.
The DSA keep-line policy permits administrators to specify a time limit during which a DSP association will remain open. Chained requests that occur within this time frame will use the same association. Administrators can set this policy for all DSAs (by specifying the DSA name /) or only for specific DSAs.
To create a keep line policy, use the dirxadm command:
[dse] modify / -addattr attribute_list
and supply the DSA-policy (DSAP) attribute in attribute_list with the following values:
-
The DSA-name (DSA) component, which is either / or a DSA name
-
The keep-line (KP) component, which specifies the time limit for the association
For example, suppose the DSA1 administrator wants to extend the DSA policy on DSA1 to include a keep-line policy of 60 seconds on all outgoing DSP associations from DSA1 to DSA3. The policy is to apply for all partner DSAs of DSA1. The administrator must modify the DSA policy for other DSAs in two steps:
-
Remove the old policy from the DSAP attribute (policies are one of the multiple values of the DSAP attribute)
-
Add the new policy and additionally specify any old options which should be kept, for example, the password
The following dirxadm commands create this keep-line policy:
modify / -removeattr DSAP={/}
modify / -addattr {DSAP={DSA={/},
                         AP={PWD=M8921DSA1},
                         KL=60
                        }
                  }
Increasing the Expiration Time of Credentials
By default, authentication credentials for simple protected DSP binds expire after 30 seconds. Since the two DSAs are on two different systems that each has its own clock, the administrators must ensure that both clocks are well synchronized. If the clocks’ time difference is more than 30 seconds, the DSP bind will be rejected because the credentials have expired.
There are two ways to increase the validity of credentials for simple protected binds to avoid clock synchronization problems between responder and initiator:
-
Increase the credentials validity on the responder side
-
Increase the credentials expiration time on the initiator side
The My-Company administrators choose to use the second approach.
The DSA authentication policy permits administrators to specify the expiration time of credentials for outgoing DSP (and DISP) binds. To create a DSA authentication policy, use the dirxadm command:
[dse] modify / -addattr attribute_list
and supply the DSA-policy (DSAP) attribute in attribute_list with the following values:
-
The DSA-name (DSA) component, which is either / or a DSA name
-
The authentication-policy (AP) component, which specifies (among others) the credentials’ expiration time (CE)
For example, suppose the DSA1 administrator wants to extend the DSA policy on DSA1 to include a DSA authentication policy with a credentials expiration time of 3600 seconds (one hour) on all outgoing DSP (and DISP) associations from DSA1 to DSA3. The policy is to apply for all partner DSAs of DSA1. The administrator must modify the DSA policy for other DSAs in two steps:
-
Remove the old policy from the DSAP attribute (policies are one of the multiple values of the DSAP attribute)
-
Add the new policy and additionally specify any old options which should be kept, for example, the password and the keep-line policy.
The following dirxadm commands create this DSA authentication policy:
modify / -removeattr DSAP={/}
modify / -addattr {DSAP={DSA={/},
                         AP={PWD=M8921DSA1, CE=3600},
                         KL=60}
                  }
Using Simple-with-Password Authentication for Outgoing DSP Associations
By default, simple protected authentication is used for all outgoing DSP (and DISP) binds. However, the DSA authentication policy permits administrators to specify the authentication method to be used for outgoing DSP binds.
To create and modify a DSA authentication policy, use the dirxadm command:
[dse] modify / -addattr attribute_list
and supply the DSA-policy (DSAP) attribute in attribute_list with the following values:
-
The DSA-name (DSA) component, which is either / or a DSA name
-
The authentication-policy (AP) component, which specifies (among others) the authentication method for binds (AMB)
Recall that the DSA1 administrator did not specify an authentication method for binds when he set up DSA1; consequently, the default of simple protected is used. Now suppose he wants to extend the DSA policy on DSA1 to include a DSA authentication policy with simple-with-password authentication for all outgoing DSP (and DISP) associations from DSA1 to DSA3. The policy is to apply for all partner DSAs of DSA1.
The administrator must modify the DSA policy for other DSAs in two steps:
-
Remove the old policy from the DSAP attribute (policies are one of the multiple values of the DSAP attribute)
-
Add the new policy and additionally specify any old options which should be kept, for example, the password and the keep-line policy. Note that there is no need to keep a value for the expiration time of credentials, as this value is only relevant for simple protected authentication.
The following dirxadm commands create this DSA authentication policy:
modify / -removeattr DSAP={/}
modify / -addattr {DSAP={DSA={/},
                         AP={AMB={AM=SIMPLE-WITH-PWD},
                             PWD=M8921DSA1},
                         KL=60}
                  }
For SIMPLE-PROTECTED authentication details, see: Simple and Structured Attributes.
SSL is recommended for secure communication between DSAs. For details see: Configuring Encrypted X.500 Protocols.