Creating a Shadow DSA
This chapter describes how to set up a distributed DirX Directory service based only on replication, also called shadowing. Shadowing is a mechanism that automatically copies directory data from one DSA to another over X.500 DISP. DirX Directory administrators can use shadowing to copy any directory tree or subtree (if it is stored in its own database) between two or more DSAs. The DSA that holds the master copy of the shadowed directory information - the supplier DSA - automatically copies any updates to that information to all of its slaves the consumer DSAs.
Recall from the section on X.500 shadowing in the chapter “Introducing DirX Directory” in the DirX Directory Introduction that DirX Directory DSAs can support shadowing with or without a total refresh, also called a total update, over DISP. When a shadowing operational binding (SOB) is established between two DSAs and the shadowing process is to be supplier-initiated, the supplier DSA duplicates the shadowed information to the consumer DSA over DISP as soon as the SOB is enabled. Using DISP to perform a total update is an effective means of data duplication for shadowed directories of fewer than one million entries, but it is not the best method for total updates of larger databases. As a result, DirX Directory permits DirX Directory administrators who are shadowing very large directory databases to perform the total update using dirxbackup save and restore operations for best performance, provided their shadow configuration replicates the entire DIT.
This chapter describes a sample shadow configuration with the following characteristics:
-
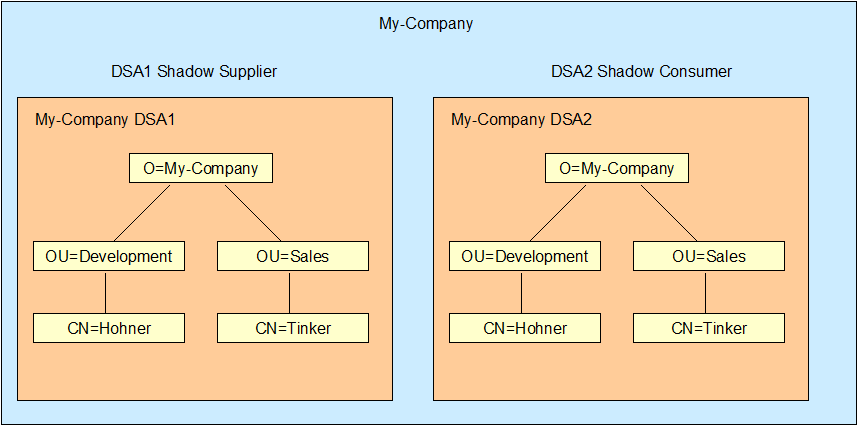
The first DSA plays the role of a shadow supplier and is the sample stand-alone DSA established in the chapter "Setting up the DirX Directory Service"
-
The second DSA plays the role of an asynchronous shadow consumer and does not master any entries. Its database profile and DSA schema are identical to those of DSA1.
-
The complete DIT of DSA1 is shadowed to DSA2.
-
The total update of DSA2 is performed via dirxbackup save and restore operations.
This configuration is an example of the "floating master" replication configuration discussed earlier in the chapter “Introducing DirX Directory” in the DirX Directory Introduction. This chapter describes how to build this configuration and how to use the DirX Directory administration tools to switch the mastership for maintenance purposes and in the event of system failure.
This chapter continues to use the fictitious company "My-Company" to illustrate the planning and administration tasks to set up the sample shadow configuration.
Tcl scripts for building this sample shadow configuration can be found in the directory
install_path/scripts/ShadowAgreements. These scripts contain all the commands and procedures discussed in this chapter.
Before You Begin
Before you start to follow the procedures and examples described in this chapter, there is some general information that you should know about how shadowing operates. The following sections provide details.
About Non-Replicated Local Information
The root DSE and the LDAP root subentry contain local information. Shadowing does not propagate modifications to these entries. You must administer the attributes of these entries locally with dirxadm, especially the following attributes of the root DSE:
-
The DirX Directory Administrators
-
The Policy attributes:
-
Audit Policy
-
DSA Policy
-
Local Scope Policy
-
Paging Policy
-
Search Base Policy
-
Time Limit Policy
-
User Policy
About the Cooperating DSAs Subentry
The cooperating DSAs subentry with the name /CN=Cooperating-DSAS-Subentry is a subentry of the root DSE. It contains information about the administered operational bindings with partner DSAs and must be the same for all participating DSAs.
When creating the first shadowing agreement to another DSA, the supplier DSA also creates a shadowing agreement for the cooperating DSA subentry. The DSA administers these agreements automatically. Administrators should never modify or delete these shadowing agreements except in a few erroneous deadlock situations; for example, after a DSA has crashed forever.
(See also the section “Cooperating DSA” in the DirX Directory Syntaxes and Attributes for details.)
Planning the Shadow Configuration
My-Company has established a single stand-alone DSA that contains general information about its employees. The amount of employee information is sizable—approximately 32 million entries. The My-Company employees access this directory data through many of the applications in the My-Company enterprise, and this data must be available to these applications at all times. Access to the data must meet the following criteria:
-
Maximum availability; that is, if the data is not available on the stand-alone DSA, employees can access the data in another DSA, and vice versa
-
The data must be up-to-date and accurate independent of where it is stored.
The solution that meets these criteria is to duplicate all the information contained in My-Company’s stand-alone DSA1 on a second DSA2 in the My-Company enterprise. DSA2 acts as an accessible DSA for load distribution purposes and as an online backup for the directory data that can also be switched to master the directory data, if necessary. The following figure illustrates this solution.
Building the Shadow Configuration
Duplicating data between DSAs requires that the administrators of DSAs to be used in a shadow configuration agree about several points.This understanding is called a shadowing agreement and represents the details of what is to be shadowed, when it is to be shadowed, and which role each DSA is to play.
As previously mentioned, the DSA that holds the information to be shadowed is called the supplier DSA or the master DSA, while the DSA that receives the shadowed information is called the consumer DSA or the shadow DSA.Supplier and consumer are known as DSA roles. The specification of what is to be shadowed is called the unit of replication.In this configuration, shadowing is supplier-initiated, where the supplier DSA determines when the shadowing actions take place, and the unit of replication is the complete contents of the DIT.
In My-Company’s shadow configuration, a single administrator is responsible for both DSA1 and DSA2, and thus is solely responsible for defining the shadowing agreement between the two DSAs.Once the My-Company administrator has defined the terms of the shadowing agreement, he uses dirxadm to create the shadowing agreement on the master DSA (DSA1). This step creates a Shadowing Operational Binding (SOB). The administrator sets up the agreement as "send changes only", which prevents DSA1 from initiating an automatic total update.DSA1 automatically stores the newly created shadowing agreement in the cooperating DSA table, which is a subentry that a DSA automatically creates in the DIT during the bootstrap procedure to store all shadowing agreements created after the DSA is up and running. The newly created shadowing agreement is disabled by default to prevent the DSA to send incremental updates while the shadow consumer is still not set up.
The My-Company administrator next sets up DSA2 with a completely empty database.He then uses dirxbackup on DSA1 to create an archive of the DSA’s complete DIT and restores this backup with dirxbackup onto DSA2.
Now DSA2 is ready to receive the incremental updates from DSA1. The administrator next enables the newly created shadowing agreement on DSA1. This causes DSA1 to propagate the incremental updates saved in the agreement-specific journal file to DSA2. While the shadowing agreement is enabled, any changes made to data within the unit of replication on DSA1 are automatically sent to DSA2 as incremental updates.Incremental updates can be sent immediately (onChange) or at bilaterally agreed-upon times (scheduled). DSA1 is the master of the shadowing agreement; all changes to the agreement must be made on DSA1, which propagates them to DSA2 as incremental updates. (The incremental update process runs under a special shadowing agreement that the supplier DSA automatically creates for each consumer DSA it supports.)
To establish the shadowing agreement on both DSAs, the My-Company administrator must perform the following tasks:
-
Define the shadowing agreement
-
Create the shadowing agreement on DSA1
-
Save the DSA1 database to an archive
-
Set up DSA2 with a completely empty database
-
Restore the saved DSA1 database on DSA2
-
Enable the shadowing agreement on DSA1
The next sections describe how to perform these tasks.
Defining the Shadowing Agreement
First, the My-Company administrator must establish the details of the shadowing agreement between DSA1 and DSA2. These details include:
-
Determining the DSA roles and identifying their names and presentation addresses
-
Determining the unit of replication
-
Determining the shadowing agreement ID
-
Determining the consumer DISP kind
-
Determining the update mode
-
Determining whether the DSA roles can be switched if necessary
Determining the DSA Roles
For My-Company, DSA1 is to be the supplier DSA. Its distinguished name is /CN=DirX-DSA-host1 (environment variable DIRX_DSA_NAME on DSA1) and it has the following presentation address (environment variable DIRX_OWN_PSAP on DSA1):
Transport selector: |
DSA1 |
|
Network address: |
Internet address: |
123.45.67.89 |
port number: |
19999 |
DSA2 is to be the consumer DSA. Its distinguished name is /CN=DirX-DSA-host2 (environment variable DIRX_DSA_NAME on DSA2), and it has the following presentation address (environment variable DIRX_OWN_PSAP on DSA2):
Transport selector: |
DSA2 |
|
Network address: |
Internet address: |
198.76.54.32 |
port number: |
21111 |
It is important to use real PSAP addresses in shadowing agreements and never to use loopback addresses. The supplier and consumer DSAs use real PSAP addresses in their knowledge information about each other, and chaining will not work without real PSAP address information.
It is also important to use correct DSA names. Incorrect administration of the DSA names will result in a DIRX_DSA_NAME conflict and the DSA will not be able to run.
Determining the Unit of Replication
For My-Company, the unit of replication is the entire naming context /O=My-Company. All entries within this naming context will be duplicated and all attributes will be duplicated.
Determining the Agreement ID
A shadowing agreement requires the presence of an agreement ID that uniquely identifies the shadowing agreement. Since a pair of DSAs can have more than one shadowing agreement, it is up to the administrators of the DSAs to negotiate a unique agreement ID value for each shadowing agreement.
An agreement ID is a sequence of two integers (an identifier value and a version number) separated by a comma. The version number is managed by the DSA. The DSA assigns the value 0 when the agreement is created (with dirxadm> sob create); each time the agreement is established (with dirxadm> sob establish), the DSA increments the version number by 1. The My-Company administrator selects the agreement ID 44 to represent this shadowing agreement.
Determining the Consumer DISP Kind
A shadowing agreement requires the presence of the consumer DISP kind unless you create a shadowing agreement on a consumer DSA participating on a X.500-compliant shadowing. The DISP kind of a DSA specifies whether the DSA participates on a DirX-Directory-compliant/asynchronous (CENTRALADMIN), a DirX-Directory-compliant/synchronous (SYNCHRON) or a X.500-compliant shadowing. (See dirxadm> sob create in the DirX Directory Administration Reference for details.)
The My-Company administrator decides that the shadowing is a DirX-Directory-compliant/asynchronous one.
Determining the Update Mode
As described earlier, a supplier DSA can send incremental updates immediately (onChange) or at bilaterally agreed-upon times (scheduled). A scheduled update strategy is acceptable for shadow DSAs to be used solely for load-balancing of directory information retrieval operations. However, since My-Company’s shadow DSA is to be used for high availability of up-to-date directory information, the update strategy for the shadowing agreement must be onChange.
Enabling Supplier Switching
DirX Directory permits administrators to change the mastership of directory entries between DSAs in a shadow configuration. The My-Company administrator wants to be able to make DSA2 the supplier DSA in the event that DSA1 fails for some reason. To make this situation possible, the administrator must establish a shadow operational binding policy (SOB-policy: the REPLS subcomponent of the consumer policy must be TRUE.) when he creates the shadowing agreement that allows DSA2 to become a supplier DSA.
Creating the Shadowing Agreement on DSA1
To create the shadowing agreement on DSA1, the administrator uses the dirxadm command:
sob create -supplier dsa_name -supplierpsap psap_address \
-consumer dsa_name -consumerpsap psap_address \
-consumerkind disp_kind \
-agreementid id -status coop_status -agreement agreement
For the agreement on DSA1, the administrator supplies the following values:
-
The distinguished name of DSA1 to the -supplier option
-
The presentation address of DSA1 to the -supplierpsap option.
-
The distinguished name of DSA2 to the -consumer option
-
The presentation address of DSA2 to the -consumerpsap option
-
The keyword CENTRALADMIN to the -consumerkind option, which specifies a DirX-Directory-compliant/asynchronous shadowing.
-
The agreement identifier 44 to the -agreementid option
-
The keyword cooperative to the -status option, which activates shadowing upon command completion and means that DSA1 creates the shadowing agreement in the cooperating DSA table.
-
An SOB consumer policy (CONS) to the -pol option, which specifies that the consumer DSA (DSA2) can become a supplier DSA if necessary (REPLS=TRUE).
-
The shadowing-subject (SS) operational attribute to the -agreement option, which must define:
-
The name of the context prefix (CP) to be replicated in the AREA component. This is DSA1’s context prefix, which is /O=My-Company.
-
The entries belonging to this naming context to be replicated in the replication-area (RA) component. The value should be DEF=TRUE, which means that the whole naming context must be replicated.
-
Whether or not a total update is to be performed in the changes-only (CHANGEO) component. The value should be CHANGEO=TRUE to indicate that only changes are to be replicated and that no total update is to be sent.
-
The attributes to be replicated in the ATT component. The value should be DEF=TRUE to indicate that all attributes are to be replicated.
-
The update strategy in the SI subcomponent of the update-mode (UM) component. The value should be OC=TRUE to indicate that updates are to be replicated on change.
The following dirxadm command creates the shadowing agreement on DSA1:
sob create -supplier {/CN=DirX-DSA-host1} \
           -supplierpsap "TS=DSA1,NA='TCP/IP_IDM!internet=123.45.67.89+port=19999'" \
            -consumer {/CN=DirX-DSA-host2} \
            -consumerpsap "TS=DSA2,NA='TCP/IP_IDM!internet=198.76.54.32+port=21111'" \
            -consumerkind CENTRALADMIN \
            -agreementid 44         \
            -status cooperative       \
            -pol {CONS={REPLS=TRUE}}  \
            -agreement {SS={AREA={CP={/o=my-company},
                        RA={DEF=TRUE}},ATT={DEF=TRUE}},
                        UM={SI={OC=TRUE}},CHANGEO=TRUE
                       }
If this command completes successfully, it displays the following information:
AGR={ID=44,VERS=0}
When the command is issued, the DSA automatically writes the shadowing agreement information into the Cooperating DSAs subentry /CN=Cooperating-DSAS-Subentry. The administrator can use dirxadm [dse] show to display the contents of this subentry. For example:
dirxadm> show /CN=Cooperating-DSAS-Subentry -allattr -pretty
Here is the output of this command: after the agreement has been created:
1) /CN=Cooperating-DSAS-Subentry
    DSE-Type                       : CP+SUBENTRY
    Object-Class                   : CDS
                                   : SUBE
    Modification-Time              : 20030430120054Z
    Supplier-Knowledge
      Supplier
        AE-Title                   : /CN=DirX-DSA-host1
        PSAP-Address
          T-Selector               : DSA1
          NSAP-Address             :
              TCP/IP_IDM!internet=123.45.67.89+port=19999
      Agreement-ID
        Identifier                 : 1
        Version                    : 1
    Consumer-Knowledge
      Consumer
        AE-Title                   : /CN=DirX-DSA-host2
        PSAP-Address
          T-Selector               : DSA2
          NSAP-Address             :
              TCP/IP_IDM!internet=198.76.54.32+port=21111
      Agreement-ID
        Identifier                 : 1
        Version                    : 0
     Current-Time-Segment          : -1
      Lower-Time-Segment           : -1
      P-Journal-Offset             : 0
      Maximum-Size                 : 262144
    Cooperating-DSA
      Supplier
        AE-Title                   : /CN=DirX-DSA-host1
        PSAP-Address
          T-Selector               : DSA1
          NSAP-Address             :
              TCP/IP_IDM!internet=123.45.67.89+port=19999
      Consumer
        AE-Title                   : /CN=DirX-DSA-host2
        PSAP-Address
          T-Selector               : DSA2
          NSAP-Address             :
              TCP/IP_IDM!internet=198.76.54.32+port=21111
      SOB-Agreement
        Shadow-Agreement-Info
          Shadow-Subject
            Area-Specification
              Context-Prefix       : /o=My-Company
              Replication-Area
                Subtree-Base       : /
            Attribute-Selection
              Default-Value        : TRUE
          Update-Mode
            Supplier-Initiated
              On-Change            : TRUE
        Agreement-ID
          Identifier               : 44
           Version                  : 0
        OprBindMngmnt-Validity
          Validity-From            : 030424121930Z
        Operational-Binding-State  : COOPERATIVE
        Related-Policies
          Consumer
              Replace-Supplier       : TRUE
      SOB-Agreement
        Shadow-Agreement-Info
          Shadow-Subject
            Area-Specification
              Context-Prefix       : /CN=Cooperating-DSAS-Subentry
              Replication-Area
                Default-Value      : TRUE
            Attribute-Selection
              Default-Value        : TRUE
          Update-Mode
            Supplier-Initiated
              On-Change            : TRUE
          Changes-Only             : TRUE
        Agreement-ID
          Identifier               : 1
          Version                  : 1
        OprBindMngmnt-Validity
          Validity-From            : 030424121930Z
        Operational-Binding-State  : COOPERATIVE
        Related-Policies
          Supplier
            Supplier-Upd.-Strategy : TOTAL-INCR
          Consumer
            Supplier-Upd.-Strategy : TOTAL-INCR
            Replace-Supplier       : TRUE
The administrator can use the dirxadm> sob show command to display the newly created shadowing agreement on DSA1. For example:
dirxadm> sob show -supplier {/CN=DirX-DSA-host1}  \
                  -consumer {/CN=DirX-DSA-host2}  \
                  -agreementid 44 -pretty
Here is the output of this command:
    Validity-Agreement
    Operational-Binding-State  : COOPERATIVE
    OprBindMngmnt-Validity
      Validity-From            : 031107102705Z
      Agreement
        Shadow-Subject
          Area-Specification
            Context-Prefix     : /O=My-Company
           Replication-Area
              Default-Value    : TRUE
          Attribute-Selection
            Default-Value      : TRUE
        Update-Mode
          Supplier-Initiated
            On-Change          : TRUE
        Changes-Only           : TRUE
    Update-Status
      Disabled                 : TRUE
      Update-Status
        Supplier-Update-Status
          Area-Change-State    : CHANGED
    Related-Policies
      Initiator:
        Recovery-Max.-Retries  : 20
        Recovery-Time-Out      : 1200
        Recovery-Interval      : 240
        Recovery-Divisor       : 16
        Automatic-Total-Update : FALSE
      Consumer
        Replace-Supplier       : TRUE
| For your convenience, the dirxadm> sob show operation displays the values of the shadowing agreement parameters Changes-Only and Initiator policy even if they were not specified when the shadowing agreement was created. To turn off this display, set the environment variable DIRX_DSA_OB_SHOW_DISPLAY_DEF_VALUES=0. |
Saving the My-Company DIT on DSA1
Now the administrator of DSA1 can use the dirxbackup utility to save the directory database into an archive. To save the complete database into an archive file, the administrator uses the dirxbackup command:
dirxbackup -S -v archive_name
The following dirxbackup command saves the My-Company DIT to the archive file My-Company_041103:
dirxbackup -S My-Company_041103
| In shadow configurations where DSAs run on different operating systems, DirX Directory administrators can use dirxadm to save the complete database in an LDIF file, and then dirxload to restore it. For example, suppose DSA1 runs on Windows and DSA2 runs on Linux. The My-Company administrator can run the following dirxadm command on DSA1 to create an LDIF content file of the complete database: |
dirxadm> create_total_ldif 45
The command creates the file in the directory install_path /server/ldif in the name format 0000001112Standalone.timestamp, where timestamp is a counter increment in milliseconds; for example, 0000001112Standalone.01068022124751. See util (dirxadm) in the DirX Directory Administration Reference for further details about this command.
Setting up DSA2 as an Empty DSA
The next step in establishing My-Company’s shadow configuration is for the administrator to set up DSA2 with an empty database. To carry out this task, the My-Company administrator:
-
Installs DirX Directory from the product CD.
-
Configures and initializes the DBAM database with dbamconfig and dbamboot; the DBAM device configuration should be identical to the configuration for DSA1.
-
Sets up the environment variable DIRX_DSA_NAME on DSA2 with the common name attribute value of DSA2’s distinguished name, /CN=DirX-DSA-host2. Note that this name must be unique in the replication environment.
-
Sets up the environment variable DIRX_OWN_PSAP on DSA2 with DSA2’s PSAP address: TS=DSA2,NA='TCP/IP_IDM!internet=198.76.54.32+port=21200'.
It is very important to administrate the environment variables DIRX_DSA_NAME and DIRX_OWN_PSAP correctly. An incorrect value in the DIRX_DSA_NAME environment variable will result in a DSA name conflict and the DSA will exit. The DSA is not able to work correctly over the network in DSA to DSA connections with an incorrect value in the DIRX_OWN_PSAP environment variable.
Restoring the My-Company DIT to DSA2
Now the administrator of DSA2 can use the dirxbackup utility to restore My-Company DIT to DSA2’s database. To restore a database from an archive file, the administrator uses the dirxbackup command:
dirxbackup -R -v archive_name
The following dirxbackup command restores the My-Company DIT to from archive file My-Company_041103:
dirxbackup -R -v My-Company_041103
The shadowing configuration between DSA1 and DSA2 is now complete and operational. From now on, the DSA administrator must be careful not to change the names of DSA1 or DSA2 in the cooperating DSA table subentry or in the DIRX_DSA_NAME environment variables of each DSA.
| In shadow configurations where DSAs run on different operating systems, DirX Directory administrators can use dirxadm to save the complete database in an LDIF file, and then dirxload to restore it. For example, suppose DSA1 runs on Windows and DSA2 runs on Linux. The My-Company administrator can run the following dirxload command on DSA2 to copy the LDIF content file of the complete database previously created on DSA1 into DSA2: |
dirxload -r -A -f 0000001112Standalone.01068022124751
See the reference pages for dirxload in the DirX Directory Administration Reference for further details about this command.
Start the DSA.
Enabling the Shadowing Agreement on DSA1
After restoring the shadowed data on the consumer DSA, the administrator must explicitly enable the agreement.
To enable a shadowing agreement with dirxadm, use the command:
sob enable -agreementid agreement_id -consumer dsa_name \
[-supplier dsa_name]
The DSA1 administrator issues the following dirxadm command to enable the shadowing agreement on DSA1 that he previously disabled:
sob enable -agreementid 44 \
           -consumer /CN=DirX-DSA-host2 \
           [-supplier /CN=DirX-DSA-host1]
Synchronizing Master-Shadow Data
Sometimes a consumer DSA’s shadowed directory data can fall out of synchronization with the master directory data on the supplier DSA. The supplier DSA can automatically detect this condition; when it does, it writes an entry into the exception log file and terminates the relevant shadowing agreement. The administrator may also observe this condition. When a shadow DSA’s database is out of sync, the administrator should take the following steps:
-
Use the dirxadm> sob terminate command to terminate the relevant shadowing agreement (unless the supplier DSA has already terminated it). Terminating the agreement erases the incremental updates that have become obsolete.
-
Use the dirxadm> sob establish command to re-establish but disable the shadowing agreement.
-
Use the dirxbackup tool to save the master database and restore it on the consumer DSA.
-
Use the dirxadm> sob enable command on the supplier DSA to re-enable the shadowing agreement.
Replicating the Root Context
If the directory tree contains multiple context prefixes, it can be easier to manage one shadow agreement starting with the root context instead of creating multiple shadow agreements starting at each context prefix.Creating the shadowing agreement in this case is similar to the procedure previously described, except for the name of the context prefix, which is the root context and is specified with “/”.
The supplier DSA1 replicates the root DSE and its prefix area plus all context prefixes below the root and all its subsidiary entries. The steps described in sections “Enabling the Shadowing Agreement on DSA1” through “Synchronizing Master-Shadow Data” also apply here. The supplier DSA1 also generates a backup signature in the subentry /CN=DirXDBVersionSubentry which will be part of the dirxbackup archive or the LDIF dump file(s).
After the archive has been restored on the consumer DSA, the supplier DSA1 evaluates in the enable operation whether the correct archive was restored on the consumer. That is, DSA1 compares the backup signature with the consumer DSA2’s signature.For this comparison to succeed, the consumer DSA2 needs to be online.If the backup signature does not match, the enable operation returns an error.
If the described verification procedure does not comply with the operational procedures, you can disable it by setting the environment variable DIRX_DSA_DISP_TUBM=0. This setting prevents the generation of the backup signature and comparison between supplier and consumer at enable time.
Using DISP to Perform a Total Update
If your directory database contains less than a million entries, you can use DISP to perform the total update to your shadow DSAs.For example, suppose the My-Company administrator has a much smaller database to shadow. The steps to set up the shadow DSA then are:
-
Determine the shadowing agreement
-
Bootstrap DSA2 (see the chapter "Setting up the DirX Directory Service" for details)
-
Create the shadowing agreement on DSA1 and specify CHANGEO=FALSE in the shadowing-subject (SS) attribute.
-
Administer the root DSA on the DSA2; that is, create the DirX Directory Administrators (DADM), DSA Policy (DSAP), and User Policy (USP) attributes with dirxadm (see the chapter "Setting up the DirX Directory Service" for details). The DISP protocol does not update the root DSE because it contains the local policies of the DSA.
-
Use the dirxadm> sob establish command to re-establish but disable the shadowing agreement.
-
Use the dirxadm> sob enable command on the supplier DSA to re-enable the shadowing agreement.
Once the DSA administrator completes these tasks, the following process occurs:
-
The action of duplicating the data begins. DSA1 initiates a DISP connection to DSA2 and sends the total update for the cooperating DSA subentry, which contains all shadowing agreements. DSA1 then sends the total update as specified by the shadowing agreement.
-
After the total update is complete, the Shadowing Operational Binding remains active on both sides.During this period any changes made to data within the unit of replication on DSA1 are automatically sent to DSA2 as incremental updates. These updates can be sent immediately (onChange) or at bilaterally agreed-upon times (scheduled). This process occurs as long as the agreement remains active (the same as it is in the dirxbackup save and restore scenario).
If the shadowing agreement is disabled on DSA1, incremental updates will no longer be sent to DSA2. Note that if the shadowing agreement is deleted on DSA1, the agreement is automatically deleted from DSA2, but the corresponding entries in DSA2’s DIT are not automatically deleted.
If your DSA contain huge entries that cannot be loaded as a whole in memory, for example entries with groups that contain more than 1000 members, you must specify the value TRUE for the Partial Entry Shadowing Policy attribute.(See section "Partial Entry Shadowing Policy" in the DirX Directory Syntaxes and Attributes for details.)
Switching Supplier DSAs in a Shadow Configuration
DirX Directory administrators can switch the mastership of directory entries between DSAs in a shadow configuration. This section describes how to use the DirX Directory administration tools to perform this task:
-
On a running system
-
When a supplier DSA has failed
The next sections describe these tasks using the My-Company example shadow configuration established in the previous sections.
Switching Masters in a Running System
DirX Directory administrators use the following dirxadm command to change a supplier DSA (the master of the directory entries in the DIT and the sender of shadowed information) in a shadow configuration:
sob switch -from dsa_name -to dsa_name
The sob switch command performs the following actions:
-
Sets the supplier DSA to a read-only state for the duration of the operation
-
Forces the propagation of all outstanding incremental updates for all enabled shadowing agreements
-
Updates all the shadowing agreements in the cooperating DSA table to the new supplier-consumer DSA configuration
-
Propagates the updated cooperating DSA table to all the consumer DSAs
-
Releases the old supplier’s read-only state
For example, suppose the My-Company administrator wants to make DSA2 the supplier DSA. He binds to the current supplier DSA, which is DSA1, with dirxadm and issues the command:
dirxadm> sob switch -from /CN=DirX-DSA-host1 \
           -to /CN=DirX-DSA-host2
This sob switch command:
-
Sets DSA1 to read-only
-
Propagates all outstanding incremental updates for all shadowing agreements to DSA2
-
Updates all shadowing agreements in the cooperating DSA table on DSA1 to show DSA2 as the supplier and DSA1 as the consumer
-
Propagates the updated cooperating DSA table on DSA1 to DSA2 (and to any other consumer DSAs that are present in the configuration)
-
Releases the read-only state on DSA1
Switching from a Failed Supplier DSA
When a supplier DSA fails in a shadow configuration, a DirX Directory administrator should remove the DSA from the system and switch mastership to a consumer DSA that contains a complete shadow of the failed master. (See the dirxadm> sob create operation in the DirX Directory Administration Reference how to establish such a stand-by shadow.) The administrator should first ensure that the failed DSA is off-line; he can then issue the dirxadm> sob switch command on one of the consumer DSAs in the configuration to make it the new supplier DSA.
When the dirxadm> sob switch command is issued on a consumer DSA, it:
-
Updates all the shadowing agreements in the cooperating DSA table to the new supplier-consumer configuration
-
Propagates the updated cooperating DSA table to all the shadow DSAs
The command does not force the propagation of incremental updates to the other DSAs in the configuration because the DSA being operated on is a consumer DSA, and thus does not have any incremental updates to propagate. The data of this DSA may differ from the data of the failed master.
For example, suppose the My-Company’s administrator has added another consumer DSA /CN=DirX-DSA-host3 to the My-Company shadow configuration, and its agreement ID is 51. DSA1 continues to be the supplier DSA; DSA2 and DSA3 are the consumer DSAs. DSA2 has been established as stand-by DSA and therefore contains a complete shadow of the master. Now suppose that the machine that hosts DSA1 fails. To react to this failure, the My-Company administrator decides to switch directory entry mastership. To make this change, the My-Company administrator:
-
Ensures that DSA1 is shut down.
-
Binds to DSA2 with dirxadm and issues the dirxadm command:
sob switch -emergency
The sob switch command:
-
Updates all shadowing agreements in the cooperating DSA table on DSA2 to show DSA2 as the supplier and DSA1 and DSA3 as consumer DSAs.
-
Propagates the updated cooperating DSA table on DSA2 to DSA3 (DSA1 is offline).
Keep in mind that the data of DSA2 and DSA3 may differ because DSA3 has not received all updates that DSA2 had received from the old master DSA1.
Restoring the Failed Master to the Configuration
The process of reinstating a failed supplier DSA (in the example, DSA1) that has been repaired to a master-shadow configuration consists of adding it as a consumer DSA and then switching directory mastership to it. Recall from the section “Building the Shadow Configuration” that DirX Directory administrator has configured all agreements to perform a total update by media to synchronize initially the shadowed directory data.
A DirX Directory administrator can use the following procedure to return it to the running system:
-
On the current supplier DSA (in the example, DSA2), terminate and then re-establish the shadowing agreements between the supplier DSA (DSA2) and the DSA (DSA1) to be re-entered into the configuration. The agreement is automatically disabled.
-
Use the dirxbackup save (on DSA2) and restore operations to perform a total update on the old supplier DSA (DSA1).
-
Start the old supplier DSA (DSA1), which now becomes a consumer DSA in the configuration.
-
Enable the corresponding shadowing agreements on the current supplier DSA (DSA2); this action propagates any updates that occurred during the save and restore operations to the consumer DSAs (DSA1 and DSA3).
-
(Optional) Use the dirxadm> sob switch command on the current supplier DSA (DSA2) to change the master-shadow roles. After this operation has finished, the repaired old master DSA (DSA1) is again the supplier DSA (and DSA2 a consumer DSA).
For example, to restore DSA1 to the My-Company shadow configuration as the supplier DSA, the administrator:
-
Binds to DSA2 with dirxadm and uses the sob terminate command to terminate all shadowing agreements between DSA2 and DSA1. In the example, these are the shadowing agreement with the identifier 44 and the agreement that propagates the modifications to the cooperating DSA table to DSA1. The administrator must only terminate the shadowing agreement with the id 44 because the DSA updates all agreements propagating the cooperating DSA table automatically. (All agreements that the DSA manages automatically have got an identifier greater or equal the value 10000. Never modify such agreements manually.)
dirxadm> sob terminate -agreementid 44 \
              -consumer /CN=DirX-DSA-host1 \
              [-supplier /CN=DirX-DSA-host2]
This action deletes any accumulated incremental updates for the target consumer, which are obsolete because a total update (via dirxbackup save and restore) will be performed.
-
Uses the dirxadm> sob establish command to re-establish as disabled shadowing agreement 44:
dirxadm> sob establish -agreementid 44 \ -consumer /CN=DirX-DSA-host1 \ [-supplier /CN=DirX-DSA-host2] -
Uses the dirxbackup -S command on DSA2 to save the My-Company DIT to an archive:
dirxbackup -S -v My-Company_073103
-
Uses the dirxbackup -R command on DSA1 to restore the DSA2 database archive to DSA1:
dirxbackup -R -v My-Company_073103
-
Starts the DirX Directory Service on DSA1. The DSA will start as a consumer DSA.
-
Uses the dirxadm> sob enable command on DSA2 to enable the shadowing agreement 44 and propagate any updates made since the save operation on DSA2 to DSA1:
dirxadm> sob enable -agreementid 44 \ -consumer /CN=DirX-DSA-host1 \ [-supplier /CN=DirX-DSA-host2] -
Uses the dirxadm> sob switch command on DSA2 to make DSA1 the supplier DSA:
dirxadm> sob switch -from /CN=DirX-DSA-host2 \
                    -to /CN=DirX-DSA-host1
Recall from the section titled “Switching from a Failed Supplier DSA” that the administrator has introduced DSA3 as a consumer DSA.DSA3 receives updates from shadowing agreement 51.After performing the dirxadm> sob switch command, DSA1 is the supplier for shadowing agreement 44 (DSA1 to DSA2) and 51 (DSA1 to DSA3).
Password Policies in a Shadow Configuration
This section provides information about password policies in a shadowing configuration.
Maintaining Local vs. Global Password Policy States
Password policy features such as account locking or password aging are supported by directory operational attributes that store password policy state information at the respective user entry.Password policy state changes occur as a result of modify operations that deal with the User Password attribute or as a result of successful or unsuccessful bind operations.While modify operation state changes are replicated by normal protocol, bind operation state changes are not.Examples of modifications performed in the context of the bind operation include removing outdated Password Failure Time values after a bind or adding the Password Account Locked Time timestamp after a repeated failing bind.
Maintaining Local Password Policy States
By default, DirX Directory maintains password policy-related operational attributes with a local scope for modifications that occur during the bind operation.
DirX Directory’s implementation of the simple bind operation in the DSA strictly follows the X.500 approach. The bind operation has a local scope; that is, the user entry with its User Password attribute must be contained in the DSA’s local database regardless of whether it is master or shadow information. A bind is never chained to another DSA. Modifications that are applied to a user entry as a result of a bind operation are always performed only in the local database, including modifications that occur as a result of password policy decisions that potentially affect one or more password policy-related operational attributes of the entry.
As a result, the view of the account locking and password aging features may differ from DSA to DSA in a replicated scenario. For example:
-
A user‘s account may be locked on DSA1, but failing binds are still allowed on DSA2.
-
A user‘s password may have expired on DSA1, but grace binds are still available on DSA2.
While this is an acceptable situation in most application scenarios, the fact remains that a condition like “lock-account-after-3-consecutive-failed-logins-within-5-minutes” is not enforced when you consider the whole system with all possible bind target DSAs.
Maintenance of local password policy states is the only option supported by DirX Directory V8.5 and older. In DirX Directory V8.6, maintenance of local password policy states is the default and is activated by setting the environment variable DIRX_GLOBAL_PPO_STATES to 0 or by not setting this environment variable at all.
Maintaining Global Password Policy States
To create a consistent view of the account locking and password aging features in a replication scenario, you can enable the maintenance of global password policy states by setting the environment variable DIRX_GLOBAL_PPO_STATES to 1 in the DSA environment; for example, in install_path/conf/dirxenv.ini.
When DIRX_GLOBAL_PPO_STATES is set to 1, each modification of an entry’s password policy-related operational attributes that occurs during the bind operation is performed by an implicit DAP modify operation. Although this DAP modify operation is not received via protocol from an external client, it results in the respective replication protocols:
-
On a shadow supplier DSA, the modification is replicated via the DISP protocol to all shadow consumer DSAs with the entry in the replication area according to the rules of the shadow agreement.
-
On a shadow consumer DSA, the modification is chained via the DSP protocol to the shadow supplier DSA.
Because standard replication is used, the distribution of the modified operational attributes is subject to replication delay; that is, the propagation of a password policy state change typically occurs on a shadow consumer DSA a couple of milliseconds after the state change becomes effective on the shadow supplier DSA, depending on the distance and quality of the network connection.
You can avoid this replication delay by configuring synchronous shadow agreements. In this case, the state changes are performed completely synchronously; that is, the bind operation returns to the client application after the necessary state changes have been performed on all participating DSAs.
You can also use scheduled agreements to couple shadow supplier and shadow consumer DSAs; in this case, the state changes are synchronized according to the specified schedule. In general, scheduled agreements are not suitable for providing a consistent view of account locking and password aging.
An entry’s state attributes are only kept consistent if the shadow agreement is enabled.
If replication is temporarily disrupted; that is, the shadowing agreement is in the error-recovery or disabled state, the following rules apply:
-
State changes that occur at the shadow supplier DSA are buffered in the shadowing journal of the supplier DSA and replayed as soon as the shadowing process is re-enabled.
-
No state changes are invoked by bind operations that occur at the shadow consumer DSA during the disabled state. Bind operations to a temporarily disconnected shadow consumer DSA work based on the state resulting from the last successful replication. The password policy state is synchronized with the one on the shadow supplier DSA after the shadowing process is re-enabled.
If the shadowing agreement is terminated and set to the NON-COOPERATIVE state, the password policy state changes that occur at the former shadow consumer DSA are maintained locally as for any other stand-alone DSA.
The following password policy-related operational attributes can be changed by implicit modify operations:
-
Password Failure Time
-
Password Account Locked Time
-
Password Expiration Warned Time
-
Password Grace Use Time
Shadow agreements must not exclude these operational attributes in their specification.
The following password policy-related operational attributes are also modified during the bind operation but are not used by the DSA for any password policy decisions and are not kept globally consistent. These attributes are only maintained on the local bind DSA independent from the setting of DIRX_GLOBAL_PPO_STATES:
-
Password Number Of Failed Logins (local)
-
Password Last Login Time (local)
You do not need to add an explicit grant in the access control settings for modifications to the password policy-related operational attributes. The DSA automatically recognizes the implicit modifications and access to these attributes is automatically granted to the requestor of the operation (that is, to the DSA) regardless of the settings specified in the Access Control subentries for users.
The implicit DAP modification representing the state change and the resulting DSP chaining and/or DISP replication operations are shown in the DSA audit like all other operations.
Do not enable the maintenance of global password policy states unless all the DSAs participating in your shadowing network are DirX Directory V8.6 or newer. The environment variable DIRX_GLOBAL_PPO_STATES should be set to 1 on all participating DSAs.
Unlocking an Account in a Shadow Configuration
If a user’s account has been permanently locked or the user’s account needs to be unlocked before the lock duration timer is over, the administrator must unlock the associated account. To make the unlock operation effective on all DSAs (regardless of whether it is hosting master or shadow information and regardless of the local or global password policy state setting), the administrator should perform the following steps:
-
Perform an LDAP bind with dirxcp to the master DSA of the entry to be unlocked.
-
Perform the following obj modify operation:
modify dn -add pwdAccountLockedTime=20000101000000Z \
          -remove pwdAccountLockedTime           \
          -add pwdFailureTime=20000101000000Z  \
          -remove pwdFailureTime             \
         [-replace userPassword=password]
where dn is the distinguished name of the entry to be unlocked and password is the new password if the administrator wants to re-set the user’s password.
If the user’s entry is inside the replicated area, the entry is unlocked on all participating DSAs after shadowing has propagated the update.
Handling the Password Must Change Condition in a Shadow Configuration
If the Password Policy subentry’s Password Must Change attribute (pwdMustChange, PPMUCH) is set to TRUE and an administrator has reset a user entry’s password, all operations are prohibited after the bind operation except for an operation to change the user’s password.All prohibited operations are rejected with the error code "unwilling to perform” and the error message "Password Modification is the only operation allowed due to Password Policy".
After binding to a shadow DSA, a user may invoke a modify operation that deals with attributes that are distinct from the user password.Because this modify operation is chained to the master DSA, this operation is not rejected with the “unwilling to perform” error code and error message. The master DSA performs the operation.
This action applies only to modify operations.
Proper access control decisions are not affected.
Shadowing in a Heterogeneous Network
In DirX Directory, shadowing agreements are administered on the master DSA of the cooperating DSA table. This DSA sends all modifications of the cooperating DSA table to all other DSAs participating in the network. That is, in DirX Directory, shadowing agreements are administered once and distributed by shadowing itself.
X.500-compliant shadowing, however, does not support this central administration of shadowing agreements.It only supports a local administration of shadowing agreements, where administrators must administer an agreement on all DSAs taking part in this agreement.
In DirX Directory, it is possible to administer a DSA for X.500-compliant or for DirX-Directory-compliant central shadowing administration through the disp_kind value of the -supplierkind and the -consumerkind options of the dirxadm> sob create operation.(See the dirxadm> sob create operation in the DirX Directory Administration Reference for details.) Once a DSA is administered as X.500- or DirX-Directory-compliant in the cooperating DSA table, administrators cannot specify the disp_kind value in new agreements for this DSA.Keep in mind that you never specify the disp_kind value for the DSA to which you are bound.Note that the disp_kind value also controls whether a DirX-Directory-compliant DSA performs asynchronous or synchronous shadowing; this topic is discussed in more detail in the chapter “Creating a Synchronous Shadow DSA”.
If a DSA—for example a non-DirX Directory DSA—is administered as X.500 compliant, the shadowing agreement must also be specified locally on that DSA. This DSA can act as a supplier or a consumer of a shadowing agreement.It is recommended to administer the shadowing agreements first on the consumer DSA.
Recall from the sections above how the My-Company administrators have set up shadowing.Now the My-Company management has bought a small company enhancing the product portfolio of My-Company.Like My-Company, the new company runs its own directory.Unfortunately, this directory is not DirX Directory, but it is X.500 compliant.
DSA 1 masters the My-Company data and the cooperating DSA table. Shadowing between My-Company’s DSA 1 and DSA2 has already been set up at the beginning of this chapter.
So now the administrators decide that they want to set up shadowing agreements where
-
The My-Company DSA 1 additionally sends the My-Company data via DISP to the new company part DSA. This DSA is referred to as DSA 3. DSA 1 is the supplier and DSA 3 is the consumer in this shadowing agreement.
-
DSA 3 sends the new company data via DISP to DSA 1 and DSA 2. In these shadowing agreements, DSA 3 acts as the supplier and DSA 1 and DSA 2 as consumers.
The necessary shadowing agreements for the old My-Company network part must be administered all on DSA 1, the master of the cooperating DSA table. DSA 1 then distributes the agreements and any subsequent modifications to this agreement to DSA 2.
All necessary shadowing agreements for the new My-Company part must be administered locally on DSA 3 because DSA 3 is a non-DirX Directory DSA and cannot participate in the central cooperating DSA table administration.
The following sections provide information on how to set up the shadowing configuration on the participating DSAs.
Setting up Shadowing for Distributing My-Company Data
As mentioned above, My-Company DSA 1 masters the My-Company data. It already distributes the My-Company data via DISP to DSA 2. Now it should also distribute this data to DSA 3. For this agreement, DSA 1 is the supplier DSA and DSA 3 is the consumer DSA.
The administrators of DSA 1 and DSA 3 take the following steps to set up the shadowing configuration:
-
First, the administrator of DSA 3 creates a consumer shadowing agreement locally to signal that DSA 3 is ready to receive first the total update and then subsequent modifications.
-
Next, the My-Company administrator creates the supplier shadowing agreement for DSA 1 with the X.500-compliant consumer DSA 3 using dirxadm on the master DSA of the cooperating DSA table (also DSA 1):
sob create -supplier {/CN=DirX-DSA-host1} \
           -consumer {/CN=DSA-host3}   \
           -consumerkind X500        \
           -consumerpsap "TS=DSA3,NA='TCP/IP!internet=198.76.54.35+port=21111'" \
            -agreementid 45          \
            -status cooperative       \
            -agreement {SS={AREA={CP={/o=my-company},
                        RA={DEF=TRUE}},ATT={DEF=TRUE}},
                        UM={SI={OC=TRUE}}
                       }
DSA 1 immediately sends a total update to DSA 3 because DSA 1 is also the supplier of the shadow information.
Setting up Shadowing for Distributing New Company Part Data
As mentioned above, DSA 3 should now send the new company part data via DISP to the My-Company DSAs DSA 1 and DSA 2. DSA 3 acts as the supplier and DSA 1 and DSA 2 as consumer DSAs.
The administrators perform the following steps to set up the shadow configuration:
-
On DSA 1, the master of the cooperating DSA table, the My-Company administrator uses dirxadm to create the following consumer shadowing agreements for DSA 1 and DSA 2 with the X.500 compliant supplier DSA 3:
-
Consumer shadowing agreement for DSA 1:
sob create -supplier {/CN=DSA-host3} \
           -supplierpsap "TS=DSA3,NA='TCP/IP!internet=198.76.54.35+port=21111'" \
            -supplierkind X500 \
            -consumer {/CN=DirX-DSA-host1} \
            -agreementid 46         \
            -status cooperative       \
            -agreement {SS={AREA={CP={/o=my-NewCompany},
                        RA={DEF=TRUE}},ATT={DEF=TRUE}},
                        UM={SI={OC=TRUE}}
                       }
DSA 1 is ready immediately to receive a total update and subsequent modifications from DSA 3.
You must provide the -supplierkind option here in order to instruct DSA1 to accept DISP updates from DSA3. -
Consumer shadowing agreement for DSA 2:
sob create -supplier {/CN=DSA-host3} \
           -supplierkind X500 \
           -consumer {/CN=DirX-DSA-host2} \
           -agreementid 47         \
           -status cooperative       \
           -agreement {SS={AREA={CP={/o=my-NewCompany},
                       RA={DEF=TRUE}},ATT={DEF=TRUE}},
                       UM={SI={OC=TRUE}}
                      }
DSA 2 is ready to receive a total update and subsequent modifications from DSA 3 after DSA 1 has distributed the cooperating DSA table modification to DSA 2.
It is not necessary to specify the supplier and the consumer PSAP addresses because they have already been specified in the other shadowing agreements.
-
-
Next, the administrator of DSA 3 creates two supplier shadowing agreements locally to achieve that DSA 3 sends first the total update and then subsequent modifications to DSA 1 and DSA 2.
Managing Unique Constraint Checks in a Shadow Configuration
Unique constraints checks of attribute values are usually performed on the supplier DSA.However, a switchable consumer DSA (where the REPLS component of the consumer policy is TRUE) also needs to perform these checks because in the case of a dirxadm> sob switch operation, DirX Directory must prove uniqueness without interruption.It is the administrator’s responsibility to configure a consistent unique constraint configuration across the relevant DSAs: every unique constraint setting must match on the supplier DSA and all switchable consumer DSAs.
Configuration always begins on the supplier DSA with the following command for each required attribute type, one after the other:
dirxadm db attrconfig attribute_type -index INITIAL UNIQUE
If post indexing detects non-unique attribute values, the operation returns an error and the UNIQUE flag is not set while the INITIAL index remains set.Non-unique attribute values are reported in the DSA’s logging file.Usually modifications of the involved entries are performed manually.
Repeat the procedure until the UNIQUE flag is set for all required attribute types.Use the dirxadm db show command to control the attribute index characteristics.
Once the supplier DSA’s configuration is stable, proceed with the switchable consumer DSA’s unique constraint configuration. During this time, the supplier DSA must be online because the switchable consumer DSA looks at the supplier DSA’s database configuration subentry to evaluate the UNIQUE flag. Note that sufficient access rights must be established; that is, read permission must be granted for attributes vendorName, vendorVersion and attributeIndex.
We recommend that you implement a consistent unique constraint configuration before applying a switch operation. For a non-emergency switch, the new designated supplier DSA’s unique constraint configuration must match the old supplier DSA’s configuration. If not, the switch operation is rejected.
For an emergency switch, checking the unique constraint configuration is not performed due to the nature of the situation. The administrator must implement a consistent configuration if he or she has not already done so. Note that a consumer DSA checks its configuration at startup against the supplier DSA and removes unique constraint settings if they are not set on the supplier DSA.
If unique constraint checks are to be deactivated, start with the switchable consumer DSAs first. Perform the following command for all attribute types required:
dirxadm db attrconfig attribute_type -index NO-UNIQUE
Finally, perform this step on the supplier DSA. At this time, all switchable consumer DSAs must be online since removal of the UNIQUE flag is proven. If this flag is not removed on any switchable consumer DSA or a consumer DSA is not online, the operation returns an error. One exception results in switchable consumer DSAs that are off-line and their agreements are disabled. They are excluded from the check and won’t reject the operation.
Non-switchable consumer DSAs (the REPLS component of the consumer policy is FALSE) should never be configured for unique constraint checking since the supplier DSA already performs this task.
Due to the lack of functionality, non-compatible DirX Directory V8.2 DSAs—DirX Directory DSAs Version 8.1 and older or non-DirX Directory DSAs—should perform the role of non-switchable consumer DSAs if unique constraint checking is planned to be applied.