Extending the DirX Directory Service
This chapter describes how to modify the sample DirX Directory service you have established in the previous chapter (“Setting up the DirX Directory Service”). Tcl scripts for extending the service can be found in the install_path/scripts/stand_alone/extensions directory and the install_path/scripts/security directory. These Tcl scripts contain the commands and procedures discussed in this chapter and additional examples; view the README files in these directories for a description of their contents.
Extending the Stand-Alone DSA
This section of the chapter explains how you can modify the sample stand-alone DSA you have established in the previous sections.It describes how to:
-
Modify the schema
-
Change access control policies
-
Introduce global policies to the DSA
-
Add administrators who are permitted to use dirxadm to manage the DSA
The next sections describe the procedures to be followed to make these modifications to the sample DSA using as an example “My-Company”.The example procedures assume that the administrator has first bound to the DSA with dirxcp or dirxadm, depending on which tool should be used for the procedure.
Modifying the Schema
This section describes how to add new object classes and attributes to a DSA schema. Note that it is not possible to delete schema elements. The commands and procedures discussed in this section are contained in the in the files:
-
install_path/scripts/stand_alone/extensions/schema_ext.cp
-
install_path/scripts/stand_alone/extensions/StandAloneSchemaExt.ldif
Adding New Object Classes and Attribute Types
When the DSA is initialized, it creates an LDAP global schema subentry and stores the object classes and attribute types defined in its standard schema as values of the subentry’s LOC (objectClasses) and LAT (attributeTypes) attributes. If the attribute types and object classes supplied in the standard DSA schema are insufficient to describe your DIT database, you can create new schema elements by modifying the LOC and LAT attributes in the LDAP global schema subentry. To add new object classes and attributes types to a schema, you:
-
Identify each new element with a definition and assign it at a minimum an object identifier, an LDAP name, an abbreviation, and—for attribute types—an attribute syntax. If you are creating an attribute type that is to be used in the -filter option of search requests or as a naming attribute, you must also specify a matching rule.
-
Modify the LDAP global schema to contain the new schema elements. You can use dirxcp or DirX Directory Manager to make the changes directly to the subentry, or you can put the changes into an LDIF change file and use dirxmodify to import them into the DIT. (Note that you cannot add to or delete the subentry; you can only modify the LOC and LAT attributes.)
The next sections describe how to accomplish these tasks using My-Company as an example.
Identifying the New Elements
My-Company owns a car park with a number of cars, each of which can be reached by a mobile telephone. My-Company wants to add the information about the cars into its DIT as a separate organizational unit Cars, with the cars reflected in subordinate entries. A Car Identifier will be used to identify each car. A short description of the car will also be given as well as the telephone number at which it can be called.
To support the addition of the car information into the DIT, the administrator defines the following new schema elements:
-
Two new attribute types named car-identifier and car-telephone
The car-identifier attribute type has the LDAP name carid, the abbreviation CARID, the object identifier 1.2.3.4.0 and is of directory-string syntax.
The car-telephone attribute type has the LDAP name cartn, the abbreviation CARTN, the object identifier 1.2.3.4.1, and has the same properties as the telephone-number standard attribute type but can contain up to 64 characters. -
One new object class named car-id, which has the LDAP name car, the abbreviation CAR and the object identifier 1.2.3.6.0
| The object identifiers used in this example were chosen arbitrarily. In reality, they should be registered. |
Defining the New Schema Elements
You can use dirxmodify, dirxcp or DirX Directory Manager to add new schema elements to a directory schema. The dirxmodify and DirX Directory Manager tools use an LDAP server to make the updates to the schema, while dirxcp can update the schema either directly via DAP or via an LDAP server over LDAP. The next sections illustrate how to use dirxmodify and dirxcp to add the car, carid and cartn elements to My-Company’s directory schema over LDAP.
Adding New Schema Elements with dirxmodify
The first step in using dirxmodify to update the directory schema is to create an LDIF change file with the schema elements to be added. The My-Company administrator creates an LDIF change file named StandAloneSchemaExt.ldif with the following content:
#
# DSA Schema extension
#
dn: cn=schema
changetype: modify
add: attributetypes
attributeTypes: ( 1.2.3.4.0 NAME 'carid' EQUALITY caseIg
 noreMatch ORDERING caseIgnoreOrderingMatch SUBSTR caseI
 gnoreSubstringsMatch SYNTAX 1.3.6.1.4.1.1466.115.121.1.
 15{64} )
-

dn: cn=schema
changetype: modify
add: attributetypes
attributeTypes: ( 1.2.3.4.1 NAME 'cartn' SUP telephoneNu
 mber EQUALITY telephoneNumberMatch SUBSTR telephoneNumb
 erSubstringsMatch SYNTAX 1.3.6.1.4.1.1466.115.121.1.44{
 32} )
-

dn: cn=schema
changetype: modify
add: objectclasses
objectClasses: ( 1.2.3.6.0 NAME 'car' SUP top STRUCTURAL
  MUST carid MAY ( cartn $ description ) )
-
| The LDIF change file must specify the new attribute types (carid and cartn) first, before it specifies the new object class in which they are used (car). |
The next step is to run the following dirxmodify command:
dirxmodify -f LDIF_file
-D bind_DN
-w password
[-h host]
[-p port_number]
where:
-
LDIF_file is the name of the LDIF change file
-
bind_DN is the distinguished name of a DirX Directory administrator in LDAP format; for the My-Company administrator, the distinguished name of the default administrator account in LDAP format is cn=admin, o=my-company.
-
password is the DirX Directory administrator account’s password (dirx for the My-Company default administrator account)
-
host is the TCP/IP address or host name of the LDAP server to which dirxmodify is to bind (the default is “localhost”)
-
port_number is the LDAP port number of the LDAP server to which dirxmodify is to bind; My-Company’s LDAP server uses the default LDAP port number 389
The My-Company administrator issues the following dirxmodify command:
dirxmodify –f StandAloneSchemaExt.ldif
           –D "cn=admin, o=my-company"
           -w dirx
Adding New Schema Elements with dirxcp
The first step in using dirxcp to update the directory schema is to create a project-specific abbreviation file that describes the new schema elements. The dirxabbr file is a standard abbreviation file that contains all the definitions, abbreviations, and object identifiers required for the standard schema of the DirX directory (see install_path/client/conf/dirxabbr). The dirxcp and dirxadm tools use this file to obtain schema information when working with a DSA; LDAP clients like DirX Directory Manager and dirxmodify do not use this file at all.
DirX Directory supports the creation of project-specific abbreviation files to contain extensions to the standard schema. At startup, the dirxcp and dirxadm tools search for and read these files after they read the dirxabbr file. Project-specific abbreviation files follow the same format as the standard dirxabbr file and are contained in the same location. The naming convention for project-specific abbreviation files is dirxabbr-ext-project_identification. The Administration Reference provides further details about DirX Directory abbreviation files and their format. Note that DirX Directory administrators must ensure that the LDAP names, abbreviations, and identifiers they plan to use for their schema customizations are unique over all the project-specific abbreviation files that may exist at their site.
The My-Company administrator creates a project-specific abbreviation file dirxabbr-ext-my-company that defines the new attribute types and object class for the car park information, as follows:
# Object Classes
...
CAR 	Car-id 	1.2.3.6.0 	-	car
...
# ATTRIBUTE DEFINITION BLOCK
...
CARID 	Car-Identifier 	1.2.3.4.0 	DIR_STR  DIR_STR	car-id
CARTN	Car-Telephone		1.2.3.4.1	PRINTABLE_STR
        PRINTABLE_STR 	car-tn
...
The next step is to issue a dirxcp bind command over LDAPv3, then use dirxcp command:
[obj] modify distinguished_name -addattr attribute_list
where distinguished name is the name of the schema subentry—in this case, CN=schema—and attribute_list contains the new object types and attribute types to be added to the subentry’s LOC (objectClasses) and LAT (attributeTypes) attributes.
My-Company uses the following set of dirxcp commands to define its new elements:
modify cn=schema –addattr {attributeTypes= \
    ( 1.2.3.4.0 NAME 'carid' \
     DESC 'My-Company car identifier' \
     EQUALITY caseIgnoreMatch \
     ORDERING caseIgnoreOrderingMatch \
     SUBSTR caseIgnoreSubstringsMatch \
     SYNTAX 1.3.6.1.4.1.1466.115.121.1.15{64} )}
This dirxcp command adds the attribute type car-identifier (carid) to the schema. The attribute syntax (SYNTAX) is DirectoryString (object identifier 1.3.6.1.4.1.1466.115.121.1.15) with a length of up to 64 characters. The Equality-, Ordering- and Substrings-Matching-Rules (EQUALITY, ORDERING, SUBSTR) are caseIgnoreMatch, caseIgnoreOrderingMatch and caseIgnoreSubstringsMatch. Refer to RFC 2252 for further details about LDAP attribute type and object class descriptions.
modify cn=schema –addattr {attributeTypes= \
    ( 1.2.3.4.1 NAME 'cartn' \
     DESC 'My-Company car telephone number' \
     SUP telephoneNumber
     EQUALITY telephoneNumberMatch \
     SUBSTR telephoneNumberSubstringsMatch \
     SYNTAX 1.3.6.1.4.1.1466.115.121.1.44{32} )}
This dirxcp command adds the attribute type car-telephone (cartn) to the schema. The attribute is a subtype (SUP) of the standard attribute Telephone-Number (telephoneNumber). The attribute syntax (SYNTAX) is Printable-String (whose object identifier is 1.3.6.1.4.1.1466.115.121.1.44) with a maximum length of 64 characters. The Equality- and Substrings-Matching-Rules are the same as for the supertype; if not specified, they are automatically derived from the supertype.
modify cn=schema –addattr {objectClasses= \
    ( 1.2.3.6.0 NAME 'carid' \
     DESC 'My-Company car identifier object class' \
     SUP top AUXILIARY \
     MUST carid MAY ( description $ cartn ) )}
This dirxcp command adds an auxiliary object class car-id (car) with a car-identifier attribute (carid) as a mandatory attribute and a Description (description) and cartn telephone-Number (telephoneNumber) as optional attributes.
Propagating Schema Updates to Multiple LDAP Servers
The directory schema is stored in the DIT. LDAP servers read the directory schema when they start up to obtain the information about object classes and attribute types contained within it. When you update the LDAP global schema subentry with a DirX Directory administration tool over LDAP, the LDAP server that performs the update request automatically reads the updated schema and thus synchronizes its schema knowledge with the directory schema’s current state. If your configuration contains multiple LDAP servers, you will need to restart them by hand so that they will re-read the updated schema.
Populating the Directory with the New Schema Objects
Once you have modified the directory schema with new or modified schema elements, you can then use dirxcp, DirX Directory Manager or dirxmodify to populate the directory database with objects that conform to the updated schema.
For example, the My-Company administrator can use the following dirxcp obj create commands to create the car organizational unit and a car identifier entry (after first performing a DAP bind to the DSA as the default administrator):
create O=My-Company/OU=Cars -attr {OCL=TOP;OU}
create O=My-Company/OU=Cars/CARID=ABC-1234 -attr \
       {OCL=TOP;CAR} \
       {DSC=Red Italian Car} \
       {CARTN=+12 34 567 893}
Modifying Access Control Policies
The initial access control policy that the administrator established when it set up its stand-alone DSA allows only the DSA administrator to modify any data in the DIT. Suppose the administrator now wants to modify this access control policy to permit users binding with simple authentication and a password to change their passwords and their telephone numbers.
Recall that the prescriptive-ACI (PACI) attribute of the access control subentry specifies the access rights of different users. When the administrator created the access control subentry during stand-alone DSA setup, he specified two types of users in the PACI attribute: the administrator and anonymous users. To establish the new access control policy granting users the rights to change their passwords and telephone numbers, the DSA administrator must add a new prescriptive-ACI (PACI) operational attribute value for the user type “My-Company users” to the access control-specific subentry that specifies the desired access rights.
To add attributes to an entry or subentry with dirxcp, you first issue a dirxcp bind command over DAP. You then use the dirxcp command:
[obj] modify distinguished_name -addattr attribute_list
The following dirxcp command adds the new PACI attribute value to the My-Company DSA’s access control-specific subentry:
modify /O=My-Company/CN=AccessControl-Subentry -addattr \
{PACI={ID=My-Company users: can modify their passwords and tele-phone numbers,
       PR=100,
       AL={BL={L=SIMPLE}},
       UF={UC={TH=TRUE},
           UP={PI={E=TRUE},
              GAD=grantModify
              };
              {PI={AT=UP;TN,
                   AAV=UP;TN},
               GAD=grantAdd+grantRemove
              }
          }
      }
}
This command adds a new PACI attribute value to the existing access control-specific subentry. The user-first (UF) component specifies in the user-class (UC) that the user whose name matches that of the entry being accessed (this-entry (TH)) is given the rights of modifying the entry (adding and deleting the attributes user-password (UP) and telephone-number (TN)).
Creating Collective Attributes in a Subtree
Collective attributes are used to specify attributes that are common to all entries of a subtree within the administrative area. The values of collective attributes are returned with the results of read or search operations. The DSA does not support collective attributes in filters.
To create collective attributes in a subtree, carry out the following steps:
-
Define a collective attribute-specific administrative point
-
Create a collective attribute-specific subentry
The next sections describe how to perform each of these tasks using My-Company as an example. My-Company’s telephone operator can be reached through a central telephone number. My-Company wants this telephone number to appear for all employees and so plans to add it as a collective attribute.
Defining the Collective Attribute-Specific Administrative Point
To permit collective attributes to be used below a particular entry, the entry must be defined as a collective attribute-specific administrative point. This is achieved by adding the value collective-attribute-specific-area (CASA) to the administrative-role (AR) attribute of the entry. If the DSE-Type of the entry has not been administrative-point (ADM_POINT) before this modification, this value is added automatically.
To permit collective attributes for an entry, use the dirxcp command:
modify distinguished_name -addattr {AR=CASA}
For the company, a collective telephone number is to be added to the entry for the My-Company organization. This entry is already an access-control-specific administrative point, but it is currently not allowed to contain a collective attribute-specific subentry. Consequently, the default administrator must modify the administrative role of the My-Company organization entry (which is the first administration point) using the dirxcp command:
modify /O=My-Company -addattr {AR=CASA}
Adding DirX Directory Administrators to a DSA
The My-Company default administrator is currently the only user who can use dirxadm (or DirX Directory Manager) to bind to and access the entries in the My-Company stand-alone DSA. The administrator hires a second-shift administrator, to whom he wants to give the same access rights to manage the DSA in his absence. To set up the DSA to be managed by this new administrator, the administrator must follow these steps:
-
Create an entry in the DIT for the second-shift administrator
-
Add the second-shift administrator’s distinguished name to the DirX-Administrators attribute
-
Modify the subentry ACI of the administration point to permit the second-shift administrator to handle subentries
-
Modify the prescriptive ACI of the access-control-specific subentry to permit the same access rights to entries for the second-shift administrator
The administrator can perform these tasks with DirX Directory Manager or with dirxcp and dirxadm. The next sections illustrate how to perform these tasks with dirxcp and dirxadm.
Adding the New Administrator Entry
The My-Company administrator decides to establish the convention of starting all DirX Directory administrator common names with admin; that is, their common name must start with the form cn=admin. The administrator plans to use the common name cn=admin2 for the second-shift administrator.
To create the entry for the second-shift administrator in the DIT, the administrator binds to the DSA with dirxcp over LDAPv3, and then issues the dirxcp command:
create cn=admin2,o=My-Company \
       -attr   {objectClass=top;person;organizationalPerson} \
               {sn=admin2} \
               {description=Second-shift Administrator} \
               {userPassword=dirx2}}
The command adds the second-shift administrator entry to the DIT with the distinguished name cn=admin2,o=My-Company.
Adding the New Administrator to the DADM Attribute
To add the administrator’s distinguished name to the DirX Administrators attribute, the My-Company administrator binds to the DSA with dirxadm and issues the command:
modify / -addattr DADM={/O=My-Company/CN=admin2}
The My-Company second-shift administrator can now use dirxadm to bind to the DSA with simple authentication and the password dirx2.
Granting the New Administrator Access Rights to Subentries
To give the second-shift administrator the same rights to subentries, the My-Company administrator binds to the DSA with dirxcp over DAP (using LDAP syntax to specify an ACI is very cumbersome) and issues the command:
modify /O=My-Company -addattr \
         {SACI={ID=admin2: enable Handling of Subentries,
                PR=254,
                AL={BL={L=SIMPLE}},
                UF={UC={N={DN={/O=My-Company/CN=admin2}}},
                    UP={PI={E=TRUE},
                        GAD=grantRead+grantBrowse+\
                            grantDiscloseOnError+\
                            grantReturnDN+\
                            grantAdd+grantRemove+grantModify};
                       {PI={AT=SS;OC;AT;DSR;
                            DCR;MR;MRU;CRN;CRT;MN;MT;PACI;EACI,
                            AAV=SS;OC;AT;DSR;
                            DCR;MR;MRU;CRN;CRT;MN;MT;PACI;EACI,
                            AUATV=TRUE},
                        GAD=grantDiscloseOnError+\
                            grantRead+grantCompare+\
                            grantFilterMatch+\
                            grantAdd+grantRemove} } } } \
         {PA={PA=My-Company Company,PA=ABC Street 123,\
              PA=D-01234 City,PA=Germany}} \
         {TN=+49 12 345 67 890} \
         {DSC=My-Company Company}
Granting the New Administrator Access Rights to Entries
To give the second-shift administrator the same access rights to the entries in the DIT, the My-Company administrator binds to the DSA with dirxcp over DAP and issues the command:
modify /O=My-Company/CN=AccessControl-Subentry  -addattr \
           {PACI={ID=admin2: enable most of operations \
                      but no Rename,
                   PR=254,
                   AL={BL={L=SIMPLE}},
                   UF={UC={N={DN={/O=My-Company/CN=admin2}}},
                       UP={PI={E=TRUE},
                       GAD=grantDiscloseOnError+\
                           grantRead+grantBrowse+\
                           grantReturnDN+\
                           grantAdd+grantRemove+grantModify};
                       {PI={AT=AR;ACS;SACI;CRN;
                            CRT;MN;MT;SOC;GSR;CE;EACI,
                            AAV=AR;ACS;SACI;CRN;
                           CRT;MN;MT;SOC;GSR;CE;EACI,
                           AUATV=TRUE},
                      GAD=grantDiscloseOnError+\
                          grantRead+grantCompare+\
                          grantFilterMatch+\
                          grantAdd+grantRemove}

 } };
Extending the My-Company LDAP Server Configuration
This section explains how to modify the sample LDAP server configuration established in “Setting up the DirX Directory Service”.It describes how to:
-
Change the values in the LDAP configuration subentry
-
Set up the LDAP server to support SSL/TLS connections
-
Set up and manage multiple LDAP servers
-
Activate configuration changes to multiple LDAP servers
-
Use IP addresses to control client access to the LDAP server
-
Modify the default LDAP cache configuration
-
Add user policies to an LDAP server
The next sections describe the procedures to be followed to make these modifications to the sample configuration using the My-Company example.
Changing the LDAP Configuration
To change an LDAP server’s configuration, you must modify the appropriate attributes of its LDAP server configuration subentry. For example, suppose the My-Company administrator wants to prohibit chaining for the LDAP modifyDN operation. To enable this configuration, he can use DirX Directory Manager or dirxcp over LDAPv3 to modify the corresponding attribute in the LDAP server’s configuration subentry to prohibit chaining.
To change attribute values in an LDAP configuration subentry with dirxcp, bind to the LDAP server’s contact DSA with dirxcp over LDAPv3, then use the command:
[obj] modify distinguished_name -replaceattr attribute_list
where distinguished_name is the name of the subentry. In the case of My-Company, the distinguished name (in LDAP syntax) is cn=ldapConfiguration,o=My-Company. To change the service control for the LDAP modifyDN operation to prohibit chaining, the My-Company administrator issues the following dirxcp command:
modify cn=ldapConfiguration,o=My-Company -replaceattr
{ldapModifyDNSvcCtl='preferChaining=T:
chainingProhibited=T:
localScope=F:dontUseCopy=T:
dontDereferenceAlias=F:
subentries=F:
copyShalldo=F:
priority=1:
timelimit=0:
sizelimit=0:
scopeofreferral=0:
attributesizelimit=0'}
Activating Configuration Changes in the LDAP Server
There are two methods for activating changes to LDAP server configuration attributes:
-
Activating the change dynamically with dirxextop or DirX Directory Manager
-
Activating the change by re-starting the LDAP server
Activating Configuration Changes Dynamically
The DirX Directory service permits a subset of LDAP configuration subentry attributes to be dynamically updated, which preserves existing connections from LDAP clients to the LDAP server instead of losing them due to LDAP server process exit on a re-start. To activate changes made to these attributes dynamically, you can use the dirxextop command with the ldap_cfg_upd extended operation or the following DirX Directory Manager path:
Monitoring → LDAP → Configuration → Update CFG attributes
In the previous step, the My-Company administrator changed the service control for the LDAP modifyDN operation to prohibit chaining. Changes to this service control are allowed to be dynamically activated. To activate the change dynamically with dirxextop, the My-Company administrator issues the following command:
dirxextop -D cn=admin,o=my-company -w dirx -t ldap_cfg_upd
For the list of LDAP configuration subentry attributes that can be updated dynamically, see the description of the ldap_cfg_upd extended operation in the DirX Directory LDAP Extended Operations.
Activating Configuration Changes with Server Re-start
Some LDAP configuration subentry attributes cannot be changed dynamically; for example, the LDAP port number (LPNU) user attribute. Changes to these attributes can only become effective after a restart of the LDAP server.
To restart the LDAP server, bind to the DSA with dirxadm dse bind (see Administration Reference for details) and use the command:
ldap restart
This command stops and restarts the LDAP server and activates a change, for example, to the LDAP port number (LPNU) user attribute as a result of the re-start.
Note that the re-start process disconnects all LDAP client connections and causes the server to re-read the directory schema.
Enabling SSL/TLS Support
Recall from the section “DirX Directory Security Services” in the DirX Directory Introduction that DirX Directory supports the Secure Socket Layer/Transport Layer Security (SSL/TLS) protocols for encrypted and authenticated LDAP client-server communications over the Internet and other TCP/IP networks. SSL/TLS session encryption ensures LDAP traffic confidentiality at the network level. When My-Company established its DirX Directory service (as described in the chapter “Setting up the DirX Directory Service), it chose not to enable SSL/TLS for its LDAP server.
Now My-Company wants to make its employee credit card numbers available to the Frankfurt travel agency for use in making travel arrangements on the employees' behalf. To protect the exchange of this information, they decide to enable the LDAP server to accept SSL connections from the Frankfurt travel agency. The company decides not to require that client authentication be performed over the SSL-encrypted transmission.
Setting up the LDAP server to support the SSL protocol consists of the following steps:
-
Adding SSL-specific information to the LDAP configuration subentry
-
Creating the SSL configuration subentry
You can perform these steps with DirX Directory Manager or with dirxcp. The next sections describe these steps and how to perform them with dirxcp.
Adding SSL Information to the LDAP Configuration Subentry
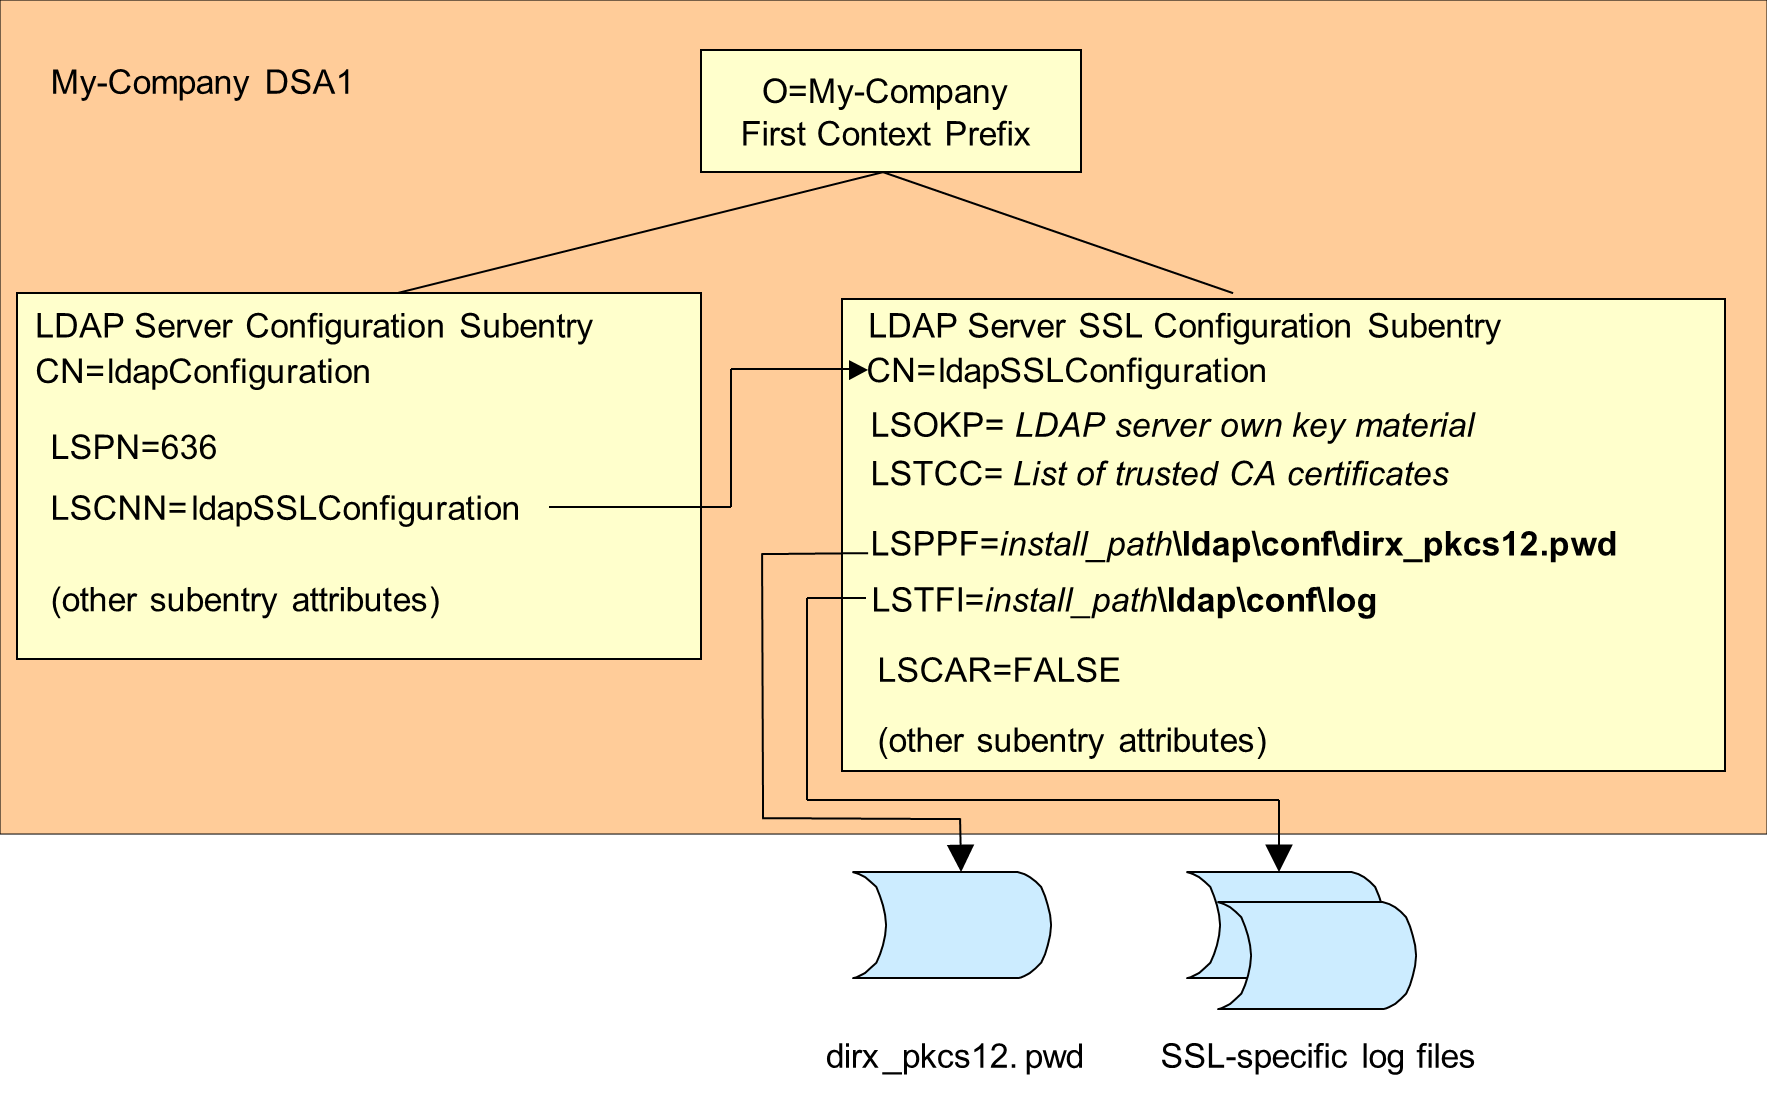
The LDAP configuration subentry contains three SSL-specific attributes:
-
The LDAP secure port number LSPN (ldapSecurePortNumber) user attribute, which specifies the secure port number on which the LDAP server is to listen for SSL/TLS requests from LDAP clients.
An LDAP server that supports SSL/TLS protocol needs to be assigned a port on which to listen for incoming requests over SSL/TLS from LDAP clients. In general, LDAP servers are assigned the secure port number 636. In some cases, however, this port may be in use by another service, and so a different LDAP server port must be selected. Since the machine on which the LDAP server is to run has nothing assigned to port 636, My-Company decides to use this port number for its LDAP server.
-
The LDAP SSL configuration subentry common name LSCCN (ldapSSLCfgSubentryCN) attribute, which specifies the value of the common name assigned to the LDAP SSL configuration subentry.
An LDAP SSL configuration subentry specifies the configuration parameters for SSL/TLS support. There can be more than one LDAP SSL configuration subentry per DSA; this is so if the configuration supports multiple LDAP server processes that are to have different SSL settings. The administrator of the contact DSA must create the SSL configuration subentry below the first context prefix using dirxcp over LDAPv3; the common name applied to this subentry must be the same as the value of the LSCCN attribute. The default name for the SSL configuration subentry is ldapSSLConfiguration; My-Company chooses to use this default.
-
The LDAP StartTLS enabled LSTEN (ldapStartTLSenabled) user attribute, which specifies whether a plain LDAP connection can be switched to SSL/TLS with the startTLS extended operation. By default, the support of startTLS is disabled. My-Company decides to use this default behavior of the plain LDAP port.
Adding SSL-Specific Information
To modify the LDAP configuration subentry with dirxcp, the My-Company administrator binds to the contact DSA with dirxcp over LDAPv3 and uses the command:
[obj] modify distinguished_name -replaceattr attribute_list
where distinguished_name is the name (in LDAP syntax) of the My-Company subentry cn=ldapConfiguration,o=My-Company. To add the SSL-specific information to the subentry, the My-Company administrator issues the following dirxcp command:
modify cn=ldapConfiguration,o=My-Company \
    -replaceattr {ldapSecurePortNumber=636} \
                 {ldapSSLCfgSubentryCN=ldapSSLconfiguration}
Creating the SSL Configuration Subentry
The LDAP SSL configuration subentry contains attributes that control how SSL functions, including:
-
The cipher suites (signature, encryption, and hashing algorithms) that the LDAP server supports for the SSL/TLS protocol handshake (attribute LSSES (supportedEncryptionStrength) and attribute LSSESEX (supportedEncryptionStrengthExt)).
-
The security protocols that the LDAP server supports: TLS v1.0, v1.1, v1.2 or v1.3) (attribute LSSSP (supportedSecurityProtocols)).
-
The public key/private key material that has been assigned to the LDAP server: its user certificate and its private key (attribute LSOKP (ldapOwnKeymaterialPEM)). This attribute must contain the data in password-protected Privacy Enhanced Mail (PEM) format. The LDAP server uses this key material to authenticate itself to a client.
-
The public key material of the Root Certification Authorities that the LDAP server trusts to issue correct client certificates (attribute LSTCC (ldapTrustedCaCerts)). The LDAP server uses this key material to verify the client’s authentication. This attribute must contain the binary public key certificates of the trusted CAs. Note that this key material is only needed if client authentication is required.
-
The files that contain the Certificate Revocation Lists (CRLs) that the LDAP server is to use to check the user certificates presented during certificate-based client authentication and when executing options (specified via other subentry attributes) that control the extent of CRL checking (attributes LSCRLC (ldapSslCrlChecking), LSTMCRL (ldapSslTolerateMissingCrl), LSANCRL (ldapSslAllowNYVCrl), LSAECRL (ldapSslAllowExpiredCrl)). The files must contain CRLs issued by the trusted CAs in PEM format (attribute LSCRLF (ldapSslCrlFileNames)).
-
The file that contains the password that the LDAP server is to use to access its own key material (attribute LSPPF (Pkcs12PasswordFile)).
-
The way in which client authentication is mapped onto a directory DN (attribute LSAIM (ldapSASLAuthIdMapping)).
-
Whether client authentication is required during the SSL handshake (attribute LSCAR (requireSSLClientAuth)).
-
Configuration parameters for SSL event logging (attributes LSTFI and LSTLE).
The following figure illustrates the relationship between the LDAP configuration and the LDAP SSL configuration subentries and the relationship between the LDAP SSL configuration subentry and the files for SSL support. The figure assumes that client authentication is not required.
The content of the key material depends on the Public Key Infrastructure (PKI) in use. Among other things, the decision about which certificate issuers are to be trusted by LDAP clients and the LDAP server is the result of the security policy planning process. This task is separate from the task of setting up an LDAP server.
Creating the LDAP SSL Configuration Subentry
To create the LDAP SSL configuration subentry below the first context prefix (which in the case of My-Company is also the first administrative point), bind to the contact DSA with dirxcp over DAP, and then use the command:
[obj] create distinguished_name -attribute attribute_list
Supply the distinguished name of the LDAP SSL configuration subentry in the distinguished_name argument; it is /O=My-Company/CN=ldapSSLConfiguration (DAP syntax) in the case of My-Company. The attribute list parameter can contain one or more SSL configuration attributes. These attributes are optional; if an SSL configuration attribute is not supplied, the DirX Directory LDAP server uses a default value.
For My-Company, the attribute list contains the following SSL configuration attributes:
-
The LDAP supported security protocols (LSSSP) user attribute. My-Company selects TLSv1.2 and TLSv1.3 (by default, the LDAP server accepts all versions of the TLS protocol).
-
The LDAP supported encryption strength (LSSES) user attribute, which specifies the ciphers that are accepted in the SSL handshake protocol for protocol versions lower than TLSv1.3. My-Company selects HIGH (the default value is RSA (all cipher suites that use the RSA algorithm are accepted)).
-
The LDAP supported encryption strength extended (LSSESEX) user attribute, which specifies the cipher suites that are accepted in the SSL handshake protocol for the protocol version TLSv1.3. My-Company selects TLS_AES_256_GCM_SHA384.
-
The LDAP PKCS12 password file (LSPPF) user attribute, which specifies the full pathname of the LDAP server’s key material password file. My-Company selects
C:\Program Files\DirX\Directory\ldap\conf\dirx_pkcs12.pwd.
The content of the dirx_pkcs12.pwd file is the clear text password only after the initial administration. Once the LDAP server has accessed the file one time, it changes the content to the encrypted format of the password. -
The LDAP server key material PEM (LSOKP) user attribute, which contains the LDAP server’s key material. My-Company provides sample key material in the file
C:\Program Files\DirX\Directory\ldap\conf\cert_ldapserver.pem and loads the file content into the attribute with the dirxcp create operation. -
The LDAP SSL trace file (LSTFI) user attribute, which specifies the full pathname of the directory where the SSL-specific log files are located. My-Company selects
C:\Program Files\DirX\Directory\ldap\log (which is the default value on Windows systems). -
The LDAP SSL client authentication required (LSCAR) user attribute, which specifies whether the LDAP server will enforce SSL client authentication. My-Company chooses FALSE, which is the default.
-
The LDAP SSL trace level (LSTLE) user attribute, which specifies the level of SSL internal logging. My-Company chooses the default value 0, which turns off trace logging. It is recommended to turn on SSL internal logging only if TLS handshake problems must be debugged. The logging can result in huge logging files that may contain confidential data.
The attribute list must also contain at least the following subentry-specific attributes:
-
The object class (OCL) user attribute that specifies the Subentry (SUBE) and LDAP configuration (LCFG) object classes.
-
The subtree-specification (SS) operational attribute, which must specify its default value, indicating that the subentry holds for the entire subtree.
The following dirxcp command creates an LDAP SSL configuration subentry for My-Company:
  create /O=My-Company/CN=ldapSSLConfiguration -attr \
         {OCL=SUBE;LSCFG} \
         {SS={DEF=TRUE} \
         {LSSSP=TLSv1.2;TLSv1.3} \
         {LSSES=HIGH} \
         {LSSESEX=TLS_AES_256_GCM_SHA384} \
         {LSPPF=
C:\\Program Files\\DirX\\Directory\\ldap\\conf\\dirx_pkcs12.pwd} \
         {LSOKP_FILE=
C:\\Program Files\\DirX\\Directory\\ldap\\conf\\cert_ldapserver.pem}\
         {LSTFI=C:\\Program Files\\DirX\\Directory\\ldap\\log} \
         {LSCAR=FALSE}
| The backslash (\) character must be escaped by a backslash (\) character. |
Setting up Multiple LDAP Servers
In some cases, DirX Directory administrators may want to run several LDAP servers on a single machine. Possible reasons can include:
-
When the LDAP clients using the LDAP service handle character sets in different ways (LDAP v2 Latin1, T61)
-
When administrators want to have special LDAP servers where no modifications to the database are allowed (Read-Only)
-
When administrators want to set up an extra LDAP server that is only accessible via SSL
All of the LDAP servers communicate with the same DSA—the contact DSA specified in the dirxldap.cfg file—and are defined by the same LDAP root subentry, but they must listen for LDAP client requests on different ports, and are configured to handle a particular type of LDAP client. If both LDAP servers are assigned to support LDAP over SSL/TLS, their secure port numbers (that is, the values of their LSPN attributes) must be different.
In addition, each additional LDAP server must be assigned its own RPC port number on which to listen for dirxadm administrative requests. The primary LDAP server—which is the first server to be set up—establishes an RPC port mapper (necessary for dirxadm RPC commands) at port 6999 by default. Any additional LDAP servers that are set up must be assigned different RPC port numbers. DirX Directory administrators must use the RPC port number as input to the dirxadm ldap binding operation, which redirects subsequent dirxadm ldap operations to the LDAP server listening on the RPC port number specified in the operation. In this way, they can switch between administration of the multiple LDAP servers.
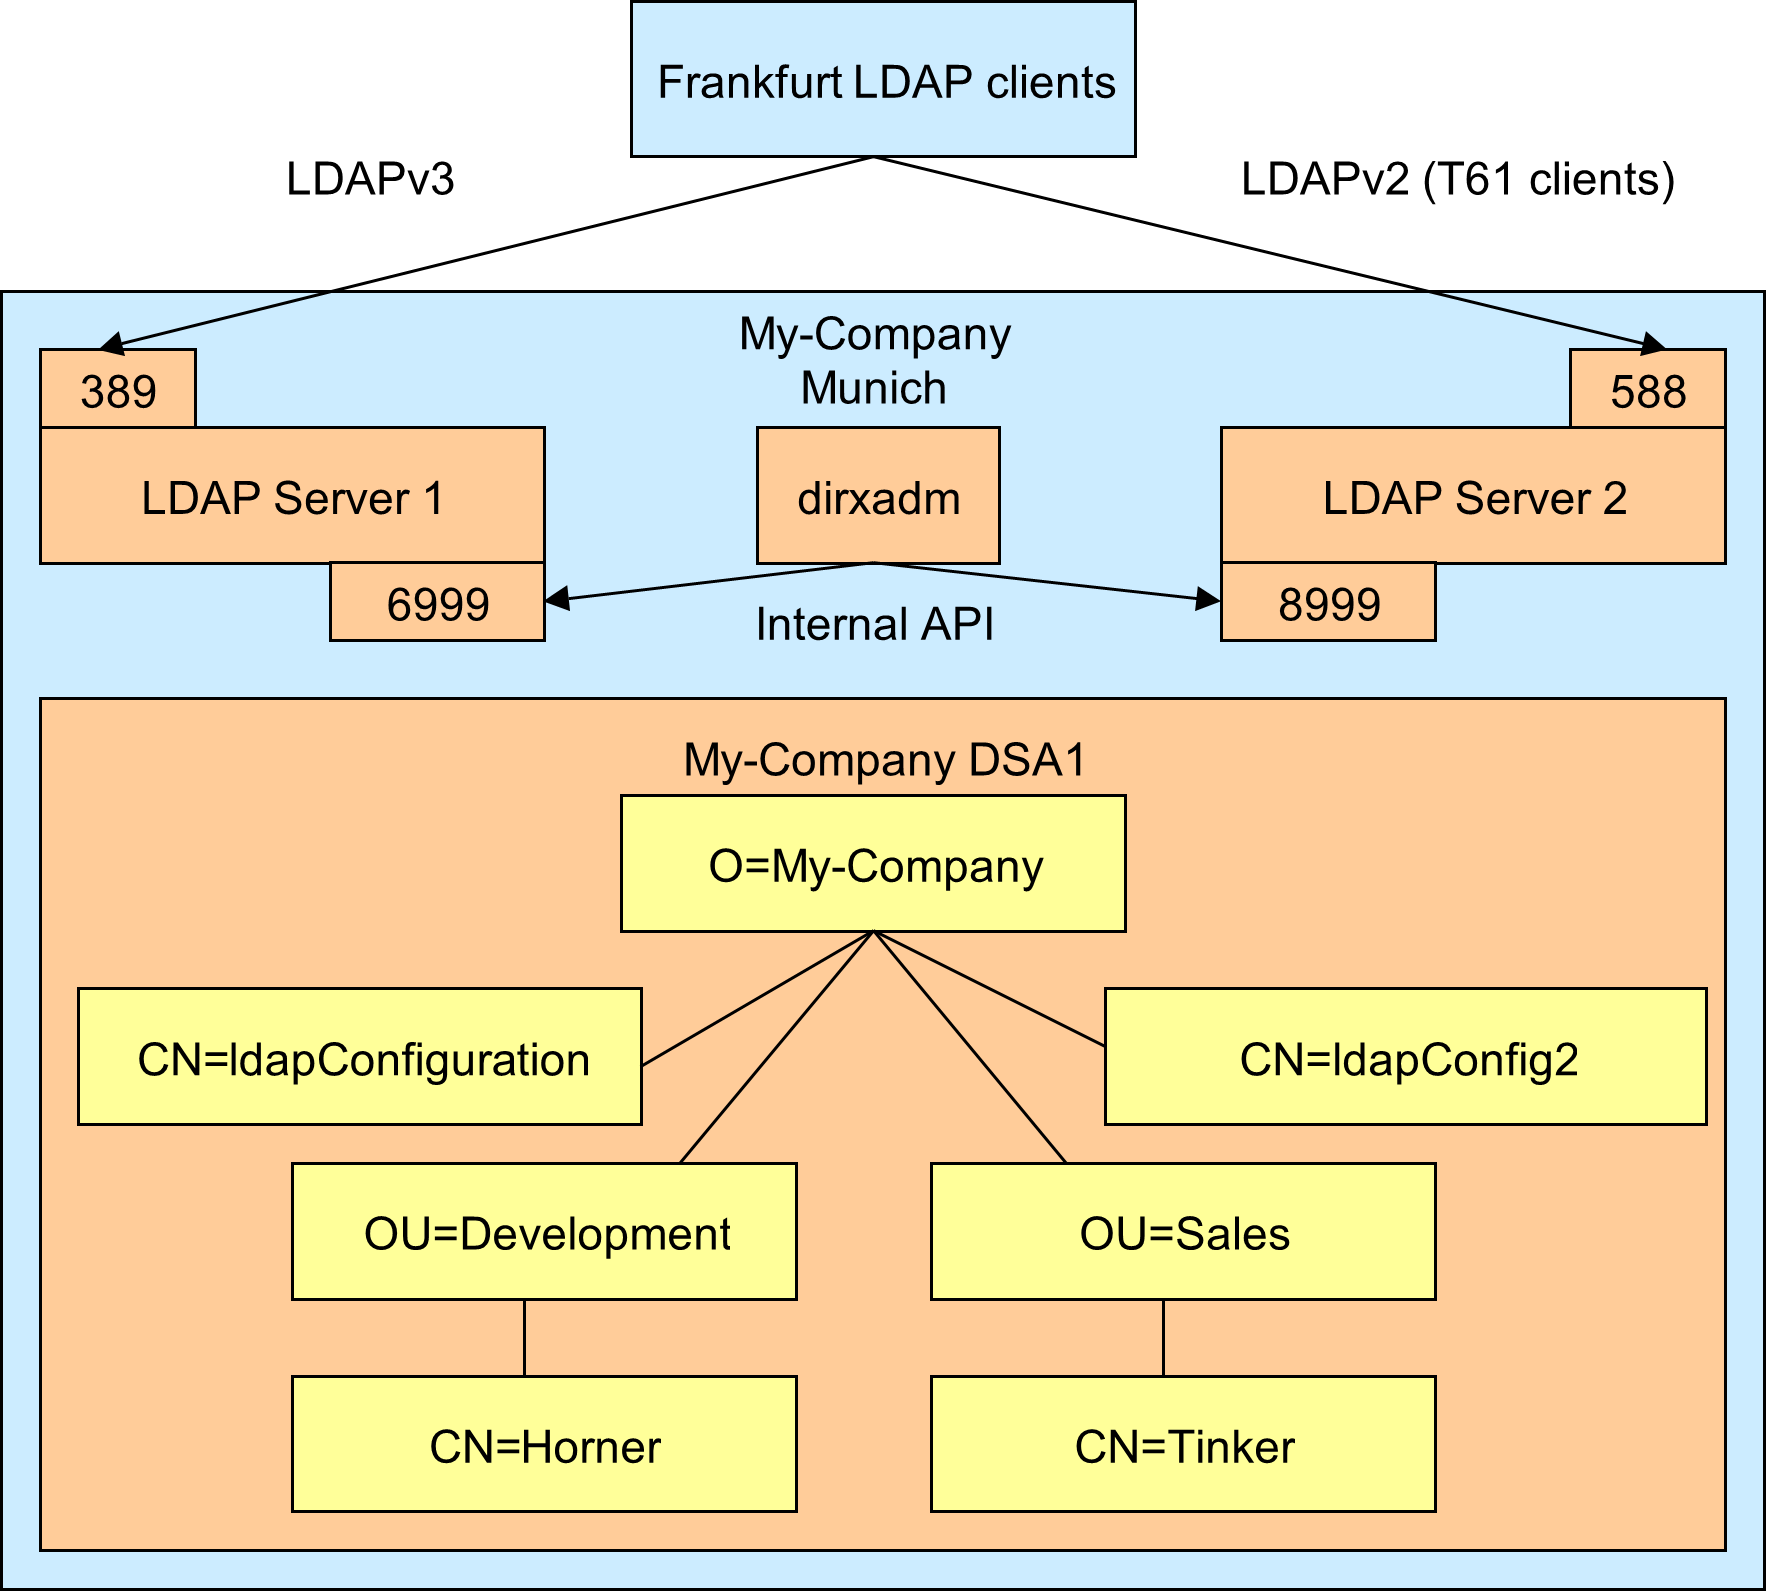
The My-Company administrator decides that his LDAP server configuration requires a second LDAP server that supports the T61 character set. He also decides that the additional LDAP server does not need to support SSL/TLS. Before he can set up this second LDAP server, he must select:
-
A different free LDAP request port number for the second LDAP server, the LDAP request port number he selects is 588.
-
A different common name to assign to the new server’s LDAP configuration subentry. He selects the common name ldapConfig2 for the second server’s LDAP configuration subentry.
-
A different unused RPC port on which the new server is to listen for dirxadm requests. The RPC port number he selects is 8999 (he uses the netstat -a command to determine whether the port he has selected is in use by another process).
The following figure illustrates My-Company’s multiple LDAP server configuration.
Next, the My-Company administrator must:
-
Create a new LDAP configuration subentry for the additional server
-
Start the new LDAP server
The next sections describe how to perform these tasks with dirxcp and dirxadm.
Creating the LDAP Configuration Subentry
To create the LDAP configuration subentry, bind to the contact DSA with dirxcp over DAP and then use the dirxcp command:
[obj] create distinguished_name -attribute attribute_list
Supply the distinguished name of the new LDAP configuration subentry in the distinguished_name argument; My-Company chooses /CN=ldapConfig2. My-Company supplies the following in attribute_list:
-
The LDAP port number (LPNU) user attribute with the value 588.
-
The LDAP Character Set Conversion Request (LCCQ) user attribute with the value T61.
-
The LDAP Character Set Conversion Result (LCCS) user attribute with the value T61.
-
For the other attributes, the same values as specified for the ldapConfiguration subentry.
The following dirxcp command creates the second LDAP configuration subentry for My-Company:
  create /O=My-Company/CN=ldapConfig2 -attr \
         {OCL=SUBE;LCFG} \
         {SS={DEF=TRUE}} \
         {LPNU=588} \
         {LSPN=0} \
         {LMCO=1024} \
         {LCIT=300} \
         {LUDT=0} \
         {LAHE=FALSE} \
         {LROS=FALSE} \
         {LCCQ=T61} \
         {LCCS=T61}
Starting the Second LDAP Server
Starting the second LDAP server consists of two steps:
-
Setting the DIRX_ADDITIONAL_LDAP_SERVERS environment variable
-
Restarting the directory service
The DIRX_ADDITIONAL_LDAP_SERVERS environment variable specifies the LDAP configuration subentry name and the RPC port number of each additional LDAP server that is to be started as part of the directory service. The procedure to set this environment variable depends on the operating system in use.
After you have set the DIRX_ADDITIONAL_LDAP_SERVERS environment variable, you must restart the directory service. This step starts all of the DirX Directory servers, including the additional LDAP servers specified in the DIRX_ADDITIONAL_LDAP_SERVERS environment variable.
Starting the Second LDAP Server on Windows Systems
On Windows systems, you access the DIRX_ADDITIONAL_LDAP_SERVERS environment variable with the path Start → Settings → System → About → System info → Advanced system settings → Advanced tab. The value of the environment variable is the common name of the LDAP configuration subentry that corresponds to the new LDAP server and its RPC port number, in the format subentry_name+RPC_port_number[: …]. If you are starting more than one additional LDAP server, use the colon as a separator between subentry+RPC_port pairs. For example, the My-Company administrator enters ldapConfig2+8999.
After you have set this environment variable, restart the system. An LDAP server that reads the configuration subentry with the common name ldapConfiguration and an LDAP server that reads the LDAP configuration subentry with the common name ldapConfig2 are started.
Starting the Second LDAP Server on Linux Systems
To set the DIRX_ADDITIONAL_LDAP_SERVERS environment variable on Linux systems, you edit the file install_path/.dirxrc, and include two lines that set the environment variable, in the format:
DIRX_ADDITIONAL_LDAP_SERVERS=subentry_name+_RPC_port_number_[: …]
export DIRX_ADDITIONAL_LDAP_SERVERS
where subentry_name is the common name of the LDAP configuration subentry that corresponds to the new LDAP server and RPC_port_number is the RPC port number assigned to the new LDAP server. (If you are starting more than one additional LDAP server, use the colon as a separator between subentry+RPC port pairs.) For example, the My-Company administrator adds the following lines to the dirxrc file:
DIRX_ADDITIONAL_LDAP_SERVERS=ldapConfig2+8999
export DIRX_ADDITIONAL_LDAP_SERVERS
After you have set the environment variable:
-
Bind to the contact DSA with dirxadm bind (if you have not done so already).
-
Issue the dirxadm command sys stop to stop the running DSA and LDAP server.
-
Issue the dirxadm command sys start to restart the contact DSA and LDAP server. An LDAP server that reads the configuration subentry with the common name ldapConfiguration (the default common name) and an LDAP server that reads the LDAP configuration subentry with the common name ldapConfig2 are started.
Managing Multiple LDAP Servers
DirX Directory administrators can use the dirxadm ldap binding operation with the -port option to move between the management of multiple LDAP servers that are running on the local system (they can use the -host and -port options to manage remote LDAP servers). For example, suppose the administrator for the travel agency in Frankfurt reports that its LDAP clients are having problems when they attempt to connect to the My-Company database. The My-Company administrator decides to enable diagnostic logging for both LDAP servers so that he can try to detect the problem. To enable diagnostic logging for both LDAP servers, the My-Company administrator performs the following sequence of dirxadm operations:
-
Binds to the contact DSA with the bind operation. This command directs dirxadm to send administrative requests to port 6999, which is the default RPC port mapper of the LDAP server and is also the first LDAP server’s RPC port.
-
Issues the ldap log operation, which enables diagnostic logging for the first LDAP server.
-
Issues the ldap binding -port 8999 operation to redirect dirxadm administrative requests to the RPC port of the second LDAP server.
-
Issues the ldap log command, which starts diagnostic logging on the second LDAP server.
Activating Configuration Changes in Additional LDAP Servers
Activating configuration changes in any additional LDAP servers consists of two steps:
-
Using the ldap binding operation with the -port option to redirect dirxadm ldap operations to the RPC port mapper of the target LDAP server
-
Activating the configuration change, either dynamically or with an LDAP server re-start
Activating Configuration Changes Dynamically
Recall from the section “Changing the LDAP Configuration” that the DirX Directory service permits a subset of LDAP configuration subentry attributes to be dynamically updated, which preserves existing connections from LDAP clients to the LDAP server instead of losing them due to LDAP server process exit on a re-start. As described in that section, the My-Company administrator changed the service control for the LDAP modifyDN operation to prohibit chaining.
Now the My-Company administrator wants to duplicate this change on the second LDAP server (see “Setting up Multiple LDAP Servers”). Recall from the earlier section that changes to this service control are permitted to be dynamically activated with the dirxextop command or with DirX Directory Manager. To activate the change dynamically with dirxextop on the second LDAP server, the My-Company administrator issues the following command:
dirxextop -D cn=admin,o=my-company -w dirx -t ldap_cfg_upd
–h /CN=DirX-DSA-MyHostname -p 8999
Activating Configuration Changes with Server Re-start
If the LDAP updated server configuration attribute is not one of the general LDAP configuration subentry attributes permitted for dynamic activation, you need to use the dirxadm ldap restart operation for the configuration change to become effective. This operation disconnects all LDAP client connections and causes the LDAP server to re-read the directory schema.
For example, suppose the My-Company administrator changes the RPC port number on which the second LDAP server listens for LDAP client requests (the LDAP port number user attribute). To activate this change, he issues the following commands:
ldap binding -port 8999
ldap restart
so that the new LDAP port number is reflected in the LDAP configuration subentry for the second LDAP server. Note that you must have performed a dse bind operation before you can perform another operation in dirxadm. (See the dse bind operation in the Administration Reference for details.)
For the list of LDAP configuration subentry attributes that can be updated dynamically, see the description of the ldap_cfg_upd extended operation in the DirX Directory LDAP Extended Operations.
Using IP Filtering to Control Client Access
The LDAP server configuration subentry contains two attributes that allow DirX Directory administrators to control access to the LDAP server by clients communicating over specific IP addresses:
-
LDAP Allow IP List (LAIP or ldapAllowIPList)—specifies IP addresses for which LDAP server access is permitted. By default, all IP addresses are allowed access to the server.
-
LDAP Deny IP List (LDIP or ldapDenyIPList)—specifies IP addresses for which LDAP server access is denied. By default, no IP addresses are denied access to the server.
DirX Directory administrators use the dirxcp obj modify operation over LDAPv3 to modify the LAIP and LDIP attributes. For example, suppose the My-Company administrator wants to prevent a group of outside consultants who are working on site in the Munich office from accessing the directory. The consultant machines use IP address 192.23.81.56. The My-Company administrator can bind to the contact DSA with dirxcp over LDAPv3, and then issue the command:
   modify /cn=ldapConfiguration,o=My-Company \
          -addattr {ldapDenyIPList=192.23.81.56}
The LDAP server uses the following simple strategy to grant or deny access for IPs:
-
A client IP must be part of the LAIP (ldapAllowIPList) list.
-
A client IP must not be part of the “deny” list.
-
Both conditions must be true to grant access, otherwise, access is denied.
As a result, the machines with the IP address 192.23.81.56 will be denied access to the LDAP server. The sections on LAIP and LDIP attributes in the DirX Directory Syntaxes and Attributes provide more details.
Modifying the Default LDAP Cache Configuration
Recall from the DirX Directory Introduction, “LDAP Server Implementation Features” that the DirX Directory LDAP server maintains a configurable and monitorable result cache that can significantly improve performance in cases where LDAP clients send frequent identical search requests. When the LDAP server’s result cache is enabled, the LDAP server searches the cache for a query before it sends the query on to the DSA for processing.
DirX Directory, as delivered, disables the LDAP server’s result cache. DirX Directory administrators can enable the LDAP result cache and configure its operation via attributes in the LDAP server configuration subentry. These attributes are:
-
The LDAP Cache attribute, which enables and disables the result cache
-
The Maximum Cached Elements attribute, which specifies the maximum number of search requests that can be stored in the result cache
-
The Minimum Cache Time and Maximum Cache Time attributes, which specify the duration that an LDAP search result will be stored in the result cache
-
The Minimum Cache Entries and Maximum Cache Entries attributes, which specify the range of result entries that an LDAP search result must have in order to be stored in the result cache
-
The Cache Table Size attribute, which specifies the size of the internal cache table
-
The Cache Update Strategy attribute, which specifies how the LDAP cache is to be updated when the DirX Directory database is modified
Administrators can use DirX Directory Manager or dirxcp obj modify operations on the LDAP server’s configuration subentry to enable and configure the LDAP result cache. Changes made to the LDAP cache configuration take effect the next time the LDAP server is started. Administrators can also use the dirxadm ldap cache and ldap restart operations to enable and disable the cache and apply cache configuration changes to a running LDAP server. The Administration Reference provides more information about the dirxcp and dirxadm tools. The next sections explain how to enable the LDAP cache and provide guidelines for configuring it with the cache configuration attributes.
Enabling the Result Cache
An LDAP server’s LDAP Cache attribute is a boolean value that controls whether the caching of LDAP search results is enabled. The DAP abbreviation for this attribute is LCA; the attribute does not have an LDAP name.
For example, suppose the My-Company administrator decides to enable the LDAP result cache. He can bind to the DSA over DAP and modify the LDAP server configuration subentry with dirxcp as follows:
modify /O=My-Company/CN=ldapConfiguration \
       -changeattr {LCA=FALSE}{LCA=TRUE}
When the DSA enables the LDAP result cache, it applies default configuration by supplying default values in its cache configuration attributes. The next sections describe these attributes and their defaults and provide guidelines for their configuration. The DirX Directory Syntaxes and Attributes describes the DAP and LDAP syntax for these attributes.
Configuring the Cache Size
There is no configurable value for the maximum size of the LDAP result cache. Instead, DirX Directory administrators use the Max Cached Elements and Max Cached Entries attributes to adjust the cache size to the available system memory. The Max Cached Elements attribute limits the number of search results the cache can hold at one time, while the Max Cached Entries attribute limits the number of entries a search result can have in order to be stored in the cache.
An LDAP search result consists of one or more LDAP result messages. Each result message describes one resulting entry. The last result message contains the result code of the search. If the search results in no entry, the LDAP search result consists only of the last result message containing the result code. A cached empty search result (a result that contains just the result code) requires 1KB of memory. The amount of memory required for a typical cached result ( a result with some number of entries) depends upon the size of the retrieved attributes.
By default, the Max Cached Elements value is set to 10,000 elements (a full LDAP cache consumes at least 10MB of memory) and the Max Cached Entries value is set to 0 (empty search results are cached). Administrators can use the following general scenarios to configure the Max Cached Elements and Max Cached Entries attributes to size the cache to their memory requirements:
-
Most of the LDAP requests return small results (each result has just a few entries). In this scenario, an administrator should specify a low Max Cached Entries value and a high Max Cached Elements value.
-
Most of the LDAP results return large results (each result has many entries). In this scenario, an administrator should specify a high Max Cached Entries value and a low Max Cached Elements value.
-
The size of the LDAP results varies between small and large results. In this scenario, an administrator should specify Max Cached Entries and Max Cached Elements values that are lower than the default values
The value given to Max Cached Elements is also related to the size specified for the internal cash table, which is controlled by the Cache Table Size attribute. For best performance, the value of the Cache Table Size attribute should be at least the value of Max Cached Elements divided by 3. The table size must not be lower than 128 and must not be greater than 64,000. Note that cache performance will decrease if too many results are stored in a table that is too small. The default Cache Table Size is 4096 for a default Max Cached Elements of 10,000.
Configuring the Results that are Cached
The following methods can be used to specify which results are cached:
-
The Minimum Cache Entry and Maximum Cache Entry Attributes:
The Minimum Cache Entry and Maximum Cache Entry attributes control which LDAP search results are stored in the result cache. An LDAP search result is only stored in the cache when the number of entries in the result is within the range specified in Minimum and Maximum Cache Entry attributes. By default, the range is from 0 through 2000.
-
The environment variables DIRX_LDAP_CACHE_BANNED_REQ_ATTR and DIRX_LDAP_CACHE_BANNED_BASE_OBJ:
The environment variable DIRX_LDAP_CACHE_BANNED_REQ_ATTR prevents search results of search requests with specific requested attributes from being cached. The environment variable DIRX_LDAP_CACHE_BANNED_BASE_OBJ prevents search results of search requests with specific base objects from being cached.
For example, the My-Company administrator knows that the entries under the node ou=state-data,o=my-company are modified very often. It doesn’t make sense to store these entries in the cache because the LDAP server evaluates whether update operations affect the cached results. To exclude these entries from being cached, the administrator specifies the environment variable DIRX_LDAP_CACHE_BANNED_BASE_OBJ=ou=state-data,o=my-company
-
The environment variable DIRX_LDAP_CACHE_ALLOWED_USER:
The LDAP server stores only search results in the cache if the user’s DN is listed in the environment variable DIRX_LDAP_CACHE_ALLOWED_USER.
Configuring when Results are Removed
The Minimum and Maximum Cache Time attributes combine with other attributes to control how long a cached search result remains the cache. An LDAP search result is removed from the cache when the following conditions are true:
-
The maximum number of LDAP search results specified in the Max Cached Elements attribute is exceeded
-
The search result has been stored for at least the minimum storage time specified in the Minimum Cache Time attribute
-
The maximum storage time specified by the Maximum Cache Time attribute is exceeded
-
The search result has the lowest hit rate
By default, a search result remains in the cache for at least 0 seconds and no longer than 12 hours (43200 seconds).
Configuring the Cache Update Strategy
The Cache Update Strategy attribute controls how the result cache is updated when the DirX Directory database is modified by an update operation, so that the cache does not return incorrect results. There are three strategies:
-
The “full erase” strategy, in which all results in the cache are removed (0)
-
The “DN” strategy, in which all results that may contain the distinguished name of the modified directory entry are removed (1)
-
The “attribute” strategy, in which all results that may contain the modified directory entry attribute are removed (2)
-
The “DN plus attribute” strategy, in which all results that may contain the distinguished name of the modified entry or the modified attribute are removed (3; this is the default strategy)
| Search results without entries will always be removed, and that the DSA will flush the cache before it begins a database restore operation. |
Adding User Policies to an LDAP Server
The LDAP server configuration subentry contains two attributes that allow DirX Directory administrators to create user-specific and group-specific access policies for clients that connect to an LDAP server:
-
LDAP User Policies (ldapUserPolicies or LUSP)—specifies policies that apply to a single user or to a set of users.
-
LDAP Group Policies (ldapGroupPolicies or LGRP)—specifies policies that apply to the members of a group.
These attributes extend the LDAP server configuration attributes LDAP Allowed Users (LAUSL), LDAP Allowed Groups (LAGRP), LDAP Denied Users (LDUSL) and LDAP Denied Groups (LDGRP) but are distinct from other LDAP server configuration attributes except for the LDAP Service Controls attributes. For more information about the LDAP User Policies and LDAP Group Policies attributes, see the DirX Directory Syntaxes and Attributes.
DirX Directory administrators can use DirX Directory Manager or the dirxcp obj modify operation over LDAPv3 to modify the ldapUserPolicies and ldapGroupPolicies attributes and then use the LDAP extended operation ldap_cfg_upd from the dirxextop command to activate it dynamically. (Dynamic activation is strongly recommended; see the description of the LDAP User Policies attribute in the DirX Directory Syntaxes and Attributes for complete details.)
For example, suppose that My-Company decides to create the following LDAP user policies:
-
The LDAP search operations for the employees in the Development and Sales departments and the employees of the Frankfurt travel agency are to be limited to returning a maximum of 100 objects per operation. In the ldapUserPolicies attribute, this policy is specified with the USER class value all and the SIZELIMIT property:
ldapUserPolicies=USER=all:SIZELIMIT=100
This setting in SIZELIMIT overrides the value of the LDAP Search Service Controls attribute if its value is lower than the LDAP Search Service Controls attribute. In My-Company’s case, LDAP Search Service Controls attribute is set to return an unlimited number of objects from a search.
-
All the My-Company administrators must bind to the LDAP server using the secure port established for SSL/TLS described in “Enabling SSL/TLS Support”. When this policy is in force, the LDAP server rejects any plain LDAP bind requests made from the administrator. However, the My-Company administrators should have an LDAP search limit that is more flexible than the search return limit of 100 objects specified for all other users. In the ldapUserPolicies attribute, these policies are specified with the WCUSER (wildcard user) class and the TLS_REQUIRED and SIZELIMIT properties:
ldapUserPoli-cies=WCUSER=”*cn=admin*”:TLS_REQUIRED=1:SIZELIMIT=1000000:PRIO=0
The TLS_REQUIRED setting is independent of the LDAP SSL Client Authentication Required (LSCAR) attribute, which controls whether client authentication is required over SSL.
By convention, all the My-Company administrators use the common name format cn=admin, as described in “Adding the New Administrator Entry”. As a result, the policy defined with WCUSER="*cn=admin*" will be applied to all the administrators. However, if an administrator entry uses a different common name format – for example, cn=main-admin or cn=second-administrator – the entry won’t be covered by the LDAP user policy as defined above. -
Anonymous users are not allowed to perform searches that start at the Development organization subdirectory or to search the default administrator entry and their operations must complete within 10 seconds. In the ldapUserPolicies attribute, this policy is specified with the USER class value anonymous, the TIMELIMIT property, the FORB_SB (forbidden search base) property and the FORB_TGT (forbidden target) property:
ldapUserPolicies=USER=anonymous:TIMELIMIT=10:FORB_SB=ou=Development,o=my-company:FORB_TGT=cn=admin,o=my-company
-
The employees from the Sales department are not allowed to perform searches that start at the Development department. In the ldapUserPolicies attribute, this restriction is specified with the FORB_SB (forbidden search base) property:
ldapUserPolicies=SUBR=ou=sales,o=my-company:FORB_SB=ou=development,o=my-company
The FORB_SB policy does not prevent a Sales department employee from searching an entry in the Development department. For example, a Sales employee can specify cn=Josef Smith, ou=development, o=my-company as the base object for the search operation instead specifying ou=development, o=my-company; the search operation that specifies the common name Josef Smith as the search base will succeed, while the search operation that specifies Development as the search base will fail.
The My-Company administrator binds to the contact DSA with dirxcp over LDAPv3 and then performs the following steps to enable the policies:
-
Adds the policies attribute to the LDAP configuration subentry:
modify cn=ldapConfiguration,o=My-Company -addattr {ldapUserPoli-cies=USER=all:SIZELIMIT=100;WCUSER=”*cn=admin*”:TLS_REQUIRED=1:SIZELIMIT=1000000:PRIO=0;USER=anonymous:TIMELIMIT=10:FORB_SB=ou=Development,o=my-company:FORB_TGT=cn=admin,o=my-company;SUBUSER=ou=sales,o=my-company:FORB_SB=ou=development,o=my-company} -
Updates the LDAP configuration dynamically with dirxextop:
dirxextop -D cn=admin,o=my-company -w dirx -t ldap_cfg_upd
Alternatively, the administrator can use DirX Directory Manager to add the policies values and update the configuration dynamically. The advantage of using DirX Directory Manager is that it performs a syntax check on the policies’ values.
See the description of the LDAP User Policies attribute in the DirX Directory Syntaxes and Attributes for a description of all the properties available for use in the LDAP User Policies attribute.
Administrators can use the LDAP extended operations ldap_show_policy_rules, ldap_show_policy_users and ldap_show_single_user_policy_rules to get information about the current LDAP user and group policies in force, the current status of users registered to the LDAP user policies and the policies that apply to an individual user. See the DirX Directory LDAP Extended Operations for details about these operations and examples of their output.