Using the Maintenance Workflows
DirX Identity maintenance workflows help to maintain your identity system to ensure consistent and current data of high quality.This chapter provides detailed information about maintenance workflow configuration, special features and user hooks.The sections in this chapter include:
-
Understanding the Java-based Maintenance Workflows - describes configuration, features, and user hooks for Java-based maintenance workflows.
-
Understanding the Tcl-based Maintenance Workflows - describes configuration, features, and user hooks for Tcl-based maintenance workflows.
For information about these workflows' theory of operation, see the DirX Identity Connectivity Administration Guide and the DirX Identity Provisioning Administration Guide.
Understanding the Java-based Maintenance Workflows
Maintenance workflows provided with the Identity Store default Connectivity scenario include workflows that run as threads in the Java-based server (IdS-J). They can run as the result of events and in many cases can be scheduled. The Java-based maintenance workflows include:
-
Entry change workflows - special workflows for each type of entry (user, organization, and so on) that apply provisioning and / or consistency rules, check for broken links or update associated entries (for example, the user, if an organizational unit changed the privilege). Deploying these workflows allows you to minimize how often the Privilege Resolution or the Consistency Rule workflow runs (see the section "Privilege Resolution Workflow" for details).
-
Process Tickets Internal - a workflow that processes DirX Identity’s internal tickets.
-
Account Password Manager - a workflow that changes account passwords generated by user requests (event-based mode). Alternatively, it can run scheduled on a specific number of account objects and creates new passwords for accounts whose passwords have expired.
-
Reset Account Passwords - a workflow that resets passwords of either functional or personal accounts. It runs scheduled on a specific number of account objects.
-
Reset Password If Displayed - a workflow that resets passwords of privileged accounts (for example, within 24 hours) after the password has been read by Web Center. It runs scheduled on a specific set of privileged account objects (defined by an LDAP filter).
-
User Password Event Manager - a workflow that changes user passwords and all related account passwords based on user requests (event-based mode).
-
User Password Expiration Notification - a workflow that finds users whose passwords are about to expire and informs the users about it by sending a notification mail.
-
Transport Workflows - a workflow that transfers data between Identity Store instances.
-
Joint Backup - a workflow that performs a synchronized backup of the Java-based Server’s repository and the LDAP Connectivity and Provisioning data store.
Entry Change Workflows
Workflows for normal entry changes (not password changes) exist for various types of entries: users, organizations, organizational units and contexts. They are invoked by the same mechanism and their processing is very similar. The following figure illustrates how these workflows are invoked:
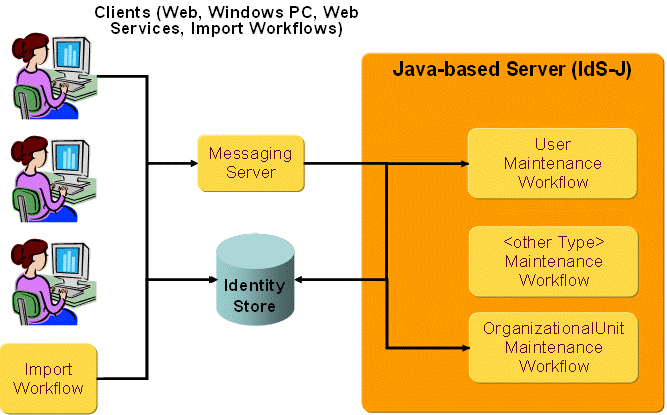
Various clients that create, update or delete entries in the Identity domain publish events after their changes. This action is controlled by the Event Policy in the domain. The event is only sent if the corresponding object type is activated in the event policy. Clients that send these types of events are:
-
Web Center and Identity Manager.
-
Provisioning Web Services.
-
Import workflows, both Tcl-based and Java-based workflows. Note that
-
For Tcl-based workflows, metacp must be configured accordingly.
-
For Java-based workflows, the audit object type in the channel that configures the mapping for import into DirX Identity domain must be set.
It does not make sense to start these workflows by hand or on a schedule because they only evaluate events. As with other real-time workflows, they are deployed to the IdS-J server if their Is Active flags are set in the configuration.
The clients send an event after an entry has been updated successfully. The topic of the event contains:
-
The object description name of the changed object: for example, dxrUser, ctxOrganizationalUnit.
-
The host name of the LDAP server. The clients use the host name as it is configured in their binding configuration.
-
The root DN of the DirX Identity domain (for example "cn=My-Company").
There is one deviation from these rules: the Java-based workflows that import accounts and groups use the cluster and domain attribute of the target system rather than the host name and the domain root of the LDAP server.
Make sure that the When Applicable section of the workflows contains the proper information.
The actions of the workflows depend on the entry type, the event type (add, modify or delete) and on the changed attributes. But typically they:
-
Apply provisioning and / or consistency rules whose filters match the entry attributes.
-
Check for broken links from the entries and especially for links to such an entry, if it has been deleted.
-
Update associated users, if a critical attribute has changed. This is particularly important if a privilege link of a business object has been added or deleted.
-
Call a user hook, if one has been configured.
-
Store the changes for the entry made during this workflow’s operation.
Deploying these workflows allows you to avoid having to start a privilege resolution or consistency check workflow on a regular basis (see the section "Privilege Resolution Workflow"). The resulting privilege changes and account updates are performed in real time.
For more details on the configuration and processing of these workflows, see the following sections.
Accounts
The following sections describe how to configure the event-based maintenance workflow for accounts and the tasks this workflow performs.
Configuring the Event-based Maintenance Workflow for Accounts
To configure the workflow:
-
Use the Identity Manager to copy the workflow to your scenario (Connectivity → Global View).
-
Select Connectivity → Expert View and then select the copied workflow object.
-
Select the join activity and then adjust the settings in the following tabs:
General tab:
Enter an appropriate resource family into Resource Family. It is a good idea to have a separate resource family for this type of workflow to ensure that the corresponding threads do not compete with threads performing other workflows.
In the Error Handling section, specify the timeout for the activity, the retry limit and the waiting time between retries.
Controller tab:
The join engine type AccountEventController should be selected. It automatically determines the proper class name.
If you want a user hook to be called during event processing, enter its full class name into Userhook Class Name. Make sure the library (jar file) containing your classes and all others on which they depend are deployed in the following folder beneath the installation:
install_path/ids-j-domain-Sn/confdb/jobs/eventBasedRules/lib
For information on how to write a user hook, see the DirX Identity Customization Guide.
Event Attributes tab:
Attributes for finding Users determines a sequence of attribute names that are used for finding the associated user of given account. Each line contains a comma-separated list of attribute names. The event controller searches for users where the values of these attributes match those of the account. If it finds exactly one, it associates the account with the user; that is, it sets the account’s user link. If it finds none or more than one user, it continues with the next list of attributes.
Sort Key defines the sort attribute for sorting rules. The default value is “cn”
Sort Ascending defines the sort order ascending. The default value is “true” so sorting is ascending.
-
In the General tab of the workflow:
-
Adjust the Is applicable for parameters. In particular, make sure type is set to the object description name SvcTSAccount and the resource and cluster are set to the server and domain name respectively.
-
Set the Active flag of the workflow.
-
Right-click the workflow object and select Load IdS-J Configuration to load the workflow into the Java-based Server.
Event-based Maintenance Workflow Operation for Accounts
The following figure illustrates how the event-based maintenance workflow operates for accounts:
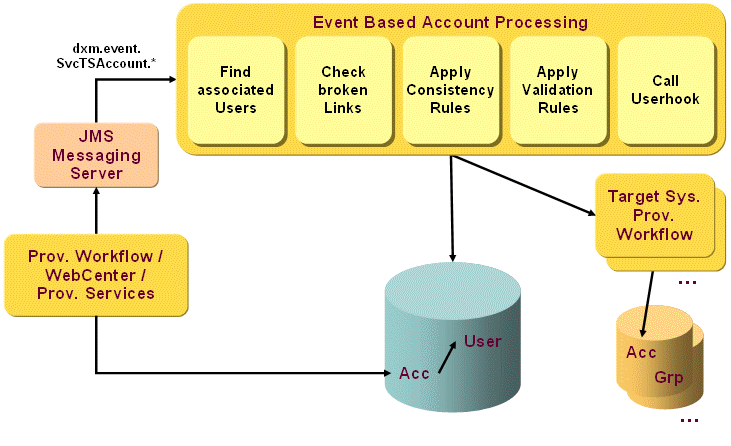
The workflow performs the following operations:
-
It checks the links from this entry to other entries. If a referenced entry cannot be found, the workflow removes the reference.
-
It applies the consistency rules whose filters match the entry’s attributes.
-
It applies the accept and cleanup rules. If one of the account’s group memberships is in the IMPORTED state and the account and the group match an accept or cleanup rule, the workflow changes the state to IGNORE or DELETED respectively. Note that this action occurs only if the memberships are stored at the account.
-
It applies the validation rules. If the account matches a validation rule’s account filter, it becomes an imported member of the respective group(s). If the account does not match the filter, but is an imported member of a matching group for no other reason, it is deleted: the membership state is changed to DELETED. This action triggers a real-time provisioning workflow and updates the state at the connected system.
-
It calls the user hook, if one is configured. The user hook has access to the affected entry and can change it. The user hook does not need to store its changes to the LDAP server because the workflow performs this task in the next step.
-
If the entry was modified, the workflow saves it to the LDAP server.
Organizations
This section describes how to configure the event-based maintenance workflow for organizations and the tasks this workflow performs.
Configuring the Event-based Maintenance Workflow for Organizations
To configure the workflow:
-
Use the Identity Manager to copy the workflow to your scenario (Connectivity → Global View).
-
Select Connectivity → Expert View and then select the copied workflow object.
-
Select the join activity and then adjust the settings in the following tabs:
General tab:
Enter a proper resource family into Resource Family. It is a good idea to have a separate resource family for this type of workflow to ensure that the corresponding threads do not compete with threads performing other workflows.
In the Error Handling section, specify the timeout for the activity, the retry limit and the waiting time between retries.
Controller tab:
Select the join engine type OrganizationEventController. It automatically determines the proper class name.
If you want a user hook to be called during event processing, enter its full class name into Userhook Class Name. Make sure the library (jar file) containing your classes and all others on which they depend are deployed in the following folder beneath the installation:
install_path/ids-j-domain-Sn/confdb/jobs/eventBasedRules/lib
For details on how to write a user hook, see the DirX Identity Customization Guide.
Event Attributes tab:
Attributes to update Users determines the list of attributes that result in the update of all associated users when one of them has been changed.
Sort Key defines the sort attribute for sorting rules. The default value is “cn”
Sort Ascending defines the sort order ascending. The default value is “true” so sorting is ascending.
-
In the General tab of the workflow:
-
Adjust the Is applicable for parameters. Make sure type is set to the object description name ctxOrganization and the resource and cluster are set to the server and domain name respectively.
-
Set the Active flag of the workflow.
-
Right-click the workflow object and select Load IdS-J Configuration to load the workflow into the Java-based Server.
Event-based Maintenance Workflow Operation for Organizations
The following figure illustrates how the event-based maintenance workflow operates for organizations:
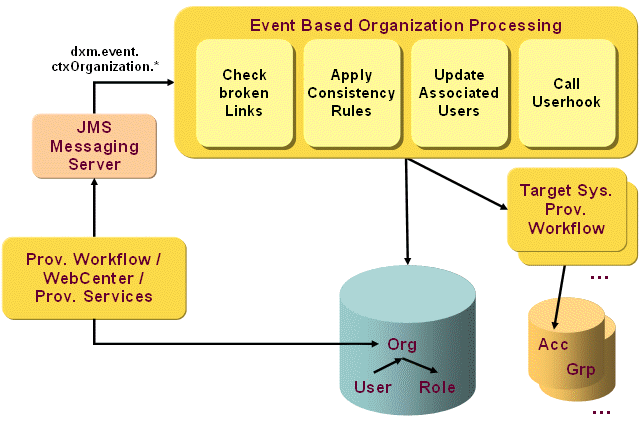
The workflow performs the following operations:
-
It checks the links from this entry to other entries. If a referenced entry cannot be found, the workflow removes the reference.
-
It applies the consistency rules whose filters match the entry’s attributes.
-
If the privilege link or one of the configured attributes has been changed, it updates all associated users. (Users are associated if they have a reference (dxrOrganizationLink or dxrSecOrganizationLink) to this entry.) The update contains the resolution of the user privileges and includes those privileges referenced from the organization.
-
It calls the user hook, if one is configured. The user hook has access to the affected entry and can change it. The user hook does not need to store its changes to the LDAP server because the workflow performs this task in the next step.
-
If the entry was modified, the workflow saves it to the LDAP server.
Organizational Units
The following sections describe how to configure the event-based maintenance workflow for organizational units and describe the tasks this workflow performs.
Configuring the Event-based Maintenance Workflow for Organizational Units
To configure the workflow:
-
Use the Identity Manager to copy the workflow to your scenario (Connectivity → Global View).
-
Select Connectivity → Expert View and then select the copied workflow object.
-
Select the join activity and then adjust the settings in the following tabs:
General tab:
Enter a proper resource family into Resource Family. It is a good idea to have a separate resource family for this type of workflow to ensure that the corresponding threads do not compete with threads performing other workflows.
In the Error Handling section, specify the timeout for the activity, the retry limit and the waiting time between retries.
Controller tab:
Select the join engine type OUEventController. It automatically determines the proper class name.
If you want a user hook to be called during event processing, enter its full class name into Userhook Class Name. Make sure the library (jar file) containing your classes and all others on which they depend are deployed in the following folder beneath the installation:
install_path/ids-j-domain-Sn/confdb/jobs/eventBasedRules/lib
For information on how to write a user hook, see the DirX Identity Customization Guide.
Event Attributes tab:
Attributes to update Users determines the list of attributes that result in the update of all associated users when one of them has been changed.
Sort Key defines the sort attribute for sorting rules. The default value is “cn”
Sort Ascending defines the sort order ascending. The default value is “true” so sorting is ascending.
-
In the General tab of the workflow:
-
Adjust the Is applicable for parameters. In particular, make sure type is set to the object description name ctxOrganizationalUnit and the resource and cluster are set to the server and domain name respectively.
-
Set the Active flag of the workflow.
-
Right-click the workflow object and select Load IdS-J Configuration to load the workflow into the Java-based Server.
Event-based Maintenance Workflow Operation for Organizational Units
The following figure illustrates how the event-based maintenance workflow operates for organizational units:
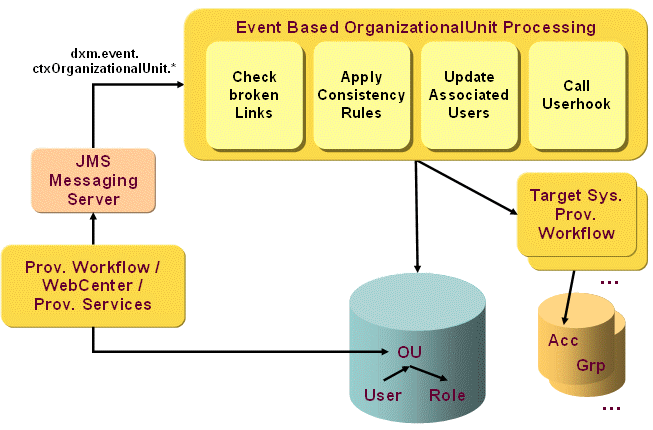
The workflow performs the following operations:
-
It checks the links from this entry to other entries. If a referenced entry cannot be found, the workflow removes the reference.
-
It applies the consistency rules whose filters match the entry’s attributes.
-
If the privilege link or one of the configured attributes has changed, the workflow updates all associated users. Users are associated with an entry if they have a reference (dxrOrganizationalUnitLink or dxrSecOrganizationalUnitLink) to it. The update contains the resolution of the user privileges and includes those privileges referenced from the organizational unit.
-
It calls the user hook, if one is configured. The user hook has access to the affected entry and can change it. The user hook does not need to store its changes to the LDAP server because the workflow performs this task in the next step.
-
If the entry was modified, the workflow saves it to the LDAP server.
Context Objects
The following sections describe how to configure the event-based maintenance workflow for context objects and describe the tasks this workflow performs.
Configuring the Event-based Maintenance Workflow for Context Objects
To configure the workflow:
-
Use the Identity Manager to copy the workflow to your scenario (Connectivity → Global View).
-
Select Connectivity → Expert View and then select the copied workflow object.
-
Select the join activity and then adjust the settings in the following tabs:
General tab:
Enter a proper resource family into Resource Family. It is a good idea to have a separate resource family for this type of workflow to ensure that the corresponding threads do not compete with threads performing other workflows.
In the Error Handling section, specify the timeout for the activity, the retry limit and the waiting time between retries.
Controller tab:
The join engine type ContextEventController should be selected. It automatically determines the proper class name.
If you want a user hook to be called during event processing, enter its full class name into Userhook Class Name. Make sure the library (jar file) containing your classes and all others on which they depend are deployed in the following folder beneath the installation:
install_path/ids-j-domain-Sn/confdb/jobs/eventBasedRules/lib
For information on how to write a user hook, see the DirX Identity Customization Guide.
Event Attributes tab:
Attributes to update Users determines the list of attributes that result in the update of all associated users when one of them has been changed.
Sort Key defines the sort attribute for sorting rules. The default value is “cn”
Sort Ascending defines the sort order ascending. The default value is “true” so sorting is ascending.
-
In the General tab of the workflow:
-
Adjust the Is applicable for parameters. In particular, make sure type is set to the object description name dxrContext and the resource and cluster are set to the server and domain name respectively.
-
Set the Active flag of the workflow.
-
Right-click the workflow object and select Load IdS-J Configuration to load the workflow into the Java-based Server.
Event-based Maintenance Workflow Operation for Context Objects
The following figure illustrates how the event-based maintenance workflow operates for context objects:

The workflow performs the following operations:
-
It checks the links from this entry to other entries. If a referenced entry cannot be found, the workflow removes the reference.
-
It applies the consistency rules whose filters match the entry’s attributes.
-
If the privilege link or one of the configured attributes has changed, it updates all associated users. Users are associated if they have a reference (dxrContextLink) to this entry: the reference can be contained in the attributes dxrContextLink (standard) and in dxrExtensionLink1, …, dxrExtensionLink10. The update contains resolution of the user privileges and includes those privileges referenced from the context.
The dxrExtensionLink attributes are not indexed per default. If you intend to use these links, set the corresponding directory indexes. -
It calls the user hook, if one is configured. The user hook has access to the affected entry and can change it. The user hook does not need to store its changes to the LDAP server because the workflow performs this task in the next step.
-
If the entry was modified, the workflow saves it to the directory server.
Location Objects
The following sections describe how to configure the event-based maintenance workflow for location objects and describe the tasks this workflow performs.
Configuring the Event-based Maintenance Workflow for Location Objects
To configure the workflow:
-
Use the Identity Manager to copy the workflow to your scenario (Connectivity → Global View).
-
Select Connectivity → Expert View and then select the copied workflow object.
-
Select the join activity and then adjust the settings in the following tabs:
General tab:
Enter a proper resource family into Resource Family. It is a good idea to have a separate resource family for this type of workflow to ensure that the corresponding threads do not compete with threads performing other workflows.
In the Error Handling section, specify the timeout for the activity, the retry limit and the waiting time between retries.
Controller tab:
Select the join engine type LocationEventController. It automatically determines the proper class name.
If you want a user hook to be called during event processing, enter its full class name into Userhook Class Name. Make sure the library (jar file) containing your classes and all others on which they depend are deployed in the following folder beneath the installation:
install_path/ids-j-domain-Sn/confdb/jobs/eventBasedRules/lib
For information on how to write a user hook, see the DirX Identity Customization Guide.
Event Attributes tab:
Attributes to update Users determines the list of attributes that result in the update of all associated users when one of them has been changed.
Sort Key defines the sort attribute for sorting rules. The default value is “cn”
Sort Ascending defines the sort order ascending. The default value is “true” so sorting is ascending.
-
In the General tab of the workflow:
-
Adjust the Is applicable for parameters. In particular, make sure type is set to the object description name ctxLocation and the resource and cluster are set to the server and domain name respectively.
-
Set the Active flag of the workflow.
-
Right-click the workflow object and select Load IdS-J Configuration to load the workflow into the Java-based Server.
Event-based Maintenance Workflow Operation for Location Objects
The following figure illustrates how the event-based maintenance workflow operates for location objects:

The workflow performs the following operations:
-
It checks the links from this entry to other entries. If a referenced entry cannot be found, the workflow removes the reference.
-
It applies the consistency rules whose filters match the entry’s attributes.
-
If the privilege link or one of the configured attributes has changed, it updates all associated users. Users are associated if they have a reference (dxrLocationLink or dxrSecLocationLink) to this entry. The update contains the resolution of the user privileges and includes those privileges referenced from the location.
-
It calls the user hook, if one is configured. The user hook has access to the affected entry and can change it. The user hook does not need to store its changes to the LDAP server because the workflow performs this task in the next step.
-
If the entry was modified, the workflow saves it to the LDAP server.
Cost Unit Objects
The following sections describe how to configure the event-based maintenance workflow for cost unit objects and describe the tasks this workflow performs.
Configuring the Event-based Maintenance Workflow for Cost Unit Objects
To configure the workflow:
-
Use the Identity Manager to copy the workflow to your scenario (Connectivity → Global View).
-
Select Connectivity → Expert View and then select the copied workflow object.
-
Select the join activity and then adjust the settings in the following tabs:
General tab:
Enter a proper resource family into Resource Family. It is a good idea to have a separate resource family for this type of workflow to ensure that the corresponding threads do not compete with threads performing other workflows.
In the Error Handling section, specify the timeout for the activity, the retry limit and the waiting time between retries.
Controller tab:
Select the join engine type CostUnitEventController. It automatically determines the proper class name.
If you want a user hook to be called during event processing, enter its full class name into Userhook Class Name. Make sure the library (jar file) containing your classes and all others on which they depend are deployed in the following folder beneath the installation:
install_path/ids-j-domain-Sn/confdb/jobs/eventBasedRules/lib
For information on how to write a user hook, see the DirX Identity Customization Guide.
Event Attributes tab:
Attributes to update Users determines the list of attributes that result in the update of all associated users when one of them has been changed.
Sort Key defines the sort attribute for sorting rules. The default value is “cn”
Sort Ascending defines the sort order ascending. The default value is “true” so sorting is ascending.
-
In the General tab of the workflow:
-
Adjust the Is applicable for parameters. In particular, make sure type is set to the object description name dxrCostUnit and the resource and cluster are set to the server and domain name respectively.
-
Set the Active flag of the workflow.
-
Right-click the workflow object and select Load IdS-J Configuration to load the workflow into the Java-based Server.
Event-based Maintenance Workflow Operation for Cost Unit Objects
The following figure illustrates how the event-based maintenance workflow operates for location objects:
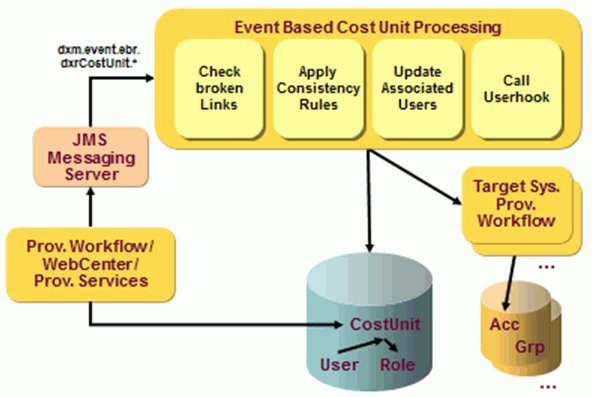
The workflow performs the following operations:
-
It checks the links from this entry to other entries. If a referenced entry cannot be found, the workflow removes the reference.
-
It applies the consistency rules whose filters match the entry’s attributes.
-
If the privilege link or one of the configured attributes has changed, it updates all associated users. Users are associated if they have a reference (dxrCostUnitLink or dxrSecCostUnitLink) to this entry. The update contains the resolution of the user privileges and includes those privileges referenced from the location.
-
It calls the user hook, if one is configured. The user hook has access to the affected entry and can change it. The user hook does not need to store its changes to the LDAP server because the workflow performs this task in the next step.
-
If the entry was modified, the workflow saves it to the LDAP server.
Project Objects
The following sections describe how to configure the event-based maintenance workflow for project objects and describe the tasks this workflow performs.
Configuring the Event-based Maintenance Workflow for Project Objects
To configure the workflow:
-
Use the Identity Manager to copy the workflow to your scenario (Connectivity → Global View).
-
Select Connectivity → Expert View and then select the copied workflow object.
-
Select the join activity and then adjust the settings in the following tabs:
General tab:
Enter a proper resource family into Resource Family. It is a good idea to have a separate resource family for this type of workflow to ensure that the corresponding threads do not compete with threads performing other workflows.
In the Error Handling section, specify the timeout for the activity, the retry limit and the waiting time between retries.
Controller tab:
Select the join engine type ProjectEventController. It automatically determines the proper class name.
If you want a user hook to be called during event processing, enter its full class name into Userhook Class Name. Make sure the library (jar file) containing your classes and all others on which they depend are deployed in the following folder beneath the installation:
install_path/ids-j-domain-Sn/confdb/jobs/eventBasedRules/lib
For information on how to write a user hook, see the DirX Identity Customization Guide.
Event Attributes tab:
Attributes to update Users determines the list of attributes that result in the update of all associated users when one of them has been changed.
Sort Key: defines the sort attribute for sorting rules. The default value is “cn”
Sort Ascending: defines the sort order ascending. The default value is “true” so sorting is ascending.
-
In the General tab of the workflow:
-
Adjust the Is applicable for parameters. In particular, make sure type is set to the object description name dxrProject and the resource and cluster are set to the server and domain name respectively.
-
Set the Active flag of the workflow.
-
Right-click the workflow object and select Load IdS-J Configuration to load the workflow into the Java-based Server.
Event-based Maintenance Workflow Operation for Projects
The following figure illustrates how the event-based maintenance workflow operates for project objects:
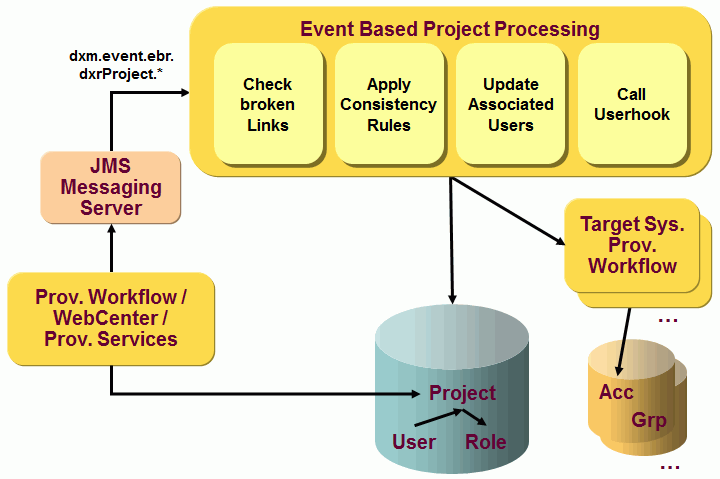
The workflow performs the following operations:
-
It checks the links from this entry to other entries. If a referenced entry cannot be found, the workflow removes the reference.
-
It applies the consistency rules whose filters match the entry’s attributes.
-
If the privilege link or one of the configured attributes has changed, it updates all associated users. Users are associated if they have a reference (dxrProjectLink) to this entry. The update contains the resolution of the user privileges and includes those privileges referenced from the project.
-
It calls the user hook, if one is configured. The user hook has access to the affected entry and can change it. The user hook does not need to store its changes to the LDAP server because the workflow performs this task in the next step.
-
If the entry was modified, the workflow saves it to the LDAP server.
Users
The event-based maintenance workflow for users accepts user change events, applies provisioning and consistency rules, resolves the users as far as necessary and updates the account attributes. Deploying this workflow allows you to avoid having to start a privilege resolution workflow on a regular basis (see the section "Privilege Resolution Workflow"). The resulting privilege changes and account updates are performed in real time. If no relevant attributes are changed, users are not resolved and accounts are not updated; this procedure may save a lot of time. You only need privilege resolution if you change the role hierarchy or group attributes and defer the resolution of affected users. The resolution or propagation process in the previous step can start additional provisioning processes to connected systems.
Configuring the Event-based User Resolution Workflow
To configure the workflow:
-
Use the Identity Manager to copy the workflow to your scenario (Connectivity → Global View).
-
Select Connectivity → Expert View and then select the copied workflow object.
-
Select the join activity and then select the Event Attributes tab. Adjust the following configuration items, which determine when accounts are to be updated:
-
Attributes to include: defines all attributes that should be processed.
-
Attributes to ignore: defines all attributes that should be ignored, if they are not in the previous set
-
Attribute prefixes to include: defines the prefixes to use to update attributes; all attributes starting with these prefixes result in account update if they are not in the "ignore" list.
-
Attribute prefixes to ignore: defines the prefixes to use to ignore attributes; if the attributes are not in any of the previous lists, but match one of these prefixes, they are ignored.
-
Searchbase for Consistency Rules: defines the top level folder of the consistency rules that the workflow performs.
-
Searchbase for Provisioning Rules: defines the top level folder of the provisioning rules that the workflow performs. Note that the rules must contain all grant- and deny rules for a given privilege, because they are executed in one common algorithm.
-
Sort Key defines the sort attribute for sorting rules. The default value is “cn”
-
Sort Ascending defines the sort order ascending. The default value is “true” so sorting is ascending.
-
In the General tab of the workflow, set the Active flag.
-
Right-click the workflow object and then select Load IdS-J Configuration to load the workflow into the Java-based Server.
Event-based User Resolution Workflow Operation
The following figure illustrates how the event-based user resolution workflow operates:
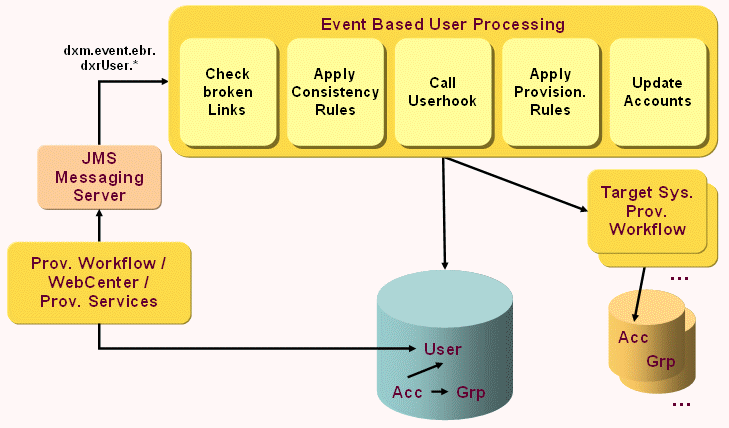
The workflow performs the following operations for an add or modify event:
-
It checks the links from this entry to other entries. If a referenced entry cannot be found, the workflow removes the reference.
-
It applies the consistency rules whose filters match the entry’s attributes.
-
It calls the user hook, if one is configured. The user hook has access to the affected entry and can change it. The user hook should not store its changes to the LDAP server because the workflow performs this task in the next step.
-
The workflow applies the matching provisioning rules, assigns new privileges or removes existing privilege assignments based on the new attribute values and at the end resolves the user, if either in the received event or after applying rules and user hook
-
at least one of the changed attributes is among the domain’s permission parameters,
-
is a state attribute,
-
a date,
-
a privilege link
-
or the attribute dxrTBA is enabled.
-
-
If the user was modified, the workflow stores it to the LDAP server.
-
If one of the attributes has changed that are configured as to be included in the Event Attributes tab of the activity, the attributes of the user’s accounts are updated. This step applies particularly to attributes that are mastered by the user. The user is not resolved.
The rules on when to update accounts are as follows: accounts are updated if at least one of the changed attributes
-
is among the configured "include" parameters;
-
matches an "include prefix", but is not among the "ignore" parameters;
-
doesn’t match any of the "ignore" and "ignore prefix" parameters.
If a delete event is received, the workflow:
-
Removes links from associated entries to the deleted entry
-
Calls the user hook.
Personas
The event-based maintenance workflow for personas accepts persona change events, applies provisioning and consistency rules, resolves the personas as far as necessary and updates the account attributes.
Since personas are just another representation of users, the PersonaResolverController uses the same implementation as the UserResolverController. The PersonaResolverController uses an additional configuration field Link Attribute for Owner in the join activity’s Event Attributes tab. It uses this attribute (owner) to check if attributes that are mastered from the owner are part of the event’s modifications. In this case, the persona is saved to update this set of attributes.
The use of different workflows for users, personas and functional users enables the use of different folders for consistency rules and provisioning rules for the three user representations.
All other aspects of event-based maintenance workflow for personas are common to the event-based maintenance workflow for users, as described in the section "Users".
Functional Users
The event-based maintenance workflow for functional users accepts functional user change events, applies provisioning and consistency rules, resolves the functional users as far as necessary and updates the account attributes.
Since functional users are just another representation of users, the FunctionalUserResolverController uses the same implementation as the UserResolverController. The FunctionalUserResolverController uses an additional configuration field Link Attribute for Sponsor in the join activity’s Event Attributes tab. It uses this attribute (dxrSponsor) to check if attributes that are mastered from the sponsor are part of the event’s modifications. In this case, the functional user is saved to update this set of attributes.
The use of different workflows for users, personas and functional users enables the use of different folders for consistency rules and provisioning rules for the three user representations.
All other aspects of event-based maintenance workflow for functional users are common to the event-based maintenance workflow for users as described in the section "Users".
Generic Objects
The following sections describe how to configure a generic event-based maintenance workflow for any object type and describe the tasks this workflow performs. Typical use of this workflow is to run consistency rules after an object is created or modified.
Configuring the Generic Event-based Processing Workflow
Configuration is possible for any type of object. Use the object description name to define the applicability of the workflow.
You want to run consistency rules whenever a role is created or modified.
Then you must perform the following steps:
-
Login into the Provisioning view group of the DirX Identity Manager.
-
Configure or extend the event policy: add dxrRole to the Selected area in the Configuration tab.
Note that dxrRole is the standard name of the role object description. If you use several different types of object descriptions, use the appropriate object description name here. -
Create a folder for the consistency rules to be run with this workflow. Create the consistency rules in this folder.
-
Create a new event-based processing workflow:
-
Log in into the Connectivity view group of the DirX Identity Manager.
-
Click Global View and then select the scenario where you want to create the workflow.
-
Click the line between the two Identity Stores and select New from the context menu.
-
Select the GenericEventBasedProcessing template and click Next.
-
In the General Workflow Info tab define a name and a description, set the active flag.
-
In the Is applicable section configure dxrRole as Type. As above, use here the object description name that defines your object. Set the Cluster field to '*'.
-
In the Event parameters tab set the path to the folder with your previously created consistency rules (Searchbase for Consistency Rules).
-
Click Next and then Finish.
-
Perform Load IdS-J Configuration to load the newly created workflow into the Java-based Server.
Now your workflow is ready to be tested.
Generic Event-based Processing Workflow Operation
The following figure illustrates how the generic event-based processing workflow operates:
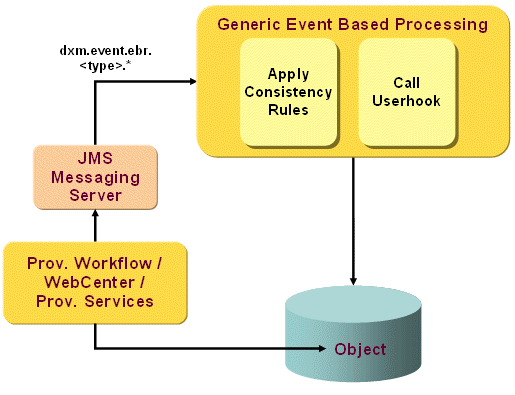
The workflow performs the following operations for an add or modify event:
-
It applies the consistency rules whose filters match the entry’s attributes.
-
It calls the user hook, if one is configured. The user hook has access to the affected entry and can change it. The user hook does not need to store its changes to the LDAP server because the workflow performs this task in the next step.
If a delete event is received, the workflow:
-
Calls the user hook.
Process Tickets Internal Workflow
The Process Tickets Internal workflow runs regularly and processes all tickets where the condition for processing is fulfilled. The figure shows the architecture.
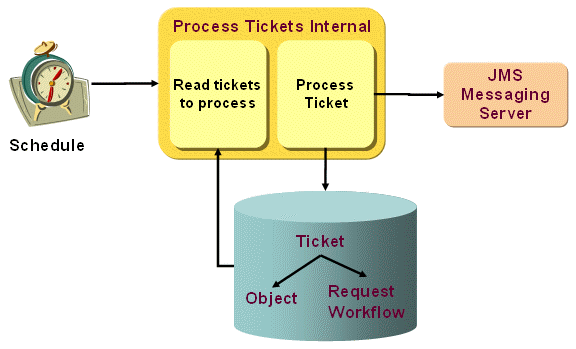
The Process Tickets Internal workflow runs typically scheduled and performs these steps:
-
It reads all tickets that are to process.
-
It processes the tickets.
-
Processing of a ticket might trigger other processes, for example a privilege resolution on a user object. In this case other objects might be created and messages for further processing might be initiated (for example provisioning requests).
For a detailed definition of the procedure see the "Process Tickets Internal Workflow Operation" chapter.
Configuring the Process Tickets Internal Workflow
To configure the workflow:
-
Use the Identity Manager to copy the workflow to your scenario (Connectivity → Global View).
-
Select your scenario (if not yet present, use the target system wizard from the Provisioning view group to create the scenario).
-
Click the workflow line between the Identity Stores and select New from the context menu.
-
Select the ProcessTicketsInternal workflow template and then click Next.
-
Define the Name and Description fields and set the Is Active flag.
-
Click Next and then Finish to complete the copy operation.
-
Perform Load IdS-J Configuration to load the workflow into the Java-based Server.
Now you can run the workflow either by hand or regularly triggered by a schedule.
Process Tickets Internal Workflow Operation
The Process Tickets Internal workflow works in two steps:
Procedure on Request Workflows That are Related to Tickets
-
During each run, it checks the status (state and application state) of all request workflows that are associated to tickets.
-
It sets the state of the ticket accordingly. This means that:
-
Workflow State=RUNNING: ticket state is not changed
-
Workflow State=SUCCEEDED and Application State=ACCEPTED: ticket State=Approval.Completed
-
Workflow State=SUCCEEDED and Application State=REJECTED: ticket State=Approval.Rejected
-
Workflow State=FAILED.*: ticket State=Approval.Error
Procedure on Tickets
-
It reads all tickets where the due date is reached.
-
It processes the ticket:
-
For ticket State=Approval.Completed it actualizes the order data from the workflow instance and then it processes the ticket.
-
For ticket State=Input.Completed it processes the ticket.
-
Processing the ticket means that the ticket data is applied to the subject; for example, the service changes some attributes at a user entry or some privilege assignments are assigned to a user.
-
If necessary, the subject is further processed; for example, a privilege resolution is performed for a user entry to calculate any changes coming from changed attributes or privilege assignments. Other processes might be triggered via JMS messages; for example, real-time provisioning to connected systems.
-
After successful processing, it sets the ticket State=ApplyChange.Completed. and the DeleteDate=today+TicketLifeTime where Ticket Life Time is the defined value at the domain object.
-
If an error occurs during processing, it does not change the status.
Account Password Manager Workflow
The Account Password Manager workflow creates new passwords for DirX Identity accounts after the old password has expired. The following figure illustrates this workflow.
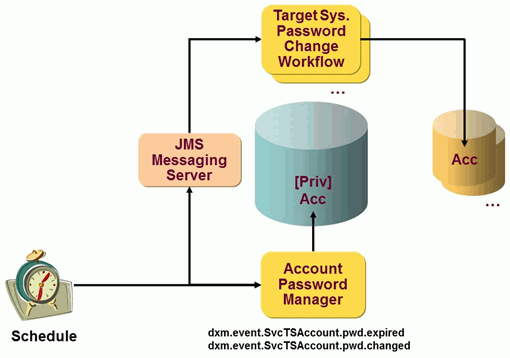
If run scheduled, the Account Password Manager workflow searches for accounts with expired passwords according to the configured search settings, it generates a new password, stores it at the account if it is privileged and triggers the target system-specific password change workflows (setPassword workflow).
If run event-based, it handles "password expired" events (topic dxm.event.SvcTSAccount.pwd.expired) and "password changed" events (topic dxm.event.SvcTSAccount.pwd.changed). For a password expired event, it generates a new password, stores it at the account if it is privileged and sets the password reset flag to false. For a password changed event, it takes the password from the event, changes it at the account if it is privileged and sets the password reset flag as desired in the event. In both cases, it then triggers the target system-specific password change (setPassword) workflow.
Note that the message topics can contain a domain extension. For more information, see the section "Message Topics" in the DirX Identity Connectivity Administration Guide.
Configuring the Account Password Manager Workflow
To run the Account Password Manager workflow successfully, you must perform these steps:
-
Use the Identity Manager to copy the workflow to your scenario (Connectivity → Global View).
-
Select Connectivity → Expert View and then select the copied workflow object.
-
Select the join activity and then select the Controller tab. Adjust the settings in this tab as follows:
-
Set the search base to the desired value.
-
Do not change the scope and filter.
-
Set the correct Domain (default: My-Company).
-
Set the parameter Days before Expiration (default: 1 day).
-
Set the parameter Keep Password History at the Account to true if you want to keep a password history at the account. The history is then used to check if the new password has not been used in the past x times where x is defined by the policy. This history keeping is performed by default for privileged accounts but not otherwise.
-
Do not change the topic prefix for the "to be built" request that triggers the setPassword workflows.
-
If you want to use own attributes sent to the setPassword workflow, which uses them for resolving placeholders in it’s Notify activity, right click the join activity and choose Edit Content. Go to the controller section of the PwdAccountExpireController and add the multi-value property accountAttrs with the desired attribute list outside the operation section.
-
Set the Active flag of the workflow.
-
Right-click the workflow object and select Load IdS-J Configuration to load the workflow into the Java-based Server.
Account Password Manager Workflow Operation
Password expiration for privileged or personal accounts (see the DirX Identity Provisioning Administration Guide for more information on these accounts) depends on the assigned account password policies and on a set of attributes at the policy and the account.
If run scheduled, the workflow searches for accounts with expired passwords according to the configured search settings. It generates a new password, stores it at the account if it is privileged and triggers the target system-specific setPassword workflow. If run event-based, it handles "password expired" and "password changed" requests for a specific account and then proceeds as in the scheduled case.
The password policy is assigned via the password policy link (attribute dxrPwdPolicyLink). If no password policy is assigned, the default password policy is used.
The expiration calculation depends on the following attributes:
-
dxrPwdMaxAge at the password policy, which defines the maximum allowed age of the password.
-
Days before expire at the join activity, which specifies the time when to reset the account passwords before they expire. If the specified number of days before expiration is reached or passed for an account password, the workflow resets that password.
-
dxrPwdChangedTime at the account, which specifies the last time the password was changed.
If the current date is greater than the value (dxrPwdChangedTime+pwdMaxAge-Days before expire), the workflow sets the password to a randomly-generated new value. The password reset flag is not set and the dxrPwdChangedTime is set to the current date and time.
The workflow generates a password change event that is to be processed by the corresponding setPassword workflow.
The identifier attributes of the password change event are set either with the attributes configured in the multi-value property accountAttrs described above or if not specified (default) with the default list of attributes described in the setPassword Notify activity (see "Context-senitive Help → Java-based Workflows → Real-time Port → Notification (optional)" (for Java-based Set Password Workflows) in the DirX Identity Connectivity Administration Guide for details). These attributes - for example mail, cn, sn or givenName - can be used as placeholders (for example, $\{IDATTR(mail)} ) in the to, from or body fields of the Notify activity.
If accountAttrs are specified, they are extended by the list of the above-mentioned default attributes if not already contained. The attributes "dxrPwdChangedTime","dxrPwdPolicyLink","dxrTSState","dxrName" and "dxrPrimaryKey" are also appended by the Account Password Manager and the Reset Account Passwords workflows and can therefore also be used as placeholder attributes for notification messages.
Note that the accountAttrs must be specified in the controller section outside the operation section. For example, set:
<controller className="com.siemens.dxm.pwdexpire.PwdAccountExpireController">
  <mvproperty name="accountAttrs">
    <value>description</value>
    <value>givenName</value>
  </mvproperty>
  <operation>
    <property name="searchBase" value="...” />
    ...
  </operation>
</controller>
if you want to add the attributes description and givenName to the default list of identifier attributes.
Reset Account Passwords Workflow
The Reset Account Passwords workflow resets passwords of DirX Identity accounts. This workflow can be used if a restore of a connected system has occurred, for example, due to a system failure that required restoration of the previous backup. The following figure illustrates this workflow.
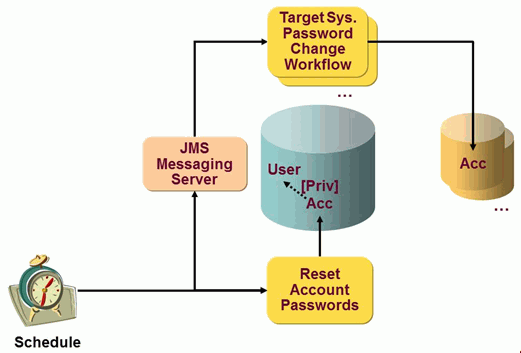
The Reset Account Passwords workflow runs only scheduled and searches for accounts according to the configured search settings. When the account is privileged, the workflow generates a new password and stores it at the account. Otherwise it takes the password from the referenced user. Then it triggers the target system-specific password change (setPassword) workflow.
Configuring the Reset Account Passwords Workflow
To configure the workflow:
-
Use the Identity Manager to copy the workflow to your scenario (Connectivity → Global View).
-
Select Connectivity → Expert View and then select the copied workflow object.
-
Select the join activity and then select the Controller tab. Adjust the following settings in this tab:
-
Set the search base to the desired value.
-
Set the filter accordingly. By default, the workflow selects all objects of type dxrTargetSystemAccount with dxrType=Privileged. Set dxrType=Personal if you intend to handle personal accounts.
-
Set the correct Domain (default: My-Company).
-
If you want to use own attributes sent to the setPassword workflow, which uses them for resolving placeholders in its Notify activity, right click the join activity and choose Edit Content. Go to the controller section of the PwdAccountResetController and add the multi value property accountAttrs with the desired attribute list outside the operation section.
-
Set the Active flag of the workflow.
-
Right-click the workflow object and then select Load IdS-J Configuration to load the workflow into the Java-based Server.
Reset Account Passwords Workflow Operation
The Reset Account Passwords workflow searches for accounts according to the configured search settings. Depending on the account type, the workflow performs these actions:
-
For a personal account, it reads the password from the user. The password reset flag is set accordingly to the user’s password reset flag.
-
For a privileged account, it generates a new password and sets it at the account. The password reset flag is set to true.
The workflow generates a password change event that is to be processed by the corresponding setPassword workflow. . For the list of identifier attributes contained in the password change event and used by the setPassword workflow to resolve placeholders for the notification messages see the description in the "Account Password Manager Workflow" section above. For more information on personal and privileged accounts, see the DirX Identity Provisioning Administration Guide.
Reset Password If Displayed Workflow
The Reset Password If Displayed workflow resets passwords of privileged DirX Identity accounts. This workflow can be used if the password of a privileged account has been read and must be changed within a given time frame (for example, within 24 hours).
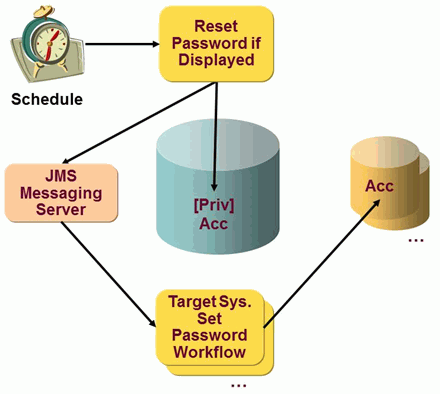
The Reset Password If Displayed workflow only runs scheduled. Alternatively, it can be started directly using the Run Workflow menu operation in the DirX Identity Manager. It searches for (privileged) accounts according to the configured search settings where the password has been displayed before the last n hours (see the option Hours before Reset). For each such account, it generates a new password. If the account is privileged, it stores the password at the account. It then triggers the password change (setPassword) workflow that is responsible for this target system.
Configuring the Reset Password If Displayed Workflow
To configure the workflow:
-
Use the Identity Manager to copy the workflow to your scenario (Connectivity → Global View).
The workflow wizard guides you through all the required configuration steps. It displays the following steps:
Template
-
Select the Reset Password If Displayed workflow
General Info
-
Set the workflow name (Name field).
-
Set the Is Active flag.
-
Adapt the workflow timeout (Timeout field).
Join Activity General Info
-
Assign the resource family, if necessary (Resource family field).
-
Adapt the Error Handling parameters, if necessary (Timeout, Retry Limit, Wait before Retry fields).
Join Activity Search Parameters / Days before Reset
-
Adapt the parameters for retrieving the privileged accounts (Search Base, Scope, Filter).
-
Adapt the Hours before Reset parameter.
This parameter defines the minimum time in hours that must have passed before the password is reset. The time at which the password was read is stored in the attribute dxrPwdDisplayTime. A parameter value 0 implies that all accounts are searched where the attribute dxrPwdDisplayTime is set. A value > 0 defines the number of hours that must have passed from now so that the account will be part of the search result.
Set Workflow Name
-
Set the workflow name, if not yet done in the General Info step (Name field).
Once the workflow has been created successfully, select Connectivity → Expert View and then select the copied workflow object.
Right-click the workflow object and then select Load IdS-J Configuration to load the workflow into the Java-based Server.
Reset Password If Displayed Operation
The Reset Password If Displayed workflow searches for (privileged) accounts according to the configured search settings whose password was displayed before the last n hours.
For each account in the search result, it obtains the appropriate password policy and then generates a new password that complies with the password policy.
The password policy is retrieved as follows:
-
If the account has set the attribute dxrPwdPolicyLink, then that policy is used.
-
Otherwise it looks for the target system’s password policy; that is, the password policy assigned in the target system’s attribute dxrPwdPolicyLink.
-
If the target system has no password policy assigned and the account has an associated user, it takes the password policy referenced from the user.
-
If it does not find any password policy, it takes the default password policy of the domain.
-
If there is no default policy, it generates an error.
If the account is privileged, the workflow stores the new password at the account.
The workflow generates a password change event that is to be processed by the corresponding setPassword workflow.
Note that the setPassword workflow is started so that it does not send e-mails after successful reset of the password in the connected system.
For more information on personal and privileged accounts, see the DirX Identity Provisioning Administration Guide.
User Password Event Manager Workflow
The User Password Event Manager workflow is part of the password provisioning scenario. For more information about the complete scenario, see the chapter "Managing Passwords" in the DirX Identity Connectivity Administration Guide.
Configuring the User Password Event Manager Workflow
To configure the workflow:
-
Use the Identity Manager to copy the workflow to your scenario (Connectivity → Global View).
-
Select Connectivity → Expert View and then select the copied workflow object.
-
Select the join activity and then adjust the settings in the following tabs:
General tab:
Enter a proper resource family into Resource Family. It is a good idea to have a separate resource family for this type of workflow to ensure that the corresponding threads do not compete with threads performing other workflows.
In the Error Handling section, specify the timeout for the activity, the retry limit and the waiting time between retries.
Controller tab:
Select the join engine type UserPasswordEventManagerController. It automatically determines the proper class name.
If you want a user hook to be called during event processing, enter its full class name into Userhook Class Name. Make sure the library (jar file) containing your classes and all others on which they depend are deployed in the following folder beneath the installation:
install_path/ids-j-domain-Sn/confdb/common/lib
For information on how to write a user hook, see the DirX Identity Customization Guide.
-
Select the notify part of the join activity and then adjust the settings in the following tabs:
Notification tab:
Define the mail to be sent on common user password changes.
Notification on Reset tab:
Define the mail to be sent on reset of a user password.
Recipients tab:
Define recipients of the notifications for password change and reset operations.
-
In the General tab of the workflow:
-
Set the Active flag of the workflow.
-
Right-click the workflow object and then select Load IdS-J Configuration to load the workflow into the Java-based Server.
User Password Expiration Notification Workflow
The User Password Expiration Notification workflow is running in the Java-based Server and has replaced the older PwExpirationNotification workflow running in the C++-based Server. It finds users whose passwords are about to expire and informs the users about it by sending a notification mail. Unlike the old workflow, which used the MailConnector, the new one sends the notifications over the notify port using the NotifyChannelConnector as it is done for almost all other realtime workflows.
More information about the notify port functionality can be found in the "Context Sensitive Help" in the DirX Identity Connectivity Administration Guide.
Configuring the User Password Expiration Notification Workflow
To run the User Password Expiration Notification workflow successfully you must perform these steps:
-
Use the Identity Manager to copy the workflow to your scenario (Connectivity → Global View).
-
Select Connectivity → Expert View and then select the copied workflow object.
-
Select the join activity and then select the Controller tab. Adjust the settings in this tab as follows:
-
Set the Number of Notifications to the desired value.
-
Do not change the selected Join Engine controller PwdUserExpireController unless you have changed the component description PwdUserExpireController.xml of that controller under Expert View → Configuration → GUI → system → componentDescriptions to adjust for example the initial content for the controller’s properties. Those changes would become active then for every newly created workflow.
-
Right-click the join activity and then select Edit Content if you want to adjust the following properties of the PwdUserExpireController’s controller section:
-
searchBase - set to *cn=Users,cn=*domain by default, where domain automatically resolves to the domain to which your workflow was copied. Must not be changed usually.
-
domain - set by default to the domain to which your workflow was copied. It is used for searching the password policies and should not be changed.
-
userAttrs - the multi value property contains the list of all attributes either the PwdUserExpireController needs to calculate the password expiration date, which are dxrPwdChangedTime and dxrPwdExpiryNotified, or those to be used in ${IDATTR(<attr_name>)} expressions in the mail parameters of the notify port, for example, in the mail body or mail subject. The attributes configured by default are sn, givenName, mail.
If you want to use more attributes, you can extend this multi-value property.
There are two pseudo attributes (not in LDAP) that the PwdUserExpireController automatically adds to the userAttrs list which can also be used in the IDATTR expressions of the mail parameters:
daysToExpire - the number of days after which the user’s password will expire.
expirationDate - the expiration date of the user’s password. -
Beneath the join activity, select the notify port, then select the Notification tab and adjust the mail parameters to your needs. The ${IDATTR(<attr_name>)} expressions can be used for any attributes, that are contained in userAttrs.
-
Set the Active flag of the workflow.
-
Right-click the workflow object and select Load IdS-J Configuration to load the workflow into the Java-based Server.
User Password Expiration Notification Workflow Operation
The workflow only runs scheduled and searches for users under the configured search base whose passwords are about to expire and notifies the affected users about it.
Password expiration for users depends on the assigned user password policy and on a set of attributes at the policy and the user.
The password policy is assigned via the password policy link (attribute dxrPwdPolicyLink). If no password policy is assigned, the default password policy is used.
The expiration calculation depends on the following attributes:
-
dxrPwdMaxAge (Maximum age) - at the password policy. It defines the maximum allowed age of the password.
-
dxrPwdExpireWarning (Expiration Warning Time) - at the password policy. It defines the time at which to warn about a pending password expiration.
-
dxrPwdChangedTime (Password Changed Time) - at the user entry. It defines the last time the password was changed.
If the current date is greater than (dxrPwdChangedTime+dxrPwdMaxAge-dxrPwdExpireWarning), the workflow sends a notification e-mail.
After sending the e-mail, the dxrPwdExpiryNotified (Password Expiration Notified) attribute of the user entry is incremented. If the configured Number of Notifications is reached no more mails are sent on subsequent workflow runs.
When the user changes the password or an administrator resets the password with Web Center the dxrPwdExpiryNotified attribute is reset to 0 again.
Transport Workflows
You can transfer data between Identity Store instances with several methods. For an overview see the chapter "Transporting Data" in the chapter "Using Utilities" of the DirX Identity User Interfaces Guide.
This section describes the available transport workflow samples. You can transport data between Connectivity and Provisioning domains. Because this is slightly different, we provide four sample workflows that you can use to set up your own procedures:
-
Export Connectivity Collections - shows how to export data from a Connectivity configuration domain.
-
Import Connectivity Collections - shows how to import data into a Connectivity configuration domain.
-
Export Provisioning Collections - shows how to export data from a Provisioning configuration domain.
-
Import Provisioning Collections - shows how to import data into a Provisioning configuration domain.
Export Connectivity Collections
This sample workflow exports by default Java-based LDAP workflows based on a collection rule. To configure the workflow:
-
Use the Identity Manager to copy the workflow to your scenario (Connectivity → Global View).
-
Make sure your scenario includes an existing ConfDB connected directory from where you want to export. Your scenario should have two instances of this connected directory with an intermediate workflow line between them. Right-click the workflow line and then select New to copy the workflow Export Connectivity Collections.
-
The first tab asks for a new workflow name. Enter your desired name.
-
In the General Workflow Info tab, check the Timeout parameter if appropriate and activate the workflow.
-
In the Connection tab:
-
Open Bind profile and check the bind profile parameters.
-
Open Connected directory and follow the link to Service. Check for correct parameters.
-
In the Export Definitions tab
-
Define either a search in the Filter area to retrieve a set of Connectivity collections to export (you need not define the object class dxmIDMWorkflow, define only additional criteria) or select a list of Connectivity collections in the Collections area. Note that you can only use one of these options.
-
Determine whether to create standard LDIF format with Base64 content or use the default readable format. Because readable format works best for configuration management systems and data that must be changed during import transport workflows, we recommend that you keep the default (no standard LDIF format).
-
If you want to generate data for a configuration management system, restrict the generated line length. Check the configuration management documentation. For ClearCase, we recommend a line length of 2000.
-
Click Finish to store your new workflow.
Now you can run the workflow either manually or via a schedule.
Import Connectivity Collections
This sample workflow imports by default the previously exported set of Java-based LDAP workflows (see the Export Connectivity Collections workflow).
To configure the workflow:
-
Use the Identity Manager to copy the workflow to your scenario (Connectivity → Global View).
-
Make sure your scenario includes an existing ConfDB connected directory from where you want to export. Your scenario should have two instances of this connected directory with an intermediate workflow line between them. Right-click the workflow line and then select New to copy the workflow Import Connectivity Collections.
-
The first tab asks for a new workflow name. Enter your desired name.
-
In the General Workflow Info tab, check the Timeout parameter if appropriate and activate the workflow.
-
In the Connection tab:
-
Open Bind profile and check the bind profile parameters for your target connected directory.
-
Open Connected directory and follow the link to Service. Check for correct parameters.
-
In the Deletion tab:
-
Enable the Is Active flag if you intend to delete a set of entries before the import operation.
-
In the Collection area, list all collection definitions (its DNs) that are to be used to delete the entries.
-
In the Import Definitions tab:
-
In the Import area, select all files you want to import.
-
By default, the files are type LDIF. In the SPML area, you can select SPML format and you can select that the SPML file is to be validated before the import.
-
Set the required options in the LDIF area; for example, an input filter that retrieves only specific object types from your files.
-
You can use the dryrun option of the Simulation Mode for a dry run. Use the log file to check the effects.
-
Click Finish to store your new workflow.
Import workflows help to filter and adapt the data. To control the mappings, perform these steps:
-
Click the Expert view and locate your workflow in your workflow folder.
-
Open this entry and then open the perform activity.
-
All mappings are located under this entry. Either change one of the existing mappings or create or delete mappings.
-
The sample workflow sets all imported workflows to active and changes the cluster and resource values (as an example).
Now you can run the workflow either manually or via a schedule.
Export Provisioning Collections
This sample workflow exports by default the complete privilege tree based on a collection rule.
To configure the workflow:
-
Use the Identity Manager to copy the workflow to your scenario (Connectivity → Global View).
-
Make sure your scenario includes an existing Identity Store connected directory from where you want to export. Your scenario should have two instances of this connected directory with an intermediate workflow line between them. Right-click the workflow line and then select New to copy the workflow Export Provisioning Collections.
-
The first tab asks for a new workflow name. Enter your desired name.
-
In the General Workflow Info tab, check the Timeout parameter if appropriate and activate the workflow.
-
In the Connection tab:
-
Open Bind profile and check the bind profile parameters.
-
Open Connected directory and follow the link to Service. Check for correct parameters.
-
In the Export Definitions tab:
-
Define either a search in the Filter area to retrieve a set of Connectivity collections to export (you need not define the object class dxmIDMWorkflow, define only additional criteria) or select a list of Connectivity collections in the Collections area. Note that you can only use one of these options. To get the DNs of the collection objects, right-click the object in the Provisioning view and then select Goto DataView to retrieve the DN of the object.
-
Determine whether to create standard LDIF format with Base64 content or use the default readable format. Because readable format works best for configuration management systems and data that needs to be adapted during import transport workflows, we recommend that you keep the default (no standard LDIF format).
-
If you want to generate data for a configuration management system, restrict the generated line length. Check the configuration management documentation. For ClearCase, we recommend a line length of 2000.
-
Click Finish to store your new workflow.
-
Now you can execute the workflow either manually or via a schedule.
Import Provisioning Collections
This sample workflow imports by default the previously exported complete privilege tree (see the Export Provisioning Collections workflow).
To configure the workflow, perform these steps:
-
Use the Identity Manager to copy the workflow to your scenario (Connectivity → Global View).
-
Make sure your scenario includes an existing Identity Store connected directory from where you want to export. Your scenario should have two instances of this connected directory with an intermediate workflow line between them. Right-click the workflow line and then select New to copy the workflow Import Provisioning Collections.
-
The first tab asks for a new workflow name. Enter your desired name.
-
In the General Workflow Info tab, check the Timeout parameter if appropriate and activate the workflow.
-
In the Connection tab:
-
Open Bind profile and check the bind profile parameters for your target connected directory.
-
Open Connected directory and follow the link to Service. Check for correct parameters.
-
In the Deletion tab:
-
Enable the Is Active flag if you intend to delete a set of entries before the import operation.
-
List in the Collection area all collection definitions (it’s DNs) that shall be used to delete the entries.
-
In the Import Definitions tab:
-
In the Import area, select all files you want to import.
-
By default, the files are type LDIF. In the SPML area, you can select SPML format and you can select that the SPML file is to be validated before the import.
-
Set the required options in the LDIF area; for example, an input filter that retrieves only specific object types from your files.
-
You can use the dryrun option of the Simulation Mode for a dry run. Use the log file to check the effects.
-
Set the correct Domain Mappings. The default workflow changes all occurrences from "My-Company" to "Customer Domain". If you have data from different domains, you can define multiple mappings to your target domain.
-
Click Finish to store your new workflow.
Import workflows help to filter and adapt the data. To control the mappings, perform these steps:
-
Click the Expert view and locate your workflow in your workflow folder.
-
Open this entry and then open the perform activity.
-
All mappings are located under this entry. Either change one of the existing mappings or create or delete mappings.
-
The sample workflow deletes all dxrGroupMember attribute values (we use the wildcard dxrGroupMember* here). Only the structure is imported, not the specific group members because these are different in your target domain.
Now you can run the workflow either manually or via a schedule.
Joint Backup Workflow
The Joint Backup workflow performs a synchronized backup of the Java-based Server’s repository and the LDAP connectivity and provisioning data store. It can also transfer the generated files to a target backup system via the Java-based Server (not currently supported) or via your own user hook class.
To transfer all generated backup files to the destination system, you can:
-
Manually transfer the generated files. With this method, files are not automatically cleaned up.
-
Let the IdS-J service transfer the generated files. To use this method, the IdS-J service must have the rights to access all files and the target path. If the system landscape is distributed, the IdS-J service needs to run under an appropriate account with access rights to network shares.
With this method, created files are cleaned up if the file transfer fails for any reason. -
Implement your own Java user class to transfer the files. This method is currently not supported. Contact technical support for more information.
Remote LDAP backup has the following constraint: The remote backup of an LDAP data store is performed via an LDAP extended operation. Only DirX Directory V8.1A or newer supports this operation. The DNs of users that are allowed to do a remote backup are maintained in the ldapConfiguration subentry in the attribute ldapExtOpAdmins. See the section "LDAP Extended Operations Admins" in the DirX Directory Administration Reference for details.
On Windows, you must install gzip 1.3.12 or newer. A suitable gzip is available on http://www.gnu.org. gzip.exe must be found via the PATH environment variable.
Configuring the Joint Backup Workflow
To configure the workflow:
-
Activate the backup in the Java-based server. (See the section "Java-based Server - Repository" in the appendix "Context Sensitive Help" in the DirX Identity Connectivity Administration Guide for details.)
-
Administer the LDAP servers: Enter the DNs of the Connectivity Domain Administrator used by IdS-J (cn=DomainAdmin,cn=*your_domain,dxmC=Users,dxmC=DirXmetahub*) and, if necessary, of the Provisioning Domain Administrator used by the IdS-J *(cn=DomainAdmin, cn=*your_domain) in the multi-value attribute ldapExtOpAdmins of the ldapConfiguration subentry of the appropriate DirX LDAP Server.
-
In the Controller tab of the perform activity, ensure that the fully-qualified pathname of the controller is correct: com.siemens.idm.jobs.Backup.
-
In the Backup Parameters tab of the perform activity you must set the folders where to store the backups and indicate whether this folder is located on a Windows system. Ignore the settings for the message server and leave them empty.
Note: The location of the Java-based Server’s backup file is configured with the server’s configuration. -
In the field Connectivity Configuration / Backup Path, specify the fully-qualified pathname of an existing folder for the backup location of the DirX Server that hosts the Connectivity data store.
Note that the pathname must not be a part of the installation tree of the DirX Server. This is a mandatory field.
Check On Windows System if the DirX Server runs on Windows. -
If the Provisioning part is hosted on a different LDAP server, specify the fully-qualified pathname of an existing folder for the backup location in the field Provisioning Configuration / Backup Path. See also the notes above.
Check On Windows System if the DirX Server runs on Windows. -
Create a schedule for the workflow. (See the section "Schedule" in the appendix "Context Sensitive Help" in the DirX Identity Connectivity Administration Guide for details.)
If you are letting the IdS-J service transfer the generated files, provide the following information:
-
In the field Target Backup System Path of the Post Operation tab, specify the fully-qualified pathname of an existing folder for the transfer location. On Windows, you can use a shared network drive, but then the IdS-J service must run under a different account from the system account and you must use the UNC syntax for the transfer folder.
-
Check On Windows System if the transfer location is hosted on Windows.
If you implemented your own Java user class to transfer the generated files, provide the following information:
-
In Userhook Class Name, specify the name of your own class.
Note: This method is not currently supported. Contact technical support for more information. -
Set the Active flag of the workflow and perform Load IdS-J Configuration from the context menu of the workflow object to load the workflow into the Java-based Server.
Consistency Management Workflows
The Java-based consistency management workflows include:
-
The Check Consistency workflow
-
The Mark Affected Users workflow
-
The User Resolution Workflow
These workflows are described in the DirX Identity Provisioning Administration Guide in the section "Managing Consistency" in the chapter "Managing the Provisioning System".
Compared to the Tcl-based maintenance workflows, the Java-based consistency management workflows allow for:
-
Subsetting of objects for deletion and particularly consistency checks.
-
Separate user resolution workflows for clear user subsets.
The Java-based and Tcl-based consistency maintenance workflows use common storage mechanisms. For optimization information, see the section "Using the Maintenance Workflows" → "Understanding the Tcl-based Maintenance Workflows" → "Consistency Check Workflow" → "Consistency Check Workflow Optimization".
Check Consistency Workflow
The Java-based consistency management workflow Check Consistency applies configured consistency rules and performs basic hard-coded consistency checks. Compared to the Tcl-based Consistency Check workflow:
-
The Java-based workflow is a combination of a policy execution workflow handling consistency policies and the Tcl consistencyCheck workflow.
-
The workflow performs no user resolution.
-
You can select to run only part of the checks this workflow performs.
-
You can select to run the checks on a subset of objects.
For more information about this workflow, see the section "Consistency Check and Consistency Rules" in the DirX Identity Provisioning Administration Guide.
Configuring the Check Consistency Workflow
To configure the workflow:
-
Use the Identity Manager to copy the workflow to your scenario (Connectivity → Global View).
-
Select Connectivity → Expert View and then select the copied workflow object.
-
Select the join activity and then select the Check Consistency Attributes tab to modify the configuration. See the context-sensitive help for details about configuration parameters.
-
Right-click the workflow object and then select Load IdS-J Configuration to load the workflow into the Java-based Server.
Because the workflow runs in the Java-based Server, you can configure tracing via Identity WebAdmin. The following packages may be involved:
-
com.siemens.idm.jobs.consistencyCheck
-
siemens.dxr.agents
-
siemens.dxm.ruleprocessing.rules
The following default values are used for empty attributes in the Check Consistency Attributes tab:
-
LDAP Page Size - 50
-
Batch Accumulator Size - 500
-
Cache MRU Size - 10000
-
Check Users Search Base - cn=users,cn=my-company
-
Check Users Filter - (objectClass=dxrUser)
-
Search Base for Roles - cn=RoleCatalogue,cn=my-company
-
Filter for Roles - (objectClass=dxrRole)
-
Search Base for Permissions - cn=Permissions,cn=my-company
-
Filter for Permissions - (objectClass=dxrPermission)
-
Search Base for Target Systems - cn=TargetSystems,cn=my-company
-
Filter for Target Systems - (objectClass=dxrTargetSystem)
-
Apply Consistency Rules Search Base - no default
-
Apply Consistency Rules Filter - (objectClass=dxrConsistencyRule)
-
Apply Consistency Rules sort attribute - cn
-
Apply Consistency Rules sort ascending - true
-
Apply Consistency Rules LDAP Page Size - 300
-
Apply Consistency Rules MRU Size - 500
Check Consistency Workflow Operation
Check Consistency workflow operation depends on the selections configured in the Consistency Check Workflow Attributes tab (visible in the workflow’s join activity).
If Check for Privileges To Be Deleted is selected, the workflow:
-
Searches for roles, permissions, and groups in the state TBDEL.
-
For each privilege in the state TBDEL, the workflow:
-
Removes the incoming assignments to users and/or senior privileges and then sets the To Be Analyzed (TBA) flag for the affected objects.
-
Deletes roles/permissions or sets the state to DELETED if history is configured.
-
Sets the state of groups to DELETED.
If Check Users is selected, the workflow performs the following steps for users that match the given search base (cn=users,cn=my-company if empty) and filter ((objectClass=dxrUser) if empty):
-
Searches all privilege assignments with relevant start or end dates. The exact filter is:
(&(|(objectClass=dxrUserToRole)(objectClass=dxrUserToGroup)(objectClass=dxrUserToPermission))(|(dxrEndDate=*)(dxrStartDate=*)))-
Deletes outdated start dates, removes assignments with outdated end dates, and marks this user for privilege resolution.
Next, the workflow checks the consistency of the matching users. It:
-
Deletes users in the state TBDEL with an expired DeleteDate.
-
Sets the DeleteDate for users in the state TBDEL that do not yet have a DeleteDate set.
-
Sets as the StartDate the current date for users in state NEW that do not yet have a StartDate set.
-
Checks whether the various date fields of the user are consistent with the user state. If not, the user is flagged with TBA for a succeeding privilege resolution.
-
Checks whether the various date fields of the user are consistent, which means that the sequence of the date fields must be StartDate, DisableStartDate, DisableEndDate, EndDate, DeleteDate.
-
Checks for broken references of privilege assignments.
-
Checks for the correct user state and then migrates the old state DELETED to TBDEL.
-
Flags users with TBA if the ErrorExpirationDate is reached.
If Check Roles/Permissions is selected, the workflow performs the following steps for objects that match the specified search base and filter:
-
Analyzes the role structures:
-
Works on all matching roles.
-
Checks whether the role is valid, that means it must have a permission or junior role assigned.
-
Checks for broken references to junior roles and assigned permissions.
-
Analyzes the permission structures:
-
Works on all matching permissions.
-
Checks whether the permission is valid, that means it must have a group assigned.
-
Checks for broken references to assigned groups.
-
Checks whether the permission is assigned to users if it is not flagged for user assignment.
-
Checks for correct permission parameters.
If Check Accounts/Groups is selected, the workflow performs the following steps for all accounts/groups of the target systems that match the specified search base and filter:
-
Checks whether the Local Admin link of a target system is broken.
-
Works on all matching target system accounts.
-
Deletes all accounts that are marked with Managed in Target System Only that are in state Deleted in the target system.
-
Checks whether the target system of this account is of the correct type and exists.
-
Checks for multiple primary accounts for a user.
-
Checks whether the User Link of the account is broken.
-
Checks for correct account states.
-
Deletes accounts that are in the state DELETED and whose EndDate is expired.
-
Checks that the account is either marked Managed in Target System Only and has no user link assigned or that it is not marked Managed in Target System Only and has a user link assigned.
When analyzing target system groups, the workflow:
-
Works on all matching target system groups.
-
Deletes all groups that are marked Managed in Target System Only that are in the state Deleted in the target system.
-
Checks whether all permission parameter values (dxrRPValues) are consistent with the permission parameter definition at the domain root object.
-
Checks for broken obligation links.
-
Checks for broken group members.
-
Checks whether the groups state has a correct value.
-
Deletes groups in the states DELETED or DISABLED with expired EndDates.
-
Updates the distribution list of a virtual group.
If Apply Consistency Rules is selected, the workflow applies all consistency rules that match the specified search base and filter.
Rule processing works in the Assign privilege only provisioning mode with Suppress Change Events set to true. This processing mode means that no user resolution is performed and no user change events are initiated.
Mark Affected Users Workflow
The Java-based consistency management workflow Mark Affected Users finds privileges with dxrTBA = true, finds the users that might be affected by a change and sets the flag dxrTBA = true for these users. The User Resolution workflow will then subsequently ensure their resolution.
This functionality is the same as provided in the Consistency Check Tcl-based maintenance workflow. In the Mark Affected Users workflow, the functionality is separated into a single workflow and can be run more frequently. It is best to run it before the User Resolution workflow. For more information about this workflow, see the section "Consistency Check and Consistency Rules" in the DirX Identity Provisioning Administration Guide.
Configuring the Mark Affected Users Workflow
To configure the Java-based Mark Affected Users workflow:
-
Use the Identity Manager to copy the workflow to your scenario (Connectivity → Global View).
-
Select Connectivity → Expert View and then select the copied workflow object.
-
Select the join activity and then select the Optimization Attributes tab to modify the configuration. See the context-sensitive help for details about the configuration parameters provided in this tab.
-
Right-click the workflow object and then select Load IdS-J Configuration to load the workflow into the Java-based Server.
Because the workflow runs in the Java-based Server, you can configure tracing via Identity WebAdmin. The following packages may be involved:
-
com.siemens.idm.jobs.consistencyCheck
-
siemens.dxr.agents
-
siemens.dxm.ruleprocessing.rules
The following default values are used for empty attributes in the Optimization Attributes tab:
-
LDAP Page Size - 50
-
Batch Accumulator Size - 500
-
Cache MRU Size - 10000
Mark Affected Users Workflow Operation
The Mark Affected Users workflow performs the following steps:
-
Searches the entire user and privilege database.
-
Sets the To Be Analyzed) (TBA) flag for all users that have a privilege assigned that is itself flagged with TBA. The workflow considers direct and indirect relationships (indirect relationships go via a role or permission).
User Resolution Workflow
The Java-based consistency management workflow User Resolution performs the following tasks:
-
Applies provisioning rules to users.
-
Enables or removes user-privilege assignments where start or end dates are reached.
-
Finds users where the state must be changed because one of the corresponding start or end dates has been changed.
-
Triggers user-privilege resolution for all matching users by sending a message to the Resolution Adapter per user.
Compared to its Tcl-based counterpart, the Java-based User Resolution workflow is a combination of a policy execution workflow handling Provisioning rules and parts of the Tcl PrivilegeResolution workflow. You can use configuration parameters to limit the set of users and rules to be evaluated. For more information about this workflow, see the section "Consistency Check and Consistency Rules" in the DirX Identity Provisioning Administration Guide.
Configuring the User Resolution Workflow
To configure the Java-based User Resolution workflow:
-
Use the Identity Manager to copy the workflow to your scenario (Connectivity → Global View).
-
Select Connectivity → Expert View and then select the copied workflow object.
-
Select the join activity and then select the Resolution Attributes tab to modify the configuration. See the context-sensitive help for details about the configuration parameters provided in this tab.
-
Right-click the workflow object and then select Load IdS-J Configuration to load the workflow into the Java-based Server.
Because the workflow runs in the Java-based Server, you can configure tracing via Identity WebAdmin. The following packages may be involved:
-
com.siemens.idm.jobs.consistencyCheck
-
siemens.dxr.agents
-
siemens.dxm.ruleprocessing.rules
The following default values are used for empty attributes in the Resolution Attributes tab:
-
Filter for users - (objectClass=dxrUser)
-
LDAP Page Size for Provisioning Rules-300
-
Cache MRU Size for Provisioning Rules - 10000
-
Batch Accumulator Size for Provisioning Rules - 500
-
LDAP Page Size for User Resolution - 50
-
Cache MRU Size for User Resolution - 10000
-
Batch Accumulator Size for User Resolution- 500
User Resolution Workflow Operation
To analyze users and assignments, the workflow performs the following actions for the given user filter and search base:
-
Searches all privilege assignments with relevant start or end dates. The exact filter is:
(&(|(objectClass=dxrUserToRole)(objectClass=dxrUserToGroup)(objectClass=dxrUserToPermission))(|(dxrEndDate<=today)(dxrStartDate<=today)))where today is replaced with the current date
-
Deletes the start date or privilege assignment and marks this user for privilege resolution.
-
Searches for matching users that must undergo a state transition: it searches for all matching users with an inconsistent state and dates and flags these users with TBA. The exact filter is:
(&(objectClass=dxrUser)(|(&(dxrEndDate<=today)(|(dxrState=ENABLED)(dxrState=DISABLED)))(&(dxrStartDate<=today)(dxrState=NEW))(&(dxrDisableEndDate<=today)(dxrState=DISABLED))(&(dxrDisableStartDate<=today)(dxrState=ENABLED))(dxrDeleteDate<=today)(&(dxrState=TBDEL)(!(dxrEndDate<=today)))))Next, the workflow applies the selected Provisioning rules. The rules are implicitly combined with the given user filter and search base, which means that rules are only applied for the given subset of users.
Finally, the workflow sends a message to the Resolution Adapter for all users that match the given search base and filter and are flagged with dxrTBA=true.
Understanding the Tcl-based Maintenance Workflows
A Tcl-based maintenance workflow typically runs scheduled and as a process in the C++-based Server (IdS-C). The pre-configured Tcl-based maintenance workflows include:
-
CleanupObjects - a workflow that cleans up all deleted or outdated objects. If auditing is enabled, the objects are only cleaned if all audit trail records are removed. This workflow is a special configuration for the policy execution service.
-
ConsistencyCheck (Java workflow) - a workflow that checks the Identity Store for consistency and performs role resolution.
-
ExtractAuditTrail - a workflow that checks the Identity Store for audit trail records (auditing information), writes them to the audit trail database and cleans up the audit trail records in the Identity Store.
-
FullSoDCheck - a workflow that checks the entire DirX Identity user database for SoD violations.
-
InitializeReapproval - a workflow that checks that all user-to-privilege assignments from privileges with checked re-approval are flagged correctly.
-
PwdExpirationNotification - a workflow that checks for passwords that are about to expire and warns the corresponding users to change them before the expiration date. This workflow has been replaced by the UserPasswordExpirationNotification workflow, which runs in the Java-based Server, but can still be used if the customer has already copied it to his scenario.
-
PolicyExecution - a workflow that applies a set of rules to a set of provisioning objects in the Identity Store and can also perform privilege resolution. This workflow is part of the "policy execution service".
-
PrivilegeResolution - a workflow that performs privilege resolution without checking the Identity Store for consistency.
-
RunWorkflowExternally - a workflow that can start workflows in another Connectivity domain that is based on another Connectivity configuration database.
-
StartReapprovalWorkflows - a workflow that checks for necessary re-approval. It starts the corresponding request workflows.
-
Status Report Generation - a workflow that writes a report in XML or HTML format for objects of the Provisioning or Connectivity view group to a file.
Cleanup Objects Workflow
The Cleanup Objects workflow runs the policy execution service. By default, the workflow is configured for all consistency rules whose names start with "cleanup". The default rules are:
-
cleanupDeletedObjects - removes all objects in state DELETED without history and whose endDate empty or passed.
Note that User objects are not handled by this rule. The service agent deletes User objects that are in state TBDEL and whose endDate has passed. -
cleanupOutDatedDelegations - removes Delegations whose drxDeleteDate is reached.
-
cleanupOutDatedRequWflowInstances - removes all request workflow instances whose dxmStatusExpirationTime has been reached.
| This workflow runs in the C++-based Server but does not run in conjunction with the meta controller and thus does not use Tcl code. |
Configuring the Cleanup Objects Workflow
To configure this workflow, run the workflow configuration wizard (option Configure in the context menu):
-
In the Rule Search Parameters tab, you can change the cleanup rules to be executed. By default, the workflow uses three standard rules whose names start with "cleanup".
-
In the User Search Parameters tab, you can set several parameters to optimize runs. See the section "Policy Agent Optimization" in the DirX Identity Provisioning Administration Guide.
-
In the Tracing tab, set the tracing parameters. By default, the workflow reports errors and warnings.
We recommend that you run this workflow once daily to remove all objects whose lifetime has expired.
Consistency Check Workflow
The Consistency Check workflow runs the service agent in checkConsistency mode. This section describes:
-
How to configure the workflow
-
The service agent configuration (*.ini) file
-
How the workflow operates
-
How to optimize the workflow
| This workflow runs in the C++-based Server but does not run in conjunction with the meta controller and thus does not use Tcl code. |
Configuring the Consistency Check Workflow
To configure this workflow, run the workflow configuration wizard (option Configure in the context menu):
-
In the Consistency Check Parameters tab, set the Subject Filter. This setting allows you to define the number of users the service agent is to check. The default filter checks all users that are flagged with the dxrTBA flag (this flag indicates that the entry is "to be analyzed").
-
In the Consistency Check Limits tab, you can set several parameters that you can use to optimize runs. See the section "Service Agent Configuration File" for a detailed explanation.
-
In the Tracing tab, set the tracing parameters. By default, only errors are reported.
For a detailed description of the consistency check procedure, see the section "Consistency Check Workflow Operation".
The complete list of INI file parameters is shown in the next section.
Service Agent Configuration File
The service agent initialization file (*.ini) file is a Java property file. Each property is described by property name=property value. Lines can be commented with a leading #. The following table describes the supported properties.
| Section: | Key: | Description: |
|---|---|---|
Tracing |
trace.filename |
Name of the trace file. All messages are written into one file. It is located in the working directory of the workflow activity. |
trace.level |
Trace level values are: 0 - no trace, no errors 1 - error (is default) 2-4: - warnings 5-8: - flow trace 9: - debug Higher levels include the content of lower levels. This means: if you specify 5, errors and warnings are also written. |
|
trace.timestamp.format |
When defined, precedes each line in the trace file with a timestamp. For details about the format specification, see below. |
|
Request Properties |
request |
Activity the agent is to perform: resolution - the agents evaluates many object types and resolves users and its privileges at the end. userResolution - the agent evaluates only users and their privileges. checkConsistency - the agent checks the consistency of the Identity Store (Provisioning Configuration) and performs a privilege resolution at the end. generateReport - the agent generates a report. |
report.name |
DN of report configuration object in Identity Store (Provisioning Configuration). |
|
report.filename |
Name of report output file (optional), overwrites name in report configuration object, if present. |
|
report.outputFormat |
Format of report output. Valid options are: XML - XML format for further processing HTML - HTML format ready to view with browsers |
|
report.sizelimit |
The maximum number of objects a report can retrieve. |
|
Connection properties |
domainRootDN |
Distinguished name of DirX Identity Provisioning domain. |
user.expert.filter |
The number of users to be checked or resolved. This parameter is not relevant for report mode. |
|
bindProfile.hostname |
Host name of DirX Identity Provisioning Configuration |
|
bindProfile.isSSL |
SSL switch: false - do not use SSL to connect to directory server (default) true - use SSL to connect to directory server |
|
bindProfile.securePort |
Port number (default 636) of DirX Identity Provisioning Configuration for SSL connections. |
|
bindProfile.port |
Port number (default 389) of DirX Identity Provisioning Configuration for non-SSL connections. |
|
bindProfile.user |
Distinguished name of DirX Identity Provisioning Configuration domain administrator. |
|
bindProfile.pwd |
Password of DirX Identity Provisioning Configuration domain administrator. |
|
bindProfile.authenticationType |
Authentication type. Valid options are: SIMPLE - simple authentication (user and password) |
|
Performance properties |
batch.accumulator.size |
Number of objects (default 500) to be read in advance before role resolution processing continues. |
ldap.pagesize |
Page size (default 300) in paged search operations. |
|
cache.update |
Cache update policy: always - Always update cached entry. The cached entry will be updated every time it is requested. never - Never update cached entry (default). An entry is read only once. timestamp Update cached entry if the entry in the directory server is newer. |
|
cache.mru.size |
Number of objects (default 10,000) to be cached |
|
Other Properties |
suppressChangeEvents |
If set to true, no change events are fired for the resolved users. |
Time Format Syntax
To specify the time format use a time pattern string. In this pattern, all ASCII letters are reserved as pattern letters, which are defined as the following:
| Symbol | Meaning | Presentation | Example |
|---|---|---|---|
G |
era designator |
(Text) |
AD |
y |
year |
(Number) |
1996 |
M |
month in year |
(Text & Number) |
July & 07 |
d |
day in month |
(Number) |
10 |
h |
hour in am/pm |
(1~12) |
12 |
H |
hour in day |
(0~23) |
0 |
m |
minute in hour |
(Number) |
30 |
s |
second in minute |
(Number) |
55 |
S |
millisecond |
(Number) |
978 |
E |
day in week |
(Text) |
Tuesday |
D |
day in year |
(Number) |
189 |
F |
day of week in month |
(Number) |
2 (2nd Wed in July) |
w |
week in year |
(Number) |
27 |
W |
week in month |
(Number) |
2 |
a |
am/pm marker |
(Text) |
PM |
k |
hour in day |
(1~24) |
24 |
K |
hour in am/pm |
(0~11) |
0 |
z |
time zone |
(Text) |
Pacific Standard Time |
' |
escape for text |
(Delimiter) |
|
'' |
single quote |
(Literal) |
' |
The definition
trace.timestamp.format=EEE MMM d HH:mm:ss.SSS yyyy:
results in
Wed Mar 3 11:30:21.323 2004: … (rest of trace file line)
Consistency Check Workflow Operation
Running the DirX Identity service agent in consistency mode consists of these steps:
Analyze Privileges toBeDeleted
This module:
-
Searches for roles, permissions, and groups in state TBDEL
-
For each privilege in state TBDEL it
-
Removes the incoming assignments to users and / or senior privileges and sets the TBA (to-be-analyzed) flag for the affected objects.
-
Deletes roles / permissions or sets its state to DELETED if history is configured.
-
Sets the state of groups to DELETED.
Mark Affected Users
This module:
-
Searches the whole user and privilege database.
-
Sets the TBA (to-be-analyzed) flag for all users that have a privilege assigned that is itself flagged with TBA. Considers direct and indirect relationships (indirect relationships go via a role or permission).
Analyze Users and Assignments
This module analyzes assignments:
-
Searches all privilege assignments with relevant start or end dates. The exact filter is:
(&(|(objectClass=dxrUserToRole)(objectClass=dxrUserToGroup)(objectClass=dxrUserToPermission))
(|(dxrEndDate=)(dxrStartDate=))) -
Deletes out-dated start dates, removes assignments with out-dated end dates, and marks this user for privilege resolution.
Then it checks the consistency of the whole user database with the filter: (objectClass=dxrUser)
-
Deletes users in state TBDEL with expired DeleteDate.
-
Sets the DeleteDate for users in state TBDEL that do not yet have a DeleteDate set.
-
Sets as StartDate the current date for users in state NEW that do not yet have a StartDate set.
-
Checks whether the various date fields of the user are consistent with the user state. If not, the user is flagged with TBA for a succeeding privilege resolution.
-
Checks whether the various date fields of the user are consistent, which means the sequence of the date fields must be StartDate, DisableStartDate, DisableEndDate, EndDate, DeleteDate.
-
Checks for broken references of privilege assignments.
-
Checks for correct user state and migrates the old state DELETED to TBDEL.
-
Flags users with TBA if the ErrorExpirationDate is reached. During the next privilege resolution, it stores the assigned groups even if the user is in error.
Analyze the Privilege Structure
This module:
Analyzes the role structures:
-
Works on all roles within the database (filter: (objectClass=dxrRole)).
-
Checks whether the role is valid, that means it must have a permission or junior role assigned.
-
Checks for broken references to junior roles and assigned permissions.
Analyzes the permission structures:
-
Works on all permissions within the database (filter: (objectClass=dxrPermission)).
-
Checks whether the permission is valid, that means it must have a group assigned.
-
Checks for broken references to assigned groups.
-
Checks whether the permission is assigned to users if it is not flagged for user assignment.
-
Checks for correct permission parameters.
Analyze Target System Accounts
This module:
-
Checks whether the Local Admin link of a target system is broken.
-
Works on all target system accounts within the database (filter: (objectClass=dxrTargetSystemAccount)).
-
Deletes all accounts that are marked with Managed in Target System Only that are in state Deleted in the target system.
-
Checks whether the target system of this account is of correct type and exists.
-
Checks for multiple primary accounts for a user.
-
Checks whether the User Link of the account is broken.
-
Checks for correct account states.
-
Deletes accounts that are in state DELETED and whose EndDate is expired.
-
Checks that the account is either marked for Managed in Target System Only and has no user link assigned or that it is not marked Managed in Target System Only and has a user link assigned.
Analyze Target System Groups
-
Works on all target system groups within the database (filter: (objectClass=dxrTargetSystemGroup)).
-
Deletes all groups that are marked for Managed in Target System Only that are in state Deleted in the target system.
-
Checks whether all permission parameter values (dxrRPValues) are consistent with the permission parameter definition at the domain root object.
-
Checks for broken obligation links.
-
Checks for broken group members.
-
Checks whether the groups state has a correct value.
-
Deletes groups in state DELETED or DISABLED with expired EndDate.
-
Updates the distribution list of a virtual group.
Analyze User Changes
-
Sends a resolve message to the Resolution Adapter for all users that match the expert filter of this consistency run.
Consistency Check Workflow Optimization
A set of parameters exist that optimize the role resolution in batch mode (as executed in the Service Agent or in the Policy Agent). Read this section carefully and perform the proposed actions. The names in brackets are the parameter names in the agents INI file.
Object Accumulator Size (batch.accumulator.size; default=500)
This parameter controls the algorithm that calculates the affected users from the privileges to be analyzed. Increasing this parameter reduces the number of LDAP searches but increases the length of the search filters.
We recommend keeping the default value as long as the searches are successful. You’ll need to reduce this parameter if the search for affected users results in an "Unwilling to perform" error returned by the LDAP Server.
Object LDAP Page Size (ldap.pagesize; default=50)
The effects of the LDAP page size parameter include:
-
Increasing the LDAP page size reduces the number of LDAP searches.
-
The reduction of searches reduces the client-server communication overhead and thus improves performance.
-
Increasing the LDAP page size leads to increased heap space.
-
Furthermore, the time from one paged search to the next increases, since more users must be resolved until the next page is requested. Thus, it is more likely that a paging policy timeout at the LDAP server can occur. This timeout results in a fatal error in the ServiceAgent and processing is stopped.
The optimum LDAP page size depends on the customer’s data profile (privilege structure, number of accounts/groups assigned to a user, number of target systems). Thus, it should be optimized at the customer’s site:
-
Check the service agent runtime with LDAP page size of 50, 100, 150, 200, 250, 300.
-
Run the tests with full logging and check the time between subsequent paged user searches.
-
Ensure that the paging policy timeout does not abort the agent run. You may increase the paging policy timeout configured at the server or reduce the LDAP page size if the paging policy timeout is hit.
Object Cache MRU Size (cache.mru.size; default=10000)
The objects being read via LDAP are stored in a cache in the storage layer. The Object Cache MRU Size defines the size of the most recently used cache, holding the objects that are not affected by the garbage collector. If the Object Cache MRU Size is too low, the objects are removed by the garbage collector and are restored from LDAP when they are accessed the next time. This slows down the agent considerably.
A debug message "gc: recovering properties for dn" is issued in this case.
-
Periodically run the ServiceAgent with full logging and check for that message. This task must be done from time to time since additional privileges / target systems may require a change in this setting.
-
In case the garbage collector message often occurs, increase the Object Cache MRU Size (cache.mru.size) to a higher value, until the message disappears.
-
An increase of the Object Cache MRU Size may require an increase of the maximum heap space of the Service Agent, since more objects are held in the cache that are not removed by the garbage collector.
Further Optimization
In a scenario with a target system holding a small number of groups that keep almost every user as a member (the account memberships are stored with the groups) the XXLGroups flag should be checked at the target system’s advanced tab.
Checking this flag will result in caching all the groups of this target system during role resolution. If you have hundreds of groups in a TS, the XXLGroups flag must not be checked since the initial load of this large number of groups is time- and memory consuming then.
Extract Audit Trail Workflow
The Extract Audit Trail workflow checks the Identity Store for audit trail records in the Provisioning view. It writes these records to the audit trail database (a file store) and performs a cleanup of the audit trail records in the Identity Store.
You can define the objects to be audited via audit policies. See the section "Managing the Audit Trail" in the DirX Identity Provisioning Administration Guide.
If you work with DirX Audit, you do not need to run this workflow. In this case, the LDAP binding component is used to extract the audit records.
Read the following sections to learn more about how to configure the workflow.
| This workflow runs in the C++-based Identity Server but does not run in conjunction with the meta controller and thus does not use Tcl code. |
Configuring the Extract Audit Trail Workflow
To configure this workflow, run the workflow configuration wizard (option Configure in the context menu):
-
In the Export Properties tab, you can define the base objects at which to start the search, the subset and the filter. Modify the base object if you want to run several Extract Audit Trail workflows in parallel on different parts of the Identity Store.
-
In the Import Properties tab, you can define the file path at which to write the extracted information.*
Note*: It makes sense to place the audit trail database on a separate disk to prevent all other processes from stopping when this disk is full. -
In the Tracing tab, you can define the tracing parameters.
By default, the workflow produces the history audit record format of version 8.0C and earlier. Beginning with 8.0C SP1, an extended history audit format is available. This format is used in conjunction with the DirX Audit product but you can also use it in your custom audit environment. To configure it, perform these steps:
-
Select the job object of your Extract Audit Trail workflow.
-
Select the Specific Attributes tab.
-
Click Edit and set the parameter name to transformToPre80CSP0 and the value to false.
-
Click Save.
Now the workflow produces the new audit format.
Full SoD Check Workflow
This workflow runs the policy execution service. By default, the workflow is configured for the following consistency rule:
-
FullSoDCheck - processes all active SoD policies. For each policy, all users are checked. Found violations result in approval workflow start for all according privileges.
| This workflow runs in the C++-based Server but does not run in conjunction with the meta controller and thus does not use Tcl code. |
Configuring the Full SoD Check Workflow
To configure this workflow, run the workflow configuration wizard (option Configure in the context menu):
-
In the Rule Search Parameters tab, you can change the rule to be executed. By default, the standard FullSoDCheck rule is used.
-
In the User Search Parameters tab, you can set several parameters to optimize runs. See the section "Policy Agent Optimization" in the DirX Identity Provisioning Administration Guide.
-
In the Tracing tab, set the tracing parameters. By default, the workflow reports errors and warnings.
We recommend that you run this workflow once a day to check for SoD violations.
Be sure that your user database is prepared for SoD checks. If you are in doubt, run the MigrateUsersForSoD rule once.
Initialize Re-approval Workflow
This workflow runs the policy execution service. By default, the workflow is configured for the following consistency rule:
-
InitializePrivilegeForReapproval - this rule processes all privileges that require re-approval. Each assignment to such a privilege is initialized for re-approval, which sets their reapproval and end date or period attributes.
| This workflow runs in the C++-based Server but does not run in conjunction with the meta controller and thus does not use Tcl code. |
Configuring the Initialize Re-approval Workflow
To configure this workflow, run the workflow configuration wizard (option Configure in the context menu):
-
In the Rule Search Parameters tab, you can change the rule to be executed. By default, the standard InitializeReapproval rule is used.
-
In the User Search Parameters tab, you can set several parameters to optimize runs. See the section "Policy Agent Optimization" in the DirX Identity Provisioning Administration Guide.
-
In the Tracing tab, set the tracing parameters. By default, the workflow reports errors and warnings.
We recommend that you run this workflow once a day to initialize re-approval. After running this workflow, you should run the Start Reapproval Workflow.
Password Expiration Notification Workflow
The Password Expiration Notification workflow checks user entries for passwords that are about to expire and sends a notification (e-mail) to the affected users. The workflow:
-
Sends a configurable number of notifications (the time between the notifications depends on the schedule frequency).
-
Allows you to define e-mail format.
| This workflow runs in the C++-based Server but does not run in conjunction with the meta controller and thus does not use Tcl code. |
Configuring the Password Expiration Notification Workflow
To complete the configuration for this workflow, you must adapt some values in the DirX Identity Connectivity configuration to your environment. Use the configuration wizard in the Identity Manager global view as follows:
-
Double-click the connected directory icon Mail Server.
-
In the wizard window, click the icon to the right of the Service field.
-
Change the IP Address and Port fields to define the mail server.
-
Click OK.
-
In the wizard window, click Bind Profiles.
-
In Bind Profiles, click Admin, and then click the button on the right to open the property window for this entry.
-
Set the User and Password fields if your mail server requires authentication.
-
Click OK and then click Finish.
You can also set the notification parameters of the workflow:
-
Right-click the workflow line between the connected directory icons Identity Store and Mail Server.
-
In the pop-up menu, select the workflow PwExpirationNotification and then click Configure.
-
Click MailConfiguration and/or MailContent.
-
Adjust the values as required.
-
Click Finish to close the wizard and save your changes.
At last you must go to the Mail Server Connected Directory in the Expert View and either set the specific attribute mapmailaddress to a valid administrator mail address if you want that all mails about expired passwords are sent to that administrator or delete the preconfigured value “dummy” if you want the mails to be sent to each user’s mail address specified in the “to” field of the Mail Configuration tab of the PwExpirationNotification job.
Now the workflow should run.
Password Expiration Notification Workflow Operation
You can assign to each user a password policy. The password policy is assigned via the password policy link (attribute dxrPwdPolicyLink). If no password policy is assigned, the default password policy is used. The expiration calculation depends on the following attributes:
-
dxrPwdMaxAge (Maximum age) - at the password policy. It defines the maximum allowed age of the password.
-
dxrPwdExpireWarning (Expiration Warning Time) - at the password policy. The time to warn before the password expires.
-
dxrPwdChangedTime (Password Changed Time) - at the user entry. The last time the password was changed.
If the current date is greater than (dxrPwdChangedTime+dxrPwdMaxAge-dxrPwdExpireWarning), the workflow generates a warning e-mail.
After sending the warning, the dxrPwdExpiryNotified (Password Expiration Notified) attribute of the user entry is incremented. If the configured Number of Notifications is reached no more warnings are sent on subsequent workflow runs.
If the user changes the password or an administrator resets the password with Web Center the dxrPwdExpiryNotified attribute is reset to 0 again.
Policy Execution Workflow
This workflow runs the policy execution service to assign and remove privileges automatically. By default, the workflow is configured for the following provisioning rules:
-
cn=Role based scenario,cn=Rules,cn=Policies,cn=My-Company - the workflow executes all provisioning rules under this specified node.
| This workflow runs in the C++-based Server but does not run in conjunction with the meta controller and thus does not use Tcl code. |
Configuring the Policy Execution Workflow
To configure this workflow, run the workflow configuration wizard (option Configure in the context menu):
-
In the Policy Agent Parameters tab, you can define whether the workflow runs in simulation mode (Simulate rules) or in real mode (Process rules). In simulation mode it only logs information and makes no changes in the Identity Store.
Additionally you can define if, after an assignment, the user should be immediately resolved (Assign Privilege and Resolve). You should use this feature only when your Provisioning domain uses simple privilege structures and has a small Identity Store. The service assigns a privilege to a user and then resolves the user. Assignment of several privileges to the same user results in multiple resolutions of this user, which can result in low performance. To optimize performance, you can build a nested workflow that consists of a policy execution step and a privilege resolution step.If SoD is enabled at the domain object, the option Assign Privilege and Resolve is enforced because SoD works hierarchically and therefore a resolution is always necessary. If possible assign several privileges with one rule instead of assigning each privilege with a separate rule. The result is a faster running policy engine process. If Suppress Change Events is set to true no “User Change Events” are initiated.
-
In the Rule Search Parameters tab, you can select the set of rules to be executed.
-
In the User Search Parameters tab, you can set several parameters to optimize runs. See the section "Policy Agent Optimization" in the DirX Identity Provisioning Administration Guide.
-
In the Tracing tab, set the tracing parameters. By default, the workflow reports errors and warnings.
We recommend that you run this workflow once a day to check for SoD violations.
Privilege Resolution Workflow
The Privilege Resolution workflow runs the service agent in resolution mode. The next sections describe:
-
how to configure the workflow
-
how the workflow operates
-
how to optimize the workflow
| This workflow runs in the C++-based Server but does not run in conjunction with the meta controller and thus does not use Tcl code. |
Configuring the Privilege Resolution Workflow
To configure this workflow, run the workflow configuration wizard (option Configure in the context menu):
-
In the Privilege Resolution Parameters tab, set the Subject Filter. This setting allows you to define the number of users the service agent is to check. The default filter checks all users that are flagged with the dxrTBA flag (this flag indicates that the entry is "to be analyzed").
-
In the Provisioning Resolution Limits tab, you can set several parameters that you can use to optimize runs. See the section "Service Agent Configuration File" for a detailed explanation.
-
In the Tracing tab, set the tracing parameters. By default, only errors are reported.
For a detailed description of the privilege resolution procedure, see the section "Privilege Resolution Workflow Operation".
The complete list of INI file parameters is shown in the section "Service Agent Configuration File".
Privilege Resolution Workflow Operation
How privilege resolution works regarding accounts and account-group-memberships and its related states is described in detail in the chapter "Managing Provisioning → Managing States → How Privilege Resolution Works" DirX Identity Provisioning Administration Guide.
Running the DirX Identity service agent in user resolution mode consists of these steps:
Analyze User Changes
This module:
-
Executes a privilege resolution on all users that match the expert filter of this run.
Running the DirX Identity service agent in resolution mode consists of these steps:
Analyze Privileges toBeDeleted
This module:
-
Searches for roles, permissions, and groups in state TBDEL.
-
For each privilege in state TBDEL it
-
Removes the incoming assignments to users and / or senior privileges and sets the TBA (to-be-analyzed) flag for the affected objects.
-
Deletes roles / permissions or sets it state to DELETED if history is configured.
-
Sets the state of groups to DELETED.
Mark Affected Users
This module:
-
Searches the whole user and privilege database.
-
Sets the TBA (to-be-analyzed) flag for all users that have a privilege assigned that is itself flagged with TBA. Considers direct and indirect relationships (indirect relationships go via an assignment object).
Analyze Users and Assignments
This module analyzes assignments:
-
Searches all privilege assignments with relevant start or end dates. The exact filter is:
(&(|(objectClass=dxrUserToRole)(objectClass=dxrUserToGroup)(objectClass=dxrUserToPermission))(|(dxrEndDate<=today)(dxrStartDate<=today)))where today is replaced with the current date
-
Deletes the start date or privilege assignment and marks this user for privilege resolution.
Then it searches for users that must undergo a state transition:
-
Is searches for all users with inconsistent state and dates and flags these users with TBA. The exact filter is:
(&(objectClass=dxrUser)(|(&(dxrEndDate<=today)(|(dxrState=ENABLED)(dxrState=DISABLED)))(&(dxrStartDate<=today)(dxrState=NEW))(&(dxrDisableEndDate<=today)(dxrState=DISABLED))(&(dxrDisableStartDate<=today)(dxrState=ENABLED))(dxrDeleteDate<=today)(&(dxrState=TBDEL)(!(dxrEndDate<=today)))))
Analyze Target System Accounts
This module:
-
Deletes accounts that are in state DELETED and whose EndDate is expired.
Analyze Target System Groups
This module:
-
Deletes groups in state DELETED or DISABLED with expired EndDate.
Analyze User Changes
This module:
-
Executes a privilege resolution on all users that match the expert filter of this run.
Run Workflow Externally Workflow
Use the Run Workflow Externally workflow to start Tcl-based workflows in another Connectivity domain. This workflow allows you to control processes between independent DirX Identity Connectivity domains.
Note: This workflow runs in the C++-based Server but does not run in conjunction with the meta controller and thus does not use Tcl code.
Configuring the Run Workflow Externally Workflow
To configure this workflow, run the workflow configuration wizard (option Configure in the context menu).
In the runWf tab, define the following parameters:
-
WorkflowName - defines the path of the workflow definition. For example, "Default/Source Scheduled/LDIFfile/LDIFfile2Ident" starts the LDIFfile2Ident workflow.
-
Instantiator - defines the name of the foreign domain (or any other meaningful name) that is later visible in the status entry.
-
MessageServer - selects your type of message server.
In the Tracing tab, you can change the tracing parameters.
Start Re-approval Workflow
This workflow runs the policy execution service. By default, the workflow is configured for the following consistency rule:
-
StartWorkflowsForReapproval - this rule starts the request workflow that has been configured for the privilege that requires re-approval.
| This workflow runs in the C++-based Server but does not run in conjunction with the meta controller and thus does not use Tcl code. |
Configuring the Start Reapproval Workflow
To configure this workflow, run the workflow configuration wizard (option Configure in the context menu):
-
In the Rule Search Parameters tab, you can change the rule to be executed. By default, the standard StartWorkflowsForReapproval rule is used.
-
In the User Search Parameters tab, you can set several parameters to optimize runs. See the section "Policy Agent Optimization" in the DirX Identity Provisioning Administration Guide.
-
In the Tracing tab, set the tracing parameters. By default, the workflow reports errors and warnings.
We recommend that you run this workflow once a day to run all necessary re-approval workflows. Before running this workflow, you should run the Initialize Reapproval Workflow.
Status Report Generation Workflow
This workflow allows you to run reports by hand or automatically. DirX Identity provides a pre-configured status report workflow for both the Provisioning and the Connectivity views:
-
ReportGeneration - this workflow is an example of a Provisioning status report that works on the users tree. The Status Report Generation workflow for the Provisioning view runs the service agent in the generateReports mode.
-
Ident2Report - this workflow is an example of a Connectivity configuration status report. The Status Report Generation workflow for the Connectivity view runs a special report agent.
The next sections describe how to:
-
Configure the workflow for the Provisioning view
-
Configure the workflow for the Connectivity view
| This workflow runs in the C++-based Server but does not run in conjunction with the meta controller and thus does not use Tcl code. |
Configuring the Status Report Generation Workflow for the Provisioning View
To configure this workflow, run the workflow configuration wizard (option Configure in the context menu):
-
In the Report Parameters tab, you can set the report definition path, the output format and the size limit. See the section "Service Agent Configuration File" for a detailed explanation.
-
In the Report Output File Properties tab, set the file name to which the report is to be written.
-
In the Tracing tab, set the tracing parameters. By default, only errors are reported.
For a detailed description of the privilege resolution procedure, see the section "Privilege Resolution Workflow Operation".
The complete list of INI file parameters is shown in the Consistency Check Workflow section. See the section "Service Agent Configuration File".
Configuring the Status Report Generation Workflow for the Connectivity View
To configure this workflow, run the workflow configuration wizard (option Configure in the context menu):
-
In the Report Properties tab, you can set the search base, the report name and the output format.
-
In the Tracing tab, set the tracing parameters. By default, no trace is performed.