Configuration
This chapter describes how the sample upload functionality is configured into the standard Web Center application for demonstration purposes.
Menu Items
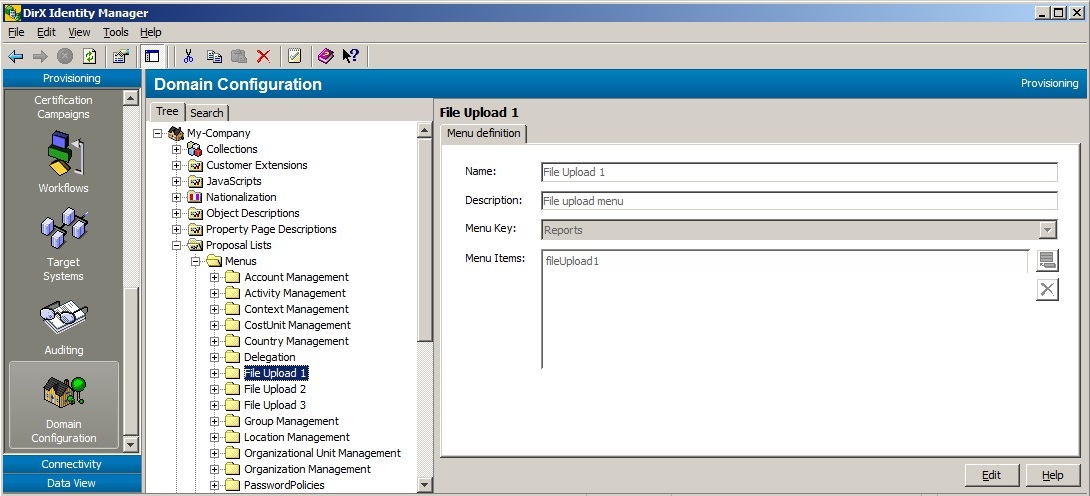
The file upload menu items must be added to a menu in the main menu bar. You could create a separate menu for them. In the Web Center standard application, however, we added them to the "Tools" menu.
There should be no need to customize the menu definitions unless you want to add the items to a different menu or your application supports more than three upload variants.
You’ll find the menu extensions in the file WEB-INF/config/identity/menu-defs.xml.
Main Menu Bar
We extended the definition of the "Tools" menu with the file upload items:
<!-- Tools menu -->
<definition name=".menuTools" extends=".menu">
<put name="accessPolicyKey" value="Reports"/>
<put name="selectors"       value="ps,pwdId"/>
<put name="msgPrefix"       value="tools"/>
<put name="items"
     value="reports:/runReport.do;
            fileUpload1:/fileUpload1Select.do;
            showFileUpload1State,fileUpload1:
                /showFileUpload1State.do::fileUploadState1;
            fileUpload2:/fileUpload2Select.do;
            showFileUpload2State,fileUpload2:
                /showFileUpload2State.do::fileUploadState2;
            fileUpload3:/fileUpload3Select.do;
            showFileUpload3State,fileUpload3:
                /showFileUpload3State.do::fileUploadState3"/>
</definition>
The definition adds two items to the menu for each upload variant. The first one displays the page to select the file or files to upload:
fileUpload1:/fileUpload1Select.do;The second item displays the list of upload state records:
showFileUpload1State,fileUpload1:
                /showFileUpload1State.do::fileUploadState1;
The second item is ignored if the corresponding upload variant is not configured to write status records.
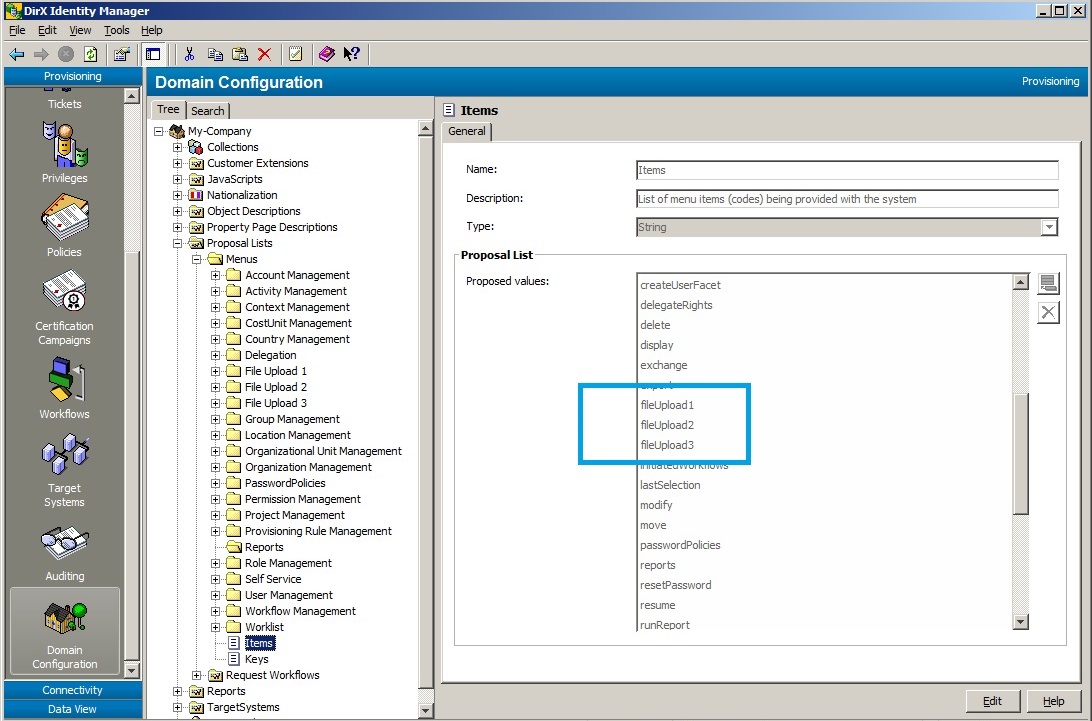
A menu item is visible to a user only if there is a menu access policy granting him access to the item. Note that the menu key for the access policy is "Reports", while the menu items are "fileUpload1", "fileUpload2" and "fileUpload3", respectively.
Context Menu for the Upload State List
We added a new context menu for the list of upload state records for each upload variant:
<definition name=".contextMenuFileUpload3State">
    <put name="accessPolicyKey" value="Reports"/>
    <put name="msgPrefix"       value="ctx.objects"/>
    <put name="items"
         value="ms;delete,fileUpload3:confirm.fileUploadStates.yes;
                 list;refreshList,fileUpload3;export,fileUpload3"/>
</definition>
The context menu includes functions to delete the selected states, to refresh the list and to export the list in HTML format (which is, for example, suitable for importing into Excel).
Deletion must be confirmed, provided that a text is assigned to the key "ctx.objects.delete.confirm.fileUploadStates" in the message file text.properties. The pre-selected button in the confirmation box is "yes". To pre-select "no", remove the ".yes" appendix from "confirm.fileUploadStates.yes".
Toolbar for State List
We added a new context menu for the list of upload state records for each upload variant:
<definition name=".toolbarFileUpload3State">
    <put name="menu"  value=".contextMenuFileUpload3State"/>
    <put name="items" value="refreshList::0;deleteList:delete;export"/>
</definition>
The toolbar displays three icons for refreshing the list, for deleting all state entries in the list, and for exporting the list in HTML format. The icon to refresh the list reacts on clicks even if the list is empty (since the minimum number of entries is set to 0).
Deletion must be confirmed, provided that a text is assigned to the key "ctx.objects.deleteList.confirm.fileUploadStates" in the message file text.properties. The pre-selected button in the confirmation box is the same as for the context menu.
Menu Definitions
We extended the menu definitions to support the three file upload variants out-of-the-box.
Access Policies
Menu access policies define which users have access to which file upload variant. The pre-configured policies in the DirX Identity sample domain allow users in the DirXmetaRole group "DataProviders" to access all three variants.
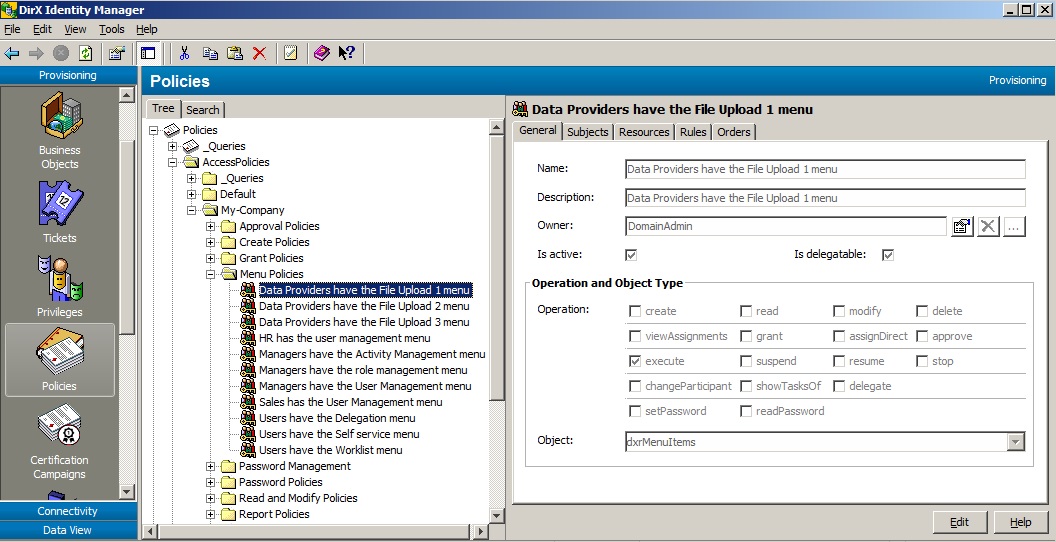
Tab "Subjects" assigns the group "DataProviders" to the field "Group of Persons".
Tab "Resources" assigns the corresponding menu definition (from the previous section) to the field "Resources".
For a customer domain, create corresponding access policies for the file upload variants you want to use and then assign the authorized users as subjects.
Settings
This section describes the configuration parameters for uploading, storing, and processing files in file WEB-INF/config/webCenter-FileUpload.properties. Note that the configuration is per file upload variant. The parameters of a specific variant start with the respective file upload identifier (fileUpload1, fileUpload2, etc.). All parameters support expressions unless otherwise stated.
Specific Variables
The following variables are made available for use in the settings:
-
docBase – the Web application’s document root folder.
-
environmentVariables – the map of environment variables of the Tomcat process.
-
systemProperties – the map of system properties of the Tomcat process.
-
applicationScope – the map of application-scoped variables of the Web application.
Sample use cases:
-
applicationScope['javax.servlet.context.tempdir'] – the temporary folder for the Web Center application; the folder is provided by Tomcat.
-
systemProperties['java.home'] – the home folder of the Java installation used by Tomcat.
-
environmentVariables.DIRXIDENTITY_INST_PATH – the DirX Identity installation folder (if any).
-
environmentVariables['catalina.home'] – the root folder of the Tomcat installation.
Uploading Files
This section describes some general configuration parameters for uploading files.
-
acceptedFiles – the file types to accept for upload, for example, "application/vnd.ms-excel,.xls". The file types are evaluated by the browsers when a user selects a file. The types are supported by Chrome, Firefox, Edge and Internet Explorer. The browsers, however, do not check whether a selected file is really of the requested type. Therefore, this setting is for end user convenience only, but not to ensure that the server only gets uploaded files of the requested types.
-
accessPolicy.item – The menu access policy item, usually one of "fileUpload1", "fileUpload2" or "fileUpload3". See the section "Menu Items" in the chapter "Configuration" for details.
-
accessPolicy.key – the menu access policy key for the file upload variant, usually "Reports". See the section "Menu Items" in the chapter "Configuration" for details.
-
baseFolder – a folder name which is referenced via ${baseFolder} in other settings. Just for convenience.
-
handlerPage – the JSP to handle uploaded files. Web Center is currently shipped with two default handlers:
-
/WEB-INF/jsp/controller/tools/fileUpload/storeFiles.jsp – stores uploaded files in a folder on the server.
-
/WEB-INF/jsp/controller/tools/fileUpload/storeFilesAndStartProgram.jsp – stores uploaded files in a folder on the server and starts a handler program to process the files.
-
lockFileName – the full path name of the lock file name. If you want to block uploads for some period of time, just create the lock file. The lock is released by removing the file. Note that uploads already in progress when creating the lock file are not affected.
-
maxContentLength – the maximum number of bytes to be transferred to the Web server in a single request (⇐ 2147483647). The amount is the total size of the uploaded files, plus some additional bytes used by the HTTP transfer mechanism.
-
messageSection – the name of the relevant message section in files text.properties. The standard section is "fileUpload.single" for uploads supporting just a single file, and "fileUpload.multiple" for uploads supporting multiple files.
-
numberOfFiles – the maximum number of files that can be selected on the upload page. The default is 1.
Checking Uploaded Files
To prevent malicious content to be uploaded to the server, the server should check the content before accepting it.
Built-In Checks
Along with the file content, the browser sends the file name and the file content type to the server. This data is not reliable and can be easily be spoofed, but anyhow, we can check them first:
-
acceptedContentTypes - the comma-separated list of accepted content types. If the list is empty, the check is skipped.
-
acceptedExtensions - the comma-separated list of accepted file name extensions. If the list is empty, the check is skipped.
The next check tries to determine the mime type of the uploaded file by looking at its content. The check is based on the Apache TIKA library and does a fairly good job though it’s not perfect:
-
acceptedMimeTypes - the comma-separated list of mime types accepted by the built-in mime type detector. If the list is empty, the check is skipped.
To find out which mime type the detector returns for a file, enable debug logging for Web Center and search in the log output for "Mime type of file".
Custom Checks
You can plug in your own content type detector. The detector must be a Java class extending the standard Java class "java.nio.file.spi.FileTypeDetector". The class must implement the abstract method "public String probeContentType(Path path)" which returns the detected content type, or null if the file type is not recognized. Note that the detector must be based on the file content only, not on the file name.
Then create a jar file containing the class and a folder named "META-INF/services". The folder should contain a file with name "java.nio.file.spi.FileTypeDetector" which lists the fully-qualified name of the custom class. See the Java API documentation of method "java.nio.file.Files.propbeContentType(Path path)" for details.
Finally, append the jar file to Tomcat’s class path, for example via the Tomcat configuration program, or one of the batch files setenv.bat and setenv.sh in folder TOMCAT_HOME/bin.
Web Center provides the jar file and the Java source for a no-op custom file type detector in folder SAMPLES_FOLDER/java.
When a file is uploaded, the content type returned by the custom class is matched against configuration parameter
-
acceptedCustomContentTypes - the comma-separated list of content types accepted by the custom file type detector. If the list is empty, the check is skipped.
Storing Files
This section comprises some configuration parameters for storing uploaded files in a folder on the server. They mainly define the upload file names, which are the names of the files the uploaded files are copied to on the server.
-
storeFiles.dateFormat – the format of the time stamps to be included in upload file names (see class java.text.SimpleDateFormat).
-
storeFiles.fileNameExtension – the upload file name extension.
-
storeFiles.fileNameTemplate – the upload file name template. Special expressions are:
-
${user.attrName} – the value of an LDAP attribute of the uploading user, like user.dn or user.sn.
-
${date} – a time stamp formatted as specified in the parameter storeFiles.dateFormat.
-
${originalBaseName} – the original (client-side) file’s base name, without extension. For example, if the original file name is "c:\tmp\alpha.xls", the base name is "alpha".
-
${originalExtension} – the extension of the original (client-side) file name, which is the part of the file name starting with the last dot. For example, if the original file name is "c:\tmp\alpha.xls", the extension is ".xls".
-
${originalFileName} – the original (client-side) file name, comprised of base name and extension. For example, if the original file name is "c:\tmp\alpha.xls", the file name is "alpha.xls".
-
${count} – a file counter per upload action. Starts with 0.
-
-
storeFiles.folder – the folder to store uploaded files in. The folder must exist and be writable by Tomcat.
-
storeFiles.invalidFileNameChars – characters which are invalid in file names. A regular expression (see class java.util.regex.Pattern).
-
storeFiles.overwrite – if an upload file already exists, whether to overwrite the existing file or to reject the upload request.
-
storeFiles.replacementString – the replacement string for invalid file name characters defined in storeFiles.invalidFileNameChars; must not contain any dollar ($) or backslash (\). Default is a dash: "-".
-
storeFiles.userAttributes – the comma-separated list of user attributes used in storeFiles.fileNameTemplate, for example "dn", or "sn,givenName".
Processing Files
This section describes some configuration parameters for starting the program to process uploaded files.
-
startProgram.base64Prefix – the prefix for arguments to be passed Base64-encoded to the handler program. The default prefix is "base64:".
-
startProgram.programName – the program name.
-
startProgram.programArgs – the program arguments, separated by spaces. Special expressions are:
-
${loginDN} – the uploading user’s DN.
-
${language} – the uploading user’s language.
-
startProgram.workingDirectory – the program’s working directory.
-
startProgram.inputFileFolder – the folder for the program’s input file.
-
startProgram.inputFileNameTemplate – the template for the program’s input file.
-
startProgram.outputFileFolder – the folder for the program’s output file.
-
startProgram.outputFileNameTemplate – the template for the program’s output file.
-
startProgram.errorFileFolder – the folder for the program’s error file.
-
startProgram.errorFileNameTemplate – the template for the program’s error file.
Upload State Form
The form displaying the list of upload state values is defined in file WEB-INF/config/tools/fileUploadn/forms-config.xml.
The form definition depends on the type of status records written by the program processing the uploaded files. We first show the definition of a simple form (fileUpload2), and then of a more complex form (fileUpload3). They correspond to the screenshots shown in the chapter "User Interface".
A Simple Form
The definition of a simple upload state form just displaying a time stamp and a message looks like this:
<form-bean name="fileUpload2StateForm">
  <form-property name="fileUploadState" y="+1" use="selectedItem"
        label="none" labelRenderer="empty" size="15"
        readonly="true"
        contextMenu=".contextMenuFileUpload2State:ms,list"
        valuePattern="fu2#\s*(\d{8}:\d{6})\s*#(.+)"
        type="com.siemens.webMgr.model.DirectoryEntryBean[]"
        width="100%" secondarySortColumns="$2">
    <data-property name="$1" type="java.util.Date"
        width="15%" label="fileUploadState.timeStamp"
        cellRenderer="sortableTimeWithSeconds"
        rendererProperties="format:yyyyMMdd:HHmmss"/>
    <data-property name="$2" type="java.lang.String"
        width="85%" label="fileUploadState.message"
        cellRenderer="toggleSelection" />
  </form-property>
  <form-property name="selectedItem" type="java.lang.String"
        value="-1" transient="true" visible="false"/>
</form-bean>
The value pattern is a regular expression (see the Java class java.util.regex.Pattern) for the state attribute values. State attribute values that don’t match the expression are ignored.
The data property with the name "$n" references the nth capturing group of a matching value. "$0" matches the entire value. Supported data property types are
-
java.lang.String – string values.
-
java.lang.Boolean – boolean values ("true", "false").
-
java.lang.Integer – number values.
-
java.util.Date – time stamps. The renderer property "format" defines the time stamp format as defined by the class java.text.SimpleDateFormat.
A Complex Form
The definition of the more complex sample file upload state form from variant fileUpload3 looks like this:
<form-bean name="fileUpload3StateForm">
  <form-property name="fileUploadState" y="+1" use="selectedItem"
        label="none" labelRenderer="empty" size="15"
        readonly="true"
        contextMenu=".contextMenuFileUpload3State:ms,list"
        valuePattern="sew#\s*(\d{8}:\d{6})\s*#\s*([^#]+)\s*#\s*
          ([^#]+)\s*#\s*(\d+)\s*#\s*(\d+)\s*#\s*(\d+)\s*#\s*(\d+)\s*"
        type="com.siemens.webMgr.model.DirectoryEntryBean[]"
        width="100%" secondarySortColumns="$1,$2,$5">
    <data-property name="$1" type="java.util.Date"
        width="15%" label="fileUploadState.timeStamp"
        cellRenderer="sortableTimeWithSeconds"
        rendererProperties="format:yyyyMMdd:HHmmss"/>
    <data-property name="$2" type="java.lang.String"
        width="25%" label="fileUploadState.fileName"
        cellRenderer="toggleSelection" />
     <data-property name="$3" type="java.lang.Boolean"
        width="12%" label="fileUploadState.finished"
        align="center"/>
    <data-property name="$4" type="java.lang.Integer"
        width="12%" label="fileUploadState.totalCount"
        align="right"/>
    <data-property name="$5" type="java.lang.Integer"
        width="12%" label="fileUploadState.processedCount"
        align="right"/>
    <data-property name="$6" type="java.lang.Integer"
        width="12%" label="fileUploadState.successCount"
        align="right"/>
    <data-property name="$7" type="java.lang.Integer"
        width="12%" label="fileUploadState.errorCount"
        align="right"/>
  </form-property>
  <form-property name="selectedItem" type="java.lang.String"
        value="-1" transient="true" visible="false"/>
</form-bean>
Nationalization
This section describes nationalization features.
Messages and Labels
Texts for messages and labels are defined as usual per supported language in the resource file WEB-INF/classes/resources/languages/language/text.properties.
Relevant are all message texts in the sections:
-
fileUpload
-
fileUploadn
-
fileUploadState
-
fileUploadnState
-
tools.showFileUploadn
-
tools.showFileUploadnState
and the two message texts with keys
-
ctx.objects.delete.confirm.fileUploadStates
-
ctx.objects.deleteList.confirm.fileUploadStates
Header Texts
The headers are stored per supported language in folder WEB-INF/classes/resources/languages/language/tools/fileUploadn:
-
select.jsp – The JSP switches between selectSingleFile.jsp and selectMultipleFiles.jsp. There should be no need to change this file.
-
selectMultipleFiles.jsp – The header text for uploading multiple files. It’s a JSP because it displays the configured maximum number of bytes to upload.
-
selectSingleFile.jsp – The header text for uploading a single file. It’s a JSP because it displays the configured maximum number of bytes to upload.
-
showState.html – The header text for the page displaying the list of upload states.
Hints
This section provides hints on using Web Center file upload features and functions.
Upload Folder
The folder must exist and must be writeable by Tomcat.
Web Center does not clean up the folder.
If the folder is the temporary folder provided by Tomcat for the Web Center application, Tomcat may occasionally clean up the folder. This folder should therefore be taken as a storage folder just for demonstration purposes.
Handler Program
Web Center just starts the handler program. Web Center does not wait for the program to finish, nor does it check its progress or result. If the program crashes or stops prematurely, it is not restarted.
The program runs independently of Tomcat. Stopping or restarting Tomcat does not affect the program.
Argument Encoding
Arguments for a handler program may include special characters or characters from exotic character sets. To be able to pass such arguments safely, Web Center can be instructed to Base64-encode their values. The handler program must then decode the values.
Web Center encodes an argument value if it is prefixed with the Base64 identifier in the program’s argument list defined in file webCenter-FileUpload.properties. The default Base64 identifier is "base64:". The prefix can be changed via configuration parameter fileUpload*n.startProgram.base64Prefix*. The actual Base64 prefix can also be passed to the program as an additional argument.
The encoded values will be prefixed with the Base64 identifier. For example, the value "dirx" is passed as "base64:ZGlyeA==" for Base64 arguments to the handler program.
Base64 encoding/decoding requires converting the argument values from Strings to byte arrays and vice versa. We use UTF-8 as the underlying character set for the conversions.
Java provides the utility class "java.util.Base64" to encode and decode strings. The following code snippet shows how to decode an argument value:
import java.nio.charset.StandardCharsets;
import java.util.Base64;

private static String decodeArgument(
               String arg, String base64Prefix) {
  String decodedArg = arg;
  if (arg != null && base64Prefix != null
                  && arg.startsWith(base64Prefix)) {
    String encodedArg = arg.substring(base64Prefix.length());
    byte[] dec = Base64.getDecoder().decode(encodedArg);
    decodedArg = new String(dec,StandardCharsets.UTF_8);
  }
  return decodedArg;
}
Status Entries
Status entries are stored as values of an LDAP attribute of the uploading user. Since attribute values must be unique, you will get an error when trying to add the same status record twice. Therefore you should take appropriate measures to prevent identical status records; for example, by including a sufficiently detailed time stamp.
Sample Handler Programs
This section describes the sample handler programs provided with the Web Center file upload feature.
StatusEntryWriter
The program reads the content of the uploaded file line by line. If a line matches a status record template, a corresponding status record is written to the uploading user’s LDAP entry. The program then waits for a configurable period of time before processing the next line.
Arguments
The handler program uses a UNIX-like argument style: –<argName> <argValue>
Supported arguments are:
-
base64Prefix – the prefix for Base64-encoded arguments. Default: "base64:".
-
dateFormat – the date format for replacing ${date} expressions in input files with the current time. Default: "yyyyMMdd:HHmmss".
-
host – the host name or IP address of the LDAP server of the DirX Identity Provisioning database. Default: "localhost".
-
inputFile – the name of the uploaded file. Required.
-
originalFileName – the client-side name of the original file. It is used for replacing ${originalFileName} expressions in the input file.
-
port – the port number of the LDAP server of the DirX Identity Provisioning database. Default: 389.
-
prefix – the prefix for status records. Default: "sew#".
-
pwd – the password for the uploading user. Default: "dirx".
-
sleep – the time (in seconds) to sleep before writing the next status record. Default: 3.
-
statusAttribute – the LDAP attribute name of the user attribute to append the status records to. Default: "dxrFileUploadState".
-
user – the uploading user’s DN. Required.