Using DirX Identity Manager
The topics in this chapter describe DirX Identity Manager features and usage for the Provisioning, Connectivity and Data View groups, including information about:
-
Logging in
-
Using the main window
-
Supplying date and time
-
Managing your configuration database
-
Handling erroneous field content
-
Using wizards
-
Using the Provisioning views
-
Using the Connectivity views
-
Using the Data View
-
Customizing DirX Identity Manager
Logging In
To start DirX Identity Manager:
-
Click Start, and then point to Programs.
-
Point to Atos DirX Identity V*x.x, and then click *Manager.
Manager displays a splash screen that shows its name and the version.After the splash screen disappears, it displays a view group dialog, as shown in the following figure:
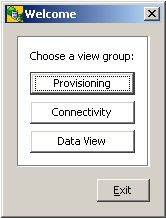
Here you can select one of the available view groups. Next, the login dialog is displayed:
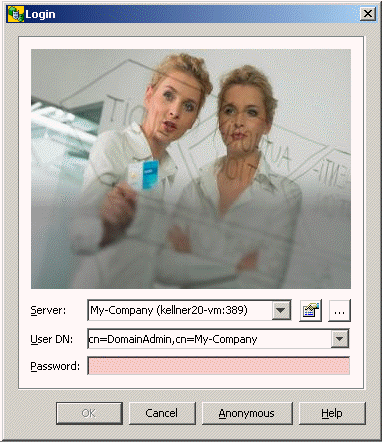
To log in to Manager:
-
Enter your login profile in User DN.Alternatively, you can use the default login profile that Manager has selected for you, if this is your login profile.
-
Enter your password.
-
Click OK or press Enter.
Manager attempts to log in to the Identity store shown in the Server field of the login dialog.If the login operation is successful, Manager closes the login dialog and displays its main window with the previously selected view group.If the login operation fails, Manager displays an error message and places the cursor in the password field.
Read the Login section in the Standard Dialogs chapter in the Basic Patterns help module to learn more about the capabilities of the Login dialog.
You can click Cancel to cancel the login procedure.Manager closes the login dialog and opens an empty main window.You must restart DirX Identity Manager to log in again.
Using the Main Window
The main window is a frame around the different views.It consists of window header, a menu bar, a toolbar, a views bar for the selection of a particular view, a work area (divided into several panes whose appearance depends on the selected view) and a status bar.
Using Manager Views
DirX Identity Manager provides the following view groups displayed in the View Bar on the left-hand side of the main window:
-
Connectivity - shows the DirX Identity Connectivity views: Global View, Expert View, Status Reports view and Monitor View.
-
Provisioning - shows the DirX Identity Provisioning views: Users, Business Objects, Privileges, Policies, Certification Campaigns, Workflows, Target Systems, Auditing, and Domain Configuration.
-
Data View - shows the Connectivity data view and Provisioning data view at the LDAP level.
Each different view is composed of a tree or list control and a work area that contains either:
-
A map that displays icons that represent connected directories and lines that represent synchronization workflows.
-
A property dialog that corresponds to the item that is currently selected in the tree control.
Note: If you need to work with the same view or with different views in parallel, you can start the DirX Identity Manager several times (make sure you have enough main memory to avoid swapping operations). Now you can use the operating system to switch between these views. You can work in all views in parallel. DirX Identity Manager is designed to have the correct information (for correct display you may need to click the Refresh button).
Using the Main Window Menu
The DirX Identity Manager’s main window provides the following menu selections:
-
File
-
Edit
-
View
-
Tools
-
Help
Note that these menu selections are completely disabled when an object is edited in the Connectivity Expert View.
File
The File menu contains items that act on a particular configuration object as a whole. The menu selections are:
-
Import - imports files (only available in the Data View and the Provisioning view)
-
Export - exports files (only available in the Data View and the Provisioning view)
-
Import Nationalization Items - imports nationalization item files. See the DirX Identity Provisioning Administration Guide for more information about nationalization items.
-
Export Nationalization Items - exports all nationalization items to a nationalization file. See the DirX Identity Provisioning Administration Guide for more information about nationalization items.
-
Properties - displays the properties of an object. For the connected directory icons and workflow lines in the Global View, this selection opens the configuration wizard. For the Expert View, this selection displays the properties of a selected configuration object in the work area.
-
Exit - unbinds and closes Manager.
Edit
The Edit menu contains all commands to manipulate a particular item. The visibility of the commands depends on the current context.
-
Cut - standard cut operation (not used in DirX Identity Manager).
-
Copy - standard copy operation (not used in DirX Identity Manager).
-
Paste - standard paste operation (not used in DirX Identity Manager).
-
Delete - standard delete operation. Enabled only when a connected directory icon or workflow line is selected in the Global View or when a configuration object is selected in the tree pane or in the object table (upper right) of the Expert View.
-
Rename - changes the displayed name of an object. Enabled only when a connected directory icon or workflow line is selected in the Global View or when a configuration object is selected in the tree pane or in the object table (upper right) of the Expert View.
View
The view menu contains menu selections that optionally display or hide parts of the main window. The menu selections are:
-
Views Bar - shows or hides the Views bar, which is the left-most pane. The Views bar contains buttons to select a Manager view.
-
Views → Connectivity → Global View, Expert View, Status Reports, Monitor View - click to show the corresponding Manager view (this selection is especially useful when the Views bar is hidden).
-
Views → Provisioning → Users, Business Objects, Privileges, Policies, Certification Campaigns, Workflows, Target Systems, Auditing, Domain Configuration - click to show the corresponding Manager view (this selection is especially useful when the Views bar is hidden).
-
Views → Data View → Connectivity, Provisioning - click to show the corresponding Manager view (this selection is especially useful when the Views bar is hidden).
-
Tool Tips - enables or disables the tool tips.
-
Refresh - click to refresh the current view.
Tools
The tools menu contains only one option for key store management. The menu selections are:
-
Options - allows you to manage Java keystores.
Help
The Help menu contains command items to show selected topics of the online documentation. The selections are:
-
Help - starts the help system and shows the online manual’s table of contents.
-
Contextual help - starts the "What’s This?" help system. Click any item in the current view to get help information about the item.
-
About… - shows a small window with some useful application information (complete application name, build number, license information).
Using the Main Window Toolbar
DirX Identity Manager’s main window provides the following toolbar buttons:
-
 Available after jumping from one object to another object in a Provisioning, Connectivity or Data View tree pane. Use this button to return to the previously selected object.
 -
 Available after jumping from one object to another object and back in a Provisioning, Connectivity or Data View tree pane. Use this button to return to the previously selected object.
 -
 Allows you to stop an LDAP operation that has been running for a long time.
 -
 Retrieves the DirX Identity data from the directory service.
 -
 Displays the properties of an object. This button opens the configuration wizard when used in the Connectivity Global View on connected directory icons and workflow lines. This button displays the properties of a selected configuration object in a new window when used in Provisioning views, the Connectivity Expert View and the Data View.
 -
 Shows or hides the Views bar, which is the left-most pane. The Views bar contains buttons to select a Manager view.
 -
 Cuts an object to the clipboard. Only used in the Data View.
 -
 Copies an object to the clipboard. Only used in the Data View.
 -
 Pastes an object from the clipboard. Only used in the Data View.
 -
 Deletes an object. Enabled only when a connected directory icon or workflow line is selected in the Global View or when a configuration object is selected in the tree pane or in the object table (upper right) of the Expert View. Also used in the Data View.
 -
 Click to view forms in design mode. This feature adds checkboxes before each field. The meaning of the checkbox is:
Checked - This field is visible when design mode is switched off.
Unchecked - This field is not visible when design mode is switched off.
Greyed - This field has been defined at a lower level (can only occur in a wizard in the Global View).After restarting DirX Identity Manager, design mode is switched off (default setting).
For details about this feature, see the section "Using Design Mode" in the DirX Identity Customization Guide. -
 Displays the Help Viewer.
 -
 After clicking this button, you can click most items in the current view to get help information.
Using Tool Tips
Tool tips provide additional information at various places. A tool tip is typically displayed for about 4 seconds. If you need a longer display time, press the shift key while the tool tip is displayed or move the pointer slightly over the tool tip.
You can enable or disable the tool tip feature from the Views menu.
Tool tips sometimes provide a hint that more information is available. Press the Shift key to display the additional information.
Using the Context Menu
DirX Identity Manager provides a context menu that is displayed:
-
When you right-click an object in the tree pane or list pane of a Provisioning view or the Connectivity Expert View
-
When you right-click a workflow line or a connected directory icon in the Connectivity Global View
The context menu enables only those options that apply to the selected object type; options that do not apply are unavailable.
The following sections summarize the common selections, Provisioning view-specific selections, and Connectivity-view specific selections that can appear in the DirX Identity Manager context menu. See also the "Workflow Line" and "Connected Directory Icon" topics in "Using the Global View" for an explanation of the context menu options available there.
Common Context Menu Selections
The following context menu selections can appear in both Provisioning and Connectivity views:
Certificate Change Notification - if you added or exchanged a certificate for attribute and bind profile encryption, this menu option allows you to distribute the new certificate to all applications.
Copy - copies the selected objects with all its content to the clipboard. Use Paste to insert this content at another location. That means that you can use the Copy and Paste sequence to copy objects. Copy together with Paste performs the same operation as Copy Object but with different handling. Alternatively you can use the drag and drop feature.
Copy Object - copies the object with all its content. You are asked for the new name (a proposal is presented). Please note that references are not updated automatically. You must perform this task by hand. Copy Object performs the same operation as Copy and Paste but with different handling. Alternatively you can use the drag and drop feature.
Cut - copies the selected objects with all its content to the clipboard. If you Paste it at the target location, the content at the source location is deleted. That means that you can use a cut-and-paste sequence to move objects. Cut together with Paste performs the same operation as Move Object but with different handling. Alternatively you can use the drag and drop feature.
Delete Collection Entries - after explicit confirmation by the user, deletes all entries that are defined by this collection. It deletes the LDAP entries in the following sequence:
-
subtrees in down-up order
-
single objects in down-up order only if they have no children
-
objects defined by rule only if the object has no children
-
subcollections
Down-up order ensures that single objects or subtree lists will be processed in the desired order. For example, suppose we have the following entries in single objects:
cn=d
cn=c, cn=d
cn=b,cn=c, cn=d
cn=a,cn=b,cn=c,cn=d
The Delete action will delete the entire sequence starting from the last object up to the first one.
Note that you can use the Import Collection File method to restore a delete operation if you have previously exported the data.
Export Collection - exports the defined collection(s) to the defined LDIF files. This item is only available at the Collection object, a selected set of collection objects (use multi selection) or a Collection Folder.
Export File - exports objects that contain text data to a text file into the file system. You are asked for the name and location of this file in a file dialog. At the end of the operation, you can view the trace file.
Goto Dataview - displays the selected object in the Data View.
Import Collection File - imports the file of this collection definition from the defined path. The action supports multi selection so that you can import multiple files with one click. It works with these import options: add new entries + modify existing entries + overwrite attribute values. This selection allows easy rollback of a previous Delete Collection Entries operation if you exported the file in a previous operation.
Import File - imports text data in a file into an object that contains text data. You are asked for the name and location of the file to import in a file dialog. Do not try to import these files with another mechanism (the internal structure is complex - a lot of special characters are contained).
Load IdS-J Configuration - loads all Java-based workflow definitions into the IdS-J server. The sent message contains the domain name. Depending on the setting of the flag Include domain into topic at the domain object, the Java-based Server performs the reload (flag is TRUE) or not (flag is FALSE). It also loads the Java-based schedules and the adaptor configuration. Nothing else is loaded; for example no object descriptions are loaded. Note: This menu option does not load the server configuration. This is only possible during an IdS-J server restart. The algorithm of the domain name calculation depends on where the command is executed:
-
From within a Provisioning domain, the domain name is set to the domain’s name. The selection is available in the Workflows view.
-
From within a Connectivity domain, the domain name is either calculated from the path (for connected directories, workflows, schedules) or from the domain name attribute at the Java-based Server object itself. The selection is available in the Expert View.
Move Object - moves objects between folders. You are asked for the new location. Then a progress dialog is displayed. You should not abort this operation because you can undo it simply by moving the object back to the original location. Move Object performs the same operation as Cut and Paste but with different handling. Alternatively you can use the drag and drop feature.
New - creates a new object. If several objects can be created under this object a selection list is displayed in the sub menu.
Open - performs the defined viewer command of the connected directory. In the Connectivity Expert View, this item is only available at the Connected Directory object. In the Provisioning view, this selection is only available through the Connectivity context menu selection on a target system object. Please note that each Open command in the Global View opens another instance of the viewer.
Paste - inserts cut or copied objects from the clipboard (see Cut or Copy). This option is only available if it is allowed to copy these objects to the current location.
Properties - shows the properties of an object in a separate window. You must close this window before you switch to another location in the Expert View.
Refresh - refreshes an object by reading actual data from the configuration database.
Reload Object Descriptors - all object descriptions are read during startup of the DirX Identity Manager. Changes are not reflected automatically to this memory copy. You can restart the DirX Identity Manager or you can use this option to reload the object descriptions after changes.
Rename - renames the object display name (not the common name!) of the object.
Report - generates reports in either HTML or XML format. HTML format is best used for documentation; XML can be used for further processing. For a detailed description of the parameters, see the Reports section in the "Context Sensitive Help" chapter of the DirX Identity Provisioning Administration Guide. For information on how to set up your own reports, see the chapter "Customizing Status Reports" in the DirX Identity Customization Guide.
Run Workflow - starts a workflow from the Expert View (only available at workflow objects in the Workflows folder) or from the Connectivity context menu selection on a target system object in the Provisioning view. A "Run workflow workflowname" window is displayed for Tcl-based workflows or a note is displayed that the Java-based was started. Note: You can also start workflows from the Global View context menu (right-click on a workflow line, select a workflow from the context menu, and then click Run).
Provisioning View Context Menu Selections
The following selections can appear in Provisioning view context menus:
Abort - aborts a request workflow activity if it is in the WaitInError state. The resulting state is Failed.Temporary. This item is only available on a Request Workflow Instance object.
Connectivity - operates on the connected directory linked to the target system through the Relationship - Connected Directory link. The selection provides options to configure and open the connected directory or to add or assign new workflows. You can also run workflows. DirXmetaRole represents the Identity Store connected directory.
Delete - deletes the object. The selection displays a confirmation dialog that asks you whether or not you really want to delete this object. Because the object may still contain history (audit) information or may be protected by request workflows for deletion, the object is only deleted after an object-specific procedure. For more information, see the DirX Identity Provisioning Administration Guide.
Export Nationalization Items - exports all nationalization items within the selected tree into a nationalization file. This selection is available in the Domain view and the Workflows view.
Login/Logout - creates a new instance of a Provisioning view or a Data View and authenticates you to this instance, or logs you out of an instance of a view. The DirX Identity login dialog is displayed (See "Logging In" for details). This menu selection allows you to run multiple instances of Provisioning views or Data Views. It is available at the top-level trees of Provisioning views and Connectivity and Provisioning Data Views.
Resume - triggers the request workflow engine to run this activity again. Either the activity runs successfully or enters the state WaitInError again. This item is only available on a Request Workflow Instance object that is in state WaitInError. This selection is available in the Workflows view.
Connectivity View Context Menu Selections
The following selections can appear in Connectivity view context menus:
Configure - starts the connected directory configuration wizard or the configuration wizard for the workflow for reconfiguration. This item is only available at the Connected Directory and Workflow object in the Global View and Expert View.
Delete - deletes the object. The selection displays a confirmation dialog that asks you whether or not you really want to delete this object. You can also select whether or not the deletion process should check for references to avoid broken links (Check references to avoid broken links). When references are detected, a confirmation dialog is displayed and deletion is not performed. We recommend that you use the checked option. The first use during a session needs more time, repeated use works much faster due to caching mechanisms. You can use the Show References menu option to test for references before a deletion operation. Please note that no undo is available. We recommend that you make regular backups of your configuration database.
Disable Scheduling - disables the scheduling mechanism previously enabled with Enable Scheduling (enabled from C++-based server startup). You can use this option to disable all schedules (running workflows are not aborted!). After checking with Get Server State that no workflows are running on any of the servers, you can be sure that no automatic activity can occur. You should use this option before restoring the database or when using complex operations like Import Data. This item is only available at the Schedules object in the Expert View.
Edit Content - allows editing the XML content of this object directly. After editing it is stored directly in LDAP and is not interpreted by the service layer (which could adapt the result).
Enable Scheduling - enables the scheduling mechanism previously disabled with Disable Scheduling. This item is only available at the Schedules object in the Expert View.
Export Configuration - exports the entire configuration tree into an LDIF file. You can read this information with Import Data. This feature permits you to make backups of the configuration tree. This item is only available at the root object Connectivity Configuration Data. If an error occurs, a dialog is displayed at the end of the operation. You can also view the trace file.
Export Data - exports complete logical trees of data from the configuration database to an LDIF file. You are asked for the name and location of the file to export in a file dialog. If an error occurs, a dialog is displayed at the end of the operation. You can also view the trace file.
Note: The default code set is utf-8 (the scripts support the switch -code <encoding>).
Export Subtree - exports the selected object and all of its children in the tree from the configuration database to an LDIF file. You are asked for the name and location of the file to export in a file dialog. If an error occurs, a dialog is displayed at the end of the operation. You can also view the trace file.
Note: The default code set is utf-8 (the scripts support the switch -code <encoding>).
Get Server State - displays the server state of a C++-based Server object (only available at this object).
Import Data - imports data that has been exported to LDIF format with Export Data or Export Configuration. This item is only available at the root object Connectivity Configuration Data. The imported data does not delete objects, it only adds and modifies them. If you want to replace the entire configuration tree, use Replace Configuration instead. If an error occurs, a dialog is displayed at the end of the operation. You can also view the trace file.
| The default code set is utf-8 (the scripts support the switch -code <encoding>). |
Manage IdS-J Configuration - allows specifying static load distribution. You can define specific adaptor types, where the scheduler and the request workflow timeout check run, and, for high availability, which server supervises which server.
Replace Configuration - imports data that has been previously been exported to LDIF format with Export Configuration. Before the import operation is started, the configuration tree is deleted (only the configuration objects that keep important configuration information for the local DirX Identity domain are not touched). This item is only available at the root object Connectivity Configuration Data. At the end of the operation a dialogue is displayed when an error happened. You can also view the trace file.
Replace Occurrences - maps all links that point to the selected object to a new one that you can select from a tree browser.
Note: This command does not copy the attributes of the source object to the target object. You must do this by hand if necessary.
Run Activity - runs a workflow from any activity. Be sure that all input conditions for this activity are satisfied, for example, an intermediate file must be present in the working directory of the previous activity. This item is only available at the root object Activity object under a Workflow object.
Show References - checks whether other objects refer to a specific object. This selection helps to maintain the database while avoiding broken references. Note that you can use this feature in the Delete menu option. The next figure shows a typical situation.
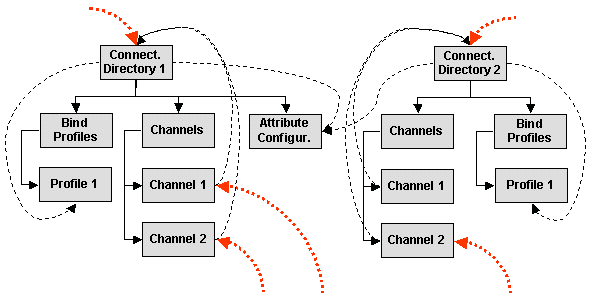
The figure shows two selected objects (Connected Directory 1 and 2). Both objects have sub structures as there are bind profile folders with bind profiles and channel folders with channels.
The connected directories refer to their bind profiles and to the same shared attribute configuration object. The channels refer back to the connected directory objects. External references (thick dotted lines) refer to channel and connected directories. Thus deletion of both connected directory objects together with their subtrees would lead to 5 broken references. The secure method is to remove the external references, to check that they no longer point to these objects and then to delete the object trees.
The show references method has two options:
-
Include objects referring to any children - References to the selected objects as well as to their children will be searched (external references).
-
Ignore ancestor / descendants references - This option ignores:
-
references of the selected objects (ancestor) to their children (for example the references to the bind profiles).
-
references of children to their ancestor (for example the references from the channels to the connected directories).
-
references of the children to other children of the respective ancestor
-
In other words: When this option is checked, only references from “outside” to the selected object (external references) are taken into account. To find out if an object may be deleted without corrupting the database, check both options.
Show Structure - displays the structure of a workflow object from the Expert View (only available at workflow objects in the Workflows folder).
Synchronize Schedulers - synchronizes the current schedules information to all schedulers (for example, after a reload of the configuration database). Interactive changes of a schedule object should be synchronized automatically. This item is only available at the Schedules folder in the Expert View.
Using Drag and Drop
In all views that provide a tree you can use DirX Identity’s drag and drop feature:
-
Simply select one or more objects.
-
Click on the selection with the left mouse button and then move the cursor. A dashed grey rectangle under the cursor shows that you move the selection.
-
If you move the cursor over a potential target location, either the target location is highlighted in blue (this is a valid one) or a stop sign shows that you cannot use it.
-
Pressing the Ctrl key defines a Copy operation (a plus sign is displayed below the cursor). If you do not press another key, a Move operation is performed.
-
If you release the left mouse button, the copy or move operation is performed.
-
To abort a drag and drop operation, simply move the cursor to a location where the stop sign is displayed and then release the mouse button.
For alternative methods for Copy or Move, see the corresponding menu items.
Using the Status Bar
The status bar at the bottom of the window contains valuable information:
-
The host name where this manager is connected to (the LDAP server host name).
-
The logged-in user.
-
The number of items visible under the currently selected tree node that is typically shown as a list in the upper right pane.
Supplying Date and Time
Some fields in DirX Identity allow input of date and time.The format is set to English and is currently not changeable.Thus the date format is:
English: 4/12/01 0:47 am
Managing Your Configuration Database
If you need to restore or exchange the database that contains your configuration, follow these steps:
-
Use Disable Scheduling (an option in the Schedules object in the Expert View) to prevent workflows from being started automatically.For details, see "Connectivity View Context Menu Selections".
-
Stop the DirX Identity IdS-J service.(Stops all Java-based Servers.)
-
Use Get Server State to check, for all C++-based Servers, that no workflows are still running.For details, see "Connectivity View Context Menu Selections".
-
Stop the DirX Identity IdS-C service.(Stops all C++-based Servers.)
-
Restore your database.You should be careful not to restore a database with an incompatible schema version.DirX Identity will not restart if this occurs, and you cannot use DirX Identity Manager on the database.In this case, you must migrate the database (assuming that the database version is one of the supported versions for migration).
-
Restart the DirX Identity Manager.
-
Start the DirX Identity IdS-C service.(Start all C++-based Servers.)
-
Start the DirX Identity IdS-J service.(Starts all Java-based Servers.)
-
Use Enable Scheduling (an option in the Schedules object in the Expert View) to re-start automatic workflow launch again.For details, see "Connectivity View Context Menu Selections".
If you do not follow this sequence, an inconsistent database could be the result.
Handling Erroneous Field Content
When fields in list boxes look like ABC??, it indicates that the value is no longer part of the selection list.This can happen especially when the selected attributes are used for list boxes.Either select another value for the list box or change the content of the list by editing the source (for example, the selected attributes).
Using Wizards
DirX Identity wizards are powerful, easy-to-use tools that help to simplify complex configuration tasks and enable you to concentrate on the important parts of a configuration.DirX Identity Manager provides the following built-in wizards for setting up configuration scenarios:
-
One Provisioning target system wizard for creating and configuring target systems that is available in the Provisioning Target Systems view
-
Two Connectivity wizards - one for creating and configuring connected directories and one for creating and configuring workflows between connected directories - that are available in the Connectivity Global View
These wizards isolate the most important configuration tasks of setting up a synchronization workflow and bring them into a logical sequence.
About the Wizard Page Layout
The configuration wizards follow a predefined layout. They start as modal dialog windows that display a form dialog called a wizard panel. The wizard panel consists of the following elements:
-
Title (for example, "Select attribute configuration").
-
Description (for example, "Check if the attribute items shown here are appropriate for a synchronization procedure. Update if necessary. Then click on "Next>>" to perform the next step.")
-
Progress illustrator, which indicates the steps that you have already performed (green color), the current step (grey color), and the steps that remain to be performed (red color). For the Connectivity wizards, the items are displayed as buttons when the respective object (connected directory or workflow) is re-configured. Click on a button to jump to the corresponding step directly.
-
Work area. Displays the input dialog for the current step.
-
Navigation buttons:
-
<< Previous - steps backward (disabled for the first step).
-
Next >> - steps forward (labeled Finish >> for the last step).
-
Cancel - stops the wizard.
-
Help - provides help information for this step.
How the Target System Wizard Works
You can use the Provisioning view’s Target System wizard to create new target system objects (you cannot use it to re-configure a target system object). This wizard provides for complete configuration of a new target system, including both the Connectivity and Provisioning pieces of the new system.
When you run the Target System wizard, it first requires you to select a pre-configured target system. The wizard derives the new target system from this template. The wizard also provides steps to:
-
Provide a name for the new target system and assign it an administrator
-
Select the cluster and domain and specify any assignment properties, synchronization properties, and group handling properties
-
Define the timing (in days) as to when target system objects are disabled or deleted
-
Configure account and group roots
-
Select the Connectivity scenario and the connected directory, and configure the connected directory
-
Select the Provisioning workflows to create, for example, Java-based or Tcl-based versions
Parts of the Target System wizard are customizable; see the chapter "Customizing Wizards" in the DirX Identity Customization Guide for details.
How the Connectivity Wizards Work
You can use the Connectivity wizards to create new objects or to re-configure existing ones. The steps you take in the wizard are different depending on which task you are performing and the kind of object you are creating or re-configuring:
-
When you create a new object, you must first select a template. When you are re-configuring an existing object, the wizard does not show you this step.
-
The next steps in the wizard depend upon the type of object you are configuring.
-
When you create a new object, you must define a name for it as the last step in the wizard. When you are re-configuring an object, the wizard does not show you this step.
-
When you want to re-configure a connected directory or a workflow using a particular step, you can jump to the desired step directly by clicking the step in the progress illustrator.
When you use the Connected Directory Configuration wizard to create a new connected directory or to insert an existing connected directory, you must first select a pre-configured connected directory. The wizard derives the new directory from this template. In most cases, you must only check whether or not the current settings are correct and adjust them if necessary. The following items are typical for this type of wizard but not always available:
-
Select the connected directory template (only when creating a connected directory object)
-
Select the schema settings
-
Select the attribute configuration settings
-
Check the login (bind) profiles and create new ones if necessary.
-
Provide a name for the new connected directory (only when creating a connected directory object).
When you use the Workflow Configuration wizard to create a new workflow, the wizard presents all workflows that fulfill the condition to connect the two directory types at the endpoints and therefore fit between the two (each of these workflows acts as a template). The list shows only those workflows that apply to the selected connected directories (that is, the source and target directories between which you’ve drawn the workflow line). If a template for the two connected directories does not exist, you must create one in the Expert View. The following items are typical for this type of wizard but not always available:
-
Select a workflow template (only when creating a new workflow)
-
Select the attributes to extract from this connected directory
-
Select the attributes in the target connected directory which must be filled
-
Define the mapping between the source and target attributes
-
Set the search parameters or, more generally, the export parameters for the source connected directory
-
Set the object handling for the import of the target attributes (that is, which objects can be deleted or created) or, more generally, the import parameters for the target connected directory
-
Set the delta handling parameters if this is a delta workflow
-
Adjust the trace parameters (eventually separate for each of the agents)
-
Provide a name for the workflow (only when creating a new workflow).Next time you run the wizard, it will present this new configured workflow as a template when a new workflow must be configured between these types of directories.
The Connectivity wizards are customizable; see the chapter "Customizing Wizards" in the DirX Identity Customization Guide for details.
Using the Provisioning Views
When you select the Provisioning view group, the view bar in the main window displays icons that allow you to select the following views:
-
Users
-
Business Objects
-
Tickets
-
Privileges
-
Policies
-
Certification Campaigns
-
Workflows
-
Target Systems
-
Auditing
-
Domain Configuration
Each view presents a tree pane and a search pane on the left side of the main window and a list pane and a details pane on the right side of the main window.
The tree pane displays a hierarchical tree of the objects that you are allowed to manage in this view and (depending on the view) set of pre-configured query folders that can be used to define individual views of the objects in the tree. To display this pane, click the Tree tab.
When managing objects you can specify a due date for creating, modifying or deleting of most object types. If this date is not in the past a ticket with the corresponding order is created.
The search pane provides a dialog for selecting and displaying a subset of the objects available in this view group. To display this pane, click the Search tab.
The list pane displays the properties of an object selected in the tree pane in column format. It appears in the upper right-hand side of the main window.
The details pane displays the properties of an object selected in the tree pane or the list pane in tabbed format. It appears in the lower right-hand side of the main window. Click the tabs to view and edit the object’s properties.
For detailed information about the panes presented in the Provisioning view groups, see the "Core Component" section in the DirX Identity Manager online help. The remainder of this section provides a brief description of how to work with the Provisioning view.
Using the Users View
The tree pane in the Users view displays the following items:
-
A tree of user entries organized into a hierarchy of "ordering" folders, including folders for countries, domain components, localities, organizations (departments), and organizational units (teams). By default, an individual user is displayed as "surname given name", for example, "Farfello Nico". The Users view tree pane is completely customizable. You can use the context menu to create your own organization subfolders (representing departments) and organizational unit subfolders (representing teams) to hold user entries, and you can create your own subtree of domain components (country, locality, and so on). You can also change the way in which user objects are displayed in the tree by changing the display name attribute for the user object type; by default, "cn" (common name) is specified as the display name attribute, but you can define another display name attribute for the user type (as well as other object types) in the object descriptions. For more information, see the section "Changing the Display Name of Entries in the Provisioning Tree View" in the DirX Identity Customization Guide.
-
A set of query folders for filtering a set of user entries according to various criteria. In the Users view, query folders allow you to search for and identify users that need some administrative action to be taken. The default query folders supplied by DirX Identity (for example, "Errors", "Inconsistent" and "To Be Deleted") address some common user administration tasks. You can also use the context menu to create your own query folders or copy a default query folder and change its properties to your requirements. You can find detailed information about how to create query folders in the topic "Creating a Query Folder" in the "Core Components" section of the DirX Identity Manager online help. For more information on user query folders, see the DirX Identity Provisioning Administration Guide.
The Search pane dialog (click the Search tab) in the Users view allows you to select and display a subset of the users in the tree pane or locate a specific user in the tree. This dialog is especially useful for performing user management tasks in extremely large user databases. You can find detailed information about the Search pane dialog in the "Core Components" section of the DirX Identity Manager online help.
For more information about the context menu selections that may be available in this view, see the topic "Using the Context Menu". For more information about the properties of objects displayed in the Users view, see the context-sensitive help. For information about user management tasks and how to accomplish them with DirX Identity Manager, see the chapter "Managing Users" in the DirX Identity Provisioning Administration Guide.
Using the Business Objects View
The tree pane in the Business Objects view (click the Tree tab) displays hierarchical trees of business objects. DirX Identity provides the following default business object trees:
-
The Companies tree, which you can use to model your company’s organizational structure. Right-clicking on the top level of the tree allows you to use the New context menu selection to create additional company container folders and new nodes in the tree (Organization business objects). Right-clicking a node in the tree allows you to use the New context menu selection to create Organization and Organizational-Unit business object types or generic-structure business objects (use the Context selection).
-
The Cost-Units tree, which you can use to model your company’s cost-unit structure and cost-center information. Right-clicking on the top level of this tree allows you to use the New context menu selection to create additional cost-unit container folders and new nodes in the tree (Cost-Unit business objects). Right-clicking a node in the tree allows you to use the New context menu selection to create Cost-Unit business object types or generic-structure business objects (use the Context selection).
-
The Countries tree, which you can use to model your company’s regional distribution. Right-clicking on the top level of this tree allows you to use the New context menu selection to create additional country container folders and new nodes in the tree (Country business objects). Right-clicking on a node in the tree allows you to use the New context menu selection to create Location business objects types or generic-structure business objects (use the Context selection).
-
The Projects tree, which you can use to define the various projects running in your organization. Right-clicking on the top level of the tree allows you to use the New context menu selection to create additional project container folders and new nodes in the tree (Project business objects). Right-clicking on a node in the tree allows you to use the New Project menu selection to create Project business objects.
DirX Identity also provides a "Custom" business object tree. Use this tree to create your own business object types (use the New → Context selection from the context menu).
The search pane dialog in the Business Objects view (click the Search tab) allows you to select and display a subset of the business objects available in the tree pane or locate a specific business object in the tree. You can find detailed information about the Search pane dialog in the "Core Components" section of the DirX Identity Manager online help.
For more information about the context menu selections that may be available in this view, see the section "Using the Context Menu". For more information about the properties of objects displayed in the Business Objects view, see the context-sensitive help. For information about business object types, business object management tasks and how to accomplish these tasks with DirX Identity Manager, see the chapter "Managing Business Objects" in the DirX Identity Provisioning Administration Guide.
Using the Tickets View
The tree pane in the Tickets view (click the Tree tab) displays the Tickets tree. The Ticket tree displays the following sub trees:
-
The Internal tree, which contains the tickets that the DirX Identity built-in ticket mechanism creates when specifying a due date in the future while managing objects, for example users or business objects. The Internal tree displays the following sub trees and folders:
-
The _Queries tree, which contains a set of default queries for filtering the tickets in the Internal tree according to various criteria. You can use the queries in this tree to search the Internal tree for tickets with a specific status, for active tickets, for error tickets and processed tickets, for tickets with time constraints, and for tickets that perform specific operations on specific object types. You can also use the context menu to create your own query folders or copy a default query folder and change its properties to your requirements. For detailed information about using query folders, see the topic "Creating a Query Folder" in the "Core Components" section of the DirX Identity Manager online help.
-
A folder for each object type, for example Users, Roles, and so on. Under each of these type folders there are folders indicating the due dates, for example 2011-09-05. These date folders contain the ticket objects.
-
Other trees, which contain custom tickets for completely customer defined objects and processes. The sub structure of this tree is completely dependent of the custom solution.
The Search pane dialog (click the Search tab) in the Tickets view allows you to select and display a subset of the tickets in the tree pane or locate a specific ticket in the tree. You can find detailed information about the Search pane dialog in the "Core Components" section of the DirX Identity Manager online help.
For more information about the context menu selections that may be available in this view, see the topic "Using the Context Menu". For more information about the properties of objects displayed in the Tickets view, see the context-sensitive help. For information about ticket management tasks and how to accomplish them with DirX Identity Manager, see the chapter "Managing Tickets" in the DirX Identity Provisioning Administration Guide.
Using the Privileges View
The tree pane in the Privileges view (click the Tree tab) displays hierarchical trees of privilege objects. DirX Identity provides the following privilege object trees:
-
The Roles tree, which presents a hierarchical tree of the roles defined for the domain and a set of default query folders for filtering them according to various criteria. Right-clicking on a container in the tree allows you to use the New context menu selection to create additional role container folders, role objects or query folders. Note that the Roles tree is only available if the optional Pro Suite is installed, which requires an additional license.
-
The Permissions tree, which presents a hierarchical tree of the permissions defined for the domain and a set of default query folders for filtering them according to various criteria. Right-clicking on a container in the tree allows you to use the New context menu selection to create additional permission container folders, permissions objects or query folders. Note that the Permissions tree is only available if the optional Pro Suite is installed, which requires an additional license.
-
The Groups tree, which is a virtual tree of the groups defined for each target system that is also visible in subfolders within the Target Systems view. The Groups tree consists of a set of target system objects- each object contains the groups defined for that target system - and a tree of default query folders for filtering them according to various criteria. Default query folders are also available within each target system object. Right-clicking on the top-level Queries folder allows you to use the New context menu selection to create new target system container folders, target system objects, and query folders. Right-clicking on a target systems object loads the menus for the associated connected directory and its workflows from the Connectivity side. Right-clicking on a group subfolder (container) within a target systems object allows you to use the New context menu selection to create a new group subfolder, a new group or a new query folder. Right-clicking on a group allows you to create a new group (use the New Group selection) to build hierarchical group structures.
In the Privileges view, query folders allow you to search for and identify privilege objects that need some administrative action to be taken. The default query folders supplied by DirX Identity address some common privilege administration tasks. You can also use the context menu to create your own query folders or copy a default query folder and change its properties to your requirements. For detailed information about using query folders, see the topic "Creating a Query Folder" in the "Core Components" section of the DirX Identity Manager online help. For more information on using privilege object query folders, see the section "Working with Privilege Structure Query Folders" in the DirX Identity Provisioning Administration Guide.
The search pane dialog in the Privileges view (click the Search tab) allows you to select and display a subset of the privilege objects available in the tree pane or locate a specific privilege object in the tree. You can find detailed information about the Search pane dialog in the "Core Components" section of the DirX Identity Manager online help.
For more information about the context menu selections that may be available in this view, see the topic "Using the Context Menu". For more information about the properties of objects displayed in the Privileges view, see the context-sensitive help. For information about privilege management tasks and how to accomplish them with DirX Identity Manager, see the chapter "Managing the Privilege Structure" in the DirX Identity Provisioning Administration Guide.
Using the Policies View
In the Policies view, the tree pane (click the Tree tab) displays two trees:
-
The Policies tree, which contains the policies and rules for access control and automated provisioning as well as segregation of duties (SoD) and password policies.
-
The Delegations tree, which contains the delegations created with DirX Identity Web Center.
The search pane (click the Search tab) allows you to select and display a subset of the policy objects available in the tree pane or locate a specific policy object in the tree.
The Policies tree consists of a set of subtrees that correspond to the types of policies available for creation and a tree of query folders for filtering the objects in the Policies tree according to various criteria. Right-clicking on the top-level node in the tree allows you to create new containers for each type of policy available in the tree, new query folders, and new generic containers.
The structure of each policy-type subtree depends on its type. Most subtrees provide a subfolder that contains the default policies that apply to this type of policy, and one or more domain-specific subfolders that contain customized policies. Right-clicking on the subtree or its subfolders allows you to use the New context menu selection to create a new container folder or policy for this type.
In the Policies tree, query folders allow you to search for and analyze instances of user access to specific resources. For more information on how to use query folders in the Policies tree, see the section "Verifying Access Policies" in the DirX Identity Provisioning Administration Guide.
The Delegations tree provides a way to view the delegations created in DirX Identity Web Center from DirX Identity Manager. The Delegations folder itself is never populated with entries. The Access Rights subtree presents all of the possible operations (for example, approve, grant, modify, and so on) that can be executed on all of the possible object types. The Access Rights subtree is initially empty; over time, it becomes populated with records of the access rights delegations that are made from one user to another in the Web Center.
For more information about the context menu selections that may be available in this view, see the topic "Using the Context Menu". For more information about the properties of objects displayed in the Policies view, see the context-sensitive help. For information about delegated administration, policy management tasks and how to accomplish them with DirX Identity Manager, see the DirX Identity Provisioning Administration Guide.
Using the Certification Campaigns View
In the Certification Campaigns view, the tree pane (click the Tree tab) displays tree of certification campaign objects. Certification campaigns tree also has two predefined containers under its root:
-
_Default, which contains notification templates usable as baseline for customized notifications in user defined certification campaigns.
-
_Queries, which is prepared for user-defined query folders and by default is empty.
-
_Archive, which contains past and successfully finished certification campaigns for campaigns with Recurring Certification Campaign set. By default, this folder is not available and is created when a recurring campaign restarts.
The search pane (click the Search tab) allows you to select and display a subset of the certification campaign objects available in the tree pane or locate a specific certification campaign object in the tree.
Certification campaign objects in the tree are represented by name and state of the campaign. Each object has two subfolders: one for notifications and other for items certified in the campaign. You can create new notifications in Notifications subfolder with the context menu.
Right-clicking on Certification Campaigns or any container folder allows you to use the New context menu selection to create a new Certification campaign object, container or query folder.
For more information about the context menu selections that may be available in this view, see the topic "Using the Context Menu". For more information about the properties of objects displayed in the Certification Campaigns view, see the context-sensitive help. For more information about user certification campaigns and how to work with them in DirX Identity Manager, see the Use Case Document DirX Identity User Certification Campaigns.
Using the Workflows View
In the Workflows view, the tree pane (click the Tree tab) displays the following subtrees:
-
The _Queries tree, which contains a set of default queries for filtering the workflow definitions in the Definitions tree according to various criteria. You can use the queries in this tree to search the Definitions tree for active and inactive workflows and for workflows that perform specific operations on specific object types. You can also use the context menu to create your own query folders or copy a default query folder and change its properties to your requirements. For detailed information about using query folders, see the topic "Creating a Query Folder" in the "Core Components" section of the DirX Identity Manager online help. For more information about using the request workflow query folders in this tree, see the section "Managing Request Workflow Definitions" in the DirX Identity Provisioning Administration Guide.
-
The Configuration tree, which contains configuration objects that allow you to set global parameters and services that can be used by the request workflow definitions. Right-clicking on the items in this tree allows you to use the New context menu to create new activity types (Component description objects), new common activities (Message item objects), and new services (Services and SMTP services objects). For more information on how to use the items in this tree, see the section "Managing Configuration Objects" in the DirX Identity Provisioning Administration Guide.
-
The Definitions tree, which contains a subfolder of default request workflow definitions, one or more domain-specific subfolders that contain customized request workflow definitions, and a System subfolder that contains system-wide workflows, for example, a standard workflow that sends all electronic mail items. Right-clicking on the default and the domain-specific subtrees allow you to use the New context menu selection to create new workflow container folders and workflows. For more information about using the items in this tree, see the section "Managing Request Workflow Definitions" in the DirX Identity Provisioning Administration Guide.
-
The Monitor tree, which contains entries that reflect running and completed workflows and a set of default queries that allow you to search for and display various subsets of these entries. For more information on how to use the items in this tree, see the section "Managing Request Workflow Instances" in the DirX Identity Provisioning Administration Guide and the section "Getting Status and Debugging Information from the Monitor Views" in the DirX Identity Troubleshooting Guide. This tree also contains the Delta subtree, which holds delta status entries of Java-based delta workflows. For a general explanation of the delta workflows, see the relevant sections in the chapter "Java-based Workflow Architecture" in the DirX Identity Application Development Guide.
The search pane dialog in the Workflows view (click the Search tab) allows you to select and display a subset of the request workflow objects available in the tree pane or locate a specific object in the tree. You can find detailed information about the Search pane dialog in the "Core Components" section of the DirX Identity Manager online help.
For more information about the context menu selections that may be available in this view, see the topic "Using the Context Menu". For more information about the properties of objects displayed in the Workflows view, see the context-sensitive help. For information about request workflow management tasks and how to accomplish them with DirX Identity Manager, see the chapter "Managing Request Workflows" in the DirX Identity Provisioning Administration Guide.
Using the Target Systems View
The tree pane in the Target Systems view (click the Tree tab) displays a hierarchical tree of the target systems whose access control information has been imported into the Provisioning configuration of the Identity Store. The Target Systems tree consists of a set of target system objects and a tree of default query folders for filtering the objects in the target system tree according to various criteria. Right-clicking on the top-level node in the tree allows you to use the New context menu selection to create new cluster containers, target system containers, query folders, and target systems. Right-clicking on the _Queries folder allows you to use the New context menu selection to create new query folders, target system containers, and target systems.
Each target system object contains the following subfolders:
-
An Accounts folder, which contains the target system accounts and a set of account-specific query folders. This subfolder is only present when the target system requires the management of accounts. Right-clicking on this folder allows you to use the New context menu selection to create a new container folder, a new account, or a new query folder.
-
A Groups folder, which contains the target system’s groups and set of group-specific query folders. Right-clicking on this folder allows you to use the New context menu selection to create a new container folder, a new group, or a new query folder.
Note that accounts and groups can be contained in a single subfolder if the target system was configured this way.
-
A Configuration folder, which contains the following subfolders:
A JavaScripts folder, which stores the Java scripts that are referenced from within the object descriptions.
An Object Descriptions folder, which stores the object descriptions for the target system’s accounts and groups.
An Obligations folder, which contains common On Assignment, On Revocation and On Validation rules that can be used by many group objects.
A folder for storing Proposal Lists.
A folder for storing specifications for the generation of reports about the target system’s accounts and groups.
(Optional) a Delta folder, which contains the delta status entries of cluster workflows. For a general explanation of the delta workflows, see the relevant sections in the chapter "Java-based Workflow Architecture" in the DirX Identity Application Development Guide.
Right-clicking on one of the Configuration subfolders allows you to use the New context menu selection to create a new configuration object of the type stored in that folder; for example, right-clicking the JavaScripts folder allows you to create a new JavaScript.
In the Target Systems view, query folders allow you to search for and identify target system-related objects that need some administrative action to be taken; for example, finding accounts or groups that require manual administrative follow-up. DirX Identity supplies a set of default query folders that address some common target system administration tasks. You can also use the context menu to create your own query folders or copy a default query folder and change its properties to your requirements. For detailed information about using query folders, see the topic "Creating a Query Folder" in the "Core Components" section of the DirX Identity Manager online help. For more information on target system query folders, see the section "Managing Target Systems" in the DirX Identity Provisioning Administration Guide.
The search pane (click the Search tab) in the Target Systems view allows you to select and display a subset of the objects available in the tree pane (in this case, accounts, groups, or target systems) or locate a specific object in the tree. You can find detailed information about the Search pane dialog in the "Core Components" section of the DirX Identity Manager online help.
For more information about the context menu selections that may be available in this view, see the topic "Using the Context Menu". For more information about the properties of objects displayed in the Target Systems view, see the context-sensitive help. For information about target system management tasks and how to accomplish them with DirX Identity Manager, see the DirX Identity Provisioning Administration Guide.
Using the Auditing View
The tree pane in the Auditing view (click the Tree tab) displays two trees:
-
The Status Reports tree, which contains configuration objects for obtaining information about the current status of DirX Identity objects
-
The Audit Trail tree, which contains configuration objects for obtaining historical information about DirX Identity objects
The Status Reports tree consists of two subfolders: a Default subfolder that contains the default status reports provided by DirX Identity and a Customer-Specific subfolder where you can create your own status reports so that they will not be overwritten by new DirX Identity releases. When you right-click on either subfolder, you can use the New context menu selection to create new status report containers, reports, or report templates. You can use the Copy Object context menu selection to copy a default status report from the Default subfolder to the Customer-Specific subfolder and change its properties to your requirements. For detailed information about creating and changing status reports, see the DirX Identity Customization Guide.
The Audit Trail tree provides an Audit Policies subtree that contains the following subfolders:
-
The _Queries folder, which contains a set of default query folders supplied with DirX Identity for filtering the auditing policy objects according to various criteria; for example, to display all active or inactive audit policies.
-
The Default audit policies folder, which contains the default audit trail policies for auditing DirX Identity objects provided by DirX Identity
-
One or more domain-specific audit policy folders, which contain customized audit trail policies for auditing DirX Identity objects. Use this area of the Audit Policies tree to store your own audit trail policies and audit query folders so that they will not be overwritten by new DirX Identity releases.
Right-clicking on any of these folders allows you to use the New context menu selection to create new audit trail folders, query folders, and audit trail policies. You can use the Copy Object context menu selection to copy a default audit trail policy or query folder and change its properties to your requirements. For detailed information about using query folders, see the topic "Creating a Query Folder" in the "Core Components" section of the DirX Identity Manager online help. For more information about audit trail policies, see "Managing the Audit Trail" in the DirX Identity Provisioning Administration Guide.
The search pane dialog in the Auditing view (click the Search tab) allows you to select and display a subset of the auditing configuration objects available in the tree pane (in this case, auditing policies or status reports) or locate a specific auditing object in the tree. You can find detailed information about the Search pane dialog in the "Core Components" section of the DirX Identity Manager online help.
For more information about the context menu selections that may be available in this view, see the topic "Using the Context Menu". For more information about the properties of objects displayed in the Auditing view, see the context-sensitive help. For information about auditing management tasks and how to accomplish them with DirX Identity Manager, see the chapter "Managing Auditing" in the DirX Identity Provisioning Administration Guide.
Using the Domain Configuration View
The tree pane in the Domain Configuration view (click the Tree tab) displays the configuration data that is specific to the customer domain, and is structured as follows:
-
The top-level node represents the domain object, from which you can make domain-wide settings such as enabling SoD checking and auditing.
-
The trees underneath the domain object contain configuration data that is common to the entire domain, such as template object and property page XML descriptions, target system definitions, JavaScripts, proposal lists, reports, collections, and language-dependent messages.
-
The DomainAdmin user object represents the domain administrator that the DirX Identity Provisioning system creates by default.
The search pane (click the Search tab) allows you to select and display a subset of the domain configuration objects available in the tree pane or locate a specific object in the tree.You can find detailed information about the Search pane dialog in the "Core Components" section of the DirX Identity Manager online help.
For more information about the context menu selections that may be available in this view, see the topic "Using the Context Menu".For more information about the properties of objects displayed in the Domain Configuration view, see the context-sensitive help.For information about domain management tasks and how to accomplish them with DirX Identity Manager, see the chapter "Managing Domains" in the DirX Identity Provisioning Administration Guide.
Using the Connectivity Views
The Connectivity view group consists of the following views:
-
The Global View is the most popular Connectivity view.You should use the Global View if you are a less experienced DirX Identity administrator.The Global View provides wizards to guide you through the synchronization setup procedures and provides selections for performing operation tasks like starting, monitoring or stopping workflows.The Global View hides the complexity of configuration data and flexibility as long as you do not need to perform any low-level object configuration and your configuration procedures consist mainly of the setting of server addresses and attribute mappings.
-
The Expert View allows you to perform all of the complex configuration work that is necessary for more sophisticated Connectivity configuration solutions.The Expert View provides property dialogs that give you access to all of the details of all Connectivity configuration objects and their properties.Through the Expert View, you can use DirX Identity Manager to configure every aspect of DirX Identity Connectivity and create new synchronization workflows.You can also use the Expert View to add your own connected directories and agents to the Connectivity configuration so that their properties are available for access with the DirX Identity Manager.See the chapter "Customizing Objects" in the DirX Identity Customization Guide for more information.
-
The Status Reports view provides a set of pre-configured status reports for you to copy and tailor to your requirements.
-
The Monitor View allows you to supervise the results of all the workflow runs of the different synchronization scenarios.It displays a tree that lists the results of all workflows and the activities contained in these workflows.The process table allows you to view currently running workflows.
The next sections describe how to use each view.
Using the Global View
The Global View provides a high-level representation of the current DirX Identity Connectivity configuration that is easy to use and hides all complexity of the system that is not necessary for standard configuration tasks. The Global View initially shows a scenario tree and a map with icons and lines. Each icon represents a connected directory. Each line represents a synchronization workflow. This configuration is called a workflow scenario. DirX Identity Manager and the configuration can maintain multiple workflow scenarios. The following figure shows the Global View.
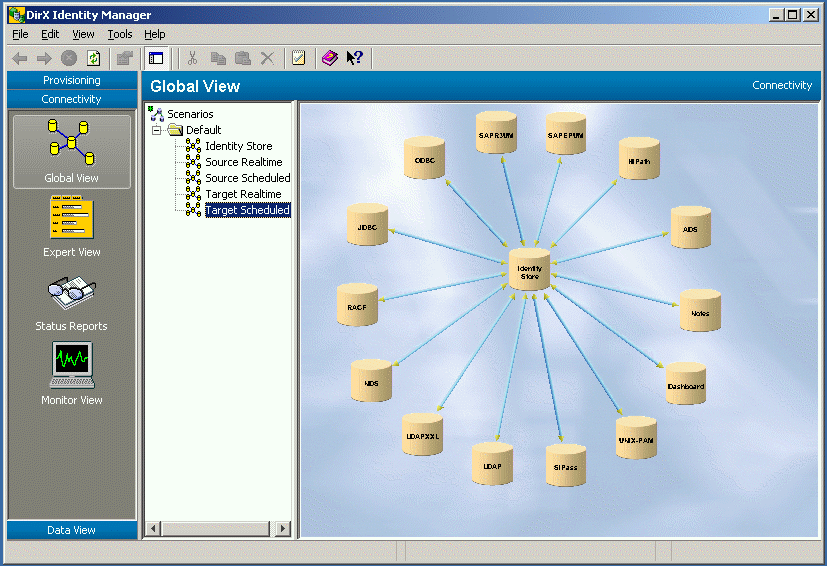
The Global View shows enterprise scenarios for synchronizations between connected directories. DirX Identity Manager represents a scenario as a map of all connected directories with link lines between them for the data flow. Double-click on a connected directory icon to show its configuration in the database. Double-click on a workflow line to show the configuration dialogs for the synchronization workflow. Right-clicking on the scenario map, connected directory icons and workflow lines display context menus that allow you to perform operations on the selected items.
The next sections describe the controls available in the Global View.
Scenario Pane
The scenario pane appears in the left portion of the global view and gives you quick access to all currently existing scenarios.
The scenario pane displays the scenarios as hierarchical tree. Open the folders to find the scenario elements.
Right-click a scenario to display its context menu, which contains all the functionality from the scenario subtree in the Expert View. For more information on these selections, see "Using the Context Menu".
The most important selections on a folder are:
-
New → Folder - Inserts a new folder at this level.
-
New → Scenario - Inserts a new scenario leaf under the selected folder and makes it the currently active scenario (the work area displays an empty scenario map).
The most important selections on a scenario object are:
-
Rename scenario - Renames the selected scenario object.
-
Copy Object - Copies the selected scenario.
-
Delete scenario - Deletes the selected scenario and the associated scenario data after requesting that you confirm the action. Note: The related workflow and connected directory information is not affected at all.
Note: If you rename a copied scenario, DirX Identity automatically renames the related folders in the Connected Directories, Jobs and Workflow folders.
| Deleting a scenario only deletes the scenario map; it does not delete the related objects. To remove a scenario’s objects - for example, after a Copy Scenario operation - you must delete the related folders in the Connected Directories, Jobs and Workflow folders by hand. Make sure you use the Delete operation’s "check for references option" to ensure that none of the objects in these folders are linked to other scenarios. |
Scenario Map
The scenario map gives you a pictorial view of the currently selected synchronization scenario. The scenario map displays connected directories as "tin" icons and displays the workflows between them as direction lines.
The scenario map background is initially blank, but you can add your company map to it.
The scenario map fills the work area completely and grows or shrinks when you resize the main window. Growing the scenario map magnifies the map and the controls placed on it. Shrinking the map shrinks the map and the controls placed on it.
Right-click in the scenario map to display its context menu. The context menu contains the following selections:
-
New Connected Directory - Inserts a new connected directory icon. The cursor changes to a cross inside the map. Click a location in the scenario map to place the icon.
-
New Workflow Line - The cursor changes to a cross inside the map. Click on a connected directory icon to fix the start point of the line, and then click on another connected directory icon to fix the end point of the line. This option is only available when more than one connected directory is available in the scenario.
-
Properties… - Displays the properties of the scenario map. You can also double-click in the map to display its properties.
You can adjust the following scenario map properties:
-
Grid - Use the Grid X and Y fields to set the grid cell width (X) and height (Y). Check or uncheck Use grid to switch the grid on or off.
-
Image - Displays the file name of the background map image in use with the scenario map. Click the … button to select an image file from a directory. You can use any JPEG or GIF file as a background image.
Manager stores the settings you make in the scenario map properties dialog in the corresponding scenario configuration object.
Note that a scenario object only contains links to workflow and connected directory objects, which allows these objects to be shared by multiple scenarios. Changing objects shared by multiple scenarios affects the scenarios that include these objects.
Connected Directory Icon
You can place a connected directory icon at any location in the scenario map.
A connected directory icon consists of the "tin" image and a label that shows the name assigned to the icon. When you change the connected directory name (from the connected directory configuration wizard or from the connected directory configuration object in the Expert View), Manager changes the connected directory icon’s label name in the scenario map.
When you resize the scenario map, the connected directory icon grows or shrinks accordingly.
Right-click a connected directory icon to display the connected directory context menu. It has the following selections.
-
Configure - Starts the connected directory configuration wizard. If the wizard is running for the first time, it displays the list of available connected directories. Select a directory, and then use the wizard to set up your new connected directory instance.
Note: This operation copies the selected template and creates a new connected directory object. It copies it to the Connected Directories folder into a folder that is named equal to the scenario. It does not copy channels and file objects. These are created during workflow copies. Therefore you should not create file objects in the corresponding wizard step. -
Data Flow - Opens the Data Flow Viewer for analyzing data flow in and out of the connected directory.
-
Open - Performs the defined viewer command of the connected directory. Please note that each Open command in the Global View opens another instance of the viewer.
-
Move - Enables or disables the ability to drag the icon to a different location. A flag before the menu entry indicates whether the option is enabled or not.
-
Rename - Renames the connected directory.
-
Report - Generates a report for selected connected directory.
-
Remove - Deletes the connected directory icon after requesting confirmation. Note: the corresponding connected directory data is not deleted from the configuration database.
Workflow Line
A workflow line represents one or more synchronization workflows and is located between the center points of two connected directory icons (examples are workflows for delta or full update or for initial load). The workflow line is either unidirectional (a single arrow) or bidirectional (a double-arrow). The arrow indicates that there are one or more workflows that work in this direction.
When you resize the scenario map, the workflow lines grow or shrink accordingly.
Right-click on a workflow line to display its context menu. The menu contains the following selections:
-
New - Starts the configuration wizard to add a new workflow to this line. If templates are not available, the wizard displays an error message. If templates are available, use the configuration wizard to configure the workflow.
Note: This operation copies the selected template and creates a new workflow object. It copies the workflow object and all activities to the Workflows folder into a sub folder that is named equal to the scenario. Additionally, it copies all related jobs, channels and file objects that belong to this workflow. The jobs are copied to the Jobs folder into a sub folder that is named equal to the scenario. The channels and file objects are created under the related connected directory objects.
-
Assign - Links the line to an existing workflow. All templates are displayed regardless whether they fit between the two connected directories. This selection allows you to use the same workflow in different scenarios. You can then configure the same workflow from all the scenarios.
-
Workflow name - Displays a menu for the selected workflow (workflow name) that contains the following items:
-
Show structure - Starts the structure view for the workflow.
-
Configure - Starts the configuration wizard for the workflow.
-
Run - Starts the workflow. A "Run workflow workflowname" window is displayed for Tcl-based workflows (see below) or a note is displayed that the Java-based was started. Note: You can also start workflows from the Expert View or from the Target Systems view in the Provisioning view group. For more information, see the section "Using the Context Menu".
-
Remove - Removes the selected workflow after requesting confirmation. Note: the workflow configuration object is not deleted from the configuration database.
-
Report - Generates XML and HTML reports of the selected object.
Run Workflow Window
The Run Workflow window consists of two tabs:
-
General - Shows a progress bar that indicates the status of the workflow. Above the progress bar status messages are displayed.
Press the Details button to review the status messages.
During the run you can press Abort Workflow to stop the workflow. This aborts in any case the workflow and the actual running activities. The running agents are only aborted if the Abort Execution Allowed flag in the agent object is set (per default it is not set).
After a run, you can rerun the workflow by clicking Run Workflow again. -
Structure - This window displays the control flow of the workflow. See the Workflow Status Structure description in the chapter "Context Sensitive Help" in the Connectivity Administration Guide.
Use the Close button to close the run workflow window.
Using the Workflow Structure View
The structure view is a powerful tool to view and edit a workflow configuration object. The view provides a clear representation of the workflow’s most important components.
Use the workflow structure view to display and edit the components that contribute to the workflow.
At the top of the view, two property items are shown:
Workflow - The workflow configuration object.
on Identity Server - The C++-based Server on which the workflow will be executed.
Below these property items is a table that contains a list of all activities that belong to the workflow ordered by their execution sequence. The table displays the following items:
Activity - The list of workflow activities, in the order in which they will run.
Identity Server - The C++-based Server on which the activity will run.
Run Object - The job to be run when its corresponding activity runs. Alternatively a workflow can be attached to this activity in case of nested workflows. In this case the rest of the columns are empty. Double-click the workflow object to open the next level of the structure view.
Channel - The input and output channels assigned to the job if Run Object is linked to a job.
Direction - The data flow direction from or to a connected directory if Run Object is linked to a job.
Connected Directory - The connected directory that corresponds to the channel if Run Object is linked to a job.
You can open more than one instance of the structure view, and the view can remain open while you are performing other tasks in the DirX Identity Manager’s main window.
Click Edit to edit the workflow configuration object. When focusing a table cell by clicking on it or moving the focus by pressing the TAB key, the appropriate editor element appears, which can be used as described in the Expert View.
Click Save to store your changes. Click Reset to discard them. Click Close to close the structure view window.
Using the Expert View
The Expert View provides a complete view of the data in the Connectivity configuration. It is intended for use by experienced users who require access to all the configuration objects in the Connectivity configuration. The Expert View displays the logical structure of these configuration objects as a hierarchical tree and presents their properties in property dialogs. You use the tree pane to access the properties of the configuration objects in the Connectivity configuration. The following figure shows the Expert View.
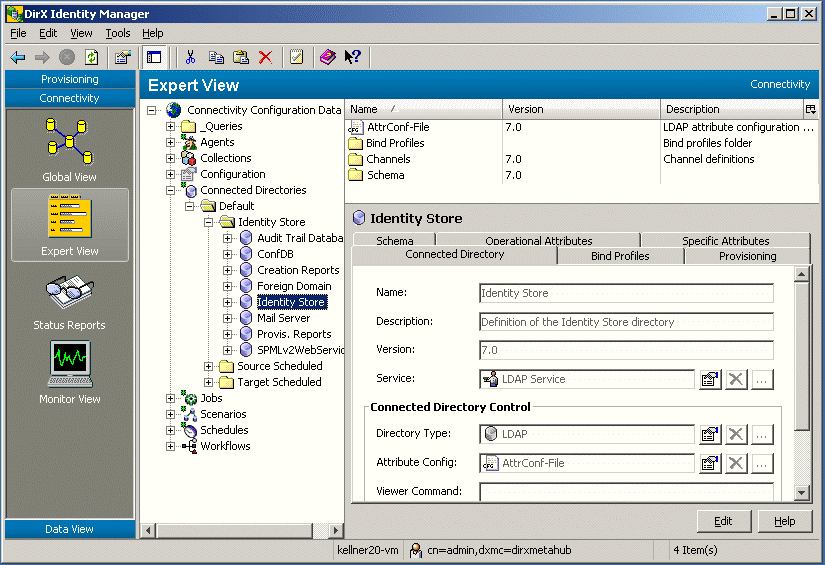
As you can see from the previous figure, the tree pane has several levels. The top-level folder represents the Connectivity configuration itself. The second level collects objects of the same type, and the third level lists the particular objects. Additional levels can also exist when they are needed.
Click Edit in a configuration object’s property dialog to make changes to it. Most of the property items can be edited by directly typing strings into the corresponding text or number field. Other items are just yes-no alternatives and must be simply marked or unmarked. More complex items are represented by editor controls that provide buttons to open another property page or to jump to the property page of the referenced object. There are also tabular representations of value sets. These values can be modified again either by typing strings directly into the table cell or the just mentioned special editor controls are provided. Click Save to save your recent changes. Click Reset to cancel any changes.
The next sections describe the editors that are available in the Expert View.
Using the Configuration Object Property Dialogs
When you select a configuration object in the logical tree view, the work area on the right-hand portion of the view displays a property dialog for working with the object’s properties.
An object’s property dialog consists of a general page that represents the object’s textual, number or option properties. An object’s property can also be a reference to another configuration object. For example, the service configuration object contains a system property, which is a reference to a system configuration object.
The Manager displays an object’s properties in read-only mode. Click Edit to open the properties for editing. Click Save to save your changes. (You must save an object’s property changes before working on another object.)
You cannot switch to another object while you are in edit mode (this is indicated by a special cursor shape when you go outside the edit window). If you click outside the edit window, Manager asks you whether you want to leave this object and save (select Yes) or not (select No) or whether you want to go back to the edit mode (select Cancel).
A property dialog in the Expert View is always based on a tabular control and can thus be composed of multiple pages that you access by tab clicks. A property dialog contains a work area that offers the following types of fields for editing the property values:
-
Text fields for pure textual input
-
Number fields for number input
-
Fields with special input format like date, IP address etc.
-
Combo and list boxes for the selection of one or more elements of a set of values
-
Radio buttons for short (up to three) option lists.
-
Check boxes for alternate switches
-
Tables for displaying complex elements with multiple properties in tabular style
The property dialog also contains the following buttons for editing control:
-
Edit - to switch to editing mode.
-
Help - to open the online help that describes how to use the property dialog.
When you click Edit, the editing control buttons change to:
-
Save - to save changes made since the last click on Save. The property dialog reverts to read-only mode and displays the new values.
-
Reset - to discard all changes since the last click on Save. The property dialog reverts to read-only mode and displays the properties of the object as they were before clicking on Edit or Save respectively.
Using the Schema Displayer
The DirX Identity Manager can read the schema from any LDAP-based connected directory into the Connectivity configuration and can automatically create the attribute configuration information that the meta controller requires. You use the Schema Displayer’s Synchronize action to direct DirX Identity Manager to read the schema of an LDAP connected directory. You can then use the Schema Displayer to view and check the read-in schema data.
Some LDAP directories - for example, Active Directory - do not allow anonymous access for a schema read. For these directories, at least one bind profile must exist for the connected directory description that can be used as the bind profile for schema read access.
Reading or updating the schema performs an automatic update of the attribute configuration information. The procedure for an update is:
-
Click Synchronize in the schema tab in a connected directory object to read the actual schema definition from the LDAP server. Prerequisite is that the server address and the bind information are set correctly. Note that the Synchronize button does not work at the schema object level.
-
When the schema read has completed, you can define all object classes to be transferred to the attribute configuration. Simply set the flag in the first column of the object class list.
-
If you proceed to the next wizard step or click Save, DirX Identity asks for confirmation on whether to update the attribute configuration. If you choose No, no update is performed (this selection allows you to check the schema and to abort the update operation if something is not correct).
-
If you choose Yes, the update is performed. It consists of several customizable steps:
-
DirX Identity uses all object classes that are flagged in the schema object in the first column to update the attribute configuration information.
-
If the flag Include orphaned attributes is set, then all attributes that do not belong to an object class are also used for the update operation.
-
For each attribute that is not yet present in the attribute configuration, a new line is created. You can control this creation with the Template tab definition in the attribute configuration object (see below).
-
For each modified attribute, an update is performed in the corresponding line. Manually added ';binary' suffixes are not affected by this procedure. You can control this modification with the Template tab definition in the attribute configuration object (see below).
-
For each attribute that is no longer part of the read schema (or that is contained in an object class that is no longer flagged for update), the line is completely removed from the attribute configuration as long as the line is not flagged in the S column of the attribute configuration. This method allows you to define local attributes (for example, attributes that exist only in the intermediate file like ChangeType) that are not affected by the update operation.
Attribute Configuration Update Template
Each attribute configuration object contains a Template tab where you can define the update procedure. For each field in the attribute configuration line, you can define the way the update must be performed. The following options are available:
-
<?name/> - Inserts the LDAP name of the read schema attribute into this field.
-
<?length/> - Inserts the length of the read schema attribute into this field.
-
<?rule/> - Inserts the match rule of the read schema attribute into this field.
-
constant - Sets this constant string value into this field. Constant values can be mixed with <?name/>, <?length/> and <?rule/> fields.
-
= - The equal sign as first character in a field defines that this field is updated during every schema update operation. If no equal sign is present, the field is only set during a creation of a new line. If you want an equal sign as first character in a field you must escape it with a backslash (\=).
Example: Look at the attribute configuration object of the Identity Store connected directory.
-
The Name and Abbreviation fields are set to the LDAP name of the attribute (<?name/>).
-
The Prefix field is set to the LDAP name of the attribute succeeded by an equal sign (<?name/>=)
-
No Suffix is set.
-
The Length field is set to the length of the LDAP attribute (=<?length/>). Because it is preceded by an equal sign, this field is also updated during a modification operation. All other fields are not touched.
-
The MV Separator is set to the constant value ';'.
-
The Match Rule field is set to the length of the LDAP attribute (=<?rule/>).
-
The Encryption field is set to the constant value 'N'.
Other examples for templates you can view in the ADS, DirXdelta and NDSldap connected directory definitions.
Note: You cannot use the schema update from the Exchange, Notes, NT and RACF directories. Exchange, NT and RACF do not allow a schema read and Notes uses different attribute names for LDAP and internally (the Notes agent cannot work with LDAP attributes).
Accessing the Schema Displayer
In the Global View, you can access the Schema Displayer when you run the connected directory configuration wizard. In the Expert View, you access the Schema Displayer when you work on the properties of a connected directory configuration object. Both types of access are only possible if the type of the connected directory contains a schema element (which is true only for LDAP directories including ADS).
The Schema Displayer consists of two tabs:
-
The Object class tab - displays the schema object classes
-
The Attribute Types tab - lists all the object attributes
Using the Object Class Tab
The Object class tab shows a table that lists all object classes in the schema. The fields in the table include:
-
Name - Contains the name of the object class. This can be any string of characters, white spaces, dashes, underlines and numbers. Other symbols (!"$%&/()=?\@+*~#’,;.:<>) are not allowed
-
OID - Holds the unique identifier for the class. This is a block of integer numbers separated by points, for example 1.3.12.2.1107.1.3.102.6.2.3.
-
Kind - Defines the class kind of the object. The following options are available: Abstract, Auxiliary, Structural
Select an object class, and then click the details button to display the remaining class properties. This dialog contains the following fields:
-
Description - Contains the description for the object class. This can be any text.
-
Superior class - Contains the super-class of the respective object class. Can be empty.
-
Obsolete - Checked if the class is obsolete (no longer used).
-
May and must attributes - displays the same information as displayed in the Object attributes tab plus a Mandatory checkbox. If checked, the attribute is mandatory (it must have a value).
Using the Attributes Type Tab
The Attributes Type tab displays a list of all configured attributes. The fields shown in the table include:
-
Name - Contains the name of the attribute. This can be any string of characters, white spaces, dashes, underlines and numbers. Other symbols (!"$%&/()=?\@+*~#',;.:) are not allowed.
-
OID - Holds the unique identifier for the attribute. This is a block of integer numbers separated by points, for example 1.3.12.2.1107.1.3.102.6.2.3.
-
Length - Contains the maximum length of the attribute and must be an integer. Can be empty to indicate that the maximum length of the field is undefined and can thus have any length.
The fields below the table display more details about the currently selected attribute. These fields include:
-
Description - Contains the description of the respective attribute. This can be any text
-
Derived from - Contains the super-class of the respective attribute and must be a valid attribute class name
-
Syntax - Holds the name string of the syntax rule used for the respective attribute
-
Usage - Means the usage scope for the attribute. The following options are available: User applications, Directory operation, Distributed operation, DS operation
The "Match rules" fields include:
-
Equality - Specifies the match rule for equality matches. The item can take one of a large set of values. Among these are the important ones: CEM (case exact match), CIM (case ignore match, OM (octet string match), DNM (distinguished name match
-
Ordering - Specifies the match rule for ordering matches. For the value range see the comment above
-
Substring - Specifies the match rule for ordering matches. For the value range see the comment above
The "Options" fields include:
-
Collective - If checked, the attribute is collective (it is assigned to all objects below the defining object in the DIT)
-
Modifiable - If checked, the attribute can be modified
-
Single value - If checked, the attribute allows a single value only. Otherwise, it is of type 'Multi value' and can contain an unsorted list of entries.
-
Obsolete - If checked, the attribute is obsolete (it is no longer used)
Using the Attribute Configuration Editor
The DirX Identity meta controller requires attribute configuration information for the connected directories it is to manage. This information can also be used in DirX Identity to provide information for Identity agent configuration files (*.ini files), for example, the ODBC agents.
The C++-based Server can automatically derive the necessary attribute configuration information from the schemas of LDAP connected directories that have been read into the configuration database (as described in the topic "Using the Schema Displayer"). For all other types of connected directories, the attribute configuration information must be present in the configuration database.
You use the Attribute Configuration Editor to supply the necessary attribute configuration information for a connected directory. You can use the Attribute Configuration Editor to:
-
enter the attribute configuration information for a connected directory by hand into the Connectivity configuration
-
import the attribute configuration information contained in an attribute configuration file (*.cfg) into the configuration database
-
Update the attribute configuration information by synchronizing the schema.
You can also use the Attribute Configuration Editor to export attribute configuration information into a file in the file system.
In the Global View, you access the attribute configuration editor when you run the connected directory configuration wizard. In the Expert View, you access the Attribute Configuration Editor when you work on the properties of a connected directory configuration object.
The Attribute Configuration Editor displays two tabs:
-
The Attribute List tab - use to enter attribute definitions for each connected directory attribute
-
The Global Info tab - use to enter optional global information fields for parsing directory data files
Click Edit to begin entering information into the attribute list table or the global information fields.
Click Save to save your attribute configuration information. Please note that large schemas or attribute configurations take time to be stored in the configuration database (up to 1 minute for 1000 rows).
Click Reset to cancel any changes since the last save operation.
Using the Attribute List Tab
Each attribute in an attribute configuration has a set of attribute definition fields associated with it. Use the attribute list tab to enter the attribute definitions for each connected directory attribute. The attribute list is a table of rows and columns. Each row provides the attribute definition for one attribute. Each column in the row consists of an attribute definition field. Attribute definition fields include the attribute’s:
-
Name
-
Abbreviation
-
Prefix
-
Suffix
-
Encryption
-
Length
-
Multi-value separator
-
Matching rule
See the chapter "Attribute Configuration File Format" in the DirX Identity Meta Controller Reference for more details about these attribute definition fields.
Use the TAB or arrow keys to move between the fields in the table.
Some attribute definition columns provide a pull-down list from which you can select a value. Click the down-arrow to the right of the column to display the list; click on a value to select it.
Click a row to select it. Click the Add Row button to add a new row after a selected row. Click the Delete button to delete a selected row.
Using the Global Info Tab
The global information portion of attribute configuration provides information for parsing connected directory data files. Use the Global Info tab to enter any global attribute configuration information required for the connected directory. Global information is optional, and can include:
-
record and field separators
-
continuation line and comment indicators
-
object (directory entry) and attribute operation code names for LDIF-formatted files.
See the chapter "Attribute Configuration File Format" in the DirX Identity Meta Controller Reference for more details about the global information fields.
Each field in the Global Info tab corresponds to a global information item. Each field provides a pull-down list from which you can select a value. Click the down-arrow to the right of the field to display the list. Click on a value to select it.
Using Import and Export
To import an attribute configuration file into the configuration database:
-
Click Import CFG File.
-
From the Import File dialog, select the target attribute configuration file, and then click Open. This action reads the contents of the attribute configuration file into the Attribute List and Global Info tabs.
-
Click Save or Reset to either save or abort the operation.
To export attribute configuration information into a file:
-
Click Export CFG File.
-
From the Export File dialog, select the target subdirectory for the file, enter the file name, and then click Save. This action reads the contents of the attribute configuration file displayed in the Attribute List and Global Info tabs into the specified file.
Using the Selected Attributes Editor
An important step in setting up a synchronization scenario is to define the set of attributes to be synchronized between the source and target connected directories. The set of attributes to be synchronized is a subset of the total set of attributes defined in the connected directory schema.
You use the selected attribute editor to select the set of attributes to be synchronized. In the Global View, you access the selected attribute editor when you run the workflow configuration wizard. In the Expert View, you access the selected attribute editor when you work on the properties of a channel configuration object.
The selected attribute editor consists of two tables:
-
Attributes in attribute configuration-displays the attributes in the connected directory attribute configuration
-
Selected attributes-displays the attributes that have been selected for synchronization and any synchronization flags set for the attributes
You select the attributes for synchronization by copying them from the Attributes in the schema list to the Selected attributes list. Click Edit to start working with the tables.
To copy an attribute from the Attributes in the attribute configuration list to the Selected attributes list, click the attribute in the schema list to select it, and then click the > arrow button.
Click the >> arrow button to copy all the attributes from the Attributes in schema list to the Selected attributes list.
To remove an attribute from the Selected attributes list, click the attribute in the list, and then click the < arrow button. Click the << arrow button to remove all the attributes from the Selected attributes list.
| When an entry in the table on the right side is displayed with a different background color, this means that this attribute is no longer in the table on the left side. Either edit the source (the attribute configuration) or remove the attribute from the list by moving it to the left side. |
To work with the synchronization flags available for the attribute:
-
In the Flags column, click … The Synchronization Flags dialog is displayed.
-
Check or uncheck a synchronization flag checkbox to enable or disable the flag. The meaning of the flags is as follows::*
Don’t add attribute* - Do not create an attribute in the target directory even if the corresponding attribute in the source directory exists. If metacp is processing an LDIF change entry, and it encounters a changetype "modify" operation with an "add" modification for a specific attribute, metacp uses this flag to verify whether it can create the attribute. In this case, the directory server may already hold the attribute; if it does, metacp creates an additional attribute value for the attribute.*
Don’t add attribute value* - Do not add additional attribute values in the source directory to the attribute in the target directory.*
Don’t delete attribute* - Do not delete the attribute in the target directory even if the corresponding attribute in the source directory is deleted.*
Don’t delete attribute value* - Do not delete a recurring attribute value in the target directory even if the corresponding attribute in the source directory does not have the recurring value.*
Don’t modify attribute* - Do not modify the attribute value(s) of the attribute in the target directory. If this flag is set, no modification at all is performed (new attribute values cannot be created, and existing values cannot be removed).*
Replace all* - Replace the existing attribute value(s) in the target directory with the attribute value(s) in the source directory. If the directory server has no equality matching rule for an attribute, this flag needs to be set for the attribute in order to permit it to be updated. An example of an attribute for which the directory server has no matching rule is Facsimile-Telephone-Number. The Mrule field in the attribute configuration file specifies whether a matching rule is defined for the attribute.
Hint: If you want to set an attribute initially but prohibit subsequent modification, set the flags Don’t add attribute value, Don’t delete attribute and Don’t delete attribute value. You cannot use Don’t modify attribute as stated above. -
Click Close.
By default, the target selected attributes list is sorted. For special purposes (for example to define the field sequence in a CSV file) you can switch off the automatic sort mechanism and order the attributes to your requirements.
-
Be sure you have activated the Edit mode.
-
Click the right mouse button over the right table of the selected attribute editor. A context menu is displayed. Unselect the option Sort by names.
-
Now you can shift the fields around by simply dragging them.
Click Save to save your changes (or click Reset to cancel them).
Using the Mapping Editor
The Mapping Editor allows you to edit attribute mappings for Tcl mapping files in the DirX Identity Manager. Its main features are:
-
Clear representation of the mapping items by a mapping table.
-
Attributes to be mapped into another can be selected from a combo-box or entered directly into the table.
-
Functions are automatically inserted with the correct count of input arguments.
-
Extra parameter insert for functions with variable input argument count by a simple mouse click.
-
Tcl editor windows to add code to be executed before and after mapping; see the Tcl editor topic for information on how to use it.
-
A Tcl editor window to add extra mapping functions after the joined entry is available during an import operation.
-
Automatic generation of the appropriate Tcl code during save operations. Generated code can be checked by switching to the Tcl content viewer.
The Mapping Editor consists of two tabs:
-
The mapping items tab
-
The contents tab
What is an Attribute Mapping?
When two connected directories are synchronized by data exchange, for each entry (record) a set of attributes on the source site is converted into a set of attributes on the target site. The rule for how to convert these attributes is described and implemented in a mapping function. Each mapping function may take one or more ingoing (source) attributes and produces one outgoing (target) attribute. The ingoing attributes are called input arguments, the outgoing attribute is called the output of the mapping:
attribute1, attribute2, attribute3, text, number, … -→ mapping function -→ attribute
Input arguments mapping result
Mapping Items Tab
This tab contains the Mapping Editor. It consists of the following fields:
-
List of input channels - When you start the attribute mapping, the source and target directory together with their channels are already configured. This means that normally the attributes selected for the data synchronization between the two directories are already available. The list of input channels shows the input channels that are part of the synchronization job and their role names. The role names are only important when you want to add your own Tcl code for pre- or post-mapping.
-
List of output channels - Shows the list of output channels and their role names.
-
Mapping table - The mapping table contains the following:
-
Input arguments column - Lists the input arguments of a mapping item, that is, all source or target attributes going into a particular mapping function. When you click a cell of this column, a combo-box button appears at the right of the cell. You can use this button to bring up a list with all source attributes. Clicking an item copies the attribute name to the cell. The attributes are shown as role name.attribute name.
It is not necessary to select the desired attribute from what can be a very long list of attributes. You can also enter it directly. The cells in this column also accept pure text. If the input is an alphanumerical string without double quotation marks, this is taken is an intermediate variable. If the text is in double quotation marks or is a pure number, it is inserted together with the double quotation marks as it is.
Attributes that do not contain a dot are treated as variables. This allows you to use intermediate variables that can be used later on. -
Mapping function column - Shows the name of the mapping function for each mapping item. When you click a cell of this column, a combo-box button appears at the right of the cell. You can use this button to bring up a list of all the mapping functions that are currently available. Clicking an item inserts the function and adjusts the number of lines belonging to this mapping item according the count of input arguments.
A description of the existing mapping functions can be found in the section "Using the Mapping Functions". -
Output column - Shows the resulting attributes of the mapping items. When you click a cell of this column, a combo-box button appears at the right of the cell. You can use this button to bring up a list of all target attributes. Clicking an item copies the attribute name to all cells belonging to this item and shows them as a single cell.
Also in this column it is not necessary to select the desired attribute from the attribute list. You can enter the name directly. However, in contrast to the "Input arguments" column, double-quoted text and pure numbers are not allowed for input.
Attributes that do not contain a dot are treated as variables. This allows you to set intermediate variables that can be used later on.
Note: When an entry in the input or results column of the table is displayed with a different background color, this means that the according attribute is currently not in the source or target selected attributes list. The synchronization procedure definitely won’t work! To correct this, add the missing attribute(s) to the respective selected attributes list.*
Note:* Inconsistent mapping entries may also be marked with the prefix "inconsistent." Select another item form the list if this occurs.
-
Buttons - The mapping table contains the following buttons on the right:
| Inserts a new empty row behind the current row. | |
|---|---|
|
Inserts a new row to add another input argument. |
|
Deletes a currently selected empty row or the corresponding whole mapping item. |
|
Deletes a single row to remove the input argument contained in this row. |
|
Copies table to file and opens editor. |
-
Premapping - a Tcl editor. You can use it to add code that is later inserted into the script above the mapping items and will be thus processed before mapping. Use New Window from the popup menu to open a large window for editing. Use the window’s close button or the Close command from the popup menu to return.
-
Postmapping - also a Tcl editor. You can use it to add code that is later inserted into the script below the mapping items and will be thus processed after mapping. Use New Window from the popup menu to open a large window for editing. Use the window’s close button or the Close command from the popup menu to return.
-
PostJoinMapping - a Tcl editor that presents the post join mapping code. Prerequisite is that the job already contains a Tcl script with the Anchor value set to PostJoinMapping. Use this script to define actions after the join operation that are dependent on the content of the joined entry. This button is only active when a script with the Anchor=PostJoinMapping is defined at the relevant job object.
Content Tab
This tab contains a viewer for the generated Tcl script. This is a Tcl editor window in read-only mode. Editing this Tcl script would not make sense because the next generation based on a change in the mapping editor window would overwrite this script completely.
Adding Your Own Tcl Scripts
If you want to write your own mapping Tcl scripts or use existing ones:
-
Select the job object where you want to create your mapping Tcl script.
-
Select New and then Tcl Script (not Mapping Script - this would create a Mapping Editor object again) from the context menu.
-
Set the Name and Description fields
-
Set the Anchor to PostJoinMapping if the Tcl script shall be used for the post join mapping. In this case it makes sense to copy the default routines from the PostJoinMapping_default Tcl script (see the Configuration → Tcl → Default folder).
-
Switch to the Content tab. Now you can either import an existing mapping script (button Import Tcl Code…) or write your own Tcl code with the Tcl editor.
-
Click the File Item tab and set the file name the mapping script will have in the work area and all the other parameters of the File Item. See the "Context Sensitive Help" chapter in the DirX Identity Connectivity Administration Guide or the DirX Identity Manager online help for details about a File Item.
-
Click OK to store the new object.
Next, link this object to your job object:
-
Click the job object.
-
Click the Tcl Scripts tab and click Edit.
-
Click the last button behind the line Mapping and select the object you have just created before in the object browser. This links your Tcl mapping script to your job.
-
If there is a Mapping Script object beneath your job then you can delete it now.
Note: Central use of mapping scripts is only possible for Tcl Mapping Scripts. Table based mapping scripts must be located directly under the job object and cannot be centralized or reused by other jobs!
Using the Mapping Functions
DirX Identity is delivered with several predefined mapping functions. You can find the definition of these functions in the folder Configuration → Tcl → Mapping Functions.
As lots of different functions exist; a naming scheme has been created so that the classification and look-up of functions can be easily done.
-
Most of the functions work on complete Tcl-Lists (they work on all elements of the Tcl list) and therefore return a Tcl-list as the result. These functions all start with 'l' (for example, lStringEscape).
-
Routines exist that accept single-valued Tcl list only. These functions also start with 'l' (for example lDNcreate). If a Tcl list at the interface is multivalued, an error will be generated. If a Tcl list at the interface is empty, an error is generated, too.
-
Other functions work on single strings only, and therefore just return a single string. They do not start with 'l'.
The name consists of the following parts
-
A specifier that indicates whether the function delivers a list or a string (l for lists, nothing for non-lists)
-
An object specification (for example, String, List, Word, Bool, …).
-
A function name (for example, Create, Replace, Escape, …)
-
In some cases a second object can follow.
Note: If native Tcl functions are used, the original name is used, which may not conform in some cases to the naming rules just described.
Examples:
lStringEscape - takes a list and escapes all list elements.
lBool2Integer - converts a list of boolean values to a list of integer values.
StringAppend - appends strings to build a composed string as result.
The next sections describe the functions that are available (this is a selection of native Tcl functions that make sense in the mapping editor environment and newly written functions). See the "Mapping Functions" chapter in the DirX Identity Connectivity Administration Guide or the DirX Identity Manager online help for a description of all Tcl Mapping Functions.
Agent-Specific Functions
hdmsCmd2dmsid - extracts DMS Identifier from CMD field of an HDMS record.
hdmsdata2dn - Computes a Directory distinguished name from hdms data.
hdmsData2telno - Utility to get telephone or facsimile telephone number as concatenation of HDMS Attributes.
Simple Comparison Functions
ifEqual - checks a variables value and sets the result to one of two values.
ifNotEqual - checks a variables value and sets the result to one of two values
LDIF Change Functions
addAttributes - creates an ADD attribute definition for an LDIF change file.
deleteAttributes - creates a DELETE attribute definition for an LDIF change file.
replaceAttributes - creates a REPLACE attribute definition for an LDIF change file.
List Functions
concat - joins lists together with a space in between (native Tcl function)
lADSpathCreate - creates an ADS path
lDNsplit - Splits a DN into the elements of a Tcl array
lBaseDNreplace - replaces the base DN in a DN
lDNcreate - creates a distinguished name (DN)
lListAppend - appends elements to a list
lListFirst - results in the first list element
lListLast - results in the last list element
lListNth - returns the nth list element
lListRest - returns the rest of the list besides the first element
lrange - returns one or more adjacent elements from a list (native Tcl function)
lreplace - replace elements in a list with new elements (native Tcl function)
lsort - sort the elements of a list (native Tcl function)
lStringAppend - appends strings to all elements of a list
lStringCompose - composes an output string from a variable number of input strings.
lStringConvertChars - replaces UTF-8 characters by underlying vowels
lStringEscape - escapes the characters ;{} in all elements of the list
lStringEscapeLDIF - converts elements of an LDIF content file or LDIF change file
lStringEscapeVar - escapes the defined characters in all elements of the list
lStringModify - replaces either 'n' or all occurrences of string A to string B in all elements of a list
lStringPrefix - adds a string before each element of a Tcl list
lStringRange - returns all the characters of each element in the list in the range from first to last
lStringTrim - drops leading and trailing characters from all elements of a list
lStringTrimLeft - drops leading characters from all elements of a list
lStringTrimRight - drops trailing characters from all elements of a list
lStringUnescape - unescapes the characters ;{} in all elements of the list
lStringUnescapeVar - unescapes the defined characters in all elements of the list
lWordCapitalize - first character of a word in uppercase, rest in lowercase for all elements in the list
lWordFirst - retrieves the first word in a list for all elements of the list
lWordLast - retrieves the last word in a list for all elements of the list
lWordNth - retrieves the nth word in a list for all elements of the list
Conversion Functions
join - create a string by joining together list elements (native Tcl function)
lBool2Integer - converts boolean values (TRUE and FALSE) to integer values (1 and 0)
lDate2GMT - converts an list of dates into a list of GENERALIZED time strings
lInteger2Bool - converts integer values (1 and 0) to boolean values (TRUE and FALSE)
lindex - returns the nth element of a list as a string (native Tcl function)
listFirst - returns the first element of a list as a string
listLast - returns the last element of a list as a string
llist - returns a list comprised of all the input arguments (native Tcl function)
lPA2String - replaces the $ characters by carriage returns
lString2PA - replaces the carriage returns by $ characters
split - split a string into a proper Tcl list (native Tcl function)
String Functions
RDNescape - escapes the characters =,+;{} in as string
RDNunescape - unescapes the characters =,+;{} in a string
string first - returns the index of the first position of a searched string (native Tcl function)
string index - return the character at a defined position (native Tcl function)
string last - returns the index of the last position of a searched string (native Tcl function)
string range - returns a range of consecutive characters from a string (native Tcl function)
string replace - removes a range of consecutive characters from a string (native Tcl function)
or replaces a range of consecutive characters from a string, if a new string is provided.
string tolower - returns the string in lower case characters (native Tcl function)
string toupper - returns the string in upper case characters (native Tcl function)
string trim - returns a string with removed leading or trailing characters (native Tcl function)
string trimleft - returns a string with removed leading characters (native Tcl function)
string trimright - returns a string with removed trailing characters (native Tcl function)
StringAppend - appends strings to the given string
StringModify - returns a string where either "n" or all occurrences of string A are replaced by string B
Some functions are only available for compatibility reasons. Do not use them because they will be removed in one of the next DirX Identity versions (an automatic migration utility will be provided to perform this task):
-
convert_bool - use lBool2Integer instead.
-
convert_PA - use lString2PA instead.
-
convert_RDN_value - use RDNescape instead.
-
convert_value - use lStringUnescape instead.
-
convert_value_import - use lStringEscape instead.
Mapping Function Examples
This section shows some typical examples of how to use the mapping functions.
Setting Empty Attributes
Use "set sn [llist ""]" to set the variable sn to an empty value. Internally a one-element list is created with the value '\0'.
For export operations, the result in an LDIF file is an attribute with an empty value:
sn:
For import operations the attribute sn is not written.
Ensuring Single Elements
If multi-value attributes occur in the LDAP directory, ensure that only a single element is taken to fill the output attribute (if you don’t want to transfer all multi values).
User either the function ListFirst or ListLast to extract one of the values.
Escaping and Unescaping Characters Correctly
If a variable can contain one of the characters ';{}' you must unescape these characters during export (use the function lStringUnescape) and escape it during import (use the function lStringEscape).
Composing Values
Of course you can combine attributes to another one with for example "$gn.$sn@mycompany.com". This works if both gn and sn are present. Use lStringCompose instead to care for empty values:
set prefix [lStringCompose "." $gn $sn]
If gn="John" and sn="Smith" the result is "John.Smith", if gn does not exist, the result is "Smith" (the dot is omitted).
Defining Your Own Mapping Functions
You can define your own mapping functions which can be used like the built-in ones. This task requires Tcl programming knowledge. Once those functions are added to the Mapping Functions folder in the Configuration branch of the Connectivity Configuration Data tree, they will appear in the Mapping function combo box that appears when you select a cell in the respective column of the mapping editor.
How is an Attribute Mapping Written in Tcl?
Each mapping function may take one or more ingoing (source) attributes and produces one outgoing (target) attribute:
attribute1, attribute2, attribute3, text, number, … -→ mapping function -→ attribute
Input arguments mapping result
In Tcl syntax this is written as
set attribute [mapping_function attribute1 attribute2 attribute3 …]
Usually, the definition and implementation of mapping_function is at the top of the mapping script and written like
proc mapping_function args {_
# the procedure’s code comes here_
}
| Also, Tcl built-in routines may be used as mapping functions. In this case, there is no definition and implementation of the used function in the mapping script. |
How is a New Mapping Function Added?
To add a new mapping function or to modify an existing one:
Go to the Mapping Functions folder contained in the TCL subfolder of the Configuration branch in the Connectivity Configuration Data tree.
You can create additional folders here to group your mapping functions.
Right-click on the folder item and select New > Mapping Function from the appearing popup menu. A dialog window opens.
Type the Name and a short Description for the new mapping function. The name must be exactly the same as it used in the procedure header (proc … args {), otherwise the execution of subsequently generated Tcl script will fail. The name given here is used to construct the mapping statement (set … […]) in the mapping procedure.
In the field Argument Count define the number of arguments the function will take (at least). If the number of arguments is variable, check the Variable Argument Count box. This information is necessary for the mapping editor: When you select this function from the mapping function list, the Mapping Editor automatically inserts the necessary amount of rows to be filled with source attributes. If the argument count is really variable, the editor allows the user to add new rows for additional argument input. Such additional rows can however be deleted again down the amount given in Argument Count.
Switch to the Content tab sheet and enter the code for the new mapping. This step requires Tcl programming knowledge. If the new mapping function is a built-in Tcl routine like the function lindex or regsub, this step is not necessary. Leave the content page empty.
Click OK to save the new mapping function.
Switch to some mapping that is constructed by the Mapping Editor, then go to the Mapping function column and click into a cell of this column. Click on the combo-box button and check that the new function is contained in the mapping functions list.
Using the Code Editor
The Code Editor is a special editing tool that you can use to maintain Tcl scripts, XML object descriptions, INI files, etc.. The Code Editor consists of a text-editing window and if a Tcl script is edited, a field that can be used to select a Tcl procedure. This field allows you to adjust the text window to the beginning of a specific procedure.
The Code Editor highlights keywords of the respective programming language, comments and string items and automatically checks bracket settings. To display documentation about a Tcl keyword, double-click it. The code editor also provides the Find and Replace functions available in any standard text editor.
The main features of the Code Editor are:
-
Syntax highlighting for a better readability of the displayed code
-
Text search and replace function
-
Multiple undo and redo actions
-
Caret location notification below the text windows
-
Automatic detection of block ends, where a block may be a text in braces, colons or other special character combinations
-
Viewer utility for resolutions of reference blocks
Especially for Tcl editing, the following features can be used:
-
Quick search for Tcl procedures within the current script by simple combo box selection
-
A rename utility for Tcl procedures within the current script
-
A generator for inserting Tcl and DirX Identity commands and all of their parameters
The Code Editor consists of the following elements:
-
Tcl procedure selection combo box
-
The main editor window
-
The status bar
-
A popup menu
Tcl Procedure Selection Combo Box
The combo box at the top of the Code Editor component is initially empty. The combo box list shows all Tcl procedures contained in the current text. A Tcl procedure is determined by the keyword proc at the beginning of a line (or after space or tabular indents).
When you select an item from the combo box list, the editor jumps to the header of the corresponding Tcl procedure.
Main Editor Window
The main editor window displays the content of the current script. Keywords, comments, and double-quoted text are displayed in different colors. The Code Editor usually appears in read-only mode (text background is greyed). Click the Edit button at the bottom of the display to switch to write mode.
When the focus is in the main editor window and you click the right mouse button, a popup menu appears containing all command items for text manipulation.
At any time you can open a separate editor window in a larger size. Select New Window from the popup menu to display this window. Use the Close button to close it after editing.
When you click at a keyword (it is not necessary to select the keyword) and press F1, the corresponding manual page will be opened in the help system.
Status Bar
The status bar shows the row and column position of the blinking caret. If the caret is behind a brace or any other block termination character (sequence) and there is no respective counterpart, an error message that indicates this fact is also displayed here.
Popup Menu
The popup menu consists of the following items:
-
New Window - Opens an extra window to allow editing in a large window with all Tcl editor features. Use the close button of the window or the Close command from the popup menu to return.
-
Undo - Undoes the last write action. When invoked again, undoes the last action before the last write action. You can repeat this action up to 32 times. This item is enabled only if there is an action that can be undone. Note, that when you type a text fluidly, all characters typed until pausing are removed by the undo operation.
-
Redo - Does the last write action again. This item is only enabled if there was already an edit action in the current edit session. Note, that also here all characters typed until pausing are inserted again by the redo operation, if the text was typed fluidly.
-
Cut (Ctrl-X) - This item is only enabled when a portion of text has been selected. Cuts off the selected text from the script and stores it in the clipboard. The action can either be started by clicking on this item or by pressing the keys "Ctrl" and "X" simultaneously.
-
Copy (Ctrl-C) - The item is only enabled when a portion of text has been selected. Copies the selected text and stores it in the clipboard. The action can either be started by clicking on this item, or by pressing the keys "Ctrl" and "C" simultaneously.
-
Paste (Ctrl-V) - This item is only enabled when the current clipboard content can be converted to text and inserted at the current position in the Tcl script. Converts the clipboard content to a text string and inserts this string at the current position of the caret. The action can either be started by clicking on this item, or by pressing the keys "Ctrl" and "V" simultaneously.
-
Find (Ctrl-F) - This item opens the find dialog and can be used even when the document is just opened for reading. The respective action can also be invoked by pressing "Ctrl" and "F" simultaneously.
-
Replace (Ctrl-R) - This item opens the replace dialog. The respective action can also be invoked by pressing "Ctrl" and "R" simultaneously.
-
Go to insertion point (Ctrl-T) - This item is useful when you scrolled a long text while editing and you lost the position of your caret. Of course, it will also be made visible when you type another character. But this is sometimes not desired. This action can also be invoked by pressing "Ctrl" and "T" simultaneously.
-
Find other block end (Ctrl-B) - This item is only enabled when the caret is currently behind a block termination character (sequence), for example an opening or closing brace etc. When invoked, the editor will show the opposite block end. The respective action can also be invoked by pressing "Ctrl" and "B" simultaneously.
-
Select all (Ctrl-A) - Use this item to select the whole content of the currently displayed document. The action can also be invoked by pressing "Ctrl" and "A" simultaneously.
The following menu item appears when editing a Tcl script or an INI file:
-
Resolve reference blocks - Handles reference block resolution. The item has three sub-items:
All blocks - All blocks will be resolved.*
This block only* - This item is only enabled when the caret is currently inside a reference block. When invoked, just this reference block is resolved.*
Clear reference objects* - Clears the current settings for the reference objects "workflow", "activity" and "job".
The remaining menu items appear only when editing a Tcl script:
-
Insert proc… - Appends a new Tcl procedure to the end of the current Tcl script. Opens a prompt window to type in the name of the new procedure and inserts it as
proc procedure name args {
}
The caret is placed at the beginning of the new line behind the opening curly brace ({).
-
Rename proc… - Renames a Tcl procedure. This item is only enabled when a Tcl procedure has been selected in the procedure-selection combo box. Opens a prompt window to type in the new name of the Tcl procedure. When confirming the new name by clicking on the OK button, the editor will not just exchange the header of the procedure but even more exchange the name at all appearances in the current script.
-
Delete proc - Deletes a Tcl procedure. This item is only enabled when a Tcl procedure has been selected in the procedure-selection combo box.
-
Insert group command - Inserts a command from one of the groups Meta, Obj, and TCL. The Meta and Obj groups contain all of the commands that are used in connection with the DirX Identity meta controller metacp. The TCL group contains all built-in Tcl commands. The group menu items may contain subgroups (for example, the Tcl group is divided into 4 subgroups "A-E", "F-K", "L-P", and "Q-Z"). Some command items build groups of subcommands. When you click on a particular leaf item in the menu tree, the command is inserted with placeholders for all parameters. A "|" character between items separates different options from another. See the Tcl manual pages for additional information.
Find/Replace dialog
When invoking the Find… or Replace… command, the Find/Replace dialog is opened. Type into the Find what field, what should be found. If the pattern should be matched exactly regarding the capitalization of letters, mark the check-box Match case. If only occurrences as isolated words should be found, mark the check-box Whole word. When clicking on the Find button, the search will start. If the caret was not at the beginning of the document, the search is done first up to the end of the text and then you are asked if you want to continue from the beginning.
The Replace dialog additionally contains a field for the replacement labeled Replace by and a check-box Confirm which is marked by default. This means that the system will request a confirmation for all matches to be replaced before doing the replacement. When clicking on the Replace button only the first occurrence is handled. Replace all will handle all occurrences instead.
Reference Block Resolution
The Tcl scripts and INI files may contain some special text blocks called "reference blocks". They can be resolved by using the Resolve reference blocks command. A special resolver module takes the source text and replaces it with the resolved one. The resolved text can only be selected as a whole and the caret cannot be placed in it. When something is currently resolved, the menu item switches to Unresolve blocks.
The reference blocks used in the Tcl scripts and INI files require a workflow, an activity and a job object to calculate the resolution result. In many cases, these objects are determined from the navigation history the user created when clicking on the respective items either in the Expert or Global View. For example, when you right-click a workflow line in the Global View, then select a workflow from the popup menu and invoke the workflow explorer window by Show structure…, you can click Edit and then edit some job. If you then go from there to a Tcl script, the reference objects are already determined and you can resolve blocks (if any) without additional work. However, if you go to the Expert View, click on Configuration in the tree and afterwards on Tcl and select the ControlScript from Default, the invocation of Resolve reference blocks (one or all) will result in the appearance of a browser window where first a workflow must be selected followed by a second dialog where an activity must be chosen. The job is detected automatically because an activity can have only one job.
Using the Superior Info Editor
The Superior Info Editor consists of a table with three columns:
Naming attribute - Here you can define the naming attribute the following definitions belong to.
Mandatory attribute - Set the mandatory attribute name that is necessary to create the naming attribute.
Default value - Define the default value for the mandatory attribute.
For naming attributes with several mandatory attributes you have to define a separate line for each mandatory attribute.
Example:
You need to create entries under higher level nodes c, o and ou. Therefore, you should define:
Naming attribute Mandatory attribute Default value
c objectclass country;top
o objectclass organization;top
ou objectclass organizationalUnit;top
Creation of the entry cn=Smith Joe,ou=Marketing,o=My-Company,c=DE would then result in the creation of the c=DE, o=My-Company and ou=Marketing node if not yet present.
Using the Specific Attributes Editor
Some objects can be extended by additional attributes. There are two levels of extension:
-
You can define these attributes by using the Specific Attributes Editor.
-
You can describe the representation of these new attributes in XML and fill the attributes afterwards (see Virtual Object Extensions).
The objects Configuration, Channel, Connected Directory, Job and Workflow contain a Specific Attributes tab that allows you to add, modify and delete attributes:
-
Click Edit to modify the table content.
-
Add a new attribute by inserting a new line into the table with the first icon right to the table. Enter the name of the attribute in the first column and the value into the second column.
-
Modify an attribute by changing the name and / or the value.
-
Delete an attribute by pushing the middle button right to the table.
-
Click Save to store your results or click Reset to abort the edit operation.
These attributes can be used to create specific information to be used in workflows. Use references to transfer the attribute values to command lines or configuration files.
Examples:
-
Parameters at a Connected Directory can be used to control all workflows that import and export information to this directory (for example the base node for some or all workflows).
-
You can use parameters at the Workflow object to control the behavior of a specific workflow (for example to control several activities of this workflow with the same parameter).
-
Additional parameters at a Job object can reflect the specific behavior of an agent. This is especially useful for scriptable agents like metacp. These scripts often require additional parameters that shall be visible at the user interface level.
-
Parameters at a Channel object can be used to influence the workflow at this point.
Using the Status Reports View
The Status Reports view displays all the status reports that are configured for the Connectivity configuration. The Status Reports view shows an object tree with the default status reports and allows you to copy and create your own status reports. Reports are based on XSL Transformations (XSLT) technology. The following figure shows the Status Reports view.
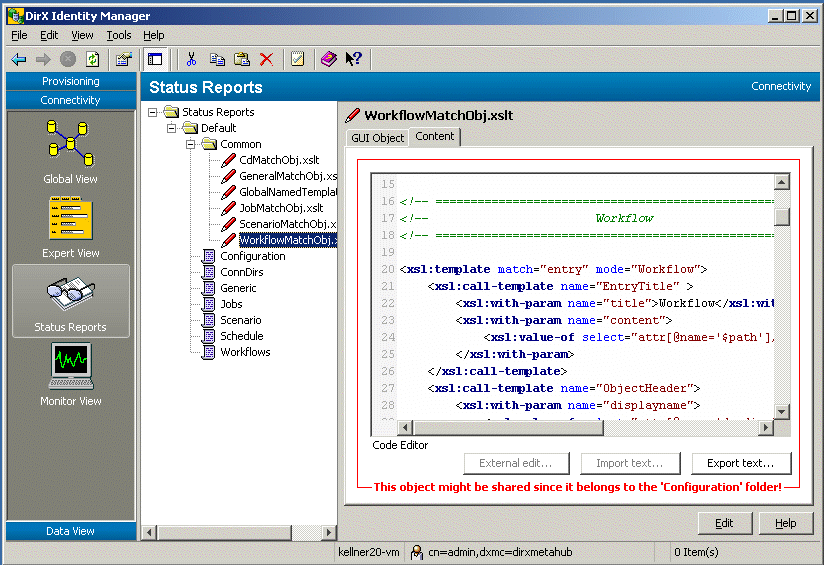
Using the Monitor View
You can use the Monitor View to check the status of running and completed workflows. The Monitor View allows you to:
-
Display running or completed workflows and activities.
-
Display the details of running and completed workflows and activities.
-
View the configuration, data, report, trace and log files created during workflow and activity operation in a fully transparent way in your whole DirX Identity domain.
-
Delete workflow status entries.
The Monitor View sorts all displayed lists in alphabetical order and writes all dates in a unified format starting with the year; for example, 20001022152308Z.
The Monitor View enables you to supervise the status of all workflows in any scenario.
The left side of the Monitor View shows at the topmost level folders for each workflow that contain the results of the individual workflow runs as entries in the folder. The deepest level shows the results of the activities contained in the workflow (only for Tcl-based workflows). You can also define your own query folders to filter the results as you require (for example, to contain only erroneous runs or the workflow from the last hour).
The right side of the screen shows a list of all activities of the currently selected workflow in the tree (only for Tcl-based workflows). Below that list, the status properties of the currently highlighted activity are shown.
The process table is a special control that contains an entry for each C++-based Server belonging to the DirX Identity domain. If you enable monitoring for a server, all running Tcl-based workflows are immediately displayed under this entry.
The structure tab of a workflow entry shows the activity structure of a Tcl-based workflow and the results in color. See the following figure.
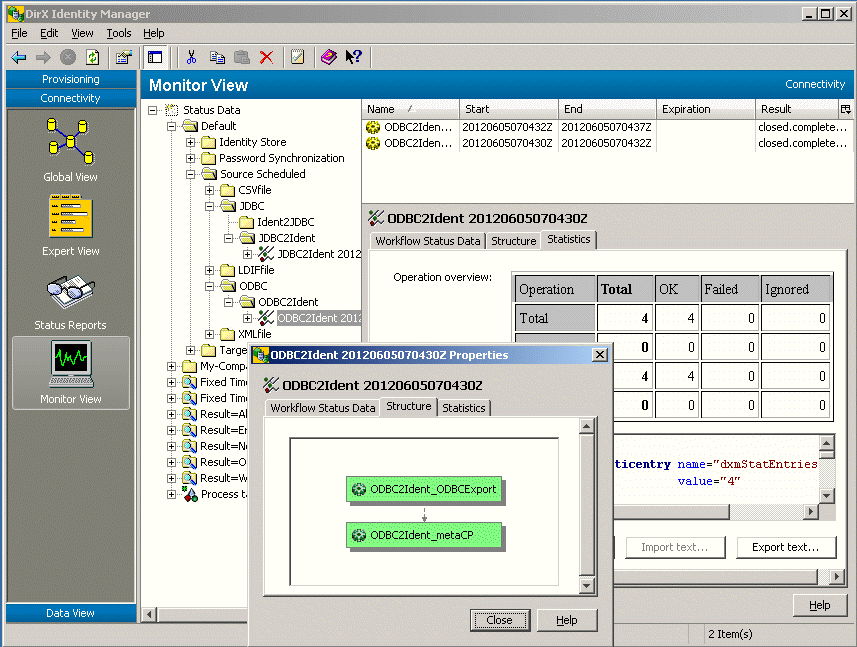
Using the Tree Pane
The tree pane (the left-hand pane) displays a hierarchical tree of status entries. At the top of the tree is the Status Data folder. It contains hierarchical workflow folder structures, filter folders and the process table.
Opening a workflow folder structure displays the workflow status entries ordered by workflow name and date at the lowest level. When you expand a workflow status entry, the tree pane shows its activity status entries. DirX Identity automatically creates workflow folders when it runs a workflow. The created structure is equal to the structure under the Workflows folder in the Expert View.
You can create query folders to define your individual view of the status entries. Some initial folders are delivered with DirX Identity.
The Process Table entry contains an entry for each C++-based Server. You can enable monitoring to view running workflows in the entire DirX Identity domain but separately for each server instance.
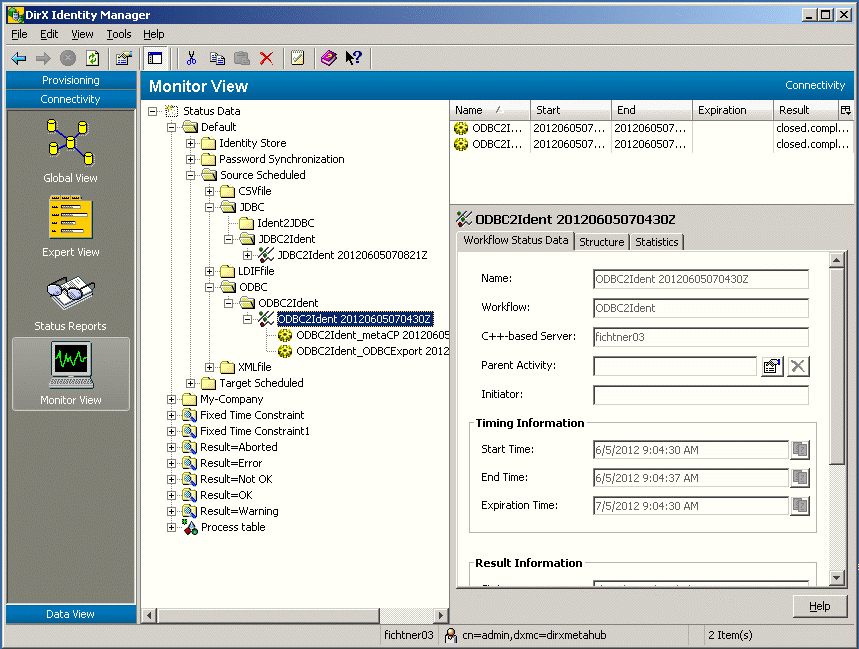
Open one of the folders in the tree pane to list the next level of information in the list pane (the upper right-hand pane). Use the Result column to find relevant entries.
Click a workflow status entry in the tree pane to list its activity status entries in the list pane and display its properties in the object pane.
Click an activity status entry in the tree pane to display its properties in the object pane.
Special Error Status Entries
If DirX Identity is requested to start the same workflow twice or if any other error condition occurs, then DirX Identity will create entries of type:
Meta2LDIFfile_Full 20020128175803Z-E
The extension -E or -En, where n represents an integer, indicates that the same workflow was requested to run at the same time multiple times. In this case, only workflow status entries with the relevant error messages are written. No activity status entries will be present.
No Status Entry Available
In some situations, the workflow fails but there is no status entry available because the workflow failed at a very early stage. Check that the C++-based Server is running correctly and also check the message server.
If these checks succeed, (for example, you can run other workflows without any problems) the setup of the workflow structure could be the problem. Check the event log or log files for messages about structure errors and correct them. This problem can occur when building nested workflows with parallel activities.
Using the List Pane
The list pane displays the main properties of workflow status entries and activity status entries in columns.
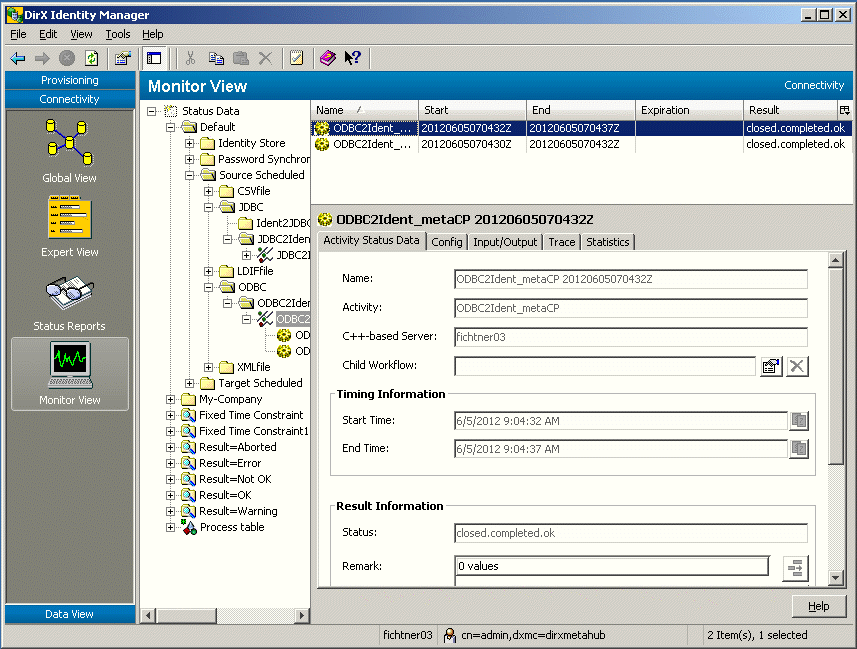
For workflow status entries, the list pane displays:
-
The name of the status entry (workflow name and date). An extension of -E or -En, where n represents an integer, indicates multiple status entries from simultaneously started workflows.
-
The workflow’s start time
-
The workflow’s end time
-
The expiration date of the workflow status entry
-
The schedule that started the workflow (if you started the workflow by hand, this field is empty)
-
The workflow’s name
-
The workflow’s run result. See "Workflow Execution Status Values" in "Managing Provisioning Workflows" in the DirX Identity Connectivity Administration Guide for further details.
-
The remarks (messages) that occurred during the workflow run.
-
The server on which the workflow ran.
For activity status entries, the list pane displays:
-
The name of the status entry (activity name and date)
-
The activity’s start time
-
The activity’s end time
-
The expiration date of the activity status entry is always empty, because activities are deleted with the corresponding workflow entry (they "inherit" the expiration date of the workflow entry)
-
The name of the activity that has generated the status data
-
The activity’s run result. See "Activity Execution Status Values" in "Managing Provisioning Workflows" in the DirX Identity Connectivity Administration Guide for further details.
-
The server on which the activity ran.
-
The exit code that the agent reported.
Using the Object Pane
Use the object pane to view all the properties of a workflow or activity status entry in detail. To display a workflow or activity status entry in detail, click it in the list pane or the tree pane. The monitor view displays all the properties of the selected status entry in the object pane.
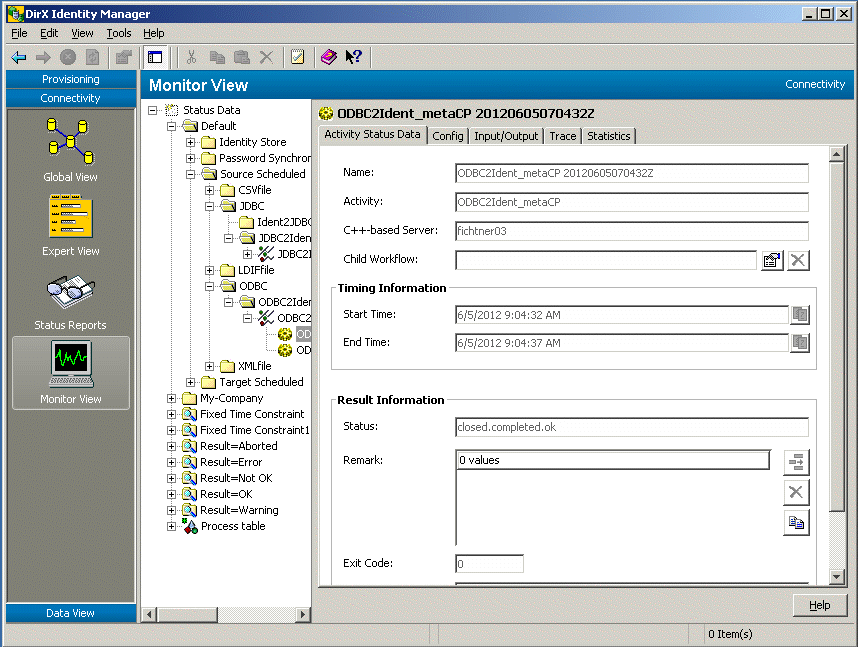
When you display the properties of an activity status entry in the object pane, the Files tab displays links to all the relevant files that the DirX Identity status tracker has saved in the status area. You can click the Properties button to the right of each file to display the file’s content (DirX Identity Manager opens the files in read-only mode). You can configure the viewing editor that you would like to use here.
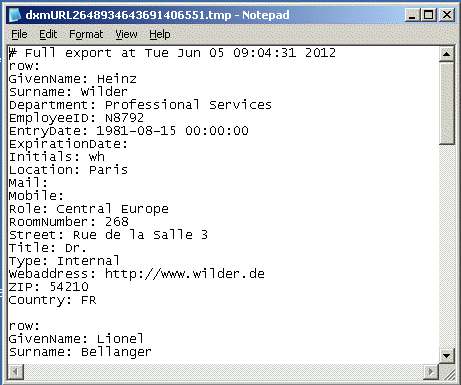
DirX Identity displays all workflow data even it is distributed on several physical machines. The directory entries and the stored files are some kind of hybrid database that is presented in a transparent and easy to use way.
Deleting Workflow Status Entries
DirX Identity provides two ways to handle status entry deletions (only complete workflow status entries can be deleted):
-
Automatic deletion managed by an expiration timestamp
-
Explicit deletion at the Monitor View.
Using Automatic Deletion
Each workflow status entry has a timestamp after which it can be deleted. The status tracker periodically scans the expiration timestamps of workflow status entries and automatically deletes the entries whose expiration time has been reached.
You can edit a workflow configuration object to adjust the value of the Status Life Time field to your requirements.
You can edit the global configuration properties to adjust:
-
The values that C++-based Server uses to calculate a status file’s expiration time (delta expiration time), if no value is provided in the workflow object
-
The parameters that control the status tracker’s automatic deletion operation (start time, interval, deviation)
To edit the global configuration properties:
-
Select the Expert View from the DirX Identity Manager main window.
-
Click the Configuration entry in the Connectivity configuration object tree. This action displays the global configuration properties.
-
Click Edit to edit the properties.
-
Click Save (or Reset to cancel any changes).
Using Explicit Deletion
To delete workflow status entries using the Monitor View:
-
Select the workflow status entries in the list pane.Use the Shift and Ctrl keys to select a range of entries.
-
Right-click and then select Delete.
You can also click on single entries in the tree view of the Monitor View and perform the same procedure.(You can’t select a range of entries when you delete entries in the tree view.)
Status entries in the configuration database can have related entries in the file system status areas (see the Status Path fields in the related C++-based Server configuration objects).DirX Identity does automatically delete these corresponding directories.If necessary it uses the file transfer service to perform this task on a remote computer.
Using the Data View
The Data View contains the Connectivity and Provisioning views and displays directory data as it is stored in the directory information tree (it’s a raw LDAP viewer and editor).You can use the Data View to examine and maintain the data in any directory that is accessible through LDAP.You can use the Data View to check the quality of directory entries that you have synchronized, to set the correct values to test your synchronizations, or to look up DirX Identity configuration object entries.You can also use the Data View to check the results of a synchronization workflow immediately after the workflow has finished without having to run a new tool.The following figure shows the Data View.
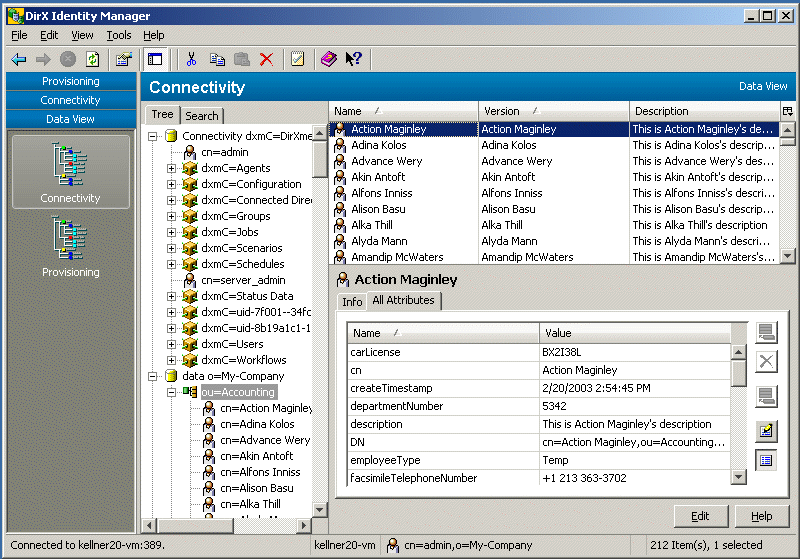
The Data View displays the configuration data and the bulk data that exists in the directory.The Data View shows the directory object classes in a tree control.For each selected item, a list of attributes is displayed in the All Attributes tab as a two-column data table with attribute name and attribute value.You can also include other LDAP directories here; for more information, see the section "Customizing Server Profiles" in the section "Customizing DirX Identity Manager".
The Data View organizes the sets of data into subtrees below the root of the tree.When you click on a directory entry in the tree and you have not yet logged into the tree, the Manager prompts you to log in.The Manager then displays a property dialog that shows the directory entry’s attributes.See the "Basic Patterns" topics in the "Core Components" section of the DirX Identity Manager online help for detailed information about this view.
You can use the search pane (click the Search tab) to define complex queries that allow you to view a specific set of entries.For more information on using the search pane, see the "Core Components" section of the DirX Identity Manager online help.
Customizing DirX Identity Manager
You can customize DirX Identity Manager by changing the parameters in the following files on a per-machine basis:
-
dxi.cfg
-
View group files
-
dxmDataView.xml
Customizing the Property File (dxi.cfg)
The DirX Identity Manager file dxi.cfg is a Java property file.Each property is described by property name=property value.Lines can be commented with a leading #.The following table describes the supported properties.
The file is located in the path install_path\GUI\bin\dxi.cfg.
If you change parameters in this file, you must restart the DirX Identity Manager for the changes to take effect. If the file is not present, DirX Identity Manager uses the default values listed here.
This file also works in the home directories of other processes, which allows you to specify additional parameters for Web Services or Web Center.
The configurable parameters are:
-
aclmgr.refresh.interval (default is 600 seconds = 10 minutes) - defines the maximum interval at which the access policy cache is refreshed or updated. A value higher than 86400 seconds (24 h) defaults to 10 minutes.
-
allow.QueryFolders (default is false) - if set to true, the creation of query objects is allowed in the Expert View. Otherwise, this feature is disabled.
-
allow.TopLevelFolders (default is false) - if set to true, you are allowed to create top-level folders in the Expert View. If set to false, you are not allowed to perform this task.
-
assign.InitialSearch (default is false) - if set to true, privilege lists are populated with a complete initial search after clicking Edit in a user object. If set to false, the search must be performed manually.
Note: This is a compatibility switch. For high performance, set this switch to false. -
cache.update (default is timestamp) - specifies the update interval of DirX Identity Manager’s local data cache. Specify one of the following options:*
always* - The cache is updated any time a DirX Identity object is accessed.*
timestamp* - The cache is updated when the modification timestamp of the respective object has changed since it was last read.*
never* - The cache is never updated. This selection means that every accessed object is just read once. -
cache.mru.size (default is 100) - specifies the number of most recently used (MRU) objects that will not be removed from the cache. DirX Identity Manager prevents all objects in this list from being removed by the garbage collector.
-
cache.prefetch.size (default is 50) - specifies the number of objects to be read in one search operation.
-
clipboard.viewer (default is notepad.exe) - specifies the clipboard viewer to be invoked when you perform the "copy" action (see Schema, Attribute Configuration, the Remarks field in the monitor view). UNIX-specific configuration lines are already contained in this file.
-
collection.base64 (default is false) - defines the file format for collection export.*
TRUE* - Complex attributes of a collection are exported in base64 format. This is standard LDIF format.*
FALSE* - Complex attributes of a collection are exported in a proprietary text format that is useful when working with configuration management systems (for example ClearCase). -
collection.maxlinelength (default is 0) - allows defining the maximum length of a line when a line is wrapped during collection export. A value of zero means that no wrapping is performed at all.
-
collection.pagesize (default is 0) - a value greater than 0 enables paging with the specified size for internal oneLevel searches made during the export of a collection. A value of 0 means that no paging is performed.
-
design.mode (default is on) - if set to on, the design mode feature (icon in the taskbar) is visible. Otherwise, design mode is switched off.
-
DiagPropVisible (default is false) - if set to true, technical debug information will be added to the general property page (java-class, X500 object class, and so on).
-
export.directory (no default) - specifies the initial path of the export file dialog box.
-
file.editor (default is notepad.exe $file) - specifies the application to be invoked to display and edit ASCII files in the monitor view. The $file parameter is replaced by the respective filename. UNIX-specific configuration lines are already contained in this file.
You can define different editors for specific file extensions. For example:
file.editor.html=IEXPLORE.EXE "$file"
In this case the Internet Explorer is used to view HTML files.
Note: Be sure that the editor is accessible via the defined path variable at the system level. If not, use an absolute path in your file.editor definition. This path must be defined with '/'. Backslashes on Windows platforms do not work.
Note: The UNIX-specific configuration lines assume that the variable $EDITOR is set to a path to an editor with a graphical user interface (vi does definitely not work!).
Otherwise, the following lines do not work:
file.editor=sh -c "$EDITOR '$file'"
clipboard.viewer=sh -c "$EDITOR '$file'"
-
GenericPropertyPage.width (default is 500) - the initial width of property pages inside dialog boxes in pixels.
-
import.directory (no default) - specifies the initial path of the import file dialog box.
-
ldap.filter.maxsize (default is 100 000) - maximum size of the search filter in an LDAP search in bytes (default 100,000).
-
ldap.maxresults (default is 0) - the maximum number of entries to be read during an LDAP search operation. When set to 0, there is no limit on the client site.
-
ldap.servertimelimit (default is 0) - the LDAP time limit (the default is 0 which means infinite).
-
ldap.switch2offline (default is 500) - maximum number of DirX Identity Provisioning objects that are to be resolved online in the DirX Identity Manager (Provisioning) session (during the privilege resolution). If this limit is exceeded, the relevant objects are flagged with the dxrTBA flag and resolved in background (you need to schedule a privilege resolution workflow). Note, that flagging many objects still needs some time!
-
ldap.trace (default is on) - if set to on, the LDAP trace is written to the path install_path*\Gui\logs\. If set to off, LDAP tracing is disabled. If set to filename, the LDAP trace is written to filename. Default file names are *ldap.DirXmetaRole.*nnn.log* (Provisioning view) and ldap.DirXmetahub.*nnn.log* (Connectivity view).
-
MessageServer - defines the message server type to be used for JMS messaging. Valid values are:*
ATS* - DirX Messaging. -
ModalWindow.sizeFactor (default is 85) - the size in % of a modal window relative to the screen size.
-
monitorview.refresh (default is on) - defines whether the monitor view is refreshed when you switch to it.
-
nationalization.isRelevant.Connectivity (default is false) - defines whether nationalization information is exported from the Connectivity view group.
-
nationalization.isRelevant.Provisioning (default is true) - defines whether nationalization information is exported from the Provisioning view group.
-
nationalization.csv.delimiter (default is ';') - lets you define the delimiter for export of nationalization information.
-
processtable.refresh (default is 30 seconds) - the process table is regularly refreshed to show the actual state. Heavy load on the server could result in a situation where the Manager does not react anymore. If you set the switch to 0, you must perform manual refresh.
-
report.sizelimit (default is 1000) - defines the size limit for reports.
-
resolution.mode (default is online) - defines whether resolution is performed immediately (online) or in background (off-line) after you have changed a privilege that affects users. For off-line mode, you need to schedule a provisioning resolution workflow. See also the ldap.switch2offline option.
Note: for Web Center, this flag is always set to off-line to enhance performance.
Note: you can configure an off-line resolution for user changes via the offlineresolution switch at the domain object. For more information, see the DirX Identity Provisioning Administration Guide. -
scheduler.sync (default is on) - specifies whether a schedule modification automatically sends a synchronization request to the scheduler
-
serverstate.timeout (default is 20 sec) - you can influence the timeout value for the Get Server State dialogue.
-
siemens.dxm.storage.beans.JnbBoolean.markemptyvalue (default is false) - boolean attributes in the directory can contain the values 'true' and 'false'. If a boolean attribute does not contain a value (it is empty), the check box is surrounded with a red border if this flag is set to 'true'.
-
siemens.dxm.storage.beans.JnbStringTag.markemptyvalue (default is false) - string attributes in the directory can contain any text value. If a string attribute does not contain a value (it is empty), the display field is surrounded with a red border if this flag is set to 'true'.
-
statustracker.sync (default is on) - defines whether the status tracker should delete status messages (on) or the DirX Identity manager itself (off).
-
StructureView.widthFactor (default is 95) - the width in % of the structure view window relative to the screen size.
-
time.display (default is local) - specifies the representation of time values. Could be either local time or GMT.
-
trace.fileprefix (default is dximanager) - the prefix of the trace output filename. The complete filename is structured as follows: prefix.*nnn.log*, where nnn is a number beginning with 000. The number is increased by 1 until the maximum file size trace.maxlines is reached. System variables like %USERNAME% can be used in fileprefix. Variables are replaced with their corresponding values if defined or with an empty string otherwise. See the trace.path parameter for the location where the file is created.
-
trace.path (default is install_path*\GUI\log*) – specifies the directory where the trace file will be stored. Every backslash in the path must be doubled. For example, the path C:\\Atos\\log is in the correct format. System variables like %LOCALAPPDATA% can be used in the path. Variables are replaced with their corresponding values if defined or with an empty string otherwise.
-
trace.level (default is 1) - trace level values are:
0: no trace, no error!
1: error
2-4: warnings
5-8: flow trace
9: debug
Higher levels include the content of lower levels. This means: if you specify 5, also errors and warnings are written. -
trace.maxlines (default is 5000) - maximum number of messages written into one trace file. If this limit is reached, trace output switches to another file with the increased number. A value of 0 prevents switching: all messages are written into one single file.
-
trace.timestamp.format (default: no timestamp information) - define a format string to enable time stamp information before each log entry in the trace file.
Example:
trace.timestamp.format=EEE MMM d HH:mm:ss.SSS yyyy -
trace.transcript (default is off) - for debugging only:*
off* - Do not write trace messages to the console
on - Write trace messages to the console -
write.cache.enabled (default is true) - controls whether or not modifications of target system group objects are cached until the end of an online role resolution phase.
Customizing View Group Files
DirX Identity Manager is delivered with two files that configure the Connectivity and Provisioning views:
install_path\GUI\profiles\dxrViewGroup.xml - configures the Provisioning view group.
install_path\GUI\profiles\dxmViewGroup.xml - configures the Connectivity view group.
This section explains how to use these files to make changes to the Connectivity and Provisioning views. All the following examples relate to the Provisioning view group. We recommend that you open the file dxrViewGroup.xml to help you understand the information presented here. Note that you must restart DirX Identity Manager to view the effects of configuration changes.
Understanding the File Structure
The following file defines a viewgroup that contains a set of views. The view group is displayed as a blue bar, and each view is displayed as a clickable icon.
<?xml version='1.0'?>
<viewgroup name="dxrManager" displayName="Provisioning" server="DirXmetaRole" serverGroup="DirXmetaRole">
<view name="dxrUser" displayName="Users" iconBase="siemens/dxr/manager/resources/icons/user">
<splitpanel orientation="horizontal">
<tabbedpanel>
<treepanel displayName="Tree" name="tree">
<genericnode class="siemens.dxr.manager.nodes.MetaRoleRootNode" name="cn=Users" displayName="Users"/>
</treepanel>
<ldapquicksearchpanel name="search" displayName="Search" server="DirXmetaRole" objectClasses="dxrUser"/>
</tabbedpanel>
<splitpanel orientation="vertical">
<listpanel listento="tree search" hideIfEmpty="true">
<listconfig>
<column name="displayName" displayName="Name"/>
<column name="description" displayName="Description"/>
<column name="dxrState" displayName="Status"/>
<column name="employeeType" displayName="Emp. Type"/>
<column name="c" displayName="Country"/>
<column name="l" displayName="Locality"/>
<column name="dxrTBA" displayName="TBA"/>
<column name="dxrInconsistent" displayName="Incons."/>
</listconfig>
</listpanel>
<propertiespanel listento="tree search listpanel"/>
</splitpanel>
</splitpanel>
</view>
<view name="dxrBusinessObjects" displayName="Business 
Objects" iconBase="siemens/dxr/manager/resources/icons/directoryview">
...
</view>
...
<view name="dxrDomain" displayName="Domain 
Configuration" iconBase="siemens/dxr/manager/resources/icons/domain">
...
</view>
</viewgroup>
The complete file defines a Provisioning viewgroup that contains Users, Business Objects and other views. Each view can consist of a pane structure. You can define horizontal and vertical splitpanels. The Users view defined in the file has two horizontal panels: the first is a tabbedpanel and the second is a splitpanel.
The tabbedpanel consists of a tree (the treepanel) and a search tab (the ldapquicksearchpanel).
The vertical splitpanel consists of a listpanel and a propertiespanel.
Most of the properties of the XML elements are easy to understand. The next sections describe the important parts that you can customize, for example, to hide or add complete views and configure search panels or list panels.
Configuring Complete Views
You can easily remove a complete view if you remove the entire XML section. For example, if some of your administrators should not be able to view the Policy view, remove or comment this section from the file:
<view name="dxrPolicies" displayName="Policies" iconBase="siemens/dxr/manager/resources/icons/policies">
<splitpanel orientation="horizontal">
...
</splitpanel>
</view>
Configuring Search Panels
The search panel (ldapquicksearchpanel) allows you to define the attribute lists that are visible in the Search for area. Configure all object classes whose attributes are to be visible, for example:
<ldapquicksearchpanel name="search" displayName="Search" server="DirXmetaRole" objectClasses="dxrRole dxrPermission dxrTargetSystemGroup"/>
Now you can select these object classes from the Object class(es) list. The names are more readable, for example dxrRole is displayed as Role, because they come from the display name attributes of the relevant object descriptions. After selecting a specific object class, all related attributes are now available for search. The attribute names are also the display names of the relevant property descriptions in the object descriptions.
Configuring List Panes
You can easily configure the columns of list panes. For example, see the Users view definition:
<listpanel listento="tree search" hideIfEmpty="true">
<listconfig>
 <column name="displayName" displayName="Name"/>
 <column name="description" displayName="Description"/>
 <column name="dxrState" displayName="Status"/>
 <column name="employeeType" displayName="Emp. Type"/>
 <column name="c" displayName="Country"/>
 <column name="l" displayName="Locality"/>
 <column name="dxrTBA" displayName="TBA"/>
 <column name="dxrInconsistent" displayName="Incons."/>
</listconfig>
</listpanel>
This definition hides the list panel completely if the selected leaf object has no more children (hifeIfEmpty="true"). The next section lists the columns. You can define the LDAP attribute name and a display name for each attribute. To guarantee a consistent user interface, the display name should be the same as the display name configured for this attribute in the properties section of the object description.
This list of attributes defines the initial state of the definitions when they are loaded for the first time in your DirX Identity Manager instance. Now you can move columns, resize them or hide them (set or reset the flags of the context menu of the header to perform this task). You can reset everything to the initial state if you use the option Reset to default from the menu. You can sort all columns. All of these individual settings are stored with your Manager instance.
Warning: Using the 'More…' menu in the Search tab destroys your configuration. You must restart the Manager and perform a new search to fix this problem.
Customizing the Look and Feel
With version 8.2C, a new Look and Feel has been introduced for the DirX Identity Manager. A Look and Feel called classic is also available, which is mainly similar to the old Look and Feel. If you prefer the classic style, you can switch to it the following way:
-
In install_path\GUI\bin edit the startscript dxi_run.bat (or .sh).
-
Put the actual Java call into comments and then un-comment the one beneath the comment: "REM to enable the classic look & feel uncomment the following line and comment above line".
Snippet:
start "dxrManager" "%DXR_JAVA_HOME%\bin\javaw" -Xm…
REM to enable the classic look & feel uncomment the following line and comment above line
REM
REM start "dxrManager" "%DXR_JAVA_HOME%\bin\java" -Xmx512M %jc% %tftimestamp% -Ddirxjdiscover.lookAndFeelStyle=classic -Dswing…
Customizing Workflow Template Selection (wfwizard.cfg)
You can access this file using the path install_path\Gui\bin\wfwizard.cfg. This file describes the "template" step of the wizard for creating a new workflow in the Global View. The presented workflows are sorted. The sort criteria are defined via the templatechooser.sort property. The default
templatechooser.sort=objectclass,$displayname
specifies that the list is sorted by the attributes objectclass and $displayname. That is first the type of workflow(=objectlass) is evaluated (Tcl based - Java based workflows) and then the pseudo property $displayname is used for sorting.
You may define other sort criteria like $path (for the readable path of workflows) or other properties. Sort mode ascending is the default. For descending sort, use propertyname*:desc*.
In the following example, objectclass is used as the first sort criterion and the path in descending order as second sort criterion:
templatechooser.sort=objectclass,$path:desc