Deprecated Features
This chapter describes features in DirX Identity that are obsolete and will not be supported in future DirX Identity releases.
Customizing Property Page Descriptions
A DirX Identity provisioning object description describes an object and its properties.In previous releases, DirX Identity used property page descriptions to implement highly flexible object presentations.In the latest release, DirX Identity’s generic property pages mechanism has been enhanced.As that result, you should use this feature instead.It solves most of the flexibility requirements and is much easier to configure.The description of the Beans Markup Language (BML) feature is only provided here for compatibility reasons and will be removed from future versions of this document.
Property page descriptions are written in Beans Markup Language (BML) and interpreted at runtime by a BML player.Property page descriptions allow you to customize a Manager "form" (tabs and their fields) by modifying the form’s property page description (its BML file); the BML player interprets the file and generates the corresponding form in DirX Identity Manager.
The specification of a GUI layout using BML requires the knowledge of a Java GUI designer.Therefore, we recommend that you modify the existing property page descriptions to add or remove a few properties, but that you do not change the overall layout or the style.Experienced users can use IDEs like Eclipse IDE for Java Developers or Netbeans' Java IDE to draw the forms and store them in a type of XML format.They must then transform this format to the XML format accepted by DirX Identity.
The elements (beans) that appear in a property page are described in hierarchical (nested) order: the description starts with the underlying panel, continues with the contained beans, and if there is a compound bean, it is described before the contained beans are listed.
For each bean, the property page description defines
-
The beans class
-
The beans properties, mainly the layout manager but also other parameters to be set prior to displaying
-
The layout properties for the bean
These items are necessary to define and use property pages. For example, suppose you want to display new properties of the user object. To perform this task:
-
Ensure that the directory schema already supports the new properties. If not, change the directory schema before you update the XML object description and the BML property page.
-
Update the object description and add the new attributes.
-
Modify the property page description by entering a bean for each of the new attributes.
The subsequent topics describe these steps in detail using the user object as an example.
Locating the Property Page Descriptions
Like the object descriptions, the property page descriptions are stored in the DirX Identity store. Thus, modifications made to these descriptions are simultaneously available to all distributed DirX Identity Manager clients. The property page descriptions are stored in a separate folder of each domain below the configuration container, next to the object descriptions:
cn=Property Page Descriptions,cn=Configuration,RDN of domain root
Descriptions for target system groups and accounts are stored below the target system folder and thus may be specified differently for each target system:
cn=Property Page Descriptions,cn=Configuration,DN of target system
Selecting the Property Page to Modify
To select the appropriate property page description, you must inspect the object description of the object in question. In our example we want to modify the user object. Therefore we take a look at the object description user.xml.
The XML element propertysheet contains a list of all property pages (tabs). Each page is described in one XML element propertypage. This element specifies the implementing class, the title to be displayed at the top of the page and a reference to the property page description in its layout attribute.
Take a look at an excerpt of the user’s object description. It lists property pages named "UserGeneral", "UserAttributes", "UserRoles", "UserGroups" and "UserAccounts":
<propertysheet>
     <propertypage name="UserGeneral"
           class="siemens.DirXjdiscover.api.nodes.customizer.BMLNodePropertyPage"
           title="General"
           layout="storage://DirXmetaRole/cn=UserGeneral.bml,cn=Property Page Descriptions,
     cn=Configuration,$(rootDN)?content=dxrObjDesc"
           />
     <propertypage name="UserAttributes"
           class="siemens.DirXjdiscover.api.nodes.customizer.BMLNodePropertyPage"
           title="General"
           layout="storage://DirXmetRole/cn=UserAttributes.bml,cn=Property Page Descriptions,
    cn=Configuration,$(rootDN)?content=dxrObjDesc"
          />
     <propertypage name="UserRoles"
           ...
          />
     <propertypage name="UserGroups"
           ...
          />
     <propertypage name="UserAccounts"
           ...
          />
</propertysheet>
Do not change the class attribute. It directs DirX Identity to display the page using the BML player.
The layout attribute holds the reference to the property page description. Its structure is:
storage://DirXmetaRole/DN of property page description
The DirXmetaRole prefix directs DirX Identity to search for the description in the DirX Identity store. The DN string:
"cn=UserAttributes.bml,cn=Property Page Descriptions, cn=Configuration,$(rootDN)?content=dxrObjDesc"
contains the variable "$(rootDN)". At runtime, it is replaced by the context prefix of the domain root.
The appropriate place to enter custom properties is the second page named "UserAttributes". The layout attribute tells us that we need to edit the property page description UserAttributes.bml.
Specifying the Properties in the Object Description
Before you edit the property page description, you must ensure that the properties are defined in the object description. In our example, we want to display the user properties "postalCode" and "roomNumber". As a result, we need to provide property definitions for them in the user object description as follows:
<properties>
    <property name="..." .../>
    <property name="postalCode" label="Postal Code" type="java.lang.String"/>
    <property name="roomNumber" label="Room Number" type="java.lang.String"/>
</properties>
Both properties are of type "String" and do not have any default values.
Adding Attributes to a Property Page Description
To modify the description with DirX Identity Manager, navigate to the domain view and select UserAttributes.bml in the Property Page Descriptions folder.
Before the modification, the form may look like this:
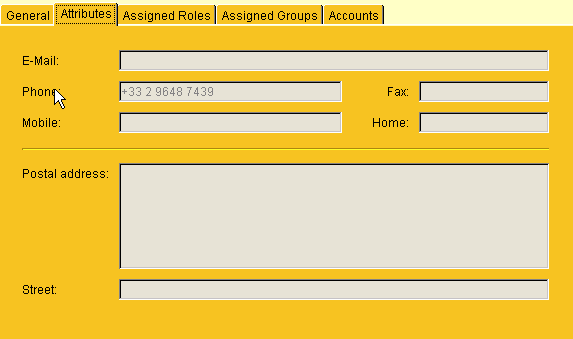
The form uses the GridBag layout to place the labels and fields into four columns and as many rows as needed. The first and third columns are used for labels, and the second and fourth columns are used for the field values. We want to place our properties into the row above the last row, just above the "Street" property.
We want to display the properties "postalCode" and "roomNumber" in one row just above the "Street" property: "postalCode" on the left, the "roomNumber" on the right side.
Adding the Postal Code
First, we must enter the label. In the UserAttributes.bml property page description file, we search for the label for the "Street" property. It is placed in the description of the first column below the "Postal address":
     <!-- Postal address label -->
     <add>
          <bean class="javax.swing.JLabel">
               <property name="text" value="Postal address:"/>
          </bean>
          <bean source="cons">
               <field name="gridx" value="0"/>
               <field name="gridy" value="4"/>
          </bean>
     </add>
     <!-- Street label -->
     <add>
          <bean class="javax.swing.JLabel">
               <property name="text" value="Street:"/>
          </bean>
          <bean source="cons">
               <field name="gridx" value="0"/>
               <field name="gridy" value="5"/>
          </bean>
     </add>
Let’s add the label for the "Postal code". The result looks like this:
     <!-- Postal address label -->
     <add>
          <bean class="javax.swing.JLabel">
               <property name="text" value="Postal address:"/>
          </bean>
          <bean source="cons">
               <field name="gridx" value="0"/>
               <field name="gridy" value="4"/>
          </bean>
     </add>
     <!-- Postal code label -->
     <add>
          <bean class="javax.swing.JLabel">
               <property name="text" value="Postal code:"/>
          </bean>
          <bean source="cons">
               <field name="gridx" value="0"/>
               <field name="gridy" value="5"/>
          </bean>
     </add>
     <!-- Street label -->
     <add>
          <bean class="javax.swing.JLabel">
               <property name="text" value="Street:"/>
          </bean>
          <bean source="cons">
               <field name="gridx" value="0"/>
               <field name="gridy" value="6"/>
          </bean>
     </add>
The label is placed in column 0 (gridx: 0) and row 5 (gridy: 5). The "Street" label is moved to row 6. The label value may be chosen independently from the XML object description.
To enter the field for the "postalCode" value, we search for the "street" field in the second column and add the necessary XML element resulting in this:
     <!-- Postal address field -->
     <add>
          <bean class="siemens.dxr.manager.controls.MetaRoleJnbGeneric" id="addr">
               <property name="nodePropertyName" value="postalAddress"/>
          </bean>
          <bean source="cons">
               <field name="gridx" value="1"/>
               <field name="gridy" value="4"/>
               <field name="gridwidth" value="4"/>
          </bean>
     </add>
     <!-- Postal code field -->
     <add>
          <bean class="siemens.dxr.manager.controls.MetaRoleJnbGeneric">
               <property name="nodePropertyName" value="postalCode"/>
          </bean>
          <bean source="cons">
               <field name="gridx" value="1"/>
               <field name="gridy" value="5"/>
               <field name="gridwidth" value="1"/>
          </bean>
     </add>
     <!-- Street field -->
     <add>
          <bean class="siemens.dxr.manager.controls.MetaRoleJnbGeneric">
               <property name="nodePropertyName" value="street"/>
          </bean>
          <bean source="cons">
               <field name="gridx" value="1"/>
               <field name="gridy" value="6"/>
               <field name="gridwidth" value="3"/>
          </bean>
     </add>
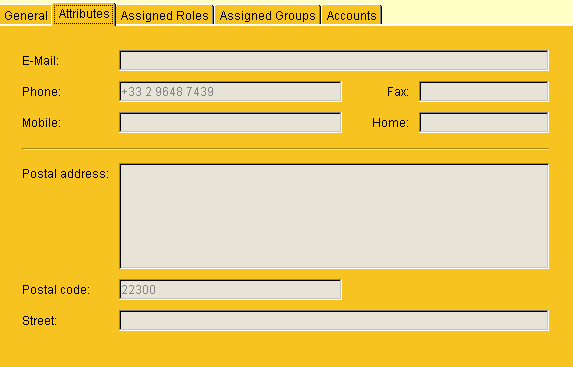
| The property name must match the one specified in the object description: "postalCode". The field is placed in column 1, row 5 with a width of 1 (gridwidth: 1). If we prefer the field covering the rest of the row, we could define a gridwidth of 3 (as for the "street"). Do not change the other values. |
We have finished the first part and get the following intermediate result (after restarting DirX Identity Manager):
Adding the Room Number
Let’s make the same type of modifications for the "roomNumber" property: first the label in the third column:
     <!-- Room number label -->
     <add>
          <bean class="javax.swing.JLabel">
               <property name="text" value="Room:"/>
          </bean>
          <bean source="cons">
               <field name="gridx" value="2"/>
               <field name="gridy" value="5"/>
          </bean>
     </add>
and the value in the fourth column …
     <!-- Room number field -->
     <add>
          <bean class="siemens.dxr.manager.controls.MetaRoleJnbGeneric">
               <property name="nodePropertyName" value="roomNumber"/>
          </bean>
          <bean source="cons">
               <field name="gridx" value="3"/>
               <field name="gridy" value="5"/>
          </bean>
     </add>
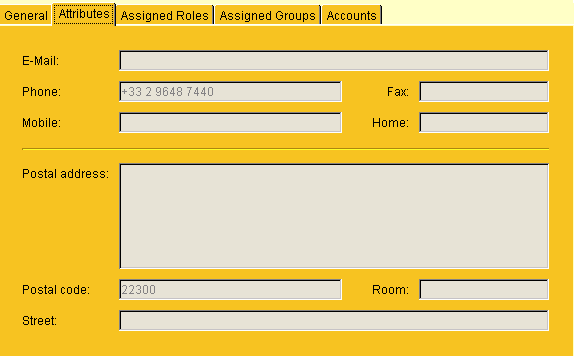
Now we have the desired result: