DirX Identity REST Services - Kerberos Authentication
This chapter describes how to set up Kerberos authentication for the DirX Identity REST Services.
Introduction
Some terms used in this chapter:
-
Host - The simple name of the host with Tomcat server the REST Services are deployed into.For example, “alpha“.
-
Domain - The fully qualified domain name of the host; for example, “beta.com“.
-
Service Principal Name - The service principal name is http/host.domain@DOMAIN, for example “http/alpha.beta.com@BETA.COM“.
-
tomcat_install_path - The installation folder of the Tomcat server, for example “C:/Program Files/Apache/Tomcat 9016”.Note that “tomcat_install_path“ is just a notation used in this chapter.Always replace it with the real path name of the Tomcat installation folder.
Restrictions:
-
Kerberos authentication does not work if browser and Tomcat run on the same machine.
Windows Prerequisites
For Kerberos on Windows, you must create a Windows user account, register the service principal name for that account, and create a keytab for the service principal name.This section describes how to perform these steps on a Windows Server 2012 R2. The details might be different on other server versions like Windows Server 2016 and 2019.
Creating an Active Directory User Account
Create a user account for Kerberos in Active Directory via program “Active Directory Users and Computers”.Assign a “User logon name” and a password.Check the flag “Password never expires”.
Kerberos on Windows works with one of three different encryption modes:
-
RC4-HMAC-NT - The default 128-bit encryption.
-
AES256-SHA1 - AES256-CTS-HMAC-SHA1-96 encryption. This is the recommended encryption mode.
-
AES128-SHA1 - AES128-CTS-HMAC-SHA1-96 encryption.
When using AES encryption for Kerberos (as recommended), open the created user account and select tab “Account”. In the options list, check the flag “This account supports Kerberos AES 128 bit encryption” or “This account supports Kerberos AES 256 bit encryption” as appropriate.
In the following samples we assume the logon name is “beta\kerberosUser”.
Registering the Service Principal Name
Use the windows tool setspn to register the service principal name for the created Kerberos account:
setspn -u -s <servicePrincipalName> <accountName>
For example
setspn -u -s http/alpha.beta.com@BETA.COM beta\kerberosUser
| The service principal name must not be registered for more than one account. You can check this with |
setspn -q <servicePrincipalName>
For example
setspn -q http/alpha.beta.com@BETA.COM
You can unregister a service principal name with
setspn -d <servicePrincipalName> <accountName>
After having registered the service principal name, open the Kerberos user account again and select the new tab “Delegation”. Select the option “Trust this user for delegation to any service (Kerberos only)”.
Creating the Keytab File
Use the Windows utility ktpass to create a keytab for the service principal name. The keytab is used on the Tomcat server to perform Kerberos authentications.
ktpass /princ <servicePrincipalName>
      /ptype KRB5_NT_PRINCIPAL
      /mapuser <accountName>
      /out <keytabFileName>
      /crypto <AES256-SHA1 or AES128-SHA1 or RC4-HMAC-NT>
      /pass *
      /kvno 0
For example:
ktpass /princ http/alpha.beta.com@BETA.COM
      /ptype KRB5_NT_PRINCIPAL
      /mapuser beta\kerberosUser
      /out alpha.keytab
      /crypto AES256-SHA1
      /pass *
      /kvno 0
You are prompted for the password of the Kerberos user twice.
| You must create a new keytab file each time you change the Kerberos account in Active Directory. |
Now open the Kerberos user account again and select tab “Account”.The “User logon name” should have changed to the service principal name.
Tomcat Configuration
In this section, we create some configuration files on the Tomcat server.We suggest putting the files into folder tomcat_install_path/conf but you can choose any other folder as well.Make sure that all the created files are readable by the Tomcat service.
Keytab
Copy the keytab file to tomcat_install_path/conf.In the subsequent examples, we assume the keytab file is copied to tomcat_install_path/conf/alpha.keytab.
File krb5.conf
Create file tomcat_install_path/conf/krb5.conf with the following content:
#
# Kerberos configuration file for running JGSS applications.
# Adapt the entries to your environment.
#
[libdefaults]
   default_realm = <DOMAIN>
   permitted_enctypes = aes256-cts aes128-cts
   allow_weak_crypto = false
   kdc_timesync = 0
   kdc_default_options = 0x40000010
   clockskew = 300
   check_delegate = 0
   ccache_type = 3
   kdc_timeout = 60000

[realms]
   <DOMAIN> = {
       kdc = <keyDistributionCenter>:<keyDistributionCenterPort>
   }

[domain_realm]
   .<domain> = <DOMAIN>
| Some lines have been split for better readability. |
Replace each occurrence of
-
<DOMAIN> with the fully qualified domain name in upper case letters.
-
<domain> with the fully qualified domain name in lower case letters.
-
<keyDistributionCenter> with the IP address or fully qualified host name of the Kerberos key distribution center, which is part of the Windows domain controller.
-
<keyDistributionCenterPort> with the port number of the Kerberos key distribution center, which is usually 88.
Adjust the encryption types if necessary. They must include the encryption type of the created Windows user account. For example, add “rc4-hmac” if necessary.
The krb5.conf file for our sample data is:
#
# Kerberos configuration file for running JGSS applications.
# Adapt the entries to your environment.
#
[libdefaults]
   default_realm = BETA.COM
   permitted_enctypes = aes256-cts aes128-cts
   allow_weak_crypto = false
   kdc_timesync = 0
   kdc_default_options = 0x40000010
   clockskew = 300
   check_delegate = 0
   ccache_type = 3
   kdc_timeout = 60000

[realms]
   BETA.COM = {
       kdc = dc.beta.com:88
   }

[domain_realm]
   .beta.com = BETA.COM
Java System Properties
Assign the path names of the Kerberos configuration files to Java system properties of the Tomcat service:
-Djava.security.krb5.conf=<krb5PathName>
Replace
-
<krb5PathName> with the full path name of file krb5.conf.
The value for our sample data is
-Djava.security.krb5.conf=tomcat_install_path/conf/krb5.conf
You can also enable some output for debugging purposes which will be written to some Tomcat log files:
-Dsun.security.krb5.debug=true
-Dsun.security.jgss.debug=true
To set the Java system properties for a Tomcat running as a Windows service, open the service’s “Configure Tomcat” item in the Windows start menu; another way to start the configurator is to run program tomcat9w.exe in Tomcat’s bin folder manually. In the configurator, select the Java tab and add the properties to the list of Java Options.
If running Tomcat from a batch script, assign the system properties to the environment variable “CATALINA_OPTS” before starting Tomcat, for example:
set KRB5_FILE=-Djava.security.krb5.conf=
              tomcat_install_path/conf/krb5.conf
SET KRB5_DEBUG=-Dsun.security.krb5.debug=true
SET JGSS_DEBUG=-Dsun.security.jgss.debug=true
SET CATALINA_OPTS=%KRB5_FILE% %KRB5_DEBUG% %JGSS_DEBUG%
| Some lines have been split for better readability. |
Increasing the Maximum HTTP Header Size
Tomcat limits the maximum size of HTTP headers by default to 4kb and discards any request with larger headers. Kerberos tickets are transferred from the browser to the server in an HTTP header. For Windows users with many groups the Kerberos ticket may become quite large so that the header size easily exceeds the default maximum size.
Therefore, you should increase the maximum HTTP header size permitted by Tomcat to 32kb or 64kb by adding the property maxHttpHeaderSize to your HTTP and/or HTTPS connector configuration in file tomcat_install_path*/conf/server.xml*.
<Connector port="8080" ...
   maxHttpHeaderSize="65536" .../>
<Connector port="8443" ...
   maxHttpHeaderSize="65536" .../>
REST Services Configuration
This section describes how to configure DirX Identity REST Services for Kerberos authentication.
File security.xml
Copy file WEB-INF/authenticationSamples/security-kerberos.xml to file WEB-INF/security.xml.The file activates Kerberos authentication for the REST Services.There should be no need to change the file content.
File security.properties
The file WEB-INF/security.properties contains some configuration parameters for performing Kerberos authentications and for mapping Kerberos users (Windows domain and account) to DirX Identity users.
Configuring Kerberos Authentications
Adjust the service principal name and the name of the keytab file:
auth.kerberos.servicePrincipalName = <servicePrincipalName>
auth.kerberos.keyTabFile = <keytabPathName>
Replace
-
<servicePrincipalName> with the service principal name.
-
<keytabPathName> with the full path name of the keytab file.
The configuration parameter values for our sample data are:
auth.kerberos.servicePrincipalName = http/alpha.beta.com@BETA.COM
auth.kerberos.keyTabFile = tomcat_install_path/conf/alpha.keytab
You can also enable output for debugging purposes which will be written to a REST Services log file:
auth.kerberos.debug = true
And you might define Kerberos as your preferred authentication method:
auth.method.preferred = kerberos
This means that responses to unauthenticated requests will include the HTTP header “WWW-Authenticate“ with the value “Negotiate“.
Configuring User Mapping
A Kerberos authentication provides the authenticated user’s Windows account name and the fully qualified Windows domain name. The task is to map these data to a user in the DirX Identity database. This is done by searching for a target system matching the domain name, and then by looking for an account matching the Windows account name in that target system.
Some configuration parameters accept a regular expression as value. The syntax for regular expressions is described in the Java API documentation of Java class “java.util.regex.Pattern”. The part of a pattern marked in bold letters shows the captured substring.
Extracting Account and Domain Name
The Windows credentials are passed in the format “<accountName>@<fullDomainName>”. The first task is to extract the Windows account name and domain name from the credentials string.
The account name is by default the substring preceding the first @ character
auth.kerberos.account.pattern = ([^@]+)@.*
The extracted domain name is by default the substring between the first @ character and the next dot, which gives the simple domain name:
auth.kerberos.domain.pattern = @([^.])(?:[.].*)?
To extract the fully qualified domain name, use
auth.kerberos.domain.pattern = [^@]+@(.*)
For example, if the provided Windows credentials are “smith@beta.com”, the extracted account name is “smith”, while the domain name is “beta” for the first domain pattern, and “beta.com” for the second domain pattern.
Finding the DirX Identity Target System
The target system is by default the one whose attribute dxrTSDomainname matches the domain name extracted in the previous step. You can configure base and filter for the search operation.
auth.kerberos.targetSystem.searchBase =
    cn=TargetSystems,cn=@DOMAIN@
auth.kerberos.targetSystem.filter =
    (&(objectClass=dxrTargetSystem)(dxrTSDomainName={domain}))
Make sure that the placeholder “@DOMAIN@“ is replaced with your DirX Identity domain.
The placeholder “{domain}” is replaced at runtime with the extracted Windows domain.
The search filter for the Windows credentials “smith@beta.com” is
(&(objectClass=dxrTargetSystem)(dxrTSDomainName=beta.com))
when using the first of the above domain patterns, and
(&(objectClass=dxrTargetSystem)(dxrTSDomainName=beta))
when using the second pattern.
Finding the DirX Identity Account
The account is by default the one whose attribute dxmADsSamAccountName matches the extracted account name. The search base is the target system found in the previous step. If no target system was found, the search extends over all target systems.
You can configure the filter for the search operation.
auth.kerberos.account.filter =
(&(objectClass=dxrTargetSystemAccount)
  (dxmADsSamAccountName={account})
  (dxrState=ENABLED))
The placeholder “{account}” is replaced at runtime with the Windows account extracted from the provided Windows credentials, the placeholder “{domain}” (which is not used by default) with the extracted Windows domain.
The search filter for the Windows credentials “smith@beta.com” is
(&(objectClass=dxrTargetSystemAccount)
 (dxmADsSamAccountName=smith)
 (dxrState=ENABLED)).
Browser Settings
This section describes how to configure internet browsers for DirX Identity REST Services for Kerberos authentication.
Internet Explorer
This section describes how to configure an Internet Explorer for Windows domain authentication based on Kerberos.This configuration requires Internet Explorer 11.
Configuring Local Intranet Sites
Internet Explorer requires servers to be configured in the category “Local intranet” to run Windows domain authentication based on Kerberos.
-
Check if the Tomcat server belongs to the browser category “Local intranet” when accessing it. Go to the home page of your Tomcat, select item Properties from the Page menu, and check property Zone.
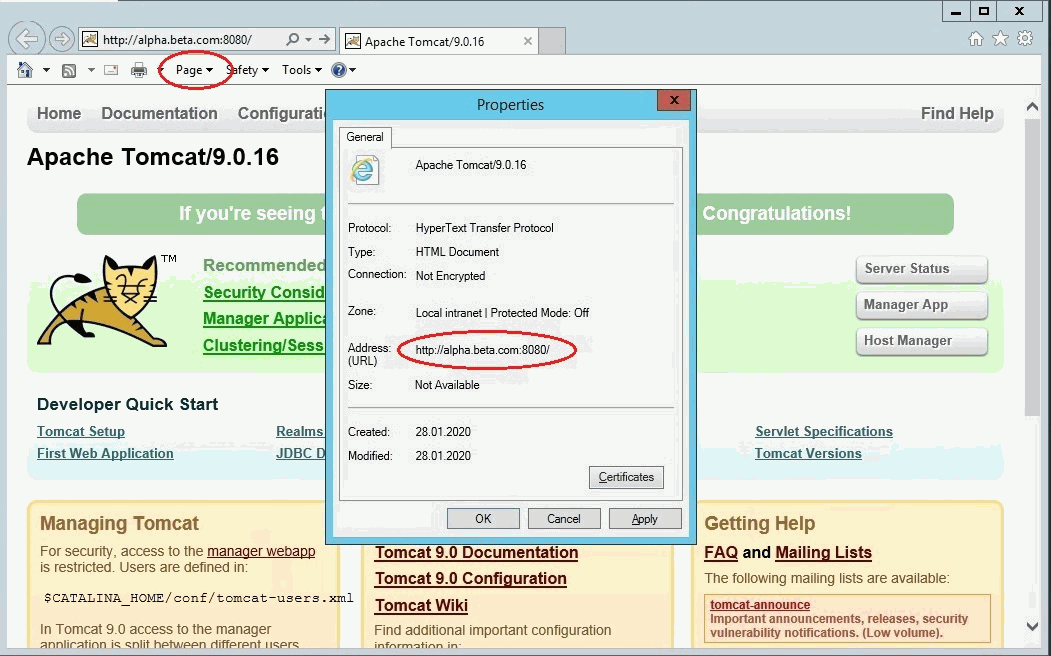
If “Local intranet” is shown when accessing Tomcat, you can skip the configuration steps for local intranet sites.
-
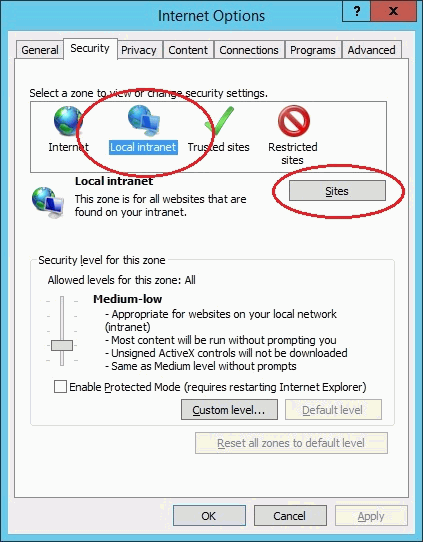
Configure local intranet sites:
-
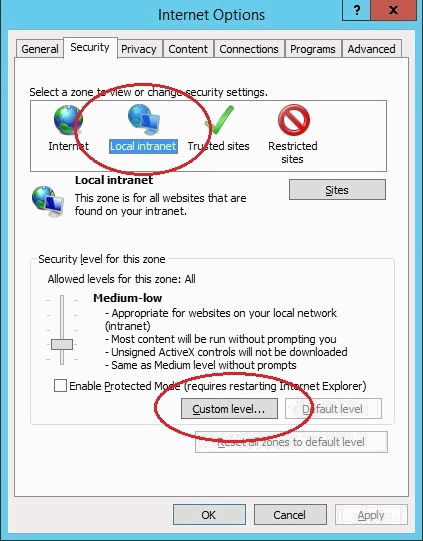
In Internet Explorer, click Tools, and then click Internet Options.
-
Click the Security tab.
-
Click Local intranet.
-
Click Sites.
-
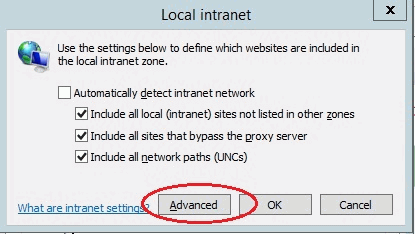
-
Ensure that Include all sites that bypass the proxy server is checked, then click Advanced.
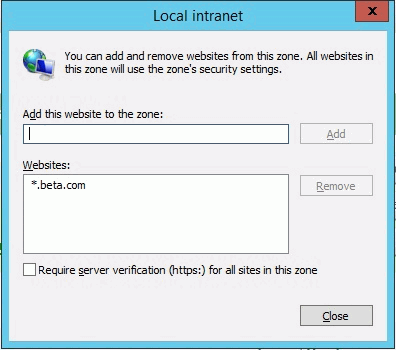
-
In the Local intranet (Advanced) dialog box, enter all relative domain names that will be used for Tomcat servers with enabled Windows domain authentication (for example, *.beta.com).
-
Click Close to close the dialog boxes.
Configuring Intranet Authentication
-
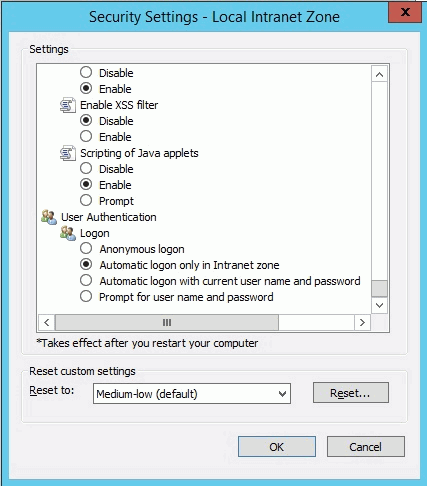
Next, click the Security tab, click Local intranet, and then Click Custom Level.
-
In the Security Settings dialog box, scroll down to the User Authentication section of the list.
-
Select Automatic logon only in Intranet zone. This setting enables integrated Windows domain authentication in the Internet Explorer.
-
Click OK to close the Security Settings dialog box.
Firefox
This section describes how to configure Firefox for Windows domain authentication based on Kerberos.
-
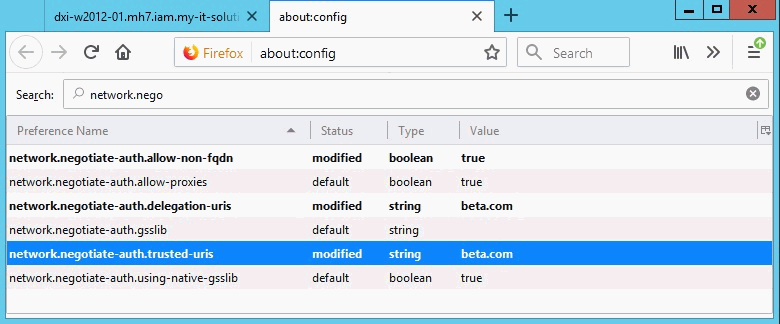
Open Firefox and enter “about:config” in the browser’s address bar.
-
Enter “network.negotiate” in the search bar.search bar.
-
Add the fully qualified domain name to parameter “network.negotiate-auth.trusted-uris”.
-
Add the fully qualified domain name to parameter “network.negotiate-auth.delegation-uris”.
-
Set “network.negotiate-auth.allow-non-fqdn” to “true”.
-
Testing
Restart Tomcat for the configuration changes to become effective.
Open a browser and enter the URL:
http://tomcatHost:tomcatPort/DirXIdentityRestService-dxiDomain/Me
Replace
-
tomcatHost with the fully qualified host name of Tomcat.
-
tomcatPort with the HTTP port of Tomcat.
-
dxiDomain with your DirX Identity domain.
For example:
If everything works fine, the server will return a JSON file with the profile data of the authenticated user.
If it works, test again using the simple host name:
Note that Kerberos usually doesn’t work if browser and Tomcat run on the same machine.
Logging and Debugging
This chapter provides information about logging and debugging of Kerberos authentication for the DirX Identity REST Services.
Kerberos Ticket Evaluation
Logging for the standard Java classes evaluating and verifying Kerberos tickets and the keytab file is activated via
-
Two Java system properties of the Tomcat service (for details see section “Tomcat Configuration”):
-Dsun.security.krb5.debug=true
-Dsun.security.jgss.debug=true
-
A configuration parameter in file WEB-INF/security.properties
auth.kerberos.debug = true
The logs are written to standard output, which is usually redirected to a Tomcat log file (like tomcat_install_path/logs/tomcat9-stdout.date.log) or the Tomcat console window.
Spring Authentication
Full logging of the Spring authentication classes is enabled in file WEB-INF/classes/log4j.properties by setting the log level of the root logger and of the Spring package “org.springframework.security” to “DEBUG”:
log4j.rootLogger=DEBUG, FILE
...
# --- Spring
log4j.additivity.org.springframework.security=false
log4j.logger.org.springframework.security=DEBUG, FILE
...
The output is written to file tomcat_install_path/logs/dxiRestServices-Ext.log.
User Mapping
Full logging of the REST Services classes mapping the Windows credentials provided by a Kerberos authentication to a DirX Identity user is enabled in file WEB-INF/classes/logging.properties by setting the log level of the asynchronous file handler and of package “com.dirxcloud.dxi.rest.security” to “FINEST”:
99catalina.org.apache.juli.AsyncFileHandler.level = FINEST
...
# --- Spring
...
com.dirxcloud.dxi.rest.security.level = FINEST
...
The output is written to file tomcat_install_path/logs/dxiRestServicesdate.log.
Links
-
An overview on Kerberos by the MIT:
https://web.mit.edu/kerberos -
Configuring Kerberos Authentication in Different Browsers:
http://woshub.com/enable-kerberos-authentication-in-browser/#h2_2 -
Configuring Kerberos Authentication in Firefox:
https://developer.mozilla.org/en-US/docs/Mozilla/Integrated_authentication -
The Windows command klist:
https://docs.microsoft.com/en-us/windows-server/administration/windows-commands/klist -
The Windows server command ktpass:
https://docs.microsoft.com/en-us/windows-server/administration/windows-commands/ktpass