Overview
DirX Identity allows for extensive customization of its features using various methods; for example, with schema extensions and object descriptions and by setting options and parameters through wizards or object pages.
DirX Identity provides for smart card login to DirX Identity Manager to connect to the Provisioning and Connectivity databases. It is based on the SASL EXTERNAL bind authentication method and is intended for use by a small subset of administrators whose access to DirX identity data requires a very strong level of security.
This chapter describes some general aspects of smart card login related to DirX Directory and DirX Identity configuration and introduces the two configuration scenarios for enabling its use with DirX Identity Manager.
Related Documentation
The following documents contain additional information related to this use case. We recommend that you become familiar with the information in these documents before proceeding with the tasks described in this use case document.
You can also consult the online help provided with DirX Manager and DirX Identity Manager (click Help in a dialog or topic to access the online help).
DirX Directory Manager Guide
-
What is DirX Manager? → Configuration View → LDAP Configuration Subentry and → LDAP SSL Configuration Subentry provide detailed information about these subentries and how to manage them with DirX Manager.
-
Schema Management provides detailed information about directory schema attribute and object class structure and describes how to manage these elements with DirX Manager.
-
Database → Indices provides detailed information about attribute indexes and describes how to manage them with DirX Manager.
-
Core Component → Using LDAP → Smart Card Login describes the prerequisites and procedure for setting up smart card login for DirX Manager. All the principles and most steps given in this document also apply to setting up smart card login for DirX Identity Manager.
-
Core Component → Basic Patterns/LDAP Functionality provides detailed information about how to use DirX Manager’s core user interface. You will need to use this interface as part of the smart card login configuration process.
DirX Directory Administration Reference
-
DirX Attributes → X.500 User Application Attributes → Attributes for LDAP Server Configuration → Attributes Controlling LDAP Extended Operations describes the attributes that specify groups of users that are allowed to perform specific extended operations and groups of operations. You will need to configure the LDAP Extended Operations Read Users attribute as part of the smart card login configuration process.
-
DirX String Representation for DAP Binds → Distinguished Names describes X.500 distinguished name format.
DirX Identity User Interfaces Guide
-
Using DirX Identity Manager describes how to use DirX Identity Manager’s login, Provisioning, Connectivity and Data Views. See also the "Basic Patterns" topics in the "Core Components" section of the DirX Identity Manager online help for detailed information about the Data View and managing LDAP server profiles for the login dialog. You will need to understand how to use these views when following the instructions for setting up smart card login given in this use case.
-
Using DirX Identity Manager → Customizing DirX Identity Manager → Customizing the Property File (dxi.cfg) describes the DirX Identity Manager dxi.cfg property file. You will need to update this file as part of the smart card login configuration process.
DirX Identity Connectivity Administration Guide:
-
Managing DirX Identity Servers → Managing the Java-based Server → Server Processes → Configuring the Processes → Java-based Server Password Parameters describes the Java-based Server password properties file. You will need to provide a similar password properties file in the DirX Identity Manager environment as part of the smart card login configuration process.
DirX Identity Customization Guide
General Information
This section provides general information about configuring DirX Directory and DirX Identity for smart card login and introduces the two smart card login configuration scenarios.
DirX Directory Configuration Requirements
Configuring DirX Directory for smart card login to DirX Identity Manager has the following requirements:
-
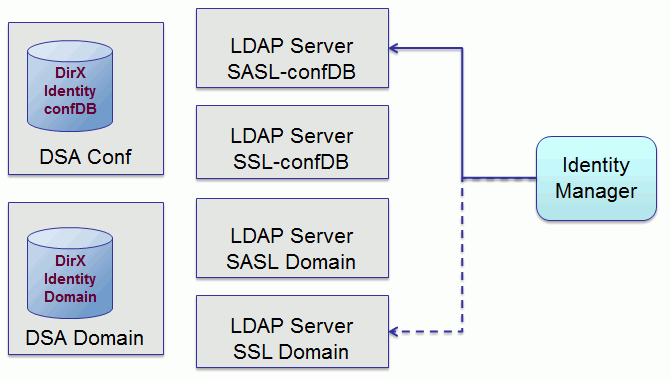
Smart card login requires the LDAP server to be configured (in the LDAP server profile) for SASL external bind authentication. When an LDAP server is configured for SASL external binds, it cannot support normal SSL binds; the two forms are mutually exclusive per LDAP server. If you want to support both SASL external binds (for example, for DirX Manager binds) and SSL binds (for example, for Java-based Server binds), your DirX Directory configuration will require two LDAP servers: one for SASL external binds, and one for SSL binds. Figures 2 and 4 illustrate this configuration. A single LDAP server can support both SASL and simple bind and/or both SASL and anonymous bind.
-
Mapping the smart card to an LDAP user requires using the mapping option that instructs the DSA to map to the user directory entry that owns the certificate specified in the SASL external bind (exactly one entry). This mapping option requires the userCertificate attribute to have an initial index.
-
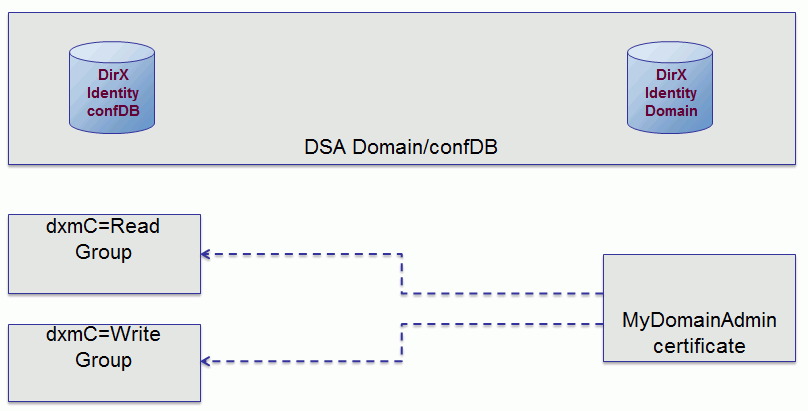
The smart card LDAP user must have the right to perform the extended LDAP operation (OID=1.3.12.2.1107.1.3.2.11.38) that retrieves the mapped user (the bind DN).
DirX Identity Configuration Requirements
Configuring DirX Identity for smart card login to DirX Identity Manager has the following requirements:
-
The smart card LDAP user is represented as a "personalized DomainAdmin" that holds the smart card certificate and is used for external SASL binds. The personalized DomainAdmin needs to be configured in DirX Identity as part of the smart card login setup process.
-
The authentication mechanism for starting request workflows needs to be configured for SASL authentication instead of user/password authentication. The following figure illustrates the configuration files and scripts for setting up request workflow service SASL authentication and the authentication control flow:
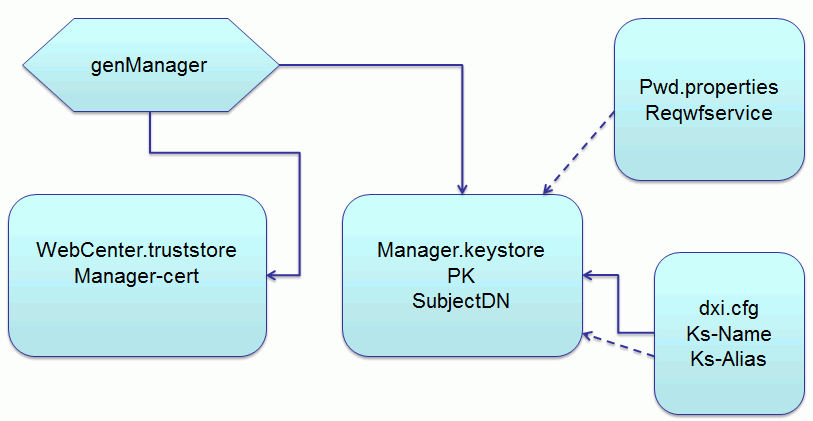 Figure 1. Request Workflow Service SASL Authentication Files
As shown in the figure:
-
The genManager script generates a keystore with a private key for DirX Identity Manager (Manager.keystore PK SubjectDN in the figure) or it appends a private key to an existing keystore and adds (or appends) a certificate for this key to the Java-based Server’s truststore (WebCenter.truststore Manager-cert in the figure). You need to copy the generated keystore (Manager.keystore in the figure) to the machine where DirX Identity Manager runs.
-
To access the keystore, you need to specify a request workflow service password, the name of the keystore, and an alias for the keystore:
-
You specify the keystore name and alias in DirX Identity Manager’s Java properties file dxi_install_path*/GUI/bin/dxi.cfg* file in the keystoreName and keystoreAlias parameters.
-
The request workflow service password is stored in a password properties file (file name:*password.properties*) in DirX Identity Manager’s runtime environment (shown as Pwd.properties Reqwfservice in the figure). This file is similar to the Java-based Server’s password properties file. It needs to reside in the DirX Identity Manager environment because the Java-based Server may be running on a different host from Identity Manager and thus may not be available, and DirX Identity Manager needs the request workflow service password to access the keystore. You need to supply the password properties file in DirX Identity Manager’s dxi_install_path*/GUI/bin* subdirectory and provide the request workflow service password in this file. This password must be identical to the password you provide in the keystorePassword parameter of the genManager script.
-
-
DirX Identity Manager uses the password properties file and dxi.cfg to read the private key from the keystore. It then encrypts the name to be used to start the request workflow service and sends it to the Java-based Server as an encrypted key.
-
The Java-based Server uses its truststore (WebCenter.truststore in the figure) and tries to decrypt the username, and then checks it.
-
Recommended Smart Card Login Scenario
In the recommended configuration, Connectivity and Provisioning are located in one database, as shown in the following figure.

For this scenario, you need to create and configure a personalized DomainAdmin that stores your certificate in the Certificate attribute. This user is used for both Provisioning and Connectivity connection, as shown in the following figure:
We recommend using this smart card login scenario because it is simpler to configure than the alternate scenario.
Alternate Smart Card Login Scenario
In the alternate smart card login scenario, Connectivity and Provisioning are located in separate DirX databases, as shown in the following figure.
As shown in the figure, there are two different DirX databases on two different machines. One DirX database hosts the Connectivity data, and the other database hosts the Provisioning domain data.
For this scenario, you need to set up two personalized user objects:
-
A personalized DomainAdmin (shown as myDomainAdmin in the next figure) that stores the smart card certificate in the Certificate attribute and is used for smart card login to the Provisioning domain.
-
A personalized metahubAdmin (shown as myMetahubAdmin in the next figure) that stores the smart card login certificate in the userCertificate attribute and is used for smart card login to the Connectivity database.
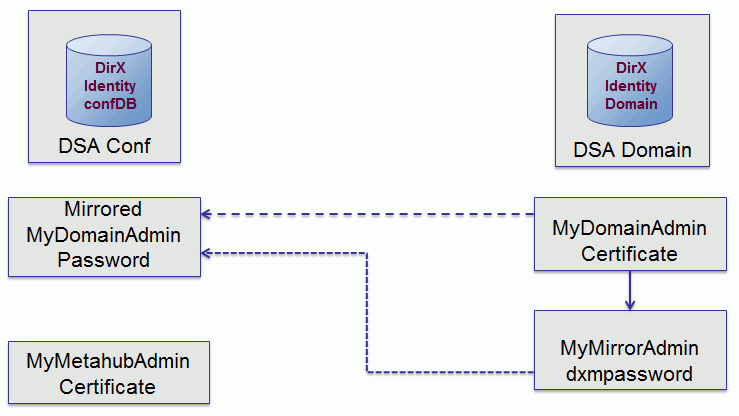
You also need to set up two "mirror" user objects for the personalized DomainAdmin to support authenticated connection between the Provisioning and Connectivity databases for access to target system data (for example, running target system workflows or wizards):
-
A mirrored personalized DomainAdmin on the Provisioning side (shown as MyMirrorAdmin in the following figure) that links to the personalized DomainAdmin and holds the encrypted password for authenticating with the mirrored DomainAdmin on the Connectivity side.
-
A mirrored personalized DomainAdmin on the Connectivity side (shown as Mirrored MyDomainAdmin in the following figure) that holds the same password as the mirrored DomainAdmin on the Provisioning side.
The following figure illustrates this scenario: