Customizing the DirX Audit Manager Classic User Interface
This chapter describes how to customize DirX Audit Manager Classic’s user interface.
It describes how to:
-
Set up single sign on
-
Customize the table page navigator
-
Configure privileged groups
-
Customize Audit analysis
-
Customize the History view
-
Customize the History timeline
-
Customize reports
-
Customize the user interface layout
-
Localize Dashboard component titles
-
Configure database connection caching
-
Enable (and disable) HTTP compression
-
Configure the default view displayed
Setting Up Single Sign On
You can use HTTP header injection to integrate DirX Audit Manager Classic with an external authentication system such as DirX Access. The external system can pass the username and tenant identification to the DirX Audit Manager Classic application in the request headers, by default DXT_USER (user header) and DXT_TENANT (tenant header). If the DirX Audit Manager Classic detects a valid username and tenant identification combination in the HTTP request by comparing it with an appropriate LDAP source, it bypasses the HTML form authentication.
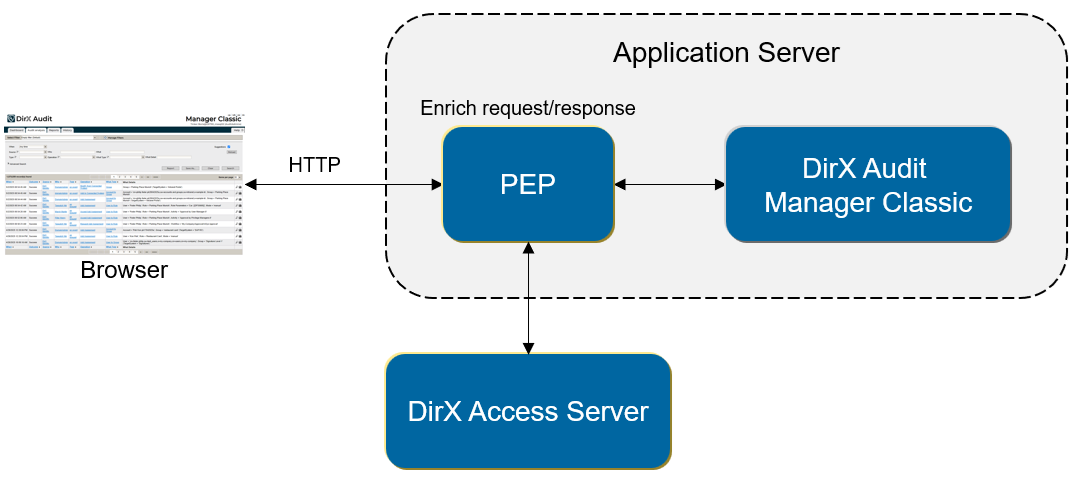
This functionality is disabled by default because it introduces a significant security risk. Before enabling SSO, you must ensure that the DirX Audit Manager Classic container is accessible only from a portal that forwards the HTTP request containing the username and tenant identification injected into the request headers.
To enable SSO, run the Core Configuration Wizard and go to the “Audit Manager Classic Authentication” step. You can also modify the request header names for username and tenant identification there. Continue with the SSO settings in the Tenant Configuration Wizard in the “Authentication Configuration” step.
It is also necessary to open DirX Audit Manager Classic without specifying the tenant parameter in the URL because the user and tenant information will be provided in the header; for example: https://localhost:8443/AuditManager/.
If you decide to use SSO, you must ensure that only one value for each HTTP header will be sent, otherwise there may be issues with HTTP headers concatenation and SSO may not work correctly.
Customizing the Table Page Navigator
To customize the table page navigator settings, edit the file:
install_path/web/audit-manager-classic.war/WEB-INF/classes/configuration.properties
You can change the values of the following keys in this file:
-
Table.maxPages – the maximum number of next and previous pages to which a user can jump by clicking on the link. The default value is 5.
-
Table.fastStep – the number of pages to switch to when fast scrolling is used. The default value is 5.
Configuring Privileged Groups
DirX Audit Manager Classic supports the following internal roles: Auditor, Audit administrator and Restricted auditor. The LDAP groups to be mapped to each internal role are set up during DirX Audit configuration in the “Authentication Configuration” step.
Users with the Auditor role can only modify their private area of the predefined Dashboard components and Audit analysis filters.
Users with the Audit administrator role can modify all public areas of the dashboard components and Audit analysis filters in addition to their private area.
Users with the Restricted auditor role have no access to Dashboards, Audit analysis or History View; they can access only a selected subset of reports via the Reports tab.
The internal roles are mapped to configured LDAP groups during the authentication procedure. For more information, see the section “Managing Application Roles” in the “Authorization” chapter of the DirX Audit Administration Guide.
Customizing Audit Analysis
To customize Audit analysis settings, edit the file:
install_path/web/audit-manager-classic.war/WEB-INF/classes/configuration.properties
You can change the values of the following keys in this file:
-
Events.suggestionList.max – the limit setting for the maximum number of displayed suggestions, which applies to suggestions fields except the Source, Type, and advanced search fields. The default value is 50.
-
Events.populateSuggestionLists.maxCount.TYPE – if the total number of event types exceeds the configured value, the autocomplete component is used in the user interface instead of the selection box component. The default value is 30.
-
Events.populateSuggestionLists.maxCount.SOURCE – if the total number of event sources exceeds the configured value, the autocomplete component is used in the user interface instead of the selection box component. The default value is 30.
-
Events.populateSuggestionLists.maxCount.OPERATION – if the total number of event operations exceeds the configured value, the autocomplete component is used in the user interface instead of the selection box component. The default value is 100.
-
Events.populateSuggestionLists.maxCount.WHAT_TYPE – if the total number of event what types exceeds the configured value, the autocomplete component is used in the user interface instead of the selection box component. The default value is 100.
-
Events.detail.attributeChanges.expanded – whether (true) or not (false) to enable the expanded overview of attribute changes included in the Event details popup. The default value is true.
-
Events.detail.attributeChanges.expanded.maxRecords – the maximum number of records that control whether or not the overview of attribute changes included in the Event details popup is displayed and expanded by default. When the number of attribute changes in the event detail is higher than the maxRecords variable, the overview is hidden by default. The default value is 20.
-
Events.detail.show.legacy.attributes – whether (true) or not (false) to show legacy fields in the event detail view. Affected fields are “Sensitivity” and “Lifecycle” in “Identification” and “What” sections. The default value is false.
-
Configuration.cache.suggestions.initialDelay – Suggestions for fields Source, Type, Operation and What Type are cached and synchronized with the database state at intervals. This key sets the initial suggestions load delay in seconds after the application starts. The default value is 10.
-
Configuration.cache.suggestions.delay – Suggestions for fields Source, Type, Operation and What Type are cached and synchronized with the database state at intervals. This key sets the interval in seconds at which the suggestions are periodically refreshed. The default value is 1800.
Customizing the History View
To customize History view settings, edit the file:
install_path/web/audit-manager-classic.war/WEB-INF/classes/configuration.properties
You can change the values of the following keys in this file:
-
History.entry.tab.PREVIEW – the number of rows to display on the page for the Overview tab. The default value is 20.
-
History.entry.tab.ATTRIBUTES – the number of rows to display on the page for the Attributes tab. The default value is 20.
-
History.entry.tab.ROLES – the number of rows to display on the page for the Roles tab. The default value is 20.
-
History.entry.tab.PERMISSIONS – the number of rows to display on the page for the Permissions tab. The default value is 20.
-
History.entry.tab.GROUPS – the number of rows to display on the page for the Groups tab. The default value is 20.
-
History.entry.tab.ACCOUNTS – the number of rows to display on the page for the Accounts tab. The default value is 20.
-
History.entry.tab.USERS – the number of rows to display on the page for the Users tab. The default value is 20.
-
History.entry.tab.RISKS – the number of rows to display on the page for the Risks tab. The default value is 20.
-
History.entry.tab.ASSIGNMENT_CAUSE – the number of rows to display on the page for the Assignment cause tab. The default value is 10.
-
History.entry.tab.CC_ENTRIES – the number of rows to display on the page for the Certification campaign entries tab. The default value is 20.
-
History.entry.attributes.maxAttrNameCount – the maximum number of attribute values shown for multivalue attributes in the history Attributes view.
The default value is 100.
To customize History view tenant-specific settings, edit the file:
install_path/conf/tenants/tenantID/configuration.cfg
Edit the section [manager.history] or create it if it does not exist. You can add or change the values of the following configuration keys in this file.
(If these keys do not exist, you can create them.):
-
search.attribute_name.provider_type – the provider to be used to provide attribute names according to the selected entry type. Possible values are:
-
CONFIGURATION – attribute lists are loaded from the configuration file
-
DATABASE – attribute lists are loaded from the database (default setting)
-
-
search.attribute_name.list.default – the value to be used as the list of attribute names when there is no defined value for a defined history entry type. The default value is cn.
-
search.attribute_name.list.EntryType – the attribute names for the specified history entry type. Replace the EntryType with the desired entry type name. The entry type name must be equal to the value you can see in the history view search form in the Type selection box and is case sensitive; for example, search.attribute_name.list.User.
-
search.attribute_name.preset.default – the preset attribute name that is used when there is no definition for the history entry type. The default value is cn.
-
search.attribute_name.preset.EntryType – the preset attribute name for the specified history entry type. Replace EntryType with the desired entry type name. The entry type name must be equal to the value you can see in the history view search form in the Type selection box and is case sensitive; for example, search.attribute_name.preset.User.
For example, when you want to provide cn, uid, dxruid, sn, and customAttribute as a list of attribute names for the User entry type and preset the customAttribute attribute name as the value in the Attribute selection box, the snippet of configuration in install_path/conf/tenants/tenantID/configuration.cfg file should look like this:
[manager.history]
search.attribute_name.provider_type = CONFIGURATION
search.attribute_name.list.User = cn, uid, dxruid, sn, customAttribute
search.attribute_name.preset.User = customAttribute
Customizing the History Timeline
To customize History timeline settings, edit the file:
install_path/web/audit-manager-classic.war/WEB-INF/classes/configuration.properties
You can change the values of the following keys in this file:
-
History.entry.timeline.from – the beginning of the timeline scope. The default value is 90 days before now, $before($now();90d).
-
History.entry.timeline.to – the end of the timeline scope. The default value is now, $now().
You can also use the time functions $now(), $before() and $after().
To customize History time point settings when accessing the History page via links from Events detail, edit the file:
install_path/web/audit-manager-classic.war/WEB-INF/classes/configuration.properties
You can change the values of the following keys in this file:
-
Events.history.entry.timepoints – the time points definition in the history timeline. Use the hash tag character (#) for the time point separation. The default value contains a list of three dates: seven days before the event was triggered, the day when the event was triggered and now:
[$before($date(@__WHEN);7d)#$date(@__WHEN)#$now()]. -
Events.history.entry.timeline.from – the beginning of the timeline scope when jumping to the History view from Audit analysis. The default value is seven days before the event was triggered: $before($date(@__WHEN);7d).
-
Events.history.entry.timeline.to – the end of the timeline scope when jumping to the History view from Audit analysis. The default value is the day when the event was triggered: $date(@__WHEN).
In the definition, you can use time functions $now(), $before(), $after(). The @__WHEN function allows you to adopt the when date from the audit event.
Customizing Reports
To customize report configuration settings, edit the file:
install_path/web/audit-manager-classic.war/WEB-INF/classes/configuration.properties
You can change the values of the following keys in this file:
-
Reports.preview.rowlimit – the number of results to which a report preview is limited. The default value is 20.
-
Reports.default.rowlimit – the number of results set as the default report result limit for all new reports (this value can be manually edited for each report).
The default value is 100. -
Reports.tooltip.default.picklist.rowlimit – the number of report parameters to be displayed in the report tooltip that is visible for each report in the report set. The default value is 10.
-
Reports.attribute.name.cache.delay – the refresh period for the reports attribute name cache. Identifying attribute names in report definitions can be cached. A value of -1 turns off the cache. A value of 0 loads cache data only once, when the DirX Audit Manager Classic application starts. A positive value defines the refresh period in minutes. The default value is 720 minutes (12 hours).
Customizing the User Interface Layout
You can change the interface layout by using images or cascading style sheets (CSS).
New or modified images and CSS files must be stored in predefined directories that are analogous to the paths in the default installation.
The following table shows the default installation and customization paths:
| Default Folder | Customization Folder | |
|---|---|---|
Images |
install_path/web/audit-manager-classic.war/img |
install_path/conf/custom/tenantID/manager/theme/img |
CSS |
install_path/web/audit-manager-classic.war/css |
install_path/conf/custom/tenantID/manager/theme/css |
For example, when you want to change the company logo that is displayed in the left upper corner, follow these steps:
-
Find the image in the default installation path. In this case, it is the company-logo-125.png image file which represents the company logo and is stored in the default installation directory install_path/web/audit-manager-classic.war/img/dxt-design/.
-
Create or check the existence of the customization folder where the modified image must be stored.
In this example, it is install_path/conf/custom/tenantID/manager/theme/img/dxt-design/. -
Replace the placeholder tenantID with the appropriate tenant identifier string.
The file name must be preserved.
Localizing Dashboard Component Titles
All existing Dashboard component titles are localized using keys starting with the dashboard.component.def prefix from the install_path/conf/i18n/messages.properties localization bundle file. When you want to localize a new or custom component title, you need to add a new localization key and an appropriate value (localized title) to the localization bundle file and use the key as the component title. Note that when you add a new key to the localization bundle file, you must restart the Apache Tomcat service (DirX Audit Manager Classic container) for the modification to take effect.
Configuring Database Connection Caching
Audit database connections are cached when the Apache Tomcat service (DirX Audit Manager Classic container) starts in order to speed up user logins and the initialization of user data and the interface. You can configure an initial delay for loading the database connection configuration and the time interval after which the connection settings are periodically rechecked.
Edit the file:
install_path/web/audit-manager-classic.war/WEB-INF/classes/configuration.properties
You can change the values of the following keys in this file:
-
Configuration.cache.initialDelay – the time (in seconds) of the delay for loading the database connection settings. The default value is 10.
-
Configuration.cache.delay – the time interval (in seconds) after which the database connection settings are rechecked. The default value is 1800.
Enabling HTTP Compression
DirX Audit Manager Classic supports built-in HTTP compression. When compression is enabled, each HTTP response is compressed before it is sent to the client and is automatically decompressed on the client side. HTTP compression can be useful when you want to improve transfer speed and bandwidth. To enable and disable HTTP compression, edit the file:
install_path/web/audit-manager-classic.war/WEB-INF/classes/configuration.properties
and use the following key:
-
Application.use_response_compression – whether (true) or not (false) HTTP compression is enabled. The default value is false.
Configuring the Default View Displayed
The Dashboard view is the default view displayed after a user logs in to the DirX Audit Manager Classic. When a user is not authorized to view a defined tab, the first permitted tab is selected for display. This feature can be configured using the Core Configuration Wizard in the “Audit Manager Classic Application” step. For details, see the section “Audit Manager Classic Application” in the “Using the Configuration Wizard for the Core Configuration” in the DirX Audit Installation Guide.