Using the Reports View
The Reports view tab is a configuration area for setting up scheduled reports. The DirX Audit Server generates these reports automatically on the specified schedule and e-mails them to the specified recipients. A report set specifies one or more report files to be sent, the schedule for when to send them, and who is to receive them. Each report file contains one or more individual reports.
This chapter describes the Reports view main page layout and how to:
-
Create reports, report files and report sets
-
Edit reports, report files and report sets
-
Delete reports, report files and report sets
-
Activate and deactivate report sets
-
Synchronize report set updates to the DirX Audit Server
It also contains a reference to the reports overview and samples.
About the Reports View Main Page
The Reports view main page is shown in the following figure:
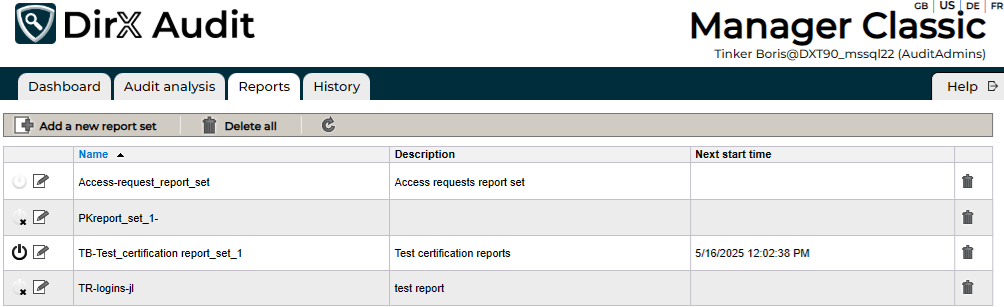
As shown in the figure, the Reports view consists of a toolbar at the top of the page and a table showing the current report set definitions. The toolbar provides the following selections:
-
 Add a new report set - allows you to create a new report set definition from scratch.
 -
 Delete all - allows you to delete all report set definitions from the table and the database.
 -
 - refresh the list of report sets.
The table consists of report set definitions listed by their names, their descriptions and the next time they will start up. You can perform the following actions here:
-
Click
 in a report set in the list to deactivate it. Click
  or
or  to activate it.
The icon indicates that it cannot be activated until its schedule is changed. -
Click
 in a report set in the list to edit it.
 -
Click
in a report set in the list to remove it.
The next sections provide more information about the operations in the Reports view. Note that users with the RestrictedAuditors role can see only the Reports view in the DirX Audit Manager Classic and only use report templates with the Restricted tag described in this section.
Creating a Report Set
To create a new report set from scratch, click the Add a new report set button. This action displays the Edit report set dialog, as shown in the following figure:
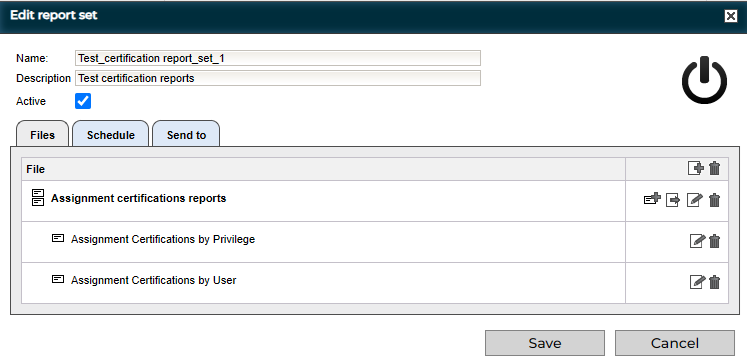
The Edit report set dialog contains the following items:
-
Name - provides a name for the report set.
-
Description - provides a description for the report set.
-
Active - activates or deactivates the report set. The
or icon appears based on the selection. -
Files - specifies the report files to be sent in the e-mail and the reports contained in each file.
-
Schedule - defines when to generate the reports.
-
Send to - specifies the e-mail data to be used when e-mailing the report (sender, recipients, message text).
-
Save - stores the report set definition.
-
Cancel - cancels the operation.
To create a new report set in the Edit report set dialog:
-
Enter a Name and Description for the report set.
-
Use the Files tab to create one or more report files and add them to the report set. See the section "Creating a Report File" for details.
-
Select the Schedule tab to define the schedule for the report set. See the section "Defining the Schedule" for more details.
-
Select the Send to tab to define the recipients and other options for the e-mailed reports. See the section "Defining the E-mail Message" for details.
-
Click Save to store the new report set definition.
Creating a Report File
To create a new report file for a report set, click in the Files tab header in the Edit report set dialog. This action starts a wizard that lets you add one or more reports to the report file and set the file’s name and format. For each report to be added, you first select a report template from a list of existing templates and then edit the scope and output format to your requirements. The next sections describe these steps in more detail.
Note that multiple reports can be combined into one file only when the file format is PDF. Legacy reports – reports that have been created with versions of DirX Audit up to DirX Audit 4.0 – cannot be combined with other reports and will always be sent as separate files.
Selecting a Report Template
The report file creation wizard’s Report selection dialog lets you select a report template from a list of existing templates. The following figure shows an example of this dialog:
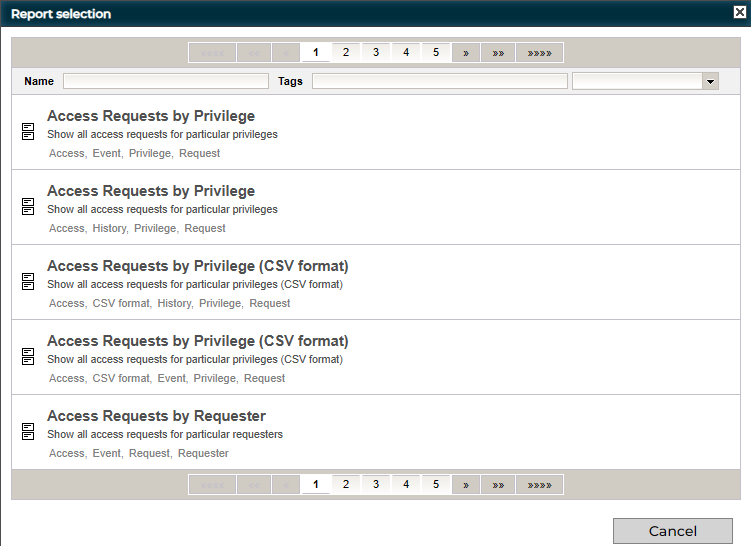
Each item in the list shows the name of the report template, its description and the list of tags associated with it.
For some report templates you can find two with the same name, you can see the difference between them by the tags, e.g. one is for Event and the other for History.
Use the page navigator at the top and bottom of the dialog window to page through the list. The section
"Using the Page Navigator" in the chapter
"Using Audit Analysis" describes how to use this tool.
Use the Name and Tags fields to filter the list of existing report templates by name or by a tag:
-
To search for a report by name, type a string into Name. The list of existing report templates is refreshed to display all reports whose names contain the string.
-
To search for a report by tag, click the down arrow to the right of Tags to display the tags associated with at least one of the existing reports and then select one or more tags. Clicking on one of the tags shown in the report definitions also adds the tag to the list. You can find reports created in versions of DirX Audit prior to V5.0 by using the tag Legacy. Some report names or configuration options may vary in new versions. The list of existing report templates is refreshed to display the reports that contain at least one of the selected tags. Note that the matching reports need not contain all of the given tags. DirX Audit 7.0 adds the Restricted tag, which is visible in the list of tags only for users with the AuditAdmins role. Users with the RestrictedAuditors role can see and use only reports with this tag.
To select a report template from the list, click it. This action opens a new Report scope dialog for setting the scope and the output format for the selected report.
Click Cancel to cancel report template selection and return to the Edit report set dialog.
Setting the Scope and Output Format
The report file creation wizard’s Report scope dialog lets you customize the scope of a report template you select in the Report selection dialog. A report’s scope specifies the set of objects on which it reports and depends on the configuration of the report template.
The first possible customization is choosing the color style of the generated report in the Style section. You can select one of the predefined color scheme.
A scope is composed of different variables; for example, a time range. Each section in the dialog allows you to define a particular variable. Some definitions are mandatory, while others are optional, depending on the report template configuration. You’ll need to define a time range in the When section for the events or entries in which you are interested. Usually, you’ll select Previous Month to get the events of the previous month - for example, the events that occurred in April when the report is run in May. The other options are the same as in the Audit analysis tab: previous day, week or year, week / month / year to date, last hour / 24 hours, today, custom time (you set fixed start and end date and time) and all (any time). See the section "Filtering Audit Events" in the chapter "Using Audit Analysis" for details.
In some cases, you will need to define a time point in the When section for history entries. Usually, you’ll select End of Previous Month to get the state of the history entry at the end of the previous month. The other options are End of Previous Day and End of Previous Week.
Other sections in the scope definition dialog let you select:
-
A list of entries (such as a list of users, privileges, or target systems) in which you are interested
-
A list of filter attributes for entries that match the filter (for example, a list of organizational units)
A scope definition dialog may also provide check boxes for specifying, for example, whether or not:
-
To produce short or long output. Long output contains more properties of an event or entry output. Short output formats typically give the most important information on an event or an entry within one line while long output formats use three or four lines per event or entry.
-
To produce CSV format report including only specific columns.
-
To include only orphaned, imported or disabled accounts.
-
To include only failed events; for example, only failed logins.
If you don’t provide a definition for an optional variable, the set of matching events or entries is unrestricted.
Some reports may also provide Requestor’s name starting box for specifying initial letters of names that will be used as a filter directly in the resulting report. This functionality can be useful if you have a long-term scheduled report, but your list of users can change, for example, with new employees. In this case, you fill in the Requestor’s name starting box initial letters of interested names and leave the subsequent selection list empty, the filter will only be used directly in the resulting report.
To select a list of users, privileges, target systems, organizational units or other similar items:
-
In the first Identifying Attributes list, click the down arrow to display a list of existing attribute names - for example, Name, First Name, Last Name for a user, Name and AltName for a privilege - and then select one from the list.
-
Enter a string into the next Attribute Value field and then click Search.
The list of matching entries is displayed in the Found table (together with number of found entries in the header).
Select one or more entries and then click Add to add them to the list of selected entries in the Selected table. If you want to remove some entries you previously added to the Selected table, select them in the Selected table and then click Remove; you can also click Clear to remove all entries from the Selected table.
In the Selected table header, you can see how many entries are selected. You can also change the count of displayed entries for both lists with selecting number in the Items per page.
A scope definition dialog may also provide the Pseudonymize checkbox for specifying whether or not to show sensitive user data in the report.
The Record limit field lets you limit the number of records for the final report; 0 means unlimited.
The following figure shows an example of this dialog. It is intended to select a list of users.
They are searched by the identifying attribute Last Name. You can also filter the users search here.
The Found table displays three users. The Selected table currently lists two users that have already been selected and added.

Click Export to export the final report. You can select between PDF and formats such as DOCX, HTML, and XLSX. Note that the Record limit field restricts the number of results.
Click Preview to see the first few pages of the report in a new browser tab. Note that the Record limit field restricts the number of results displayed in the Preview report.
Click Next Report to add another report to the same report file.
Click Finish when you have completed the scope definition for the final report to be added to the report file and you don’t want to add another report to the same file. The wizard opens a new dialog to define the report file’s name and format.
Click Cancel to discard your changes and return to the Report selection dialog.
Defining the File Name and Format
The report file creation wizard’s Edit file dialog allows you to enter the report file’s name and its description and to specify its file format. The following figure shows example of this dialog:
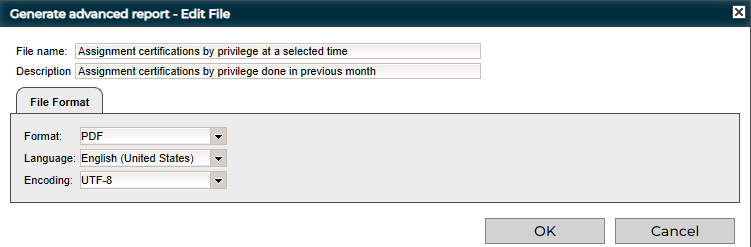
In the File Format tab, you can set:
-
Format - the file output format. You can select between PDF and formats such as DOCX, HTML, and XLSX. Note that only PDF format allows for combining multiple reports in the same file.
-
Language - the language to use for localized reports. Selections are German, French, English (United States) and English (United Kingdom).
-
Encoding - the character encoding to be used for report production.
Click OK to save the report file definition in the report set and return to the Reports view main dialog.
Defining the Schedule
Use the Schedule tab in the Edit report set dialog to set up the schedule for when the report files are to be produced for the report set. You can select from Simple, Recurring, Expert and As soon as possible configurations.
The Simple configuration contains only the date and time at which the report set should be run.
The Recurring configuration provides user controls to run the report set repeatedly on a daily, weekly or monthly basis. Specify the Start date and optionally the End date of the report and the time to run it. Select days of week for the weekly frequency and day of month for the monthly frequency.
The Expert configuration is based on a cron expression. Specify the Start date and optionally the End date of the report, and then define the cron expression. For a detailed tutorial on cron expressions, see the following CronTrigger tutorial:
https://www.quartz-scheduler.org/documentation/quartz-2.3.0/tutorials/tutorial-lesson-06.html
For example, to run a report daily at 3:01am, use the following expression:
0 1 3 * * ?
When you select As soon as possible, the DirX Audit Server produces and sends the report set as soon as it reads it. In cases where the server is not running, you can limit the time period. If the server reads the request after the set end date, it will silently ignore it.
Note that you can also use the schedule feature in the Dashboard view and Audit analysis to schedule reports of Dashboard components and event filters.
Editing a Report Set
To edit a report set, click in the selected report set in the table of the Reports view main page. This action opens the Edit report set dialog. See the section "Creating a Report Set" for a general description of this dialog.
When you open a report set for editing, select the Files tab if it’s not already selected. It lists the report files included in the report set (identified by the  icon for multireports or the
  icon for single reports) and shows the individual reports included in each report file (identified by the
  icon).
To change the name or format of a report file included in the report set, click in the column to the right of the report file listed in the Files tab. This action opens the report file creation wizard’s Edit file dialog. See the section "Defining the File Name and Format" for details.
To change the template or the scope of a report included in a report file, click in the column to the right of the report listed underneath the file report line in the Files tab. This action opens the report file creation wizard’s Report scope dialog. See the sections "Selecting a Report Template" and "Setting the Scope and Output Format" for details.
To add a new report to a report file included in the report set, click  in the column to the right of the report file listed in the Files tab. This action opens the report file creation wizard’s Report selection dialog.
To export a report set, click the ![]() export icon in column to the right of the selected report set. This action exports the report in .pdf file.
export icon in column to the right of the selected report set. This action exports the report in .pdf file.
Use the Schedule tab to change the report set schedule. See the section "Defining the Schedule" for details.
Use the Send to tab to change the e-mail information. See the section "Defining the E-mail Message" for details.
Deleting Reports and Report Sets
You can delete a single report set or all report sets from the Reports view table:
-
To remove a single report set from the table, click
in the corresponding row. -
To remove all report sets, click
Delete all in the table header.
To remove a report from a report file in a report set, click in the corresponding row for the report of the Edit report set dialog’s File tab.
Activating and Deactivating Report Sets
To activate or deactivate a report set, you can either:
-
Click
or in the first column for the report definition in the report set table. -
Check or uncheck the Active checkbox in the Edit report set dialog to activate or deactivate the report set. The
or icon appears based on the selection.
The icon in a report set definition indicates that it cannot be activated until its schedule is changed.
Synchronizing Report Set Updates to the DirX Audit Server
Every change you make in the Reports view must be synchronized to the DirX Audit Server. The synchronization process runs automatically on the DirX Audit Server, which checks the changes on every specified time interval. Synchronization of a recently changed report set is indicated with  in the first column of the report set list. The synchronization is usually finished in few seconds. If it does not finish in a minute, check whether the DirX Audit Server service is running.
About the Reports Overview
The reports overview file is intended to help you find the right report for your data. The reports overview provides a list of reports, divided into groups, including all tags and descriptions. It specifies source data and provided output, the DirX Audit version in which the respective report was introduced, and links the reports to the configuration files in the install_path/conf/defaults/report-definitions/ folder and to the sample report files provided in the install_media/Additions/Data/SampleReports folder where the reports overview file is also stored.