Using the Dashboard View
The Dashboard view allows you to analyze identity audit data that has been aggregated according to key performance indicators (KPIs) and stored as online analytical processing (OLAP) data cubes in the DirX Audit Database. DirX Audit provides a set of pre-defined OLAP data cubes that cover the most commonly used identity audit KPIs and allows you to configure your own customized OLAP data cubes.
To view and analyze this data, you select from a set of Dashboard "components" that are displayed in tiles (or "zones") in the Dashboard main page. Each component displays one aspect of the aggregated data stored in a KPI-based data cube - for example, the total number of password changes made, by date, within the last month - in one of the available tiles. DirX Audit provides a set of standard components that you can use right away and allows you to create your own components.
This chapter describes the features of the Dashboard page and how to:
-
Select and display components and control the Dashboard page layout.
-
Drill down from the data in the Dashboard view to more detailed data in the events view.
-
Export the data provided in a component to a file.
-
Send component data in an e-mail.
-
Schedule the generation of a component report.
-
Select the data to be provided in a component and how it is to be displayed.
-
Import component data stored in a file to the Dashboard.
-
Create a new component.
About the Dashboard Main Page Layout
The Dashboard main page layout is shown in the following figure.
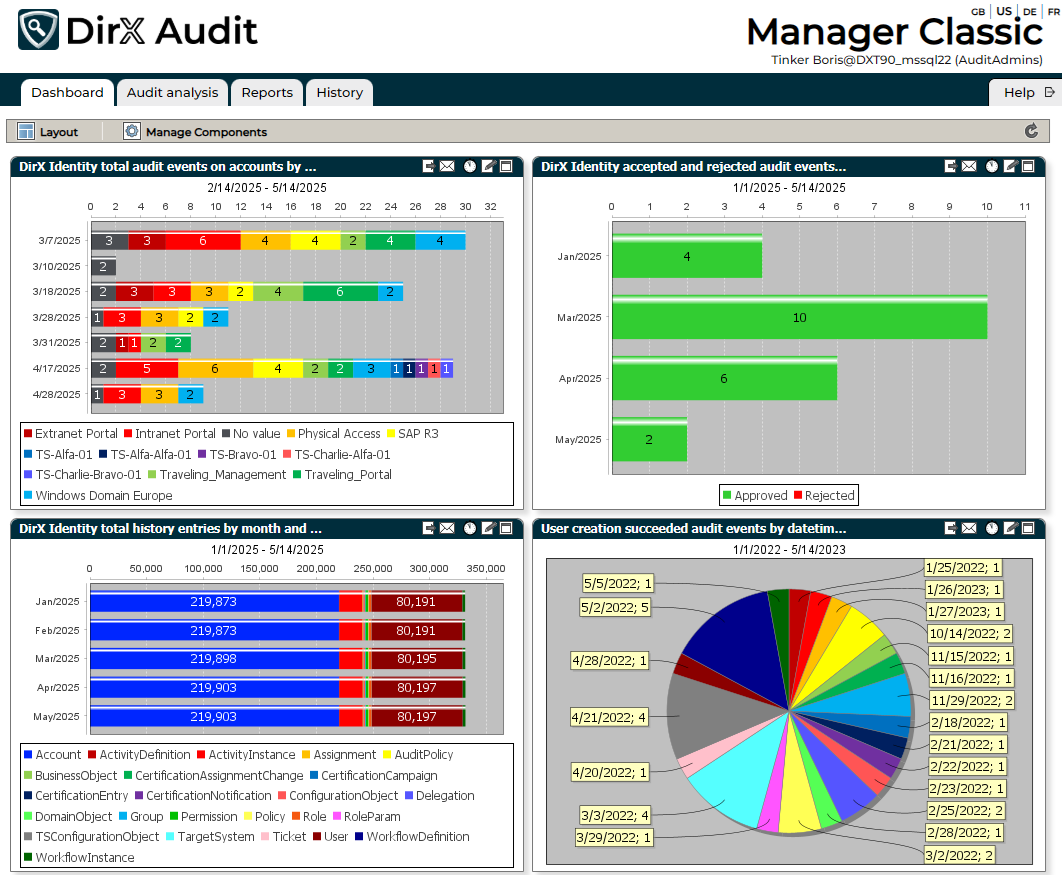
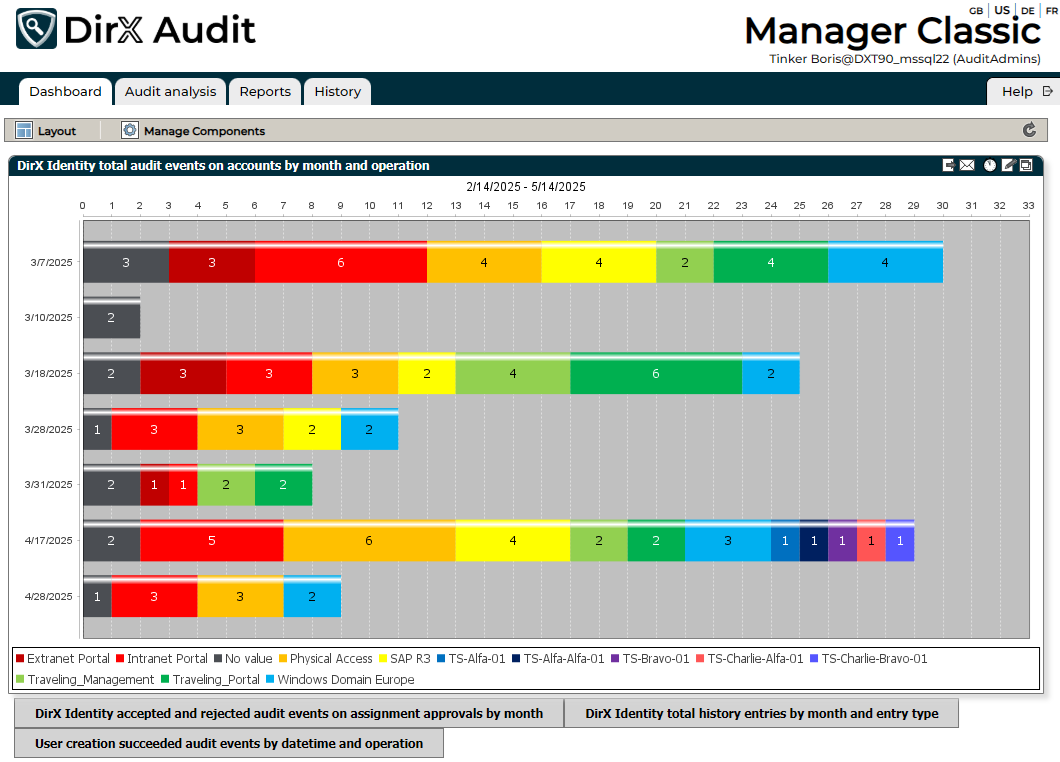
As shown in the figure, the Dashboard view page is composed of a toolbar and a display pane.
The toolbar provides the following selections:
-
Layout - allows you to select the components you want to display and the layout of the Dashboard. The Dashboard display pane is divided into different tiles. Each tile typically displays one component but can be empty if the number of available tiles in your layout is greater than the number of components you have selected to display. The layout selected in the previous figure allows a maximum of four components to be displayed at a time in a left-to-right, top-down display. For more information, see "Displaying Components".
-
Manage Components - allows you to import, edit, export and delete components.
For more information, see "Managing Components".
-
Refresh - cancels any unsaved changes you have made to the Dashboard component’s settings and reverts to the last saved settings. Furthermore, it clears cached chart colors and reloads JSON files holding predefined chart colors. For more information, see the section "Changing a Component".
Accessing Components
The Dashboard interface defines two types of component:
-
Public - components created by an administrator for use by the entire DirX Audit user community.
-
Private - components created by a logged-in user for his or her private use.
The components that a user sees when he is logged in to DirX Audit Manager Classic and the kind of access he has to these components depends upon his / her user type (role). DirX Audit Manager Classic currently specifies several user types (roles): "audit administrator", "auditor", and "restricted auditor". Access to components for these users is as follows:
-
Audit administrators can view and manage all Public components and their own Private components.
-
Auditors can view and use the Public components but they cannot make changes to them or delete them.
-
Restricted auditors have no access to Dashboard, Audit analysis and History view and they can only view and schedule Reports.
-
Audit administrators and auditors can view, change and delete their own Private components.
Whether a user is an audit administrator, an auditor or a restricted auditor is determined by the user’s membership in configurable groups in any LDAP directory (usually the source of the audit information). For example, in DirX Identity, these are two predefined groups - Auditors and AuditAdmins - that are controlled by roles. See the DirX Audit Installation Guide and DirX Audit Administration Guide for details about configuring user authentication.
Displaying Components
Use  in the Dashboard main page to:
-
Select the components you want to display in the Dashboard view’s display pane.
-
Change the number of tiles used to display components in the Dashboard view’s display pane.
The following figure shows the Layout dialog.
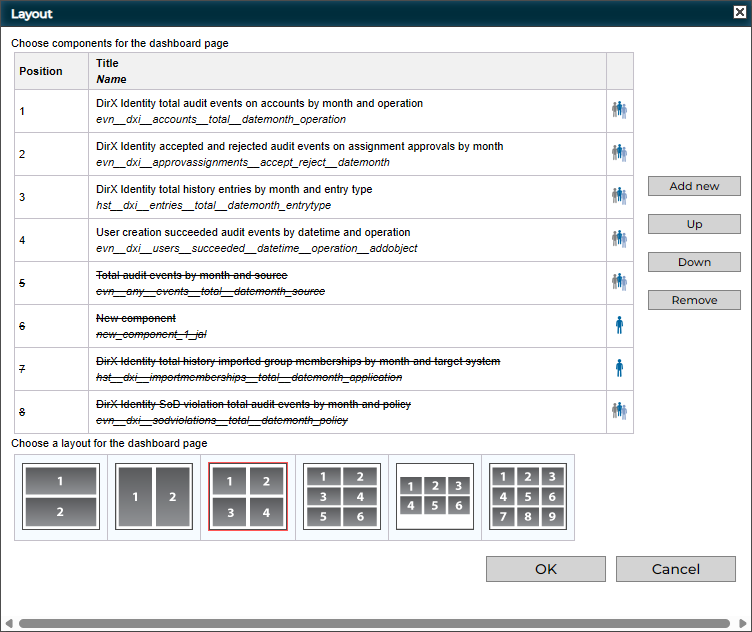
As shown in the figure, the Layout dialog provides two areas: one for selecting the components to be displayed and one for selecting the type of layout to use. The next sections explain how to use each area.
Selecting Components
The upper part of the Layout dialog allows you to select the components you want to display in the Dashboard view’s display. The following figure shows this area:
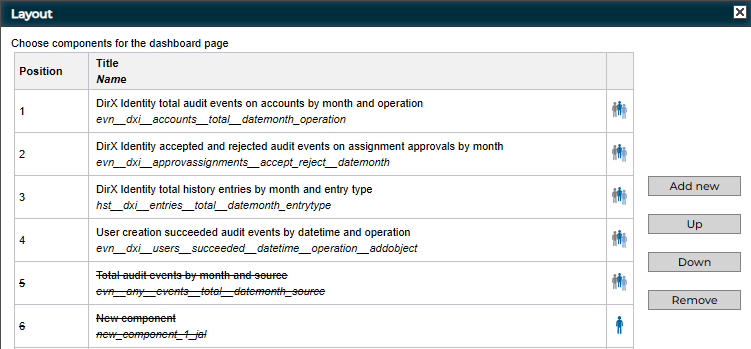
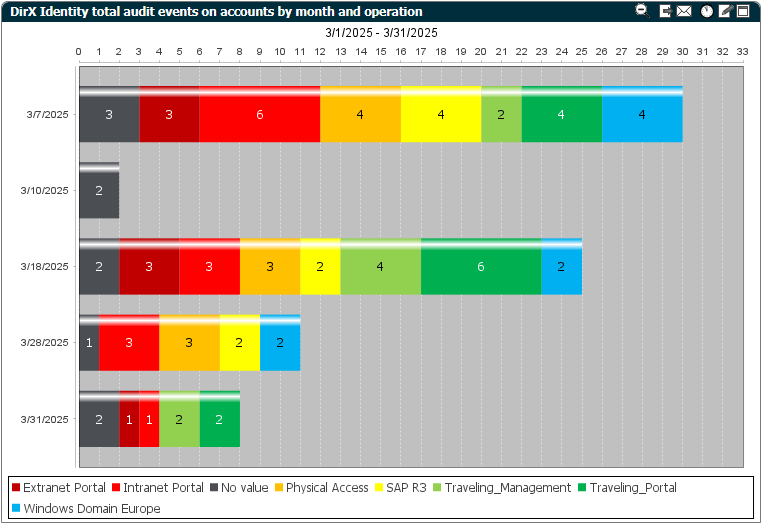
The Position column indicates the tile in the display pane layout at which the named component is displayed. In this example, a four-tile layout is selected and DirX Identity total audit events on accounts by month and operation appears in the top left tile.
The icon in the last column of the table identifies whether the component is public  or private
  .
.
To add a new component to the list, click Add new. The DirX Audit Manager Classic displays two tabs: one that lists the public components available to you, and one that lists your private components:
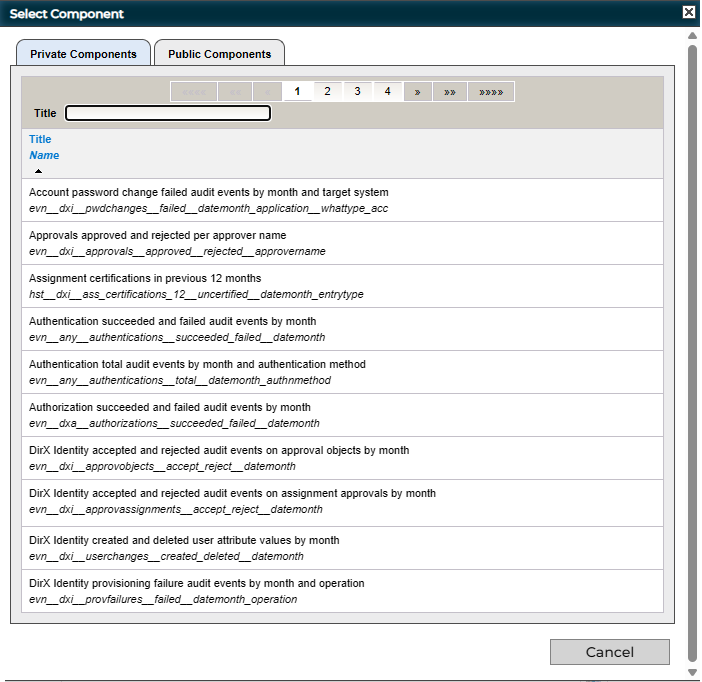
Click a tab to choose which kind of components to list. You can use the Title field to filter the component names. When you find a component you want to use, click it in the list to select it. The DirX Audit Manager Classic adds the new component to the bottom of the selected components list. If there is no available zone in which to display the new component, it is shown as crossed out in the list.
To move a component to a different position in the selected components list, click the component and then click Up or Down. To delete it from the list, click Remove.
To exit the dialog without making any changes, click Cancel.
Controlling Component Layout
The lower part of the Layout dialog displays a selection of layouts from which you can choose, as shown in the following figure:
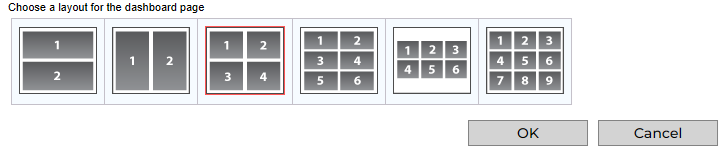
To select a layout, click it. The selected layout is then highlighted in red. To confirm the selection, click OK. To cancel the selection and return to the Dashboard main page, click Cancel.
If there are more components selected than tiles available in the layout, the components that can no longer be displayed are shown crossed out in the Components Selection area. For example, suppose you are displaying six components in a six-tile layout, and then you change the layout from six tiles to two. When you click OK, the Components Selection dialog shows the components in positions 1 and 2 (the only available tiles in the new two-tile layout) but crosses out the components in positions 3 through 6. If you want to display different components in the available tiles, select them in the list and then click Up or Down to move them into the available tile positions (1 and 2, in this example).
Working with Components
This section describes how to work with the Dashboard’s component interface, including how to:
-
Maximize and restore component display
-
Export component data to a file
-
Send component data as an e-mail attachment
-
Drill down to audit events
-
Drill down to history entries
-
Change component settings
-
Schedule the generation of a report
Maximizing and Restoring Component Display
To display a single component in the entire Dashboard display, click the  button in the component display. The following figure shows a maximized component.
When one component is maximized, you can display a different component by clicking its title button below the maximized component.
To restore the display to show the selected components in their tiles, click the  button.
Exporting Component Data
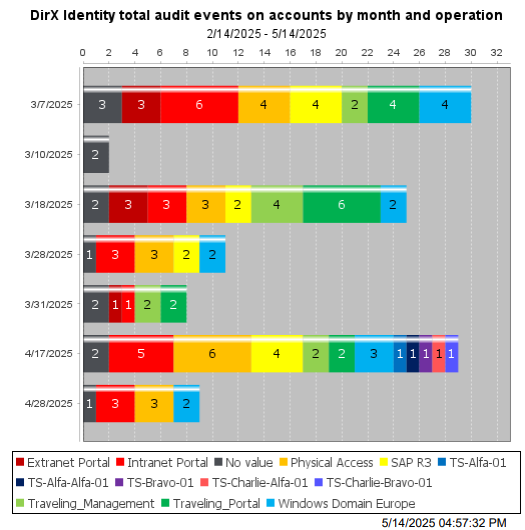
To export the aggregated audit data presented in a component into a PDF file, click the  button in the component display. DirX Audit Manager Classic creates a PDF file that you can open in a separate tab with a PDF reader or save to your local file system with your Internet browser.
Here is an example of an exported component:
Sending Component Data in E-mail
To send the aggregated audit data presented in a component as a PDF file in an e-mail attachment, click the  button in the component display.
DirX Audit Manager Classic creates a PDF file that can be enclosed in an e-mail message. Provide data for the To, Cc, Bcc, Subject and Body e-mail message fields, and then click OK to send the message.
button in the component display.
DirX Audit Manager Classic creates a PDF file that can be enclosed in an e-mail message. Provide data for the To, Cc, Bcc, Subject and Body e-mail message fields, and then click OK to send the message.
This feature is only available when you have set and configured Send emails in the Core configuration. See the section “Common SMTP Configuration” in the DirX Audit Installation Guide for details.
Drilling Down to Audit Events
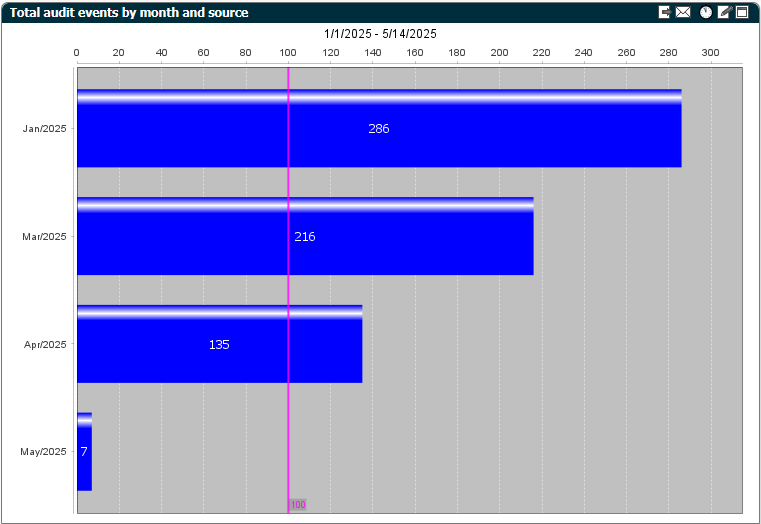
To display detailed information about the audit events indicated in a bar, line, or slice in a component display, click it. The DirX Audit Manager Classic opens the events view and displays details about each audit event. For example, consider the Total audit events by month and source component, shown below.

Each bar in the chart indicates the total number of audit events that occurred on a specific source. To get detailed information about the seven audit events from DirX Identity on May 2025, click on the bar labeled May/2025. DirX Audit Manager Classic displays the following information about these audit events:
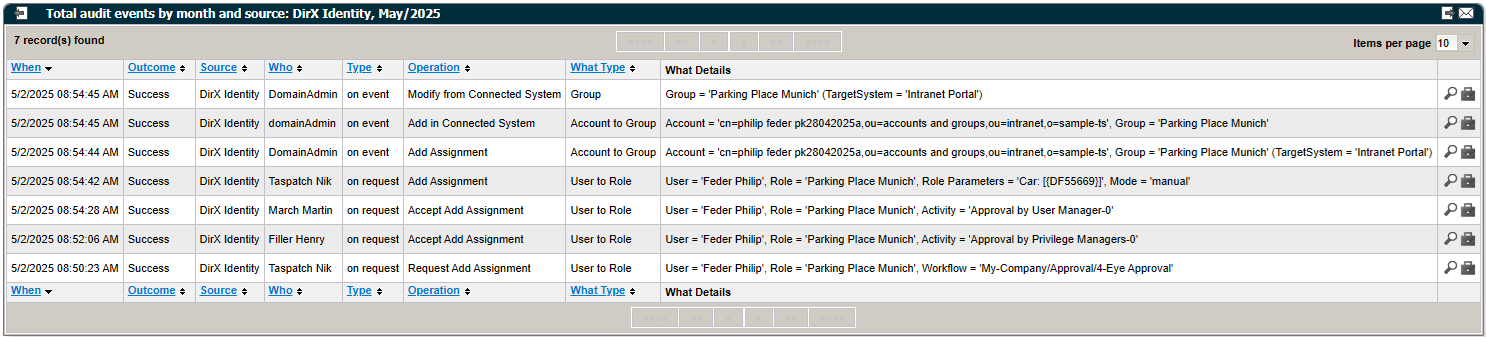
Each row in the table provides details about each of the ten password change events. For more information on how to work with the events view, see the chapter "Using Audit Analysis", because the basic functionality is the same.
To return to the Dashboard component view, click the  button.
Sometimes the total number of events displayed in a Dashboard component audit event category does not correspond to the number of events you see when you drill down on the category. This can happen when:
-
The Dashboard values for the audit event category have not been calculated for recently imported audit messages; for example, for the current day, but they are already stored in the DirX Audit Database and visible with the events view. In this case, the Dashboard component displays a lower number.
-
Some audit messages, including their related audit events, have been exported with the purge tool and thus cannot be shown when drilling down on the category. In this case, the Dashboard component indicates a higher number.
-
The user has no privilege to view individual audit events because of the fine-grained access control policies in force. In this case, the Dashboard component indicates a higher number.
Drilling Down to History Entries
You can use the Dashboard charts on history entries to directly access the detailed view of related history entries. To display detailed information about the history entries indicated in a bar, line, or slice in a component display, click it. The DirX Audit Manager Classic opens the list of history entries and displays details about each of them.
When the dimension is set to Month, Dashboards that display history entries will display the status for each month as of the last day of that month. Set the dimension to Date and time to view all values for the month. For more information about how to change the dimension, see the section "Changing Component Settings" and "Changing the Data Source".
The DirX Identity total history approval workflow entries by month and status component shown below has the dimension set to the value Date and time and shows all values in the months.
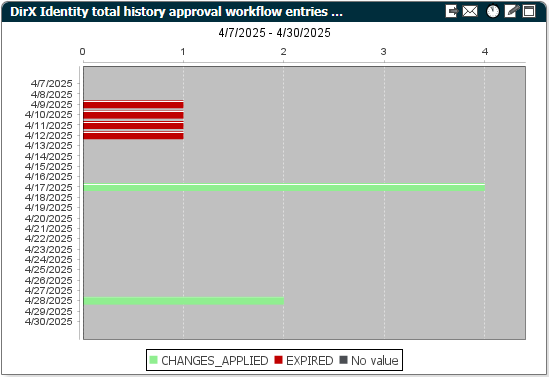
Each bar in the chart indicates the approval workflow history entries on a specific date. To get detailed information about history entries, click, for example, on the bar labeled 4/28/2025. DirX Audit Manager Classic displays the following information about these history entries:

To access the history entry’s details, click the ![]() button in the last column of the drill down list. The History view opens.
button in the last column of the drill down list. The History view opens.
You can sort the result list either by entry type or by the dxrUid (dirxEntryUUID) identifier. You can use the Name field to filter the entries by name.
To return to the Dashboard component view, click the button.
Changing a Component
To change the settings for a component you’re displaying, click the  button in the component display. This action opens the Edit component dialog for the component, where you can change the data source or the display format for the component. For more information about how to use this dialog, see the section "Changing Component Settings".
Scheduling Component Report Generation
To schedule the generation of a component report, click the  button in the component display. This action opens the Add a new report to a report set dialog where you can select an existing report set or create a new one. For more information about how to configure a report, see the section "Using the Reports View".
Managing Components
The  selection in the Dashboard main page allows you to manage the components to which you have access. Only users with the audit administrator role can view and manage the public components in the Manage Components dialog. The following figure shows the Manage Components dialog.
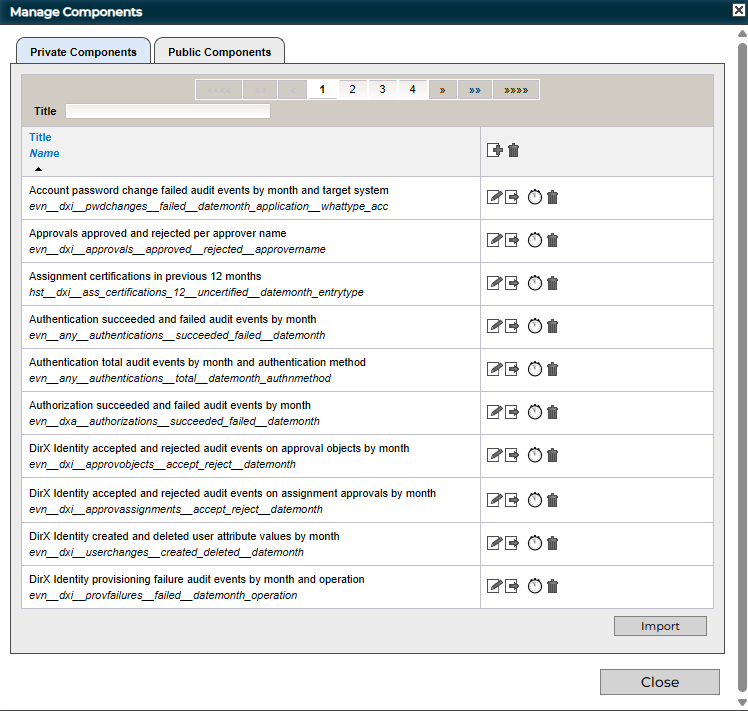
As shown in the figure, the Manage Components dialog contains: two tabs, one for managing your private components, and one for managing public components, if your DirX Audit role permits this action (see "Accessing Components" for details). If there are more components available than can be displayed in the dialog, a Page Navigator is provided for paging through the list. You can use the Title field to filter the component names.
From the Manage Components dialog, you can:
-
Click
to the right of a component in the list to change its settings. See the section "Changing Component Settings" for details. -
Click
to the right of a component in the list to export its settings to the local file system as an XML file. See the section "Exporting Component Settings" for details. -
Click
to the right of a component in the list to schedule a generation of a Dashboard component report. -
Click Import to import an XML file of component settings from the local file system. See the section "Importing Component Settings" for details.
-
Click
 to create a new dashboard component from scratch with the Edit component dialog.
 -
Click
 to the right of a component in the list to delete it.
 -
Click Close to exit the dialog and return to the Dashboard main page.
Changing Component Settings
To change a component’s settings, click the button to the right of the component in the list. This action displays the Edit component dialog, as shown in the following figure:
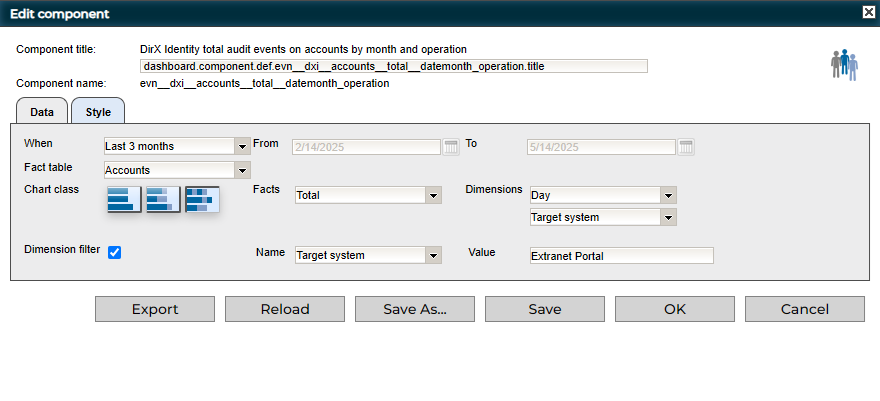
As shown in the figure, the Edit component dialog contains the following items:
-
The component title used in its display and its key, which is used for component title localization. If the key is not found in the localization files, a proper component title cannot be displayed and the key is used as the component title.
-
The component filename.
-
An icon that indicates whether it is a public or private component.
-
Data - selects the aggregated audit data to be provided by the component.
-
Style - selects the look and feel of how the component data is displayed.
-
Export - exports the component’s definition (its XML format) to the local file system. For more information, see "Exporting Component Settings".
-
Reload - cancels any changes you have made to the component’s settings and reverts to the last saved settings.
-
Save As - saves the component’s settings to a new entry in the DirX Audit Database. For more information, see "Creating New Components".
-
Save - saves your changes to the component’s settings in the DirX Audit Database. This item is available if you have permission for this action.
-
OK - applies the changes you have made and returns you to the Manage Components dialog.
-
Cancel - cancels any changes you have made to the component’s settings and returns you to the Manage Components dialog.
Changing the Data Source
Click the Data tab to change the source of the aggregated audit data that a component provides; that is, the OLAP data cube in the DirX Audit Database from which it retrieves the data.
As shown in the figure, the Data tab provides the following items:
-
When - filters the available data according to a specific or a relative time period; for example, within the previous year (Previous Year), within the previous month (Previous Month), within the current month (Month to date) and so on. Selecting Any time means that all the aggregated audit data contained in the specified OLAP data cube is displayed. Selecting Custom time allows you to set specific start and end dates with the From and To fields.
-
From and To - selects the data in the time period defined by the start (From) and end (To) date.
-
Chart class - selects a chart class, which can be one fact and one dimension, two facts and one dimension, or one fact and two dimensions. Some chart classes may be disabled for some fact tables.
-
Fact table, Facts and Dimensions - specifies the OLAP data cube to be used to supply the aggregated audit data.
-
Dimension filter - specifies an additional filter for presenting component data. When you check this box, you can select a dimension related to the selected Fact table from the drop-down list and then enter a string in Value. This filter specifies that component data is to be sliced to audit events or history entries with the specified value for the selected dimension. Only audit events or history entries matching this additional condition are reflected when data is aggregated for the Dashboard component.
Facts and Dimensions can be configured, added or removed from the list. For more information, see the section “Customizing Fact and Dimension Tables” in the DirX Audit Customization Guide and the section “Managing Fact and Dimension Tables” in the DirX Audit Administration Guide.
Zooming the Date Dimension
Click the date indicator in a chart to zoom into the view and see more detailed values for months or days. Here is an example:
Click  in the toolbar to zoom out of the view and back to the original settings.
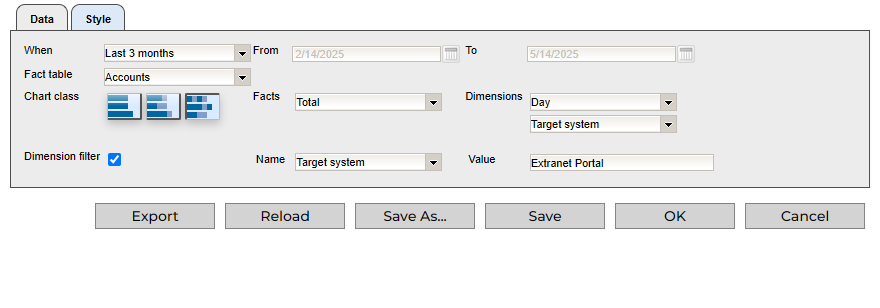
Changing the Display Format
Click the Style tab to configure the look and feel of the component’s data display:
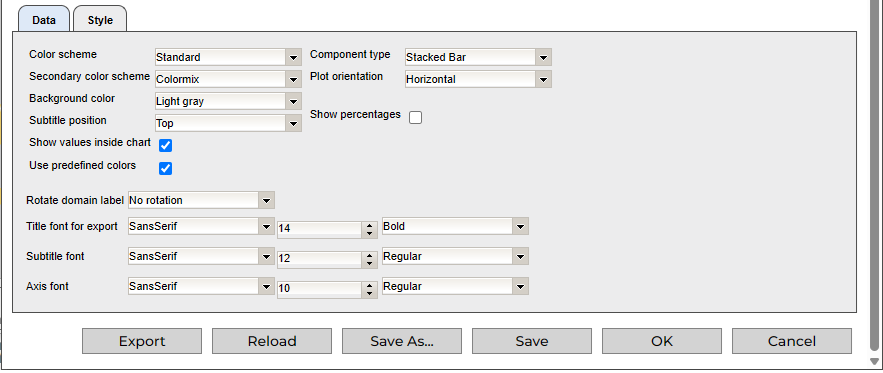
As shown in the figure, the Style tab provides the following items:
-
Color scheme - selects a predefined color scheme for the component display; for example, Ocean or Forest.
-
Secondary color scheme - selects a secondary predefined color scheme for the component display. These colors will be used when all colors from primary color scheme are exhausted.
-
Use predefined colors - determines if customized colors for specific values will be used.
-
Repeat color scheme - determines if colors from the primary color scheme will be repeated, so the secondary color scheme will not be used.
-
Background color - selects a background color for the component display.
-
Subtitle position - selects the position at which the subtitle of the component display is to appear: above the chart (top) or below the chart (bottom). The subtitle displays the relative or specific time period you selected in the Data tab (if you select Any time, a subtitle is not displayed).
-
Show values inside chart - show or hides the labels given on a bar, line, or slice in a component display that identify the number of audit events that occurred and the audit event category to which they belong.
-
Show percentages - show the percentages instead of the numbers on a bar, line, or slice in a component display that identify the number of audit events that occurred and the audit event category to which they belong. This parameter is visible only for a component with the "two facts and one dimension" or "one fact and two dimensions" chart class selected.
-
Component type - selects a display type for the component data; for example, a bar chart or a pie chart. Depending on the selected type, additional parameters may be displayed; for example, when you select a Bar component type, a parameter for Plot orientation is displayed. Components with two dimensions or two facts can use Stacked Bar or Stacked Bar 3D component types.
-
Rotate domain label - rotates the axis value labels by 45 or 90 degrees for better readability.
-
Title font, Subtitle font, and Axis font - selects the type face (Serif, Sans Serif, Monospace), font size (10, 12, 14…) and appearance (bold, italic …) of the type used in the display.
Adding a Threshold
You can add a threshold to a component with the "one fact and one dimension" chart class to highlight results above the determined limit:
-
In the Style tab, insert a value into Threshold.

When the limit conforms to the chart range, the threshold is displayed.
Exporting Component Settings
To export a component’s settings - its configuration data - to an XML file in the local file system, you can either:
-
Click Export in the Edit component dialog.
-
Click
to the right of a component listed in the Manage Components dialog.
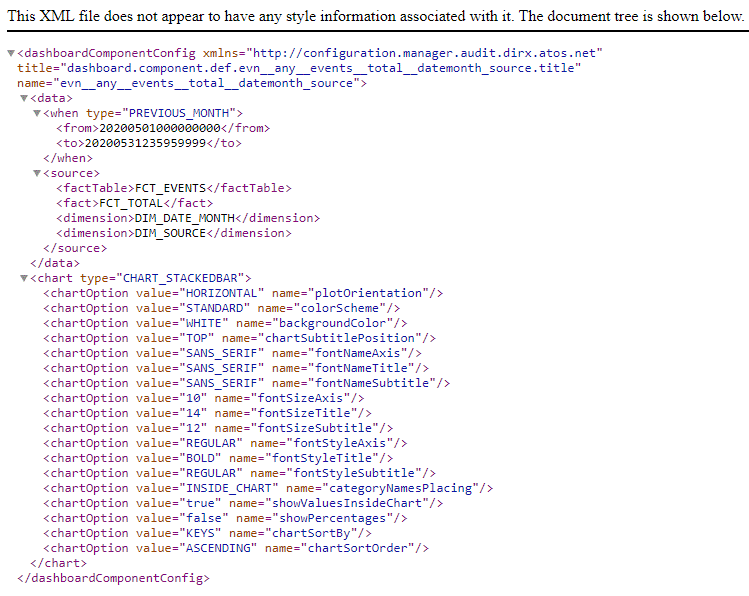
The following figure shows an example of an XML definition of a component’s settings.
Importing Component Settings
To import component settings defined in an XML file to the Dashboard:
-
Click Import in the Manage Components dialog.
-
In the dialog displayed, click Add. DirX Audit Manager Classic allows you to navigate to a file in the local file system and select it. Repeat this step for any other files you want to select for import.
-
Click Upload. DirX Audit Manager Classic loads the selected files into memory and checks for valid content and for any naming conflicts with other components. If it finds a conflict, it highlights the wrong component name. Rename the component and change its title. If you decide not to import a file that you have previously selected, check Skip to the left of the component name.
-
Click Import. The DirX Audit Manager Classic loads the selected and validated component(s) into the DirX Audit Database and displays it in the Manage Components dialog.
The import and export functions in the Manage Components dialog work together to allow you to export a component’s settings to an XML file and then change them "offline" in the file system, and then upload them back into the Dashboard. You can also use the import function to create a new component "offline" and then import it into the Dashboard.
Creating New Components
You can create new components in several ways:
-
You can import an XML file of component settings into the Dashboard, as described in "Importing Component Settings"
-
You can use the Edit component dialog described in "Changing Component Settings" to change an existing component’s settings, and then use Save As in that dialog to save it in the database under a different name.
-
You can use
(Add new) in the Manage Components dialog described in "Managing Components". This action opens the Edit component dialog with default values for the new component. For information about customizing components, see the DirX Audit Customization Guide.