Using the History View
The History view is DirX Audit Manager Classic’s interface to the DirX Audit History Database. The History view works directly with history entries stored in the DirX Audit Database. This chapter describes the features of the History view and how to:
-
Select a history entry
-
Show a history entry’s details
-
Export history entries
Selecting a History Entry
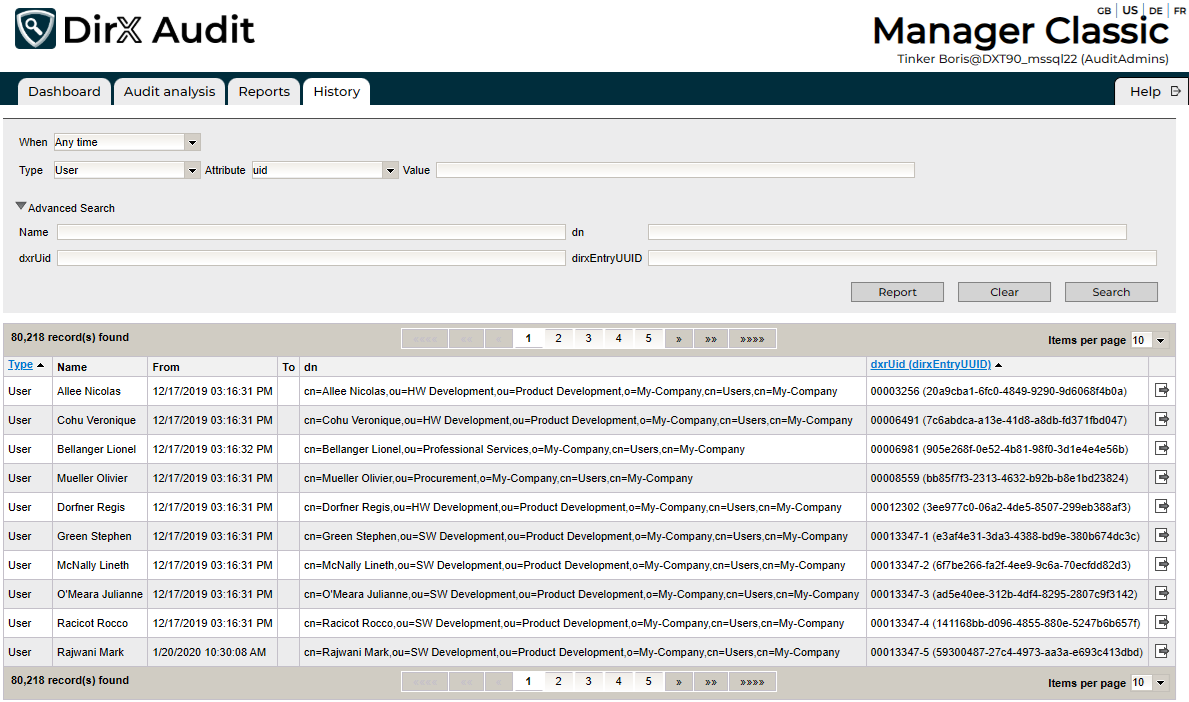
The History view’s main page allows you to select an entry in the DirX Audit History Database for historical analysis. The History view main page is shown in the following figure:
To select a history entry:
-
Set a relative or absolute period in When; for example, within the previous year (Previous Year), within the previous month (Previous Month), within the current month (Month to date) and so on. Selecting Any time means that all of the history entries are displayed. Selecting Custom time allows you to set specific start and end dates with the From and To fields.
-
From and To - filters the audit events according to an absolute time period defined by a start and end date. Not visible if Any time is selected in the When field.
-
Select an entry type in Type. Selecting ANY displays all of the types.
-
Select a history object attribute in Attribute and enter its value in Value to filter the history entries with specific attribute value. To prevent filter criteria from being applied to an attribute, leave the Value field empty.
-
Optionally expand the Advanced Search area (click the arrow on the left) and then enter the entry’s name or its prefix in Name or its distinguished name in dn. You can enter the entry’s unique identifier or its prefix in dxrUid or dirxEntryUUID. If you don’t provide it, the set of matching entries is unrestricted.
-
Click Search to find entries that existed in the period specified in When and match the other conditions too.
For the Attribute filter, the Selection list component is used and you can select one of the preselected available values from the list. The attribute list is loaded directly from the database (default) or from the configuration file according to your configuration. For more details on customizations, see the section “Customizing the History View” in the DirX Audit Customization Guide.
Filter conditions of the DN search in the advanced search mode use an "Ends with" comparison operator. This facilitates searching for history entries from the same company or organizational unit; that is, entries having the same final part of their DN attribute value. For example, entering the dn filter value of "cn=MVS,cn=TargetSystems,cn=My-Company" results in searching only for history entries from the MVS node of target systems in the My-Company node.
Filter conditions for Value, Name, dxrUid and dirxEntryUUID use a "Starts with" comparison operator. For example, entering "Meeting" into the Name field returns all meeting room entries. You can also use the SQL wildcard character % to field input. For example, searching for the value of "%Munich" of the "cn" attribute will find also entries with Munich in the middle of their name such as Parking Place Munich or Access to Munich - Data Center.
If you want to clear all filter values, you can use Clear.
To run the search, click Search. DirX Audit Manager Classic populates the search results area with the history entries retrieved according to your search criteria.
If the search operation does not find any history entries that match the search criteria, it displays a message.
If the search operation finds exactly one history entry, it displays this entry’s details page, as described in the "Showing a History Entry’s Details".
If the search operation finds more than one history entry, it displays a result table that lists all of the matching entries. The table header and footer show the total number of matching entries and provide a table page navigator and a drop-down menu for changing the maximum number of items displayed per page.
The following figure shows a result table page:
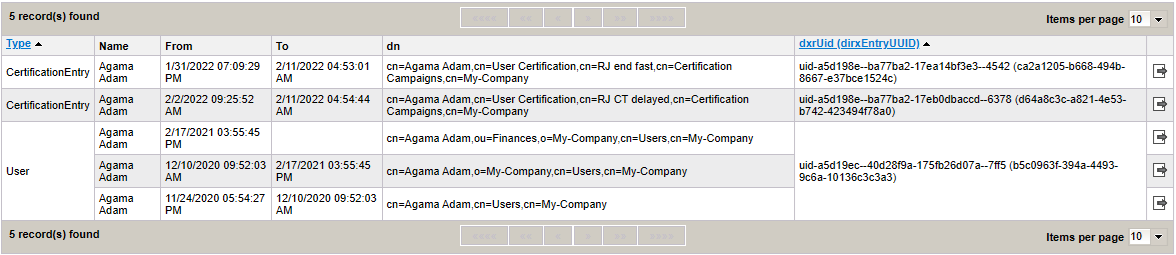
Each history entry listed in the result table is identified with its Name, dn and dxrUid (dirxEntryUUID) attributes, whose values correspond to the entry’s data in the related DirX Identity domain. If an entry’s Name or dn has been modified during the selected time period, the entry row is duplicated and each row result contains history data that existed before and after the modification.
The From and To columns indicate the entry’s lifetime: when it was created to when it was deleted or renamed.
You can sort the result table according to the Type and dxrUid (dirxEntryUUID) values in ascending or descending order.
To examine the data for an entry in the table, click  in its row. The details page for the entry opens.
Click Report if you want to write the search results to a file; for more information, see "Exporting History Entries".
Showing a History Entry’s Details
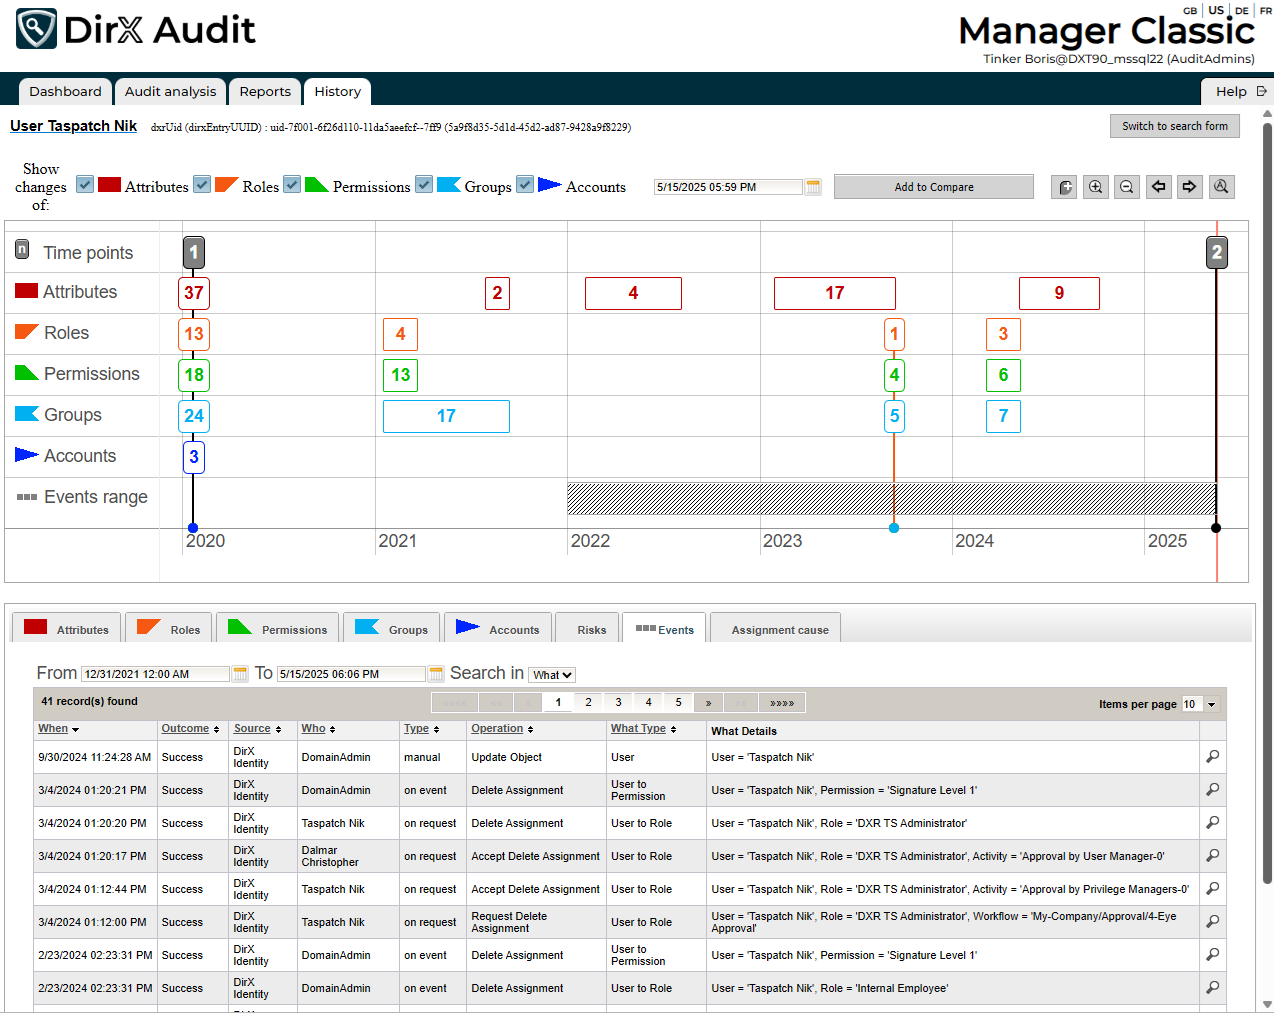
The history details page provides detailed information about a selected history entry. The following figure shows an example of a history entry’s details page:
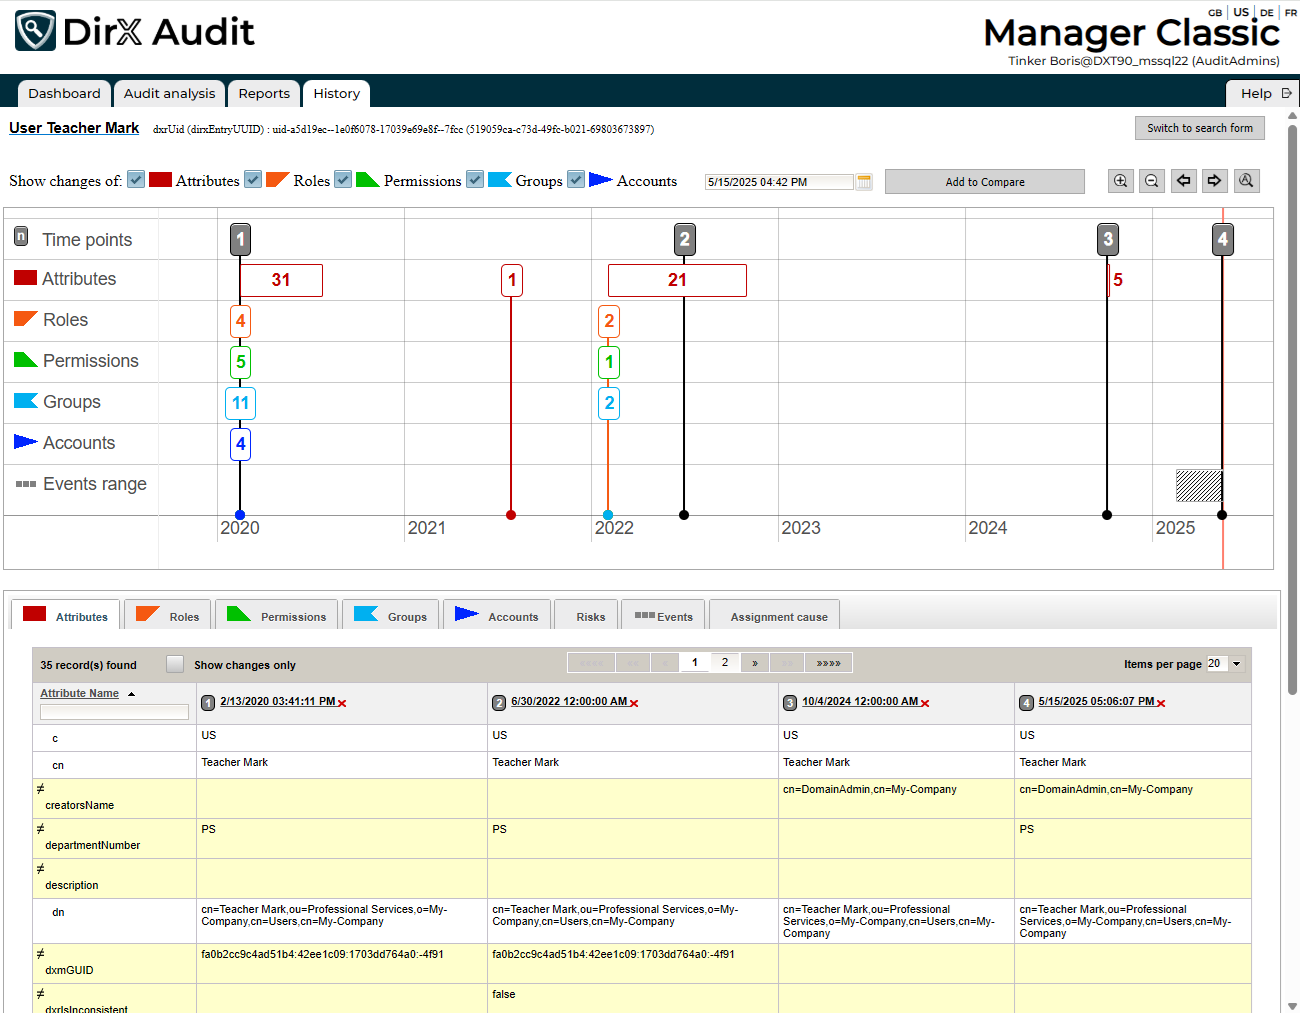
As shown in the figure, the history details page is composed of a header area, a timeline area, and a data area.
The header area identifies the entry’s type and name and provides controls for:
-
Setting target time points (dates and times) for comparing entry history data at different points in time.
-
Selecting the type of history entry data to be displayed in the timeline.
-
Returning to the history search results page.
The timeline area is composed of a calendar grid that displays:
-
Comparison time point markers, which show the comparison time points indicated by the values supplied in the When parameter for the search (Previous Month, custom time and so on) and any new comparison time points you create. If you select Any time for the search, the from value of this history entry is used as the first time point. These markers are numbered sequentially and are shaded in gray. For example,
 indicates the first time point in the timeline.
 -
Change markers, which show time points at which entry data was created or modified. Change markers indicate the number of items affected by the creation or modification operation and are outlined in color. A change marker’s color corresponds to the item’s type, as specified in the Show changes of fields and the left-most column of the timeline grid. For example,
 indicates two attribute changes.
Note that the timeline area shows the cumulative information about history entry data changes because the zoom level is set to months. To view the times in more detail, you’ll need to adjust the timeline’s scale and then zoom in to days. You can proceed this way up to milliseconds.
The data area contains one or more tabs, depending on the entry type. Each tab provides a results table that shows the history entry’s data at each selected comparison time point. When user type entries are displayed, any privilege or account history entry types that are not synchronized to the DirX Audit History Database will show only summary information (common name and its DN) in the result table. Some tabs contain additional filtering options for faster searching in parameters. The table header and footer show the total number of data items and provide a table page navigator and a drop-down menu for changing the maximum number of items displayed per page.
From the header area, you can:
-
Check and uncheck the Show changes of fields to select the types of data items associated with the entry to be shown in the timeline and data areas; for example, Attributes, Roles, Permissions, Groups or Accounts. The available fields depend on the entry type.
-
Enter a target date and time and then click Add to Compare to add a new comparison time point to the timeline and data areas. This action adds a new comparison time point marker to the timeline area and a new column with the new comparison time point and the resulting data to each tab in the data area.
-
Check Show changes only to restrict the results displayed in data area tabs to changed values only; otherwise, all data is presented. Rows that contain changes are highlighted.
In the timeline area, you can:
-
Use the zoom in/out buttons to increase or decrease the timeline scale.
-
Use the left- and right-arrow buttons to move the timeline forward or back. You can also click in the timeline and then use your mouse to drag it forward or back.
-
Use the
 icon to reset the timeline area’s boundaries so that all comparison time point markers and change markers are displayed.
 -
Double-click in the timeline area to create a new comparison time point. This action has the same result as using Add to Compare.
-
Select a comparison time point and then drag and drop it to another part of the timeline area. This action recalculates the column in the data area that corresponds to the adjusted time point.
-
Associate a comparison time point with a change marker by clicking on the change marker and then clicking the
 button that appears to the left of the
  icon. (Note that the button does not appear if a comparison time point is already associated with the change marker). This action adds a comparison time point that corresponds to the change related to the selected change marker to the timeline area and the data area.
The data area presents the history entry’s data in two or more tabs depending on the entry type:
-
The Attributes and Events tabs are presented for every entry type.
-
The Overview tab is available for Workflow Instances, Certification Campaign and Certification Assignment Change history entry types.
-
The User history entry’s data is extended with the Roles, Permissions, Groups, Accounts, Risks and Assignment cause tabs.
-
The Role history entry’s data is extended with (Junior) Roles, Permissions and Users tabs.
-
The Permission history entry’s data is extended with Groups and Users tabs.
-
The Group history entry’s data is extended with the Users tab.
-
The Certification Campaign entry’s data is extended with either the Users or Privileges tab.
In the data area, you can delete a comparison time point by clicking the  button in its column head. This action removes the column from the table and removes the time point marker from the timeline area. The comparison time point date can be changed either by moving the point in the timeline or by clicking it in the data area and entering a new time value.
The Attributes tab table is divided into the Attribute Name column and one or more attribute value columns for each target date. You can sort the table data according to the attribute name in ascending or descending order. You can use the filter field in the Attribute Name column for faster searching in parameters. The same filter field is available in other tabs and it is recommended that you use it for searching instead of browsing through pages in case you have a large amount of data, such as many users in one role. You can then use the cross icon to clear the filter field.
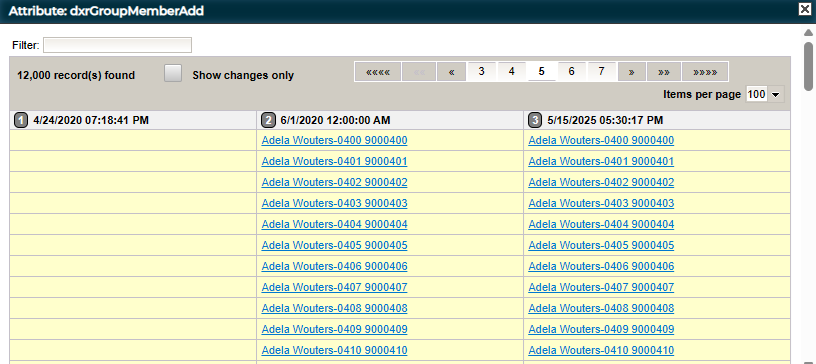
Some multivalue attributes contain a large number of values; for example, the dxrGroupMemberAdd attribute. For better readability, the number of displayed values is limited. If the count of attribute values exceeds the configured maximum, the total number of values is displayed in red.

To see all values, click  (Show Detail) near the attribute name. A new window opens showing the complete results. In this window, you can use the filter for faster searching in values; the table header and footer show the total number of data items and provide a table page navigator and a drop-down menu for changing the maximum number of items displayed per page. For more details on customizing the maximum value, see the section “Customizing the History View” in the DirX Audit Customization Guide.
Some attribute values represent references to other entries. You can click the value to get history entry’s data for the referenced entry. You can then use the Already Viewed Entries selection box in the page header to get to the previous entry.
The Roles, Permissions and Groups tabs are organized in a different way. The name column also contains the assignment mode: rule, BO, manual and inherited. For groups, it is also extended with the target system name. Each comparison time point column indicates whether or not the entry (user, role or permission) to privilege assignment existed and contains additional assignment data such as start date, end date, needs re-approval flag, in approval flag and is inconsistent flag for all assignment type and role parameter values for manual user-to-role assignment. For user-to-privilege assignments, the time period for which the assignment is valid is also shown in the table cell.
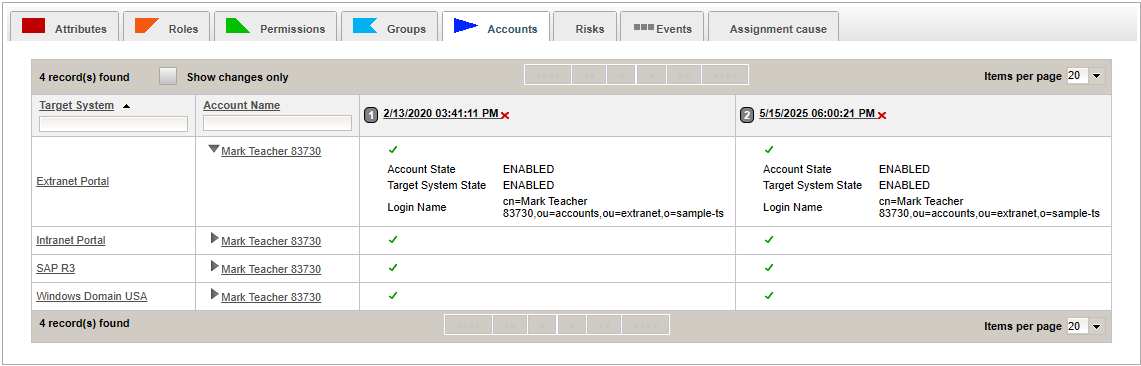
The Accounts tab is similar to the other Groups tabs. The name column also contains the target system name and each comparison time point column indicates whether or not the user’s account existed. Account state and target system state are also shown here.
The individual items in these tabs can be expanded by clicking  next to their names to display their state and properties.
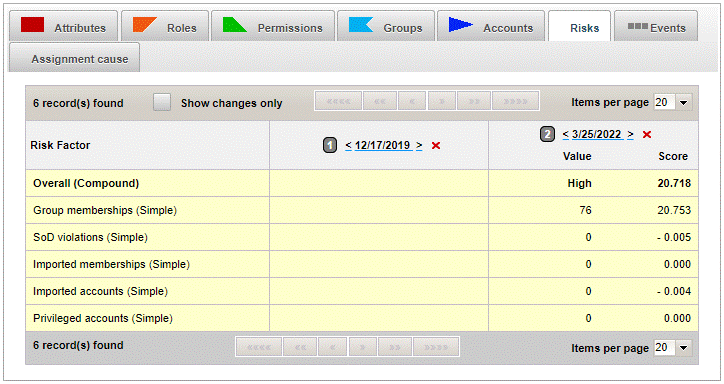
The Risks tab provides user risk data based on DirX Identity risk factors and overall risk values. These values are synchronized from the DirX Identity store into the DirX Audit Database along with other data.
The Events tab displays events related to the selected history entry. The events are displayed in the time period defined either by the Events range bar in the timeline or by specifying the initial From and final To dates in the Events area below the timeline.
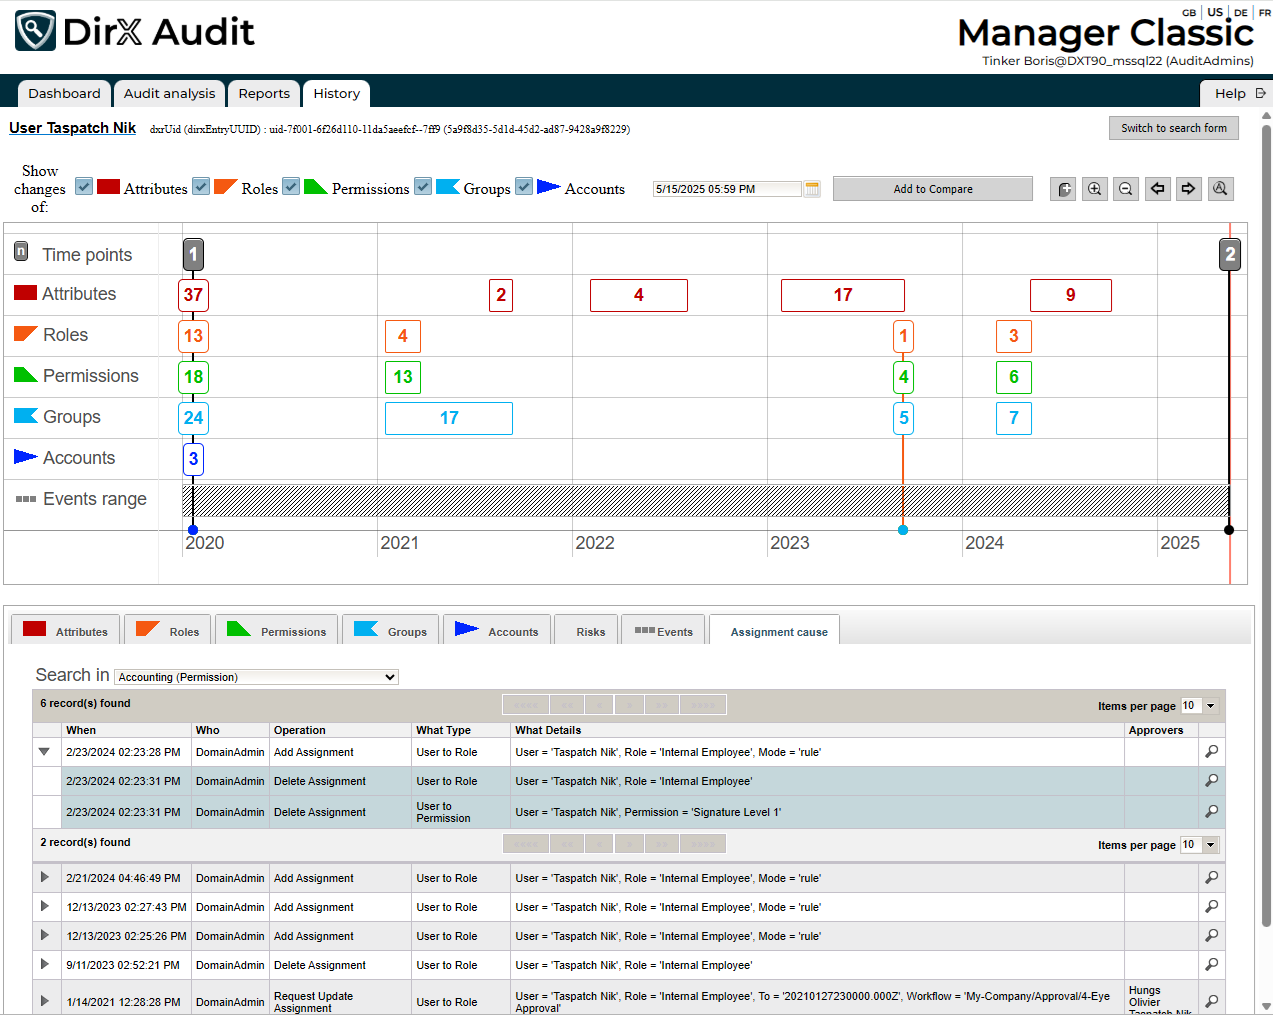
The Assignment cause tab (located next to the Events tab under the timeline) displays causing events for the selected privilege. To view contextually-related events in an expanded list, click in front of the event date. This tab offers a useful correlated data search for the original event that triggered the selected role, permission or group assignment. You can use the selection box to select the privileges. You can also choose a privilege in individual Roles, Permissions and Groups tabs by clicking  next to the corresponding privilege name. This action automatically switches the view to the Assignment cause tab.
Each expanded list contains information how many contextually-related events are found. You can also change the count of displayed records in this expanded list with selecting number in the Items per page related to this expanded list. This selection will affect the settings for other expanded lists as well.
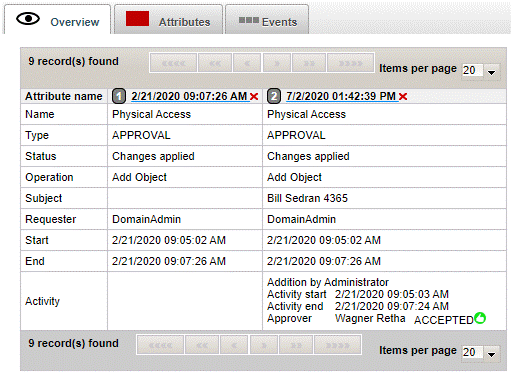
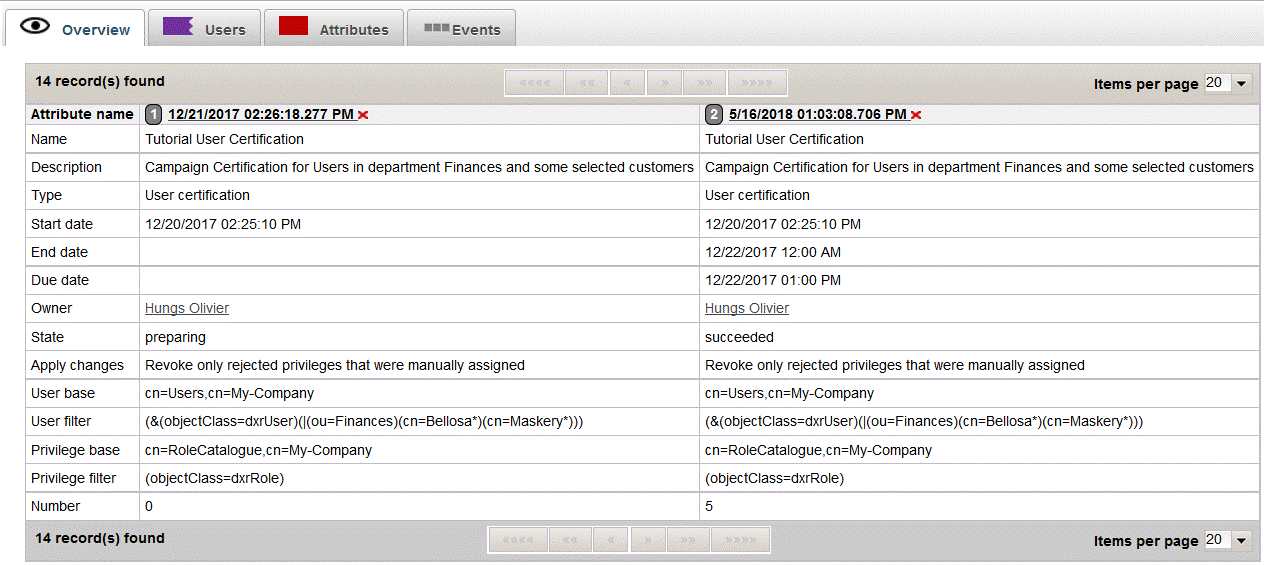
The Overview tab is available for workflow instances, Certification Campaign and Certification assignment change history entry types. The Overview tab is displayed as these entries' default tab. This tab provides an overview of important workflow information such as status, result, requestor and approvers and related activities for workflows; type, owner, status and certification entries for certifications.
Exporting History Entries
To export the history entries presented in a search result table to a report-formatted file, click Report in the filter definition area. The DirX Audit Manager Classic displays a dialog that allows you to set the output format for the file as follows:
-
Template - selects the report template to be used for the file.
-
Format - selects the file format to be used; for example, PDF, CSV, Microsoft Word formats (DOCX, RTF), and so on.
-
Encoding - selects the type of character encoding to be used; for example, UTF-8, Big5, EUC-JP, and so on.
-
Rows - the number of rows presented in a search result table used for exported report.
For value 0 all history entry data presented in a search result table are exported.
Click Export to continue the export procedure or click Cancel to dismiss it.
When you click Export, the Internet browser running the DirX Audit Manager Classic may display a dialog that prompts you to open the report file, save it, or cancel the operation.