Understanding the Default Application Workflow Technology
The default applications are constructed from three different workflow architectures:
-
Request workflows, which handle self-service and delegated administration requests that may require authorization by one or more human approvers.Request workflows operate inside the DirX Identity Store and allow you to define processes like creating a new user or modifying a user’s attributes and manage the approvals that are often required as part of these processes. Request workflows can work with any DirX Identity object type, for example, roles or policies.Request workflows can automatically trigger Java-based or Tcl-based workflows to provision the resulting identity data updates to the connected systems.The default request workflows provided with DirX Identity are available in the DirX Identity Manager’s Provisioning view group.
-
Java-based workflows, which handle both real-time and scheduled provisioning and synchronization.Java-based workflows work mainly with the user, account and group objects in the Identity Store and the source and connected systems.They operate primarily outside of the Identity Store and perform the provisioning / synchronization of identity data between source systems and the Identity Store and between connected systems and the Identity Store.(Note that it is possible to build Java-based workflows that work from the Identity Store to the Identity Store; the DirX Identity maintenance workflows are representatives of this type.) The runtime environment for Java-based workflows is provided by the Java-based Identity Server (IdS-J).The default Java-based workflows provided with DirX Identity are available in Identity Manager’s Connectivity view group
-
Tcl-based workflows, which handle scheduled provisioning and synchronization using the DirX Identity meta controller (metacp) and agents.Like the Java-based workflows, Tcl-based workflows work mainly with the user, account and group objects in the Identity Store and the source and connected systems, operate primarily outside of the Identity Store (the maintenance workflows are the exception) and provision and synchronize between the source systems, connected systems, and Identity Store.The runtime environment for Tcl-based workflows is provided by the C++-based Identity Server (IdS-C).Like the Java-based workflows, the default Tcl-based workflows provided with DirX Identity are available in Identity Manager’s Connectivity view group.
This chapter provides the following information about these workflows:
-
"Understanding Request Workflows" describes the architecture used for request workflows and how to customize them to your requirements.
-
"Understanding Java-based Workflows" describes the architecture used for the Java-based default connectivity workflows and how to customize them to your requirements.
-
"Understanding Tcl-based Workflows" describes the architecture used for the Tcl-based default connectivity workflows and how to customize them to your requirements.
Understanding Request Workflows
This section provides information about Java-based workflows, including information about:
-
Request workflow architecture
-
Customizing request workflows
Request Workflow Architecture
You can use request workflows for a variety of tasks, including:
-
Controlling user self registration
-
Creating objects (users, roles, and so on) with or without approval
-
Modifying objects (users, roles, and so on) and approving object attribute changes
-
Approving privilege assignment changes
DirX Identity Provisioning handles request workflows of any complexity with a wide variety of features, including:
-
Graphical workflow configuration with multiple steps
-
Static, dynamic, group-based and rule-based approver list generation
-
Filters to help reduce or adapt a list of approvers
-
Constraints to specify, for example, minimum requirements on the number of participants
-
Dynamic activity generation based on lists
-
Sequential and parallel activity execution
-
Conditions like "All must succeed" or "Only one may decide"
-
WhenApplicable rules to restrict the application of a specific workflow template
-
Start conditions for activities, including AND and OR
-
Timeout definition for workflow and activities
-
Easy setup of e-mail notification
-
An unlimited number of escalation steps for each activity
-
An "active" flag to prohibit the execution of incomplete rules
-
Lifetime definition for workflow instances including automatic removal
-
Auditing
The next section discusses the application of request workflows and provides some examples that explain the features in more detail.
Understanding Activity Types
Request workflows consist of steps that we call "activities". Three basic types of request workflow activity exist:
-
People activities - activities executed by one or more persons, which we call "participants". This type of activity needs some time (from several seconds to days).
-
Error activities - activities that handle error conditions. These activities generally send e-mail to well-defined administrators.
-
Automatic activities - activities executed by automated procedures. Examples of these activities include creating a global unique ID (GUID) for a user and creating the LDAP entry upon creation approval and sending an e-mail message.
-
Conditional activities - activities that wait for some event. An example is the completion of a sub-workflow.
DirX Identity supplies the following default people activities:
-
Approve assignment, which asks a participant to approve a specific user-to-privilege assignment. You define the participants and optionally the escalation steps. You typically set up an e-mail notification to inform the participants about this task.
-
Approve delete, which asks a participant to approve an object deletion.
-
Approve modification, which asks a participant to approve an object modification.
-
Approve object, which presents a list of attributes to a participant that he must approve. You define the list and the sequence of attributes, the participants and optionally the escalation steps. You typically set up an e-mail notification to inform the participants about this task.
-
Enter attributes, which allows a participant to enter a set of attributes for a new object. You define the list of attributes, their display name and whether they are optional or mandatory.
-
Request privileges, which allows a participant to assign privileges. You can define the types of privileges (role, permission, group).
-
Certification Campaigns, which allows a participant to certify a subject: a privilege or a user. For example, he can verify all manually assigned users of a role or manually assigned roles of a user.
DirX Identity supplies the following default error activities:
-
General Error, which sends an e-mail notification to someone who can analyze and solve the problem. This activity is discussed in more detail in the section "Request Workflow Error Handling".
-
Error Handler, which sends an e-mail notification to someone if the workflow ran on timeout (status FAILED.EXPIRED).
DirX Identity supplies the following default automatic activities:
-
Apply approved privileges, which implements a privilege assignment after approval was performed. It performs a privilege resolution and starts the necessary updates by creating update events (but only if Enable Real-time Provisioning is set at the target system).
-
Apply object, which either creates the object if it does not yet exist or it performs all attribute changes as defined in the corresponding subject order (created by previous activity steps or workflows).
Creation - can be used for all objects besides users. For users, use the Apply User With Assignments activity instead.
Modification - can be used for all objects. It adds new attributes and modifies or deletes existing attributes. If the target object is a user, the activity checks whether one or more attributes are permission parameters and performs a privilege resolution if true. Privilege resolution may result in the creation of events for real-time synchronization workflows. -
Apply orders from ticket, which applies the subject order (if the flag is selected) that can be either a creation or a modification request for an object. In case of a user object it additionally evaluates assignments and starts (if required) approval workflows as child workflows.
In conjunction with a Wait for child workflows activity the parent workflow is notified when the child workflow(s) are complete.
If you use the Track changes in child workflows flag then all child workflows propagate their provisioning changes to the parent workflow. You can use the Wait for completed provisioning activity to check for completed provisioning of accounts and groups. -
Apply user with assignments, which either creates the user if it does not yet exist or it performs all attribute changes as defined in the corresponding subject order (created by previous activity steps or workflows). Additionally it evaluates all assignments as defined in the corresponding resource orders (created by previous activity steps or workflows).
If an assignment requires approval, it starts an independent approval workflow. Otherwise, it performs a privilege resolution and starts the necessary updates by creating update events (but only if Enable Real-time Provisioning is set at the target system). -
Acknowledge update, used in manual provisioning workflows to set the states according to the performed action. Note that this activity cannot verify whether the administrator performed the action correctly. This activity sets the TS State account or group states as defined by the State attribute and the membership states as defined by DirX Identity.
-
Calculate VMID GUID, which calculates a VMID global unique identifier and adds the calculated value into a definable object attribute.
-
Calculate Siemens GUID, which calls the Siemens internal GUID generator web service to calculate a global unique identifier and adds the calculated value into a definable object attribute. The activity provides a new GUID value for an identity or an error message if the request is not sufficient or the identity already exists. An optional search can be configured that retrieves the existing GUID if the GUID generation failed because the identity already exists.
-
Calculate Risk, used in risk approval workflows to compute the risk level that a requested privilege assignment would have if it was approved. For new/deleted group assignments, the activity calculates the risk and then merges these new risks with the risk values that have already been calculated to define the new possible risk level. This new risk level is stored in the application state and in the workflow context (name: risklevel). Values of 0, 1, 2 and 3 are possible, where 3 indicates high risk. The user’s old risk level is stored in the workflow context (name: oldrisklevel). If risk checking is not active at the domain, nothing is done and the activity succeeds. If risk checking is active but there is no active risk policy, the activity generates an error. You can use the parameter Force An Error If no actual RiskLevel is available to control how the activity functions when risk is active but risk values have not already been computed for a given user. If this parameter is unchecked, the value 0 is used as the risk level and is stored in the application state and the workflow context. You can configure your workflow’s start conditions to respond to this value in a particular way; otherwise, an error is generated. You can also use the workflow’s risklevel or oldrisklevel context variables for the start conditions of other activities to respond to special values.
-
Check SoD, which checks for SoD violations and automatically starts approval workflows if an SoD violation is detected.
-
Map attributes, which lets you define additional attributes or recalculate existing ones (in this workflow order). You can use it to set constants or to combine attributes to fill another attribute (for example 'cn=${sn} + " " + ${givenName}').
-
Send e-mail, which sends an e-mail notification. Use this type of activity if the e-mail notification is conditional; that is, it’s only executed if a specific workflow application state (see the section "Handling Request Workflow States") or state of the previous activity occurs. Activities of this type are visible in the graphical workflow structure.
-
Split order, which delivers an Application State attribute according to the order type. Valid values are Add, Modify or Delete.
-
Wait for completed provisioning, which is a conditional activity that waits for the completion of all related provisioning steps that were initiated by the parent workflow and all child workflows. The activity polls for the expected provisioning results. On completion, the workflow proceeds and the results are available in the workflow context. If some provisioning results are pending, the activity uses the retry mechanism to wait for some period of time before performing the next check. Configure the retry mechanism - for example, for 500 retries of 5 minutes - to be sure that provisioning has enough time to complete.
This activity requires correct settings of previous activities: -
All apply activities have the flag Track changes. If you set it, all resulting provisioning actions of this activity are noted in a list in the workflow context.
-
The Apply Order activity also has the flag Track Changes in Child Workflow. When set, it enforces the child workflows to propagate all resulting provisioning actions to the parent workflow. They are integrated into the list in the workflow context.
The filled list is then used by the Wait for completed provisioning activity to check the results.
DirX Identity supplies the following default conditional activities:
-
Wait for child workflows is a conditional activity that waits for completion of child workflows. It checks whether child workflows are started. If so, it stops further execution of the workflow. If a child workflow finishes, it notifies this activity about its completion, its states, and the changes it performed if the flag Track Changes in Child Workflow was checked at the preceding Apply Order activity. Parent and child workflows must be correctly and consistently configured. In the parent workflow, the Wait for child workflows activity requires a preceding Apply Order activity where you can set the aforementioned flag. If all child workflows are finished, workflow execution continues.
About the Activity Sub-Structure
Request workflow activities have a fixed sub-structure that makes workflow design easier and keeps workflow definitions simple. The following figure illustrates this sub-structure:
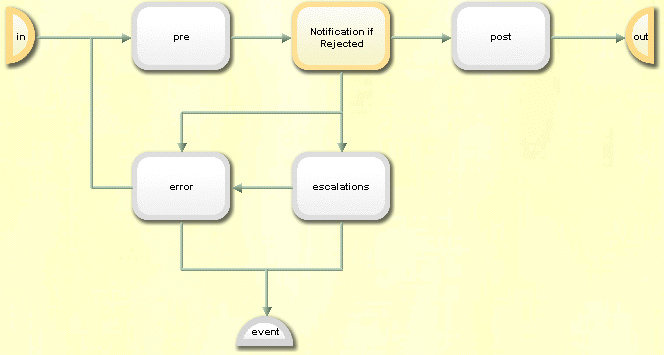
Activity sub-structure elements are:
-
Pre step - an optional step that typically contains a notification to the participants of the main step. Note that failure of this step is logged but has no effect on the state of the activity.
-
Main step - the main part of the activity, for example, an approval step. This step sets the state and application state values for the entire activity.
-
Post step - an optional step that typically contains a notification after the main activity is completed. Note that failure of this step is logged but has no effect on the state of the activity.
-
Error step - an optional definition of the error notification to be sent to the administrator if the main step fails. If this sub activity is not configured, the activity goes to state Failed and the General Error activity is activated. See the section "Request Workflow Error Handling" for more details.
-
Escalations step - an optional definition of escalation steps. If escalations are defined, the complete activity is re-calculated with the escalation definition and run again. The previous activity remains in state Failed.Expired.
The main step is always present and must be defined. All other steps are optional. You can activate and deactivate them as required. An active step is shown in yellow, while an inactive step is shown in gray.
Understanding Notifications
You can define explicit or implicit notifications:
Explicit notifications are directly visible in the graphical workflow structure. You use an explicit notification for conditional e-mail notification; for example, an e-mail to be sent if an approval is rejected or if a previous activity fails.
Implicit notifications are part of the (fixed) sub-structure of an activity (see the section "About the Activity Sub-Structure" for details). You can activate or deactivate this type of activity. Use an implicit notification if it is closely related to the activity’s main task. Typical uses are a notification request to the participants of an approval task or an informational notification after a task has been performed.
In some cases, it is up to you to choose between an explicit or implicit notification. Implicit notifications help to keep workflow definitions simple by reducing superfluous or recurring information.
HTML Notifications
You can send notifications in plain text or in HTML format.
Most of the request workflow templates delivered with DirX Identity are set up as plain text mails. One example is set up as HTML mail.
Default → Assignments → Manager Nomination → Approval by Company Head (notifyBefore)
In this example, we did not set up nationalization to show the HTML code in one piece.
<!DOCTYPE HTML PUBLIC "-//W3C//DTD HTML 4.0 Transitional//EN">
<HTML>
<HEAD>
<META http-equiv=Content-Type content="text/html; charset=iso-8859-1">
<STYLE type=text/css>P.generalquestions {
BORDER-RIGHT: #bcd 1px solid; BORDER-TOP: #bcd 1px solid; FONT-SIZE: 10px; BORDER-LEFT: #bcd 1px solid; COLOR: #039; BORDER-BOTTOM: #bcd 1px solid; FONT-FAMILY: Arial,sans-serif}
</STYLE>
<META content="MSHTML 6.00.6000.17102" name=GENERATOR>
</HEAD>
<BODY>
<B>
<? if ${to.gender} == "W" ?>
Dear Mrs. ${to.sn},
<? else ?>
Dear Mr. ${to.sn},
<? endif ?>
</B>
<P></P>
<P>Please approve the following privilege assignment:
<BR>User: <B>${workflow.subject.cn}</B>
<BR>Privilege: <B>${workflow.resources[0].dxrassignto@cn}</B> </P>
<P>To approve, follow the link: <A href="${workflow.approvalLink}">Web Center</A> </P>
<P><I>This is an automatically generated mail. Please do not reply.</I> </P>
<P class=generalquestions>For general questions about this workflow please contact:
<I><A href="mailto:${workflow.owner.mail}">Pitton Lavina</A></I>
<BR>Workflow: ${workflow.path}
<BR>Activity: ${name} </P>
</BODY>
</HTML>
The SendMail workflow recognizes the HTML format from the DOCTYPE statement at the very beginning. The example shows that you can integrate variables (for example ${workflow.subject.cn}) and conditional statements (here the <? if ?> statement) without any problems. Read more about using variables and conditional statements in the section "Using Variable Substitution".
Although you can separate pieces of this code into nationalization items, we recommend setting up the whole HTML code first, testing it and then dividing it into nationalization items that you can then reuse.
To play with this example, for example, in the My-Company sample domain:
-
Copy the workflow and activate it.
-
Restart the Java-based Server or perform Load IdS-J Configuration.
-
Assign the workflow to any privilege directly.
-
Assign the privilege to a user.
-
An approval workflow should be started and the mail should be sent.
Understanding Request Workflow States
The states of the request workflow and its activities are closely related. This section describes request workflow states and activity states.
Types of Request Workflow States
A request workflow object has two types of state:
-
A workflow state, which indicates the general state of the workflow and has fixed values such as Succeeded or Failed. DirX Identity’s request workflow service automatically sets this state.
-
A workflow application state, which is a programmable state that is controlled by the specific workflow definition. For approval workflows, the possible values for the workflow application state are Accepted or Rejected. DirX Identity customers can define their own states, and if there are no special states defined, the application state value can also be empty.
The following figure illustrates request workflow states:
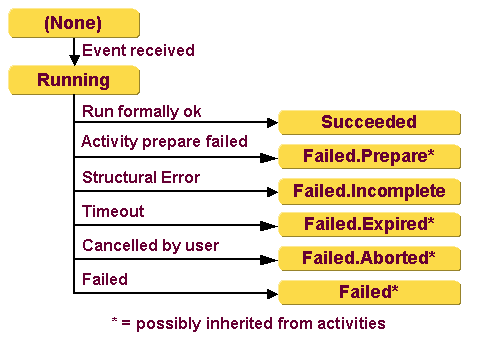
Workflow states are:
(None) - the Java-based Identity Server is aware of the workflow definition (because it is flagged as active) but instances of the workflow do not yet exist.
Running - the request workflow service has started an instance of this workflow definition after receiving an appropriate event.
Succeeded - the run of the workflow instance is formally successful; that is, a final activity has succeeded. If this activity contains an application state, the workflow instance inherits it. The request workflow service takes the application state from the calculated value of the final activity or, if there is no value there, the display name of the start condition. If the display name is empty, the application state will be empty, too.
Failed.state - the run of the workflow instance has failed. Check the activity states to see the details. state indicates the following special states:
Failed.Prepare - the state inherited from the relevant activity, which is the activity that an administrator or the request workflow service (for example, by retries) could not resolve before it reached its defined timeout value and entered an error condition.
Failed.Incomplete - the request workflow service discovered a structural error in the workflow definition but the workflow has not yet completed because:
- a startable activity no longer exists
- a running activity no longer exists
- a finished final activity is not available
Failed.Expired - there was either a timeout inherited by the relevant activity or a timeout of the complete workflow.
Failed.Aborted - either a user has cancelled this workflow instance or the timeout was inherited from the relevant activity (a user has cancelled this activity). If a user cancels the workflow, all activities that are still running go to status Failed.Aborted, too.
If parallel activities must all succeed, this state is also reached if one of the parallel activities goes to state REJECTED.
Failed - any other error inherited from the relevant activity
See the section "Request Workflow Error Handling" for more information.
Understanding Request Workflow Activity States
The following figure illustrates the request workflow activity states:
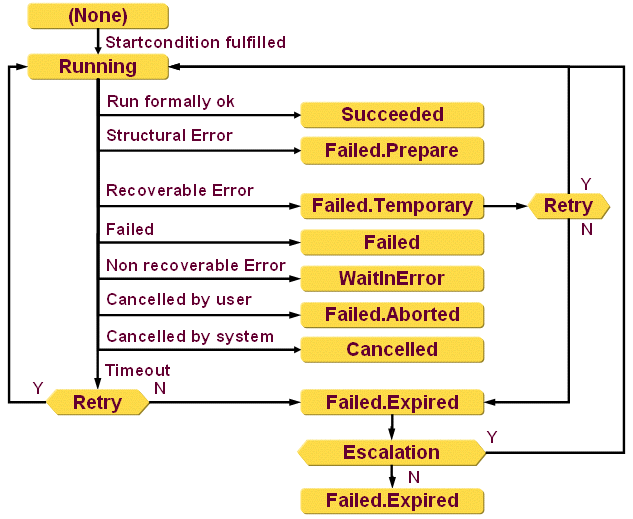
Activity states are:
(None) - the activity instance exists but the start condition is not yet satisfied.
Running - the activity instance is running due to a satisfied start condition.
Succeeded - the run of this activity instance was successful.
Failed.Prepare - an exception occurred during the participant constraint calculation that is not ConstraintViolationException.
Failed.Temporary - the activity determined that the error that occurred is only temporary (for example, the network is temporarily unavailable). If retries are configured for this activity, the request workflow service starts the activity after the Wait before retry period to resolve the error. If no retries remain, the activity goes to status Failed.Expired.
Failed - the run of this activity instance failed due to a non recoverable error and no Error sub activity is configured.
WaitInError - the run of this activity instance failed due to a non-recoverable error and an Error sub activity is configured. This error activity is used to send a notification to the administrator, who can resolve the problem and resume the workflow, or cancel the workflow if he cannot resolve the problem.
Failed.Aborted - a user cancelled this activity.
Cancelled - the request workflow service canceled this (parallel) activity because another user approved this step.
Failed.Expired - the run of this activity instance failed due to a timeout or a Failed.Temporary condition. In this case, the request workflow service checks whether retries are configured. If they are, it restarts the activity. If the activity sub-structure contains a pre-step, it reminds the relevant user that there is still a task to do. If retries are not configured, the workflow engine sets the activity state to Failed.Expired and determines whether an escalations step is configured and still available. If no, the activity is completed and remains in the Failed.Expired state. If yes, the escalation definition is evaluated and a new activity is started.
See also the section "Request Workflow Error Handling" for more information.
The workflow calculates participants in an activity by evaluating:
-
The configured participant calculation mechanism; for example, a static list or access policies.
-
The participants filter (it removes, for example, the initiator of this workflow).
-
The participants constraints, as follows:
-
If participant constraints are not defined and no approver is retrieved, the request workflow service assumes a correct approval (activity state = Succeeded, application state = Accepted).
-
If participant constraints are defined and the exception thrown is ConstraintViolationException, the routine (Java class) that the workflow designer has written to calculate the constraints can set the state and application state to any value and return it to the workflow engine. Thus in this case, the workflow designer has complete control over these values.
-
If participant constraints are defined and the exception thrown is not ConstraintViolationException, the workflow’s General Error activity starts and sets this activity and the workflow state to Failed.Prepare to indicates a serious error.
Understanding the Full Checker
The full checker is a built-in service to handle running request workflow instances. It runs on a regular basis and checks all entries that are still in a "running" state for special conditions.
The full check that works on all running workflows is no longer needed, thus the checkallinterval is set to 0 to disable it by default.
Full Check for Expired Workflows and Activities
Checks for expired workflows and activities.
The filter for workflow instances is:
|(&(dxrExpirationDate<=__current_date__)(dxrState="RUNNING"))(dxrState="UNDERCONSTRUCTION")(dxrState=RUNNABLE)The filter for activity instances is:
|(&(dxrExpirationDate<=__current_date__)(dxrState="RUNNING"))(dxrState=RETRY)(dxrState=WAITINERROR)(dxrState=RUNNABLE)This type of the full checker runs every 30 minutes by default.
Full Check for All Running Workflows
Checks all instances in state running for these conditions:
-
Determines whether a timeout condition occurred. If yes, it handles the timeout (see the section "Understanding Request Workflow States" for details).
-
Checks whether there are running workflows and/or activities that have expired. If such workflows or activities are detected, the corresponding workflows are forwarded to the workflow engine, which will calculate the next activities.
The filter to search for these instances is:
|(dxrState="RUNNABLE")(dxrState="RUNNING")(dxrState="UNDERCONSTRUCTION")(!(dxrState=*))By default, this type of the full checker is disabled. If it is enabled, it is started automatically about 1 minute after server start.
Full Checker Configuration
You can change the full checker intervals in the server.xml for request workflows under this path:
install_path*\ids-j-domain-S*n*\extensions\com.siemens.idm.requestworkflow\server.xml*
where domain is the domain for which the IdS-J server is running and S*n is the server number (counts per domain). For example, *ids-j-My-Company-S1. See the section on "Naming Schemes" in the section "Managing Java-based Servers" in the DirX Identity Connectivity Administration Guide for a discussion of the naming schemes used for DirX Identity services.
Search for the <schedules> tag:
<schedules>
<RequestWorkflowFullCheck>
<class>com.siemens.idm.requestworkflow.tasks.FullCheck</class>
<start>0</start>
<!-- interval when all expired workflows and activities are checked (in msec) -->
<period>**1800000**</period>
<singleton>true</singleton>
<!-- interval when all (running) workflows are checked (in msec) -->
<checkallinterval>**0**</checkallinterval>
</RequestWorkflowFullCheck>
</schedules>
You can set the full check interval for expiration checks with the parameter <period> in milliseconds. By default, 1800 000 ms = 30 min are set.
You can also set the full check interval for all running workflows with the parameter <checkallinterval> in milliseconds. By default, this mode is disabled.
If you want to run with a large number of running workflows, we recommend using these settings:
<period>3600000</period> <!-- 60 minutes -->and
<checkallinterval>0</checkallinterval> <!-- service disabled -->Request Workflow Error Handling
The request workflow service handles various types of errors. See the section "Understanding Request Workflow States" for details.
For each request workflow activity, you can configure an Error sub-structure element that allows you to define a specific error notification to be sent to the administrator if the activity’s main step fails (see the section "About the Activity Sub-Structure" for details). If a non-recoverable error occurs in an activity, it goes to state WaitInError. If the Error sub-activity is not defined, the activity goes to state Failed and the default error activity General Error takes control.
For each workflow, the General Error activity is configured by default as Error Activity, which sends a notification to the workflow initiator that something is wrong. You can create your own workflow-specific or workflow group-specific error activities and link them to a workflow or a group of workflows to implement special behavior.
The request workflow service calls the General Error activity once during each workflow re-calculation (either triggered by an internal status change event from an activity or by a full check from the workflow engine itself). The General Error activity:
-
Checks all activities to determine whether they are in a Failed.state that is not Failed.Expired or Failed.Temporary.
-
For activities that meet this determination, the request workflow service aborts the workflow and sets the workflow state and application state to the states of the failed activity. If several activities in a workflow meet the determination, the request workflow service selects one at random and uses its states.
You can configure an ErrorHandler for workflow timeout (status FAILED.EXPIRED). Simply add this activity to your workflow definition. It should not be connected to any other activity. It sends an e-mail if the workflow times out.
Nationalizing Request Workflows
People activities within request workflows create dynamic pages in Web Center. For complete nationalization of Web Center pages, you need to
-
Use the Web Center’s nationalization feature for all static pages (see the chapter "Adding Languages" in the Identity Web Center Customization Guide).
-
Use the Request Workflow’s nationalization feature for all dynamic pages.
The next section describes the nationalization concept for dynamic pages.
Note that DirX Identity is delivered by default with message items in the locales en and de.
Understanding Request Workflow Nationalization
DirX Identity’s concept for nationalization of dynamic Web Pages and also mail content is based on the Java concept for nationalization. A text element can keep one or more message items that are replaced during runtime with text that corresponds to the user’s requested language.
An example for a mail body within a request workflow activity is:
#{Request Workflows/Assignment Workflows.AssignmentOfPrivilegeRejected_body}

#{Common Text.ContactPersonsThatRejected}

<? for activity in ${workflow.activities} ?>
<? if ${activity.applicationState} == "REJECTED" ?>
<? for participant in ${activity.approvers} ?>
#{Request Workflows/Assignment Workflows.AssignmentOfPrivilegeRejected_loopline}
<? endfor ?>
<? endif ?>
<? endfor ?>

#{Common Text.AutomaticGeneratedMail}

#{Common Text.GeneralQuestions}
If the English language is requested, this generic text definition is resolved as follows:
The assignment of privilege ${workflow.resources[0].dxrassignto@cn} to user ${workflow.subject.cn} was rejected.

Please contact the persons that rejected the request:

<? for activity in ${workflow.activities} ?>
<? if ${activity.applicationState} == "REJECTED" ?>
<? for participant in ${activity.approvers} ?>
- Activity step: '${activity.name}': User ${participant.cn} with reason: ${activity.reason}
<? endfor ?>
<? endif ?>
<? endfor ?>

This is an automatically generated mail. Please do not reply.

For general questions about this workflow please contact: ${workflow.owner.mail} +
Workflow: ${workflow.path} +
Activity: ${name}
For example, the definition
#{Common Text.AutomaticGeneratedMail}is resolved to
This is an automatically generated mail. Please do not reply.
Note that message items can contain variables, for example ${workflow.subject.cn} that are replaced during runtime with the corresponding value, in this case the common name of the subject. For more information about this concept, see the section "Using Variable Substitution" in the DirX Identity Application Development Guide.
Using the Nationalization Wizard
Some fields within DirX Identity support nationalization. Typical fields are the subject or the body of a mail definition.
To determine whether a field supports nationalization, use the Identity Manager to view the description of the individual field in the online help. Alternatively, you can click in a field and view the context menu, which may show you the menu items of the nationalization wizard.
In read mode, one menu item is available:
Show resolved text - click this item to resolve all message items to the language definitions defined by the Default Language field in the domain object.
In edit mode, these menu items are visible:
Insert a message - the nationalization wizard opens and presents the central message item tree under Configuration → Nationalization. Select a message item object in the language of your choice and then select a message from the list of message items. The wizard inserts the corresponding message item at the cursor location.
Insert a message relative - the nationalization wizard opens and presents the local message items for this workflow. Select a message item object in the language of your choice and then select a message from the list of message items. The wizard inserts the corresponding message item at the cursor location.
Show resolved text - click this item to resolve all message items to the language definitions defined by the Default Language field in the domain object.
Organizing Message Topics
To optimize nationalization message management, you can define messages at two locations:
-
You can define more common message items in the central Nationalization folder in the Domain Configuration, which allows you to reuse messages in many objects. Message references to these items can be seen as absolute references.
-
You can define specific message items together with your configuration object, for example, the request workflow definition. Message references to these items can be seen as relative references. If you copy this type of configuration object, the message items are also copied and the references are still valid and point to your copied configuration object.
Use both methods to structure your message catalog. Try to reuse messages as much as possible.
Customizing Request Workflow Nationalization
DirX Identity provides three methods for customizing request workflow nationalization:
Local message items - you can copy a request workflow together with its local nationalization items. You can change the local items because they are copies of the original objects. You can also extend them with other locales.
Central default message items (under the path Nationalization) - you can extend the existing default message items with additional locales but you cannot change the delivered default message items.
Custom default message items (under the path Nationalization → Customer Extensions) - if you need additional central message item definitions, define them under this folder. Use folders to structure the items accordingly. Set up items for all required locales.
Using an External Nationalization Editor
You can use the built-in features of the Identity Manager to create and maintain message items, particularly if you create new workflow definitions with the corresponding message items in the primary language.
Use an external nationalization editor primarily to
-
Check the consistency of a large number of message items
-
Add a new language
The export file format is comma-separated values (CSV). You can use any tools that allow you to edit CSV files correctly.
The following sections explain how to export and import nationalization information and how to edit the items with Microsoft Excel.
Exporting Nationalization Information
You can export the complete nationalization information into one file or you can select specific parts of the information:
File → Export Nationalization Items - use this menu item from the menu bar to export all nationalization information into one file. A file selection dialog asks for the file location and name.
Export Nationalization Items - use this context menu item at a message item folder or message item to export a subtree or a single item into a file. A file selection dialog asks for the file location and name.
You can specify the delimiter that is used with the parameter nationalization.csv.delimiter in the file dxi.cfg. By default, we use a semicolon ';'. Note: after changing this file, you must restart the Identity Manager.
The format of the file looks like this if two languages are exported (Excel representation):
| path | key | de | en |
|---|---|---|---|
Prov:Configuration/Nat… |
dxrStartDate |
Start Datum |
Start Date |
mobile |
Mobiltelefonnummer |
Mobile |
|
… |
|||
Prov:Configuration/Nat… |
RequestApproval_body |
Bitte genehmigen Sie die folgende Anforderung: |
"Please approve the following request: |
… |
The first line is the header line. The field definitions are as follows:
path - the object path of this message item (for example, "Conn:Configuration/Nationalization/Attribute Descriptions"). The last part is the name of the message item (here "Attribute Descriptions").
key - the key in the file (for example, mobile).
language - a column for each language in alphabetical order.
The next lines contain collections of message items (the key and the information for each language). The first line contains the path, while the last line is empty and serves as a separator.
Editing in an External Editor
You can use any editor that allows editing of CSV files. Examples are Microsoft Excel or Microsoft Access.
Before you start editing a large amount of data the first time, we recommend that you test the editor with a small amount of data. Perform an export, edit the data and then import it into DirX Identity. You should then check the following:
-
Were national characters handled correctly?
-
Did the editor handle multi line message items correctly?
-
Could you create a new key with no problems (result should be new message items)?
If all these issues worked well, you can start editing.
We tested with Microsoft Excel. Here are some hints on how to work with it:
-
Use a colon ';' or a comma ',' as a delimiter for the export. For ease of handling, you should use the default Excel delimiter, which depends on your language settings. The colon is the default delimiter.
-
Double-click the CSV file. Excel should open it with correctly populated columns. If not, you used the wrong delimiter.
-
Now you can edit the file with all Excel features.
You can perform these operations:
-
Change an existing language information field. This action changes the corresponding line in the message item.
-
Populate an empty field (translate it from another language). Copy the language item (for example, in the English language) to the empty field.
After import, this operation populates the corresponding line in the message item. -
Add a new line with a key and language information.
After import, this operation adds a new line to the corresponding message item. -
Delete a line with key and language information.
After import this removes the line from the corresponding message item. -
Add a new column to add a new language. Write the language code in the header line (for example 'it').
After import this creates the new message items. -
You can reorder the language columns for easier editing but do not touch the path or key columns.
-
You can check easily if cells for a specific language are not filled correctly.
There are some restrictions:
-
Do not destroy the structure of the file. In particular, do not remove or reorder the path or key columns. These columns must be the first two columns.
-
If you created a new language column and during import the option "Create empty objects" is set, a large number of empty objects may be created. There is no way to remove these objects as a whole.
-
If you change the language code in the header, no rename is performed. Instead all objects are created with the new name. The old objects with the old name persist and must be manually removed.
Importing Nationalization Information
To import exported and edited nationalization information files:
-
Back up the database to be able to revert to the previous state (optional).
-
Select File → Import Nationalization Items from the menu bar within in the Identity Manager.
-
A file selection dialog asks for the file location and name of the file to import. It also contains these parameters:
Create empty objects - setting this option will create menu items that contain only keys but no language data. This option is useful for creating empty message items that you populate later on in the Identity Manager.
Report object creation as error - setting this option will cause all object creations to be reported as errors. This option is useful if you made changes only in your nationalization information and you want to be warned if you destroyed something.
Note that the import method automatically calculates the delimiter from the header line in the file.
Determining the Language
The process used to determine the correct language to use differs depending on the DirX Identity feature.
Web Center Pages
The language in which a Web Center page is displayed (this is valid for static and dynamic pages) is calculated in this sequence:
-
The user can select a language from the Web Center language selection. This value is stored in a cookie and is used during the next login.
Note: if you delete the cookie, the language setting must be repeated. -
After login of a user, the configured browser language is used.
Note: if SSO with NetWeaver is configured, NetWeaver passes the language setting to Web Center. -
If the language cannot be evaluated or the evaluated language cannot be resolved (no nationalization text available), English is used by default.
Notification Resolution
The language that is used to resolve a defined notification object is calculated in this sequence:
-
The Language field of the notification object is evaluated. If this field resolves to a valid language, this language is used. Keep in mind that the resolved message text is shown as ???*original text???* if nationalized messages are not available for that language or if the original text for that language doesn’t exist.
-
If the language cannot be evaluated and resolves to null, English is used by default.
Handling Message Items during Runtime
DirX Identity handles message items during runtime as follows:
-
During the Java-based Server startup, all message items are read and resolved to Java resource files.
-
If you request a re-load of the server configuration (Load IdS-J Configuration), all message items are re-loaded.
The load procedure resolves message items to absolute paths in a pre-defined folder structure:
-
The common path for all message items starts with
install_path*\ids-j-domain-S*n*\tmp\nat\classes\* -
Message items for request workflows are located under rqwfs.
-
Global items are resolved to the sub-folder gen.
-
Local items are resolved to the sub-folder wfs.
-
Under the global and workflow paths, the items are located in the corresponding item structure.
-
You will find message files for all locations under this path. The file name is:*
messages_*locale*.properties* -
The content appears as follows if it is identical to the message item content:
#
#Sun Feb 15 12:51:48 CET 2009
RequestWasRejected_body=We regret to inform you that your self-registration request was rejected.
DearUser_body=Dear User,
For example:
-
The local definitions of the Customer Self Registration message items reside beneath the path Definitions → Default → Users → Customer Self Registration → _Nationalization.
-
After loading, the path is:_
install_path_*ids-j-*domain*-S*n*\tmp\nat\classes\rqwfs\wfs\Default\Users\Customer Self Registration\_Nationalization* -
You will find the files messages_en.properties and messages_de.properties
Load Effort for Nationalization
Reading and processing the nationalization information during startup or during Load IdS-J Configuration of the Java-based Server requires some additional time. You can measure this overhead with the following procedure:
-
Open the Web Admin
-
Select the logging configuration section.
-
Add the Java Class com.siemens.idm.server.nationalization and set the logging to Finest.
-
Restart the Java-based Server.
-
Check in the server log files for this string:
"Loading resource files takes … ms"
Selecting Request Workflows
Selection of request workflows is different for creation, modification and assignment workflows and also depends on the calling source (Web Center, Manager or Web Services). The next sections describe request workflow selection for:
-
Creation workflows
-
Modification workflows
-
Assignment workflows
Creation Workflow Selection
The selection methods for creation workflows depend on the calling client:
-
Web Center
-
Identity Manager
-
Web Services
Workflow Selection from Web Center
Workflow selection depends on the type of license you have.
If you have a Business Suite license, you cannot run request workflows. In this case, the ability to create a user depends on the creation access policies established for this user. For more information, see the section "Policies for Object Creation" in "Managing Access Policies" in "Delegated Administration" in the "Managing Policies" chapter of the DirX Identity Provisioning Administration Guide.
If you have the Professional Suite license, you can create objects in three ways (note that you can set up a mix of these methods within one Web Center application):
a. Object creation via request workflows (default):
If you click, for example, the "Add user"' menu item, the Web Center application retrieves all workflows:
-
that the logged-in user is allowed to execute (this depends on the access policies established for this user)
-
that have the Type field in the When Applicable section of the workflow set to Create
-
that have the Subject field set to User
-
and that have an empty Resources field
If more than one creation workflow is found, the list is presented to the user for further selection. If only one workflow is found, this workflow is started immediately. If no workflow is found, an error is returned to the user that he is not allowed to execute any creation workflows.
The same algorithm is applied if the creation for a different object type is requested (for example, a Role).
b. Object creation via the Create user by request workflow flag feature:
You can customize Web Center to use the Create user by request workflow flag feature. Collect all necessary information to create an object (for example, user attributes, assignment of privileges) and then save the user object. This results in a start of a request workflow that stores the object later on.
Setting the Create user by request workflow flag at the domain object influences the save operation of the object. Instead of saving the object directly, the save operation is converted to a request workflow start where the entered data is transferred as input parameters in the form of an order object. The corresponding activity of the request workflows defines when to store the object (typically this activity is named Apply changes).
c. Object creation via Creation Access Policies
You can customize Web Center to use Creation access policies. For examples, see the pages set up for the Business Suite license.
Workflow Selection from Identity Manager
Workflow selection depends upon the type of license you have.
If you have a Business Suite license, you cannot run request workflows. In this case, objects are always stored directly when pressing the Save button.
If you have a Professional Suite license, the creation depends on the Create user by request workflow flag at the domain object:
-
If the flag is not set, an object is created directly when clicking the Save button.
-
If the flag is set, the system tries to start a corresponding request workflow when clicking the Save button.
For example, if a user object is to be created, the Identity services retrieve all workflows:
-
that the logged in user is allowed to execute (this depends on the set up access policies for this user)
-
that have the Type field in the When Applicable section of the workflow set to Create
-
that have the Subject field set to User
-
and that have an empty Resources field
If only one workflow is found, this workflow is started immediately. If more than one workflow or no workflow is found, an error is returned to the user if the Create user directly if no workflow available flag is not set. Otherwise the user entry is created directly.
The same algorithm is applied if the creation for a different object type is requested (for example, a Role).
Workflow Selection from Web Services
Workflow selection depends on the Create user by request workflow flag at the domain object:
-
If the flag is not set, an object is created directly when executing an Add Object operation.
-
If the flag is set, the system tries to start a corresponding request workflow when executing an Add Object operation.
For example, if a user object is to be created, the Identity services retrieve all workflows:
-
that the requesting service is allowed to execute (this depends on the access policies established for the user account that is used by the service to authenticate)
-
that have the Type field in the When Applicable section of the workflow set to Create
-
that have the Subject field set to User
-
and that have an empty Resources field
If only one workflow is found, this workflow is started immediately. If more than one workflow or no workflow is found, an error is returned to the service if the Create user directly if no workflow available flag is not set. Otherwise, the user entry is created directly.
The same algorithm is applied if the creation for a different object type is requested (for example, a Role).
Modification Workflow Selection
This section describes the request workflow selection methods for modification workflows.
You can set up Attribute Policies for any object type to define the request workflows for attribute modification. (See the section "Attribute Policies for Users" in "Managing Attribute Policies" in the chapter "Managing Policies" in the DirX Identity Provisioning Administration Guide for details.
If an attribute of an object is changed, the service layer checks the change against the defined attribute policies:
-
It retrieves all attribute policies for the relevant object type (for example dxrUser).
-
It checks whether the changed attribute is part of the Selected list in the Configuration tab of the attribute policy.
-
If no policy matches, the attribute is changed directly.
-
If a policy matches, the configured approval workflow is started.
If more than one policy is configured for an object type (for example, one for mail changes and one for department changes), and both attributes are changed, for each affected policy one workflow is started.
If a workflow link is set at the attribute policy, the referenced workflow is started. If no link is set, the workflow being started is selected by evaluating the When Applicable section of all workflows.
This mechanism is performed independently for each affected policy. If no matching workflow is found for a policy when saving the object, an error message is displayed.
If an attribute policy contains multiple attributes and several of them are changed, only one approval workflow is started.
Note that Java-based workflows do not evaluate attribute policies due to performance reasons. They only send events if enabled for an object type.
Assignment Workflow Selection
DirX Identity provides two mechanisms to select the correct workflow for a specific privilege:
-
Direct workflow selection - sets a direct link from the privilege to the workflow
-
Rule-based workflow selection - sets up When Applicable at each workflow definition
The algorithm is slightly different depending on the assignment environment. We distinguish between these types for user-to-privilege assignments:
User-to-Privilege assignment - assignment, modification or removal of a privilege to or from a user (the corresponding operations for the assignment are create, modify, delete)
Segregation of duties (SoD) - an SoD policy requests an approval workflow for a user-to-privilege assignment
Re-approval - requires regular starts of re-approval workflows for a user-to-privilege assignment
Selection of approval for approval of links between privileges is handled in a similar way.
Workflow Selection Algorithm for User-to-Privilege Assignments
The calculation mechanism for workflow selection works as follows:
Calculate all workflows the logged-in user is allowed to execute. You can define the number of workflows for a specific user via access policies. (See the section "Managing Access Policies" in the section "Delegated Administration" in the chapter "Managing Policies" in the DirX Identity Administration Guide for details.)
The next steps depend on the direct workflow assignments at the privilege and the rule definitions in the When Applicable tab of the request workflow definitions:
-
If a privilege is flagged with "Requires Approval", the service evaluates the type of operation (create, modify or delete) and request from the request workflow engine (running in the Java-based Server) to start a request workflow.
-
The request workflow engine checks whether a direct link to a workflow is set for this privilege and for this type of operation.
-
If yes, it takes this workflow and starts it.
-
If no, it selects all workflows that fit with the defined Type (the operation), the Subject type and the Resource type(s).
-
If an optional Condition is set, it filters the list of workflows accordingly.
-
If the list still contains multiple workflows, it takes the workflow with the highest priority and starts it.
-
If there are several workflows with the highest priority, it takes one by random.
-
If the list is empty and operation type is create, an error is returned to the calling routine.
-
Otherwise it tries to use the workflow for create → start again with step 2 and type create.
Workflow Selection Algorithm for SoD
The calculation mechanism for workflow selection works as follows:
Calculate all workflows the logged in user is allowed to execute. You can define the amount of workflows for a specific user via access policies. (See subsection "Managing Access Policies" in section "Delegated Administration" in chapter "Managing Policies" in the DirX Identity Administration Guide for details.)
The next steps depend on the direct workflow assignments at the privilege and the rule definitions in the tab When Applicable of the request workflow definitions:
-
The service sets the operation to SoD and request from the request workflow engine (running in the Java-based Server) to start a request workflow.
-
The request workflow engine checks whether the direct workflow link for SoD is set for this privilege.
-
If yes, it takes this workflow and starts it.
-
If no, it selects all workflows that fit for operation type SoD, the Subject type and the Resource type(s).
-
If an optional Condition is set, it filters the list of workflows accordingly.
-
If the list still contains multiple workflows, it takes the workflow with the highest priority and starts it.
-
If there are several workflows with the highest priority, it takes one by random.
-
If the list is empty, it tries to use the workflow for create → start again with step 2 and type create.
Workflow Selection Algorithm for Re-Approval
The calculation mechanism for workflow selection works as follows:
Calculate all workflows the logged-in user is allowed to run. You can define the number of workflows for a specific user via access policies. (See the subsection "Managing Access Policies" in the section "Delegated Administration" in the chapter "Managing Policies" in the DirX Identity Administration Guide for details.)
The next steps depend on the direct workflow assignments at the privilege and the rule definitions in the tab When Applicable of the request workflow definitions:
-
The service sets the operation to re-approve and request from the request workflow engine (running in the Java-based Server) to start a request workflow.
-
The request workflow engine checks whether the direct workflow link for re-approval is set for this privilege.
-
If yes, it takes this workflow and starts it.
-
If no, it selects all workflows that fit for operation type re-approval, the Subject type and the Resource type(s).
-
If an optional Condition is set, it filters the list of workflows accordingly.
-
If the list still contains multiple workflows, it takes the workflow with the highest priority and starts it.
-
If there are several workflows with the highest priority it takes one by random.
-
If the list is empty it tries to use the workflow for create → start again with step 2 and type create.
Workflow Selection Algorithm for Approval of Links between Privileges
The calculation mechanism for workflow selection works as follows:
Calculate all workflows the logged in user is allowed to run. You can define the number of workflows for a specific user via access policies. (See the subsection "Managing Access Policies" in the section "Delegated Administration" in the chapter "Managing Policies" in the DirX Identity Administration Guide for details.)
The next steps depend on the direct workflow assignments at the privilege and the rule definitions in the tab When Applicable of the request workflow definitions:
-
If a privilege is flagged with "Requires Approval" in the section Privilege Assignment Configuration, the service evaluates the type of operation (assign or remove) and request from the request workflow engine (running in the Java-based server) to start a request workflow.
-
The request workflow engine checks whether a direct link to a workflow is set for this privilege and for this type of operation.
-
If yes, it takes this workflow and starts it.
-
If no, it selects all workflows that fit with the defined Type (the operation), the Subject type and the Resource type(s).
-
If an optional Condition is set, it filters the list of workflows accordingly.
-
If the list still contains multiple workflows, it takes the workflow with the highest priority and starts it.
-
If there are several workflows with the highest priority, it takes one at random.
-
If the list is empty and operation type is create, an error is returned to the calling routine.
-
Otherwise, it tries to use the workflow for create → start again with step 2 and type create.
Executing Request Workflows
To execute a request workflow, the services calculate the URL to which the HTTP request is to be sent. The steps are:
-
The service performs a search for the related IdS-J server. The filter used is:
(&(objectClass=dxmIDMServer)(!(dxmType=workerContainer))(dxmDomain=<domain>))-
If no server configuration object is found for the domain, the search is repeated with the following filter:
(&(objectClass=dxmIDMServer)(!(dxmType=workerContainer))(!(dxmDomain=*)))This filter is applied for compatibility reasons, to find a server if no domain is explicitly configured.
-
The link to the service (dxmService-DN) defines as set of attributes:
dxmSpecificAttributes(ssl) - an SSL connection is established if this value is 'true'.
dxmDataPort - this port number is used if SSL is not enabled.
dxmSecurePort - this port number is used if SSL is enabled. -
The link to the system object (dxmSystem-DN) defines the host address. If the host address at the system object is empty, the host field of the service object is taken.
The resulting URL is as follows:
-
If SSL is not enabled:
http://$(dxmAddress):$(dxmDataPort)//RequestWorkflow/reqwfsvc-
If SSL is enabled:
https://$(dxmAddress):$(dxmSecurePort)//RequestWorkflow/reqwfsvcCustomizing Request Workflows
DirX Identity comes with a set of default request workflows that are sufficient for many purposes. Nevertheless, details must be adapted to the customer environment or new workflows should be created. The following sections explain how to customize the default request workflows:
-
Working with Variable substitution
-
Implementing an activity
-
Implementing a Java class for finding participants
-
Implementing participant filters and constraints
For a discussion of request workflow management, see the chapter "Managing Request Workflows" in the DirX Identity Provisioning Administration Guide.
Using Variable Substitution
DirX Identity provides an easy-to-use variable substitution mechanism that can be used to:
-
define variable text sections for e-mails to be substituted during runtime. A typical application of this mechanism is e-mail texts. You can use variables in all text fields like From, To, Subject and Body. You can use simple variables to insert small text pieces like an e-mail address, or you can use control-flow statements with included variables to create more complex structures such as several lines of text coming from lists of objects (for example, a list of all workflow participants).
-
calculate participants for approval activities according to a dynamic specification.
Here is an example that shows how the mechanism works within e-mails:
User '${workflow.initiatorEntry.cn}' launched the workflow '${workflow.name}' for '${workflow.subject.cn}'.
This request was rejected.
Please contact the persons that rejected the request:
<? for activity in ${workflow.activities} ?>
<? if ${activity.applicationState} == "REJECTED" ?>
<? for participant in ${activity.approvers} ?>
- User ${participant.givenName} ${participant.sn} rejected with reason: ${workflow.activity.reason}
<? endfor ?>
<? endif ?>
<? endfor ?>
This is an automatically generated mail. Please do not reply.
At runtime, this template is expanded to:
User 'Donegan Mark 1234' launched the workflow 'Create User' for 'Sober Marietta 9876'. This request was rejected.
Please contact the persons that rejected the request:
-
User Fred Strober rejected with reason: Not the right person.
-
User Donald Duck rejected with reason: Do not like him.
This is an automatically generated mail. Please do not reply.
Read the next sections for details about e-mail text variables.
Here are several examples that apply to participant calculation:
${workflow.subject.manager} - retrieves the manager(s) of the subject (uses the manager link to look up the manager DNs) ${workflow.subject.owner} - retrieves all owner of the subject (uses the owner link to look up the owner DNs) ${workflow.subject.manager.manager} - retrieves the manager of the subject’s manager (useful for escalation) ${workflow.subject.dxrLocationLink.manager} - retrieves the manager of the location the subject is assigned to ${previousParticipants.manager} - retrieves the manager(s) of the previous activity during an escalation
Use the static selection of the Participants tab of an approval definition to setup such definitions. For a detailed description see the section Participant Calculation below.
Elements
A variable definition looks like this:
${root.object.object…object.attribute}
It starts with a root object that can be composed of many sub-objects. The last element must be an attribute.
Root element
Root elements are:
server - provides some general variables of the Java-based Server.
workflow - represents the start element of the current workflow instance. From here you can access sub elements and structures.
<empty> - if nothing is specified, the current activity is assumed.
Examples:
$(workflow.subject.mail)
This statement retrieves the mail attribute of the subject this workflow handles.
$(workflow.subject.manager.mail)
This statement retrieves the mail attribute of the subject’s manager.
Structures
This section explains the structures that can occur within request workflows. This has to do with the orders that such a workflow contains.
The general structure is:
Workflow → One subject order → Zero or more resource orders
Note that the resource orders are about assignments and not the objects itself. From here you can access the subject and the real resources:
${workflow.resources[0].dxrassignfrom@…} - allows accessing the subject (so this is equivalent to the workflow.subject construct).*
${workflow.resources[0].dxrassignto@…}* - allows accessing the resources.
Examples and how to access information:
User modification: Workflow → User
${workflow.subject.cn} - name of the user
${workflow.subject.mail} - mail address of the user
${workflow.subject.manager.mail} - mail address of the user’s manager
${workflow.subject.dxrLocationLink.manager.sn} - the surname of the location manager
Privilege assignment: Workflow → User → Assignment
${workflow.resources[0].dxrStartDate} - the start date of the assignment
${workflow.resources[0].roleParameter_Project@value} - the value of the role parameter Project.
${workflow.resources[0].roleParameter_Project@oldvalue} - the value of the role parameter Project.
${workflow.resources[0].roleParameter_Project@modified} - indicates the modification of the Project role parameter. The value is either TRUE or FALSE.
${workflow.resources[0].dxrassignfrom@mail} - the mail address of the user (you can use workflow.subject.mail instead).
${workflow.resources[0].dxrassignto@cn} - the name of the privilege.
${workflow.resources[0].dxrassignto@owner.mail} - the mail address of the privilege owner.
${workflow.resources[0].dxrassignto@owner.manager.mail} - the mail address of the privilege owner’s manager.
Multiple privilege assignments: Workflow → User → Assignments
You can use the same definitions as shown for one assignment if you define the index with control constructs.
Access certification: Workflow → Privilege → Users
${workflow.resources[0].dxrStartDate} - the start date of the assignment
${workflow.resources[0].roleParameter_Project@value} - the value of the role parameter Project.
${workflow.resources[0].roleParameter_Project@oldvalue} - the value of the role parameter Project.
${workflow.resources[0].roleParameter_Project@modified} - indicates the modification of the Project role parameter. The value is either TRUE or FALSE.
${workflow.resources[0].dxrassignfrom@description} - the description of the privilege (you can use workflow.subject.description instead).
${workflow.resources[0].dxrassignto@sn} - the surname of the user.
${workflow.resources[0].dxrassignto@mail} - the mail address of the user.
${workflow.resources[0].dxrassignto@manager.mail} - the mail address of the user’s manager.
${workflow.resources[0].dxrassignto@dxrLocationLink.manager.sn} - the surname of the location manager.
Note that in the examples we access a specific object if multiple objects are available (resources[0]). Use control structures to evaluate complete lists of objects.
Server Variables
The Java-based Server reads some variables at startup. The following attributes are available:
Domain - the domain name for which this server works
TechnicalDomain - the technical domain name for which this server works
Workflow Instance
The available attributes of a workflow instance are:
absoluteDisplayName (string) - the path of the workflow instance. It contains the display name and all preceding folder names separated by "/" . See path for the display name of the workflow definition.
activities (list of objects) - the list of activities.
applicationState (string) - the instance’s (application) logical state. This state is calculated at the end of a workflow run depending on the final or erroneous activity.
context (map) - a hash list of customer-defined variables (name / value pairs). Can be empty.
contextAttributes (map) - a hash list of customer-defined variables (name / value pairs). Can be empty. Note that this is just an alternative to using “context”.
Keep in mind that all (string) context variables are stored as specific attributes in LDAP, too (LDAP attribute: dxmSpecificAttributes). Context variables that are added or modified are in sync with the LDAP attribute. Variables that are deleted from the context are not synchronized to the LDAP attribute. Therefore when deleting a variable from the context you additionally should create an own variable indicating that the original variable is deleted. Then this new variable can easily be processed using "dxmSpecificAttributes".
displayName (string) - the human-readable name of this workflow instance.
endTime (string) - the date and time in ms (calculated from 1.1.1970) at which the workflow run finished.
expirationTime (string) - the date and time at which the workflow instance expires. This is the workflows start time plus the configured timeout value.
initiator (string) - the user that initiated this workflow.
initiatorEntry (object) - the initiator object with all attributes.
path (string) - the path of the workflow definition. It contains the display name and all preceding folder names separated by "/". See absoluteDisplayName for the display name of the workflow definition.
resources (list of objects) - the list of resource objects
Examples: roles, permissions, groups, users.
You can access specific attributes of user to privilege assignments:
Access to a new role parameter value:*
${workflow.resources[0].roleParameter_*name*@value}*
For modifications, you can also access the old value:
${workflow.resources[0].roleParameter_*name@oldvalue}*
Please keep in mind that this expression only works in emails that are sent before the object has been changed in an “Apply Changes” activity.
This flag allows recognition whether the value was changed (you can use it for conditions):*
${workflow.resources[0].roleParameter_*name*@modified}*
The delivered value is either TRUE or FALSE.
Example for role parameter Project:
${workflow.resources[0].roleParameter_Project@value}
You can access specific parameters of accounts (works only if the assignment is of type group):
${workflow.resources[0].dxrassignto@account_*name}*
Example for the description attribute:
${workflow.resources[0].dxrassignto@account_description}
This definition retrieves the description attribute of the primary account.
You can access specific parameters of a target system (works only if the assignment is of type group):
${workflow.resources[0].dxrassignto@targetsystem_*name}*
Example for the description attribute:
${workflow.resources[0].dxrassignto@targetsystem_description}
This definition retrieves the description attribute of the target system.
You can access specific parameters of an assignment:
${workflow.resources[0].controllerLink.attribute}
Example: ${workflow.resources[0].controllerLink.mail}
This definition retrieves the DN of the person(s) that performed the access certification approval.
${workflow.resources[0].userInfo}
This definition retrieves the flag that can be set by the approver during an access certification to indicate that this user shall be informed via e-mail.
${workflow.resources[0].typeOfOrder}
This definition retrieves the type of the order. The possible values are ADD, MODIFY or DELETE.
subject (object) - the subject object of this workflow
Examples: the user to be created, the user to assign a privilege, …
startTime (string) - the date and time in ms (calculated from 1.1.1970) when the workflow run was started.
state - the workflow state (SUCCEEDED, FAILED, …).
UID (string) - the workflow instance’s unique ID.
Activity Instance
The available attributes of an activity instance are:
activityType (string) - the type of activity, for example: applyChange, enterAttributes, approveCreate, e-mail etc.
activitySubType (string) - currently equal to the activityType.
applicationState (string) - the instance’s (application’s) logical state (for example REJECTED or ACCEPTED).
approvalResult (string) - the approval result of the activity (for example REJECTED or ACCEPTED).
approvers (list of objects) - the list of participants for this activity that really approved/rejected. This attribute represents a list of users. You can access all existing user attributes.
category (string) - one of the categories "operational" or "errorhandler".
context (map) - a hash list of customer-defined variables (name / value pairs). This attribute can be empty.
Example: ${workflow.context.myVar}
retrieves the value of the context variable myVar for further processing.
Keep in mind that all (string) context variables are stored as specific attributes in LDAP, too (LDAP attribute: dxmSpecificAttributes). Context variables that are added or modified are in sync with the LDAP attribute. Variables that are deleted from the context are not synchronized to the LDAP attribute. Therefore when deleting a variable from the context you additionally should create an own variable indicating that the original variable is deleted. Then this new variable can easily be processed using "dxmSpecificAttributes".
endTime (string) - the date and time in milliseconds (ms) (calculated from 1.1.1970) at which the workflow run finished.
escalationLevel (integer) - current escalation level.
0 escalation not yet started
> 0 level of escalation
expirationTime (string) - the date and time at which the workflow instance expires. This is the workflows start time plus the configured timeout value.
immutableJob (object) - the job definition of this activity. It contains these attributes:
baseName (string) - the base name at which the job’s classes and lib directory reside.
className (string) - the class name of the associated job implementation.
extensionsName (string) - the name of the server-extensions where the job resides.
name (string) - the job name.
params (map) - name/value pairs of job-specific information.
interactiveTaskDescription (list of interactiveAttributes) - defines the user task to be performed at the Web interface (for example, to enter attributes). Attributes for interactiveAttributes are:
description - the display name of this attribute at the Web interface.
mandatory - defines mandatory attributes if set to true. Otherwise the value is false.
name - the name of this attribute (typically the LDAP name).
master (string) - the master activity. When calculating approvers and n approvers are found, the master activity is expanded to n activities.
name (string) - identifies the activity within the workflow.
participantEntries (list of objects) - the list of participants for this activity. This attribute represents a list of users. You can access all existing user attributes.
reason (string) - the reason why the approver accepted or rejected the approval request.
startTime (string) - the date and time in ms (calculated from 1.1.1970) at which the workflow run started.
state (string) - the activity state (SUCCEEDED, FAILED, …).
timeout (string) - the timeout of this activity in milliseconds (ms) (calculated from 1.1.1970).
Control Structures
Control structures allow you to generate more complex text structures. Controls are surrounded by <? statement ?>, where the blank between <? and statement is mandatory. Control structures consist of if/else statements for condition handling, for statements for loop handling, and Java statements for defining your own text structures.
If/Else Statement
The if/else statement allows you to handle conditions. The syntax is:
<? if condition ?>
…
<? else ?>
…
<? endif ?>
The condition compares two values, the overall syntax is
operand1 comparator operand2
The comparator is one of:
== | eq | equals - compares whether the two operands are equal.
!= | ne | notequals - compares whether the two operands are not equal.
< | lt - checks whether the first operand is smaller than the second one.
> | gt - checks whether the first operand is greater than the second one.
⇐ | le - checks whether the first operand is smaller than the second one or equal to the second one.
>= | ge - checks whether the first operand is greater than the second one or equal to the second one.
Examples:
<? if ${to.gender} != null ?>
<? if ${to.gender} == “W” ?>
Dear Mrs. ${to.sn},
<? else ?>
Dear Mr. ${to.sn},
<? endif ?>
<? else ?>
Dear Mrs./Mr. ${to.sn},
<? endif ?>
The previous statement tests whether the gender attribute of the participant is filled. If yes, it defines the correct salutation for male and female participants. If not, it defines a more general salutation.
<? if ${name} == “joe” ?>
...
<? endif ?>

<? if ${name} != “joe” ?>
... +
<? endif ?>

<? if ${value} lt 1 ?>
...
<? endif ?>

<? if ${name} gt “abc” ?>
...
<? endif ?>
For Statement
The for statement allows you to handle loops. The syntax is:
<? for variable in list ?>
…
<? endfor ?>
where variable is the name of a placeholder which can be subsequently used and list a list of “ “ delimited values (either constants or delivered by a placeholder whose type is a list).
Examples:
<? for activity in ${workflow.activities} ?>
<? if ${activity.approvalResult} == "REJECTED" ?>
<? for participant in ${activity.approvers} ?>
- User ${participant.cn} rejected with reason: ${activity.reason}
<? endfor ?>
<? endif ?>
<? endfor ?>
which could result in
-
User Huber Fritz rejected with reason: Do not like this person
-
User Berner Hans rejected with reason: Maybe a security risk?
Note that the line "- User ${participant.cn} rejected with reason: ${activity.reason}" acts like a template. You can also define several lines as template text.
Java Statement
The Java statement allows you to define your own text structures. The syntax is:
<? Java class1 class2 ... classN ?>where classX represent Java classes that must implement the interface JavaPlugin.
Example:
<? java placeholder.TestPlugin placeholder.TestPlugin ?>is resolved to
Hello here I am!
Hello here I am!
where placeholder.TestPlugin is defined as
package placeholder;
import java.io.PrintWriter;
import com.siemens.idm.text.parser.JavaPlugin;
import com.siemens.idm.text.parser.ParserException;
import com.siemens.idm.text.parser.TextParser;
public class TestPlugin implements JavaPlugin {
    public void execute(TextParser parser, PrintWriter out) throws ParserException {
        out.println("Hello here I am!");
    }
}
Java Function
The Java statement allows you to define your own text structures. The syntax is:
<? JavaFunction class input ?>where
class - represents a Java classname that must implement the interface JavaPluginExt.
input - is a string / an expression that is passed to the specified Java class (execute method).
Example:
<? JavaFunction com.siemens.idm.jini.util.GeneralizedTime2ISO8601 ${workflow.initiatorEntry.dayOfBirth} ?>If input = ${workflow.initiatorEntry.dayOfBirth} and dayOfBirth has the value 19700218230000Z the function retrieves 1970-02-19 as result.
The class com.siemens.idm.jini.util.GeneralizedTime2ISO8601 is defined as:
package com.siemens.idm.jini.util;
import java.io.PrintWriter;
import java.text.SimpleDateFormat;
import com.siemens.date.GeneralizedTime;
import com.siemens.idm.text.parser.JavaPluginExt;
import com.siemens.idm.text.parser.ParserException;
import com.siemens.idm.text.parser.TextParser;

public class GeneralizedTime2ISO8601 implements JavaPluginExt {
    /**
    * transforms given string from generalizedTime format to yyyy-MM-dd format.
    * @param parser the parser
    * @param toBeProcessed the string to be transformed
    * @param out write transformed string to the PrintWriter
    * @return transformed string; <code>NULL</code> if toBeProcessed == null or <code>not a GeneralizedTime</code> if invalid format
    */
    public void execute(TextParser parser, String toBeProcessed, PrintWriter out) throws ParserException {
        String res = toBePocessed;
        if (res == null) {
            out.println("NULL");
        }
        //out.println("String: " + res);
        GeneralizedTime t;
        try {
            t = new GeneralizedTime(s);
        } catch (Exception e) {
            // error
            out.println("not a GeneralizedTime");
            return;
        }
        SimpleDateFormat dateFormat = new SimpleDateFormat("yyyy-MM-dd");
        String result = dateFormat.format(t.getDate());
        out.println(result); // result
    }
}
Reduced Run-time Activities
For approval activities, DirX Identity can run in two modes that depend on the setting of the Reduce Runtime Activities flag that is visible in the Participants tab of a request workflow definition. The meaning of the values is:
false (default) - besides the original master activity one activity for each approver is created. This mode is compatible with versions prior to 8.2A.
true - besides the original master activity it keeps only one common activity that handles all approvers together.
Use the corresponding variables in your mail text to guarantee correct resolution during runtime. For additional information how to fill the address fields see the section Filling the Address Fields.
Reduce Runtime Activities = false
Use the following variable references in mails:
To - use ${participantEntries[0].mail} to send the mail to the (single) participant.
Language - use ${participantEntries[0].preferredLanguage} to select the language for the resulting mail text if you use e-mail nationalization.
Body - use for example ${participantEntries[0].sn} to include the surname of the participant into the mail text.
You can also use these settings with the same result:
To - use ${participantEntries.mail} to send the mail to the (single) participant.
Language - use ${to.preferredLanguage} to select the language for the resulting mail text if you use e-mail nationalization.
Body - use for example ${to.sn} to include the surname of the participant into the mail text.
This allows you to use the same mail text fragments for workflows with Reduce Run-time Activities set or not set.
Reduce Runtime Activities = true / Separate mails = false
This mode creates only one activity for all approvers. Use the following variable references in mails:
To - use ${participantEntries.mail} to add all participants of this activity into this field.
Language - use ${participantEntries[0].preferredLanguage} to select the language for the resulting mail text if you use e-mail nationalization.
Note: if the definition resolves to several languages, English is taken per default.
Body - use for example ${participantEntries.sn} to include all surnames separated with blanks into the mail text. Alternatively you can use the variable ${to.sn} to obtain the same result. If you use ${to[0].sn} you will obtain the sn of the first participant. Use the for statement (for example with the loop variable 'i') and ${to[i].sn} to process all participants as you need it.
Reduce Runtime Activities = true / Separate mails = true
A more comfortable solution is to send separate mails to each of the participants. In this case set the Separate mails flag and use these settings:
To - use ${participantEntries.mail} to add all participants of this activity into this field.
Language - use ${to.preferredLanguage} to select the language for the resulting mail text if you use e-mail nationalization.
Body - use for example ${to.sn} to include the surname into the mail text. You can address any other attribute of the participant here, for example ${to.givenName}.
Using ${to.gender} allows distinguishing text for men and women, for example:
<? if ${to.gender} == “W” ?>
Dear Mrs. ${to.sn},
<? else ?>
Dear Mr. ${to.sn},
<? endif ?>
Filling the Address Fields
There are various methods to fill the address fields of a mail template (From, To, CC, BCC). This section explains the features and provides some examples.
Read also the section Reduced Run-time Activities because this flag influences mail generation.
Some general rules apply for the field calculation:
-
You can send a mail to several persons only in one language. Set the Language field accordingly.
-
Users with no mail address do not lead to an error as long as there are other mail addresses available.
-
An error is generated if after calculating the From or To field no mail address is available.
-
There are specific errors (To field only) returned from the mail server that result in a send error (for example "550 Relaying denied to <tester@alphabeta.com>"). In this case the mail is also not sent to the other members of the To field.
Addressing a Single User
In many cases you send the e-mail to exactly one person. In this case you can use the expression:
${participantEntries[0].mail}If the mail attribute contains only one value, it retrieves a single mail address, for example: Nik.Taspatch@My-Company.com
If the mail attribute contains multiple mail addresses, the result is for example: Nik.Taspatch@My-Company.com Niki@gmx.com
Note that the addresses are separated by blanks.
If this expression is set in the To field, the user might get multiple instances of the same mail.
If this expression is set in the From field, the first address is taken, the others are ignored (depends also on the mail server type).
If you want to enforce only one value, you can use the expression:
${participantEntries[0].mail[0]}There is no way to define which value is taken from the list.
Addressing Multiple Users
You can use the expression
${participantEntries.mail}to retrieve the mail addresses of all participants. The resulting string could be for example:
Nik.Taspatch@My-Company.com Niki@gmx.com; Lavina.Pitton@My-Company.com ; Retha.Wagner@My-Company.com ;
The addresses of one user are separated by blanks (here for Nik Taspatch), the users are separated by semicolon.
If you use this definition in the To field, you can work with the to variable in conjunction with the Separate mail flag. See the section Reduced Run-time Activities for more information.
You can use semicolon to define multiple expressions in one line, for example:
${participantEntries[0].mail};${workflow.subject.mail}Defining Conditional Addresses
In some cases you might want to define conditional addresses. This is for example useful in privilege access certification workflows where you want to inform only the users that their privilege assignment is removed. Define a conditional expression:
<? for res in ${workflow.resources} ?><? if ${res.userInfo} == "true" ?>${res.dxrassignto@mail};<? endif ?><? endfor ?>which is a loop that filters all assignments where the userInfo flag is set to true:
<? for res in ${workflow.resources} ?>
<? if ${res.userInfo} == "true" ?>
${res.dxrassignto@mail};
<? endif ?>
<? endfor ?>
The mail addresses are separated by a semicolon.
Using the “To” Variable
If you use expressions in the To address field that include the substrings “.mail” or “@mail” then a to variable (representing user objects) is set internally. This to variable can then be used in other expressions, too.
For example, in the message body:
<? if ${to.gender} != null ?>
<? if ${to.gender} == "W" ?>
Dear Mrs. ${to.sn},
<? else ?>
Dear Mr. ${to.sn},
<? endif ?>
<? else ?>
Dear Mrs./Mr. ${to.sn},
<? endif ?>
Keep in mind that this kind of approach only works if the Separate mails flag is turned on.
Participant Calculation
You can define participants in many ways. The method described here is easy to understand, powerful and well suited to a directory object structure that works with links.
Select the static method from the drop-down selection in a Participants tab in approval activities. Here you can define a mix of
-
static participant definitions (for example cn=Berner Hans,ou=Human Resources,o=My-Company,cn=Users,cn=My-Company
-
or dynamic participant definitions (for example ${workflow.subject.manager} which retrieves the manager of the subject this workflow is for).
If an attribute (for example ${workflow.subject.owner}) contains several links, all are used as participants.
Start Objects
There are several start objects for dynamic participant definitions:
workflow.subject - the subject of the request workflow (for example a user, a privilege or a business object)
workflow.resources.dxrassignto - the resource(s) of the request workflow
workflow.initiatorEntry - the initiator of the workflow
previousParticipants - the previous participant (can be used during escalations). Note that you cannot use the participantEntries start object because this is the one that is in calculation.
Methods to set up dynamic definitions are:
One-level Definitions
These definitions use a link attribute at the start object.
${workflow.subject.manager} - retrieves the manager(s) of the subject (uses the manager link to look up the manager DNs)
${workflow.subject.owner} - retrieves all owner of the subject (uses the owner link to look up the owner DNs)
${workflow.initiatorEntry.manager} - retrieves the initiator’s manager.
${workflow.resources.dxrassignto@owner} - retrieves the privilege owner(s).
${workflow.resources.dxrassignto@owner.manager} - retrieves the manager(s) of the privilege owner(s).
Multi-level Definitions
Definitions of this type use a link chain to get the attribute where to retrieve the participants from.
${workflow.subject.manager.manager} - retrieves the manager of the subject’s manager (useful for escalation)
${workflow.subject.dxrLocationLink.manager} - retrieves the manager of the location the subject is assigned to
Relative Definitions
During escalation you can refer to the previous participant(s) of an approval activity.
${previousParticipants.manager} - retrieves the manager(s) of all participants of the previous activity during an escalation
${previousParticipants[0].manager} - gets the manager of the first participant of the previous activity during an escalation
Multiple Definitions
To retrieve participants from different links, use multiple lines in the static table of the Participants tab, for example:
${workflow.subject.manager} - retrieves the manager
${workflow.subject.secretary} - additionally retrieves the secretary
${workflow.subject.sponsor} - and finally evaluates the sponsor link
Tips and Tricks
This section provides some examples of variable substitution as well as valuable tips and tricks.
Representing Fields and Strings
The syntax you use in field and string representations depends on the internal representation of a requested field (whether it is a string or an array of strings) and the location where the field is used.
Example 1:
Dear Mr. ${workflow.subject.sn}might be resolved to
Dear Mr. SmithExample 2:
<? if ${workflow.subject.sn[0]} == "Smith" ?>is resolved to true if sn = "Smith"
If you are in doubt try both variants.Evaluating the Resource Order Type
Use the attribute typeOfOrder to determine the resource order type for privilege assignments, for example:
<? if ${workflow.resources[0].typeOfOrder} == "ADD" ?>The possible values are ADD, MODIFY or DELETE.
Creating Correct Salutations in Email
You can create correct salutation with these statements:
<? if ${participantEntries[0].dxrSalutation[0]} == Herr ?> Sehr geehrter Herr ${participantEntries[0].sn}, <? endif ?>
<? if ${participantEntries[0].dxrSalutation[0]} == Frau ?> Sehr geehrte Frau ${participantEntries[0].sn}, <? endif ?>
In an international environment, you may want to include the preferredLanguage attribute for correct salutation.
Creating Escalation Specific Bodies in Email
You can create escalation specific mail bodies by evaluating the variable ${escalationLevel}, for example:
<? if ${escalationLevel} == "0" ?>
... body without escalation ...
<? else ?>
<? if ${escalationLevel} > "1" ?>
... body for levels > 1 ...
<? else ?>
... body for level = 1
<? endif ?>
<? endif ?>
Implementing a New Activity
The preferred way to create a customized job implementation is to leverage the socketed job framework for automatic activities (see the chapter "Implementing a Socketed Job Framework-based Activity" for more details). You only need to define a brand-new activity if the socketed job framework is not sufficient for your needs. This section describes the general steps necessary to define and implement such an activity.
To create your own job implementation, you must:
-
Define configuration parameters
-
Supply a component description
-
Implement the job as a Java class
-
Read the job configuration
-
Read the workflow instance data
-
Modify the workflow instance data
-
Read and change orders
-
Deploy your job implementation
-
Obtain a connection to the Identity domain
For the API documentation, consult the following folder on your DVD:
Documentation\DirXIdentity\RequestWorkflows\index.html.
For sample sources, see the following folder on your DVD:
Additions\RequestWorkflows\samples.
Defining Configuration Parameters
The entire workflow configuration is passed to the server as an XML document. The configuration parameters for the job are part of this document. When the server starts the job, it passes am XML configuration object with the <job> element as the parent node. It should conform to the following structure:
<job>
<basename>myjob</basename>
<class>com.mycompany.myorg.MyJobImpl</class>
<params>
<param name="param1" value="value1"/>
<param name="param2" value="value2"/>
</params>
</job>
basename:
The basename string value tells the server’s class loader the name of the folder in which to search for your job classes. It must be a folder underneath
install_path*/ids-j-domain-S*n/confdb/jobs.
In the above sample, the server assumes your classes are in the following folder:
install_path*/ids-j-domain-S*n*/confdb/jobs/myjob*.
class:
The full class name of your job implementation; that is, the class that implements the interface
com.siemens.idm.api.Job.
params:
The <params> element contains a list of <param> sub-elements with your configuration parameters. For each parameter, you specify its name and the value. It’s the responsibility of your job implementation to evaluate them.
Supplying a Component Description
To allow Identity Manager to configure an activity with your job, you must supply a component description. The component description extends an abstract object description of an activity. The activity creation wizard searches for activity component descriptions and presents them in a list.
Adding the Component Description LDAP Entry
You must add your component description LDAP entry underneath the workflow configuration folder in the Identity domain:
cn=Activity Types,cn=Configuration,cn=wfRoot,cn=<your domain>.
We recommend that you create your own subfolder (for example, "cn=Customer Extensions") to clearly separate your configurations from configurations installed with DirX Identity.
Please supply values for the following LDAP attributes. They help to present your activity appropriately in the wizard.
objectclass - needs the values dxmComponentDescription and top.
cn - the naming attribute.
dxmComponentType - needs the value activity for the activity creation wizard, which only presents component descriptions with this attribute value.
dxmType - categorizes the basic activity type. The following values are supported:
automatic: an activity that runs automatically without any human interaction. It is started by the server as soon as the start conditions of the activity evaluate to true. Typically, this is the value you should provide.
notify: an activity that can be used for notifications, especially in case of errors or at the end of a workflow. DirX Identity already supplies e-mail notifications.
people: an activity that requires human interaction. It is not applicable for your job implementation.
dxmActivityType - a string value that helps to further categorize the activity. It is displayed in the selection page of the create activity wizard.
description - the description that is displayed in the selection page of the create activity wizard.
dxmContent - the XML document that represents the component description.
Creating the Component Description XML Document
Use the following template for your own component description:
<componentDescription
name="Name of your component"
componentCategory="activity"
>
<extendsComponentDescription>automaticActivity</extendsComponentDescription>
<rootelement>activity</rootelement>
<element name="activity" extends="activity">
<properties>
<property name="dxmActivityType" >
<value>applyChange</value>
</property>
</properties>
<element ref="job" minOccurs="1" maxOccurs="1"/>
</element>
<element name="job" extends="job">
<properties>
<property name="basename" xmlNotation="SimpleElementProperty"
elementname="basename" >
<value>**Your Job classes folder**</value>
</property>
<property name="class" xmlNotation="SimpleElementProperty"
elementname="class" >
<value>**com.mycompany.myorg.MyJobImpl**</value>
</property>
</properties>
<element ref="params" minOccurs="1" maxOccurs="1"/>
</element>
<element name="params" extends="params">
<properties>
<property name="*param1*" xmlNotation="NameValueProperty"
elementname="param" type="java.lang.Boolean">
<value>false</value>
</property>
<property name="*param2*" xmlNotation="NameValueProperty"
elementname="param" type="java.lang.String">
<value default="true">the default value</value>
<value>value2</value>
</property>
</properties>
</element>
<presentationDescription>
<propertypage name="JobTab"
insertafter="GeneralTab"
class="siemens.dxr.manager.nodes.customizer.GenericPropertyPage"
title="Parameters"
layout="properties: *job/params/param1,job/params/param2*"
/>
<propertyPresentations>
<property name="*job/params/param1*">
<label>**Param 1**</label>
</property>
<property name="*job/params/param2*" >
<label>**Param 2**</label>
</property>
</propertyPresentations>
</presentationDescription>

</componentDescription>
Leave most of the template unchanged. You only need to insert the name of your component, your job class folder, the class name of your job implementation and for each configuration parameter, a description of the property and its presentation. See also "Defining Configuration Parameters".
Element <componentDescription>, attribute name:
The name of your component description as it is displayed in the column "component" in the selection page of the activity creation wizard.
In the element named job: <element name="job" …/>:
In <property name="basename":
In the <value> sub-element, enter the name of the subfolder in which the class loader of the IdS-J server searches for the classes of your job implementation.
In <property name="class":
In the <value> sub-element, enter the full class name of your implementation.
In <element name="params", sub-element <properties>:
For each configuration parameter, enter an element <property> with the following attributes:
name: the parameter name, for example, param1.
xmlNotation: always use the value "NameValueProperty".
elementname: always use the value "param".
type: designates the data type of the parameter. Common values are: java.lang.Boolean, java.lang.String.
Provide allowed values as a list of <value> sub-elements. Flag the default value by the attribute default set to true.
The presentation of your configuration parameters in the Identity Manager is specified in the <presentationDescription> element.
The <propertypage> sub-element defines a property page. Make sure that all your parameters are listed in the layout attribute. They are presented in the same order as the list. Pay special attention to the parameter names: they must be prefixed with the XML parent element names in XPath format. For our scenarios, this is always "job/params/". To present your parameters "param1" and "param2" you must enter:
layout="properties: job/params/param1, job/params/param2"
The presentation of your parameters is specified in the <propertyPresentations> element. Enter a <property> sub-element for each of your parameters.
Attribute name:
The name of your property in the same format as used for the <propertypage>. This means: Use "job/params/param1" for parameter "param1"!
Sub-element <label>:
The name of your parameter as it is displayed in the property page.
If you entered a list of allowed values in the <element><property> definition, Identity Manager automatically presents them as a combo box.
Implementing the Job
When an activity is to be started, the IdS-J server loads a class with the name configured in the <classname> sub-element of the <job>. The server expects that this class has a default constructor and implements the interface com.siemens.idm.api.Job.
This interface requires the following methods:
setConfiguration(IDMJob cfg):
The server calls this method before the run() method to hand over the job configuration.
It passes the configuration in a class that wraps the XML fragment containing the job configuration. The root element is the <job> element with the configuration parameters in its params/param element. See "Reading the Job Configuration" for details.
run(TaskContext ctx, Map modifications):
This method starts the job. The server passes two parameters.
The task context gives read access to the activity and workflow instance, especially to the workflow and activity states, the workflow initiator, the subject and the optional resources.
The job can indirectly modify the workflow by entering the desired modifications into the passed modification map. Use this facility to set the resulting activity state or application state.
Handling Retries
In error situations, the workflow engine re-starts a job according the retry configuration: retry limit and "wait before retry". The engine assumes an error if the job implementation throws an exception. As a result, the job implementation does not need to handle retries. It just throws an exception and relies on the workflow engine to start it again later on. If the job sets an application state (see "Modifying Instance Data" for information on how to do this), it is taken as application state for the activity after the last retry failed.
Activity Timeout
A timeout is indicated to the job via the TaskContext. If the job does not react or does not react in a timely fashion an interrupt for the thread is called. The resulting InterruptedException should not be ignored. For more information, see the Use Case documentation Java Programming in DirX Identity.
Importing Required Libraries
When compiling your class, make sure you have the following jar file on your classpath:
com.siemens.idm.server-api.jar
com.siemens.idm.requestworkflow-api.jar
dxmAPI.jar
dxmUtil.jar
dxmOrder.jar
For the API documentation, consult the following folder on your DVD:
Documentation\DirXIdentity\RequestWorkflows\index.html.
For sample sources, see the following folder on your DVD:
Additions\RequestWorkflows\samples.
Reading the Job Configuration
The IdS-J server provides a convenience class XmlNodeMapImpl that holds the configuration parameters in a Map. Get a parameter string value using the parameter name as a key. Here is a sample snippet for a string and a boolean parameter:
Node paramsNode = _cfg.getNode("params");
Map map = new com.siemens.idm.jini.util.xml.XmlNodeMapImpl(paramsNode);
_attributeName = String.valueOf(map.get("attributeName"));
String s = String.valueOf(map.get("modifySubject"));
_modifySubject = Boolean.valueOf(s);
See also the readConfiguration() method in the sample.
Reading the Workflow Instance Data
The configuration object passed in the run(…) method allows us to obtain the activity and the workflow instance object as in the following sample snippet:
com.siemens.idm.api.nodes.IDMActivity activity = _cfg.getActivity();
com.siemens.idm.api.nodes.IDMWorkflow wf = activity.getWorkflow();
This gives us the interface of a standard workflow. Since we are working here with a request workflow, we want the specialized interface, which we get by class casting:
com.siemens.idm.requestworkflow.api.RequestWorkflowInstance rqwf = (RequestWorkflowInstance)wf;Now we are able to obtain some data from the workflow, such as the initiator, the subject and the resource(s). Here is a snippet that reads the DN of the workflow initiator:
String initiator = wf.getInitiator();In the following sections, we show how to read the subject and the resources. For reading other properties, see the javadoc of the API.
Reading the Workflow Subject
The workflow subject is the entry that represents
-
the user who is created with this workflow or
-
whose attributes are modified or
-
who is assigned some privilege or
-
the role or other object which is created or modified.
The subject is stored in the workflow instance as an XML object, which we call "Order". An order is basically an SPML request that is extended with some properties such as the activation date, the creator, and so on. There are several types of orders: Add- or Modify-Orders are used with a creation or an "approve-modification" workflow, while an Info-Order represents a subject that is not modified as with a user-assignment approval. Note that you can change an Add- or Modify-Order from within an activity, but not an Info-Order.
You obtain a subject via the request workflow instance:
com.siemens.dxm.api.order.Order subject = rqwf.getSubject();There are a number of "getters" to read properties such as the DN, the order type (Add, Modify, Info, and so on) or the directory type (user, role, …) of the order instance. Here are a few samples. For more details, see the API.
String subjectDN = subject.getID();
String orderType = subject.getType();
String directoryType = subject.getDirectoryType();
Note: if you want to modify the subject and store it persistently for further use in follow-up activities, don’t use the "setter" methods; use the modification object passed in the calling run(…) method. See the section "Modifying Workflow Instance Data" for more details.
Reading the Workflow Resource(s)
A workflow instance may contain no resources, one resource, or more than one resource. For example, a workflow for creating a (user) object or approving its modification does not need a resource. In a workflow for approving a user-role assignment, the role assignment is the resource.
The resources in a workflow instance are very similar to workflow subjects: they are represented as an "Order".
To work with resources, you have the following alternatives:
-
Handle them as orders. This is the preferred way.
-
Handle them as XML strings.
To work with resources as orders, you obtain an array of resources from a workflow instance by issuing:
Order[] resourceOrders = null;
resourceOrders = rqwf.getResources();
The following code snippet shows how to read attributes from a resource and set some value. For the complete code, see the sample delivered with DirX Identity.
for (Order resource: resourcesArray) {
    log.info("Resource: resource type=" + resource.getResourceType() + ", Order Type=" + resource.getType() + ", Resource ID="+resource.getID());
    String[] attrnames = resource.getAttributeNames();
    for (String attrname: attrnames) {
        log.info("Value(s) of resource attribute " + attrname + ": " + stringArray2String(resource.getValues(attrname)));
    }
    if (!modifySubject) {
        resource.setProperty(_attributeName, _attributeValue);
        log.info("Resource modified: "+resource.toXMLString());
    }
}
To work with resources as strings:
-
Obtain the resources as a collection from a workflow instance by calling its getResourceAsString method:
ArrayList resourceStrings = null;
Collection resources = rqwf.getResourceStrings();
resourceStrings = processResourceStrings(resources.iterator());-
Transform the resource string to an order with the following code snippet:
while (it.hasNext()) {
    String rs = (String)it.next();
    OrderFactory factory = new OrderFactoryImpl();
    Order resource = factory.create(rs);
    // now you can handle the resource order as above
}-
Get back the resource as string with the order method toXMLString():
String resourceString = resource.toXMLString();Note: if you want to modify the resource and store it persistently for further use in follow-up activities, don’t use the setter methods. Use the modification object passed in the calling run(…) method. See the section "Modifying the Workflow Instance Data" for more details.
Modifying the Workflow Instance Data
Use caution when modifying a subject or a resource in a workflow instance. With a normal class, you expect to use the setter methods to store new or modified values. You can do this for orders, too, but the changes are not stored back in the workflow instance; they are lost when your job ends. To store your changes in the workflow instance and make them available to downstream activities, you must return them to the workflow engine as modifications.
An empty modifications map is passed to your job as parameter of the "run" method call:
run(TaskContext ctx, _Map modifications_)Use this map to return your changes and make them persistent. Put the changed objects into the map using some predefined keys. The following snippets are taken from the sample job implementation delivered with DirX Identity and demonstrate how to store the changes for a subject or a resource as an order or an XML string:
// subject as an order: +
modifications.put(RequestWorkflowInstance.KEY_WF_SUBJECT, subject);

// subject as string: +
modifications.put(RequestWorkflowInstance.KEY_WF_SUBJECTSTRING, subject.toXMLString());

// resource as an order: +
modifications.put(RequestWorkflowInstance.KEY_WF_RESOURCES, resourceOrders);

// resource as string: +
modifications.put(RequestWorkflowInstance.KEY_WF_RESOURCESTRINGS, resourceStrings);
There are other standard keys. You find them as static properties of the RequestWorkflowInstance interface. A very important key is KEY_ACT_APPLICATION_STATE to set the application state of an activity. Use it to set the activity state explicitly. A workflow designer can then easily configure different downstream activities depending on the state of your job implementation. The following sample sets the application state to success:
modifications.put(RequestWorkflowInstance.KEY_ACT_APPLICATION_STATE, "success");For more details on changing an order see the section Reading and Changing Orders.
Read and Write Context Properties
You can use the workflow context to store application-specific information in a request flow activity and then read it later on in a downstream activity. The context allows you to store custom properties as you would in a Java map. You obtain the context from the request workflow instance as shown in the following snippet (for details, see "Reading the Workflow Instance Data"):
IDMActivity activity = _cfg.getActivity(); +
IDMWorkflow wf = activity.getWorkflow(); +
RequestWorkflowInstance rqwf = (RequestWorkflowInstance)wf; +
IDMWorkflowContext *ctx = rqwf.getContext()*;
The following snippet shows how to put a property named "testtest" with the ID of the Java Virtual Machine into the context:
VMID vmid = new VMID(); +
String id = vmid.toString();* +
ctx.put*("testtest", id);* +
rqwf.setContext*(ctx);
Don’t forget to set the modified context at the workflow!
Obtaining a property from the context is as easy as reading it from a map:
String test = (String) *ctx.get*("testtest"); +
logger.info("retrieve testtest:" + ((test !=null) ? test: "nada"));
Reading and Changing Orders
Subjects and resources in a workflow instance are orders. The section "Reading the Workflow Instance Data" shows how to obtain them from the workflow. Orders implement the interface com.siemens.dxm.api.order.Order.
An order is either of type InfoOrderRequest, AddOrderRequest, ModifyOrderRequest or DeleteOrderRequest (short: info order, add order, etc). The type depends on the workflow type and on the data with which the workflow was created. In a workflow with resources (that is, assignments for a subject user) the subject is always an info order. An info order contains only a number of attributes for the subject, no modifications. If the workflow is for creating an object (for example, creating a user), for approving subject attributes or for deleting an object, the order is of type add, modify or delete respectively.
Use the method getType to determine the type of the order. With getID, you obtain the object’s DN and with getValues(*propertyname)*, you get the values of an property as a string array. For more details, examine the appropriate API.
The following methods are provided for changing an order:
setSubjectDN(*dn)* / setResourceDN(*dn)*:
Sets the identifier (the distinguished name) of the subject with respect to the resource.
setProperty(*name,* value*)*:
Sets or changes attributes controlled in an order. Note that the behavior depends on the type of the order. For:
Info Order:
This method simply sets the value for the attribute. Changes are NOT stored in the subject entry in LDAP, they reside only in the workflow.
If the value is empty, or an empty String ("") or an array of length 0, the old attribute value is removed from the order.
Add Order:
Attribute changes are stored in the workflow and the apply Change activity stores them in the new subject / resource entry in LDAP.
If the value is empty, or an empty String ("") or an array of length 0, the old attribute value is removed from the order.
Modify Order:
Attribute changes are stored in the workflow and the apply Change activity stores them in the updated subject / resource entry in LDAP.
Modify orders are different from add orders in that they contain modifications for attributes. An attribute modification contains an operation. This means a setProperty overrides the property modification. Therefore, the name attribute is evaluated differently from the other order types:
It is expected in the format "*operation",* "*property-name"* where operation is add, replace or delete, name is the name of the property as you use it in getProperty or getValues.
Samples:
setProperty("add-description", "New Description")
adds the value "New Description" to the attribute"description".
setProperty("delete-mail", "sample@gmx.de")
deletes the value "sample@gmx.de" from the attribute "mail".
As in the add and info order, an empty value deletes the modification. For example:
setProperty("delete-mail", "") or setProperty("delete-mail", null)
deletes the modification previously produced with setProperty("delete-mail", "sample@gmx.de").
A setProperty("*name",* value*)* is not expected here. As empty values delete modifications, only a setProperty("*name"," ")* can be accepted for the modification.
Deploying the Job
When you have compiled your job classes and have produced a jar file, you must then deploy it to the IdS-J server. The class loader of the server searches the job-specific classes in a separate folder for your job underneath the server’s "confdb/jobs" folder. Suppose we have a job named "sampleJob". We need to create the folder
install_path*/ids-j-domain-S*n*/confdb/jobs/sampleJob/lib*
You need to place all the jar files your job needs underneath the lib subfolder. This is the jar file of your job implementation and optionally other third-party jar files that your job requires (and which are not yet available in the confdb/common/lib folder). If the class loader doesn’t find a class here, it searches in the confdb/common/lib folder.
Obtaining a Connection to the Identity Domain
Sometimes custom implementations need an LDAP connection to the Identity domain. There are two methods to obtain this information. We recommend using the job interface described in the following sections. The DomainSessionAccessor method is deprecated.
Implementing a Job with access to the Identity Domain
A job interface is available that provides access to the Identity domain, the subject and resource orders, and the job configuration parameters.
Implementing the Job
You need to derive your job class from the class com.siemens.idm.jobs.BasicJob. This class provides an extended run interface that supplies a SvcSession object that is managed in a session pool, subject- and resource orders and a map of configuration parameters.
The Interface
You need to implement the following interface:
/**
* A run method providing session access.
* Implement this run method in the derived class
* @param taskCtx The task context
* @param modifications The modifications to be applied to the workflow instance
* @param session The service session, providing LDAP Access
* @param subject The subject order
* @param resources The resource orders
* @param parameters The map of configuration parameters
* @throws Exception An exception leads to a temporary error (retry).
*/
protected abstract void run (TaskContext taskCtx, Map modifications, SvcSession session, Order subject, Order[] resources, Map parameters) throws Exception;
A Sample Job
A sample job is provided on the DVD in the folder Additions → RequestWorkflows → samples (class SampleJobWithSession). It shows how to read job configuration parameters, to search objects in LDAP and to set the application state.
Deployment
The basic class com.siemens.idm.jobs.BasicJob is deployed in the jar file orderImpl.jar. Consequently, you can deploy your jar file to confdb/jobs/order/lib.
Using the DomainSessionAccessor Method
You can obtain the connection parameters from the IdS-J server using the static method getSessionClone() of the singleton DomainSessionAccessor. Here is a code snippet that shows how to perform this task:
// get a clone of the domain session
SvcSession session = DomainSessionAccessor.getClone(50000);
netscape.ldap.LDAPConnection ldapcon = session.getLDAPConnection().getLdapConnection.getLDAPConnection();
Because this method clones the session, it can create memory problems and thus this method is deprecated. We recommend using the job interface described above.
Implementing a User Hook for an applyChange Activity
ApplyChange activities are used in a request workflow to apply the changes stored in the subject and/or resource orders to the data store. The applyChange activities allow you to add a user hook that is called before and after the application of each order. You can use this user hook to modify the data before the change is applied or to change the order after the change is processed. Changed orders are written back to the workflow instance and can be read in successive activities.
Configuring the User Hook
To configure a user hook, enter its fully-qualified class name in the Class name text entry field of the activity’s Parameters tab. If you want to use the sample user hook, you must enter the class name com.siemens.idm.jobs.sample.SampleApplyChangesUserhook here.
The Interface
The user hook must be written in Java. It must implement the following interface:
package siemens.dxr.service.order.api;
public interface ApplyChangesUserHook {
/**
* Calls a UserHook before applying the orders
* - changes to the orders are updated at the worklow instance
* - if an ApplyChangesException is thrown, processing is aborted.
* - in this case, workflow context and the activity's application state are updated from the exception if non-null values are provided
* - settings of workflow context / activity application state to the apply changes context are not considered if an exception is thrown
* @param subject The subject order that is applied in the next step.
* @param resource The resource order that is applied in the next step. May be null if no resource is assigned.
* @param context The context object
* @param ld A clone of the session's LDAP connection. Is closed by ApplyChanges.
* @throws OrderJobException Aborts processing
*/
void preProcess(Order subject, Order resource, ApplyChangesContext context, LDAPConnection ld) throws OrderJobException;

/**
* Calls a UserHook after applying the orders
* - changes to the orders are updated at the worklow instance
* - if an ApplyChangesException is thrown, processing is aborted.
* - in this case, workflow context and the activity's application state are updated from the exception if non-null values are provided
* - settings of workflow context / activity application state to the apply changes context are not considered if an exception is thrown
* @param subject The subject order that is applied in the next step.
* @param resource The resource order that is applied in the next step. May be null if no resource is assigned.
* @param context The context object
* @param ld A clone of the session's LDAP connection. Is closed by ApplyChanges.
* @throws OrderJobException Aborts processing
*/
void postProcess(Order subject, Order resource, ApplyChangesContext context, LDAPConnection ld) throws OrderJobException;
}
A context object is passed to the user hook methods. The context object implements the following interface:
package siemens.dxr.service.order.api;
public interface ApplyChangesContext {

    /**
    * Boolean flag indicating that subject orders are applied
    * @return flag to apply subject orders
    */
    public boolean isApplyAttributeChanges();

    /**
    * Boolean flag indicating that resource orders are applied
    * @return flag to apply resource orders
    */
    public boolean isEvaluateAssignments();

    /**
    * Boolean flag indicating that an approval workflow is started for a privilege requiring approval
    * @return flag for starting approval workflow for resource order
    */
    public boolean isStartApprovalWorkflows();

    /**
    * sets the activity's application state.
    * @param aState The application state to set. If set here, the activity's application state is set to that value after ApplyChanges has completed.
    */
    public void setActivityApplicationState(String aState);

    /**
    * gets the activity's application state
    * @return the activity's application state
    */
    public String getActivityApplicationState();

    /**
    * The audit master uid
    * @return The audit master uid
    */
    public String getAuditMasterUID();

    /**
    * Reads the workflow context
    * @return The workflow context.
    */
    public Map<String, String> getWorkflowContext();

    /**
    * sets the workflow context. If set, the values stored in the context are added to the workflow context after applyChanges has completed.
    * Use getWorkflowContext to get the current context and modify it. Then use setWorkflowContext to make the changes permanent after ApplyChanges has finished.
    * @param wfContext
    */
    public void setWorkflowContext(Map<String, String> wfContext);

    /**
    * The workflow instance ID
    * @return The workflow instance ID
    */
    public String getWfInstId();
}
A Sample Job
A sample job is provided on the DVD in the folder Additions/RequestWorkflows/samples (class SampleApplyChangesUserhook). It shows how to set a unique ID at the subject order and adds a start date to a resource order before it is applied to the data store.
The postProcess call is not used in the sample; it has an empty body.
Deployment
The interface siemens.dxr.service.order.api.ApplyChangesUserHook is deployed in the jar file dxrServices.jar. You should deploy your jar file to confdb/commons/lib.
Implementing a Socketed Job Framework-based Activity
The socketed job framework allows you to implement your own automatic activity with minimal configuration effort and Java code writing. The idea is simple: you configure a predefined universal activity type Run socketed job which invokes your implementing Java class specified as a common parameter. The framework provides access to the Identity domain, the subject and resource orders and the predefined job configuration parameters, which means that no new component description is necessary.
To create your own job implementation, you must:
-
Add a new activity of the type Run socketed job
-
Specify values for predefined configuration parameters
-
Implement the job as a Java class
-
Read the job configuration
-
Read the workflow instance data
-
Modify the workflow instance data
-
Read and change orders
-
Deploy your job implementation
The socketed job framework is based on the common request workflow API. Consult the following folder on your DVD:
Documentation\DirXIdentity\RequestWorkflows\index.html.
For the specific API and sample sources, see the following folders on your DVD:
Additions\SocketedJob\api
Additions\SocketedJob\samples
Adding the New Socketed Job Framework Activity
When defining a request workflow, select the universal automatic activity template Run socketed job. Connect it with other activities and define the start conditions. Use start conditions based on application state; for details, see the section "Understanding Request Workflow States" in the chapter "Request Workflow Architecture".
Specifying Predefined Configuration Parameters
The Run socketed job already contains the following predefined configuration parameter names:
Class name for socket job - the parameter is accessible as className in the XML configuration of the job. This parameter is mandatory and must contain a fully qualified class name of a Java class implementing one of the following interfaces:
com.siemens.idm.jobs.socketed.api.CustomSocketJob
com.siemens.idm.jobs.socketed.api.CustomSocketSvcSessionJob
The specified class must be stored in the following folder:
install_path*/ids-j-domain-S*n*/confdb/jobs/socketed/lib*
1. Parameter to be passed to job - the parameter is accessible as paramOne in the XML configuration of the job.
2. Parameter to be passed to job - the parameter is accessible as paramTwo in the XML configuration of the job.
3. Parameter to be passed to job - the parameter is accessible as paramThree in the XML configuration of the job.
4. Parameter to be passed to job - the parameter is accessible as paramFour in the XML configuration of the job.
5. Parameter to be passed to job - the parameter is accessible as paramFive in the XML configuration of the job.
These parameters are optional and can be used to pass any configuration parameter value to the custom socket job. You can pass any value that can be stored as a common string: for example, a path to a file, a number or a boolean value. Note that the name of the parameter cannot be changed and you should document its meaning in the relevant socket job activity implementation. These parameters are also always available only as string constants. You need to convert these strings to the correct types in your socket job class if necessary.
The number of parameters cannot be changed without modifying the component description for the Run socketed activity job (Run socketed job.xml). If necessary, define a new component description. Do not rewrite the default one. See the section "Supplying a Component Description" in the chapter "Implementing a New Activity" for more details.
Implementing the Job
When running the activity, the IdS-J server will search for a class defined in the mandatory configuration parameter class name for socket job. This class must implement one of these very similar interfaces:
com.siemens.idm.jobs.socketed.api.CustomSocketJob - use this interface when no access to the Identity domain is required, it requires only one method:
executeSocketJob(TaskContext taskCtx, Map<String, Object> modifications, Order subject, Order[] resources, Map<String, Object> parameters, RequestWorkflowInstance wfInstance)
This method contains the main logic of the job. The server passes six parameters.
The task context gives read access to the activity and workflow instance, especially to the workflow and activity states, the workflow initiator, the subject and the optional resources.
The job can indirectly modify the workflow by entering the desired modifications into the passed modification map. Use this facility to set the resulting activity state or application state.
The subject contains the subject order of the request workflow as stored within the task context. It is a convenient way to access it directly.
The resources contain the resource orders of the request workflow as stored within the task context. It is a convenient way to access it directly. Note that the resource orders may be not available for some request workflow types.
The parameters map contains the values for predefined configuration parameters. The values are accessible for key names paramOne, paramTwo, paramThree, paramFour and paramFive as described in the section "Specifying Predefined Configuration Parameters".
The request workflow instance contains the object as it is stored within the task context. It is a convenient way how to access it directly.
com.siemens.idm.jobs.socketed.api.CustomSocketSvcSessionJob – use this interface when you need direct access to the Identity domain; it requires only one method:
executeSocketJob(TaskContext taskCtx, Map<String, Object> modifications, SvcSession session, Order subject, Order[] resources, Map<String, Object> parameters, RequestWorkflowInstance wfInstance)
This method contains the main logic of the job but this time the server passes seven parameters. The signature of the method and its logic are almost the same as the previous interface.
This interface also provides session-representing access to the Identity domain.
Handling States
We recommend using application state when returning a result of the activity to be used as a start condition for a next activity. Use constants from com.siemens.idm.requestworkflow.api.ApplicationState or a custom value and use them in the start conditions. See the section "Modifying the Workflow Instance Data" in the chapter "Implementing a Generic Activity" for more details.
Do not set state (com.siemens.idm.api.Job.STATE) directly. It will be set automatically to Succeeded if no exception occurs or to Failed.Temporary if an unhandled exception is thrown. See the section "Understanding Request Workflow Activity States" in the chapter "Request Workflow Architecture" for more details.
Importing Required Libraries
When compiling your class, make sure you have the following jar files in your classpath:
commons-pool.jar
com.siemens.idm.requestworkflow.jar
com.siemens.idm.requestworkflow-api.jar
com.siemens.idm.server-api.jar
com.siemens.idm.server-config.jar
com.siemens.idm.server-core.jar
dxcLogging.jar
dxiSocketedJob.jar
dxmAPI.jar
dxrServices.jar
ldapjdk.jar
storage.jar
Note that the list might not be complete since it depends on the customer extensions. You may also need to add jar files with missing dependencies to the deployment directory; see the section "Deploying the Job".
Reading the Job Configuration
The socketed job framework provides methods and keys to access the predefined configuration parameter values:
String p1 = SocketedJob.getParameterAsString(ActivityConstants._PARAM_ONE_, parameters);

String p2 = SocketedJob.getParameterAsString(ActivityConstants._PARAM_TWO_, parameters);

String p3 = SocketedJob.getParameterAsString(ActivityConstants._PARAM_THREE_, parameters);

String p4 = SocketedJob.getParameterAsString(ActivityConstants._PARAM_FOUR_, parameters);

String p5 = SocketedJob.getParameterAsString(ActivityConstants._PARAM_FIVE_, parameters);
See also the ParamListingJob class in the sample directory.
Reading the Workflow Instance Data
The socket job interfaces give you direct access to the request workflow instance, to the subject and to the resources if available. You can also read the participant of the previous people activities or read the initiator of the workflow. See the class ParamListingJob and Utils in the sample directory for these advanced examples.
Modifying the Workflow Instance Data
The socketed job framework is based on common request workflow API. Use the methods described in the section "Modifying the Workflow Instance Data" in the chapter "Implementing a New Activity" for more details.
Read and Write Context Properties
The socketed job framework is based on common request workflow API, use the methods described in the section "Read and Write Context Properties" in the section "Implementing a New Activity" for more details.
Reading and Changing Orders
The socketed job framework is based on common request workflow API. Use the methods described in the section "Reading and Changing Orders" in the section "Implementing a New Activity" for more details.
Deploying the Job
The jar file containing compiled custom implementation of the socketed job APIs must be placed within the folder install_path*/ids-j-domain-S*n*/confdb/jobs/socketed/lib*. Do not add other jar files to this directory unless it is necessary due to class loader problems. It is mainly necessary when using other third-party dependencies.
Implementing a Java Class for Finding Participants
Instead of finding the participants of a people activity by approval policies or group lists, you can write your own Java class to do it. To create your own "find participants" implementation, you must:
-
Define configuration parameters
-
Implement a Java class
-
Deploy the Java class
For the API documentation, consult the following folder on your DVD:
Documentation\DirXIdentity\RequestWorkflows\index.html.
For sample sources, see the following folder on your DVD:
Additions\RequestWorkflows\samples.
Defining Configuration Parameters
When you create or modify a people activity, select the type class from the drop-down list at the top of the Participants tab.
In the "Class" field, enter the full class name of your Java class. For the sample class described here, enter: com.siemens.idm.participants.sample.FindParticipantsSample.
If your class needs configuration parameters, enter them in the "Parameters" table. For each parameter, enter the parameter name into the left column and the value into the right column. Suppose you want to read some data from a file; in this case, you might define a parameter "filename" in the left column and then enter the absolute path name of the file "c:\myconfigdata\findparticipant.properties" in the right column.
See the section "Implementing the Java Class" for information on how to read them in your Java class.
Implementing the Java Class
The Java class must provide a default constructor and implement the interface com.siemens.idm.api.custom.Participants. Optionally, it can implement the interface com.siemens.idm.api.custom.ParticipantsExtended: it enables the custom class to obtain a connection to the Identity Store.
Implementing the Participants Interface
For the Participants interface, the only method you need to realize is findParticipants(…). The IdS-J server passes the following parameters from the workflow and activity instance:
operation - the operation string taken from the workflow definition.
subjecttype - the subject type taken from the workflow definition. In most cases, the subject of the workflow is a user.
subjectDn - the distinguished name of the workflow’s subject.
Note: If there is an escalation, the subjectDN is the DN of the participant of the previous level. For example, in the first escalation level, you get the DN of the original activity participant, in the second level, the DN of the participant of the first level. Nevertheless, you have access to the workflow subject via the activity. For more details, see the section "Reading the Workflow Instance Data". Here are the necessary commands:
com.siemens.idm.api.nodes.IDMActivity activity = _cfg.getActivity();
com.siemens.idm.requestworkflow.api.RequestWorkflowInstance rqwf = (RequestWorkflowInstance) activity.getWorkflow(); com.siemens.dxm.api.order.Order subject = rqwf.getSubject();
properties - a map of configuration parameters taken from the activity definition. See the section "Defining Configuration Parameters" for information on how to specify and set them in the workflow.
activity - the interface to access the activity instance and through it the workflow instance. Your class must return a collection of String objects that represent the distinguished names of the participants.
Implementing the ParticipantsExtended Interface
The ParticipantsExtended interface allows a participant finder to obtain a context, which especially gives access to an LDAP connection to the DirX Identity domain. This interface defines a setter for a ParticipantContext. The com.siewmens.idm.api.custom.ParticipantContext defines the following methods that are to be implemented:
LDAPConnection getLdapConnection() - returns a “netscape.ldap.LDAPConnection”. It is connected to the DirX Identity domain and you use it to retrieve any LDAP entries in the domain. You can also change any LDAP entry, so be careful when using it.
Reading Configuration Parameters
Reading the configuration parameters is very simple: just call the get(…) method of the properties map and provide the parameter name as the key, as shown in this sample:
String filename = (String)properties.get("filename");
Note that the parameter values are treated as strings.
Returning Participants
The server expects the participants as a collection of strings.
The following code snippet simply constructs a list of DN strings and returns them:
ArrayList<String> res = new ArrayList<String>(1);
res.add("cn=Taspatch Nik,ou=Global IT,o=My-Company,cn=Users,cn=My-Company");
return res;
Importing the Required Libraries
When compiling your class, make sure you have the following jar files in your classpath:
dxmApi.jar
com.siemens.idm.server-api.jar
com.siemens.idm.requestworkflow-api.jar
For the API documentation, consult the following file on your DVD:
Documentation\DirXIdentity\RequestWorkflows\index.html.
Implementing Participant Filters and Constraints
Each people activity allows for specifying a participant filter and participant constraints which are applied to the result of the "find participants" implementation. The filter allows for reducing the list of participants; for example, skipping the workflow initiator. The constraint implementation decides whether the number of participants meets the workflow’s requirements ("4-eye-principle").
Implementation of a filter and a constraint are quite similar. Both must be realized as Java classes. The server passes the list of participants and the current activity. Only the result of their operation is different.
Participant Filter:
A participant filter must implement the interface com.siemens.idm.requestworkflow.api.ParticipantsFilter. In its only method filterParticipants(…) it receives the list of participants and the current activity. It must return the allowed participants as a list of strings denoting the distinguished names of the participants. For details, see the section "Implementing a Participant Filter".
Participant Constraints:
A participant constraints class implements the interface com.siemens.idm.requestworkflow.api.ParticipantConstraints. In its only method checkParticipantsConstraints(…) it receives the list of participants and the current activity. If it rejects the participants, it must throw a ConstraintViolationException. For details, see the section "Implementing Participant Constraints".
Filters and Constraints as Joblets (Deprecated):
As an alternative to providing Java classes implementing the interfaces ParticipantsFilter and ParticipantConstraints, filters or constraints can be realized as joblets. Joblets are Java sources implementing the IDMJob interface that are compiled and started at runtime by the IdS-J server. See the sections "Configuring a Joblet" and "Implementing a Joblet" for instructions on how to realize a joblet.
Deploy Filters and Constraints:
For details, see the section "Deploying Filters and Constraints".
For the API documentation, consult the following folder on your DVD:
Documentation\DirXIdentity\RequestWorkflows\index.html.
For sample sources, see the following folder on your DVD:
Additions\RequestWorkflows\samples.
Implementing a Participants Filter
Your participants filter implementation should have a default constructor and implement the interface com.siemens.idm.requestworkflow.api.ParticipantsFilter. The only method of the interface is filterParticipants(…). The additional interface com.siemens.idm.requestworkflow.api.ParticipantsFilterExtended allows you to obtain a context with the LDAP connection to the Identity domain.
Interface ParticipantsFilter:
The only method you must implement is: filterParticipants(…). The server passes two parameters:
participants: the list of participants calculated so far, each as a distinguished name string.
activity: the current activity for which the participants are to be calculated.
The method returns the list of filtered participants as a collection of strings, each representing a participant’s distinguished name.
The following snippet shows you how to read the workflow initiator’s DN, exclude the initiator from the participants and return the new participant list:
RequestWorkflowInstance wf = (RequestWorkflowInstance) activity.getWorkflow();
String initiator = wf.getInitiator();
ArrayList allowedParticipants = new ArrayList();
Iterator it = participants.iterator();
while (it.hasNext()) {
    Object o = it.next();
    String participant = (String)o;
    if (participant.equalsIgnoreCase(initiator)) {
        log.info("ParticipantFilterSample - participant: " + participant + " not allowed for approval");
    } else {
        allowedParticipants.add(participant);
    }
}
return allowedParticipants;
Interface ParticipantsFilterExtended
This interface extends ParticipantsFilter and establishes the ParticipantContext. This allows obtaining an LDAP connection to the DirX Identity domain and thus to execute LDAP operations. You must implement the following methods:
public void setParticipantContext(ParticipantContext ctx): the server passes a com.siemens.idm.api.custom.ParticipantContext. See below.
Interface ParticipantContext
This interface provides the following method:
public LDAPConnection getLdapConnection(): it returns an LDAP connection to the DirX Identity domain.
Writing Logs
You can issue log messages that appear in the server’s log files. The server’s log support com.siemens.idm.jini.util.logging.LogSupport provides the usual log interface, especially the following methods:
log.error(…): error message
log.warning(…): warning message
log.info(…): normal informational message
log.finest(…): debug message
Implementing Participant Constraints
Your participant constraints implementation should have a default constructor and implement the interface com.siemens.idm.requestworkflow.api.ParticipantConstraints. Optionally it can also implement com.siemens.idm.requestworkflow.api.ParticipantConstraintsExtended. The only method of the interface is checkParticipantConstraints(…).
Interface ParticipantConstraints
You must implement the only method checkParticipantConstraints(…*)*. The server passes two parameters:
participants: the list of participants calculated so far, each as a distinguished name string.
activity: the current activity for which the participants are to be calculated.
A participant constraints implementation returns a ConstraintViolationException to notify the server that the participant list does not meet the constraint conditions. In the exception constructor, you can supply the desired resulting activity state and application state along with an error message that will be stored with the activity instance. This allows you to configure subsequent activities that are started in this case.
The following snippet shows you how to make sure that the list contains at least one participant:
if (participants == null || participants.size() < 1)
    throw new ConstraintViolationException("SUCCEEDED", "REJECTED", "Too few approvers, at least one approver required!") +
);
If not enough participants are found, the server sets the resulting activity state to "SUCCEEDED" and the activity application state to "REJECTED".
Interface ParticipantConstraintsExtended
This interface extends ParticipantConstraints and establishes the ParticipantContext. This allows accessing the LDAP connection and thus to execute LDAP operations. You must implement the following methods:
public void setParticipantContext(ParticipantContext ctx): the server passes a com.siemens.idm.api.custom.ParticipantContext. See below.
Interface ParticipantContext
This interface provides the following method:
public LDAPConnection getLdapConnection(): it returns an LDAP connection to the DirX Identity domain.
Writing Logs
You can issue log messages that appear in the server’s log files. The server’s log support provides the usual log interface, especially the following methods:
log.error(…): error message
log.warning(…): warning message
log.info(…): normal informational message
log.finest(…): debug message
Configuring a Joblet
A joblet is a Java class source code that is compiled by the Java-based Server (IdS-J) at runtime. The server includes the body of the configured Java source code into a template, compiles it and loads the compilation unit.
The template contains the common parts of the Java source code implementing the com.siemens.idm.jobs.java.Joblet interface:
The leading package line
It is built dynamically including the workflow and activity name.
The common import statements
import java.util.Map;
import com.siemens.idm.jini.util.logging.LogSupport;
import com.siemens.idm.api.nodes.IDMJob;
import com.siemens.idm.api.context.TaskContext;
import com.siemens.idm.jobs.java.Joblet;
The class and interface method declaration.
And the trailing closing brackets for the interface method and the class definition.
You must provide the missing parts of the source code in two fields:
Imports: The additional import statements.
For each additional import, supply the full class name without the leading "import" and the trailing ";" strings.
Code: The method body.
See the section "Implementing a Joblet" for details.
Implementing a Joblet
A joblet must implement the com.siemens.idm.jobs.java.Joblet interface with the method:
public void run(IDMJob job, TaskContext taskCtx, Map modifications) throws Exception;
The server passes the following parameters when running the joblet:
Job: gives access to the job, which in turns allows reading the activity and the workflow instance.
Task Context: gives access to a map of context properties. It can be used as an application-specific properties container.
modifications: An empty map for returning modifications that are made on the workflow instance. This parameter should not be used in participant filters and constraints!
When implementing a joblet, you only need to provide the additions to the surrounding template: the additional class names to be imported and the body of the run(…) method.
Note:
The joblets are compiled at runtime using Java 1.4 compiler settings. Do not include Java 5 constructs such as generics or the loop enhancements.
For the API documentation, consult the following file on your DVD:
Documentation\DirXIdentity\RequestWorkflows\index.html.
Deploying Filters and Constraints
When you have compiled your filter and constraint classes, you must produce a jar file and then deploy it to the IdS-J server. The class loader of the server searches the filter and constraint classes in its common folder
install_path*/ids-j-domain-S*n*/confdb/common/lib*.
If you need additional jar files, place them into the same folder.
Testing Request Workflows
Request workflows can be quite complex.Therefore we recommend intensive testing.Use these methods:
-
Test the workflow in a test environment.Use collections in conjunction with the transport feature to transfer tested workflows between test and production environments.
-
While in a development or test environment, set up the Map Mail Address field to your mail address.Then you can evaluate and adjust notification mails easily.
Understanding Java-based Workflows
This section provides information about Java-based workflows, including information about:
-
Java-based Connectivity architecture
-
Customizing Java-based workflows
-
Customizing event-based maintenance workflows
Java-based Workflow Architecture
Java-based workflows can be separated into "provisioning workflow" and "event-based maintenance workflow" categories.
Provisioning workflows:
-
Provision account and group attributes and memberships to connected systems.
-
Validate connected systems.
-
Update user passwords and provision password changes to connected systems.
-
Import users and other entries from other source systems.
-
Can work in full or delta mode.
Event-based maintenance workflows:
-
Are only started upon a change event of an entry in the Identity domain.
-
Apply rules (consistency, provisioning and validation) depending on the type, check links and update associated users where necessary.
Java-based workflows are hosted by the Java-based Identity Server (IdS-J). Depending on the type, they can be started by an event, by a schedule or manually in Identity Manager.
The following sections describe:
-
The differences between full export, delta and event-based workflows
-
The location of delta state
-
How to start a Java-based workflow
-
The structure of a provisioning workflow
-
Workflow classification
-
Mapping
-
Cross-memberships
Full, Delta and Event-based Workflows
This section gives information on workflow types that perform a full or delta export or those that are triggered by change events.
When started by a change event, the workflow processes the entry identified by the event.
When started by schedule or by Identity Manager, the workflow exports and processes the entries of all channels matching the search criteria. This is typical for Validation or Full Export workflows.
A delta workflow is also started by a schedule or by Identity Manager, but it exports only those entries that have been changed since the last run. When a delta workflow finishes successfully, it stores the delta time in a delta state entry in the Identity domain. Note that each channel has its own delta state. When a delta workflow runs for the first time (it has no delta state), it exports all of the entries from the source system.
Compared to the delta features provided by Tcl-based workflows, the Java-based workflows
-
Support the delta feature for all connectors and all systems that supply attributes that indicate the last modification time.
-
Additionally support reading deleted entries from Active Directory.
-
Store their delta state in the Identity domain rather than in the configuration database.
Location of Delta State
If a delta workflow synchronizes accounts or groups of a target system, it stores the delta state beneath the target system’s configuration folder. The DN is composed of the RDN display names of the workflow definition and the channel. For example: Windows Domain Europe / Configuration / Delta / My-Company / Target Realtime / ADS / ADS_Ident_Realtime_Delta / accounts.
If the workflow is not associated with a target system, it stores the delta state beneath the workflow root of the domain. For example: My-Company / wfRoot / Monitor / Delta / My-Company / Source Realtime / ADS / Import Users from ADS / users.
Note that delta workflows read both the attributes requested in the channel and those that are needed to issue delta searches. For LDAP systems in particular, these are the operational attributes createTimestamp and modifyTimestamp. Make sure that the bind account has sufficient access rights to read them.
Java-based Workflow Structure
The structure of Java-based workflows is nearly always the same. The following figure illustrates this structure:
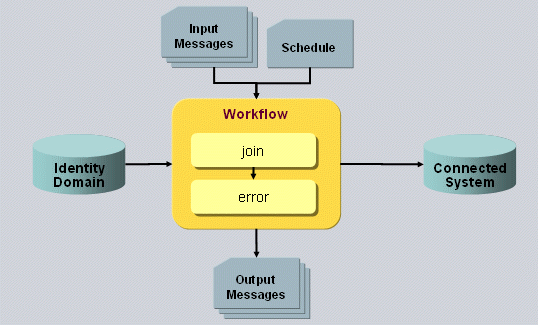
As shown in the figure, the Java-based workflow consists of two activities:
-
The "join" activity, which is responsible for the workflow functionality and is the productive activity.
-
The "error" activity, which is only involved if errors occur. The join activity passes request and response of a failed update request into the error channel. The workflow engine keeps these requests and re-starts the workflow with such events after a retry waiting time. The failed events are passed to the error activity only if the retry limit is reached. The error activity then usually sends e-mail to an administrator.
The workflow can either be started by an event, by a schedule or manually. It receives the events in its input channel.
Normally, the workflow synchronizes data between an Identity domain and a connected system. These items are configured as ports named "IdentityDomain" and "TS" respectively. The join activity’s controller determines the specific behavior. If configured to do so, the workflow sends e-mails using a "notify" channel with the appropriate connector, usually the mail connector.
Some workflows only work with the Identity domain and therefore need only the configuration for the "IdentityDomain" port. The User and Account Password Managers are examples. The "Event-based Resolution" workflow only works with the Identity domain and by default takes the connection from the Identity server.
The structure of a Provisioning activity is also nearly always the same, and is illustrated in the following figure:
The controller determines the activity’s behavior and thus the complete workflow behavior. The controller is often called the "join engine". See the section "Workflow Types" for the list of controllers. In Identity Manager, when you have selected the join activity in a workflow, you can select the controller from a proposal list. This allows you to easily change the type of a workflow.
To access the Identity domain and the connected system, the controller uses the connectors configured for the port: the LDAP connector to the Identity domain and a connector that is appropriate for the type of connected system.
The activity is responsible for all entries of the connected system and the associated target system sub-tree in the Identity domain; that is, for all accounts and groups of the target system. These entries are defined via the included channels.
When configuring a provisioning port in Identity Manager, you must select a "channel parent" entry. The subtree beneath it contains all of the channels that are considered to be part of the port, as shown in the following figure.
Each channel represents a type of entry in the attached system. Among other items, the channel defines the search base and search filter for identifying the entries in its export section. For more details, see the "Channels and Mapping" section.
The workflow and activity structure for cluster workflows is the same as for single systems. They simply use the appropriate type of cluster controller. The following figure illustrates this structure:
The workflow is configured for a default connected system. When the workflow is started, the controller reads the configuration data for the actual connected system from the appropriate target system entry:
-
If the workflow has been triggered by an event, it searches the target system entry to which the changed account or group belongs. The target system entry contains address and binding information for the connected system as well as other options used for mapping. The controller reads this data and updates the connector configuration and environment properties accordingly.
-
If the workflow has been started by a schedule or manually, the start request contains attributes to identify the target system that needs to be provisioned. This information allows the controller to find the target system entry and read and update the configuration data as previously described.
Note that the structure for cluster target systems is fixed:
Target Systems → cluster_container → cluster → target_system
Cluster containers can only reside at the top level directly between the node cn=Target Systems. This is due to performance aspects. It allows the software to find the related object descriptions of a cluster at a fixed place. No costly evaluation of tree nodes is necessary.
For details about how to configure clustered workflows, see the chapter "Creating Cluster Target Systems" in this guide or the chapter "Cluster Workflows" in the DirX Identity Connectivity Administration Guide.
Change Events:
After the join engine has changed an entry in the Identity domain, it sends change events depending on the configuration.
It searches the appropriate active attribute policy using the object type configured in the channel. It uses the same object type to find the audit policy. If the attribute policy flag for sending events is set, the join engine sends a change event using the JMS connector in the event port. The join engine builds the event topic as it does other events: values for type, cluster and resource are prefixed with a value that indicates the type of the event. In this case, the join engine uses the prefix "dxm.event" to distinguish it from a provisioning request event that starts a synchronization workflow.
If the event is for a target system account or a group, the values for type cluster and resource are taken from the respective attribute of the target system entry. This action allows for different workflows for each target system.
For other types of objects (such as users, roles, and organizations), the type is the object description name of the changed object, the cluster is the server name where the Identity domain resides and the resource is the domain name.
This event is to be processed by the event workflow responsible for this type of object and if appropriate for the target system.
Note that for performance reasons, Java-based workflows do not take attribute policies into account.
Audit:
The join engine writes audit logs for each update operation both at the Identity and at the connected system side. If the audit flag in the port configuration is set, the join engine searches the appropriate audit policy for the given object type. It includes the configured identifying attributes into the record and passes it through the audit channel (which is always internally configured) to the audit log listener(s).
Controller Types
DirX Identity supports a set of different Java-based workflow types. The type of a workflow is determined by the controller of the join activity (see the section "Workflow Structure"). These controllers can be divided into the following categories:
Target System Provisioning (single system)
-
Sync2TS (event-based) - an event-based synchronization from the Identity Store to a connected system and backwards.
-
Sync2TS (scheduled) - a scheduled synchronization from the Identity Store to a connected system and backwards.
-
SyncOneWay2TS (event-based) - an event-based synchronization from the Identity Store to a connected system.
-
SyncOneWay2TS (scheduled) - a scheduled synchronization from the Identity Store to a connected system.
-
SyncOneWay2Identity (scheduled) - a scheduled synchronization from a connected system to the Identity Store. Note that there is no event-based synchronization when using the SyncOneWay2Identity controller.
-
SyncOneWay (event-based) - an event-based synchronization from the Identity Store to a connected system. Note that this controller is only available for compatibility reasons; it has been replaced by SyncOneWay2TS.
-
SyncOneWay (scheduled) - a scheduled synchronization from the Identity Store to a connected system. Note that this controller is only available for compatibility reasons; it has been replaced by SyncOneWay2TS.
-
Validation (scheduled) - a scheduled validation from a connected system to the Identity Store. Note that this controller works in mode InitialLoad as long as the Last Validation date field in the General tab of the target system object is empty. After a run, this field is updated and the next run performs a Validation. A run in Validation mode means that changes are reported in ToDo fields.
-
FullImport (scheduled) - a scheduled workflow from a connected system to the Identity Store.
-
RestoreTS (scheduled) - a scheduled workflow that restores a connected system from Identity Store.
-
FullSyncToHistoryDB (scheduled) - a controller for a scheduled workflow that synchronizes all entries of a configured type from Identity Store to the DirX Audit History Database.
Clustered Target System Provisioning
-
ClusterSynchronization - a workflow that synchronizes clusters of target systems from Identity Store to connected systems and backwards. It can be started by a scheduled or triggered by a change event.
-
ClusterValidation - a workflow that validates clusters of connected systems into Identity Store.
-
ClusterRestoreTS - a workflow that can restore clusters of connected systems from Identity Store.
-
ClusterSyncOneWay2Identity - a workflow that synchronizes clusters of connected systems into Identity Store.
-
ClusterSyncOneWay2TS - a workflow that synchronizes clusters of target systems from Identity Store to connected systems.
Password Synchronization
-
UserPasswordEventManager - a workflow that accepts password changes from Windows domain accounts or from Web Center, updates them at the Identity users and requests password changes for each affected account.
-
PwdExpiration - a workflow that checks for expired account passwords and generates new ones in case the workflow runs scheduled. In the event-based situation it accepts account password changes from Web Center and changes the given account password.
-
PwdReset - a scheduled workflow that can be configured for privileged or for personal accounts by setting the respective search filter. If configured for privileged accounts it generates a new password for every privileged account and sets it at the account. If configured for personal accounts it reads the password from the associated user and sets it at the account.
-
PwdUserExpiration - a scheduled workflow that sends notification messages to users whose passwords are about to expire.
Target System Delta Provisioning (single system)
-
DeltaSyncOneWay2TS (scheduled) - a scheduled synchronization from the Identity Store to a connected system. The controller searches only for the entries that were changed since the previous run.
-
DeltaSynchronization (scheduled) - a scheduled synchronization from the Identity Store to a connected system and backwards. The controller searches only for the entries that were changed since the previous run.
-
DeltaSyncOneWay2Identity (scheduled) - a scheduled synchronization from a connected system to the Identity Store. The controller searches only for the entries that were changed since the previous run. Note that there is no event-based synchronization with this controller.
-
DeltaSyncToHistoryDB (scheduled) - a controller for a scheduled workflow that synchronizes all entries of a configured type from Identity Store to the DirX Audit History Database. The controller searches only for the entries that were changed since the previous run.
Clustered Target System Delta Provisioning
-
DeltaClusterSynchronization (scheduled) - a workflow that synchronizes clusters of target systems from Identity Store to connected systems and backwards. It searches only for the entries that were changed since the previous run.
-
DeltaClusterSyncOneWay2TS (scheduled) - a scheduled synchronization from the Identity Store to a cluster of connected systems. The controller searches only for the entries that were changed since the previous run.
-
DeltaClusterSyncOneWay2Identity (scheduled) - a scheduled synchronization from a cluster of connected systems to the Identity Store. The controller searches only for the entries that were changed since the previous run.
Maintenance Workflows
Maintenance workflows apply rules on changed entries in the Identity domain. Their actions depend on the type of the changed entry and on the changes notified in the event:
-
Event-based User Resolution - a workflow that operates on changes to a DirX Identity user. It analyzes the changes and either performs a complete user resolution, updates attributes of the associated accounts or does nothing, if none of the critical attributes have been changed.
-
Business Objects (such as Organization, Organizational Unit and Context) - workflows that apply the consistency rules whose filters match the entry attributes, check for broken links to and from the entry and update associated users.
-
Generic Event Controller - allows configuring event-based processing workflows for custom objects.
It does not make sense to start maintenance workflows manually or by a schedule because they only handle events.
Note that workflows that are marked as scheduled can also be started in Identity Manager and operate as if they were started by a schedule.
Target System Synchronization Controllers
The Sync2TS controller provisions entries of the target system in the Identity domain to the connected system and synchronizes their state back to the Identity domain. The operation depends on whether it is called via an event or a schedule. The following figure illustrates the processing:
As illustrated in the figure:
-
The event contains the DN of the changed entry in the DirX Identity domain.
-
The join engine reads this entry. Based on the DN or on other read attributes, it selects the appropriate channel. If no event is given, the join engine assumes it was started by a schedule or manually. It then performs a search evaluating the configuration in the <export> section. Then it processes the entries of the search result one by one the same way as it does in the event case. Note that in this case the channel sequence is determined by the sequence numbers of the destination channels, in this case the channels attached to the connected system.
-
The join engine searches the joined entry using the join conditions of the corresponding channel. The join conditions are performed one after the other until a single entry has been found. The join engine evaluates the join conditions in the following way: if the join condition defines a search base, then that object is read; if the join condition defines an SPML filter, then that filter is used and is combined with the search base defined in the <export> section. Depending on the search result, the join engine provides the (default) entry operation for the mapping step: ADD if no entry has been found), MODIFY if an entry has been found.
-
The join engine performs mapping and builds an add, modify or delete request depending on the mapping result. It updates the joined entry or creates a new one by passing this request to the connector.
-
The join engine reads the updated entry again using the returned entry identifier for backward synchronization and to retrieve attributes that were indirectly set by the connected system.
-
The join engine performs mapping for the other backward direction using the configuration of the channel attached to the Identity domain.
-
Depending on the mapping result, the join engine builds an add or modify request and updates the entry in the Identity domain.
Note that the Sync2TS controller is also used to synchronize passwords to the connected system (and optionally back to IdentityStore). If the topic of the incoming event starts with either "dxm.setPasswordRequest." or "<Domain>.dxm.setPasswordRequest." then passwords are synchronized to the connected system and optionally password relevant attribute information is synchronized back to IdentityStore. If the password channel on Identity side is missing then synchronisation is done only to the connected system; otherwise synchronisation is done both ways.
No other attributes than defined in account or group channels are synchronized.
Target System Validation Controller
The validation controller performs a target system validation against the content of the target system representation in the Identity Store. The following figure shows the processing:
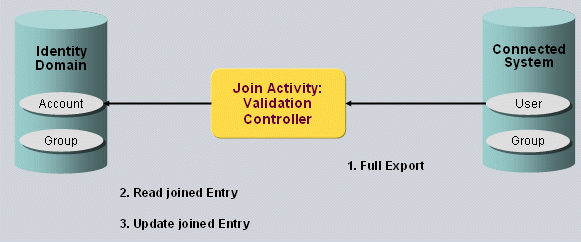
As shown in the figure, the validation controller performs the following actions:
-
Searches the entries in the connected system by constructing a search request for each channel based on the channel’s <export> section. The channel sequence is determined by the sequence numbers of the destination channels, in this case the channels attached to the target system in the DirX Identity domain. Let’s assume the account channel in DirX Identity has sequence number 1, because the membership references are stored in the groups. In this case, the corresponding channel in the connected system - the one for the users - is searched first. When all entries of the result are processed, the controller issues the search for the next channel (here, the groups) and processes them.
-
Evaluates the join conditions of the DirX Identity channel and searches the joined entry. (For details on evaluation of the join condition see step 3 of "Sync2TS" controller above.)
-
Performs the mapping configured in the DirX Identity channel, constructs the appropriate request (add, modify or delete) and passes it to the LDAP connector for updating the joined entry in the DirX Identity domain.
The validation controller deletes entries in the Identity domain that have no corresponding entry in the connected system. In order to identify these entries, the validation controller uses two different algorithms that depend on the definition of the sort attribute in the <export> section:
-
If a sort attribute is configured at both sides, the controller searches both the source and the destination. It processes the source search result entries one by one, and:
-
If the source entry matches the next destination entry according to the join conditions, it considers this entry the joined entry and updates it. Then it continues with next source entry and next destination entry.
-
If the source entry’s sort attribute is lexicographically smaller than the destination entry’s sort attribute, it assumes that the destination entry needs to be created. Then it continues with the next source entry.
-
If the source entry is lexicographically greater than the destination entry, the controller assumes that the destination entry needs to be deleted. It either issues a delete request for the destination entry or delegates the task to the user hook according the user hook’s response to the "getCallDelete()" method. The controller then continues by comparing current the source entry with the next destination entry.
-
When there are still source entries available and all destination entries have been processed, then all these remaining source entries will be created (after having performed the appropriate mappings).
-
When there are still destination entries available and all source entries have been processed, then all these remaining destination entries need to be deleted. (For details on deletion algorithm look at the previous steps.)
-
In all other cases, the controller first searches for all identifiers of the destination and stores them in a map. Then, it exports the source entries and joins one after the other in the destination:
-
If no matching entry is found, the entry will be created in the destination.
-
If a matching entry is found, the entry is eventually modified and the joined entry is deleted from the map.
-
In the end, only the entries that have no corresponding source entries remain in the map. The validation controller either deletes them itself or delegates this task to the user hook.
-
Note:
As a consequence of the algorithms described above, you should configure a Sort Attribute if you configure Paged Read in a channel’s <export> section. This configuration enables the validation controller to process the entries page by page rather than having to read all pages first into memory before starting the comparison algorithm. As a result, Paged Read, which especially makes sense for large search results, performs in an optimal way if a Sort Attribute is configured, too. Also keep in mind to configure an appropriate size limit at the LDAP Server for the complete search result even if you choose Paged Read.
a. Full Import Controllers
The "full import" controller performs a full import from a connected system into DirX Identity. Its operation is identical to the validation controller with one exception: the validation controller updates the "last validation date" at the target system when the job is finished. In other words, full import is the same as initial load with respect to a connected system. Full import can be used not only for connected systems with accounts and groups, but also for all types of systems and objects, especially for importing users.
b. Restore Target System Controller
The "restore target system" controller restores a connected system with the entries stored in the Identity Store after a crash of the connected system. The controller works like the "full import" controller, but from the Identity Store to the connected system. It should be started by a schedule or (preferably) by hand using Identity Manager. It exports all entries of the "IdentityDomain" port and imports them into the connected system. It deletes entries in the connected system that have no representative in the Identity Store.
Note: if you don’t want objects that do not have a representative in the Identity Store to be deleted in the connected system, you should use the Sync-One-Way-2-TS Controller, which only adds or modifies objects. We recommend using this controller first when going productive to test if your environment and your mapping are correct before using the Restore Target System Controller.
c. Sync-One-Way Controller / Sync-One-Way-2-TS Controller
The "sync-one-way" controller synchronizes entries from the Identity Store to the connected system. Its operation differs from the "Restore" controller in that it does not delete entries that were deleted in the Identity Store. Its operation differs from the "Sync2TS" controller in that it does not synchronize the changes back from the connected system to Identity Store: it works only "one-way".
d. Sync-One-Way-2-Identity Controller
The "sync-one-way-2-identity" controller synchronizes entries from the connected system to the connected system. Its operation differs from the "FullImport" controller in that it does not delete entries that were deleted in the connected system, and it does not update the “last validation date”. Its operation differs from the "Sync2TS" controller in that it does not synchronize the changes back from the Identity Store to the connected system: it works only "one-way".
e. Cluster Synchronization Controller
The "cluster synchronization" controller is like the "Sync2TS" controller except that it serves not only one target system, but a cluster of them. The appropriate workflows accept change events for a target system, but can also be started by a schedule or manually by Identity Manager.
When started by a schedule or by hand, the workflow expects the DN of the target system, its type, cluster and domain attributes as start parameters. The controller reads the connector configuration and the environment properties from the target system entry, opens the target system connector with the new configuration data and provisions the entries of the Identity Store to the connected system exactly the same way as the "Sync2TS" controller.
When started by a change event, the controller finds the target system by evaluating the event topic: The topic contains the type, domain and cluster attributes of the target system.
f. Cluster Validation Controller
The "cluster validation" controller is like the normal "validation" controller except that it serves not only one target system, but a cluster of them. For more details on cluster handling, see the Cluster Synchronization Controller.
g. Cluster Restore TS Controller
The "cluster restore" controller is like the normal "restore target system" controller except that it serves not only one target system, but a cluster of them. For more details on cluster handling, see the Cluster Synchronization Controller.
h. Password Reset TS Controller
The "password reset TS" controller resets the passwords of the accounts of a DirX Identity target system. If the workflow is configured for personal accounts, it reads the password from the user and sets it at the account. If it is configured for privileged accounts, it generates a new password and sets it at the account. For each change, it sends a change event that triggers the password synchronization workflow to update the password at the connected system. The controller does not handle change events.
i. Password Expiration Controller
The "password expiration" controller checks for expired passwords of privileged accounts in DirX Identity. The controller searches for passwords that are going to expire according to the configured filter. The number of days before expiration is configurable. The controller generates a new password, sets it at the account and sends the change event to trigger the password synchronization workflow. The controller does not handle change events.
Channels and Mapping
The channel configuration specifies how to find entries in the attached system and how to map them to corresponding system.
A channel is always attached to a connected directory, which represents either a connected system or a target system sub-tree in an Identity domain. We differentiate between a number of channel types, as shown in the following figure.

As shown in the figure:
-
Main or primary channels represent the entries of a certain type, typically accounts or groups. They have a reference to the corresponding channel, which represents the entries at the other system. Typically, an accounts channel for the Identity domain has a corresponding channel for the users in the connected system. The same holds for groups.
-
Member channels represent the account-group memberships. In order to support "cross-membership" scenarios (for more details, see the section
"Cross Memberships"), the attributes that hold the membership information (for example, for LDAP: attribute "members") are separated and managed in the member channel. The member channel is referenced from one of the primary channels, which indicates that the membership attributes are stored in the primary entry. The member channel also has a corresponding channel that may be attached to another primary channel that is not the corresponding channel of the source. This relationship defines a "cross-memberships" scenario, where members are stored in groups at one side and in users at the other. -
Password channels represent the password-related attributes of an entry type; that is, of users and accounts. These attributes include the attribute that stores the password (for example, "userPassword" for LDAP systems), and can include additional ones, especially for password reset information. The password channel references the primary channel for the entry that holds its attributes. Separating the password attributes from the normal ones allows the join engine to identify the attributes to be updated upon password change events. The password channel on Identity side is an optional one and will be used when synchronizing password relevant attribute information from Connected System back to IdentityStore.
-
Secondary channels are mainly intended for relational database systems, which store entry attributes in several joined tables. Each secondary channel has a reference to its primary channel. When reading an entry from the attached system, the join engine also reads the attributes from the secondary channel(s). As a result, it needs some information from the schema of the database:
-
The storage location of the reference between primary and secondary channel
-
The attributes that hold the reference in the source and which are referenced in the destination
-
The type of relationship: 1-to-1, 1-to-many.
The channel configuration is separated into the following sections:
Export: Defines the elements to search the entries in the attached system, usually search base, search filter and scope (for hierarchical systems). Furthermore, the controller can be advised to perform a paged search (with page size, time limit, etc.). You should only activate this option if the appropriate connectors support this functionality.
Delta: The settings here are only evaluated by delta controllers. You have two options here:
-
Extend the search filters in order to obtain only the changed entries since the last change. This option can be applied to any connector and any connected system that supports attributes representing the creation and or modification time. Typical samples are LDAP servers with the attributes “createTimestamp” and “modifyTimestamp”. You just need to supply the list of attributes containing the creation or modification time.
-
This option, called the “Expert Operational Attributes”, is only for special connectors that explicitly support delta handling. The most important sample is the Active Directory connector. It is able to not only obtain the changed entries, but also those, which were deleted since the last export. In this case you just need to select the “Expert Operational Attributes” option and enter a fixed XML String containing the value “${LastDeltaValue}” for the operational attribute “dxm.delta”.
For more information about the specific aspects when selecting this option for the Active Directory Delta Workflow see "Using the Target System (Provisioning) Workflows → Understanding Java-based target System Workflows - > Active Directory (ADS) Workflows → Customizing the ADS Workflows → Delta Workflows" in this guide
Join: Specifies a number of join conditions that the join engine is to evaluate when it tries to find the joined entry in the destination, given an entry from the source system. The conditions are applied one after the other. If any one condition leads to exactly one resulting entry in the search, the join engine considers this to be the joined entry. Otherwise, it evaluates the next one in the list. You have two options for formulating a join condition:
Specify a search base:
<searchBase type="..."><spml:id>${source.dxrPrimaryKey}</spml:id></searchBase>The join engine in the search request replaces the search base defined in the export section with this one. This option is appropriate if you know the identifier from the source entry. You can use placeholders for referencing attributes of the source, the target entry or the environment. In case of a target entry, the mapping for this attribute is performed.
Specify a filter extension:
<filterExtension><dsml:equalityMatch name="..."><dsml:value>...In the search request, the join engine extends the filter given in the export section with this term by "and-ing" the given conditions. For the values, you can use the same placeholders as mentioned above and in attribute mapping in general.
Import: The import section specifies some options that are evaluated when the join engine creates, updates or deletes an entry in the attached system. In particular, you can define, if a notification is to be sent, when an entry is created or deleted.
Mapping: The mapping section contains the mapping for all attributes of the destination system when a source entry is to be updated / imported at the attached system. You have several options for specifying the mapping, ranging from direct mapping to simple expressions with placeholders to Java mapping classes. You can even specify a post mapping that is called after all the attribute mappings. For details, see the help page on the channel and the customization chapter for Java attribute mapping.
Operational Attributes: A list of so-called "operational attributes" can be passed to the connector with each request. This list depends on the connector. In most cases, you can ignore them.
Cross-Memberships
In most applications and systems, user-group memberships are stored at the group. This is typical for LDAP and Active Directory systems: users are members in groups. Scenarios with large groups may face performance problems: the long member lists often must be read and updated. Storing the memberships at the user would normally be much faster.
You cannot change how memberships are stored at existing connected systems. But you can change it for the accounts and groups in a DirX Identity target system. If the flag "Reference group from account" is checked, group memberships are stored in the attributes of an account. You can easily change this setting, but you must make sure that the Provisioning workflow is configured consistently.
Memberships are Stored in Groups at Both Sides
At the DirX Identity target system entry, the flag "Reference group from account" is not checked.
In the workflow configuration, the channel "members" is set as the member channel of the groups channel for both connected directories. Make sure that the groups are synchronized after the accounts / users by setting the "Export Sequence Number" to "2" in the groups channels and to "1" in the accounts channels.
Memberships are Stored in the Account or User at Both Sides
At the DirX Identity target system entry, the flag "Reference group from account" is checked.
In the workflow configuration, the channel "members" is set as the member channel of the accounts channel for both connected directories. Make sure that the accounts are synchronized after the groups by setting the "Export Sequence Number" to "2" in the accounts channels and to "1" in the groups channels.
Cross-Membership Scenario
When the memberships are stored at the accounts in DirX Identity and at the groups in the connected system we call this a "cross-membership" scenario.
At the DirX Identity target system entry the flag "Reference group from account" is checked. If in the connected system the identifier of the user is not used as reference in the group, we need to set the attribute "Source for referenced property" at the target system: Set the attribute name of the user, which is used in the member attribute of the group in the connected system. For a Lotus Notes system this would be the "fullname". For LDAP and Active Directory systems it is the DN, which is also used as identifier in mapping: Hence you can leave this attribute empty.
In the workflow configuration, the channels must be handled differently:
For the connected directory representing the DirX Identity target system, the channel members must be assigned as the member channel in the General tab of the accounts channel and must be de-assigned at the group channel. The accounts must be imported after the groups. Therefore, the "Export Sequence Number" in the accounts channel must be set to "2" and that of the groups channel must be set to "1".
For the connected directory representing the connected system, it is the other way around: The groups must be imported after the users / accounts. Therefore, the "Export Sequence Number" in the accounts channel must be set to "1" and that of the groups channel must be set to "2". Also regarding the members channel assignment the default setting - members channel is assigned at the groups channel - can be left.
Starting Java-based Workflows
Java-based workflows are started:
-
as the result of an event sent because of an object change
-
regularly by a schedule
-
manually in Identity Manager
The next sections provide more information about these start-up methods.
Event-Based Workflows
Conceptually, we distinguish between the following types of event-based workflows:
-
Provisioning workflows, which provision accounts and groups to a connected system.
-
Password change workflows, which receive password changes of a user or a privileged account and update them in the Identity domain and in the user’s associated accounts in connected systems as necessary.
-
Event-based maintenance workflows, which are started when an entry (such as a user, a role, or an organizational unit) within the Identity domain is changed. They determine the changes that must be made to the entry itself or to associated entries within the domain. Typical reasons for such changes are provisioning or consistency rules that must be applied.
Provisioning Workflows
Typically account or group changes trigger a real-time workflow, as illustrated in the following figure.

Suppose a manager at Web Center or Identity Manager assigns a role to a user. DirX Identity resolves the resulting access rights, creates an account in the Identity Store, puts it into the member list of a group and sends two change events: one for the account, and one for the group. A workflow associated with the target system receives the events and synchronizes the changes in Identity Store with the connected system.
The same process occurs as result of a request workflow. Usually, the last activity in an approval or object creation workflow is the "apply change" activity. It stores the changes requested in the workflow and sends the same change events for accounts and groups as in the previous scenario.
Note that DirX Identity sends the changes only if the flag "Enable Real-time Provisioning" is set to active.
Password Workflows
Real-time provisioning workflows are also involved in password changes. A typical scenario is illustrated in the following figure.
Assume that a user changes her password in the Windows domain. the DirX Identity Windows Password Listener captures the new password at the domain controller and sends an appropriate change event. The "User Password Event Manager" receives the event, searches the Windows account and then the user entry and updates the password in the Identity Store. Then it finds all accounts of the user for which password synchronization is enabled (see the flag at the target system entry) and sends messages that request the password change at the connected systems. These requests are handled by a "set password" workflow. It takes the new password and if required, the current password out of the message and updates them at the connected system.
Nearly the same process occurs if the user changes her password with Web Center. The "User Password Event Manager" workflow finds the user directly with the DN given in the event, updates the password and sends the change requests for the accounts.
A user can also use Web Center to change the password of a privileged account. Web Center sends a password change event for the account, which is processed by the "Account Password Manager" workflow. It updates the password at the account in the Identity Store and sends the same password change request as in the previous scenarios to update the password at the connected system.
Event-based Maintenance Workflows
The maintenance workflows work only with the DirX Identity domain. They are invoked when a domain entry is created or changed, not only accounts or groups but also users, roles, permissions and business objects. Their processing depends upon the entry type, but typically they apply provisioning and consistency rules and check for broken links. The following figure illustrates maintenance workflow operation.
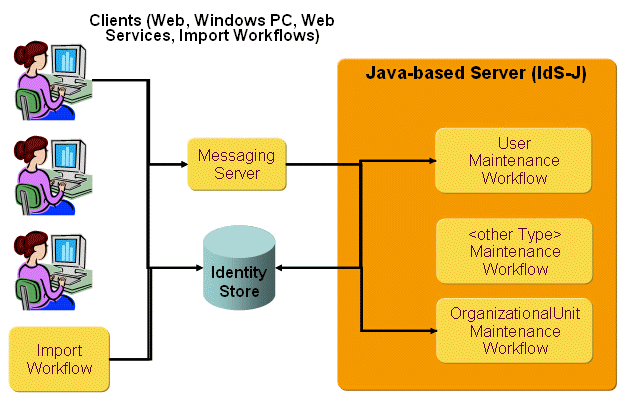
The workflows are triggered by a change event that is published by a number of sources:
-
Web Center, Identity Manager
-
Provisioning Web Service clients
-
Import workflows, both Tcl-based and Java-based workflows
The client publishes a change event for an entry if the corresponding entry type is activated in the domain’s event policy. The message topic includes the entry type, which allows the IdS-J server to invoke the appropriate maintenance workflow. The workflow analyzes the changed attributes and performs several maintenance tasks depending on the entry type. For example, the user maintenance workflow:
-
Applies consistency rules.
-
Checks for broken links.
-
Applies provisioning rules, if their filters match the user attributes.
-
Resolves the user and updates the accounts, if a permission parameter has been changed.
-
Updates account attributes, if an attribute has been changed that matches a list of configured names or wildcards.
-
Ignores the event, if none of the above conditions applies.
If in the course of a user resolution an account or a group is modified, the workflow publishes a provision request that triggers a provisioning workflow.
Scheduled Workflows
You can also define schedules for Java-based workflows. The IdS-J workflow scheduler starts the workflow at the scheduled times.
A scheduled workflow operates a little bit differently from the way it operates when triggered by an event. It synchronizes all entries from the source to the destination system. For a synchronization workflow, this means that the workflow reads all accounts and groups from Identity Store and updates them one after the other at the connected system.
If you want to define a schedule for cluster workflows (which can provision a set or cluster of homogeneous connected systems), you must specify a search filter for all target systems to be provisioned according this schedule. For each target system, the scheduler starts a workflow instance that provisions only the accounts and groups of this system.
Note that starting a real-time workflow manually or on a schedule may not make sense for all types of workflows. This is especially true for
-
Maintenance workflows: they only process events.
-
Password workflows: they require the new password in the event message.
Starting a Workflow Manually
You can also start a workflow manually in Identity Manager in one of two ways:
-
In the Connectivity configuration, select a Java-based workflow and start it from the context menu. The workflow works as if started by a schedule and provisions the entire target system.
-
In the Identity domain, choose a target system and from the context menu, select Connectivity, then the workflow, and then start the workflow. This method is especially appropriate for cluster workflows: they process only the entries of this target system.
Note that starting a real-time workflow manually or on a schedule may not make sense for all types of workflows. This is especially true for
-
Maintenance workflows: they only process events.
-
Password workflows: they require the new password in the event message.
Customizing Java-based Workflows
This section describes how to customize the default set of Java-based workflows provided with DirX Identity. It explains how to:
-
Configure and implement user hooks
-
Create complex mapping functions with Java classes
-
Test real-time workflow mapping
-
Create connector filters that intercept calls to connectors
Using User Hooks
User hooks are extensions made by customers to DirX Identity common code that are independent of this code and which therefore do not change with product updates. The DirX Identity default application code is divided into common code (control and central scripts that can change with product updates) and user hooks (customer routines that are protected from product updates).
User hooks in a Provisioning workflow are called at various phases while synchronizing a source entry into a destination system. They can
Read the source entry, the joined entry and the mapped entry
Change the mapped entry
Have access to the source and destination systems via the connectors.
There are two types of user hook:
-
A global user hook, which applies to the whole activity
-
A channel user hook, which applies to the entries associated with a channel
The following figure illustrates user hooks.
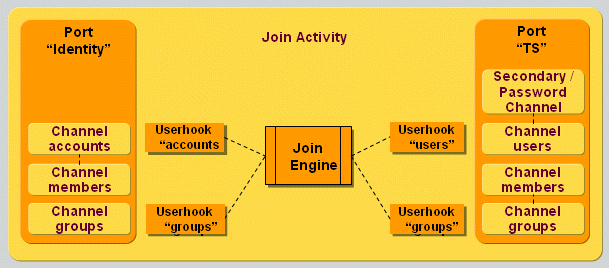
As illustrated in the figure, you can have different user hooks when importing
-
an account into Identity domain
-
a user into a connected system
-
a group into a connected system
-
a group into Identity domain.
This section describes how to:
-
Configure a user hook
-
Implement a global user hook
-
Implement a channel user hook
-
Implement a user hook for e-mail notifications.
-
Deploy a user hook.
-
Run executables from a user hook.
Configuring a User Hook
This section explains how to configure a global and a channel-specific user hook.
The global user hook is configured in the XML configuration of a job, which itself is part of an activity configuration. A channel user hook is configured for each channel. Their configuration parameters are the same.
A job is configured as part of an activity within a <workflow> element. The global user hook is part of the controller configuration. The XPath expression of the corresponding XML element reads:
workflow/activities/activity[@name='…']/job/controller/operation/user hook.
A job configuration collects a number of <port> elements, which itself collect a number of <channel> elements. A channel user hook is a sub-element of the <channel> element. Here the XPath notation:
workflow/activities/activity[@name='…']/job/port/channel/user hook.
The XML attributes of the <userhook> element include:
classname: The full class name of your user hook Java class. It must implement the IGlobalUserHook or the IUserHook interface.
implementationLanguage: Currently only the value "java" is supported. It’s also the default, if omitted.
data: The source of your user hook Java class.
code: The octets of the compiled unit. This property is loaded by the controller instead of searching a class from the class path. This property will be filled by the Identity Manager in the course of configuration.
Sub-properties of <userhook>: Some properties are denoted as property sub-elements as follows: <property name="…" value="…"/>. The following properties are evaluated by the controller:
sourcepath: The full path name of the Java file that contains the source of your user hook implementation. This property is supported for local testing.
Implementing a Global User Hook
A global user hook is called at the beginning and at the end of a job. It must implement the interface com.siemens.dxm.join.api.IGlobalUserHook with the following methods:
setGlobalContext
With this method, the controller passes a reference to the global context. It gives access to the connectors, the configurations of the job, the controller and the user hook and to the current working directory.
prolog:
The method prolog() is called at the beginning of a job, before any entry or channel is handled. It allows you to prepare a job and set any global properties into the job context.
Among other tasks, the global user hook can add its proprietary properties in the global context. The join engine passes the updated global context to each channel user hook. In order to avoid overlap of other property names, use custom prefixes such as org.myorg.mydep.MyProperty.
epilog:
The epilog() method is called at the end of the job. It allows you to close any open resources, such as file or network handles.
Implementing a Channel User Hook
The join engine calls the channel user hook in various phases while it processes an entry. A user hook implements the interface com.siemens.dxm.join.api.IUserHook and optionally com.siemens.dxm.join.api.IUserHookExt. The following figure provides an overview of the API operations and when they are called from the join engine:
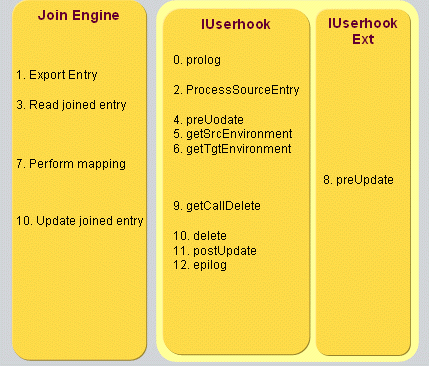
As shown in the figure, there are the following user hook operations:
prolog:
Before the first entry is processed, the join engine passes the environment properties of the source and the target channel to the user hook. These properties comprise the context properties set by the global user hook and a set of "specific attributes" taken from the following entries of the Connectivity configuration database: channel, connected directory, workflow, global configuration.
This action allows the user hook to open a file or a connection to another system or do some other preparation task. It may add its own properties to the target environment. The join engine reads them from the user hook at several times via the method getTgtEnvironment (see below).
processSourceEntry
After the join engine has read a source entry, it asks the user hook whether to process it. The processSourceEntry method receives the identifier and the list of attributes of the source entry and returns a boolean. In case it is false, the join engine skips processing this entry.
preUpdate
The join engine reads the joined entry from the target system. Then it calls the preUpdate method of the user hook (note: the method of the IUserhook API). As parameters it passes: identifier and attribute list of source and joined entry, references to connectors to source and target system. This action allows the user hook to read additional information from the source or the target, do some processing at the target or some other task before the entry is updated at the target system.
This method returns a boolean. If it is set to false, the join engine skips further processing this entry and continues with the next one.
For a method that is called after the mapping and before the update, see the preUpdate method of the IUserHookExt interface.
getSrcEnvironment
The join engine calls this method several times: before the prolog, before the mapping and before the epilog. It allows the user hook to extend the environment properties related to the source channel by its own proprietary ones.
getTgtEnvironment
The join engine calls this method several times: before the prolog, before the mapping and before the epilog. It allows the user hook to extend the environment properties related to the target channel by its own proprietary ones.
preUpdate (API IUserhookExt)
After the join engine has mapped the source entry to the target entry and before it updates the target entry, it calls the preUpdate method of the user hook, if it implements the interface IUserHookExt.
As parameters, it passes the identifier and attribute list of the source and joined entry, the mapped entry, and references to connectors to source and target system. This action allows the user hook to change the mapped entry, do some processing at the target or some other task before the entry is updated at the target system.
This method returns a boolean. If it is set to false, the join engine discontinues processing this entry and continues with the next one.
getCallDelete
When the join engine encounters a mapped entry with request type DELETE, it first asks the user hook whether a custom delete method must be called. When this method returns true, the join engine calls the user hook method delete(). Otherwise it performs the delete request at the connector using the identifier of the mapped entry.
delete
The join engine calls this method when an entry is to be deleted by the user hook instead of performing the delete request itself; that is, if the getCallDelete method returns true. It passes a reference to the connector for the affected system and the mapped entry. As a result, the user hook can issue its own request at the connector (for example, a modify or extended request) or perform other tasks without the connector.
postUpdate
After the entry has been updated, the join engine calls this method. It passes the identifier and the attributes of the source and the joined entry, the performed update request, the response with its result code and the source and target connector.
The update request and the response can be null if no update was performed because the entry was already up-to-date. These two parameters can also be null if the user-defined delete operation is used; in this case, no information about user-defined update requests and update responses is available; it is even unknown whether an update operation has been executed at all.
This action allows the user hook to perform additional requests for the updated entry both at the source and the target system.
This method returns a boolean. If it is set to false, the join engine discontinues processing this entry and continues with the next one.
epilog
This method is called after all the entries of a channel have been processed. This action allows the user hook to close all pending handles (for example, sockets or files).
For a detailed description of the parameters, see the Java interface documentation in the folder Documentation/DirXIdentity/RealtimeWorkflows.
Review the contents of the Additions\RealtimeWorkflows\samples folder in the product DVD for a sample implementation that demonstrates basic handling.
For details on how to read and set the identifier and attributes of source or target entries, see the section "Evaluating a Mapping Entry".
Deployment
Make sure the jar file containing your user hook implementation is deployed in the correct folder of your IdS-J server, which is:
install_path*/ids-j-domain-S*n*/confdb/common/lib*
Implementing a User Hook for Email Notifications
It is possible to send an e-mail notification in a user hook. You can find the sample Java-based workflow using the mail notification for account creation in the sample workflows for Extranet Portal, which is the part of the sample My-Company connectivity scenario. See the chapter "Loading the Connectivity Scenario" in the DirX Identity Tutorial for more information about the My-Company scenario. The provided user hook can be found on the DVD as Java class NotifyMailAccountCreationUserHook.java. It implements in particular the method postUpdate, which takes the mail attribute of the account and creates a specially-handled SPMLv1 request; this request is then sent to connector identified by the name "notify". If the provided mail is valid and the notify activity is correctly configured, it sends the notification to that mail address about account creation. Tailor this class to your needs if you intend to use special mail notifications in a Java-based workflow.
Deploying a User Hook
Make sure the jar file that contains your user hook class is deployed in the correct folder of your IdS-J Server, which is:
install_path*/ids-j-domain-S*n*/confdb/common/lib*
Running Executables from a User Hook
DirX Identity provides a general user hook class UserHookRunExecutable, which allows running any executable configured in a realtime workflow channel object. It can be used immediately without any extra programming. Specify the class name com.siemens.dxm.join.userhook.common.UserHookRunExecutable in the General tab of the channel and specify the executable name and command line in the channel-specific attributes.
For the preUpdate and the postUpdate user hook methods, you can configure an executable with a command line in the channel-specific attributes post_executable, post_cmdline, pre_executable, pre_cmdline. In the postUpdate case, the executable is only called if the update (add or modify) of the object was successful.
Architecture
The following figure illustrates the architecture of running an executable from a user hook:
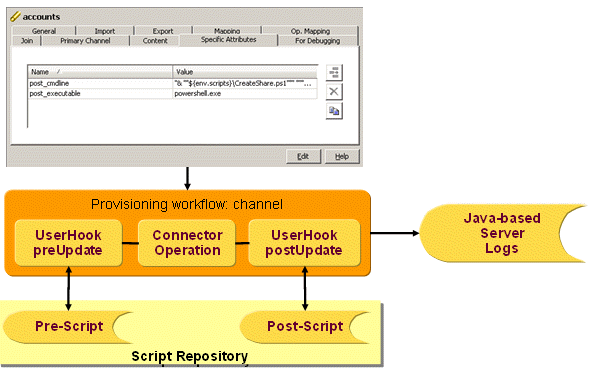
Concept
The following features are available:
-
Running executables as part of a user hook.
-
Using the standard user hook with a few configuration steps in any user hook.
-
Using the source code starting point for more complex solutions.
-
Working in a high availability scenario.
-
Running in a multi-threaded environment.
-
Redirecting of logging to the Java-based Server logs by default.
The following samples are provided:
-
A PowerShell script for personal folder creation.
-
Several PowerShell scripts for managing Exchange mailboxes.
Command Line Parameters of the Executable
The command line parameters specified in the channel specific attributes post_cmdline and/or pre_cmdline can contain fixed parts and variable parts. The variable parts can reuse all mapping variables by specifying the source, target, env and joinedEntry constructs, like ${source.dxrName}, ${target.homeDirRoot}, ${env.domain}, ${joinedEntry.cn}.
Central (Shared) Script Folder
Beneath each Java-based Server’s repository folder, which can be specified at the Java-based Server object in the Connectivity Expert View, there is a subfolder scripts where the executables can be located. In a distributed Java-based Server environment, this high availability location can be shared by all running instances.
The absolute path of the scripts folder is put into the Java-based Server context and can be accessed from user hooks by the environment variable ${env.scripts}. It can also be specified in the channel-specific attributes; for example, in the post_executable or post_cmdline attribute.
Output File and Error Handling
By default, the executable’s standard output and standard error messages and the exit code are written to the Java-based Server log file. If the executable fails, the user hook preUpdate and/or postUpdate methods return “false” to the join engine according to the user hook API, which causes the join engine to pass an error record to the Audit Connector and to the Monitor View and to stop processing this entry.
You can also define executable return codes that you classify as successful by specifying the specific attributes post_ok_codes and/or pre_ok_codes for executables started in the related user hook methods. The return codes are specified as integer values and must be separated by blanks. If nothing is specified, the return code “0” is regarded as successful by default.
If the executable’s output is to be written to separate files, specify the output file names in the command line as parameters. The executable must interpret these output file names.
If you specify your own output files, we recommend including the Workflow Instance ID in the names of the output files to prevent running workflow instances started through further events from overwriting output files that have already been recorded. The Workflow Instance ID is also contained in the Java-based Server context and can be used by specifying the environment variable ${env.dxm.uh.wfInstID}.
The workflow name is accessible in the environment and must be specified by ${env.dxm.uh.wfName}.
Interrupting Executables
If the activity that starts the executable times out or the Java-based Server shuts down, the Java-based Server sets a cancellation flag. During a "graceful" shutdown period, the running activities (this is a standard task of the controller implementations) check this flag at certain times and finish the process. A good time to perform this task, for example, is after one event has completed in a scheduled synchronization. After the configurable graceful shutdown period has elapsed, the Java-based Server interrupts all running activities. If an executable has not yet finished, the UserHookRunExecutable class catches this interruption and kills the executable, which was started as an asynchronous process.
Killing Executables after a Configurable Time Period
Independently of this interruption scenario, the UserHookRunExecutable class starts the process running the executable asynchronously and asks for the process return value in a loop for a certain time (by default, 90 seconds) and then kills the process if it has not finished in this time frame. You can configure this time in milliseconds in the channel-specific attribute post_timeout for executables started in the postUpdate user hook method or in the pre_timeout specific attribute for executables started in the preUpdate user hook method.
Connection Parameters
If the activity’s connection parameters like server, user or password should be passed as parameters to the executable, you can extend the UserHookRunExecutable class by adding the desired parameters to the command line. For example, the connection parameters of the target connector can be accessed in a user hook the following way:
DxmConnectionConfig connectionConfig = null;
DxmConnectorConfig connectorConfig = (DxmConnectorConfig) (_tgtEnv.get("dxm.uh.connectorConfByName.ts"));
if(connectorConfig != null) {
    DxmConnectionConfig connectionConfig = (DxmConnectionConfig) connectorConfig.getConnections().firstElement();
    String server = connectionConfig.getServer();
    int port = new Integer(connectionConfig.getPort());
    String user = connectionConfig.getUser();
    String pwd = connectionConfig.getPassword();
}
This coding example is already contained as a comment in the standard UserHookRunExecutable class provided as source code.
The bind parameters in the sample PowerShell scripts delivered with DirX Identity are kept in the scripts. The scripts read the password from a file that contains the password that you have saved encrypted with PowerShell.
Mapping with Java Classes
You can provide Java sources or pre-compiled Java classes to realize complex mapping functions. They can be configured for
-
Calculating the identifier of the target entry; for details, see the section "Identifier Mapping".
-
Mapping of attributes; for details see the section "Attribute Mapping".
-
Post mapping; that is, after all attributes have been mapped and before the update of the entry is performed. For details, see the section "Post Mapping".
This section also provides information how to
-
deploy a mapping class.
-
evaluate a mapping entry.
-
handle environment properties.
-
handle the mapped entry.
-
set the map result.
-
write log messages.
You can find a sample source that implements all interfaces in the following folder of your installation DVD:
Additions\RealtimeWorkflows\samples
Identifier Mapping
A class that realizes the mapping of an identifier must implement the interface com.siemens.dxm.join.api.IMapIdentifier. It consists of one method:
Identifier mapId(MappingEntry source, MappingEntry joined, HashMap<String,Object> environment)
The join engine passes the following parameters:
source: the source entry, or null if no source entry exists, which occurs when validation workflows find entries at the target that have no corresponding source entry.
joined: the joined entry, or null if no joined entry has been found.
environment: a map of environment properties collected by the specific attributes taken from the affected channel, connected directory, activity and workflow entries. User hook implementations can append additional properties.
The identifier mapper must return the new identifier of the mapped entry.
For an example see the file Idmapping.java on the DVD in the folder Additions/RealtimeWorkflows/samples/mappings
For details on how to handle these parameters, see the following sections:
-
Evaluating a Mapping Entry
-
Setting the Map Result
-
Handling Environment Properties
Attribute Mapping
A class that realizes the mapping of an attribute must implement the interface com.siemens.dxm.join.api.IMapAttribute. It consists of one method:
MapResult mapAttr(String tgtAttrname, Request.Type reqType, MappingEntry source, MappingEntry joined, HashMap<String,Object> environment)
The join engine passes the following parameters:
tgtAttrname: the name of the target attribute.
reqType: the proposed request type. The attribute mapper can change it in the returned map result. Allowed types are: Request.Type.ADD, Request.Type.MODIFY, Request.Type.DELETE.
source: the source entry, or null if no source entry exists, which occurs when validation workflows find entries at the target that have no corresponding source entry.
joined: the joined entry, or null if no joined entry has been found.
environment: a map of environment properties collected by the specific attributes taken from the affected channel, connected directory, activity and workflow entries. User hook implementations may append additional properties.
The attribute mapper must return the map result. In the simplest case, it contains only one value for the attribute. But you can also set a series of attribute modifications, a set of operational attributes and also return a changed request type. The request type determines the request to be issued to the target system connector: add a new entry, modify the existing joined entry or delete the existing entry.
A note concerning deleted source entries: normally, the join engine deletes an attribute value in the target entry, if the mapped value is empty or null. If the source entry no longer exists, the mapping routines typically produce empty values for the mapped attributes. However, if you want the target entry just to be modified (for example, set the state to DELETED) or moved (tombstone!), you typically do not want the target attribute values to be deleted. To support this operation, the join engine deletes the attribute values only if the modification operation is set to "delete". By default, it is set to "replace". As a result, if you want a target attribute to be deleted if the source entry no longer exists, it is not sufficient to return an empty value. You must explicitly set the operation in the modification to "delete". The following code snippet provides an example:
DsmlModification targetMod = new DsmlModification();
targetMod.setName(tgtAttrname);
targetMod.setOperation(DsmlModificationOperationType.DELETE);
For details on how to handle the input parameters, see the following sections:
-
Evaluating a Mapping Entry
-
Setting the Map Result
-
Handling Environment Properties
Post Mapping
A class that realizes the post mapping of an entry must implement the interface com.siemens.dxm.join.api.IPostMapping. It consists of one method:
MappedEntry doPostMapping(MappedEntry mappedEntry, Request.Type reqType, MappingEntry source, MappingEntry joined, HashMap<String,Object> environment)
The join engine passes the following parameters:
mappedEntry: the result of the previous attribute and identifier mappings.
reqType: the proposed request type. The attribute mapper can change it in the returned map result. Allowed types are: Request.Type.ADD, Request.Type.MODIFY, Request.Type.DELETE.
source: the source entry, or null if no source entry exists, which occurs with validation workflows when entries at the target are found that have no corresponding source entry.
joined: the joined entry, or null if no joined entry has been found.
environment: a map of environment properties collected by the specific attributes taken from the affected channel, connected directory, activity and workflow entries. User hook implementations may append additional properties.
The post mapping returns the new mapped entry. Post mapping is called after all attribute mappings and the identifier mapping have been performed.
The post mapping can modify all attribute modifications, the identifier, operational attributes and the request type. The request type determines the request to be issued to the target system connector: add a new entry, modify the existing joined entry or delete the existing entry.
For details on how to handle these parameters, see the following sections:
-
Evaluating a Mapping Entry
-
Handling Environment Properties
-
Handling the Mapped Entry
Deploying the Mapping Class
Make sure the jar file that contains your mapping class is deployed in the correct folder of your IdS-J server, which is:
install_path*/ids-j-domain-S*n*/confdb/common/lib*
Evaluating a Mapping Entry
A source or joined entry is represented as Java class com.siemens.dxm.join.map.MappingEntry. The mapping entry holds the entry’s identifier, list of attributes and operational attributes.
Read Identifier
Each entry has an identifier. It is modelled according the OASIS SPML standard. The identifier has a type (most often DN or generic string), an id value and optionally a list of identifier attributes. The following code snippet shows how to read the identifier value from the joined entry:
Identifier id = null;
String idvalue = null;

if (joined!=null)
    id = joined.getId();
if (id!=null) {
    IdentifierType type = id.getType();
    idvalue = id.getIdentifierChoice().getId();
}
Read Attributes from the Source or Joined Entry
Each source and joined entry contains a list of attributes, where each attribute may have a list of values. The values are typically of type string, but may sometimes also be binary. The following code snippet shows how to read the string attribute 'sn' from a source entry. Reading from the joined entry is identical.
String srcSn;
if (source != null && source.getAttrs() != null) {
    DsmlAttr srcSnAttr = (DsmlAttr) source.getAttrs().get("sn");
    if (srcSnAttr != null) {
        srcSn = srcSnAttr.getValue(0);
    }
}
Reading a multi-value string attribute is almost the same. You get an array of strings:
String[] srcDescriptions;
if (source != null && source.getAttrs() != null) {
    DsmlAttr srcAttrDescription = (DsmlAttr) source.getAttrs().get("description");
    if (srcAttrDescription != null) {
        srcDescriptions = srcAttrDescription.getValue();
    }
}
The following snippet shows how to get a binary value and assure the attribute’s member type base64:
// get - fictive - single-value attribute "binaryValue" from source entry
byte[] binValue = null;
if (source != null && source.getAttrs() != null) {
    DsmlAttr srcBinAttr = (DsmlAttr) source.getAttrs().get("binaryValue".toLowerCase());
    if (srcBinAttr != null) {
        String memberType = srcBinAttr.getMemberType();
        if (DsmlValue.BASE64BINARY_TYPE.equalsIgnoreCase(memberType)) {
            binValue = srcBinAttr.getBinValue(0);
        }
    }
}
Note: Use lower-case notation for attribute names. When storing attributes internally in the hash map, the join engine uses the lower-case notation of the attribute name as a key.
For more details on how to handle attribute,s take a look at the Java integration framework.
Read an Operational Attribute
Reading an operational attribute from a source entry is nearly identical to reading a 'normal' attribute. Here a sample snippet for the (fictitious) attribute 'dxrPrimaryKeyOld':
// read operational attribute "dxrPrimaryKeyOld"
String opKey = null;
if (source != null && source.getOpAttrs() != null) {
    DsmlAttr srcOpAttr = (DsmlAttr) source.getOpAttrs().get("dxrPrimaryKeyOld".toLowerCase());
    if (srcOpAttr != null) {
        opKey = srcOpAttr.getValue(0);
    }
}
Operational attributes, like the normal ones, can be multi-valued or binary.
Note: Use lowercase notation for attribute names. When storing attributes internally in the hash map, the join engine uses the lowercase notation of the attribute name as a key.
Handling Environment Properties
All mapping functions have access to environment properties, which are collected from the respective configuration entries (channel, connected directory, activity, workflow) or set by a global or channel user hook.
The environment properties are simply a hash map of objects identified by their name of type String. The following snippet read the standard property "user_base":
// read environment property "user_base"
String userBase = (String)environment.get("user_base");
Setting an environment property is also as simple:
// set a custom environment property
environment.put("com.siemens.map.ldap.myEnvProperty", "someValue");
In order to avoid naming collisions, we recommend that you use an adequate prefix for your property names that is analogous to the one shown in the example: com.siemens.map.ldap.
Handling the Mapped Entry
The mapped entry is first built up by the identifier mapping and the list of attribute mappings. After that, the join engine passes the result to the post mapping (if configured). The post mapping also has access to the source and the joined entry. It can change the complete mapping entry: the identifier, the attribute modifications, the operational attributes and the request type.
The sections Identifier Mapping and Evaluating a Mapping Entry show how to read the identifier and the source and joined entry. This section shows how to read the mapping entry and modify it.
Identifier
Reading and setting the identifier is simply realized by a getter and a setter method as the following code snippet shows:
Identifier id = mappedEntry.getIdentifier();
// change the identifier ...
mappedEntry.setIdentifier(id);
See the section on Identifier Mapping for information on how to work with the Identifier.
Attribute Modifications
You can read the modifications for a single attribute or get a map with the modifications of all attributes. Updating the modifications is done on a per-attribute basis as the following snippet shows:
DsmlModification[] snMods = mappedEntry.getModification("sn");
HashMap<String, DsmlModification[]> modMap = mappedEntry.getModifications();
snMods = modMap.get("sn");
// change the modifications for attribute "sn"
mappedEntry.updateModification(snMods);
For more details on working with modifications, see "Evaluating a Mapping Entry" and "Setting the Map Result".
Operational Attributes
Reading and modifying the operational attributes is very similar to the attribute modifications. You can either get them all as a map or read them one-by-one. Updating is done on a per-attribute basis:
HashMap<String, DsmlAttr> opAttrMap = mappedEntry.getOpAttrs();
DsmlAttr myOpAttr = mappedEntry.getOpAttr("myOperationalAttribute");
myOpAttr = opAttrMap.get("myOperationalAttribute");
// change the operational attribute
mappedEntry.setOpAttr(myOpAttr);
For more details on working with operational attributes, see "Evaluating a Mapping Entry" and "Setting the Map Result".
Request Type
The post mapping can get the request type from the parameter list or read it from the mapped entry via the getter method. Updating it is done via the corresponding setter method:
mappedEntry.setRequestType(reqType);Setting the Map Result
The mapping result for an attribute consists of the following items:
-
A list of modifications
-
A list of operational attributes
-
The request type
Request Type
The request type determines the kind of operation to be issued at the target system connector: ADD, MODIFY or DELETE. For the list of allowed values see the static enumeration in the class com.siemens.dxm.join.util.Request.
Initially, the join engine proposes a value:
-
MODIFY, if it has found a joined entry.
-
ADD if no joined entry is found.
In the mapping function, you can change the value according your needs. The following code snippet shows how to set the type to DELETED, which results in a delete request:
// delete target entry, if mapped state DELETED
if (IState.DELETED.equalsIgnoreCase(tgtState)) {
    targetMapResult.setRequestType(Request.Type.DELETE);
}
Attribute Modifications
The mapping result contains a list of attribute modifications. Each attribute modification needs the attribute name, the modification operation (replace, delete, add) and the attribute value(s). The modifications are applied as they are, if the request is a MODIFY. In case of an ADD, the join engine transforms them to a list of attribute values; that is, it skips the operation. The mapping function does not usually need to be aware of this.
The following code snippet shows how to create a MapResult object, create one attribute modification with the attribute name and the default operation REPLACE, add an attribute value and set the new modification and a request type in the mapping result:
MapResult targetMapResult = new MapResult();
targetMapResult.setRequestType(reqType);
DsmlModification targetMod = new DsmlModification();
targetMod.setName(tgtAttrname);
targetMod.setOperation(DsmlModificationOperationType.REPLACE);
// calculate the attribute value ...
String value = "...";
targetMod.addValue(value);
targetMapResult.addModification(targetMod);
As you can see from the sample, it’s even possible to add a number of modifications for the same attribute or for a list of attributes.
Operational Attributes
The mapping function may append operational attributes to the mapping result. Note that they are specific for a connector or a SPML target service. Here is a short code snippet that shows how to create an operational attribute and add it to the mapping result:
// add an operational attribute to the map result
DsmlAttr dstOpAttr = new DsmlAttr();
dstOpAttr.addValue(userBase);
dstOpAttr.setName("myOperationalAttribute");
targetMapResult.addOperationalAttr(dstOpAttr);
Logging
If you want to implement logging, you can use a log support that provides some simple log methods. The following code snippet shows how to obtain the log support and issue a debug log message:
// Obtain the Log support for your class; here "SampleMapper" +
private static final LogSupport logger = LogSupport.forName(SampleMapper.class);

// Write a debug log +
logger.debug("SampleMapper - Source Entry SN = " + srcSn);
For logging messages with other levels, use the appropriate methods:
-
error
-
warn
-
info
The messages are written to the same files as that of the other DirX Identity components.
Testing the Real-Time Workflow Mapping Classes
The following sections provide information on how to develop and test your own Java mapping classes for a specific real-time workflow.
About the Mapping Test
The Java Eclipse Project dxmTestMapping can help you develop and test your Java mapping classes needed for a specific real-time workflow. The project is delivered on the DirX Identity DVD as a zip file and can be unpacked to any location in the file system. It has all the necessary libraries in its own subfolder and is independent of any installed DirX Identity files.
The mapping can be tested either by running the batch file runTestMapping.bat or by running the Junit-Test TestSample.java. The Junit Test is configured in build.xml, so it is run automatically by starting the build process with mkTestMapping.bat. It can also be started inside the project by configuring a Junit Test with the TestSample class.
In both cases (batch file or Junit Test), the agent framework main class AgtSessionExe is called with the configuration file src.test/confs/sample/conf.xml. The resulting trace and response files can be inspected in the src.test/confs/sample subtree.
About the Mapping Test Structure
The Java Eclipse Project dxmTestMapping consists of the following subtrees and files:
-
src.test/confs/sample/conf.xml
This is a standalone agent framework job configuration file containing the mapping of several attributes for one entry including the mapping of the Java source code EmployeeTypeSource.java. This mapping is configured in the first (and only) channel of the TS-port, hence in job/port[@name='TS']/channel/mappingDefinition [XPath notation].
As a controller the class EntryMappingController, which is part of the join package, is specified in conf.xml. It expects a SPML search request in the request.xml file. The search request is passed to the Identity Domain connector, which gives the search result back in domain-response.xml. The controller takes the first (and only) search result entry as the source entry, configures the mapping in the (one and only) channel of the TS-port, creates an add or mod request from the mapped entry and passes it to the TS-connector configured in the TS-port. The response of the TS-connector is passed to the configured response writer, which writes it into the response.xml file.
The configured connectors are only test connectors that write their requests into files and read responses from files. The TS-connector can also be replaced by a real target system connector if that part of the process should be tested besides the mapping. -
src.test/confs/sample/request.xml
Holds the SPML search request passed to the Identity Domain connector by the EntryMappingController. -
src.test/confs/sample/domain-response.xml
Holds a search result entry taken by the EntryMappingController as the source entry when performing the mapping as configured in the channel. -
src.test/TestSample.java
The Junit test class to run the agent framework job configured in src.test/confs/sample/conf.xml -
src/map/samplets/accounts/to/EmployeeTypeSource.java
The sample Java source code, for which an attribute mapping with type javasource is configured in conf.xml. -
src/map/samplets/accounts/to
Folder containing further Java source code mapping files performing an account attribute mapping from TS to Identity. -
src/map/samplets/accounts/from
Folder for Java source code mapping files performing an account attribute mapping from TS to Identity. -
src/map/samplets/groups/to
Folder for Java source code mapping files performing a group attribute mapping from Identity to TS. -
src/map/samplets/groups/from
Folder for Java source code mapping files performing a group attribute mapping from TS to Identity.
Testing the LDAP Channel Configuration
After the single mappings have been tested as described, each channel as it is configured in LDAP can be tested as a whole the following way:
Go to the corresponding LDAP channel, open the Mapping page and insert a new Java source code mapping if it does not yet exist. Go to the Java source mapping LDAP object and import your tested Java source code mapping file (like the EmployeeTypeSource.java mentioned above). Repeat this for all Java source code attribute mapping files belonging to this channel and then export the resolved channel configuration into a file and copy it into the channel part of your standalone conf.xml file.
Now the standalone batch script can be run again to check whether the LDAP configuration is also correct.
The environment property source path which you can see in the conf.xml sample no longer exists in the resolved channel, because at this time the compiled code exists in the channel section. As a result, the source path where the files to be compiled can be found if no byte code exists is no longer needed.
Using Connector Filters
Connector filters intercept calls from the Provisioning controller (that is, the "join engine") to connectors. They see all requests to and all responses from the connector. The following figure illustrates connector filters.
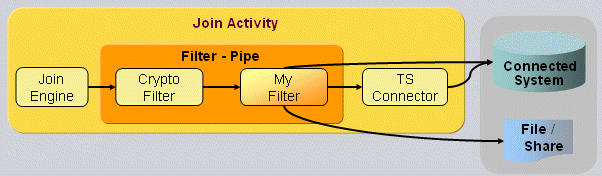
A filter can change requests to the connector or responses from the connector, issue new requests to the connector, prohibit sending requests to the connector or even perform other tasks without the connector on the connected system. As an example, it could create or update a share on a Windows file system.
By default, DirX Identity uses a connector filter for decrypting and encrypting data, especially passwords. Other custom filters can be inserted before or after the default filter.
The connector filters are part of a chain of filters. In its doFilter() method, each filter receives the request. Usually, it checks the type of request (is it an Add, a modify, delete or search), optionally modifies it and passes it to the successor in the chain by calling its doFilter() method. This method returns the response from the successor. The filter can inspect it, modify it or do anything else. But it must return a response to its predecessor in the chain.
The framework passes the configuration options of a connector filter in its open() method. Essentially, they are a list of simple properties. The section "Configuring a Connector Filter" provides more detail.
Some filters might need to access the connected system directly and bypass the connector. In order to reduce configuration, they have access to the connector configuration, especially to address parameters and binding credentials. For this they must implement the interface ConnectorFilterConfig, through which the connector framework passes the connector configuration.
Configuring a Connector Filter
The connector filter is configured as part of the job configuration, which itself is part of an activity configuration. This section describes the XML format of the configuration that is passed to the framework. For the presentation in Identity Manager, see a filter entry beneath a port.
A job configuration contains a number of <port> elements. A <port> contains a <connector> and a list of <filter> and <channel> elements. A <filter> element represents the configuration of a connector filter.
XML attributes of <filter>:
classname: The full class name of the connector filter Java class; mandatory.
name: An optional name of the filter.
Sub-Elements of <filter>:
A <filter> allows only a number of <property> sub-elements. Each <property> supports the following XML attributes:
name: The name of the configuration property; mandatory.
value: The value of the configuration property.
Deploying a Connector Filter
Make sure the jar file that contains your connector filter implementation is deployed in the correct folder of your IdS-J server, which is:
install_path*/ids-j-domain-S*n*/confdb/common/lib*
Notes:
-
All dependent jar files for your connector filter must also be deployed in the above folder.
-
For a SAP ECC UM connector filter, you then need to move the files sapjco3.jar, the associated shared library (sapjco3.dll/.so) and SapUM4Role.jar from confdb/jobs/framework/lib to the above mentioned folder. Alternatively, you can just put your SAP ECC UM connector filter jar file into the folder confdb/jobs/framework/lib.
For more details on the interfaces, see the chapter on "Java Connector Integration Framework" in the DirX Identity Integration Framework Guide. You can also find information about reading the configuration and working with requests and responses in this guide. A sample is provided on the product DVD in the folder: Additions\SampleConnectorFilter.
Customizing Password Synchronization Workflows
This section describes how to customize the default set of Java-based workflows provided with DirX Identity for password management with user hooks. User hooks for password synchronization controllers are based on an extended global user hook interface used in common Java-based Provisioning workflows. Currently only User Password Event Manager workflow can use a user hook. The user hook can:
-
Read the source password event, user entry and related account entries.
-
Skip the processing of a source password event for a user entry or for an account.
-
Gain access to the Identity store and other components via the connectors.
This section describes how to:
-
Configure a password user hook.
-
Implement a password user hook.
-
Deploy a password user hook.
Configuring a Password User Hook
The password user hook is configured in the XML configuration of the job for the User Password Event Manager controller, which itself is part of an activity configuration.
A job is configured as part of an activity within a <workflow> element. The password user hook is part of the controller configuration. The XPath expression of the corresponding XML element reads:
workflow/activities/activity[@name='…']/job/controller/operation/user hook.
The XML attributes of the <userhook> element include:
classname: The full class name of your user hook Java class. It must implement the IPasswordUserHook.
implementationLanguage: Currently only the value "java" is supported. It’s also the default, if omitted.
data: The source of your user hook Java class.
code: The octets of the compiled unit. This property is loaded by the controller instead of searching a class from the class path. This property will be filled by the Identity Manager in the course of configuration.
Sub-properties of <userhook>:
Some properties are denoted as property sub-elements as follows: <property name="…" value="…"/>. The following properties are evaluated by the controller:
sourcepath: The full path name of the Java file that contains the source of your user hook implementation. This property is supported for local testing.
Implementing a Password User Hook
A password user hook is called several times during execution of the workflow job. It must implement the interface com.siemens.dxm.join.api.IPasswordUserHook with the following methods:
setGlobalContext
With this method, the controller passes a reference to the global context. It gives access to the connectors, the configurations of the job, the controller and the user hook and to the current working directory.
prolog:
The prolog() method is called at the beginning of a job, before any entry is handled. It allows you to prepare a job and set any global properties into the job context.
epilog:
The epilog() method is called at the end of the job. It allows you to close any open resources, such as file or network handles.
processPasswordEvent:
The processPasswordEvent() method is called at the start of processing of an incoming JMS message that contains a password change event. It allows you to omit a password change for certain users on specific conditions.
preUserPasswordUpdate:
The preUserPasswordUpdate() method is called just before a real password change in the Identity store. You can stop the processing or define additional actions.
postUserPasswordUpdate:
The postUserPasswordUpdate() method is called after successful change of a user password in the Identity store. You can define additional actions like notifications. You can also stop further processing of the accounts.
processAccountPassword:
The processAccountPassword() method is called just before a JMS notification for a setPassword workflow is sent. The method is called for all related accounts. You can prevent the workflow from sending the event and stop the processing of the account or define additional actions.
Customizing Event-based Maintenance Workflows
All event-based maintenance workflows call a user hook during processing of the event. This action is usually performed after normal operation just before the entry is to be stored to LDAP, but might be different for certain entry types. Consult the respective description of the workflow’s operation.
A user hook is a Java class that implements the API com.siemens.idm.jobs.ebr.api.IEventProcessor. The user hook has access to the event and the changed entry. It can change the entry and perform other operations in the Identity domain using the available LDAP connection.
The following sections describe how to:
-
Implement the user hook
-
Configure the user hook
-
Use event contexts
-
Deploy the user hook
For a sample, see the folder Additions/EventMaintenanceWorkflows on the installation DVD.
Configuring a User Hook for an Event-based Maintenance Workflow
This section explains how to configure a user hook for an event-based maintenance workflow.
You configure a user hook in the "join" activity of the workflow. You must supply the class name and optionally also configuration options. Enter these values in the activity’s Userhook tab. The following figure shows this tab:
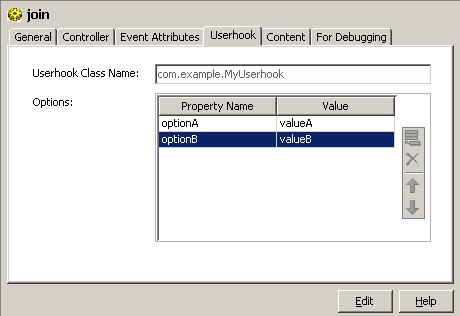
Enter the full class name of your implementation into Userhook Classname. This value indicates to the workflow that a user hook is to be called.
If the user hook expects configuration options, enter them in the Options table:
-
The Property Name column contains the name of the option as the user hook expects it.
-
The Value column contains the string value of the option.
The workflow passes the configuration with the open method. See the implementation section for a snippet how to read the options in your user hook.
Implementing a User Hook for an Event-based Maintenance Workflow
The event maintenance workflow calls the user hook typically after it has performed the standard operations just before it stores the entry changes. The user hook implements the interface com.siemens.idm.jobs.ebr.api.IEventProcessor with the following operations:
setEventContext:
This is the first method the workflow calls after instantiating the user hook. In addition to the LDAP connection to the domain, the event context provides some useful methods for reading and searching one or more entries. See "Using Event Contexts" for more details.
open(DxmUserhookConfig conf)
With this method the workflow passes the configuration options for the user hook before any of the events is processed.
The only parameter is the user hook configuration implementing the interface siemens.dxm.configuration.DxmUserhookConfig. In addition to some meta information important for the workflow it allows to read configuration properties with its getProperty method. The following snippet shows how to read an option "objectclass":
Map<String, String> options = new HashMap<String, String>();
options.put("objectclass", (String)conf.getProperty("objectclass"));
processAddEvent(AddEvent event, Entry changedEntry)
The workflow calls this method, when the entry was created in the Identity domain. It passes the created entry and the add event.
Each entry implements the interface com.siemens.dxm.api.entry.Entry. This interface allows getting and set attribute values and especially the DN of the LDAP entry. The siemens.dxm.connector.event.AddEvent class is generated according an XML schema, which extends a SPMLv1 request with some information about the event topic and the event source. The following snippet shows how to read the values of the attribute "owner" and to set one, if it was empty before:
String[] values = changedEntry.getValues("owner");
if ((values == null) || (values.length == 0)) {
    changedEntry.setProperty("owner", "cn=DefaultOwner,cn=Users," + eventCtx.getDomainRoot());
}
Note that you shouldn’t store the entry changes yourself. This is done by the workflow at the end of the event processing, if the entry was changed. But if you change other entries, you need to store them yourself. See "Using Event Contexts" how to do this.
processModifyEvent(ModifyEvent event, Entry changedEntry)
The workflow calls this method when the entry was changed in the Identity domain. It passes the changed entry and the modify event.
Each entry implements the interface com.siemens.dxm.api.entry.Entry. This interface allows getting and set attribute values and especially the DN of the LDAP entry. The siemens.dxm.connector.event.ModifyEvent class is generated according an XML schema, which extends a SPMLv1 request with some information about the event topic and the event source. The following snippet shows how to check, if the attribute "dxrState" was modified to the value "TBDEL", i.e. if the entry is to be deleted in the connected system:
for (DsmlModification mod : event.getModifications().getModification()) {
    if ("dxrState".equalsIgnoreCase(mod.getName()) && ("TBDEL".equalsIgnoreCase(mod.getValue(0)) {
        entryDeleted = true;
        break;
    }
}
Note that you shouldn’t store the entry changes yourself. This is done by the workflow at the end of the event processing, if the entry was changed. But if you change other entries, you need to store them yourself. See "Using Event Contexts" how to do this.
processDeleteEvent(DeleteEvent event)
The workflow calls this method, when the entry was deleted in the Identity domain. It passes only the delete event as the entry itself is not available any more.
The siemens.dxm.connector.event.DeleteEvent class is generated according an XML schema. In addition to the event topic and the event source the embedded SPMLv1 delete request contains the DN of the deleted entry. See the following snippet how to read the DN:
String dn = SpmlUtils.getIdString(event);This allows you to search for other entries referencing the deleted one and perform some cleanup.
close():
The workflow calls this method after all entries of the batch are processed. It allows the user hook to perform some housekeeping.
Using Event Contexts
A user hook for an event-based maintenance workflow may use an event context object. An event context implements the interface com.siemens.idm.jobs.ebr.api.EventContext*. It is passed in the method *setEventContext of the IEventProcessor interface.
The event context provides some useful helper methods:
getDomainRoot()
Returns the DN of the Identity domain root node.
getLDAPConnection()
Returns an established LDAP connection to the Identity domain.
getEntry(String dn)
Reads the entry with the given DN from the Identity domain. It returns an object, which implements the com.siemens.dxm.api.entry.Entry API. This API allows reading and setting attributes.
searchEntries(String base, String filter)
Performs an LDAP search in the Identity domain with the given search base and filter. The method returns the found entries as an enumeration. Each entry implements the com.siemens.dxm.api.entry.Entry API.
saveEntry(Entry entry)
Stores the entry in the Identity domain.
Note that the user hook should not store the entry referenced in the change event, but needs to store all others it has changed.
Deploying a User Hook for an Event-based Maintenance Workflow
To deploy your user hook, build a jar file with your class and copy this file and any other jar files you need to the following folder of your Java-based Server installation:
install_path*/ids-j-domain-S*n*/confdb/common/lib*
Make sure the user hook is configured and then re-start the IdS-J server.
Using Combined Workflows
You can combine a set of Java-based workflows into a "combined workflow" and define the sequence in which these workflows should be run. Note that you cannot combine entry change workflows, cluster workflows and combined workflows.
For a combined workflow, you select a sequence of workflows. All activities of the selected workflows are copied into the combined workflow (the referenced workflow is only referenced, not changed). Start conditions are adapted so that the activities are started in the defined sequence.
The activities are named worklow_name*-join-*sequence-nr.Activity n+1 is started after activity n has finished.
For every workflow that is included in the combined workflow, you can also define whether or not it should stop if the preceding workflow or activity finishes with the state WARNING.
To create a combined workflow, use the New menu and select Combined Realtime Workflow.In the Workflow Sequence tab, insert the workflows in the order you want to run them.
You can start a combined workflow with the DirX Identity Manager by using Run workflow from the context menu at the combined workflow object or you can define a schedule for the combined workflow.
Using a combined workflow (instead of scheduling each workflow separately with a given start time) guarantees that the workflows are started in sequence one after the other and ensures that there are no overlays or gaps between the workflows.For example, you can define a combined workflow that first performs a source import from a database, next performs a source import from SAP and then performs user resolution for these imported users.
Understanding Tcl-based Workflows
The sections in this chapter include information about Tcl-based workflows:
-
Tcl-based Connectivity architecture - defines the concepts of the DirX Identity Tcl-based workflows
-
Understanding server delta handling
-
Customizing Tcl-based workflows - describes customization procedures and hints.
Tcl-based Connectivity Architecture
The Tcl-based connectivity architecture is based on a standard script that is designed to handle all transfers between two connected directories in one step.For two-step workflows (which require an additional agent to access the target connected directory’s API), the standard script handles the meta controller (metacp) step.
The connectivity standard script can be controlled by about 60 parameters and also by optional user hook routines. It is structured into the following logical sections:
-
A control script, which defines all parameters, including the default values and references to the relevant attributes at the user interface (DirX Identity Manager) level.
-
A profile script, which contains the central algorithm for the connectivity script.
The profile script is divided into the following logical sections:
-
The prolog section, which performs preparatory tasks before the loop section is executed, such as opening input and output connections, reading attribute configuration files, and so on.
-
The loop section, which performs, for each entry in the source, all of the necessary actions: mapping, joining, operation on the target system side, and so on. This section is the most complex, because it can handle file and LDAP connections and contains most of the script’s functionality and features.
-
The epilog section, which performs all completion tasks, such as releasing handles and closing connections.
All of the parameters that control the script are accessible from Identity Manager. They are distributed into the relevant tabs of the job, channel and connected directory configuration objects, which can be referenced from the relevant wizards.
The script’s design is based on the following requirements:
-
One script for all applications
-
Controllable by switches and user hooks
-
Clear separation between central, local and user parts
-
Clear separation between entry masters and attribute masters. An entry master can add and delete entries, while an attribute master can only perform attribute modifications.
-
Handling of multi-entry and attribute masters
-
Support of manual masters (such as Web interfaces)
-
Support of purification workflows (for example, the deletion of entries marked for deletion).
Note: This version does not implement this feature. -
Support of operational attributes (mastership, status, entry and expiration dates)
-
Enhanced tracing (an additional command trace)
-
Delta handling based on date type
-
Tuning parameters (Read DN Only, paged mode)
-
Support of merge and replace modes
-
Standard handling of notifications
The script can handle the following types of synchronizations:
-
File to file
-
LDAP to file
-
File to LDAP
-
LDAP to LDAP
With extra profile scripts, it can handle DirX change log information and HDMS connections.
All LDAP connections can work optionally in paged mode.
The next sections provide information about:
-
The script structure
-
The script behavior
-
The switches and parameters that control the script
-
References used in default applications
-
Object class handling
-
The GUID generator
-
Multi-mastered attributes
-
Naming and scopes
-
User hook routines
-
Important Tcl interfaces
-
Global Tcl variables
-
Meta handles
Connectivity Standard Script Structure
The Connectivity standard script consists of logical pieces that are stored in specific physical locations in the installation area or the configuration database. The following sections describe the script’s logical structure and use an example to illustrate its physical structure.
Connectivity Standard Script Logical Structure
The following figure illustrates the logical structure of the DirX Identity Connectivity standard script.
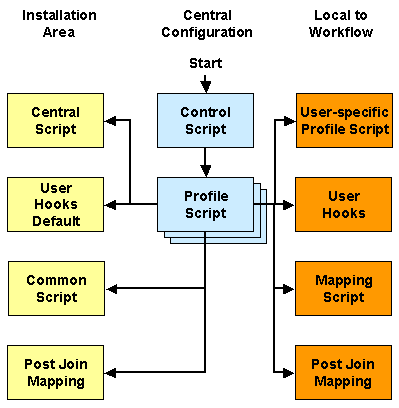
The control script is the script that starts the whole procedure. It contains all of the variables that control the rest of the procedure. The values of these variables are linked by DirX Identity references to the attributes of objects in the configuration directory. It also loads the central routines from the installation area and the profile, mapping and miscellaneous scripts from the job object.
The control script calls the profile script, which performs the central algorithm. Different profile scripts are delivered to provide different basic algorithms. Most workflows use the standard script Profile Script, while others use the HDMS Export Profile Script or the LDIF Change Profile Script.
One of the most important parts of this algorithm - the mapping script - must be highly configurable, since it is individual to each workflow. The script is divided into a mapping that occurs before the join operation and a post join mapping that occurs after the join operation.
All scripts can call common routines provided by the central script (routines that are common to any workflow) and the common script (routines that are used by this type of workflow).
The profile script calls local routines (hooks). Default routines for these hooks are loaded with the user hooks default script. You can establish your own extensions by providing routines in the user hooks script (they will overload the default routines).
Connectivity Standard Script Physical Structure
We’ll use an example to explain the physical structure of the Connectivity standard script and its relationship to other objects in the configuration database and the installation area. The following figure illustrates this example.
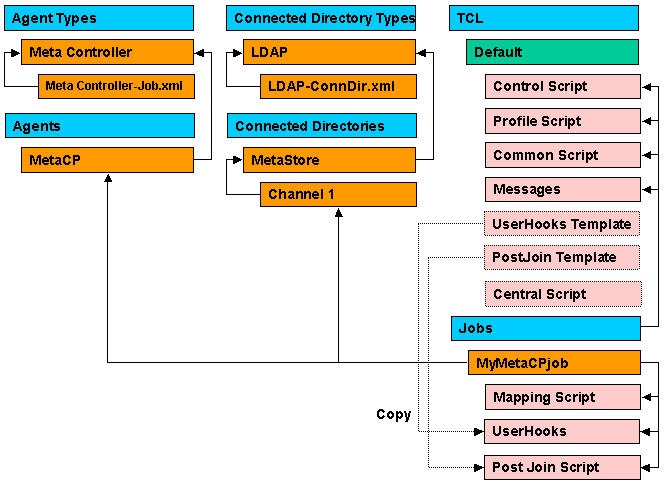
The job MyMetaCPjob references the MetaCP agent that is of type Meta Controller, which is described by the "Meta Controller-Job.xml" definition. The job also relates to channels (here Channel 1) that access the LDAP directory (for example, MetaStore), which is of type LDAP and is described by the "LDAP-ConnDir.xml" definition.
The mapping script and the user hooks script are local objects of the workflow. They are downloaded to the work area before each workflow run. Only some of the default application workflows initially contain a user hooks script (for example the RACF workflows).
The central script, the common script, the post join default script and the user hooks default script (a template) are located in the installation area of DirX Identity (path: install_path*\lib\centralTcl*). They are part of the installation and will not be downloaded before each workflow run. Because the common script’s size is more than 130 KB, this saves time. For information purposes, a copy of these scripts is shown at the user interface level in the configuration database.
Please note that changing these script copies has no effect! You should instead copy the user hooks default script as an individual user hooks script or post join script under your job object (don’t forget to link it to the job) and modify the routines as required. This user hooks script and all of the other miscellaneous scripts will be downloaded before each workflow run.
The control, profile, common, post join default script and user hooks default scripts (together with the messages script that contains all messages) are located in the central configuration area in the section Tcl → Default. Only the control, profile and messages scripts will also be downloaded before each workflow run.
Warning: You are not allowed to change the central or common scripts (because any changes will be overwritten during update and upgrade installations!). Instead, you can copy a routine you’d like to change to your local user hooks script. This routine overloads the routine from the central script. The advantage of this method is that you can view all of your changes in one place and that an exchange or update of central script will not affect your workflow at all.
Provisioning Workflow Script Structure
The DirX Identity Provisioning workflows use the default DirX Identity Connectivity standard script structure. The following figure illustrates how the DirX Identity Provisioning script structure is embedded in the DirX Identity Connectivity script structure.
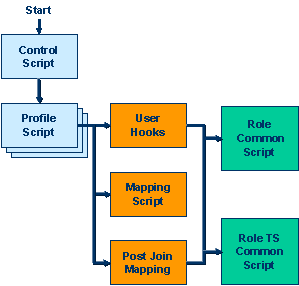
The left two columns of the figure represent the default DirX Identity Connectivity script structure. The DirX Identity metacp scripts (mapping, post-join mapping, and user hooks) call functions in the DirX Identity provisioning common script and the provisioning TS common script. The following figure illustrates these interactions in more detail.
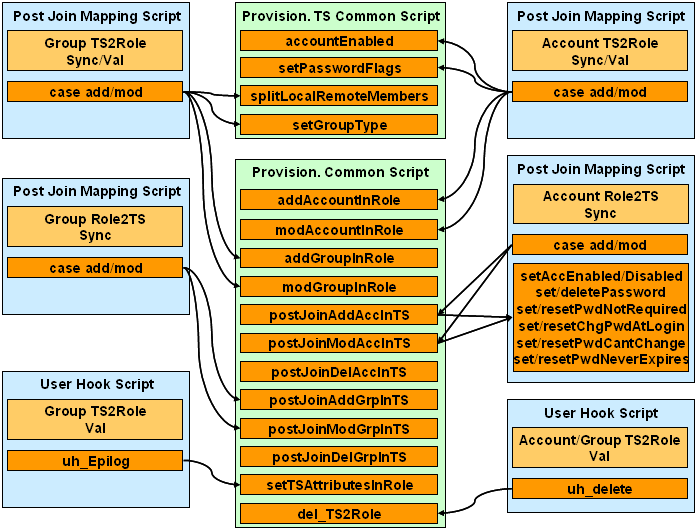
The provisioning TS common script functions include:
-
accountEnabled()
Checks whether the account is enabled or disabled in the target system depending on the passed target system attribute(s), and sets the passed variable AccEnabled to TRUE or FALSE. -
setPasswordFlags()
Sets the password-specific flags of an account in a role depending on the passed target system attribute(s). -
splitLocalRemoteMembers()
Divides the list of the target system group members into local members, which are all members that belong to the target systems users or group root, and remote members, which are outside these roots. -
setGroupType()
Sets the group type attribute in a role depending on the passed target system attribute.
The Provisioning common script functions include:
-
addAccountInRole()
Sets the dxrTSState attribute of the account in a role to DISABLED or ENABLED depending on the passed AccEnabled parameter. Sets the dxrState attribute to IMPORTED and the dxrToDo attribute to CREATED_IN_TS for a validation workflow. -
modAccountInRole()
Sets the dxrTSState attribute of the account in a role to DISABLED or ENABLED depending on the passed AccEnabled parameter. The function leaves the dxrState attribute as it is and sets the dxrToDo attribute to RECREATED_IN_TS for a validation workflow if dxrState was in the state DELETED. -
addGroupInRole()
Sets the dxrTSState and the dxrState attribute of the group in a role to ENABLED. Sets the dxrTSLocal attribute to TRUE and the dxrToDo attribute to CREATED_IN_TS in case of a validation workflow. Sets dxrGroupMemberImported to the local members of the target system, which were calculated by the splitLocalRemoteMembers function. -
modGroupInRole()
Sets the dxrTSState attribute of the group in a role to ENABLED. The function leaves the dxrState, dxrTSLocal and dxrToDo attributes as they are and sets the group member attributes according to the passed list of local target system group members and of the actual group member states in role. -
postJoinAddAccInTS()
Depending on the account attributes in a role, calls the following functions of the postJoinMapping script of the sync account job, which perform the target system specific attribute settings: -
setAccEnabled() if the accounts dxrState in role is ENABLED
-
setAccDisabled() if the accounts dxrState in role is DISABLED
-
setPassword()
-
resetPwdNotRequired()
-
setChgPwdAtLogin()
-
resetPwdCantChange()
-
setPwdNeverExpires() if dxrPwdNeverExpires in role is TRUE
-
resetPwdNeverExpires() if dxrPwdNeverExpires in role is FALSE
-
postJoinModAccInTS()
Depending on the account attributes in a role, calls the following functions of the postJoinMapping script of the sync account job, which perform the target system-specific attribute settings: -
setAccEnabled() if the accounts dxrState in role is ENABLED
-
setAccDisabled() if the accounts dxrState in role is DISABLED
-
deletePassword()
-
setPwdNotRequired() if dxrPwdNotRequired in role is TRUE
-
resetPwdNotRequired() if dxrPwdNotRequired in role is FALSE
-
setPwdCantChange() if dxrPwdCantChange in role is TRUE
-
resetPwdCantChange() if dxrPwdCantChange in role is FALSE
-
setPwdNeverExpires() if dxrPwdNeverExpires in role is TRUE
-
resetPwdNeverExpires() if dxrPwdNeverExpires in role is FALSE
-
postJoinDelAccInTS()
This function currently does nothing. In the future, it may contain common coding for all target system workflows. -
postJoinAddGrpInTS()
This function currently does nothing. In the future, it may contain common coding for all target system workflows. -
postJoinModGrpInTS()
This function currently does nothing. In the future, it may contain common coding for all target system workflows. -
postJoinDelGrpInTS()
This function currently does nothing. In the future, it may contain common coding for all target system workflows. -
setTSAttributesInRole()
For a validation workflow, sets the dxrLastValidation attribute of the target system object in a role to the current time and the accountRootInTS and groupRootInTS attributes of the target system object in a role to the values passed to the function. -
del_TS2Role()
Called only in the validation workflow for all objects in a metacp search result that cannot be matched to any source entry in order to either delete or modify the object. The function deletes the object in a role if the dxrState attribute of the object is set to DELETED; otherwise, it sets the dxrTSState attribute to DELETED and writes a dxrToDo message.
Connectivity Standard Script Operation
The meta controller is called with the control script as a parameter (see the command line attribute of the job). The next sections describe how the control and profile scripts operate.
Control Script Operation
The Connectivity standard script’s control script contains all of the variable settings; that is, constants or references to attributes of other objects in the configuration database. These variable settings are grouped into the following sections:
-
Common parameters - basic parameters needed for the other sections (for example, the role names of the input and output channels).
-
GUID generator parameters - parameters that control the generation of global unique identifiers.
-
Common job-specific parameters - parameters that belong to the job: tracing, operation control, notification and data control.
-
Source parameters - parameters that control the source connected directory and its channel.
-
Target parameters - parameters that control the target connected directory and its channel.
The control script loads the standard scripts in the following sequence:
-
Loads the central.tcl script with the source command. This script contains important routines like dxm_source that are necessary to load scripts with another code set.
-
Reads user_hooks_default.tcl, which contains all relevant empty user hook routines. This action pre-defines these routines.
-
Reads the mapping script.
-
Uses a loop to load all miscellaneous scripts, including the user_hooks.tcl script if it is defined by the user and any other routines needed for the job. Note: Scripts that cannot be edited are not loaded (the common script is an example).
-
Reads the profile script.
The control script’s loading logic relies on Tcl’s routine overloading mechanism, in which the last loaded routine is used.
Profile Script Operation
The control flow for the standard script consists of several steps. The prolog step prepares all of the necessary prerequisites. The process entry loop reads entries from the source, maps the entries, then joins the mapped entries and writes them to the target. The epilog step closes all channels and handles and performs notifications if necessary.
The profile script contains only the main logic. All detailed routines are contained in the common script or the central script. The following figure illustrates the profile script algorithm.
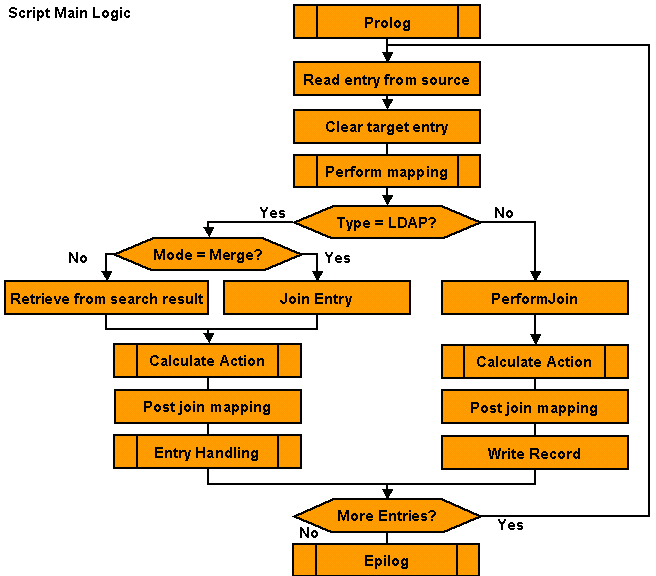
Profile Script - Prolog
The prolog step performs the following tasks:
-
Initializes the meta controller.
-
Sets all necessary default values.
-
Calls the uh::Preprocessing user hook, which prepares everything before the rest of the script logic is executed. Note: no handles are available at this point.
-
Opens connections to the source and target connected directories and creates handles for them. This task consists of the following sub-tasks:
-
Reading the attribute configurations (variables: File Name and Encoding).
-
Performing a bind if Directory Type = LDAP (variables: Server Address, Protocol, User, Password, SSL Connection, Authentication, Protocol).
-
Opening a file if Directory Type = File (variables: File Name, File Format, File Mode, Encoding).
-
Creating the necessary handles for the source and target connection.
-
Creating a second handle for the input channel, if Read DN Only is set.
-
Defining Page Size to allow page mode operation if Paged Read is set.
-
Reads the source (variables: Base Object and Subset both from the input channel as well as a Search and OR Filter) and eventually sort it (if Sorted List = true together with Sort Key and Sort Order). This is only necessary when the search result is not sorted and a sorted result is necessary. If Paged Read is set Page Size must be defined to allow page mode operation.
-
If the workflow shall replace all entries in the target; that is, if a deletion of entries that are no longer available compared to the source is necessary, a full target search (variables: Base Object, Subset both from the output channel as well as the Replace Filter) with a subsequent sort is required (variables: Sorted List = true together with Sort Key and Sort Order). The result must be sorted because the Sort Key is used for the find operation later on in the join operation.
-
Calls the uh::Prolog user hook.
Now the source and target are prepared. Next, the loop on all entries must be performed.
Profile Script - Process Entry Loop
The profile script’s standard entry processing loop (used by the profile.tcl script) performs the following tasks:
-
Reads an entry from the source.
-
Initializes the target entry (sets all fields to initial values).
-
Optionally applies an extra filter during the user hook uh::LoopExtraFilter. This filter allows the individual exclusion of entries from further actions.
-
Performs the mapping (subroutine perform_mapping). This routine delivers the return code 0 for OK and 1 for errors that occurred.
The sequence of steps is different depending on the Directory Type.
If Directory Type = LDAP, the following steps are performed:
-
If Import Mode = Merge, a search based on the Join Expression or Expert Filter is performed in the target directory. In this case a list of searches can be performed.
-
If Import Mode = Replace, the object is retrieved from the existing (and sorted) search result.
-
Depending on the result, an action is calculated (see the subroutine Calculate Action).
-
After calculating the action, a postJoin routine (uh::LoopPostJoin) performs an additional mapping step that merges information from the joined entry with the mapped information.
-
Depending on the calculated action and the join result, the Entry Handling subroutine is called. The possible actions are:
-
action = add
A new entry will be created. -
action = mod
The located entry is to be modified. -
action = modDN
The distinguished name (DN) of the located entry will be modified. -
action = del
A delete operation will be performed for this entry depending on the selected deletion mode (see the deletion algorithm ). The user hook uh::Delete is eventually called. -
action = done
The action to be taken has already been carried out. No action is necessary. -
action = error
An error must be reported because something was incorrect. This action will result in a warning at the workflow level. -
An extra function can be optionally executed (uh::LoopExtraFunction)
If Directory Type = FILE, similar procedures are called:
-
A user-specific join routine can be performed (uh::LoopPerformJoin).
-
Depending on the result, an action is calculated (see the Calculate Action subroutine).
-
After calculating the action, a postJoin routine (uh::LoopPostJoin) performs an additional mapping step that merges information from the joined entry with the mapped information.
-
Writes the record to the file.
Profile Script - Calculate Action
The profile script’s "calculate action" subroutine calculates the action to be taken based on any change type, source entry status, and target entry conditions, as illustrated in the following figure.

As shown in the figure:
-
A ChangeType condition allows the action in the target directory to be controlled by information coming from the source directory (for example, change types defined in LDIF change syntax).
-
When the source directory keeps status information about new or deleted entries (Source Add Marking Attribute and Value and Source Del Marking Attribute and Value), this information allows the action to be controlled at the target directory side. For example, a customerStatus attribute with the value New in the source directory could force an add operation in the target directory.
-
In some cases, the existence of an attribute in the source directory that comes from the target directory can indicate the existence of a target system entry (Target Entry Exists). This indicator only works when a workflow operates in the opposite direction that handles this attribute.
If none of these conditions is met, the action is set to mod.
Profile Script - Entry Handling
Based on the calculated action and the result of the join operation, the entry is handled as shown in the following figure.
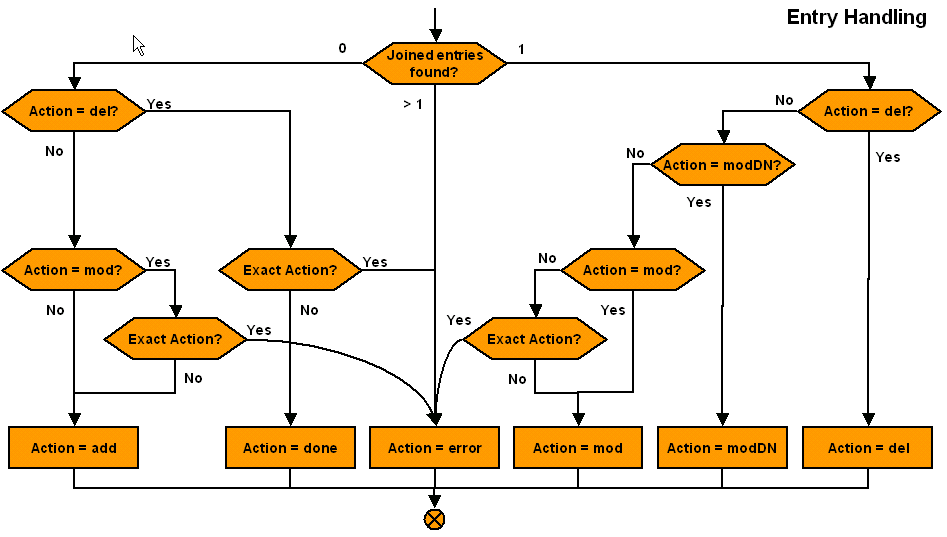
As shown in the figure:
-
If no entry is found and action = del, an error is reported or no further action is performed, depending on the exact action switch. If action = mod, an error is reported or an add operation is performed, depending on the exact action switch
-
If exactly one entry is found and action = del, the entry is deleted. Action = modDN results in a modifyDN operation. If action = mod, the entry is modified. Otherwise, the entry is either modified or an error is reported, depending on the exact action switch
-
If more than one entry is found, an error is reported.
After the entry processing, a user hook (uh:LoopExtraFunction) allows you to define user-specific additional processing.
Note: In the loop, an error means that the workflow’s result will be Warning. Otherwise one single erroneous entry would abort the workflow.
Profile Script - Epilog
The profile script’s epilog step performs the following tasks:
-
When the script works in replace mode (switch Import Mode), it deletes all entries that were not contained in the source but are contained in the target (in a separate loop after the main loop).
-
When the script works in delta mode (switch Delta Synchronization), it processes the delta information and delivers it to the C++-based identity server.
-
When notifications are required (switch Notify Not OK is set or one of the Entry Handling switches Add Entries, Modify Entries or Delete Entries is set to one of the NTF options), it sends notifications.
-
Closes all connections have (unbind for directories, close for files)
-
Writes statistics (switch Statistics).
-
Terminates the meta controller and automatically closes all handles.
Profile Script - Delete Entries
The delete routine is either called from the central processing loop for each entry or from the separate loop at the end for all unmarked entries. The following figure illustrates its logic:
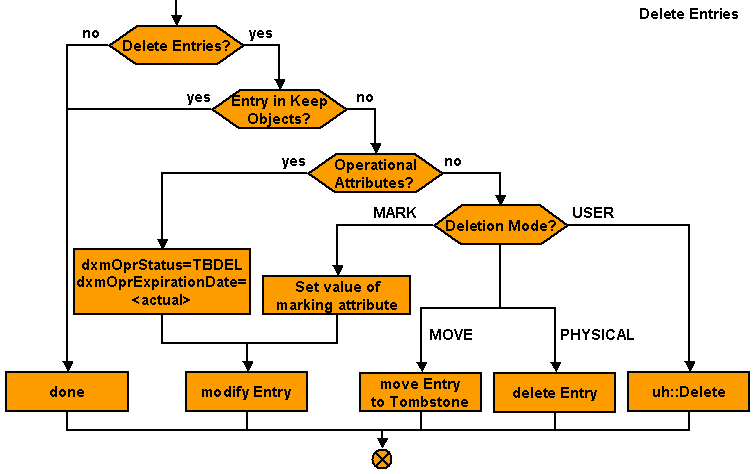
As shown in the figure, the delete routine:
-
Does nothing if Delete Entries is not activated.
-
Checks whether the entry is in the Keep Objects list. If yes, it preserves the entry.
-
If Operational Attributes are activated, sets the dxrState to TBDEL and sets the dxrEndDate to the current date.
-
Otherwise, evaluates the Deletion Mode:
-
MARK - Sets the value of the defined marking attribute.
-
MOVE - Moves the entry to the tombstone area (by eventually calling uh::GenerateTombstoneDN).
-
PHYSICAL - Physically deletes the entry.
-
USER - Calls the user hook uh::Delete.
Connectivity Standard Script Switches and Parameters
You use switches and parameters to control the behavior of the Connectivity standard script. The following sections give information about switches and parameters for:
-
Operational control
-
Notification control
-
Global unique identifier (GUID) generation
-
Trace control
-
Source connected directory specification
-
Input channel specification
-
Target connected directory specification
-
Output channel specification
-
Pre-configured operational attribute handling
Switches for Operational Control
The following set of switches control the script’s operation:
-
The Delta Synchronization switch allows you to run the meta controller (metacp) job in delta mode based on date information (by default based on creation and modification time stamps or optionally on any other time attribute). For details, see "Understanding Delta Handling" in section "Managing the C++-based Server" in chapter "Managing Identity Servers" in the DirX Identity Connectivity Administration Guide.
-
The Minimum Source Entries switch helps to avoid situations in which the number of source entries differs a lot (due to an error in the generation of the entries) during subsequent runs of a full update or an export. The switch allows you to specify a minimum number of entries that must be available; otherwise, the workflow terminates with error and returns exit code 12.
For import workflows running in MERGE mode, this parameter is not evaluated. However it is evaluated for import workflows running in REPLACE mode. In REPLACE mode, this parameter helps to avoid deletion of objects if only a small number of source entries is provided (by mistake). -
The Exact Action switch allows you to control the algorithm’s automatic correction features.
-
The Init Mode switch allows you to run the meta controller either in real mode, where LDAP operations are performed, or trial mode, where trace information is written but LDAP update operations are not performed (searches are performed to simulate the real behavior).
-
The Test Mapping Only switch allows you to select whether just a test mapping is performed or if all operations (LDAP and file operations) are executed. You can use the Test Max Entries switch to define the number of entries to be mapped.
-
The Operational Attributes switch controls whether operational attributes are to be used, which controls the marking of entries with the master name or the handling of status attributes and entry and expiration dates. See the "Pre-Configured Operational Attribute Handling" section for details.
Switches for Notification Control
The Connectivity standard script currently implements two basic notification mechanisms:
-
The Notify Not OK switch, which allows a notification to be created when the meta controller job runs into an error and/or warning situation.
-
The Entry Handling switches Add Entries, Modify Entries and Delete Entries, which allow data notification to be executed if the switches are set to one of the NTF options. If set to NTF, notification is performed instead of the operation (add, delete or modify), if set to operationNTF (ADDNTF, MODNTF or DELNTF), the operation is performed but the same information is sent via notification.
Switches for GUID Generation
The Connectivity standard script allows global unique identifiers (GUIDs) to be generated for each entry that is to be imported into the Identity Store. See the "GUID Generation" section for more information. The parameters for this generation are stored in the field variable GUIDparam.
Switches for Trace Control
The meta controller can generate a lot of trace information, and you can use the switches Trace Level and Debug Trace to control the granularity of this output. The parameter Max Trace Entries controls the number of hits that are output during a join operation. Trace information can be written into Trace Files or Report Files.
The Statistics switch allows you to control whether or not the meta controller writes standard statistics. If you disable the standard statistics, your script must provide its own statistics.
Source Directory Parameters
This set of parameters is necessary to connect correctly to the specific type of the source connected directory. The most important parameters are the Directory Type and the Directory Subtype, which determine the behavior of the connected directory.
The script generally needs the file name of the attribute configuration file, which is controlled via the parameters File Name and Encoding.
If Directory Type = LDAP, the additional parameters are required to perform an LDAP bind. These parameters are: Server Address, Protocol, User, Password, Authentication, Protocol and SSL Connection (see the Service and Bind Profile configuration objects for details).
If Directory Type = FILE, the following parameters are necessary to handle the file correctly: File Name, File Format, File Mode and Encoding (see the section File Item configuration object for details).
Input Channel Parameters
The input channel definition allows access to the related connected directory.
The parameter Selected Attributes defines he list of attributes that must be handled.
If Directory Type = LDAP, a Base Object, the Subset definition, a Search Filter optionally together with an OR Filter and whether the result is to be sorted (Sorted List together with the Sort Key and the Sort Order) must be defined (see Export Properties for details).
You can use the switch Read DN Only or Paged Read together with Page Size to optimize memory consumption.
If Directory Type = File, no additional parameters need to be specified in the input channel definition.
Target Directory Parameters
This set of parameters is necessary to connect correctly to the specific type of the target connected directory. The most important parameters are the Directory Type and the Directory Subtype, which determine the behavior of the connected directory.
The script needs generally needs the file name of the attribute configuration file, which is controlled via the parameters File Name and Encoding.
If Directory Type = LDAP, the following additional parameters are required to perform an LDAP bind: Server Address, Protocol, User, Password, Authentication, Protocol and SSL Connection (see the Service and Bind Profile objects for details).
If Directory Type = FILE, the following parameters are necessary to handle the file correctly: File Name, File Format, File Mode and Encoding (see the section File Item configuration object for details).
Output Channel Parameters
The output channel definition allows access to the related connected directory.
The Selected Attributes parameter defines the list of attributes to be handled.
If Directory Type = LDAP, a Base Object, the Subset definition, a Join Expression (or alternatively Expert Filters) and whether the result should be sorted (Sorted List together with the Sort Key and the Sort Order) must be defined (see Import Properties for details).
You can use the switch Read DN Only or Paged Read together with Page Size to optimize memory consumption.
If Directory Type = File, no additional parameters need to be specified in the output channel definition.
Entry handling parameters are also required to define the behavior at the target connected directory side. This is the Import Mode that controls whether the script works in merge or replace mode.
The Add Entries, Superior Info, and the source and target Add Marking Attribute and Add Marking Value parameters can control the addition of entries.
The Modify Entries, Modify Marking Attribute, Modify Marking Value and Rename Entries switches control entry modification.
The switches Delete Entries, Deletion Mode, the source and target Del Marking Attribute and Del Marking Value and Keep Objects control entry deletion.
Switches for Pre-Configured Operational Attribute Handling
DirX Identity provides a pre-configured handling of the operational attributes. By default, dxmOprMaster, dxrStartDate, dxrEndDate and dxrState are used as attribute types if the switch Operational Attributes is on. You can select your preferred set of operational attributes in the user hooks script. The following description works with the standard set of operational attributes.
These attributes are only handled for entry masters depending on the calculated action.
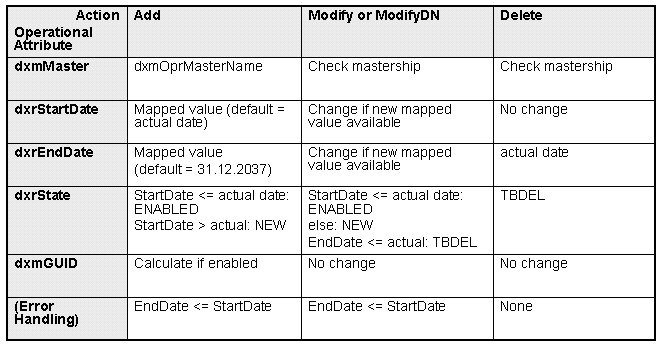
DxmOprMaster Handling
-
Add: this attribute will be set to the dxmOprMasterName value of the relevant source connected directory.
-
Modify, ModifyDN and Delete: DirX Identity checks the mastership of the relevant entry. Only entries that belong to this entry master may be touched.
Entry and Expiration Date Handling
Both date values are always set (empty fields cannot occur):
-
Add: the dxrStartDate or dxrEndDate is either set to the mapped value or if not present to the actual date or to 31.12.2037.
-
Modify: if new mapped values are available, dxrStartDate or dxrEndDate are updated.
-
Delete: dxrStartDate is not touched, dxrEndDate is set to the actual date.
Status Handling
-
Add: dxrState will be set to
ENABLED if dxrStartDate ⇐ actual date
NEW if dxrStartDate > actual date
Note: The entry will be refused if dxrEndDate ⇐ dxmEntryDate. -
Modify: dxrState will be set to (tests in this sequence!)*
ENABLED* if dxrStartDate ⇐ actual date
NEW if dxrStartDate > actual date
TBDEL if dxrEndDate ⇐ actual date
Note: An error will be reported if dxrEndDate ⇐ dxmEntryDate. -
Delete: dxrState will be set to TBDEL.
References in the Default Connectivity Applications
References are widely used in DirX Identity’s default applications, allowing a high degree flexibility (especially through copy operations) to be combined with the central configuration of important and widely-used parameters. This section describes some general reference concepts that are used in the default applications: base object references and references in filter expressions.
Most references are defined in configuration files (Tcl files, INI files, XML files). For a detailed description of how to create and interpret references, see the chapter "Customizing Object References" in the DirX Identity Customization Guide. You can also find some references in attributes at the user interface level.
Base Object References
DirX Identity uses a two-step approach to make the configuration of the base object fields in channels easy and consistent. The following figure illustrates this approach.
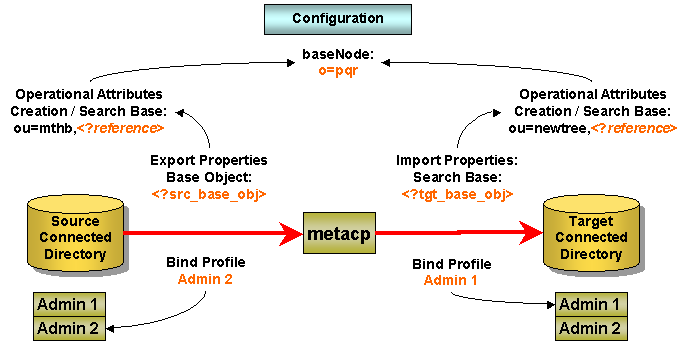
The Base Object field in an input or output channel can contain values like:
<?$src_base_obj/> or <?$tgt_base_obj/>
These values are reference variables, which almost completely hide the complexity of references. The DirX Identity default applications contain the following reference variables:
<?$src_base_obj/> - occurs in input channels. Points to the source connected directory to the specific attribute base_obj (named Creation / Search Base at the user interface).
<?$tgt_base_obj/> - occurs in output channels. Points to the target connected directory to the specific attribute base_obj (named Creation / Search Base at the user interface).
<?$src_master_name/> - occurs in input channels. Points to the source connected directory to the attribute dxmMasterName (named Master Name at the user interface in the Operational Attributes tab).
<?$tgt_master_name/> - occurs in output channels. Points to the target connected directory to the attribute dxmMasterName (named Master Name at the user interface in the Operational Attributes tab).
<?$tgt_machine_name/> - occurs in output channels. Points to the service object of the target connected directory to the attribute dxmAddress (named IP Address at the user interface).
<?$tgt_server_address/> - occurs in output channels. Points to the service object of the target connected directory to the attribute dxmAddress and dxmDataPort (named IP Address and Data Port at the user interface). Note: This reference does not work for SSL connections.
You can find the definition of these reference variables in the control Tcl script or at the start of the INI files. The definitions are contained in comments because they only set the variable content that is used later on in other places. They are not visible to the Tcl or INI script. Note: another way to hide this information is to use set_nv instead of set for the variable definition, but this technique makes debugging more difficult because you cannot see the evaluated values.
The <?$src_base_obj/> and <?$tgt_base_obj/> reference variables point to the base_obj fields in the connected directories. To make the values here as independent as possible of a specific directory implementation, the values in the base_obj fields can also contain references, for example:
ou=mthb,<?Configuration@SpecificAttributes(BaseNode)/>
The reference to the specific attribute Base Node allows you to set a central definition of the start node in the directory. For example, DirX Directory delivers samples that start with o=My-Company. In the example (which is valid for most workflows in DirX Identity’s default applications), the workflows use ou=mthb,o=My-Company as the base point.
Other variables, such as the Tombstone Base in a connected directory’s Operational Attributes tab, can also use this base value, for example, ou=tombstone,<?Configuration@SpecificAttributes(BaseNode)/>. This method creates very consistent scenarios that can easily be adapted to new situations.
Another example is the setting in the Search Base field of the Import Properties tab of the Ident2ADS workflow: LDAP://<?$tgt_machine_name/>/<?$tgt_base_obj/>. In this case, the search base is built from a constant "LDAP://", then the target machine name, another constant "/" and then the target base_obj.
References in Filter Expressions
Fields like Search Filter, OR Filter, Expert Filter or Replace Filter in input or output channels can contain simple or complex LDAP filter expressions, and they can also contain references. For example:
\{dxmOprMaster=<?$src_master_name/>}
This filter searches for all entries that contain the value of the src_master_name reference in the dxmOprMaster attribute. Simply change the Master Name field of your source connected directory to handle another master source. The advantage of these fields is that both the import and export workflows use them. As a result, you don’t need to set two different values in each workflow - one central change is sufficient.
Object Class Handling
The Connectivity standard script supports easy object class handling. Use these two variables to perform object class handling tasks:
-
dxm_add_objclass - These object classes will be added to the set of object classes.
-
dxm_rem_objclass - These object classes will be removed from the set of object classes.
These two variables permit the object classes to be completely handled during add and modify operations.
The object classes are calculated in the following steps:
-
Use the mapped target’s objectClass attribute value (for example, rh_ldap(objectClass)) as the starting point. This is supported for compatibility reasons.
-
For a modify operation only, merge the object classes from the target entry.
-
Merge the object classes from the Object Classes field in the target connected directory’s Operational Attributes if available.
-
Merge the list of object classes from dxm_add_objClass.
-
Remove the list of object classes from dxm_rem_objclass
Examples:
Set dxm_rem_objclass to the object classes of the joined entry. This action removes all object classes from the entry. If you set new object classes with dxm_add_objclass, you can completely replace the object classes.
Joined entry object classes = "person inetOrgPerson", dxm_add_objclass = "dxmADsUser", connected directory object classes = "person inetOrgPerson organizationalPerson". These values are merged to "person inetOrgPerson organizationalPerson dxmADsUser".
Global Unique Identifier (GUID) Generation
Global unique identifiers (GUIDs) significantly ease synchronization work. All processes such as join operations are well-defined and robust.
The basic GUID concept is that each entry in the Identity Store contains a unique identifier that is used as much as possible for all synchronizations to target systems (ideally, this identifier is stored in the target systems). A re-synchronization from the target system to the Identity Store can use this identifier to join to the correct entry exactly without any ambiguity.
The Connectivity standard script generates a GUID only during add operations. If a GUID is defined in the mapping, this value is taken. Otherwise, DirX Identity Connectivity supports three mechanisms to create a unique GUID: local GUID generation, central GUID generation, and user-defined GUID generation. You can switch between these modes in the job object’s GUID Generation Type.
Local GUID Generation
In local GUID generation, a GUID can be generated from a local unique identifier and a unique prefix from the source system. The employeeNumber is a good example of a unique source system identifier. You define this attribute type in the source connected directory’s Local GUID Attribute field.
A unique prefix is necessary for creating a unique identifier for the entire scenario. This prefix must be defined manually. It can be stored in the dxmGuidID attribute value of the source connected directory (GUID Prefix).
In the target connected directory, you must define the GUID Attribute, which stores the GUID values.
Central GUID Generation
DirX Identity Connectivity provides an algorithm that allows for the creation of unique integer numbers. In this case, the highest already used value is stored in a special attribute dxmActualGUIDvalue in the target connected directory object.
To generate a new GUID value, this value is retrieved, increased by one and stored again in the actual GUID value attribute. The algorithm guarantees that double generation of a number is impossible.
Because each add entry operation would require an additional read and a write operation to this actual GUID attribute, it is possible to reserve n GUID values with one read/write operation. If all of these numbers are not used, this method may lead to unused numbers. The highest possible number (2.147.483.647 for Windows) limits this method. You can specify the block size with the GUID Generation Block Size parameter in the job object.
User-Defined GUID Generation
DirX Identity Connectivity provides the following user hooks for implementing user-defined GUID generation:
-
uh:InitCreateGUID - use this routine to initialize your procedure before processing all entries.
-
uh::CreateGuid - use this routine to process a single GUID.
-
uh::CleanupCreateGuid - use this routine to clean up after processing all entries.
Multi-Mastered Attributes
DirX Identity provides the dxmOprOriginator attribute to handle multiple masters for the different values of multi-valued attributes This attribute keeps the organizational information to handle the different values of multi-valued attributes and is part of the dxrUser object class of a user entry. The dxmOprOriginator attribute is a structured attribute of the form:
master_namemaster_rec_IDattribute_name#attribute_value
where
master_name is the name of the master directory (and should be the dxmMasterName property of the source directory)
master_rec_ID is the unique record ID that identifies the record in the source (master) system.
attribute_name is the name of the multi-valued attribute.
attribute_value is the value of the multi-valued attribute that is mastered.
For example:
HDMS1#12345#telephoneNumber#+49 89 636 45667
HDMS1#34526#telephoneNumber#+49 89 722 82736
PHONEDIR#43257#telephoneNumber#+49 89 722 34526
HDMS1#12345#faxNumber#+49 89 636 45668
In this example, the phone number +49 89 636 45667 is mastered from the record 12345 in the HDMS1 system together with the FAX number +49 89 636 45668.
The record 34526 from same system HDMS1 masters the phone number +49 89 722 82736.
Another record (43257) from the system PHONEDIR masters a telephone number of the same user: +49 89 722 34526.
This example shows that several systems can handle the same attribute and on the other hand that several attributes can be handled from the same master but from different records. Thus the concept covers all possible cases.
Note: This mechanism is currently only used by the HDMS workflows.
Naming and Scopes
If you want to use your own functions and variables, you should use name spaces. This approach guarantees that there are no collisions in variable names and procedure names.
The default applications use the following name spaces, which you therefore must not use:
- uh
-
- used for user hooks
- dxm
-
- reserved for future use (for default applications)
- hdms
-
- used by the HDMS workflow
You are also not allowed to re-define the global variables used in control.tcl (for details, see the "User Hooks" section).
User Hooks
You can control the standard Connectivity script with the switches and parameters described in the "Switches and Parameters" section, and you can also control it by customizing the user hook routines. The following figure shows these routines and their relationship to the standard script structure.
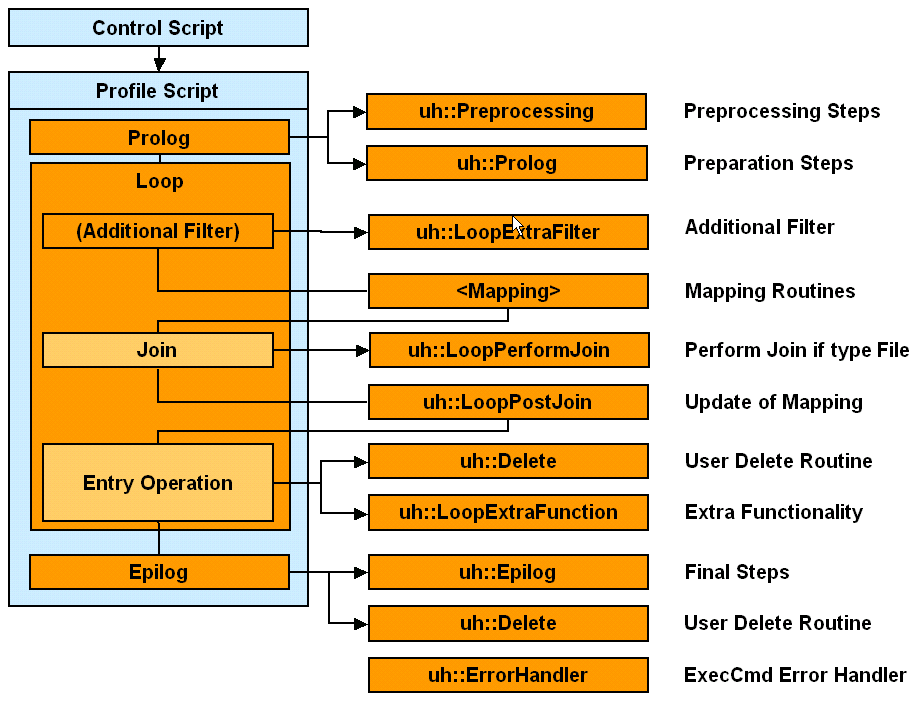
DirX Identity provides the following user hook routines:
uh::Initialize
Initializes the script. Currently only the array opr is set (defines the names of the operational attributes).
uh::Preprocessing
Prepares everything that’s needed before the rest of the profile code is executed. No files or handles are open at this time. An example is to set additional control variables with references.
uh::Prolog
Handles everything that is needed before the loop is entered (for example, opening additional files). Here all handles are already available.
When the "lStringEncrypt" mapping function is called the very first time, it reads the userCertificate using the latest bind connection. Therefore this user hook provides also the bind information that needs to be used for retrieving the userCertificate. For import workflows, it uses the target connection parameters "tgt_conn_param". For export workflows, it uses the source connection parameters "src_conn_param". If the user data that needs to be encrypted is not stored in the directory server where the ConfDB tree (which includes the userCertificate) is located, then the user hook needs to be changed.
uh::RefineSearch
If a search returns with a predefined amount of entries (for example, 4096 for RACF), the default applications try to read pieces of the search result. A default mechanism is provided that can be customized (see an application of this user hook in the RACF workflows).
uh::GenerateTombstoneDN
Used for move mode in the delete procedure. Generates the Tombstone-DN by concatenating the original DN with the tombstone base by default. Another function can be defined here.
uh::LoopExtraFilter
Filters entries that are not to be processed in the loop (for example, RACF does not permit entries to be read with a filter condition; filtering must be performed in the central script logic on a per-entry basis).
(Mapping)
You can freely define the mapping between the source and target entries in the mapping script.
uh::LoopPerformJoin
Performs a user-specific join routine when type is set to FILE. The routine can be used to compare the actual set of entries with a previous set to calculate delta information.
uh::LoopPostJoin
Runs after the join operation but before the write/update operation to the target system. The mapping can be adapted according to the results from the read entry of the target system.
uh::Delete
Defines a user-specific entry deletion method. This routine is only used when the switch Deletion Mode is set to ‘User’. It is used during the main loop processing and during the processing of unmarked entries after the main loop.
uh::LoopExtraFunction
Performs additional actions for an entry (for example, writing additional log file information into a special file).
uh::Epilog
Closes and finalizes everything that is needed after the loop has been processed (for example, the closing of additional files).
uh::ErrorHandler
Error codes that are returned as errorCode value by the general function exec_cmd can be changed here. Codes can be ignored, modified or additional actions can be issued.
uh::InitCreateGuid
Initializes the GUID generator before processing all entries.
uh::CreateGuid
Creates a user-specific GUID value. Define your own algorithms here and set the GUID Generation Type to "User".
uh::CleanupCreateGuid
Defines the cleanup code for the GUID generator after processing all entries.
See the section "Important Routines" for information about the interfaces to some of these routines.
To use the user hook routines:
-
Select the job object in the DirX Identity Manager’s expert view.
-
Right-click the job, then select New → Tcl Script. Set the name to "User Hooks Script".
-
Open Configuration → Tcl → Default → User Hooks Default Script.
-
Select the Content tab. Click in the edit window. Select the entire code (for example, with Ctrl-A) and copy it (for example, with Ctrl-C).
-
Click the Content tab of your newly created Tcl script. Click Edit. Paste the content of the default script into your script object. Click Save to store it. Note that you can’t copy the User Hooks Default Script object as a whole because it is set to read-only. Consequently, you must copy the content.
-
Link the job to your Tcl script: Click the tab Tcl Scripts, click Edit, create a new line in the Miscellaneous table and link it to the User Hooks Tcl script. Click Save.
-
Note: We recommend that you delete all of the routines in your user hook scripts that you do not use. This action makes your changes more obvious.
- The user hook routines are defined in the name space uh::. All user hook routines must be called with the prefix uh
-
==== Important Tcl Interfaces
This section describes some important Tcl interfaces in the central.tcl, user_hooks_default.tcl and post_join_mapping.tcl files.
Central Tcl Interfaces
The following Tcl interfaces are provided in central.tcl:
exec_cmd
Executes a metacp command and terminates on error.
exec_cmd executes a given command and returns the result of the executed command. The global variable debug_trace should be set to one of the values 8, 9, 12, 13 to make command trace information available in the trace file. The command meta initialize should be the very first command that is executed by exec_cmd; otherwise tracing can’t be successfully performed.
When serious errors occur, exec_cmd terminates with exit code 10. exec_cmd does not handle some error situations; for example, the error "METACP 4852" (“object doesn’t exist” in case of a search operation) or the error "METACP 4515" (“no more results in a paged result request”). In these cases, these error codes are returned.
Synopsis:
exec_cmd command directory_subtype
Parameters:
command - the command to be executed
dir_subtype - the directory subtype, for example, RACF
Global variables used:
errorCode - Tcl error code variable
debug_trace - level of debug tracing
0 – no trace
4 – Tcl variable trace to stdout
5 – Tcl variable trace to file
8 – command trace to stdout
9 – command trace to file
12 – Tcl variable trace and command trace to stdout
13 – Tcl variable trace and command trace to file
trace_file - the name of the trace file
notify_not_ok - a flag that indicates whether a notification should be sent in case of errors/warnings
notify_notok_file - a notification file
DEBUG_COMMAND indicates that Tcl commands should be traced
Return values:
result - on success, the result string of the executed command.
errorCode - on error, the error code of the executed command (for errors that are not serious)
Exit codes:
10 on serious errors
Example:
set result [exec_cmd “meta modifyentry –oldentry old –newentry new”]getCurrentTimeGMT
Returns the current time as a GENERALIZED_TIME string.
Synopsis:
getCurrentTimeGMT
Parameters:
None.
Global variables used:
None.
Return values:
time_value - the current system time as a GENERALIZED_TIME string
Example:
set current_time [getCurrentTimeGMT]int2zulu
Converts a time in seconds into a GENERALIZED_TIME value
Synopsis:
Int2zulu [time_val]
Parameters:
time_val - a time value in seconds (optional); if omitted, the current system time is used.
Global variables used:
None.
Return values:
value - time value as GENERALIZED_TIME string
Example:
int2zulu 1000000 - returns the value “19700112134640Z”
int2zulu - returns the current time as GENERALIZED_TIME string
trace_out
Writes trace information to the trace file.
trace_out writes the strings given in the parameters string1, string2, … to the trace file, if the global variable debug_trace permits the operation. The parameter mode defines the kind of information that string1, string2, … represent. If the value of mode matches the value of debug_trace, then the trace information will be written. mode is a bit combination of the global variables DEBUG_VARIABLE, DEBUG_COMMAND, DEBUG_LEVEL1, …, DEBUG_LEVEL4.
Synopsis:
trace_out mode string1 [string2 ..]
Parameters:
mode - the type of information to be written
string1, string2 … - a list of strings to be written
Global variables used:
debug_trace - for details, see the description in exec_cmd
DEBUG_IN_FILE - defines that trace information should be written into the trace file; if not set, tracing is sent to stdout
DEBUG_VARIABLE - defines that variable tracing is switched on
DEBUG_COMMAND - defines that command tracing is switched on
DEBUG_LEVEL1 - defines that trace information of level 1 will be written
DEBUG_LEVEL2 - defines that trace information of level 2 will be written
DEBUG_LEVEL3 - defines that trace information of level 3 will be written
DEBUG_LEVEL4 - defines that trace information of level 4 will be written
Return values:
None.
Example:
proc f {
 global DEBUG_VARIABLE
 trace_out $DEBUG_VARIABLE “rh_ldap(sn)=$rh_ldap(sn)”
}
zulu2int
Converts a GENERALIZED_TIME value to its representation in seconds
Synopsis:
zulu2int time_val
Parameters:
time_val - a GENERALIZED_TIME value
Global variables used:
None.
Return values:
seconds - the time value in seconds
Example:
zulu2int 20031231120000Z - returns the value “1072872000”Default User Hook Tcl Interfaces
The following Tcl interfaces are provided in user_hooks_default.tcl:
uh::Delete
Defines a user-specific entry deletion method.
uh::Delete implements a user-defined method of deleting an entry. You define the action to be executed when an entry should be deleted. The routine is used when the deletion_mode switch is set to "User". This routine is used in the default applications during the main loop processing and during the processing of unmarked entries after the main loop.
Synopsis:
uh::Delete tgt_data
Parameters:
tgt_data - an array of attribute values that represent the object to be deleted
Global variables used:
tgt_conn_param - the connection parameters to be used when performing a directory update operation
Return values:
0 in case of success
1 in case of errors
Example:
set update_result [uh::Delete tgt]uh::Epilog
Closes and finalizes everything that is needed after the loop has been processed (for example, the closing of additional files)
Synopsis:
uh::Epilog
Parameters:
None.
Global variables used:
None.
Return values:
0 - on success
return_code - on error
Example:
set return_code [uh::Epilog]uh::ErrorHandler
Handles specific errors that were originally returned in "errorCode" (in exec_cmd).
uh::ErrorHandler is called by the exec_cmd procedure when errors occur. Because error operation is different for various directory systems (for example, RACF is very restrictive and very often returns the LDAP error “LDAP_OTHER”), exec_cmd must handle these situations. You should implement uh::ErrorHandler to return “0” for errors that are not serious and that do not prevent the Connectivity standard script from continuing its entry-processing functions, and return “1” for serious errors.
Synopsis:
uh::ErrorHandler command result dir_subtype
Parameters:
command - a command string that has been executed by exec_cmd
result - a result returned by exec_cmd
dir_subtype - a directory subtype, e.g., RACF
Global variables used:
errorCode - Tcl error code variable
Return values:
0 if a specific error has been handled by that procedure
1 if the error has not been handled by that procedure
Example:
set return_code [uh::ErrorHandler $command $result RACF]uh::GenerateTombstoneDN
Generates a DN when an object that should normally be deleted is moved to a different tombstone branch of the DIT.
uh::GenerateTombstoneDN generates the tombstone DN by exchanging the target search base object with the tombstone base object.
Synopsis:
uh::GenerateTombstoneDN current_dn
Parameters:
current_dn - the DN of the object to be moved to the tombstone branch
Global variables used:
tombstone_base - the base DN of the tombstone branch
tgt_search_param - the target search parameters
Return values:
new_dn - tombstone DN
Example:
set new_dn [uh::GenerateTombstoneDN $current_dn]uh::Initialize
Initializes the default applications.
uh::Initialize is used to initialize the environment of the default applications. Because it’s the very first statement of the Connectivity standard script, the meta controller’s meta initialize operation has not yet been called, so no tracing can be done in that routine. The routine currently initializes the names of the operational attributes.
Synopsis:
uh::Initialize
Parameters:
None.
Global variables used:
opr - an array of operational attribute names
Return values:
0 - on success
1 - on error
Example:
set rc [uh::Initialize]uh::LoopExtraFilter
Filters entries that are not to be processed in the loop (for example, RACF does not permit entries to be read with a filter condition; filtering must be performed in the central script logic on a per-entry basis).
For entries that should be ignored, the return code of the function should be set to 1; otherwise, 0 should be returned.
Synopsis:
uh::LoopExtraFilter data
Parameters:
data - the name of the Tcl array that holds the source data
Global variables used:
None.
Return values:
0 if the source entry will not be ignored
1 if the source entry will be ignored
Example:
set rc [uh::LoopExtraFilter rh_ldap]uh::LoopExtraFunction
Performs additional actions for an entry.
uh::LoopExtraFunction allows to perform additional actions for an entry (for example, to write additional log file information into a special file). Both the names of the source data array and the target data array are passed to the routine so that the user can operate on both arrays. In addition, the executed operation is passed in the operation parameter, the result of that operation in the rc parameter.
Synopsis:
uh::LoopExtraFunction source target operation rc
Parameters:
source - the name of the Tcl array that holds the source data
target - the name of the Tcl array that holds the mapped target data
operation - the operation that has been performed for the entry:
“add”: if the entry has been created
“del”: if the entry has been deleted
“mod”: if the entry has been modified
“modifyDN”: if the entry’s name has been changed
“error”: if the entry caused multiple matches
“done”: if the entry doesn’t exist in the DIT
rc - the return code of the directory operation
Global variables used:
None.
Return values:
0 if the source entry will not be ignored
1 if the source entry will be ignored
Example:
set rc [uh::LoopExtraFunction rh_file rh_ldap $action $update_res]
uh::LoopPerformJoin
Performs a user-specific join routine when an entry is exported to FILE. You can use this routine to calculate delta information by comparing the current set of entries with a previous set.
Synopsis:
uh::LoopPerformJoin source target joined_entry num
Parameters:
source name - the Tcl array that holds the source data
target name - the Tcl array that holds the mapped target data
joined_entry - OUT: the array of data fields of the joined entry
num - OUT: the number of matching entries
Global variables used:
None.
Return values:
0 on success
1 on error
Example:
set rc [uh::LoopPerformJoin rh_file rh_ldap entry count]Note: When using name spaces, there might be problems using the variable source and target. As an alternative the following expression can be used:
"rh_<?job@InputChannel-DN@RoleName/>" for source
"rh_<?job@OutputChannel-DN[Anchor=DATA]@RoleName/>" for target
uh::Preprocessing
Prepares everything that’s needed before the profile code is executed. No files or handles are open at this time.
Synopsis:
uh::Preprocessing
Parameters:
None.
Global variables used:
None.
Return values:
0 on success
1 on error
Example:
set rc [uh::Preprocessing]uh::Prolog
Handles everything that’s needed before the loop is entered (for example, opening additional files or setting additional control variables with references).
Synopsis:
uh::Prolog
Parameters:
None.
Global variables used:
None.
Return values:
0 on success
1 on error
Example:
set rc [uh::Prolog]Post-Join Mapping Tcl Interfaces
The following Tcl interfaces are provided in post_join_mapping.tcl:
uh::LoopPostJoin
Performs additional mapping before calling the ADD, DELETE or MODIFY operation. Mappings that are commonly used for ADD, DELETE, and MODIFY operations should be listed in the body of this procedure. Internally, uh::LoopPostJoin calls one of the following subroutines:
-
uh::postMappingAdd
-
uh::postMappingDel
-
uh::postMappingMod
The operation-specific mappings should be listed in one of these procedures.
The action parameter is used as an input and an output parameter. When used as an input parameter, it indicates the directory operation that should normally be performed. This operation can change if the situation requires an operation other than the initially calculated one.
Synopsis:
uh::LoopPostJoin source target joined_entry action
Parameters:
source - the name of the Tcl array that holds the source data
target - OUT: the name of the Tcl array that holds the mapped target data
joined_entry - the name of the Tcl array that holds the joined entry
action - IN/OUT: the calculated action, which is one of the following values:
“add” for object creation
“mod” for object modification
“del” for object deletion
Global variables used:
None.
Return values:
0 - indicates successful post mapping
1 - indicates an error in post mapping
Example:
set rc [uh::LoopPostJoin rh_file rh_ldap entry mod]uh::postMappingAdd
uh::postMappingAdd allows you to perform additional mapping procedures before the final directory update operation (which normally is an ADD operation) is called.
The action parameter is used as an input and an output parameter. When used as an input parameter, it indicates the directory operation that should normally be performed. This operation can change if the situation requires an operation other than the initially calculated one.
Synopsis:
uh::postMappingAdd source target action
Parameters:
source - the name of the Tcl array that holds the source data
target - OUT: the name of the Tcl array that holds the mapped target data
action - IN/OUT: the calculated action, which is one of the following values:
“add” for object creation
“mod” for object modification
“del” for object deletion
Global variables used:
None.
Return values:
0 - indicates successful post mapping
1 - indicates an error in post mapping
Example:
set rc [uh::postMappingAdd rh_file rh_ldap add]uh::postMappingDel
uh::postMappingDel allows you to perform additional mapping procedures before the final directory update operation (which normally is a DELETE operation) is called.
The action parameter is used as an input and an output parameter. When used as an input parameter, it indicates the directory operation that should normally be performed. This operation can change if the situation requires an operation other than the initially calculated one.
Synopsis:
uh::postMappingDel source target joined_entry action
Parameters:
source - the name of the Tcl array that holds the source data
target - OUT: the name of the Tcl array that holds the mapped target data
joined_entry - the name of the Tcl array that holds the joined entry
action - IN/OUT: the calculated action, which is one of the following values:
“add” for object creation
“mod” for object modification
“del” for object deletion
Global variables used:
None.
Return values:
0 - indicates successful post mapping
1 - indicates an error in post mapping
Example:
set rc [uh::postMappingDel rh_file rh_ldap entry del]uh::postMappingMod
uh::postMappingMod allows you to perform additional mapping procedures before the final directory update operation (which normally is a MODIFY operation) is called.
The action parameter is used as an input and an output parameter. When used as an input parameter, it indicates the directory operation that should normally be performed. This operation can change if the situation requires an operation other than the initially calculated one.
Synopsis:
uh::postMappingMod source target joined_entry action
Parameters:
source - name of the Tcl array that holds the source data
target - OUT: name of the Tcl array that holds the mapped target data
joined_entry - name of the Tcl array that holds the joined entry
action - IN/OUT: the calculated action, which is one of the following values:
“add” for object creation
“mod” for object modification
“del” for object deletion
Global variables used:
None.
Return values:
0 - indicates successful post mapping
1 - indicates an error in post mapping
Example:
set rc [uh::postMappingMod rh_file rh_ldap entry del]Global Tcl Variables
This section describes all of the variables that can be used when working with the Connectivity standard script.
Control Script Variables
The default applications use a set of global variables that are defined in control.tcl. Many of these variables can be used in the user hook routines, if not already passed as argument.
The description of the user hook interfaces lists only the global Tcl variables that are currently used by the given routine. Because you can set up very complex user hooks, the description of an interface doesn’t list all of the global variables that are available. It’s up to you to select the relevant variables, if required.
The most important global variables are (in alphabetical order):
-
add_entries - NONE = no addition, ADD = addition only, NTF = notification only, ADDNTF = addition and notification.
-
debug_trace - 0 – no trace, 1 – variable trace to screen (compatibility mode), 2 – variable trace to file (compatibility mode), 4 – variable trace to screen, 5 – variable trace to file, 8 – command trace to screen, 9 – command trace to file, 12 – command and variable trace to screen, 13 – command and variable trace to file.
-
delete_entries - NONE = no deletion, DEL = deletion only, NTF = notification only, DELNTF = deletion and notification.
-
deletion_mode - PHYSICAL = physical removal of entry, MARK = entry is only marked, MOVE = entry is moved to tombstone area, USER = user hook defines the mechanism.
-
delta_check - defines whether the script runs in delta mode. FALSE = Delta Mode is off, TRUE = Delta Mode is on.
-
delta_date - the deltaInputData delivered from the Identity server.
-
exact_action - (static) Tcl variable:
TRUE = prohibits soft change of action from add to modify or no action when entry is already deleted (if set to TRUE). Reports error instead.
FALSE = allows soft change of action. -
filter_type - defines whether the filter or join_expression field shall be taken for the join operation. Either table or expert.
-
GUIDparam - (static) Tcl array with information for generation of GUIDs; its subcomponents are
type - GUID generation type (none, local, global).
targetIDattr - attribute where to store the generated GUID in the target directory.
blockSize - number of central GUIDs to be generated to minimize read accesses.
user - user name to access the configuration tree of Connectivity.
pass - password to access the configuration tree of Connectivity.
address - server address to access the configuration tree of Connectivity.
base - search base.
nr_free_guids - internal counter for number of free GUIDs in the block.
next_free_guid - next free GUID in the block.
sourceGuidID - fixed value to be used as prefix for the generation of a local GUID.
sourceIDattr - attribute from which to obtain the variable (unique) part of local GUID to be generated. -
init_mode - type of script operation:
real = real operation.
trial = simulation (no real operation, only traces).
If trial mode is selected, the meta controller must exit with error (because no valid data has been generated for subsequent steps). -
join_expression - join expression filter.
-
master_name - master name to be filled into the target entry.
-
max_trace_entries - maximum number of hits displayed in trace file.
-
min_source_entries - minimum number of source entries that must be present (valid for import and export).
-
modify_entries - NONE = No modification, MOD = Modification only, NTF = Notification only, MODNTF = Modification and Notification.
-
notif_notok - 0 = no notification, 1 = notification when workflow ended with warning, 2 = notification when workflow ended with error, 3 = notification when not OK (error or warning).
-
notify_notok_file - the INI file for the "notify if not ok" operation.
-
notify_data_file - the INI file for notification to write entries for manual handling.
-
object_class_collection - the object to which the object_classes belong (for example, user or group).
-
object_classes - the object classes that must be handled during an add or modify operation.
-
operational_attributes - whether or not operational attributes like dxrState shall be handled.
-
opr - the operational attributes to be used (by default, dxmOprMaster, dxrState, dxrStartDate, dxrEndDate).
-
rename_entries - FALSE = move DN not allowed, TRUE = move DN allowed.
-
src_conn_param - (static) a Tcl array with information about source connection; its subcomponents are
attr_file - name of attribute configuration file.
attr_file_localcode - code set of the attribute configuration file.
attr_list - list of attributes to be handled at the source side.
dir_type - type of source connection.
dir_subtype - subtype of LDAP directory (RACF, NDS) to react on specific behavior.
superior_info - information to create higher level entries.
data_file - name of data file (if dir_type=File).
file_format - file format (if dir_type=File).
file_mode - read or write mode (if dir_type=File).
file_localcode - code set of file (if dir_type=File).
authentication - type of authentication.
user_name - user name of bind profile.
user_pwd - user password of bind profile.
ssl - FALSE = no SSL connection, TRUE = SSL connection.
server_address - server TCP/IP address and port number.
protocol - LDAP protocol (V2 or V3).
bind_id - internal name of bind connection.
LDIFchangeOutput - write all operations into an LDIF change file instead of direct LDAP operations.
LDIFagreementFolder - the folder where DirX changelogs reside. -
src_data - the name of the Tcl array that holds the source entry. The source entry’s data is available after the source entry has been read from the source directory and therefore can be used in the following user hooks:
uh::LoopExtraFilter
uh::LoopExtraFunction
uh::LoopPerformJoin
uh::LoopPostJoin
Note: When using name spaces, there might be problems using the variable “src_data”. The following expression can be used as an alternative:
"rh_<?job@InputChannel-DN@RoleName/>"
-
src_add_marking_attr - the attribute type that is used as status attribute to indicate add operations at the source side.
-
src_add_marking_value - the value that indicates an add operation at the source side.
-
src_del_marking_attr - the attribute type that is used as status attribute to indicate delete operations at the source side.
-
src_del_marking_value - the value that indicates a delete operation at the source side.
-
src_search_param - (static) a Tcl array with information about source search parameters; its subcomponents are
base_obj - the base object at which to start the search.
subset - the search scope, either -baseobject, -onelevel, -subtree.
filter - the filter definition for the search.
or_filter - the OR filter (optional).
read_DN_only - read DNs only. Perform for each entry a separate search afterwards. Either true or false.
paged_read - read in paged read mode, either true or false.
page_size - the page size for paged read. -
src_sort_param - (static) a Tcl array with information about source sorting parameters; its subcomponents are
sorted_list - FALSE = result not sorted, TRUE = result sorted.
key - the attribute to sort when the result shall be sorted. DDN cannot be used!
order - ASCENDING = ascending sort order, DESCENDING = descending sort order. -
start_time - a Tcl variable that holds the start time.
-
statistics - a switch that suppresses standard metacp statistics.
-
target_entry_exists - the name of an attribute that is used to indicate whether an entry exists in the target system.
-
test_mapping_only - FALSE = full operation, TRUE = only mapping is performed.
-
test_max_entries - the number of entries that are mapped when test_mapping_only is TRUE.
-
tgt_add_marking_attr - the attribute type that is used as a status attribute to mark add operations.
-
tgt_add_marking_value - the value that is used as a status attribute to mark add operations.
-
tgt_conn_param - (static) a Tcl array with information about target connection; its subcomponents are the same as in the src_conn_param variable.
-
tgt_data - the name of the Tcl array that holds the target entry. The target entry’s data is available after the target entry has been mapped and therefore can be used in the following user hooks:
uh::LoopExtraFilter
uh::LoopExtraFunction
uh::LoopPerformJoin
uh::LoopPostJoin
Note: When using name spaces, there might be problems using the variable “tgt_data”. The following expression can be used as an alternative:
"rh_<?job@OutputChannel-DN[Anchor=DATA]@RoleName/>"
-
tgt_del_marking_attr - the attribute type that is used as a status attribute to mark delete operations.
-
tgt_del_marking_value - the value that is used as a status attribute to mark delete operations.
-
tgt_import_mode - REPLACE = Complete subtree in the target area is replaced by subtree from source, MERGE = Subtree from source is merged into subtree in target.
-
tgt_keep_objects - the objects that are not to be deleted.
-
tgt_mod_marking_attr - the attribute type that is used as a status attribute to mark modify operations.
-
tgt_mod_marking_value - the value that is used as a status attribute to mark modify operations.
-
tgt_search_param - (static) a Tcl array with information about target search parameters; its subcomponents are
base_obj - the base object from which to start the search.
subset - BASE_OBJECT, ONE_LEVEL, SUBTREE.
filter - the filter to perform a join operation.
delete_filter - the search filter that searches the set of entries for REPLACE mode.
read_DN_only - read DNs only. Perform for each entry a separate search afterwards. Either true or false.
paged_read - read in paged read mode, either true or false.
page_size - the page size for paged read. -
tgt_sort_param - (static) a Tcl array with information about target sorting parameters; its subcomponents are the same as the src_sort_param variable.
-
tombstone_base - the base node at which to place the deleted entries (if deletion_mode = MOVE).
-
trace_file - the name of the trace file.
-
trace_level - 1 = Error trace, 2 = Full trace, 3 = Short trace.
Profile Script Variables
The profile script profile.tcl also defines some global variables. These variables are created in the procedures listed in common.tcl while executing the synchronization logic.
-
counter - a Tcl array of counters used for additional statistic information; its components are
-
mappingProblem - the number of ignored records/entries due to mapping problems
-
userFilter - the number of ignored records/entries due to user defined filtering
-
wrongDates - the number of ignored records/entries due to expirationDate < entryDate
-
alreadyExpired - the number of ignored records/entries due to expirationDate is already in the past
-
missingSortKey - the number of ignored records/entries due to sorting key attribute not present
-
missingSortKey - the number of ignored records/entries due to sorting key attribute not present
-
illegalFilter - the number of ignored records/entries due to illegal filters
-
nonUnique - the number of ignored records/entries due to non unique objects found in the DIT
-
noPermission - the number of ignored records/entries due to missing permissions
-
nonExistingObj - the number of ignored records/entries due to non existing objects
-
differentMaster - the number of ignored records/entries due to ownership of entry is held by a different master
-
exactAction - the number of ignored records/entries because the calculated action is different from action provided with the record/entry
-
sourceEntryCount - the number of entries processed from source directory
-
guidError - the number of ignored records/entries due to errors while generating a GUID
-
entry_handle - the name of the handle that represents the current matching entry in the target directory. The handle name is set to "entry_h" (or “entry_h” and “entry_h_next” when paged results are used). It’s available after the join has been performed.
-
ExitCode - the Tcl variable that holds the current exit code used by profile.tcl when terminating. Pre-defined exit codes are the following global values:
-
TCL_ERROR (4) - a Tcl script is syntactically incorrect.
-
SERIOUS_ERROR (10) - a meta command of metacp failed.
-
ERROR (11) - the parameters defined in control.tcl are inconsistent, so the synchronization cannot be performed; for example, sorted results should be generated, but no sort key is given.
-
DATA_ERROR (12) - the minimum number of expected source entries (min_source_entries) is not available.
-
NOTIFICATION_ERROR (59) - errors occurred while sending notifications.
-
WARNING (60) - the workflow terminated with warnings, for example, the object that should be modified belongs to a different master.
-
WARNING_UPDATE (61) - an LDAP update operation terminated with an error.
The meta controller itself can also generate errors. For information about these errors, refer to the DirX Identity Meta Controller Reference.
Note: Users can exit in the user hooks directly. But before terminating the meta controller, at least meta terminate should be called in order to get a consistent trace file output.
-
src_conn_handles - the Tcl array that holds the names of source connection handles; components are:
-
Standard - a connection handle that requests all the attributes to be synchronized. The handle name is set to “src_ch”. It’s available after initChannel for the source channel has been called and therefore can be used in the following user hooks:
uh::LoopExtraFilter
uh::LoopExtraFunction
uh::LoopPerformJoin
uh::LoopPostJoin
uh::GenerateTombstoneDN -
Minimal - a connection handle that requests just a very limited number of attributes, e.g. DDN, dxrState and the sort key attribute. The handle name is set to “src_min_ch” in case the “read_DN_only” flag is set for that connection. In that case it’s available after initChannel for the source channel has been called and therefore can be used in the following user hooks:
uh::LoopExtraFilter
uh::LoopExtraFunction
uh::LoopPerformJoin
uh::LoopPostJoin
uh::GenerateTombstoneDN -
src_search_res_handle - the name of the search result handle used for accessing the source search result. The handle name is set to "src_search_res". It’s available after initChannel for the source channel has been called.
-
start_time - the Tcl variable that holds the start time of the job. This variable is available after the routine initJob has been called in profile.tcl.
-
tgt_conn_handles - the Tcl array that holds the names of target connection handles; its components are
-
Standard - a connection handle that requests all the attributes to be synchronized. The handle name is set to "tgt_ch". It can be used whenever additional data is to be written into the target connected directory.
-
Minimal - a connection handle that requests just a very limited number of attributes, e.g. DDN dxrState and the sort key attribute. The handle name is set to “tgt_min_ch” in case the “read_
-
LDIF-CHANGE - a connection handle used while processing LDIF change files. The handle name is set to "tgt_ldif_change_ch".
The handles are available after initChannel for the target channel has been called and therefore can be used in the following user hooks:
uh::LoopExtraFilter
uh::LoopExtraFunction
uh::LoopPerformJoin
uh::LoopPostJoin
uh::GenerateTombstoneDN
-
tgt_del_handles - the Tcl array that holds the names of target connection handles that are used when deleting/moving objects; its components are
-
ldap_del_ch - the name of the LDAP connection to be used when physically deleting objects. The handle name is set to "del_ch".
-
ldap_del_handle - the name of the handle to be used when physically deleting objects. The handle name is set to "del_hdl".
-
ldap_mark_ch - the name of the LDAP connection to be used for marking objects. The handle name is set to "mod_ch".
-
ldap_mark_handle - the name of the handle to be used when marking objects for deletion. The handle name is set to "rh_mod".
-
ldap_move_ch - the name of the LDAP connection to be used for moving objects. The handle name is set to "mod_ch".
-
ldap_move_handle - the name of the handle to be used when moving objects to the tombstone branch. The handle name is set to "rh_mod".
The handles are available after initChannel for the target channel has been called and therefore can be used in the following user hooks:
uh::LoopExtraFilter
uh::LoopExtraFunction
uh::LoopPerformJoin
uh::LoopPostJoin
uh::GenerateTombstoneDN
-
tgt_search_res_handle - the name of the search result handle to be used for accessing the target search result. The handle name is set to "tgt_search_res". It’s available after initChannel for the source channel has been called.
Meta Handles
The default Connectivity applications use the following "meta" handles that can be used in the user hook routines:
-
del_ch - for details, see the description of the Tcl array tgt_del_handles in the section “Global Tcl Variables”.
-
del_hdl - for details, see the description of the Tcl array tgt_del_handles in the section “Global Tcl Variables”.
-
entry_h and entry_h_next for details, see the description of the Tcl variable entry_handle in the section “Global Tcl Variables”.
-
mod_ch - for details, see the description of the Tcl array tgt_del_handles in the section “Global Tcl Variables”.
-
rh_mod - for details, see the description of the Tcl array tgt_del_handles in the section “Global Tcl Variables”.
-
src_ah - represents the attribute handle for accessing the source attribute configuration file. The handle is available once the routine initChannel has been called for the source channel.
-
src_ch - for details, see the description of the Tcl array src_conn_handles in the section “Global Tcl Variables”.
-
src_min_ch - for details, see the description of the Tcl array src_conn_handles in the section “Global Tcl Variables”.
-
src_search_res - for details, see the description of the Tcl variable src_search_res_handle in the section “Global Tcl Variables”.
-
tgt_ah - represents the attribute handle for accessing the target attribute configuration file. The handle is available once the routine initChannel has been called for the target channel.
-
tgt_ch - for details, see the description of the Tcl array tgt_conn_handles in the section “Global Tcl Variables”.
-
tgt_ldif_change_ch - for details, see the description of the Tcl array tgt_conn_handles in the section “Global Tcl Variables”.
-
tgt_min_ch - for details, see the description of the Tcl array tgt_conn_handles in the section “Global Tcl Variables”.
-
tgt_search_res - for details, see the description of the Tcl variable tgt_search_res_handle in the section “Global Tcl Variables”.
Understanding Delta Handling
This section describes:
-
The types of delta-handling mechanisms that DirX Identity supports
-
The DirX Identity controls for delta operations
Types of Delta handling
Directory synchronizations typically run in full or delta mode. DirX Identity supports different methods of delta handling. There are three ways that a job can manage delta handling:
-
Type DATE: Using a date from which entries in the connected directory must be extracted (typically the data of the end of the last synchronization).
-
Type USN: Using unique serial numbers provided by some directories. The number from the last synchronization is used for the next one
-
Type FILE: Using a delta file that contains information about the last run. Some jobs keep delta files from different runs.
Most agents and connected directories only support one of these methods, which means that this is a fixed parameter that cannot be changed. You can use the DirX Identity Manager to view a delta job to see which type of delta is supported (select the Delta Handling tab and then examine the Delta Type field).
Note: If a workflow contains jobs that work in delta mode, DirX Identity guarantees that the delta information is only updated when the complete workflow runs successfully (does not return closed.completed.error). Thus the next run of the workflow will start the same delta operation as the previous one (the one that failed). This operation ensures that no data is lost.
Warning: Do not use the Ignore Errors flag of the Activity object for jobs that use delta handling. This could result in serious data loss! (For details on the Ignore Errors flag see the Connectivity Administration Guide → Context Sensitive Help → Tcl-based Workflows → Tcl-based Activity.)
Date-Oriented Delta Handling
In order to perform date-oriented delta handling, each entry in the configuration database must contain a creation and/or a modification date. If another attribute is used for date oriented delta handling all entries must have this attribute set (see the Delta Time Attribute setting for jobs in the Connectivity Administration Guide → Context Sensitive Help → Jobs → Operation → Delta Handling).
You can then extract and process all entries where the delta time attribute has changed since the last delta date, which must be kept in the configuration database under the corresponding job entry.
Note that this type of delta handling cannot detect explicitly deleted entries because they are no longer contained in the directory. Deletions can only be properly handled if they are marked with a specific value (but not deleted) or if they have been moved to a tombstone area.
For password synchronization a special algorithm is used that compensates time differences between client and server machines. The mechanism consists of a client side and workflow side part.
Client-Side Handling
If the client writes a password to a user entry it sets the dxmPwdLastChange attribute to the local time plus a previously calculated offset representing the time difference of the local machine to the machine where the directory server resides (dxmPwdLastChange = localtime + offset).
It then reads the entry and checks whether the absolute difference between the dxmPwdLastChange attribute and the modification timestamp is below a defined limit (see for example the Delta Time attribute of the event manager in the Connectivity Administration Guide → Context Sensitive Help → Jobs → Tcl-based Event Manager - Operation). If the comparison fails the dxmPwdLastChange value is set to the value of the modifyTimestamp and the offset value is adapted. Note that the modification timestamp might be slightly higher than the value of the dxmPwdLastChange attribute because the second write operation differs from the first one.
The client must calculate the offset after startup during handling of the first entry. It writes the password to the first entry and reads the modifyTimeStamp. It compares it with the local time and stores the difference in offset (offset=modifyTS - localtime). For this entry it writes the dxmPwdLastChange attribute with the modifyTimeStamp value.
This algorithm guarantees that the dxmPwdLastChange attribute of the entries differs only within the defined limit even if the client and server machines run with different clock settings. Note that these calculations must be done in GMT time to work properly.
Workflow-Side Handling
Even if the dxmPwdLastChange is adjusted by the client side algorithm, the standard script provides a mechanism that allows compensating the remaining difference. You can activate this mechanism with the Password Synchronization flag of a meta controller job. Additionally you must set the Delta Time Attribute to "dxmPwdLastChange" and define the compensation time (Password Delta Time). (For details see Connectivity Administration Guide → Context Sensitive Help → Jobs → Operation → Delta Handling.) You should set the Password Delta Time to a value slightly higher than the highest limit of all clients. A good value to start is to set the Delta Time of the clients to 2 seconds and the Password Delta Time to 3 or more seconds.
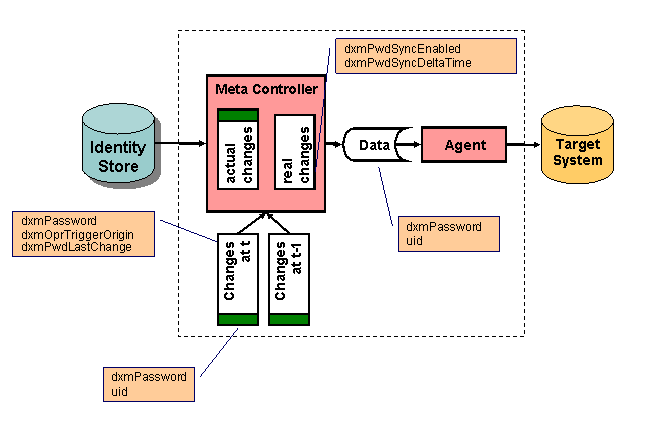
The workflows retrieve password changes from the directory by using the dxmPwdLastChange attribute as delta time attribute for the DirX Identity delta mechanism. Due to the fact that the dxmPwdLastChange attribute is only exact within some limit (the reason is that the modifyTimestamp attribute is only delivered in seconds) a comparison between the list of retrieved directory entries and a stored delta file in the work area of the password synchronization workflow can be used to identify the real difference. The delta file contains at the beginning the delta_input information and then a set of password changes of the last run. The UID can be any unique attribute that is used for join purposes in the target systems (for example employeeNumber).
The fact that the delta workflow can fail due to various reasons complicates this issue (this results in no update of the delta information in the configuration database). Thus the workflow must keep two delta files in his work area. The file names are fixed: _delta_primary.csv and _delta_secondary.csv
Based on this concept we must distinguish two possible use cases:
Use Case 1: Full transfer - The workflow retrieves all entries from the directory. The delta files must be ignored.
-
In this case a lot of password updates at the target systems could fail if the password policy is set to 'user cannot set the same password again'. Nevertheless at the end of this workflow all passwords in the target system are up to date.
-
If the target system allows overwriting the same password value the result is up to date passwords, too. If the target system delivers password events (for example via the Windows Password Listener) then a lot of such events could be generated which results in high load of the message system. These changes are blocked at the event manager so the loop is broken here (overwriting the same password is not possible).
-
A new delta file _delta_primary.csv is written at the end that keeps the last few entries according to the Password Delta Time value set (for example the last three seconds).
Full password workflow synchronizations can result in many warnings that should be ignored.
Case 2: Delta transfer - The workflow retrieves delta entries from the directory.
The workflow reads all entries based on the delta specification from the directory. In parallel it checks the delta files:
-
If no delta file is available, all entries are transferred to the target systems (this case should normally not happen).
-
If one delta file _delta_primary.csv is available and the delta_input_data is different from the first entry in the file, this file is used as delta list for comparison.
-
If one delta file _delta_primary.csv is available and the delta_input_data is equal (which indicates that the previous run was not successful), the second delta file _delta_secondary.csv is used as delta list for comparison. If this file is not present, all entries are transferred to the target system.
Comparison means that each entry from the source is compared with the delta list via the UID. If a UID is found in this list, the passwords (both encrypted) are compared. If they are equal, this entry was obviously already delivered and is dropped therefore. All other entries are delivered to the target system.
This mechanism guarantees that passwords are not delivered twice to the target system if the workflow runs in delta mode. Thus a warning for an entry must have another reason that the administrator should be sure to check.
Client-Side Delta Handling
If the client writes a password to a user entry it sets the dxmPwdLastChange attribute to the local time plus a previously calculated offset representing the time difference of the local machine to the machine where the directory server resides (dxmPwdLastChange = localtime + offset).
It then reads the entry and checks whether the absolute difference between the dxmPwdLastChange attribute and the modification timestamp is below a defined limit (see for example the Delta Time attribute of the event manager). If the comparison fails the dxmPwdLastChange value is set to the value of the modifyTimestamp and the offset value is adapted. Note that the modification timestamp might be slightly higher than the value of the dxmPwdLastChange attribute because the second write operation differs from the first one.
The client must calculate the offset after startup during handling of the first entry. It writes the password to the first entry and reads the modifyTimeStamp. It compares it with the local time and stores the difference in offset (offset=modifyTS - localtime). For this entry it writes the dxmPwdLastChange attribute with the modifyTimeStamp value.
This algorithm guarantees that the dxmPwdLastChange attribute of the entries differs only within the defined limit even if the client and server machines run with different clock settings. Note that these calculations must be done in GMT time to work properly.
Workflow-Side Delta Handling
Even if the dxmPwdLastChange is adjusted by the client side algorithm, the standard script provides a mechanism that allows compensating the remaining difference. You can activate this mechanism with the Password Synchronization flag of a meta controller job. Additionally you must set the Delta Time Attribute to "dxmPwdLastChange" and define the compensation time (Password Delta Time). You should set the Password Delta Time to a value slightly higher than the highest limit of all clients. A good value to start is to set the Delta Time of the clients to 2 seconds and the Password Delta Time to 3 or more seconds.
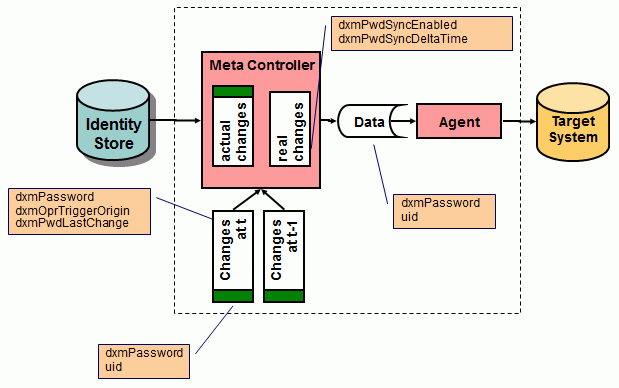
The workflows retrieve password changes from the directory by using the dxmPwdLastChange attribute as delta time attribute for the DirX Identity delta mechanism. Due to the fact that the dxmPwdLastChange attribute is only exact within some limit (the reason is that the modifyTimestamp attribute is only delivered in seconds) a comparison between the list of retrieved directory entries and a stored delta file in the work area of the password synchronization workflow can be used to identify the real difference. The delta file contains at the beginning the delta_input information and then a set of password changes of the last run. The UID can be any unique attribute that is used for join purposes in the target systems (for example employeeNumber).
The fact that the delta workflow can fail due to various reasons complicates this issue (this results in no update of the delta information in the configuration database). Thus the workflow must keep two delta files in his work area. The file names are fixed: _delta_primary.csv and _delta_secondary.csv
Based on this concept we must distinguish two possible use cases:
Use Case 1: Full transfer - The workflow retrieves all entries from the directory. The delta files must be ignored.
-
In this case a lot of password updates at the target systems could fail if the password policy is set to 'user cannot set the same password again'. Nevertheless at the end of this workflow all passwords in the target system are up to date.
-
If the target system allows overwriting the same password value the result is up to date passwords, too. If the target system delivers password events (for example via the Windows Password Listener) then a lot of such events could be generated which results in high load of the message system. These changes are blocked at the event manager so the loop is broken here (overwriting the same password is not possible).
-
A new delta file _delta_primary.csv is written at the end that keeps the last few entries according to the Password Delta Time value set (for example the last three seconds).
Full password workflow synchronizations can result in many warnings that should be ignored.
Case 2: Delta transfer - The workflow retrieves delta entries from the directory.
The workflow reads all entries based on the delta specification from the directory. In parallel it checks the delta files:
-
If no delta file is available, all entries are transferred to the target systems (this case should normally not happen).
-
If one delta file _delta_primary.csv is available and the delta_input_data is different from the first entry in the file, this file is used as delta list for comparison.
-
If one delta file _delta_primary.csv is available and the delta_input_data is equal (which indicates that the previous run was not successful), the second delta file _delta_secondary.csv is used as delta list for comparison. If this file is not present, all entries are transferred to the target system.
Comparison means that each entry from the source is compared with the delta list via the UID. If a UID is found in this list, the passwords (both encrypted) are compared. If they are equal, this entry was obviously already delivered and is dropped therefore. All other entries are delivered to the target system.
This mechanism guarantees that passwords are not delivered twice to the target system if the workflow runs in delta mode. Thus a warning for an entry must have another reason that the administrator should be sure to check.
USN-Oriented Delta Handling
In order to perform USN-oriented delta handling, each change in the connected directory must be written into a special tree (the "changelog" tree). A unique serial number (USN) identifies each entry in this tree. The content of this entry is the type of change and a reference to the entry that was changed.
You can extract this "changelog" information from the connected directory, analyze the contained information and process the corresponding entries.
This type of delta handling mechanism can handle deletions correctly.
Note: Some implementations only keep the DN of the deleted entry. If you need other information like a global unique identifier for removal of this entry in your target system, you must store the DN in your target system!
File-Oriented Delta Handling
In order to perform file-oriented delta handling, an external delta database must exist against which the current state of the directory can be compared (this means that the directory does not support any delta mechanism). The external delta database is usually a file with partial content (hashed entries are also possible).
The agent for the directory must create and maintain these files and handle the compare operation. All types of changes (also deletions) can be processed correctly.
This type of delta-handling mechanism is very time-consuming, especially for large amounts of data.
Delta Handling Control
At the user interface, all of the delta-handling types are reduced to a list of dates where delta runs were performed. This list is part of the delta-handling properties of the related job configuration object. Normally the next delta run is performed on the result of the last one (the value RECENT indicates this mode).
In special cases (for example, when a connected directory must be restored due to a severe error), the administrator can select a specific date to perform the next run.
The delta information stored in the configuration database is a list of date/time stamps with the necessary values (a date, a USN, a file name) denoting the time points where former synchronizations took place. This list is extended by the items RECENT and FULL to indicate a request for synchronization of all data changed since the last synchronization.
The following figure illustrates the delta information as it appears in the job configuration object viewed with the DirX Identity Manager Expert View.
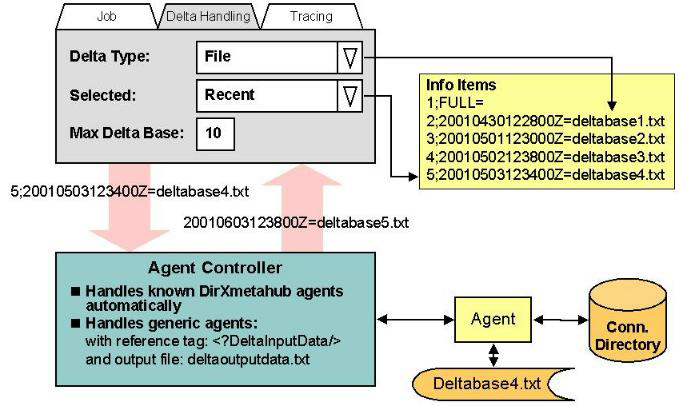
The relevant fields are:
Delta type: the type of delta handling (DATE, USN, FILE).
Info Items: the list of delta information in the format number, time, delta_value which keeps the results of all delta runs in the configuration database. You cannot see this list from the DirX Identity Manager. Examples are:
DATE delta Example: 7;20010503123400Z=20010503123400Z
FILE delta Example: 5;20010503123400Z=delta1.txt
DATE full Example: 1;FULL=19800101000000Z
FILE full Example: 1;FULL=
Selected: the value from the Info Items list to start the next delta run:
RECENT - (value 0) takes the item with the highest sequence number in the list
FULL - takes the item number 1
date value - represents one of the stored delta runs
MaxDeltaBase: the maximum number of Info Items entries (used to clean up the item area).
The next sections discuss how to:
-
Control delta runs
-
Configure delta handling
How to Control Delta Runs
Normally the value of the field selected is RECENT, but you can select another value for the next run, either FULL or a date which characterizes older delta run results (refer to the previous figure, which shows an example of type FILE).
When the C++-based Server starts the corresponding activity during the next run, it delivers the content of the relevant Info Item field to the agent controller based on the value of the Selected field.
The agent controller performs the delta operation. If it completes successfully, the agent controller returns as a result the current time value with the specific delta information (the USN, date or file name).
DirX Identity stores this information in the Info Items list with the next available item number when it was not a temporary run and resets the Selected field to RECENT.
Note: If a workflow contains jobs that work in delta mode, DirX Identity guarantees that the delta information is only updated when the complete workflow runs successfully (does not return closed.completed.error). Thus the next run of the workflow will start the same delta operation as the previous one (the one that failed). This operation ensures that no data is lost.
Warning: Do not use the Ignore Errors flag of the Activity object for jobs that use delta handling. This could result in serious data loss! (For details on the Ignore Errors flag see the Connectivity Administration Guide → Context Sensitive Help → Tcl-based Workflows → Tcl-based Activity.)
Configuring Delta Handling
When you define a new job, you must set up DeltaType in the configuration database. Set the field Delta Type in the Delta Handling tab of the job object or use a wizard in the DirX Identity Manager Global View. The Info Items field is automatically initialized to:
USN full Example: 1;FULL=1
DATE full Example: 1;FULL=19800101000000Z
FILE full Example: 1;FULL=
Please note that if you change the DeltaType field at any time later on, DirX Identity Manager will reset the existing Info ltems list to the FULL-entry. The Selected field is set to Recent.
Hint: DirX Identity agents are designed to work with the agent controller to support delta handling in the correct way, but any other agent can also use the delta handling feature of DirX Identity:
-
The delta information from the last run can be obtained via the reference <?DeltaInputData/>. You can use this reference in the command line or in any configuration file.
The new delta information, which should be stored into the Connectivity configuration, must be written into the first line of the file deltaoutputdata.txt (location must be the work path).
Customizing Tcl-based Workflows
Each Tcl-based workflow has a number of parameters that you can change. These parameters are common to most Tcl-based workflows and can all be accessed from the corresponding workflow wizard. The topics in this section describe these parameters for workflows that export data from the Identity Store and workflows that import data from the Identity Store.
Customizing Identity Store Export Workflows
The most important parameters for workflows that export data from the Identity Store are attribute mapping, base object, filter and tracing. Clicking Help in the relevant wizard step gives you more information about these parameters.
Attribute Mapping
You need source and target attributes for attribute mapping. Use the source selected attributes to define the attributes to be exported from the Identity Store. Use the target selected attributes to define the attributes to be imported into the target system. Use the mapping editor to define the mapping from source to target. You can use the pre-defined mapping functions or create additional ones.
If the left-hand list in the selected attributes editor does not contain the necessary attributes, you need to add the attributes to your source or target connected directory. Double-click the connected directory icon in the Global View and select the Attribute Configuration step. Add the necessary attributes to the list and set the correct parameters. If the connected directory is of type LDAP or ADS, you can update the list by synchronizing the schema.
Base Object (Export Properties Tab)
This parameter defines the base point at which the search is to be performed.
For the creation workflows, this variable is set to
o=My-Company,<?Job@InputChannel-DN@ConnDir-DN@SpecificAttributes(Role_user_base)/>
which is a combination of a constant (o=My-Company) and a reference.
The reference fetches the specific attribute role_user_base from the connected directory. It starts at the job object, selects the connected directory via the input channel, and from the connected directory it uses the specific attribute role_user_base.
For the Provisioning synchronization workflows, this variable is set to:
<?Workflow@Activity-DN[Anchor=TSagent]@RunObject-DN@InputChannel-DN@ConnDir-DN@SpecificAttributes(Role_TS_Account_Base)/>
The reference starts at the workflow object, goes down to the start activity and then to the job object. At the job level, it selects the connected directory via the input channel, and from the connected directory it takes the specific attribute role_ts_account_base.
You could set these parameters directly to the correct values, but then you would lose the advantage of being able to change parameters for an entire set of workflows at the same time because each workflow uses an individual value. In this case, the validation and synchronization workflows use such central parameters.
Filter (Export Properties Tab)
This parameter allows you to define a filter condition in LDAP notation. In the default Connectivity scenario, this field is set in several ways.
For the creation workflows, the filter is usually set to a constant value, for example:
( not ( c="DE" ) and not ( c="IT" ) and not ( c="US" ) )
For Provisioning synchronization workflows, the filter is set, for example, to:
(objectClass="dxrTargetSystemAccount" and not ( dxrTSState="DELETED" ) )
In this case, the workflow exports target system accounts whose dxrTSState values are not in the DELETED state.
Customizing Identity Store Import Workflows
The most important parameters for workflows that import data to the Identity Store are mapping and selected attributes, base object, import mode, filters for merge/replace, entry handling, tracing, and page mode. Clicking Help in the relevant wizard step gives you more information about these parameters.
Mapping and Selected Attributes
You need source and target selected attributes for the mapping. Use the source selected attributes to define the attributes to be exported from the source system. Use the target selected attributes to define the attributes to be imported into the Identity Store. It is important to set the correct flags that influence whether attributes may be added, deleted or modified. A combination of these flags for a specific attribute defines the mastership for that attribute.
Use the mapping editor to define the mapping from source to target. You can use the pre-defined mapping functions or create additional ones.
If the left-hand list in the selected attributes editor does not contain the necessary attributes, you need to add them to your source or target connected directory. Double-click the connected directory icon in the global view and select the Attribute Configuration step. Add the necessary attributes to the list and set the correct parameters. If the connected directory is of type LDAP or ADS, you can update the list by synchronizing the schema.
Base Object (Import Properties tab)
This parameter defines the base point for the join operation.
For creation workflows, this value is set to a reference:
<?Job@OutputChannel-DN@ConnDir-DN@SpecificAttributes(Role_user_base)/>
The reference retrieves the specific attribute role_user_base from the Identity Store object.
For Provisioning synchronization workflows, the base point is set to a reference:
<?Workflow@Activity-DN[Anchor=TSagent]@RunObject-DN@InputChannel-DN@ConnDir-DN@SpecificAttributes(Role_TS_Account_Base)/>
See the export section for an explanation of this reference.
Import Mode (Import Properties Tab)
For import operations, you can choose between two modes: Replace and Merge.
Replace mode assumes the existence of a full set of entries and therefore cannot handle delta information. In this mode, the source and the target are identical after the operation. This mode can be used for up to 250,000 entries without any problems (typical execution times are 2.5 hours or less). This mode is particularly useful for initial loads. In this case, it is about four times faster than merge mode.
Merge mode can handle all kinds of input. Content information can be handled as a full import or as a delta set if only addition and modification are enabled (see the Entry Handling tab for these settings). If the source delivers an operation code (especially for deleted entries), then deletions can be handled in this mode, too. Large numbers of entries (500,000 entries and more) should be handled with this mode in conjunction with a delete operations code.
Creation and provisioning workflows use merge mode in the default scenario.
Filters for Merge / Replace (Import Properties Tab)
Depending on the value of the import mode parameter (Merge or Replace), you need to set either the Filters for Merge or the Filters for Replace parameter.
If the import mode is Merge, you use the Join table either in table or expert mode (for details, see the description of this element). Each row in this table defines a separate filter condition that is evaluated one after the other until exactly one match is found. For example, you can first search for the employeeNumber, then for a combination of sn, givenName and telephoneNumber and so on.
If the import mode is Replace, you define a Replace Filter, which is a condition that retrieves all entries in the target into the meta controller’s memory. The meta controller compares all source entries with this memory list. Entries that it finds are marked and modified if the content has changed. Entries that it does not find must be added to the target. At the end, all entries that are not marked in the list are subject to be deleted from the target. This algorithm guarantees a consistent set of entries after the operation. In this mode, it is important that the retrieved memory list is sorted with the field that is used for comparison. This field is to be defined as Sort Key.
Entry Handling Properties Tab
This tab contains a set of properties that allow you to define together with the Import Mode parameter the specific behavior of the entry handling at the target side. You can define parameters for Add, Modify and Delete operations.
The Add Entries/Modify Entries/Delete Entries switches each allow four options. You can either forbid the operation (None), allow it (Add, Modify or Delete) or choose instead only notification (NTF), where a file is generated for this type of operation and is sent via e-mail to an administrator, who must then perform the requested task manually. The fourth option permits the performance of both the operation and the notification. This option is useful if the administrator wants to check the operations regularly and is especially useful for additions and deletions.
For Add, you should set the Superior Info information. This is not necessary if you are absolutely sure that creation of upper-level nodes is never required.
For Modify, you can choose whether you want to allow a DN rename operation (Rename Entries)
For Delete, you can choose the Deletion Mode. The selection must be consistent with your delivered data. You can use the Keep Objects field to define DNs that your workflow should not delete.
See the script structure sections in the chapter "Understanding the Default Application Workflow Technology" for information about the other entry handling properties.
Page Mode
DirX Identity’s default workflows are configured to run without paging by default. However, if you intend to work with large amounts of data, use paging wherever possible. Otherwise you could reach the limits of the directory server or the operating system. In the latter case, the result is not predictable. Note that for comparison of two result lists, sorting is absolutely necessary if you work in paged mode.