Connector Integration Framework
The DirX Identity Connector Integration Framework has two API-dependent variants:
-
The Java Connector Integration Framework, which permits you to create connectors and agents that integrate target systems with Java APIs.
-
The C/C++ Connector Integration Framework, which allows you to create connectors that integrate target systems with C/C++ APIs.
The sections in this chapter describe each framework’s elements and how to configure and deploy it.
Java Connector Integration Framework
The DirX Identity Java Connector Integration Framework helps developers build DirX Identity agents and connectors for new types of target systems with a minimum of effort.Written in Java, it includes:
-
Builder components to read the configuration data and transform it to Java objects and build the stack to process a DirX Identity job
-
Reader classes to read input data from files or servlet requests in Services Provisioning Markup Language (SPML) or LDAP Data Interchange (LDIF) format
-
Writer classes to output response data to files or servlet response in SPML or LDIF format
-
Transformation classes to transform input data or output data from SPML format with Extensible Stylesheet Language (XSL) transformations
-
A connector interface to incorporate third-party connector implementations
-
Controller classes to run a DirX Identity job either as standalone executable or as a servlet and control the correct invocations of readers, transformers, response writers and the connector according the job configuration
In order to support the implementation of connectors for RESTful services the framework provides a template RESTful connector along with special interfaces and their simple and/or sample implementations. For more details on that see the corresponding section in the Use Case document Java Programming.
The information in the following sections serves two audiences:
-
Administrators who want to configure DirX Identity jobs based on framework implementations. These readers need to know about the framework’s deployment and configuration.
-
Developers who want to implement new agents based on the framework. These readers need to know about the framework’s deployment and configuration and also about the connector interface and how to use it.
How the Java Connector Integration Framework Works
The following figure shows the main components of the framework:
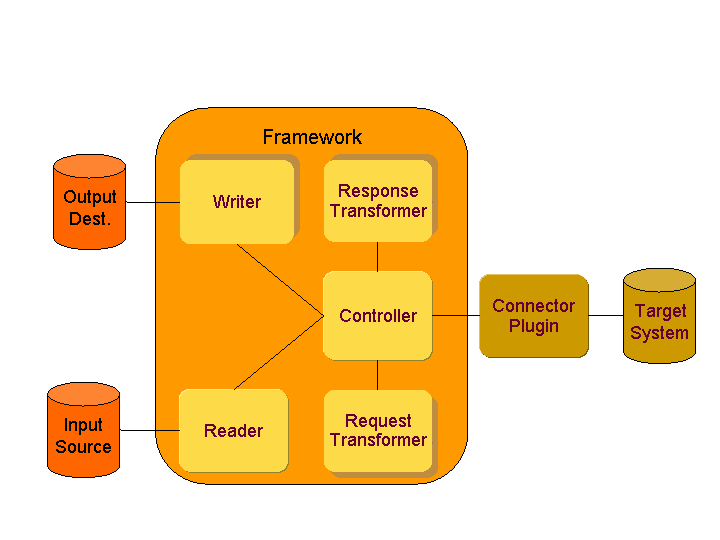
As illustrated in the figure:
-
A reader reads a request from an input source. In most cases, the input source is a file - for example, an LDIF file or an SPML file - but it can also be a Java Message Service (JMS) message or an SPML request over Simple Object Access Protocol (SOAP).
-
The reader passes the input data to the controller as Java objects logically compliant with SPML format.
-
The controller invokes one or more read transformers to transform the input and pass the results to the connector.
-
The connector operates the request against the target system and returns an SPML response, which may be transformed by one or more transformers before it is written to output destinations by writers.
-
Within the framework, the data is represented as Java objects that represent SPML requests and responses. Transformers may also decrypt and encrypt the data. The connector always handles data in clear text format.
-
All the participating classes, data source and destinations and operation options are configured in an XML-formatted file. On startup, this file is converted to Java objects via a mapping file.
Deploying the Framework
The Java Connector Integration Framework can be deployed as a standalone executable, as a Simple Object Access Protocol (SOAP) client, or as a SOAP service in a Web container. The next sections describe how to deploy the framework in each of these environments.
Deploying the Framework as a Standalone Executable
The Java Connector Integration Framework is typically deployed as a standalone executable like the agents for batch workflows in DirX Identity. In this type of deployment, the framework executable is started by the C++-based DirX Identity server, reads its input requests from a file and writes the response to another file. The following figure shows a typical import/export deployment, where the framework acts as an executable that cooperates with the DirX Identity meta controller (metacp).
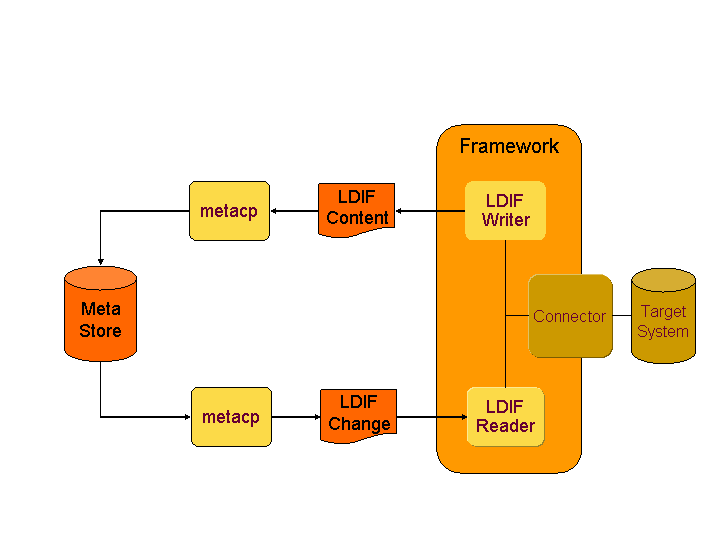
In this deployment, metacp exports data from the identity store (an LDAP directory) and transforms it to LDIF change format. An LDIF reader within the framework converts the data to SPML requests. The connector carries out the request at the target system and returns an SPML response, which LDIF writer converts to LDIF content format. metacp then transforms the response and writes it back to the identity store. Note that transformation can occur within metacp and also within the framework in both the input and output direction. However, it is metacp that determines the requests: add, modify or delete an entry.
A pure framework export scenario is slightly different, and is shown in the following figure.
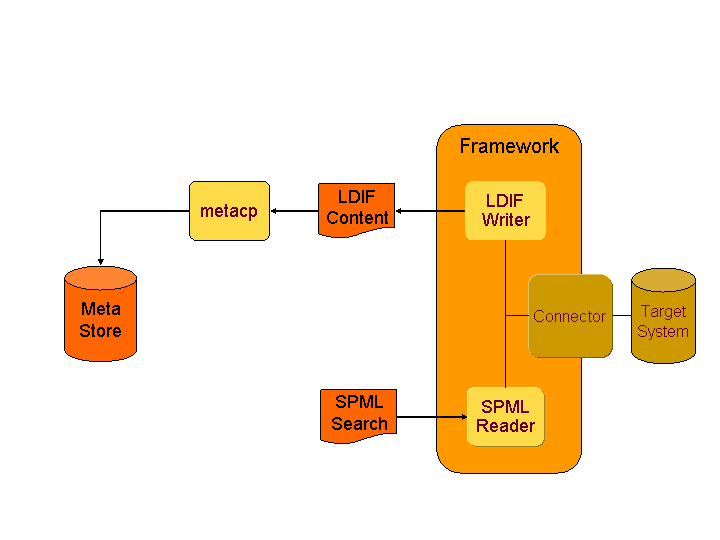
In this scenario, the administrator prepares an SPML request document that contains just a search request. The framework’s SPML reader passes this request to the connector, which presents it to the target system. The rest of the procedure operates just as the import/export scenario.
The following command line invokes the framework as an executable:
java -cp classpath siemens.dxm.connector.framework.AgtSessionExe -c confFilename -p programName -v version -d buildDate -Enc \{ATTRIB_ADMIN_PW | ADMIB_PW | NONE} -Timeout timeout -Port port -CryptlogLevel cryptloglevel -AuditLevel auditlevel
where
-
-c is the name of the configuration file (mandatory).
-
-p indicates the agent’s program name.
-
-v indicates the agent’s version.
-
-d indicates the agent’s build date.
-
-Enc is the encryption level (for details, see the DirX Identity documentation); the default is NONE.
-
-timeout is the maximum time the agent is to wait to receive the key from DirX Identity server.
-
-port is the port number for communication with DirX Identity server.
-
-cryptlogLevel indicates the log level for encryption.
-
-auditLevel indicates the level of writing audit logs.
| Only the -c option is mandatory. The -Enc option is only mandatory if the input data or the configuration file contains encrypted attribute values; for example, passwords. |
Deploying the Framework as a SOAP Client
The standalone executable framework deployment can itself be deployed as a SOAP client that sends SPML SOAP requests over HTTP and receives SPML SOAP responses from a SOAP service. To deploy the framework in this way, just select the appropriate class as the connector. You have two options:
-
DxaSpmlSoapProxy: produces SPML requests according the latest OASIS SPMLv1 standard (http://www.oasis-open.org/committees/download.php/4138/os-pstc-spml-schema-1.0.xsd).
-
SpmlSoapProxy: produces SPML requests according a more recent version of SPMLv1 that is not considered the official release any more (http://www.oasis-open.org/committees/download.php/2396/cs-pstc-spml-schema-1.0.xsd).
The following snippet shows a configuration with the latest connector:
<connector
 role="connector"
 className="siemens.dxm.connector.framework.soap.DxaSpmlSoapProxy"
 name="SPML connector">
 <connection type="SOAP"
       url="http://localhost:8080/spmlsoapservice/services/SpmlSoapService"
 >
 </connection>
</connector>
The proxy class sends the SPML requests to the URL specified in the connection section of this configuration. It must be adjusted to the configuration of the server side. See "Deploying the Framework as a SOAP Service" for an example.
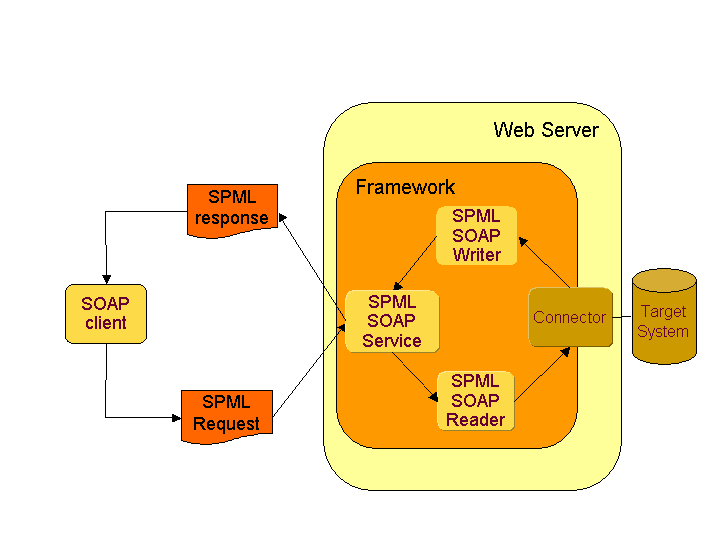
Deploying the Framework as a SOAP Service
The framework can also be deployed as a SOAP service within a Web container. When deployed as a Web service, the framework receives SPML SOAP requests via HTTP and returns SPML SOAP responses, as shown in the following figure.
Configuring the SOAP Reader and Writer
You need to specify a SOAP reader and a SOAP writer in the framework configuration file to receive the requests and send the responses. The following configuration snippet shows the important sections:
<job>
<connector
    name="Default Controller" version="0.1"
    role="controller"
    className="siemens.dxm.connector.framework.DefaultControllerService">
    <logging ... />
</connector>
<connector
    role="reader"
    name="SPML SOAP reader"
    className="siemens.dxm.connector.framework.soap.SpmlSoapReader">
</connector>
<connector
    role="connector"
    className="your connector class name"
    name="name your connector">
    <connection ... />
</connector>
<connector
    role="responseWriter"
    name="SPML SOAP writer"
    className="siemens.dxm.connector.framework.soap.SpmlSoapWriter">
</connector>
</job>
Make sure you select a controller class that implements the DxmControllerService interface; for example, the DefaultControllerService of the framework.
Setting Up the Web Deployment Descriptor
A typical Web deployment descriptor for a web server might look like this:
<web-app>
<servlet>
  <servlet-name>SpmlSoapService</servlet-name>
  <servlet-class>siemens.dxm.connector.framework.soap.AgtSessionServlet
  </servlet-class>
  <init-param>
    <param-name>confFileName</param-name>
    <param-value>confService.xml</param-value>
  </init-param>
    <init-param>
      <param-name>mappingFilename</param-name>
      <param-value>agentconf.xml</param-value>
    </init-param>
  <load-on-startup>1</load-on-startup>
</servlet>
<servlet-mapping>
<servlet-name>spmlsoapservice</servlet-name>
<url-pattern>/spmlsoapservice</url-pattern>
</servlet-mapping>
</web-app>
It defines a servlet named SpmlSoapService and the necessary initialization parameters that provide the names of the configuration and the mapping file (as absolute path names).
Setting Up the Axis SOAP Deployment Descriptor
The SOAP service uses the Axis framework as its SOAP engine, so you need to add the service to the Axis server’s Web service deployment descriptor, for example:
<deployment …>
<service name="SpmlSoapService"
provider="java:MSG" style="message" use="literal" streaming="on">
 <parameter name="allowedMethods" value="spmlRequest"/>
<parameter name="className"    value="siemens.dxm.connector.framework.soap.SpmlSoapService"/>
</service>
</deployment>
This step defines the SOAP service’s class name and the methods to be called. The method spmlRequest() within the class SpmlSoapService handles the incoming SOAP requests. It passes them to the SpmlSoapReader and via the framework controller to the class you specified as the connector. The connector’s response is passed to the SpmlSoapWriter class, which produces the SOAP response message.
Deploying a Connector in the IdS-J Server
A connector implementation can be deployed as a standalone agent (see Framework as Executable) and in the IdS-J server. In the server it can run as part of a workflow in a number of threads at the same time. This requires the connector implementation to be thread-safe. This means especially to be careful with static variables and in the open() and close() methods. Especially keep in mind that this method pair could be called multiple times within a job!
Component Description
In order to select a connector for an activity, you need to supply a component description. In the configuration store, component descriptions of connectors have to be stored beneath the "Configuration/Connector Types" folder. Here you find a sub-tree for each type of connector. Create a new folder for your connector; for example, "Sample". Take one appropriate component description as a template, copy it and place it into the sub-folder "Component Descriptions". The component type should be "connector".
The content is an XML document with the root element <componentDescription>. Its name attribute is important: In the configuration of an activity port, it is listed when selecting a connector. The Identity Manager stores the selected value in the port’s XML content. Then it serves as the only reference from the port configuration to the component description.
The component description defines the configuration properties of your connector and how they are presented within the job configuration. It has to display the fields for the connector configuration parameters, at least the ones with may be changed. The component description is a merge between XML schema and DirX Identity object descriptions. It describes a XML structure with XML elements and attributes and <property> elements. The basic structure is the same for all connectors: it conforms to the connector configuration described in Configuration.
Important for your connector are the properties. You have three alternatives for setting them:
- Set a default value within the component description
-
This can be done with the <value> element beneath the <property> as in this sample for the classname:
<property name="className" mandatory="true" xmlNotation="xmlAttribute" type="java.lang.String"> <value>siemens.dxm.connector.ldap.LdapConnector</value> </property>xmlNotation="…" tells DirX Identity that this property is to be stored as an XML attribute. Take the value from an LDAP attribute of the same or a referenced entry:
As with a lot of others, parameter values can be taken at load time from LDAP entries, either the port entry or one, which is referenced from it. See the following sample, which takes the user name from a referenced bind profile:
<value>${DN4ID(THIS)@dxmBindProfile-DN@dxmUser}</value>The term "${DN4ID(THIS)" denotes the current LDAP entry. Each "@<attributetype>" takes the value from the LDAP attribute. If it is followed by another "@…" expression, it is interpreted as DN and DirX Identity reads the referenced LDAP entry and the next attribute.
- Let the administrator set the value with DirX Identity Manager
-
This alternative requires displaying the property in the GUI. This is accomplished similarly, but not exactly the same way as with object descriptions. In contrast to an object description, presentation is configured in separate elements: <presentationDescription>/<propertyDescriptions>/<property>. This <property> element must refer via its name attribute to a <property>, which has already been defined beneath an <element>, either for a <connector> or for the <connection>. The following property definition refers to the bind profile and defines the label and the editor to be used (if not standard string type):
<property   name="dxmBindProfile-DN"  editor="siemens.dxm.storage.beans.JnbReference" editorparams="showpath">
     <label>Bind Profile</label>
</property>
Deploying the JAR File
The jar file that contains your connector implementation must be copied to a classpath that the IdS-J server searches when processing framework-based workflows. Copy your jar file to the system file folder install_path/ids-j-domain-Sn/confdb/framework/lib. Make sure it is not deleted after upgrade installations.
About the Connector Interface
The connector interface marks the interface between the DirX Identity agent framework and the connector components that provision target systems. It reflects the requests of the SPMLv1 standard.
The interface consists of mandatory and optional pieces. The mandatory interfaces are:
- DxmConnectorCore
-
This interface consists of the methods open() and close() to read configuration data, open and close the connection to the target system.
- DxmRequestor
-
This interface contains the operations to read, update and delete entries in the target system: add(), modify(), delete() and search().
The optional DxmConnectorExtended interface adds the rest of the SPMLv1 requests:
-
getSchema()
-
status()
-
cancel()
-
extendedRequest()
-
batchRequest() to deliver a collection of requests at one time
For more information on the interface and the input and return parameter classes, see the Java documentation provided on your DVD in the folder:
Documentation\DirXIdentity\ConnFrameWork
About the DxmConnectorCore Interface
The interface siemens.dxm.connector.DxmConnectorCore includes the mandatory methods to read the configuration and open and close the connection to the target system:
- void open(DxmConnectorConfig connectorConfig)
-
Call the open() method after the implementing class has been instantiated. Other methods in the interface cannot be called until this method successfully returns.
The method opens a connection to the target system (called a provisioning service target (PST) in SPML). The framework delivers the configuration options in the connectorConfig parameter of type siemens.dxm.configuration.job.DxmConnectorConfig. It contains all the information that was configured in the connector element with role="connector". The most important ones are contained in the connection sub-element with address and bind credentials to access the target system.
Connector developers do not need to handle parsing the XML document: the framework handles this task and creates a Java class that corresponds one-to-one to the configuration. The attributes of the connector XML element are properties of the Connector class. You can read them by issuing a getProperty("optionname") call. The connection sub-elements are themselves a collection of Java classes, which you can read by issuing a getConnections() call.
The following code snippet shows how to access standard and custom connection options:
DxmConnectionConfig connection = (DxmConnectionConfig) connectorConfig.getConnections().firstElement(); String rspFilename = connection.getFilename(); // how to read custom configuration properties: String dbgFilename = (String)connection.getProperty("debugfile"); void close() - void close()
-
Call the close() method to shut down the connection to the target system and release all resources. After this method is called, only an open() call is allowed.
About the DxmRequestor Interface
The interface siemens.dxm.connector.DxmRequestor includes the methods to read, update and delete an entry:
- AddResponse add(AddRequest req)
-
Call this method to perform an add request and return a SPML AddResponse. The AddRequest and AddResponse are both Java classes that conform to the SPML specification.
The following code snippet shows how to read the requestid, the identification and the attributes from the AddRequest class:
String requestid = req.getRequestID();
Identifier identifier = req.getIdentifier();
Attributes attributes = req.getAttributes();
For more details on AddRequest and AddResponse, see the Java documentation.
- ModifyResponse modify(ModifyRequest req)
-
Call this method to perform a modify request and return a SPML ModifyResponse. The ModifyRequest and ModifyResponse are both Java classes that conform to the SPML specification.
The following code snippet shows how to read the requestid, the identification and the modifications from the ModifyRequest class:
String requestid = req.getRequestID();
Identifier identifier = req.getIdentifier();
Modifications attributes = req.getModifications();
DsmlModification[] = Modifications.getModification();
For more details on ModifyRequest and ModifyResponse, see the Java documentation.
- DeleteResponse delete(DeleteRequest req)
-
Call this method to perform a delete request and return a SPML DeleteResponse. The DeleteRequest and DeleteResponse are both Java classes that conform to the SPML specification.
The following code snippet shows how to read the requestid and the identification from the DeleteRequest class:
String requestid = req.getRequestID();
Identifier identifier = req.getIdentifier();For more details on DeleteRequest and DeleteResponse, see the Java documentation.
- SearchResponse search(SearchRequest req)
-
Call this method to perform a search request and return a SPML SearchResponse . The SearchRequest and SearchResponse are both Java classes that conform to the SPML specification.
The following code snippet shows how to read the requestid, the search base, the search filter and the requested attributes from the SearchRequest class:
String requestid = req.getRequestID();
Identifier identifier = req.getSearchBase();
Filter filter = req.getFilter();
AttributeDescriptions attrDesc[] = req.getAttributes();
For more details on SearchRequest and SearchResponse, see the Java documentation.
About the DxmConnectorExtended Interface
The interface siemens.dxm.connector.DxmConnectorExtended extends the DxmConnectorCore interface and includes the additional optional methods of the DirX Identity connector interface:
- SchemaResponse getSchema(SchemaRequest req)
-
Call this method to return information from the target system schema. The SchemaRequest and SchemaResponse are both Java classes that conform to the SPML specification.
The following code snippet shows how to read the requestid, the optional identifications of the provider and the schema from the SchemaRequest:
String requestid = req.getRequestID();

//read providerID as string
String provider = (String) req.getProviderIdentifier().getProviderID();

//read operationID as string
String operation = (String) req.getOperationIdentifier().getOperationID();

SchemaIdentifier schemaid = req.getSchemaIdentifier();
The next snippet suggests how to build a schema and a schema response:
SchemaResponse rsp = new SchemaResponse();
rsp.setRequestID(requestid);
rsp.setResult(ResultCode.VALUE_0);  //success
Schema schema = new Schema();
schema.setProviderIdentifier(providerid);
schema.setSchemaIdentifier(schemaid);
AttributeDefinition attrDef = new AttributeDefinition();
attrDef.setName("someAttributeType");
schema.addAttributeDefinition(attrDef);
AttributeDefinitionReference attrDefRef = new AttributeDefinitionReference();
attrDefRef.setName("someAttributeType");
attrDefRef.setRequired(false);
AttributeDefinitionReferences attrRefs = new AttributeDefinitionReferences();
attrRefs.addAttributeDefinitionReference(attrDefRef);
ObjectClassDefinition objDef = new ObjectClassDefinition();
objDef.setName("someObjectClass");
objDef.setMemberAttributes(attrRefs);
schema.addObjectClassDefinition(objDef);
rsp.addSchema(schema);
For more details on SchemaRequest and SchemaResponse, see the Java documentation.
- StatusResponse status(StatusRequest req)
-
When SPML operations are being executed asynchronously, call this method to query the status of a request. The connector may also return results of requests being processed, especially in case of long search result sets. The StatusRequest and StatusResponse are both Java classes that conform to the SPML specification.
The following code snippet shows how to read the requestid from the StatusRequest and set the result code "pending" in the response:
String requestid = req.getRequestID();
StatusResponse rsp = new StatusResponse();
rsp.setRequestID(requestid);
rsp.setResult(ResultCode.VALUE_2);    //pending
For more details on the StatusRequest and StatusResponse, see the Java documentation.
- CancelResponse cancel(CancelRequest req)
-
When SPML operations are being executed asynchronously, call this method to cancel the request. The CancelRequest and CancelResponse are both Java classes that conform to the SPML specification.
The following code snippet shows how to read the requestid from the CancelRequest and to set the result type of the response:
String requestid = req.getRequestID();
CancelResponse rsp = new CancelResponse();
rsp.setRequestID(requestid);
rsp.setResult(ResultCode.VALUE_1);
rsp.setCancelResult(CancelResultsType.VALUE_1);   //cancelled
For more details on CancelRequest and CancelResponse, see the Java documentation.
- ExtendedResponse extendedRequest(ExtendedRequest req)
-
Call this method to request services that are not specifically defined in SPML. The ExtendedRequest and ExtendedResponse are both Java classes that conform to the SPML specification.
The following code snippet shows how to read the requestid, the mandatory identifications of the provider and the operation from the ExtendedRequest :
String requestid = req.getRequestID();

//read providerID as string
String provider = (String) req.getProviderIdentifier().getProviderID();

//read operationID as string
String operation = (String) req.getOperationIdentifier().getOperationID();
The ExtendedResponse may contain one Attributes collection including a number of Attribute objects (as in the AddResponse).
For more details on ExtendedRequest and ExtendedResponse, see the Java documentation.
- BatchResponse batchRequest(BatchRequest req)
-
Call this method to collect a number of simple requests: just AddRequest, ModifyRequest, DeleteRequest and ExtendedRequest.
When the framework encounters a batchRequest, it usually splits it up and passes the individual requests to the connector. A future operational flag will advise the framework to transfer the BatchRequest as a whole to the connector.
DirX Identity-Specific Conventions
DirX Identity defines some conventions and extensions that a connector implementation should follow. The next sections explain these items.
Attribute "customError" in SPML Response
The DirX Identity connector interface has extended the SPML response with the optional attribute "customError", which allows additional information to be given about the error. The following values are allowed:
FAILED.TEMPORARY: a temporary error. The request can be repeated after some waiting period.
OBJECT_ALREADY_EXISTS: the entry to be added already exists.
NO_SUCH_OBJECT: the requested entry does not exist.
NO_SUCH_ATTRIBUTE: the requested attribute or attribute to be added or updated does not exist.
ATTRIBUTE_OR_VALUE_EXISTS: the attribute or value to be added already exists.
Operational Attributes in Search Request
- scope
-
The scope attribute is interpreted the same way as in LDAP requests. The following values are accepted: subtree, base, onelevel.
Here is a sample snippet of a search request:
<attr name="scope">
<value>subtree</value>
</attr>
Connectors are highly recommended to support the values "subtree" and "base". Especially, the "base" value is set automatically by the join engine in order to read a single object only given its identifier.
- sizeLimit
-
The maximum number of entries to be returned.
- timeLimit
-
The maximum waiting time (seconds) for the search.
Requested Attributes in Search Request
The <attributes> section of a search request specifies the attributes to be returned in the search result entries. SPML makes no statements on how to express that all or no attributes have to be returned. DirX Identity supports the following convention:
If no requested attributes are given, the connector is expected to return ALL attributes for compliance with the LDAP specification.
If no attributes must be returned, the operational attribute "noattr" has to be supplied, as shown in the following sample:
<attr name="noattrs">
<value>true</value>
</attr>
Paged Search
The OASIS SPMLv1 standard does not cover paged or iterative searches. In order to support large numbers of entries, DirX Identity uses the following operational attributes in Search Requests:
-
pageSize: To be interpreted as an Integer; denotes the maximum number of entries returned per page.
-
sortAttribute: the attribute type, which determines the sequence of entries in the search result.
-
sortOrder: determines the sort order. Allowed values are: ASCENDING, DESCENDING.
Although the join engine might require the connector to perform a paged search, it expects one search response through which it can iterate. That means, it’s up to the connector to fill the gap: Build a response, fill with the first result page, fetch the next page, when the join engine has read all entries of the first page and iterates to the next result entry.
Move Operations
The SPML standard does not specifically describe how to request rename operations or a move in a hierarchical system such as LDAP. DirX Identity uses the following proprietary approach:
The operational attribute "dxrPrimaryKeyOld" contains the current identifier of the entry to be modified. If it does not match the identifier of the modify request, the identifier has been changed and the entry has to be renamed or moved.
Using the Connector Interface
This section provides information about how to use the connector interface that may be valuable for developers of connectors or transformers, including how to:
-
Write log entries
-
Handle string and binary attribute values
-
Test request transformers
-
Test connector responses
DirX Identity also provides the Java source for a sample connector that you can use as a template. The sample connector contains examples for logging and reading or writing attribute values and shows how to walk through the attribute lists (as used in Add requests and Search responses), modification lists and search filters. The sample source code is available on your DVD in the folder:
Additions\SampleConnector\java
The following files are available:
-
SampleConnector.java - sample connector source
-
MsgID.java - message codes for logging
-
sample.properties - log messages in resource file
Writing Log Entries
The framework provides a log support that allows each connector and other framework components to write log entries in different deployment environments.
As a first prerequisite, each class must be in a package that starts with siemens. or com.siemens., instantiate a logger and provide its own class as parameter, as shown here for the SampleConnector class:
private static final LogSupport logger = LogSupport.forName(SampleConnector.class);
The logger provides a list of log methods for writing log entries.
The simplest way is to use the same methods that are provided in standard logging frameworks such as log4j and Java utilities: error, warn, info, finest. The logger prefixes the log message with a standard string specific for the log level. For example a
logger.debug("My debug message");
is written to file with the prefix "DBG(STG100): My debug message".
Equivalent to this is calling the log() method with the log level as first parameter followed by the message string, as shown in the following example:
logger.log(Level.INFO, _classname + ": No response found for request with id: " + req.getRequestID());
The logger supports the following log levels (see the Level class), ranging from lowest to highest. The following table shows the level name as defined in the Level class, the corresponding number to be used in configuration, the corresponding message prefix and some explanatory text:
| Level | Number in Configuration | Message Prefix | Comment |
|---|---|---|---|
FATAL |
1 |
FTL |
Errors that prevent the component from continuing its processing. |
SEVERE, ERROR |
1 |
ERR |
For serious error messages. |
WARNING |
2 |
WAR |
Error messages that should be investigated by the administrator, but usually do not disturb other requests. |
INFO |
5 |
LOG |
Normal information log messages. |
CONFIG |
6 |
CON |
Next higher level, usually to be used for configuration logs. |
FINE |
7 |
FIN |
|
FINER |
8 |
FNR |
|
FINEST, DEBUG |
9 |
DBG |
Highest log level, just for debug messages. |
If the configured log level is lower than the level parameter in the log method, the logger ignores the request and does not write a log entry. For example, if log level INFO is configured (<logging level="5" …/>), log messages for level DEBUG are ignored.
Producing debug messages is often very time-consuming. You can avoid this problem by first consulting the configured log level:
if (logger.isDebugEnabled()) {
      logger.log(Level.DEBUG, "some long message");
}
Instead of providing the log level as a separate parameter, you can indicate the level with a message prefix. See the previous table for corresponding levels and prefixes. The following method calls are equivalent:
logger.log(Level.DEBUG, "some long message");
logger.log("DBG: some long message");
In order to enable internationalization, it is recommended to hold message texts in resource files. This is also supported by the logging framework. Provide a message ID as first parameter and then either an object array or a list of up to 5 objects, as shown in the following sample:
logger.log(MsgID.LOG_CONN_NORSP, _classname, req.getClass().getSimpleName(), req.getRequestID());
This requires a class MsgID, which holds the static message id fields:
static final String LOG_CONN_NORSP = "LOG_CONN_NORSP";
and a resource file with the message templates containing the placeholders:
LOG_CONN_NORSP=LOG:CONN003:{0}: No response found for request {1} with id: {2}.
LOG_CONN_NORSP.explanation=Add missing response to response file!
The resource file should be located into the classpath, at best as part of the produced jar file. As an example, the resource file for the class siemens.dxm.connector.sample.SampleConnector is named sample.properties and located in the folder (package) "siemens.dxm.connector". In your connector class you have to register the file at the ResourceManager as in this sample:
ResourceManager.getDefault().addResource("siemens.dxm.connector.sample");
If you need the message string also in exceptions or in the <errormessage> element of an SPML response, you can call the message formatter to get the localized message string, as shown here:
String msg = logger.getMessage(new MsgFormatter(), MsgID.DBG, new Object[] {e.getLocalizedMessage()});
logger.log(MsgID.ERR_CONN_UNMARSHAL_EX, msg);
throw new DxmConnectorException(msg);
For a full sample see the Additions/SampleConnector/java folder of your installation DVD.
Binary and Base64 Values
SPML attribute values can either be strings or binary values. SPML refers to the Directory Services Markup Language (DSML) v2 standard, which allows a union of XML types: xsd:string, xsd:base64Binary and xsd:anyURI. Attributes are used in a number of Java objects, the most prominent of which are AddRequest, ModifyRequest and SearchResultEntry.
This section provides some hints on how to set and get string and binary values. The Java class that represents them is DsmlValue.
If you are sure that your values are always strings, simply call the getContent() and setContent(…) methods of the DsmlValue class. Don’t worry about marshalling them to or from XML strings. Escaping and un-escaping of XML markup characters like "&" and "<" is implicitly performed by the class itself.
If you have binary values, you must base64-encode them prior to marshalling them as XML. The convenience method getDsmlValueFromBinary() creates a DsmlValue object from a byte array:
byte[] bytearray;
// ... set your array
DsmlValue dval = getDsmlValueFromBinary(bytearray);
The method encodes the byte array to a base64 string and sets the value type to 'base64'.
If you receive a DsmlValue and don’t know the type, first check the type and then get either the string value or the byte array:
String val;
if (DsmlValue.BASE64BINARY_TYPE.equals(dval.getMemberType())) {
// value is base64 encoded: get the binary value
    bytearray = dval.getBinvalue();
}
else {
    // string or uri type
    val = dval.getContent();
}
To add values to an attribute, you use the methods addValue(…) for strings and addBinValue(…) for binaries and the methods removeValue(integer) and removeBinValue(integer) to delete selected values.
You don’t even need to use DsmlValue classes. Just use the DSML attribute class’s convenience methods to set and read string or binary values:
String strVal= "...";
DsmlAttr attr = new DsmlAttr();
attr.setName("mixedvalues");

// first set a binary and a string value ...
attr.addBinValue(bytearray);
attr.addValue(strVal);

// ... then read them:
byte[][] retBytes = attr.getBinValue();
String[] strvals = attr.getValue();
Testing Request Transformations
The framework offers a designated test connector to help you run automated test cases for your request transformation scripts or input readers. The test connector compares the requests it receives from the controller with requests stored in a reference file.
You configure your job for a standalone executable deployment and use the TestConnector class in the package siemens.dxm.connector as the connector. It compares the incoming requests with a reference taken from a file. Name the reference file in the configuration as shown in the following configuration snippet:
<connector
 role="connector"
 className="siemens.dxm.connector.framework.TestConnector"
 name="Test connector">
<connection type="file"
     filename="sampleData\sampleRsp.xml"
     >
     <property name="referencefile"
         value="sampleData\referenceRq.xml"
     />
</connection>
</connector>
The TestConnector returns a response for each request. Usually it mirrors the request attributes and options. If it receives a SearchRequest, it takes the search result entries from a file given in the filename attribute.
If you need to manage attribute values such as date or time that may change in each run, you can use wildcards "*" in your reference values.
Testing the Connector Responses
The framework offers a designated test writer to help you run automated test cases for your connector. The test writer compares the responses it receives from a connector with responses stored in a reference file.
You configure your job for a standalone executable deployment and use the SpmlTestWriter class in the package siemens.dxm.connector.test as a response writer. It works the same way as the SpmlFileWriter, but additionally compares each response with a reference. Name the reference file in the configuration as shown in the following configuration snippet:
<connector
 role="responseWriter"
 name="SPML File writer"
 className="siemens.dxm.connector.framework.test.SpmlTestWriter">
 <connection type="SPML"
     filename="sampleData\receivedRsp.xml">
     <property name="referencefile"
         value="sampleData\referenceRsp.xml"
     />
 </connection>
</connector>
If you need to manage attribute values such as date or time that may change in each run, you can use wildcards "*" in your reference values.
About the Filter Interface
The filter interface represents the interface between the DirX Identity agent framework on one side and the connector component that provisions the target system on the other side. A filter is used to intercept connector calls. For example, a filter can build the delta between two consecutive search requests.
The interface consists of a mandatory and an optional interface. The mandatory ConnectotFilter interface consists of the following methods:
-
open() - reads configuration data and initializes the filter component.
-
close() - tidies up the filter component.
-
doFilter() - processes the SPML request, passes it to the successor filter (or connector) in chain, processes the SPML response from the successor, and returns it to the initiator.
-
setSuccessor() - gets the successor in the filter chain.
The optional ConnectorFilterConfig can be used if the filter must access the configuration of the associated connector; for example, if the filter must use the same connection as the connector to the target system. The method is:
-
setConnectorConfiguration()
For details on the interface and the input and output parameter classes see the Java documentation provided on your DVD in the folder:
Documentation/DirXIdentity/ConnFrameWork
About the ConnectorFilter Interface
The interface siemens.dxm.connector.framework.filter.ConnectorFilter includes the following mandatory methods to read the configuration and open and close the filter.
- void open(DXMFilterConfig config, Context context)
-
The open() method is the first call after the implementing class has been instantiated. This method must be performed successfully before any other methods can be performed.
The method opens and initializes the filter. The framework provides the configuration options in the config parameter of type siemens.dxm.configuration.DxmFilterConfig. The most important one is the class name of the filter.
Filter developers do not need to handle parsing the XML document. The framework handles this task and creates a Java class that corresponds one-to-one to the configuration. The attributes of the filter XML element are properties of the Filter class. You can read them by issuing a getProperty("optionname") call.
The following code snippet illustrates how to access standard and custom connection options:
String filterName = config.getName();
// how to read a custom configuration property:
String dbgFilename = (String)config.getProperty("debugfile");
The second parameter is the job context. From the job context the filter can get environment information and access to a connection pool manager.
- void close()
-
The close() method tidies up the filter. After performing this method only an open() call is allowed.
It is important to call at least successor.close()in the close() method to tidy up the chain.
- SpmlResponse doFilter(SpmlRequest request)
-
This is the main method of the filter. A filter can process requests and / or responses. It can process only certain requests and / or responses for example only add requests or only modify responses.
In any case it must perform a successor.doFilter()to call the successor in the chain, to get the response, and to return the response to the initiator.
See the Java documentation for details on SpmlRequest and SpmlResponse.
- void setSuccessor(ConnectorFilter successor)
-
This method is performed once before the open() method. It provides the successor to the filter.
About the ConnectorFilterConfig Interface
The interface siemens.dxm.connector.framework.filter. ConnectorFilterConfig includes the optional method to get access to the connector configuration.
- void setConnectorConfiguration(DxmConnectorConfig connectorConfig)
-
This method provides the configuration of the associated connector. It is performed once before the open() method.
The configuration can be used if the filter wants to use the same connection as the connector to the target system.
The following code snippet illustrates how to access the standard connection option:
DxmConnectionConfig connection =
(DxmConnectionConfig) connectorConfig.getConnections().firstElement();
Configuring the Framework
The framework takes its configuration from an XML file. On startup, it parses the file and builds corresponding Java classes that the framework components interpret. The following figure shows the configuration structure.

The root element is the job. It comprises a number of connector and optionally requestTransformer and responseTransformer elements. Each of these elements can contain a connection which in turn can contain a logging and an operation element. In addition, all of these elements can include property and mvproperty elements to carry customer defined single- or multi-value options.
The connector elements need the role attribute to distinguish between the connector types: reader, response writer, controller or connector. You can define a number of readers, writers or transformers, but only one controller and one connector. The connection elements carry information of the data sources or destinations, usually file names or directory or databases addresses.
The logging and operation elements are only evaluated by the controller and are thus ignored when entered as sub-elements of other connectors.
All of these elements comprise a list of standard attributes to cover usual and common options, such as user, password, filename, url, classname and many others. To support customer- and type-specific extensions, most of the elements can include additional options by entering them in <property> or <mvproperty> elements. A <property> element carries one value; a <mvproperty> carries a list of them.
The next sections provide more information about these elements.
Job
The <job> element represents a DirX Identity job and has no attributes. It allows the following subordinate elements:
-
<controller>: 0..1; Options for the job controller.
-
<connector>: 0..n; options for the reader, response writer, target system and other connectors.
-
<port>: 0..n; Specifies the port to a target system. Is needed when SPML requests to a connector must be filtered. Contains the configuration for the connector and the filter. In this case, the connector must be configured subordinate to the <port> element and not subordinate to the <job>!
-
<requestTransformer>: 0..n; options for the optional component that transforms the SPML input request before it is processed by the controller.
-
<responseTransformer>: 0..n; options for the optional component that transforms the SPML response returned by the (target system) connector before it is passed to the response writer(s).
-
<basename>: 0..1; Only evaluated in real-time workflows within the Identity server. It denotes the basename of the file folder from where the classes of the job implementation are loaded. The parent folder is: install_path/ids-j-domain-Sn/confdb/jobs.
-
<class>: 0..1; Only evaluated in real-time workflows within the Identity server. Contains the classname of the job implementation. For framework jobs this is com.siemens.idm.framework.Job.
-
<mapFilename>: 0..1; Only evaluated in real-time workflows within the Identity server. Contains the path to the mapping file required to read the job configuration. Should be: install_path/ids-j-domain-Sn/confdb/connector/agentconf.xml.
Controller
Within a job configuration there is only one controller element. It represents the controller implementation. An equivalent configuration would use the <connector> element with the role="controller" attribute. The <controller> element allows the following subordinate elements:
-
<operation>: 0..1; controls the operation of the controller.
-
<logging>: 0..1; controls logging of the job. Only evaluated in standalone deployments, not in real-time workflows running in DirX Identity server.
-
<property>: 0..n
-
<mvproperty>: 0..n
It supports the following standard attributes:
-
className: mandatory; the name of the implementing class.
-
usePSE: optional; boolean (true / false), which tells the framework that this controller is allowed to crypt and encrypt data.
-
name: optional; name of the controller; currently not evaluated.
-
version: version of controller implementation.
The identity integration framework currently provides the following controller implementation classes:
-
siemens.dxm.connector.framework.DefaultControllerStandalone - a simple "pass-through" controller for agent jobs in stand-alone deployments. Use this class in a configuration for jobs that read SPML or LDIF input files, process them against a target system and write the SPML response back to a file. This class is delivered with the framework as part of dxmConnector.jar.
-
com.siemens.dxm.join.JoinAccount - the event manager in real-time workflows that handle password change events.
-
com.siemens.dxm.join.SetPassword - used in real-time workflows to set the password at a target system.
-
com.siemens.dxm.join.ErrorActivity - used in error activities of real-time workflows.
Operation
The <operation> element controls the operational options of the job controller. The options that are evaluated depend on the controller implementation. The pass-through controller (DefaultControllerStandalone) evaluates these options for checkpointing.
In general, the operation element accepts the following subordinate elements:
-
<userhook>: 0..n
-
<property>: 0..n
It does not currently support any standard attributes.
User Hook
The <userhook> element specifies a user extension called a "user hook" that is called during job processing.
The administrator can provide a JavaScript (or a Java class in future releases). Selected job controller implementations (currently SetPassword join engine, error activity, join account) call them at dedicated points while processing an SPML request. For information about how to write a user hook, see the samples delivered with the release.
The <userhook> element accepts the following subordinate elements:
-
<data>: exactly 1. Contains only the JavaScript as its content enclosed in ![CDATA[…]] tags.
-
<property>: 0..n. Simple properties to be evaluated by the user hook implementation; for example, the script.
The <userhook> element allows the following standard attributes:
-
implementationLanguage: mandatory; specifies the language of the user hook implementation. Allowed values: "javascript".
-
name: mandatory; the name of the user hook. Used to identify several user hooks within one job. The names must agree with the job controller. The current controllers read only the "mapping" hook.
Here is a typical user hook configuration:
<userhook implementationLanguage="javascript" name="mapping">
 <property name="pwdResetAttr" value="pwdLastSet"/>
 <data><![CDATA[... your javascript ...    ]]></data>
</userhook>
Logging
The <logging> element specifies the logger and some of its options, especially the log level.
It allows the following subordinate elements:
-
<property>: 0..n
It supports the following standard attributes:
-
logger: optional; class name of logger; currently not evaluated!
-
filename: name of logging file
-
level: integer between 0 (no log) to 9 (debug log)
The logger accepts the following property elements:
timestamp
If set, each log entry is prefixed with a timestamp according the format:
<property name="timestamp" value="EEE MMM d HH:mm:ss.SS yyyy:" />
where EEE denotes day-of-week, yyyy the year, MM the month, d the day, HH:mm:ss hour, minutes and seconds and SS milliseconds.
The format string is evaluated by the JDK class java.text.SimpleDateFormat.
modules
Provides a list of the classes to be logged. Enter the full class names. Wildcards can be included, as shown in the following example:
<property name="modules" value="*.AgtSessionExe, *.LdifFileWriter" />
If not set, the log level applies to all classes.
Port
The <port> element combines a list of <filter> elements with one <connector>. It specifies the port to a target system and is needed when SPML requests from the controller to a connector must be filtered. The <port> contains the configuration for the connector and the filter(s). In this case, the connector must be configured subordinate to the <port> element and not subordinate to the <job>!
The <port> element does not support any standard or custom properties, but just the following sub-elements:
-
<filter>: 0..n; list of filter configurations.
-
<connector>: 1. The corresponding connector.
Filter
A filter intersects the data flow from the job controller to a connector. Typical implementations encrypt or decrypt SPML requests and responses or build the delta between two consecutive search requests.
The configurations for the filter and the corresponding connector are subordinate to a <port> element. Thus different filters can be specified for different connectors. Several filters can be concatenated. The order of the configuration defines the sequence in which they are processed.
The <filter> element supports the following standard attributes:
-
className: mandatory; the class name of the filter implementation.
-
name: optional; name of the filter (to optionally distinguish between a list of filters).
-
usePSE: optional; boolean (true / false), which tells the framework that this component is allowed to decrypt and encrypt data. A value of "true" is mandatory for the crypto filter!
The <filter> element only supports the standard sub-elements to specify custom single- and multi-value properties:
-
<property>: 0..n
-
<mvproperty>: 0..n
Connector
Each <connector> element represents a connector implementation such as a reader, writer, controller or target system connector identified by its role name. It allows the following subordinate elements:
-
<connection>: a list is possible, but only the first is evaluated.
-
<logging>: 0..1; currently only evaluated when subordinate to connector with role=controller. (deprecated!)
-
<property>: 0..n
-
<mvproperty>: 0..n
It supports the following standard attributes:
-
name: string. Used to distinguish between a number of connectors of the same type. Must be unique in within one job! Standard names in real-time jobs are: error, retry, audit. They identify the corresponding connectors for the error, retry and audit channels.
-
role: mandatory attribute to specify the role of the connector within the framework. See this topic for the list of evaluated roles. Note that the roles that are evaluated and used depend on the controller implementation.
-
className: the name of the implementing class.
-
id: the identification of the connector.
-
version: for future use.
Some framework classes accept properties beyond the standard ones. They are entered as <property> sub-elements in the following format:
<property name="some property name" value="the value for your property"/>
The classes are:
-
Ldif Change Reader
-
SPML File Reader
-
SOAP Connector
List of role names currently evaluated:
-
reader: 1..n; currently only the first is evaluated. Reads the input requests (file or channel in a real-time workflow), transforms to SPML and passes to job controller.
-
responseWriter: 1..n. Accepts SPML responses and outputs to destination (file or channel in a real-time workflow). May transform to other format; for example, LDIF content.
-
connector: 1..n. A connector implementation that receives SPML requests and returns SPML responses. is supposed to process the SPML requests against the target system. A number of connectors are distinguished by their names. They must be unique and agree with the controller implementation.
-
controller: 1. The construct <connector role="controller" …/> is deprecated. Use the equivalent <controller> element instead.
Connection
Each <connection> element provides information for a connector to connect to the data source: a file, a directory, a database or the like. It allows the following subordinate elements:
-
<property>: 0..n
-
<mvproperty>: 0..n
It supports the following standard attributes:
-
port: port number of the target system.
-
server: server name or IP address of the target system.
-
filename: in case data is input or output to/from a file.
-
url: URL of a Web service, if the target system is reached via HTTP.
-
user: user name used for the connection.
-
password: password used for binding to the target system.
-
ssl: Boolean (true / false); use SSL/TLS connection.
-
authentication: specifies the authentication method; for example, simple, strong.
-
certificate: reserved for input of user certificate for binding.
-
type: just descriptive
-
trustStore: the path to the trust store file containing the certificate of the server to be used for SSL/TLS server-side authentication.
-
trustStorePassword: the password that is needed to read the server certificate from the trust store.
-
keyStore: the path to the key store file containing the private key or certificate to be used for SSL/TLS client authentication.
-
keyStorePassword: the password that is needed to read the key from the key store.
-
keyStoreAlias: the alias name to identify the private key in the key store.
-
driverDBType: Only relevant for JDBC connector. Denotes the Java type for a class that characterises the database supported SQL data types and their handling through the JDBC connector. The following values are currently supported:
-
siemens.dxm.connector.jdbc.DefaultDriverDB: the default, applies to most databases.
-
siemens.dxm.connector.jdbc.SQLServerOverMicrosoftDriver: for MS SQL Server.
-
siemens.dxm.connector.jdbc.AccessOverJdbcOdbcDriver: for MS-Access, HSQLDB.
-
requestTransformer
This element has the same attributes and subordinate elements as the connector element. The framework provides an XSLT transformer. It expects SPML requests, applies an XSL stylesheet on each request and passes the result back to the framework. The controller (specifically, the default controller class siemens.dxm.connector.framework.DefaultControllerStandalone) hands the transformed request to the next configured transformer or to the connector, if there are no more configured transformers.
The transformer is configured as shown in the following snippet:
    <requestTransformer
      role="requestTransformer"
      name="XSL transformer"
      className="siemens.dxm.connector.framework.SpmlXslTransformer">
      <connection type="XSL-stylesheet"
          filename="tf-request.xsl">
      </connection>
  </requestTransformer>
responseTransformer
This element has the same attributes and subordinate elements as the connector element. The framework provides an XSLT transformer. It expects SPML responses, applies an XSL stylesheet on each response and passes the result back to the framework. The controller (exactly: the default controller class siemens.dxm.connector.framework.DefaultControllerStandalone) hands the transformed response either to the next configured transformer or to the response writer, if there is no more.
The transformer is configured as shown in the following snippet:
    <responseTransformer
      role="requestTransformer"
      name="XSL transformer"
      className="siemens.dxm.connector.framework.SpmlXslTransformer">
      <connection type="XSL-stylesheet"
          filename="tf-response.xsl">
      </connection>
  </responseTransformer>
Configuring Default Controller Checkpointing
The default pass-through controller (DefaultControllerStandalone) evaluates the following operation properties to perform checkpointing:
-
checkpoint_frequency - an integer value that specifies how often to write checkpoints.
-
checkpoint_value - the value of the last checkpoint; an empty value specifies that no checkpoint was written in the last run.
A checkpoint frequency greater than 0 enables checkpoint handling. The controller ignores all incoming requests (add, modify, delete, not search) until one matches the configured checkpoint value. The subsequent requests are processed normally. Each time checkpoint_frequency requests have been handled, the controller writes a checkpoint to the checkpoint file "DeltaOutputData.txt". The checkpoint is usually the identifier of the request. Only when no identifier exists (which is just possibly for an AddRequest), the controller concatenates the first up to 5 attributes to the checkpoint.
If the job succeeds, the controller deletes the checkpoint file.
Configuring Encryption Filters
The filter class siemens.dxm.connector.framework.filter.CryptFilter decrypts request attributes and encrypts response attributes as they pass between the job controller and the connector.
When a job receives a request with encrypted data or reads encrypted attributes from some target system or file, the crypto filter decrypts the values and passes them to the connector in clear-text form. The same operation occurs on the return path: when the connector returns a SPML response, the crypto filter can encrypt the attributes. This allows the data to remain encrypted as long as possible and only be decrypted just before it is written to the target system or evaluated by the join engine. No connector needs to decrypt itself or call any decryption module; the framework does this automatically, if properly configured.
The filter does not decrypt/encrypt all attributes, just those that are configured. Note that the filter not only handles the attributes and modifications in the "normal" <attributes> and <modifications> section, but also the operational attributes.
The configuration options are set in a <filter> element within a <port> and at the same level with the associated <connector> element. The <filter> needs the following standard attributes:
-
className: for the crypto filter this is "siemens.dxm.connector.framework.filter.CryptFilter"
-
usePSE: needs to be set to "true" for the Crypto Filter.
-
name: optional; some identifying string.
The Crypto Filter evaluates the following custom properties in the <filter> section:
decryptRequest (optional):
If this boolean property is set to "true", the filter decrypts selected attributes from the request.
decryptAttributes (optional):
This property contains the comma separated list of attributes that must be decrypted from the SPML request. When it receives a request, the filter also checks the operational attribute "encryptedAttributes". If one of these lists is empty, it decrypts all attributes of the other list. Else it decrypts only the attributes appearing in both lists. This means, the controller can restrict the set of attributes to be decrypted.
encryptResponse (optional):
If this boolean property is set to "true", the filter encrypts selected attributes from the response.
encryptAttributes (optional):
This property contains the comma-separated list of attributes that must be decrypted from the SPML response. The filter also checks the operational attribute "encryptedAttributes" in a response. For each of the attributes listed there, it assumes that it is already encrypted and thus ignores it. It encrypts only the rest of the configured attributes.
Here is a sample configuration snippet that directs the filter to decrypt the attribute "unicodePwd" in the request and encrypt the attribute "password" in the response:
<port mode="inout" name="TS">
      <filter className="siemens.dxm.connector.framework.filter.CryptFilter" name="CryptSupport" usePSE="true">
              <property name="decryptRequest" value="true"/>
              <property name="decryptAttributes" value="unicodePwd"/>
              <property name="encryptResponse" value="true"/>
              <property name="encryptAttributes" value="password"/>
      </filter>
      <connector ... />
</port>
Configuring Connectors
This section describes the configuration properties of the connectors provided with the Java Connector Integration Framework.
SPML SOAP Proxy
The class siemens.dxm.connector.framework.soap.SpmlSoapProxy is a connector that sends the SPML request as a SPML/SOAP request message to the URL specified in the configuration. The message conforms to the SPML/SOAP binding standard.
The SPML SOAP client sends SPML SOAP requests over HTTP to the configured endpoint and receives SPML SOAP responses from a SOAP service. To deploy the framework in this way, just select the appropriate class as the connector. You have two options:
-
DxaSpmlSoapProxy: produces SPML requests according the latest OASIS SPMLv1 standard (http://www.oasis-open.org/committees/download.php/4138/os-pstc-spml-schema-1.0.xsd).
-
SpmlSoapProxy: produces SPML requests according a more recent version of SPMLv1 that is not considered the official release anymore (http://www.oasis-open.org/committees/download.php/2396/cs-pstc-spml-schema-1.0.xsd).
The connector evaluates the following standard and non-standard properties.
Standard attributes:
- url
-
optional. The endpoint where to send the request; for example, http://localhost:8080/spml/spmlservice.
You either have to specify the SOAP endpoint completely in this url parameter or provide the parts in the properties 'server', 'port', 'ssl' and the non-standard property 'path'.
A protocol selector of "https" requests SSL/TLS protocol. In this case, you must ensure that the certificate of the addressed Web server is imported in the trust store of the Java runtime. See the JDK documentation (keytool) for details. - server
-
optional. If no url is given, this property provides the server part of the url. In the above sample, this would be "localhost".
- port
-
optional. If no url is given, this property provides the port of the url. In the above sample, this would be "8080".
- ssl
-
optional. If no url is given, this property tells the connector which protocol to use. In case of 'true', 'https' is selected. Otherwise, the connector sets 'http'. In the above sample, a missing ssl property or the value 'false' would apply.
- user
-
optional; the user name used for HTTP basic authentication.
- password
-
optional; the password used for HTTP basic authentication.
- trustStore
-
optional; the path to the trust store file, which contains the certificate of the server to be used for SSL/TLS server-side authentication.
- trustStorePassword
-
optional; the password that is required to read the certificate from the trust store.
- keyStore
-
optional; the path to the key store file that contains the private key or certificate to be used for SSL/TLS client authentication.
- keyStorePassword
-
optional; the password that is needed to read the key from the key store.
- keyStoreAlias
-
optional; the alias name to identify the private key in the key store.
The SOAP connector evaluates the following non-standard properties beneath the <connection> element:
- maintainSession
-
optional, boolean (true / false); if set to "true" (the default), maintains the HTTP session to the target Web service between consecutive requests and thereby saves performance.
- path
-
optional. If no url is given, this property provides the path of the url. In the above sample, this would be "spml/spmlservice".
- timeout
-
optional. The socket timeout in seconds. Default is 60 sec.
Here a configuration sample using the url property to denote the SOAP endpoint:
<connector    role="connector" className="siemens.dxm.connector.framework.soap.DxaSpmlSoapProxy"
name="SPML connector">
<connection type="SOAP"
     url="http://localhost:8080/spmlsoapservice/services/SpmlSoapService"
/>
</connector>
The following is an alternative with the older SPML implementation using the properties server, port, path and ssl to denote the SOAP endpoint.
<connector  role="connector" className="siemens.dxm.connector.framework.soap.SpmlSoapProxy"
   name="SoapConnector">
   <connection type="SOAP"
       server="localhost" port="8080" ssl="false"
   >
       <property name="path" value="spmlsoapservice/services/SpmlSoapService"/>
   </connection>
</connector>
LDIF Change Reader
The framework class siemens.dxm.connector.framework.LdifChangeReader reads LDIF change requests from file. It does not evaluate any connector attribute or property, but needs the following standard attribute in the <connection> element:
-
filename: mandatory; denotes the name of the input file.
The LdifChangeReader class accepts the following non-standard properties in the <connection> element:
-
IdentifierType - specifies the identifier type to be used in SPML requests sent to the connector. Usually the reader uses the DN type. The values must be compliant with the SPML standard. For using the generic string type, set
<property name="IdentifierType"
value="urn:oasis:names:tc:SPML:1:0#GenericString"/>In this case, the other properties "ExtractRdn" and "IncludeNamingAttribute" also must be set.
-
ExtractRdn - directs the reader to use either the entire DN as the identifier (value="false") or just the naming part (value="true"). If set to false, the property "IncludeNamingAttribute" is not evaluated.
-
IncludeNamingAttribute - directs the reader to include the naming attribute (value="true") or just use the value of the naming attribute (value="false").
This sample illustrates how these properties function:
<connection type="LDIF"
 filename="sampleRq.ldif">
 <property name="IdentifierType" value="urn:oasis:names:tc:SPML:1:0#GenericString"/>
  <property name="ExtractRdn" value="true"/>
 <property name="IncludeNamingAttribute" value="false"/>
</connection>
Using this configuration, the reader transforms the DN value:
"cn=John Doe, cn=PowerUsers,… "
to the SPML identifier "John Doe".
SPML File Reader
The framework class siemens.dxm.connector.framework.SpmlFileReader reads SPML requests from file. It does not evaluate any connector attribute or property, but needs the following standard attribute in the <connection> element:
-
filename: mandatory; denotes the file name of the input request file.
and the following non-standard properties (<property name="…" value="…"/>):
-
validate: optional, boolean (true / false); if set to "true", the reader turns on validation checking for the request, i.e. checks against the SPML schema. In case of validation errors it stops parsing the request.
Sample configuration snippet:
    <connector
      role="reader"
      name="SPML file reader"
      className="siemens.dxm.connector.framework.SpmlFileReader">
      <connection type="SPML"
          filename="request.xml">
          <property name="validate"  value="true"/>
     </connection>
  </connector>
SPML Loop Reader
The framework class siemens.dxm.connector.framework.test.SpmlLoopFileReader reads SPML requests from file. In contrast to the SPML file reader, this connector processes the input file in a loop.
In the <connector> element, it evaluates the following non-standard property:
-
counter: optional, integer. The integer value tells the reader how often to process the requests of the input file.
Furthermore, it evaluates the following standard attribute in the <connection> element:
-
filename: mandatory; denotes the file name of the input request file.
and the following non-standard properties (<property name="…" value="…"/>):
-
validate: optional, boolean (true / false); if set to "true", the reader turns on validation checking for the request; that is, it checks against the SPML schema. In case of validation errors it stops parsing the request.
Sample configuration snippet:
<connector role="reader" name="SPML loop file reader" className="siemens.dxm.connector.framework.test.SpmlLoopFileReader">
	<property name="counter" value="2"/>
	<connection type="SPML" filename="request.xml">
		<property name="validate" value="true"/>
	</connection>
</connector>
By using a placeholder in the input file you can arrange for different data per loop.The reader replaces a variable ${counter} with the value of the respective loop.Here a sample snippet for an input request:
<spml:attr name="employeeNumber">
    <dsml:value>EN-${counter}</dsml:value>
</spml:attr>
SPML File Writer
The framework provides two response writers that write SPML responses to a file:
siemens.dxm.connector.framework.DxaSpmlFileWriter: SPML response conforms to the latest OASIS SPMLv1 standard (http://www.oasis-open.org/committees/download.php/4138/os-pstc-spml-schema-1.0.xsd).
siemens.dxm.connector.framework.SpmlFileWriter: produces SPML output according to an older version of SPMLv1 that is not considered the official release any more (http://www.oasis-open.org/committees/download.php/2396/cs-pstc-spml-schema-1.0.xsd).
The writers do not evaluate any connector attribute or property, but the following from the <connection> element.
-
filename: mandatory; denotes the file name of the output file.
Non-standard properties:
-
validate: (optional); if set to 'true', the writer validates the given response.
Sample configuration snippet:
<connector role="responseWriter" name="SPML File writer" className="siemens.dxm.connector.framework.DxaSpmlFileWriter">
	<connection type="SPML" filename="response.xml">
     </connection>
</connector>
LDIF File Writer
The framework class siemens.dxm.connector.framework.LdifFileWriter transforms SPML responses to LDIF content format and writes them to the configured file. It does not evaluate any connector attribute or property, but the following attributes and properties from the <connection> element.
Standard attribute:
-
filename: mandatory; denotes the file name of the output file.
Non-standard properties:
-
NamingAttribute (optional) - this property is needed when the response identification is not a DN type or when the response contains no identification. In this case it prefixes the DN value with the RDN built from the configured attribute type and the attribute value. The attribute value is either taken from the response identification or from the attribute with the configured type. Assume you have configured …
<connection …
<property name="NamingAttribute" value="employeeNumber"/>
</connection>
-
the LDIF output DN would start with
dn: employeeNumber=123,…
-
contenttype (optional) - denotes the LDIF format to be written to the output file. Allowed values are: "LDIF-CHANGE" (default), "LDIF-CONTENT".
The LDIF writer processes SPML responses as follows:
-
For search responses, the writer produces LDIF content with the list of result entries.
-
For add responses, the writer takes the DN value from the response identifier, outputs the list of attributes in the response and sets the changetype to "add", if contentype LDIF-CHANGE is configured.
-
For modify responses, the writer tries to construct a DN from either the response identification, which it prefixes with "cn=" or from an operational attribute named "dn". If format "LDIF-CHANGE" is configured, the writer outputs the response with changetype "modify" and the list of attribute modifications. Otherwise it simply outputs LDIF content format with the list of attribute values taken from the modification elements.
-
For delete responses, the writer tries to construct a DN as with the modify response processing. If format LDIF-CHANGE is configured, it outputs the entry with changetype "delete". Otherwise it outputs an attribute type "isDeleted" with value "1".
Test Connector
The framework provides a connector just for testing purposes: siemens.dxm.connector.framework.TestConnector. The test connector outputs SPML requests to file and returns responses taken from a response file. If a reference request file is configured, it compares each request with the reference and logs errors in case of mismatch. A wildcard "*" in the reference value matches with all values. It does not evaluate any connector attribute or property, but the following attributes and properties from the <connection> element.
Standard attribute:
-
filename: (optional); denotes the name of the file that contains a search response to be returned. If not configured, the connector throws an exception in case it receives a search request. For other requests, the connector returns default responses.
Non-standard properties:
-
debugfile: (optional); if configured outputs each received request to the file in SPML format.
-
listfile: (optional); if configured outputs each received request to the file in LDIF like pseudo format.
-
referencefile: (optional); this file contains the reference requests. The connector tries to find a reference for each received request. It associates both with the requestid. If the received request does not contain an id, it simply takes the next reference request of the same type. If the received request and the reference do not match, the connector logs an error.
Here is a sample configuration snippet for the test connector:
<connector role="connector" className="siemens.dxm.connector.framework.TestConnector" name="Test connector">
	<connection type="file" filename="sampleRsp..xml>
        <property name=" debugfile" value="dbgOut.xml"/>
	    <property name="listfile" value="listing.txt"/>
	    <property name="referencefile" value="referenceRq.xml"/>
    </connection>
</connector>
Test Writer
The framework provides a response writer just for testing purposes: siemens.dxm.connector.framework.test.SpmlTestWriter. The test writer outputs SPML responses to file. If a reference file is configured, it compares each response with the reference and logs errors in case of mismatch. A wildcard "*" in the reference value matches with all values. It does not evaluate any connector attribute or property, but the following attributes and properties from the <connection> element.
Standard attribute:
-
filename: (mandatory); the name of the file, where to write the SPML response.
Non-standard properties:
-
referencefile: (optional); this file contains the reference responses. The writer tries to find a reference for each received response. It associates both with the requestid. If the received response does not contain an id, it simply takes the next reference response of the same type. If the received response and the reference do not match, the writer logs an error.
-
validate: (optional); if set to 'true', the writer validates the given response.
Here is a sample configuration snippet for the test writer:
<connector
      role="responseWriter"
      name="SPML File writer"
      className="siemens.dxm.connector.framework.test.SpmlTestWriter">
      <connection type="SPML"
          filename="receivedRsp.xml">
          <property name="referencefile"  value="referenceRsp.xml"/>
      </connection>
  </connector>
C/C++ Connector Integration Framework
The DirX Identity C/C++ Connector Integration Framework helps developers build DirX Identity connectors for new types of target systems with a minimum of effort.
The C++ connector server (which is part of the C++-based Identity Server) is a framework for using DirX Identity connectors written in C++.While Java connectors are integrated into the Java-based DirX Identity server as Java classes, C or C++ connectors are integrated into the C++-based Identity Server as shared libraries.The following figure illustrates the C/C++ Connector Integration Framework architecture.
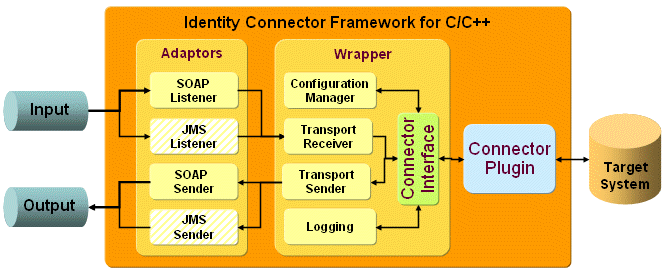
DirX Identity delivers a set of C and C++ connectors and allows you to create your own custom connector to provide special functionality or access to a special target system.You implement a C/C++ connector as a shared library using the connector server API, deploy the library to the installation path and insert this library name (and other related configuration data) into the C/C++ server configuration.
How a C++ Connector Works
The C++ connector server is a multithreaded application that communicates with the DirX Identity Java server using the SPML-over-SOAP interface. Connectors are inserted into the server as “plugins” in the form of shared libraries. Connectors run in separate threads inside the server (the thread count for each connector is configurable). Each connector receives SPML requests that are addressed to it. These requests represent operations that should be carried out in the target system to which the connector belongs. After accomplishing the requested operation in the target system, the connector forms an SPML response that describes the results of the operation and returns the response to the connector server, which then returns it to the client.
The following types of error can occur:
-
An error occurs in the operation that the connector carries out in the target system but the error has no influence on the connector’s ability to run; it only means that the current request cannot be handled. For this type of error, the connector should use the error fields inside the SPML response; that is, it should return an "SPML response with error" result.
-
A serious error occurs in the operation of the connector and/or target system that prevents the connector from processing further requests. For this type of error, the connector should throw an exception (of a certain type, discussed later in this section). This exception will be caught in the server. The SOAP request will be answered with an error and, depending on the contents of the exception, the thread in which the connector is running may be finished, the connector can be suspended from operation, and so on.
-
An exception of an unknown or unexpected type occurs during the connector operation; this type of error will be caught on the server level. The server attempts to terminate the affected thread and continue working.
The process of connector server operation and co-operation with connectors runs inside the multithreaded application; that is, all the process steps run independently of each other. This means, for example, that if one connector blocks to carry out a time-consuming operation the other connectors can continue working. However, this independence is limited as you can see from the unknown/unexpected error case. Even when connectors run in separate threads, they are still part of a single application and fatal errors and exceptions may have application-wide effect.
About Connectors and Filters
A C/C++ connector is a pluggable component implemented in a shared library whose task it is to carry out operations on a particular target system. A C/C++ connector can also have another pluggable component optionally associated with it - this component is called a filter.
A C/C++ connector can have zero or any number of filters associated with it. Filters are ordered into a chain. The SPML requests coming to a connector are handed to all of its associated filters in the chain and the SPML responses are handed to all these filters in backward order. Each filter carries out some transformation of the requests / responses; that is, the filter’s task is to transform the request (according to the filter’s purpose and configuration), hand the request to the next filter in the chain, receive the response from that filter, transform it back and return to the caller.
DirX Identity delivers a set of standard filters; for example, the encoding transformation filter that transcodes the strings inside the SPML classes from one character encoding to another. You can also implement your own filters; this task is described in the connector API section.
Using the C/C++ Connector API
This section describes the components of the API that the C/C++ connector server defines for the development of custom connectors and filters.
Creating and Compiling a Connector Library
As mentioned in an earlier topic, you insert a C/C++ connector into the C/C++ connector server as a dynamically-loaded shared library. The connector itself is a class inside this library. A connector library is a special case of the connector server component library. It is a shared library that contains one dynamically-loaded component (in this case, the connector class).
The component library must observe the following rules:
-
It must contain and export exactly one component (connector) class implementing (that is, inheriting from) the component (connector) interface (abstract predecessor class) – CConnectorInterface.
-
It must contain the class method’s implementation for the component interface classes. One class method is used as a factory method for producing instances of the actual component (connector) classes. Other class methods are used for initializing and uninitializing the whole library (if needed for multithreaded use of the library). For a more detailed description, see the "Implementing a Connector Class" topic.
The library can contain any number of other classes or functions in addition to the connector class.
To compile the component library, you include the main API header file (which includes other header files needed for the library) and link it with the API shared libraries – see the list of files in "Additional Information". Compile and build the library using compatible compiler and linker environment and settings with the connector server. Note that these implementation details may change with newer versions of the framework.
Implementing a Connector Class
The connector is an instance of the connector class which must be contained in and exported from the connector shared library. The connector class must be inherited from the abstract class CConnectorInterface. It provides the following methods:
-
Constructor / destructor - call these methods when the instance is created using the GetInstance method or deleted using the delete operator.
-
Open - call this method before the connector handles any requests. The method receives an instance of the current configuration data (see the "About the Connector Configuration Class" section) and should open and prepare its connection to the target system. Note that the open method can be called more than once during the lifetime of the object instance. The method close will always be called between two calls of open. This method pair defines the state of the object as opened or closed. Calls to methods other than open are only allowed in the opened state. The open method prepares the object’s connection to the target system and initializes associated internal structures so that after the method completes, the operation on the target system can be successfully performed without delays.
-
Add / Modify / Delete / Search - call an "operation" method to carry out the operation described by the request class and return the operation result using the response class. The methods receive an internal SPML representation (ISR) class (see the "About the ISR Classes" section for details) that contains the representation of the SPML request and response.
-
Close - call this method when no more operation methods are to be called. It can be called at any point in the connector server operation. Open/close methods can be called more than once during the lifetime of a connector instance but it is guaranteed that no operation method is called after close and before open.
In addition to the connector class, the connector shared library must contain the implementation of the following CConnectorInterface methods:
-
The factory method of the abstract interface class - CConnectorInterface::GetInstance. This method (which must be implemented in each connector shared library) produces the instances of the desired connector every time the server requires it. This method must instantiate the appropriate connector class (that is implemented in the library) and returns the pointer to the newly created instance (see the declaration of the factory method).
-
The constructor and the destructor of CConnectorInterface - they should be empty.
Note: depending on the connector configuration, more than one connector class instance may exist at one time, each instance running independently in a separate thread. If you intend to configure the connector class this way, appropriate mechanisms should be used when implementing the class to ensure the multithreading capability of the class.
Implementing a Filter Library
Filters are implemented in the same way as connectors: as dynamically-loaded classes inside a shared component library. Most of the rules that apply to connector libraries also apply to filter libraries.
The filter shared library must contain exactly one filter class which inherits from the abstract filter interface class CFilterInterface defined in the filter API header (see "Additional Information"). The library can contain any number of other classes and functions in addition to the filter class.
Compile and link a filter library in the same way as a connector library.
Implementing a Filter Class
The filter class contained in the filter shared library must be inherited from the abstract CFilterInterface base class. It provides the following methods:
-
Constructor and destructor - call these methods when the instance is created using the GetInstance method or deleted using the delete operator.
-
Open – call this method to initialize the filter; the rules for the connector open method apply to this method, too. The method receives the configuration class, the PSE context class and the NextInChain argument, which points to the next filter instance in the chain that must be used in the DoFilter method. The open method should store this pointer for later use.
-
DoFilter – call this main filter method to transform the requests and responses. The method has one input/output argument of type CRequestResponse. This compound class can contain both the SPML request and the response. When the DoFilter method is called, the compound object contains only the request. The method may first need to cast the compound object to some of its descendants depending on the operation defined in the request. Use the casting methods described in "About the ISR Classes". The method should then transform the SPML request class (use the modification methods) depending on the configuration data received in the open method. Next, the descendant filter’s DoFilter method should be called to handle the compound object with the request as the input argument. When the descendant’s DoFilter returns, the compound object now contains the response (created by the connector associated to the filter chain). The filter must now transform the response back and return it in the input/output compound object argument. The compound object and the contained request and response remain the same (instance) during this process; only their contents change (using their modification methods).
-
Close – call this method to place the instance in the closed state; the rules for the connector close method apply to this method, too.
You can use the ISR class transformation methods in the filters to transform all strings of a request/response. See the "About the ISR Classes" section for details.
The filter class must also implement the factory method and constructor/destructor class methods defined in the base interface class.
As in the connector case, more instances of a filter class will typically exist. They may be part of one filter chain (and so exist inside the same thread) or they may be parts of different chains of two connector instances. In the latter case, the instances will exist in separate threads. Multithreading capability of the filter class is therefore required.
Loading and Initializing the Component Library
Previous topics described the component shared libraries that are used to plug the filters and connectors into the DirX Identity servers. There are also features that are common to all such component libraries. The abstract interface classes of filters and connectors are derived from the common base class CLibComponentInterface. This base class defines the InitLibrary and TermLibrary methods for initializing the entire shared library. These methods are called only once each, after the library is loaded and before it is unloaded. They are intended for initializing internal structures of the library, especially those used for multithreading.
The component libraries are loaded in the server’s initialization phase or when it is reconfigured in runtime. If an error occurs during the initialization phase (this includes the case when the InitLibrary method throws an exception), the associated components (the connector and its filters) are placed in an error state (you will see a message in the log) and will not be operational until the server is restarted or reconfigured.
If the server is reconfigured in runtime, the state of the connectors and filters is adapted to the new configuration. Connectors and filters that no longer exist are removed and new instances are added. The configuration parameters of existing components are changed and the server will try to initialize the components that are in an error state.
| When a component library changes (its contents) during server operation, it will not be reloaded until the server starts again. |
About the Connector Configuration Class
The instance of the class CConfigData is given as an argument into the connector’s open method. This class is called the connector configuration class and is declared in the configuration header file (see "Additional Information" for a list of relevant files). It contains "get" methods for retrieving particular configuration parameters that are in effect for the current connector (like user, password, type, name, version, server, port) and for retrieving properties, which are a set of name/value pairs. See also the contents of the configuration header file.
About the Filter Configuration Class
Analogous to the connector configuration class is a filter configuration class named CFilterConfigData which is declared in the filter configuration header (see "Additional Information"). Use its "get" methods to retrieve the configuration data from the class. An important part of the functionality is carried out by methods inherited from the base class CCommonConfigData. This base class is common for both filter and connector configuration classes.
Handling Errors and Exceptions in Connectors and Filters
There are two ways to react to errors inside a connector or a filter:
-
Return an error result and error message inside the SPML response returned by the connector’s or filter’s operation method. This is an appropriate way to react to errors related to individual requests (for example, the object to which the operation should be applied does not exist in the target system).
-
Throw an exception of type ECntrException. Use this mechanism when there is a problem with running the connector that may last for some period of time and is not bound to the current request - for example, when the target system has a serious error or is inaccessible. Depending on the flags (see the exception class declaration) you include in the exception and the count of such exceptions thrown by the given connector, the connector server decides what to do with the connector and its thread. The server usually attempts to close and open the connector again and, if this action does not help, may terminate the thread or place the connector in an error state.
| ECntrException is the only exception type that a connector or filter can throw. This rule has the following important consequences for connector and filter developers: |
-
Connector and filter code must catch and handle all exceptions that may be thrown from any C++ components used inside the connector or filter (possibly by throwing an ECntrException but not necessarily). This rule includes ISR classes (see the "Exceptions" section in "ISR Classes") and exceptions thrown by various I/O operations (like file manipulation). You typically find the thrown exceptions in the API of these components, in comments or directly in the source code. If you do not have such information available, consider adding general catch handlers at the places where the components are called so that the cause of the problem can be more easily found when the call fails.
-
Interpret each exception by determining its cause and writing an understandable message about the cause of the error into ECntrException or into the error message in the SPML error response you produce. The error message should be clear to a user - who is typically not a developer - so don’t mention the exception itself, as it’s only an internal mechanism for error handling and not the cause of the error.
If you fail to catch all exceptions inside the connector or filter, the server will consider any thrown exception as a fatal C++ exception (because the server has no way of determining the cause of the exception). In this case, the server will place the connector in the error state and it will not be operational until the server is restarted or reconfigured.
Logging Connector Messages
The connector server contains a framework for convenient logging of application messages. This framework is accessible for the connector implementation using the macro DXM_MSG_PRINTF. As arguments for this macro you must insert:
-
The connector or filter logging number - every connector and filter has its own logging number, which is set in the server configuration and can be retrieved inside the connector implementation by calling the getLoggingNo method of the configuration class.
-
The message type - messages have several degrees of “fatality” defined, from fatal errors over warning to several debug messages levels. See the main API header file for details.
-
A message string - a string that describes the message.
The logged messages will be written into the DirX Identity C++ server log.
About the Heap Check Mechanism
Memory management is one of the most important quality aspects for C++ applications, and memory leaks represent the worst problem in this field. Memory leaks are pieces of memory that were allocated using various allocation mechanisms (new, malloc, STL allocators and so on) but which were not released once they were no longer needed. In a continuous-run application like the connector server, memory leaks cause it to consume all operational memory of the computer on which it’s running and then crash. As a result, you need to develop connectors and filters that do not contain memory leaks. The connector server API offers a heap check mechanism for debugging memory leaks. It is intended for classes defined inside the connector library (and not for classes from third-party libraries like STL).
The connector and filter interface classes are inherited from the CCSvrObjBase class, which implements the heap check mechanism. When allocating instances of a class inherited from CCSvrObjBase, you must use the macro CSNEW instead of the standard new operator. For deallocating (destruction) of such object instances you use the normal delete operator. The heap checking mechanism records all of these allocations and logs the object instances that have not been deallocated at the end of the server run. In a normal server termination, these instances represent memory leaks. You can obtain the line number at which the allocation occurred from the server log – logging component csvr, level debug 1.
The heap checking mechanism is turned off by default so that it does not adversely affect the server’s performance. You can turn it on for debugging purposes; see the server-wide configuration section for details.
About the ISR Classes
Internal SPML representation (ISR) is a submodule of the C++ connector server interface library that provides a set of C++ classes that implement various SPML constructs. ISR is a custom SPML implementation that includes all SPML constructs supported by the DirX Identity connectors.
The DirX Identity C++ connector server uses these classes to communicate with the connectors that are running within it. SPML requests are received in textual form by the server from other system components via various communication channels. The C++ connector server unmarshalls each request and creates the respective ISR object for it. This ISR object is then sent to the connector (and its filters) via the standard connector interface (as an argument of the connector interface method).
The C++ connector or filter that receives the object can use its methods to retrieve the information from the request. According to this information the connector provides the requested services (writes or reads some data etc.). After that the connector creates an ISR response object using other methods of the original ISR object and returns the object back to the server through the connector interface.
In this chapter explains how to use ISR classes. See the ISR header files for the class structure in detail. ISR classes implement the SPML classes defined in the XSD specification of SPML. In the class comment in the header files, you’ll find a reference to the XSD class that the ISR class represents. Note that the SPML class names sometimes differ only in plural (that is, the ending "s"). You’ll also find some comments in the header file that describe conditions and constraints for using the ISR classes and their methods.
About the Compound Classes
There are two groups of ISR classes: compound classes and SPML classes. The compound classes are wrappers for an SPML request/response pair. In normal operation, the server receives an SPML request and reacts with an SPML response, while the connectors actually handle the SPML data object - the requests are the input data for the connector and the responses are the output data. However, responses are logically bound to the requests. They constitute one logical data entity (which can be described as the data of one connector transaction).
From the logical point of view, the connector receives (in the call to modify, add, delete or other interface methods) one instance of the compound ISR object. This compound object contains only the SPML request object. The connector handles the data from the request and then stores the results of its operation in an SPML response object and inserts it into the original compound object. This object is then returned to the server. One operation of the connector can thus be described as reading and modifying the received ISR compound object and acting according the information in it.
Examine the base compound class CRequestResponse. Its relevant methods include:
-
Casting methods – these methods are used to downcast the object; that is, to convert it to a pointer to the appropriate descendant type. You will need these methods in filters before you can modify the contents of the requests/responses. The correct method must be called (according to GetType), otherwise an exception is thrown.
-
Methods that return the contained object instances - GetRequest and GetResponse. These methods return pointers to the contained SPML request/response objects (or NULL if no such object is stored in the compound object). The user is expected to change the returned instance (by calling its methods) but is not allowed to destroy the returned instance (since the compound object still owns it).
-
Method that creates the response sub object - CreateResponseFromRequest. This method creates the SPML response object from the contained request object by copying some important data structures (like RequestID or Identifier) from the request to the response. Other data fields of the response remain empty or have default values.
-
Methods that set common data fields in the response sub object - SetErrorMessage, SetErrorCode, SetResult. The response sub object must exist before these methods are called.
Other compound classes are derived from the base class. These derived classes implement the particular main SPML operation types. Look at the class CModifyRequestResponse. it contains the following methods (in addition to the inherited methods from the common compound base class):
-
Methods that add new data items directly to the response sub object - AppendModification, AppendOperAttr. The response sub object must exist before the methods are called. See also Response classes.
About the SPML Classes
The SPML classes provide a C++ implementation of the standard SPML classes, and include the following types:
-
Base classes - these classes contain methods that are common to a certain group of SPML classes. These base classes are not called directly; they are accessed through their methods inherited in descendant classes.
-
Request and response classes - these classes are called directly and implement SPML requests and responses. Their objects typically contain sub objects (which represent various SPML substructures, for example, attributes or modifications). An example of this group of classes is CModifyRequest
-
SPML substructure classes - these classes are not self-standing SPML structures, but they are contained in the request and response objects. For example, CSpmlAttributes or CSpmlIdentifier.
Look at the base classes. The class CSpmlBase is the base class common to all SPML classes (request, response and substructure classes). The following methods are of interest:
-
Marshall - this method appends the textual form (XML) of the respective SPML object to the given string stream
-
Equals - this method returns true if the given object is equivalent with the method owner. Equivalent means that it can differ only by the sequence of attributes / modifications and so on.
The class CSpmlReqRespBase is the base class common to all request and response classes and inherits the methods from CSpmlBase. The following methods are of interest:
-
Unmarshall and UnmarshallFromFile - these methods are class methods; that is, they are used to create a new instance of a request or response. Unmarshall parses the XML from a memory buffer, UnmarshallFromFile from a file. The methods return an instance of type CSpmlReqRespBase, but you should use the appropriate casting method to get the correct request or response type.
-
Casting methods - these methods are named ToOperationRequest and ToOperationResponse (example, ToModifyRequest). You call these methods after you get the CSpmlReqRespBase pointer on a new SPML object instance from the unmarshall methods. The real type of the object is, however, not CSpmlReqRespBase but one of the request/response types (descendants of CSpmlReqRespBase). You call the respective casting method on a CSpmlReqRespBase instance to cast it to the desired class request/response instance.
-
Content reading methods - GetOperAttribs, HasOperAttribs, GetIdentifier, HasIdentifier and GetRequestId - these methods return the SPML substructures of a request/response object
-
Copy methods - these methods copy the SPML substructures from other objects.
-
Add/set methods - these methods programmatically add new SPML substructures into the instance.
There is also a base class common to all request types (that is, not responses). This class CSpmlRequest inherits from CSpmlReqRespBase and has only some minor "get" methods. For responses, there is the CSpmlResponse base class, which inherits from CSpmlReqRespBase. It contains methods for handling SPML result and error codes.
Request objects (for example, CModifyRequest) inherit from CSpmlRequest and contain additional methods for handling special SPML substructures contained only in the respective type of request. For CModifyRequest the Modifications element is an example. Handling of other SPML subelements is inherited from CSpmlRequest and CSpmlReqRespBase respectively. Analogous with the response classes (e.g. CModifyResponse).
Using ISR Classes
The ISR classes are normally created within the C++ connector server after the SPML requests are received from various communication protocols. Once a request is received, it is unmarshalled into the request type and inserted into the appropriate compound object (for example, CModifyRequestResponse).
The compound object is then sent to the connector methods (Add/Modify/Delete/Search). The rest of this section describes the actions that should be performed inside the connector to handle the request correctly and return the correct response. Here the actions will be explained in the context of a modify request, the use of other request types is analogous.
First you must get the request from the compound object, for example, by calling GetModifyRequest. From the CModifyRequest pointer you read the SPML data that the connector needs for its operation. This is the request ID (for logging purposes), the identifier, operational attributes and modifications. You use the "get" methods of the request class (CModifyRequest) or its base class methods. These methods often return pointer to sub objetcs (for example, CSpmlAttributes). You should not modify or delete these objects that you get from the request object. These objects are only meant to be read.
After getting the information, you handle the actions in the connector; that is, write some data into the target system, change or delete them. The results of this data operation must be written into the response object.
First you must create a response object instance inside of the compound ISR object. For this action, call the CreateResponseFromRequest method. Subsequently, you can get the pointer to the response object (by calling the GetModifyResponse method) and use the Add/Set/Copy methods of the response class or its base classes to add the data to the response.
You should insert the results of a correct connector operation as well as the error information in the response. In case of a serious exception, you can also throw an exception; see the section "Handling Exceptions".
The request and response instances must remain in the compound object. With the GetModifyRequest and GetModifyResponse, you only receive pointers to these instances so that you can read and modify them. The instances are returned within the compound object after the Modify (or other) connector method returns. Do not delete any SPML object instances you receive from the compound object from inside the connector. They all remain inside the connector and are deleted by the server later on.
Using Copy/Add/Set Methods
The response classes provide several methods for adding or modifying the contents of the object. They copy some substructures from other objects (mainly from the requests), add new substructures or set them to a given value.
The methods are generally used to add new substructures to the SPML objects. Sometimes, however, replacing information inside the SPML objects may be required. In this case, you should be aware of the Set/Add/Copy methods' replace semantics. Some of the methods expect to be used to add a new content to the object and not to replace the old content, because replacing the old content could be unintentional and could lead to information loss. These methods will not allow you to directly replace the contents. You should first explicitly remove the substructure from the SPML object and then add a new instance (otherwise you incur an exception). In other cases, the implicit replace semantics are allowed (where it is natural or does not impose a risk for unintentional data loss).
To determine a method’s replacement semantics, consult the comments at its declaration
Using Transformation Methods
The SPML classes have a built-in mechanism that allows you to transform all text contents of an SPML request/response in a defined way. The ISR classes provide the method TransformStrings for this purpose. This method has two arguments:
-
Which – denotes the set of strings that should be transformed inside the ISR instance
-
Transformer – a reference to the instance of the transformer object that should be used for the transformation
To carry out a particular transformation of the strings inside a ISR request or response, you must first implement the transformer class. You create your own class derived from the CIsrStringTransformerBase base class. You implement the inherited abstract method Transform, which receives the string as the argument and returns the result of the transformation. Next, you create an instance of this new class and call the TransformStrings method of the ISR class whose strings you want to transform. As the Transformer argument you give the reference to your transformer object instance. The ISR class will apply the defined transformation on all strings that it contains using the transformer.
Handling Exceptions
ISR classes use their own exception type for reporting errors – EIsrException. Nearly every ISR method can throw this exception. In some cases, the header file comments describe the cause of throwing the exception. You should always catch and interpret these exceptions inside of a connector or filter. When it’s unclear as to why the exception was thrown, we recommend that you insert the EIsrException’s text message into the generated error message and include with it the identification of the location at which exception was caught (for example, while changing some attribute contents, and so on). You should not rely on the assumption that the exception will not be thrown in a particular case. The exceptions are used to guard the internal consistency of the classes and you can’t be sure that a violation will not occur in runtime.
The connectors and filters should never let the EIsrException out to the server.
Handling Data Encoding
Note that all character values (strings) that the SPML and ISR class methods return are encoded in ASCII or UTF-8. Similar if you set values you must use ASCII/UTF-8 encoded character values. You cannot use ISO8859-1 (latin-1) or any other encoding. There is, however, a standard filter defined for converting some encodings (or you may write your own filter for that).
About the Connector Server Configuration
The following sources of configuration options are in effect for the C++ connector server:
-
Configuration data stored in the directory (LDAP) server
-
Configuration data in other configuration files, for example, the logging configuration file
This section describes the configuration data that applies to the connector server and its subcomponents.
Server-Wide Configuration
The following options control the connector server as a whole. They are stored with one exception in the directory and consist of the following data:
-
Number and list of configured connectors
-
Ports for communication over SOAP/HTTP and SOAP/HTTPS
-
Accept and receive timeout - control the TCP transmission timeouts for the SOAP communication
-
Thread minimum and maximum count for receiver threads - how many threads should receive SPML requests from the network and deliver it to the connectors
-
Queue maximum - the maximum number of requests that can wait in a receiver thread queue. If the queue is full, the server will not accept any more requests
-
SSL key file path and key password - for using SOAP over HTTPS
-
Heap check mechanism - turned on / off (see "About the Heap Check Mechanism" and "C++ Identity Server INI File Configuration" )
Logging Configuration
The connector server uses the same logging mechanism as the DirX Identity C server. Each logged message is assigned to a particular component and a particular logging level. You can specify which components and logging levels inside them should be logged in the logging configuration file. Separate levels exist for errors and warnings and several debug logging levels are used for debug messages. The following components are relevant for the connector server: cutl, csvr, cwrp, cmgr. "cutl" is a core component of the server; it handles various low-level tasks like thread synchronization or dynamic library loading. "cmgr" is a module for reading configuration data from LDAP or files. "cwrp" is a module that controls the activity of connectors. "csvr" is the central server module that controls the network interface as well as the flow of data through the server.
Connectors log their messages as ’conn’ components where n represents the logging number of the respective connector. See the description of connector configuration.
Connector-Dependent Configuration
The following options are available for every configured connector:
-
Maximum number of threads - the maximum number of connector class instances that can exist at one time in separate threads. If you have a connector that is not thread safe, use 1 as the maximum.
-
Maximum size of the queue - the maximum number of requests that can wait in the connector class’s queue. When the queue is full, the server will not accept further requests for the respective connector.
-
User, password, type, name, version, server, port - data needed for the connector operation and for accessing the associated target system.
C++ Identity Server INI File Configuration
Some rarely-used configuration options are configured in the C++ DirX Identity server’s INI file:
-
Section [settings], option CConnServer, value 1 or 0 - turns the connector server on general on and off.
-
Section [settings], option CConnServer-MemCheck, value 1 or 0 - turns the heap checking mechanism on and off (see the "About the Heap Check Mechanism" section.)
Miscellaneous Information
This section provides some additional information about the C/C++ Connector Integration Framework.
Windows Platform Dependencies
The current DirX Identity connector server version was compiled using Microsoft Visual Studio 6. It uses the STLport implementation of the STL library (www.stlport.com). Because STL objects are part of the connector server API, it is necessary to compile the connectors using STLport as well. To find out how to compile and link your source with this library, see the product related documentation. You must ensure that the standard Microsoft STL header files are ignored and instead the STLport headers are included. The same applies to the STL runtime libraries. Note: Do not forget to use the namespace "_STL" instead of "std".
When compiling a DLL on Windows, you must typically define a preprocessor symbol for the DLL linkage (is usually defined in the header file and differently redefined for the import / export case). As a result, the main API header file contains the symbol DXMCCONINTERFACE_EXPORTS. This symbol should be defined when compiling the connector library.
You also need to include some standard compilation symbols. You can find them in the sample connector implementation discussed in the section "Sample Implementation".
Use the "Multithreaded DLL" library.as the C runtime library.
You can also compile the server under Visual Studio .NET 2005 environment as an unmanaged C++ application. This environment has its own multithreading-capable STL implementation so you won’t need to use the STLport implementation.
Relevant Files and their Function
This document refers to the following files:
-
Main API header file (“dxmcconinterface.hpp”) - should be included into the connector source. Includes all other required header files.
-
Filter API header file (“dxmcconfilterif.hpp”) – should be included into the filter source.
-
Heap check header file (“dxmcconmembase.hpp”) - is automatically included from the main API header file. Contains declarations of classes and macros for the connector server’s built-in heap checking mechanism (see the section "About the Heap Check Mechanism")
-
Configuration header file (“dxmcconfigmgr.hpp”) - contains the configuration classes; see the section "Using the C++ Connector API".
-
Filter configuration header file (“dxmcconfigfilter.hpp”) – contains the filter configuration class, see the section "Using the C++ Connector API".
-
API shared libraries ( “libdxmcconinterface.”, “libdxmcconfigmgr.”) – shared libraries (the file extension depends on the target platform) that are necessary to link to any component shared library (connector or filter)
-
Logging configuration file (“dirxlog.cfg” under install_path*/server/conf*) - contains the configuration of the logging subsystem.
-
Server INI file (“dxmmsssvr.ini” under install_path/server/conf) - contains configuration settings for the server. See the section "C++ Identity Server INI File Configuration".
-
ISR header files (“dxmSPMLisr.hpp”, “dxmcconctr.hpp”, “dxmisrsup.hpp”) - contain the declarations of ISR classes; see the section "About the ISR Classes".
Sample Implementation
Additional files are available on your DVD in the folder
Additions\SampleConnector\cpp
This folder contains a ZIP file that contains all necessary header and lib files to build your own connector. It also contains an example test connector implementation that you can build with Microsoft Visual Studio C++ 6.0. For more information, see the file ReadMe.txt.