Managing Request Workflows
Many DirX Identity features run completely automatically and in the background if you configure them correctly. Nevertheless, today’s processes in a company require that data and access rights be controlled by manual interaction and approval or certification by people in the company. To address this requirement, DirX Identity provides request workflows with a comprehensive set of features. You can use these workflows to manage the life-cycle of objects in a controlled way including the necessary approval or certification steps. Request workflow management is the process of defining, maintaining and monitoring workflow processes.
Let’s look at the Request Workflows feature from DirX Identity Manager. Log in to DirX Identity Manager’s Provisioning view, and then click Request Workflows. Manager displays the view shown in the following figure.
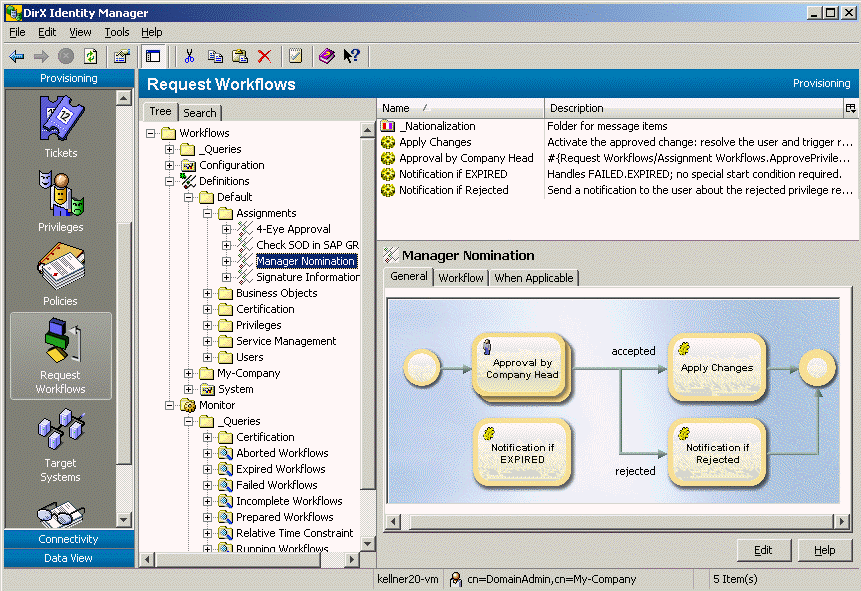
The Request Workflows view contains the following subtrees:
-
_Queries - contains predefined stored queries
-
Configuration - contains central configuration objects (for example, the configuration for the mail server)
-
Definition - contains pre-configured workflows that you can use "as is" or as templates for your own request workflows, and contains your workflow definitions.
-
Monitor - contains objects that reflect running and completed workflows
| If you have used DirX Identity’s Approval Workflows feature from previous DirX Identity releases, you will see two additional subtrees: Jobs and Workflows. The Approval Workflows feature still works, but we strongly recommend that you migrate to the Request Workflows feature. It is much more powerful and easier to handle (because it has more intuitive graphical administration). |
Managing Configuration Objects
The request workflow configuration allows you to set global parameters and services that can be used by the request workflow templates, including:
-
Folders - for structuring the configuration topics.
-
Activity types - contains the default activity types and your own activity types.See the DirX Identity Customization Guide for more information.
-
Common activities - contains all activities that can be shared.
-
Services - contains central services; for example, the SMTP service.
Workflow configuration management consists of the following tasks:
-
Adding new configuration objects
-
Changing configuration objects
-
Deleting configuration objects
-
Organizing the configuration object subtree
Adding Configuration Objects
To add a new configuration object:
-
Click a folder in the configuration subtree or click the top-level configuration folder.
-
Select New → type in the context menu.
-
Enter the name of the configuration object and any other general configuration object attributes.
Once you have added a configuration object to the configuration subtree, you can copy it, move it, or rename it. To copy a configuration object, click it and then select Copy Object from the context menu or menu bar. To move a configuration object, click it and then select Move Object from the context menu or menu bar. To rename a configuration object, click it and then select Rename from the context menu or menu bar.
Changing Configuration Objects
You can change any attribute of a configuration object.
To change the value of one or more of the properties displayed in a tab, click Edit. Manager keeps the changes you make to the object in its internal cache until you click Save. As long as you do not use Save, you can use the Manager’s Reset function to restore the settings to their old values (the values that are stored in the Identity Store (Provisioning Configuration)).
These changes take effect during the next execution of a workflow.
Deleting Configuration Objects
You can delete configuration objects at any time.
Be sure not to delete default configuration objects.
Organizing Configuration Objects
A configuration folder is a DirX Identity Provisioning object that the workflow administrator can use to organize the configuration subtree (the tree view of the defined configuration objects in the Configuration subtree that is displayed when the Request Workflows view is selected in the Manager). The purpose of the configuration folder is to make it easy for the administrator to manage the viewable configuration subtree.
You can make the following changes to the hierarchical tree view of the DirX Identity Provisioning configuration structure:
-
Add a new empty configuration folder
-
Copy a configuration folder (with all its content)
-
Move a configuration folder (with all its content)
-
Delete a configuration folder (with all its content)
-
Rename a configuration folder or change its description
To add a new folder, click the root configuration folder or one of the folders below it, and then select New - > Folder from the context menu. Manager prompts you to enter the unique name for the folder.
To copy an existing folder, click it and then select Copy Object from the context menu or menu bar.
To move an existing folder, click it and then select Move Object from the context menu or menu bar.
To change an existing folder, click it and then click Edit.
To delete an existing folder, click the folder and then select Delete from the context menu or menu bar.The folder to be deleted must not contain any configuration objects.
To rename a configuration or a configuration folder, click it and then select Rename from the context menu or menu bar.
Managing Request Workflow Definitions
DirX Identity delivers a set of pre-defined request workflows that you can use as templates.To work with them, log in to DirX Identity Provisioning, select Request Workflows from the view bar and then select the Definitions → Default folder.The main task of managing request workflow definitions is to copy the templates that meet your workflow requirements and then change them accordingly.
To view the properties of a request workflow object, click its entry in the tree.When you select such a workflow object, DirX Identity Manager (Provisioning) displays a property dialog for the object.The dialog consists of a set of tabs that you can use to view the object’s properties.Click the tabs in the property dialog to move between the different property categories.Note that the first tab contains the graphical representation of the workflow.
Managing request workflow definitions, then, consists of these tasks:
-
Creating your own workflow definition folder structure
-
Copying the delivered request workflow templates and modifying them to create your own request workflows
-
Adding new request workflows
-
Deleting request workflows
The topics in this section describe how to use DirX Identity Manager (Provisioning) to perform them.
Organizing the Definition Subtree
The Definition folder presents a set of default workflow templates underneath the Default folder. You should create a parallel structure of folders to store your own request workflow definitions. This is important because the original default workflow definition might change from release to release without any notice. Copied or newly created workflows are not changed at all during an upgrade or update installation.
To create a new folder, right-click the relevant folder and select New → Workflow. We recommend that you first create a project folder and then a set of sub folders that are structured by object types similar to the structure underneath the Default folder.
Because your folder structures could be complex, you should use the stored queries in the _Queries folder to find all active or inactive workflows or to find workflows of a specific type. You can set up your own queries. Either copy an existing query and modify it or create a new query from scratch.
Copying Request Workflow Definitions
Creating request workflows from scratch is a complex task even if you can use the graphical editor for this task. It is much easier to copy an existing template and modify it afterwards. Perform these steps to create a request workflow definition from a copied template:
-
Select the template that best fits your requirements. You can use one of the default templates or any of your previously created request workflows as starting point.
-
Right-click the template, then select Copy Object. Select a target location (one of your previously created workflow folders) and define the name of the new workflow. Click OK to copy the object.
-
Select the new object and change all workflow parameters like Description, Owner and When Applicable. Uncheck the Active flag for so long as the new template is not ready to use.
-
Select the Workflows tab and change all activities as required for the new workflow definition. You can delete, add and modify activities. Alternatively you can open the workflow in the tree and edit the activities from there.
For a description of the graphical workflow editor, see the "Workflow Editor" and "Activity Editor" sections.Use the context-sensitive help if you need more information about the fields of an object.
Adding Request Workflow Definitions
Creating request workflow definitions from scratch requires a good understanding of all the workflow concepts and parameters.For a detailed description of how to create and customize workflow definitions, see the section "Customizing Request Workflows" in the DirX Identity Application Development Guide.
Deleting Request Workflow Definitions
You can delete request workflow definitions that are no longer of any use to you.To delete a request workflow definition, right-click it and select Delete.If you are not sure whether or not you’ll need a request workflow definition sometime in the future, then just deactivate it.This action allows you to activate it later on as needed.
Managing Request Workflow Instances
Running request workflows are displayed underneath the Monitor subtree of the Request Workflows view.Here you can view and maintain all instances of the workflows.
The workflow instances are shown in equivalent subtree structures of the Definition subtree.An additional folder is built as an endpoint for each day in which the workflow ran.
This section also discusses common problems that can occur during workflow execution.
Searching Workflow Instances
Workflow instances keep all important information in LDAP attributes, which allows searching via LDAP filters; for example, with query folders.The most important attributes for searches are:
createTimestamp - the creation time of the workflow instance.
description - the description of the workflow definition.
dxmDisplayName - the human-readable display name of the workflow instance.
dxmSpecificAttributes - keeps additional information about the workflow. Important attributes are:
absoluteDisplayName - the human-readable path of the workflow instance (for example: My-Company/Approval/4-Eye Approval/2010-05-20/Abele Marc → Test role - Parameters)
owner - the owner DN of the workflow definition.
path - the path of the wokflow definition (for example: Definitions/My-Company/Approval/4-Eye Approval).
dxmStatusExpirationTime - the time at which the workflow instance is removed from the Identity Store (note that you must configure a workflow to perform this task).
dxrApplicationState - the application state. For approval workflows, typical values are ACCEPTED or REJECTED.
dxrEndDate - the time at which this workflow instance was completed.
dxrEpirationDate - the time at which this workflow instance runs into the configured time out.
dxrObjectType - the object type this workflow handles (for example, dxrUser).
dxrOperationImp - the operations for which this workflow definition is applicable (for example, create or delete).
dxrResourceLink - the DNs to the resources (if any) that are linked to the subject (for example, a role to a user or a permission to a role).
dxrStartDate - the time at which the workflow instance was calculated by the workflow engine (this is typically later than the creationTimestamp).
dxrState - the status of the workflow instance (for example SUCCEEDED).
dxrSubjectLink - the subject this workflow instance handles (for example, a user or a permission).
dxrType - the request workflow type.
dxrUserLink - the initiator of this workflow instance.
modifyTimestamp - the time of the last modification of this workflow instance.
Viewing Workflow Instances
Workflow instances are shown as a tree node under the respective folder of the day in which the workflow instance was started. These tabs are available:
-
The General tab shows the graphical view of this instance. Border colors and small symbols within each activity icon indicate the state of the activity as follows:
-
Orange (no symbol) - activity not yet started.
-
Blue or
 - a running activity.
 -
Green or
 - activity successfully completed.
 -
Red or stop symbol - activity failed.
You can right-click an activity instance and then select Open to show the details of this activity. See the section "Viewing Activity Instances" for details. For a detailed description of all available options in the graphical workflow view, see the Workflow Editor description in the context-sensitive help.
-
Workflow - displays global data as the name and description of the workflow instance as well as the workflow type information. It also shows the initiator, the subject and resources of this workflow. Note that some fields can be empty for specific types of workflows.
-
Status information - shows status and timing related data.
-
Modifications - displays the pending order information for example the attributes of a new object.
-
Resources - shows all pending assigned resources, for example the privileges assigned to a new user object.
You can open the workflow object from the tree to see the activities in alphabetical order. Click on an activity instance to display its details.
Viewing Activity Instances
Activity instances are either shown as a tree node underneath the respective folder of the day on which this instance was started or as icons within the graphical view of the workflow structure. If you open one of the activities, the following tabs are available:
-
General - displays global data as the name and description of the activity instance and the activity type information and the start condition.
-
Status information - shows status and timing related data and the relevant participant(s) and all error handling parameters.
Managing Problems with Workflow Instances
Problems with request workflow instances can sometimes occur, depending on how complex the workflow definition is. This section describes common problems and how to solve them, including how to:
-
Change participants
-
Restart workflows
Changing Participants
There are many reasons why a participant in a running workflow may not be available and has not set up the proper delegation for approval in his absence; for example, he has suddenly become ill, or he has had an accident. To mitigate this situation, you can establish escalation procedures for an activity. If you have not done so, you must change the approver by hand. You can use the Manager or Web Center to change a participant. The following sections provide instructions.
Changing a Participant with DirX Identity Manager
If the workflow is still in the state Running, you can use this method to change a participant. If the workflow has timed out, you must start the entire workflow from the beginning (this action creates a new instance).
For a workflow in the Running state, an administrator can perform this procedure:
-
Navigate to the relevant activity instance within the workflow.
-
Click the Status Information tab.
-
Click Edit and then select the required participant in the Participants section.
-
Click Save.
This procedure changes the participant, sets the activity state to Runnable and informs the Java-based Server via an HTTP message that the workflow has changed and requires recalculation. If the message cannot be sent, a succeeding FullCheck will perform the recalculation.
The recalculation sends an e-mail to the new participant and the process continues with this approval step.
Changing Participants with Web Center
Whether you can change a participant in Web Center depends on the access policies in force. First, you must have the right to view the tasks of the person the workflow instance is related to (access right showTasksOf), and then you need the right to change the participant (access right changeParticipant) and finally, you need a set of users you can select from (access right delegate).
The context menu entry Change Participant in the Web Center allows you to change a participant. You can use the Acquire menu entry to request an approval step for yourself.
Restarting Workflows
You can restart workflows that are in states FAILED.ABORTED, FAILED.EXPIRED or FAILED.INCOMPLETE. Use the DirX Identity Manager to perform this task as follows:
-
Select Provisioning → Request Workflows → Monitor.
-
Locate the workflow to restart: either open the relevant folder or use the query "Failed Workflows".
-
Select RunJavaScript restartWF from the context menu of the workflow instance.
-
The workflow is set to state RUNNABLE and the workflow engine is informed about this change to handle it immediately.
The workflow is restarted.
Detailed Procedure
The RunJavaScript method calls a JavaScript procedure that performs a specific task. DirX Identity comes with a JavaScript that handles the states FAILED.ABORTED/EXPIRED/INCOMPLETE.
The script is located in the Domain Configuration view under the folder JavaScripts → Request Workflows.
The script performs these tasks in its prepareRestart method:
-
the state is set to RUNNING
-
the enddate / endtime is removed
-
the expiration time is recalculated
-
the request workflow engine is informed about the change
Custom JavaScripts
You can write your own JavaScripts procedures to handle other states. You can call these scripts via the RunJavaScript context menu entry.
You can also provide a corresponding action statement in the Workflow Instance object description to get your own menu entry.