Managing Policies
Policy management is the process of setting up the initial policy structure. You can create different types of policies and rules and then maintain that structure. Use DirX Identity Manager (Provisioning) to set up the policy structure by hand.
The topics in this section describe how to use DirX Identity Manager (Provisioning) to create and manage the objects associated with a policy structure.
When you log into DirX Identity Provisioning and select Policies from the view bar, DirX Identity displays two trees of objects:
-
Policies - contains all types of policies for access control and automated provisioning as well as segregation of duties (SoD) policies and password policies.
-
Delegations - contains all delegations.
To view the properties of a policy or delegation object, click its entry in the tree. When you select a policy or delegation object, DirX Identity Manager (Provisioning) displays a property dialog for the object. The dialog typically consists of a set of tabs that you can use to view the object’s properties. Click the tabs in the property dialog to move between the different property categories.
Delegated Administration
Delegated administration is a two-step process:
-
Setting up and maintaining access policies with DirX Identity Manager (Provisioning) that define access rights for access control and retrieval of approvers for approval workflows.
-
Creating and maintaining delegations with DirX Identity Web Center that are based on the access policies you defined.
Note: if you intend to use the delegation feature, try to restrict the number of resources per operation type to less than 1000. Otherwise you will encounter performance problems.
You can modify delegation and access right objects with DirX Identity Manager (Provisioning).
The following figure shows the access policy architecture.
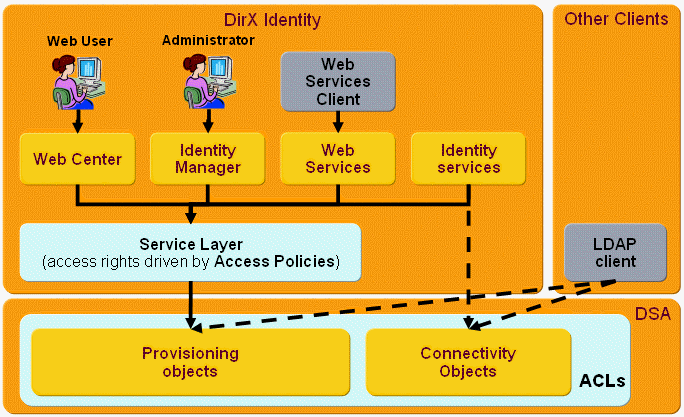
At the LDAP level (DSA), all objects are protected by directory access control lists (ACLs). Because these ACLs are not standardized, there is no common mechanism to set up ACLs in LDAP directories of different vendors. Furthermore, the capabilities of the ACLs vary from vendor to vendor. Most vendors do not support access control based on attribute values; for example, read access to all users that have the employeeType=Internal.
Nevertheless, DirX Identity Provisioning and Connectivity objects are protected by a basic set of ACLs at the LDAP level to control access from pure LDAP clients.
For Connectivity objects, three default ACL groups exist:
cn=Read - allows read access to all connectivity objects. The admin and server_admin accounts use this group.
cn=Write - allows write access to all connectivity objects. The admin and DomainAdmin accounts use this group.
cn=Server - allows write access to a few specific objects. Only the server_admin account uses this group.
You can find these groups under the node dxmC=Groups,dxmC=DirXmetahub. The corresponding accounts are either located under the root node dxmC=DirXmetahub or under the node dxmC=Users,dxmC=DirXmetahub.
Additionally all DirX Identity components (Web Center, Identity Manager, Web Services, Identity Services) access all Provisioning objects through the Service Layer. Access policies protect the access through this layer to all configuration and data objects. This structure guarantees common operation for all components and a single point of control.
Set up audit policies to audit all operations through this layer; see the topic "Managing Auditing → Managing the Audit Trail "for more information.
Managing Access Policies
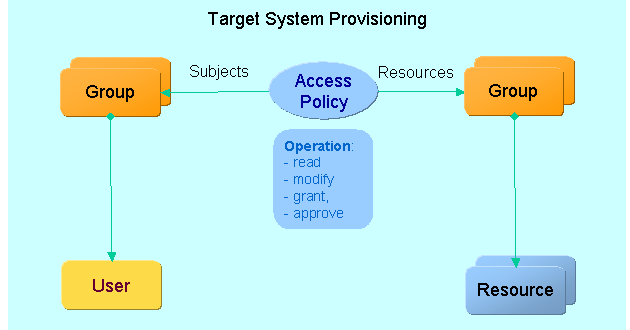
Access policies control the operations of a subject (normally a user) to a resource (any object) in the Identity Store (Provisioning Configuration). The following figure illustrates the access control model.
This concept is very similar to the access control model for external target systems, but here the targets are the internal objects of DirX Identity. Access policies define a group of subjects that have specific access to a group of resources.
Access policies can be used to:
-
Define access rights for access control and delegation
-
Define access policies to view privilege assignments and accounts
-
Define access policies for hierarchical role parameter values
-
Retrieve approvers for approval workflows
The next sections describe these tasks in more detail.
DirX Identity comes with a set of default access policies that are necessary for correct operation in a configured customer domain of the initially installed product (cn=Default,cn=AccessPolicies,cn=Policies,cn=domain).
Add your own access policies under a custom folder; for example, cn=MyPolicies,cn=AccessPolicies,cn=Policies,cn=domain. Check the inactive policies in this default area to see if you can use them, or view the My-Company sample domain for policies that can be reused in your custom environment.
Understanding Access Policies
You can define access policies for access control on many object types with a lot of operations. DirX Identity access policy definitions are inspired by XACML but they are not expressed in XML. Instead, access policies are simple LDAP entries.
To specify an access policy, define the following parameters:
-
The object type this access policy is to protect; for example, a user or a role.
-
For some object types - for example role parameters - you need to specify additional parameters.
-
The operation this access policy is to handle; for example, read, modify or delete.
-
The subjects to which this access policy applies.
-
Optionally, the resources that the subjects are allowed to work on via this access policy.
-
For policies with read or modify operations, the resource attributes to which the policy applies.
-
An optional rule that defines the relationship between subjects and resources.
These parameters allow you to define almost any kind of access control. Including groups as subjects or resources is particularly effective if you populate these groups via DirX Identity’s privilege features: assigning a role to a user which results in the membership to a specific group. If this group is used by an access policy, the access policy is controlled by the role assignment which itself can be a result of a privilege rule.
DirX Identity converts these access policies to LDAP queries and attempts to work with only one combined LDAP filter for optimized performance. If this is not possible, it reads entries from the directory and then filters the resulting list in memory, for example, against another list. In some cases, this procedure may result in poor performance. Try to avoid such filter conditions.
The following figure shows the operations allowed for each object type.
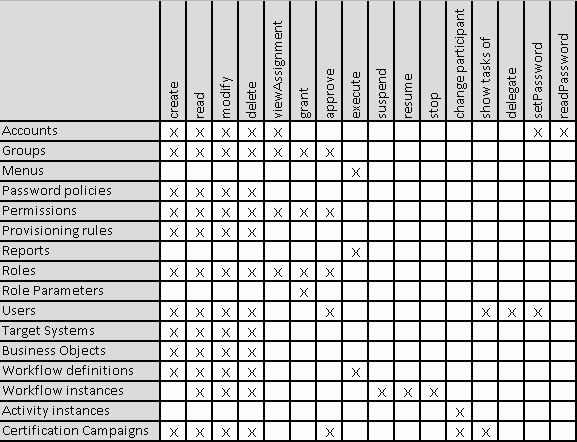
Read the section "Understanding the Sample Domain → My-Company Sample Domain → Policies → Access Policies" in the DirX Identity Tutorial. It explains some of the examples that are delivered as default policies or that are part of the Sample Domain.
How to Select Subjects
This section shows different ways to select subjects. You can:
-
Select a list of discrete users
-
Select a dynamically filtered object list (LDAP filter)
-
Select a list of groups (dynamically populated with privileges) in one of the following ways:
-
By direct assignment of privileges
-
Controlled by user attributes (permission parameters)
-
Controlled by assignment parameters (role parameters)
-
Where the assignment is controlled by provisioning rules (user parameters)
Selecting a List of Direct Users
You can set up a discrete list of persons. Enter the list row by row into the Persons field. The following figure illustrates this method:
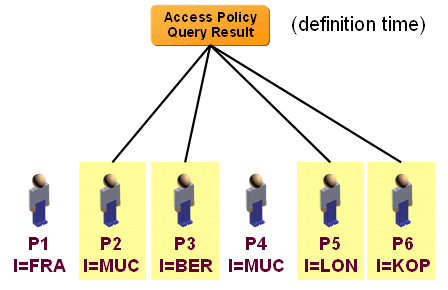
The figure shows that user P2, P3, P5 and P6 are valid subjects of the access policy. This selection is static and does not change.
Selecting a Dynamically Filtered Object List
You can set up an LDAP filter to select subjects. Use the Persons Filter field. The access policy is updated in real-time. The following figure illustrates this method:
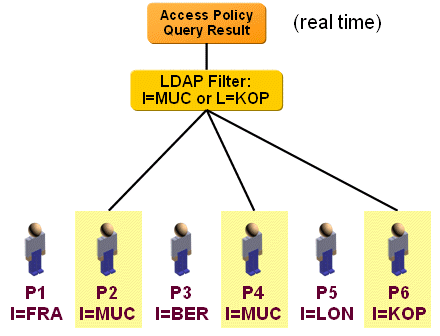
In this example, all persons that are located in Munich (MUC) or Copenhagen (KOP) are selected via a dynamic LDAP query as subjects of this access policy. After changing the LDAP query, the result is changed during the next access policy request in real time.
Selecting a List of Groups by Direct Privilege Assignment
To select a list of groups (dynamically populated with privileges) by direct assignment of privileges, assign roles to users to fill in the members of a group accordingly. Changing the role assignments changes the membership. Add the relevant groups to the Group of Persons field. The access policy result is updated after privilege resolution. The following figure illustrates this method:
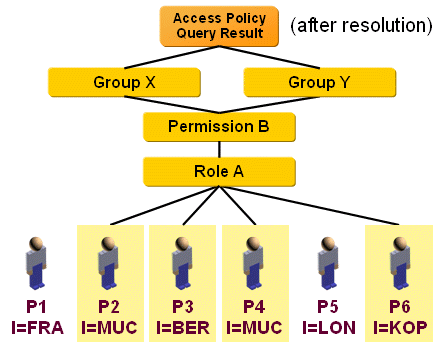
As shown in the figure, P2, P3, P4 and P6 are selected as subjects because role A is assigned. This action results in group memberships for group X and Y. Both are included in the access policy.
Selecting a List of Groups Controlled by User Attributes
To select a list of groups (dynamically populated with privileges) controlled by user attributes, use a group that is selected via permission parameters that are compared against user attribute values via permission match rules. Use the Groups of Persons field to select the correct group. The access policy result is updated after privilege resolution. The following figure illustrates this method:
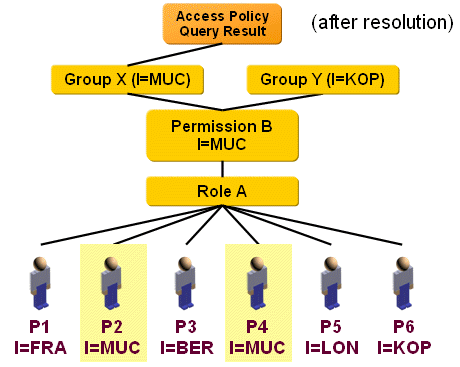
In this example, the users P2 and P4 are selected as subjects because they are located in Munich (MUC). This selection results in group memberships for group X. This group is included in the access policy.
Selecting a List of Groups Controlled by Assignment Parameters
To select a list of groups (dynamically populated with privileges) controlled by assignment parameters (role parameters), use a group that is selected via role parameters that are assigned during role assignment. These values are evaluated via role parameter match rules. Use the Groups of Persons field to select the correct group(s). The access policy result is updated after privilege resolution. The following figure illustrates this method:
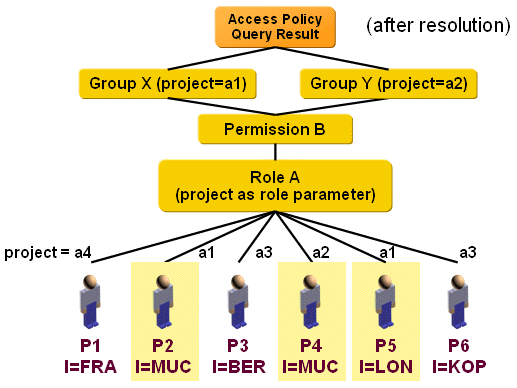
In this example, the users P2, P4 and P5 are assigned the role parameter values a1 or a2 during assignment of the role. The role parameter match rule adds these persons as members to the corresponding groups. These groups are included in the access policy.
Selecting a List of Groups Controlled by Provisioning Rules
To select a list of groups (dynamically populated with privileges) whose assignment is controlled by provisioning rules (user parameters), use a group that depends on a role that is assigned automatically via a provisioning rule. The provisioning rule decides on user parameter values. Use the Groups of Persons field to select the correct group(s). The access policy result is updated after privilege resolution. The following figure illustrates this method:
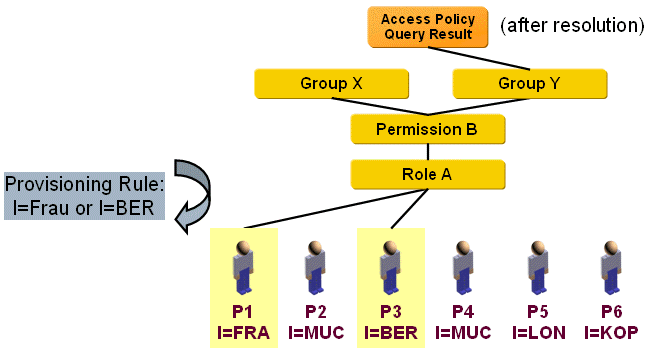
In this example, the provisioning rule assigns role A to the users P1 and P5 according to the locality parameters of the users. The role uses a permission that itself is tied to group Y. Group Y is included in the access policy.
Policies for Object Creation
You can control object creation in various ways depending on the kind of license you have:
-
If you have a business license, the ability to create objects depends on the Creation access policies (operation = create) that have been established. You define which object types a user is allowed to create and the object types themselves. You can also use creation access policies to define the node under which the user can create objects. If you want to define several locations for object creation, you must define multiple access policies. A business license does not permit the use of request workflows.
-
If you have a professional license, you can use request workflows to create objects. For more information about this feature, see the section "Creation Workflow Selection" in section "Selecting Request Workflows" in the chapter "Understanding the Default Application Workflow Technology" in the DirX Identity Application Development Guide.
Policies for Object Access
You can control object access by read and modify operations. You can create policies that combine these two operations or you can create separate policies for read and modify.
Without selecting an attribute, the subjects can perform the read and modify operations on all attributes of a resource. If you select one or more attributes, the operations are restricted to these attributes. For example, if you have a read policy on user resources and you select the attributes sn and givenname, the subject users can read only the first and family name of the resource users.
Using attribute policies, you can start request workflows to approve the modification of specific attributes. See the section "Attribute Policies for Users" for more information.
Policies for Grant Operations
Grant operations control the assignment of privileges (roles, permissions, groups) to users. Because this is an operation that affects two objects (the user and the privilege to assign), it is important to understand the corresponding access policies:
-
A user (the subject) can assign privileges to a set of users (the resources) he is allowed to read; this means that the access policies with operation read and object type User are relevant.
-
A user (the subject) can assign all privileges (the resources) for which he has the grant access right to all of the above defined users.
This means that a user requires a read access right on a set of users and a grant access right on a set of privileges to assign privileges to users.
You can use two operation types for granting privileges:
grant - use this operation type for normal operation. For privileges that are marked for approval, it starts the corresponding request workflow.
assignDirect - use this operation type only for a restricted set of administrators. These administrators can assign privileges directly even if they are marked for approval. No approval workflow is started. This operation type works only in connection with a grant policy for the privileges.
Policies for Approvals
Access policies can be used to retrieve approver lists for approval workflows. Access policies are typically used twice: once for the subject (the user who gets the privilege) and once for the resource (the privilege that is assigned to the user). In both cases, a list of approver lists can be the result. The following figure shows the approver calculation.
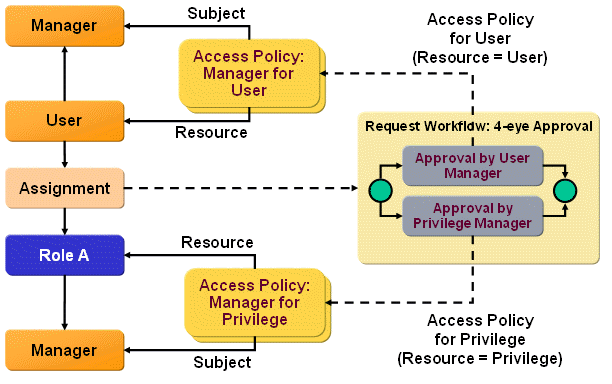
As shown in the figure, the DirX Identity Provisioning system evaluates a workflow approval request as follows:
-
The item to be processed is either of type "User" or "Privilege". If it is of type "User", it is a user object, otherwise it is a privilege object (role, permission, group). You can see the two types as 'Approval by User Manager' and 'Approval by Privilege Manager' activities in the workflow.
-
The system retrieves all access policies that contain the Operation 'approve'.
-
For each access policy, the system determines whether the item is a member of the Resources list.
-
If the item is a member, the Rule is evaluated against the Subjects list.
-
All found members of the subject list that satisfy the rule comprise the result of this access policy.
-
The process is repeated with the next access policy starting at step 3.
-
When all access policies have been evaluated, the system returns a combined list of approvers to the approval workflow request.
For example, suppose the role Windows Administrator is assigned to the user Axel Bartsch. This action (the flag "Requires Approval" is set for the role) generates a "4-eye Approval" approval workflow. The workflow consists of two parallel steps: the first step retrieves the approvers for the user (User Approval List), and the second step retrieves the approvers for the privilege (Privilege Approval List).
Axel Bartsch is member of the HW development department. His manager is Veronique Cohu. This example assumes that the approver of the user is the manager of this user. Therefore, the manager attribute in each user entry points to the entry of the manager.
The owner of the Windows Administrator role is Nik Taspatch, which means that Nik is the responsible for that privilege.
The approval workflow first wants to find the approver for the user Axel Bartsch. The relevant access policy is "Manager for user". The system performs the following steps for approver retrieval of the User Approval List:
-
The item in this case is "Axel Bartsch". It is the resource, and it is of type "User".
-
When evaluating all access policies with Operation=approve, the system finds in the default setup only the access policy Manager for user.
-
The list of resources is defined by a filter with a base object of "cn=Users,cn=My-Company" and a search filter "objectClass=dxrUser" which simply searches all users under this subtree. This means that this access policy is valid for all users in this subtree. Because Axel Bartsch is one of these users, the access policy is used for further evaluation.
-
Next, the list of subjects is retrieved. It is defined by a filter with a base object of "cn=Users,cn=My-Company" and a search filter "objectClass=dxrUser" which again retrieves all users of this subtree.
-
Now the rule is evaluated against the members of this list. The rule is defined as a permit rule:
$(subject.dn)="$(resource.manager)"
This rule finds the entry with a distinguished name equal to the value of the manager attribute of the user. This is the manager of this user. -
So the result of the access policy Manager for user is Veronique Cohu.
| the calculation is not exactly as described above because this would result in huge lists read into memory if the number of users is very large. The software optimizes the calculation to simple LDAP searches that are very fast. |
Now the approver for the privilege is evaluated (Privilege Approval List).
-
The item in this case is "Windows Administrator". It is the resource and of type "Privilege" (in fact, it is defined more precisely as a role, permission or group).
-
When evaluating all access policies with Operation=approve, the system finds after some time the access policy Manager for resource.
-
The list of resources is defined by a search in the subtree "cn=Corporate Roles,cn=RoleCatalogue,cn=My-Company" with the search filter "objectClass=dxrRole". This means that this access policy is valid for all roles in this subtree. In our example, the privilege "Windows Administrator" is part of that subtree and thus the access policy is used for further evaluation.
-
Next, the list of subjects is retrieved. It is defined by a filter with a base object of "cn=Users,cn=My-Company" and a search filter "objectClass=dxrUser" which retrieves all users of this subtree.
-
Now the rule is evaluated against the members of this list. The rule is defined as a permit rule:
$(resource.owner)="$(subject.dn)"
This rule finds the user entry with a distinguished name equal to the value of the owner attribute of the resource. -
So the result of the access policy Manager for resource is Nik Taspatch.
| the calculation is not exactly as described above because this would result in huge lists read into memory if the user number is very large. The software optimizes the calculation to simple LDAP searches that are very fast. |
The approval workflow "4-eye approval" results in parallel approval requests to the manager of the user (Veronique Cohu) as well as to the manager (owner) of the resource (Nik Taspatch). If a privilege has several owners or the user has several managers, all owners and managers are selected as approvers.
| For a sample workflow that uses this technology, see the section "4-Eye Approval" in the section "Understanding Assignment Workflows" in chapter "Using Request Workflows" in the DirX Identity Application Development Guide. |
Policies for Viewing Assignments
This feature allows you to restrict the privilege assignments visible at each user entry. You can also control the accounts that are visible.
Because this feature has a significant impact on the Web Center and Identity Manager display, you must enable it explicitly:
-
Set the flag Enable View Policies in the Policies tab of the Domain object.
The feature’s effect is as follows:
-
A user can always see his own privilege assignments and accounts.
-
A user will only see direct privilege assignments for other users if he is allowed to grant them to other users.
-
Privileges that have been implicitly given are not visible. These privileges are inherited permission assignments for roles and all calculated group assignments for role and permission assignments.
-
Accounts are not visible at all.
To view additional privilege assignments and accounts, you must set up access policies explicitly with the viewAssignments operation. You can enable:
-
Additional role assignments
-
Additional permission assignments
-
Additional group assignments
-
A set of accounts
| this feature can result in the situation where a user cannot see any privilege assignment and cannot see any other user accounts. |
Policies for Hierarchical Role Parameters
This feature allows you to define access policies to restrict the assignment of hierarchical role parameters.
Hierarchical role parameters are typically modeled as an object tree; for example, as a group tree. The following figure illustrates an example:
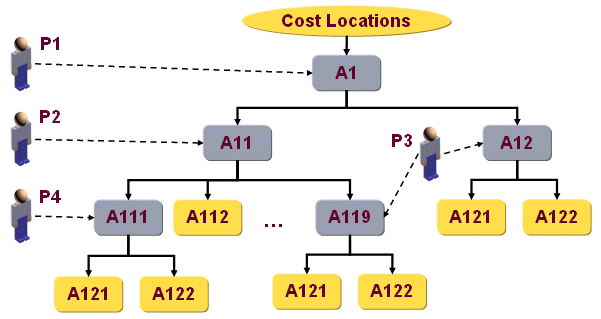
In this example, a cost location tree is modeled as a group tree. The super administrator P1 gets the right to assign cost locations starting from the top level object A1 via an initial access policy. He assigns to another person P2 the right to assign cost locations under the tree A11 and to P3 the right to assign cost locations beneath the trees A12 and A119. P2 decides to assign the right for the A111 tree to P4. This is done via a cost location manager role.
All four persons can use the assigned objects and all objects that belong to these tree nodes as role parameters for role assignment. The following figure and sections explain the details of this mechanism. Note that this is only an example that explains the possibilities of this feature. It can be used in many other ways.
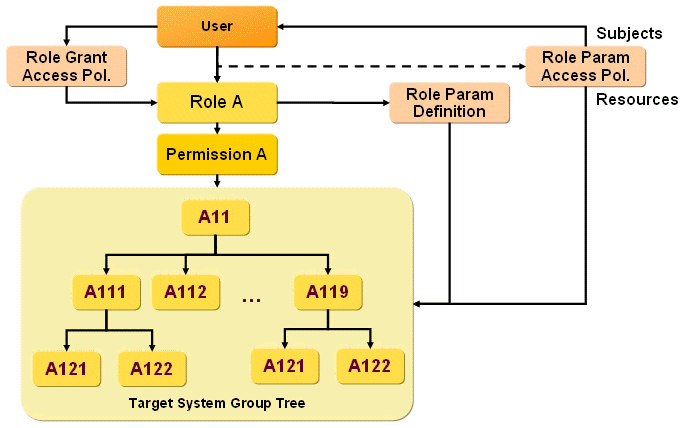
Defining the Hierarchical Role Parameter Object
After you set up the cost location group tree (see the previous figure), you must define a role parameter object that allows for handling this group tree as role parameters (the role parameter definition shown in the previous figure):
-
Create a new role parameter object in the Domain view beneath the Customer Extensions → Role Parameter folder.
-
Set the Type to Hierarchical DN.
-
In the Root field, select the cost location group tree top-level node.
-
Set the object class to dxrTargetSystemGroup. This setting defines which objects are role parameters.
You can find an example of this kind of object in the Sample Domain: Cost Locations.
Defining Privileges with Hierarchical Parameters
To define privileges with hierarchical parameters (role A, permission A shown in the figure), define a permission that uses the previously set up group tree of cost locations.
-
Create a new permission object in the Privileges view beneath the Permissions folder.
-
Link all groups from the cost location tree to this permission.
Define a role that uses the hierarchical parameter definition object.
-
Create a new role object in the Privileges view beneath the Roles folder.
-
Set up a rule in the Role Parameters tab:
Cost Locations = group (dn) -
Link the previously created permission to this role.
You can find an example of such an object in the Sample Domain: Cost Location Manager.
Defining a Grant Policy for the Role (Role A)
You must define a grant access policy that allows the user to assign Role A to users, and you must define role parameter policies.
First, use initial access policies for role parameters (Role Param Access Pol. in the previous figure) to define the starting points for hierarchical role parameter assignment:
-
Create a new access policy object in the Policies view beneath the Policies → Access Policies folder.
-
Set the Operation to "grant" and the Object to "RoleParam".
-
Link the previously created role parameter object to the Role Param field.
-
Define the subjects (for example, all people of the finance department).
-
Define as a resource one or more of the nodes in the group tree.
-
Set as the rule: Permit.
You can find an example of this kind of object in the Sample Domain: "Cost location admins".
All persons that meet the subject definition have now the right to assign the "Cost location manager" role to other persons where the role parameters are restricted by the initial access policy.
Next, define an access policy for the delegation of role parameters (Role Param Access Pol. in the previous figure) that allows persons that are assigned a Cost location manager role with a well-defined cost location parameter to assign the Cost location manager role with parameters that lie hierarchically beneath the assigned root node to other persons.
-
Create a new access policy object in the Policies view beneath the Policies -> Access Policies folder.
-
Set the Operation to grant and the Object to RoleParam.
-
Link the previously created role parameter object to the Role Param field.
-
Define the subjects (for example, all internal employees).
-
Define as a resource the whole cost location object tree.
-
Set as the rule:
$(subject.dxrprivilegesgrantedlink)="$(resource.dn)"
You can find an example of this kind of object in the Sample Domain: "Cost location managers".
All persons that meet the subject definition have now the right to assign the "Cost location manager" role to other persons where the role parameters are restricted by this access policy.
Policies for Menus
You can define policies that define the visibility of Web Center menus. To define menu visibility:
-
Define the menu keys (the primary menu items) and the menu items (the secondary menu items) as keys and items proposal lists in the folder Domain Configuration → Customer Extensions → Proposal Lists → Menus.
-
Create collections of menu items that you want to control via access policies. These items can be complete primary menus (coarse granular control) or parts of it (fine granular control).
-
Define the necessary access policies to control the defined menu collections.
Note: if you use only a slightly modified version of Web Center, you can use the predefined menu items under the path Domain Configuration → Proposal Lists → Menus. Note that you cannot change or extend these items because they are overwritten with each product upgrade. However, you can add additional access policies in your environment.
Guidelines for Access Policy Setup
Setting up access rights is something you should plan carefully to avoid performance problems. Read the following hints and guidelines thoroughly.
-
Avoid defining too many access policies. Too many access control definitions slow down any computer application.
-
Check the sample access policies in the sample domain to see if they can be used in your environment.
-
Avoid performance problems in advance: Try to create policies with simple and direct filter conditions. If necessary think about additional attributes, that means do not hesitate to extend your directory schema.
-
Do not think about indirect filter conditions; for example, "Select all users that have a role assigned that requires approval". Use groups that are populated via role assignments and automatic provisioning rules. You can use any existing group in a target system. If you need a target system-neutral group, create it in the DirXmetaRole target system.
-
If you intend to use the delegation feature, try to restrict the number of resources per operation type to less than 1000.
-
Do not use wildcards in the filter expression, for example:
$(subject.ou)=$(resource.ou)*
This setup prevents DirX Identity from evaluating the access policy with a single combined LDAP operation. Instead, a huge number of objects may be read and additional comparison operations may occur in memory to reduce the huge list. If size limits are set at the directory server, the result is not complete and may even be empty in some cases. -
If you use search filters to find groups, do not use the following ‘not’ clause:
(&(…)(!(objectClass=dxrObligation))
This slows down access policy evaluation due to inefficient implementation of not filters in the directory server. -
Do not create complex filter conditions that contain the dn as attribute like
( ( $(resource.dxrRoleAdmin)="$(subject.dn)" or $(resource.owner)="$(subject.dn)" ) and $(resource.owner)=* )
Define the policy in this way:
Resource Filter: objectClass="dxrRole") and (owner=*
Addionally define two rule lines (click the "+" button for a new line):
Rule 1: $(resource.dxrRoleAdmin)="$(subject.dn)"
Rule 2: $(resource.owner)="$(subject.dn)"
The reason why you should not use the complex filter condition with a dn is that you cannot search for a dn in the directory. -
Make sure that any multi-value attribute that is used in the evaluation of access policies has an object description with multivalue="true". Otherwise, the default "single valued string" is assumed in the storage layer, and only the first of the multiple values is evaluated. This leads to unpredictable and maybe continuously changing search results.
-
We recommend restricting the number of access policies you make delegable to protect your system performance. Decide which access rights are really critical and should be delegable and keep that number small. Set the Is Delegatable flag at each access policy accordingly.
Verifying Access Policies
The DirX Identity Services layer evaluates access policies as rules that control access of subjects to resources. The result is a set of access rights. In some cases, it is not easy to understand why a specific person has a specific access right or why he or she does not.
DirX Identity comes with a set of default query folders that help analyzing access policies (cn=_Queries,cn=AccessPolicies,cn=Policies,cn=My-Company). Use these query folders to find all active access policies that handle, for example, read access rights. If the default queries are not sufficient, set up your own custom queries to get more specific results. Now you can check whether or not the access policies you have found are set up correctly.
Managing Delegations
The Delegations folder contains complete delegations (a complete delegation is a definition of which access rights are delegated from a user to another user) as well as the corresponding access rights in the folder Access Rights and its sub folders for all access rights (for example, create, modify, delete).
Understanding Delegations
Each of the DirX Identity users (the delegator) may delegate part of his administrative rights that are delegatable to other persons (the substitutes). You can use the DirX Identity Manager (Provisioning) Policy view to view the delegation objects and the associated access rights you must use DirX Identity Web Center to perform the actual delegation. The following figure illustrates DirX Identity Provisioning delegation.
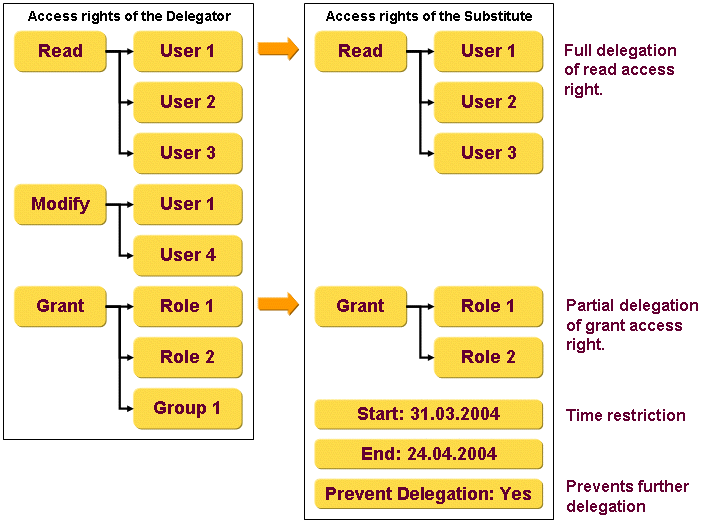
If a user (delegator) wants to delegate access rights to another user (substitute), the delegator performs these steps:
-
Selects the user to be the substitute
-
Selects a set of access rights from his available access rights based on specific operations (read, modify, grant, approve)
-
Restricts the available resources (selects a subset) (optional)
-
Defines a time period during which the delegation is valid (optional)
-
Sets the flag Prevent Delegation to prevent any further delegation of this set of access rights (optional)
Special notes:
-
You can only delegate access rights whose access policies have the Is delegatable flag set. If the flag is not set, access rights from these policies have their effect but cannot be delegated.
-
The delegation of the access right approve is treated in a special way. In this case, the substitute is retrieved as an approver instead of a delegator. Thus the delegation is exclusive. Otherwise several persons would be selected to approve (the delegator(s) and the substitute).
-
Delegations are currently static: changing the access rights of a delegator does not affect existing delegations.
-
Delegation of approve access rights results in propagation of this right from the delegator to the substitute. This means that the delegator no longer has this access right.
-
Delegation performance is not sufficient when working with access policies that retrieve a huge amount of target objects. Use the flag Is delegatable for each access policy to specify whether or not it is delegatable. Set the flag only for access policies that retrieve less than 1,000 target objects.
-
If person A delegates approval access rights to person B, and person B delegates this access right back to person A, a delegation loop exists. In this case, DirX Identity Provisioning does not retrieve an approver and the approval workflow will fail if the constraints define an approver. This process applies to loops of any depth. The criteria is that there must be a person in the delegation sequence that did not delegate the approve access right to another one. DirX Identity Provisioning takes this person as the approver.
Understanding Access Control
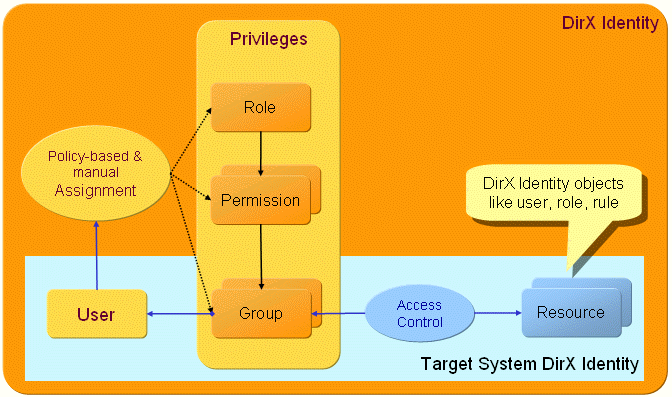
Delegated administration presumes a concept of access control. Access to resources can be restricted via access policies. To be able to use all the sophisticated DirX Identity Provisioning mechanisms, Provisioning treats itself as a target system, as illustrated in the following figure.
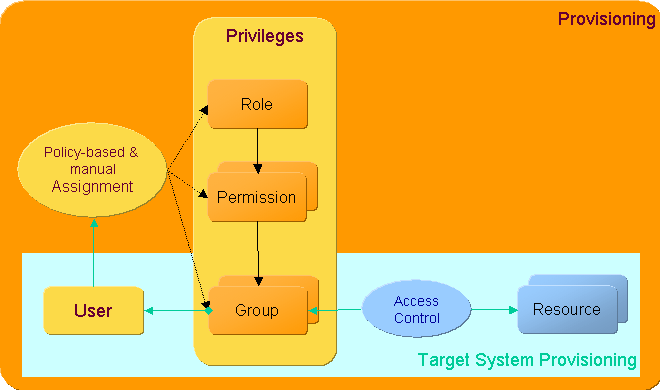
The access of users to resources (either other users or privileges) is defined by the assignment of privileges (roles, permissions, groups) to users. Privilege assignment can be carried out by hand or as an automated process based on rules.
Access policies control the access to the resources. The DirX Identity Provisioning security manager uses access policies to control access to all the resources in the Identity Store (Provisioning Configuration). Because the target system DirX Identity Provisioning is an integrated part of DirX Identity, no extra provisioning is necessary.
| The access control layer is a virtual layer above the directory. It is not built as directory access control information. Thus the security manager is only effective for all accesses coming from the DirX Identity Manager (Provisioning) or the DirX Identity Web Center. In both cases, a technical user (the DomainAdmin) with high-level access rights is used to access the directory. Access policies restrict this access via the security manager at the virtual level. Pure LDAP client access is not controlled via the security manager. |
To simplify administration, DirX Identity Provisioning allows you to formulate access policies that grant access rights (editing users, granting roles, permissions or groups, approving privileges) comfortably for sets of users and privileges. The following figure illustrates the access policy structure and its relationship to users, groups and resources.
An access policy defines the access of subjects to resources through for example the following operations:
-
read - controls read access to the resource.
-
modify - controls whether the subject is allowed to modify the resource.
-
grant - allows assignment of resources (privileges = roles, permissions, groups) to subjects (users).
-
approve - controls approval of user-to-privilege assignments.
Subjects and resources can be a combination of
-
A list of objects
-
A list of groups (that each contains a list of objects). Note that groups can be populated with members by hand or by automatic provisioning procedures.
-
A filter definition (base object and LDAP filter) and an additional list of objects to exclude
Additional match rules can be defined in an LDAP filter style; the following figure shows an example.

A match rule contains an effect (permit or deny), a priority and a filter. The example shown in the figure checks the manager attribute of the resource against the DN of the subject. This works if the manager attribute of a user points to the manager entry. The rule means that a manager can view and edit all his employees.
Managing Automatic Provisioning and Consistency Checking
You use DirX Identity Provisioning rule objects to define policies for the automatic provisioning of users and for consistency checking in the Identity Store (Provisioning Configuration). A DirX Identity Provisioning rule performs a search on a set of Provisioning objects according to a search filter, then runs an operation on the retrieved objects. Rule operations are either hard-wired or configurable, depending on the rule type.
You use the Rules and Operations subtree to manage DirX Identity Provisioning rules and rule operations. The following sections describe the types of rules and rule operations and how to use the Rules and Operations subtree to:
-
Add, delete, and maintain rules
-
Add, delete and maintain rule operations
The chapter also provides information about how rules operate in DirX Identity Provisioning.
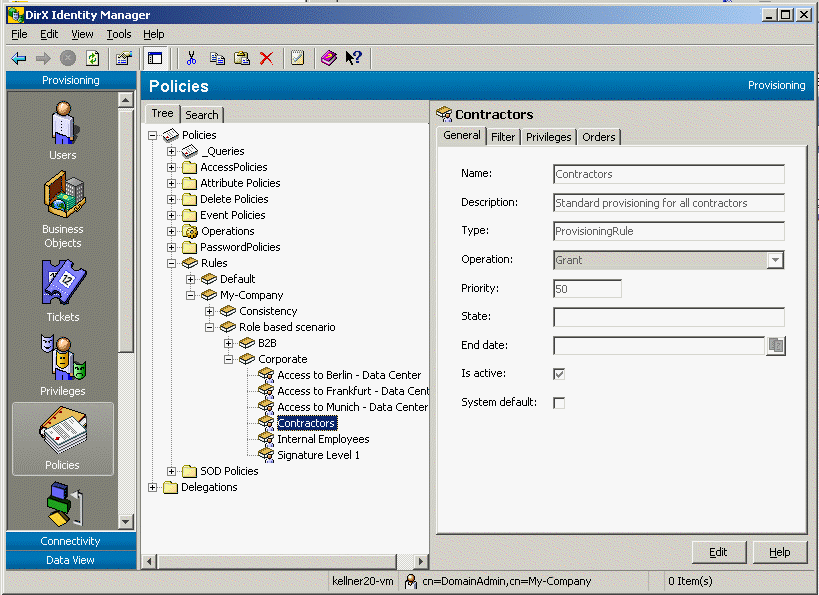
Managing Rules
You use the Rules subtree of the Policies tree to manage the rules associated with automatic provisioning and consistency checking. The following figure shows the Rules subtree of the Policies tree.
Rule management consists of the following tasks:
-
Adding new rules
-
Changing the attributes of existing rules
-
Deleting rules
-
Organizing the rule subtree
The next sections describe the types of rules available in DirX Identity Provisioning and how to manage them with DirX Identity Manager.
Understanding Rule Types
DirX Identity Provisioning provides the following rule types:
-
Consistency rules
-
Provisioning rules
-
Validation rules
The next sections describe these rules.
Consistency Rules
Consistency rules provide a mechanism for checking and purifying the Identity Store (Provisioning Configuration). A consistency rule performs a search on a set of objects specified in its search filter, then runs a specified operation on the retrieved objects. Consistency rule operations can be implemented as executables (programs or scripts), Java methods, or JavaScript programs. DirX Identity Provisioning supplies a set of default consistency rules (the following list shows only a part of the available rules; see the Provisioning configuration for more rules):
-
assocAccount2User - a consistency rule that associates accounts to users via single value attributes.
-
assocAccount2UserMV - a consistency rule that associates accounts to users via multi value attributes.
-
cleanse-AD-mail-address - a consistency rule that deletes all mail addresses of the professional services users that are not in Windows target systems.
-
cleanupDeletedCertificationCampaigns - a consistency rule that removes certification campaigns in the state DELETED without history and whose Status Expiration Date is reached.
-
cleanupDeletedObjects - a consistency rule that removes objects in the state TBDEL or DELETED without history and whose End Date is empty or is reached. See the filter definition to view the objects that are handled.
-
cleanupOutDatedDelegations - a consistency rule that removes delegations whose dxrDeleteDate is reached.
-
cleanupOutDatedRequWflowInstances - a consistency rule that removes request Workflow instances whose dxmStatusExpirationTime is reached.
-
cleanupOutDatedTickets - a consistency rule that removes tickets whose dxrDeleteDate is reached.
-
CreateFunctionalUsersForUnassignedAccounts - a consistency rule template that creates functional users for all accounts that are not assigned to a user. For information on how to customize the rule, see the section "Automatic Functional User Creation" in the chapter "Customizing Program Logic" in the DirX Identity Customization Guide.
-
CreatePersonasForNonPrimaryAccounts - a consistency rule template that creates personas for all non-primary accounts that are assigned to a user. How to customize the rule see section "Automatic Persona Creation" of chapter "Customizing Program Logic" in the DirX Identity Customization Guide.
-
CreateUsersForUnassignedAccounts - a consistency rule template that creates users for all accounts that are not assigned to a user. For information on how to customize the rule, see the section "Automatic User Creation" in the chapter "Customizing Program Logic" in the DirX Identity Customization Guide.
-
dxrNameFromAdsSAMName4Accounts - a consistency rule that fills the dxrName attribute with the contents of dxmAdsSAMAccountName.
-
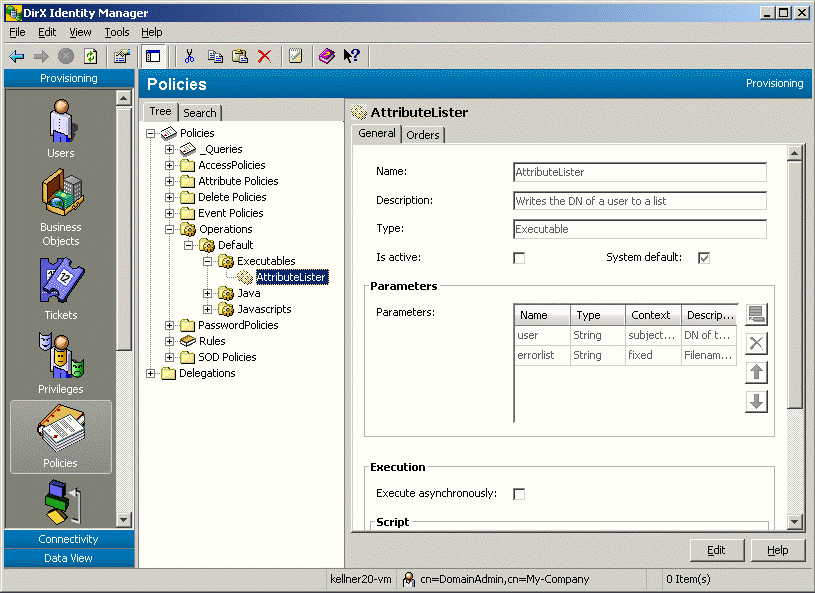
ListUsersWithErrors - a consistency rule that appends the DNs of users with non-empty error field to the file defined in the errorlist attribute.
-
Mail-contractors - a consistency rule that creates an email address for all users that are contractors.
-
Mail-internals - a consistency rule that creates an email address for all internal employees.
-
removePrivilegesFromDisabledUser - a consistency rule that removes the privilege assignments that are flagged as true from a user in the state DISABLED. You can control the types of privileges (role, permission, group) to be handled.
-
removePrivilegesFromDisabledUserWithWhiteList - a consistency rule that removes all privileges of a user in the state DISABLED except for the privileges stored in the white list. You can control the types of privileges (role, permission, group) to be handled. You can also define a set of roles to be excluded in a white list.
-
removePrivilegesInBlackListFromDisabledUser - a consistency rule that removes the privileges listed in the black list from a user in the state DISABLED.
-
removePrivilegesFromTBDELUser - a consistency rule that removes the privilege assignments from a user in the state TBDEL ten days after the end date is reached. You can control the types of privileges (role, permission, group) to be handled.
-
removePrivilegesFromTBDELUserWithWhiteList - a consistency rule that removes the privilege assignments from a user in the state TBDEL ten days after the end date is reached. You can control the types of privileges (role, permission, group) to be handled. You can also define a set of roles to be excluded in a white list.
-
removePrivilegesInBlackListFromTBDELUser - removes the privilege assignments from a user in the state TBDEL ten days after the end date is reached. You must define the set of roles to be removed in a black list.
-
resolveInconsistentGroupMembership - a consistency rule that searches accounts/groups whose membership attributes are out of sync because many realtime workflows update the same account/group in parallel. If a member exists in both dxrGroupMemberImported and dxrGroupMemberOK, it is removed from dxrGroupMemberImported. If a member exists in both dxrGroupMemberAdd and dxrGroupMemberOK, it is removed from dxrGroupMemberAdd.
-
Set-dxrToPeer - a consistency rule that finds an associated account in one of the target systems located under DestinationBase and sets the dxrToPeer attribute.
-
Win2k-Mail-address-to-users - a consistency rule that copies all of the email addresses of accounts in a Windows system to their users.
You can customize these default consistency rules by defining your own rule operations for them, and you can also create your own consistency rules. The section "Adding Operations" provides more details about how to create your own operations for consistency rules and integrate them into DirX Identity Provisioning.
Provisioning Rules
Provisioning rules are the most common type of rule. A provisioning rule allows you to define privileges for a well-defined set of user objects. A provisioning rule applies a search filter to DirX Identity user objects and then performs a grant or deny operation, either granting or denying a list of privileges specified in the rule.
Note that personas and functional users also possess the dxrUser object class. Thus, the existing provisioning rules act on personas and functional users as well. If you want to exclude personas / functional users from the result, you must AND the filter (!(objectClass=dxrPersonas)) / (!(objectClass=dxrFunctionalUser)).
A provisioning rule with the grant operation assigns the specified list of privileges to each user who matches the conditions of the rule’s search filter. A privilege is not assigned if a deny rule with higher priority exists that refers to the same user and the same privilege.
A provisioning rule with the deny operation (deny rule) prevents the users from receiving a privilege due to a rule with lower or equal priority. It does not remove privileges that are assigned manually. You can specify a list of privileges and a set of privilege filters in the deny rule; both of these items are used in combination.
You can grant or deny any combination of privileges (roles, permissions or groups). Unlike the rule operations for consistency rules, the grant and deny provisioning rule operations are not configurable.
Note that roles that require parameters cannot be used within provisioning rules (automatic population of parameters does not make sense and is therefore not supported).
Note that a grant rule results in two actions:
-
First all users are searched with the defined filter that do not have the required privilege(s).
-
Then all users are searched with an auto-revoke filter who have this right assigned but who should no longer have it.
This works for filters like (dxrPrivilegeGrantedLink=<dn1>). This filter is converted to the auto-revoke filter (!(dxrPrivilegeGrantedLink=<dn1>)). This works well unless the attribute is only changed. It does not work for an empty attribute. In this case, you should change the filter to (!(&(dxrPrivilegeGrantedLink=<dn1>)(dxrPrivilegeGrantedLink=*))).
Validation Rules
Validation rules are applied to target systems and are typically used with the target system validation workflows that detect deviations between the local target system’s accounts, groups, and account-group memberships and the same information in the Identity Store (Provisioning Configuration). Validation rules allow you to detect imported attribute-based privileges and to accept or clean up imported privileges not granted by DirX Identity Provisioning.
As described in "Monitoring Accounts and Account-Group Assignments", newly imported accounts, groups, and account-group memberships are flagged with the IMPORTED state. Their states change to the ENABLED state when user-account and account-group assignments are made as part of DirX Identity Provisioning user-privilege assignment and privilege resolution. As described in "Handling the Results of the Validation Workflow", you need to follow up periodically on the validation workflow reports on accounts, groups, and account-group memberships that remain in the IMPORTED state. The validation workflows allow you to automate the maintenance tasks discussed in "Handling the Results of the Validation Workflow" that you otherwise must perform by hand.
Three types of validation rules exist:
-
Accept rules
-
Cleanup rules
-
Validate rules
Validation rules of type "accept" search groups with imported members and change the member state to ENABLED if the account matches the account filter of the rule. Validation rules of type "cleanup" take the same imported memberships and accounts, but change the state to DELETED. The next synchronization workflow deletes these memberships in the target system.
Validation rules of type "validate" search attribute-based privileges in a target system and add the retrieved accounts into the appropriate groups in the IMPORTED state. "Validate" rules use "OnValidation" filters stored in group or obligation objects. When evaluating a "validate" rule, the rule processor first searches for groups or obligations that contain an "OnValidation" filter. The group filter of the rule restricts this search. Using this validation filter, the rule processor then searches for accounts. Each account in the result set is added as a group member in IMPORTED state if the account matches the account filter of the "validate" rule.
"Validate rules" can be used, for example, to detect mailbox-enabled Active Directory accounts. Active Directory users become mailbox-enabled by setting some mail attributes, such as the mail address, the home MTA or home MDB. The mailbox-enabled state usually represents an access right within a Windows system and thus should be controlled via a DirX Identity Provisioning group. Attaching an "OnValidation" filter to this group and applying the "validate" rule for the target system allows DirX Identity Provisioning to detect these accounts and make them members of the group.
DirX Identity Provisioning supplies a set of default validation rules (the following list might show only a part of the available rules; see the Provisioning configuration for more rules):
-
Accept-PC-Mailboxes - accept mailboxes for all employees of the Product Development department.
-
Cleanup-non-local-mailboxes - reject mailboxes for all non-local employees of all Windows target systems.
-
Mailbox-Enabled-Users-in-Windows2000 - discover all mailbox-enabled users in Windows target systems
Adding Rules
To add a new rule:
-
Right-click a rule folder in the rule subtree or the top-level Rules folder.
-
Select New and then select the type of rule to create: Consistency Rule, Provisioning Rule or Validation Rule.
To add a consistency rule:
-
Enter a Name for the consistency rule and describe the rule in the Description field.
-
Select the correct Operation via the object select dialog (the operation must exist).
-
Enter the Parameter Values that are appropriate to the operation you selected. View the Type and Description fields to understand the meaning of the parameters. Stretch the dialog for better readability if necessary.
-
Set the Is Active flag, because otherwise the rule cannot be executed.
-
Click the Filter tab and set the correct filter parameters to retrieve the subjects. Use the "+" button to add extra filter conditions.
-
Click OK to create the rule or Cancel to abort the creation process.
To add a provisioning rule:
-
Enter a Name for the provisioning rule and describe the rule in the Description field.
-
Select the operation type: use grant if you want to assign privileges, use deny if you want to forbid privileges.
-
Set a priority. 0 is the lowest priority, 100 is the highest priority. Setting a priority allows you to define a precedence between provisioning rules that refer to the same subjects and privileges.
-
Set the Is Active flag, because otherwise the rule cannot be executed.
-
Click the Filter tab and refine the filter condition if you don’t want to use the entire user tree as subjects. Use the "+" button to add extra filter conditions.
-
Click the Privilege tab and select any number of privileges (roles, permissions or groups) to be granted or denied. In deny mode you can also choose a filter condition.
-
Click OK to create the rule or Cancel to abort the creation process.
To add a validation rule:
-
Enter a Name for the validation rule and describe the rule in the Description field.
-
Select the operation type: use validate if you want to detect attribute-based privileges, use accept if you want to accept imported privileges or use cleanup if you want to delete them.
-
Set the Is Active flag, because otherwise the rule cannot be executed.
-
Click the Accounts tab and define a filter for the accounts to be used as rule subjects. Use the "+" button to add extra filter conditions.
-
Click the Groups tab and define a filter for the groups to be searched for imported members (operations accept or cleanup) or onValidation filters (operation: validate). Use the "+" button to add extra filter conditions.
-
Click OK to create the rule or Cancel to abort the creation process.
Once you have added a rule to the operation subtree, you can copy it, move it, or rename it. To copy a rule, click it, then select Copy Object from the context menu or menu bar. To move a rule, click it, then select Move Object from the context menu or menu bar. To rename a rule, click it, then select Rename from the context menu or menu bar.
Changing Rules
You can change all the parameters of a rule. Click Edit to make your changes. DirX Identity Manager (Provisioning) keeps the changes you make to the rule in its internal cache until you click Save. As long as you do not use Save, you can use the Manager’s Reset function to restore the rule settings to their old values (the values that are stored in the Identity Store (Provisioning Configuration)).
The changes to a rule take effect when it is next executed, as follows:
-
For provisioning rules, privileges that are no longer valid are revoked, and new valid privileges are granted.
-
For all other rule types, the changed rule is simply executed. Effects from the previous version of the rule are not removed.
| Rules that are checked as System Default can be copied but cannot be changed. |
Deleting Rules
You can delete rules that do not have the System Default field checked:
-
For consistency rules, the rule is simply deleted. There is no mechanism that removes the effect of the consistency rule automatically. You need to define a special rule that performs this task and run it once.
-
For provisioning rules, DirX Identity Provisioning removes all privileges given by this rule from the Identity Store (Provisioning Configuration) (but only if a privilege is not given by another mechanism, for example, manually) and then deletes the rule.
-
For validation rules, the rule is simply deleted. There is no mechanism that removes the effect of the validation rule automatically. You need to define a special rule that performs this task and run it once.
Organizing Rules
A rule folder is a DirX Identity Provisioning object that the rule administrator can use to organize the rule subtree (the tree view of the defined rules in the "Rules" subtree that is displayed when "Policies" is selected in the Manager). Placing a rule in a rule folder does not affect the rule’s priority. The purpose of the rule folder is to make it easy for the administrator to select a set of rules later on and execute them with a rule processor workflow.
You can make the following changes to the hierarchical tree view of the DirX Identity Provisioning rule structure:
-
Add a new empty rule folder
-
Copy a rule folder (with all its content)
-
Move a rule folder (with all its content)
-
Delete a rule folder (with all its content)
-
Rename a rule folder or change its description
To add a new folder, click the root rule folder or one of the folders below it, and then select New → Rule Container from the context menu. Manager prompts you to enter the unique name for the folder.
To copy an existing folder, click it, then select Copy Object from the context menu or menu bar.
To move an existing folder, click it, then select Move Object from the context menu or menu bar.
To change an existing folder, click it, and then click Edit.
To delete an existing folder, click the folder, and then select Delete from the context menu or menu bar. The folder to be deleted must not contain any rule objects.
To rename a rule or a rule folder, click it, then select Rename from the context menu or menu bar.
| You cannot put operations into rule folders. |
Managing Consistency Rule Operations
You use the Operations subtree of the Policies tree to manage the operations associated with consistency rules. The following figure shows the structure of the Operations subtree.
Consistency rule operations management consists of the following tasks:
-
Adding new consistency rule operations
-
Changing the attributes of existing operations
-
Deleting operations
-
Organizing the operations subtree
The next section describes the types of operations available in DirX Identity Provisioning and how to manage them with DirX Identity Manager.
About Operation Types
The following types of operations can be used in consistency rules:
-
Operations based on executables (programs and scripts)
-
Operations based on Java methods
-
Operations based on JavaScript programs
The next sections describe these operation types and how to use them in consistency rules.
Using Operations Based on Executables
Consistency rule operations can be based on programs or scripts that are external to the LDAP directory in use with DirX Identity Provisioning. The executable must either reside on the system that runs the DirX Identity policy execution agent or be accessible via a shared file system. Operations based on executables are located in the Executables subtree underneath the Operations subtree in the Policies view.
Script operations must be started with a command interpreter. DirX Identity Provisioning provides the following default script command interpreters:
-
cmd.exe start/C (Windows)
-
/bin/sh -c (Linux)
You can also use your own script interpreter. The Windows command interpreter transfers parameters as an array, which avoids problems with spaces in parameters. The UNIX command interpreter requires a single command string. To avoid problems with spaces or special characters like * or $, the parameters are enclosed in single quotes (').
You can also control whether the rule processor starts the executable sub-process synchronously or asynchronously.
If the sub-process is executed synchronously, all output is sent to stdout as log messages. All output to stderr is output as error messages. The exit code is checked. Values not equal to zero are reported as errors.
If the sub-process is executed asynchronously, its output is muted to avoid mixed logging. The exit code is not checked because the external process can run longer than the internal one (the rule processor).
We recommend that you use synchronous mode whenever possible.
| the rule processor environment is only available to UNIX script sub-processes in a UNIX environment. |
Using Operations Based on Java Methods
You can also use Java methods to implement operations for consistency rules. Java operations are methods of a Java class. When processing a Java operation, DirX Identity Provisioning creates the class using its default constructor and then calls the method. As a result, the method is assumed to be self-sufficient: it only works with its input parameters.
To use Java methods as rule operations:
-
Implement each Java method to be used as a rule operation. The action class must implement the ActionConfig interface defined in the package siemens.dxm.ruleprocessing.actionrunner. This interface contains the abstract method setContext(RuleContext context) which the rule processor uses to pass the context to the action. We recommend that the context object be held as a class member to make use of its methods. The methods provided by the context object include:
-
getSubject() - the search result object to be processed by the operation
-
getSimulateOnly() - true when the policy agent runs in simulation mode. The action’s implementation is responsible for handling simulation correctly.
-
getUserStorage() - returns the user storage for the modification of users, accounts and groups.
-
getRuleStorage() - returns the rule storage for the modification of policies.
-
-
Build the Java class by creating a jar file myAction*.jar* that contains the compiled action class.
-
Update the runtime environment for the policy execution agent by adding the jar file myAction.jar to the policy agent’s class path, in MetaRolePolicyAgent.bat (Windows) or MetaRolePolicyAgent.sh (Linux).
-
Configure the Java class and methods (as Java Method Actions) with DirX Identity Manager (Provisioning)
-
Create a consistency rule with DirX Identity Manager (Provisioning) that references one of the methods (a Java Method Action). The action is then called once for each object retrieved by the rule’s search filter.
Here is an example of a rule operation implemented as a Java method:
/**
 * setSubjectAttribute
 *
 * @param node
 * @param attribute
 * @param namingRule
 * @return Object
 */
public Object setSubjectAttribute(StorageObject node, String attribute, String namingRule) {
    String value = null;
// Setting attribute={0} for user={1} according to rule ''{2}''.
    logger.log(MsgID.DBG_SET_ATTRIBUTE_NR, attribute, node.getID(), namingRule);
    try {
        value = replaceSubjectAttributes(node, namingRule);
    } catch (RunnerException e) {
// Attribute value for attribute {0} not set at subject {1}.
// Attributes from naming rule {2} are missing on the subject.
        logger.log(MsgID.WAR_ATTR_NOT_SET, attribute, node.getID(), namingRule);
        return new Integer(1);
    }
    if (context.getSimulateOnly() == true) {
// SIMULATE: Adding property ''{0}'' with value ''{1}'' to subject DN={2}.
        logger.log(MsgID.LOG_SIM_ADD_PROPERTY, attribute, value, node.getID());
    } else {
// Adding property ''{0}'' with value ''{1}'' to subject DN={2}.
        logger.log(MsgID.LOG_ADD_PROPERTY, attribute, value, node.getID());
        node.setProperty(attribute, value);
        try {
            node.save();
        } catch (StorageException e) {
            return new RunnerException(e.getMessage(), e);
        }
    }
    return value;
}
Using Operations Based on JavaScripts
You can also use JavaScript programs to define operations for consistency rules. The policy execution agent loads them at runtime and provides their input parameters in the context. Your JavaScript operation can use simple parameters or DirX Identity Provisioning Java classes, especially those for the user, the account and the group.
DirX Identity Provisioning extends the ScriptContext abstract class with the following methods:
getObject() - returns the subject.
getParameter(String name) - returns the parameter that is defined in the operation definition under this name.
getUserStorage() - returns the user storage for the modification of users, accounts and groups.
getRuleStorage() - returns the rule storage for the modification of policies.
getSimulateOnly() - returns the value of the simulate flag. The JavaScript program is responsible for correctly using this method.
The following log methods are also provided to permit you to output messages via the DirX Identity Provisioning logging facility:
logDebug(String message) - produces a debug-level message. If the rules are processed in the IdS-J server, you need to set the following log level to see debug-level messages:
siemens.dxm.ruleprocessing.actionrunner FINEST
You should see other log levels by default unless you have set a contradictory log level.
logInfo(String message*)* - produces an informational message.
logWarning(String message*)* - produces a warning level message.
logError(String message*)* - produces an error level message.
When specifying the importPackage statement, if the package does not begin with "java", precede it with "Package". For example:
importPackage(Package.siemens.dxm.storage);
JavaScript recognizes the array type "Array". This type is not compatible with the Java String Array and thus cannot be used for the setProperty operation. Instantiate the Java Array via the Java Reflection Interface. For example:
importPackage(java.lang.reflect);
...
var length = array.length;
...
// Instantiate String[] here
var attrs = java.lang.reflect.Array.newInstance(java.lang.String, length);
Here is an example of a rule operation implemented as a JavaScript program:
// creates an Email-Address
// modifies the user
importPackage(java.lang);

obj=scriptContext.getObject();

gn=obj.getProperty("givenName");
sn=obj.getProperty("sn");
domain = scriptContext.getParameter("domain");

if (sn == null) {
mail = null;
}
else {
if (gn == null) {
mail=sn+"@"+domain;
}
else {
mail=gn+"."+sn+"@"+domain;
}
}
if (scriptContext.getSimulateOnly() == true) {
scriptContext.logInfo("SIMULATE: Adding mail="+mail+" to user "+obj.getID());
}
else {
obj.setProperty("mail", mail);
scriptContext.logInfo("Adding mail="+mail+" to user "+obj.getID();
scriptContext.logInfo("Saving user "+obj.getID());
try {
obj.save();
}
catch(Exception) {
scriptContext.logError("Save of user failed."+obj.getID());
}
}
Adding Consistency Rule Operations
You use the Operations subtree in the Policies view of DirX Identity Manager (Provisioning) to add executable, Java, and JavaScript operations for use in consistency rules. The next sections describe how to use DirX Identity Manager to add the information about these different types of operation into the Identity Store (Provisioning Configuration).
Once you have added an operation to the Operations subtree, you can copy, move, or rename it. To copy an operation, click it, then select Copy Object from the context menu or menu bar. To move an operation, click it, then select Move Object from the context menu or menu bar. To rename an operation, click it, then select Rename from the context menu or menu bar.
Adding an Executable Operation
To add an executable as a rule operation:
-
In the Policies view, right-click the Executable Operations folder in the operation subtree or click the top-level Operations folder
-
Select New, and then select Executable Action.
-
Enter a Name for the executable action and describe the action in the Description field.
-
Define the Path to the executable. If the path is known from the operating system path variable, the name of the executable is sufficient.
-
In Parameters, specify the executable’s parameters. Add a line for each parameter and set the Type, Context and Description fields. In Type, select String. In Context, select fixed if you want to specify the parameter value at design time; that is, in the operation. Otherwise, you can select the object of the search result itself (select subject) or one of its attributes. The field offers you the list of attributes in the format subject.*attribute_type; for example, *subject.sn.
-
Check Execute asynchronously if your operation is to execute asynchronously (not recommended and only for UNIX).
-
Check Is Script if your operation is a (batch) script and must be started using a command interpreter.
-
For script operations, specify in Script interpreter one of the default interpreters (cmd.exe start /C for Windows and /bin/sh -c for UNIX) or specify your own command interpreters with its parameters.
-
Set the Is Active flag, because otherwise the operation (and all rules that use this operation) cannot be executed.
-
Click OK to create the operation (or Cancel to cancel the creation process).
Adding a Java Operation
Adding Java methods as rule operations consists of two steps:
-
Creating the Java class
-
Adding the Java methods as sub-objects of the Java class
To create a Java class with DirX Identity Manager (Provisioning):
-
In the Policies view, right-click a Java operation folder in the Operations subtree or click the top-level Operations folder.
-
Select New, and then select Java Class.
-
Enter the fully-qualified Java class name in Name and describe the class in Description.
-
Enter the class or library in Java class path. If the class or library is in the policy execution agent’s class path settings, specifying the class name alone is sufficient. Otherwise enter the path to the class or library.
-
Set the Is Active flag, because otherwise the operation (and all rules that use this operation) cannot be executed.
-
Click OK to create the operation (or Cancel to cancel the creation process).
Next, you add a Java Method Action entry to your new Java class entry for each Java method in the class that is to be used as the operation. To create a Java Method Action entry:
-
Right-click the newly created Java class and select New Java Method Action.
-
Enter the name for the method in Java method and describe it in Description. Note that DirX Identity Provisioning does not support the definition of multiple methods that use the same name but specify different parameters.
-
Create the parameter list for the method in Parameters. Add a line for each parameter and set the Name, Type, Context and Description fields.
In Type, select one of the Java standard types (String, Integer, Vectors of standard types, and so on) or a DirX Identity Provisioning class. Click the down-arrow to see a list of types.
In Context, specify the parameter’s context. A parameter’s context can be fixed or subject. A fixed parameter is a constant whose value is defined at the moment you enter it. The declaration is made for the action, but the value is defined by editing the related rule. Thus, the same action can be called from different rules using different sets of fixed parameters. A subject parameter is a value that is derived from each individual search result object (subject) at runtime. If the context is subject, the subject itself is passed to the method. If the context is $(subject.attribute_type), the attribute attribute_type is read from the subject at runtime and its value is passed to the method. Click the down arrow to see a list of attribute types.
Note: At runtime, the method is retrieved using the Java reflection interface. Thus, the method name and the parameter list entered in the Java Method Action entry must be identical to the name and parameter list of the Java method implemented to perform the operation. -
Set the Is Active flag, because otherwise the operation (and all rules that use this operation) cannot be executed.
-
Click OK to create the operation (or Cancel to cancel the creation process).
Adding a JavaScript Operation
To add a JavaScript program as a rule operation:
-
In the Policies view, right-click the JavaScript Operations folder in the operation subtree or click the top-level Operations folder
-
Select New, and then select JavaScript Action.
-
Enter a Name for the JavaScript operation and describe it in Description.
-
Define all the Parameters that the JavaScript requires. Set the Name, Type, Context and Description fields as described earlier in this topic.
-
Set the Is Active flag, because otherwise the operation (and all rules that use this operation) cannot be executed.
-
Click the Implementation tab and enter the JavaScript code that defines the operation.
-
Click OK to create the operation (or Cancel to cancel the creation process).
Changing Operations
You can change any attribute of an operation object by opening the operation object and clicking Edit. DirX Identity Manager (Provisioning) keeps the changes you make to the object in its internal cache until you click Save. As long as you do not use Save, you can use the Manager’s Reset function to restore the settings to their old values (the values that are stored in the Identity Store (Provisioning Configuration)). The changes you make to an operation take effect when it is next executed.
| The effect of the previous parameters is not automatically reversed. You need to define a special operation and a rule that performs this task and run it once. |
| Operation objects whose System Default flag is set can be copied but cannot be changed. |
Deleting Operations
You can delete an operation whose System Default field is not checked.
| There is no automatic mechanism that removes the effect of this operation automatically. You need to define a special operation and define a rule that performs this task and run it once. |
Organizing Operations
An operation folder is a DirX Identity Provisioning object that the policy administrator can use to organize the operations subtree (the tree view of the defined operations in the "Operations" subtree that is displayed when "Policies" is selected in the Manager). The purpose of the operation folder is to make it easy for the administrator to manage the viewable operation subtree.
You can make the following changes to the hierarchical tree view of the DirX Identity Provisioning operation structure:
-
Add a new empty operation folder
-
Copy an operation folder (with all its content)
-
Move an operation folder (with all its content)
-
Delete an operation folder (with all its content)
-
Rename an operation folder or change its description
To add a new folder, click the root operation folder or one of the folders below it, and then select New → Operation Container from the context menu. Manager prompts you to enter the unique name for the folder.
To copy an existing folder, click it, then select Copy Object from the context menu or menu bar.
To move an existing folder, click it, then select Move Object from the context menu or menu bar.
To change an existing folder, click it, and then click Edit.
To delete an existing folder, click the folder, and then select Delete from the context menu or menu bar. The folder to be deleted must not contain any rule objects.
To rename an operation or an operation folder, click it, then select Rename from the context menu or menu bar.
| You cannot put rules into operation folders. |
About Rule Operation
This section describes:
-
How to run rules
-
How rule processing works
-
How to optimize rule operation
Running Rules
You run the policy execution workflow to execute rules. You can define single rules or a set of rules contained in a rule folder.
To execute a set of rules:
-
Create a new scenario in the DirX Identity Manager (Connectivity view group) Global View (if not yet done).
-
Create your Identity Store connected directory from the Identity Store template (for example, name it MyIdentityStore). Create a second connected directory icon and assign MyIdentityStore to it.
-
Connect these two connected directories with a workflow line.
-
Right-click the workflow line and then select New.
-
Select the PolicyExecution template from the list.
-
Define a Name for your copy in the General Information tab (for example, MyPolicyExecution).
-
Set either Process Rules or Simulate Rules from the Policy Agent Parameters tab. We recommend that you test new rules in simulate mode (this shows what would happen but does not change any real data). We also recommend that you turn off privilege resolution (perform a separate activity for this task in the same workflow or as a separate workflow in a nested workflow).
-
In the Rule Search Parameters tab, set the Base Object and a Search Filter condition that defines the set of rules you want to execute.
-
In the Tracing tab, set the trace parameters. We recommend that you trace only Errors.
-
Click Finish to save your configured workflow.
Execute the workflow to run the rule processor. Check the result in the Monitor View. If necessary, retry the workflow with other tracing parameters.
How Rules Work
The rule processor searches the rules to be processed by a search filter expression. It processes all types of rules that match the search filter in one run. The rules are processed in the following steps:
The rules are separated according to their different types:
-
Consistency rules are stored in a list in the sequence in which they are returned from the search
-
Provisioning rules are gathered in rule clusters. For each privilege to be granted or denied, a separate cluster is created that contains all rules for that privilege.
-
Validate rules are stored in a list in the sequence in which they are returned from the search.
-
Accept/Cleanup rules are gathered in one rule cluster.
After it reads in all the rules, the rule processor executes them in the following sequence:
-
Provisioning rules clusters - For each cluster, processes the resulting granting rule first, then processes the deny rule.
-
Consistency rules - processes them in the order they were returned by the rule search.
-
Validate rules - processes them in the order they were returned by the rule search.
-
Accept/cleanup rule clusters - processes each cluster. The cleanup rule that has the higher priority wins.
Sorting of rules:
A list of sort attributes can be specified in a rule search. This configuration affects the sequence in which the rules are returned by the search and thus the sequence they are run within one category. The overall sequence grant/deny ⇒ consistency ⇒ validate ⇒ accept/cleanup rules is not changed by sorting.
Hierarchy issues:
The statement that all rules acting on the same privilege are combined to two searches is only true when the search bases of the user filters are equal.
For different search bases, two searches are performed for each search base, combined only of those filters that are valid in this tree.
Suppose the user store is structured according to organizational units. And for each organizational unit, a separate set of rules is provided, granting the same privilege. In this case, the rule processor will create sub-clusters for each ou that are processed separately and independently.
Next, suppose a grant rule that is valid in the whole organization is combined with a deny rule that is valid only on an organizational unit that is located in a subtree of the organization. In this case, the rule processor clusters and executes the rules bottom-up:
-
Step 1: The organization-wide grant rule is combined with the more localized deny rule and executed on the scope of the deny rule in step 1.
-
Step 2: Now the organization-wide grant rule is executed on the scope of the organization (without consideration of the deny rule). In this step, the users that were processed in step 1 are skipped, since the single grant rule must not be applied to them.
Simulate Mode
When the rule processor runs in simulate mode, all changes are simulated but are not applied. Note that in simulation mode, all rules are processed independent of the setting of their isActive flag; in process mode, only rules and operations with isActive=true are processed. As a result, simulation will show different results if some provisioning rules are flagged isActive, while others are not: In process mode, the inactive rules are simply ignored.
Simulate mode allows you to check new rules in a productive environment without affecting the Identity Store (Provisioning Configuration). After the run you can check the simulated results in the real environment. If everything is ok, set process mode and run the rule processor again.
How to Process Provisioning Rules
Each provisioning rule is defined by a search filter that is applied to DirX Identity users, by its operation type (grant or deny), its priority and the set of privileges it grants (or denies).
The rule processor combines all grant- and deny-rules for a single privilege into a “rule cluster”. The rule processor creates a combined grant filter and a combined deny filter from the filters of the rules contained in the cluster. Consequently, all grant- and deny-rules for a single privilege are processed in two searches:
-
Grant - for users matching the grant filter, the privilege is assigned.
-
Deny - from all users matching the deny filter, the privilege is revoked.
This method guarantees that users are only touched when they do not have that privilege (in case of grant) or if they have the privilege (in case of deny).
| Users in state TBDEL are not touched by the provisioning rule algorithm. This means that a user in state TBDEL neither gets new privileges via rules nor loses any privileges that are still assigned. Use the removePrivilegesFromTBDELUser consistency rule to remove privileges from users in state TBDEL. |
After assignment/revocation of the privilege, a user to group resolution can be performed, thus propagating the effect of assignment/revocation to the affected account and group objects in the DirX Identity Provisioning target systems. We recommend that you do not use this feature because it works correctly only in simple environments with a few rules. In complex environments with many rules, a user is resolved several times after one of the privileges is assigned, which can negatively impact performance. A clear sequence of rule processing and privilege resolution guarantees that you will not run into this problem.
The following additional issues are covered by the clustering algorithm:
-
Priority
A deny rule takes precedence over a grant rule if its priority is greater or equal to that of the grant rule -
Auto-revocation
A privilege that has been granted to a user is automatically revoked if the user’s attributes are changed so that the grant rule no longer matches or a deny rule with higher or equal priority matches. -
Exclude rules
If a privilege is only referenced by deny rules, an exclude rule is applied, revoking the privilege from all matching users. You can use this method to remove privileges that were previously assigned by a grant rule.
How to Process Consistency Rules
Consistency rules perform a search on a set of objects that is defined in their search filter. An operation is applied to each subject returned by the search. The operations are assigned to the rule by a DN reference. An operation can be implemented as a Java method, as a JavaScript, or as an executable (program or script).
How to Process Validation Rules
These rules are processed depending on their type.
Validation Rules
-
Searches for groups matching the validation rule’s groups filter and which are configured for validation or have an obligation assigned.
-
Creates a combined account validation filter from the groups and/or the obligation’s validation filters.
-
Searches for all accounts matching the rule’s account filter. This action defines the set of accounts to be validated.
-
For each account, checks if the account matches the account validation filter created in step 2.
-
If the filter matches, determines the member state of the account:
If the account is not already a member of the considered group, its state is set to IMPORTED.
If its state is DELETE, the member is removed from the group. -
If the filter does not match, determines the member state of the account.
If ADD/ENABLED, the onAssignment actions are processed, setting the account attributes.
If IMPORTED/IGNORE, the member state is set to DELETED, and the onRevocation actions are processed.
If DELETED, the onRevocation actions are processed.
Accept/Cleanup Rules
These rules work in the following way:
-
The rule processor collects all accept/cleanup-rules are combined into an “accept/cleanup rule cluster” and processes them together.
-
First, the rule processor searches all imported accounts (paged operation).
-
For each account it checks in memory whether a rule applies. If several rules apply, they are sorted by priority.
-
If the priority of a cleanup rule is greater than or equal to that of an accept rule, the cleanup rule takes priority.
-
The resulting rule is executed. It sets all memberships of all groups that are defined in the rule to the according state (cleanup = DELETED, accept = IGNORE).
-
If an account is not affected by a rule, the memberships remain in state IMPORTED and an informational message is written to the log file.
See the section about "Managing Group Memberships" in the chapter "Managing Target Systems" for more information about handling IMPORTED memberships.
Optimizing Rule Operation
This section provides hints on how to optimize your rule processing based on the information given in "How Rules Work".
Separating Rules
You can set up any number of rule processing workflows that operate on a specific set of rules. Here are some guidelines to follow:
-
You should carefully plan the set of workflows: define a set of rules that works on a set of subjects. Try to set up a rule environment that is easy to understand, clearly separated and only as complex as necessary.
-
Define schedules for these workflows or combine them in a nested batch workflow.
-
Separate policy execution and privilege resolution into two succeeding workflows; this configuration guarantees that a user is only resolved once per run and not once per rule.
-
If you want to handle large amounts of subjects, distribute the rules, for example, to work on separate user trees.
-
Use DirX Identity Connectivity’s powerful capability to distribute these workflows on separate DirX Identity servers (perform DirX Identity Agent installations). This configuration allows you to distribute the processing load.
The following filters must be applied for the different kinds of rules if you want to separate rules:
| Rule Type | Search Filter |
|---|---|
consistency |
dxrType=ConsistencyRule |
grant / deny |
dxrType=ProvisioningRule |
validate |
dxrOperationImp=validate |
accept / cleanup |
(|(dxrOperationImp=accept)(dxrOperationImp=cleanup)) |
all rules together |
(|(objectClass=dxrConsistencyRule)(objectClass=dxrProvisionRule)) |
Other Hints
If you expect huge changes in your store (for example, a complex organizational change) that affects all or almost all of your users, try to perform the organizational change during night or on a weekend.
Warnings
-
Do not separate rules that belong to the same cluster
We recommend that you run grant/deny rules in a common run of the rule processor. For all grant/deny rules acting on the same privilege this is a must:
If a grant rule is acting on a special privilege (let’s call it Group_One) and a deny rule is acting on the same privilege are processed in different workflows, the rules are not processed in a common rule cluster. Thus, the priorities of the rules are not evaluated and you encounter the following behavior:
-
Every time you run the first workflow, Group_One is granted to a set of users.
-
Later, when you run the workflow that contains the deny rule, Group_One is revoked from the users.
Similarly, all accept/cleanup rules running in the same target system must be executed in one common run of the rule processor.
Managing Object Policies
DirX Identity provides several types of object-related policies:
Event Policies - use these policies to trigger event-based processing of an entry after an add or modify operation.
Attribute Policies - these policies allow starting request workflows if specific attributes have been changed.
Delete Policies - use these policies to trigger request workflows if a specific object type is to be deleted.
The next sections describe in more detail how to set up and use these policies.
Managing Event Policies
Event policies for objects indicate that an event must be sent if an object is created or modified. This event is used by the relevant event-based processing workflow(s). For more information about these workflows, see the chapter "Understanding the Java-based Maintenance Workflows" in the DirX Identity Application Development Guide.
Event policies keep configuration information for several object types. Thus, it is not necessary to create and maintain a folder structure. One event policy for a domain is sufficient.
Adding Event Policies
To add a new event policy:
-
Open the Policies view group in the Provisioning Configuration and then open the Event Policies folder.
-
Copy an existing event policy (for example, the delivered default policy). Use the Copy Object menu entry from the context menu.
-
Alternatively, you can create a new policy. Right-click the Event Policies folder and then select New → Event Policy Configuration from the context menu.
-
Set the Name and Description fields in the General tab. Activate the new policy.
-
Click the Configuration tab.
-
Select one or more object types from the Available list and move them to the Selected list.
-
The OD name represents the name from the corresponding object description. This allows setting up multiple event policies for different object descriptions, for example you might want to distinguish between external and internal users. Both have the same object classes, but the object descriptions can differ in some aspects.
-
The Object Class column must contain a representative object class that is used by these object descriptions. The meta controller uses the object class because it has no access to object descriptions.
-
The Object Class2 column defines a second object class for this object description type. This definition allows the meta controller to distinguish between users, personas and functional users. Since personas and functional users have the object class dxrUser (as the normal users), the meta controller matches the definition with the best match (a two-object-class match is preferred over a single-object-class match).
-
The Type column defines another match criterion for the meta controller that evaluates the object’s dxrType attribute. Matching is performed in the order
1) two object classes match
2) object class and type match
3) object class matches -
In the last column, you can set this event policy to active.
-
Click OK to store it or Cancel to abort the creation process.
You should restart the DirX Identity Manager to make the changes effective. Otherwise, the aclmgr.refresh.interval in the dxi.cfg file defines the refresh period (by default, 10 minutes).
Perform a logout / login sequence in Web Center to make the new policy effective.
Changing Event Policies
To modify an event policy:
-
Open the Policies view group in the Provisioning Configuration and then open the Event Policies folder.
-
Select the policy to modify.
-
Adapt the attributes in the tabs. Use the Help button for more explanation.
Note: use the Rename method from the context menu of the policy to rename it. -
Click OK to store it or Cancel to abort the creation process.
You should restart the DirX Identity Manager to make the changes effective. Otherwise, the aclmgr.refresh.interval in the dxi.cfg file defines the refresh period (by default, 10 minutes).
Perform a logout / login sequence in Web Center to make the new policy effective.
Deleting Event Policies
To delete an event policy:
-
Open the Policies view group in the Provisioning Configuration and then open the Event Policies folder.
-
Select the policy to delete.
-
Select Delete from the context menu.
-
Confirm the message box.
You should restart the DirX Identity Manager to make the changes effective. Otherwise, the aclmgr.refresh.interval in the dxi.cfg file defines the refresh period (by default, 10 minutes).
Perform a logout / login sequence in Web Center to make the new policy effective.
Managing Attribute Policies
Attribute policies control the modification of critical attributes for a specific object type. If you change one or more of the object’s critical attributes, the DirX Identity Services layer automatically starts an approval workflow. The next sections describe the attribute policies for objects and how to organize, change, and delete them.
Attribute Policies for Objects
You can configure attribute policies for any important (for example security relevant) attribute of a object. The next paragraphs explain typical use cases.
User attribute values can example affect his access rights in many ways.
-
When used as permission parameters, the values of user attributes control the groups assigned to users. Changing a user attribute used as a permission parameter changes the assigned groups.
-
When used in provisioning policies, the values of user attributes control the privilege assignments that the provisioning workflows automatically calculate and make.
Changing the role parameter or permission parameter definition of a role or permission also affects the assignment of groups in target systems.
In both cases, changing one of these attributes is critical. Therefore, we recommend that you define these attributes as subject to approval by defining an attribute policy for the user object class. The DirX Identity Services layer starts approval workflows if one of these attributes is changed.
Adding Attribute Policies
To add a new attribute policy:
-
Right-click a rule folder in the subtree or the top-level Attribute Policies folder.
-
Select New → Attribute Policy.
-
Set the Name and Description fields in the General tab. Activate the new policy.*
Note*: To enable modification approval, you generally set the Attribute modification approval flag at the domain object. -
Click the Configuration tab. Select the object type and set the object class (only used by the meta controller). Select some of the attributes in the Available pane and move these attributes down to the Selected pane.
-
Click OK to store the policy or Cancel to abort the creation process.
Changing Attribute Policies
You can change all the parameters of a policy. Click Edit to make your changes. DirX Identity Manager (Provisioning) keeps the changes you make to the policy in its internal cache until you click Save. As long as you do not use Save, you can use the Manager’s Reset function to restore the policy settings to their old values (the values that are stored in the Identity Store (Provisioning Configuration).
Set or reset the Is Active flag to enable or disable a policy.
Deleting Attribute Policies
You can delete attribute policies at any time. However, if you intend to use the policy again later on, we recommend that you only reset the Is Active flag.
Organizing Attribute Policies
You can structure policies within a folder hierarchy. We recommend that you create a policy folder for your project.
You can make the following changes to the hierarchical tree view of the DirX Identity Provisioning policy structure:
-
Add a new empty policy folder
-
Copy a policy folder (with all its content)
-
Move a policy folder (with all its content)
-
Delete a policy folder (with all its content)
-
Rename a policy folder or change its description
To add a new folder, click the root policy folder or one of the folders below it and then select New → Attribute Policy Container from the context menu. Manager prompts you to enter the unique name for the folder.
To copy an existing folder, click it and then select Copy Object from the context menu or menu bar.
To move an existing folder, click it and then select Move Object from the context menu or menu bar.
To change an existing folder, click it and then click Edit.
To delete an existing folder, click the folder, and then select Delete from the context menu or menu bar. The folder to be deleted must not contain any policy objects.
To rename a policy or a policy folder, click it, then select Rename from the context menu or menu bar.
Managing Deletion Policies
Delete policies for objects indicate that a request workflow must be started if an object is to be deleted. Set up the corresponding request workflow with operation=delete. For more information about these workflows, see the chapter "Understanding Deletion Workflows" in the DirX Identity Application Development Guide.
Delete policies keep configuration information for several object types. Thus, it is not necessary to create and maintain a folder structure. One delete policy for a domain is sufficient.
Adding Delete Policies
To add a new delete policy:
-
Open the Policies view group in the Provisioning Configuration and then open the Delete Policies folder.
-
Copy an existing delete policy (for example, the delivered default policy). Use the Copy Object menu entry from the context menu.
-
Alternatively, you can create a new policy. Right-click the Delete Policies folder and then select New → Delete Policy Configuration from the context menu.
-
Set the Name and Description fields in the General tab. Activate the new policy.
-
Click the Configuration tab.
-
Select one or more object types from the Available list and move them to the Selected list.
-
The OD name represents the name from the corresponding object description. This allows setting up multiple event policies for different object descriptions, for example you might want to distinguish between external and internal users. Both have the same object classes, but the object descriptions can differ in some aspects.
-
In the last column, you can set this delete policy to active.
-
Click OK to store it or Cancel to abort the creation process.
You should restart the DirX Identity Manager to make the changes effective. Otherwise, the aclmgr.refresh.interval in the dxi.cfg file defines the refresh period (by default, 10 minutes).
Perform a logout / login sequence in Web Center to make the new policy effective.
Changing Delete Policies
To modify a delete policy:
-
Open the Policies view group in the Provisioning Configuration and then open the Delete Policies folder.
-
Select the policy to modify.
-
Adapt the attributes in the tabs. Use the Help button for more explanation.
Note: use the Rename method from the context menu of the policy to rename it). -
Click OK to store it or Cancel to abort the creation process.
You should restart the DirX Identity Manager to make the changes effective. Otherwise, the aclmgr.refresh.interval in the dxi.cfg file defines the refresh period (by default, 10 minutes).
Perform a logout / login sequence in Web Center to make the new policy effective.
Deleting Delete Policies
To delete a delete policy:
-
Open the Policies view group in the Provisioning Configuration and then open the Delete Policies folder.
-
Select the policy to delete.
-
Select Delete from the context menu.
-
Confirm the message box.
You should restart the DirX Identity Manager to make the changes effective. Otherwise, the aclmgr.refresh.interval in the dxi.cfg file defines the refresh period (by default, 10 minutes).
Perform a logout / login sequence in Web Center to make the new policy effective.
Managing SoD Policies
You need segregation of duties (SoD) policies to satisfy regulatory compliance. Set up SoD policies to define conflicting privileges. For example, an auditor should not be one of the administrators whose tasks are audited or a person in the procurement department should not be able to approve his own orders. You can mix any type of privilege in an SoD policy; for example, you can define a group conflict with a role. The next sections describe these tasks in more detail. See the section "Managing SoD" for a description of the SoD checking mechanisms provided with DirX Identity and how they work, and the context-sensitive help chapters for a description of the corresponding SoD policy objects and fields.
To understand the SoD concept, read the DirX Identity Use Case Document Using SoD.
Adding SoD Policies
To add a new SoD policy:
-
Right-click a rule folder in the subtree or the top-level SoD Policies folder.
-
Select New → SoD Policy.
-
Set the Name and Description fields in the General tab. Activate the new policy.
Note: to enable SoD checks generally, set the Segregation of Duties (SoD) checks flag at the domain object. -
Create two or more lines in the Conflicting Privileges pane and select the corresponding privileges.
-
Click OK to store it or Cancel to abort the creation process.
All privileges that are referenced from an active SoD policy have the Has conflicting privilege flag set (a read-only flag). This flag makes it easy to detect whether a privilege is part of an SoD policy.
Changing SoD Policies
You can change all the parameters of a policy. Click Edit to make your changes. DirX Identity Manager (Provisioning) keeps the changes you make to the policy in its internal cache until you click Save. As long as you do not use Save, you can use the Manager’s Reset function to restore the policy settings to their old values (the values that are stored in the Identity Store (Provisioning Configuration).
Set or reset the Is Active flag to enable or disable a policy.
Deleting SoD Policies
You can delete policies at any time. If you intend to use the policy again later on, we recommend that you only uncheck the Is Active flag for the policy. Disabling or deleting an SoD policy resets the corresponding Has conflicting privileges flag at the related privileges if the privilege is not referenced by any other SoD policy.
Organizing SoD Policies
You can structure policies within a folder hierarchy. We recommend that you create a policy folder for your project.
You can make the following changes to the hierarchical tree view of the DirX Identity Provisioning policy structure:
-
Add a new empty policy folder
-
Copy a policy folder (with all its content)
-
Move a policy folder (with all its content)
-
Delete a policy folder (with all its content)
-
Rename a policy folder or change its description
To add a new folder, right-click the root policy folder or one of the folders below it, and then select New - > Attribute Policy Container. Manager prompts you to enter the unique name for the folder.
To copy an existing folder, click it and then select Copy Object from the context menu or menu bar.
To move an existing folder, click it and then select Move Object from the context menu or menu bar.
To change an existing folder, click it and then click Edit.
To delete an existing folder, click the folder and then select Delete from the context menu or menu bar. The folder to be deleted must not contain any policy objects.
To rename a policy or a policy folder, click it and then select Rename from the context menu or menu bar.
Managing Password Policies
Password policies define restrictions on password management. Changing a password or resetting a password requires fulfilling the defined password policies for a specific user.
The following capabilities are available for password policies:
-
You can create a new password policy only within Web Center.
-
You can change a password policy via Web Center and Identity Manager.
-
You can define a specific password policy for each user.
-
You can set up the default password policy to be used for all users where no specific policy is defined.
-
You can define Microsoft Windows-compliant password policies.
For a detailed description of all password policy parameters, see the context-sensitive help.
You can also program your own password checks and deploy them with Web Center. For more details, see "Customizing Password Management" in the DirX Identity Customization Guide.