Using Request Workflows
You can use request workflows for a variety of tasks, including:
-
Creating objects (user self registration, users, roles, and so on with or without approval)
-
Modifying objects (users, roles, and so on) and approving object attribute changes
-
Approving privilege assignment changes
-
Deleting objects (users, roles, and so on)
-
Performing certifications
-
Performing service management tasks
Understanding Creation Workflows
Creation workflows allow you to place controls on the object creation process.Let’s look at several typical examples:
User Self Registration Workflows - the Customer Self Registration workflow allows for self registration of a customer
Create User Workflows - the Create User With Approval workflow shows how an administrator enters a new user with approval.
Create Persona Workflows - the Create Persona from User shows a typical workflow for administrative persona creation.
Create User Facet Workflows - the Create User Facet from User shows a typical workflow for creating a user facet.
Create Functional User Workflows - the Create Functional User from User shows a typical workflow for administrative functional user creation.
Create Privilege Workflows - the Create Role workflow defines a process for role creation.
These examples of creation workflows show that you can build various types of creation workflows that satisfy your organizational and process requirements. We recommend that you streamline your processes when defining request workflows so that they are fast and flexible but still maintain regulatory compliance.
User Self Registration Workflows
Self registration workflows have a special function: they are triggered by a user that is not yet registered within DirX Identity. To handle this case, DirX Identity uses the special and reserved user ANYONE, which has the limited access rights defined by access policies that are sufficient to perform the self registration process. See the access policies for ANYONE under Policies → Access Policies → Default → Request Workflow Definitions for more information. You need to supply a password for ANYONE in the file install_path*\web\webCenter\WEB-INF* to enable the self registration process.
A typical self registration workflow is the Customer Self Registration workflow:
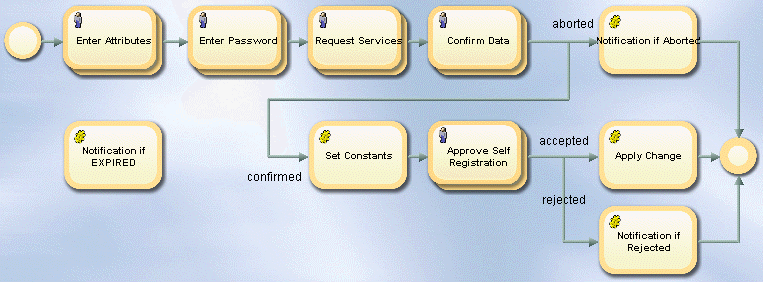
The Customer Self Registration workflow contains the following activities
Enter Attributes (people) - displays a set of attributes (mandatory or optional) that the requesting user must supply.
Enter Password (people) - requests a password that complies with the defined password policies from the user.
Request Services (people) - allows the user to select some of the offered services. The policy execution service can assign additional privileges automatically later on.
Confirm Data (people) - presents all entered data to the user, who can change the data if it is not correct and then either confirm or abort the entire self registration process.
Notification if Aborted (automatic) - sends a final notification to the requesting user that he aborted the self registration process.
Set Constants (automatic) - sets some constant values, for example, the user type to "Customer" and the master attribute to "Self Registration".
Approve Self Registration (people) - requires a set of persons (the participants) to approve this user self registration request. In this case, a fixed group of people defines the list of approvers.
Apply Change (automatic) - creates the LDAP entry for the user if the participants in Approve Creation accept the creation request. Up to this point, the user entry does not exist. It exists only as an order object within the workflow instance. Creating the user LDAP entry includes a privilege resolution and generation of events for real-time workflows.
Notification if Rejected (automatic) - typically sends an e-mail notification to the initiator of this workflow if the participants reject the user creation request.
Notification if EXPIRED (automatic) - sends an e-mail to an administrator that the workflow has expired. Obviously the participants did not react in time.
Create User Workflows
You can create users in various ways. The following figure shows a typical workflow for administrative user creation:
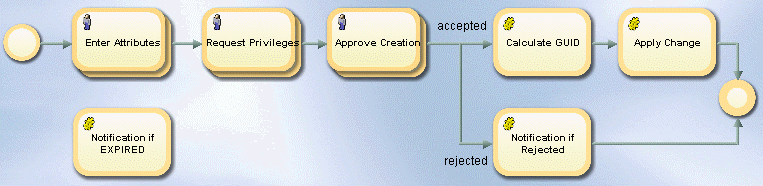
The workflow shown in the figure contains the following activities:
Enter Attributes (people) - displays a set of attributes (mandatory or optional) that the administrator must supply.
Request Privileges (people) - allows the administrator to assign some privileges by hand. The policy execution service can assign additional privileges automatically later on.
Approve Creation (people) - requires a set of persons (the participants) to approve this administrative request for user creation. There are many ways to define the participants; for example, fixed lists, the members of groups, an LDAP filter definition and so on. For this workflow, a fixed list of approvers that are part of the human resources department is configured.
Calculate GUID (automatic) - calculates a standard global unique identifier. Example: uid-c0a8e480—4b5b380c-121222f6f42—7fb8. You can create your own UID generator as a custom activity.
Apply Change (automatic) - creates the LDAP entry for the user if the participants in Approve Creation accept the creation request. Up to this point, the user entry does not exist. It exists only as an order object within the workflow instance. Creating the user LDAP entry includes a privilege resolution and generation of events for real-time workflows.
Notification if Rejected (automatic) - typically sends an e-mail notification to the initiator of this workflow if the participants reject the user creation request.
Notification if EXPIRED (automatic) - sends an e-mail to an administrator that the workflow has expired (the participants did not respond in time).
Create Persona Workflows
You can create personas in various ways. The following figure shows a typical workflow for administrative persona creation:
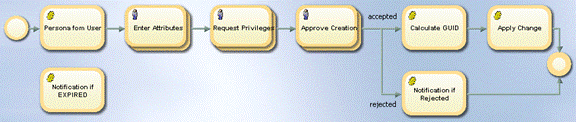
The workflow shown in the figure is derived from the corresponding create user workflow, which has been extended to include a new first activity:
Persona from User (automatic) - creates the default values for the persona to be created from its owner using a special object description. This workflow causes the "enter attributes" dialog for personas to be populated with useful default values.
All of the other activities for the create persona workflow are the same as the create user workflow described in the previous section.
See the section "Customizing Persona Create Workflows" in the chapter "Customizing Program Logic" in the DirX Identity Customization Guide for information on how to configure the Persona from User activity.
Create User Facet Workflows
You can create user facets in the same ways as for personas. The workflow for creating a user facet is basically the same as the workflow for creating a persona described in the section "Create Persona Workflows". The only difference is the first automatic activity User Facet from User, which sets default values for the new user facet taken from the associated user and configured in the object description UserFacetFromUser.xml.
See the section "Customizing User Facet Create Workflows" in the chapter "Customizing Program Logic" in the DirX Identity Customization Guide for information on how to configure the User Facet from User activity.
Create Functional User Workflows
You can create functional users in various ways. The following figure shows a typical workflow for administrative functional user creation:
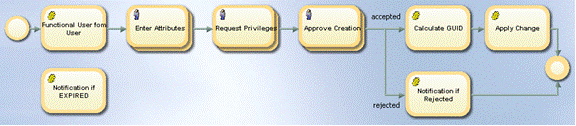
The workflow shown in the figure is derived from the corresponding create user workflow, which is extended to include a new first activity:
Functional User from User (automatic) - creates the default values for the functional user to be created from its sponsor using a special object description. This workflow causes the "enter attributes" dialog for functional users to be populated with useful default values.
All of the other activities for the create functional user workflow are the same as the create user workflow described in the previous section.
See the section "Customizing Functional User Create Workflows" in the chapter "Customizing Program Logic" in the DirX Identity Customization Guide for information on how to configure the Functional User from User activity.
Create Privilege Workflows
There are also many ways to define a workflow for a role - or more generally, a privilege - request. The following figure shows a typical workflow definition:
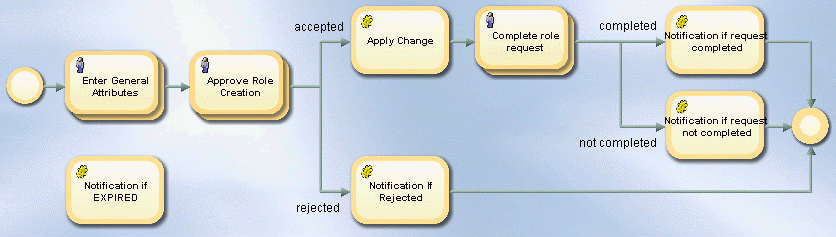
Because role creation is a complex task, the workflow takes a two-step approach. First, a person supplies a set of descriptive attributes to request the new role. When this "basis" request is approved, the workflow creates the role object and notifies a role administrator to complete the role definition. This workflow contains the following activities:
Enter General Attributes (people) - displays a set of descriptive attributes (mandatory or optional ones) the role requester must supply.
Approve Role Creation (people) - requires a set of persons (the participants) to approve the role creation request, possibly including a check for an existing role definition that can be used instead of the requested one.
Apply Change (automatic) - creates the preliminary LDAP role entry if the participants of Approve Role Creation accept the creation request.
Notification if Rejected (automatic) - typically sends an e-mail notification to the initiator of this workflow if the participants of Approve Role Creation reject the role creation request.
Perform Administrative Tasks (people) - notifies the role administrator that a preliminary role object has been created and requests that he completes the role definition.This action may include tasks like setting the role ID, assigning permissions, role parameters and senior roles (and perhaps these additional objects must be created first), assigning users as owners and role administrators and defining approval and re-approval parameters.
Notification if Role Request Completed (automatic) - typically sends an e-mail notification to the initiator of this workflow when the role administrator can complete the role definition successfully.
Notification if Not Completed (automatic) - typically sends an e-mail notification to the initiator of this workflow when the role administrator finds that the role creation is not possible; for example, because there is a conflict with other role definitions.
Notification if EXPIRED (automatic) - sends an e-mail to an administrator that the workflow has expired (the participants did not respond in time).
Understanding Modification Workflows
This type of workflow allows approval of object modifications if critical attributes are changed.You use attribute policies to define the list of critical attributes for an object type.Managing attribute modification approval comprises these steps:
-
Enabling attribute modification approval via the Attribute Modification Approval flag of the domain object.
-
Configuring the corresponding attribute policies for each object type (critical attributes).
Note: either create your own attribute policies or copy the default policies to prevent your policies from being overwritten during upgrade installation.
Each matching policy results in the start of one workflow.
The next section provides an example for a user attribute modification workflow.You can set up similar modification workflows for other object types.
User Modification Workflows
The following figure shows a typical attribute modification workflow that is triggered by a change of the dxroulink or dxrlocationlink attributes.
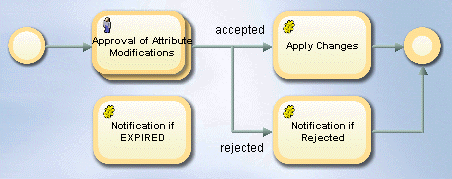
The workflow shown in the figure contains the following activities:
-
Approval of Attribute Modifications (people) - requests that a set of participants approve the modification of critical attributes. In this special case, we use all persons of the HR department as approvers. These persons are also allowed to change some of the attributes to their correct values before they accept the changes.
-
Apply Change (automatic) - changes the LDAP entry if the participants of the previous step accepted the modification. Up to now, the modifications do not exist. They exist only as an order object within the workflow instance.
-
Notification if Rejected (automatic) - typically sends an e-mail notification to the initiator of this workflow if the participants reject the modification request.
-
Notification if EXPIRED (automatic) - sends an e-mail to an administrator that the workflow has expired. Obviously the participants did not react in time.
The attribute modification workflow functions as follows:
-
The modification workflow does not allow a participant to accept a part of the attributes and reject the rest.
-
If several participants must approve, and all approve but some make changes to the data before they approve, DirX Identity takes the changes made by the last approver, and ignores the rest.
-
If several workflows are started for the same attribute, DirX Identity takes the changes from the last approved change.
This feature is not applicable for:
-
Properties that depend on a master object.In this case, the change of the master attribute must be approved rather than the change of the dependent attribute.For more information, see the section "Using the Master Attribute" in the section "Customizing Objects" in the DirX Identity Customization Guide.
-
Properties that are used as system properties for privilege assignment.The privilege assignments are handled by extra assignment approval workflows.
-
Properties that are calculated automatically by the system to set some states or other system relevant values.
-
Properties that are specific properties holding a set of individual properties.For example, dxrRPValues cannot be chosen, select dxrRPValues(c) or dxrRPValues(l) instead.
The workflow checks these rules and if it detects a violation, it reports it as an error message when the policy is saved.
Warning: You can bypass these checks by editing the attributes for approval in the attribute policy with a native LDAP editor (for example, DirX Identity’s Data View).However, this action may result in unexpected problems that are not covered by product support.
Understanding Assignment Workflows
This type of workflow only handles the approval of privilege assignments.In this section, we:
-
Describe how approval works.
-
Examine the 4-eye approval, automatic (notification-only) approval and risk approval workflows.
-
Explain how to set up approval workflows for different assignment operation types.
-
Give some guidelines for determining when to implement privilege assignment approval and re-approval.
How Approval Works
The following figure illustrates the approval process in DirX Identity Provisioning.
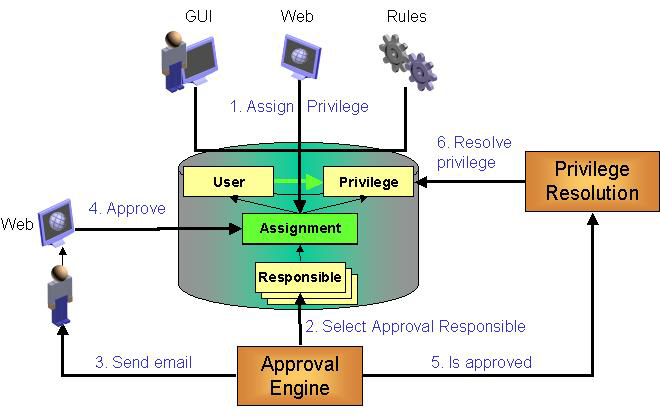
The approval process works as follows:
-
A privilege that is flagged for approval is assigned to a user. This action initiates a request workflow configured for assignment approval (the creation request is sent via HTTP/SOAP from the client to the Java-based Server).
-
The request workflow service checks all active workflow templates to determine whether they fit (When Applicable section).
-
The first workflow template that fits is converted to a workflow instance. The state is set to Running.
-
The request workflow service starts all activities whose start conditions are satisfied and performs the assigned actions (for example, sending an e-mail to the relevant approver(s)).
-
The request workflow service waits for responses from the approvers or for new approval workflow requests. Note: from time to time, it performs a full check of the instances to solve the problem of lost SOAP requests. The full check interval is configurable (the default is 5 minutes).
-
When a user performs an approval (he accepts or rejects), a SOAP message informs the request workflow service again. It performs the necessary actions and calculates the next steps.
-
When a workflow instance finishes, either successfully (state Succeeded) or with error (state Failed), the workflow is completed. If the approval was successful, the user-to-privilege assignment is enabled and a privilege resolution is performed automatically. Now the assignment is active.
-
The workflow instance remains in the Identity Store based on the configured Expiration Time. Use the Cleanup Objects workflow with its corresponding cleanup rules to remove the expired instances from the Identity Store regularly. Note that all history information is removed from the expired instances before they can be deleted. Thus it is good practice to run the Extract Audit Trail workflow in advance (or to set up the corresponding collector of DirX Audit).
Changing an existing assignment or deleting an assignment also triggers an approval workflow if the privilege is flagged for approval.
Let’s look at three examples of approval workflows: 4-eye approval, automatic (notification only) approval and risk approval.
4-Eye Approval
You can approve privilege assignments in various ways. A typical approval type is 4-eye approval if you assign a privilege to a user. Both the manager of the user and the manager of the privilege must approve. The following figure shows an example of this workflow:
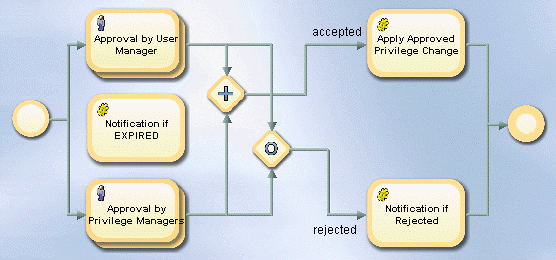
This workflow contains the following activities:
Approval by User Managers (people) - requires the user’s manager(s) to approve the privilege assignment, which means he accepts that the user receives these additional access rights to perform new tasks.
Approval by Privilege Managers (people) - requires the privilege’s manager(s) to approve that this user gets this privilege, which means that this user has access to the resources this privilege protects.
+ Merge (AND) - calculates the result of previous activities, which means that it calculates all applications states via AND.
o Merge (OR) - calculates the result of previous activities, which means that it calculates all applications states via OR.
Apply Approved Privilege Change (automatic) - assigns the privilege to the user if all participants approve the assignment. This activity includes a privilege resolution and generation of messages for real-time workflows.
Notification if Rejected (automatic) - typically sends an e-mail notification to the related user that the privilege is not assigned, if the participants reject the assignment request.
Notification if EXPIRED (automatic) - sends an e-mail to an administrator that the workflow has expired (the participants did not respond in time).
Note: For details about configuration with access policies, see the subsection "Policies for Approvals" in the section "Delegated Administration" in the chapter "Managing Policies" in the DirX Identity Provisioning Administration Guide.
Automatic (Notification Only) Approval
Another example is a workflow that simply sends a notification when a privilege is assigned to a user. In this example, the workflow informs a user that he has received the "Signature Level 1" privilege with some valuable hints about using it:
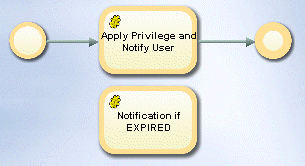
This workflow consists of these activities:
Apply Privilege and Notify User (automatic) - assigns the privilege to the user automatically, including a privilege resolution and generation of messages for real-time workflows. The activity also sends a notification to the user about this assignment.
Notification if EXPIRED (automatic) - sends an e-mail to an administrator that the workflow has expired. Obviously the participants did not react in time.
Risk Approval
In a risk approval workflow, the first activity calculates the new risk level that would become effective if the assignment was approved. If the risk level is computed to high (is equal to 3), an additional approval step Approval by Company Head must be executed if Approve by Privilege Manager has been accepted. The following figure shows an example of this workflow:
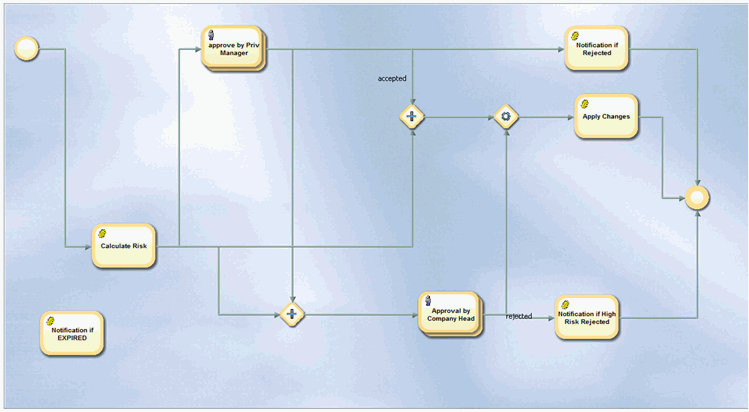
This workflow contains the following activities:
Calculate Risk (automatic) - simulates a risk level resolution for the requested privilege assignment. For the new/deleted group assignments, it calculates the risk and then merges these new risks with the risk values already computed to calculate the new potential risk level. The activity then stores this new risk level in the application state and the workflow context (values of 0, 1, 2 and 3 are possible, with 3 corresponding to a high risk assignment).
Approval by Privilege Manager (people) - requires the privilege’s manager(s) to approve that this user gets this privilege, which means that this user has access to the resources this privilege protects.
+ Merge (AND) - calculates the result of previous activities, where Approve by Privilege Manager was accepted and Calculate Risk computed a high risk (a value of 3).
Approval by Company Head (people) - requires the company head to approve that this user receive this privilege, which means that this user has access to the resources this privilege protects. This activity is only entered if a high risk for the assignment was calculated and the first approval was accepted.
+ Merge (AND) - calculates the result of previous activities, which means that it calculates all applications states via AND. Approve by Privilege Manager was accepted and Calculate Risk computed a lower risk (not equal to 3) so that no additional approval is necessary.
o Merge (OR) - calculates the result of previous activities, which means that it calculates all applications states via OR. Either Approval by Company Head was accepted or Approve by Privilege Manager was accepted and the risk was not calculated to be high.
Apply Approved Privilege Change (automatic) - assigns the privilege to the user if all participants approve the assignment. This activity includes a privilege resolution and generation of messages for real-time workflows.
Notification if Rejected (automatic) - typically sends an e-mail notification to the related user that the privilege is not assigned, if the participants reject the assignment request. This activity is called if the privilege manager has rejected the assignment.
Notification if High Risk Rejected (automatic) - typically sends an e-mail notification to the related user that the privilege is not assigned, if the participants reject the assignment request. This activity is called if Approval by Company Head was rejected.
Notification if EXPIRED (automatic) - sends an e-mail to an administrator that the workflow has expired (the participants did not respond in time).
Note: For details about configuration with access policies, see the subsection "Policies for Approvals" in the section "Delegated Administration" in the chapter "Managing Policies" in the DirX Identity Provisioning Administration Guide.
Understanding Assignment Operation Types
DirX Identity can distinguish between several operation types for assignments. These operation types are available:
Create - a privilege is assigned either to another privilege or a user.
Modify - a privilege assignment to a user is to be modified (for example the end time or a role parameter value changes).
Delete - a privilege is removed either from another privilege or a user.
SoD - an SoD rule requires approval of a user-to-privilege assignment.
Re-Approval - an existing user-to-privilege assignment is to be re-approved at the defined time.
You can set up workflows for specific operation types either from a privilege via the corresponding direct workflow link or via the When Applicable section in a request workflow definition.
Note that links between privileges allow only the operations assign and remove.
Guidelines for Approving Privilege Assignments
When talking about approval of assignments, you should be aware that many privilege assignments in a company do not require approval. For example, consider the following policies:
-
All of your employees - internal and external ones - are to have a Windows account and an e-mail box. This policy is best implemented with a provisioning rule that provides a basic role. Approval does not make sense in this case.
-
All of your internal employees are to have access to public pages in your intranet.This policy is best handled with a provisioning rule that acts on the attribute value employeeType=Internal.Approval does not make sense in this case.
There are a lot of other cases where approval does not make sense.A good rule of thumb is to determine whether or not you required approval for a privilege when your process was paper-based.Another important issue is to check whether a privilege is compliance-relevant and should therefore be approved.
You should thoroughly define which privileges need approval and only define approval workflows for these items.Otherwise you end up with a lot of unnecessary overhead, which results in additional costs and time-consuming processes because approval costs time.
Guidelines for Re-Approving Privilege Assignments
The re-approval feature is even more critical than the approval feature because it generates approval requests fairly frequently.Thus we recommend that you make sure that it’s really necessary to set up re-approval for a specific privilege.Re-approval makes sense for highly critical access to business-critical applications as well as for compliance-relevant access rights.
Understanding Deletion Workflows
This type of workflow allows approval of object deletions.You use delete policies to define approval for deletion of a specific object type.
Managing object deletion approval comprises these steps:
-
Configuring a Delete Policy that contains all object types whose deletion is to be approved.
Note: either create your own attribute policies or copy the default policies to prevent overwritten policies during upgrade installation. -
Defining one or more deletion request workflows for each of these object types.In the When Applicable section of the workflow, set the operation to delete and the subject field to the corresponding object type.
Note that you can only define a deletion policy for an object type (for example, roles).It is not possible to define a policy for a portion of the objects.
Hint: You can specify different object descriptions as a workaround, but this task requires that you set up a mapping section. For example, you could add a custom flag to the object "Request workflow for deletion" and then include this flag into the mapping section of your object descriptions.
The next sections provide
-
an overview of the deletion procedure.
-
a list of object types that support deletion workflows.
-
an example of a role deletion workflow. You can set up similar modification workflows for other object types.
Deletion Procedure
The deletion procedure depends on the object type and whether auditing is enabled. The basic procedure is shown in the next figure.
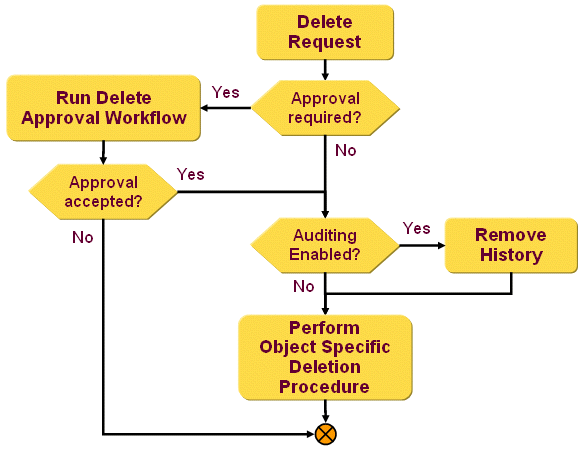
The procedure comprises these steps:
-
Receiving a deletion request, the service layer checks for an active Delete Policy for this object type.
-
If no policy is active, it proceeds with step 5.
-
If a policy is active, a deletion approval workflow is started. If none is found, an error is reported.
-
If the object deletion is rejected, the object is not deleted.
-
If the object deletion is accepted, the deletion procedure is performed.
-
If auditing is disabled, the object-specific procedure is performed immediately. In most cases, this is a direct deletion of the object.
-
If auditing is enabled, history / audit information is written to the objects into the attribute dxrHistory. This means that objects cannot be deleted immediately; they are set to the DELETED state. You must set up workflows for history extraction and object deletion, which guarantees that no audit information is lost.
Supported Object Types
Deletion workflows are not yet supported for all object types. The following types are currently supported (the deletion procedure is briefly described):
Groups - are always set to DELETED status. See the chapter "Managing States" in the DirX Identity Provisioning Administration Guide for more information.
JavaScripts - direct deletion
Nationalization - direct deletion
Object Descriptions - direct deletion
Proposal Lists - direct deletion
Role Parameters - direct deletion
Roles - direct deletion
Permissions - direct deletion
Users - are always set to TBDEL status. See the chapter "Managing States" in the DirX Identity Provisioning Administration Guide for more information.
Policies
Access Policies - direct deletion
Attribute Policies - direct deletion
Audit Policies - direct deletion
Delete Policies - direct deletion
Event Policies - direct deletion
Password Policies - direct deletion
SoD Policies - direct deletion
Business Objects
Context - direct deletion
Cost Units - direct deletion
Countries - direct deletion
Locations - direct deletion
Organizations - direct deletion
Organizational Units - direct deletion
Projects - direct deletion
Role Deletion Workflow
The following figure shows a typical delete workflow that is triggered by a deletion of a role. This workflow is started when the delete policy for roles is active.
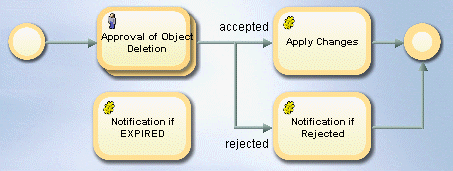
The workflow shown in the figure contains the following activities:
-
Approval of Object Deletion (people) - requests that the role administrators must approve the deletion of a role.
-
Apply Change (automatic) - changes the LDAP role entry if the participants of the previous step accepted the deletion.Up to this point, the deletion request existed only as an order object within the workflow instance.
-
Notification if Rejected (automatic) - typically sends an e-mail notification to the initiator of this workflow if the participants reject the modification request.
-
Notification if EXPIRED (automatic) - sends an e-mail to an administrator that the workflow has expired (the participants did not respond in time).
The object deletion workflow functions as follows:
-
The deletion procedure used depends on the type of object and the audit settings.Users and Privileges are not directly deleted.Instead the status is set to DELETED and the end date is set.The CleanupObjects rule (typically part of a Tcl-based workflow) needs to be run to delete the object completely.This deletion may be delayed until the history (audit) information is removed from the object entry.
-
Other objects are immediately deleted.
Understanding Certification Workflows
Certification workflows allow you to certify various object types.DirX Identity currently supports workflows for certification campaigns, which means that you can verify and clean up the manual assignments of a privilege to users.
To use this type of certification, perform these steps:
-
Configure the certification campaign feature, including a corresponding schedule.
-
Create a certification campaign for privileges or users.
-
Configure a certification campaign with the Review the revocation of all manually assigned privileges that are rejected or left uncertified option for the Apply Changes configuration field.
For details about certification campaigns, read the DirX Identity Use Case Document Certification Campaigns.
Understanding Service Management Workflows
Service management workflows help to perform tasks in a service management environment (ticket-based workflows).
DirX Identity currently supports two use cases:
-
Manual provisioning of offline target systems
-
Workflows for ticket processing from a source ticket system
For more information about service management use cases, read the DirX Identity Use Case Document Service Management.
Manual Provisioning Workflows
DirX Identity currently supports only workflows for manual provisioning, which means that you can handle manual provisioning for systems that are not (yet) connected to the Identity Store.
To use this type of workflow, perform these steps:
-
Set up a target system of type Service Management. Part of this setup is the configuration of a Java-based synchronization workflow that uses a request workflow connector to start a corresponding request workflow for each action.
-
Set up the necessary manual provisioning request workflow.
The following figure shows a typical manual provisioning workflow that can be used in service management environments.
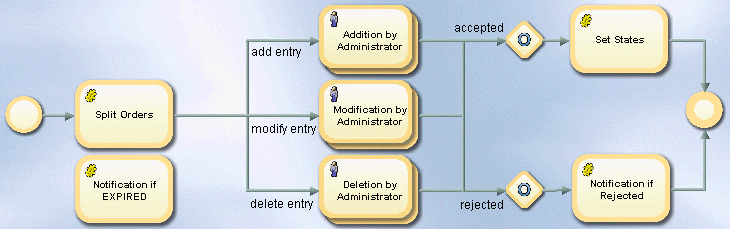
The workflow shown in the figure contains the following activities:
-
Split Orders (automatic) - checks the order type (Add, Modify, Delete) and sets the Application State accordingly. The following activities are started according to this value.
-
Addition by Administrator (people) - requests that an administrator adds the object (account or group) with all defined properties into the offline target system. After completion of this task, the approver confirms the activity (accepts it). This step is configured to take the owners of the privilege as approvers.
-
Modification by Administrator (people) - requests that an administrator modifies an object (account or group) with all defined properties in the offline target system. After completion of this task, the approver confirms the activity (accepts it). This step is configured to take the owners of the privilege as approvers.
-
Deletion by Administrator (people) - requests that an administrator deletes the object (account or group) in the offline target system. After completion of this task, the approver confirms the activity (accepts it). This step is configured to take the owners of the privilege as approvers.
-
Set States (automatic) - sets the target system state (dxrTSState) of the object according to the operation; for example, a new account is set from NONE to ENABLED.
-
Notification if Rejected - sends an e-mail to the corresponding user if the manual provisioning request was refused by the administrator.
-
Notification if EXPIRED (automatic) - sends an e-mail to an administrator that the workflow has expired (the participants did not respond in time).
The manual provisioning workflow works as follows:
-
In Web Center, the approvers receive a form with the specific request and its details.
-
They perform the corresponding task in the target system.
-
After performing the task, they accept the form. DirX Identity sets the target system state (dxrTSState) attribute for accounts and groups accordingly or moves the user to the correct member attribute (for example, from dxrGroupMemberAdd to dxrGroupMemberOK).
For more information about manual provisioning, refer to the DirX Identity Use Case Document Service Management.
Process Ticket Workflows
DirX Identity supports workflows to process incoming tickets from source ticket systems. These tickets are converted into DirX Identity orders that are processed by a corresponding request workflow.
To use this type of workflow, perform these steps:
-
Set up a ticket web service interface that consumes the tickets sent from a service management workflow. Use the sample ticket web service interface as starting point.
-
Use the provided "Process Ticket" workflow sample and adapt it to your requirements.
The following figure shows a typical ticket-processing workflow that can be used in service management environments.
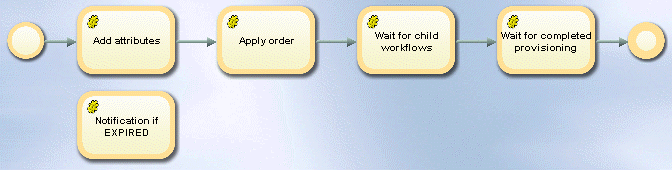
The workflow shown in the figure contains the following activities:
-
Add attributes (automatic) - adds some fixed attributes to the subject order. In the pre-configured example, the employeeType is set to Contractor and the dxmOprMaster is set to Service Management.
-
Apply order (automatic) - this step executes the order(s). For example, if you send a create user request with two role assignments, the user is created and the assignments are resolved. If an assignment requires approval, a child workflow is started automatically.
-
Wait for child workflows (conditional) - this activity waits for all started child workflows to complete.
-
Wait for completed provisioning (automatic) - this activity waits for all provisioning actions to target systems to be completed.
The Process Ticket workflow as defined in this default workflow works completely automatically without any user interaction. It instantiates or changes the object, assigns privileges and eventually starts a child workflow. Then it waits until the child workflows and the generated provisioning actions are complete.
For more information about ticket processing, read the DirX Identity Use Case Document Service Management.