Managing Target Systems
This chapter describes how to work with target system objects. Target system management consists of the following tasks:
-
Adding target systems to the Identity Store
-
Monitoring account and account-group assignments
-
Handling the results of the validation workflow
-
Managing target system accounts
-
Managing target system groups
-
Deleting target systems from the Identity Store
Managing Access Rights
DirX Identity supports several methods for access control in connected systems, as illustrated in the following figure:
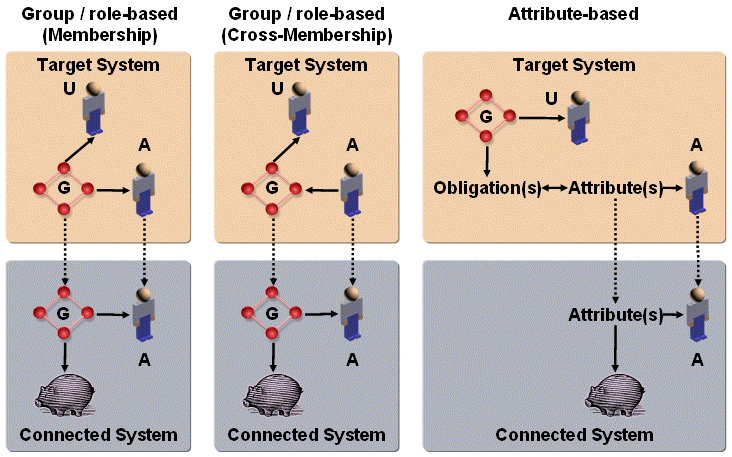
The next sections provide more information about the group-based membership and attribute-based membership access control models.For more information about the cross-membership model, see the section "Cross-Membership Scenario" in the DirX Identity Application Development Guide.
Managing Access Rights with Group-based Memberships
The preferred method is to control access rights via group memberships. Each group defines a set of access rights in the connected system regarding a set of resources. The meaning of a group is only visible from the group name. DirX Identity does not handle or store any discrete access control information.
Assigning a user a group either directly or via permissions and roles gives the user the right to handle the defined resource accordingly. Removing the user from the group revokes the access rights. DirX Identity supports group-side and account-side memberships. In group-side membership, the group holds the accounts as members. In account-side membership, the account holds the groups as members.
Fortunately, most connected systems today use the group-based access control.
You should try to work with account-side memberships as much as possible, because typically all users of a company can be members of a single (company) group. If a company has 500,000 users, this results in 500,000 group members. Handling such large groups is a problem for LDAP directories. On the other hand, the number of groups is typically much lower than the number of users in a large company, and there will be no user that is a member of all groups, which means that the user has full access to all resources in the company.
We recommend that you set up the target system in the Identity Store in account-side mode. If the connected system is not able to work in this mode, you can use cross-membership configuration for the Provisioning workflows to manage this problem. See the section "Cross-Membership Scenario" in the DirX Identity Application Development Guide for more information.
Managing Access Rights with Attribute-based Memberships
Some connected systems do not support the concept of group-based access control.In this case, access control is performed via attributes at the user’s account.To keep a unique method on the Identity Store side, we use group-based assignment of access rights as well.These groups possess obligations that set or reset the relevant account attributes.
The groups and the group memberships exist only in the Identity Store.Only the accounts with the access right-relevant attributes are synchronized between the target system and the connected system.Special validation rules can be established to create the relevant group memberships if the attributes are changed on the connected system side.
A prominent example of an attribute-based connected system is Microsoft Exchange.The attributes for the mailbox are held at the Active Directory Account.
For more information, read the sections about validation rules in the section "Managing Rules" in the chapter "Managing Policies".To understand obligations, read the section "Handling Attribute-based Access Rights" in the DirX Identity Customization Guide.
Working with Target System Objects
When you log into DirX Identity Manager (Provisioning) and select "Target Systems" from the view bar, DirX Identity Manager displays a hierarchical tree of the target systems whose access control information has been imported into the Identity Store (Provisioning Configuration).
Underneath a target system, the tree displays the following objects:
-
An Accounts folder (optional), which contains the target system accounts (if the target system type requires the management of accounts).
-
A Groups folder, which contains the target system’s groups.
-
Alternatively, a common subtree can exist that contains both Accounts and Groups (you can select this option only during creation of the target system).
-
A Configuration folder, which can contain:
-
A JavaScripts folder, which stores the Java scripts that are referenced from within the object descriptions.
-
An Object Descriptions folder, which stores the object descriptions for the target system’s accounts and groups.
-
An Obligations folder that contains common On Assignment, On Revocation and On Validation rules that can be used by many group objects.
-
A Property Page Description folder, which stores the property page descriptions for the target system’s accounts and groups.
-
A folder for storing Proposal Lists.
-
A folder for storing specifications for the generation of Reports about the target system’s accounts and groups.
The Accounts and Groups folders contain a default set of query folders, which allow you to search for Provisioning objects in an inconsistent state, such as objects that have a value in an Error or a To do field, or accounts with no user assignment.
The following figure shows an example of a target system displayed in DirX Identity Manager’s Target Systems view (Provisioning view).
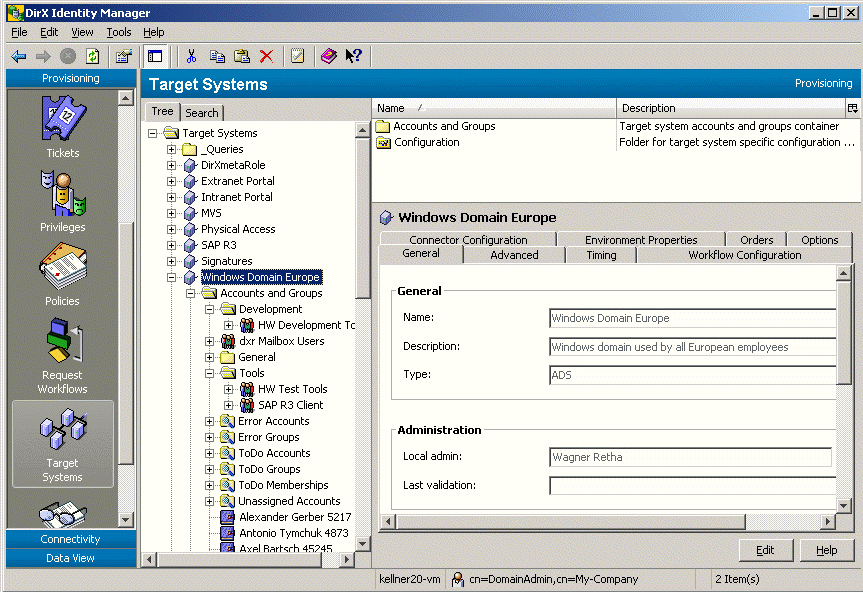
As illustrated in the figure, you view the properties of a target system object by clicking its entry in the tree.DirX Identity Provisioning also provides a search dialog that you can use to select and display a subset of these objects.When you select a target system object, DirX Identity Provisioning displays a property dialog for the object.The dialog typically consists of a set of tabs that you can use to view the object’s properties.Click the tabs in the property dialog to move between the different property categories for the target system object.
To change the value or one or more of the properties displayed in a tab, click Edit.Manager keeps the changes you make to the object in its internal cache until you click Save.As long as you do not use Save, you can use the Manager’s Reset function to restore the settings to their old values (the values that are stored in the Identity Store (Provisioning Configuration)).
When you click Save or change to another tab, Manager checks the modifications you have made for consistency.If you have clicked Save, Manager stores the changes in the Identity Store (Provisioning Configuration); if you have changed tabs, it stores the changes in its internal cache.Manager may return warnings and errors; the type and content depend upon the object you’re changing and the type of changes you’ve made.If you receive warnings or errors, you can use Cancel to cancel your changes.You can also choose Save; in this case, DirX Identity Manager will store the appropriate error messages with the object.Manager then saves the changes in the Identity Store (Provisioning Configuration).In the event that it is unable to save the data because of network failure or an LDAP server error or timeout, Manager notifies you of the error.
To work with the related Connectivity objects, click the target system entry in the tree, open the context menu and select one of the options from the Connectivity submenu.
To access the Identity Store itself and the corresponding maintenance workflows, select the Connectivity submenu at the top-level node of the Target Systems view.
Adding a Target System
Adding a target system is a one-time set-up task that you must perform for each connected system that you want DirX Identity to manage.Use the target system wizard to perform this task.It helps you to create the target system object within the provisioning view as well as all necessary objects required for provisioning to the connected systems in the connectivity view.
Adding a target system consists of the following tasks:
-
Use the target system creation wizard to create a new target system including all necessary workflows in the Identity Store.
-
Customize the Provisioning account and group object descriptions for the new target system (with DirX Identity Manager (Provisioning)) - this task is only necessary if you want to use non-standard account or group properties or non-standard default values (such as name space rules or password generation rules) for generating accounts.
-
Adapt the mapping of the initial load / validation workflow.
-
Run the initial load workflow
-
Define rules to automate tasks
-
Manage the accounts that have no user assignment
-
Assign the imported groups to permissions or delegate this task to the role administrator.
-
Configure the synchronization and validation workflows and define a schedule to run these workflows regularly.
Variations:
To add a virtual target system, perform steps 1 and 2; the other steps are not necessary.
Creating the Target System
To create a target system with DirX Identity Manager (Provisioning):
-
Click the top-level Target System folder.
-
If you want to group your target systems into different containers, you can create a new container by selecting New → Target System Container from the context menu. Supply a name and a description for the new container and store it.
-
Select the container, where you want to create your new target system. Select New → Target System from the context menu. The target system wizard starts. It allows you creating a target system including all necessary workflows.
-
For cluster target systems, you need to build a fixed structure:
-
Under the top-level node (Target Systems), you can create a cluster workflow container (for example, My Unix systems).
-
Under this container, you can create any number of cluster target systems.
-
| If the target system requires a target system-specific schema extension, be sure to extend the schema before you create the new target system. |
If you have created a virtual target system, you may need to customize the target system’s properties. These properties are available on the target system’s Advanced and Options tabs. The DirX Identity Customization Guide provides further details on how to set up these properties to correspond to your virtual target system.
Extending Account and Group Object Descriptions
During the privilege resolution process, DirX Identity Provisioning automatically creates target system accounts without any administrator interaction. As a result, DirX Identity Provisioning requires that you provide it with the information it needs about how to create the target system account names and passwords and other required attributes so that it can perform this automatic function. You can:
-
Define naming rules for account name and password creation: simpler ones that generate attribute values by combining other attributes, or more complex ones, by using Java scripts.
-
Supply default values for attributes
-
Add new attributes for accounts or groups that you want to synchronize with the connected system
-
Use proposal lists to restrict the value range for attributes
To accommodate an individual connected system’s requirements for account and group descriptions, DirX Identity Provisioning supplies template descriptions of account and group objects and allows you to customize them to a particular target system’s account and group descriptions. These templates are located within each target system’s Configuration folder, as follows:
-
The Object Descriptions folder contains the attribute descriptions with the default values and naming rules
-
The Property Page Descriptions folder contains the layout description of the tabs, where you can view and edit the properties
-
The JavaScripts folder contains the Java scripts
To edit these descriptions with DirX Identity Manager (Provisioning):
-
Select the description in the subtree to display its properties.
-
Click the Object Description tab, and then click Edit.
Now you can use the object description editor to specify:
-
The naming rules that DirX Identity Provisioning is to use when creating accounts and groups in the target system
-
The target system-specific account and/or group attributes and default values, if any
The DirX Identity Customization Guide describes the structure of these files and how to modify them.
Alternatively, you can use DirX Identity Manager (Provisioning) Export text function to write the description to a file, and then use your favorite XML editor to edit it within the file system. You then use DirX Identity Manager (Provisioning) Import text function to import the file back into the Identity Store (Provisioning Configuration).
Note that during an upgrade installation of DirX Identity your versions of the account and group object and property page descriptions are preserved. See "Upgrading Customized Descriptions" for further details.
| If you are adding target-system specific account and/or group attributes, you will also need to add these attribute types to the default LDAP directory schema supplied with DirX Identity Provisioning. You use the schema modification tools of the particular LDAP directory to accomplish these tasks. For example, if you are using the DirX LDAP directory, you use the DirX administration tools for modifying the schema. The DirX Identity Customization Guide provides more information about these tasks. |
Configuring the Initial Load Workflow
The initial load workflow is a batch workflow that you use to load a snapshot of the connected system’s accounts and groups into the Identity Store (Provisioning Configuration). DirX Identity Provisioning supplies an initial load workflow template (the validation workflow is used here) that is copied by the target system creation wizard. This design ensures that the workflow is also correctly configured.
If you have extended the account or group object descriptions, you may need to adapt the mapping of the workflow. Use the DirX Identity Manager (Connectivity) Configure Workflow wizard to adapt the mapping (and maybe other parameters) as follows:
-
Adapt the attributes to be exported for accounts and groups (source selected attributes)
-
Adapt the attributes to be imported for accounts and groups (target selected attributes)
-
Create a corresponding mapping for accounts and groups
The DirX Identity Connectivity Administration Guide and the DirX Identity Application Development Guide provide more information about workflow configuration parameters and how to use DirX Identity Manager (Connectivity) to configure them.
Running the Initial Load Workflow
To run the initial load workflow, click the target system in the Target System view and then select Connectivity → Validation → Run Workflow from the context menu. Alternatively, you can use the DirX Identity Manager’s Connectivity view to run the initial load workflow by hand.
The workflow exports all accounts and groups and the relationships between them from the connected system and imports them into the target system subtree in the Identity Store (Provisioning Configuration).
The first execution of this workflow runs in mode "initial load". All subsequent executions run in mode "validation". The mode sequence is controlled by the Last validation field on the General tab. If it is empty, the workflow runs in "initial load" mode, otherwise it runs in "validation" mode.
To re-run the initial load workflow if it fails to complete due to a network or database failure, just clear the Last validation field before the run.
The DirX Identity Connectivity Administration Guide provides more information about how to use DirX Identity Manager (Connectivity) to run and monitor a workflow.
Note that the difference between "initial load" and "validation" mode is only that the validation mode sets the ToDo fields at accounts and groups.
Defining Rules to Automate Tasks
To automate tasks in target system management, you may need to configure some consistency rules and validation rules. For information on how to check and automatically handle account-group assignments with validation rules, see the section "Checking Account-Group Assignments".
DirX Identity Provisioning provides the following consistency rule templates that you can copy and customize:
- assocAccount2User or assocAccount2UserMV
-
These rules search for unassigned accounts; that is, accounts without a user assigned. For each account, it searches for a matching DirX Identity user. To match accounts to users, it performs a best-guess match using the value configured for the input parameter join filter. If the search returns exactly one entry, it makes the user-account assignment. The MV rule works with multi-value attributes.
Note that you can use event-based processing workflows for accounts. These workflows have a configurable feature to associate accounts to users. This is especially useful when new accounts are added during a validation workflow. Then the accounts are immediately bound to users.
- CreatePersonasForNonPrimaryAccounts
-
This rule creates personas for all non-primary accounts that are assigned to a user. First, it checks whether a user already has a primary account assigned in the target system. Next, it creates personas for all non-primary accounts of the user and links the personas to the user. Read the section "Full Provisioning" in the section "Managing Personal Accounts" to understand the use case. See the section "Customizing the Consistency Rule for Automatic Persona Creation" in the chapter "Customizing Program Logic" in the DirX Identity Customization Guide for details about customizing the rule.
- CreateFunctionalUsersForUnassignedAccounts
-
This rule creates functional users for all accounts that are not assigned to a user and then links the accounts to the newly created functional users. Read the section "Full Provisioning" in the section "Managing Personal Accounts" to understand the use case. A description and hints for customization are given in the section "Customizing the Consistency Rule for Automatic Functional User Creation" in the chapter "Customizing Program Logic" in the DirX Identity Customization Guide.
- CreateUsersForUnassignedAccounts
-
This rule creates users for all accounts that are not assigned to a user and then links the accounts to the newly created users. Read the section "Full Provisioning" in the section "Managing Personal Accounts" to understand the use case. A description and hints for customization are given in the section "Customizing the Consistency Rule for Automatic User Creation" in the chapter "Customizing Program Logic" in the DirX Identity Customization Guide.
- Win2k-Mail-address-to-users
-
This rule copies all mail addresses of the Windows accounts matching the rule filter to their assigned users.
- Ex55-Mail-address-to-users
-
This rule copies all mail addresses of the Exchange 5.5 mailboxes matching the rule filter to their assigned users.
- cleanse-AD-mail-address
-
This rule deletes all mail addresses of user subjects that are not in their Windows accounts.
- cleanse-NT-mail-address
-
This rule deletes all mail addresses of user subjects that are not in the NT 4.0 or Exchange 5.5 target systems.
Monitoring Account and Account-Group Assignments
When it imports a connected system’s accounts, groups, and account-group relationships into the Identity Store (Provisioning Configuration), the target system validation workflow in "initial load" mode assigns newly imported accounts and newly imported account-group assignments to the IMPORTED state.This state indicates to DirX Identity Provisioning that it should not automatically delete the account-group assignment and the corresponding account if they are not granted through a user-privilege assignment.The state exists to give the role administrator time to assign the newly imported groups for example to permissions in the privilege structure.
After the initial target system load, the user-privilege assignment and resolution process causes DirX Identity Provisioning to change these states as follows:
-
When user-privilege assignment and privilege resolution results in the assignment of the account to a user, DirX Identity Provisioning changes the account state to ENABLED.When the last user-privilege assignment is later revoked, DirX Identity Provisioning disables the account.
-
When user-privilege assignment and privilege resolution results in the account-group assignment, DirX Identity Provisioning changes the account-group assignment state to ENABLED and thus to a normal assignment.When the user-privilege assignment is later revoked, DirX Identity Provisioning removes the account-group assignment.
If accounts and/or account-group assignments remain in the IMPORTED state for some time after a target system has been added to DirX Identity Provisioning, it means that their assignment to one or more Provisioning users was made locally at the connected system and outside the DirX Identity Provisioning user-privilege assignment process.You should periodically monitor the state of recently imported target system accounts and account-group assignments to make sure that, over time, they move to being controlled by the DirX Identity Provisioning access management functions.
The role administrator or the connected system administrator can choose to accept an account-group assignment that has been made outside the user-privilege assignment process by using Manager or a rule to change the assignment state to IGNORE (see the topic "Checking Account-Group Assignments" for details).If the DirX Identity Provisioning user-privilege assignment process subsequently grants the assignment, DirX Identity Provisioning changes its state to ENABLED.
You can create a query folder underneath each target system (and also in the Users view) that you can use to search for and identify assignments in the IMPORTED state.When you open the folder, it performs a search on the Identity Store (Provisioning Configuration) according to the values in its Filter tab and displays the results as objects underneath the query folder.
Handling the Results of the Validation Workflow
When the target system validation workflow runs, it writes messages about the deviations it finds between the local connected system and the Identity Store (Provisioning Configuration) into the To do fields of the affected target system objects in the DirX Identity store (Provisioning Configuration).The To do fields of the target system objects will contain messages when the following actions have been carried out in the target system without DirX Identity Provisioning triggering them:
-
An account has been created or deleted
-
A group has been created or deleted
-
A group-account membership has been created or deleted
DirX Identity Provisioning provides a To do query folder underneath each target system that you can use to search for and identify objects with values in their To do fields.When you open the folder, it performs a search on the Identity Store (Provisioning Configuration) according to the values in its Filter tab and displays the results as objects underneath the To do folder.You should periodically use the target system’s To do query folder to search for objects with values in their To do fields, and follow up with the appropriate actions.
The validation workflow identifies accounts and groups created in the connected system by the To do field value Created in target system and the IMPORTED state.You must decide whether to delete these accounts and groups or integrate them into the Identity Store (Provisioning Configuration).
The validation workflow identifies accounts and groups deleted in the connected system by the To do field value Deleted in target system and the DELETED state. If you determine that an account that has been deleted in the connected system is no longer needed, use DirX Identity Manager (Provisioning) to delete it from the Identity Store (Provisioning Configuration). If an associated user needs the account, DirX Identity Provisioning automatically creates a new one with the next privilege resolution.
If new groups have been created autonomously in the local connected system, you must perform the same actions for these groups as you did for the groups that were imported during the initial load procedure:
-
Mark the groups that do not need permission assignments as "target system local" by selecting them for editing and then checking their Manage only in target system fields
-
Delete any groups that do not match the privilege structure; see the topic "Deleting a Group" for further details
-
Assign permission parameters and values to the groups; see the topic "Assigning Role Parameters" for further details
-
Identify the new groups to the privilege structure administrator for permission assignment
DirX Identity Provisioning automatically re-creates deleted group-account memberships with the next privilege resolution.
| You can use rules to automate the tasks described here. |
Managing Target System Accounts
DirX Identity distinguishes between two types of accounts:
-
Personal accounts, which belong to exactly one person.
-
Privileged accounts, which exist for administrative tasks and can be used by more than one user.Privileged accounts are typically created for tasks that require very high access rights; for example, the root account in UNIX operating systems and the Administrator account in Windows systems.
Both types of accounts can be used in a single domain.
The next sections describe how to manage personal and privileged accounts and how to use functional accounts to manage multiple personal accounts
Managing Personal Accounts
The connected system administrator generally does not need to create, delete or modify personal connected system accounts because DirX Identity Provisioning automatically handles these tasks. DirX Identity Provisioning creates an account when a user is granted his first access right in the target system and disables the account when the last right has been revoked.
However, the synchronization and validation of the remote connected system can reveal differences in the target system object states in the Identity Store (Provisioning Configuration). The validation workflow detects accounts, groups, and account-group memberships that have been created or deleted in the connected system independently of a DirX Identity Provisioning request. The workflow notifies you about these objects by writing messages into their To do fields. As a result, you should periodically use the To do query folder to search for accounts (and other objects) in an inconsistent state, and follow up with the appropriate actions, as described in the topic "Handling The Results of the Validation Workflow".
The topic "Handling Imported Accounts" describes the account management functions that you need to perform when you add a target system to the Identity Store (Provisioning Configuration).
Managing target system accounts comprises these concepts:
-
Adding a new personal account
-
Changing the attributes of a personal account
-
Handling imported accounts
-
Handling multiple accounts
-
Automatic account creation
-
Smooth account creation
-
Managing accounts only in the connected system
-
Deleting a personal account
In general, you will only need to perform these tasks as the result of some unusual condition; these tasks are not typical day-to-day maintenance tasks.
Adding a Personal Account
In general, you do not need to create new target system accounts, because they are automatically created as part of the privilege resolution process. However, you may need to add an account by hand if the privilege resolution function was unable to create it due to naming rule violations or other problems.
To add a new target system account:
-
In the Target Systems view, right-click the Accounts folder in the target system’s subtree.
-
Select New → Account. Enter a name (common name (cn)) for the account.
Manager returns an error if the name you supply for the account is not unique.
For hierarchical target systems, you can structure your accounts with containers:
-
Select New → Container to create a new container.
-
Use the Move Object function to move accounts to containers.
Changing the Attributes of an Account
In some cases, you may need to make changes to a target system account. For example, you may need to:
-
Mark the account as "Managed only in target system" because it does not need a user assignment.
-
Make the account a primary account, if the user has more than one account in the connected system. Only one account can be the primary account and DirX Identity Provisioning does not check for this constraint. For a user-to-privilege assignment, only the primary account is used for the group membership.
-
Clear the To do field.
All of these properties are available as attributes of the target system account object. To change an account’s attributes:
-
Select the account in the target system subtree to display its properties.
-
Click the tab that contains the attribute you want to change, and then click Edit.
-
Check the Primary account field as necessary.
-
Check the Manage only in target system field as necessary.
-
Select whether the account is to be managed as personal or privileged account.
-
Click Save to save your changes.
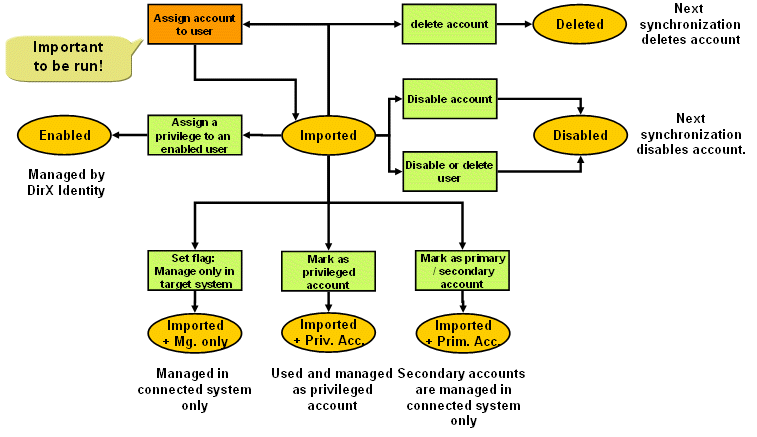
Handling Imported Accounts
After initial load or after a validation, you will encounter accounts in the state IMPORTED. These accounts are not under DirX Identity’s control. The following figure illustrates alternative methods for handling these accounts.
Association of Accounts to Users
First, you should try to associate the imported account with an existing user. You can use either the consistency rule assocAccount2User or the EventBasedAccountProcessing workflow to perform this task automatically. Depending on your join criteria, most imported accounts will be assigned to a user.
However, you must handle the accounts that the rule could not assign because it could not find a matching user or because it found multiple matches. Use the query folder unassigned below the Accounts or Accounts and Groups folder to display all remaining unassigned accounts.
For these accounts, try to perform this procedure:
-
Select the account from the subtree to display its properties, then click Edit.
-
Right-click the ellipsis button to the right of the User field. Manager displays a search dialog.
-
Use the search dialog to search for a matching Provisioning user. If you find a matching user, select the user to assign it to the account.
-
If you cannot find an existing user, you can decide to create a new one and then assign this account to the user.
Handling Assigned Accounts
For accounts that you can successfully assign to a user and that are still in the state IMPORTED, you now have these options:
-
Assign privileges
You can assign a privilege to the user. The state of the account will change to ENABLED. If a membership of a group already exists, this membership also changes its state from IMPORTED to ENABLED. -
Delete or disable the user
You can delete or disable the user. The account’s state will be set to DISABLED.
By default, DirX Identity Provisioning sets an end date for the account’s lifetime when it changes to the DISABLED state. When this date is reached, DirX Identity Provisioning automatically changes the account’s state to DELETED. When the target system synchronization workflow runs, it deletes the account from the connected system; if this operation is successful, it deletes the account from the Identity Store (Provisioning Configuration). -
Set the Primary Account flag
If there are several accounts from the same target system assigned to the user, you must flag one of them as the primary account, or the privilege resolution will fail. For more information about this concept, read the section about handling multiple accounts and the description of partial provisioning.
For all accounts that you still cannot assign to a user, you must select one of the options described in the next section.
Handling Unassigned Accounts
You need to decide whether to:
-
Delete the account
If you know that an unassigned imported account is of no use to the DirX Identity Provisioning system (or perhaps should not be available within it) you can delete it from the Identity Store (Provisioning Configuration). See the topic "Deleting an Account" for information on how to delete it with DirX Identity Manager (Provisioning). These accounts will be deleted from the connected system during the next synchronization (it was a lost account). -
Disable the account
If you are unsure about the purpose of an imported account, you can disable it. To disable an account, right-click it in the subtree, then click Disable. Note that this option is only available for unassigned accounts! DirX Identity Provisioning changes the account’s state to DISABLED. The target system synchronization workflow will attempt to disable the account in the connected system the next time it runs. If this operation is successful, the workflow changes the account’s state in the target system to DISABLED in the Identity Store (Provisioning Configuration). You can use DirX Identity Manager (Provisioning) to enable the account later on, if necessary.
By default, DirX Identity Provisioning sets an end date for the account’s lifetime when it changes to the DISABLED state. When this date is reached, DirX Identity Provisioning automatically changes the account’s state to DELETED. When the target system synchronization workflow runs, it deletes the account from the connected system; if this operation is successful, it deletes the account from the Identity Store (Provisioning Configuration). -
Handle the account as a multiple account for a user; see the section "Handling Multiple Accounts" for instructions.
-
Handle the account as a privileged account; see the chapter "Managing Privileged Accounts" for instructions.
-
Manage the account only in the connected system.
If you want to keep an imported account in DirX Identity Provisioning, but you do not want to assign it to a user and you do not handle it as a privileged or multiple account, you can check its Manage only in target system field. Checking this field indicates that the account will be managed locally in the connected system, and not by DirX Identity Provisioning. See the topic "Changing the Attributes of an Account" for information on how to make this modification with DirX Identity Manager (Provisioning). See the section Manage Only in Connected System for more information about the concept.
Handling Multiple Accounts
DirX Identity provides several mechanisms to handle multiple accounts per target system. To understand this feature, you first need to understand why users can have multiple accounts in target systems. Typical reasons are:
-
Users want a clear separation of access rights when they are logged in. A user might have a personal account where he handles all personal tasks, for example writing and reviewing of documents, browsing the Intranet and Internet and so on. This user might also be an administrator in one or more target systems with very high access privileges that allow him to handle important resources. The user prefers to use the privileged account only for his administration tasks to minimize the danger of making unintentional errors.
-
Compliance requirements force companies more and more to monitor sensitive actions in IT systems. If users work with different accounts, the company can focus on auditing the most important accounts in more depth (for example, privileged and functional accounts).
-
If personal accounts (which really represent the user) and functional accounts (which represent a specific task carried out for some time by a specific user) are clearly separated, it is easy to switch a functional account from one user to another if tasks change.
These requirements show the benefits of having different accounts for the same user. Initial load of target systems shows that these methods are widely used. The requirements also show that different accounts exist because they represent different access rights in the connected systems. In this case, a user has an identity that can exist as several personas, as shown in the following figure.
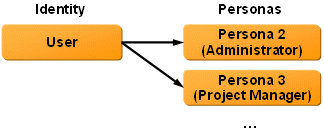
As shown in the figure, the user needs a personal representation (the primary representation that is the identity itself). He can also be represented in other facets; in this example, as an administrator or a project manager. Personas are typically represented as additional accounts in target systems.
DirX Identity allows for modeling personas with the full set of features like privileges and access policies, referred to as "full provisioning". We recommend using this method if multiple accounts are frequently used. If only a few multiple accounts exist, you can use a simpler approach, called "partial provisioning". The next sections describe these methods in more detail.
Full Provisioning
The "full provisioning" method models each persona as an additional persona entry, as shown in the following figure:
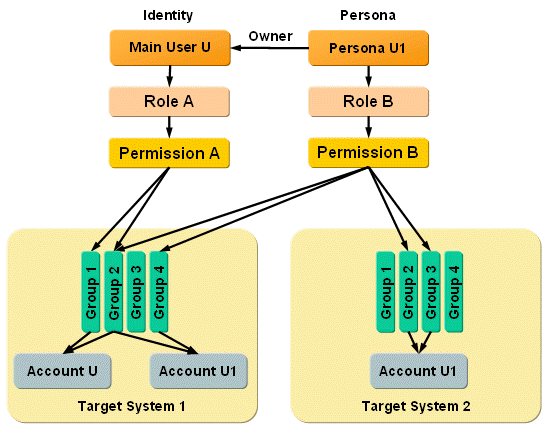
As illustrated in the figure:
-
User U represents the primary identity. Perhaps this entry is fed by an HR system. Assignment of role A to this entry results in two group memberships and the corresponding account U.
-
A persona entry (Persona U1) is created. It represents for example administrative tasks in one or more target systems. The assigned role B results in two group memberships in target system 1 and the corresponding account U1 as well as two group memberships in target system 2 and the corresponding account U1.
This example shows that you can handle the privileges of the identity and the personas completely independently. To indicate the affiliation, you link the persona U1 to user U via the owner attribute.
You can run a consistency rule on a regular basis to check that the owner links are still valid (that is, they point to enabled users). If an owner link is no longer valid, the persona is marked to be erroneous. You can use the standard query folders to assign valid identities again.
You can run other consistency rules regularly to copy important attributes from the identity to all linked personas, if this is a required feature.
To handle all of these operations correctly, it makes sense to work with personas and functional users. Consistency rules can then distinguish easily between identities and personas.
We have just described how the system operates. Another issue is how to set it up when connected systems already exist. Perform these steps for target system setup:
-
Use the target system wizard to create the new target system in DirX identity.
-
Run the initial load workflow to import all relevant accounts and groups.
-
Run the consistency rule assocAccount2User to link as many accounts as possible to user entries.
-
Build a consistency rule that checks for multiple assignments. Run it and check all multiple assignments. Decide which account is the identity account and mark it as the primary account.
-
For all other assignments, create persona entries and link the accounts to these new entries. Set the owner link to the corresponding identity. For this task, you can use the consistency rule CreatePersonasForNonPrimaryAccounts, which is delivered as a template and must be configured to your needs. See the section "Automatic Persona Creation" in the chapter "Customizing Program Logic" in the DirX Identity Customization Guide for details.
-
Check for unassigned accounts. Decide whether these represent identities, personas or functional users. Create the necessary objects and link the accounts to them. For this task, you can use the consistency rules CreateFunctionalUsersForUnassignedAccounts or CreateUsersForUnassignedAccounts, which are delivered as templates and must be configured to your needs. See the section "Customizing the Consistency Rule for Automatic User Creation" or "Customizing the Consistency Rule for Automatic Functional User Creation" in the chapter "Customizing Program Logic" in the DirX Identity Customization Guide.
Now you should have a target system that is completely controlled by DirX Identity.
Partial Provisioning
If only a few multiple accounts exist (for example, some administrator accounts), you can either use the Manage only in target system flag, the Primary Account flag or the privileged account feature to model multiple accounts. The following figure illustrates this method:
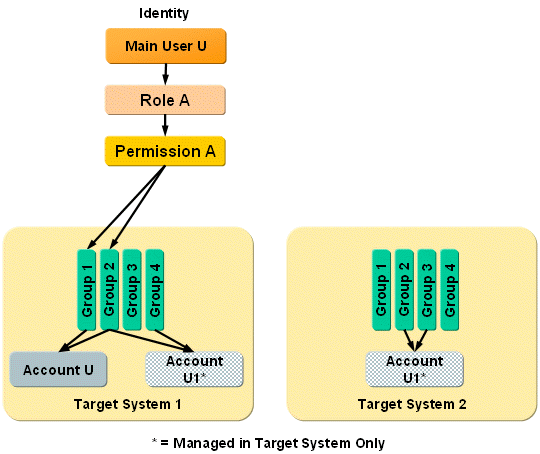
The figure shows an example with three target system accounts. If you use the Manage only in target system feature, only the identity (user U) is controlled by DirX Identity (Account U). The other two accounts and their group memberships are controlled only by the connected system administrators.
A disadvantage of using the Manage only in target system feature is that you cannot see these accounts at the user entry. If you use the Primary Account flag instead, you can see all accounts at the user. In our example, you flag Account U as the Primary Account and Account U1 as the secondary account (which means that the Primary Account flag is clear). In this case, all accounts are linked to the user and thus visible but only Account U is used by the privilege resolution process for membership control to groups. Account U1 is not touched at all.
In Target System 2, you can only use this method if you disable smooth account creation. Then you can reset the Primary Account flag for Account U1 so that this account is not used by the privilege resolution process. Instead, a new account is created if the naming rules allow it. If the privilege resolution process tries to create an account with the same name, an error message occurs. Thus it might be better to use the Manage only in target system flag for this target system.
Automatic Account Creation
This section describes how the privilege resolution process handles the creation or the re-use of single or multiple accounts. This is especially important if a user has multiple accounts in a target system because the privilege resolution process needs to know which account to use for subsequent automated group assignments. These algorithms work per target system.
Algorithm for one account:
-
If an account is assigned to a user and it is the only one, this account is taken and the Primary Account flag is set if not yet set.
-
If the privilege resolution process needs an account. smooth account creation at the domain is enabled and the account fits for the privilege resolution (it has the calculated name), the account is linked to the user and the Primary Account flag is set.
-
If Smooth Account Creation is not enabled, a new account is created. If an account with the same name already exists, an error is indicated and privilege resolution stops.
Algorithm for multiple accounts:
-
If none of the existing accounts that are linked to this user is flagged as the Primary Account, a warning is issued and privilege resolution stops.
-
If more than one account is flagged as the Primary Account, an error is issued and privilege resolution stops.
| The Primary Account flag is reset if a user link is removed either manually or by an automatic process that uses the DirX Identity Services layer. |
Smooth Account Creation
Assigning a privilege to a user will result in account creation if an account in the respective target system is not yet created. Depending on the algorithm defined for the account, name errors can occur. If an account with the same name already exists, and the algorithm is not able to calculate an alternative name, this is reported and account creation is aborted.
You can switch on smooth account creation to avoid this situation. Check the corresponding flag Smooth account creation at the domain object.
If the flag is set and an account is to be created, the software performs this procedure:
-
It checks whether an account with the same name already exists where the Manage only in target system flag is not set.
-
If no, it creates the account again.
-
If yes, it checks whether this account is linked to this user or whether the user link is empty.
-
If yes: it takes this existing account and does not create a new one. If the account is already in dxrState DELETED it enables the account. The attribute dxrState is set to DISABLED and the attribute dxrTSState is set to NONE.
-
If no: if the calculation of alternative names is configured it tries with these new names. If only a fixed name is available an error message is generated.
-
This feature allows maximum use of existing accounts, but be aware that there are situations where an incorrect account can be selected. If you perform an initial load from a connected system, all available accounts are imported. If you do not run the procedure to associate these accounts to users or if the procedure cannot assign all accounts to users, and you assign privileges to users, an account may be used that is not the account of this user. This situation occurs if the account name algorithm calculates an account name that is equal to an existing account name. In this case, the account is assigned to a user to which it does not belong.
Managing Accounts Only in the Connected System
You can use the flag Manage only in target system to indicate that an account should be managed completely in the connected system and not by DirX Identity. When you set this option, the account is only visible in the target system in the Identity Store and requires regular updating by the validation workflow.
The flag is evaluated by all automatic associations of accounts to users. It indicates to these processes that this account should not be linked to a user entry. Processes that operate this way include:
-
The EventBasedAccountProcessing workflow
-
The AssocAccount2User rules
-
Smooth account creation
The flag is reset only if you:
-
Set the user link directly either manually or through any automatic process that uses the DirX Identity Services layer.
-
Reset the flag either manually or through any automatic process.
Deleting an Account
You may need to delete a target system account by hand if, for example, a user has several accounts on the target system, but really only needs one of them. You can only delete secondary (non-primary) accounts. DirX Identity Provisioning automatically handles the deletion of group memberships.
To delete an account, right-click it in the subtree, then click Delete. DirX Identity Provisioning changes the account’s state to DELETED. The target synchronization workflow will attempt to delete the account from the connected system the next time it runs. If the operation is successful, it will also delete it from the Identity Store (Provisioning Configuration).
Managing Privileged Accounts
Privileged accounts typically come with the initial installation of a target system. Accounts like "root" for a UNIX system or "Administrator" for a Windows system already exist and are not bound to a specific user entry.
Any user can use a privileged account as long as he can authenticate with this account: he must know the password of this account or his certificate must be assigned to this account (this method is only supported by some target systems).
DirX Identity’s role-based management allows for managing password access to these privileged accounts. The following figure illustrates this concept:
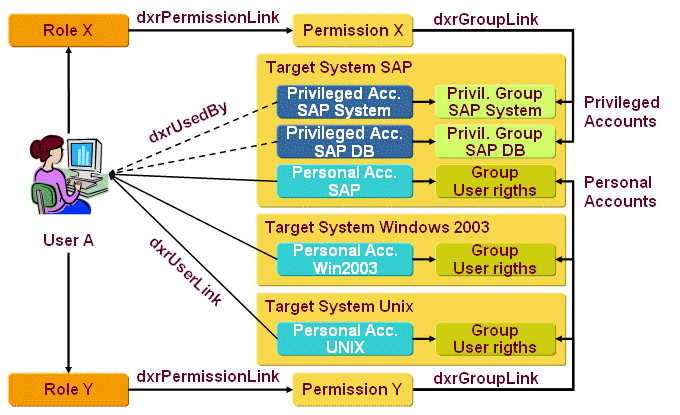
The figure shows that assignment of a role (Role Y) assigns via permissions (Permission Y) one or more groups in different target systems to a user (Group user rights). The necessary accounts (Personal Account …) are created automatically and assigned to these groups. The accounts are linked via the dxrUserLink attribute to the user entries.
If Role X is assigned to the user, then via Permission X a set of privileged groups may be assigned. It does not imply the creation of personal accounts; only a link is set from the corresponding privileged accounts to the user entries (attribute dxrUsedby).
As a result, the user can now read the passwords of the assigned privileged accounts in clear text. The system can also copy the certificates of the user to this account. Provisioning of the password and the certificates to the connected system allows accessing the target system with these credentials.
If the role assignment is removed, the dxrUsedBy attribute is deleted. Because the user could still remember the old password, the system automatically changes the password. This action guarantees that only users who are still assigned to the privileged account can read the password. The system also removes all certificates of the user from the account, which disables access to the connected system.
To handle other critical situations, DirX Identity comes with a set of account password management services. See the DirX Identity Application Development Guide for more information.
The next sections describe the management of privileged accounts in more detail.
Enabling Privileged Account Management
For performance reasons, privileged account management is disabled by default. To enable it, set the switch Enable Privileged Accounts at the domain object.
Marking a Privileged Account
After initial load of your target system content, or later on if a privileged account was added to the target system and a validation retrieved it from the target system, follow this procedure for each privileged account:
-
Set the Account Type flag at each of these accounts to Privileged. This action guarantees that the privilege resolution service handles this account as a privileged account (it uses the dxrUsedBy attribute).
-
Set up additional password policies for this target system with a correct Maximum Age parameter. Be sure that this time is shorter as the required connected system setting. Set the Character Check parameters, too.
-
Assign one of these password policies to each privileged account (Authentication tab).
-
Check the assigned groups of this account (view the Member of tab of the account).
-
If groups are already assigned (they came from the target system via initial load or validation), set the Group for Priv. Account flag for each of these groups to indicate to the privilege resolution service that this group handles only privileged accounts.
-
If there are no groups assigned, create a new group for each privileged account. Set the Group for Priv. Account flag and assign the privileged account in the Privileged Members tab. If this group is subsequently assigned to a user, the dxrUsedBy links are set for all assigned privileged members (that are the privileged accounts).
Note that these groups are not necessary for the target system handling, so it doesn’t matter whether they are synchronized to the target system. -
For each account that you do not want to manage from DirX Identity, do not create a group for the account. Instead, mark the account as Privileged to indicate that it cannot be used as a personal account.
-
Assign the existing or newly created groups to permissions and maybe to roles if you want to handle the privileged accounts via permission or role management.
If there are any criteria that let you recognize all privileged accounts, you can write a consistency rule that automatically performs the procedure described here.
Now you can assign privileged accounts to users via role → permission → group assignment.
Managing Security Tokens
DirX Identity provides two authentication mechanisms for privileged accounts:
-
Passwords - use passwords to authenticate in the target system with a privileged account.
-
Certificates - use certificates for your privileged accounts.
For each target system, set up one of these mechanisms. You can also set up a mixed solution.
Password Management for Privileged Accounts
If you manage access to your connected system via passwords and you have set up the system according to the instructions in "Marking a Privileged Account", you can use the following features:
-
The default access policy Users handle passwords of their accounts defines that users can read and set privileged account passwords if the corresponding group assignment has set the dxrUsedBy attribute (check the policy definition).
-
Setting the passwords at these privileged accounts requires setup of the Java-based AccountPasswordManager workflow. This workflow receives the JMS event (for example, from Web Center) and sets the password at the account.
-
The AccountPasswordManager workflow also creates a Java-based Server internal event to trigger the corresponding target system workflow. Set up the required SetPassword target system workflows to guarantee correct propagation to the connected systems.
-
Set up a schedule for the AccountPasswordManager that checks at regular intervals if passwords are about to expire. If this is the case, the account password manager creates a new password according to the defined password policy and sets it at the account within the target system. The SetPassword workflow propagates the changed password to the connected system.
-
If a connected system must be restored for some reason - for example, because the passwords for the privileged accounts might be out of sync after a severe error - use the ResetAccountPasswords workflow to generate new passwords for all privileged passwords of the connected system. The SetPassword workflow propagates the changed password to the connected system.
Certificate Management for Privileged Accounts
If the connected system provides authentication via certificates, set up these features:
-
Set up the master mechanism to transfer the certificate(s) of a user to a privileged account.For more information, see the section "Using the Master Attribute in a Property Element" in the DirX Identity Customization Guide.
-
Set up the Java-based provisioning workflows for synchronization of the certificate attribute (adapt the mapping accordingly).
Managing Functional Accounts
Functional accounts can also come with the initial target system.Examples of functional accounts include a trainee account, a meeting room account, or a group mailbox account.
You can choose to handle a functional account as a privileged account or as a personal account of a functional user.If you have a scenario similar to the one described in "Managing Privileged Accounts", where multiple administrators use the same account to log on to a system, it is convenient to model this situation with a privileged account.If you have several different functional accounts, it makes sense to create a functional user for each functional account.You then use the sponsor link to associate the functional user with its responsible user.The account is completely managed by the DirX Identity privilege resolution process and is assigned to the functional user as his personal account.For details on creating a functional user, see the chapter "Managing Functional Users".
Managing Target System Groups
You can manage groups in the Identity Store.Synchronization and validation with the local connected system can reveal differences between the target system content and the Identity Store.The validation workflow detects accounts, groups, and account-group memberships that have been created or deleted in the local connected system independent from a DirX Identity Provisioning request.The workflow notifies you about these objects by writing messages into their To do fields.As a result, you should periodically use the To do query folder to search for groups (and other objects) in an inconsistent state, and follow up with the appropriate actions, as described in the topic "Handling The Results of the Validation Workflow".
Managing target system groups consists of these tasks:
-
Adding a new target system group
-
Changing the attributes of a group
-
Managing group hierarchies
-
Managing imported groups
-
Managing group memberships
-
Deleting a group
Adding a Target System Group
You can import groups and group from target structures via the validation (optionally in initial load mode) workflows or create groups by hand within the DirX Identity Manager.
To add a new target system group:
-
In the Target Systems view, right-click the Groups, Accounts and Groups or any of its sub folders in the target system’s subtree.
-
Select New → Group. Supply a name (common name (cn)) for the group.
Manager returns an error if the name you supply for the account is not unique.
For hierarchical target systems, you can structure your groups with containers:
-
Select New → Container from the context menu to create a new container.
-
Use the Move Object function to move accounts to containers.
Changing the Attributes of a Group
In some cases, you may need to make changes to a target system group. For example, you may need to:
-
Change group attributes
-
Change one or more of the permission parameters to influence assignment of this group to users
-
Mark the group as Manage only in target system because DirX Identity is not to actively handle it
-
Clear the To do field
All of these properties are available as attributes of the target system group object. To change a group’s attributes:
-
Select the group in the target system subtree to display its properties.
-
Click the tab that contains the attribute you want to change, and then click Edit.
-
Change the relevant attributes.
-
Click Save to save your changes.
Managing Group Hierarchies
DirX Identity allows using group folders and hierarchies. With this feature:
-
DirX Identity allows Group folders to structure groups only if the corresponding connected system supports group folders (for example, LDAP directories or Active Directory).
-
The structure must be identical in DirX Identity and in the target system.
-
You can only create folder structures in the connected system. These structure can be synchronized with the target system workflows to DirX Identity.
Creating group folders in DirX Identity requires that you customize the target system workflows.
Managing Imported Groups
This section explains the options for handling imported groups. Imported groups are immediately set to state ENABLED. The following figure illustrates the options for handling imported groups.
Processing tasks on the imported groups after the initial load workflow has executed include:
-
Identifying the imported groups to the privilege administrator so that he can assign them to permissions in the privilege structure (or assign the groups to permissions yourself, if you are the privilege administrator). See the topic "Managing a Permission’s Group Assignments" for details.
-
Assigning permission parameters and their values to the imported groups; see the topic "Assigning Permission Parameters" for details
-
Adding additional values for attributes that were not imported from the connected system.
-
Deleting the imported groups that do not match the privilege structure. See the topic "Deleting a Group" for details (analogous to deleting accounts). The next synchronization deletes the group in the connected system. The group in the target system will be deleted by the privilege resolution or consistency checker after the end date is reached.
| You can use rules to automate some of these tasks. |
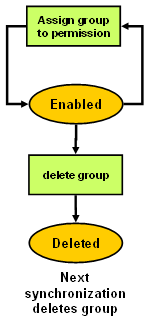
Managing Group Memberships
The target system workflows - especially the validation workflows - import the accounts and groups, and also import their memberships: the account-group assignments. They assign the IMPORTED state to newly imported assignments. The following figure illustrates the alternatives for managing imported group memberships.
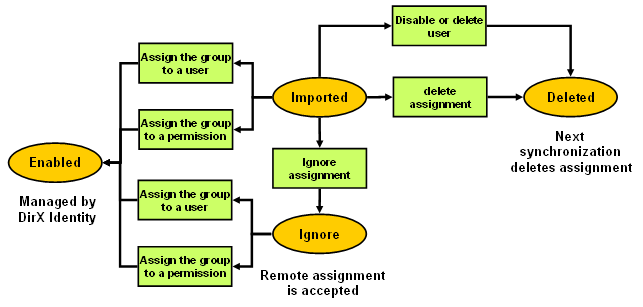
To display the memberships of the group, select it in the subtree, then click the Member tab. Manager displays the accounts that are members of this group and the account-group assignment state. You can perform these tasks:
-
Change the assignment state manually
Edit the group, select the Member tab and then select the assignment in the State of Assignment column. You can-
Set the assignment to DELETED. The next synchronization removes the account from this group in the connected system.
-
Set the assignment to IGNORE. This setting indicates that this assignment is accepted and controlled from the connected system.
You can automate these tasks by configuring validation rules of type Accept or Cleanup. Accept rules set assignment state of the matching members to IGNORE. Cleanup rules set it to DELETED. For a description how these validation rules work, see the section "How Rules Work" in the "Managing Policies" chapter.
-
-
Assign the group to a user or a business object
You can do this by hand, with a rule or with business object inheritance. The assignment state of this assignment changes to ENABLED, as does the corresponding account state. From now on, this assignment is controlled by DirX Identity. -
Assign the group to a permission
If the permission or any higher level role is already assigned to users, the assignments of these users are created automatically as well as the necessary accounts (all go to state ENABLED). Existing accounts and assignments (coming from an import) that are assigned via this permission or role change their states to ENABLED. From now on, this group is controlled by DirX Identity.
After performing these tasks, you should not find any more group memberships in state IMPORTED.Use the todoMemberhips query folder to check on it.
If the member is a group, Manager displays the state NESTED.Account members of the nested group are also shown with state NESTED.
Deleting a Group
You can delete a target system group by hand.To delete a group, right-click it in the subtree and then click Delete.DirX Identity Provisioning changes the group’s state to DELETED, that is, the group is not immediately and physically deleted.
The target synchronization workflow attempts to delete the group from the connected system the next time it runs.If the operation is successful, it sets the group’s dxrTSState to DELETED.Running the consistency rule cleanupDeletedObjects will remove the group if its audit trail is empty.
Deleting a Target System
Deleting a target system means deleting the target system data from the Identity Store (Provisioning Configuration).The connected system itself is unaffected by this operation.
To delete a target system, click it, and then select Delete from the context menu.DirX Identity Manager (Provisioning) checks that you are authorized to delete the system, and then requests that you confirm the delete.The DirX Identity Provisioning system then deletes from the Identity Store (Provisioning Configuration):
-
All assignments from Provisioning users and permissions to the target system’s accounts and groups
-
All the target system accounts
-
All the target system groups
-
The target system and its object descriptions
DirX Identity Provisioning returns a warning message if it cannot remove a user-account or permission-group assignment; in this case, you must remove the assignment by hand with DirX Identity Manager (Provisioning).
You must also use DirX Identity Manager (Connectivity) to disable the schedules for the target system’s synchronization and validation workflows. Alternatively, you should delete the workflows and connected directories that were used with the deleted target system. Perform these activities in this sequence:
-
Global View - remove the connected directory related to the deleted target system from all scenarios (there could be several instances). Note: these visual representations are only links to the real object, thus you need to delete the real object in the next step:
-
Expert View - remove the connected directory.
-
Expert View - remove all related workflows.
-
Expert View - remove all related jobs.
-
Expert View - remove all related channels from the Identity Store.