Managing Provisioning Workflows
This chapter discusses how to manage:
-
Java-based Provisioning workflows
-
Tcl-based Provisioning workflows
Managing Java-based Provisioning Workflows
This section provides information about managing Java-based Provisioning workflows for real-time synchronization, including:
-
Runtime operation
-
Target system Provisioning workflow operation
-
Error handling and retry
-
Cluster workflows
-
Target system attributes for cluster workflows
-
How to copy Java-based Provisioning workflows
-
How to start Java-based workflows
For trouble shooting hints in a real-time workflow scenario see the section "Real-time Synchronization" in the DirX Identity Troubleshooting Guide.
Java-based Workflow Runtime Operation
This section describes Java-based workflow runtime operation, including:
-
The general concept of runtime operation for real-time (event-based) and scheduled workflow execution
-
Java-based Server support for real-time event handling and message flow
General Runtime Operation
The following figure illustrates the general concept of runtime operation for a Java-based workflow for real-time synchronization:
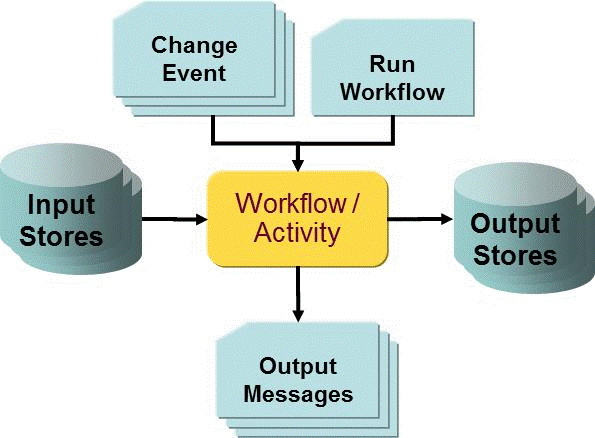
Java-based workflows are started by messages. These can convey an entry change, a request to change a password or a request to start a workflow.
An important example is the change of an account or a group. In this case, the event contains the DN of the changed entry within the input store, typically the DirX Identity domain. The workflow reads this object from the input store, transforms it into the format of the output store and performs the necessary operation at the output store. If necessary, it can create additional messages to trigger other real-time workflows.
You can also start Java-based workflows at a specific time via schedules or immediately using DirX Identity Manager. In this case, the workflow works on all objects in the input store that are identified by the search filters in the corresponding channels.
The general runtime concept can be used in a variety of applications.
Server Support for Runtime Operation
The following figure illustrates the logical structure of the Java-based DirX Identity server components.
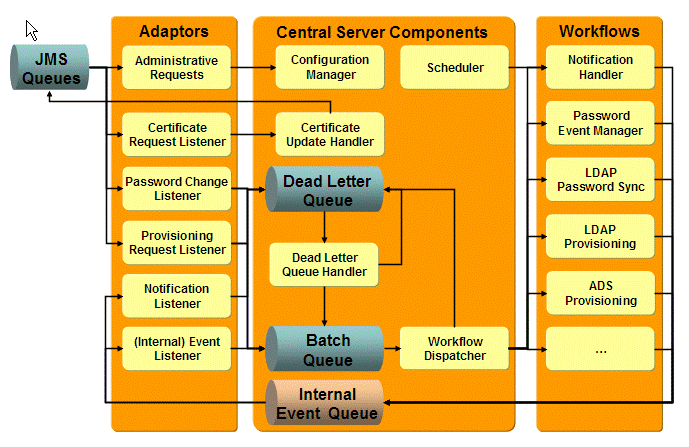
The Java-based Server contains two workflow engines: one for real-time provisioning workflows and one for request workflows (see the DirX Identity Provisioning Administration Guide for more information about request workflows).
Provisioning workflows are started by events. The Java-based Server uses functions called adaptors to read events from Java Messaging Service (JMS) queues.
The Java-based Server can handle the following types of events (not all of them are shown in the figure):
-
Administrative Requests (Admin Request Handler) - currently only the Load IdS-J Configuration request from the DirX Identity Manager is handled.
-
Configuration Requests (Configuration Handler) - the Windows Password Listener (or any other component that needs a current certificate) requests the initial certificate and a list of available messaging services. The Configuration Handler sends the requested information via a JMS message to the requester (broadcast). If update requests cannot be handled, the event is put into the Dead Letter Queue.
-
Notification Requests (Mail Listener) - all components can send notification requests. These requests are centrally handled by a Notification Handler, which sends the messages to the mail server. If messages cannot be sent, the event is put into the Dead Letter Queue.
-
Real-time Events - various listeners read events for specific topics and put them into the Batch Queue for further processing. After delivery to this queue, the JMS event is confirmed and deleted from the JMS queue. If an event does not have the correct format, it is put into the Dead Letter Queue.
Real-time event listeners are:-
Account Password Change Listener - reads all account password change events.
-
Entry Change Listener - reads all events resulting from entry changes.
-
Password Change Listener - reads all user password change events.
-
Provisioning Request Listener - reads all provisioning request for connected systems.
-
SetAccountPasswordListener - reads password events from the User Password Event Manager to update accounts.
-
-
Start Workflow Requests - reads all requests for starting event-based processing and provisioning workflows listeners. Start workflow requests listeners and adapters are:
-
Entry Change Start Workflow Listener - reads all requests for starting event-based processing workflows, automatically collocated with the Entry Change Listener.
-
Provisioning Request Start Workflow Listener - reads all requests for starting provisioning workflows, automatically collocated with the Provisioning Request Listener.
-
Resolve User requests – resolves the assignments of the selected user to the access rights in the target systems. This function is performed by the Resolution Adapter.
-
For efficient processing, events of the same type are bundled as batch requests if requests are arriving at a high rate. The Workflow Dispatcher reads these batch requests and assigns them to already running but waiting Workflow Threads. If it is not possible to find a suitable workflow thread, the Workflow Dispatcher places the request in the Dead Letter Queue.
The Workflow Threads try to resolve the requests. If successful, they send a response message to the Workflow Dispatcher indicating that the task was successful and the request is deleted from the queue. If the request cannot be resolved after a configurable number of retries, the Workflow Threads place it in the Dead Letter Queue.
Workflow Threads can create additional events. For example, the Password Event Manager creates a set of Password Synchronization Requests for the related target systems and stores them in the Internal Event Queue. The (Internal) Event Listener reads these requests, bundles them as batch requests and places them in the Batch Queue.
Requests stored in the Dead Letter Queue are not handled automatically again because normally administrative action is necessary before further processing is worthwhile. An administrator can
-
Solve the related problem (for example, there was no workflow set up for specific request types or the target system was not available). He can then process the stored events again. The Dead Letter Queue Handler bundles them as batch requests and puts them into the Batch Queue.
-
Decide to delete stored requests if further processing no longer makes sense (for example, because the parameters of the requests are wrong).
Target System Provisioning Workflow Operation
This section explains the general concept of operation for the real-time Provisioning workflows between the Identity Store and target systems. The following figure illustrates how request and real-time (Java-based) workflows cooperate to process a user creation request.
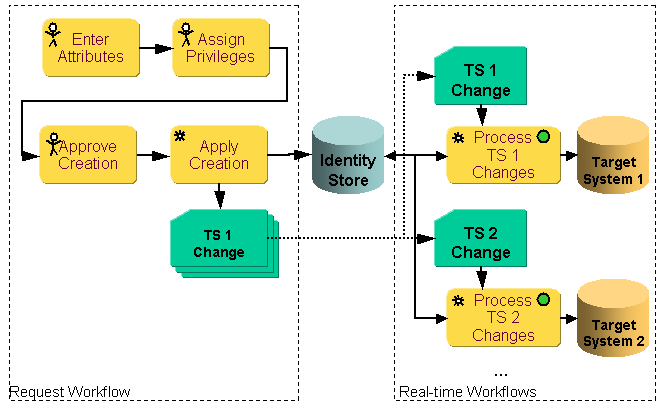
The example shown in the figure assumes that a request workflow for user creation with several interactive activities results at the end in the automatic activity Apply Creation:
-
The Apply Creation activity creates the user entry and calculates based on the assigned privileges during the privilege resolution the necessary set of accounts and group memberships in various target systems. This information is written into the Identity Store and in parallel sent as events to the JMS messaging service (TS n Change).
-
The corresponding adaptor (Provisioning Request Listener) reads the events from an external queue. It puts the events into the Internal Event Queue (permanent queue) and deletes them from the external queue.
-
A workflow dispatcher component (not shown in the figure) analyzes the event in the Internal Event Queue and starts the workflows that can handle these types of events. In this case, the relevant target system Provisioning workflows are started.
-
After start, the target system workflow analyzes the event’s content (the event contains typically only the DN of the relevant object):
-
The target system workflow reads the object from the Identity Store, performs mapping and join operations and writes it to the target system. If this operation is successful, the status of the relevant object in the Identity Store is updated accordingly.
-
The workflow engine retries unsuccessful requests that are the result of temporary errors (for example, the network was temporarily unavailable) until the retry limit is reached. It then passes the requests and their responses to the error activity, which issues e-mail notifications. The failed request is stored in the Java-based Server’s dead letter queue, where administrators can evaluate it and perform another retry operation once the cause of the error has been eliminated.
-
The target system workflows write logging, auditing and statistics information to be processed by the corresponding handlers.
-
At the end of each workflow, successful or not, the requests are removed from the Internal Event Queue.
Error Handling and Retry Operation
Each activity within a Java-based workflow has two channels that the Java-based Server’s real-time workflow engine uses to combine unsuccessful requests with their responses: an error channel and a retry channel. The choice depends on the error code that the connector returns in its SPML response.
-
An error code FAILURE indicates a permanent error. This type of error typically results from incorrect bind credentials or a non-existent base node for searches. The Java-based Server’s real-time workflow engine places permanent error SPML responses into the error channel.
-
An error code TEMP_ERR indicates a temporary error. This type of error typically results from a lost connection. The Java-based Server’s real-time workflow engine places temporary error SPML responses into the retry channel.
After a configurable waiting period, the workflow engine restarts the activity with the requests in the retry channel. If the configured retry limit is reached, it puts the requests and error responses into the error channel.
If an error activity is configured, it receives the requests and responses from the error channel and notifies the affected user with an e-mail.
If this fails or if no error activity is configured, the real-time workflow engine places the request in the Java-based Server’s dead letter queue. Administrators can use the Java-based Server’s Web Admin interface to view the failed requests and responses in this queue and to delete or re-process them. For details about dead letter queue handling, see the "Server Support for Runtime Operation" section. For details about Web Admin, see the chapter "Using Web Admin" in the DirX Identity User Interfaces Guide.
An activity usually processes a batch of requests. The entire activity is classified as failed only when one of its components is unable to process any request. This means that the workflow is classified as successful when some requests have temporarily failed or when the error activity has successfully handled permanent errors.
Using Cluster Workflows
Typically, you set up one workflow type for provisioning from a target system to a connected system. Setting up many similar target systems of the same type requires you to set up the corresponding number of workflows. Changing the behavior of these workflows can be cumbersome because you need to adapt all these definitions by hand. If the properties of the connected systems are similar (except for the address and bind information and a few specific properties), you can use cluster workflows, which allow you to set up one workflow that is controlled by properties of the target system instances. Using cluster workflows allows you to set up and maintain a single workflow (or one set of workflows for synchronization, validation and password synchronization) for a cluster of target systems. The following figure illustrates the cluster workflow concept.
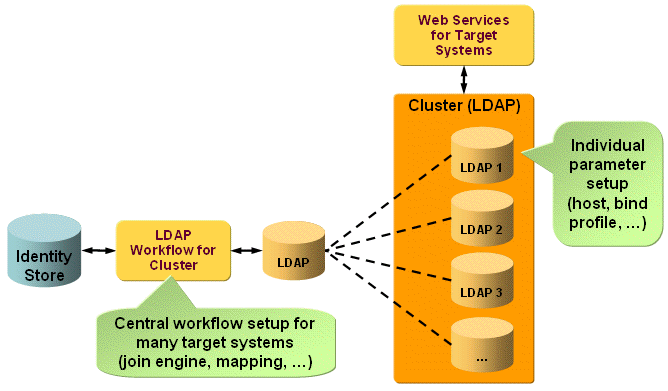
As shown in the figure, you can set up one workflow that handles the entire set of clustered target systems. To use this method, the target systems must have identical configurations regarding most of the parameters (for example, attribute mapping).
The next sections describe the cluster workflow concept in more detail, including:
-
A comparison of non-clustered and clustered solution configurations
-
The individual parameters to access the target system of the cluster are defined at the target systems in the Provisioning view group. Typical parameters are host, port and bind profile.
-
The workflows can run in event-based or scheduled mode. For schedule setup information, see the section "Scheduling Cluster Workflows".
Setting Up Non-clustered and Clustered Workflows
This section explains the differences between the non-clustered and clustered setup of Java-based workflows. The following figure illustrates the non-clustered workflow and target system configuration:
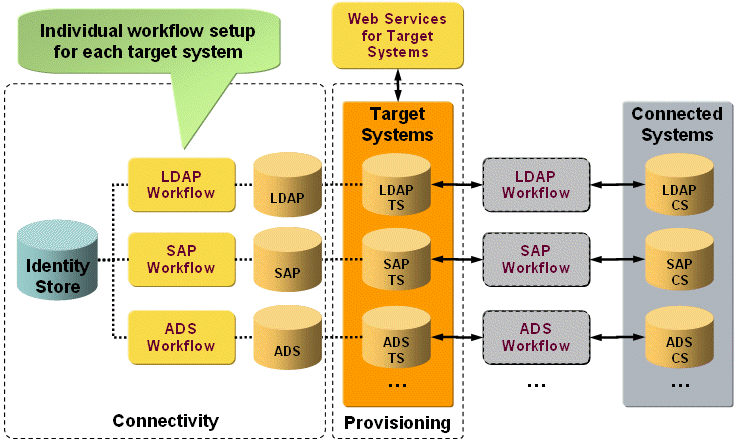
To set up a non-clustered solution, set up one workflow definition between the connected directory Identity Store and each connected directory that represents your connected system (here: LDAP, SAP, ADS). Set up each workflow independently. When the workflow subsequently runs between the target system and the connected system, it takes all configuration information from the workflow definition and the connected directory and all data from the target system and/or from the connected system.
The following figure illustrates the clustered workflow and target system configuration:
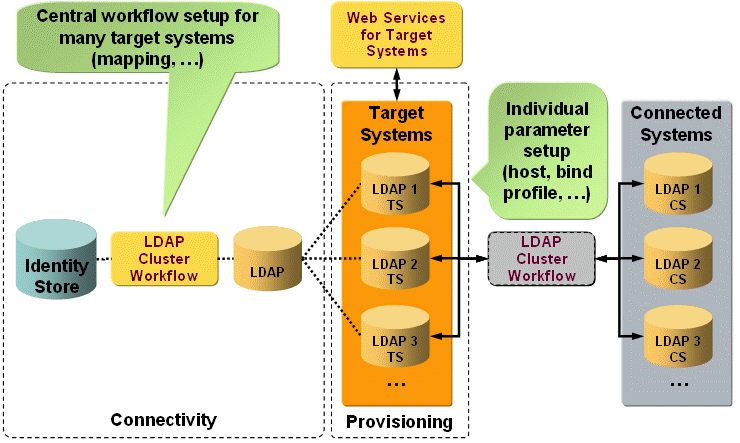
To set up a clustered solution, set up one workflow definition between the Identity Store connected directory and one connected directory that represents all instances of your connected system (in this example, LDAP). The workflow setup is valid for all systems in the cluster. When the workflow subsequently runs between the target systems and the connected systems, it takes the static part of the configuration information from the workflow definition and the dynamic part from the target system definition and from the Workflow Configuration, Connector Configuration and Environment Properties tabs.
Depending on the data to be transferred from right to left or left to right, the correct individual parameters are evaluated by the workflow instance and used for accessing the connected system.
Configuring Cluster Workflows
Cluster workflows read their target system-specific options only from the target system in the DirX Identity domain. While other workflows read these options from the connected directory, this is not possible for a workflow that supports a number of target systems.
Therefore, the target system allows for setting a number of new attributes for the workflow configuration. The target system provides a set of standard attributes and a "specific attribute" feature to configure additional attributes without the need for extending the LDAP schema. These configuration options can be separated into workflow configuration attributes, connector configuration attributes and environment configuration attributes. The next sections provide more information about these attributes.
About Workflow Configuration Attributes
Workflow configuration attributes are a set of fixed properties that contain the address and bind information to access the connected system. Since most connectors share a set of common configuration parameters, DirX Identity has defined a standard set of options: address, data port and secure data port, SSL, authentication mode, path to key store and trust store files and key store alias name.
For binding of the target system connector, you must reference an account in the domain. The attributes "dxrName" and "dxmPassword" of this account are used as user name and (encrypted or scrambled) password.
About Connector Configuration Attributes
Connector configuration attributes define additional target system-specific configuration options for the target system connector. These attributes must be defined as environment properties in the Connector Configuration tab and are stored as tag/value pairs in the LDAP attribute "dxmSpecificAttributes".
For example, if you want to specify some connection-specific properties of a connector, like the following connection section properties for the SapR3UMConnector:
General:
<property name="client" value="800"/>
<property name="language" value="en"/>
For connecting without load-balancing:
<property name="systemID" value="08"/>
For connecting via gateway :
<property name="systemIDgateway" value="08"/>
<property name="gwhost" value="host"/>
<property name="gwserv" value="server"/>
For connecting via load-balancing (messaging service):
<property name="r3SystemName" value="sysname"/>
<property name="group" value="group"/>
Other parameters, for example, access to CUA:
<property name="accessToCUA" value="FALSE"/>
<property name="combinedRoleProfileSubsystem" value="FALSE"/>
For more options, see the content of object “ts” (section connection) in a configured real-time SAP workflow.
Specify them as tag/value pairs (for example, "client/800") in the Connector Configuration tab of the provisioning target system object.
About Environment Configuration Attributes
Environment configuration attributes define options for the workflow mapping. Since these options vary significantly from workflow to workflow, there are no standard attributes defined. Instead, they are all stored in the LDAP attribute "dxrEnvironmentProperties" as tag/value pairs. Parameters that are used in many workflows include account and group base both in DirX Identity and in the target system, domain name, "no_members" for the default group member if creating a group without account members. As a default rule, take all specific attributes of the connected directory and store them in the target system as environment properties.
Note that some logically equivalent attributes were entered both in the target system and the connected directory: the base nodes for accounts and groups in DirX Identity. The attributes of the connected directory are used in workflow configuration, the attributes in the target system are referenced in the object descriptions when creating accounts and groups. The latter ones are stored as tag/value pairs in the LDAP attribute "dxrOptions". The parameters for workflow configuration are now stored in "dxrEnvironmentProperties". You can avoid this duplicate storage by either changing the object descriptions of accounts and groups or by changing the workflow configuration, typically the export section and the identifier mapping.
Copying Java-based Provisioning Workflows
You can copy Java-based workflows either in DirX Identity Manager’s Global View or in its Expert View. The next sections describe how to perform these tasks. For details about DirX Identity Manager, see the chapter "Using DirX Identity Manager" in the DirX Identity User Interfaces Guide.
Copying Java-based Workflows in the Global View
To make copy operations easier and more intuitive, DirX Identity provides a complex copy method that is activated in DirX Identity Manager using the Configure method for connected directories and the New method for workflows. Both methods work closely together.
First, you create new connected directory icons that represent your connected directories. With the Configure method, you can configure these objects based on other existing connected directories that act as templates in this case. This template is copied to represent your new connected directory. Note that the related service object is also copied, which avoids interference with the original object.
| To avoid copying files and channels that will never be used, the copy operation does not copy files and channels of connected directories of type File. Instead, the data files and channels are created when a workflow is copied. As a result, it does not make sense to create data files during such a copy operation. |
When two or more of these connected directories exist, you can link these objects via workflow lines. Next, you can either link existing workflows to these lines (using the Assign method) or create copies of existing workflows (using the New method) that act as templates. This template is copied to represent your new workflow.
Copying these templates is a complex procedure that handles all types of Java-based workflows in addition to the password synchronization workflows.
-
DirX Identity tries to find all workflows that fit between the two connected directories. If no workflows can be found, an error message is displayed.
-
The wizard tries to identify the corresponding target system in the Provisioning view group to fill the Cluster and Domain parameters. If the target system could not be found the error message "No associated target system for targetsystem" is displayed. You can ignore this message (click Yes) and set the two parameters by hand later on.
-
The workflow is copied, including all activities and ports.
-
All referenced channels are copied to the related new connected directories and linked to the corresponding ports. The procedure uses existing channels where possible.
-
A channel folder is created beneath the connected directory that represents the target system if -n workflows refer to it but have different Identity Stores.
Some types of workflows cannot be copied with the New method and thus must be copied in the Expert View:
-
Password synchronization workflows with JavaScript Mapping (you can identify this type of workflows by the blue flag symbol).
Both the Configure method for connected directories and the New method for workflows keep the original folder sub structure in the scenario to which the objects are copied. You can change these structures at any time with the Move method in the Expert View if required.
Copying Java-based Workflows in the Expert View
If you copy an object in the Expert View, the complete sub-tree is copied. For example, copying a workflow copies the workflow object and all activities with all links to other objects. Linked objects - channels, in this case - are not copied. As a result, you must copy the linked objects separately and change the links accordingly.
For example, if you copy workflow W1 with activity A1 that points to a channel C1, this results in workflow W2 with activity A1 that points to channel C1. The activity name can remain the same because it resides under a different workflow object.
In this example, you must copy channel C1 separately, which results in channel C2 with the relevant Java-mapping objects. Now you must relink activity A1 from workflow W2 to channel C2. This action makes the two workflows (W1 and W2) independent down to the channel level. If other channels are referenced after this copy, you must repeat this procedure for all of these objects.
Because this is a difficult and error-prone procedure, we recommend that you use the copy procedures provided in the Global View whenever possible.
Because password synchronization workflows have a simple structure with only a few links, it is safe to copy these workflows in the Expert View.
Starting Java-based Provisioning Workflows
You can start Java-based Provisioning workflows in two different ways:
-
DirX Identity clients can send real-time events that trigger the workflows.
-
You can set up schedules to run the workflows regularly at specific times or time periods.This method is especially useful for validation workflows, which are typically not triggered by events.
For more information about Java-based workflow runtime operation and the Java-based Server’s real-time event handling operations, see the section "Java-based Workflow Runtime Operation".
Managing Tcl-based Provisioning Workflows
This section describes how to manage Tcl-based Provisioning workflows, including:
-
Runtime operation
-
Configuration files and Tcl scripts
-
Object naming
-
Linking objects
-
Understanding notifications
-
Tcl-based workflow design rules
-
Copying Tcl-based workflows
-
Starting Tcl-based workflows
Runtime Operation
This section describes Tcl-based workflow runtime operation, including:
-
How DirX Identity handles the workflows and how the Tcl- and C++-based components work together
-
DirX Identity agent controller runtime tasks
-
The execution status values generated during Tcl-based workflow and activity runs
-
The checkpoints
-
File paths and areas for Tcl-based workflow runtime operation
Basic Runtime Operation
The following figure shows the interactions between DirX Identity components during a run of an example Tcl-based provisioning workflow with two activities (Active Directory export and identity store import). The example assumes that the administrator starts the workflow by hand from the DirX Identity Manager.
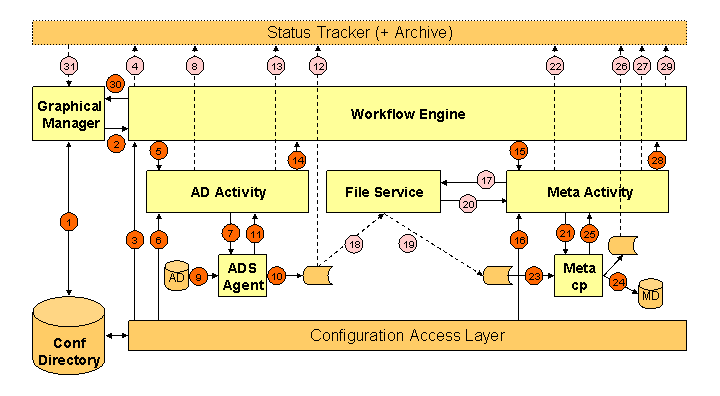
As shown in the figure:
-
The DirX Identity administrator configures the workflow using the DirX Identity Manager Global or Expert view.
-
The DirX Identity administrator starts the workflow from the DirX Identity Manager.
-
The workflow engine (WFE) reads the workflow configuration data (the activities to be started and the sequence in which to start them).
-
The WFE notifies the start of the workflow to the status tracker (STT). A workflow status entry is created in the configuration database.
-
The WFE starts the C++-based DirX Identity server’s agent controller (AGC) to run the Active Directory (AD) activity.
-
The AGC reads the activity configuration data for the AD activity and prepares the ADS agent environment (creates the agent configuration "ini" file).
-
The AGC starts the ADS agent.
-
The AGC notifies the STT again.
-
The ADS agent reads the Active Directory according to the "ini" file configuration.
-
The ADS agent writes an intermediate data file and a trace file.
-
The ADS agent exits and reports this action to the AGC.
-
The AGC moves all required files to the status area specified by the status path.
-
The AGC notifies the STT about the completion of this activity.
-
The AGC exits and reports to the WFE. The WFE finishes the AD activity.
-
The WFE starts the AGC again to run the meta activity.
-
The AGC reads the configuration data for the meta activity.
-
The AGC starts the file service if the activities ran on different machines and if there is no shared file system configured.
-
The file service reads the file from the source location.
-
The file service copies the file to the required target location.
-
The file service exits and reports this action to the AGC.
-
The AGC prepares the meta controller environment (creates the Tcl and attribute configuration files) and starts the meta controller.
-
The AGC notifies this to the STT.
-
The meta controller reads the intermediate file.
-
The meta controller imports the information from the intermediate file into the identity store.
-
The meta controller exits and reports this action to the AGC.
-
The AGC moves all relevant files to the status area.
-
The AGC notifies the STT about this action.
-
The AGC then exits and reports to the WFE.
-
The WFE finishes the meta activity and reports this action to the STT.
-
The WFE exits and reports to the DirX Identity Manager.
-
The DirX Identity Manager can read the complete monitor information including the information in the status area. Of course you can view status information throughout the workflow run to watch the progress of the operation.
Agent Controller Runtime Tasks
The C++-based Server’s agent controller component performs three main tasks during an agent run:
-
Produces the files that the agent requires. These files can be "ini" files, Tcl script files, or attribute configuration files. During this step, the agent controller resolves all references to the property settings of other objects in the configuration database that are contained in these files.
-
Runs the agent on the correct C++-based server using the command line defined in the job. The command line can also contain references (for example, to file name definitions in other objects); the agent controller resolves these references before it runs the agent.
-
Transfers the agent’s exit code (through the status tracker) to the corresponding status entry after the agent terminates. Next, the agent controller copies all required files-configuration files, input files, output files, trace file, and report files-into the status area specified by the status path in the C++-based Server configuration object. (You can use the file configuration object to configure this behavior for each file; by default, all files are copied). The agent controller notifies the Status Tracker about these copy operations and the locations of the files and writes this information into the corresponding status entry. The agent controller deletes all files in the work area that the administrator has defined to be temporary in the configuration database.
The following figure illustrates these tasks.
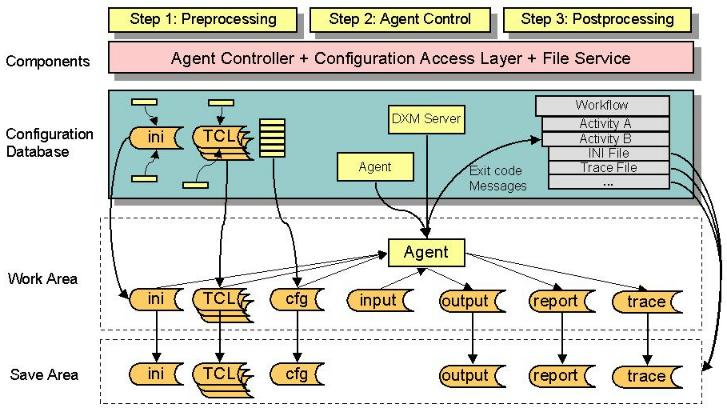
When errors or warnings occur during these steps, agent controller transfers the information to the status tracker, which writes it into the Remark field of the status entry.
The agent controller writes a "processInfo" file that contains information about internal details of this run, such as the executable that was called and the command line and the delta information that was passed back and forth.
The processInfo file contains the following fields:
-
Return - the exit code that the agent returned
-
Remark - messages that the agent controller generated for this agent
-
DeltaOutputData - the delta information that DirX Identity extracted from the job object to deliver to the agent controller or the agent
-
ExpirationTime - the defined timeout in the job definition for this agent
-
DeltaInputData - the delta information that the agent has delivered to be stored in the DirX Identity database after a successful run
-
CommandLine - the command line for this agent run
-
Executable name - the name of the executable that was used for this run
-
ProcessUserName - the user name under which this agent run was started (note: the password that was used is not displayed here)
-
ProcessDomain - the domain under which this agent run was started
-
JobPath - the path of the work area where this agent has been run
DirX Identity also catches any stdout and stderr output and reports it if present in the processInfo file.
Workflow and Activity Execution Status Values
This section describes the status values that can occur during the run of a Tcl-based workflow or activity. These values are displayed in the DirX Identity Manager Monitor View in the Result field of a workflow or activity status entry.
Workflow Execution Status
The following figure illustrates workflow status changes that can occur during workflow execution.
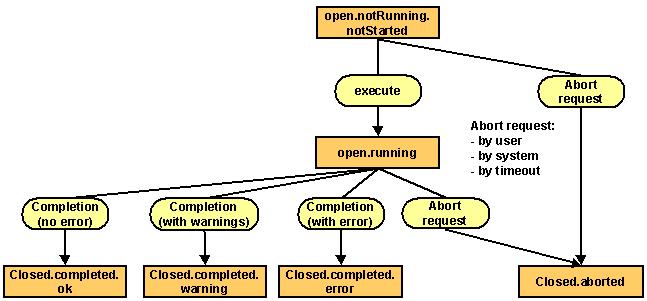
The possible workflow execution values shown in the figure are:
-
open.notRunning.notStarted - The workflow’s initial state.
-
open.running - The normal state of the running workflow.
-
closed.completed.ok - All workflow activities have run successfully. This message indicates a successful workflow run.
-
closed.completed.warning - One ore more activities in the workflow have reported a warning. The workflow is not aborted.
-
closed.completed.error - One activity in the workflow has not run successfully and the workflow has been aborted at this point. This message indicates an erroneous workflow run.
Note: You can ignore this state when setting the Ignore Errors flag in the activity definition. -
closed.aborted - The workflow was aborted by a request from the DirX Identity Manager (the administrator has initiated the abort) or by the C++-based Server due to a fatal error condition or a timeout.
Activity Execution Status
The following figure illustrates activity status changes that can occur during activity execution.
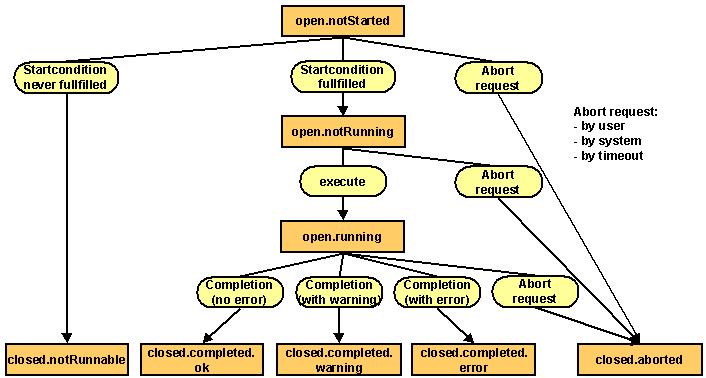
The possible activity execution values shown in the figure are:
-
open.notStarted - The activity’s initial state.
-
open.notRunning - The start condition is satisfied, but the activity is still not running.
-
closed.notRunnable - A start condition exists that does not allow the activity to run.
-
open.running - The normal state of the running activity.
-
closed.completed.ok - The agent has returned an exit code that indicates no errors or warnings which DirX Identity treats as a successful run. Please note that the incomplete generation of status entries is treated as a warning that is only reported in the remark field of the status entry. See the OK Status fields in the Agent and Job objects to setup the required behavior.
-
open.completed.warning - The agent has returned an exit code that is defined as a warning. In this case the workflow is not aborted, but the warning is reported. A warning is also reported when the agent controller detects stdout or stderr output. See the Warning Status fields in the Agent and Job objects to setup the required behavior.
-
closed.completed.error - The agent has returned a non-zero exit code, which is treated as an erroneous run. The workflow will be aborted.
-
closed.aborted - The workflow was aborted by request from the DirX Identity Manager (the administrator has initiated the abort) or by the system due to a fatal error condition or a timeout.
Checkpoints
You can use the checkpoint feature for workflows that contain either the meta controller or framework-based jobs. Framework-based agents are Dashboard, SAP R3 UM and SAP EP UM.
This feature is especially useful for workflows that run for many hours. If a temporary error occurs during such a run, the workflow ends with an error. If it is re-started later on, it performs all operations from the beginning regardless of whether the job runs in delta or full mode.
If checkpointing is enabled, the relevant jobs write a checkpoint after a definable number of correctly-processed records. If the workflow runs into an error, the checkpoint value is stored via DirX Identity’s delta mechanism. If the workflow is re-started, it starts the job where the error occurred and the job itself begins processing records starting from the last checkpoint value. This might result in processing some records again.
To enable the feature, set the parameters at the workflow object and/or the related parameters at the corresponding job objects. Checkpointing for the workflow and one or more jobs are independent of each other. If you only enable the workflow for checkpointing, the workflow starts with the erroneous activity on the next run. If you only enable one job for checkpointing, this job starts with the saved checkpoint of the last run. If the last job run finished without errors, no checkpoint is written and the job starts from the beginning.
The checkpointing mechanism also works with hierarchical workflows, meaning that the activity to be restarted can also be a sub workflow, whose activities can be also be configured for checkpointing.
The relevant workflow parameters for checkpoint control are visible in the Operations tab:
- Enabled
-
the workflow works in checkpoint mode. One or more jobs can also be enabled for checkpointing. If no job is enabled for checkpointing, only the “Restart at Activity” mechanism becomes operative.
- Retry Limit (default is 3)
-
the maximum number of retries. If the limit is reached, the workflow runs again in complete full or delta mode (as defined). It also informs all jobs to start from the beginning even though checkpoints might have been saved. (It sets a “ignoreCheckpoint” flag in the “create” message of the activity.)
Workflow parameters that display the checkpoint status are:
- Retry Count
-
the number of retries already performed.
- Restart Activity
-
displays one or more activities that are started in parallel during a retry operation. This field is read-only.
The corresponding job parameters are visible in the Operation tab:
- Checkpointing Enabled
-
if this flag is set, the job writes checkpoints regularly.
- Checkpoint Frequency
-
the number of processed records after which a checkpoint is written. After a serious agent problem, this activity can start at the last checkpoint (and not from the beginning again).
Events where Checkpoints are Saved for the Next Run
Checkpoints are saved if the workflow completes with errors (for example, at least one activity ends with an error) or the workflow or an activity is aborted. The delta information is only saved in each job configuration entry if the workflow ends without errors.
If both delta and checkpointing are enabled for one job, the delta info item containing either delta or checkpoint information is saved at the end of the workflow regardless of whether the workflow ended with or without error.
File Paths and Areas
The DirX Identity runtime environment requires three file paths for each C++-based Server to work properly:
-
Installation path - the path to the installation area where DirX Identity is installed. For example: C:\Program Files\Atos\DirX Identity
Do not change this field because it is handled automatically by the installation routine. -
Work path - the path to a work area that stores all files created during the execution of an activity when relative paths are used. For example: C:\Program Files\Atos\DirX Identity\work
-
Status path - the path to a status area that stores all permanent files after the execution of an activity for each workflow run. For example: C:\Program Files\Atos\DirX Identity\status
You can set up the work and status paths to conform to your requirements. You can also distribute both areas on different disks to ensure that full status areas do not disturb the runtime environment.
| When the status area is inaccessible or full, the C++-based Server does not stop further workflow runs and does not regard this as erroneous result of a workflow run. However, it logs and reports the problem. |
Work Area
The structure of this storage area is:
-
work\workflowFolderStructure_workflow__activity_
Where workflowFolderStructure is equal to the structure of the workflow folder in the Connectivity configuration under the object Workflows, for example for the workflow
-
Workflows\Default\LDIFfile\LDIFfile2Meta
the work area path is
-
…work\Default\LDIFfile\LDIfile2Meta
Below this path additional activity folders are created. In this case:
-
…work\Default\LDIFfile\LDIfile2Meta\LDIFfile2Meta_MetaCP
This file directory contains all input, output, delta, configuration, report and trace files of a specific workflow and activity (DirX Identity uses the display names of the objects) that are flagged with Save mode = PERMANENT. For example:
-
…work\Default\LDIFfile\LDIfile2Meta\LDIFfile2Meta_MetaCP\control.tcl
Status Area
The structure of this storage area is:
-
status\workflow.starttime_activity.starttime_
For example for the workflow
-
Workflows\Default\LDIFfile\LDIFfile2Meta
the status area path for the workflow is
-
…status\LDIfile2Meta.20030113142011Z
Below this path additional activity folders are created. In this case:
-
…LDIfile2Meta.20030113142011Z\LDIFfile2Meta_MetaCP.20030113145822
This activity folder contains all copied input, output, delta, configuration, report and trace files from a specific agent run (the files that are flagged with Copy to status area. For example:
-
…LDIFfile2Meta_MetaCP.20030113145822\control.tcl
Configuration Files and Tcl Scripts
DirX Identity Connectivity stores all of the configuration information that an agent requires in attributes (object properties) within the configuration. Agents typically require this configuration information to be made available to them through files. The DirX Identity agent programs (which use "*.ini" configuration files) and the meta controller (which is controlled by Tcl scripts) read their operating instructions from these files, which must exist prior to their execution. The meta controller also requires attribute configuration files that describe the input and output format information.
For example, for import to a DirX Identity store via the meta controller, the agent configuration information is contained in Tcl scripts. For import into an Active Directory connected directory, the agent configuration information is contained in an "ini" file.
The meta controller Tcl scripts (called the synchronization profile) are generally separated into a well-defined structure. The most important parts are:
-
The control script, which is called from the command line. The control script contains a list of variables that define all of the necessary parameters for connecting to directories or opening files in read or read/write mode, the attribute configuration and selected attributes for both the source and target directory, the export and import parameters, and so on. The control script calls the profile script, which in turn calls the mapping procedure.
-
The profile script, which contains the main code of the synchronization procedure. Its structure can vary dependent on the synchronization scenario and it is normally based on a lot of standard code delivered with DirX Identity.
-
The mapping script, which contains the entire code for performing an attribute mapping according to the settings made at the user interface level, for example by filling a table with appropriate assignments of target attributes via mapping procedures to source attributes.
Central use of mapping scripts is only possible for Tcl Mapping Scripts. Table based mapping scripts must be located directly under the job object and cannot be centralized!
For details, see the section "Tcl-based Connectivity Standard Script" in the DirX Identity Application Development Guide. The pre-configured objects contained in the default applications delivered with DirX Identity use this Tcl script structure.
The meta controller needs attribute configuration files in addition to the Tcl scripts. Attribute configuration files describe the static content of the connected directories, such as the objects and attributes of a database (for LDAP, ODBC or other formats) or the format and content of files (for tagged files like LDIF or non-tagged files like CSV and XML). See the DirX Identity Meta Controller Reference for further details.
A DirX Identity Connectivity job can handle:
-
One ini file
-
One control Tcl script
-
One profile Tcl script
-
One mapping Tcl script
-
An unrestricted number of additional Tcl scripts
A DirX Identity connected directory provides one attribute configuration object, which is used by the meta controller to generate the corresponding attribute configuration file.
The number and kind of configuration files depends on the type of agent. The generic agent type, which is the basic agent type that DirX Identity provides (and from which all other agents are derived), contains all of these files. Consequently, the number of configuration files that DirX Identity can handle is not restricted.
The agent configuration files contain a lot of information that already exists in the properties of configuration objects in the configuration database. For example, the "server" parameter in an agent configuration file can map to the TCP/IP address of a particular service object.
You can set references to these object properties in the agent configuration file to guarantee consistency between the parameter in the configuration file and the setting for the property in the configuration database.
At each runtime, DirX Identity regenerates the agent configuration file from the property information in the configuration database. At this time, it resolves the references contained in the configuration file and updates the file with any configuration changes made since the last run. Thus configuration information is always up-to-date.
Object Naming
DirX Identity supports two object naming mechanisms:
-
Object identifiers
-
Display names
Object Identifiers (common names)
When administrators work with several instances of DirX Identity Manager in parallel on the same configuration database, it is possible that the two different Manager instances can create the same object identifiers (the common names in the LDAP directory) at the same time because both administrators choose the same name. To avoid this problem, the DirX Identity Manager creates unique object identifiers (IDs). These IDs are difficult for users to read and remember (you can see them in the data view of the DirX Identity Manager when looking at newly created configuration objects in the Connectivity configuration tree). For example:
-
uid-c0671bf6:1ac93:e734b95f23:-7ff9
You can define a readable display name for each configuration object, which is stored in the attribute dxmDisplayName. You can rename this display name as necessary without disturbing the internal structure of the configuration database, because the ID is used for all references (with the exceptions described in the topic "Display Names").
If you delete an object and create it again with the same display name, it has a different ID but looks to be the same. References contained in the configuration database that pointed to the old object will not point to the new object. You must set all references manually again to the new object. Use the Show References feature to find all incoming references.
You may notice that a lot of objects in the Connectivity configuration have readable common names; for example, BA_ADS for the connected directory that has the display name ADS. This readable naming results from the creation method used in the beginning.
Display Names
DirX Identity Manager administers unique display names in a specific subtree of the configuration database because it would be very confusing to see two different objects with the same name at the user interface level.
However, there are circumstances in which display names are used outside of the configuration database:
-
DirX Identity uses the activity and workflow display names as part of the work and status area paths. If your activities keep any files that affect the next run of the workflow-for example, a delta database-and you change the display names of either of these two objects after you have run the workflow for the first time, DirX Identity relocates the work path to the new display name(s) and the delta database remains in the old location. As a result, your workflow will perform a full operation instead of a delta run. Currently DirX Identity does not warn you if you rename an activity or workflow name. You must know if there will be a problem (if the workflow has never been executed you will not have a problem) or you must solve the problem (for example, by moving the delta database to the new work path).
-
The DirX Identity reference mechanism (see the chapter "Customizing Object References" in the DirX Identity Customization Guide) is built so that references are as stable as possible and remain independent from values in the configuration database. Sometimes you must use other attributes in references to specify a particular value of a multi-valued attribute, for example, for distinguished names (DNs). Do not use the display name because the reference is broken when you change the display name or when it is set automatically during a copy operation because the reference is not updated automatically. DirX Identity detects the break during the next workflow run, resulting in an error. DirX Identity cannot detect the effect on reference definitions in configuration files in advance because this action would be extremely time-consuming. You should avoid this behavior in many cases by using the dxmAnchor attribute, which is not changed during copy operations in contrast to the display name.
Linking Objects
DirX Identity supports different mechanisms to use objects; for example, attribute configuration or Tcl files. You can locate objects either locally under the parent object or in a central place.
Objects are used by setting a link from the parent object to the required object. Depending on the location, the result will be different:
-
When you reference a central object, changes to this object will affect all parent objects and their workflows. This behavior is nice when you need a central place to change parameters. On the other hand, changes to the object (especially when performed with a wizard, where you don’t see the object structure) may affect workflows that you do not intend to change. DirX Identity displays a red border with the text "This object might be shared since it belongs to the Configuration Folder" to indicate the use of central objects.
-
Referencing a local object allows you to set all parameters individually. However, when you need to change a central parameter (which is contained in several local objects), you must make the change multiple times, and you may miss making the change to one of the objects
-
Local objects can also be used by several parent objects, which creates a type of quasi-central object (shared objects). The same problem can arise as with central objects regarding the change of attributes. In addition, you may unintentionally delete an object that is still used by another one. Use the option "Check references to avoid broken links" when deleting objects to avoid such situations.
Understanding Notifications
DirX Identity provides two types of notifications in the Tcl-based environment:
-
Change notifications - the meta controller calculates all necessary actions and changes to update the directory. Optionally it can send a JMS message that contains all change information. You can set up Java-based workflows to interpret and process these messages.
-
E-mail notifications - if program logic cannot solve outstanding issues or for informational purposes, you can produce e-mail notifications.
Change Notifications
Before performing updates at the directory server, the meta controller calculates all necessary actions and changes. It can optionally send this information in the form of a JMS message for further processing. Set the relevant change notification parameters to enable this feature.
E-mail Notifications
DirX Identity provides a notification agent, which is a separate executable that can be used to send an e-mail message from within a Tcl script using the metacp exec operation. You control the notification agent through a simple command sequence and a configuration file in XML format that defines all parts of the message. As with Tcl or "ini" files, the agent controller writes the notification XML configuration file to the work area. All the operations for files (for example, deleting files in the work area and moving them to the status area) are also available for notification files.
You can send a notification from within a Tcl script with the following command sequence:
proc calculateJavaPath { } {
    global env
    regsub -all "\\\\" $env(DIRXMETAHUB_INST_PATH) "/" install_path
    source "$install_path/basic.input.tcl"
    return $DXI_JAVA_HOME
}
regsub -all "\\\\" $env(DIRXMETAHUB_INST_PATH) "/" install_path
set java_dir [calculateJavaPath]
if {$tcl_platform(platform) == "windows"} then {
    set cmd "exec \"$java_dir/bin/java\" -Duser.language=en -cp \"$install_path/lib/java/ext/javax.activation.jar;$install_path/lib/java/ext/mail.jar;$install_path/lib/java/notify.jar;$install_path/lib/java/dxcCrypto.jar;$install_path/lib/java/dxmUtil.jar" siemens.dxm.notify.sendmail \"$notify_cfg_file\" "
} else {
    set cmd "exec \"$java_dir/bin/java\" -Duser.language=en -cp \"$install_path/lib/java/ext/javax.activation.jar:$install_path/lib/java/ext/mail.jar:$install_path/lib/java/notify.jar:$install_path/lib/java/dxcCrypto.jar:$install_path/lib/java/dxmUtil.jar" siemens.dxm.notify.sendmail \"$notify_cfg_file\" "
}
In this sequence, DirX Identity evaluates the fully qualified pathname first. It then calls the notification agent; the calling syntax depends on the platform on which the Tcl script is executing. The procedure calculateJavaPath computes a representation of dxi_java_home as needed in Tcl scripts.
The notification agent uses the XML configuration file to process the request. It processes an e-mail notification, which must contain addresses (From, To, CC (optional)), a subject, a message text (optional and with references to be resolved) and attachments (optional; for example, a log or data file). Note that you can configure only one To address because DirX Identity assumes that there is exactly one entity responsible for the requested action. You can define as many CC addresses as you like.
The notification agent returns the following exit codes:
-
Exit code = 0: The message has been sent correctly.
-
Exit code = 50: General error.
-
Exit code = 51: The sending of this message has failed.
-
Exit code = 52: The command line for the notification agent contains an error.
Example: java siemens.dxm.notify.sendmail .\config.xml -
Exit code = 53: The type is not email.
-
Exit code = 54: The XML description contains a syntax error.
-
Exit code = 55: One of the following entries is missing:
-
Type
-
Host
-
From
-
To
-
Subject
-
The Tcl procedure should handle these exit codes and set an exit code that the agent controller can process.
You can define any type of notification that can be performed from within a Tcl script. For example, you can define notifications that send an e-mail with the trace file when a specific error condition occurs during a workflow run.
Most of the workflows provided with DirX Identity use two standard notifications: Notify if not OK and data notification (NotifyData). The data files for these notifications are centrally configured in the Configuration → Standard Files folder for ease of administration. You use the job’s Notification and Operation tabs to control how these notifications are used during the metacp job’s operation. You can also create customized notifications using the Notification configuration object. The next sections provide more information about these features.
Notify if not OK
The "notify if not OK" notification sends a message if the workflow runs on a warning or error condition. This notification is available for all meta controller jobs and is configurable via the Notify if not OK field in Notification Control in the Operations tab in the job object. Possible values are:
-
0 - no notification at all
-
1 - send notification if warnings occur
-
2 - send notification if errors occur
-
3 - send notification if warnings or errors occur
The Notification tab in the job object also manages notification objects. Click this tab to define all notification parameters.
Data Notification
The data notification feature sends data change information. In the Entry Handling tab of input or output channels, you can define whether the processed data changes are:
-
Automatically processed by the relevant agent, or
-
Sent via e-mail to an administrator, who then handles the event by hand.
You can also choose automatic processing and in-parallel notification to the administrator.
The data notification feature is controlled by the three drop-down lists in the Entry Handling tabs of input or output channels. The fields are:
-
Add Entries- controls the behavior for add operations:
NONE - no add operation at all
ADD - Adds are performed only automatically
NTF - Adds are performed by notification (no automatic processing)
ADDNTF - Adds are performed automatically and notification is sent -
Modify Entries - controls the behavior for modify operations:
NONE - no modify operation at all
MOD - Modify operations are performed only automatically
NTF - Modify operations are performed by notification (no automatic processing)
MODNTF - Modify operations are performed automatically and notification is sent -
Delete Entries - controls the behavior for delete operations:
NONE - no delete operation at all
DEL - Deletes are performed only automatically
NTF - Deletes are performed by notification (no automatic processing)
DELNTF - Deletes are performed automatically and notification is sent
In a possible scenario, the administrator handles add and delete operations by hand and modifications are performed automatically.
Creating Your Own Notifications
You can extend workflows to perform your own notifications. To extend the workflows:
-
Create a notification object under the relevant job object (this is currently only possible for meta controller jobs) or copy an existing one from a job object (Copy Object) and move it to the target job object (Move Object). You can also set up a central notification object in the Configuration → Notifications folder.
-
Set all parameters (for example, the From and To fields) and adjust the text in the XML file (tab Content) to your needs.
-
Define all files that are to be sent during the notification as attachments.
-
Select the Operation tab in your job object and set the link to the newly created notification object.
-
Call the notification from your Tcl scripts (use, for example, the user hooks uh::Epilog).
Workflow Design Rules
When you create or run Tcl-based workflows, you should follow some basic rules. The next sections provide information on:
-
Rules for algorithms
-
Rules to set up correct schedules to avoid timing conflicts
-
Rules for backup and restore
Rules for Algorithms
When you design your synchronizations, you must be sure not to produce conflicts. This section provides some rules to avoid problems in this area.
Single Master System Design
If you follow the rules in this topic, your system will be very robust. Conflicts cannot occur by design.
-
Define only one master for entry creation and deletion.
-
Run only workflows with non-overlapping execution times. If this is not possible, be sure that the workflows do not influence each other.
-
If workflows create or use the same files (for example, one workflow creates an LDIF file, the other reads it), be sure that the execution times do not overlap.
Multi Master System Design
The rules in this topic help to control a multi-master system and minimize conflicts.
-
If you need to set up several masters for entry creation and deletion, define unique criteria to distinguish the corresponding entries. Two examples are:
-
Create different trees in your directory that belong to the different masters.
-
Set up attributes or object classes that allow for distinguishing between the entries of the different masters, for example by filtering expressions.
-
If you cannot follow the previous guideline, be sure that workflows that create or delete entries do not run at the same time (avoid overlapping execution time - see the next topic).
-
If workflows create or use the same files (for example one workflow creates an LDIF file, the other reads it), be sure that the execution times do not overlap.
Rules for Schedules
Many issues must be considered when scheduling workflows. This topic explains the rules and their reasons. Set up schedules so that:
-
They do not have unrealistic values; for example, an interval of 0, which means that the workflow would always run - the scheduler ignores schedules with this setting.
-
Their possible start times cannot overlap
-
Their execution times cannot overlap
DirX Identity has some built-in features to handle conflicting situations, but only when the parameters are set correctly. For example, the DirX Identity default applications use the dxmOprMaster attribute to distinguish he mastership of different source connected directories.
Starting the Same Workflow Twice
The C++-based Server does not allow starting the same workflow twice (for example from the scheduler and from the DirX Identity Manager by hand). Both workflows would try to open, read and write the same files in the work area, which cannot work properly.
A message is written into the server logging and an extra status entry is written for the second instance.
Starting Workflows after the Server Starts
At the time when the C++-based Server is started, all workflows are started where the start time has passed and the deviation time is not over.
In this case, it can happen that a workflow was previously aborted (during the stop sequence of the C++-based Server). The messaging service keeps the related start message and resends it after C++-based server startup. The scheduler at the same time tries to start the same workflow. This operation will fail, because the same workflow was already started (a message is written into the server log and a status entry that indicates a double workflow start is created). In this way, DirX Identity ensures that the workflow is only started once.
Basic Rules for Central Configuration Object Parameters
This section describes the basic rules for setting the values of parameters in the central configuration object.
Rule 1: Polling time
-
The Polling Time in the central configuration object must be greater than 0. Otherwise, the scheduler will assume a default of 5 seconds.
Reason: a timer based on the polling time activates the scheduler. A polling time of 0 would result in heavy system load. Therefore we do not permit you to set this value.
Rule 2: Time Interval
-
The Time Interval in the central configuration object must be greater than 0. Otherwise, the scheduler will assume a default of 1 day (86400 seconds).
Reason: this value determines the interval at which the status tracker removes status entries from the database. A Time Interval of 0 would result in heavy system load. Therefore, we do not permit you to set this value.
Rule 3: Schedule Sync Interval
-
The Schedule Sync Interval of the central configuration object must be greater than 0. Otherwise, a default of 1 hour (3600 seconds) will be assumed.
Reason: normally the DirX Identity Manager automatically informs the scheduler when schedule information is changed. If this operation fails, this mechanism reads the schedules regularly from the configuration database. A Schedule Sync Interval of 0 would result in heavy system load (the schedule reread would happen always). Therefore we do not permit you to set this value.
Basic Rules for Schedule Object Parameters
This section describes the basic rules for setting the values of parameters in the schedule object.
Rule 4: Time Interval
The Time Interval in a schedule object must be
-
Greater than 0.
Reason: this value determines the interval after which this workflow has to be started again. A Time Interval of 0 does not make sense. Therefore we do not permit you to set this value. -
Greater than the polling time (see central configuration object). The scheduler will ignore schedules that do not satisfy this condition. Related error messages will be written into the logs (event log or log files).
Reason: A time interval that is smaller than the polling time could result in missed starts of workflows. -
Greater than the sum of deviation + timeout + 5 * polling time. The time buffer of 5 * polling time is recommended because multiple server components (scheduler, workflow engine, agent controller, messaging service) are involved in aborting a workflow when timeout is exceeded. Here, timeout is the sum of all job timeouts of the related workflow, multiplied with (1 + latency-factor / 100).
Example: Suppose that a workflow consists of 2 jobs running in a sequence, both with a job timeout of 10 minutes, and the latency factor is 20. Then timeout (of the workflow) is 24 minutes.
Reason: The schedule might miss start times when this condition is not satisfied.
Rule 5: Deviation
-
The Deviation of the schedule must be greater than the polling time (see central configuration object).
Reason: When this condition is not satisfied, the scheduler can miss workflow start times.
Combined Rules
These rules must be considered when several workflows that could influence each other shall not be started simultaneously or may not have overlapping execution times.
To give full control to the C++-based Server (for example, to abort agents after the timeout has been reached), you must set the Abort Execution allowed flag in the agent object in the Expert View.
Rule 6: Non overlapping start times for workflows
Suppose you don’t want the scheduler to start a set of workflows simultaneously (we assume that the workflows' runtime is no longer than 30 minutes). Define the related schedule’s start time, deviation and interval parameters so that the intervals of possible start times do not overlap. The following table provides an example of non-overlapping start times.
| Schedule | Start Time | Interval | Deviation |
|---|---|---|---|
A |
01.01.2001 00:00:00 |
2 h |
30 minutes |
B |
01.01.2001 01:15:00 |
2 h |
30 minutes |
The scheduler will not start the related workflows simultaneously, as the following figure illustrates.
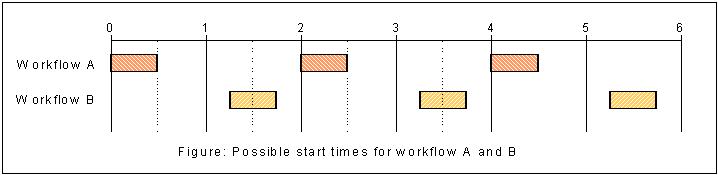
If we change the interval of workflow B to 3 hours, then overlapping starts would be possible at 4:15 to 4:30, 10:15 to 10:30 and so on.
We must also take into account that after a restart of the C++-based Server all workflows that are in their deviation time will be started simultaneously at the same time (the related messages are waiting in the messaging service). Let’s assume that the server is restarted at 4:20; then both workflows are started immediately.
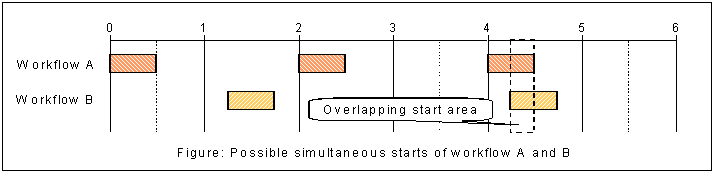
Rule 7: Non overlapping execution of workflows
Suppose you want to schedule workflows so that their execution does not overlap (which may be convenient for resource-consuming workflows). Then you must define the related schedule parameters start time, deviation, interval and polling time so that the intervals of possible execution times of a workflow do not overlap.
| Schedule | Start Time | Interval | Deviation | Timeout |
|---|---|---|---|---|
A |
01.01.2001 00:00:00 |
2 h |
15 minutes |
30 minutes |
B |
01.01.2001 01:00:00 |
2 h |
15 minutes |
30 minutes |
We additionally suppose that the polling time is set to 5 seconds.
As shown in the next figure, the workflow execution cannot overlap.
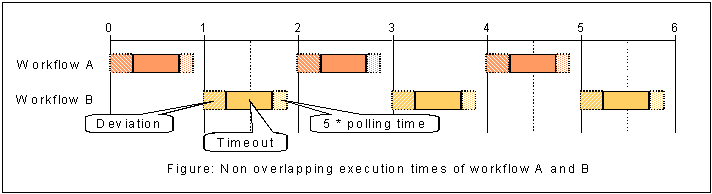
In normal operation, the upper limit of a life time of a workflow instance in the C++-based Server will be timeout + polling time, because there may be a delay of polling time before scheduler and workflow engine really detect a timeout.
The example shows that a workflow can only be active in time intervals between start time n and start time n + deviation + timeout + 5 * polling time, where start time n = start time + n*interval (n being an integer).
Rules for Backup and Restore
If you want to back up and restore your LDAP server or the configuration part of it, we recommend the following procedure:
-
Deactivate all schedules to ensure that no new workflows are started (use the Disable Scheduling function).
-
Check with the DirX Identity Manager’s Get Server State function on each C++-based Server in your environment that no workflows are still running (only status tracker and scheduler threads may be visible in the details view of this feature).
-
Stop all C++-based Servers.
-
Perform a backup or restore of your server with the native methods of your LDAP directory (for DirX, you will normally use DirXmanage) or perform an Export Configuration or Import Data command from the DirX Identity Manager’s Expert View.
-
After a restore, restart all DirX Identity Managers (because the content of the configuration database could be changed completely and the caches must be cleared).
-
Restart all C++-based Servers.
-
Activate all schedules (use the Enable Scheduling function).
Normal operation is now restored.
After a restore of a complete database or only the configuration tree in the database, you must be aware of the following problems:
-
If you have restored an older version of your configuration tree, status entries in the Monitor View of the DirX Identity Manager may be missing. Consequently, you can no longer access the related status entry file information in your status area in the file system.
-
If your database comes from a different environment (for example from a test environment), some settings in your database may not be correct, and you must adjust them by hand. Candidates are the settings in the service objects and others that are different in the two environments. Consequently, we do not recommend exchanging whole databases or configuration trees. Use instead the Export data / Export Subtree and Import data feature of the DirX Identity Manager to exchange parts of the configuration database (a whole scenario, workflows, jobs or connected directory objects).
-
Do not try to use the Import data method with data that was created with a previous version of DirXmetahub V6 if this was not explicitly allowed (see the release notes). Changes in the data structure may no longer fit with the new version of DirX Identity.
Copying Tcl-based Provisioning Workflows
You can copy Tcl-based Provisioning workflows either in DirX Identity Manager’s Global View or in its Expert View. The next sections describe how to perform these tasks. For details about DirX Identity Manager, see the chapter "Using DirX Identity Manager" in the DirX Identity User Interfaces Guide.
Copying Workflows in the Global View
To make copy operations easier and more intuitive, DirX Identity provides a complex copy method that is activated within DirX Identity Manager using the Configure method for connected directories and the New method for workflows. Both methods work closely together.
First, you create new connected directory icons that represent your connected directories. With the Configure method, you can configure these objects based on other existing connected directories that act as templates. This template is copied to represent your new connected directory. Note that the related service object is also copied, which avoids interference with the original object.
| To avoid copying files and channels that will never be used, the copy operation does not copy files and channels of connected directories of type File. Instead, the data files and channels are created when a workflow is copied. As a result, it does not make sense to create data files during such a copy operation. |
When two or more of these connected directories exist, you can link these objects via workflow lines. Next, you can either link existing workflows to these lines (using the Assign method) or create copies of existing workflows (using the New method) that act as templates. This template is copied to represent your new workflow.
Copying these templates is a complex procedure that can handle most variants of workflows:
-
By default, DirX Identity tries to find all workflows that fit between the two connected directories. It checks the Type field of the connected directory type objects of the connected directories at both sides of the workflow line and compares them with the Endpoints field of all workflows. Matching workflows are displayed in the template chooser dialog. If no workflows can be found, an error message is displayed.
-
In some cases, the list does not contain the workflow you want to copy. Deselect the Matching endpoints flag to show the list of all workflows. Now you can freely choose any of the workflows. Using this flag is especially useful if you intend to create a new type or variant of workflow starting with an existing one.
Note: The copy procedure may run into an error if the workflow requires resources that are not available between the two connected directories. In this case, you need to copy and change the workflow in the Expert View. -
If the connected directories are of the same type, you are asked about the direction the workflow is to work (for example, for an LDAP to LDAP workflow).
-
The workflow is copied, including all activities.
-
All jobs referenced by these activities including all sub-objects are copied, too. If an activity references a workflow, the workflow is not copied (a warning message is shown).
-
The input channel of the first activity (the start activity) is mapped to the related new connected directory. This action creates a new channel that points to the source connected directory. If the connected directory type is File, the necessary data file to which the channel points is also created.
-
The output channel of the last activity (end activity) is mapped to the related new connected directory. This action creates a new channel that points to the target connected directory. If the connected directory type is File, the necessary data file to which the channel points is also created.
-
When copying nested workflows, you can choose with the Copy workflows recursively flag whether the sub workflows shall be copied or not. If you do not copy the sub workflows, the copied workflow points to the original workflows. You can change these links later on by hand.
Some types of workflows cannot be copied completely with the New method and thus must be copied partially with other methods:
-
Nested workflows can only be copied when the source and target connected directories of the sub workflows are the same as for the top-level workflow. You must copy workflows that do not meet this restriction by hand.
-
For workflows that contain more than one start or end activity, DirX Identity tries to find a connected directory that fits with the corresponding connection of the workflow line and maps the new connected directory with the original one. Connected directories that do not map are not re-mapped; you must take care of this step by hand afterwards.
Both the Configure method for connected directories and the New method for workflows keep the original folder sub structure in the scenario to which the objects are copied. You can change these structures at any time with the Move method in the Expert view if required.
Copying Workflows in the Expert View
If you copy an object in the Expert View, the complete subtree is copied. For example, copying a workflow copies the workflow object and all activities with all links to other objects. Linked objects (like jobs or channels) are not copied. As a result, you must copy the linked objects separately and change the links accordingly.
For example, if you copy workflow W1 with activity A1 that points to a job J1, this results in workflow W2 with activity A1 that points to job J1. Note that the activity name can stay the same because it resides under a different workflow object.
In this example, you must copy job J1 separately, which results in job J2 (with all its sub-objects like configuration files, local connected directories or trace files). Now you must re-link activity A1 from workflow W2 to job J2. Now the two workflows (W1 and W2) are independent down to the job level.
Because job J2 still points to the same channels as job J1, you must repeat the procedure for the channels and eventually the connected directories.
Starting Tcl-based Provisioning Workflows
You can start Tcl-based Provisioning workflows in several different ways:
-
To run a workflow only from time to time or to test workflows, you should use the Run option of the workflow line context menu in the DirX Identity Manager Global View or the Run Workflow or Run Activity options of the context menus of the workflow or activity objects in the DirX Identity Manager Expert View.
-
You can use schedules to run workflows regularly at well-defined times.
-
You can use the runwf tool to trigger a workflow start from any event. See the chapter "Using DirX Identity Utilities" in the DirX Identity User Interfaces Guide for more information.
If you try to start a workflow that is still running, DirX Identity uses the following procedure to handle this situation:
-
When a workflow is started and a previous instance is still running, the workflow request is buffered as a waiting thread.
-
When the previous workflow ends it starts the next workflow (the next waiting thread) automatically.
Because the number of threads in DirX Identity is limited (see the Max number of threads parameter of the C++-based Server), the buffering stops when two-thirds of this number is reached and a "Second workflows instance" message is sent. The rest of the threads are left for other workflows to be run. Otherwise one client could request many workflow starts that fill up the server and prevent any other workflow from starting.
Raise the Max number of threads parameter if you need a higher number of buffered workflows.
When the Max number of threads is reached, an error message is sent as in previous versions of DirX Identity.
| These waiting threads are visible in the Process table of the Monitor View (entries without a time extension of the display name) as well as in the Get Server State table. |