Using DirX Identity Utilities
DirX Identity provides a set of utilities necessary for data management. These utilities include:
Transport - a set of tools that allow for the exchange of data between directory servers and domains.
Link Checker - a set of tools that check for broken links and can remove them on request.
Log Merger (logMerge) - a tool to merge the workflow-specific log files of several Java-based Servers.
Log Analyzer (logAnt) - a tool to analyze complex Java-based Server log files.
Log Viewer (logViewer) - a tool to analyze complex Web Center log files.
Run Workflow Tool - a tool to start workflows from any location inside the network from the shell level.
Run Report Tool - a tool to start reports from any location inside the network from the shell level
Transporting Data
Identity management systems require transfer of data under various circumstances.The topics in this section describe DirX Identity’s transport mechanism, including:
-
Typical application of the transport mechanism
-
How to use collections
-
Methods for exporting, deleting and importing data
-
Transporting data as a Java-based workflow
-
Transporting data in batch mode
-
How to simulate transport, including comparison of source and target
-
Some hints and restrictions you should take into account
You use DirX Identity object collections to define the set of objects you want to transfer from one location to another. The transport mechanism allows you to export collections automatically with schedules and import a set of exported files with additional filtering and mapping of attributes and automated domain mapping.
The sections that follow explain typical applications of the transport mechanism in more detail.
Typical Applications
This section describes typical applications of the transport mechanism:
-
Concurrent development in a complex identity project.
-
Management of configuration data in a configuration management system (CMS).
-
Transport of data between development system, integration / test system and productive system.
Using Concurrent Development
Customer scenarios often comprise a large set of functionality. To meet project deadlines, several developers must work in parallel, each one developing a well-defined part of the customer scenario. The concurrent work results are typically consolidated and tested in a Development system.
Let’s assume that each developer creates workflows to a specific connected system. A proven work procedure for these tasks is:
-
In the Connectivity Expert view, define a collection folder under Collections for your project.
-
Define a central collection that contains all objects that are used by all workflows (for example, the central Identity Store), project folder objects for workflows, jobs and connected directories and multiple-use agent or connected directory type definitions, INI files or scripts. We recommend creating a hierarchy of collections, where each one keeps a specific part of the central data.
-
Do not include the channel objects of the Identity Store into the central collection, since these items belong to the individual workflows. Select the Identity Store with all its sub objects, but not with the channel objects, using a rule-based export definition. Ideally, one developer (the central collection developer) should be responsible for these central collections.
-
Define a separate collection for each workflow (or set of workflows that connect a specific connected directory). Use folder objects to collect the necessary workflows, jobs and connected directories as sub structures if you want to handle multiple workflows per collection. Each workflow developer has his own collection.
Include the collection object itself into the collections (include it into the Objects tab). This step preserves the object and allows it to be used at the target side.
At the beginning of the project, the central collection developer builds the central collection once and distributes it to the workflow developers, who can now work in their private installations of DirX Identity. When a local result is available, the developers deliver their collection to the central Development system where it can be consolidated and tested. If necessary, the central collection can be updated at any time to the local sites.
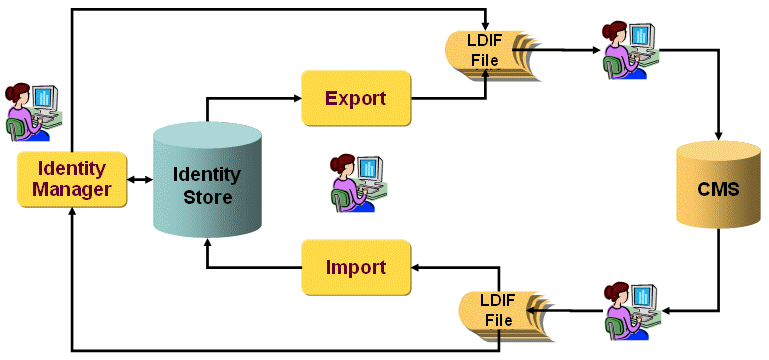
Using Configuration Management Systems (CMS)
If you use a software configuration management system, you can keep the resulting collection files as separate objects in the configuration management store. Each checkin creates a new version, which makes it easy to reset your work to a consistent state. The following figure illustrates this process.
If you need a single LDIF file with the complete project content, we recommend that you produce it during production using simple concatenation.
Alternatively, you can define a project collection that contains all of the required collections and exports it into a single file that is checked into the CMS. The disadvantages with this method are that the file may become quite large and that you lose the ability to reset parts of the file individually. So we strongly recommend using separate files.
When working with configuration management systems, you should not generate LDIF files that contain base64 format. For this reason, we recommend that you keep the flag collection.base64 set to FALSE (see the dxi.cfg file or the corresponding setting of a transport export workflow). This setting guarantees that all parts of the collection are visible in clear text format (which is not standard LDIF format and cannot be read by standard LDIF readers). These files can be handled best by configuration management systems that calculate differences from the files to reduce the amount of total disk space and to allow you to view the differences between versions of the same object.
Some configuration management systems cannot handle very long lines (for example, ClearCase). Use the parameter collection.maxlinelength in the file dxi.cfg or the corresponding setting in the transport export workflow. Set collection.maxlinelength to 2000 if you use, for example, ClearCase.
Managing Staged Environments
In identity management projects, it is important to separate development, integration and productive systems clearly. In small projects, an integration system might be dispensable. The following figure illustrates this process.
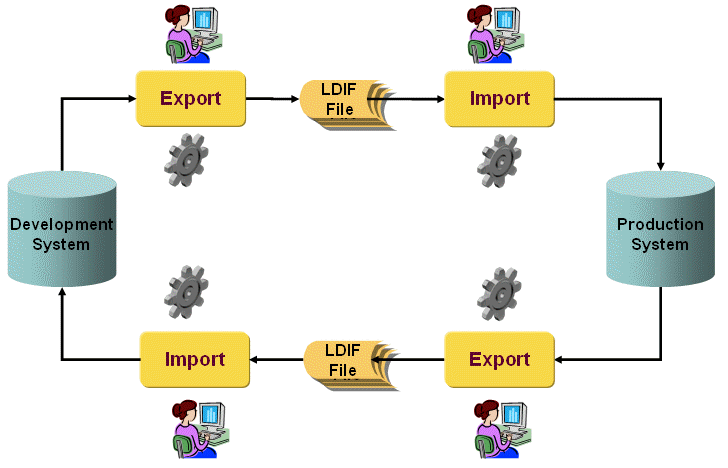
The figure shows that you can set up an export from one system and an associated import into another system and vice versa. Easy-to-use import features allow you to filter the data accordingly.
In all cases, you transfer the data between these systems as follows:
-
Define collections in the source system (for example, the development system) to identify the objects to transfer and the files where the data shall be stored.
-
Specify a transport export workflow to export these collections from the source system.
-
Define a transport import workflow to import the exported data into the target system (for example, the integration system). The import procedure lets you define domain mapping and attribute mapping operations.
Using Collections
Object collections are an easy way to define a set of objects you want to export from a Provisioning domain or a Connectivity database. You can define single object lists, lists of sub-trees and lists of rule-based object exports. You can also create object collection hierarchies.
About Collections
A collection can comprise these object sets:
Objects - a list of single objects.
Subtrees - a list of objects that each comprise a complete sub-tree of objects.
Rule-based - a list of objects that are collected based on a rule-based approach.
Collections - a list of sub-collections, this collection shall include.
To create a new collection:
-
Create a new object collection. Right-click the Collection folder or one of its sub-folders, and then select New → Collection.
-
Enter a Name and a Description for the new object collection.
-
Define the path and name of the LDIF file to which the collection is to be written.
-
You can define a set of single objects, a set of object trees, a set of objects that are exported based on rules and a set of nested collections.
-
Save the collection object.
For more information about collections and especially the collection rules, see the context-specific help information in the DirX Identity Connectivity Administration Guide and the DirX Identity Provisioning Administration Guide.
Collection Output Sequence
The output of a collection is sorted to enable comparisons on whole file contents (important for manual or automatic checks). This mechanism guarantees stable output for configuration management systems such as ClearCase.
-
First the objects of the collection (as listed at the user interface level) are sorted.
-
Next, the sub objects (if a subtree is exported) of one of these objects are sorted.
-
Next, the rule based objects are sorted.
-
Next, the sub collections are integrated and sorted.
-
Next, the attributes within each object are sorted.
-
Lastly, the values within a multi-value attribute are sorted.
Collection Examples
This chapter provides some examples of object collections. Because collections of single objects and sets of subtrees are easy to define, this section concentrates on rule-based collections.
Example 1: Tcl-based Workflows (Connectivity View Group)
Tcl-based workflow definitions consist of a complex set of objects and subtrees connected via links. You can export Tcl-based workflows best with DirX Identity’s predefined collection rule Tcl-based Workflows. You can find this collection rule in Connectivity → Collections → Collections Rules → Default. Check the Content tab for the definition, which is as follows:
-
This definition allows an export of containers (dxmContainer) with all their sub nodes.
-
Next, it defines that the dxmActivity-DN link is used from workflow objects (dxmWorkflow) to find all related activities.
-
The dxmRunObject-DN is used from the activities (dxmActivity) to retrieve either workflow objects or job objects.
-
The collection takes the job objects (dxmJob) and down to a level of three all sub objects (you could also specify 'all' at this point to take the whole subtree). Additionally, the dxmInputChannel-DN and the dxmOutputChannel-DN links are used to find all related channels.
-
All dxmSelectedFile-DN are used from the channels (dxmChannel) to retrieve potential file definitions.
-
The last definition excludes all Java-based channels (dxmChannelDefinition).
These objects define the entire workflow with all of the required channels but without the two connected directories at both endpoints. Use this template and adapt it to your needs.
Example 2: Java-based Workflows (Connectivity View Group)
Java-based workflow definitions consist also of a set of objects and subtrees that are only partially connected via links. You can export Java-based workflows best with DirX Identity’s predefined collection rule Java-based Workflows. You can find this collection rule in Connectivity → Collections → Collections Rules → Default. Check the Content tab for the definition, which is as follows:
-
This definition allows an export of containers (dxmContainer) with all their sub nodes.
-
Next, it defines to take all workflow objects (dxmIDMWorkflowDefinition) together with the next level, the activities.
-
Together with the activities (dxmIDMActivityDefinition), it retrieves the port objects and follows the dxmBindProfile-DN.
-
The collection takes the port objects (dxmPortDefinition) and follows the dxmSpecificAttributes:channelparent link to retrieve the channels.
-
The definition takes all channels (dxmChannelDefinition), including the next level of objects (the mapping objects).
-
The last definition excludes all Tcl-based channels (dxmChannel).
These objects define the entire workflow with all of the required channels but without the two connected directories at both endpoints. Use this template and adapt it to your needs.
Example 3: Users with all Objects (Provisioning View Group)
Users are related to many other objects, such as privileges, business objects and other users. DirX Identity’s predefined collection rule Users with all objects allows you to export this structure. You can find this collection rule in Provisioning → Collections → Collections Rules → Default. Check the Content tab for the definition, which is as follows:
-
The first four definitions define the export of folders, as there are countries, locations, organizations and organizational units in the user tree.
-
The next definition is the most complex one for the user object itself (dxrUser). It also exports sub objects, the privilege assignment objects and defines a lot of links to other objects. Note that the links to other users define their own user entry definitions with level=1 and do not contain any further links to follow. This definition prevents loops from occurring and also prevents the entire user population from being exported starting from one single user object.
-
The following definitions define all potential linked objects (accounts, privileges, business objects and password policies). These definitions are all set to level=1 and do not contain further link definitions.
| The links to other users define their own user object definition with level=1 and do not contain any further links to follow. These definitions prevent loops from occurring and also prevent the entire user population from being exported starting from one single user object. |
Example 4: Privilege Tree (Provisioning View Group)
In many cases, it makes sense to export a part of the privilege tree or the entire tree between systems, for example, from a development to a productive system. This type of export allows you to test new or extended privilege structures before releasing them to production. Use the predefined collection rule Privilege tree to export such structures. You can find this collection rule in Provisioning → Collections → Collections Rules → Default. Check the Content tab for the definition, which is as follows:
-
This definition allows an export of containers (dxrContainer) with all their sub nodes.
-
The next definition is for roles (dxrRole) and follows the links to junior roles (dxrRoleLink) and permissions (dxrPermissionLink).
-
The permissions (dxrPermission) are now defined, which follow the links to groups (dxrGroupLink).
-
The last definition is for target system groups (dxrTargetSystemGroup).
All of these definitions include all parents up to the highest level (the domain object). This definition ensures that no objects are missing at the target side. Note that each object is included only once into the collection.
| This definition does not export the configuration of the target systems (the object descriptions etc.). You should set up separate collections to export these definitions; otherwise, DirX Identity cannot correctly display the account and group objects of a specific target system. |
Exporting Data
DirX Identity provides a set of mechanisms to transport data from Connectivity and Provisioning databases. You can export these collections by hand or use a transport utility for more complex transfers and conversions.
The following export mechanisms are available:
Manual Collection Export - select one or more collection definitions in the tree pane, and then select Export Collection from the context menu. This action exports all selected collections into separate files. For more information about this context menu selection, see "Common Context Menu Selections".
Manual Collection Folder Export - select a folder that contains collection definitions in the tree pane and then select Export collections of subtree from the context menu. This action exports all collection definitions from this subtree into separate files. For more information about this context menu selection, see "Common Context Menu Selections".
Manual Transport Export Workflow - define a transport export workflow that exports a set of collections. After loading the workflow to the Java-based Server, select Run Workflow from the context menu. The result is an export of all collection definitions into the corresponding files. For more information about this context menu selection, see "Common Context Menu Selections".
Scheduled Transport Export Workflow - define a transport export workflow that exports a set of collections. Set up a schedule that runs this workflow periodically. Load the workflow and the schedule to the Java-based Server. The result is an export of all collection definitions into the corresponding files at the defined time.
Batch Transport Export Workflow - set up an external batch script that defines a transport export. Run the script either by hand or scheduled (using your operating system’s mechanism). The result is an export of all collection definitions into the corresponding files.
Deleting Data
You can use a collection definition to delete all entries the collection definition comprises. There are two ways of performing this operation:
-
Use the Delete Collection Entries from the context menu of the collection (for details, see "Common Context Menu Selections"). After confirmation, all entries defined in this collection definition are removed from the database. Entries are only deleted if they would be also exported by the collection.
-
Use the Deletion tab in a Transport Import workflow to define deletion of the previously imported objects before the new object set is imported. This method requires that the previously imported collections contain their collection definitions, or that there are collection definitions that permit deletion of the correct set of objects. You can use this deletion procedure to guarantee proper cleanup of a database before you import the new set of objects.
Don’t use this deletion method if you have changed some of the previously imported objects by hand - for example, if you have modified some server addresses - because the deletion mechanism does not recognize these kinds of changes. Instead, define a more specific deletion procedure and an import procedure that does not change the manually-modified attribute values.
Importing Data
DirX Identity provides a set of mechanisms to transport data from Connectivity and Provisioning databases. You can import these collections by hand or use a transport utility for more complex transfers and conversions.
The following import mechanisms are available:
Manual Connectivity Collection Import - in the Expert View, right-click the root node of the Connectivity view group and then select Import Data. After you confirm the resulting dialog, a file selection dialog is displayed. Select the file to import. The meta controller imports the LDIF file and creates missing intermediate nodes automatically where necessary. Alternatively, you can use the Import Collection File method from the context menu of a collection object to import the previously exported collection file again. For more information about these context menu selections, see "Common Context Menu Selections".
Manual Provisioning Collection Import - select the root node of any of the views of the Provisioning view group. Select File → Import from the menu bar. Choose the file to import in the resulting file selection dialog. The file is imported. If intermediate nodes are missing, error messages are displayed. Check the export definition for a complete export definition and try the procedure again. Alternatively, you can use Import Collection File from the context menu of a collection object to import the previously exported collection file again. For more information about these context menu selections, see "Common Context Menu Selections".
Manual Transport Import Workflow - define a transport import workflow that imports a set of files. After loading the workflow to the Java-based Server, select Run Workflow from the context menu. The result is an import of all files into the target directory.
Scheduled Transport Import Workflow - define a transport import workflow that imports a set of files. Set up a schedule that runs this workflow periodically. Load the workflow and the schedule to the Java-based Server. The result is an import of all files into the target directory at the defined time.
Batch Transport Import Workflow - set up an external batch script that defines a transport import. Run the script either by hand or scheduled (using your operating system’s mechanism). The result is an import of all collection definitions into the corresponding files.
Using Transport Workflows
Transport workflows allow the exchange of data from one directory to another. Data is exported from the source system into LDIF files and then imported from these files to the target system. This section provides information about import and export workflow setup and about Connectivity and Provisioning transport workflows.
Export Transport Workflow
An export transport workflow definition in the Connectivity view consists of the following items:
-
Connection information to the source system, which consists of the address of the source directory and the bind information.
-
The data set to be exported, which consists of a set of predefined collections.
-
If you want to create several files, use several collection definitions. Each collection can contain its own file name and path.
-
If you intend to work with one file, define one collection (this collection defines the file name and path) and then include all other collections as sub collections.
We strongly recommend that you do not use Base64 format because it limits the ability to control and modify the input operation.
Import Transport Workflow
An import transport workflow definition in the Connectivity view consists of the following items:
-
Connection information to the target system, which consists of the address of the target directory and the bind information.
-
The data to be imported, which is defined as a set of files.
-
A set of collections that allow for deletion and cleanup of the target database (optional).
-
One or more domain mappings, if you handle Provisioning data and if source and target domains are different. If you import data from different domains, you can set up several domain mappings.
-
One or more attribute mappings, as required. You can use all of the features of DirX Identity’s framework for Java-based workflows, which include direct mapping (the default), constant mapping, simple expression mapping and Java-based mapping. Additional transport-specific features are delete, exclude and replace.
Connectivity Transport Workflows
This section describes some typical use cases of Connectivity transport workflows.
Transferring Workflows
In many cases, it is necessary to set up and test Java-based or Tcl-based workflows thoroughly in a development system before they are used in a production system. Keeping the trees synchronized is not easy. The following procedure (which describes Java-based workflows) can help to automate this process:
-
Set up a rule-based collection in the development system that exports a set of Java-based workflows either with one common node or a set of common nodes. Use the Java-based Workflows sample collection rule to perform this task. This rule exports all related objects, including activities, ports and channels.
-
Set up an export transport workflow that exports this collection from the development system to the associated file.
-
Set up an import transport workflow that imports this file into the productive system.
-
Define attribute mappings to create working applications, for example
-
Set the active flag for all workflows to true with constant mapping
-
Exchange cluster and resource definitions to the target values with constant or replace mapping
| You can set up an export and import transport workflow in the opposite direction to transfer data from the production system to the development system. |
| We assumed only a development and a production system. Larger customer environments include an integration or test system between these two endpoints. In this case, you must set up workflows from the development to the integration system and then from the integration to the production system. |
Provisioning Transport Workflows
This section describes some typical use cases of Provisioning transport workflows.
Exchanging Privilege Trees
In many cases, it is necessary to set up and test privilege hierarchies thoroughly in a development system before they are used in a production system. Keeping the trees synchronized is not an easy task. The following procedure can help to automate this process:
-
Set up a rule-based collection in the development system that exports all roles starting either with one common node or a set of common nodes. Use the Privilege tree sample collection rule to perform this task. This rule exports also all inherited junior roles, all permissions and all groups of all target systems.
-
Set up an export transport workflow that exports this collection from the development system to the associated file.
-
Set up an import transport workflow that imports this file into the production system.
-
In this case, we assume that the domain names are the same, so a domain mapping is not necessary.
-
Because it is not desirable to transfer the group members, set up attribute mappings that exclude these attributes.
| You can set up an export and import transport workflow in the opposite direction to transfer data from the production system to the development system. |
| We assumed only a development and a productive system. Larger customer environments include an integration or test system between these two endpoints. In this case, you must set up workflows from the development to the integration system and then from the integration to the production system. |
Transferring User Trees
Use the following procedure to transfer a user subtree from one domain to another:
-
Set up a rule-based collection in the source domain that exports all users starting either with one common node or a set of common nodes. Set up a collection rule that exports only the user objects: do not follow any links and do not transport the assignment objects under the user entries (set childLevel="1").
-
Set up an export transport workflow that exports this collection from the source domain to the associated file.
-
Set up an import transport workflow that imports this file into the target domain.
-
Set up a domain mapping that converts the source domain to the target domain.
-
Set up attribute mappings to guarantee that the user entries do not contain broken links. This step may require setting up exclude rules for the following attributes:
-
Privileges: dxrGroupLink, dxrPermissionLink, dxrRoleLink, dxrInheritedPrivilegeLink, dxrPrivilegeLink
-
Business Objects: dxrContextLink, dxrCostUnitLink, dxrLocationLink, dxrOrganizationLink, dxrOULink, dxrSecLocationLink, dxrSecOrganizationLink, dxrSecOULink
-
Users: dxrRepresentative, manager, dxrSponsor, owner, secretary
-
Password Policies: dxrPwdPolicyLink
-
Note that you can keep some of these attributes if you are sure that the related objects exist. For example, if all managers and secretaries of these users are in the same tree, you can keep these attributes.
-
To be sure that no broken links exist, use the link checker and let it remove broken links if necessary after the import of the data.
Running Transport Workflows in Batch Mode
You can run transport workflows as batch jobs. The following sections describe how to set up and configure such jobs. Set up an XML configuration file that defines options and use the corresponding batch script. Additionally / alternatively you can control the script via option switches. Run the script either by hand or scheduled (by means of your operating system).
You can set up jobs for
Export - produces a list of LDIF files based on collections defined in the Identity Store (both from Connectivity and Provisioning view groups) or deletes the entries in the LDAP directory.
Import - works with a list of LDIF files (for example produced from collections) that are joined using a set of mapping rules to the target Identity Domain.
Command Line
Both export and import jobs can run from a command line. The batch job files exportConfig and importConfig reside at the following location:
install_path\tools\transport
The general syntax of the command line is
jobname [-conf filename][switches] [object [object …]]
where
- jobname_
-
is the name of the job, either exportConfig or importConfig.
- -conf filename
-
defines an XML configuration file. The default is the built-in configuration file (see also the printConf parameter described later on in this section).
- switches
-
specifies a set of switches to control the job operation.
- object
-
is either an LDIF file path in case of an import or a collection DN in case of an export or delete.
The following switches are available:
-help or -? - displays help for this job (import or export)
-server server - specifies the LDAP server address (the default is "localhost")
-user username - specifies the LDAP user DN to connect to the server (the default is "cn=DomainAdmin,cn=My-Company")
-pwd password - specifies the LDAP user password (the default is "dirx")
-ssl true | false - specifies whether to use an SSL connection (the default is false)
-trace tracefile - specifies the trace file path (if not specified, no tracing is performed)
-level level - specifies the trace level (0-9, default is 0)
-delete - deletes the entries defined in the collections instead of exporting them. This switch is only available for exportConfig. For importConfig no corresponding switch is available.
-printXSD - displays the configuration XSD schema
-printConf - displays the default XML configuration (used when no configuration file is defined, see the -conf parameter described earlier in this section)
Export Configuration
Export manages exporting of collections based on given list of collection DNs or a search definition (search base and filter) or a combination of both.
Extra Command Line Switches
The following additional switches can override settings in the configuration file:
-searchBase basenode - the base node from which to search for collection definitions to process.
-filter filter - the filter (LDAP syntax) used to search for collections under the defined base node.
-base64 true | false - whether (true) or not (false) to encode exported collections in base64 (the default is false).
-maxLine length - the maximum line length in the exported LDIF file (important if a configuration management system has a restricted length). Use 2000 for ClearCase.
-pageSize size - the page size to use for internal one-level searches. A value of 0 means that paging is not used.
-delete - perform a delete operation instead of an export operation.
Selecting Collections
You can define the list of collections with a filter definition or with an explicit list of collection definitions.
You can specify the filter on the command line in LDAP notation or in the XML configuration file as a DSML filter definition. The dxmObjectCollection class is automatically added to the filter definition.
Import Configuration
Import manages the importing of LDIF files based on a given file list and provides custom mapping of attributes depending on various custom settings.
Extra Command Line Switches
The following additional switches can override settings in the configuration file:
-spml - indicates that input files are in SPML format
-srcDomain srcdomain - defines the source domain DN for domain mapping (for example, "cn=My-Company")
-tgtDomain tgtdomain - defines the target domain DN for domain mapping (for example, "cn=Customer Domain")
-attrFile filename - specifies the file to be used as the attribute source list. Otherwise the attributes are read from the LDAP schema.
-simMode none | loggerSPML | simulateSPML | loggerLDIF | simulateLDIF - specifies the simulation mode:
loggerSPML - records the SPML request and modifies the target
simulateSPML - records the SPML request without any modifications in the target
loggerLDIF - records the request in LDIF format and modifies the target
simulateLDIF - records the request in LDIF format without any modifications in the target
none (default) - modifies the target without recording requests
-simFile filename - specifies the file to be used to record modifications. This switch is required when simMode is specified.
Standard Mapping Types
The Standard mapping types are as follows:
javaclass - use custom java class mapping
simpleexpression - use simple expression mapping
constant - use constant mapping
Transport-Specific Mapping Types
The transport-specific mapping types are as follows:
direct - set attribute value in the target from the value in the LDIF file
delete - delete all attribute values in the target
exclude - do not modify these attribute values
replace - replace patterns in attribute values
The patterns syntax is:
flags/pattern/replacement/
where
flags - specify occurrence and matching in the format
[occurrence][matching]
where
occurrence is either a (all occurrences, default) or f (first occurrence) and
matching is either m (case-sensitive, default) or i (case-insensitive).
If not specified the default value for occurrence is a (replace all occurrences of pattern) and the default for matching is m (match case).
Examples:
-
f - only the first occurrence of pattern is replaced, matching case.
-
i - all occurrences of pattern are replaced, ignoring case.
-
ai - all occurrences of pattern are replaced, ignoring case.
pattern - is a pattern definition in Java pattern syntax.
replacement - is a string with respect to character escaping ($, \, / and so on).
Note that the characters ">" and "<" have a special meaning in XML and therefore they should be specified as > and <.
For a detailed description on Java Regular Expression syntax and examples see http://docs.oracle.com/javase/tutorial/essential/regex/.
Examples:
-
All patterns (match case) of search are replaced with replace. The result for "I can search strings." is "I can replace strings."
a/search/replace/
-
All words starting with multiple "a" are replaced by a single "a". The result for "aaaaargh aaron abele" is "argh aron abele".
i/\ba+([b-z][a-z]*)\b/a$1/
-
All occurrences (ignore case) of "your<anAdjective>car" are replaced by "my<theAdjective>car. The result for "yourslowcar yourbluecar yourbluebike" is "myslowcar mybluecar yourbluebike".
im/your([a-z]*)car/my$1car/
Mapping Principles
There is an old way of mappings that are under <template> element in the XML configuration file and a new way mappings under <attrMapping> element. The GUI enables to edit/delete old way mappings and create/edit/delete new mappings.
Old Way Mapping
This attribute mapping allows specify only objectclass filter to match entries. onemptyonly and oneaddonly are handled as standalone mapping types. The old definitions are compatible with new functionality, but it is not recommended to create old way mappings in the GUI.
New Way Mapping
The new mapping offers a wider way of import possibilities. To use new approach, choose the Attribute Config of type ExtendedAttributeDefinition. For each attribute, it is possible to select different mappings for different entries. The entries that match given conditions are mapped with given mapping type. Each attribute config can define multiple mapping choices in the configuration defined by the <mapitem> subelement in the GUI represented as a subnode of the attribute config node.
Each <mapitem> element has a <matching> section and mapping section. The matching section specifies conditions that must be met in order to use the mapping defined in mapping section. A condition could be an LDAP filter or a set of DN patterns or both. Conditions can also contain the following flags:
onemptyonly - use the mapping only if the value was not set and the joined entry exists.
onaddonly - use the mapping only for a new entry.
Remarks
See the XML schema of the configuration file or the online help to get a detailed description of the mapping elements.
Simulating Transport
The import transport feature allows you to simulate a run. Simulating an import transport can help you to determine:
-
The changes that will be performed before you run the real import operation.
-
Whether the source and target are synchronized
Simulation does not cover deletion of objects. Use procedure described in "Simulating Deletion" to check how deletion would be performed.
Simulating Import
This use case assumes that you want to check the import result before you really import it into the target.
Set the option Simulation Mode of your import workflow to simulateLDIF. Define a file name (for example, simulation.ldif) and a location for the simulation result.
Run the workflow. It generates two LDIF files that show the intended operations on the target.
The simulation.req.LDIF file contains all search requests for the target and the necessary add or modify operations. For example, for an add operation:
searchbase: cn=Customers,cn=B2B Roles,cn=RoleCatalogue,cn=Customer Domain
scope: Base

dn: cn=Customers,cn=B2B Roles,cn=RoleCatalogue,cn=Customer Domain
changetype: add
objectClass: dxrContainer
objectClass: top
description: Roles for customers
dxrType: dxrRoleContainer
dxrUID: uid-7f001-6f26d110-11da5aeefcf--78dc
cn: Customers
For a modify operation:
searchbase: cn=RoleCatalogue,cn=Customer Domain
scope: Base

dn: cn=RoleCatalogue,cn=Customer Domain
changetype: modify
replace: description
description: Container for roles.
Setup your role tree here:
- Define a folder structure. You can use the structure either for logical grouping of roles or for using such folders in access policies.
- Create your roles in the defined structure.
- Assign permissions to these roles.
-
replace: dxrUID
dxrUID: metacp767f58-4a6078a8-7e3fc-358-a43c1-12d
-
The simulation.rsp.LDIF file contains all original records of the target and the necessary add or modify operation. For example, for an add operation:
dn: cn=Customers,cn=B2B Roles,cn=RoleCatalogue,cn=Customer Domain
changetype: add
objectClass: dxrContainer
objectClass: top
description: Roles for customers
dxrType: dxrRoleContainer
dxrUID: uid-7f001-6f26d110-11da5aeefcf--78dc
cn: Customers
For a modify operation:
dn: cn=RoleCatalogue,cn=Customer Domain
objectClass: dxrContainer
objectClass: top
cn: RoleCatalogue
description: Container for roles.
dxrUID: metacp767f58-4a60797c-8d00c-cf8-cc429-12d
dxrType: dxrRoleContainer

dn: cn=RoleCatalogue,cn=Customer Domain
changetype: modify
replace: description
description: Container for roles.
Setup your role tree here:
- Define a folder structure. You can use the structure either for logical grouping of roles or for using such folders in access policies.
- Create your roles in the defined structure.
- Assign permissions to these roles.
-
replace: dxrUID
dxrUID: metacp767f58-4a6078a8-7e3fc-358-a43c1-12d
-
If everything is as you expect it, set the option Simulation Mode of your import workflow to loggerLDIF. Define a file name (for example, logger.ldif) and a location for the logging result.
Run the workflow. It generates two LDIF files that show the real operations on the target (these operations should be identical to the simulation operations).
Comparing Systems
If two systems are synchronized, you would like to see what the differences are. Export the source system and then run a simulation against the target.
Set the option Simulation Mode of your import workflow to simulateLDIF. Define a file name (for example, compare.ldif) and a location for the simulation result.
Run the workflow. It generates two LDIF files that show the differences to the target.
You can see this information best in the compare.req.ldif file:
-
It contains a lot of search requests. You can ignore them.
-
Search for changetype: modify or changetype:add records. These records indicate the differences between source and target.
After reviewing the changes, you can set the Simulation Mode to loggerLDIF and synchronize the differences.
Simulating Deletion
Simulation does not cover deletion of objects. Use this procedure to check how deletion would be performed:
-
Use the option "Export Collection" from the context menu of the related collections to be deleted. This action creates a backup file that contains all entries that shall be deleted. You can use this file to check which entries will be deleted before the import operation.
-
Use the option "Delete Collection Entries" to find out if any conflicts occur, and then check into why these conflicts occur.
-
Use the option "Import Collection File" to import the previously exported entries.
Now everything should be as it was before.
Hints and Warnings
Transporting data can cause some unwanted effects.Try to avoid them:
-
Transfer of Tcl-based workflows - when objects that belong to Tcl-based workflow are updated during import operations, it can affect running workflows.For example, suppose that some activities are completed but others are still to be started.This situation can lead to inconsistencies because these activities use the updated information or a mix of original and updated information.
-
Transfer from older version to newer one - do not import data from previous versions of DirX Identity.Important mandatory attributes could be missing, which results in strange behavior of the DirX Identity Manager.If you need to do this, two options exist:
-
in some cases, you can run a migration routine after importing the data
-
set up an import workflow that sets the missing mandatory attributes to fixed values.You can change them later on.
-
-
Transfer from newer version to older one - if you want to transfer data from the current DirX Identity version to an older one, set up a batch import workflow that removes all attributes that did not exist in the previous DirX Identity version.Otherwise, you will encounter object class violations.
Using the Link Checker
The Link Checker searches for broken links in the Connectivity database or in a Provisioning domain, reports the broken links and optionally performs a cleanup.The check and cleanup functionality is configured by XML configuration files.
Four modes of operation are pre-configured:
-
Check of a Provisioning domain
-
Cleanup of a Provisioning domain
-
Check of a Connectivity database
-
Cleanup of a Connectivity database
You can change the behavior of the link checker via its configuration files.
Finally, this section provides information about Link Checker reports.
Checking a Provisioning Domain
To run a Provisioning domain check:
-
Navigate to the folder
install_path\GUI\tools\linkchecker -
You can check and adapt the configuration in the file CheckProvisioningConfig.xml. Read the link checker configuration file chapter for more information.
-
Run the file CheckProvisioning.bat
-
The results are reported in the files CheckProvisioningTrace.txt and CheckProvisioningBroken.xls
Cleaning Up a Provisioning Domain
To run a Provisioning domain cleanup operation:
| we strongly recommend running a Provisioning domain check before you run the cleanup procedure. |
-
Navigate to the folder
install_path\GUI\tools\linkchecker -
You can check and adapt the configuration in the file CleanupProvisioningConfig.xml. Read the link checker configuration file chapter for more information.
-
Run the file CleanupProvisioning.bat
-
The results are reported in the files CleanupProvisioningTrace.txt and CleanupProvisioningBroken.xls
Checking the Connectivity Database
To run a Connectivity database check:
-
Navigate to the folder
install_path\GUI\tools\linkchecker -
You can check and adapt the configuration in the file CheckConnectivityConfig.xml. Read the link checker configuration file chapter for more information.
-
Run the file CheckConnectivity.bat
-
The results are reported in the files CheckConnectivityTrace.txt and CheckConnectivityBroken.xls
Cleaning Up the Connectivity Database
To run a Connectivity domain cleanup:
-
Note: we strongly recommend to run an Connectivity domain check before you run the cleanup procedure.
-
Navigate to the folder
install_path\GUI\tools\linkchecker -
You can check and adapt the configuration in the file CleanupConnectivityConfig.xml. Read the link checker configuration file chapter for more information.
-
Run the file CleanupConnectivity.bat
-
The results are reported in the files CleanupConnectivityTrace.txt and CleanupConnectivityBroken.xls
Configuring the Link Checker
The configuration file controls the link checker’s behavior.
Server Connection
user - the bind account.
password - the password for this account.
server - the host name of the LDAP server.
port - the port of the LDAP server.
ssl - whether (true) or not (false) to use SSL (the configuration is similar to the bind profile) The default is false.
domain - the root node where to start the check or cleanup.
Example:
<connection
user="cn=DomainAdmin,cn=My-Company"
password="dirx"
server="localhost"
port="389"
domain="cn=My-Company"
/>
Logging Configuration
fileName - the path and name of the trace file
level - the log level with a value range from 0 to 9. For a good readability of the report, use level="2".
Processing Mode
The mode is configured in the process tag:
process mode - defines the processing mode. Supported values are:*
check* - in this mode broken links are checked but not modified.*
cleanup* - in this mode broken links are reported and removed.
| You can overwrite this mode for single object classes. |
Object Types and Link Attributes
The object classes of the objects to be checked and its link attributes are defined in the linkdef tag, having the attributes objectClass and "attributes" and (optionally) mode.
For each linkdef definition, one simple paged search is performed, returning all objects of the specified object class. For each object, the link attributes to be checked are read from the comma-separated attributes in the linkdef tag.
Example:
<linkdef objectClass="dxrRole" attributes="dxrRoleLink,dxrPermissionLink" mode="check" />
In this example, all roles are processed. For each role, the contents of dxrRoleLink and dxrPermissionLink is checked. In case "mode" is defined in a linkdef tag, it overwrites the global default value from the processing mode section.
Unreferenced Map Items in the Connectivity Database
mapitems - a specialized routine checks or cleans unreferenced map items in the Connectivity database. Supported values are:*
none* - does not check for broken map items (this is the default mode if the complete tag is missing)*
check* - checks for broken map items
cleanup - performs a cleanup of broken map items
Link Checker Reports
The Link Checker generates a report as shown below.
LOG(LNC201): Program 'Link Checker', Version '1.0.0.0' of '2004-11-16' started ***
LOG(LNC100): --------------------------------------------------------------------------------
ERR(LNC406): User                                        | link attribute | broken link (cleanup)
ERR(LNC406): cn=DomainAdmin                              | RoleLink       | cn=test,cn=RoleQAPSr,cn=QA,cn=RoleCatalogue,cn=My-Company
ERR(LNC406): cn=DomainAdmin                              | PermissionLink | cn=broken,cn=Permissions,cn=root
ERR(LNC406): cn=FOSTER HAROLD,ou=METAROLE,cn=Users       | RoleLink       | cn=test,cn=RoleQAPSr,cn=QA,cn=RoleCatalogue,cn=My-Company
ERR(LNC406): cn=FOSTER HAROLD,ou=METAROLE,cn=Users       | PermissionLink | cn=broken,cn=Permissions,cn=root
ERR(LNC406): cn=RAYMOND ALEXANDER,ou=METAROLE,cn=Users   | RoleLink       | cn=test,cn=RoleQAPSr,cn=QA,cn=RoleCatalogue,cn=My-Company
ERR(LNC406): cn=RAYMOND ALEXANDER,ou=METAROLE,cn=Users   | PermissionLink | cn=broken,cn=Permissions,cn=root
ERR(LNC406): cn=CANIFF MILTON,ou=METAROLE,cn=Users       | RoleLink       | cn=test,cn=RoleQAPSr,cn=QA,cn=RoleCatalogue,cn=My-Company
ERR(LNC406): cn=CANIFF MILTON,ou=METAROLE,cn=Users       | PermissionLink | cn=broken,cn=Permissions,cn=root
ERR(LNC406): cn=HOGARTH BURNE,ou=METAROLE,cn=Users       | RoleLink       | cn=test,cn=RoleQAPSr,cn=QA,cn=RoleCatalogue,cn=My-Company
ERR(LNC406): cn=HOGARTH BURNE,ou=METAROLE,cn=Users       | PermissionLink | cn=broken,cn=Permissions,cn=root
ERR(LNC406): cn=TUFTS WARREN,ou=METAROLE,cn=Users        | RoleLink       | cn=test,cn=RoleQAPSr,cn=QA,cn=RoleCatalogue,cn=My-Company
ERR(LNC406): cn=TUFTS WARREN,ou=METAROLE,cn=Users        | PermissionLink | cn=broken,cn=Permissions,cn=root
ERR(LNC406): cn=MCCAY WINSOR,ou=METAROLE,cn=Users        | RoleLink       | cn=test,cn=RoleQAPSr,cn=QA,cn=RoleCatalogue,cn=My-Company
ERR(LNC406): cn=MCCAY WINSOR,ou=METAROLE,cn=Users        | PermissionLink | cn=broken,cn=Permissions,cn=root
ERR(LNC406): cn=HERRIMAN GEORGE,ou=METAROLE,cn=Users     | RoleLink       | cn=test,cn=RoleQAPSr,cn=QA,cn=RoleCatalogue,cn=My-Company
ERR(LNC406): cn=HERRIMAN GEORGE,ou=METAROLE,cn=Users     | PermissionLink | cn=broken,cn=Permissions,cn=root
ERR(LNC406): cn=MCMANUS GEORGE,ou=METAROLE,cn=Users      | RoleLink       | cn=test,cn=RoleQAPSr,cn=QA,cn=RoleCatalogue,cn=My-Company
ERR(LNC406): cn=MCMANUS GEORGE,ou=METAROLE,cn=Users      | PermissionLink | cn=broken,cn=Permissions,cn=root
ERR(LNC406): cn=KNERR HAROLD,ou=METAROLE,cn=Users        | RoleLink       | cn=test,cn=RoleQAPSr,cn=QA,cn=RoleCatalogue,cn=My-Company
ERR(LNC406): cn=KNERR HAROLD,ou=METAROLE,cn=Users        | PermissionLink | cn=broken,cn=Permissions,cn=root
ERR(LNC406): cn=SEGAR ELZIE CRYSLER,ou=METAROLE,cn=Users | RoleLink       | cn=test,cn=RoleQAPSr,cn=QA,cn=RoleCatalogue,cn=My-Company
ERR(LNC406): cn=SEGAR ELZIE CRYSLER,ou=METAROLE,cn=Users | PermissionLink | cn=broken,cn=Permissions,cn=root
ERR(LNC406): cn=tttt,cn=Users                            | RoleLink       | cn=test,cn=RoleQAPSr,cn=QA,cn=RoleCatalogue,cn=My-Company
ERR(LNC406): cn=tttt,cn=Users                            | PermissionLink | cn=broken,cn=Permissions,cn=root
ERR(LNC406): UserToPermission                            | link attribute | broken link (check)
ERR(LNC406): cn=uid...,cn=tttt,cn=Users                  | AssignFrom     | cn=tttt broken,cn=Users,cn=My-Company
ERR(LNC406): UserToGroup                                 | link attribute | broken link (check)
ERR(LNC406): cn=uid...,cn=tttt,cn=Users                  | AssignFrom     | cn=tttt broken,cn=Users,cn=My-Company
ERR(LNC406): cn=uid...,cn=tttt,cn=Users                  | AssignTo       | cn=QAUsers  broken,cn=Groups,cn=Exchange5.5DL,cn=TargetSystems,cn=My-Company
LOG(LNC100): --------------------------------------------------------------------------------
LOG(LNC202): Program 'Link Agent' ended with 0 fatalError(s), 30 error(s), and 0 warning(s).
The broken links are reported in a table with three columns.
If there are broken links for an objectClass, a header row is written, with objectClass without "dxr/dxm" prefix, "link attribute" and broken link (cleanup) or broken link (check), depending on the mode configured.
This header row is followed by data rows, one for each broken link.The first column contains the dn of the object.To save space, the domain root is removed from the distinguished name (DN).The second column contains the link attribute without the "dxr/dxm" prefix.The third column contains the value of the broken link.
Using the Log Analyzer
Use the log analyzer tool (logAnt) to analyze complex Java-based Server log files.The tool solves two issues:
-
It writes for each workflow instance a separate file that comprises all log entries and messages.Now you have two views on Java-based Server operation: the original log files show the operation sequence as a long list of messages.The separated files allow you to view specific workflow instances.Both views are necessary for analysis of run-time behavior and in case of problems.
-
It writes statistics files in CSV format that list each workflow instance as one line.Use Microsoft Excel to analyze such files.This allows you to get an overview for a specific time range of Java-based Server operation.
Request workflows can now run several Java-based Servers.As a result, several log files must be evaluated in order to get a complete overview of one workflow.If you are running several Java-based Servers, you must evaluate all log files (using logANT) and use the log merging tool (logMerge) that generates one file per workflow but merges all logs of the different Java-based Servers based on the time stamps.
If you are running the Java-based Servers in a heterogeneous environment (Windows, UNIX), you should run logANT both on your Windows and UNIX machines because the log files normally use a different time stamp format in the log files.Next, copy the output files of logANT to any of the machines and then run logMerge.
If all your Java-based Servers run in a homogeneous environment (producing the same time stamp format in the log files), you can copy the server log files on one machine (using one folder per Java-based Server) and then run logANT and then logMerge.
The next sections explain:
-
How to configure and use the log analyzer tool (logAnt)
-
How to work with the separated files
-
How to analyze statistics files
How to Use Log Analyzer
The log analyzer tool logAnt reads the Java-based Server log files (server*.txt) and creates separated workflow-specific files as well as statistics files.
The files are written into a configurable status area, grouped by folders workflow name.
The file names are built from the start time and the workflow instance id, for example
20100528_050302.781_128dcd9f7361086.log
Note that the dollar signs ($) in the UID are removed to avoid problems with UNIX file names.
In addition, a statistics file is written in CSV format that provides an overview of all workflow runs.
Configuring the Log Analyzer
Use the logANT.ini file to configure the tool.
Input and Output
inputPath - pathname(s) of the logs folder that contains the Java-based Server log files to be analyzed. The inputPath is a comma-separated list of pathnames where the log file folders of the different Java-based Servers need to be listed. If the Java-based Servers run on different platforms, then you need to copy the log files manually to a new subfolder (one new subfolder per remote Java-based Server) on your local computer.
Example: sampleData/logs
sampleData1/logs,sampleData2/logs,sampleData3/logs
outputPath - pathname(s) of the folder where to store the analyzed files. The outputPath is a comma-separated list of folder names (one folder per Java-based Server).
Example: sampleData/status
sampleData1/status,sampleData2/status,sampleData3/status
statisticsFileName - pathname(s) of the statistics file. The statisticsFileName is a comma-separated list of statistics files (one statistics file per Java-based Server).
Example: sampleData/status/statistics.csv
sampleData1/status/statistics.csv,sampleData2/status/statistics.csv,
sampleData3/status/statistics.csv
| The number of pathnames in inputPath, outputPath and statisticsFileName must be same for all three parameters. |
Format and Filtering
completeOnly - set this flag to true if you want to suppress incomplete log files. Otherwise, (if set to false) all log files are extracted, even incomplete ones where the beginning or the end is missing.
dateFormat - the date format string. The following 2 formats are automatically selected as defaults:
dd.MM.yyyy HH:mm:ss.SSS
MMM dd, yyyy HH:mm:ss.SSS
Define your own date format if those formats do not apply. See SimpleDateFormat javadoc for format definitions
filterPath - a partial path describing one or more workflows that have to be analyzed.
All workflows under the filterPath are processed. If empty, all workflows are considered.
Examples:
My-Company/Main/Identity Store/ → delivers all real-time maintenance workflow instances of the My-Company folder
Definitions/My-Company → extracts all request workflow instances of the My-Company sub-folder
filterID - a (partial) workflow instance ID defining one (or more) special workflow(s) to be analyzed.
Example: 128f3a4e274$-758a
Note: if you copy these IDs from a file name, be aware that the $ was removed!
Trace Configuration
trace.filename - the name of the trace file.
Example: sampleData/logANT.trc
trace.level - the trace debug log level for the output to the trace file. Allowed values are 0 to 9. No file is written if trace.level is set to 0.
console.level - the console debug log level for the output to the trace file. Allowed values are 0 to 9. No console output is written if trace.level is set to 0.
How to Use Separated Files
The log analyzer writes a set of files into a flat folder structure under the outputPath where the folder names are workflow names, for example:
EventBasedAccountProcessing
EventBasedUserResolution
PasswordEventManager
Each file in such a folder represents a workflow instance. The file extension informs you about specific situations
.log - a complete file with no errors and warnings.
.err - a complete file with errors (and maybe warnings).
.war - a complete file with warnings only.
.inc_log - an incomplete file with no errors and warnings.
.inc_err - an incomplete file with errors (and maybe warnings).
.inc_war - an incomplete file with warnings only.
Because you analyze typically only a set of log files that represent a specific time range some of the files might be incomplete. This is indicated by a file extension that starts with inc.
Analysis of a Workflow Instance File
Workflow instance files contain all messages that belong to a specific workflow instance. Java-based Server log file lines in the original log files can be very long and thus hard to interpret.
A typical file has this structure:
Line 1: start_time [thread] [workflowPath], for example:
Jun 30, 2010 13:41:26.480 [colocated-0] [ My-Company/Main/Identity Store/EventBasedAccountProcessing/12988a86e5f$-3a5a ]_
start_time_ - the time where this workflow instance was started._
thread_ - the first thread who worked on that workflow._
workflowPath_ - the workflow path of the instance. This path is valid for the whole file.
Line and following lines: timestamp [threadShortcut] message, for example:
13:41:26.480 [c-0] [initiator=ResolveTask] wfID [uid=12988a86e5f$-3a23, expired=false]: WF start_
timestamp_ - a time stamp without date when this message occurred._
thread_ - either a complete thread specification (a TCP IP address) or a shortcut. c-n stands for 'colocated-n'._
message_ - the message itself.
For realtime workflows, all following messages have a standardized format. For request workflows, there are different message types:
-
Messages which contain a workflow path and a workflow ID. These messages have the same standardized format as for realtime workflows.
-
Messages of the Java-based Server extension for request workflows (REQWF):
-
Messages representing internal handling of a request workflow instance and which contain the workflow ID only. These messages contain timestamp, thread and the message text itself.
-
Messages representing a request workflow instance start without even a workflow ID. These messages contain timestamp, thread and the message text itself.
See the samples below for a better understanding.
Realtime Workflow File Sample
Here is an example file (with preceded line numbers for reference):
Jun 30, 2010 13:41:26.480 [colocated-0] [ My-Company/Main/Identity Store/EventBasedAccountProcessing/12988a86e5f$-3a5a ] (1)
13:41:26.480 [c-0] [initiator=ResolveTask] wfID [uid=12988a86e5f$-3a23, expired=false]: WF start (2)
13:41:26.481 [c-0] IDSJ654 State of workflow with ID '12988a86e5f$-3a5a' (12988a86e5f$-3a5a) changes from '' to 'RUNNING'. (3)
13:41:26.481 [c-0] IDSJ651 State of activity 'join' of workflow with ID '12988a86e5f$-3a5a' (12988a86e5f$-3a5a) changes from 'PREPARING' to 'RUNNING'. (4)
13:41:26.531 [c-5] [join,initiator=.] EBR001 AccountEventController received ModifyEvent with id = ... (5)
 13:41:26.729 [c-5] EBR039 AccountEventController finished processing a ModifyEvent for Entry ... (6)
...
13:41:26.898 [c-5] IDSJ651 State of activity 'join' of workflow with ID '12988a86e5f$-3a5a' (12988a86e5f$-3a5a) changes from 'RUNNING' to 'SUCCEEDED'. (7)
13:41:26.898 [c-5] IDSJ659 State of activity 'join' of workflow with ID '12988a86e5f$-3a5a' changes to 'SUCCEEDED'. Workflow put to Java space. (8)
13:41:26.904 [c-0] [initiator=join] IDSJ651 State of activity 'join' of workflow with ID '12988a86e5f$-3a5a' (12988a86e5f$-3a5a) changes from 'RUNNING' to 'SUCCEEDED'. (9)
13:41:26.913 [c-0] IDSJ654 State of workflow with ID '12988a86e5f$-3a5a' (12988a86e5f$-3a5a) changes from 'RUNNING' to 'SUCCEEDED'. (10)| 1 | The first message contains the start time and the full workflow path. |
| 2 | This line shows a workflow start message that was produced by the thread colocated-0 which runs in the Java-based Server itself. This thread represents the workflow engine. |
| 3 | |
| 4 | The workflow engine (c-0 = colocated-0) changes the workflow instance state to RUNNING and the activity state to RUNNING and puts the workflow item into the Java space where threads for this resource family (not visible here) can lease and work on it. |
| 5 | |
| 6 | A specific thread (c-5 = colocated-5) leased this workflow item from Java space and works on it. The messages here are individual to the workflow type. |
| 7 | |
| 8 | These two lines show the end of the work for thread colocated-5. It puts the Workflow back to Java space. |
| 9 | |
| 10 | The workflow engine (colocated-0) takes over and finishes this workflow instance. |
This is a sample of a workflow that is processed in one step, which means that the workflow engine prepares the workflow and then it is processed by a specific thread. If workflow runs in steps or if an error activity is triggered, the workflow engine puts the workflow several times to Java space and there may be different specific threads that work on this workflow instance.
Request Workflow File Sample
Here is an example file (with preceded line numbers for reference). Messages of the Java-based Server extension for request workflows are shown in bold type:
29.04.2015 09:15:28.050 [http-nio-40000-exec-1] [ confdb/workflows/Definitions/My-Company/Approval/4-Eye Approval/14d04020c7a$-7a0e ] (1)
09:15:28.050 [http-nio-40000-exec-1] [] REQWF307 "createWorkflowInstance" started; authenticated user: cn=DomainAdmin,cn=My-Company, workflowName: null, language: null. (2)
09:15:29.095 [http-nio-40000-exec-1] REQWF308 "createWorkflowInstance" of workflowID '14d04020c7a$-7a0e' terminated successfully. (3)
09:15:29.157 [c-1] [initiator=Service (WorkflowServiceImpl)] IDSJ676 Running Workflow {uid=14d04020c7a$-7a0e, repositoryID=cn=14d04020c7a$-7a0e,cn=2015-04-29,cn=4-Eye Approval,cn=Approval,cn=My-Company,cn=monitor,cn=wfroot,cn=My-Company, properties=null, {resourcefamily={workflowengine}}initiator=Service (WorkflowServiceImpl)}. (4)
09:15:29.204 [c-1] IDSJ657 State of activity 'Approval by Privilege Managers' of workflow with ID '14d04020c7a$-7a0e' (My-Company/Approval/4-Eye Approval/2015-04-29/Pitton Lavina -> Analyst Reports) changes from 'null' to 'null'. Workflow put to Java space. (5)
09:15:29.251 [c-1] IDSJ657 State of activity 'Approval by User Manager' of workflow with ID '14d04020c7a$-7a0e' (My-Company/Approval/4-Eye Approval/2015-04-29/Pitton Lavina -> Analyst Reports) changes from 'null' to 'null'. Workflow put to Java space. (6)
09:15:29.251 [c-1] IDSJ650 State of activity 'Approval by User Manager' of workflow with ID '14d04020c7a$-7a0e' (My-Company/Approval/4-Eye Approval/2015-04-29/Pitton Lavina -> Analyst Reports) changes from 'PREPARING' to 'RUNNING'. (7)
…
09:16:13.347 [http-nio-40000-exec-2] REQWF319 "getWorkflowInstance" started; authenticated user: cn=Benetton Gianfranco,ou=Marketing,o=My-Company,cn=Users,cn=My-Company, workflowID: '14d04020c7a$-7a0e', language: de.
09:16:13.427 [http-nio-40000-exec-2] REQWF320 "getWorkflowInstance" of workflowID '14d04020c7a$-7a0e' terminated successfully.
…
09:16:17.300 [c-1] IDSJ650 State of activity 'Apply Approved Privilege Change' of workflow with ID '14d04020c7a$-7a0e' (My-Company/Approval/4-Eye Approval/2015-04-29/Pitton Lavina -> Analyst Reports) changes from 'RUNNING' to 'SUCCEEDED'. (8)
09:16:17.300 [c-1] IDSJ653 State of workflow with ID '14d04020c7a$-7a0e' (My-Company/Approval/4-Eye Approval/2015-04-29/Pitton Lavina -> Analyst Reports) changes from 'RUNNING' to 'SUCCEEDED'. (9)
09:16:17.456 [c-1] IDSJ660  Workflow 14d04020c7a$-7a0e ('My-Company/Approval/4-Eye Approval/2015-04-29/Pitton Lavina -> Analyst Reports') has finished. Cleanup started. (10)
09:16:17.549 [http-nio-40000-exec-2] [] REQWF354 "waitForIdle" of workflowID '14d04020c7a$-7a0e' terminated successfully. (11)
| 1 | The first message contains the start time and the full workflow path. |
| 2 | This line shows the start of a createWorkflowInstance operation initiated by the Request Workflow processor. The workflow path and the workflow ID are not yet known at operation start. |
| 3 | This line shows successful termination createWorkflowInstance operation including the resulting workflow ID. |
| 4 | This line shows a workflow start message that was produced by the thread colocated-1 which runs in the Java-based Server itself. This thread represents the workflow engine. |
| 5 | |
| 6 | |
| 7 | The workflow engine (c-1 = colocated-0) changes the workflow instance state to RUNNING and the activity state to RUNNING and puts the workflow item into the Java space where threads for this resource family (not visible here) can lease and work on it. |
| 8 | |
| 9 | |
| 10 | The workflow engine (colocated-1) takes over and finishes this workflow instance. |
| 11 | The operation waitForIdle terminated successfully. |
This is a sample of a request workflow where all relevant approvers accepted an assignment of a privilege to a user.
How to Use Statistics Files
The log analyzer writes statistics files in CSV format that comprise not more than 65535 lines. This limit comes from Microsoft Excel that does not allow more lines.
Each workflow instance is represented by one line in such a file. The next sections explain the statistics file format and elaborate how to analyze such a file.
Statistics File Format
The statistics file contains a header line with the field names and then up to 65535 lines with these fields:
Start time - the date and time when the workflow started or when the analysis started (if the workflow start is not contained in the file).
End time - the date and the time when the workflow ended or when the analysis ended (if the workflow end is not contained in the file).
Duration - the duration of this workflow run in the format hh:mm:ss,000 (the last three digits represent milliseconds).
Wf-Name - the name of the workflow (without the path, see below).
Wf-ID - the workflow ID. This field is important for backtracking into the original log files.
Complete - a flag that indicates that the workflow was completely processed (no missing lines at the beginning or at the end). The following values can occur:*
C* - complete
I - start or end missing
ERR - the number of error messages that occurred within this workflow run.
WAR - the number of warning messages that occurred within this workflow run.
Path - the complete workflow path
Example:
Jun 30, 2010 13:32:58.995;Jun 30, 2010 13:33:04.197;00:00:05.202;SetPassword in Intranet;129889a4697$5b48;C;0;0;My-Company/Main/Target Realtime/Intranet Portal
How to Analyze Statistics Files
You can analyze the resulting statistics files best with Microsoft Excel. Perform the following steps to analyze a file with the delivered analysis template.
Preparing the Analysis
Perform these steps:
-
Be sure that Microsoft Excel is installed on the machine where you want to analyze the statistics file.
-
Copy the file statistics_template.xls from the product media.
-
Copy it to statistics.xls or any other file name.
-
Open the statistics file (let’s assume its name is output.csv) that was produced by the log analyzer tool (double click it). Excel should display a page with the data already separated to columns. If this is not the case, use the Data → Import External Data function of Excel to read the input correctly.
-
Open the prepared statistics.xls file.
-
Select the Data tab. It should be empty.
-
Copy and paste all lines from the opened output.csv file to the Data tab into cell A1. You can now close the output.csv file (do not save it) because we do not need it anymore.
-
Perform Tools → Macro → Macros and run the macro Statistics_Format
Viewing Statistics
In this section you can view statistics on all entered data. Perform these steps:
-
Click the Workflows tab and then select a cell in the pivot table.
-
Perform Refresh Data from the context menu.
-
The table shows now statistics on the data coming in the Data tab.
For each workflow name you can see:
Count - the number of workflow runs found.
Minimum of Duration - the minimum duration of all these workflow runs.
Average of Duration - the average duration of all these workflow runs.
Maximum of Duration - the maximum duration of all these workflow runs.
Sum of Errors - the sum of all error messages for this workflow type.
Sum of Warnings - the sum of all warning messages for this workflow type.
Additionally, you can view the last three parameters in graphical form:
-
Perform the same action on the Table tab to refresh the chart in the Chart tab.
-
Click the Table tab and then select a cell in the pivot table.
-
Perform Refresh Data from the context menu.
-
Click the Chart tab.
The chart shows now statistics on the data in the Data tab in graphical form.
Viewing Workflow Runs Over Time
Here you can view the behavior of all workflow runs over time.
-
Lookup the last line in the Data tab.Let’s assume it is for example 1447.
-
Click the Timing tab and click in the middle of the chart.
-
Perform Source Data from the context menu and then click the Series tab.
-
Click the All workflows series and enter '=Data!C2:C1447' into the Values field.Enter '=Data!A2:A1447' into the Category (X) axis labels field.Click OK.
The chart displays the duration of all workflow runs (y-axis) over the parameter start time (x-axis).You can easily see if there are hot spots or areas where workflows need a longer time.
Using the Log Merger
Use the Log Merger (logMerge) if you are running several Java-based Servers and you want to merge workflow-specific log files that have been generated (using the logANT tool).
The Log Merger processes all the output folders that have been generated by logANT and then generates one file per workflow.The merging of the records is performed on the time stamps.
The Log Merger solves two issues (same as in logANT, but for all output files of logANT):
-
It writes a separate file for each workflow instance that comprises all log entries and messages.Now you have two views on Java-based Server operation: the original log files show the operation sequence as a long list of messages.The separated files allow you to view specific workflow instances.Both views are necessary for analysis of run-time behavior and in case of problems.
-
It writes statistics files in CSV format that list each workflow instance as one line.Use Microsoft Excel to analyze these files.This technique allows you to obtain an overview of a specific time range of Java-based Server operation.
The next sections explain:
-
How to configure and use the Log Merger (logMerge)
-
How to work with the separated files
-
How to analyze statistics files
How to Use the Log Merger
The Log Merger (logMerge) reads the output files generated by logANT and creates separate workflow-specific files and statistics files.
The files are written into a configurable status area, grouped by folders workflow name.
The file names are built from the start time and the workflow instance ID, for example:
20100528_050302.781_128dcd9f7361086.log
| The dollar signs ($) in the UID are removed to avoid problems with UNIX file names. |
A statistics file is also written in CSV format that provides an overview of all workflow runs.
Input and Output
inputPath - pathname(s) of the logs folder that contains the workflow-specific log files to be merged. The inputPath is a comma-separated list of pathnames where the workflow-specific log files have been generated by a previous call to logANT.
Example: sampleData/status
sampleData1/status,sampleData2/status,sampleData3/status
outputPath - pathname of the folder in which to store the merged files.
Example: sampleData/status
statisticsFileName - pathname of the overall statistics file.
Example: sampleData/status/statistics.csv
Trace Configuration
trace.filename - the name of the trace file.
Example: sampleData/logMerge.trc
trace.level - the trace debug log level for the output to the trace file. Allowed values are 0 to 9. No file is written if trace.level is set to 0.
console.level - the console debug log level for the output to the trace file. Allowed values are 0 to 9. No console output is written if trace.level is set to 0.
How to Use Separated Files
The Log Merger writes a set of files into a flat folder structure under the outputPath where the folder names are workflow names.
The same information applies as for logANT, as logMerge just creates an overall view of the workflow-specific logs.For more details, see "How to Use Separated Files" in the section "Using the Log Analyzer".
How to Use Statistics Files
The Log Merger writes an overall statistics files in CSV format that comprises no more than 65535 lines.This limit comes from Microsoft Excel, which does not allow more lines.
Each workflow instance is represented by one line in the file.
The same information applies as for logANT, as logMerge just creates an overall view of the workflow-specific logs.For more details, see the section "How to Use Statistics Files" in the section "Using the Log Analyzer".
Using the Log Viewer
Use the Log Viewer (logViewer) tool to analyze complex Web Center log files.The tool solves two issues:
It displays all requests (Struts actions) within that log file in a list.
For each request you can open a details window that displays the complete logging part of this request.
The next sections explain:
-
How to use the Log Viewer (logViewer) tool
-
How to work with the request list
-
How to work with the details window
How to Use the Log Viewer
The log analyzer tool logViewer reads Web Center debug log files (usually stdout.timestamp.txt in the folder TOMCAT_HOME\logs) and prepares them for detailed analysis.
The log files must be obtained with Web Center log level set to DEBUG. (Assign the value 2 to the parameter com.siemens.webMgr.log.level in Web Center’s web.xml.)
Running the Log Viewer
Perform these steps:
-
Unpack the tool to any folder you like.
-
Copy a Web Center debug log file to the logViewer\log folder.
-
Rename it to log.txt.
-
Run the logViewer\run.bat (or the logViewer/run.sh) file.
-
After a few seconds the result is created in the log folder.
-
Start the logViewer\log\summary.html page. The tool displays all requests (Struts actions) in a list. (Use the tool tips to understand the columns and items.)
-
Clicking a row opens a separate window that displays the complete logging part for this specific request.
How to Use the Request List
The request list displays all requests as a list. The meaning of the columns is:
R - the request sequence number.
Start - start time for this request.
End - end time for this request.
Time - duration of this request.
Session ID - the identifier of the session. The tooltip displays the full session id. A flag indicates whether the session was newly created (N) or already in use before (U).
SSL ID - the SSL identifier for requests sent via HTTPS.
Loginname - the common name of the logged-in user. The tooltip displays the user’s full DN.
SSO User - the single sign-on username in case of a single sign-on request.
Path - the requested Struts action. The tooltip displays also the JSP executed and the form bean name. The special paths STARTUP and SHUTDOWN indicate that the Web Center application was started and stopped, respectively.
Forward - the action forward returned from the executed JSP.
Target - the path assigned to the action forward. The path is either a Struts action or a Tiles definition name. In case of a Struts action, a flag indicates whether the action is invoked via an HTTP redirect (R) or via a local redirection (L).
Exceptions - any exceptions that occurred during request processing.
Use the scroll bars to navigate within the list.
How to Use the Details Window
This window shows all messages for a specific request. The top level line allows navigation through the request list:
(name) - the request name in the form rn-sn-action where
rn - indicates the sequence request number
sn - indicates the sequence session number. s0 is displayed for start and stop requests.
action - defines the Struts action.
Fix session - use this flag to fix the current session. This allows navigating only within the request list of this session. In the rest of this chapter, first (next, previous, last) request means the first (next, previous, last) request in the current session if this flag is enabled.
First - displays the first request in the list.
Startup - displays the most recent previous the startup request.
Exc - displays the most recent previous request that threw an exception.
Prev - displays the previous request in the list.
Next - displays the next request in the list.
Exc - displays the next request that threw an exception.
Shutdown - displays the next shutdown request.
Last - displays the last request in the list.
Use the scroll bars to navigate in the message list.
Using the Run Workflow Tool
The run workflow tool allows you to start workflows from any location inside the network from the shell level.The tool is Java-based and can run on all DirX Identity supported platforms.The tool does not need any other parts of the DirX Identity system installed.You can use it to start workflows triggered by any event outside DirX Identity (event trigger).
The run workflow tool consists of two components to run workflows in the C++-based Server and in the Java-based Server.
The functionality to execute a workflow is provided as two Java classes (siemens.dxm.tools.RunWorkflow for a workflow running in the C++-based Server and siemens.dxm.tools.RunJavaWorkflow for a workflow running in the Java-based Server), the delivered batch files act as wrappers.The tool connects to the configuration database (via LDAP) and reads the bind credentials to establish a connection to the DirX messaging service.If this action succeeds, subsequent messages are sent to the appropriate C++-based Server to start and monitor the workflow.For workflows running in the Java-based Server, one message is sent to the messaging system that triggers the workflow; the workflow itself is not monitored by the run workflow tool.
Installing the Run Workflow Tool
Note: All machines where DirX Identity is installed already contain an installed version of the run workflow tool.Extra installation is not necessary.On all other machines, perform this sequence:
-
The Java Runtime Environment (JRE) must be installed on the machine. (See the readme file on the DVD for the version supported.)
-
A zip or tar file is delivered with DirX Identity in the folder:
install_path\tools\utilities\runwf.zip (on Windows) or
install_path\tools\utilities\runwf.tar (on Linux) -
Extract the file runwf.zip to any file directory of your choice on Windows platforms.
-
Unpack the file runwf.tar.gz (using gunzip and tar) into any file system directory on UNIX platforms. Perform chmod 755 runwf.sh.
Running the Run Workflow Tool
For workflows running in the C++-based Server, you can run the tool with one of the commands:
-
runwf.bat workflow-path (on Windows)
-
runwf.sh workflow-path (on UNIX platforms)
For workflows running in the Java-based Server, you can run the tool with one of the commands:
-
runJavaWf.bat workflow-path (on Windows)
-
runJavaWf.sh workflow-path (on UNIX platforms)
Or you can include the Java class into your Java application.
The one and only parameter of the batch file is the workflow-path. This is a slash (/) separated list of display names as shown in the tree view of the DirX Identity Manager’s Expert View.
Examples:
-
runwf.bat "Default/Source Scheduled/LDIFfile/LDIFFile2Ident"
Traverses the tree beginning with the node "workflows" and finds the corresponding workflow by comparing the display names. In this case, it starts the workflow Meta2LDIFfile_Full located in the sub-folder Default/Source Scheduled/LDIFfile/LDIFFile2Ident. As shown in the example above, a workflow path which contains blanks must be enclosed with double quotes, for example "my name". -
java -cp … siemens.dxm.tools.RunWorkflow -cfg runwf.cfg
This is a direct call of the Java class without a batch file. It reads the configuration file runwf.cfg and starts the related workflow. runwf.cfg contains all relevant parameters and should appear as follows:tf=trace.out trace=3 name=default/Source Scheduled/LDIFfile/LDIFfile2Ident
Parameters
The batch file contains a set of parameters. The option -cfg filename allows you to store all parameters to be loaded from a file. The valid parameters and their options are:
-
name - a list of display names which qualify the workflow to be started. For example: Default/Source Scheduled/LDIFfile/LDIFFile2Ident.
-
dn - starts the workflow with this distinguished name. Note that either -name or -dn must be provided.
-
host - the LDAP server’s hostname. This is the server where the Connectivity configuration resides. The default value is localhost.
-
port - the LDAP server’s port. The default value is 389.
-
rootDN - the distinguished name (DN) of the configuration data’s root. The default value is dxmc=dirxmetahub.
-
user - the bind profile that will be used. The default value is cn=server_admin,dxmc=dirxmetahub.
-
password - the bind profile’s password. Specifying this parameter in the batch file or configuration file is deprecated for security reasons. Instead it should be absent. If absent, the password is taken from the property ldap of the file password.properties of the installation folder of this tool. It will be stored back in encrypted form for security reasons.
-
auth - the authentication type. Anonymous and simple (the default) are currently supported.
-
initiator - setting this switch allows you to distinguish between several runwf instances. This value is transferred to the Initiator field in the corresponding workflow status entry. The default value is extern. This parameter is only used for workflows running in the C++-based Server.
-
tf (or equivalently: tfile) - the trace file where the trace output will be written. If absent, no trace output will be written. The placeholder <?Localtime/> (case-sensitive) expands to a timestamp representing the current time. When using this placeholder in a productive environment, it is your responsibility to clean up the resulting trace files.
-
timeoutCreate - after sending the workflow create message, the runwf tool waits this number of seconds for a reply (this is normally fractions of a second). This switch prevents deadlocks at this point. A value of 0 or absence of this parameter or command-line option, respectively, denotes infinite waiting. This parameter is only used for workflows running in the C++-based Server.
-
timeoutExecute - after sending the workflow execute message, the runwf tool waits this number of seconds for a reply. This switch prevents deadlocks at this point. A value of 0 or absence of this parameter or command-line option, respectively, denotes infinite waiting. This parameter is only used for workflows running in the C++-based Server.
-
statustracker - delivers status tracker messages to the log file (can be used for debugging)
off - Status tracker messages are not written to the log file (default)
on - Status tracker messages are written to the log file
This parameter is only used for workflows running in the C++-based Server. -
trace - trace level. The following levels are supported:
0 - none
1 - default
2 - detailed
3 - verbose
Exit Codes
The batch file (and the Java class) will return 0 to indicate successful execution.Otherwise, the return code has the following meaning:
-
1 - internal error (critical)
-
2 - destroy instance failed.Can’t destroy the previously created workflow instance.This return code is only relevant for workflows running in the C++-based Server.
-
3 - unbind from the C++-based Server failed.This return code is only relevant for workflows running in the C++-based Server.
-
>3 - an error number delivered by either the message service or the C++-based Server.This return code is only relevant for workflows running in the C++-based Server.
Using the Run Report Tool
The run report tool allows you to start reports from any location inside the network from the shell level.The tool is Java-based and can run on all DirX Identity supported platforms.The tool does not need any other parts of the DirX Identity system installed.You can use it to start reports triggered by any event outside DirX Identity.
The functionality to execute a report is provided as a Java class (siemens.dxm.report.Main), the delivered batch files act as wrappers.The tool connects to the configuration database (via LDAP) and then reads the bind credentials to establish a connection to the DirX messaging service.If this action succeeds, subsequent messages are sent to the appropriate C++-based Server to start and monitor the report.
Installing the Run Report Tool
To install the run report tool:
-
The Java Runtime Environment (JRE) must be installed on the machine.(See the readme file on the DVD for the version supported.)
-
A zip or tar file is delivered with DirX Identity in the folder:
install_path\tools\utilities\runReport.zip (on Windows) or
install_path\tools\utilities\runReport.tar (on UNIX) -
Extract the file runReport.zip to any file directory of your choice on Windows platforms.
-
Unpack the file runReport.tar.gz (using gunzip and tar) into any file system directory on Linux platforms. Perform chmod 755 runReport.sh.
Running the Run Report Tool
You can run the tool with one of the commands:
-
runReport.bat report-name report-type (on Windows)
-
runReport.sh report-name report-type (on Linux)
Or you can include the Java class into your Java application.
Example:
-
runReport.bat Default/Generic HTML
Runs the Generic report in HTML format. -
java -cp … siemens.dxm.report.Main -cfg runReport.cfg
This is a direct call of the Java class without a batch file. It reads the configuration file runReport.cfg and executes the related report. runReport.cfg contains all relevant parameters and should appear as follows:tf=trace.out tr=3 password=dirx name=default/LDIFFile/Meta2LDIFfile_Full
Parameters
The batch file contains a set of parameters. The option -cfg filename allows you to store all parameters to be loaded from a file. The valid parameters and their options are:
-
name - a list of display names which qualify the report to be executed. For example: default/Generic
If the path contains blanks, you should enclose it with double quotes, for example "my name". Start qualifying the report name from the node "dxmC=reports,dxmC=GUI,dxmC=Configuration,dxmC=DirXmetahub". Note that either name, dn or f must be provided. -
dn - executes the report with this distinguished name. Note that either name, dn or f must be provided.
-
f - define a file path that contains the report definition. Note that either name, dn or f must be provided.
-
type - the report type, for example HTML or XML.
-
host - the LDAP server’s host name. This is the server where the Connectivity configuration resides. The default value is localhost.
-
port - the LDAP server’s port. The default value is 389.
-
ssl - indicates whether SSL shall be used for authentication. Allowed values are true and false.
-
user - the bindprofile that will be used. The default value is cn=server_admin,dxmc=dirxmetahub.
-
password - the bind profile’s password.
-
auth - the authentication type. Anonymous and simple (the default) are currently supported.
-
rootDN - the distinguished name (DN) of the configuration data’s root. The default value is dxmc=dirxmetahub.
-
base - the node at which to start object processing for this report. For example:
dxmC=Default,dxmC=Status Data,dxmC=DirXmetahub. -
scope - the scope for searching the objects to process. The default is subtree. Allowed values are
base object - the base object itself
one level - use only objects of the next level under the base object
subtree - use all objects beneath the base object -
o - the output path to which the report result is to be written.
-
trace - trace level. The following levels are supported:
0 - none
1 - default
2 - detailed
3 - verbose