Managing Compliance
Compliance management consists of the following tasks:
-
Setting up segregation of duties (SoD) to ensure that conflicting privileges are not assigned to users.
-
Setting up risk management to ensure that high-risk privileges are only assigned to users when absolutely necessary.
-
Setting up certification campaigns to control user access rights to resources in connected systems.
-
Setting up the DirX Identity audit trail to get historical information about objects.
-
Setting up and using DirX Identity status reports to get up-to-date information about objects.
The next section describes these tasks in more detail.
Managing Segregation of Duties (SoD)
Segregation of duties (SoD) is the set of policies that specify user-privilege assignments that constitute conflicts of interest and the process of checking whether privilege assignments to a specific user are in conflict according to the policies.These policies work with any type of privilege and even with different types of privileges.
DirX Identity’s features for SoD allow you to:
-
Create an unlimited number of SoD policies.
-
Combine any type of privilege with any other type to define a conflict (roles, permissions, groups).For example, you can define that a role is in conflict with a group.Note that you cannot define SoD policies for role parameters.Instead, you should define policies at the group level.
-
Detect hierarchical SoD problems.The SoD checking algorithm can detect hierarchical SoD violations.For example, if you assign two roles that are not in conflict, DirX Identity might detect a conflict at the permission or group level during privilege resolution.
-
View all accepted SoD conflicts for a user from the SoD Exceptions tab.
-
View all SoD exceptions for a specific SoD policy from the SoD Exceptions objects that are located under it.
-
Run a full SoD check at regular intervals. Use the FullSoDCheck rule via the FullSoDCheck workflow that runs the policy execution service.
To understand the SoD concepts, read the DirX Identity Use Case Document Using SoD.
How SoD Works in DirX Identity
This section explains how segregation of duty works within DirX Identity.
-
To avoid reduced performance, you must activate this feature for each domain at the domain object explicitly (by using the Segregation of Duties (SoD) checks flag).
-
To optimize performance, activating an SoD policy sets the Has conflicting privileges flag in the corresponding privileges. If the privilege is no longer part of an SoD policy, the flag is reset automatically. Note: if you intend to import SoD policies directly via LDAP, be sure that the Is active flag is not set. Set the flag manually after import for each SoD policy.
-
All users are also checked to determine whether SoD violations already exist. If SoD violations are detected, the corresponding approval workflows are started (for the selection mechanism see below).
-
During privilege resolution, the DirX Identity services layer checks for SoD conflicts only if a privilege is marked with the Has conflicting privileges flag. "Add privilege" orders handled in approval workflows that are already running are also checked. This means that already running approvals and the new approvals started by current actions are both counted. These SOD conflicts are stored in the orders of the approval workflows described in this section. If the DirX Identity Services layer detects a conflict, it starts an approval workflow automatically (for the selection mechanism see below). Note that this action is completely independent of whether the privilege is marked for approval. The approvers can see the SoD conflicts and must decide whether they approve the conflict.
-
If the approvers reject the assignment, the privilege is not assigned to the user.
-
If the approvers accept the assignment despite the SoD conflict (which makes sense in some cases), the privilege is assigned to the user. In this case:
-
The privilege is automatically marked for regular re-approval with an end date according to the default parameters of the domain.
-
The SoD conflicts are shown in the SoD Exceptions tab of each user entry.
-
For each SoD policy, you can view all existing SoD Exceptions as sub-objects.
-
-
You can run FullSoDcheck workflows regularly to be sure that no undetected SoD violations exist in your domain. This workflow checks that all detected SoD violations already have a corresponding SoD exception.
It is important to understand that DirX Identity does not use special SoD workflows.Workflow selection operates as follows:
-
If a privilege is flagged for approval (the "Requires approval" flag is set), the defined approval workflow is used also for SoD approval.
-
If a privilege is not flagged for approval (the "Requires approval" flag is not set), a default workflow is used for SoD approval.
For both cases, the workflow selection mechanism is described in the section "Workflow Selection" in the chapter "Understanding Request Workflows" in the DirX Identity Application Development Guide, where the DomainAdmin is the logged-in user (the DomainAdmin executes the SoD services).Be sure that the access policies allow the DomainAdmin to execute the required approval workflow(s).
To understand the SoD concept, read the DirX Identity Use Case Document Using SoD.
Managing Risk
DirX Identity provides the ability to perform risk assessment for identities based on an extensible set of risk factors.
When risk assessment is enabled at the domain and a risk policy is defined, DirX Identity’s Risk Calculation workflow regularly calculates the risk factors for every user in the domain and then aggregates them into a compound risk, thus classifying users into risk categories from low to high.Web Center displays a user’s risk category, and DirX Identity Manager displays a user’s individual risk factors.Examples for risk factors include SoD violations, imported accounts and group memberships and total number of group memberships or privileged accounts.For any requested change in a user’s privilege assignments, a DirX Identity assignment request workflow can compare the compound risk before and after privilege assignment.If the risk category increases as the result of the requested privilege assignment, additional approval steps can be required before the privilege can be assigned.Compliance officers, line managers and administrators can use DirX Identity’s risk assessment feature to monitor the risk values in the domain and plan actions to reduce the number of high risk users; for example, by running appropriate certification campaigns or by enforcing additional approval steps.
This section explains how DirX Identity risk management works and how to configure it.
How Risk Assessment Works
DirX Identity provides the following mechanisms for performing risk management:
-
A domain-wide control for activating and deactivating the risk assessment function.
-
A risk policy object for defining the risk factors to be measured and their relative importance in the domain. Exactly one domain-wide risk policy must be defined.
-
A Risk Calculation workflow that calculates the risk for every user in the domain and assigns every user a computed overall risk level of low, medium or high.
-
A Risk Approval workflow for privilege assignments and deassignments that computes the potential risk level for the user if the change is approved. If the potential assignment indicates high risk, the workflow invokes an additional approval step.
Supported Risk Factors
DirX Identity supports the following risk factors:
-
Group memberships
-
Imported memberships
-
Imported accounts
-
Privileged accounts
-
SoD violations
The Risk Calculation workflow computes each factor separately for every user. In the risk policy for the domain, you specify a weight for each factor to identify which factors are more important than others for your domain. Risk calculation takes place over the entire domain and the workflow stores each risk factor’s mean and standard deviation in the risk policy object.
Computed Values
Values computed by the Risk Calculation workflow include:
-
The raw value for a risk factor, which is the computed score of the factor at a specific user.
-
The standard score for a risk factor, which is a normalized score for the factor at a specific user. It is computed in the following way:
-
Standard Score = (raw score – arithmetic mean) / standard deviation
-
-
The compound score for a user, which is all the standard scores for the user computed with the formula:
-
∑(riskFactorScorei * riskFactorWeighti)
The result is a double-precision floating point number.
-
-
The overall risk for a user, which is calculated using the high-risk and low-risk limits defined in the risk policy object. If the user’s compound score exceeds the upper limit, the risk classification is high. If the user compound score falls below the lower limit, the risk classification is low. All values between are treated as medium.
How Risk Factors are Computed
This section describes how the Risk Calculation workflow calculates each supported risk factor.
Group Memberships
Some groups contribute more to a user’s risk than others. In the same way, some applications (which are equivalent to target systems) are considered risky for a company. As a result, a risk weight can be attached to each group and to each target system. The default weight is 1 for both groups and target systems. So the risk score for the memberships of a target system would be:
-
riskWeightTS * ∑(1Group * riskWeightGroupi)
The risk score/raw value for all group memberships is then the sum of the target system scores.
Imported Accounts
The risk score is the sum of imported accounts, each account multiplied with the risk weight of its target system. An imported account is one with dxrState = Imported. Imported accounts might not be associated with a user. Therefore, they are not counted for any user.
Privileged Accounts
The risk score is the sum of privileged accounts, each account multiplied with the risk weight of its target system. A privileged account is one with dxrType = Privileged.
Sod Violations
Each SoD Policy that a user violates increases the risk. An SoD violation is stored as an LDAP entry of type dxrSoDException beneath the violated policy entry. Its attribute dxrUserlink refers the violating user.
Special Handling for Personas, User Facets and Functional Users
The Risk Calculation workflow computes and displays the risk values for all of these objects. For personas, the risk factors are implicitly added to the corresponding user. So at the user, the additional factors obtained via the persona are included. This means that risk factors are counted here - for example, special Group memberships - that you cannot see looking at the user entry (as they come just from an associated persona). For user facets, this action is performed implicitly during user facet inheritance. There is no special handling for functional users.
Configuring Risk Management
To configure your domain for risk assessment (risk-based governance):
-
Define a risk policy for the domain
-
Configure the Risk Calculation workflow
-
Set up the Risk Approval workflow
-
Activate risk management at the domain
The next sections describe these tasks in more detail.
Defining a Risk Policy
An inactive risk policy object is available in the My-Company domain at the location Policies → Risk → Risk policies → Risk Policy in DirX Identity Manager’s Provisioning view.
In Customer Domain, create your own risk policy and check the Is active flag. Be aware that there should be only one active risk policy for a domain.
In the risk policy object:
-
Select the risk factors that you want to use for risk calculation and assign a weight to each one according to your needs. Risk factors that you leave empty are not used for risk calculation.
-
Define the upper and lower risk limits for overall risk calculation.
Last Risk Calculation, Compound Score Deviation, Standard Deviation, mean and count fields are populated by the Risk Calculation workflow.
Configuring the Risk Calculation Workflow
In DirX Identity Manager’s Connectivity view, you’ll find the template Risk Calculation workflow in:
Workflows → Default → Identity Store → RiskGvnController
Use this template to create this workflow type in your domain. You can use the Global View if you have already a scenario for your domain. If not, a scenario that includes this workflow type will be created during the first run of the Target System Wizard
Activate the workflow and create a schedule to run it periodically; for example, every night.
This workflow uses the RiskGovernance resource family. Be sure to configure threads for this resource family in your Java-based Server.
The workflow computes the risk scores for all users, personas, user facets and functional users in your domain. It stores the values at the corresponding objects. The workflow also populates the Last Risk Calculation, Compound Score Deviation, Standard Deviation, mean and count fields in the risk policy object.
Configuring the Risk Approval Workflow
n DirX Identity Manager’s Provisioning view, you’ll find the sample risk approval request workflow at:
Workflows → Definitions → Default → Assignments → RiskApproval
The first activity in this workflow calculates the new risk level that would become effective if the assignment was approved.If the risk level is computed to high (is equal to 3), an additional approval step Approval by Company Head must be executed if Approve by Privilege Manager has been accepted.For more information about the risk approval workflow, see the section "Understanding Assignment Workflows" in the chapter "Using Request Workflows" in the DirX Identity Application Development Guide.As with other assignment workflows, you can customize the risk approval workflow to your needs.See the DirX Identity Customization Guide for details.
Activating Risk Management
To enable risk management, check Risk Check active checks in the Compliance tab of the domain configuration object.This action enables the Risk Calculation workflow to run on schedule.You can check the risk policy object in DirX Identity Manager to view the time at which the workflow last ran.
To view the risk assessment for a user, user facet, persona or functional user, click the object’s Risk Parameters tab.This tab displays the risk values computed during the last Risk Calculation workflow run.
Managing Certification Campaigns
Managing certification campaigns consists of the following tasks:
-
Preparing a campaign
-
Starting a campaign
-
Monitoring a campaign
-
Generating reports
For details on how to perform these tasks for user or privilege certification campaigns, see the DirX Identity Use Case Document Certification Campaigns. Note that the access certification technique is now deprecated in DirX Identity and is replaced with the technique used for user certification campaigns.
The next section provides information about setting up DirX Identity for certification campaigns. These steps are pre-requisites to running user certification campaigns and are described in more detail in the DirX Identity Use Case Document Certification Campaigns.
Enabling the Mail Workflow
Certification campaigns send mail at various intervals, so you need to ensure that the mail workflow is enabled:
-
In the Provisioning View, browse to Workflows → Configuration → Services → SMTP
-
Enable the mail workflow by providing the SMTP host address and port and removing the value dummy for Map Mail Address.
Setting up the Certification Campaign Controller
Before you can start, monitor or complete a certification campaign, you need to configure the Certification Campaign Controller workflow, add a resource family for it and create a schedule for it.
To add a resource family for the Certification Campaign Controller workflow:
-
In the Connectivity view, browse to Expert View → Configuration → DirX Identity Servers → Java Servers → your_domain_name → your_domain_server.
-
In the Resource Families tab, move the CertificationCampaign resource from the Available list to Selected. Set the value for Thread number to 1, and then click Save.
To configure and enable the Certification Campaign Controller workflow:
-
In the Connectivity Global View, select the appropriate scenario for your domain. Select the workflow line between the two Identity Store connected directories and then select New from the context menu.
-
Select the Certification Campaign Controller workflow. The workflow wizard starts and guides you through the configuration options. In the first step, make sure to check Is Active. After the last step, click Finish to save the new workflow in your scenario.
To add a schedule for the Certification Campaign Controller workflow:
-
Browse to Connectivity → Expert View → Schedules.
-
Add a schedule task for CertificationCampaignController. See the context-sensitive help for details.
Creating a Certification Campaign Folder
The Certification Campaigns view contains certification campaigns. It also contains a folder named Default, which contains notification templates in the Notifications subfolder. You can use these templates when you set up a campaign.
When recurring certification campaigns are used, a folder Archive will be automatically created and will store all successfully completed certification campaigns. This folder is a backup repository and is not handled by the Certification Campaign controller.
To create a certification campaign, you create a new campaign folder:
-
In the Certification Campaigns view, select a campaign folder and then select New from the context menu.
For more information on creating certification campaigns, see:
-
The DirX Identity Tutorial.This document provides a tutorial on how to create a user or privilege certification campaign.
-
The DirX Identity Use Case Document Certification Campaigns.This document provides use cases that illustrate how to create and manage user or privilege certification campaigns.Note that the access certification technique is now deprecated in DirX Identity and is replaced with the technique used for user certification campaigns.
Managing the Audit Trail
You can configure an audit trail for each DirX Identity domain.They track all changes in the Identity store and generate audit trail information from all workflows.
The audit records are in XML format.Most of them are stored in the Identity Store along with the entry that was changed, or, when produced by a workflow, in log files of the corresponding Java-based Server or pushed to a Message Broker, if DirX Audit is installed.Each audit record may be signed.
You can use the DirX Identity Provisioning audit trails in conjunction with the tracing information from the Tcl-based workflows to audit the DirX Identity Provisioning system.
This chapter explains
-
How audit trail works
-
The audit trail format
-
How to set up audit trail
-
How to handle the audit trail service
-
How to verify signatures
How Audit Trail Works
DirX Identity’s audit trail mechanism ensures that all relevant actions in the Identity Store and the Identity Servers are correctly tracked:
-
Audit policies allow you to configure the DirX Services layer audit trail. This audit trail tracks all requests to the Identity Store coming from the user interfaces (Business User interface, Web Center, Identity Manager), Web Services (REST service, SPML service), consistency and resolution workflows, as well as the meta controller in Tcl-based provisioning workflows. These components store the audit records in the attribute dxrHistory of the affected LDAP entry.
-
The auditing of Java-based realtime workflows can be activated per workflow, and for request workflows, globally for the whole domain. They store their audit trails in extra log files of their hosting Java-based server.
-
For Web Center, auditing for authentication can be enabled. The corresponding audit records are written to the dxrHistory attribute in LDAP.
The following figure illustrates DirX Identity’s audit service components.
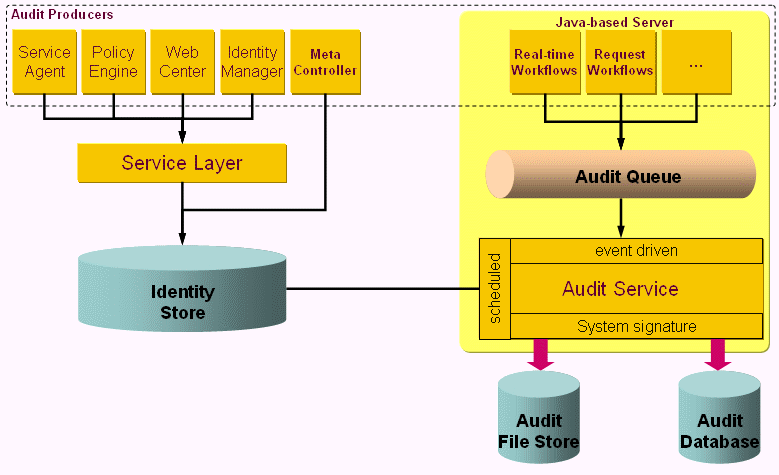
If DirX Audit is installed:
-
The Java-based server can send the audit trail directly to DirX Audit’s Message Broker using the JMS audit handler. A DirX Audit JMS collector picks them up immediately and stores them in the Audit Database.
-
DirX Audit server regularly reads the audit records from the dxrHistory attribute of the LDAP entries, stores them in the Audit Database and removes them from the LDAP entry.
Without DirX Audit, you can schedule the ExtractAuditTrail workflow to read the audit trail from dxrHistory attributes and store them in files. Afterwards, it also removes the extracted values from LDAP.
DirX Identity comes with a pre-configured setup of objects and attributes that are tracked by the audit trail mechanism. You can change this default audit trail configuration as necessary.
| Either create your own audit policies or copy the default policies to prevent any changes you make to them from being overwritten during an upgrade installation. |
| You can only establish auditing for objects that have a dxrHistory attribute in their schema definition. The corresponding object description must also contain a definition for the dxrHistory attribute. Otherwise, the audit policy does not allow selecting this object type. |
Identifying Multiple Causes of Account and Group Changes
To audit the complex operations in DirX Identity, it is essential to identify the causal event of a group membership change or an account creation or account state change. The following causes for these changes exist:
-
Changes to date fields at the user (can result in state changes)
-
Privilege assignments at the user
-
Change to permission parameters at the user
-
Changes in privilege structure
-
Privilege assignments to business objects
Each audit record contains the ID of the causing audit event, if it was triggered by another action. Audit causes are transported from the causal event (like a new privilege assignment) down to secondary (account and group modification) and ternary events (provisioning actions at the connected system) automatically. The system makes sure to pass the causing event ID to downstream actions, either by putting the ID into messages or by storing it at the changed LDAP object (like the changed role). If the object was changed multiple times, there can be more than one causing ID. You can see them in audit records in the why → referenceID section; the multiple cause IDs are separated by blanks.
The following figure shows the use cases in more detail.
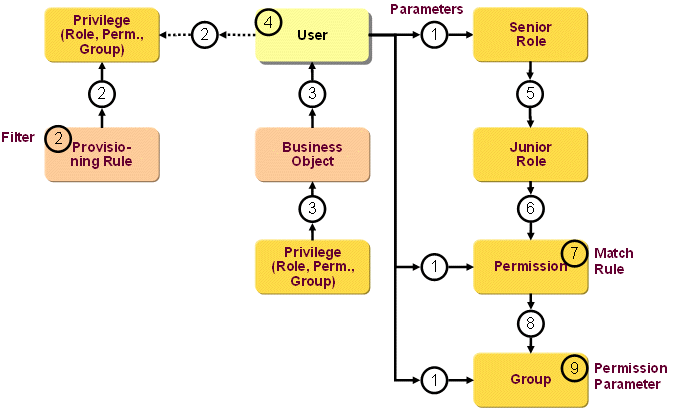
As shown in the figure, the possible causes for account or group changes are:
-
Adding, changing or removing an assignment to the user manually in any client (for example, Identity Manager, Web Center or a consistency rule in the Policy Execution). Change covers changes of start- and end date and of role parameters. If a privilege is flagged for approval, the assignment is forwarded to the corresponding request workflow.
-
Adding or removing an assignment to the user by executing a provisioning rule.
-
Adding or removing an assignment to the user by business object inheritance.
-
Changing a date field or a permission parameter at the user. Changing a date field can result in a state change. Permission parameter changes may affect the evaluation of a permission match rule
-
Adding or removing a junior role assignment to the role.
-
Adding or removing a permission assignment to the role.
-
Adding, changing or removing a match rule at the permission.
-
Adding or removing a group assignment to the permission.
-
Changing a permission parameter at the group.
Identifying and Referencing Audit Causes
Each audit trail is identified by a unique audit trail ID. A sample ID is uid-c0a8c84-2701ff04-130994315e4—7fff.
If multiple causes occur at one object in one edit step (for example two or more role assignments are added to the user before the user is saved), the audit trail IDs of the second (and further) causes are deduced from the first cause’s ID (= basic ID) by incrementing an integer number, for example
uid-c0a8c84-2701ff04-130994315e4--7fff: first cause, basic ID
uid-c0a8c84-2701ff04-130994315e4--7fff-1: second cause
uid-c0a8c84-2701ff04-130994315e4--7fff-2: third cause
In this special case, in the account or group audit trails, the first cause is always referenced in the why → referenceID element. This is done since the current reference algorithm cannot distinguish between the different causes. Note that the numbering is arbitrary, which means that each of the causes may be the real causal event of the account/group change.
About Audit Trail Format
Audit trails are in XML format. For example, setting an end date at a user which results in a deactivation of this user entry is recorded as follows:
<audit:auditRecord recordID="uid-8b19a156--48df5847-11c27441c27--7f96" seqNo="25" when="20080903085602.000Z"
xmlns:audit="urn:com:siemens:dxm:audit:1:0" xmlns:dsml="urn:oasis:names:tc:DSML:2:0:core" xmlns:history="urn:com:siemens:dxr:history:1:0" xmlns:spml="urn:oasis:names:tc:SPML:1:0" xmlns:xsi="http://www.w3.org/2001/XMLSchema-instance">
<audit:activeParticipant>
<spml:identifier type="urn:oasis:names:tc:SPML:1:0#DN">
   <spml:id>cn=Taspatch Nik,ou=Global IT,o=My-Company,cn=Users,cn=My-Company</spml:id>
   <spml:identifierAttributes>
       <spml:attr name="Name">
            <dsml:value type="string">Taspatch Nik</dsml:value>
       </spml:attr>
        <spml:attr name="AltName">
            <dsml:value type="string">5326</dsml:value>
        </spml:attr>
        <spml:attr name="First Name">
            <dsml:value type="string">Nik</dsml:value>
        </spml:attr>
        <spml:attr name="Last Name">
            <dsml:value type="string">Taspatch</dsml:value>
        </spml:attr>
    </spml:identifierAttributes>
    <audit:uid xsi:type="audit:uid">uid-7f001-2c9c34a9-11c24031414--7ff9</audit:uid>
    <audit:objectType xsi:type="audit:objectType">User</audit:objectType>
</spml:identifier>
</audit:activeParticipant>
<audit:whereFrom application="ApplyChange" server="139.25.161.86"/>
<audit:whereTo port="389" server="kaiserswerth06"/>
<audit:why>
<audit:type>onRequest</audit:type>
<audit:referenceID>uid-8b19a156--48df5847-11c27441c27--7fad</audit:referenceID>
</audit:why>
<audit:operation operation="modify">
<audit:operationCategory>Object</audit:operationCategory>
<spml:identifier type="urn:oasis:names:tc:SPML:1:0#DN">
    <spml:id>cn=Franca Baretti 8744,cn=Accounts and Groups,cn=Windows Domain Europe,cn=TargetSystems,cn=My-Company</spml:id>
    <spml:identifierAttributes>
        <spml:attr name="Name">
            <dsml:value type="string">Franca Baretti 8744</dsml:value>
        </spml:attr>
        <spml:attr name="AltName">
            <dsml:value type="string">uid-7f001-2c9c34a9-11c24031414--7ff1</dsml:value>
        </spml:attr>
        <spml:attr name="First Name">
            <dsml:value type="string">Franca</dsml:value>
        </spml:attr>
        <spml:attr name="Last Name">
            <dsml:value type="string">Baretti</dsml:value>
        </spml:attr>
    </spml:identifierAttributes>
    <audit:uid>uid-7f001-2c9c34a9-11c24031414--76c5</audit:uid>
    <audit:objectType xsi:type="audit:objectType">Account</audit:objectType>
</spml:identifier>
<spml:modifications>
    <spml:modification name="State" operation="add">
        <dsml:value type="string">DISABLED</dsml:value>
    </spml:modification>
    <spml:modification name="State" operation="delete">
        <dsml:value type="string">ENABLED</dsml:value>
    </spml:modification>
    <spml:modification name="EndDate" operation="add">
        <dsml:value type="string">20081002220000.000Z</dsml:value>
    </spml:modification>
</spml:modifications>
</audit:operation>
<audit:response result="urn:oasis:names:tc:SPML:1:0#success"/>
</audit:auditRecord>
This audit trail example shows most of the features:
- Header
-
each trail starts with general information:
- seqNo
-
if the trails are stored in a file, a sequence number protects deletions of items (this requires a system signature).
- when
-
each trail comes with the date and time stamp at which this event occurred
- activeParticipant
-
indicates the person that initiated this event. It contains a set of identifying attributes:
- spml:id
-
the DN of the person
- audit:uid
-
the audit trail UID. DirX Identity automatically provides a UID value that allows the object to be tracked for as long as it exists. Moves or renames of the object do not change this UID value.
- audit:objectType
-
the object type to which this event belongs. You can use audit policies to define this value per object type.
- spml:identifierAttributes
-
the attributes for each object type that are to be delivered with each audit trail. You can use audit policies to define these values per object type.
- audit:whereFrom
-
information about the application that caused the event and the server on which this application ran.
- audit:whereTo
-
information about the server and the location to which the event was written.
- audit:why
-
the reason the event was created:
- audit:type
-
the type of event (event based, manually triggered, …)
- audit:referenceID
-
only available if this event (a secondary event) was caused by another event (primary event). This information allows for tracking dependencies between events.
- operation
-
the audited operation in detail:
- audit:operation
-
the type of operation (add, modify, delete)
- audit:operationCategory
-
a coarse-grained category for the operation (object, assignment, …)
- spml:identifier
-
the object. It contains a set of identifying attributes. For details, see the activeParticipant description in this section.
- spml:modifications
-
the modifications in detail.
- audit:response
-
the operation result (success, failure)
Features that are not represented in the example trail shown here include:
- System signature
-
each trail can optionally be protected by a system signature which guarantees that the audit trails cannot be changed.
- Client signature
-
most manual actions can optionally be signed with a client certificate to guarantee the identity of the activeParticipant.
Audit trails remain in the Identity Store (Provisioning Configuration) until the ExtractAuditTrail workflow writes them to a file and then deletes them from the Identity Store.
DirX Identity Provisioning does not provide any clients for audit trail viewing. Use standard XML tools instead.
To prevent audit trails from being deleted with their related object, the objects remain in the Identity Store (Provisioning Configuration) until the audit trail is saved by a ExtractAuditTrail workflow. A special consistency rule cleanupDeletedObjects can be used to periodically delete all objects without audit trails.
Setting up Audit Trail
Configure the audit trail mechanism for DirX Identity and for Web Center authentications at the service, request workflow, and real-time workflow layers. The next sections provide instructions on how to perform these tasks, as well as providing information about how to set up audit policies for custom object types and set up client signatures.
Auditing for the Service Layer
To set up auditing for the DirX Identity Services layer:
-
In the Compliance tab at the Domain object, check the Enable Auditing for → Service Layer flag.
-
In the Audit Trail Database connected directory in the Connectivity view, set the path and filename where the audit information is to be written in the Filename field of the Data File definition. For more details, see the section "Handling Audit Trail Workflows".
-
In the Provisioning → Auditing view, set up audit trail policies to configure the details of audit trail recording. For instructions on how to set up audit trail policies for your own object definitions, see the section below.
Auditing for Request Workflows
To set up request workflow auditing:
-
In the Compliance tab at the Domain object, check the Enable Auditing for → Request Workflows flag.
-
In the Compliance tab at the Domain object, check the Enable Client Signature for → Request Workflows flag if you want to work with client signature for people activities. In this case the relevant people activities must be flagged accordingly.
-
In the Compliance tab at the Domain object, check the Enable Client Signature for → Privilege Assignment Requests flag if you want to work additionally with client signature for privilege assignment requests.
-
In the Compliance tab at the Domain object, check the Enable Client Signature for → Attribute Modification flag if you want to work additionally with client signature for attribute modification requests.
-
At each Java-based Server object (see the Audit Trail Folder field), define the path where the audit trail information for request workflows is to be written.
Auditing for Real-time Workflows
To set up auditing for real-time workflows:
-
You can enable auditing for real-time workflows at each individual real-time workflow (see the activities' Write Audit Log flag). There is no central flag to enable / disable auditing for real-time workflows.
-
At each Java-based Server object (see the Audit Trail Folder field), define the path where the audit trail information for real-time workflows is to be written.
Auditing for Web Center Authentications
To set up auditing for successful and failed attempts to log in to Web Center:
-
In the Compliance tab at the Domain object, check the Enable Auditing for → Authentications flag.
-
In the Audit Trail Database connected directory in the Connectivity view, set the path and filename where the audit information is to be written in the Filename field of the Data File definition. For more details, see the section "Handling Audit Trail Workflows".
-
If auditing for the DirX Identity Services layer is enabled and an audit policy for user objects is activated, the audited identifying attributes for users authenticating against Web Center are taken from that policy. Otherwise, some default identifying attributes apply.
Setting up Audit Policies for Custom Object Types
You can create audit policies for your own custom object types.
If you use an object description with a symbolic name (for example, '<object name="myObject">' that is represented as the LDAP object class myObjectClass, you should map these values in the file Customer Extensions → Object Descriptions → ObjectTypeMap.properties in the form:
myObject=myObjectClass
Now you can select myObjectClass from the drop-down list in the access policy definition.
Setting up Client Signature
Client signature works with both, Internet Explorer and Firefox.
We recommend setting up a certificate owner check. For more information, see the section "Customizing the Certificate Owner Check" in the chapter "Customizing Auditing" in the DirX Identity Customization Guide.
Internet Explorer
Take into account the following prerequisite to set up client signature:
-
Microsoft CAPICOM SDK (version 2.1.0.2 or higher) is a prerequisite for operation of DirX Identity with client signature. Note that Microsoft does not support CAPICOM on Windows 7.
Perform the following steps to install CAPICOM:
-
Download the correct versions from the vendor’s site and install them.
-
Navigate to the folder containing the shared object capicom.dll.
-
Register the shared object using the suitable operating system commands.
The following sample command sequence shows how to locate and register capicom.dll using a DOS command prompt:
cd C:\Program Files\Microsoft CAPICOM 2.1.0.2 SDK\Lib\X86

regsvr32 capicom.dll
Handling Audit Trail Workflows
The ExtractAuditTrail workflow creates audit trail records. This workflow reads audit trail from the Identity Store and writes them to the file identified by the AuditTrailDB connected directory. To configure the workflow, right-click ExtractAuditTrail and then select Configure:
-
The Export Properties tab lets you define the Base Object, Subset and Search Filter for audit trail record retrieval. All objects included in the search are handled by the workflow.
-
The Import Properties tab contains a link to the file object where you can define the path and filename prefix of the audit trail files, for example:
C:\MetahubData\AuditTrailDB\auditTrail_
In this case, the files are written to the directory C:\MetahubData\AuditTrailDB\. During each run, a file with the name prefix timestamp.xml is generated. -
The Set Tracing tab allows you to define the trace parameters for the audit trail workflow.
You can define several audit trail workflows that handle different parts of your Identity Store in parallel or at different times.
Managing Status Reports
For each DirX Identity domain, you can configure status reports that reflect the current status of objects in the identity store.
This section explains how to generate reports.See the DirX Identity Customization Guide for information on how to customize status reports.
Generating Status Reports
DirX Identity Provisioning provides several ways to produce status reports about the objects in the Identity Store (Provisioning Configuration).You can produce them:
-
With the Web Center, to produce object status reports.The type of status reports you can produce depends on the access policies that you have set up.
-
Dynamically, by hand, using DirX Identity Manager (Provisioning) to generate a status report and display it online or write it to a file, as desired.
-
Automatically on a regular basis, by scheduling a Tcl-based workflow that generates the status reports (one job for each report type). Note that there are two different workflows for the Connectivity and Provisioning configuration.
-
With the runReport tool to generate a report in the Connectivity configuration. Note that there is currently no runReport tool to generate reports in the Provisioning configuration. For details about how to configure and run this tool, see the section "Using the Run Report Tool" in the chapter "Using DirX Identity Utilities" in the DirX Identity User Interfaces Guide.
Status reports that are generated and written to files (either through DirX Identity Manager (Provisioning) or through a status report generator workflow) can be output in the defined format; this selection is made when you configure the workflow for generating the report, and is made on a per-job basis. XML status reports are useful for import into standard report generators like Crystal Reports, or to Microsoft Excel or a database to enable statistical analysis. HTML reports are "ready to view".