Using the Target System (Provisioning) Workflows
DirX Identity target system (Provisioning) workflows synchronize information from connected systems with the Identity Store.
The DirX Identity target system workflows provided with the default Connectivity scenario include:
-
Initial load/validation workflows - workflows that perform an initial load or a validation from the connected system.In initial load mode, existing accounts and groups can be loaded from the connected system into the Identity Store.In validation mode, the workflow compares accounts and group information from the connected system with the current content of the Identity Store and updates the objects in DirX Identity or marks the differences for later reconciliation.
-
Synchronization workflows - workflows that synchronize accounts and groups from the Identity Store to the corresponding connected system.This type of workflow runs in full, delta or event-triggered mode to provision the changed information as quickly as possible.
This chapter provides detailed information about target system workflow configuration, special features and user hooks.The sections in this chapter include:
-
Extending the Schema for Target System Workflows - describes the procedure for extending the DirX Identity Store schema with target system-specific information required by most (but not all) of the Java-based and Tcl-based target system workflows.
-
Understanding Java-based Target System Workflows - describes the Java-based target system workflows.
-
Understanding Tcl-based Target System Workflows - describes the Tcl-based target system workflows.
Extending the Schema for the Target System Workflows
Most of the target system provisioning workflows require you to extend the schema for the DirX Identity Store so that it can store target system-specific information. Setting up the Identity Store schema depending on the type of target systems you’d like to provision is a task that you should plan thoroughly. You should only set up the required object classes and attributes to guarantee high performance and easy handling.
If you selected to install the Sample Domain when you installed and configured DirX Identity, the configuration procedure has automatically extended the Identity Store schema with a minimal set of attributes and object classes for most of the supported target systems. You should check these schema extensions to make sure they meet your provisioning requirements. If you do not install the Sample Domain, no automatic schema extensions are performed. As a result, if you have not installed the Sample Domain or you want to use additional target system-specific attributes that are not present in the Identity Store schema, you need to extend the schema manually by:
-
Customizing the target system-specific schema LDIF files provided with DirX Identity to your requirements.
-
Running the agent schema tool to install your schema customizations.
The next sections describe how to perform these tasks.
| We strongly recommend that you back up your directory before you run any scripts. You cannot reverse schema extensions in a directory. |
Customizing the LDIF Schema Files
DirX Identity provides several complete sets of attribute and object class extensions for each supported target system type, delivered as LDIF files. The first step in extending the schema is to update these schema definitions according to your requirements:
-
Open the directory install_path*/schema/tools*.
-
Open the subdirectory that corresponds to your directory installation: dirx-ee for a DirX Directory installation.
-
Copy the entire Customer Domain subdirectory and name it Customer Domain.orig.
Now you can update the schema definitions in the Customer Domain subdirectory according to your requirements.
For a DirX Directory installation (dirx-ee is DirX Directory V8.3 or newer):
-
In the ldif subdirectory, select the LDIF file that corresponds to your DirX Identity Connectivity package. For example, dirx.nt.ldif.
-
Remove the attributes you don’t want to use by removing their corresponding MODIFY records that refer to attributeTypes creations.
-
Remove these attributes from the object class definitions by removing their corresponding LDAP attribute names from the MODIFY records that refer to objectClasses creations.
-
If indexes have been defined for these attributes, remove the attribute types from the dbconfig_opt statements in the dirxadm script of your DirX Identity Connectivity package. For example, DirXmetahub-schema.Nt.adm for Windows NT.
Now you can use the agent schema tool to install your schema extensions.
Installing the LDIF Schema Extensions
To install your schema extensions:
-
Under install_path/schema/tools, run the script agent-schema.bat (on Windows) or agent-schema.sh (on UNIX).
-
Type the password of the DirX Identity administrator admin.
-
Select the appropriate DirX Identity Connectivity package to install this part of the schema extension. If you have multiple Connectivity packages to extend, you must select each Connectivity package separately.
-
Select whether or not to create the attribute indexes.
The schema extensions are now installed. Check the trace.txt file for errors (the exit codes at the end should be 0).
Understanding the Java-based Target System Workflows
This section provides configuration hints and details about the Java-based target system (provisioning) workflows, including:
-
ADS workflows (Microsoft) - default workflows that provision the Microsoft Active Directory including the Exchange Server and the Skype for Business Server (formerly the Lync Server).
-
Citrix ShareFile workflows - default workflows that provision a Citrix ShareFile system.
-
DirX Access workflows - there exist two methods to connect DirX Access with DirX Identity.
-
Evidian Single Sign-on (ESSO) workflows - workflows that provision an Evidian ESSO system.
-
Google Apps workflows - default workflows that provision a target system of type Google Apps in the Identity Store and the corresponding connected Google Apps endpoint.
-
JDBC workflows - default workflows that provision three predefined tables in any relational database that provides a JDBC connection.
-
LDAP workflows - default workflows that provision any LDAP directory.
-
IBM Notes workflows (IBM) - workflows that provision IBM Notes.
-
Medico workflows (Siemens) - workflows that provision the Siemens healthcare medico//s system.
-
Entra ID workflows - workflows that provision a target system of type EntraID in the Identity Store and the corresponding connected Entra ID endpoint.
-
OpenICF Windows Local Accounts workflows - workflows that synchronize data between a target system of type OpenICF in the Identity Store and the corresponding connected Windows local accounts and groups system accessible through a .Net OpenICF connector server.
-
RACF workflows - default workflows that provision RACF systems via the IBM Tivoli Directory Server (LDAP).
-
Salesforce workflows - workflows that provision a target system of type Salesforce in the Identity Store and the corresponding connected Salesforce system.
-
SAP ECC (R/3) UM workflows - workflows that synchronize data between a target system of type SAPR3UM in the Identity Store and the corresponding connected SAP R/3 system.
-
Service Management workflows - workflows that allow for manual provisioning of offline (not connected) target systems.
-
SharePoint workflows (Microsoft) - workflows that provision Microsoft SharePoint server sites in conjunction with the ADS workflows.
-
Unify Office workflows - workflows that provision a target system of type Unify Office in the Identity Store and the corresponding connected Unify Office (RingCentral) endpoint.
-
UNIX-OpenICF workflows - workflows that provision a target system of type OpenICF in the Identity Store and the corresponding connected OpenICF connector server.
General Information
This section covers features that are common for all or a subset of the Java Provisioning Workflows, including:
-
How the workflows automatically create superior folders
-
How to configure the workflows that support a central proxy server configuration
Superior Folder Creation
This section describes how the workflows automatically create superior folders in connected systems and in the Identity Store.
In the Connected System
When the creation of new objects fails due to missing superior nodes, the realtime workflows automatically try to create them. But there is one limitation: the same structure is required in both in the Identity Store and in the connected system and therefore the individual nodes are mapped one-to-one.
When creating the missing entry in the connected system, the workflows use the following attributes from the appropriate entry in the Identity Store:
-
dxrOCLinTS: defines the object classes in the connected system
-
dxrOptions: defines default values for other mandatory attributes
DN in Identity Store: cn=Miller,ou=sales,o=My-Company,cn=Accounts,cn=My-TS,cn=TargetSystems,cn=My-Company
DN in connected system: cn=Miller Peter,ou=sales,o=My-Company,c=de
Assume that "c=de" exists, but nothing else. Then:
-
For creation of "o=My-Company,c=de", the workflows use the attributes "dxrOCLinTS" and "dxrOptions" of the entry "o=My-Company,cn=Accounts,cn=My-TS,cn=TargetSystems,cn=My-Company".
-
For creation of "ou=sales,o=My-Company,c=de", the workflows use the attributes "dxrOCLinTS" and "dxrOptions" of the entry "ou=sales,o=My-Company,cn=Accounts,cn=My-TS,cn=TargetSystems,cn=My-Company".
In the Identity Store
The realtime workflows will create the missing superiors as far as possible.
A) If a superior node doesn’t exist in the connected system, they create the relevant entry in the Identity Store with a default attribute list:
-
dxrType=dxrTSAccountGroupContainer
-
objectClass=dxrTSContainer
-
objectClass=dxrContainer
-
objectClass=top
B) If the superior node exists in the connected system, the workflows use the following attributes from the appropriate entry in the connected system:
-
The attributes "c", "o", "ou", "l", "dc" are stored in the same attribute types .
-
The attribute "objectClass" is mapped to "dxrOCLinTS".
-
The naming attribute value in the Connected System is mapped to "dxrRDNinTS".
-
The attributes "dxrType" and "objectClass" are mapped in the same way as the previous step.
DN in connected system: cn=Miller Peter,ou=sales germany,o=My-Company,c=de
DN in Identity Store: cn=Miller,ou=sales germany,ou=sales europe,o=My-Company,,cn=Accounts,cn=My-TS,cn=TargetSystems,cn=My-Company [defined by Identifier mapping]
-
The entry "o=My-Company,cn=Accounts,cn=My-TS,cn=TargetSystems,cn=My-Company" is created with information as defined in B.
-
The entry "ou=sales europe,o=My-Company,cn=Accounts,cn=My-TS,cn=TargetSystems,cn=My-Company" (which has no appropriate entry in the connected system) is created with information as defined in A.
-
The entry "ou=sales germany,ou=sales europe,o=My-Company,cn=Accounts,cn=My-TS,cn=TargetSystems,cn=My-Company" is created with information as defined in B.
HTTP Proxy Server Configuration
Some of the target system workflows - such as the Google Apps, Office 365 and Salesforce workflows - support a central proxy server configuration. If your organization requires the use of an HTTP proxy server for Web access, configure the host and port of the HTTP proxy server represented by a connected directory within the Identity Store folder for your Provisioning domain:
-
Go to the Expert View and then create a new proxy server entry as a copy of an existing template from Connectivity Configuration Data → Connected Directories → Default → Identity Store → Proxy Server if necessary.
-
On the HTTP/HTTPS Proxy Server tab for each connected directory that supports a central proxy server configuration, set a link to the proxy server entry.
Do not use an authenticated proxy server. Configure and deploy a local transparent HTTP proxy server that can handle authentication and can forward requests to the corporate HTTP proxy server if necessary. Configure this local proxy server as the one used with DirX Identity.
If you have direct access to the HTTP/HTTPS servers needed to run the relevant workflows, remove any links to proxy servers from the HTTP/HTTPS Proxy Server tab of the relevant connected directories.
Active Directory (ADS) Workflows
The Active Directory (ADS) Provisioning workflows operate between a target system of type "ADS" in the Identity Store and the corresponding Active Directory connected system.
The ADS connector used in the workflows communicates with the ADS server (AD LDAP provider) across the native LDAP protocol, as illustrated in the following figure.
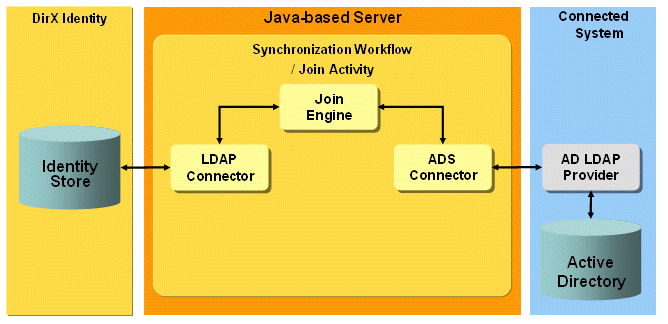
The workflows allow you to synchronize Identity account and group objects with ADS standard users, mail- or mailbox-enabled users, groups or distribution lists depending on the attributes set.
ADS Workflow Prerequisites and Limitations
The ADS Provisioning workflows have the following prerequisites:
-
Before you can use the workflows, you must extend the DirX Identity Store schema with ADS target system-specific attributes and object classes so that the workflows can store Active Directory-specific information in the Identity Store. For instructions, see the section "Extending the Schema for the Target System Workflows".
-
If you plan to create mailbox-enabled users and groups or other mailbox-enabled object types like shared, room or equipment mailboxes in Active Directory, you must install an Exchange Server in the Active Directory Domain, which extends the Active Directory schema with mail-enabling attributes.
-
If you plan to create lync-enabled users in Active Directory, you must install a Skype for Business Server, formerly Lync Server, in your environment, which extends the Active Directory schema with lync-enabling attributes.
Connecting to Active Directory
This section provides information about ADS workflow configuration on the Connectivity side.
Connection to the target system:
Specify the IP address and the data port at the ADS service object (ADS CD → Service). The IP address may contain the server name - full qualified or not - or a TCP/IP address.
In the Bind Profile (ADS CD → Bind Profile) specify a user in DN format. This user must have administrative rights in Active Directory.
| If you want to enable/disable SSL for one of the workflows, don’t use the SSL flag in the Bind Profile, which is kept there for compatibility reasons with the Tcl-based workflows. Use the SSL flag in the TS port of the join activity of the selected workflow instead. |
Configuring the ADS Target System
This section provides information about ADS target system configuration on the Provisioning side.
Setting Match Properties
In the Advanced tab of the target system object, the properties Type, Forest and Domain must be set correctly according to your connected system. The event-based workflows on the Connectivity side assigned to this target system must hold the same values in their Is applicable for section. If a Windows Password Listener is also active in the related Active Directory domain, the property Forest must be specified in the full qualified form, for example “dc=your-company,dc=net” and the property Domain must contain just the name of the domain, like “your-company” to correctly receive the password change requests - keeping this information in their topics- sent by the Password Listener.
Special Attributes
dxrPrimaryKey
The dxrPrimaryKey attribute of accounts and groups contains the objects' connected system DN. It is also used as the member attribute of groups. On account creation, it is generated by the tsaccount.xml object description using the target system-specific attributes Account Root in TS and Group Root in TS in the Options tab.
dxrName
The dxrName attribute of accounts and groups contains the target system-unique attribute samAccountName. It is generated with the Java script dxrNameForAccounts if the account or group is created in DirX Identity. It is used for joining in the Identity direction.
Setting Account- and Group Root in TS
In the Options tab of the target system object, the DN values for the Account Root in TS and Group Root in TS properties must be set correctly. They are used to generate the dxrPrimaryKey attribute on creation or modification of an account or group in DirX Identity. The dxrPrimaryKey attribute holds the DN of the object in the connected system.
Setting Exchange Base Properties
If an Exchange system is to be provisioned, some basic Exchange attributes must be configured in the Options tab of the target system object. They are used as base values for generating mailbox-specific attributes for an account when the "dxr mailbox users", "dxr shared mailbox creation", "dxr room mailbox creation" or "dxr equipment mailbox creation" groups are assigned to the related user.
Enabling User Mailboxes
To enable an account in DirX Identity for Exchange mailbox functionality, assign the "dxr mailbox users" group to the related user. To make this assignment, you usually create a corresponding role assigned to this group or you assign this group directly. On assignment, the obligations linked to this group set all of the mailbox-enabling attributes that are required to create a mailbox-enabled user in Active Directory. On revocation, these attributes are cleared or set according to revocation.
There are two levels of obligations assigned:
-
The base obligations common to all mailbox types (user, shared, room, equipment mailboxes) held in the obligation object Configuration → Obligations → Mailbox-enabling to which each mailbox-enabling group links.
-
The obligations specified directly in the Obligations tab of each mailbox-enabling group specific to the mailbox type.
Creating Shared, Room and Equipment Mailboxes
To create a shared, a room or an equipment mailbox in Exchange 2013 or newer, assign the “dxr shared mailbox creation”, “dxr room mailbox creation” or “dxr equipment mailbox creation” group to a user representing this mailbox object in Active Directory. On assignment, the obligation rules for this group calculate and set all attributes required for the relevant mailbox type. On revocation, these attributes are cleared or set to the appropriate value.
Enabling Share, Room and Equipment Mailboxes
To grant permissions to a user in DirX Identity to access a specific shared, room or equipment mailbox in Exchange, create a related rights assigning group in DirX Identity by copying the existing “dxr shared mailbox team1” group and adapt its obligation rules.
The “dxr shared mailbox team1” group is a sample for giving an account the right to share the specific mailbox named SharedMailbox_team1, which must exist already in Exchange. For every shared, room or equipment mailbox in your Exchange system that you want to share, you need to create a shared-mailbox-enabling group - for example, by copying and renaming the sample “dxr shared mailbox team1” group - and adapt the name of the mailbox to be shared in the OnAssignment rule of the Obligations tab, which sets the mailbox name to be shared to the dxmADsExtensionAttribute2. This attribute is then mapped in the ADS synchronization workflow account channel to the target virtual (not in the schema) attribute ps_script_param1 and passed as the first parameter to the specified PowerShell script. The PowerShell script name is set in the OnAssignment rule to the dxmADsExtensionAttribute1 attribute, which is mapped to the target non-schema attribute ps_script_name. The dxmADsExtensionAttribute3 attribute is filled with the cn of the assigned user, which is mapped to the target attribute ps_script_param2 and passed as the second parameter to the PowerShell script AddSharedMailboxPermission.ps1 (running the Add-MailboxPermission cmdlet). The script is executed after the account has been created or updated in the connected system and assigns the rights to access the shared mailbox to the account.
On unassigning these rights, the script RemoveSharedMailboxPermission.ps1 (running the Remove-MailboxPermission cmdlet) is called. This is specified in the OnRevocation rules of the obligations.
The PowerShell scripts AddSharedMailboxPermission.ps1 and RemoveSharedMailboxPermission.ps1 are installed under install_path\samples\ADS\scripts\ and must be copied into the Java-based Server’s repository\scripts folder.
For assigning and unassigning rights for room and equipment mailboxes, you perform the analogous actions and create a rights-assigning group for each Exchange room or equipment mailbox to be shared. The same PowerShell scripts for any mailbox types used for sharing (shared, room or equipment mailbox types) can be used for rights assignment and unassignment.
| Only mailbox-enabled accounts can get permissions on other mailboxes. Standard Active Directory accounts with no mailbox-enabling attributes set cannot be given permissions on other shared mailboxes. |
Setting Lync Base Properties
If an Active Directory system hosting a Skype for Business Server (formerly Lync Server) is to be provisioned, some basic lync-enabling attributes must be configured in the Options tab of the target system object. They are used as base values for generating lync-enabling attributes for an account when the "dxr lync users" group is assigned to that account.
Lync Enabling
To enable an account in DirX Identity for Skype (formerly Lync) functionality, assign the "dxr lync users" group to this account. To make this assignment, you usually create a corresponding role assigned to this group or you assign this group directly. On assignment, the obligations linked to this group set all of the lync-enabling attributes that are required to create a lync-enabled user in Active Directory. On revocation, these attributes are cleared.
ADS Workflows and Activities
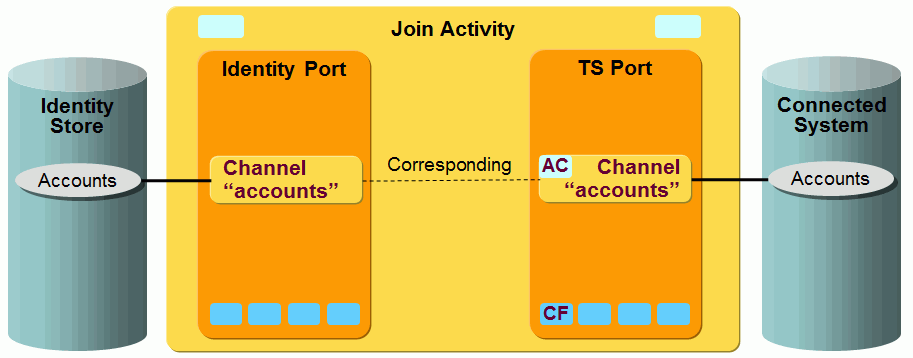
The following figure shows the layout of the channels that are used by the ADS workflow’s join activity.
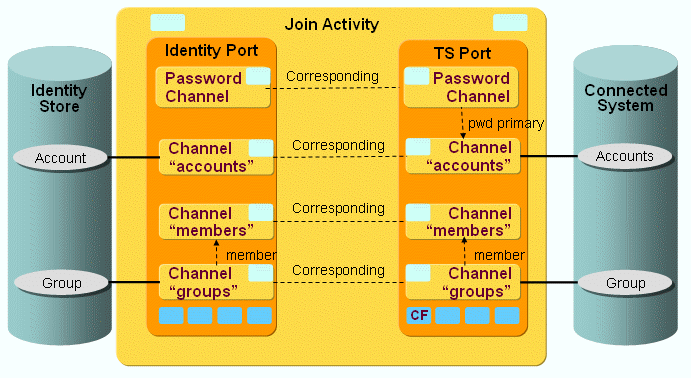
As the figure shows, there is a pair of channels between accounts, groups and members on each side. The members are linked to the groups on both sides.
ADS Workflow Ports
This section provides information about ADS workflow ports.
TS Port
-
CF - Crypt Filter
The configured Crypt Filter is used to send the password attribute unicodePwd decrypted to the ADS server.
ADS Workflow Channels
This section provides information about ADS workflow channels.
Account and Group Channels
Both Directions
a. Master attributes
You can master attributes by setting the OnAddOnly flag in the according mapping direction. For example, if you want Identity to master a certain attribute, you set this flag in the mapping direction to Identity to let the connected system only set the attribute on an add operation in Identity and vice versa.
If the mapping is more complex, mastering can also be implemented in a Java mapping, as done for the Identifier mapping. The Identifier is mastered by DirX Identity in the default real-time synchronization workflow. In the target system direction, it is set by Identity with the dxrPrimaryKey attribute value and results in moving the object in the target system if dxrPrimaryKey changes. In the Identity direction, the Identifier is calculated only on an add operation, otherwise the joined object’s Identifier is taken.
Special caution is necessary for the attribute proxyAddresses:
The proxyAddresses multi-value attribute is handled as case-sensitive in Active Directory because a value starting with the uppercase letters "SMTP:" is considered to be the primary e-mail address of a user in contrast to possible further values starting with the lowercase letters "smtp:". In DirX Identity, the corresponding attribute dxmEX2kProxyAddresses is not defined to be case-sensitive but is case-insensitive in the schema; this definition should not be changed in DirX Identity for compatibility reasons. Provisioning it can cause the primary address of a user, which possibly might have been changed by an administrator in Active Directory, to be overwritten with the wrong value of lowercase letters on the next synchronization run to Active Directory, regardless of whether or not a validation has been previously performed.
To solve this problem, the OnAddOnly flag can be set in the mapping direction to Active Directory for the proxyAddresses attribute. This setting can be made because the attribute does not belong to the mailbox-enabling attributes, which must be able to be assigned and unassigned at any time during the lifetime of the user.
If you want to set proxyAddresses on both an add and a modify operation, you can uncheck the flag checkModification. In this case, the join engine does not compare the values of the joined entry in Active Directory with the mapped values but just replaces the values as they are in the mapped entry. Then uppercase and lowercase letters are preserved and must just be provided correctly on synchronization to Active Directory.
b. Moving objects
The default ADS real-time synchronization workflow can perform a rename/move in AD as follows:
If the dxrPrimaryKey attribute of the account is changed in Identity (as a result of a user resolution and new calculation of the account attributes, which can have dependsOn or masteredBy settings in the accounts object description), the workflow performs the following tasks:
-
Takes this as the new DN in AD.
-
Tries to find (join) the account with the configured join attributes (trying one after the other).
-
Takes the samAccountName attribute as the default, which is unique in the whole AD domain (that’s why it shouldn’t change on user resolution in Identity, otherwise another unique attribute must be taken for joining).
-
When the account has been found in AD, takes that DN as the old DN and renames/moves the account from this old DN to the new DN.
-
Puts the current AD DN into the dxrPrimaryKey and dxrPrimaryKeyOld attributes in Identity on the way back.
-
The dxrPrimaryKeyOld attribute is not taken for synchronization to the connected system but only for other purposes.
Direction: Identity → Connected System
a. PostMapping
A PostMapping exists only for the group channel in the target system direction. It is used for changing the request type to DELETE if the dxrState attribute in Identity contains the value DELETED. This results in deleting the object in the target system.
For accounts, the deletion of objects in the connected system is handled in the userAccountControl Java mapping.
Password Channel
The password channel updates the Active Directory account passwords.
The associated SetPassword workflow is started by either the User or the Account Password Event Manager workflow listening for Web Center or Password Listener requests. The Active Directory attributes unicodePwd and pwdLastSet are mapped from the pseudo source attributes dxmPassword and dxmPasswordExpired, which are contained only in the password change request and not read from an LDAP attribute.
The ADS Set Password workflow also resets the lockoutTime attribute to zero (0) to finish the user’s lockout period immediately and to enable him to log in again after his password has been updated.
A password channel can also be configured backwards from the connected system to Identity to be able to update some attributes in Identity after a password change or a reset has taken place in the connected system. The join engine then synchronizes the attributes specified in the corresponding password channel mapping to Identity after the account with its password relevant attributes was updated in the connected system.
Customizing the ADS Workflows
This section provides:
-
A description about delta workflows.
-
Hints and guidelines on how to configure selected versions of Microsoft Exchange.
-
A description of how to run PowerShell scripts.
-
A description of how to manage remote folders with external tools that can execute remote commands.
ADS Delta Workflows
For a general explanation of the delta workflows, see the sections under "Java-based Workflow Architecture" in "Understanding the Default Application Workflows" in this guide.
The default delta workflow for Active Directory ADS_Ident_Realtime_Delta is configured with the delta type SearchAttributes in the account and group channels. With this setting and the default search attributes uSNchanged and uSNcreated, the export search filter is extended by searching only for those objects whose uSNchanged or uSNcreated attribute values are greater than or equal to the highest value of the last delta run stored in the Identity domain for each channel.
If you also want to export the objects that were deleted after the last delta run - in addition to the ones that were changed - you must change the delta type to Expert Operational Attributes. This action generates and shows the operational attributes section for the attribute dxm.delta and the placeholder value ${LastDeltaValue}. At runtime, the join engine replaces the placeholder with the last delta state value stored in the Identity domain as a base64-encoded binary value (cookie). It reflects the last value that was returned by Active Directory at the end of the previous delta search.
If operational attributes are used for delta searches, several adaptations must be made at the workflow configuration:
Search Base Adaptations
The ADS connector uses the DirSync LDAP control for doing delta searches. This has the restriction that only root searches are allowed. As a result, the specified search base must be a domain or subdomain; for example, dc=domain1,dc=munich,dc=my-company,dc=net. In the default delta workflow configuration, the search base configured at the ADS Connected Directory channels is beneath an organizational unit.
To restrict the search result to a certain set of objects, any filter can be specified.
Filter Adaptations
In the default workflow, the filter (&(objectClass=user)(objectCategory=person)) is specified. Since deleted objects lose the objectCategory person, eliminate that part of the filter.
Mapping Adaptations
Extend the mapping to Active Directory with the isDeleted attribute by inserting a direct mapping null→isDeleted with the attribute flags readOnly and retrievable set. The mapping function for the dxrTSState attribute in Identity evaluates the flag and sets the value DELETED for the deleted objects.
Mapping Flags Adaptations
Since the DirSync LDAP control returns only changed attributes for an object, you must remove the flag checkModification for every attribute in the mapping to Identity; otherwise, the attributes are deleted in Identity if they have not been changed in Active Directory and hence do not exist in the list of exported attributes.
Hints for Deciding which Delta Type to Use
Technical conditions:
If you want to integrate the delta workflow into an existing target system with real-time workflows configured to synchronize accounts and groups beneath an organizational unit (like the default ADS real-time workflows do), you must use the default settings of the delta workflow (filter extension type) for this target system, because the search base is configured at the channels and used by all workflows of the target system.
Consequently, a delta workflow using operational attributes is
-
Appropriate primarily for a target system provisioning a complete Active Directory domain,
-
Possible also for a target system with at least the search base specified as the domain root and the search filter specified to get only a subset of objects. Remember that users and groups in Active Directory usually do not have the attribute ou configured holding their organizational unit, which would make it possible to set the search filter appropriately and get only objects beneath a certain organizational unit. You can either configure this behavior or use other filters.
Scenario considerations:
The validation workflow can also recognize changes and deletions made in Active Directory by calculating the differences of the complete set of objects on both sides. It does not evaluate the delta settings resulting in delta exports like the delta workflow does. As a result, there are different possibilities for which workflows and configurations to use depending on your scenario.
If you have a scenario with a validation workflow scheduled to run very infrequently - for example, because it takes a long time due to a high number of users and groups to synchronize - and you want to react to changes - especially deletions - made in Active Directory more often, you should choose the delta type of operational attributes.
If you have the same scenario without the need to react quickly to deleted and moved objects but with the need to react quickly to changed objects, you can use the default delta type of filter extensions.
Moreover, if you have a scenario with a fairly limited set of users, you could schedule a validation workflow more often to recognize the deleted objects and leave the delta workflow with the default settings to recognize the changed objects.
Configuring Exchange
The default Java-based synchronization workflow mapping is configured to provision an Exchange 2016/2019 connected system. The configuration in Provisioning regarding object descriptions and obligation rules for the mailbox-enabling groups is also set up for an Exchange 2016/2019 connected system. This does not affect your existing ADS target systems and workflows.
If you create a new ADS target system with the target system wizard (the type in DirX Identity is still called Windows 2000), the base properties of your specific Exchange system have been set - or can be set afterwards - in the Options tab of the new target system.
The following section describes other issues related to customizations.
Common aspects for all versions greater than or equal to Exchange 2007
The ADS connector and the ADS agent (which is used in the Tcl-based workflows) both generate the mandatory attributes msExchMailboxSecurityDescriptor and msExchMailboxGuid automatically when a user is to be mailbox-enabled. The connecto and the agent determine whether or not a user is to be mailbox-enabled by checking whether the attribute msExchRecipientTypeDetails is contained in the list of attributes to be set, which is true only if a mailbox-enabling group was assigned. All other attributes mandatory for creating a fully-functioning Exchange mailbox are created through the standard obligation rules used as source attributes in the mapping to the AD attributes. For a user update in Active Directory, the ADS connector uses the LDAP interface and the ADS Agent uses the ADSI Interface.
If you want to synchronize additional Exchange attributes, you have the following choices:
-
If you just want to see the content of some more Exchange attributes on the Identity side, you don’t have to deal with obligation rules at all. You only need to map them towards Identity either to related Identity attributes if they exist in the Identity schema or to some of the various extension attributes (dxmADsExtensionAttribute1-15 and dxmEX2013ExtensionAttribute16-20). You can also adapt the tsaccount.xml object description to make them visible in the Active Directory tab of the account.
-
If you want to provision more Exchange attributes towards Active Directory and their related attributes exist in the DirX Identity schema, you can just add obligation rules to fill them and then use them in the mapping in both directions.
-
If their related attributes don’t exist in the schema on Identity side, you can either extend the Identity schema or just use the various extension attributes by setting them through obligation rules and then mapping them to the desired AD attributes.
-
If you only need to set constant values for some attributes and the related attributes don’t exist in the schema on the Identity side, be aware that if you just set those values in the mapping towards the connected system, these attributes are then always contained in the requests towards the connected system for "non mailbox- enabled" users provisioned with the same workflow, which can cause problems on user modification. To avoid this situation, you can set the attributes in a Postmapping depending on whether a specific Exchange attribute, for example msExchRecipientTypeDetails, is set, which is only true if a mail-enabling group was assigned. The easiest and recommended way, however, is to fill some extension attributes in obligation rules and map them to AD attributes instead of defining a Postmapping.
Customizing Exchange 2016/2019
If you want to provision an Exchange 2016/2019 connected system and you created a new target system with the target system wizard of the current version, you must apply the following customizations:
-
In the Obligations tab of all mailbox-enabling groups you intend to use (dxr mailbox users, dxr shared mailbox creation, dxr room mailbox creation and dxr equipment mailbox creation), adapt the OnAssignment rule generating the multi-value attribute dxmEX2kShowInAddressBook to the values appropriate to your specific Exchange system (DNs of the default Exchange address books).
Note: Since multi-values can now be directly assigned in obligation rules, the former method of assigning the values in the updateAddressbook.js java script is no longer needed.
Customizing Exchange 2013
If you want to provision an Exchange 2013 connected system and you created a new target system with the target system wizard of the current version, you must apply the following customizations:
-
In the Obligations tab of all mailbox-enabling groups you intend to use, adapt the OnAssignment rule generating the multi-value attribute dxmEX2kShowInAddressBook to the values appropriate to your specific Exchange system (DNs of the default Exchange address books).
Customizing Exchange 2010
If you want to provision an Exchange 2010 connected system and you created a new target system with the target system wizard of the current version, you must apply the following customizations:
-
Add the attribute homeMTA to the mapping of both directions and to the obligation rules of the dxr mailbox users group. From Exchange 2013 on, the attribute must not be provisioned because the Transport Server Role can no longer reside on a different server than the Database Server Role.
-
Set the attribute msExchVersion in the obligation onAssignment rule of the dxr mailbox users group to the value 44220983382016.
-
Adapt the Java script updateAddressbook.js in Domain Configuration → TargetSystems → Windows 2000 → JavaScripts with the DNs of the default Exchange address books of your Exchange system.
-
In the Obligations tab of all mailbox-enabling groups you intend to use, adapt the OnAssignment rule generating the multi-value attribute dxmEX2kShowInAddressBook to the values appropriate to your specific Exchange system.
Customizing Exchange 2007 or Exchange 2003
If you want to provision an Exchange 2007 or Exchange 2003 connected system and you created a new target system with the target system wizard of the current version, you must apply the following customizations:
-
Add the attribute homeMTA to the mapping of both directions and to the obligation rules of the dxr mailbox users group.
-
Delete the attribute msExchRecipientTypeDetails from the mapping and the obligation rules.
-
Delete the attribute msExchVersion from the mapping and the obligation rules.
-
Adapt the Java script updateAddressbook.js in Domain Configuration → TargetSystems → Windows 2000 → JavaScripts with the DNs of the default Exchange address books of your Exchange system.
-
In the Obligations tab of all mailbox-enabling groups you intend to use, adapt the OnAssignment rule generating the multi-value attribute dxmEX2kShowInAddressBook to the values appropriate to your specific Exchange system.
Running PowerShell Scripts
DirX Identity provides a general user hook class UserHookRunExecutable, which allows running any executable configured in a realtime workflow channel object. For the preUpdate and the postUpdate methods of the user hook, an executable with a command line can be configured in the specific attributes pre_executable and/or post_executable of the channel. The corresponding command lines are specified in pre_cmdline and/or post_cmdline. In the postUpdate case, the executable is only called if the update (add or modify) of the object was successful.
The UserHookRunExecutable class starts powershell.exe - as a specific executable - only if a PowerShell script name is passed to it as a parameter; otherwise it just logs that nothing needs to be done. This configuration allows always specifying the UserHookRunExecutable class in the General tab of the Accounts channel (and of course any other channel), because the PowerShell script name is now only set with a non-empty value in the standard mapping if a permission-granting mailbox group is assigned to the associated user. In all other cases, the script name is not populated and hence powershell.exe is not started.
This behavior, along with setting the script name depending on whether or not other (rights-representing) attributes are set, is also useful for modeling other customer-specific requirements.
Common Architecture for Running Executables
The common architecture and features for running executables from a user hook are described in "Running Executables from a User Hook" in "Understanding the Default Application Workflow Technology".
PowerShell Prerequisites
A PowerShell script can use the cmdlets that are part of the locally-installed PowerShell instance and it can also use and remotely run cmdlets that are only part of the remotely-installed PowerShell instance. You can even call PowerShell 64-bit cmdlets from clients running a PowerShell 32-bit version.
You need to have the Windows Management Framework installed to use PowerShell cmdlets that reside only on the remote server and not on the client machine’s locally installed PowerShell instance. An example is to administer Exchange using the remote Exchange management cmdlets without having them installed locally.
Windows Management Framework includes Windows PowerShell V2 and Windows Remote Management (WinRM) 2.0, which is the Microsoft implementation of the SOAP-based WS (=Web Services)-Management Protocol.
For Windows 7 or Windows Server 2008 R2 and newer, the correct version of the Windows Management Framework is already installed.
Required PowerShell Settings
Apply the following settings to enable the remote server to execute PowerShell commands. For Windows versions greater than or equal to Windows Server 2012, this is usually already enabled by default and so none of the following settings need to be explicitly applied.
Server-side settings:
Call the command enable-psremoting in the Administrator PowerShell of the remote server. It creates a listener for HTTP connections and sets firewall exceptions for Http port 80 and Https port 443.
Client-side settings:
Call the command set-executionpolicy remotesigned in the Administrator PowerShell of the client to enable it to run scripts.
Specifying PowerShell Script Names in the Standard ADS Workflows
The standard ADS real-time workflow account channel is pre-configured to run any PowerShell script - after the account is updated in the connected system - that is passed as a parameter in the source attribute dxmADsExtensionAttribute1 mapped to the target attribute ps_script_name. The script parameters are set in additional extension attributes depending on the groups that are assigned to the accounts’ associated user. Script name and parameters are then passed to the post_cmdline specific attribute, which is taken as input for running powershell.exe specified as the executable in post_executable. The extension attributes are cleared in the mapping back to Identity to prevent the PowerShell script from being started again on the next synchronization run.
-
User Hook name:
The user hook class name com.siemens.dxm.join.userhook.common.UserHookRunExecutable is specified by default in the General tab of the account channel in the ADS direction. If no PowerShell script name is passed in the dxmADsExtensionAttribute1 source attribute in the mapping - which is the case for "normal" accounts with no special mailbox rights assigned or for those accounts that the script has already run once - the UserHookRunExecutable class does not start powershell.exe unnecessarily. -
Specific attribute post_executable:
The PowerShell executable powershell.exe is already specified in the specific attribute post_executable. Nothing must be changed here.
Specific attribute post_cmdline:
The name of the script to run is set through the mapping and passed to post_cmdline as the first parameter. The "$\{env.scripts}" placeholder resolves to the scripts subfolder of the Java-based Server’s repository folder. Consequently, you must: -
Copy the scripts to run from install_path*\samples\ADS\scripts\* or from your own folder with possibly your own scripts to the scripts subfolder of the Java-based Server’s repository folder if you want to leave the setting, or
-
Specify an absolute path where your scripts reside, or
-
Copy the scripts to a folder contained in the Path variable; for example, into the bin subfolder of the associated Java-based Server.
If the script path contains a blank, PowerShell expects a "&" before the script name and the script name to be enclosed in double quotes and parameters containing blanks to be enclosed in triple double quotes if the script is called from the command line, like this:
powershell "& ""C:\Documents and Settings\myscript.ps1""" """param 1""" """param 2"""If the script is called from within the PowerShell, it is done as follows:
& "C:\Documents and Settings\script1.ps1" "param 1" "param 2"The delivered batch script runPSS.bat to start and test PowerShell scripts standalone (not started by the Java-based Server) handles this correctly.
-
Adaptation of the delivered PowerShell sample scripts to run:
Adapt the variables $server, $binduser and $pwd to your environment. Note that you must generate the encrypted password file yourself, for example cred.txt, by running the delivered sample PowerShell script CreatePasswordFile.ps1 installed under install_path\samples\ADS\scripts\ in the Administrator PowerShell.
If you do not want to use the PowerShell encrypting password feature, you can also extend the parameter list of the script and pass username and password from the ADS bind profile by adapting the UserHookRunExecutable class, as described in "Running Executables from a User Hook" in "Understanding the Default Application Workflow Technology". -
Java Server service account:
If your PowerShell script - like the delivered script AddSharedMailboxPermission.ps1- reads a password from a file (for example, from cred.txt as previously described), that was encrypted by PowerShell running under a specific account, the Java-based Server must also run under this account.
Running an Exchange cmdlet in the Java-based Server
In addition to the PowerShell scripts AddSharedMailboxPermission.ps1 and RemoveSharedMailboxPermission.ps1, which are used in the standard ADS realtime synchronization workflow for assigning mailbox rights, DirX Identity delivers sample scripts that contain Exchange cmdlets. These scripts are installed under install_path*\samples\ads\scripts*.
The DisableMailbox.ps1 sample script expects two parameters: one for identifying the mailbox (user principal name) and one for identifying whether or not the mailbox shall be disabled. This parameter can also be set independently from the msExchHideFromAddressLists attribute. It is taken here as one reasonable way for specifying enabling or disabling a mailbox, because a disabled mailbox should also not appear in the global address lists.
The DisableMailbox.ps1 script uses the Disable-Mailbox cmdlet. In addition to removing all mailbox-enabling attributes from the Active Directory user, the Disable-Mailbox cmdlet also performs a cleanup task on the mailbox, disconnecting the mailbox immediately from the user so that you don’t need to wait for a nightly maintenance complete mailbox database cleanup task.
The ConnectMailbox.ps1 script uses the Connect-Mailbox cmdlet, which reconnects a disconnected mailbox to an Active Directory user.
If you want to create a new mailbox for an existing Active Directory user, the Enable-Mailbox cmdlet must be used. You can easily create a new PowerShell script for this task simply by copying the ConnectMailbox.ps1 script to a new script - for example, EnableMailbox.ps1 - and then exchanging the Connect-Mailbox cmdlet with Enable-Mailbox, which expects the same parameters as Connect-Mailbox.
Note: If you want to mailbox-enable a user by running an Exchange cmdlet (for example, Enable-Mailbox for an existing user or New-Mailbox for a new user) instead of setting the mailbox-enabling attributes with the standard ADS synchronization workflow, adapt the workflow mapping and the obligation rules of the dxr mailbox users group appropriately depending on the attributes you want to pass to the cmdlet as parameters. Cmdlets usually offer a lot of variation on which parameters can be passed and which are set with default values. Read the Microsoft documentation about the complete functionality of each cmdlet you want to use.
Running a Lync cmdlet in the Java-based Server
You can also extend the standard ADS real-time workflow to run a PowerShell script containing Lync cmdlets to be executed on the remote Skype for Business Server (formerly Lync Server). For an explanation about how to pass parameters to the script, how to provide credentials and where to place the script, see the instructions given in "Running an Exchange cmdlet in the Java-based Server".
The sample script LyncEnableUser.ps1 is installed under install_path*\samples\ads\scripts*. Running it is an alternative way to lync-enable a user instead of doing it by mapping all lync-enabling attributes produced by the obligation rules of the dxr lync enabling group as done in the default ADS real-time workflow.
The LyncEnableUser.ps1 script uses the Enable-CsUser cmdlet for lync-enabling a user. The Disable-CsUser cmdlet is also described in this script as well as other lync-handling cmdlet samples.
In order to be allowed to remotely execute the cmdlets, a secure connection to the Lync Server over https is required. As a prerequisite for such a secure connection, the root CA certificate that issued the lync-related certificates must be imported into the Trusted Root Store of the workstation running the script.
| A user in Active Directory with administrative rights can only be lync-enabled by using either the AdsConnector to set the lync-enabling attributes or by running the Enable-CsUser PowerShell cmdlet. It cannot be lync-enabled by using the Skype for Business (formerly Lync Server) "Control Panel" admin tool. |
Remote Folder Management
Remote Folder Management can be performed using the related PowerShell cmdlets, but you can also use this older tool described here.
The functionality described here allows the management of folders and shares on a remote computer running the Windows 2003 Server operating system or newer. You can use it in a user hook or in the attribute mapping code of a Java-based workflow. It can create and delete folders on a remote computer and copy/move folders between remote computers.
Architecture
The remote execution works over $ADMIN and $IPC shares on the remote computer. The external CLI utility accesses the $ADMIN share to set up the remote listener service and then passes remote commands via $IPC share. Results and outputs from these commands are returned to the Java code. The following figure illustrates this control flow:

With the exception of ssh, all of the tools use $IPC and $ADMIN shares. The remote management functionality that has been used and tested in customer projects includes:
-
create folder
-
delete folder
-
move/copy folder
-
inside partition
-
over partition
-
over machines
-
-
check if folder exists
-
set folder file system permissions
-
account name/SID support
-
-
create share
-
set share permissions
-
account name/SID support
-
-
delete share
-
convert share name to local path
CLI Tools
To enable remote management, you need to select a toolkit. The following list evaluates tools that can be used to execute commands remotely. xCmd is the preferred tool.
xCmd
+ freeware
+ nothing required on target machine (service is copied automatically)
+ sources are available
- works only between Windows machines
For more information and for download, visit: http://www.codeguru.com/Cpp/I-N/network/remoteinvocation/article.php/c5433
PsExec
+ nothing required on target machine (service is copied automatically)
- works only on Windows machines
For more information and for download, visit: http://technet.microsoft.com/en-us/sysinternals/bb897553.aspx
winexe
+ freeware
+ sources available
+ nothing required on target machine
- works only from UNIX to Windows machines
For more information and for download, visit: http://sourceforge.net/projects/winexe.
ssh
+ freeware
+ sources available
+ reliable
+ works from any of the supported platforms to any other
- needs ssh-keygen to prepare ssh keys so that it doesn’t prompt for a password.
- manual sshd installation on remote machine required
Support Utilities
The following set of utilities provides useful functions on a remote machine.
Part of standard Windows installation:
-
mkdir
-
rmdir
-
dir
-
xcopy
-
move
-
cacls
-
net share
External utilities:
-
setacl 2.x (supports SID identifiers in place of account names, http://setacl.sourceforge.net/)
Requirements
To set up and use folder management based on the xCmd utilities:
-
Reference the dxmJoin.jar package, which contains the necessary classes, in com.siemens.dxm.join.userhook.ads.
-
The xCmd utility must be available in the executable path of the IdS-J server.
-
The account that will be used to access a remote computer must have admin privileges on the remote computer. The account is not to be specified in DN format.
-
The IdS-J server must run under an account with set password to be able to connect to the network. The default LocalSystem account is therefore not suitable.
-
When setting the account permission to a folder or share, note that the account must be visible on the remote computer unless you are using the account SID and the correct domain prefix must be specified if necessary.
Deployment
-
Copy the xCmd utility to the path where the IdS-J server can find it.
-
If necessary, copy the setacls utility to all target machines that will be managed.
Usage Sample
This functionality can be used, for example, to implement the creation of user home and profile folders with appropriate shares on a given user home server within Active Directory target system provisioning:
-
create account
-
change account attributes
-
delete account
Some permanent configuration information is stored as target system environment variables (root of home folders, default permissions to be set). Account credentials to connect remotely to the home server are extracted from the target system connection obtained from the environment (same account used).
The user hook is bound to the account channel of the target system. The channel mapping manages the homeFolder and profilePath attributes of Active Directory. When creating the folders after a new account is created, permissions are not set within the given user account name, but within the user SID, because the home server does not know about the new account immediately.
The user hook handles the following situations:
-
Add request: the source entry is searched for the home folder attribute and when found, folder and share are created.
-
Modify request: the account state modification is checked first. If it is presented, it is evaluated first (see below). If not, the request is searched for the home folder modification and when found and it differs from the source entry value, folders are moved and shares are recreated in a new location.
-
If the account state changes to DISABLED: no action is performed.
-
If the account state changes to ENABLED: folder and share are checked for existence and created if necessary.
-
Delete request: the source entry is searched for the home folder attribute and when found, folders and shares are deleted.
Additional Information
For additional information, search for the FolderManager.java class under the Additions\RealtimeWorkflows folder of the DirX Identity delivery media. It contains a channel user hook template for creation of the account home folder and share.
Citrix ShareFile Workflows
The Citrix ShareFile Provisioning workflows operate between a target system of type LDAP in the Identity Store and the corresponding connected Citrix ShareFile application.
The workflows use the Citrix ShareFile connector for provisioning. This connector communicates with the Citrix ShareFile across the HTTP protocol.
The workflows handle the following objects:
Users - the Citrix ShareFile users and contacts.
Groups - the Citrix ShareFile groups.
The delivered workflows are:
-
Ident_Citrix ShareFile_Realtime - the synchronization workflow that exports detected changes for account and group objects from Identity Store to the Citrix ShareFile cloud and then validates the processed changes in the Citrix ShareFile to the Identity Store.
-
Validate_Citrix ShareFile_Realtime - the validation workflow that imports existing Citrix ShareFile users and groups with group assignments from the Citrix ShareFile cloud to the Identity Store.
Citrix ShareFile Prerequisites and Limitations
Depending on the type of Citrix subscription, the maximum number of employees that can be managed by DirX Identity may be limited.
It is not possible to change a group’s name using DirX Identity Manager.
The delivered workflows do not configure password synchronization.
Because of a constraint in DirX Identity when handling membership for a user without an existing account in Citrix, the e-mail address is used to identify the user inside an SPML modify request. (The same condition applies to an add request.) If there is already an account for the user in Citrix, the Citrix id is used to identify the user inside an SPML modify request.
The Citrix ShareFile API does not allow you to create a user with the same e-mail address as an existing user. Such an attempt fails. The Citrix ShareFile connector returns the ID of the user with this e-mail address in the SPML response.
The Citrix ShareFile API does allow you to create a group with the same name as an existing group. However, the Citrix ShareFile connector does not forward such a request to Citrix and returns an error.
Connecting to Citrix ShareFile
To configure the connection to Citrix ShareFile:
-
Specify the name of the Citrix ShareFile server.
-
Set up the bind credentials of the connected directory representing Citrix ShareFile. Use a ShareFile account with sufficient rights.
-
Specify the HTTP proxy in the bind profile if necessary.
-
Check the provisioning settings used by the connected Citrix ShareFile system. Specify them according to real values for your provisioned Citrix ShareFile target system.
Configuring the Citrix ShareFile Target System
The Citrix ShareFile target system requires the following layout:
-
Accounts - all accounts are located in a subfolder Accounts.
-
Groups - all groups are located in a subfolder Groups.
The attribute dxrPrimaryKey of accounts and groups contains the identifier of these objects in the connected system.
DirX Access Workflows
There are two methods to connect DirX Access with DirX Identity:
-
DirX Access can directly make use of the DirX Identity target system.
-
DirX Identity can provision DirX Access via standard LDAP workflows.
The first method is easy to set up and handle, is always up to date and avoids any synchronization effort.
The second method should be used if the combined load coming from DirX Access and DirX Identity is too high for the directory server.
Using the Target System
This variant assumes that DirX Access uses directly the DirX Identity target system. Perform these steps:
-
Set up a virtual target system in DirX Identity. State handling is not necessary for this type of target system.
-
Set up DirX Access to use the DirX Identity target system as user store. Read the corresponding DirX Access documentation.
-
Test the solution.
All changes of accounts and group memberships in DirX Identity are immediately visible from DirX Access.
Using LDAP Connectivity
In this model we assume two different directory server instances: one keeps the Identity Store, the other one acts as DirX Access repository.
To set up this solution, perform these steps:
-
Create a new target system of type LDAP in DirX Identity. The necessary synchronization and validation workflows will be automatically configured.
-
Adapt the mapping of the synchronization and validation workflows according to the requirements of DirX Access.
-
Test the solution.
In this case provisioning changes (account and group changes) are propagated with real-time workflows to DirX Access. The delay is typically only a few seconds.
Evidian ESSO Workflow
The Evidian ESSO system is an Active Directory (ADS) or LDAP target system in which every account can be enabled for single sign-on (SSO) to intranet- and extranet-based applications.
A target system associated with the application to be accessed via SSO from user accounts in the ADS/LDAP ESSO target system is configured in the Evidian ESSO workflow. This configuration allows a user who is logged into the ADS/LDAP ESSO connected system with the corresponding ADS/LDAP account to access the application-specific connected system - for example, a Salesforce system - without additional login.
The Evidian ESSO workflow operates between an Identity Store and an ADS/LDAP ESSO connected system. The workflow uses the LDAP connector on the Identity Store side and the ESSO connector on the Evidian ESSO side. The connector communicates via the Evidian User Access Web Service (labeled ESSO Web API in the next figure). The following figure shows this deployment:
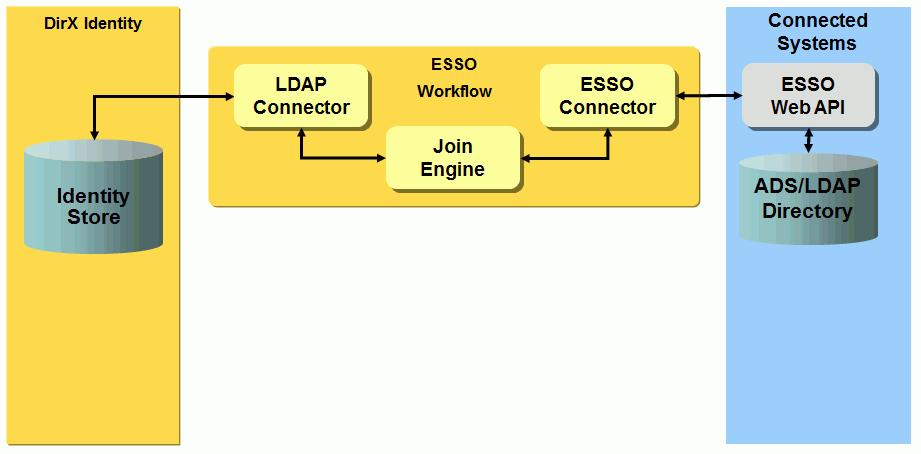
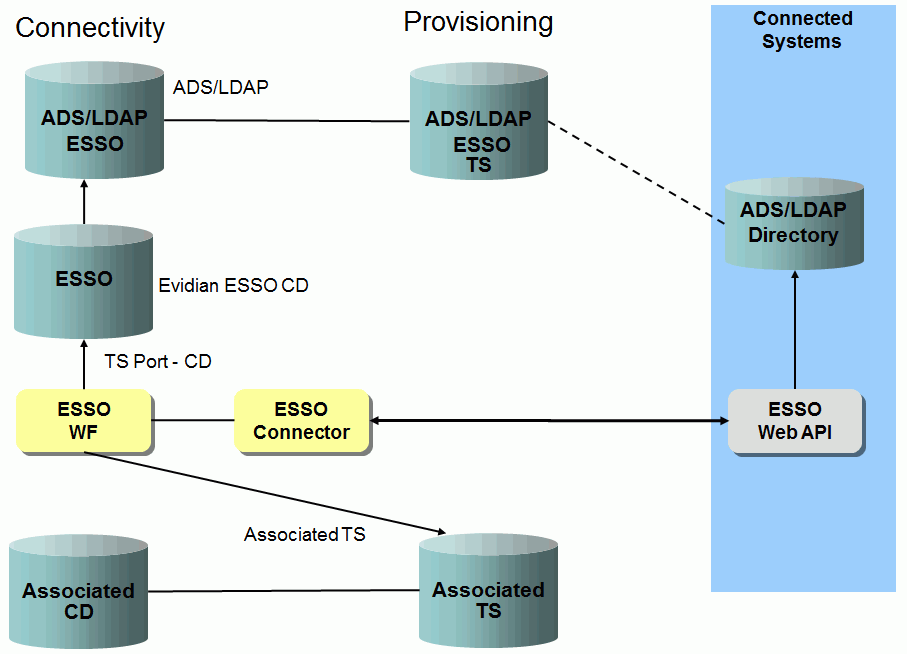
To provision the Evidian ESSO system, you create an Evidian ESSO connected directory and link it to the ADS/LDAP ESSO target system’s connected directory. The following figure illustrates the simplified data model in Connectivity/Provisioning:
Evidian ESSO Workflow Prerequisites and Limitations
The Evidian ESSO workflow has the following prerequisites:
-
The Evidian User Access Web Service must be reachable.
-
The Evidian certificate authority (CA) must be added to the cacerts file used by the Java-based Server (IdS-J).
-
The Evidian ESSO system must be configured as an Active Directory target system. The accounts must be available (at least in the state IMPORTED) and linked to a user.
-
To perform ESSO provisioning for the ADS ESSO target system, a connected directory of type ESSO (shown as ESSO in the previous figure) must be configured and linked with the ADS ESSO connected directory (shown as ADS/LDAP ESSO in the previous figure).
The Evidian ESSO workflow assumes that a boolean flag dxrOptions(enablesso) is configured for the account. It’s up to you how to populate it. You can define a flag at the user that is mastered to the account or you can define rules that specify for which accounts ESSO should be enabled. Here is a target system instance-specific object description extension for the definition:
...
<!-- LDAP specific property pages -->
<propertysheet>

  <propertypage name="Esso"
      insertafter="AccountGeneral"
      class="siemens.dxr.manager.nodes.customizer.GenericPropertyPage"
      title="Esso Enabling"
      layout="dxrOptions(enableEsso)"
      helpcontext="mr_ts_group_tsspecific"/>
  </propertysheet>

<!-- LDAP specific properties -->
<properties>
  <property name="dxrOptions(enableEsso)"
      type="java.lang.Boolean"
      label="Enable for SSO"
      readonly="false"
      multivalue="false"
  />
</properties>
...
Setting up the Evidian ESSO Workflow
To set up the Evidian ESSO workflow:
-
Create the ADS or LDAP target system for the Evidian ESSO system.
-
Run the validation workflow to get the account data.
-
Link the accounts to the users.
-
Introduce the "enable SSO" flag into the target system associated with the application; for example, the Salesforce TS.
-
Create the Evidian ESSO connected directory and then link it to the ADS ESSO target system that you created in the first step.
-
Create the Evidian ESSO workflow and then link to the target system associated with the application.
-
Add the Evidian certificate authority (CA) to cacerts.
Connecting to Evidian ESSO
In the Provisioning tab of the ESSO connected directory configuration object, specify the URL to the Evidian Web Service. In the Bind Profiles tab, specify a user and a password.
Evidian ESSO Workflow and Activities
The following figure shows the Evidian ESSO workflow’s join activity objects at the Identity Store and connected system sides as well as the related ports and channels and their relationships.
ESSO Workflow
In General → Associated TS for the Evidian ESSO workflow configuration object, specify the target system that corresponds to the application you want to access via Evidian ESSO. The Is applicable for section for the workflow must match the Match properties defined in the associated target system. The workflow uses the SynchOneWay controller.
Evidian ESSO Workflow Ports
This section provides information about the Evidian ESSO Provisioning workflow ports.
TS Port
-
CF - Crypt Filter
The standard crypt filter for password decryption.
Evidian ESSO Workflow Channels
This section provides information about Evidian ESSO channels. Only accounts are supported. Since a SynchOneWay controller is used, the channel on the Identity side is only relevant for reading the necessary attributes.
Common Aspects
Direction: Identity Store → ESSO
-
ID is calculated using the environment variables essouser and essoapplication. The environment variable essoapplication is configured at the account channel in the Specific Attributes tab and is always DirXIdentity.
User Hook
com.siemens.dxm.join.userhook.esso.UserHookAccountsTo
Implements the "Process Source Entry" procedure. It reads the user link of the source entry and tries to find the corresponding account in the ADS/LDAP ESSO target system. It provides the DN (in the connected system) of this account and the State attributes in the following environment properties: essouser, essouserstate, essousercsstate.
If the account cannot be found, it returns false and the entry will not be processed (you can’t manage Evidian ESSO accounts without an Active Directory account).
Export/Join
A simple expression is used:
The user DN part of the identifier is taken from the environment property essouser which is populated by the processSourceEntry user hook. The application part is taken from the essoapplication environment property. The join expression is just a dummy as the connecter does not support filters. The whole Join criteria is given by the base DN, which identifies exactly one account in the ADS/LDAP ESSO connected system.
ID Mapping
ID mapping is a Java source mapping. It corresponds to the base object of the export (if no joined entry is found):
String adsUserDN = (String) env.get("essouser");
String application = (String) env.get("essoapplication");
targetIdStr = adsUserDN + ",application="+application+",role=DirXIdentity";
Post Mapping
Post mapping is a Java source mapping. The following attributes control the outcome:
-
The State attributes of the corresponding ADS/LDAP ESSO account (from environment)
-
The dxrState of the source entry (the account in the associated target system)
-
The flag that specifies whether ESSO should be enabled in the default dxrOption(enableesso) attribute of the source entry (the account in the associated target system)
-
The joined entry (whether it is available)
Customizing the Evidian ESSO Workflow
This section describes how to customize the Evidian ESSO Provisioning workflow.
Google Apps Workflows
The Google Apps Provisioning workflows operate between a target system of type LDAP in the Identity Store and the corresponding connected Google Apps endpoint.
The workflows use the Google Apps connector for provisioning. This connector communicates with the Google Apps endpoint across the HTTP protocol using a REST API provided by Google, called Admin Directory API.
The connector uses Google OAuth service for authentication and authorization purposes.
The workflows handle the following objects:
Users - the Google Apps users.
Groups - the Google Apps groups.
The delivered workflows are:
-
Ident_GoogleApps_Realtime - the synchronization workflow that exports detected changes for account and group objects from the Identity Store to the GoogleApps server and then validates the processed changes in Google Apps to the Identity Store. The workflow also generates a password if the object is created.
-
Validate_GoogleApps_Realtime - the validation workflow that imports existing Google Apps users and groups along with group assignments from Google Apps to the Identity Store.
-
SetPassword in Google Apps - the workflow that sets the password for the user object in GoogleApps.
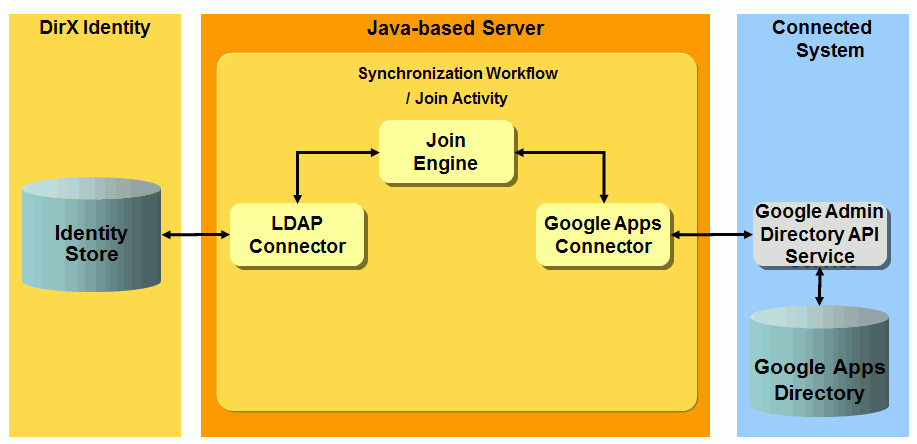
The following figure illustrates the Google Apps Provisioning workflow architecture.
Google Apps Workflow Prerequisites and Limitations
The Google Apps connector acts as a remote application to the Google Apps system. As a result, you need to create a Google Admin Account and then link it to a Google Service Account in order to be able to access the API using the OAuth 2.0. (For details, see https://developers.google.com/accounts/docs/OAuth2Login.)
To obtain Google Admin Directory API credentials:
-
Log in to the Google Developers Console with your admin user credentials at https://console.developers.google.com.
-
Create a new project. You need only provide a name; for example, DirX-Interop.
-
In the Projects window, navigate to APIs & auth → APIs.
-
Search for the Admin SDK API and enable it for this user.
-
Navigate to APIs & auth → Credentials and then create a new Service Account:
-
In the OAuth section, click Create new Client ID.
-
From the pop-up window, select the Service account and then click Create Client ID.
| Your Client ID, Service Account Email and Private P12 Key have been generated (Please download your generated key as a P12 file. You will need it when setting up the Google Apps connected directory in DirX Identity). |
To use the Google Admin Directory API:
-
Log in to the Google Admin Console with your admin user credentials at https://admin.google.com.
-
Navigate to Security → Advanced settings → Manage OAuth Client access.
-
In Client Name, enter the client ID generated by Google in the Developers Console.
-
In One or more API Scopes, enter the Google API scope URLs, separated by commas (we only need to be able to modify users and groups: https://www.googleapis.com/auth/admin.directory.group, https://www.googleapis.com/auth/admin.directory.user).
-
Click Authorize and then check to see that your changes appear in the list below. Note that when you make these changes, it takes Google a little time to apply them on its side.
Now you are ready to use the Google Admin Directory API.
Connecting to Google Apps
To configure the connection to Google Apps:
-
Set up the bind credentials of the connected directory that represents the Google Apps system. Use the correct credentials (with sufficient rights). These are the credentials used for administration of the Google Apps domain. The User must be a valid Google Apps user name or e-mail address.
-
Set up the following items in your Google Apps connected directory (in the Google API tab):
-
Private Key - use the P12 file generated by Google for your account.
-
Service Account Email - use the one generated by the Google developer console.
-
Application Name - you can use anything you like.
-
Domain Name - must contain the name of your company domain. (If the domain is not configured (default) it is deduced from the bind profile user id)
-
If necessary, specify the HTTP proxy server in the HTTP/HTTPS Proxy Server tab.
-
Check the provisioning settings used by the connected Google Apps system and set them to the values required by your provisioned Google Apps target system.
To run the Google Apps workflows:
-
Assign the resource family GoogleApps in the IdS-J server.
Configuring the Google Apps Target System
The Google Apps target system requires the following layout:
-
Accounts - all accounts (Google Apps users) are located in a subfolder Accounts.
-
Groups - all groups are located in a subfolder Groups.
The dxrPrimaryKey attribute of accounts and groups contains the identifier of these objects in the connected system. This attribute is generated only by Google.
The group membership is stored at the account object and references the dxrPrimaryKey attribute of group objects.
Configure the Domain property at the target system at the Options tab. This value is used as a suffix for Google Apps User Email and Group Email.
Google Apps Workflow and Activities
The following figure shows the layout of the channels that are used by the Google Apps workflow join activity.

The Google Apps users and groups (and memberships) are synchronized via a pair of channels (one channel per direction). The membership in the Identity Store is stored in accounts. See the default Google Apps workflow for details
Google Apps Ports
This section describes the Google Apps ports.
TS Port
-
CF - Crypt Filter
A Google Apps filter is configured implicitly. It is used to send the decrypted password attribute userPassword to the Google Apps endpoint.
Google Apps Account-Channel Mapping
In the account channel mapping, many LDAP attribute are mapped to/from Google Apps attributes. The following attributes receive special handling:
Direction: Identity Store → Google Apps
-
ID - dxrPrimaryKey
-
Join - $\{source.dxrPrimaryKey}
-
Password - remember that the account’s password is inherited from the user object in Identity Store when you assign a group to a user (and the account is then created implicitly). If no password is present at the user, the account’s password is initially set to the default password. Check to make sure that the passwords comply with the password policies in effect for the Google Apps system. (By default, Google needs a password with a minimum length of eight (8) characters).
-
userName - this attribute doesn’t need mapping because Google automatically generates the user name by concatenating the givenName and familyName
-
givenName - this attribute is set to "N/A" if the user doesn’t provide a givenName.
-
orgUnitPath - the root (/) is always mapped to this attribute because the connector doesn’t support the full functionality of the Google Apps organizational units.
Direction: Google Apps → Identity Store
-
ID - $\{joinedEntry.id} or "cn="${source.userName}","+${env.role_ts_account_base}
-
Join - ${target.dxrPrimaryKey} or ${target.id}.
-
givenName - ${joinedEntry.givenName} or ${source.givenName} because the Google Apps system may register the changes after the validate workflow is finished.
-
sn - ${joinedEntry.sn} or ${source.familyName} because the Google Apps system may register the changes after the validate workflow is finished.
-
dxrName - ${joinedEntry.dxrName} or ${source.userName} because the Google Apps system may register the changes after the validate workflow is finished.
-
c, l, postalCode, postalAddress, postOfficeBox, st, street - these attributes are all mapped from Google’s multi-valued addresses attribute only for the address flagged as primary.
-
secretary - Google permits multiple secretaries. Only the first entry is mapped to the Identity Store.
-
employeeNumber - mapped from Google’s multi-valued externalIds attribute only for the externalId of type organization.
Google Apps Group-Channel Mapping
Mappings are defined for the Google Apps attributes Name, Description and Email.
Direction: Identity Store → GoogleApps
-
ID - dxrPrimaryKey
-
Join - ${source.dxrPrimaryKey}
-
Post-Mapping - if the dxrState attribute in the Identity Store is DELETED, the operation (as part of the mapped entry) is set to DELETE.
Direction: GoogleApps → Identity Store
-
ID - ${joinedEntry.id} or "cn="${source.groupName}","+ env.role_ts_group_base}
-
Join - ${target.dxrPrimaryKey} or ${target.id}.
-
dxrTSState - the attribute used to detect the current state of the group in Google Apps. It is set to ENABLED for existing entries and to DELETED for non-existing entries.
JDBC Workflow
The JDBC Provisioning workflow synchronizes data between a JDBC target system within the Identity Store and a relational database. The following figure shows the deployment.
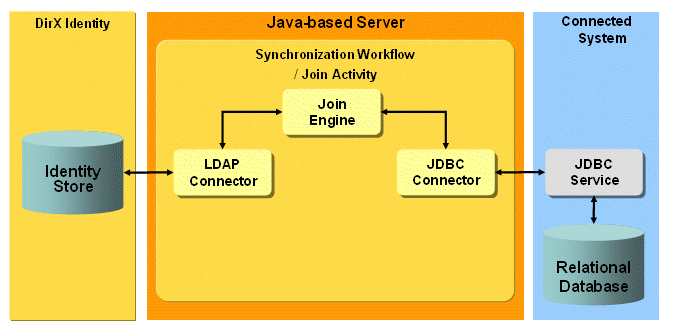
The workflow uses the LDAP connector on the Identity Store side and the JDBC connector on the database side. The connector communicates with JDBC drivers.
The default JDBC workflow is set up for three application-related database tables that hold accounts, groups and memberships. The membership table keeps the relationship between the accounts and the groups. Handling of other or more tables is a customization task.
JDBC Workflow Prerequisites and Limitations
You must install the driver jar files that correspond to the JDBC drivers you intend to use. For each IdS-J Server installation, place the jar files in the server’s confdb\common\lib directory to enable the IdS-J Server to use the drivers.
The default for new JDBC target systems is now that memberships are held at the account objects, which enhances performance for the real-time workflows. Because the Tcl-based workflows assume memberships at group objects, you cannot use the Tcl-based JDBC provisioning workflows in parallel with the JDBC real-time workflows for the same target system instance.
The JDBC connector runs in lite mode as much as possible, which means that database meta information is read from the database and therefore must not be explicitly configured.
Connecting to JDBC
To configure the connection to JDBC:
-
Select the type in the Configuration Page of the JDBC Connected Directory and the corresponding Driver Type. Check the driver’s documentation to determine the URL that is required to connect.
Configuring the JDBC Target System
Memberships are held at the account objects.
The default workflow configuration assumes that every provisioned table has an auto-generated primary key. This key cannot be calculated in DirX Identity. It is generated by the database. This key is used as dxrPrimarykey.
Attribute Correlation
Attributes in the DirX Identity target system belong to the corresponding attributes in the JDBC target system.
| DirX Identity - Group | JDBC - Group Table | Remark |
|---|---|---|
cn |
dxrGroupName |
Unique name in DirX Identity |
dxrPrimaryKey, dxrName |
ID (DB key) |
Identifiers |
| DirX Identity - Group | JDBC - Memberships Table | Remark |
|---|---|---|
dxrPrimaryKey, dxrName of group |
GroupID: DB key of group |
Identifiers |
DxrPrimaryKey, dxrName of referenced account |
AccountID: DB key of account |
Identifiers |
| DirX Identity - Account | JDBC - Accounts Table | Remark |
|---|---|---|
cn |
DxrAccountName |
Unique name in DirX Identity |
dxrPrimaryKey, dxrName |
ID (DB key) |
Identifiers |
JDBC Workflow and Activities
The following figure shows the JDBC workflow’s join activity objects at the Identity Store and connected system sides as well as the related ports and channels and their relationships.
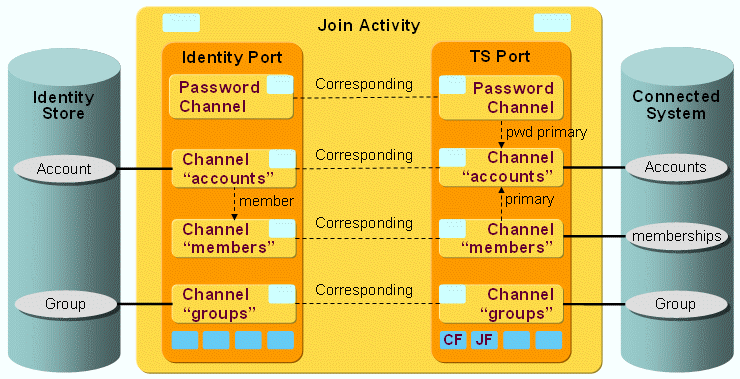
As shown in the figure:
-
The "accounts" channel points to the "member" channel because the accounts keep the memberships.
-
The primary channel construct defines the memberships in the database.
-
The password synchronization workflow uses the password channel.
JDBC Workflow Ports
This section provides information about the JDBC workflow ports.
TS Port
-
CF - Crypt Filter
The standard crypt filter for password decryption. -
JF - JDBC Filter
A JDBC Filter is configured. It is used to transform multi-value membership attributes in Identity to multiple records in the JDBC membership table. As the Filter is a general Filter for handling transformation of multi-value attributes to multiple records, its configuration is independent of the workflows environment.
Configuration:
Request:
-
Member Attribute - the attribute that holds the target of the membership.
Default: GroupID (because the Accounts table references the Groups table). -
Member Table - the table that holds memberships.
Default: Memberships. -
Member Source Attribute - the attribute that holds the source of a membership.
Default: AccountID as Accounts reference groups.
Search Response:
-
Match Type - the attribute used for matching records corresponding to the same identity object. Here it is accountID, as all memberships belonging to this account have the same accountID.
-
Multivalue Attributes - the attribute that should be accumulated.
Default: GroupID as all GroupIDs should be stored at the corresponding account.
JDBC Workflow Channels
This section provides information about JDBC workflow channels.
Common Aspects
Direction: Identity Store → JDBC
-
ID is calculated via calculateIdInJdbc. For details, see the Java documentation.
Direction: JDBC → Identity Store
-
ID is calculated via CommonProcsJDBC.calculateIdInIdentity. It assumes that the specific attributes "accountnameatt" and "groupnameatt" (at the JDBC connected directory) contains the attribute names holding the (unique) account name and (unique) group name attributes.
-
dxrName is taken from the database ID column.
Membership
Direction: Identity Store → JDBC (TS Account-Group-Membership)
-
ID: "accountId="$\{source.dxrPrimaryKey}",Table=Memberships"
-
Primary Channel account Join: Memberships.AccountID = ID
SetPassword
-
Maps the dxmPassword to the password column in your account table.
-
A password channel can also be configured backwards from the connected system to Identity to be able to update some attributes in Identity after a password change or reset has taken place in the connected system. The join engine then as usual synchronizes the attributes specified in the corresponding password channel mapping to Identity after the account with its password-relevant attributes has been updated in the connected system.
Customizing the JDBC Workflows
You can customize the JDBC workflows in two ways:
-
Adapt the database scheme in relationship to a different table layout
-
Call stored procedures
Adapting the Database Scheme
In most cases, your database table(s) will differ from the assumed default tables.
Table Names
In every mapping where the syntax Tablename.ColumnName is used, change the table name
IDMapping → JDBC:
-
Change calculateIdInJdbc
targetId = CommonProcsJdbc.calculateIdInJdbc( sourceEntry, joinedEntry, env, entry_type, "Groups", "groups-id"); -
If your Group Table is named GRP, change to:
targetId = CommonProcsJdbc.calculateIdInJdbc( sourceEntry, joinedEntry, env, entry_type, "GRP", "GRP-id"); -
Change the Export Search base.
-
At the JDBC CD, set the SpecificAttribute membertable to your membertable.
-
At the JDBC filter, adjust the member table.
Column Names
You can change the column names directly in every mapping line. If you want to select attribute names from a list, you must edit the JDBC CD attribute configuration.
If column names of the columns holding the unique identity attribute (by default, dxrGroupName, dxrAccountName) differs, adjust this in JDBC CD SpecificAttribute accountnameatt / groupnameatt
-
If an ID attribute changes:
-
All mappings containing ID
-
Channels → Id: dxrName/dxrPrimaryKey/dxrPrimaryKeyOld: Javamapping sourceAttrName = "ID";
-
Account-group-membership channel: join condition Primary
-
If accountID/groupID changes in membership table:
-
JDBC filter configuration
-
Adjust Specific attribute memberatt/ membersourceatt at JDBC connected directory
-
ID Mapping → JDBC account-group-membership
-
Primary Channel join secondary account-group-membership
-
Join in account-group-membership channel
Primary Key is not an Auto Key
This is not possible in pure lite mode. Define instead the primary keys (in TS port):
<jdbc-connection always-follow-references="false">
    <abbreviation name="account-id">Accounts.ID</abbreviation>
    <abbreviation name="group-id">Groups.ID</abbreviation>
    <abbreviation name="membership-id">Memberships.ID</abbreviation>
    <tables-and-views>
        <table primary-keys="account-id">
            <name>Accounts</name>
        </table>
        <table primary-keys="group-id">
            <name>Groups</name>
        </table>
        <table primary-keys="membership-id">
            <name>Memberships</name>
        </table>
    </tables-and-views>
</jdbc-connection>
Here a separate ID column in the membership table is assumed. It’s also possible account-id and group-id defines the key. In this case the definition of the membership table and the corresponding abbreviation is not needed.
Use the defined abbreviation for id column in ID mapping
targetId = CommonProcsJdbc.calculateIdInJdbc(
        sourceEntry,
        joinedEntry,
        env,
        entry_type,
        "Accounts",
        "account-id",false);
Use CommonProcsJdbc.calculateIdInJdbc with argument autogeneratedkey=false.
Use the defined abbreviation in members channel as the primary value in Primary Channel join condition.
Use the defined abbreviation in join condition
<join>
    <searchBasetype="urn:oasis:names:tc:SPML:1:0#DN">
        <spml:id>"accountid="+${source.dxrPrimaryKey}+",Table=Accounts"</spml:id>
    </searchBase>
</join>
Use the defined abbreviations in Primarykey(old) and DxrName Java mapping at Identity side.
Change the object description to generate a unique key for dxrPrimaryKey.
Use a Column to specify the Account State
To configure a column representing the account state in your account table insert a new line at the JDBC connected directory propertypage Specific Attributes. As name enter accountstateatt. Fill in the column name as value. The default dxrTSState Mapping for the account uses this column to set the dxrTSState if the configured column exists. Only the values ENABLED and DELETED are allowed. If your column contains other values, you must map your values to these allowed values. To do this edit the dxrTSState mapping at the account channel.
Calling Stored Procedures
Under the default JDBC TS port, you will find an example for a stored procedure definition.
<?xml version="1.0" encoding="UTF-8"?>
<!-- a procedure with 2 in params returning an int -->
<function name="changePassword">
    <return>
        <range exact="0" category="OK"/>
    </return>
    <argument name="ID" in-out="IN" dataType="INTEGER" />
    <argument name="pw" in-out="IN" dataType="VARCHAR" />
</function>
The sample represents a SQL server stored procedure returning 0 on success. It takes two parameters: the ID that identifies the record and the password that should be set.
To call this stored procedure, an extended request is necessary. This request may be called in the postmapping or in a user hook. Building the extended request in the postmapping means that it is called after a normal request.
Call via postmapping:
In the default setPassword channel, you will find an example (in comments):
logger.debug("SP postmapping called");
HashMap<String,DsmlAttr> sourceAttrs = source.getAttrs();
if (sourceAttrs == null)
    return mappedEntry;

// the Stored Procedure +
String theSP = "changePassword";

ExtendedRequest extReq = new ExtendedRequest();
mappedEntry.addExtendedRequest(extReq); // append the SP call as extended request
extReq.setRequestID("SPCall");
OperationIdentifier opId = new OperationIdentifier();
opId.setOperationID(theSP); // name of SP +
opId.setOperationIDType(OperationIdentifierOperationIDTypeType.GENERICSTRING);
extReq.setOperationIdentifier(opId);
ProviderIdentifier provId = new ProviderIdentifier();
provId.setProviderID("SP"); // SP for Stored procedure
provId.setProviderIDType(ProviderIdentifierProviderIDTypeType.URN);
extReq.setProviderIdentifier(provId);

// assume two parameter, the ID the password pw +
// first ID from source ??later also from mappedEntry +
// only the first element of attArr is computed by the connector +
Attributes[] attArr = new Attributes[1];
DsmlAttr pkey =sourceAttrs.get("dxrprimarykey");
DsmlAttr id = new DsmlAttr();
id.setName("ID");
id.addDsmlValue(pkey.getDsmlValue(0));
Attributes atts = new Attributes();
atts.addAttr(id);
logger.debug("SP argument ID: "+pkey.getDsmlValue(0).toString());

// second Password from mapped pw attr
DsmlModification[] mod = mappedEntry.getModification("pw");
if (mod.length > 0) {
    // take first
    DsmlAttr pw = new DsmlAttr();
    pw.setName("pw");
    pw.addDsmlValue(mod[0].getDsmlValue(0));
    atts.addAttr(pw);
    logger.debug("SP argument pw: "+pw.getDsmlValue(0).toString());
}
attArr[0] = atts;
extReq.setAttributes(attArr);
// only extended Request to be processed
mappedEntry.setRequestType(Request.Type.NONE);
Here the first argument ID is taken from the source attribute dxrprimarykey.
The second argument is taken from the mapped entry. This example shows that you can do some complicated mapping and take the result as an argument. Keep in mind that for mapped attributes, modifications will be generated. If you do not want the password to be set twice (by generated modification an by stored procedure) you can use the attribute flag Readonly to prevent it. In this sample, the RequestType is set to NONE at the end, which means that only the stored procedure is called and other generated modifications are ignored. Normally you do not intend to do this, so all generated modifications are made (for example, the description has changed) and afterwards the stored procedure is called to set the password column.
In the com.siemens.dxm.join.userhook.jdbc.UserHookAccountsTo user hook, you will find an example of how to call a stored procedure in a user hook.
/**
* Call an SP via extended request
*
* Can also be done in postMapping or another user hook
* @see com.siemens.dxm.join.api.IUserHookExt#preUpdate(siemens.dxm.connector.DxmRequestor, siemens.dxm.connector.DxmRequestor, siemens.dxm.connector.spml.Identifier, java.util.HashMap, com.siemens.dxm.join.map.MappedEntry, siemens.dxm.connector.spml.Identifier, java.util.HashMap)
*/
public boolean preUpdate(DxmRequestor srcConn, DxmRequestor tgtConn, Identifier sourceId, HashMap<String,DsmlAttr> sourceAttrs, MappedEntry mappedEntry, Identifier joinedId, HashMap<String,DsmlAttr> joinedAttrs) {

// the Stored Procedure
String theSP = "changePassword";

ExtendedRequest extReq = new ExtendedRequest();
extReq.setRequestID("SPCall4SetPassword");
OperationIdentifier opId = new OperationIdentifier();
opId.setOperationID(theSP); // name of SP
opId.setOperationIDType(OperationIdentifierOperationIDTypeType.GENERICSTRING);
extReq.setOperationIdentifier(opId);
ProviderIdentifier provId = new ProviderIdentifier();
provId.setProviderID("SP"); // SP for Stored procedure
provId.setProviderIDType(ProviderIdentifierProviderIDTypeType.URN);
extReq.setProviderIdentifier(provId);

// we have two parameters, the ID and the password pw
// first take ID from source attributes
// only the first att is computed by the connector
Attributes[] attArr = new Attributes[1];
DsmlAttr pkey =sourceAttrs.get("dxrprimarykey");
DsmlAttr id = new DsmlAttr();
id.setName("ID");
id.addDsmlValue(pkey.getDsmlValue(0));
Attributes atts = new Attributes();
atts.addAttr(id);

logger.debug("SP argument ID: " + pkey.getDsmlValue(0).toString());

// second parameter Password from mapped pw attribute
DsmlModification[] mod = mappedEntry.getModification("pw");
if (mod.length > 0) {
    // take first
    DsmlAttr pw = new DsmlAttr();
    pw.setName("pw");
    pw.addDsmlValue(mod[0].getDsmlValue(0));
    atts.addAttr(pw);

    logger.debug("SP argument pw: "+pw.getDsmlValue(0).toString());
}
attArr[0] = atts; // IN and IN_OUT parameters
extReq.setAttributes(attArr);

if (tgtConn instanceof DxmConnectorExtended) {
    // call extended Connector
    DxmConnectorExtended theConnector = (DxmConnectorExtended)tgtConn;
    try {
        ExtendedResponse rsp = theConnector.extendedRequest(extReq);
    } catch (DxmConnectorException e) {
        logger.error("SP Call failed: ",e);
    }
}
// process extended request only
// ignore other modifications to avoid a 2nd modification of the mapped pw
mappedEntry.setRequestType(Request.Type.NONE);

return true;
}
What’s the difference?
In a user hook, you must call the connector’s extendedRequest method explicitly. In postmapping, you just build the extendedRequest and add it to the mapped entry:
mappedEntry.addExtendedRequest(extReq); // append th SP call as extended requestGeneral Notes:
-
Always set "SP" as providerId
-
Attributes Array always has size 1. Every argument is an element of this one and is the only array element.
Function or Procedure?
The definition of a stored procedure may depend on the database system. For the JDBC connector definition, a function is defined if it returns a value. If no value is returned, it is a procedure.
Here is a Microsoft SQL Server 2005 stored procedure:
ALTER PROCEDURE [dbo].[changePassword]
    -- parameters for the stored procedure
    @userId int,
    @pw varchar(50)
This stored procedure returns an int, which means you must configure this procedure as a function:
<function name="changePassword">
    <return>
        <range exact="0"/>
    </return>
    <argument name="ID" in-out="IN" dataType="INTEGER" />
    <argument name="pw" in-out="IN" dataType="VARCHAR" />
</function>
In Oracle, a stored procedure does not return a value, which means you must configure a procedure. But for a procedure, you must specify the "return" argument because the connector needs an indicator for the outcome of the procedure. Therefore, you cannot use a procedure with the same arguments in Oracle. You must wrap the procedure to get an "out" argument for return:
<procedure name="changePw">
    <return name="dummy">
        <range exact="0"/>
    </return>
    <argument name="ID" in-out="IN" dataType="INTEGER" />
    <argument name="pw" in-out="IN" dataType="VARCHAR" />
    <argument name="dummy" in-out="OUT" dataType="INTEGER" />
</procedure>
LDAP Workflows
The LDAP Provisioning workflows operate between a target system of type "LDAP" in the Identity Store and the corresponding connected LDAP Directory system.
The LDAP connector used in the workflows communicates with the LDAP server across the native LDAP protocol, as shown in the following figure.
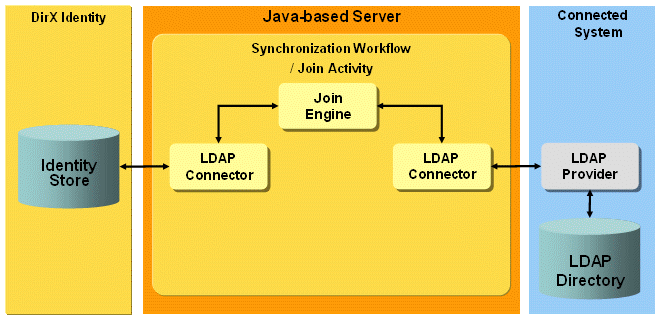
The workflows allow you to synchronize Identity account and group objects with LDAP Directory users and group objects.
LDAP Workflow Prerequisites and Limitations
The LDAP workflows currently have no prerequisites or limitations.
Configuring the Connection to LDAP
This section provides information about LDAP target system configuration.
Connection to the target system:
Specify the IP address, the data port, and the secure port at the LDAP service object (LDAP CD → Service). The IP address may contain the server name - fully-qualified or not - or a TCP/IP address.
In the Bind Profile (LDAP CD → Bind Profile), specify a user in DN format.
For SSL/TLS, fill the following fields:
SSL Connection - check it for SSL connections, whether server or client authentication.
Client Authentication - check if if you want to use client-side SSL.
Path to Key Store File - the file name of the file-based keystore containing the certificate/private key pair and the relevant CA certificates for this client certificate.
Key Store Password - the password for accessing the key store.
Key Store Alias - the alias name of the keystore entry (optional).
Path to Trust Store File - the file name of the file-based truststore containing the LDAP server CA certificate.
Trust Store Password - the password for accessing the truststore.
Configuring the LDAP Target System
Pay attention to the following attributes:
-
The attribute dxrPrimaryKey of accounts and groups contains the object’s target system DN. It is also used as the member attribute of groups. On account creation, it is generated by the tsaccount.xml object description using the connected directory-specific attributes account base and group base.
-
The attribute dxrName of accounts and groups contain the dxrPrimaryKey value. It is used for joining in Identity direction.
LDAP Workflow and Activities
The following figure shows the layout of the channels that are used by the join activity.
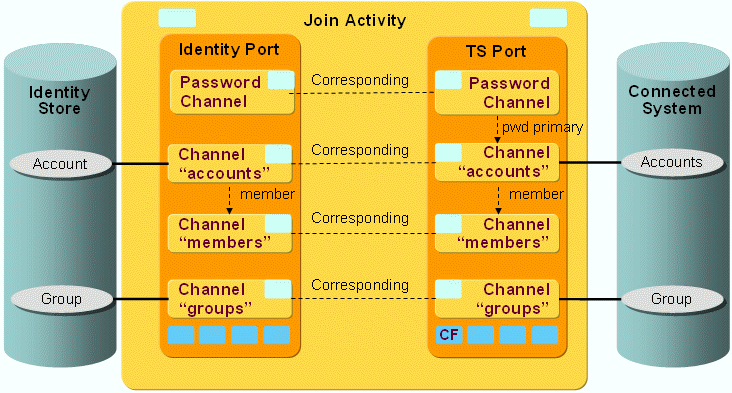
As the figure shows, there is a pair of channels between accounts, groups and members on each side. The members are linked to the groups on both sides.
LDAP Workflow Ports
This section describes LDAP workflow ports.
TS Port
-
CF - Crypt Filter
The configured Crypt Filter is used to send the password attribute userPassword decrypted to the LDAP server.
LDAP Workflow Channels
This section provides information about LDAP workflow channels.
Account and Group Channels in both Directions
Master attributes:
Most attributes (except, for example, the dxrTSState attribute) are mastered by DirX Identity. Consequently, these attributes have the OnAddOnly flag in the mapping direction to Identity. This is particularly true for the Identifier, which is also mastered by DirX Identity in the default real-time synchronization workflow. In the target system direction, it is calculated by DirX Identity in the dxrPrimaryKey attribute and results in moving the object in the target system if dxrPrimaryKey changed. In the DirX Identity direction, the Identifier is calculated only on an add operation, otherwise the joined object’s Identifier is taken.
Moving account objects:
The default LDAP real-time synchronization workflow can perform a rename/move of accounts in the LDAP target system. It operates in the following way:
If the dxrPrimaryKey attribute of the account is changed in DirX Identity (as a result of a user resolution and new calculation of the account attributes, which can have dependsOn or masteredBy settings in the account’s object description), the workflow performs the following actions:
-
It takes this as the new DN in LDAP.
-
It tries to find (join) the account with the configured join attributes (trying one after the other).
-
One of the join attributes is the employeeNumber, which shouldn’t change on user resolution in Identity.
-
When it finds the account in LDAP, it takes this DN is as the old DN and renames/removes the account from this old DN to the new DN.
-
On the way back, it puts the actual LDAP DN into the dxrPrimaryKey and dxrPrimaryKeyOld attributes in DirX Identity.
-
The dxrPrimaryKeyOld (as described above) is not taken for sync to TS but for other purposes.
Changing the account state holding the attribute employeeType:
If you want to use another attribute for holding the account state than employeeType you must do the following mapping adaptions in the account channel:
Direction Identity → Connected System
Just change the java mapping line with employeeType on the right side by exchanging employeeType with another attribute name. The content of the Java coding on the left side has not to be changed because it references now the term tgtAttrname instead of hard coded employeeType. The Java class name is just changed to the new attribute name if the mapping is saved.
Direction Connected System → Identity
Adapt the Java mapping to the target attribute dxrTSState and exchange employeeType in the line
CommonProcsLdap.setAccountStateAttr("employeeType");
by the new attribute name.
PostMapping:
A postMapping exists only for the group channel in the target system direction. It is used for changing the request type to DELETE if the dxrState attribute in Identity contains the value DELETED, which results in deleting the object in the target system.
For accounts deletion of objects in the target system is handled in the Java mapping to the account state holding attribute, which is by default employeeType.
Password Channel
The target system’s password attribute userPassword is updated with the current password of the account in DirX Identity and the pwdReset attribute, which determines whether or not the password must be changed on the next login by the user, is set depending on the source attribute dxmPasswordExpired. This attribute was previously set by the User or Account Password Event Manager workflow listening for requests from Identity Web Center or Password Listener.
Case-Sensitive Rename
If you want to enable case-sensitive renames like ou=RedFlag → ou=Redflag, you need to set the operational attribute caseExactRDNComparison to true in the generated request. Use the Op. Mapping tab of your channel get this into the workflow:
<?xml version="1.0" encoding="UTF-8"?>
<mappingDefinition>
    <operationalAttrMapping mappingType="constant" name="caseExactRDNComparison">
        <value>true</value>
    </operationalAttrMapping>
</mappingDefinition>
LDAP Delta Workflows
For a general explanation of the delta workflows, see the sections under "Java-based Workflow Architecture" in "Understanding the Default Application Workflows" in this guide.
The default LDAP delta workflow LDAP_Ident_Realtime_Delta (as the workflow name already implies) synchronizes deltas from an LDAP connected system to the Identity Store both for accounts and groups. You can verify this function by looking at the deltaSyncOneWay2Identity controller used by the workflow. The delta definitions given in the Delta tab for the LDAP connected directory’s channels apply (Connectivity Configuration Data → Connected Directories → Target Scheduled → LDAP → Channels).
Delta synchronization for the LDAP connected directories is based on time stamps: specifically, the LDAP attributes createTimeStamp and modifyTimeStamp. In the Delta tab, Delta Type is set to SearchAttributes and the two LDAP attributes are listed, and in Sort Type, the value String is selected.
When searching for deltas, the (configured) export search filter is extended and entries whose createTimeStamp or modifyTimeStamp attributes are set to a value that is more recent than (or equal to) the time stamp of the previous workflow run will be searched. For the first run, the (configured) export filter is not changed because there is no time stamp available for comparison.
When evaluating the search result, the most recent time stamp is retained as delta information and is stored in the Identity domain for each channel. This time stamp is subsequently used when the workflow is next activated (either in the DirX Identity Manager or by schedule).
| The Delta tab of the corresponding channels (that is, the Identity Store channels) hold delta definitions, too. These definitions apply if you have defined a delta workflow for synchronization from the Identity Store to the LDAP connected system. |
HCL Notes Workflows
The IBM Notes (formerly Lotus Notes) Provisioning workflow synchronizes data between an IBM Notes target system within the Identity Store and an IBM Domino server. The following figure shows the deployment.

The join engine running in the Java-based Server needs to send and retrieve data from a Domino server. The Notes API that is used for accessing the Notes address book is a C/C interface. Therefore, the Notes Provisioning workflow provides an SPML/SOAP connector that enables the join engine to exchange SPML requests and responses with the C-based Server. The SPML/SOAP-service running in the C-based Server exchanges the SPML requests and responses with the Notes connector, which finally interacts with the Domino server using the Notes C/C-API.
The Notes Provisioning workflow allows you to synchronize accounts and groups with Notes users and groups in the Notes address book.
Notes Workflow Prerequisites and Limitations
The Notes Provisioning workflow has the following prerequisites and limitations:
-
The workflow requires the version of Notes C/C++-API V 7.0.2 or newer.
-
Before you can use the workflow, you must extend the DirX Identity Store schema with Notes target system-specific attributes and object classes so that the workflows can store Notes-specific information in the Identity Store. For instructions, see the section "Extending the Schema for the Target System Workflows".
Configuring the Notes Workflow
Configuring a Notes Provisioning workflow consists of the following steps:
Configuring the Notes Connector (running in the C++-based Server)
In Identity Manager, log in to Connectivity, go to the Expert View, and set the Is Active flag in
Connectivity Configuration Data → Configuration → DirX Identity Servers → C Servers → server_name → Notes_Connector_name
Verify the attributes of the C++-based Server (in ConSvr SOAP Listener and ConSvr SOAP Receiver tab) in
Connectivity Configuration Data → Configuration → DirX Identity Servers → C Servers → server_name
Configuring the Notes Service
Assign the Notes server name in the following (Notes-specific) format:
CN=server_name/O=org_name[/…]
Make sure that the attribute types in the server name (for example, CN, O, OU) are specified in uppercase letters.
Configuring the Connected Directory
Assign the Addr(ess) Book field.
In the Provisioning tab, check the fields
-
Account Base and Group Base in "in Identity" property page.
-
user Base and Group Base in "in Target System" property page.
-
Admin Request Database, Admin Request Author, Group Member Limit and Unique Org Unit Attr in "Notes specific" property page. For details see the section "Static Configuration" in the DirX Identity Connectivity Reference.
Configuring the Bind Profiles
At least two bind profiles are required: one for the Notes administrator (Admin) and another one for registering, moving or renaming users (Certifier).
Others may be required when moving Notes users to different organizations or organizational units. (one per organization or organizational unit)
Note that the User field of the bind profile is used as the file name of the appropriate Notes ID file. Furthermore, make sure that the file name exactly matches the file in the Notes profile when used as “PathFileCertId”.
For details, see the section “Static Configuration” in the DirX Identity Connectivity Reference.
Configuring the Organizational Specific Profiles
For registration of users or moving users in the Notes address book, the Notes APIs need several attributes. For details, see the topic “Notes Connector” in the DirX Identity Connectivity Reference.
Profiles are used for storing Notes-relevant attributes per organizational unit in order to avoid storing each attribute in the account separately. The profiles are located in
domain_root → TargetSystems → Targetsystem_name → configurations → profiles
At least one default profile must exist. It’s used when no organizational unit specific one is available.
Configuring the Notes Target System
To support Notes groups and accounts in Identity Store, the service layer makes use of object descriptions and Java scripts that are located in
domain_root → TargetSystems → Notes → ObjectDescriptions
domain_root → TargetSystems → Notes → JavaScripts
The following object descriptions are provided:
Group.xml - for creation of Notes groups in the Identity Store
Profile.xml - for creation of profile objects (profiles) in the Identity Store
TS.xml - for creation of a Notes target system in the Identity Store
TSAccount.xml - for creation of Notes accounts in the Identity Store
The following Java scripts (called when processing the object descriptions) are also provided:
mail.js - for creation of the mail attribute
ProfileFromOU.js - for creation of the dxrProfileLink attribute
UniqueNameForAccounts.js - for creation of the dxrPrimaryKey attribute for accounts (which represents the attribute FullName in Notes)
UniqueNameForGroups.js - for creation of the dxrPrimaryKey attribute for groups (which represents the attribute ListName in Notes)
The following section describes these object descriptions in detail.
Object Descriptions
This section provides detailed information about object descriptions.
Group.xml
The object description is used for creation of a Notes group in the Identity Store.
Profile.xml
The Notes APIs need several attributes for registration of users or moving users in the Notes address book. For details, please refer to the section Notes Connector” in the DirX Identity Connectivity Reference.
Profiles are used for storing Notes-relevant attributes per organizational unit in order to avoid storing each attribute in the account separately. The profiles are located in
domain_root → TargetSystems → Targetsystem_name → configurations → profiles
At least one default profile must exist. It is used when no organizational unit specific one is available.
The available attributes from the Notes profile objects are:
Control parameters:
CreateIdFile
CreateMailDatabase
CreateMailDBNow
CreateNorthAmericanId
SaveIdInAddressBook
SaveIdInFile
SaveInternetPassword
DeleteMailFile
Other attributes:
CertifierStructure (will be passed as TargetCertifier to the Notes Connector)
ClientType
DbQuotaSizeLimit
DbQuotaWarningThreshold
DefaultMailServer (will normally be mapped to the attribute MailServer)
LocalAdmin
MailACLManager
MailForwardAddress
MailOwnerAccess
MailServer
MailSystem
MailTemplate
MinPasswordLength
OtherMailServers
PathFileCertId
PathFileCertLog
PathUserId
RegistrationServer
Validity
TS.xml
The object description is used for creation of a Notes target system in the Identity Store.
TSAccount.xml
The object description is used for creation of a Notes account in the Identity Store. New accounts inherit many attributes from the user. (for example, description, ou, and so on). The following attributes are explicitly set by the object description and hold the following default values:
dxmLNcreateInAddressBook=true
dxmLNregisterUser=true
dxmLNuserRegistered=false
dxmLNuserInAddressBook=false
There are a few attributes that depend on others:
dxrProfilesLink depends on ou
dxrPrimaryKey depends on dxrProfileLink
dxmLNuniqueOrgUnit depends on dxrPrimaryKey
mail depends on dxmLNshortName
Keep in mind that dxrProfileLink is only set for new objects (see description of ProfileFromOU.js) and therefore all the other attributes are only created and never changed.
Java Scripts
This section provides detailed information about Java scripts.
Mail.js
In the object description TSAccount.xml, the Java script mail.js is called to generate the mail attribute of the account. The value is calculated whenever the attribute dxmLNshortName changes or is created for the first time.
The script checks whether the account object holds the attribute dxrProfileLink. If true, it uses the attribute dxrCreateObjDefaults(mail) of the profile. The value of that attribute is used as a suffix that is blindly appended to the calculated value of the mail address. If dxrCreateObjDefaults(mail) is not set or the attribute dxrProfileLink is not available, then no mail attribute value is returned.
If the mail suffix is available, the mail attribute is calculated in the following way:
value_of_givenName.value_of_sn.value_of_dxmLNshortName@mail_suffix
If one of the attributes givenName, sn (surname), dxmLNshortName is not set, the missing components (including the delimiter for the next component) are dropped.
The return value of the Java script is stored in the variable "mail".
ProfileFromOU.js
In the object description TSAccount.xml, the Java script ProfileFromOU.js is called to generate the dxrProfileLink attribute of the account. The value is returned in the variable dxrProfile and is set based on the value of the attribute ou. If a value of the organizational unit is present, the script tries to find the appropriate profile in the target system specific subtree
domain_root → TargetSystems → TargetSystem_name → configuration → profiles
by matching the ou value with the cn value of the profile.
If no profile for that organizational unit was found or if the ou attribute in the account is empty, the Java script tries to find the default profile. If there is no default profile, the return value dxrProfile of the Java script is "".
Note that the attribute dxrProfileLink is only calculated for new objects. If, for example, the ou changes in the user object, then the ou attribute in the account changes, too (by a master mechanism); nevertheless, the attribute dxrProfileLink is not updated (even if it depends on attribute ou). It is a workflow task (in the user hooks) to update the attribute dxrProfileLink after having renamed the user in the Notes address book.
UniqueNameForAccounts.js
In the object description TSAccount.xml, the Java script UniqueNameForAccounts.js is called to generate the dxrPrimaryKey attribute of the account. The value is returned in the variable UniqueNameAccount.
The attribute UniqueNameAccount must be unique and is generated the following way:
CN=value_of_givenName value_of_initials value_of_sn/OU=value_of_uniqueOrgUnit/O=value_of_orgUnit
Setup of CN is straightforward. Missing components are simply ignored and the delimiter moves to the next components. The other components require a more sophisticated approach.
For the components O and OU, the Java script reads the attributes
dxrCreateObjDefaults(Unique)
dxrOptions(TargetCertifier)
of the relevant profile (that is defined in the attribute dxrProfileLink). The attribute dxrOptions(TargetCertifier) is used as value of the component O. The component OU is only set, if the attribute UniqueNameAccount is not yet unique. Therefore the Java script searches all accounts whose attribute dxrPrimaryKey matches the component CN and component OU. If no object with that name is found UniqueNameAccount is returned as
CN=value_of_givenName value_of_initials value_of_sn/O=value_of_orgUnit
If more than one object has been found, then the Java script function getUniqueOrgUnit analyzes the search results and returns the next available value for OU by using the base for OU (dxrCreateObjDefaults(Unique)) and appending a unique number.
| As opposed to UniqueNameForGroups.js, a unique account name is generated by the script itself. There is no need for the service layer to call the script several times to generate a unique value by a trial and error procedure. |
UniqueNameForGroups.js
In the object description Group.xml, the Java script UniqueNameForGroups.js is called to generate the dxrPrimaryKey attribute of the group. The value is returned in the variable ListName.
The Java script uses the attribute cn of the group as the ListName and generates a unique name by simply appending an integer value. The service layer provides the current value of that integer value in the variable $UniqueOrgUnit. The service layer tries to create the group with that name; if not unique, it will call the Java script again with an incremented value of $UniqueOrgUnit. If the Java script reaches the limit 100, it returns the string JavaScript.Error, which causes the service layer to stop creation of the group (because no unique list name could be generated).
UniqueShortName.js
In the object description TSAccount.xml, the Java script UniqueShortNames.js is called to generate the dxmLNshortName attribute of the account. The value is returned in the variable ShortName.
The Java script sets up the value as follows:
-
first letter of givenName
-
first letter of sn
-
employeeNumber
The Java script checks whether that value is unique by calling the Java script function searchAccountName, which searches all accounts whose dxmLNshortName attribute matches that value (initial substring matching). If the attribute value is not unique, the Javascript calls the function getUniqueCounter, which calculates the next available number to make the basic value unique. getUniqueCounter analyzes the search result (returned by searchAccountName) and returns the next available unique number. This unique number is appended to the basic value.
| As opposed to UniqueNameForGroups.js, a unique short name is generated by the script itself. There is no need for the service layer to call the script several times to generate a unique value by a trial and error procedure. |
Notes Workflow and Activities
The following figure shows the layout of the channels that are used by the join activity.
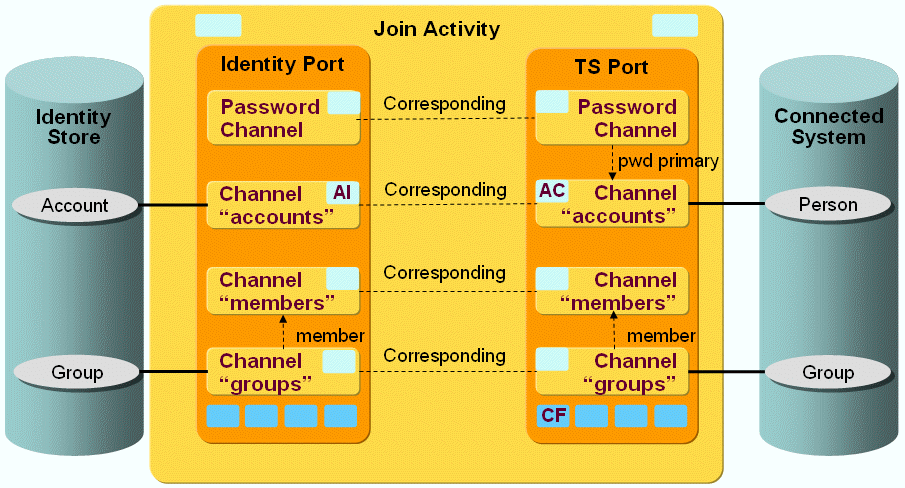
The workflows handle these Notes objects:
-
Person - a physical user in the Notes address book
-
Group - a group in the Notes address book
DirX Identity supports these Notes workflows:
-
Ident_Notes_Realtime - this workflow is a Java-based synchronization workflow. It can run either scheduled or event-based. Event-based means that it is triggered by an account or group change in DirX Identity. Each modification of an account or a group, for example, adding an attribute to an account, adding a new group, adding/removing a member to or from a group or changing the group owner starts a workflow that propagates this change to Notes.
Once the change is applied, it is propagated back to the account or group object in the DirX Identity target system, for example to adjust the group’s state or other data. -
Restore_Notes_Ident - this workflow is a scheduled validation workflow running from the Identity Store to the Notes address book. It imports persons and groups in the Notes address book using the associated Identity target systems accounts and groups. It
-
creates new persons and groups in the Notes address book
-
modifies existing persons and groups (for example, modifies the group’s members and other attributes according to the current group state)
-
deletes persons and groups in the Notes address book
This workflow is used to perform an initial load of the Notes address book and to keep the Notes address book in sync if changes are done in Identity target system (for example, accounts or groups are added or deleted).
-
SetPassword_in_Notes - this workflow is a Java-based synchronization workflow that synchronizes the attribute dxmPassword of a target system account with the attribute HTTPPassword of a person in the Notes address book.
-
Validate_Notes_Ident - this workflow is a scheduled validation workflow. It imports persons and groups from the Notes address book to the associated Identity target systems and
-
creates new accounts and groups in the Identity Store
-
modifies existing accounts and groups (for example, modifies the group’s members and other attributes according to the current group state)
-
deletes accounts and groups in the Identity Store
This workflow is used to perform an initial load of the Identity Notes target systems and to keep the Identity target systems in sync if changes are done in Notes (for example, persons or groups are added or deleted).
Notes Workflow Ports
This section describes Notes workflow ports.
TS Port
The ts port references the Notes connected directory and its channels. The channels contain the mapping definitions for the import of persons/groups to the Notes address book and the join definitions. The export parameters are also defined (for exporting persons and groups from the Notes address book).
The following filters are defined:
-
CF - Crypt Filter
Standard crypt filter for password decryption.
IdentityDomain Port
The IdentityDomain port references the Notes channels (Channel Parent) of the Identity connected directory. The channels contain the mapping definitions for the import of accounts and groups from the Notes address book and the join definition for Identity. The export parameters are also defined (for exporting persons and groups from the Notes address book).
There is no filter defined in the IdentityDomain port.
Note that the validation workflow and the sync workflow use the same connected directory and channel configuration. Only the controller class is changed in the join activity.
Notes Workflow Channels
This section provides information about Notes workflow channels.
Direction: Identity Store → IBM Notes
This section describes the mapping and user hook details of the direction Identity Store to IBM Notes. Complex post-mappings and user hooks are required because the Notes target system handles some of the update requests asynchronously (using the adminP process) and problems arise if the previous request has not been successfully processed when the next request arrives. Therefore the Notes real-time workflows use an internal attribute dxrPendingRequest that indicates whether or not a request can be sent to the Notes system without resulting in an error. For details, please refer to the following sections.
For a complete list and explanation of Notes-specific attributes, see the attribute section of the Notes connector description in the DirX Identity Connectivity Reference.
Post-Mapping for Groups
If the attribute dxrState in Identity Store is "DELETED", the operation (as part of the mapped entry) is set to DELETE.
Post-Mapping for Accounts
If the attribute dxrState in Identity Store is “DELETED”, the operation (as part of the mapped entry) is set to DELETE and the value of the attribute DeleteMailFile is set to 0.
For Modify Requests, the following steps apply:
-
For each modify request to the Notes connector, a check is performed whether there is a pending request available (these pending requests are stored in the attribute dxrPendingRequest).
Presence of a pending request results in a check of the FullName of Notes against the attribute dxrPrimaryKey in the Identity Store. If the attributes are still the same, a trace entry (a warning) is written indicating that the current request will not be propagated (the Request-Type in the mapped entry is set to NONE).If the attribute values differ, then later on, the attribute dxrPendingRequest will be removed by the user hook preUpdate, because the user hook knows the connector for updating the attribute whereas the post-mapping procedure doesn’t. -
Next, the current request is analyzed. A check is made as to whether the request would result in both a Rename and a MoveInHierarchy operation.
The Rename operation is detected by comparing the attributes LastName, FirstName, MiddleInitial and UniqueOrgUnit (identified by the UniqueOrgUnitAttrType attribute) of Notes against sn, givenName, initials and dxmLNuniqueOrgUnit in the Identity Store. If one of the values is different, a Rename operation is propagated. A MoveInHierarchy operation is detected by the existence of the attribute PathFileTargetCertId in the attribute list.) If both a Rename and MoveInHierarchy operation are detected, then the parameters for the MoveInHierarchy operation are dropped and a logging entry (a warning) is written. The MoveInHierachy operation (PathFileTargetCertId) will be propagated the next time the account is synchronized again to Notes.
AC - com.siemens.dxm.join.userhook.notes.UserHookAccountsTo (user hooks for accounts)
The following user hooks are used:
User hook preUpdate
-
This user hook checks whether the attribute dxrPendingRequest (set by an earlier request) could be reset. This is indicated by a change of the FullName which means that the request has been processed by Notes. If the FullName of Notes is different from the attribute dxrPrimaryKey in the Identity Store, then the attribute dxrPendingRequest is deleted.
-
The user hook must provide additional attributes that are kept in the Notes profile object in the Identity Store. For this reason, the profile identified by the value of the attribute ou is selected. If no such profile exists or the value of ou is empty, then the default profile is selected.
The source attribute list is extended by a set of attributes from the profile object. For details, see the section "Notes Dynamic Configuration" in the DirX Identity Connectivity Reference. -
Next, the user hook checks whether the account has been moved to another organizational unit in the Identity Store. This is indicated by a change of the ou attribute, whereas the attribute dxrProfileLink was not changed. If the entry was moved, then a potentially new Notes profile object needs to be assigned in the attribute dxrProfileLink.
The user hook preUpdate determines which profile applies and stores the name of the new profile in the member variable newProfileName of the user hook. Later on, the user hook postUpdate will update that profile name in the Identity Store.
Assignment of a new profile updates these attributes:*
PathFileTargetCertId* (derived from the attribute PathFileCertId of the new profile)
TargetCertifier
Validity
| If no profile is available for the new ou and the old value of dxrProfileLink was mapped to the default profile, then propagation of MoveInHierachy to Notes is not possible as no new information for PathFileTargetCertId and TargetCertifier is available. |
If the attribute dxrProfileLink is not set (for example, because the account was created in an earlier DirX Identity version that did not support this attribute) then the user hook preUpdate evaluates a profile name using the value of ou.
User hook postUpdate
After a successful update in Notes this user hook checks whether the attribute dxrPendingRequest needs to be set. The existence of the attribute dxrPendingRequest guarantees that no other critical update operation (rename or move) on the same objects is initialized while the previous one is still running.
The check comprises these tests:
-
If the attribute dxmLNregisterUser is set to true, the user is registered in the Notes server and normally the FullName is generated. If the FullName is not available in the SPML-Response of the update request, then a pending request is generated.
-
The attributes LastName, FirstName, MiddleInitial and UniqueOrgUnit (stored in the attribute defined by uniqueOrgUnitAttrType) of Notes are checked against the attributes sn, givenName, initials and dxmLNuniqueOrgUnit of the Identity Store. If there is a difference in one of these attributes and the FullName of Notes is still the same as dxrPrimaryKey in Identity Store, the attribute dxrPendingRequest is set.
-
If the attribute PathFileTargetCertId is present in the attribute list, then a MoveInHierarchy operation needs to be executed by Notes. This is an indication to set the attribute dxrPendingRequest.
The format of the attribute dxrPendingRequest is:
date=date;PendingOperation=operation;PathFileCertId=value;PathFileTargetCertId=value;FullName=value
Furthermore, if a requested move operation was successful, then the attribute dxrProfileLink is set to the value of the previously evaluated newProfileName (see the preUpdate user hook).
Direction: IBM Notes → Identity Store
This section describes the user hook details of the direction Identity Store to IBM Notes.
For a complete list and explanation of Notes-specific attributes that are kept in the Identity Store, see the attribute section of the Notes connector description in the DirX Identity Connectivity Reference.
AI - com.siemens.dxm.join.userhook.notes.UserHookAccountsFrom (user hooks for accounts)
The following user hooks are used:
User hook postUpdate
-
The user hook checks after a successful update in Identity Store, whether the attribute dxrPendingRequest could be deleted. If the request contained an update of the attribute dxrPrimaryKey, then the attribute dxrPendingRequest has to be read first. The reason is, that it could have been set in the postUpdate user hook of Identity Store to Notes synchronization. Therefore, it is not available in the attribute list of the Identity Store on the way back due to the fact that the Identity Store is normally not read again. If dxrPendingRequest exists it will be deleted.
Password Channel
A password channel updates the account passwords.
A password channel can also be configured backwards from the connected system to Identity to be able to update some attributes in Identity after a password change or reset has taken place in the connected system. The join engine then as usual synchronizes the attributes specified in the corresponding password channel mapping to Identity after the account with its password-relevant attributes was updated in the connected system.
Mail Workflows
The MAIL Provisioning workflows operate between a target system of type Mail Server in the Identity Store and the corresponding connected SMTP Mail Server endpoint.
The workflows use the Mail connector (MailConnector) for provisioning. This connector communicates with a Mail Server endpoint using SMTP with or without SSL/TLS.
The Mail workflows handle the following Mail objects:
-
Email (=Account) - representing an email. Emails are stored in subfolder "outbox" when created. After being sent, the emails are moved to the subfolder "sent".
-
Template - object to contain email template with context, sender, recipients, subject and html content, all supporting variables for automated replacement when creating emails.
The delivered workflows include:
-
Send Emails - the synchronization workflow that exports emails (accounts) in the outbox folder and sends them to the SMTP server using the MailConnector.
The following figure illustrates the Mail Provisioning workflow architecture.
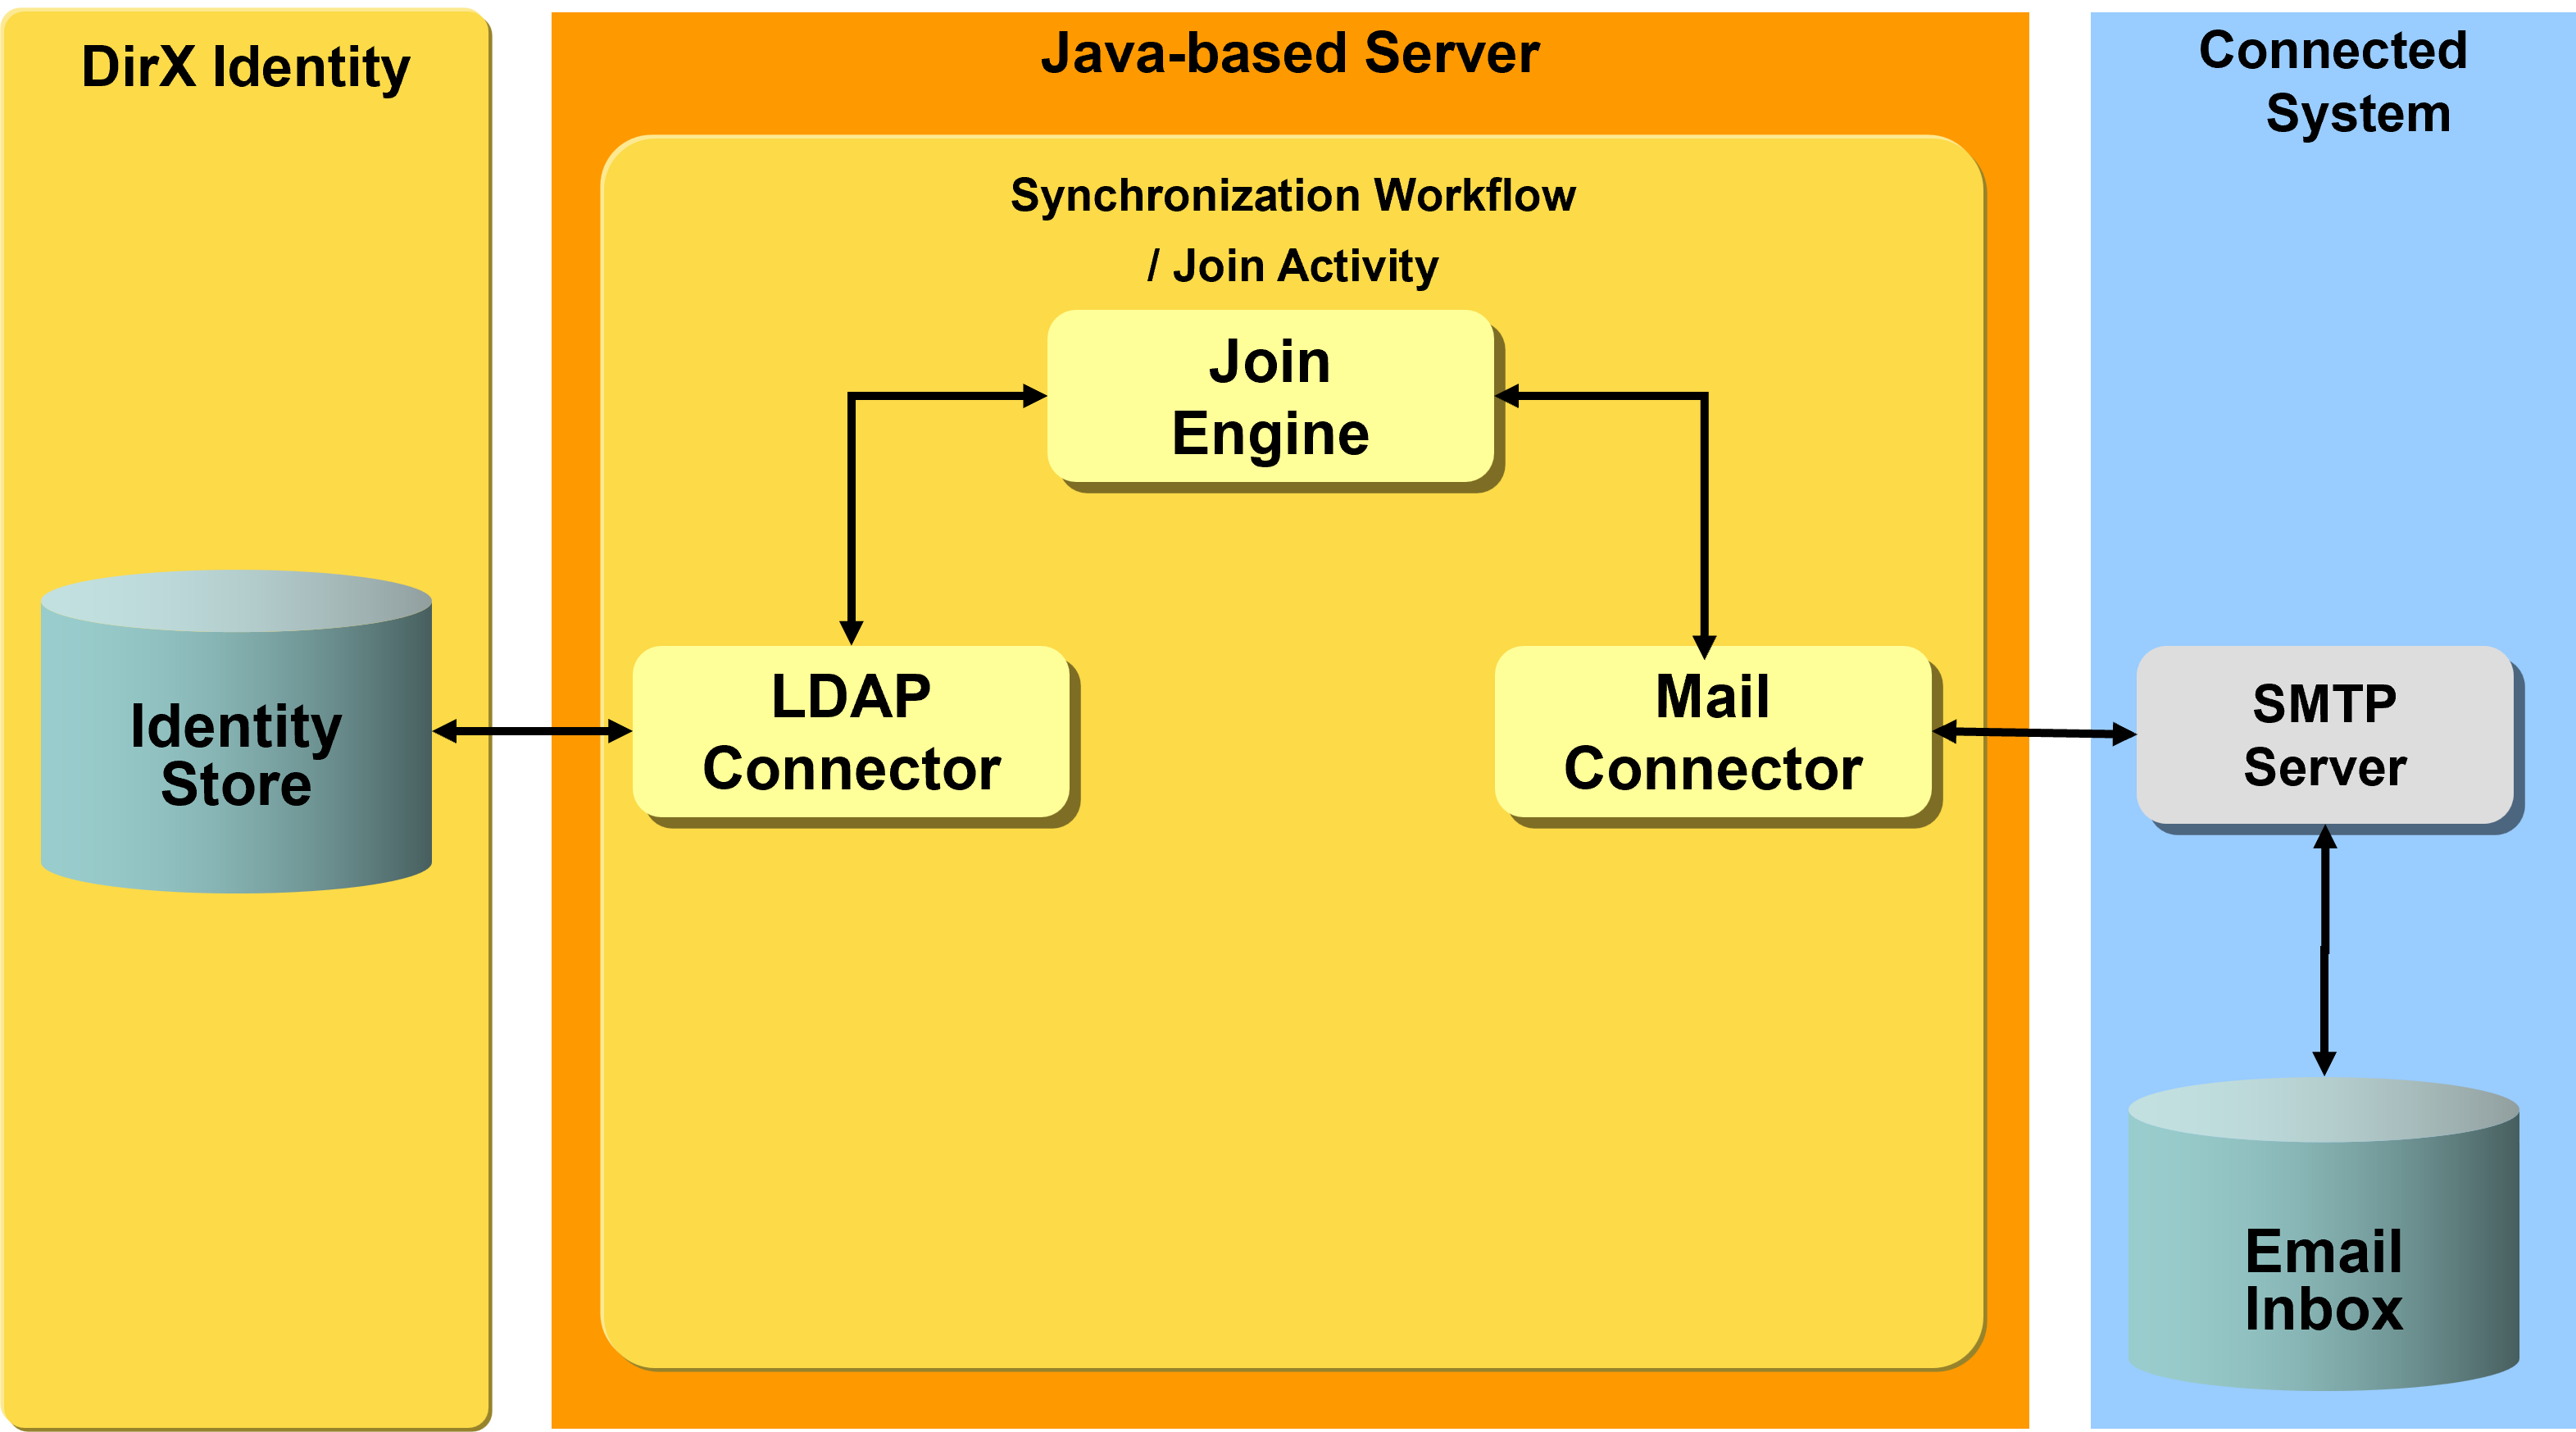
Prerequisites and Limitations
The Mail Provisioning workflows offer a channel for the email objects and attributes defined in the Mail Connector. It handles the following attributes:
| Name | Description |
|---|---|
attachment |
Paths to files that are send as attachments |
bcc |
a list of email addresses used as blind carbon copy |
body |
body content of the email, can be text or html |
cc |
a list of email addresses used as carbon copy |
certificate |
certificate for encrypting or signing emails |
from |
an email address used as sender |
subject |
subject line of the email |
to |
a list of email addresses used as receiver |
Connecting to SMTP Mail Server
Verify that services are correctly configured at the MAIL connected directory. The MAIL Service referenced by the connected directory should contain the IP Address or Server Name of the SMTP server. The default port is set to 25. When you enable SSL, you can also define a secure port (default is 465). The default port for TLS is 587. The connection to the SMTP server is established using the credentials of the user defined in the Bind Profile, when necessary.
The MAIL connected directory and Provisioning workflows support the central HTTP proxy server configuration. See the section “HTTP Proxy Server Configuration” for details.
Configuring the Unify Office Target System
The MAIL target system requires the following layout:
-
Emails - all email accounts are located in either the subfolder outbox or sent. When created the email is stored in the outbox folder. After being sent, the email is moved to the sent folder. To keep track of the sent-status the dxrTSState attribute is used. Initially set to NONE, the provisioning workflow will set it to ENABLED after the email is sent. This ENABLED state leads to the email being moved into the sent folder.
-
Templates - email accounts are created based on templates. These templates contain the email body, subject, sender and receiver. The templates are stored in the templates folder. The context and language is used during email creation to identify the correct template.
The referenced property for the email accounts is the dn. Although not being used, the member property has to be set to uniqueMember. Both are configured at the Target System.
Workflow and Activities
The MAIL accounts are synchronized via a pair of channels (one channel per direction).
Workflow Ports
This section describes the MAIL workflow ports.
TS Port
-
CF - Crypt Filter
A connector filter is configured implicitly. It is used to send decrypted passwords to the SMTP server.
Workflow Channels
This section provides information about Unify Office workflow channels.
Accounts
Direction: Identity Store → MAIL:
-
ID: dxrPrimaryKey
-
Join: ${source.dxrPrimaryKey} or userName=${target.userName}
-
accountEnabled - the attribute used to disable the account object in Unify Office. The correct value is derived from the dxrState attribute of the corresponding account object in the Identity Store.
Direction: MAIL → Identity Store
-
ID: ${joinedEntry.id}
-
Join: ${target.cn}
-
dxrTSState - the attribute used to keep track of the state of the email whether it was sent. Initially it is set to NONE, after successful delivery to the SMTP server the state changes to ENABLED.
Email creation and handling
As the logic for email creation differs from normal account creation, additional business logic is implemented using consistency rules that are executed by a policy execution workflow.
Consistency Rules
Under Policies → Rules → Consistency → Mail you can find the following rules:
- MoveSentEmailsToSentFolder
-
As the name suggests this rule moves emails, that have been successfully sent (dxrTSTSState=ENABLED) to the sent folder. The rule is executed by the policy execution workflow.
- CreateEmailFromErrorTemplate-Example
-
This rule serves as an example how to use consistency rules to create emails from templates. In the Parameter Values you can define the context (emailContext) that is used to identify the correct template. In this example the context is "Error". In the Filter tab you can define the condition under which an email is generated. The rule is executed by the policy execution workflow.
Policy Execution Workflow
There are two policy execution workflows, one for scheduled use (Email Notification handling), the other event-based (EventBased Email Notification Handling). Both will execute the consistency rules defined in the Policies → Rules → Consistency → Mail section.
ObjectClass dxrSender
To support the business logic and keep track of when an email should be sent, and when not, a new auxiliary objectClass "dxrSender" was introduced that contains the attributes dxrNotifySend and dxrNotifySent. While they are free for use, the intention is to write any trigger, that should lead to an email being sent, into dxrNotifySend, this could be for example the context for the email. When an already sent email is being moved to the sent folder, the dxrNotifySent attribute is set to the same value as dxrNotifySend together with a timestamp. This way you can keep track of all emails related to an entry.
Medico Workflows
The Medico Provisioning workflows operate between a target system of type Medico in the Identity Store and the corresponding connected Medico system.
Because Medico provides an SPML/SOAP service, the workflows use the SPML connector (SpmlV1SoapConnector2TS) for provisioning. This connector communicates with the Medico SPML server. The following figure illustrates the Medico Provisioning workflow architecture.
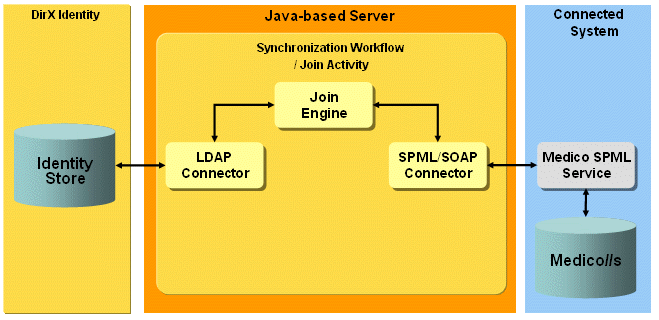
The workflows handle the following Medico objects:
Person - the physical user. The Person object holds the demographic data and is not used for login.
LoginID (or User ID) - the user login account ID. Each user can have one or more accounts to log into a Medico application. Different accounts are needed for different access rights. Access rights are expressed in terms of roles, profiles and groups. There are special accounts (“Sonderbenutzer” / “Sonderrolle”) with high access rights that are reserved for emergency situations.
Role - the role associated with the LoginID. A role is composed of a set of entry points that regulate the applications and menu entries that are allowed for and presented to a LoginID.
Profile - the profile associated with the LoginID. The profile contains information used mainly to determine the stations (beds) for which physicians are responsible.
Group - the group associated with the LoginID. The group exists for historical reasons, but it can be used to specify general access rights, for example, printer access. A LoginID must have exactly one group associated with it.
The following figure illustrates the relationships between Medico and DirX Identity objects.
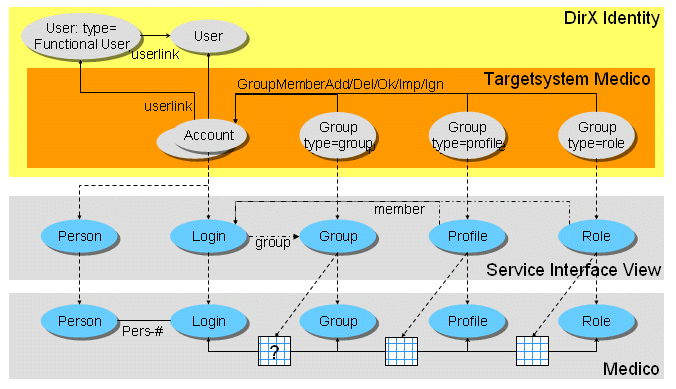
As shown in the figure, a Person and LoginID object on the Medico side are created from the Account entry on the Identity side.
Groups within the Medico target system in DirX Identity have a type attribute. The corresponding object on the Medico side (Role, Profile, Group) is mapped according to this type attribute.
The memberships between a LoginID and a Role or Profile are described as member attributes of a Role or Profile. Membership changes result in an add or delete member attribute at the Identity side.
The membership between a LoginID and a Group is described in the groupid attribute of the LoginID.
Medico Workflow Prerequisites and Limitations
The Medico workflow requires medico//s Release 16 or higher.
The Medico SPML server supports a subset of the SPML V1 request; in particular, the server does not support search requests without filter specifications. As a result, you must be careful when changing the configuration. For detailed information on the Medico SPML server, see the Medico documentation. This limitation also means that the real-time password workflow SetPassword currently does not work. Please use the "setPassword in Medico" workflow instead.
Configuring the Medico Workflow
To configure the connection to Medico:
-
Specify the IP address and the data port at the Medico service object (Medico CD → Service).
-
Configure the socket timeout at the workflow’s TS port. You may increase the timeout value (in seconds) for long SPML requests to the Medico SPML server (for example, searches with a large result set).
-
Do not change the URL path.
Configuring the Medico Target System
The Medico target system requires the following layout:
-
Accounts - for each Medico LoginID, one account with dxrType=login is created in DirX Identity. The Medico target system in the Identity Store does not contain any Person objects. All accounts are located in a subfolder logins.
-
Groups - the Medico role, profile and group objects are represented as groups in the subfolders Medico Roles, Medico Profiles and Medico Groups. The attribute dxrType is used to identify the type.
The Medico-specific JavaScript superior.js is used to distribute the objects to the different folders.
The following Medico-specific JavaScripts calculate the attributes dxrName and dxrPrimaryKey:
-
calcDxrNameAcc.js
-
calcDxrNameGroup.js
-
calcPrimaryKeyAcc.js
-
calcPrimaryKeyGroup.js
The attribute dxrPrimaryKey contains the SPML ID in the target system:
-
loginid=dxrName/employeeNumber,type=login
-
groupid=dxrName,type=group
-
profileid=dxrName,type=profile
-
roleid=dxrName,type=role
The attribute dxrName contains the employeeNumber for accounts and the cn for groups.
Mastered attributes for accounts include:
-
dxrProfession
-
gender
-
dayOfBirth
-
mail
-
street
-
postalCode
-
l
-
c
-
telephoneNumber
-
title
Medico Workflow and Activities
The following figure shows the layout of the channels that are used by the Medico workflow’s join activity.
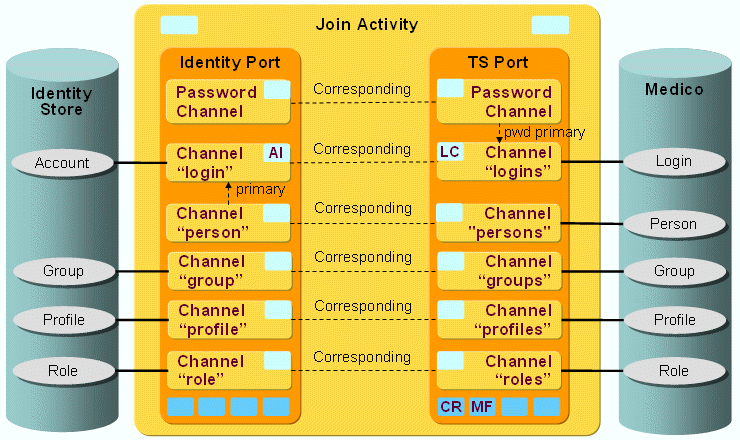
A pair of channels (one channel per direction) exists for every Medico object (Role, Profile, Group, LoginID, Person). There are no member channels. Memberships are modeled as the member attribute.
The following construction is used for the logins and persons channels:
-
Identity side - the logins channel is the primary channel of the persons channel. Person data is merged with the login channel that represents the account. DirX Identity does not model a Person object.
-
Medico side - the persons channel references the Medico Person object. Demographic data is passed in this channel.
Medico Workflow Ports
This section describes the Medico workflow ports.
TS Port
-
CR - Crypt Filter
The standard crypt filter for password decryption. -
MF - Medico Crypt Filter
A MedicoCrypt filter is implicitly configured. It is used to send the Medico password attribute pawo in the SOAP request decrypted to the Medico SPML server. This filter is used only for the initial password when a new login is added.
Medico Workflow Channels
This section provides information about Medico workflow channels.
Common Aspects
Direction: Identity Store → Medico
-
mapAttrMaxLength - Medico attributes have a maximum length, and requests with attribute values exceeding this limit will fail. As a result, this mapping function truncates the value.
-
mapAttrDefaultMaxLength - for convenience, an additional mapping function is defined which sets a given default value if there is no source attribute value. The function also truncates the value to the defined maximum length.
-
mapValidFromAttr - in the Medico system, objects are never deleted. Each object has a validFrom and validTo attribute. The conversion is handled within this mapping function.
Direction: Medico → Identity Store
-
CommonProcsMedico.calculateIdInIdentity - calculates the Id.
-
dxrType is set according to the type of the channel handles (login, profile, …).
-
dxrPrimarykey is set to the value of the source ID.
-
dxrName is taken from the Medico id attribute (loginid, profileid, …).
Person
Direction: Identity Store → Medico
-
ID: "pnr="${source.employeeNumber}",type=person
-
Join: pnr= ${source.employeeNumber}
-
A Medico person has two additional name attributes:
Namechr surname, givenName
Namechrnorm Namchr umlauts are expanded and converted to lowercase
For details see the JavaDoc of mapNameChr and mapNameChrNorm -
Medico supports only one e-mail address per person. In DirX Identity, e-mail is defined as a multi-valued attribute. If there is no e-mail attribute value stored in Medico, the first value is taken from the DirX Identity e-mail attribute. If the value in Medico matches one of the DirX Identity values, nothing is changed. If not, the first value is taken.
Direction: Medico → Identity Store
-
Primary Channel login - join to primary via employeeNumber.
-
Postmapping - prevents creating a Person object. Action is set to NONE if the action was set to add.
Login
Direction: Identity Store → Medico
-
ID: the dxrPrimaryKey is used as the identifying attribute.
-
Join: the join is performed with the ID.
-
loginid: the dxrName value is used as the loginid.
-
For new logins, a constant groupid DIRXOHNE is set (groupid is a mandatory attribute).
LC - com.siemens.dxm.join.userhook.medico.UserHookAccountsTo
-
preUpdate - creates a person if necessary
-
postUpdate - if login was renamed, the old login is disabled
Direction: Medico→ Identity Store
LI - com.siemens.dxm.join.userhook.medico.UserHookAccountsFrom
-
preUpdate: merge the person attribute to account. In the current workflow version, it should work without this user hook (primary channel construct). If you have an older version of this workflow, you need this user hook.
Password Channel
A password channel updates the login passwords.
A Password Channel can also be configured backwards from the Connected System to Identity to be able to update some attributes in Identity after a password change or reset has taken place in the Connected System. The join engine then as usual synchronizes the attributes specified in the corresponding Password Channel Mapping to Identity after the account with its password relevant attributes was updated in the Connected System.
📘 Microsoft Entra ID Workflows Overview
Microsoft Entra ID provisioning workflows synchronize and manage objects between:
-
A target system of type Microsoft Entra ID in the Identity Store
-
The connected Microsoft Entra ID endpoint
Provisioning is handled by the EntraIDConnector, which communicates via RESTful APIs using JSON. Authentication is provided by the Microsoft Entra ID OAuth server.
📦 Supported Object Types
-
Account — Common Microsoft Entra ID (formerly Azure AD) accounts
-
Group — Security and Microsoft 365 groups
-
Role — Predefined administrative roles
-
Service Plan — Applications bound to one licensed SKU
⚙️ Included Workflows
| Workflow Name | Purpose |
|---|---|
|
Imports accounts, groups, roles, and service plans from Entra ID to Identity Store |
|
Syncs accounts and groups from Identity Store to Entra ID, then validates changes |
|
Set passwords for user objects in Microsoft Entra ID |
@startuml
skinparam linetype ortho
skinparam defaultTextAlignment center
left to right direction

skinparam rectangle {
FontSize 16
RoundCorner 20
Shadowing true
}

skinparam componentstyle rectangle
skinparam component {
BackgroundColor #fcfe9c
RoundCorner 20
}

skinparam database {
  BackgroundColor #92c3c2
}

rectangle "DirX Identity\n\n\n\n\n" as DXI #fcda4c {
    database "Identity\n Store" as IDStore
}

rectangle "Java-based Server" as JBS #fc9a04 {
    rectangle "\nSynchronization Workflow / Join Activity\n\n" #fcda4c {
        [LDAP\n Connector] as LDAP
        [Join\n Engine] as Join
        [Microsoft\n Entra ID Connector] as EntraConn
    }
}

rectangle "Connected System\n" as CS #9ccefc {
    [OAuth\n Service] as OAuth #dcdedc
    [Graph API\n Service] as GraphAPI #dcdedc
    database "Microsoft\n Entra ID" as EntraDB
}

IDStore  <-->  LDAP
LDAP  <--> Join
Join  <--> EntraConn

EntraConn <..> OAuth
EntraConn <--> GraphAPI
GraphAPI <--> EntraDB

DXI -[hidden]-> JBS
JBS -[hidden]-> CS

@enduml
🧰 Prerequisites & Limitations
-
Only objects/attributes supported by EntraIDConnector can be provisioned.
-
Supports a single valid Microsoft Entra ID license (SKU).
🔌 Connecting to Microsoft Entra ID
Before initiating workflows:
-
Verify services in connected directory are correctly configured
-
Ensure Graph API and OAuth service endpoints are reachable
-
Verify SSL is enabled for these services.
-
Configure central HTTP proxy if needed (see “HTTP Proxy Server Configuration” for details)
🔑 Principal Service Setup
-
Register DirX Identity as a principal using PowerShell or the downloadable
CreateServicePrincipal.ps1. -
Configuration provides an Application Principal ID and Client Secret.
🔐 Role Requirements
| Task | Required Role |
|---|---|
User & group sync |
|
Role assignment |
|
Ensure the Application Secret is renewed annually to maintain OAuth authentication.
🗂️ Target System Structure
| Object Type | Folder Location |
|---|---|
Accounts |
|
Groups |
|
Roles |
|
Service Plans |
|
🧾 Key Attributes
-
dxrPrimaryKey— Unique ID from Entra ID -
dxrLicense— Populated when service plans are assigned -
Group memberships are stored in the account object and reference
dxrPrimaryKey
Set Tenant Domain in Options tab to define the UserPrincipalName suffix.
⚙️ Workflow Activities, Ports and Channels
🧪 Activity
The following figure shows the layout of the channels that are used by the join activity.
@startuml
skinparam linetype ortho

skinparam rectangle {
  BackgroundColor #FFE082
  RoundCorner 20
  Shadowing true

}

skinparam usecase {
  BackgroundColor #dcdedc
  RoundCorner 20
  Shadowing true
}

skinparam database {
  BackgroundColor #92c3c2
  Shadowing true
}

skinparam card {
  BackgroundColor #64cefc
  FontColor #64cefc
}

' Identity Store
database "Identity Store" as IS {

    (Dummy1) as IS_DM1 #transparent;line:transparent;text:transparent
    (    Account   ) as IS_AC
    (Member) as IS_MB #transparent;line:transparent;text:transparent
    (     Group     ) as IS_GP
    (      Role      ) as IS_RO
    (Service Plan) as IS_PL
    (Dummy2) as IS_DM2 #transparent;line:transparent;text:transparent

    IS_DM1 -[hidden]-> IS_AC
    IS_AC -[hidden]-> IS_MB
    IS_MB -[hidden]-> IS_GP
    IS_GP -[hidden]-> IS_RO
    IS_RO -[hidden]-> IS_PL
    IS_PL -[hidden]-> IS_DM2

}

' Join Activity
rectangle "Join Activity" as JA #fcda4c {

    ' Technical Service Port (TS Port)
    rectangle "TS Port" as TS #fc9a04 {
        rectangle "Password Channel" as TS_PWD
        rectangle "<back:lightblue><size:14><b>AC</b>\nChannel "accounts"" as TS_AC
        rectangle "Channel "members"" as TS_MB
        rectangle "  Channel "groups"  " as TS_GP
        rectangle "   Channel "roles"   " as TS_RO
        rectangle "  Channel "plans"   " as TS_PL

        TS_PWD ..> TS_AC : pwd primary
        TS_AC ..> TS_MB : member
        TS_MB -[hidden]-> TS_GP
        TS_GP -[hidden]-> TS_RO
        TS_RO -[hidden]-> TS_PL

        card "CR" as CR1 #text:black
        card "C2" as CR2
        card "C3" as CR3
        card "C4" as CR4

        CR1 -[hidden] CR2
        CR2 -[hidden] CR3
        CR3 -[hidden] CR4

        TS_PL -[hidden]down-> CR1

    }

    ' Identity Port
    rectangle "Identity Port" as IP #fc9a04 {
        rectangle "Channel "password"" as IP_PWD #transparent;line:transparent;text:transparent
        rectangle "<back:lightblue><size:14><b>                            AI</b>\nChannel "accounts"" as IP_AC
        rectangle "Channel "members"" as IP_MB
        rectangle "  Channel "groups"  " as IP_GP
        rectangle "    Channel "roles"   " as IP_RO
        rectangle "   Channel "plans"   " as IP_PL

        IP_PWD -[hidden]-> IP_AC
        IP_AC ..> IP_MB : member
        IP_MB -[hidden]-> IP_GP
        IP_GP -[hidden]-> IP_RO
        IP_RO -[hidden]-> IP_PL

        card "C1" as CL1
        card "C2" as CL2
        card "C3" as CL3
        card "C4" as CL4

        CL1 -[hidden] CL2
        CL2 -[hidden] CL3
        CL3 -[hidden] CL4

        IP_PL -[hidden]-> CL1

    }
}

' Entra ID
database "Microsoft Entra ID" as EID {

    (Dummy1) as EID_DM1 #transparent;line:transparent;text:transparent
    (    Account   ) as EID_AC
    (Member) as EID_MB #transparent;line:transparent;text:transparent
    (     Group     ) as EID_GP
    (       Role      ) as EID_RO
    (Service Plan) as EID_PL
    (Dummy2) as EID_DM2 #transparent;line:transparent;text:transparent

    EID_DM1 -[hidden]-> EID_AC
    EID_AC -[hidden]-> EID_MB
    EID_MB -[hidden]-> EID_GP
    EID_GP -[hidden]-> EID_RO
    EID_RO -[hidden]-> EID_PL
    EID_PL -[hidden]-> EID_DM2

}

' Identity Store to Identity Port
IS_AC -[thickness=2] IP_AC
IS_MB -[hidden] IP_MB
IS_GP -[thickness=2] IP_GP
IS_RO -[thickness=2] IP_RO
IS_PL -[thickness=2] IP_PL : "         "

' Entra ID to TS Port
EID_AC -[thickness=2] TS_AC
EID_MB -[hidden] TS_MB
EID_GP -[thickness=2] TS_GP
EID_RO -[thickness=2] TS_RO
EID_PL -[thickness=2] TS_PL

' Identity Port to TS Port
IP_AC . TS_AC : Corresponding
IP_MB . TS_MB : Corresponding
IP_GP . TS_GP : Corresponding
IP_RO . TS_RO : Corresponding
IP_PL . TS_PL : Corresponding


@enduml
The Microsoft Entra ID objects and membership are synchronized via a pair of channels (one channel per direction).
📌 TS Port - Crypt Filter
-
Used for secure password handling via the decrypted
passwordattribute.
🔄 Channels
-
Channels operate bi-directionally for Accounts and Groups.
-
Objects are matched using
dxrPrimaryKeyand other key attributes. -
State detection via attributes like
dxrState,accountEnabledanddxrTSState.
| Direction | Details |
|---|---|
Identity Store → Microsoft Entra ID |
|
Microsoft Entra ID → Identity Store |
|
| Direction | Details |
|---|---|
Identity Store → Microsoft Entra ID |
|
Microsoft Entra ID → Identity Store |
|
| Direction | Details |
|---|---|
Identity Store → Microsoft Entra ID |
|
Microsoft Entra ID → Identity Store |
|
| Direction | Description |
|---|---|
Identity Store → Microsoft Entra ID |
❌ Roles are read-only in Microsoft Entra ID |
Microsoft Entra ID → Identity Store |
|
| Direction | Description |
|---|---|
Identity Store → Microsoft Entra ID |
❌ Service plans are read-only in Microsoft Entry ID |
Microsoft Entra ID → Identity Store |
|
| Direction | Description |
|---|---|
Identity Store → Microsoft Entra ID |
Handles password synchronization for Microsoft Entra ID accounts. Passwords are decrypted and sent via the TS Port Crypt Filter. |
Microsoft Entra ID → Identity Store |
N/A |
| Direction | Description |
|---|---|
Identity Store → Microsoft Entra ID |
|
Microsoft Entra ID → Identity Store |
|
OpenICF Windows Local Accounts Workflows
The OpenICF Windows Local Accounts Provisioning workflows operate between a target system of type OpenICF in the Identity Store and the corresponding OpenICF .Net connector server, which is configured for communication with a Windows Local Accounts and Groups database using the OpenICF connector bundle WindowsLocalAccounts.Connector.dll.
The WindowsLocalAccounts.Connector.dll bundle represents the OpenICF Windows Local Accounts connector, which is described in the DirX Identity Connectivity Reference in the section "OpenICF Windows Local Accounts Connector".
The following figure illustrates the OpenICF Windows Local Accounts deployment.
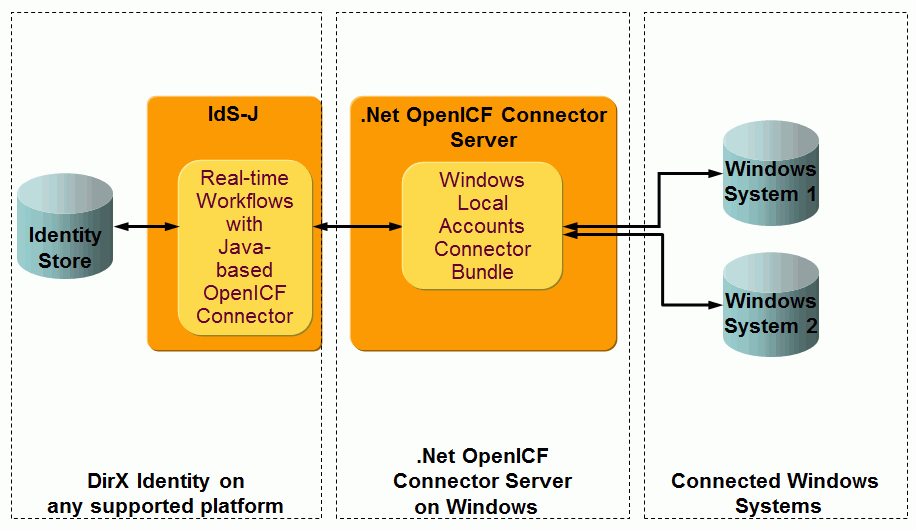
As shown in the figure, the Java-based UNIX-OpenICF connector sends a request to an OpenICF .Net connector server which runs on a Windows platform. The OpenICF connector server passes the request to the Windows Local Accounts connector bundle. The bundle then establishes a connection to the specified Windows host and performs the operations on the host’s local Security Account Manager (SAM) database. It is possible to provision several Windows hosts using a single OpenICF .Net connector server.
For a more detailed description about deployment scenarios, see the DirX Identity Connectivity Reference → "OpenICF Windows Local Accounts Connector".
For a detailed description of the DirX Identity Java-based UNIX-OpenICF connector, see the DirX Identity Connectivity Reference → "UNIX-OpenICF Connector".
The following figure illustrates the OpenICF Windows Local Accounts Provisioning workflow architecture.
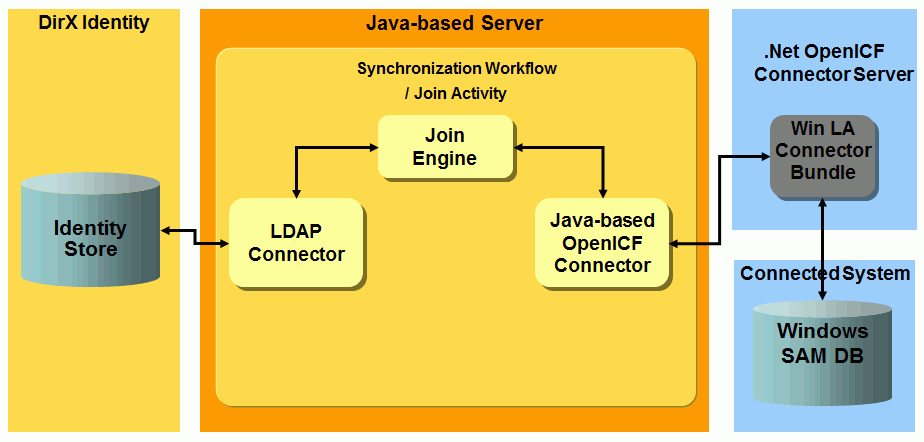
The workflows handle the following Windows local system objects:
Account (synonymously also named User) - the Windows local system accounts.
Group - the Windows local system groups.
The delivered workflows are:
-
Ident_WinLA-OICF_Realtime - the synchronization workflow that exports detected changes for account and group objects from the Identity Store to the Windows system and then validates the processed changes in the Windows system to the Identity Store.
-
SetPassword in WinLA-OICF - the workflow that sets the password for the account in the Windows system.
-
Validate_WinLA-OICF_Realtime - the validation workflow that imports existing Windows accounts and groups including group assignments from the Windows system to the Identity Store.
OpenICF Windows Local Accounts Workflow Prerequisites and Limitations
All prerequisites and limitations refer to the connector and are therefore described in the DirX Identity Connectivity Reference "OpenICF Windows Local Accounts Connector" section.
Connecting to the Windows Local Accounts System
Before you configure the workflows, install and configure the OpenICF .Net Connector Server as described in the DirX Identity Connectivity Reference → OpenICF Windows Local Accounts Connector.
Then configure the following:
-
From the WinLA-OpenICF connected directory that represents the Windows Local Accounts system to be provisioned, go to the OpenICF Connector Server tab and from there to the connected directory that represents the OpenICF Server (Generic connected directory type) and specify the IP address or the host name and the data port of the OpenICF Server service object. Adapt the bind profile for the OpenICF Server: set the password that is configured as a shared secret with the OpenICF connector server and enable SSL if it is enabled on the OpenICF server side. Using SSL may require additional configuration steps. See the section "UNIX-OpenICF Connector" in the DirX Identity Connectivity Reference for details.
-
On the WinLA-OpenICF connected directory, specify the IP address or the host name of the targeted Windows system at the WinLA-OpenICF service object. No port number is required here. Then set the bind profile properly. Because the OpenICF .Net Connector Server is started under credentials with appropriate access rights for managing the target Windows systems, no user name must be specified. A user name beginning with "dummy" would have the same effect because it is not used for building a connection to the target Windows system. The password is ignored in these cases.
-
Specify the Response Timeout property on the OpenICF Connector Server tab of the WinLA-OpenICF Connected Directory. The default value is 30 and should be sufficient.
-
Check the settings related to the OpenICF connector bundle at the TS port object tab OpenICF Connector Bundle, which usually must not be changed. The properties to define are Bundle Name (default: WindowsLocalAccounts.Connector), Bundle Version (default: 1.4.0.0) and Class Name (the default is Org.IdentityConnectors.WindowsLocalAccounts.WindowsLocalAccountsConnector).
-
Assign the resource family OpenICF in the IdS-J server.
Configuring the OpenICF Windows Local Accounts Target System
The target system requires the following layout:
-
Accounts - all Windows accounts are located in a subfolder Accounts.
-
Groups - all Windows groups are located in a subfolder Groups.
The attributes dxrName and dxrPrimaryKey of accounts contain the name (SamAccountName) of these objects in the connected Windows system.
The standard JavaScript dxrNameForAccounts.js generates the attribute dxrName for the Windows account.
The attributes dxrName and dxrPrimaryKey of groups contain the name (SamAccountName) of these objects in the connected Windows system.
The account object also stores the group membership and references the dxrPrimaryKey attribute of the group objects.
OpenICF Windows Local Accounts Workflow and Activities
The following figure shows the layout of the channels that are used by the OpenICF Windows Local Accounts workflow’s join activity:

OpenICF Windows Local Accounts Workflow Ports
This section describes the ports of the workflows.
TS Port
-
CF - Crypt Filter
This filter is configured implicitly. It is used to send the decrypted password attribute PASSWORD to the OpenICF connector server.
OpenICF Windows Local Accounts Workflow Channels
This section provides information about the OpenICF Windows Local Accounts workflow channels.
Accounts
Direction: Identity Store → WinLA -OpenICF
-
Direct mapping dxrPrimaryKey → ID - where dxrPrimaryKey is built by the common JavaScript dxrNameForAccounts, producing a unique account name in the Identity target system.
-
Java Source mapping → ENABLE - the attribute is used for enabling or disabling the account in the Windows system. The value is derived from the dxrState attribute of the corresponding account object in DirX Identity.
-
Direct mapping dxmPassword → PASSWORD - which is used only on an add request.
-
Join - ${source.dxrPrimaryKey}
Direction: WinLA -OpenICF → Identity Store
-
Join via the dxrName attribute that is mapped in the same way as the dxrPrimaryKey attribute from $\{source.id}.
Groups
Direction: Identity Store → WinLA -OpenICF
-
Direct mapping dxrPrimaryKey → ID– where dxrPrimaryKey is taken from the cn of the group in the Identity target system.
-
Join - ${source.dxrPrimaryKey}
-
PostMapping script - changes the type of the request to delete if dxrState=DELETED.
Direction: WinLA -OpenICF → Identity Store
-
Join via the dxrName attribute that is mapped in the same way as the dxrPrimaryKey attribute from ${source.id}.
RACF Workflows
The RACF Provisioning workflows operate between a target system of type RACF in the Identity Store and the corresponding connected RACF system.
The RACF connector used in the workflows communicates with the LDAP server across the native LDAP protocol, as shown in the following figure:
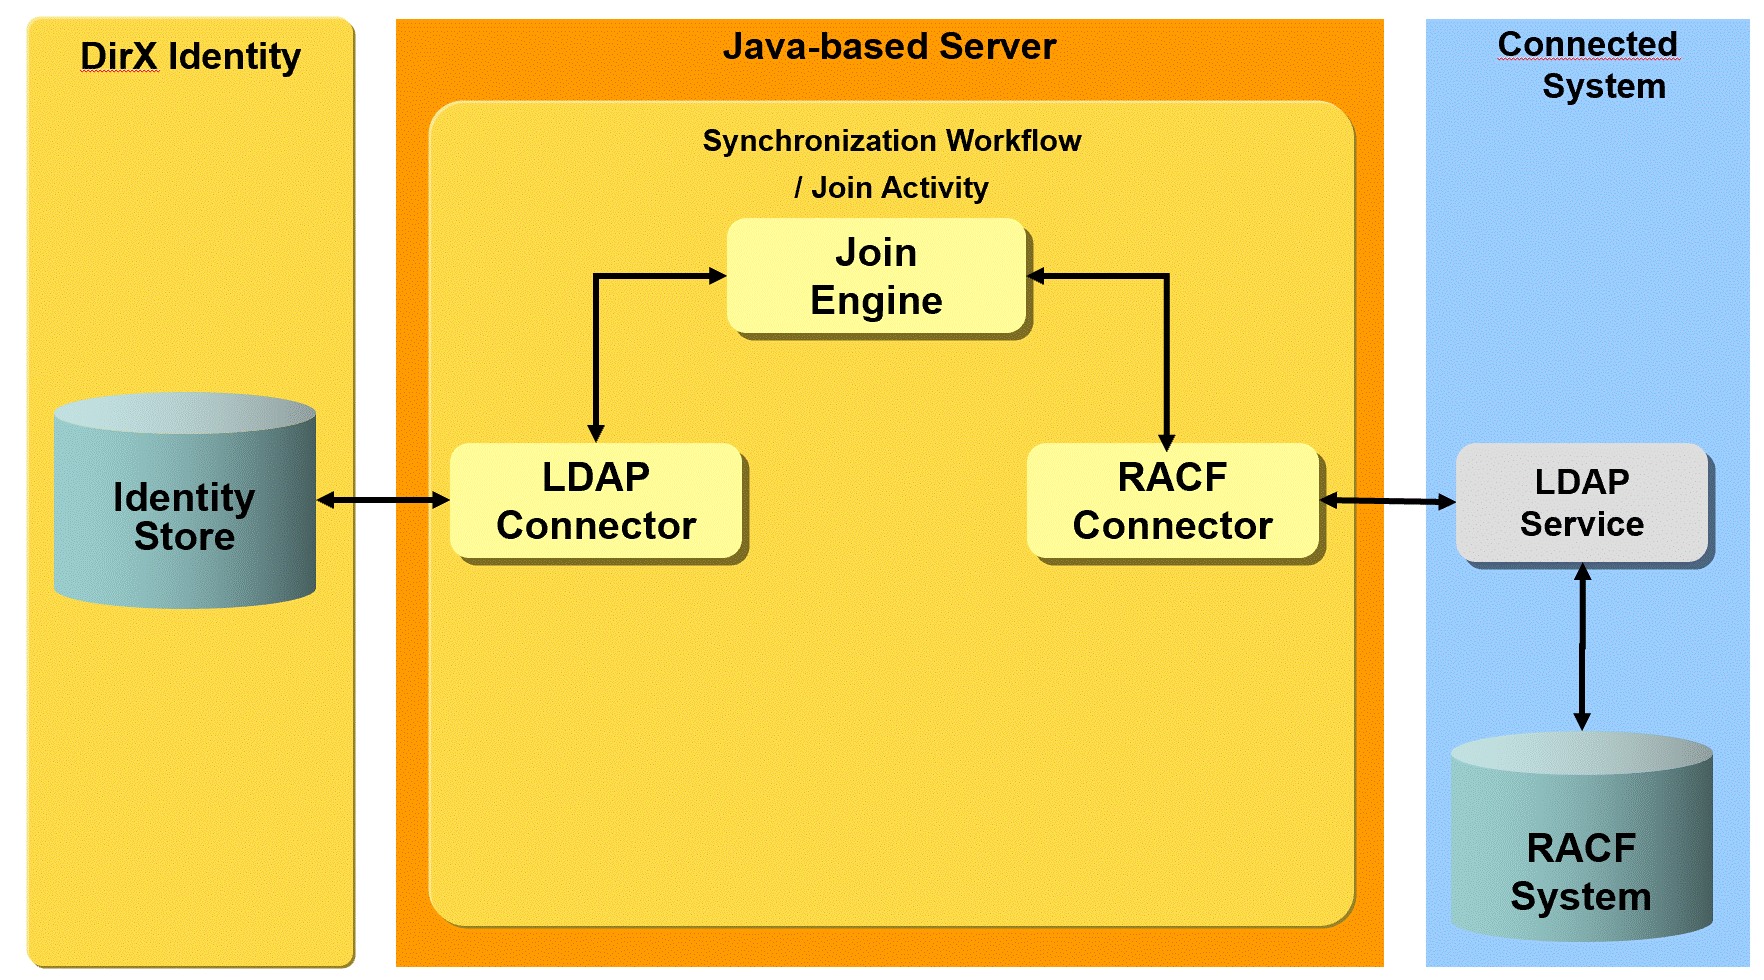
The delivered workflows include:
-
Ident_RACF_Realtime - the synchronization workflow that exports detected changes for account and group objects from Identity Store to the RACF end system and then validates the processed changes in RACF to the Identity Store. The workflow also generates a password if the object is created. When this workflow is triggered by a schedule or started directly in DirX Identity Manager, it also synchronizes the Users and Groups subtrees.
-
SetPassword_in_RACF - the SetPassword workflow that synchronizes the user’s password to RACF when a password change in the Identity Store is detected.
-
Validate_RACF_Realtime - the validation workflow that imports existing RACF accounts and RACF groups from RACF to the Identity Store.
Prerequisites and Limitations
The RACF workflows have the following prerequisites and limitations:
-
The RACF connector does not support nested group assignments. They cannot be read or written.
-
The workflow and the connector do not handle the RACF group member limit for groups that are not default groups.
-
Group memberships in the DirX Identity target system must be stored at the account.
Configuring the RACF Target System
Group memberships must be stored at the accounts, so Reference Group from Account must be checked.
Each RACF user must have a RACF default group. When a RACF user is to be created, the channel user hook of the Provisioning workflow calculates the default group to be used. It selects from a list of default groups that are configured in the target system using the Options tab → Default Groups. Make sure to fill in this list with enough groups to hold all the RACF users and make sure they already exist in RACF. Keep in mind that the maximum number of users per RACF group is limited to 5900.
The Options tab of the target system also shows the field Last Used Default Group. It is managed by the workflow user hook and holds the last used default group. You do not need to fill in this field.
Configuring the Connection to RACF
As the RACF connector accesses the RACF system via LDAP, the properties for the LDAP service and bind profile apply.
Configuring the Connected Directory
As with the LDAP connected directory, it is important to configure the base nodes for users and groups within the DirX Identity target system folder and in the connected system. The corresponding fields can be set in the connected directory’s Provisioning tab.
| If the tab is not visible, perform Reload Object Descriptors from the context menu. |
In addition, for a RACF system, you must configure the parent node for the connection objects (representing RACF user - group memberships) in the Specific Attributes tab.
Provisioning
Account Base - the base node for the account tree in the DirX Identity target system.
Group Base - the base node for the group tree in the DirX Identity target system.
User Base - the base node for the accounts in the RACF connected system.
Group Base - the base node for the groups in the RACF connected system.
Specific Attributes
connect_base - the base node for the connect objects (user-group memberships) in the RACF connected system.
RACF Workflow Ports
This section describes RACF workflow ports.
TS Port
-
CF - Crypt Filter
The configured Crypt Filter decrypts the password attribute racfPassword before passing it to the RACF connector. The attribute name is configured in the Target System tab of the TS port.
RACF Workflow Channels
This section provides information about RACF workflow channels.
Accounts Channel
The members channel must be referenced from the accounts channel. Note the following attributes:
racfid
The racfid is used as an identifier for users in RACF and is stored in the DirX Identity target system account in the attribute racfid.
| The racfid cannot have more than 8 characters. |
racfDefaultGroup
The default group for a RACF user is calculated in the channel user hook and passed as an artificial attribute of the source entry. For details on configuring default groups, see the section “Configuring the RACF Target System” in this guide.
racfAttributes
The racfAttributes attribute triggers special processing in the RACF LDAP service and represents their result when reading. The following values related to activating / deactivating a RACF user are set by the connector. They are calculated in the mapping function configured for this attribute:
RESUME – set for unlocking a RACF user.
REVOKE – set for locking a RACF user. After successful processing, RACF sets the value REVOKED.
racfPassword
Make sure to set an initial password when the account is created in the DirX Identity target system and map it from dxmPassword to racfPassword.
When you observe the values PASSWORD or PROTECTED in the user’s racfAttributes in the RACF system, the typical reason is that the user has no password or an expired one. For more details on racfAttributes, see the IBM documentation, for example, https://www.ibm.com/docs/en/zos/2.5.0?topic=information-associating-ldap-attributes-racf-fields.
Groups Channel
Note that the attributes racfSuperiorGroup, racfOwner, and racfSubGroupName are only read from the RACF system.
The racfid is used as identifier for groups in RACF and is stored in the DirX Identity target system group in the attribute racfid. Note that the racfid cannot have more than 8 characters.
Members Channel
The members channel must be referenced from the accounts channel.
| The attribute dxrPrimaryKey must be mapped to the identifier. |
SetPassword Channel
Password change operation
The old password must be part of the password change request because RACF does not allow resetting a password. After the password is set, the connector performs an extra bind operation with the RACF user and the old password to set the new password. The two passwords are delivered in one string, separated by a slash character, for example, oldpassword/newpassword.
Salesforce Workflows
The Salesforce Provisioning workflows operate between a target system of type Salesforce in the Identity Store and the corresponding connected Salesforce system. The Salesforce connector uses the REST API, which provides a powerful, convenient and simple Web services API for interacting with the Salesforce system.
The Salesforce workflows handle the following Salesforce tables (note: in this section, SF indicates Salesforce objects and DXI indicates DirX Identity objects):
-
SF Account - the Salesforce accounts. This table represents an individual account, which is an organization or person involved with a business (such as customers, competitors, and partners) and holds a ContactID, which is the ID of the user who currently owns the account.
-
SF Contact - the Salesforce contacts. This table represents a contact, which is a person associated with an account. It holds the following important attributes:
-
ContactID - the ID of the account that’s the parent of this contact.
-
OwnerID - the ID of the owner of the account associated with this contact.
-
SF PermissionSet - the Salesforce permission sets. This table represents a set of permissions used to grant more access to one or more users without changing their profiles or reassigning profiles. (The Permission Set object is available in the SalesForce API version 22.0 and newer.)
-
SF Profile - the Salesforce profiles. This table represents a profile, which defines a set of permissions to perform different operations, such as querying, adding, updating, or deleting information. It holds a UserLicenseId, which is the ID of the UserLicense associated with this profile.
-
SF User - the Salesforce users in an organization. This table holds the following important attributes:
-
AccountID - the ID of the account associated with a customer portal user. This field is null for Salesforce users.
-
ContactID - the ID of the contact associated with this account. This field is null for Salesforce users.
The Salesforce workflows synchronize a Salesforce user (with its profile/user license information and optionally one or more permission sets) to a target system account in DirX Identity and store the SF Profile and SF PermissionSets as target system groups.
Salesforce also supports the concept of community users, which are external users with access to a Salesforce community. These users require holding information about SF Contacts and SF Accounts. A community user uses one of the following user licenses: Customer_Community, Customer_Community_Login, Partner_Community, Partner_Community_Login. Salesforce stores community users in the same user table as other users. The only difference is the use of a few ProfileIds that are attached to these community user licenses. As a result, community users appear in the DirX Identity account tree of the target system.
SF Accounts are mapped to DXI Organizations. They should reside in the subfolder Business Objects/SalesforceAccounts to distinguish them from other organizations.
SF Contacts are mapped to DXI users. These users are assumed to be associated with organizations such as customers. Storing SF Contacts in the DirX Identity user tree makes them available to user relations and to delegated user management. Thus they can also be provisioned to other target systems. This design supports a global view compared to having everything in a target system. SF Contacts should reside in the subfolder Users/SalesforceContacts to distinguish them from internal users.
The following figure illustrates how DirX Identity represents the Salesforce object model:
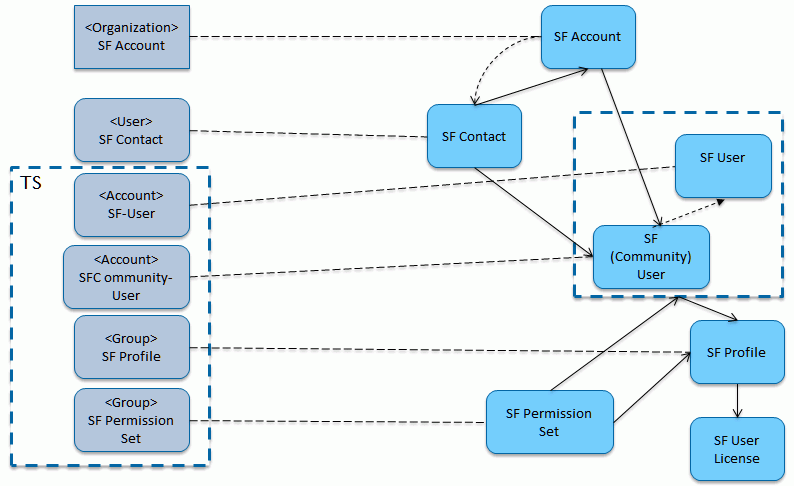
The figure shows the DirX Identity objects on the left and the Salesforce objects on the right. On the DirX Identity side:
-
The target system holds the DirX Identity accounts (which are SF users and SF (Community) users) and the DirX Identity groups (which are the SF Profiles and the SF Permission Sets).
-
Outside the target system are the DirX Identity business organizations for SF Accounts and the DirX Identity users (for SF Contacts).
-
The names enclosed in brackets (< >) represent DirX Identity objects. The names of objects that appear underneath the DirX Identity objects are the corresponding Salesforce objects.
On the Salesforce side:
-
The SF users and the SF (Community) users are enclosed in a dashed-line box to indicate that "normal" users have no relationship to SF Account and SF Contacts whereas the SF (Community) users require the existence of an entry in the SF Account and in the SF Contact table.
-
The arrows represent the links between the tables.
The delivered Salesforce workflows include:
-
Ident_Salesforce_Realtime - the synchronization workflow that exports detected changes for account and group objects from Identity Store to the Salesforce cloud and then validates the processed changes in Salesforce to the Identity Store. The workflow also generates a password if the object is created. When this workflow is triggered by a schedule or started directly in DirX Identity Manager, it also synchronizes the Users/SalesforceContacts and the Business Objects/SalesforceAccounts subtrees.
-
Ident_Salesforce_SLSFAccounts_Realtime - the synchronization workflow that is triggered by an entry change event and exports detected changes for an object in the Business Objects/SalesforceAccounts subtree in Identity Store to the Salesforce cloud and then validates the processed changes in Salesforce to the Identity Store. Note that this workflow uses an entry change topic and therefore uses the following definition in the WhenApplicable section:
-
Topic Prefix: dxm.event.ebr
-
Type: aSFOrganization
-
Cluster; *
-
Domain: *
-
This definition implies that an event policy for the object description aSFOrganization and the LDAP object class dxmSLSFaccount needs to be active.
-
Ident_Salesforce_SLSFContacts_Realtime - the synchronization workflow that is triggered by an entry change event and exports detected changes for an object in the Users/SalesforceContacts subtree in Identity Store to the Salesforce cloud and then validates the processed changes in Salesforce to the Identity Store. Note that this workflow uses an entry change topic and therefore uses the following definition in the WhenApplicable section:
-
Topic Prefix: dxm.event.ebr
-
Type: aSFContact
-
Cluster; *
-
Domain: *
-
This definition implies that an event policy for the object description aSFContact and the LDAP object class dxmSLSFcontactt needs to be active.
-
Validate_Salesforce_Realtime - the validation workflow that imports existing SF Accounts, SF Contacts, SF PermissionSets and SF Profiles from the Salesforce cloud to the Identity Store.
-
SetPassword in Salesforce - the SetPassword workflow that synchronizes the user’s password to Salesforce when a password change in the Identity Store is detected.
The following figure illustrates the Salesforce Provisioning workflow architecture.
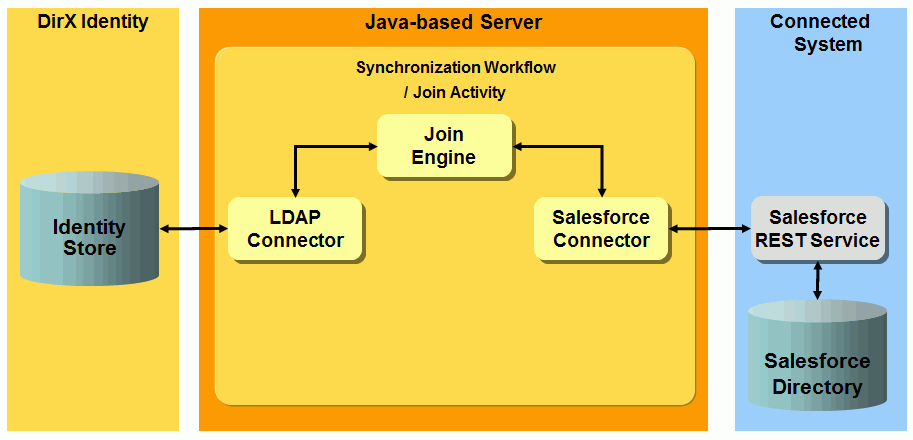
SF Profiles and SF PermissionSets are only administered in Salesforce directly. (One of the reasons for this is that SF PermissionSets are very complex objects with a huge variety of permission flags). As a result, you always need to start by running the Validate_Salesforce_Realtime workflow to make these objects available in the TS groups subtree.
Once these objects are available, you can fully administer the SF Accounts, SF Contacts and SF users directly in the Identity Store.
When creating new entries in DirX Identity, the (Salesforce) Id attribute of such an entry is not yet known; it is synchronized back from Salesforce to Identity and the object in Identity is renamed (because the Id is stored in the cn in Identity).
DirX Identity provisions both SF Profiles and SF Permission Sets as groups and stores them in the TS subtree groups → Profiles and groups → PermissionSets.
When you assign Salesforce groups to a user, you must assign exactly one group that is an SF Profile and optionally one or more SF PermissionSets.
SF Profiles and SF PermissionSets can be differentiated by the description attributes. SF Profiles are identified by the (PRF) prefix, for example:
(PRF): Chatter Free User; (UL): Chatter Free
Note that the substrings (UL) identify the underlying user license on which the SF Profile is based.
SF PermissionSets are identified by the (PERM) prefix; for example:
(PERM): (PRF): -; (UL): -
(PERM): (PRF): -; (UL): Salesforce
| The substring (PRF) identifies the SF Profile that is assigned to that SF PermissionSet. The (UL) prefix identifies the underlying user license on which the SF Profile is based. |
(PRF) and (UL) may be absent (represented by a hyphen (-), if the SF PermissionSet is not attached to an SF Profile. In this case, such permission sets can be used in addition to any SF profile.
Keep in mind that the SF Profile and the SF PermissionSet profile definitions must match. If they do not, they are in conflict and can’t be assigned in parallel.
Salesforce Workflow Prerequisites and Limitations
Before you can use the Salesforce workflows, you must perform the following tasks:
-
Create and register a Remote Access application in the Salesforce system, as described in "Registering the Remote Access Application".
-
Create the customer-specific attribute StatusInfoc to manage the status of Salesforce user deletion, as described in "Creating the StatusInfoc Attribute".
-
Extend the DirX Identity Store schema with Salesforce target system-specific attributes and object classes so that the workflows can store Salesforce-specific information in the Identity Store, as described in the section "Extending the Schema for the Target System Workflows".
Registering the Remote Access Application
The Salesforce connector acts as a remote application to the Salesforce system. As a result, you need to create a Remote Access application in the Salesforce system before you can use the Salesforce workflows. (For details, see https://developer.salesforce.com/page/Getting_Started_with_the_Force.com_REST_API). To register the remote access application:
-
Log in to Salesforce.com with your (developer) account and then navigate to Setup > Develop > Remote Access.
-
In the Connected Apps section, click New. In the next dialog, enter the following items:
Connected App Name; for example, DirXIdentityConnector
API Name; for example, DirXIdentityConnector
Contact Email - your e-mail address
-
In API (Enable OAuth Settings), select Enable OAuth Settings. Enter the following items:
Callback URL; for example, https://localhost:88123/REST-API/callback
Selected OAUth Scopes - select full access (full)
-
When you click Save, you will see the following items in the API (Enable OAuth Settings) section:
Consumer Key
Consumer Secret
Now your remote access application has been created. Consumer Key and Consumer Secret must be provided in the connected directory for Salesforce as described in "Configuring the Salesforce Workflows".
Creating the StatusInfo__c Attribute
Salesforce users can’t be deleted. In the Salesforce system, each user has an IsActive attribute that is set to false if the user is deleted. Furthermore the workflow sets the customer specific attribute StatusInfo__c of the Salesforce user to DELETED. So there is another task before you can run the workflows. You have to create the customer specific attribute StatusInfo_c:
-
Log in to Salesforce.com with your (developer) account and then navigate to Setup > Build > Customize > Users > Fields.
-
In the section User Custom Fields, click New. In the Data Type section, select Text and then click Next.
-
In Step 2. Enter the details, enter the following fields:
-
Field Label: StatusInfo
-
Length: 16
-
Field Name: StatusInfo
and then click Next.
-
-
In Step 3. Establish field level security, select the Visible field and then click Next.
-
In Step 4. Add to page layouts, the Add field and User Layout should already be selected. If they are not selected, select them, and then click Save. You will see the User Custom Fields again and you will see the new attribute StatusInfo with its internal API name StatusInfo__c.
The internal name StatusInfo__c is used in the account-channel mapping and in the account-channel Export section as a filter. If you want to use another Salesforce attribute, you must change the account-channel mapping and the account-channel Export section.
Salesforce Workflow Limitations
The following limitations apply:
-
Currently, only Salesforce users and profiles are synchronized.
-
A Salesforce user can only hold one value in the ProfileId attribute. Consequently, you can only assign one group (=Salesforce Profile) to a DirX Identity account.
-
Salesforce users can’t be deleted. In the Salesforce system, each user has an IsActive attribute that is set to false if the user is deleted. Furthermore the workflow sets the customer-specific attribute StatusInfoc of the Salesforce user to DELETED, as described in "Creating the StatusInfoc Attribute". When you remove a group from an Identity Store user, the account is normally disabled. At the account (which also received the state DISABLED), you normally no longer see the assigned group in the Member of tab.
The Salesforce workflows have a different behavior concerning the deletion of groups. The ProfileId attribute (which represents the assigned group) can’t be deleted at the Salesforce user. Thus, when synchronizing back to the Identity Store, the ProfileId is still returned in the search result and so, when applying the mapping for the dxrGroupMemberDelete attribute, the value doesn’t change (will not be deleted). As a result, you will always see the group (ProfileId) with the state DELETE in the Member of tab of the account. -
Salesforce profiles can’t be created/deleted using the Salesforce connector. As a result, you must run the Validate_Salesforce_Realtime workflow as the first action once you have set up your environment. When doing so, the Salesforce profiles are created as groups in the Identity Store. From now on, you can assign one of these groups to your Identity Store users.
Configuring the Salesforce Workflows
To configure the connection to Salesforce:
-
Specify the IP Address in the Salesforce service object; for example, login.salesforce.com. Check the SSL flag. No Ports are required.
-
Set up the bind credentials of the connected directory that represents the Salesforce system. Use a Salesforce user with sufficient rights. Enter Name, Password and Security Token (which you normally receive as e-mail from Salesforce, if you registered for the first time or if you changed your password).
-
Set up the following items in your Salesforce connected directory (in the Salesforce tab):
-
URL-Suffixes:
For connecting to the Salesforce system using OAuth, enter:
/services/oauth2/token
For performing search and updates requests, enter the Salesforce API version you want to use. For example:
/services/data/v30.0
-
Consumer Key - enter the consumer key of your remote access application.
-
Consumer Secret - enter the consumer secret of your remote access application.
-
Set up the following items in your Salesforce connected directory, if required (in the HTTP/HTTPS Proxy Server tab):
-
In Proxy Server, the link to the proxy server modeled as a connected directory object.
-
In Proxy Server Bind Profile, the link to the bind profile used by the proxy server.
To configure the Salesforce workflows:
-
Install the schema extensions required by the Salesforce workflows as described in the section "Extending the Schema for the Target System Workflows", selecting the Salesforce extensions.
-
Assign the resource family Salesforce in the IdS-J server.
Configuring the Salesforce Target System
The Salesforce target system requires the following layout:
-
Accounts - all accounts (Salesforce users) are located in a subfolder Accounts.
-
Groups - all groups (Salesforce profiles) are located in a subfolder Groups.
Salesforce Workflow and Activities
The Salesforce users and profiles are synchronized via a pair of channels (one channel per direction). The membership in Identity (Salesforce attribute ProfileId) is stored on accounts. See the default Salesforce workflow for details.
Salesforce Workflow Ports
This section describes the Salesforce workflow ports.
TS Port
-
CF - Crypt Filter
A Salesforce crypt filter is implicitly configured. It is used to send the decrypted password attribute Password to the Salesforce system.
Account-Channel Mapping for SF Users
In the Account channel mapping, many LDAP attributes are mapped one-to-one to Salesforce attributes. The following attributes receive special handling:
-
EmailEncodingKey, LanguageLocaleKey, LocaleSidKey, TimeZoneKey - these mandatory attributes are generated via a Java Source mapping, but only for an ADD operation. The attributes are not stored in the Identity Store. In the Java Source mapping, either the LDAP attribute language or c is evaluated.
-
Password - remember that the account’s password is inherited from the user object in Identity Store when you assign a group (=Salesforce profile) to a user (and then implicitly the account is created). If no password is present at the user, the account’s password is initially set to dirxdirx1. Check to make sure that the passwords comply with the password policies in effect for the Salesforce system. If the default password dirxdirx1 is not useful for your purposes, you need to change the object description for Salesforce (cn=TSAccount.xml,cn=Object Descriptions,cn=Salesforce,cn=TargetSystems,cn=Configuration,cn=<domain>).
-
Email - the Email attribute in the Salesforce system is a single-valued attribute; in the Identity Store, the corresponding LDAP mail attribute is a recurring attribute. As a result, the Java Source mapping operates as follows:
-
If the attribute is not yet set in the Salesforce system, the value of mail that fits best with the attribute dxrName is mapped to Email. (remember that the Username attribute in Salesforce is derived from dxrName in the Identity Store, and that Username and Email in the Salesforce system normally appear to be similar or are even the same.).If none of the values of mail matches with dxrName, the first value of mail is mapped to Email.
-
If the value of Email is already set in the Salesforce system, this value is retained "as is" if it is available in the mail attribute in the Identity Store.
-
If the value of Email in the Salesforce system is completely different from the values of mail in the Identity Store, the value is generated as if it was not yet set in the Salesforce system.
-
Phone - the Phone attribute in the Salesforce system is a single-valued attribute; in the Identity Store, the corresponding LDAP attruibute telephoneNumber is a recurring attribute. As a result, the Java Source mapping operates as follows:
-
If the attribute is not yet set in the Salesforce system, the first value of telephoneNumber is mapped to Phone.
-
If the value of Phone is already set in the Salesforce system, this value is retaiined "as is" if it is available in the telephoneNumber attribute in the Identity Store.
-
If the attribute value of Phone in the Salesforce system is completely different from the values of telephoneNumber in the Identity Store, the first value of telephoneNumber is mapped to Phone.
-
StatusInfoc - the customer-specific attribute StatusInfoc is set to DELETED if the corresponding dxrState attribute in the Identity Store is set to DISABLED or DELETED.
-
IsActive - the IsActive attribute is set to true if the corresponding dxrState attribute in the Identity Store is set to DISABLED or DELETED.
-
When a new account is created by assigning a Salesforce group to a user in Identity Store.
Group-Channel Mapping for SF PermissionSets
Mappings are defined for the Salesforce attributes Name, Description, LicenseId and ProfileId. However, because SF PermissionSets cannot be added, modified or deleted, you should avoid making changes to the groups in Identity Store. (Note that these mappings are only present to define the set of attributes that is read when synchronizing from Salesforce to Identity Store.) Make the changes in Salesforce and then run the Validate_Salesforce_Realtime workflow to update the groups in the Identity Store.
Many attributes are simply mapped one to one or comparable attribute names are mapped (for example, Name to cn).
The dxrPrimaryKey attribute of groups contains the identifier (the Id attribute in Salesforce) of the Salesforce profile objects. The dxrName attribute contains the Salesforce Name attribute.
Group-Channel Mapping for SF Profiles
Mappings are defined for the Salesforce attributes Name, Description, UserLicenseId and UserType. However, because Salesforce profiles cannot be added, modified or deleted, you should avoid making changes to the groups in Identity Store. (Note that these mappings are only present to define the set of attributes that is read when synchronizing from Salesforce to Identity Store.) Make the changes in Salesforce and then run the Validate_Salesforce_Realtime workflow to update the groups in the Identity Store.
Many attributes are simply mapped one to one or comparable attribute names are mapped (for example, Name to cn).
The dxrPrimaryKey attribute of groups contains the identifier (the Id attribute in Salesforce) of the Salesforce profile objects. The dxrName attribute contains the Salesforce Name attribute.
Channel Mapping for SF Accounts
Mappings are defined for the Salesforce attributes Name, Description, LicenseId and ProfileId. However, because SF PermissionSets cannot be added, modified or deleted, you should avoid making changes to the groups in Identity Store. (Note that these mappings are only present to define the set of attributes that is read when synchronizing from Salesforce to Identity Store.) Make the changes in Salesforce and then run the Validate_Salesforce_Realtime workflow to update the groups in the Identity Store.
Many attributes are simply mapped one to one or comparable attribute names are mapped (for example, Name to cn).
The dxrPrimaryKey attribute of SF Accounts contains the identifier (the Id attribute in Salesforce) of the SF Accounts objects. The dxrName attribute contains the Salesforce Name attribute.
When creating an SF Account in Identity Store, take the following steps:
-
Set the attribute “Provision To Salesforce”; if it is not set, the SF Account is not synchronized to Salesforce.
-
Assign an “Owner” in the “Owner Information” section; note that the “Owner Id” is automatically set when assigning the “Owner”.
-
Set additional attributes.
Note that the BO organization in Identity Store that you just created is renamed by the workflow and the cn then holds the id attribute of the new SF Account in Salesforce.
Channel Mapping for SF Contacts
Many attributes are simply mapped one to one or comparable attribute names are mapped (for example, dxmSLSFwebSite to cn).
The dxrPrimaryKey attribute contains the identifier (the Id attribute in Salesforce) of the SF Contact objects. The dxrName attribute contains the Salesforce Name attribute.
Member-Channel Mapping for SF Users
The member channel mapping for PermissionSetId (which contains both the Ids for the SF Profile and the SF PermissionSets) sets the attribute ProfileId in Salesforce when assigning groups to a user in Identity Store. It also creates/updates/removes the internal Salesforce Permission Set assignment.
SetPassword-Channel Mapping for SF Users
Password changes in the Identity Store (in the LDAP attribute dxmPassword) are transferred as a modification of the pseudo-attribute Password. An additional modification request is also sent to the Salesforce system to reset the user’s password.
When you subsequently log in to Salesforce, the system asks you to enter a security question with its answer. On this Web page, you need to enter the new password (and the security question/answer); but you don’t need to change the password again.
Account-Channel Mapping for Identity Store Accounts
Many attributes are simply mapped one-to-one or comparable attribute names are mapped (for example, CompanyName to o).
The dxrPrimaryKey attribute of accounts contains the identifier (the Id attribute in Salesforce) of the Salesforce user object. The attribute dxrName contains the Salesforce Username.
Remember, too, that for most of the attributes, the onAddOnly flag is set in the mapping because the assumption is that the Identity Store holds the master data and thus the Identity Store will never be overwritten with updates from Salesforce.
Group-Channel Mapping for Identity Store Profiles
Many attributes are simply mapped one-to-one or comparable attribute names are mapped (for example, UserLicenseId to dxmSLSFuserLicenseId).
The dxrPrimaryKey attribute of accounts contains the identifier (the Id attribute in Salesforce) of the SF Profile object. The attribute dxrName contains the Salesforce Name.
Group-Channel Mapping for Identity Store PermissionSets
Many attributes are simply mapped one-to-one or comparable attribute names are mapped (for example, LicenseId to dxmSLSFuserLicenseId).
The dxrPrimaryKey attribute of accounts contains the identifier (the Id attribute in Salesforce) of the SF PermissionSet object. The attribute dxrName contains the Salesforce Name.
Channel Mapping for Identity Store Organizations (SF Accounts)
Many attributes are simply mapped one-to-one or comparable attribute names are mapped (for example, Fax to facsimileTelephoneNumber). Note that the schema maps the Salesforce attributes to attributes in the Identity Store using the same name and the prefix dxmSLSF; for example, Site is mapped to dxmSLSFsite.
The dxrPrimaryKey attribute contains the identifier (the Id attribute in Salesforce) of the SF Account object. The attribute dxrName contains the Salesforce Name.
Channel Mapping for Identity Store Users (SF Contacts)
Many attributes are simply mapped one-to-one or comparable attribute names are mapped (for example, MobilePhone to mobile). Note that the schema maps the Salesforce attributes to attributes in the Identity Store using the same name and the prefix dxmSLSF; for example, OtherPhone is mapped to dxmSLSFotherPhone.
The dxrPrimaryKey attribute contains the identifier (the Id attribute in Salesforce) of the SF Contact object. The attribute dxrName contains the Salesforce Name.
SAP ECC (R/3) UM Workflows
The SAP ECC (formerly R/3) UM Provisioning workflows synchronize data between a target system of type SAPR3UM in the Identity Store and the corresponding connected SAP ECC system. In the following sections, R/3 is synonymous with ECC.
The SAP R/3 UM connector used in the workflows communicates with the SAP R/3 system across the SAP Java connector JCo.
The following figure illustrates the SAP R/3 UM workflow architecture.
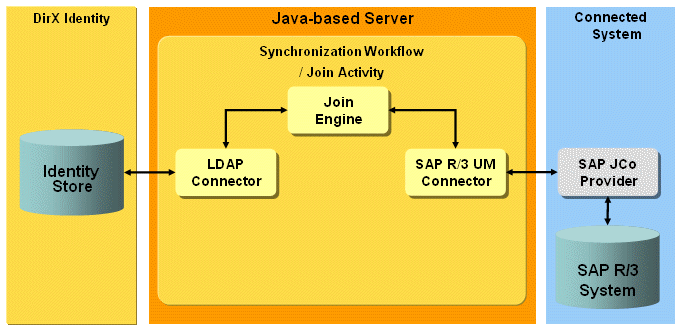
The validation, synchronization and password workflows allow you to synchronize DirX Identity account and group objects with SAP R/3 user, role and profile objects.
SAP R/3 UM Workflow Prerequisites and Limitations
The SAP R/3 UM workflows have the following prerequisites and limitations:
-
The SAP Java Connector JCo must be installed on the machine where the SAP R/3 UM connector runs. It can be downloaded free of charge from the SAP Web pages.
-
Roles and profiles are not allowed to be created in SAP R/3 by the underlying SAP BAPI interfaces, so the synchronization workflows can only modify user-SAP role or user-SAP profile assignments.
-
Before you can use the workflows, you must extend the DirX Identity Store schema with SAP R/3 UM target system-specific attributes and object classes so that the workflows can store SAP R/3 UM-specific information in the Identity Store. For instructions, see the section "Extending the Schema for the Target System Workflows".
Configuring the SAP R/3 UM Target System
This section provides information about SAP R/3 UM target system configuration.
Connectivity View
Configure the SAPR3UM connected directory with the connected directory configuration wizard from the Global View target real-time scenario. You are guided through the steps. The main configuration tasks are:
-
Specify the IP address or host name of the SAP R/3 UM service object (SAP application server).
-
Specify username and password in the bind profile.
-
Specify account and group base of the target system in provisioning.
-
Specify the values on the parameters page, mainly client Id, system number and whether you work with a CUA enabled system or not.
Provisioning View
When creating the account, the attribute dxrName is created with a target system-wide unique value. You can see this in the tsaccount.xml object description. Also the attribute sapUsername is filled with this value. sapUsername is used for generating the identifier passed to the SAP R/3 connector when synchronizing the account to the SAP R/3 connected system. In the DirX Identity direction, the dxrName attribute is used for joining.
In the SAP R/3 UM target system, the members are referenced from the account objects. The reference attribute is the cn attribute of the groups. Also in the connected SAP R/3 system the memberships are held by the accounts.
SAP R/3 UM Workflow and Activities
The following figure shows the layout of the channels that are used by the join activity.

As the figure shows, there is a pair of channels between accounts, groups and members on each side. The members are linked to the accounts on both sides, so there is no cross channel relationship.
SAP R/3 UM Workflow Ports
This section describes SAP R/3 UM workflow ports.
TS Port
-
CF - Crypt Filter
The configured crypt filter is used to send the password attribute PASSWORD.BAPIPWD decrypted to the SAP R/3 system.
SAP R/3 UM Workflow Channels
This section provides information about SAP R/3 UM workflow channels.
Common Aspects
Master attributes
Almost all attributes except a few special ones like dxrTSState are mastered by DirX Identity. Consequently, in the mapping direction to DirX Identity, these attributes have set the OnAddOnly flag and in the target system direction this flag is not set.
However, some attributes cannot be changed for single users through the mapping. Those attributes, for example ADDRESS.STREET, are linked to an extra table for a certain group of users, where they are set by the SAP R/3 administrator.
CUA- or non CUA system
The workflow does not need to be adapted depending on whether or not the connected system is a CUA (Central User Administration) system. The workflow mappings and post-mappings handle the difference transparently.
Accounts
Direction: Identity → Connected System
The attribute dxrTSState is a pseudo attribute of the SAP R/3 connector. That is it is not passed to the SAP R/3 system as an attribute, but is interpreted by the connector, which performs the corresponding actions depending on the values ENABLED, DISABLED or DELETED.
Direction: Connected System → Identity
The attributes ISLOCKED.LOCAL_LOCK and ISLOCKED.GLOB_LOCK, which are set depending on whether a CUA or non-CUA system is connected, are read from the SAP R/3 connected system and converted by the dxrTSState Java mapping to the corresponding states in DirX Identity.
Groups
Direction: Identity → Connected System
The group mapping only results in modifications to the corresponding role in SAP R/3 because roles and profiles are not allowed to be created in SAP R/3 via an interface. Add operations are rejected by the SAP R/3 connector.
Direction: Connected System → Identity
The mapping, the export filters and the join filters of the group channels are configured to synchronize SAP R/3 roles - not profiles - to Identity groups.
Memberships
In both systems, DirX Identity and SAP R/3, accounts hold the memberships. Therefore, no cross-channel relationship is required.
Direction: Identity → Connected System
Post-Mapping
If a non-CUA system is connected, the target attribute ACTIVITYGROUPS.AGR_NAME must be mapped. If a CUA system is connected, the attribute dxrRole.NAME must be set. This action is handled in the Java PostMapping, which must have access to both attributes.
Password Channel
The target systems password attribute PASSWORD.BAPIPWD is updated with the current password of the account in DirX Identity contained in the attribute dxmPassword. The dxrPwdReset attribute of the SAP R/3 connector, which determines whether the user must change the password on the next login, is set depending on the source attribute dxmPasswordExpired. This attribute was set beforehand by the Password Event Manager workflow listening for requests of Web Center or Password Listener.
A Password Channel can also be configured backwards from the Connected System to Identity to be able to update some attributes in Identity after a password change or reset has taken place in the Connected System. The join engine then as usual synchronizes the attributes specified in the corresponding Password Channel Mapping to Identity after the account with its password relevant attributes was updated in the Connected System.
Customizing the SAP R/3 UM Workflows
The workflows can be customized to synchronize SAP R/3 profiles instead of SAP R/3 roles. To make this customization:
-
Set up a corresponding object structure on the Identity side.
-
Specify the prefix "PROFILE:" instead of "ROLE:" in the workflows export filter and identifier mapping of the group channel.
-
Specify the corresponding member attributes in the membership mapping.
Service Management Workflows
The Service Management Provisioning workflows operate between a target system of type RequestWorkflow in the Identity Store and the external offline system. Instead of direct provisioning, the Java-based workflows start a corresponding request workflow instance for each provisioning action via the DirX Identity Request Workflow Services. This model assumes that there is an acting administrator who receives tasks via request workflow approval activities. He performs manual provisioning and then approves the task.
For more information about manual provisioning, read the corresponding section in the DirX Identity Use Case Document "DXI Service Management".
The workflows handle these common objects:
Account - the account represents a common account in a target system. It represents any account-like object in the real (offline) system.
Group - the group represents a common group in a target system. It represents any group-like object in the real (offline) system.
The delivered workflows are:
-
Ident_SvcMgmt_Realtime - the synchronization one-way workflow that exports detected changes for account or group objects from DirX Identity to the Workflow Service, which creates the appropriate request workflow instances.
Service Management Workflow Prerequisites and Limitations
The Connectivity workflow does not update the entries in the external offline system directly. It only invokes a special request workflow that contains tasks for a human administrator. This means that there is no direct provisioning to the offline system.
In this scenario, password management does not make sense because the administrator would see all user passwords.
The scenario does not comprise initial load or validation workflows. Such workflows must be built as project-specific solutions; for example, via files.
Configuring Service Management Workflows
To configure the Service Management workflows, use the connected directory and workflow wizards.
Connected Directory Wizard
-
Open the connected directory wizard and open the Service object.
-
Specify the IP Address of the host where the DirX Identity Request Workflow Service runs. This is the Java-based Server that is configured for the domain.
DirX Identity is typically configured to accept SOAP requests for request workflow management on the pre-configured unsecured port 40000 (and on the secured port 40443).
Workflow Wizard
-
Open the workflow wizard.
-
Click the Join Activity General Info tab. Here you can configure the timing parameters for the join activity.
-
Click the Request Workflows Settings tab. Here you can configure the URL Path and Socket Timeout at the target system port of the appropriate workflow object.
-
The URL Path of the Workflow Service is pre-configured to the default value workflowService/services/WorkflowService. Do not change this setting.
-
Set the timeout value (in seconds) in Socket Timeout if necessary.
-
Enter LDAP name of the provisioning domain into the optional Domain property. It enables the Java-based Server to identify if the request is for the correct domain.
-
Primary Workflow DN is the valid DN of the active request workflow definition, which will be used for handling the generated requests. The primary workflow will always be invoked for account objects if configured. It will also be used for group objects if the Secondary Workflow DN is not set. Secondary workflow can be configured only for handling the group objects. The secondary workflow configuration is valid only if the primary workflow is also configured. If both primary and secondary workflow configurations are not set, the Workflow Service will try to find a suitable request workflow definition according to its When Applicable settings. It is recommended to configure at least a primary workflow. Remember that using a single request workflow definition requires an implementation that can handle two different object types.
Configuring the Service Management Target System
A service management target system requires the following layout:
-
Accounts - in the DirX Identity target system, a corresponding account object exists for every account in the external offline system. All accounts are located in the subfolder Accounts.
-
Groups - in the DirX Identity target system, a corresponding group object exists for every group in the external offline system. All groups are located in the subfolder Groups.
The attribute dxrPrimaryKey has a special meaning. It stores the identification of the account or group object in the offline system. It is also a description that should be well-understood by an administrator performing the manual operation in the offline system. The slight modification of the object descriptions for account and group objects in the Provisioning configuration may be necessary in order to satisfy this goal.
Service Management Workflows and Activities
The following figure shows the layout of the channels that are used by the join activity:
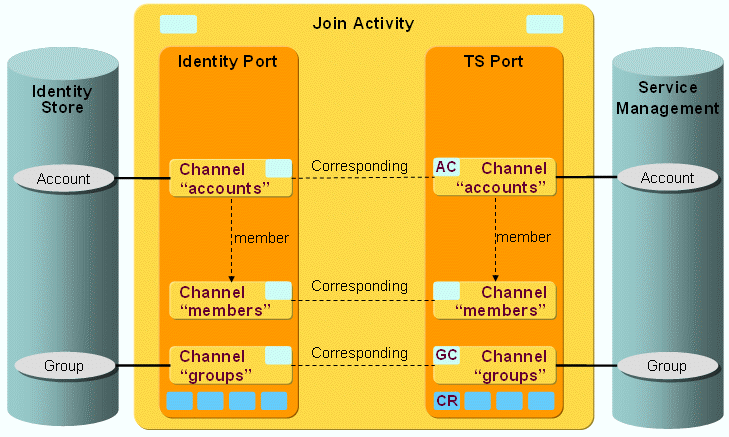
The service management account and group objects are synchronized via a pair of channels. Both channels use the same user hook implementation.
Service Management Workflow Ports
This section describes the Service Management ports.
TS Port
-
Crypt Filter
a service management filter is configured implicitly. It is pre-configured for custom usage only.
Service Management Workflow Channels
This section provides information about Service Management Workflow channels.
Common Aspects
Direction: Identity Store → Service Management
-
The workflow uses a special channel user hook implementation. The workflow gets the original SPMLv1 event along with tracked attribute changes initiated by the saved change of an account or a group object. Add or delete events are directly transformed to add or delete types of the mapped SPMLv1 request. A modify event can be transformed to a delete type if the tracked event modifications contain the change of the dxrState attribute with the added value "DELETED". Add and modify events always contain a list of changed attributes.
These event attributes are taken and compared with the list of mapped attributes (channel configuration). The result contains the intersection of the attribute names contained in the event and in the mapped entry. If such an intersection is empty, no request is propagated. The generated request always contains the attribute values taken from the corresponding mapped attribute. Attribute values contained in the event are ignored.
Direction: Service Management → Identity Store
-
The workflow uses the one-way synchronization controller. Therefore no direct updates are possible.
SharePoint Workflows
The SharePoint Provisioning workflows provision groups and group memberships between a target system of type SharePoint in the Identity Store and the corresponding connected SharePoint system. Supported SharePoint systems are SharePoint Server 2007, SharePoint Server 2010, SharePoint Server 2013 and SharePoint Server 2016.
Microsoft introduced the claims-based identity model in SharePoint Server 2013. A claim is a piece of identity information, like name, email address, group membership or type of the identity. This model includes that SharePoint group memberships are kept in the form claims-based identity prefixdomain_name\user_name. For instructions on how to configure the SharePoint workflows and the SharePoint target system to correctly provision group memberships, see the sections "Configuring the SharePoint Target System" and "SharePoint Workflow Channels".
Because SharePoint uses the accounts from the Active Directory, a corresponding ADS workflow must be configured.
The SharePoint workflow’s join activity uses the LDAP connector to connect to the Identity Store and the SharePoint connector to connect to the SharePoint server.
Two default workflows are provided for DirX Identity SharePoint synchronization:
-
Ident_SharePoint_Realtime_Clustered - performs synchronization to SharePoint.
-
Validate_SharePoint_Ident_Clustered - helps to validate the SharePoint connected system with the related DirX Identity target system.
The following figure illustrates the SharePoint Provisioning workflow architecture.
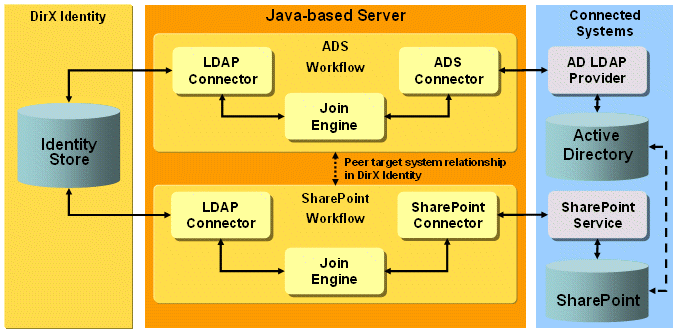
Data Structures
SharePoint is organized into sites. Each site has its own set of groups with a different set of access rights (called roles in SharePoint). SharePoint uses the Windows account names to identify users. Adding an account to a SharePoint group will grant the user the access rights that are attached to the group.
Each SharePoint site has its own bind credentials that are related to a bind account.
DirX Identity’s target system cluster feature is used to map this structure to DirX Identity. Each SharePoint site has its counterpart in a DirX Identity target system that is part of a common SharePoint cluster. The advantages of this approach are that only one workflow needs to be configured for use by all the clustered target systems and that clusters support a bind account mechanism. Each target system references one bind account that holds the credentials for the target system connection. This mechanism fits perfectly with the requirement of different bind credentials per site.
Since SharePoint uses the Windows Active Directory accounts, account objects are not held in the SharePoint target systems. Each SharePoint target system references the associated Active Directory target systems by a peer target system link.
In a group of an Identity SharePoint target system, the members are DN links to the user objects. Special SharePoint user hooks are added to the SharePoint workflows that transform user DNs to account names and vice-versa by evaluating the accounts in the linked peer target system related to the user by the dxrUserLink attribute.
SharePoint Workflow Prerequisites and Limitations
The SharePoint workflows have the following prerequisites and limitations:
-
Before you can use the workflows, you must extend the DirX Identity Store schema with SharePoint target system-specific attributes and object classes so that the workflows can store SharePoint-specific information in the Identity Store. For instructions, see the section "Extending the Schema for the Target System Workflows".
Configuring the SharePoint Clusters, Workflows and Connection
Configuring the SharePoint workflows consists of the following steps:
-
Setting up SharePoint clustered target systems
-
Setting up the SharePoint workflows
-
Setting up a SharePoint SSL connection
Creating Clustered SharePoint Target Systems
To set up a SharePoint cluster in the Identity Manager:
-
Select the Provisioning → Target System view.
-
Select New → Cluster Container at the top-level node and create a cluster container. For example, name it SharePoint.
-
Select this container, and then select New Cluster to create a cluster for your SharePoint server. For example, name it SharePointServer1. It shall contain all SharePoint sites as target systems.
-
Select the cluster object, and then select New Target System for each site. This action starts the Target System wizard. Note that the wizard does not create Java-based workflows because only one workflow is necessary for a SharePoint cluster (it handles all contained sites). To set up the synchronization and validation workflows, perform the procedure described in "Configuring SharePoint Workflows".
The result is a structure like this:
SharePointServer1
Site1
Site2
…
SharePointServer2
Site1
…
| All target systems use a common configuration tree with common object descriptions. Thus, after you create the first target system, move the configuration container from the target system one level up. Now it is a child of the cluster and lies in parallel with the target system. If you add the next target system to the cluster, the configuration container is automatically omitted. |
The following configuration steps must be performed at each SharePoint target system:
-
In the General tab, add the links to the related peer target systems. These are the target systems containing the related active directory accounts.
-
In the Server Connection tab, enter the URL of the related SharePoint site.
-
In the Server Connection tab, edit the bind account. Click Edit and enter the bind credentials for the SharePoint site: domain\loginname (for example, domain1\admin) and password.
-
Save bind account and target system.
Configuring SharePoint Workflows
If you don’t want to use the Target System wizard to create the SharePoint workflows, you can also:
-
Use the Identity Manager to copy the workflow to your scenario (Connectivity → Global View).
-
Select the copied workflow from the context menu of the workflow line, and then select Configure.
-
Check that the Is applicable for parameters section is set correctly (for the synchronization workflow only; leave the parameters empty for the validation workflow):
-
Type - must be set to SharePoint.
-
Cluster - should be set to the Cluster field value of the target system objects in your corresponding cluster (Advanced tab, Match properties).
-
Domain - set this field to '*'. This action defines that this workflow runs for all target systems in your target system cluster, which means it runs for all sites in your SharePoint server.
Configuring SharePoint SSL Connections
To create an SSL connection to SharePoint:
-
Create a trust store (a keystore containing the certificate of the trusted root certification authority).
-
Configure SSL in DirX Identity.
Creating the Trust Store
The trust store is a Java keystore that is created using the keytool supplied with the Java Runtime Environment. The certificate is obtained by exporting it from the Internet Explorer’s key store of trusted root certification authorities.
-
Export the certificate as DER encoded binary X.509 (.CER) to file, for example, SharePointCa.cer.
To create a Java keystore containing this file, call the Java keytool with the following arguments:
keytool -import -alias alias -storepass password -keystore keystore_filename -file certificate_filename
alias can be randomly chosen, and it must be unique if multiple certificates are stored in the keystore.
password is the keystore password. It must be entered later on as the trustStorePassword in the DirX Identity target system configuration.
keystore_filename is the keystore file name. It should have the extension .jks
certificate_filename denotes the file containing the certificate, with the extension .cer
keytool asks if this certificate is trusted. You must answer "Yes" if you want to use this certificate.
Here is a sample call:
keytool -import -alias sharepoint -storepass changeme -keystore SharePointCaCerts.jks -file SharePointCa.cer
This call creates a keystore file SharePointCaCerts.jks containing the certificate exported in the first step. It is called a trust store since it contains certificates of trusted authorities.
Configuring SSL in DirX Identity
Select the DirX Identity target system and choose the Server Connection tab. Set the following parameters to set up SSL:
Site URL - set the site URL beginning with https and using the secure port (by default, 443). A sample structure of the URL is
https://server:port/sites/site
Path to Trust Store File - set the fully-qualified path name of the trust store file created in the preceding step.
Trust Store Password - set the trust store password. Note that the password should be scrambled or RSA-encrypted.
You must then restart the Java-based Server to apply the changes.
Configuring the SharePoint Target System
Users are not created in SharePoint but are taken from a peer target system. Note that the SharePoint user hook supports multiple peer target system links. If you set multiple links, all accounts a user has in the related target systems are enabled for the SharePoint site.
The next sections describe the settings of the target system in more detail.
Advanced Settings
The match properties Type, Cluster and Domain are part of the event topic that is sent when a group is changed. They are used to select the appropriate workflow and to identify the target system in the workflow:
Type - must contain the fixed value SharePoint (do not change!).
Cluster - should contain the name of your SharePoint server (can be a symbolic name).
Domain - should contain the SharePoint site name.
The assignment properties should not be changed. You must check Enable Realtime Provisioning to start an event-based workflow for a group change. Disable Password Sync should be set because the accounts reside in the Active Directory domain.
Server Configuration
This tab allows setting the URL. It contains the host address and the port.
| Normally SharePoint is accessed via port 80. In case of SSL, port 443 is used. |
The reference to the bind account is entered here, holding the bind credentials for the related site. Note that the account’s dxrName attribute must contain domain\account; for example, domain1\admin. The password must be stored in the bind account’s dxmPassword attribute. To achieve this, you must change the userPassword attribute of the bind account in the Data View.
Connector Configuration
You can configure the following values for an optional proxy server:
Host - host name of the proxy server (optional).
Port - port of the proxy server (optional).
User - user for proxy server authentication (optional).
Password - password for proxy server authentication (optional).
You can configure the following values for the connector:
User Name Prefix - is used in sites whose members follow the syntax prefixaccount_name.
For example the prefix ptdssomember: is used for sites with member syntax ptdssomember:account_name. Note that you must configure an empty domainnameattribute at the connected directory of those sites.
Search Groups from Site Collection - a Boolean flag indicating that the groups must be searched from the site collection rather than from the specified (sub)site.
| If the subsite on your SharePoint server was created with inheriting the site collection (parent site) permissions, the groups created in this subsite are part of the site collection and are only contained in the search result for the subsite if this flag is set. If the subsite to be provisioned was created with unique permissions, this flag must not be set (default) if only the subsite’s groups are to be provisioned and not all site collection groups including those of subsites with inherited permissions, too. |
Debugging trace file:
Trace File - a path and filename for the request. This file is useful in debugging mode to inspect the SPML requests towards the connector and the corresponding responses. Once the workflows become productive, delete or rename the option to prevent writing to the trace file.
Environment Properties
You can configure the following values:
Domain\Userloginname - a valid default user login name for a new group.. A user name in SharePoint versions before SharePoint Server 2013 is presented in the form domain\account. From SharePoint Server 2013 on, a user name is presented in the form of a claims-based identity type prefix (for a Windows claims identity type, the prefix is i:0#.w|) followed by domain\account. If this default_userloginname is set, it is used as the defaultUserLoginName when a new group is created in SharePoint. If it is left empty, the group’s default userloginname is populated from the user provided with the bind account.
Default Owner → Owner - the default owner, if a group’s owner attribute on the DirX Identity side is not populated. The SharePoint attribute ownerIdentifier is mandatory for creating a group in SharePoint. The owner type, whose default value can be set in the environment property default_owner_type, must be either User or Group. If the owner type is User, the value for the default owner must be a valid username in the syntax domain\account or claims_based_prefixdomain\account depending on the SharePoint Server version as described in Domain\Userloginname. If the owner type is Group, the default owner must be the name of a group in the same SharePoint site..
Default Owner → Owner Type - the default owner type. Allowed values are User and Group.
Base DN (mandatory) - the base DN for groups in the current target system. This DN is used as a parent folder for the groups imported from the validation workflow. It is automatically set during save of the target system to the value cn=Groups,dn of target system.
SharePoint Workflow and Activities
The following figure shows the layout of the channels that are used by the SharePoint workflow’s join activity.
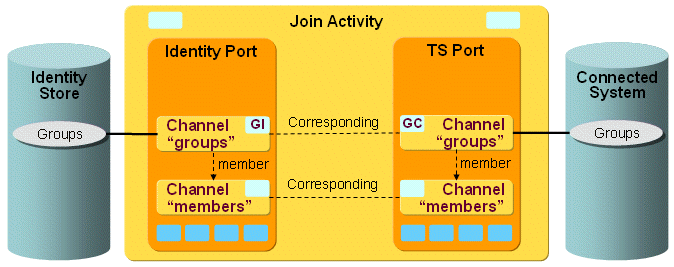
DirX Identity supports these SharePoint workflows:
-
Ident_SharePoint_Realtime_Clustered - this workflow is a Java-based synchronization workflow. It can run either scheduled or event-based. Event-based means it is triggered by a group change in DirX Identity. Each modification of a group - for example, adding a new group, adding/removing a member to a group or changing the group owner - starts a workflow that propagates this change to SharePoint.
Once the change is applied, it is propagated back to the group object in the DirX Identity target system, for example, to adjust the group’s state or other data. -
Validate_SharePoint_Ident_Clustered - this workflow is a scheduled validation workflow. It imports groups from SharePoint sites to the associated DirX Identity target systems and modifies the group’s members and other attributes according to the current group state.
This workflow is used to perform an initial load of the DirX Identity SharePoint target systems and to keep the DirX Identity target systems in sync if changes are made in SharePoint (for example, groups are added or deleted).
SharePoint Workflow Ports
This section describes the SharePoint workflow ports.
TS Port
The TS port references the SharePoint connected directory and its channels. The channels contain the mapping definitions for export of groups to SharePoint and the join definition for SharePoint.
IdentityDomain Port
The IdentityDomain port references the SharePoint channels (Channel Parent) of the DirX Identity connected directory. The channels contain the mapping definitions for import of groups from SharePoint and the join definition for DirX Identity.
Note that the SharePoint validation workflow and the synchronization workflow use the same connected directory and channel configuration. Only the controller class is changed in the join activity.
SharePoint Workflow Channels
This section provides information about SharePoint workflow channels.
Aspects Common to All Channels and Synchronization Directions
At the SharePoint connected directory, the directory type LDAP is used since the required configuration parameters are almost the same. The clustered workflows ignore the SharePoint target system service and the bind profiles. These parameters are read from the target systems/bind profiles in the Provisioning domain.
The Identity → Group Base property must not be set at the connected directory because it is different for each target system. In a clustered workflow, this value is overwritten by the target system-specific configuration attribute Group Folder → Base DN in the Environment Properties tab (attribute role_ts_group_base) in the Provisioning domain. The Target System → Group Base property of the connected directory must be set even though it is ignored when exporting the groups from the SharePoint server since all groups per site are flat.
Some specific attributes of the Connected Directory are important for the workflows:
accountnameattribute (mandatory) - the name of the LDAP attribute holding the Windows account name in the peer target system’s account objects.
delete_group_enabled - a boolean flag. If set to true, deleting a group in DirX Identity results in a physical deletion of the group in the connected SharePoint site. If set to false, groups are not deleted in SharePoint.
debug_to_screen - a boolean flag. If set to true, extra debug information is written to stdout. This attribute must be set to false in a production environment.
domainnameattribute - the name of the LDAP attribute holding the Windows domain name in the peer target system’s account objects. If no value is specified, the domain of the bind account is added to the account name. In SharePoint Server versions prior to SharePoint Server 2013, the user name is composed of domain\account. In SharePoint Server 2013 and higher, the user name is composed of a claims-based identity type prefix (for a Windows claims identity type, the prefix is i:0#.w|) followed by domain\account. This means that the domain attribute (the default attribute name holding the domain name is dxmAdsDomain) of an account in the peer target system must consist of this claims-based prefix plus the domain name; for example, i:0#.w|domain1.
In SharePoint sites that use the member syntax prefixaccount (for example, ptdssomember:account) the domainnameattribute must be left blank. This leads to the following behavior:
In the sync direction (Identity to SharePoint) the members are created without the domain prefix in the join engine. The SharePoint connector then adds the prefix to the account name.
In the validation direction (SharePoint to Identity), the connector strips off the configured prefix from the members. In the join engine, the corresponding accounts then are searched without domain name, only with the filter cn=account.
If you use both sites with and without user name prefix, it may be necessary that you must configure two SharePoint clusters: one for the use with user name prefix (and empty domainnameattribute), and one for the use for members with syntax domain\account (with domainnameattribute configured).
filterblocksize - the maximum number of account names in one search filter. The account name-to-user mapping is performed via LDAP searches in DirX Identity. This attribute adjusts the maximum number of account names that are combined in one search filter.
Groups
Direction: Identity Store → SharePoint
GC - com.siemens.dxm.join.userhook.sharepoint.UserHookGroupsTo
This user hook performs the following mapping functions:
-
The group member DNs are converted to the target account names by searching the accounts in the peer target system according to their dxrUserLinks. The references member DN to domainname\account name are extracted from the accounts.
-
If the owner DN points to a user, it is converted to domainname\account by the same mechanism. If it is a group, the group name is extracted.
Export Section
-
This section contains the search filter to export all SharePoint groups of one site. In the future, other object types (beside groups) may be handled, so an object class Group is introduced here.
Mapping Section
The DirX Identity to SharePoint mapping is:
Identifier - the identifier is created in a Java mapping function. It contains the group’s cn.
objectClass - set to the fixed value "Group"
groupName - the cn of the group.
ownerIdentifier - a Java source mapping that performs the following mapping:
-
If a value for owner is present in the source entry, this valued is returned in the map result.
-
Otherwise, the value for default_owner_type is read from the environment and returned in the map result.
-
If none of the above is present, the ownerIdentifier is not deleted for a modify group operation; the old value is kept instead. For an add operation, the group creation will fail, because the ownerIdentifier attribute in SharePoint is mandatory.
ownerType - a Java source mapping that performs the following mapping:
-
If a value for owner is present in the source entry, this value is returned in the map result.
-
Otherwise, the value for default_owner_identifier is read from the environment and returned in the map result.
role - in the sample workflow, dxrHistoryRemoved holds the SharePoint role names. It is directly mapped to the sharePoint role attribute. You must choose your own attribute here if you intend to provision role names.
description - direct mapping to the same attribute.
defaultUserLoginName - a Java source mapping that performs the following mapping:
-
If a value for owner is present in the source entry and the owner is a user, this value is returned in the result.
-
Otherwise, the value for default_userloginname is read from the environment and returned in the result.
Operational Mapping Section
-
The remote members of the group are mapped to the operational attribute "localMember". This mechanism preserves local members so that they are not deleted in SharePoint.
Join Section
-
The join filter matches the group’s cn in DirX Identity against its SharePoint group name.
Direction: SharePoint → Identity Store
GI - com.siemens.dxm.join.userhook.sharepoint.UserHookGroupsFrom
This user hook performs the following mapping functions:
-
The target account names are converted to user DNs. Through the domainnameattribute and the accountnameattribute in the connected directory configuration, the account is searched in the peer target system. If found, the dxrUserLink attribute if populated holds the related user DN. If no DN is found for an account name, the member is mapped to "remotemember".
-
The owner identifier is converted to a user or a group DN. If no DN is found, the owner is mapped to "remoteowner".
Export Section
-
The export section defines the search filter to export all groups of a SharePoint target system. As the search base role_ts_group_base is used, it is defined in the DirX Identity target system configuration (Base DN in the Environment Properties tab).
Mapping Section
The SharePoint to DirX Identity mapping is:
Identifier - the identifier is created in a Java mapping function. If a joinedId already exists, this value is used. In a validation workflow, the group’s DN is built from the SharePoint groupName and the role_ts_group_base configured at the corresponding DirX Identity target system.
objectClass - defines the object classes required for a target system group.
description - direct mapping from the description in SharePoint.
ownerType - the type of the SharePoint owner is mapped to dxrDefaultGroupType in the sample. You may need to change this mapping if you use dxrDefaultGroupType for other purposes.
owner - the owner is mapped from the ownerIdentifier. Note that the user hook runs prior to the mapping and thus the ownerIdentifier is already a DN here.
cn - the group’s common name is filled with the SharePoint groupName.
dxrHistoryRemoved - this attribute is used to hold the SharePoint role names in the sample workflow. You should change this to another attribute if you intend to provision the roles.
dxrState, dxrTSState, dxrTSLocal and dxrToDo - the standard mapping as, for example, in the LDAP-to-LDAP workflows is used here, too.
Join Section
-
The group is joined in DirX Identity by its DN created in the mapping section.
Member Channel
The member channel configuration holds the mapping of the group members.
Direction: Identity Store → SharePoint
-
The mapping of the member attribute is handled in a special Java mapping function. It was copied from the LDAP-to-LDAP workflow.
Direction: SharePoint → Identity Store
Mapping Section
The DirX Identity to SharePoint mapping is:
dxrGroupMember attributes - the mapping of the member state attributes is standard for most attributes. Only dxrGroupMemberRemote and uniqueMember are mapped with special Java functions.
dxrGroupMemberRemote - before the mapping, remotemember contains all SharePoint user names that cannot be mapped to a DirX Identity user. This situation occurs if the Windows account is not managed in a peer target system. The Java mapping function maps remotemember to dxrGroupMemberRemote. If no remotemember exists, dxrGroupMemberRemote is deleted.
uniqueMember - in a target system without accounts but with states, uniqueMember must contain all users referencing the group. Once the user is removed from all group members, it is also removed from uniqueMember.
Unify Office Workflows
The Unify Office Provisioning workflows operate between a target system of type Unify Office in the Identity Store and the corresponding connected Unify Office endpoint.
The workflows use the Unify Office connector (UnifyOfficeConnector) for provisioning. This connector communicates with the Unify Office (RingCentral) endpoint using RESTful API with JSON requests.
The connector uses the Unify Office (RingCentral) OAuth server for authentication and authorization.
The Unify Office workflows handle the following Unify Office objects:
-
Account - the common Unify Office (RingCentral) user (SCIMv2 conformant, translates to RingCentral extension object).
The delivered workflows include:
-
Validate_UnifyOffice_Realtime - the validation workflow that imports existing Unify Office users from Unify Office (RingCentral) server to the Identity Store.
-
Ident_UnifyOffice_Realtime - the synchronization workflow that exports detected changes for account from Identity Store to the Unify Office (RingCentral) endpoint and then validates the processed changes in Unify Office (RingCentral) endpoint to the Identity Store.
The following figure illustrates the Unify Office (RingCentral) Provisioning workflow architecture.
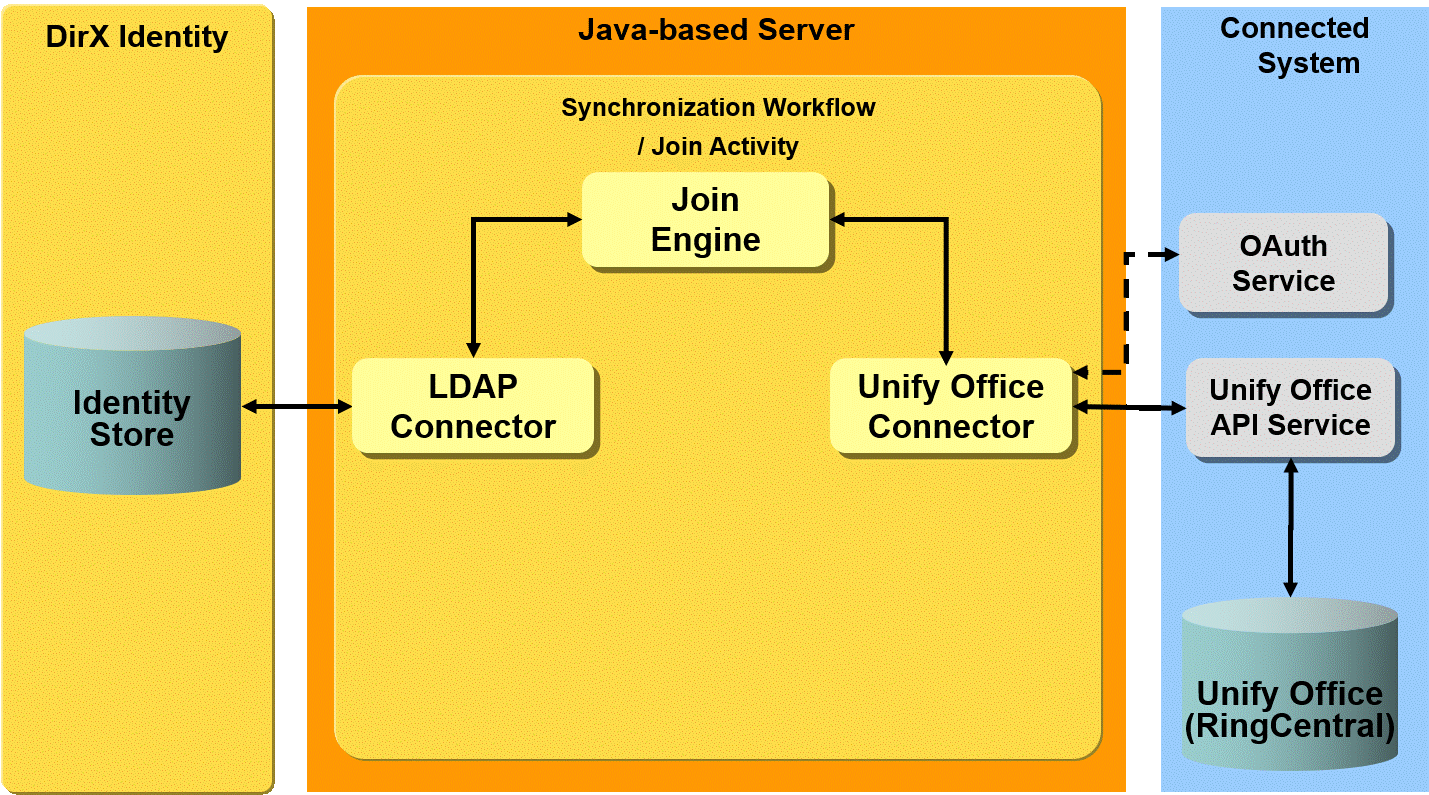
Prerequisites and Limitations
The Unify Office Provisioning workflows only offer channels for the SCIM objects and attributes provided by the appropriate RingCentral API endpoint. The Unify Office Connector supports other objects as well, but since these are specific for voice telephony they are out of scope.
Connecting to Unify Office
Verify that services are correctly configured at the Unify Office connected directory. The Unify Office Service referenced by the connected directory should contain the default value platform.devtest.ringcentral.com with SSL enabled. This platform connects to the sandbox account; for production, it must be changed to platform.ringcentral.com.
The Unify Office connected directory and Provisioning workflows support the central HTTP proxy server configuration. See the section “HTTP Proxy Server Configuration” for details.
DirX Identity must be registered as a valid principal service for your existing Unify Office tenant (account). Use the Unify Office (RingCentral) developer portal https://developers.ringcentral.com/ to create your app and generate your client ID and client secret.
Configure the bind profile for the Admin User when you plan to use the Resource Owner Password Flow and configure the bind profile for client authentication with the generated client ID and Client Secret field from your generated app.
Check the Provisioning settings used by the connected directory and then set them to the real values for your provisioned target system.
Configuring the Unify Office Target System
The Unify Office target system requires the following layout:
-
Accounts - all Unify Office accounts are located in a subfolder Accounts.
The dxrPrimaryKey attribute of accounts contains the unique ID generated by the Unify Office (RingCentral) endpoint.
Workflow and Activities
The following figure shows the layout of the channels that are used by the join activity:
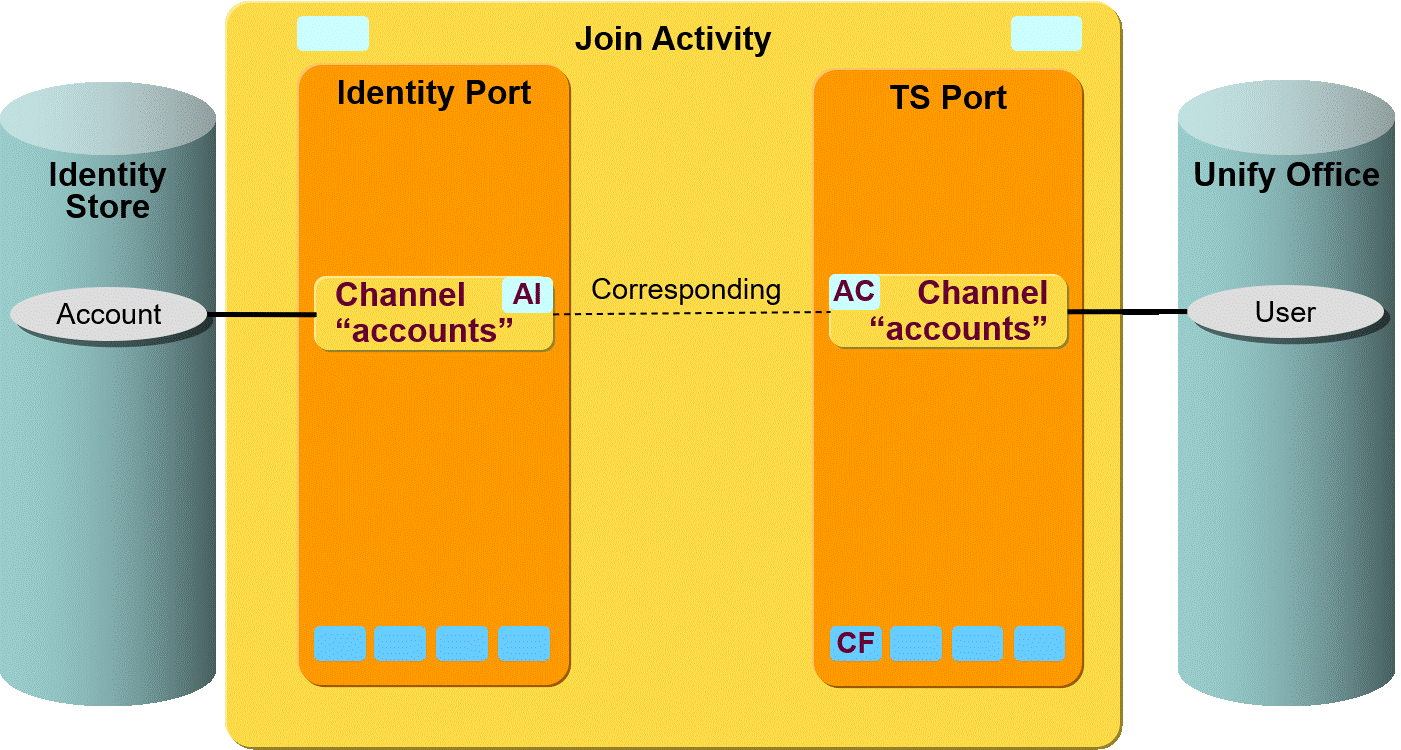
The Unify Office objects are synchronized via a pair of channels (one channel per direction).
Workflow Ports
This section describes the Unify Office workflow ports.
TS Port
-
CF - Crypt Filter
A connector filter is configured implicitly. It is used to send decrypted passwords to the Unify Office endpoint.
Workflow Channels
This section provides information about Unify Office workflow channels.
Accounts
Direction: Identity Store → Unify Office:
-
ID: dxrPrimaryKey
-
Join: ${source.dxrPrimaryKey} or userName=${target.userName}
-
accountEnabled - the attribute used to disable the account object in Unify Office. The correct value is derived from the dxrState attribute of the corresponding account object in the Identity Store.
Direction: Unify Office → Identity Store
-
ID: "cn="${source.userName}","+${env.role_ts_account_base} or ${joinedEntry.id}
-
Join: ${target.dxrPrimaryKey} or ${target.dxrName} or ${target.id}.
-
dxrTSState - the attribute used to detect the current state of the account in Unify Office. The correct value is derived from the accountEnabled attribute of the corresponding account object in Unify Office. It is set to DELETED when no account entry is found.
UNIX-OpenICF Workflows
The UNIX-OpenICF Provisioning workflows operate between a target system of type OpenICF in the Identity Store and the corresponding connected OpenICF connector server which is configured for communication with a UNIX (Linux) system using the OpenICF connector bundle org.forgerock.openicf.connectors.solaris-connector (UNIX connector).
The following figure illustrates the OpenICF connector server architecture.
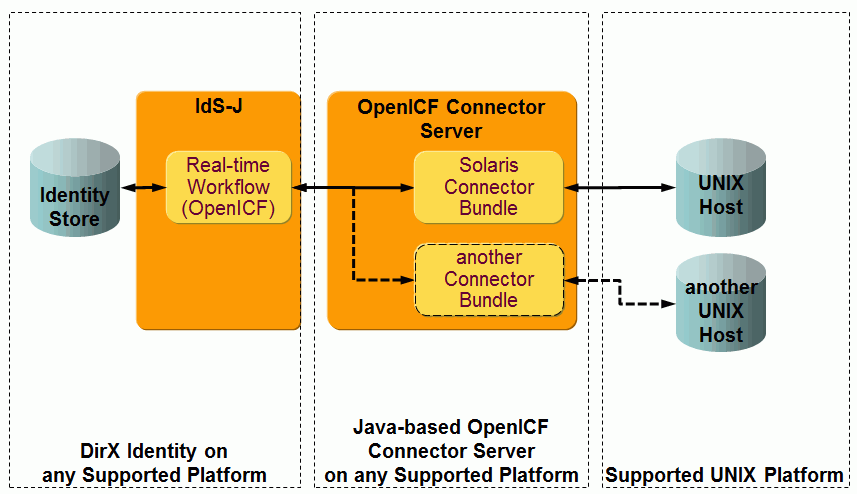
As shown in the figure, the Java OpenICF connector sends a request to an OpenICF connector server which runs on a supported platform. Note that single an OpenICF server may support more connector bundles at the same time. The OpenICF server passes the request to the UNIX connector bundle. The bundle then establishes a SSH or telnet connection to a configured UNIX host and executes the necessary scripts. It is possible to provision more UNIX hosts using the single OpenICF connector server.
The workflows use the specially preconfigured DirX Identity OpenICF connector for UNIX provisioning (OpenIcfConnector2Unix). This connector communicates with the OpenICF connector server using the special OpenICF protocol. See the section "OpenICF Connector" in the DirX Identity Connectivity Reference for more details. The following figure illustrates the UNIX-OpenICF Provisioning workflow architecture.
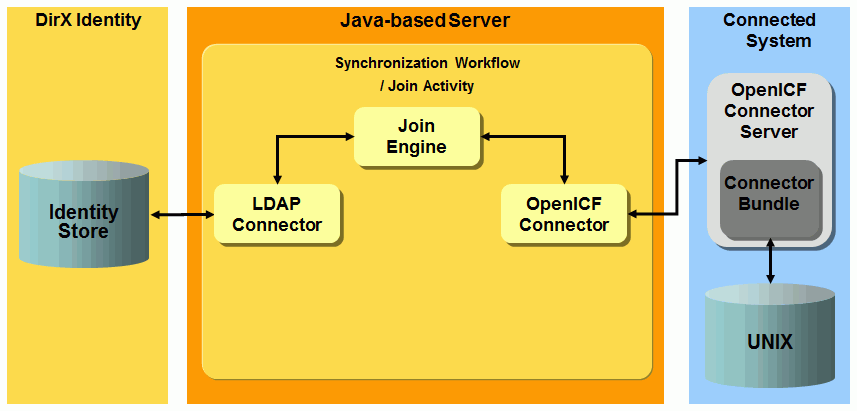
The workflows handle the following UNIX objects:
Account - the common UNIX accounts.
Group - the common UNIX groups.
The delivered workflows are:
-
Ident_UNIX-OICF_Realtime - the synchronization workflow that exports detected changes for account and group objects from Identity Store to the UNIX system and then validates the processed changes in the UNIX system to the Identity Store.
-
SetPassword in UNIX-OICF - the workflow that sets the password for the account in the UNIX system.
-
Validate_UNIX-OICF_Realtime - the validation workflow that imports existing UNIX accounts and groups with group assignments from the UNIX system to the Identity Store.
UNIX-OpenICF Prerequisites and Limitations
The UNIX-OpenICF workflows have the following prerequisites and limitations:
-
The delivered workflows require a properly deployed OpenICF connector server with a supported version of org.forgerock.openicf.connectors.solaris-connector (UNIX connector). DirX Identity delivers an enhanced version of this bundle based on version 1.1.1.0-SNAPSHOT.
-
Some SUSE Enterprise Server distributions may not be able to completely remove secondary group assignments for a user. The OpenICF UNIX connector uses the common UNIX command usermod -G "" account_name. This command might not work correctly on SUSE distributions. In this case, deprecated secondary group assignments will remain unassigned.
-
Before you can use the workflows, you must extend the DirX Identity Store schema with UNIX-OpenICF target system-specific attributes and object classes so that the workflows can store UNIX-OpenICF-specific information in the Identity Store. For instructions, see the section "Extending the Schema for the Target System Workflows". When performing the procedures described in this section, select the extensions for PAM-UNIX and UNIX.
Connecting to the UNIX System
Building the connection to the UNIX system consists of two steps:
-
Installing and configuring the Java-based OpenICF connector server
-
Configuring the connection to the OpenICF connector server
Setting up the Java-based OpenICF Connector Server
This section provides information on how to set up the Java-based OpenICF connector server.
OpenICF Server
Download a stable installation package for the Java OpenICF connector server on http://www.forgerock.org/openicf-archive.html. We recommend the version OpenICF Java 1.1.1.0 for compatibility reasons. Follow the installation instructions on http://openicf.forgerock.org/connector-framework-internal/connector_server.html. Configure the OpenICF server port, shared secret and create host certificates if you intend to use SSL.
OpenICF UNIX Connector Bundle
Deploy the delivered improved version of the UNIX connector bundle to your OpenICF connector server installation directory. After you have installed the feature for OpenICF connectivity, you can find the UNIX connector in the folder install_path/connectors/OpenICF/bundles/java (the file name is in the form solaris-connector-.jar*). Copy the file to the openicf_install_path*/bundles* directory. If there is an older version of the file solaris-connector-.jar* in this folder, delete it. The configuration of the connector bundle does not require any special steps.
Configuring the Connection to the OpenICF Connector Server
To configure the connection to a UNIX system using an OpenICF connector server:
-
Specify the IP address or the host name and the data port of the OpenICF connector server with the deployed UnixConnector bundle. Adapt the bind profile for the OpenICF server - set the password that is configured as a shared secret with the OpenICF connector server and enable SSL if it is enabled on the OpenICF server side. Using SSL may require additional configuration steps. See the section "OpenICF Connector" in the DirX Identity Connectivity Reference for more details. All of these properties can be configured using the connected directory (Generic connected directory type) that represents the OpenICF server. It is referenced from the connected directory that represents the UNIX system (the OpenICF Server and OpenICF Server Bind Profile property on the OpenICF Connector Server tab).
-
Specify the IP address or the host name of the UNIX system at the UNIX-OpenICF service object and then set the bind profile properly. UNIX-OpenICF connected directory represents a real UNIX system that will be provisioned by our workflows. Use the correct port numbers that are configured on the UNIX host for the desired type of communication (SSH or telnet). Use credentials with sufficient access rights (UNIX account and group management).
-
Specify the Response Timeout property on the OpenICF Connector Server tab of the UNIX-OpenICF connected directory. Set the value that is sufficient for the selected bundle type (UnixConnector). The default value is 30.
-
Check the settings related to the OpenICF connector bundle at the TS port of the workflow object (OpenICF Connector Bundle tab). The Bundle Specification area allows you to define the Bundle Name (the default is org.forgerock.openicf.connectors.solaris-connector), Bundle Version (the default is 1.1.1.0-SNAPSHOT) and Class Name property (the default is org.identityconnectors.solaris.UNIXConnector). Only use values that are valid for a connector bundle deployed on the OpenICF connector server. Override default values if necessary. The Bundle Settings area lets you choose the Unix Mode (use linux for Linux flavors), Connection Type (use ssh or telnet) and set the Shell Prompt (use the string character that is displayed at the beginning of the UNIX command prompt for the connected user. The hash tag (#) sign is typically used for the root account.)
Configuring the UNIX-OpenICF Target System
The UNIX-OpenICF target system requires the following layout:
-
Accounts - all UNIX accounts are located in a subfolder Accounts.
-
Groups - all UNIX groups are located in a subfolder Groups.
The attributes uid, dxrName and dxrPrimaryKey of accounts contain the name (uid) of these objects in the connected UNIX system.
The standard JavaScript dxrNameForAccounts.js generates the attribute uid for the UNIX account.
The attributes dxrName and dxrPrimaryKey of groups contain the name (gid) of these objects in the connected UNIX system.
The attribute dxmUnixPrimaryGroup for the UNIX account (refers to the primary UNIX group of the account) is by default automatically chosen as one of the currently assigned UNIX groups. It uses the obligation mechanism (see group objects) and the UNIX-OpenICF specific JavaScript AccountPrimaryGroup.js. The JavaScript updates the dxmUnixPrimaryGroup when necessary. You can change the primary group manually at the account object.
The account object also stores the group membership and references the dxrPrimaryKey attribute of the group objects.
The workflows support disabling of the accounts. In this case, a special primary group needs to be assigned for a disabled account since the primary group membership is mandatory for UNIX systems. You can configure the name of the group that will be used solely for disabled accounts. See the UNIX-OpenICF tab of the target system instance and the property Group for disabled accounts. Create a real group in the connected UNIX system with no access rights with the corresponding name (gid).
UNIX-OpenICF Workflow and Activities
The following figure shows the layout of the channels that are used by the UNIX-OpenICF workflow’s join activity:
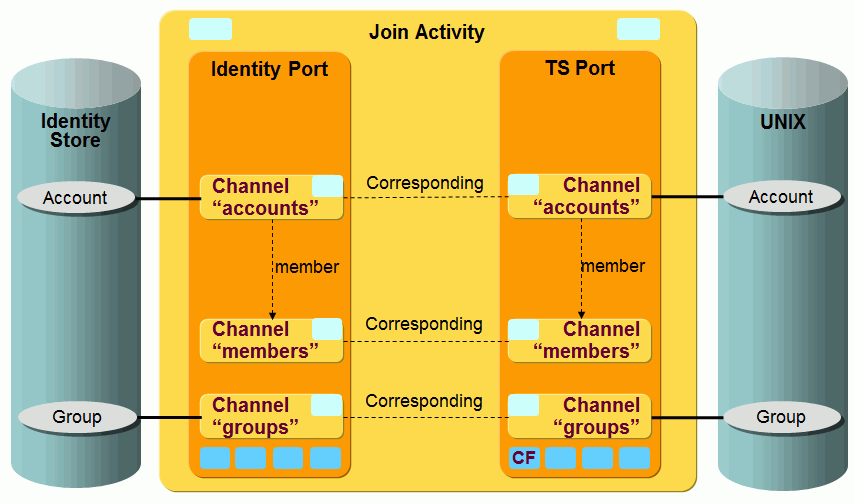
The UNIX objects account and group (and membership) are synchronized via a pair of channels (one channel per direction).
UNIX-OpenICF Workflow Ports
This section describes the UNIX-OpenICF workflow ports.
TS Port
-
CF - Crypt Filter
A UNIX-OpenICF filter is implicitly configured. It is used to send the decrypted password attribute PASSWORD to the OpenICF connector server.
UNIX-OpenICF Workflow Channels
This section provides information about UNIX-OpenICF workflow channels.
Common Aspects
Direction: Identity Store → UNIX-OpenICF
-
ENABLE - the attribute used for disabling the account in UNIX. The value is derived from dxrState attribute of the corresponding account object in DirX Identity.
-
secondary_group - the attribute for secondary UNIX group membership detects changes of primary group assignment and adds the deprecated primary membership to secondary UNIX groups if necessary. It also removes primary groups from the list of secondary (supplementary) groups.
Accounts
Direction: Identity Store → UNIX-OpenICF
-
ID: dxrPrimaryKey
-
Join: ${source.dxrPrimaryKey} or ${source.uidNumber}
-
The GROUPS attribute holds the name of the primary group.
Direction: UNIX-OpenICF → Identity Store
-
Join via the dxrName attribute that is mapped identically as the uid and dxrPrimaryKey attribute.
Groups
Direction: Identity Store → UNIX-OpenICF
-
ID: dxrPrimaryKey
-
Join: ${source.dxrPrimaryKey} or {source.gidNumber}
-
PostMapping script changes the type of the request to delete if necessary.
Direction: UNIX-OpenICF → Identity Store
-
Join via the dxrName attribute that is mapped identically as the dxrPrimaryKey attribute.
Understanding the Tcl-based Target System Workflows
The topics in this section provide configuration information about the Tcl-based target system (Provisioning) workflows, including:
-
The types of Provisioning workflows that exist for each target system
-
Object identification and group-to-account referencing
-
A summary of target system reference, join, and primary key attributes
For a description of the script structure used by the target system workflows, see "Understanding the Default Application Workflow Technology" > "Understanding Tcl-based Workflows" > "Tcl-based Connectivity Architecture" > "Provisioning Workflow Script Structure".
This section provides details about the Tcl-based default target system workflows, including:
-
HiPath workflow (Siemens) - describes details about the HDMS / HiPath 4000 Manager workflow
Note that the Siemens HiPath synchronization workflow does not work from a DirX Identity target system - it works from the user tree of the Identity Store. See the HiPath workflow section for more information. -
ODBC workflow - describes details about the ODBC workflow
-
RACF workflow (IBM) - describes details about the RACF workflow
-
SiPass workflow (Siemens) - describes details about the SiPass workflows
Target System Workflow Types
Each target system has a validation and a synchronization provisioning workflow.
You can run the validation workflow in one of two modes:
-
InitialLoad - exports all of the accounts and groups and the relationships between them from the target system and imports them into the relevant target system subtree in the Identity Store. It performs a full export of the target system and an import to DirX Identity in replace mode. This is the default mode.
-
Validation - detects deviations between the state known in DirX Identity and in the target system, for example about created or deleted accounts and groups or their relationships in the target system. It writes messages about the deviations it finds into the "to do" fields of the affected target system objects in the Identity Store. It does a full export of the target system and an import to DirX Identity in replace mode.
Initial load and validation modes use the same jobs and are almost identical. The only difference between them is the specific attribute mode of the workflow object, which is set to InitialLoad for the initial load workflow. The Provisioning common script checks this flag and writes the dxrToDo fields for a validation workflow run.
The synchronization workflow exports all relevant changes from the DirX Identity accounts and groups subtree, imports them into the target system and acknowledges the changes back to the Identity Store. It does a delta export in both directions and imports the data to DirX Identity in merge mode.
Both synchronization and validation workflows update the dxrTSState attribute and the group member attributes of the affected target system objects in the DirX Identity store with the state of the object in the target system.
Object Identification and Group-to-Account References
The Provisioning workflows for the default Connectivity scenario operate on both "hierarchical and "non-hierarchical" target systems. In a hierarchical target system, entries (typically, accounts and groups) are ordered hierarchically in trees; LDAP and ADS are examples of hierarchical target systems. A non-hierarchical target system has a "flat" ordering of entries; Windows is an example of a non-hierarchical target system. This section provides referencing and joining information about the hierarchical and non-hierarchical target system workflows provided with the default scenario.
Workflows for the Hierarchical Target Systems
This section provides general, referencing, and joining information for the ADS, Exchange, SAP EP UM, and LDAP hierarchical target system workflows.
General Information
The hierarchical workflows for the ADS, Exchange, SAP EP UM and LDAP target systems map the hierarchical tree structure of the target system to the DirX Identity target system accounts and groups subtree. They use the DirX Identity attribute dxrPrimaryKey for account and group objects to hold the target system DN of the object.
At the end of the initial load and validation workflows, the AccountRootInTs and GroupRootInTs parameters of the target system object in DirX Identity Provisioning are set to the values specified in DirX Identity Connectivity in the target system connected directory in the provisioning step. They define the account and group root distinguished name (DN) in the target system and are used in DirX Identity to create the dxrPrimaryKey attribute of an account or group object that is created in DirX Identity.
Referencing Information
The workflows for the target systems ADS, Exchange, LDAP and SAP EP UM use the dxrPrimaryKey attribute as the reference attribute from a group to an account. Because it holds the DN of the object in the target system, the DirX Identity group member attributes can be mapped directly to the target system member attribute and vice versa.
Joining Information
The Exchange and SAP EP UM workflows use the dxrPrimaryKey attribute for joining (identifying) a target system object with an object in the Identity Store.
The LDAP workflows use the employeeNumber attribute and the ADS workflows use the sAMAccountName attribute for joining. This usage has the advantage that objects that have been moved in the LDAP or ADS directory are identified in the Identity Store and can be moved there if the flag Rename Allowed is set in the import properties of metacp.
Workflows for the Non-Hierarchical Target Systems
This section provides information about referencing and joining for the Windows NT and ODBC non-hierarchical workflows.
Referencing and Joining
The NT and ODBC non-hierarchical workflows use the cn attribute as the reference attribute from groups to accounts. The ODBC workflows supply an ODBC unique identifier in the dxrPrimaryKey attribute and use it for joining in subsequent workflows. The Windows NT workflows do not use the dxrPrimaryKey attribute; instead, they use cn, which holds the Windows NT account name, for joining.
In the non-hierarchical workflows RACF and SAP R3 UM, the accounts contain the group member lists so that the groups are referenced from the accounts. This flag is set in the target system advanced page. The reference attribute of the RACF target system is the racfid of a group, and the reference attribute of the SAP R3 UM target system is the cn of a group. Neither of these target system workflows use the dxrPrimaryKey attribute. The RACF workflow uses the racfid for joining and the SAP R3 UM workflow uses sapUsername.
Target System Reference and Join Summary
The following table provides the reference attribute, reference direction, join attribute and dxrPrimaryKey for all of the target systems supported by DirX Identity.
| Reference Attribute | Reference Direction | Join Attribute | dxrPrimaryKey | |
|---|---|---|---|---|
ADS |
dxrPrimaryKey |
Group - Group |
sAMAccountName |
DN of TS object |
LDAP |
dxrPrimaryKey |
Group - Group |
employeeNumber |
DN of TS object |
LDAPXXL |
dxrPrimaryKey |
Account - Group |
employeeNumber |
DN of TS object |
ODBC |
cn |
Group - Group |
dxrPrimaryKey |
ODBC unique identifier |
JDBC |
cn |
Group - Group |
dxrPrimaryKey |
JDBC unique identifier |
Notes |
cn |
Group - Group |
cn (=LNfullName) |
not used |
RACF |
racfid |
Account - Account |
racfid |
not used |
SAPR3UM |
cn |
Account - Account |
sapUsername |
not used |
SAPEPUM |
uid |
Group - Group |
dxrPrimaryKey |
DN of TS object |
The reference direction indicates how the group memberships are stored in DirX Identity and in the target system. For example "Group - Group" indicates:
-
Identity Store: the memberships are stored in attributes that point from the groups to the accounts.
-
Target system database: the memberships are stored in attributes that point from the groups to the accounts.
The group-side storage does not work for very large numbers of group members. In a company with 500,000 employees, all might be in the group "Standard Employee" which resides in 500,000 attribute values in one group attribute. Target systems (for example, LDAP directories) cannot handle groups of any size.
If the memberships are stored on the account side, the limit is less critical because the number of groups of which a user can be a member will not be more than 10,000. This number can be handled by any LDAP server.
RACF Workflows
The DirX Identity RACF workflows provision a RACF target system. Two workflows are available:
-
RACF2Ident_Validation - performs initial load or validation from a RACF target system
-
Ident_RACF_Sync - synchronizes between the Identity Store and a RACF target system
The RACF workflows are based on the DirX Identity meta controller (metacp). They use the RACF LDAP interface via IBM’s SecureWay LDAP server. The workflows can support all object types and attribute types that are accessible via the RACF interface.
Before you can use the RACF workflows, you must extend the DirX Identity Store schema with RACF target system-specific attributes and object classes so that the workflows can store RACF-specific information in the Identity Store. For instructions, see the section "Extending the Schema for the Target System Workflows".
RACF contains a lot of subsystems that are not used at every customer site. DirX Identity only supports a basic set of subsystems. Others must be configured for a specific customer. The following subsystems are configured in the default applications:
-
TSO (Time Sharing Option) - basic configuration of users, groups, and so on
-
WORKATTR (Work Attributes) - additional attributes
-
OMVS (Open Edition MVS) - UNIX system for MVS, only used for FTP transfer (for all users, not specific for each user)
The following subsystems are not configured in the default applications:
-
CICS (Customer Information Control System) - tele-processing monitor for online transaction systems
-
DCE (Distributed Computing Environment) - distributed application handling
-
NETVIEW (Network Automation) - network monitoring and automation
-
OVM (Open Edition VM) - UNIX system for VM
-
OPAPAM - MCS console
-
LANGUAGE - nationalization
-
DFP (SMS Routine = System Managed Storage) - file management, pool sharing, disk management, profile management, disk space management.
Note: Due to capabilities that are missing from the RACF LDAP server, it is not possible to read or update the schema via LDAP with DirX Identity automatic schema retrieval.