Managing the Connectivity System
This chapter describes how to manage:
-
Administrative accounts
-
Connectivity security
-
Secure connections with SSL
-
File handling mechanisms
Managing Administrative Accounts
DirX Identity uses a set of accounts for normal operation.The following figure provides an overview of the most important accounts:
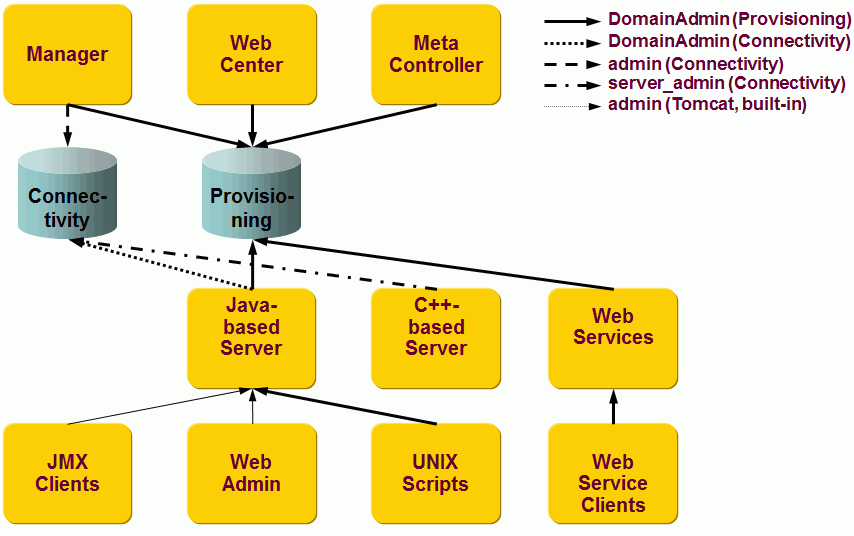
DirX Identity provides the following administrative accounts:
-
ANYONE (Provisioning, not shown in the figure) - an account used only for self registration because the user does not yet have an account.This account is used only by the Web Center and has very restricted access rights.
Its distinguished name is: cn=ANYONE,cn=*domain
If you change its password in the database, don’t forget to change it in Web Center’s *password.properties file, too. -
DomainAdmin (Provisioning) - the system account for a specific domain in your Provisioning configuration. It is used by many components like servers, services, agents, connectors and user interfaces.
Its distinguished name is: *cn=DomainAdmin,cn=*domain
The initial password is: (the value entered in Configuration Wizard) -
DomainAdmin (Connectivity) - the corresponding system account for a specific domain in your Connectivity configuration. This account must use the same password as the DomainAdmin account of the Provisioning configuration.
Its distinguished name is: cn=DomainAdmin,cn=*domain,*dxmC=Users,dxmC=DirXmetahub
The initial password is: (the value entered in Configuration Wizard for the DomainAdmin (Provisioning)) -
NoApprovalAdmin (Provisioning) - a special account that can be used by default for assignment of privileges without approval even if the privileges are flagged for approval. This account allows for defining privileges that must be approved manually. Services - especially the Policy Execution service - can use this account to assign privileges without approval.
Its distinguished name is: *cn=NoApprovalAdmin,cn=*domain
The initial password is: (the value entered in Configuration Wizard for the DomainAdmin (Provisioning)) -
SystemAdmin (Provisioning) - the system account for the system domain in your Provisioning Configuration. It is only used by the DirX Identity Manager to copy initial target system definitions from the System Domain to the Customer Domain.
Its distinguished name is: cn=SystemAdmin,cn=DirXmetaRole-SystemDomain
The initial password is: (the value entered in Configuration Wizard) -
admin (Connectivity) - an account that has full control over all parts of the Connectivity configuration. Used mainly by the DirX Identity Manager.
Its distinguished name is: cn=admin,dxmC=DirXmetahub
The initial password is: (the value entered in Configuration Wizard) -
server_admin (Connectivity) - a restricted account used only by the C-based server. It can read all parts of the configuration database but can only write C-based Server, job and status entry objects.
Its distinguished name is: cn=server_admin,dxmC=DirXmetahub
The initial password is: (the value entered in Configuration Wizard) -
admin (embedded Tomcat) - the standard pre-configured Tomcat administrative account to access the Java-based Server’s web interface. Note: this embedded Tomcat is not the Tomcat you use to run the Web Center or the Web Services.
The initial password is: wE3!dirx -
admin (ActiveMQ message broker) - the standard pre-configured ActiveMQ administrative account to access the ActiveMQ console.
The initial password is: wE3!dirx
You should change the passwords for these accounts immediately after you install the C++-based Server using DirX Identity Manager’s Data View. Alternatively, you can delete the accounts that you do not need (for example, the WriteAdmin and the ReadAdmin accounts). The next sections provide more information on how to change these passwords.
Changing the DomainAdmin Password (Provisioning)
Use any LDAP tool to change the password of this entry: cn=DomainAdmin,cn=domain
Set the identical password value for this entry: cn=DomainAdmin,cn=domain,dxmC=Users,dxmC=DirXmetahub
Set the identical password value for this entry: *cn=NoAppropalAdmin,cn=*domain
Now change or use the new password at these locations:
-
Inform all users of the DirX Identity Manager that use the DomainAdmin account that the password has changed.
-
Change the password for the Provisioning Services in the file install_path\provisioningServices\spmlv2\conf.xml
Note: you can find the related admin DN in the file install_path\provisioningServices\spmlv2\conf.xml -
Change the password for the Web Services in the relevant password file used by the Web Services instance. By default, this is install_path/web/instance/provisioningServlet-technical-domain-name/WEB-INF/password.properties. However, if you have configured this instance to use a different password file (with the passwordFile parameter in install_path/web/instance/provisioningServlet-technical-domain-name/WEB-INF/web.xml) then you need to change that password file. Restart the Tomcat. Note: you can find the related admin DN in the file install_path/web/instance/provisioningServlet-technical-domain-name/WEB-INF/config.xml.
-
Change the password of the Java-based server in the file install_path\ids-j-domain-Sn\private\password.properties
Restart the Java-based Server.
Note: you can find the related admin DN in the file install_path\ids-j-domain-Sn\bindprofiles\private\domain.xml -
Change the password for the Web Center in the file install_path\web\instances\webCenter-technical-domain-name\webCenter\WEB-INF\password.properties
Restart Tomcat.
Note: you can find the related admin DN in the file install_path\web\instances\webCenter-technical-domain-name\webCenter\WEB-INF\web.xml -
Change the password for the DirX Identity REST Service in the file install_path*/web/instances/DirXIdentityRestService-technical-domain-name/WEB-INF/password.properties*.
Restart Tomcat.
Note: you can find the related admin DN in the file install_path/web/instances/DirXIdentityRestService-technical-domain-name/WEB-INF/web.xml. -
If the LinkChecker or any scripts use the DomainAdmin as their account, change the password accordingly.
Changing the SystemAdmin Password (Provisioning)
It is not necessary to change this user’s password because it is only used during configuration.
Changing the Connectivity server_admin Password
Use any LDAP tool to change the password of this entry: cn=server_admin,dxmC=DirXmetahub.
Now change or use the new password at these locations:
-
Change the password of the C++-based server in the file install_path\server\conf\dxmmsssvr.ini
Restart the C++-based Server.you can find the related admin DN in the same file. -
If any scripts use server_admin as their account, change the password accordingly.
We recommend the following procedure to change the C++-based server’s server_admin password:
-
Disable all schedules (see the DirX Identity Manager online help for information on how to do this; for example, in the Expert View, right-click the (Central) Configuration object and then click the Scheduler tab. Now click Help).
-
Check that no workflows are currently running by using the Get Server State function on all servers in your DirX Identity Connectivity domain (see the DirX Identity Manager online help for information on how to do this).
-
Stop the DirX Identity IdS-C service (go to the local machines to stop the services).
-
Change the password in the directory (use the DirX Identity Manager’s Data View or the native tools for each of the directories.
-
Change the password entries in the C++-based server initialization file (dxmmsssvr.ini).
-
Restart the DirX Identity IdS-C service.
-
Re-enable the schedules (see the DirX Identity Manager online help for information on how to do this).
Changing the Connectivity admin Password
Use any LDAP tool to change the password of this entry: cn=admin,dxmC=DirXmetahub.
Now change or use the new password at these locations:
-
Inform all users of DirX Identity Manager that use the admin account that the password has changed.
-
If the LinkChecker or any scripts use admin as their account, change the password accordingly.
Changing the Embedded Tomcat admin Password
To change the password of the admin account of the embedded Tomcat:
-
Open a shell window and navigate to install_path*/ids-j-domain-S*n*/bin*.
-
Run the script dxidigest.bat or dxidigest.sh with the new password as an argument. The script will output the new password and its SHA-512 hash value. Password and hash are separated by a colon. For example:
abc-123:0e2f0e2699cacc7f46614a563c09c6d3be376e2e27117facade74810966ad011$1$9e3ee
7ba0899a66c1bde6adf89879365b249a42b7f772cb4b65e9d6fc848b231cd6eb0d4ef7762feeacec
1f239e69d25d6b9e908a6b0f8478a9f9393cb07ac9a
-
Check if the new password was correctly recognized by the script. Some special characters might need escaping when passing the password as argument to the script.
-
Navigate to install_path*/ids-j-domain-S*n*/tomcat/conf*.
-
Open the file tomcat-users.xml.
-
Copy the hash from the script output and set it as the password for the admin account.
<user name="admin"
password="0e2f0e2699cacc7f46614a563c09c6d3be376e2e27117facade74810966ad011$1$9e3ee
7ba0899a66c1bde6adf89879365b249a42b7f772cb4b65e9d6fc848b231cd6eb0d4ef7762feeacec
1f239e69d25d6b9e908a6b0f8478a9f9393cb07ac9a"
roles="admin,manager"/>
-
To ensure that only authorized administrators can modify this file, specify the correct access rights of the file.
-
Now change or use the new password at these locations.
-
Inform all users who use the Web Admin or any other JMX tool that uses the admin account that the password has changed.
Changing the ActiveMQ admin Password
To change the password of the admin account of the ActiveMQ message broker:
-
Open a shell window and navigate to install_path*/messagebroker/bin*.
-
Run the script dximqdigest.bat or dximqdigest.sh with the new password as an argument. The script will output the new password, the obfuscated password and its MD5 hash value. For example:
abc-123
OBF:1igd1igf1igh16yn1idp1idr1idt
MD5:6351623c8cef86fefabfa7da046fc619
-
Check if the new password was correctly recognized by the script. Some special characters might need escaping when passing the password as an argument to the script.
-
Navigate to install_path/messagebroker/conf.
-
Open the file jetty-realm.properties.
-
Copy the hash (including the MD5: prefix) from the script output and set it as password for the admin account, for example:
admin: MD5:3ad1e9e943bc3431553c0791aac83466, admin
-
To ensure that only authorized administrators can modify this file, specify the correct access rights of the file.
-
Now inform all users who use the ActiveMQ Console that the password has changed.
Managing Connectivity Security
This section discusses general security considerations and describes how to:
-
Secure different types of DirX Identity data
-
Manage data encryption
-
Set up audit signature
-
Generate a Personal Security Environment (PSE)
-
Manage anonymously readable attributes
-
Manage keys
Securing DirX Identity Data
By design, DirX Identity assumes that the machines themselves and all the running processes are protected by operating system-specific security features. The main security weakness is data transfer over the network. The sections in this topic discuss the security requirements for a number of different data types.
Securing Control Data
Control data consists of the messages sent by the C++-based Server components via the messaging service to start, check, and stop processes. Because the server can only start completely configured workflows, there is no opportunity to change any of the configuration data (for example an account, a password, or any other configuration parameter). Consequently, securing this channel is not necessary.
Securing Password Changes
Password change data is critical data that should be protected throughout the entire system. Password data is encrypted and only transferred in encrypted form up to the target system interfaces where it is required to be available in clear text form.
Use client-side SSL connections for the messaging service. See the DirX Identity Installation Guide for the setup procedure.
Secure the channels to your target systems that transfer password data in clear text form. See "Securing Data to be Synchronized" for more information.
Securing Configuration Data
Configuration data is the data that is transferred via LDAP while editing with the DirX Identity Manager. Part of this data is also transferred via LDAP before a workflow or an activity is started. Configuration data is very important and must therefore be handled securely. Connect the C++-based Server via SSL with the configuration database to guarantee secure editing and secure data transfer before a workflow or an activity starts.
Securing Administrative Passwords
DirX Identity agents need bind profiles (username and password) to authenticate to a specific target connected directory. These passwords are very important because they allow you to change a lot of administrative data at the target system side. As a result, administrative passwords must be highly secure. Use the DirX Identity data encryption mechanism to secure these bind profile passwords. See the topic "Managing Data Encryption" for more information.
Securing Data to be Synchronized
The category "data to be synchronized" includes data itself and the interfaces used to transfer the data. Use the DirX Identity data encryption mechanism to secure very important data, such as selected attributes. See the topic "Understanding Data Encryption" for more information.
Data interfaces to be secured include:
-
LDAP connections. Use SSL to secure LDAP connections. See the chapter "Establishing Secure Connections with SSL" for more information.
-
JMS messaging connections. Use SSL to secure this type of connection. See the chapter "Establishing Secure Connections with SSL" for more information.
-
HTTP connections. Use SSL to secure HTTP connections. See the chapter "Establishing Secure Connections with SSL" for more information.
-
Files. Files are often used to transfer data between agents. DirX Identity provides two mechanisms to transfer files between different machines:
-
The file transfer service, which copies data by default via the message service channels. You can secure this connection if you switch on encryption. DirX Identity Manager also uses the file transfer service to allow you to view files from the status areas of other machines. Note that you can use the Copy to Status Area flag in the file item object to determine whether critical files are stored in the status area. You can also force DirX Identity to delete these files from the work area if possible (see the Save Mode flag in the file item object).
-
Shared file systems, for fast file transfer. This connection can only be secured with operating system features.
-
Target system APIs. The security of these interfaces used by agents is highly dependent on the capabilities of the interface and whether these features are usable through the agent. For more information, refer to the target system documentation or the DirX Identity Connectivity Reference.
Managing Data Encryption
This section describes the mechanisms that DirX Identity provides for enabling encrypted data synchronization. DirX Identity allows you to secure the DirX Identity environment and to establish data security, especially password synchronization. DirX Identity can also protect a specific set of attributes via attribute encryption. See the section "Securing DirX Identity Data" for more general considerations.
How DirX Identity Data Encryption Works
Directories today permit the storage of passwords in the userPassword attribute either in clear text or one-way encrypted. If you want a secure system, clear text storage is not an option. Choosing one-way encryption no longer permits reading the password. One-way encrypted passwords can only be used for applications that use the directory for authentication. The application delivers the clear text password over an SSL-secured connection to the directory. The directory server encrypts it again and checks it against the stored userPassword value. It then notifies the application whether the comparison was successful, which means that the password is correct.
All target systems force DirX Identity to provide clear text passwords to authenticate. Passwords for accounts must also be set in clear text format. The target system stores the values in encrypted format. As a result, DirX Identity cannot use the userPassword attribute for password encryption. To enable this kind of functionality, an additional attribute for each user or administrator entry is necessary - dxmPassword - that holds the password in two-way encrypted format.
This method requires that all clients that handle passwords be able to set or update both userPassword and dxmPassword attributes synchronously. To perform this task correctly, the user must authenticate against the directory with the existing password (based on the one-way encrypted userPassword). When the user enters the new password, the client reads the public key from the directory and encrypts the new password value delivered from the user. Now it can set both values in the directory: a replace operation sets the new one-way encrypted userPassword and another replace operation sets the dxmPassword in encrypted format. We assume that all these tasks are performed via secure SSL connections. Otherwise, clear text passwords would be visible in the network. The following figure illustrates DirX Identity secure password synchronization.
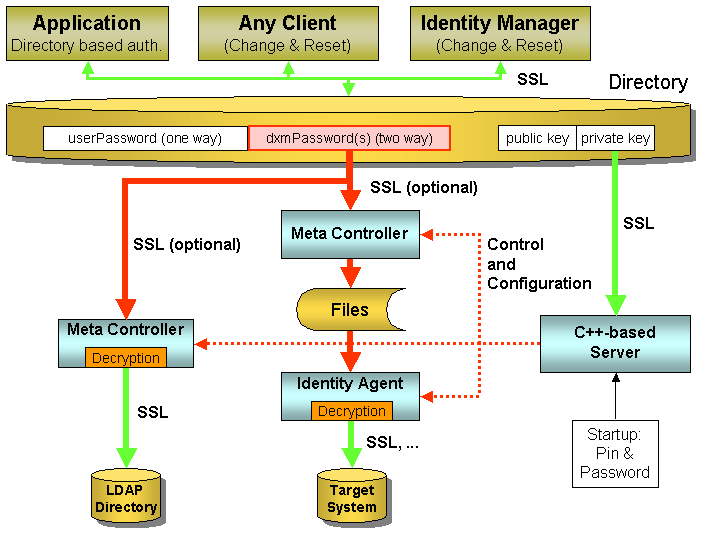
In the figure, three clients are shown:
-
Any Client - any client that is able to handle the password synchronization procedure just described can be used to set and maintain password attributes. These clients read the public key, and can be part of a self-service scenario, where users change their passwords regularly or reset their passwords based on additional questions when they have forgotten their password. Alternatively, the password reset can be performed by an administrator that uses a similar client. Note: These clients are not part of the DirX Identity tool suite.
-
DirX Identity Manager - DirX Identity provides a password dialog for bind profiles that uses the public key to set and maintain the administrative passwords. Because administrative passwords must be set consistently in the target system and in the corresponding bind profile, there is no built-in protection against changing passwords. If a password is changed on only one side, the corresponding workflow will no longer run. Thus, there is no security risk.
-
Application - any application that uses the directory for authentication. This application only provides the clear text password to authenticate against the directory. Reading the public key is not necessary.
If the dxmPassword fields in the directory are correctly set and encrypted, the C++-based Server can use them. The server must be set up correctly for encryption and the correct server_admin password and the PIN for decryption must be entered correctly during startup. The C++-based Server can read the private key from the directory. When starting workflows, several things happen:
-
It processes the configuration files that still contain encrypted passwords as part of the bind information.
-
It starts the agent and moves all information necessary for decryption over a secure connection to it.
-
The agent is now able to decrypt the bind password and to authenticate against the source and target connected directories.
-
Additionally, the agent can decrypt any encrypted attributes (mainly dxmPassword but also any other attributes) if this is the agent that handles the target connected directory API. It can store the decrypted values into the target system.
As you can see in the figure, encrypted information is transferred from the directory in encrypted format up to the last possible point: the target API. Because information is again readable in clear text format here, a secure connection like SSL must be used. See the DirX Identity Connectivity Reference or the DirX Identity Meta Controller Reference for details on how to set up SSL connections.
There are two basic uses of the encryption feature:
-
Encryption of administrative passwords only (the bind passwords)
-
Encryption of administrative passwords and user passwords or other attributes.
| It is not possible to encrypt attributes but not encrypt the administrative passwords. From a security standpoint, this does not make any sense. |
Handling Specific Encryption Requirements
DirX Identity provides additional features to handle specific encryption requirements:
-
You can disable the encryption feature for agents that are unable to perform decryption (especially agents integrated into DirX Identity with the Agent Integration Kit). Use the Disable Encryption switch in the corresponding bind profile. When disabling encryption for an agent, you should ensure that no attribute in the attribute configuration object for the agent is marked in the E column (encryption column).
-
You can use DirX Identity routines for key management, if security has been compromised, or you want to exchange your key pair and certificate.
-
You can set up all file transfers in encrypted mode. In DirX Identity Manager, click Configuration → Messaging Services → Message Service, then set Encryption Mode to Encrypted.
-
You can use the data encryption feature to set up a password synchronization scenario. This task requires additional components that are not part of the DirX Identity delivery as previously mentioned, such as clients for user self-service, eventually clients for administrator password reset, and workflows or other mechanisms that detect "old" passwords and notify the user, for example, by e-mail to update the password in the directory. In this scenario, users should not change their passwords directly in the target system. Therefore, it makes sense to disable most of the password policies in the target systems and to use common policies in the directory instead. It also makes sense to build extra workflows that run very frequently to update changed passwords in the target systems or to use the different changelog features of the various directories to trigger password update workflows.
You cannot synchronize the account that is used as administrative bind (the bind profile for the target system). In future versions of DirX Identity, the agents will generate one-time passwords that are written to the target system and the bind profile in the configuration database in parallel. This method raises the security level.
Setting up Data Encryption
Perform the following steps to set up encryption for administrative passwords or data attributes. Steps that are only necessary for the encryption of data attributes are indicated by the notation "data encryption only".
-
Set up a secure directory server. Set up your directory server so that it handles the userPassword attribute securely (via one-way encryption). Define the required password policies. Refer to your directory vendor’s documentation for more information about these tasks. Note that the security mechanisms for the directory server are completely independent of DirX Identity. If you do not follow this procedure, passwords are stored in clear text in the directory and state-of-the-art security policies are not used.
-
Generate a personal security environment (PSE). Generate the RSA key pair (public/private) and user certificate and store them in the cn=server_admin,dxmC=DirXmetahub entry in the configuration database.
-
Disable scheduling and wait for workflows that have not completed. Use the Disable Scheduling and Get Server State functions in the DirX Identity Manager to perform these tasks.
-
Extend the user data schema (data encryption only). If user data attributes are to be encrypted, you must extend the user database schema to include the additional attributes (for example, dxmPassword and optionally dxmOldPassword when user passwords must be handled).
-
Extend or create workflows for encrypted synchronization (data encryption only). Extend existing workflows or create new workflows to synchronize the encrypted attributes.
-
Enable encrypted synchronization. Click the (Central) Configuration object in the DirX Identity Manager Expert View, then click the Server tab. Select either Administrative Passwords Only or Attributes and Administrative Passwords (data encryption only).
-
Initially encrypt administrative passwords. All administrative passwords must be initially encrypted. To perform this task, you can use the change password dialog for the bind profiles in the DirX Identity Manager or run the meta controller’s metacp encryptdata operation. The metacp encryptdata operation takes all current dxmPassword values, encrypts them and stores them in the dxmPassword and dxmOldPassword attributes. The command also sets the userPassword attribute.
-
Initially encrypt data attributes. All data attributes (for example, the dxmPassword attribute or other attributes you have selected for encryption) must be encrypted if any values are already in the directory. To perform this task, run the metacp encryptdata operation. The operation takes the defined attributes, encrypts them and writes them back into the directory. If you want to set up user passwords and the userPassword values are already one-way encrypted, only a default value can be stored in the dxmPassword attribute. This default is then later synchronized into the target systems and forces the user to change his password (Note: this mechanism does not work for target systems where the synchronization needs the old password to change the password, for example RACF).
-
Configure all C++-based Servers. Set the encryptionMode switch in the dxmmsssvr.ini file to 1 to run the server in a secure mode. Set the pin in the install_path*/ssl/password.properties* file. The server will encrypt the pin in the file during the next start.
-
Configure SSL for all DirX Identity Managers.
-
Configure SSL for all Java-based Servers. Like the C++-based Server, the pin is read from the install_path*/ssl/password.properties* file.
-
Start the C++-based and Java-based Servers.
-
Test your workflows. Start all workflows by hand and check that everything works correctly.
-
Enable scheduling - Normal system operation.
The next sections provide more details about these steps.
Extending/Creating Workflows for Encrypted Synchronization
To configure a synchronization (workflow) for encryption:
-
Define the mapping for the attribute(s) as usual. For example, suppose you want to transfer user passwords to the Windows NT connected directory. Set up a mapping that maps the dxmPassword to the dxmNTuserPassword.
-
Flag all attributes to be decrypted in the E column of the Attribute Configuration Editor. Note: this is only necessary for the attribute configuration that defines the target API. For example, flag the dxmNTuserPassword attribute in the attribute configuration of the Windows NT connected directory.
-
Ensure that the connection to your target system is secure. For example, use SSL for LDAP connections and Kerberos for the connection to the Active Directory.
Initially Encrypting Administrative Passwords
You can initially encrypt administrative passwords with DirX Identity Manager or with the encryption tool available on the DirX Identity DVD.
You can use the DirX Identity Manager to encrypt each password individually. To encrypt the admin password in the Identity Store, perform these steps:
-
Click Global View.
-
Right-click the Identity Store connected directory icon and then select Configure from the context menu.
-
Click the Bind Profiles step in the wizard.
-
Select UserAdmin and open it.
-
In Password, click
 .
. -
Enter the old and new passwords and then click OK.
Alternatively, you can use the encryption tool on the DirX Identity DVD. Note that this tool is not installed automatically. To use the tool:
-
Save the configuration database (stop all running workflows and disable all schedules).
-
Change to the directory DirXIdentity → EncryptionTool on the DirX Identity DVD.
-
Copy the complete directory to your computer.
-
Check the settings (server_address and user_pwd (of user “cn=admin,dxmC=DirXmetahub”)) in the Tcl file encrypt.tcl.
-
Set the variable bind_profiles to TRUE to encrypt bind_profiles.
-
Run metacp encrypt.tcl from the directory you to which you copied the files.
-
Check the result in the trace file tracefile.txt.
The encryption tool uses the public key in the directory and encrypts the requested fields that are either in clear text or scrambled format.
| You can run the encryption tool several times. |
Initially Encrypting Attributes
Use the encryption tool on the DirX Identity DVD to initially encrypt data attributes. Note that this tool is only available on the DirX Identity DVD and is not installed automatically. To use the tool:
-
Save the configuration database (stop all running workflows and disable all schedules).
-
Change to the directory EncryptionTool on the DirX Identity DVD.
-
Copy the complete directory to your computer.
-
Check the settings (Server_address, User_name, User_pwd, base_obj, subset, filter, and ldap_attr_list) in the Tcl file encrypt.tcl. (Please note the exact spelling of Server_address, User_name and User_pwd (initial capitalized) in the section for encryption of user data.)
-
Set the variable bind_profiles to FALSE to encrypt user data.
-
Run metacp encrypt.tcl from the directory to which you copied the files.
-
Check the result in the trace file tracefile.txt
The encryption tool uses the public key in the directory and encrypts the requested fields that are either in clear text or scrambled format.
| You can run the encryption tool several times. |
Setting up Audit Signature
Perform the following steps to set up digital signature for auditing. Note that you can run auditing without signature (this speeds up server operation).
-
Generate a personal security environment (PSE). Generate the RSA key pair (public/private) and user certificate and store them in the cn=DomainAdmin,cn=mydomain,dxmC=Users,dxmC=DirXmetahub entry in the configuration database.
-
Set the auditing switches at the password and provisioning real-time workflow activities that shall perform auditing in the connectivity configuration database.
-
Set the auditing switches for the service layer and request workflows if you want auditing for these services at the Domain Configuration object in the Provisioning configuration database (see the DirX Identity Provisioning Administration Guide or the online help for more information).
-
Set the signaturePin value in the file install_path\ids-j-domain-Sn\private\password.properties.
-
(Re-)start the Java-based Servers.
-
Test auditing. Check that auditing works correctly for all audit-enabled services.
|
Generating a Personal Security Environment (PSE)
You use the dirxgenpse tool to generate a personal security environment (PSE). On Windows systems, you run this tool from the command prompt window.
| The dirxgenpse tool is only available on the DirX Identity DVD. It is not installed automatically. Copy it from the DVD to the directory install_path*/bin*. |
| Do not use the dirxgenpse version from the DirX Directory server delivery! It does not work. |
dirxgenpse [-options]
Options are:
-
-D DN - specifies the distinguished name (DN) of the keyOwner directory entry (mandatory)
-
-P PSE-PIN - specifies the PSE protection passphrase (mandatory)
-
-s serial - specifies the serial number of the certificate (mandatory for the first key pair; if omitted, it is set to the next higher value)
-
-l keylen - specifies the length of the RSA key in bits (default is 1024)
-
-O - runs the tool in off-line mode (the default is online)
-
-h host - specifies the host name of the LDAP server (default is localhost)
-
-p port - specifies the LDAP port of the LDAP server (default is 389)
-
-w pwd - specifies the password of the keyOwner directory entry (optional)
-
-t secpath - specifies the path to the cert8.db file for SSL/TLS security (default is none)
-
-e expiry - specifies the expiration period in days (default is 1826)
-
-o file - specifies the filename of the PSE files to be created (optional)
-
-v - runs the tool in verbose mode (default is no verbose)
| You must supply the distinguished name (DN) of the keyOwner and a PSE Protection PIN. |
There is a conflict between an internally-used private key and using the key version number 00000001 for a customer’s private key. This conflict is relevant for the data encryption case. Therefore, if you start using encryption, you must start with a serial number 2 (00000002) by using the -s serial option. You don’t need to use this option for subsequent generate operations because the next free number is chosen automatically.
If you already have at least one private key with a serial number 00000001 in the PSE attribute you must resolve the conflict by migrating to a new private key; you cannot have any private key with serial number 00000001. Even if you have a current private key with serial number 00000002 but a previous private key with serial number 00000001, you must generate a new private key.
If you generate a PSE with the same serial number as an existing PSE, the outcome is undefined and the Identity services will report errors.
| Use secure PINs to ensure high security and do not forget the values! There is absolutely no way to recover them. |
To run the dirxgenpse tool with the following examples, open a command prompt window in the DirX Identity installation bin subfolder install_path*\bin*.
Example for data encryption:
dirxgenpse –D cn=server_admin,dxmc=DirXmetahub –s 2 –P mYverYspeciaLpiN$41
This command generates a key pair and a certificate based on the PIN value mYverYspeciaLpiN$41 with serial number 2 and writes it into the server_admin entry.
Example for audit signature:
dirxgenpse -D
cn=DomainAdmin,cn=MyDomain,dxmC=Users,dxmC=DirXmetahub –P mySignaturePin$7
This command generates a key pair and a certificate based on the PIN value mySignaturePin$7 and writes it into the DomainAdmin entry in the Connectivity configuration.
To find the serial number of the private key, in DirX Identity Manager, open the Connectivity View and go to the Data View. On the Tree tab, select the entry of cn=server_admin,dxmc=DirXmetahub. In the right pane under All Attributes you see then the keyOwnerPSE attribute. The value has a readable prefix like
{P:1:3:2:IR9m5usbwteo4g9YgXZwmdP0dzY=:00000003:cn=server-admin,1.3.12.2.1107.1.3.102.4.13.17=DirXmetahub}
The number, here 00000003, before cn=server-admin is the serial number of the private key.
Managing Anonymously Readable Attributes
To make it easier to set up DirX Identity in a distributed environment, DirX Identity provides a set of attributes in the Connectivity configuration database that is readable with anonymous bind. Consequently, you cannot disable anonymous access of your directory servers. The list of attributes is:
Object class: dxmRoot
-
dxmSpecificAttributes (DXMSPECAT)
Object class: dxmATS
-
dxmService-DN (DXMSV)
-
dxmQueueManager (DXMQMGR)
-
dxmStreamCommand (DXMSTCMD)
-
dxmStreamFileService (DXMSTFS)
-
dxmStreamStatusTracker (DXMSTST)
-
dxmStreamEvent (DXMSTEVNT)
-
dxmSupportedTopics (DXMSTOPICS)
Object class: dxmService (DXMSV)
-
dxmAddress (DXMADR)
-
dxmDataPort (DXMDPORT)
-
dxmSecurePort (DXMSPOPRT)
Object class: dxmTopic
-
dxmTopicName (DXMTOPICNAME)
-
dxmTopicValue (DXMTOPICVAL)
Object class: dxmCentralConfig
-
dxmEncryptionMode (DXMENM)
Object class: keyOwner
-
userCerificate (UC)
Managing Keys
This section gives hints on how to manage keys within DirX Identity, including:
-
Managing keys for data encryption
-
Using the key migration tool
-
Managing keys for audit signature
Managing Keys for Data Encryption
You should change your PSE for data encryption from time to time or when security has been corrupted. DirX Identity provides smooth certificate exchange. This is especially important in environments that use the DirX Identity Windows Password Listener. It keeps its own local certificate. Due to network problems the update of this local certificate might be delayed. Thus, the whole environment (including all DirX Identity agents) must be able to work with old and new encrypted data values.
The procedure for key exchange consists of these steps
-
Disable all schedules.
-
Check that no workflows are running.
-
Stop the DirX Identity IdS-C and IdS-J services.
-
Create a new PSE (key pair and certificate) with a new pin. This replaces the certificate in the directory which means that all clients that encrypt data values work from this time with the new public key.
-
Change the install_path*/ssl/password.properties* file for all servers. Set the previousPin to the value of the PIN (the PIN of the previous key) and set the PIN to the new PIN value (used to create the new key).
-
Start the services. The servers (and for the C++-based server, all agents that are started via workflows) can now handle two private keys for data decryption.
-
The Java-based Server’s configuration handler will distribute the new certificate (public key) to all Windows Password Listeners. It does not matter how long this will take as long as the old private key is available in the directory.
-
Run the key migration tool to convert all encrypted values from the old key to the new key. Run this tool from time to time.
-
Before you intend to change the PSE again, run the key migration tool to check that there are no old encrypted values in your directory (this would indicate that there is a Windows Password Listener that did not get the new certificate). Check the reason and repair this problem. When the key migration tool does not find any old encrypted values in the directory, you can delete the old private key in the directory and start the key exchange procedure again.
| DirX Identity can only handle two private keys in the directory (this requires the corresponding two PIN values during server startup). Be sure that no data values encrypted with the old key exist in the directory before you change the PSE again. Otherwise, the agents will not be able to decrypt these values and the workflows will fail. |
Using the Key Migration Tool
DirX Identity provides a key migration tool to convert all encrypted values from an old key to a new key. Data that is encrypted with the old key is decrypted using the old private key (the PIN must be provided) and is encrypted with the current public key (from the certificate). Data in clear text is processed as in the initial encryption.
Note: The scripts can be run several times. Actual data is recognized and is not encrypted again.
To use the key migration tool:
-
Change to the directory EncryptionTool on the DirX Identity DVD.
-
Copy the complete directory to your computer.
-
Check the settings in the Tcl file encrypt.tcl. Set the variable bind_profiles to either encrypt bind_profiles or user data.
-
Run the script: metacp encrypt.tcl old_sequence_number | PREVIOUS
-
The script prompts you for the PIN of the old key with the given sequence number old_sequence_number. If the argument PREVIOUS is given the PIN for the second-newest key is needed.
-
Check the result in trace file tracefile.txt
Managing Keys for Audit Signature
You should change your PSE for audit signature from time to time or when security has been compromised.The procedure for key exchange consists of these steps:
-
Export the cn=DomainAdmin,cn=mydomain,dxmC=Users,dxmC=DirXmetahub entry to back up your current certificate for audit signature.If you use tools to verify the signature of auditing information, be sure to keep these certificates; otherwise you will no longer be able to verify the auditing information.
-
Stop the DirX Identity IdS-J service(s) (stops the Java-based Servers).
-
Create a new PSE (key pair and certificate) with a new PIN.This action replaces the certificate in the directory, which means that all clients that encrypt data values work from this time with the new public key.
-
Change the signaturePin value in the password.properties files for all Java-based Servers.
-
Start the DirX Identity IdS-J service(s).(Starts the Java-based Servers.)
-
Add the new certificate information to your tools that you use to verify the signature of auditing information.
Establishing Secure Connections with SSL
Secure Socket Layer (SSL) is a common technique for encrypting TCP/IP network communication based on "trusted" certificates or "keys".Transport Layer Security (TLS) is a small evolutionary advance over SSL and is intended to replace SSL at some point.Whether TLS or SSL is used in a particular connection is the result of a negotiation between client and server.Possibly more important, the key length is negotiated, too.A key length of 40 bits is considered "weak", while a key length of "128" bit is considered "strong".
There are two security stages:
Stage 1 ("certificate-based server authentication") - if you want to make sure the server you are talking to is actually the one you think it is.Stage 1 implies encryption.It is often referred to as "server-side SSL".
Stage 2 ("certificate-based client authentication") - if the server asks you to authenticate yourself through a certificate.Stage 2 implies Stage 1. It is often referred to as "client-side SSL".
For in-depth information on this topic, please refer to https://docs.oracle.com/javase/8/docs/technotes/tools/#security (search for the appropriate keywords; for example, "+keytool +keystore +cacerts").
DirX Identity components use a lot of LDAP and HTTP connections either for internal communication or for communication with external target systems. These connections can be secured via SSL for optimum security.
This chapter gives an overview on the available connections and detailed information about how to set them up. The next figure shows DirX Identity’s components and the SSL connections that can be made between them.
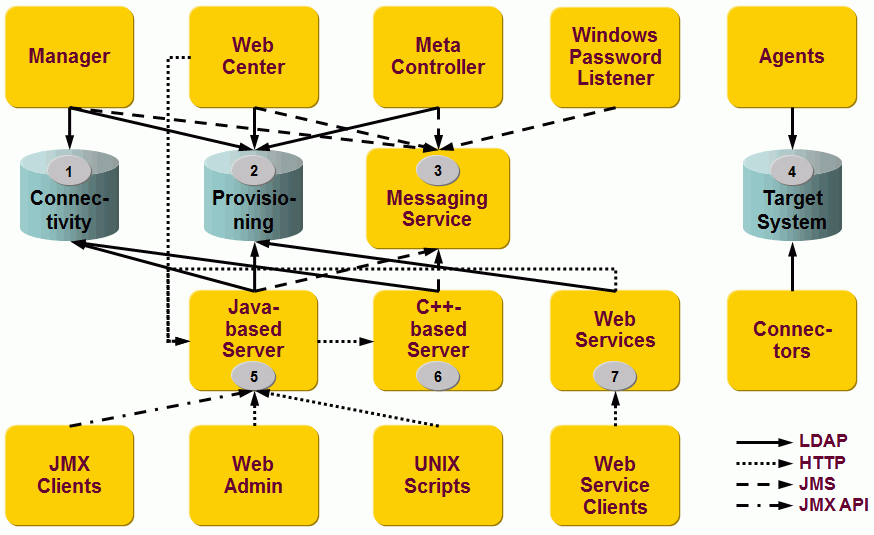
You can configure SSL for each server component. Note that SSL connections require some extra time during the bind operation. Therefore, we recommend that you set up SSL connections only for distributed components.
The next sections describe the procedures for securing connections between each component shown in the figure, in Windows notation. For UNIX, the steps are slightly different:
-
Use the scripts *.sh instead of *.bat
-
Use forward slashes (/) instead of backward slashes (\)
Securing Connectivity Database Connections with SSL
Running the Connectivity configuration database with SSL requires setting up the directory server (see the corresponding server documentation) and all the clients that access it, including:
-
LDAP server
-
DirX Identity Manager
-
Java-based Server
-
C++-based Server
-
Java-based Configuration Wizard
The next sections explain how to set up these components for SSL.
Setting up the LDAP Server
This section explains how to set up the Connectivity configuration LDAP server for SSL.
Managing Keys
DirX Directory comes with an example server and CA certificate for testing purposes. This keychain is available in the file dirx_install_path*/LDAP/conf/cert_ldapserver.pem*.
For a production environment, you should set up your own key material for the LDAP server.
Preparing the LDAP Server for SSL
To establish an SSL connection on the LDAP server side for DirX Directory:
-
Import the file dirx_install_path/LDAP/conf/cert_ldapserver.pem into the LDAP SSL configuration using the DirX Directory Manager. Check the DirX Directory documentation to verify how to set up the DirX Directory for SSL.
| If you see a file named dirx_install_path*/LDAP/conf/cert_ldapserver.pem.new*, use this file instead. |
Setting up DirX Identity with the Configuration Wizard
This section explains how to set up DirX Identity with the Configuration Wizard to use an SSL-secured connection to the Connectivity configuration LDAP server.
Managing Keys
DirX Identity comes with different files containing the test certification authority (CA) certificate that has signed the test server certificate used from DirX Directory for incoming LDAP connections. These files can be used to establish an example SSL/TLS connection from the DirX Identity components to a DirX Directory LDAP directory. For other directory types, see the vendor documentation.
The following files are provided in the path install_path/client/conf:
-
cert8.db - contains the DirX Directory test certificate "cn=test-CA,ou=DirX-Example,o=My-Company". The file key3.db must be also present in order to use the file cert8.db. These files are used by the C/C++ components of DirX Identity (C++-based Server, Meta Controller) to establish LDAP-secured connections.
The following files are provided in the path install_path/gui/:
-
cacerts - contains the DirX Directory test certificate "cn=test-CA,ou=DirX-Example,o=My-Company". This file is the default java certification store used from the DirX Identity Manager.
Preparing the Certificate Stores
To establish secured SSL connections to the LDAP directory, the CA certificate that has signed the LDAP server certificate must be imported into different certificate stores.
Use DirX Identity Manager to export the DirX Directory test-CA certificate from install_path/gui/cacerts:
-
At the start, you have no configured connection. In this case select Data View and then click one or two times on Cancel.
-
In the Tools menu, select Options.
-
Select This application’s installation folder (the file install_path/gui/cacerts is shown) and then export the certificate testca to a file testca.cer.
Use DirX Identity Manager to import the DirX Directory CA certificate to the Java trust stores in use:
-
In the Tools menu, choose Options.
-
Select Java Runtime Environment.
-
Select Import, and then select the LDAP CA certificate you want to import (testca.cer). When prompted for the key store password, enter the default value changeit.
-
Select Other and then select the trust store used from your Tomcat installation (either tomcat_java_home/lib/security/cacerts or Tomcat’s trust store if it is already using SSL).
-
Select Import and then select the LDAP server certificate you want to import (testca.cer).
-
When prompted for the key store password, enter the default value changeit.
-
Click OK and the certificate will be imported.
Alternatively, you can use the keytool command to export and import the CA certificate. For detailed information on the keytool command, please refer to https://docs.oracle.com/javase/8/docs/technotes/tools/#security.
The C++-based Server will use install_path/client/conf/cert8.db as the certificate store. This store already contains the DirX Directory test-CA certificate. If you need to add your own certificate, you need to administer this file with the certutil tool, which is part of the Mozilla NSS Utils.
Using the Configuration Wizard to Set up DirX Identity
Start the Configuration Wizard. In the Connectivity Configuration step, check Use SSL and configure the correct LDAP SSL port. This action configures every DirX Identity component to use SSL to the LDAP Connectivity directory.
After running the Configuration Wizard, use DirX Identity Manager’s Connectivity view to set up the Identity Store of your domain to use SSL:
-
Select the Global View.
-
Right-click the Identity Store of your domain and then select Configure.
-
In General Information, display the properties of the Service object.
-
Select SSL and the correct Secure Port and then click OK.
-
In Bind Profile, display the properties of the Domain_Admin object.
-
Select SSL Connection and then click OK.
-
Click Finish.
The next sections describe the configuration in detail for each single component.
Important Locations
Trust store: install_path/client/conf/cert8.db.
Trust store: install_path/gui/cacerts.
Password for trust store: dirxdirx (default).
Trust store: tomcat_java_home/lib/security/cacerts.
Password for trust store: changeit (default).
Trust store: dxi_java_home/lib/security/cacerts.
Password for trust store: changeit (default).
Setting up Identity Manager
This section describes how to set up DirX Identity Manager for SSL to the Connectivity configuration database. The DirX Identity Manager requires LDAP / LDAPS access to the Connectivity configuration database to manage it.
Managing Keys
The DirX Identity Manager uses its own trust store named install_path/gui/cacerts. By default, this key store already contains the LDAP server certificate provided with the installation.
If you need to use another server certificate, import it using the DirX Identity Manager. In the Tools menu, select Options. On the next page, the GUI’s key store is already selected by default (This application’s installation folder is already selected and the file install_path/gui/cacerts is shown.) Choose Import and then select the certificate you want to import.
Alternatively, you can use the keytool command to import the server certificate. For detailed information on the keytool command, please refer to https://docs.oracle.com/javase/8/docs/technotes/tools/#security.
Setting up Manager for SSL (server-side SSL)
For SSL connections over LDAP to the Connectivity configuration database, you must:
-
Make sure that a suitable CA certificate is available in install_path/gui/cacerts. "Suitable" means that the certificate transmitted by the directory server must be trusted by at least one of the certificates stored in the trust store cacerts (for details, see the "Managing Keys" section).
-
Make sure that the bind profiles you are using have the correct SSL port set and the flag Use secure connection (LDAP v3 only) is turned on.
Setting up Web Center
This section describes how to set up DirX Identity Web Center for SSL to the Connectivity configuration database. Web Center requires LDAP / LDAPS access to the Connectivity configuration database to read some configuration data. Note that server, port and SSL flag for connections to the Connectivity configuration database are taken from the domain object in the Provisioning database.
Managing Keys
Store the LDAP server certificate either in the trust store of the Java environment that Tomcat is using or use the Tomcat trust store.
To import the server certificate, use DirX Identity Manager:
-
In the Tools menu, select Options.
-
On the next page, the GUI’s trust store is selected by default. Select This application’s installation folder (the file install_path/gui/cacerts is shown) and export the certificate testca to a file testca.cer.
-
Select Other and then select the appropriate trust store (either tomcat_java_home/lib/security/cacerts or Tomcat’s trust store if it is already using SSL).
-
Select Import and then select the LDAP server certificate you want to import: in this case, the previously exported testca.cer.
-
When prompted for the key store password, enter the default value changeit.
-
Click OK and the certificate will be imported.
Alternatively, you can use the keytool command to import the CA certificate. For detailed information on the keytool command, please refer to https://docs.oracle.com/javase/8/docs/technotes/tools/#security.
If you decide to create a new trust store for Tomcat, customize your Tomcat configuration (for details, see the Tomcat description).
Windows example:
-
Activate the Tomcat Configuration Menu (Start → Programs → Apache Tomcat version → Configure Tomcat).
-
Click the Java tab.
-
Add -Djavax.net.ssl.trustStore=truststore_path -Djavax.net.ssl.trustStorePassword=truststore_password to the Java Options.
UNIX example:
-
Add -Djavax.net.ssl.trustStore=truststore_path -Djavax.net.ssl.trustStorePassword=truststore_password to your Tomcat environment variable JAVA_OPTS.
Setting up the Java-based Server
This section describes how to set up the Java-based Server for SSL to the Connectivity configuration database. The Java-based Server requires LDAP / LDAPS access to the Connectivity configuration database to read the server configuration, the real-time workflow definitions and other related configuration objects.
Managing Keys
For each Java-based Server that is to use an SSL connection, store the LDAP server certificate in the key store dxi_java_home/lib/security/cacerts of the Java for DirX Identity.
To import the server certificate, use the DirX Identity Manager:
-
In the Tools menu, select Options.
-
Select This application’s installation folder (the file install_path/gui/cacerts is shown) and export the certificate testca to a file testca.cer.
-
Select Java Runtime Environment.
-
Select Import and then select the LDAP CA certificate you want to import (testca.cer). When prompted for the key store password, enter the default value changeit.
-
Click OK and the certificate will be imported.
Alternatively, you can use the keytool command to import the server certificate. For detailed information on the keytool command, please refer to https://docs.oracle.com/javase/8/docs/technotes/tools/#security.
Setting up the Java-based Server for SSL
For each Java-based Server that is to use an SSL connection:
-
Make the following changes to the files install_path/ids-j-domain-Sn/bin/bindcredentials.xml and
install_path/ids-j-domain-Sn/bindprofiles/private/domain.xml:
Switch the ssl flag from false to true: <ssl>true</ssl>. -
Update the port number and change to the ssl port; for example, <port>636</port>.
-
Make sure that a suitable server certificate is available in the key store of the Java for DirX Identity. (For details, see the "Managing Keys" section).
Setting up the C++-based Server
This section describes how to set up the C++-based Server for SSL to the Connectivity configuration database. The C++-based Server requires LDAP / LDAPS access to the Connectivity configuration database to read the server configuration as well as Tcl-based workflow definitions and other related configuration objects.
Managing Keys
For each C++-based Server that is to use an SSL connection:
-
Ensure that you’re using the correct cert8.db file. By default, the C++-based Server uses the file cert8.db located in install_path/client/conf. If you use your own key material, please provide your version of cert8.db. You always need the additional file key3.db in order to use cert8.db.
Setting up the C++-based Server for SSL
For each C++-based Server that is to use an SSL connection:
-
Open the file dxmmsssvr.ini in the path install_path/server/conf.
-
Set the parameter port=secure_port, for example port=636.
-
Set the parameter ssl=1.
-
Set the parameter cert-db-path to the location of the cert8.db (typically in the folder install_path/client/conf).
-
Restart the server. It should connect to the DirX LDAP directory via SSL (see the DirX documentation for information on how to check this action).
Note: Do not set the DirX environment variable DIRX_TRUSTED_CA.
Setting up the Java-based Configuration Wizard
This section describes how to set up the Java-based Configuration Wizard for SSL to the Connectivity configuration database. The Java-based Configuration Wizard requires LDAP / LDAPS access to the Connectivity configuration database to read and update all kinds of configuration data and to load the Connectivity schema during configuration.
Managing Keys
If the Configuration Wizard is to use an SSL connection, store the LDAP server certificate in the key store dxi_java_home/lib/security/cacerts of the Java for DirX Identity.
To import the server certificate, use the DirX Identity Manager:
-
In the Tools menu, select Options.
-
Select This application’s installation folder (the file install_path/gui/cacerts is shown) and then export the certificate testca to a file testca.cer.
-
Select Java Runtime Environment.
-
Select Import and then select the LDAP CA certificate you want to import (testca.cer). When prompted for the key store password, enter the default value changeit.
-
Click OK and the certificate will be imported.
Alternatively, you can use the keytool command to import the server certificate. For detailed information on the keytool command, please refer to https://docs.oracle.com/javase/8/docs/technotes/tools/#security.
Setting up the Java-based Configuration Wizard for SSL
If the Configuration Wizard is to use an SSL connection:
-
Check Use SSL in the Connectivity Directory step.
-
Update the port number in this step to the LDAP Server’s SSL port.
-
Make sure that a suitable server certificate is available in the key store of the Java for the Configuration Wizard itself. (For details, see the "Managing Keys section").
-
Make sure that a suitable server certificate is available in the metacp tool’s cert8.db trust store (see the section "Important Locations") because metacp also uses SSL if the Use SSL flag is set for loading LDIF files to the Connectivity database during the Configuration Wizard run.
Securing Provisioning Database Connections with SSL
Running the Provisioning configuration database with SSL requires setting up the directory server (see the corresponding server documentation) and setting up all the clients that access this server, including:
-
LDAP server
-
DirX Identity Manager
-
Web Center
-
Java-based Server
-
Web services
-
Meta controller
-
Java-based Configuration Wizard
The next sections explain how to set up these components for SSL.
Setting up the LDAP Server
For a description of how to set up the Provisioning configuration LDAP server for SSL, see the section "Setting up the LDAP Server" in the section "Securing Connectivity Database Connections with SSL".
Setting up DirX Identity with the Configuration Wizard
For a description of how to easily set up DirX Identity to use SSL with the Provisioning configuration LDAP server, see the section "Setting up DirX Identity with the Configuration Wizard" in the section "Securing Connectivity Database Connections with SSL".
Setting up Identity Manager
The DirX Identity Manager requires LDAP / LDAPS access to the Provisioning configuration database to manage it.
For SSL connections over LDAP to the Provisioning configuration database, see the section "Setting up Identity Manager" in the section "Securing Connectivity Database Connections with SSL".
Setting up Web Center
This section describes how to set up DirX Identity Web Center for SSL to the Provisioning configuration database. The Web Center requires LDAP / LDAPS access to the Provisioning configuration database to manage its objects.
Managing Keys
See "Setting up Web Center" in the section "Securing Connectivity Database Connections with SSL".
Setting up Web Center for SSL (server-side SSL)
To set up an SSL connection:
-
Open the file install_path\web\instances\webCenter-domain\WEB-INF\web.xml.
-
Adapt the parameter com.siemens.webMgr.ldap.port to the server SSL port (for example, 636).
-
Set SSL mode via the parameter com.siemens.webMgr.ldap.ssl to "true".
-
Restart Tomcat.
Setting up Web Center for Password Management for SSL (server-side SSL)
To set up an SSL connection:
-
Open the file install_path\web\instances\pwdManagement-domain\WEB-INF\web.xml.
-
Adapt the parameter com.siemens.webMgr.ldap.port to the server SSL port (for example, 636).
-
Set SSL mode by setting the parameter com.siemens.webMgr.ldap.ssl to "true".
-
Restart Tomcat.
Setting up the Java-based Server
The Java-based Server requires LDAP / LDAPS access to the Provisioning configuration database to read the request workflow definitions and other related configuration objects. For instructions on how to set up SSL connections over LDAP to the Provisioning configuration database, see the section "Setting up the Java-based Server" in the section "Securing Connectivity Database Connections with SSL".
Setting up the Web Services
This section describes how to set up the Web Services for SSL to the Provisioning configuration database. The Web Services require LDAP / LDAPS access to the Provisioning configuration database to manage their objects.
Managing Keys
The managing keys task depends on where you have deployed the Web Services:
-
If you have deployed the Web Services into the Tomcat of the Java-based Server, you must store the LDAP server certificate in the key store dxi_java_home/lib/security/cacerts of the Java for DirX Identity. For details, see the section "Setting up the Java-Based Server" in the section "Securing Connectivity Database Connections with SSL".
-
If you have deployed the Web Services into an external Tomcat, see the section "Setting up Web Center".
Setting up the Web Services for SSL
-
Modify the file install_path/provisioningWebServices/instance/WEB-INF/config.xml, where instance is of the form provisioningServlet-technical-domain-name (for deployment into the Tomcat server) or provisioningServlet-embedded-technical-domain-name (for deployment into the Ids-J server). Modify said file so that port is 636 and ssl is true.
-
Restart the IdS-J server or Tomcat, depending on where you have deployed the Web Services.
Important Locations
If you have deployed the Web Services into the Tomcat of the Java-based Server, see the section "Setting up the Java-Based Server" in the section “Securing Connectivity Database Connections with SSL”.
If you have deployed the Web Services into an external Tomcat, see the section "Setting up Web Center for SSL to the Provisioning Configuration".
Setting up the Meta Controller
The meta controller (metacp) requires LDAP / LDAPS access to the Provisioning configuration database to provision and synchronize objects. For instructions on setting up SSL connections from the meta controller to the Provisioning configuration database, see the DirX Identity Meta Controller Reference.
By default, the file cert8.db located in install_path/client/conf is used. If you use your own key material, please provide your version of cert8.db. You always need an additional file key3.db in order to use cert8.db.
To use SSL within Tcl-based workflows, you must enable the flag SSL Connection in the corresponding bind profiles.
Setting up the Java-based Configuration Wizard
The Java-based Configuration Wizard requires LDAP / LDAPS access to the Provisioning Configuration database to load the Provisioning schema and the domain data to the Provisioning Configuration database during the configuration.
For instructions on how to set up SSL connections over LDAP to the Provisioning Configuration database, see the section "Setting up the Java-based Configuration Wizard" in the section "Securing Connectivity Database Connections with SSL". Follow the instructions given in the section, but set the Use SSL flag in the Provisioning Directory step instead of the Connectivity Directory step.
Securing Identity Server Connections with SSL
Running all Identity servers - the Java-based Server, the C++-based Server and the ActiveMQ Message Broker - with SSL requires setting up the servers themselves and all clients that access the servers, including:
-
DirX Identity Manager
-
Java-based Identity Server
-
C++-based Identity Server
-
ActiveMQ Message Broker and Web Console
-
Web Admin
-
Web Center
-
Business User Interface
-
Supervisor
-
Web Services
-
Windows Password Listener
-
Meta controller
-
JMX clients
-
UNIX scripts
Note that DirX Identity mainly uses server-side SSL. The only exception is communication with the ActiveMQ Message Broker, which also requires client-side SSL. The next sections describe how to set up these components for SSL.
Securing the Identity servers consists of two steps:
-
Setting up the X.509 certificates
-
Securing the Identity services
These steps are described in the following sections.
Setting up the X.509 Certificates
An X.509 certificate provides a way of binding an identity (in the form of an X.500 distinguished name) to a public key. The certificate essentially consists of an identity concatenated with a public key, with the entire certificate being digitally signed in order to guarantee the association between the identity and the public key.
The certificate must be signed by someone that you trust. The certificate signer can be:
-
Self - if the certificate signs itself, it is called a self-signed certificate. If you need to deploy a self-signed certificate, the certificate must be obtained from a secure channel. The only guarantee you have of the certificate’s authenticity is that you obtained it from a trusted source.
-
CA certificate - a more common solution is to sign certificates using a Certificate Authority (CA) certificate. In this case, you only need to be careful about deploying the original CA certificate (that is, obtaining it through a secure channel). All the certificates signed by this CA, on the other hand, can be distributed over insecure, public channels. The trusted CA can then be used to verify the signature on the certificates. In this case, the CA certificate is self-signed.
The user can use his own created CA or use any company offering CA services. The latter may be imposed by the company’s guidance.
DirX Identity provides a set of batch scripts that allows you to create your own CA root and the key material for the Identity servers and client components. Note that for one machine, only one server private key is necessary (for all servers on the same host); the server’s certificate is signed by the CA. Clients communicating with an ActiveMQ Message Broker only need one universal client key which is used on all hosts and need the CA certificate in their trust store in order to accept the server certificates issued by this CA.
The next sections describe how to set up and run these batch scripts.
Configuring the Certificate Generation Scripts
Before you can run the scripts that generate the X.509 certificates, you must make the following updates to the batch script install_path\ssl\set_Environment.bat:
-
Update the dname parameter. Make sure "localhost" is replaced by the local machine name. If you configured the servers with a nonqualified hostname, set the hostname as cn. If you configured the servers using a fully-qualified hostname (including domain name), set the same name as cn. Note that the name matching is case-sensitive. Use the same spelling when configuring DirX Identity and when setting up the scripts.
-
Update the validity parameter. This parameter specifies the validity for all generated keys and certificates; the value is given in days. Note that on update or upgrade installations, the set_Environment.bat file is overwritten.
-
Set the pwd environment variable in your environment (not in the batch script). The batch script uses this pass phrase for both the server key store and trust store. Make sure that you use the same password for all mentioned files in the Configuration Wizard unless you have a distributed environment. Note that you will be prompted for the password for the CA private key.
Setting up a Certificate Authority
To set up a certificate authority for a DirX Identity installation, run the SSL batch script:
install_path\ssl\generate_CA.bat
| when you run this script, you will be asked for the pass phrase four times. |
This script creates the following files:
-
install_path\ssl\ca.key - the CA private key
-
install_path\ssl\ca.crt - the self-signed CA certificate
The CA certificate file (ca.crt) and the files containing this certificate will be used on all machines in a distributed environment.
| You only need to run this script once for a distributed DirX Identity installation. |
Setting up the Host Server Key
To set up a server key:
-
If you are on a different host from where you set up the Certificate Authority, copy the ca.key and ca.crt files into the local install_path*\ssl* folder.
-
Run the script install_path*\ssl\generate_ServerKeystore.bat*.
This script creates the following files:
-
install_path\ssl\identity-keystore - the server’s private key, in JKS format.
-
install_path\ssl\server.csr - the server’s certificate request (CSR), which needs to be signed by the CA.
Signing the Server Certificate Request
The server’s CSR file can be signed by an external CA or by the CA you created.
To sign the CSR file with your own CA:
-
If you are on a host that is different from where you set up the CA, copy the ca.key and ca.crt files into the local install_path\ssl folder.
-
Run install_path\ssl\sign_ServerCSR.bat.
| You will be asked for the pass phrase one time. |
This script creates the following file:
-
install_path\ssl\server.crt - the server’s certificate signed by the CA.
Importing the Server’s Certificate into the Shared Key Store
To import an external CA certificate or your own CA certificate and the generated server certificate into the shared key store, run the batch script:
install_path\ssl\import_ServerCertKeystore.bat
This script updates the following files:
-
install_path\ssl\identity-keystore - the updated key store with both certificates
-
install_path\ssl\identity-truststore - contains the CA certificate
If you obtain the CA certificate in DER format from the CA authority, you must adapt the import script. If you obtain an additional intermediate CA certificate, you must import this certificate into the identity-keystore and identity-truststore, too.
Converting the Server Key to PEM
You need to convert the server key contained in the shared key store from JKS format to PEM format because the C++-based Server uses PEM format. To convert the key to PEM, run the batch script:
install_path\ssl\convert_ServerKeystoreToPem.bat
This script creates the following files:
-
install_path\ssl\server-key.pem - the key store in PEM format with the host-specific server key.
-
install_path\ssl\ca-crt.pem - the CA certificate in PEM format without password.
Setting up the Client Key
To set up a shared client key:
-
If you are on a different host from where you set up the Certificate Authority, copy the ca.key, ca.crt and identity-keystore files into the local install_path\ssl folder.
-
Run the script install_path\ssl\generate_ClientKeystore.bat. This script updates or creates the following files:
install_path\ssl\identity-keystore - the added shared client’s private key, in JKS format.
install_path\ssl\client.csr - the client’s certificate request (CSR), which needs to be signed by the CA.
Signing the Client Certificate Request
The client’s CSR file can be signed by an external CA or by the CA you created.
To sign the CSR file with your own CA:
-
If you are on a host that is different from where you set up the CA, copy the ca.key and ca.crt files into the local install_path\ssl folder.
-
Run install_path\ssl\sign_ClientCSR.bat.
Note: You will be asked for the pass phrase one time.
This script creates the following file:
install_path\ssl\client.crt - the shared client’s certificate signed by the CA.
Importing the Client Certificate into the Shared Key Store
To import the generated client certificate into the shared key store, run the batch script:
install_path\ssl\import_ClientCertKeystore.bat
This script updates the following file:
install_path\ssl\identity-keystore - the updated key store with the added client certificate.
Converting the Client Key to PEM
You need to convert the client key contained in the shared key store from JKS format to PEM format because the C++-based Server uses PEM format. To convert the key to PEM, run the batch script:
install_path\ssl\convert_ClientKeystoreToPem.bat
This script creates the following files:
install_path\ssl\client-key.pem - the key store in PEM format with the client key.
Importing the Certificate into the Java for DirX Identity
The CA certificate needs to be imported into the cacerts file of the Java for DirX Identity; that is, the Java that is used by the DirX Identity installation. You must perform this step on every machine where Java-based client/server components are installed; for example, DirX Identity Manager, Java-based Server, C++-based Server (Java-based agents), ActiveMQ Message Broker and so on.
To import the certificate with DirX Identity Manager:
-
Start the DirX Identity Manager and log in.
-
In the Tools menu, select Options.
-
On the next page, the GUI’s trust store is selected by default. (This application’s installation folder is already selected and the file install_path\gui\cacerts is displayed.)
-
Select Other.
-
Select the Java used by your DirX Identity installation. For example, C:\Program Files\Java\*jdkversion\lib\security\cacerts*.
-
Select Import and then select the CA certificate (install_path/ssl/ca.crt) you want to import. When prompted for the key store password, enter the default value changeit.
-
Click OK. The certificate is now imported.
To import the certificate with the keytool utility from the command prompt: (if there is no DirX Identity Manager installed on the machine):
-
Open a command prompt.
-
Run the command:
keytool -import -noprompt -trustcacerts -alias sampleca -file install_path/ssl/ca.crt -keystore dxi_java_home/lib/security/cacerts -storepass password
The default password for the cacerts file is changeit. The value for dxi_java_home is the path of the Java that was selected during DirX Identity product installation.
If you have a distributed environment, you must copy the following files from the ssl folder into the ssl folder on the target machine:
-
If you installed a server (Java-based Server, C++-based Server, or ActiveMQ Message Broker), perform the steps described in "Setting up the Host Server Key", "Signing the Server Certificate Request", "Importing the Server’s Certificate into the Shared Key Store" and "Converting the Server Key to PEM".
-
If you installed a client component (Windows Password Listener, Web Center, Identity Manager, and so on), copy the files identity-keystore, identity-truststore, ca-crt.pem, client-key.pem and password.properties from a machine where a server is located into the local install_path/ssl folder.
Securing the Identity Services
The following sections describe how to secure the Identity server and client components once the X.509 certificates have been generated.
Securing is done via setting a global SSL flag in the configuration.
To set the global SSL flags start the Configuration Wizard again and choose the following four options:
-
Connectivity Schema and Data Configuration
-
ActiveMQ Message Broker Configuration
-
C++-based Server Configuration
-
Java-based Server Configuration
In the step System-wide Configuration, check the Use SSL flag.
| In the steps for Message Broker, C++-based Server, and Java-based Server, make sure to specify for the hostname exactly the value you have specified inside the set_Environment.bat script described in "Setting up the X.509 Certificates". This is the full qualified domain name of the server. |
Securing DirX Identity Manager with SSL
To secure DirX Identity Manager with SSL, you only need to import the CA certificate into the Java on the machine on which DirX Identity Manager is installed, as described in "Importing the Certificate into the Java for DirX Identity". No further setup is required.
Securing the Java-based Server with SSL
To secure the Java-based Identity Server with SSL, you only need to import the CA certificate into the Java on the machine on which the server is installed, as described in "Importing the Certificate into the Java for DirX Identity ". No further setup is required.
Securing the C++-based Server with SSL
To secure the C++-based Identity Server with SSL, you only need to import the CA certificate into the Java on the machine on which the server is installed, as described in "Importing the Certificate into the Java for DirX Identity". No further setup is required.
Securing the Message Broker and Web Console with SSL
To secure the Message Broker with SSL, you only need to import the CA certificate into the Java on the machine on which the broker is installed, as described in "Importing the Certificate into the Java for DirX Identity". No further setup is required.
The ActiveMQ Web Console is also automatically configured for server-side SSL. You only need to import the CA certificate into your browser certificate settings. See next chapter for instructions for Firefox and Internet Explorer.
The URL to access it is by default https://myserver:port/admin, where myserver is the machine where your message broker runs and port is the Web Console port that you entered in Configuration Wizard as port.
You can configure the Web Console for client-side SSL access in the following steps:
-
Configure the Web Console for client-side SSL:
In the file install_path/messagebroker/conf/jetty.xml in the section <bean id="handlers" class="org.eclipse.jetty.util.ssl.SslContextFactory">, add the following three lines:
<property name="trustStorePath" value="install_path/ssl/identity-truststore" />
<property name="trustStorePassword" value="your store password" />
<property name="needClientAuth" value="true" /> -
Create a p12 format truststore including the client private key and the client certificate. The installation provides a script that converts the identity-serverstore file into a p12 file. Note that only the identity-serverstore file includes the client private key. The script name is convert ServerKeystoreToP12.bat/sh.
-
Include this p12 file to your browser’s certificate store.
-
Disable use of username/password authentication.
The Web Console is configured to use username/password authentication which is unnecessary when using client-side SSL To disable it, in the file install_path/messagebroker/conf/jetty.xml, change the value from true to false in the line:
<property name="authenticate" value="true" />
This line occurs twice in jetty.xml: in the bean element with the ID securityConstraint and adminSecurityConstraint.
Securing Web Admin with SSL
This section describes how to set up DirX Identity Web Admin for SSL to the Java-based Server. Web Admin requires access to the Java-based Server to handle HTTP / HTTPS requests for server management operations.
To set up Web Admin for SSL to the IdS-J server:
-
Set up the following URL for the Web Admin: https://server:port/admin; for example, https://myserver:port/admin, where myserver is the machine where your IdS-J server runs and port is the port that you entered in Configuration Wizard as port.
-
On a Firefox browser, perform these steps:
-
In Firefox, open Options → Options. Select the Advanced tab.
-
Click View Certificates. Open the Authorities tab and import the file ca.crt.
-
On an Internet Explorer browser, import the CA certificate into the Microsoft certificate store:
-
In Internet Explorer, Open Tools → Internet Options.
-
On the Content tab, open the Certificates dialog.
-
Select the tab Trusted Root Certification Authorities and then click Import.
-
The Certificate Import Wizard starts. Click Next. Browse to the file ca.crt in the ssl folder. Select Trusted Root Certification Authorities as the store in which to place the certificate. Click Next and import it. You must accept the security warning.
-
An Authentication Required dialog requests a username and a password (default: admin / wE3!dirx).
Securing Web Center with SSL
This section describes how to set up DirX Identity Web Center for SSL to the Java-based Server or Message Broker. Web Center requires access to the Java-based Server to handle HTTP / HTTPS requests for request workflows. It requires access to the ActiveMQ Message Broker for sending events.
Managing Keys for Server-side SSL to the Java-based Server
The trust store for SSL from Web Center to the Java-based Server is either the file referenced by the Tomcat Java option javax.net.ssl.trustStore or the cacerts file of the Java used for Tomcat. If the Java option is set, the Java cacerts file is ignored. Note that any trust store configuration for Tomcat’s HTTPS connector in Tomcat’s server.xml file does not affect the SSL connections discussed here. You can use the same trust store here, but you still need to configure it separately via Java options.
When using a specific trust store, set the Java options for Tomcat if you haven’t done so already.
Here is a Windows example:
-
Activate the Tomcat Configuration Menu (Start → Programs → Apache Tomcat version → Configure Tomcat).
-
Click the Java tab.
-
Add -Djavax.net.ssl.trustStore=install_path/ssl/identity-truststore to the Java Options.
-
(optional) Add -Djavax.net.ssl.trustStorePassword=truststore-password to the Java Options. This step is optional. Reading certificates from a trust store usually works without a password; trust store integrity checks, however, are not performed.
Here is a UNIX example:
-
Add -Djavax.net.ssl.trustStore=install_path/ssl/identity-truststore to your Tomcat environment variable JAVA_OPTS.
-
(optional) Add -Djavax.net.ssl.trustStorePassword=truststore-password to your Tomcat environment variable JAVA_OPTS. This step is optional. Reading certificates from a trust store usually works without a password; trust store integrity checks, however, are skipped.
Next, import the CA certificate install_path*/ssl/ca.crt* into the trust store.
When using the Java cacerts file, import the CA certificate into the cacerts file of the Java you use for Tomcat:
-
Start the DirX Identity Manager.
-
In the Tools menu, select Options.
-
On the next page, the GUI’s trust store is selected by default. (This application’s installation folder is already selected and the file install_path/gui/cacerts is displayed.)
-
Select Other.
-
Select the Java cacerts file used by Tomcat. For example, C:\Program Files\Java\jdkversion\jre\lib\security\cacerts.
-
Select Import and then select the CA certificate (install_path/ssl/ca.crt) you want to import. When prompted for the key store password, enter the default value changeit.
-
Click OK to import the certificate.
Managing Keys for Client-side SSL to the Message Broker
The DIRXIDENTITY_INST_PATH environment variable must be set in the context of the Tomcat process. The related files are:
-
install_path/ssl/identity-keystore - the key store for SSL from Web Center to the message broker.
-
install_path/ssl/identity-truststore - the trust store for SSL from Web Center to the message broker.
-
install_path/ssl/password.properties - the file from which the trust and key store passwords are obtained.
Check to make sure that the variable DIRXIDENTITY_INST_PATH exists. It can be missing on some hosts in distributed environments with Web Center deployed into a native Tomcat. If the variable does not exist, continue with the following steps.
-
Define the environment variable DIRXIDENTITY_INST_PATH using an existing directory folder as a value.
-
Copy the files install_path/ssl/identity-keystore, install_path*/ssl/identity-truststore* and install_path/ssl/password.properties to the directory folder you defined in DIRXIDENTITY_INST_PATH.
Note that the Java options javax.net.ssl.trustStore and javax.net.ssl.trustStorePassword are no longer supported for the Message Broker SSL.
The Java cacerts file is not evaluated here.
Securing the Supervisor with SSL
Because the supervisor is deployed into the embedded Tomcat of the Java-based Server and the CA certificate is deployed in the Java cacerts file, no further action is required to secure this component.
Securing Provisioning Web Services with SSL
This section describes how to set up the DirX Identity Web Services for SSL to the Java-based Server or the Message Broker. The Web Services require access to the Java-based Server to handle HTTP/SOAP or HTTPS/SOAP requests for request workflows.
If the Web Services have been deployed into the embedded Tomcat of the Java-based Server, no further action is required.
For Web Services deployed into a native Tomcat, you need to manage the keys for server-side SSL for communication with the Java-based Server and keys for client-side SSL for the Message Broker.
Check to make sure that the variable DIRXIDENTITY_INST_PATH exists. It can be missing on some hosts in distributed environments with Web Center deployed into a native Tomcat. If the variable does not exist, continue with the following steps.
-
Define the environment variable DIRXIDENTITY_INST_PATH using an existing directory folder as a value.
-
Copy the files install_path/ssl/identity-keystore, install_path/ssl/identity-truststore and install_path/ssl/password.properties to the directory folder you defined in DIRXIDENTITY_INST_PATH.
If you have already configured SSL support on Tomcat, add the CA certificate install_path/ssl/ca.crt to your Tomcat trust store.
If you have not used SSL support on Tomcat, do one of the following:
-
Customize the Tomcat configuration:
On Windows:
-
Activate the Tomcat Configuration Menu (Start → Programs → Apache Tomcat version → Configure Tomcat).
-
Click the Java tab.
-
Add -Djavax.net.ssl.trustStore=install_path/ssl/identity-truststore
-Djavax.net.ssl.trustStorePassword=truststore_password to the Java Options.
On UNIX:
-
Add -Djavax.net.ssl.trustStore=install_path/ssl/identity-truststore
-Djavax.net.ssl.trustStorePassword=truststore_password to your Tomcat environment variable JAVA_OPTS. -
The preferred method is to import the CA certificate into the cacerts file of the Java you use for Tomcat.
-
Start the DirX Identity Manager.
-
In the Tools menu, select Options.
-
On the next page, the GUI’s trust store is selected by default. ("This application’s installation folder" is already selected and the file install_path/gui/cacerts is shown.)
-
Select Other.
-
Select the Java cacerts file used by Tomcat (for example, C:\Program Files\Java\jdkversion\jre\lib\security\cacerts).
-
Select Import and then select the server certificate (install_path/ssl/server.crt) you want to import. When prompted for the key store password, enter the default value changeit.
-
Click OK and the certificate will be imported.
Securing the Business User Interface with SSL
This topic is described in the DirX Identity Business User Interface Configuration Guide in the chapter “Configuring the Access to the DirX Identity REST Services”.
Securing the Windows Password Listener with SSL
To secure the Windows Password Listener (WPL) with SSL:
-
Select the useSSL button in the Messaging Service dialog during the installation or set the property "UseSSL=1" after installation in the options.ini configuration file.
-
Copy the files ca-crt.pem, client-key.pem and password.properties from a machine where they have been created into the local WPL install_path/ssl folder.
Securing the Meta Controller with SSL
To secure the meta controller (metacp) with SSL, you only need to import the CA certificate into the Java on the machine on which the meta controller is installed, as described in "Importing the Certificate into the Java for DirX Identity". No further setup is required.
Securing JMX Clients with SSL
JMX clients require access to the Java-based Server to handle RMI requests for server management operations.
Example: To set up SSL from the Jconsole, call the Jconsole with the following command options (Windows):
jconsole.exe -J-Djavax.net.ssl.trustStore="install_path/ssl/identity-truststore"
-J-Djavax.net.ssl.trustStorePassword=changeme
For more instructions on how to set up SSL connections for JMX clients, see the related Oracle documentation.
Securing UNIX Scripts with SSL
This section describes how to set up UNIX scripts for SSL to the Java-based Server. UNIX scripts require HTTP / HTTPS access to the Java-based Server to handle requests to stop the server in a controlled way.
To prepare UNIX scripts for SSL, review the password settings in the file install_path/ids-j-domain-Sn/clients/bin/shutdown_ini.sh. They must match the passwords of the related key store and trust store.
Securing Connections between Web Services Clients and Web Services with SSL
Running the DirX Identity Web Services with SSL requires setting up the Web Services servlet and all clients that access it. However, client-side SSL is currently not supported for Web Services clients. The relevant tasks are
-
Managing keys for server-side SSL
-
Setting up SSL for Web Services clients for server-side SSL
Managing Keys for Server-Side SSL
Perform the following steps if Web Services have been deployed into a native Tomcat:
-
Perform the steps described in the section "Securing Browser Connections with SSL", using the file
install_path/ids-j-domain-Sn/private/server-keystore as the key store file. -
Add the server certificate into the trust store of the JRE used by the Web Services client. For the Web Service clients, this item is described in the DirX Identity Integration Framework Guide in the chapter "Web Services". For the Java-based Server, see the section "Sample Client". The relevant JRE is located in dxi_java_home.
These steps are required for setting up the Web Services client for client-side SSL.
Managing Keys for Client-Side SSL
Client-side SSL is currently not supported for Web Services clients.
Setting up SSL for Web Services Clients for Server-Side SSL
For the Web Services clients shipped with this installation, the configuration file install_path/provisioningServices/spmlv2/conf.xml needs customizing.
Customizing is required for the url parameter of the definition block starting with
<connection type="Soap"
The URL parameter must be correct regarding the protocol (http or https), the host and port for addressing the Web Services.
Here are examples for correct URL specifications in the file install_path/provisioningServices/spmlv2/conf.xml:
-
To address Web Services deployed into the Java-based Server with secure port 40000:
url="https://myhost:40000/ProvisioningService-technical-domain-name/services/Spmlv2RequestService" -
To address Web Services deployed into a native Tomcat with secure port 8443: url="https://myhost:8443/ProvisioningService-technical-domain-name/services/Spmlv2RequestService"
Web Service clients in general need customizing regarding the URL in their own configuration or software coding.
These steps are required for setting up the Web Services client for client-side SSL.
Securing Connections to Tomcat Web Applications with SSL
The DirX Identity Web applications that run in an external Tomcat web server are:
-
Web Center
-
The Provisioning Web Service
-
The Business User Interface
-
The DirX Identity REST Service
Clients of these Web applications include:
-
Browsers (for Web Center and the Business User Interface)
-
The Business User Interface (for the DirX Identity REST Service)
-
Custom clients (for the Provisioning Web Service or the DirX Identity REST Service)
To secure connections between the clients and the Web applications with server-side SSL, configure an HTTPS connector for Tomcat with an appropriate keystore in Tomcat’s conf/server.xml file.
<!-- Example for a definition of an SSL HTTP/1.1 Connection on port 8443 -->
<Connector port="8443"
    protocol="org.apache.coyote.http11.Http11NioProtocol"
    maxThreads="150"
    SSLEnabled="true"
    keystorePass="changeme"
    keystoreFile="C:\Program Files\Atos\DirX Identity\ids-j-domain-Sn\private\webcenter-keystore"
    clientAuth="false"
    sslProtocol="TLS"
/>
Adapt the parameters keystorePass and keystoreFile.The key in the Web Center keystore will do, but of course you can take any other appropriate key as well.
| This configuration is part of Tomcat and may be subject to change.Check the Tomcat documentation if this hint does not work. |
Add a certificate for the server’s key to each client’s certificate store (like a cacerts file for Java clients or the Trusted Root Certification Authorities store for Internet Explorer).You’ll find a certificate for the Web Center key in the same folder as the Web Center keystore.
Understanding File-Handling Mechanisms
The DirX Identity runtime environment provides several mechanisms to handle files.Files can be:
-
Configuration files, such as "ini" files, Tcl script files or attribute configuration files.
-
Input and output files
-
Trace or report files
The supported file-handling mechanisms are:
-
Handling of absolute and relative paths
-
Automatic procedures for file preservation
-
Procedures for file transfers
Path Handling
There are two ways to set up file information in the configuration database:
-
You can use relative paths (we recommend that you use only the short name of the file, for example "options.ini"). Relative paths allow high flexibility when the configuration must be changed or re-configured. All the DirX Identity examples in the initial database are configured this way.
-
You can use absolute path names, but you should be aware of the consequences. DirX Identity cannot assist with absolute path name updates during reconfiguration of workflows or jobs. You should use absolute path names only when it is really necessary (for example, when you want to set up a central file pool as an interface to other applications).
File Preservation Mechanisms
DirX Identity provides the following mechanisms to prevent files from being overwritten on subsequent runs of an activity in a workflow:
-
The C++-based Server does not allow you to start the same workflow simultaneously. An error message will be the result that is reported in the logging files and in the monitor view if the workflow was started via the scheduler.
-
During a workflow run, the agent controller keeps all files that are relevant for a specific run of an activity in a specific work path folder (this works only if relative paths are used). This folder is defined by the work path in the corresponding C++-based Server object for this activity, the workflow display name, and the activity display name. The agent controller starts the agents in this (current) directory and assumes that an agent can handle any file location in the shared file system. If this is not the case, you must write a script when you configure of the job that moves and renames the necessary files (a pre- and post-wrapper).
-
After the run of the activity, the agent controller moves all relevant files to a run-specific status area which is defined by the status path in the C++-based Server object, the workflow display name and start time, and the activity display name and start time. The agent controller writes the paths of these copied files to the corresponding status entry in the configuration database (you can define which files shall be copied by the Copy to Status Area flag in the file item object). The status tracker keeps the files until the expiration time of the corresponding status entry is reached. All other files remain in the work path (or at an absolute location when defined this way). You can define whether files should be preserved in the work path by the Save Mode flag in the file item object.
File Transfer Mechanisms
DirX Identity supports several mechanisms to transfer data files automatically from one location to the location at which this data is required. DirX Identity detects automatically whether the data resides on the local machine:
-
If it resides on the local machine, links are used to access data with the highest possible performance.
-
If data is accessible via a shared file system (and this information is set up in DirX Identity) then data is simply linked and not copied.
-
If data does not reside on the local machine and no shared file system has been set up (or this fact is not known to DirX Identity), then data is transferred automatically via the file service, which uses DirX Identity’s messaging service. This data transfer is about one-third the performance of a shared file system (the reason is that two file copies must be performed). This is the default mechanism, which means that data is always transferred without any necessary setup configuration.
Local Machine File Handling
To prevent interference between different activities of a workflow, each activity uses its own working directory. This mode of operation results in the following problem:
-
The first activity works via its output channel into the related intermediate connected directory. For example:
…\work\myworkflow\A_activity\data.txt -
The second activity expects the data file in its input channel from the related intermediate connected directory. For example:
…\work\myworkflow\B_activity\data.txt -
Because the file is not in this directory, the problem must be solved.
DirX Identity automatically sets a link to the file in the working directory of the previous activity if both activities run on the same machine (specifically, it follows the channel to the intermediate connected directory that belongs to the previous job).
Distributed Machines with Shared File Systems
To get maximum performance, you can set up a shared file system between two machines. Because DirX Identity cannot automatically detect this setup, you must configure it in the Shared Paths tab of the C++-based Server object.
DirX Identity automatically sets a link to the file in the working directory of the previous activity via the shared file system. This configuration guarantees the fastest possible performance because data is now transferred by the native operating system facilities.
If you have set up absolute paths for file handling and these paths are accessible via the shared file system, DirX Identity uses this mechanism.
| Use a secure network connection if data files to be transferred contain critical data. |
Distributed Machines with No Shared File System Set Up
If a shared file system is not set up (or if it is not configured in DirX Identity), the file service copies the data from the source to the target machine using the messaging service’s message queues. This mode of operation results in reduced performance (about one third compared with a shared file copy).
The messaging service transfer uses the set-up port (see the data port in the messaging service object in the configuration database). This port is the only port that must be configured in addition to the LDAP port to overcome a firewall.
| You can optionally encrypt the file transfer mechanism. |
For relative paths, the data file is copied from the working directory on the source machine to the working directory on the target machine.
If you have set up absolute paths for file handling, the file is copied from the fixed location on the source machine to the working directory on the target machine.
Please note that DirX Identity Manager uses the same mechanism to access files in the status area of all machines that belong to a DirX Identity domain.