Deprecated Features
This section contains features that still work but should not be used because better features are available.
Use the Java-based workflows instead of the Tcl-based workflows described in this chapter.
Note that the features described in this chapter are still supported but will not be enhanced.
ADS Provisioning Workflows
This section comprises all issues related to Active Directory and Exchange Provisioning workflows.
Exchange Server 2007 Provisioning Workflow
Microsoft strongly recommends that you install Exchange Server 2007 on a 64-bit processor machine with a 64-bit operating system, even though it is possible to install it on a 32-bit processor machine. Also at least one domain controller that is the schema master must have Windows Server 2003 Service Pack 1 installed.
For further hardware and software requirements as well as the required steps to prepare Active Directory, the domains and the forest for Exchange 2007, refer to the Microsoft documentation.
To administer Exchange Server 2007 including the administration of mailbox-enabled users (if the mailbox Server role was installed) you can install the Exchange 2007 management tools, which consist of the following:
-
Exchange Management Console
-
Exchange Management Shell
-
Exchange Help File
-
Exchange Best Practices Analyzer Tool
-
Exchange Troubleshooting Assistant Tool
Creating Mailbox-enabled Users:
To create mailbox-enabled users with the Tcl-based provisioning workflows (C++-based AdsAgent) the following changes in the attribute mappings must be done:
The attribute “textEncodedORAddress” can be eliminated from the mapping because Exchange 2007 does not support the X400 provider anymore by default.
The attribute displayName has to be set to make the created mailbox enabled user work properly together with the Exchange 2007 GUI. For example map the LDAP cn attribute to the Exchange displayName attribute.
In addition to the known attributes that must be set on creation of a mailbox-enabled user the following ones can be set:
-
msExchRecipientTypeDetails
-
msExchVersion
-
msExchRecipientDisplayType
Setting these attributes prevents the created mailbox to be shown as Legacy Mailbox by the Exchange Management Console tool. By Exchange 2007 a Legacy Mailbox is regarded as a one that resides on an Exchange 2000/2003 server or that has been created by an Active Directory Users and Computers snap in extended by Exchange 2000/2003 functionality.
To make a Legacy Mailbox a User Mailbox also the Exchange Management Shell command setMailbox with the ApplyMandatoryProperties parameter can be used:
C:\>Set-Mailbox -Identity USERNAME –ApplyMandatoryProperties
Configuring with C++ based AdsAgent:
In the import.ini file the attributes must be set with the following types:
-
msExchRecipientTypeDetails=Integer
-
msExchVersion=CaseIgnoreString
-
msExchRecipientDisplayType=Integer
Mapping with both C++-based and Java-based agent or connector:
Set these attributes in the mapping to constant values:
-
msExchVersion: 4535486012416 (optional)
-
msExchRecipientDisplayType: 1073741824 (optional)
-
msExchRecipientTypeDetails: 1 (mandatory)
Dashboard Workflow
The DirX Identity Dashboard workflow provisions a Dashboard target system. The following workflow is available:
-
Ident_Dashboard_Sync - exports data from the Identity Store and imports it to the Dashboard target system and vice versa
Note that the complexity of the Dashboard system requires a workflow of corresponding complexity to handle all of Dashboard’s features. The next sections provide conceptual and operational information about the Dashboard workflow.
Dashboard Workflow: General Issues
DirX Identity synchronization workflows read information from the Identity Store, perform the necessary update operations in the target system, read the target system content and update the Identity Store information accordingly. This procedure sets the status information in the identity store to correct and consistent values.
Because the Dashboard system handles a set of other target systems and is not readable through its interfaces, DirX Identity uses a special procedure to handle this target system. The following figure illustrates this procedure.
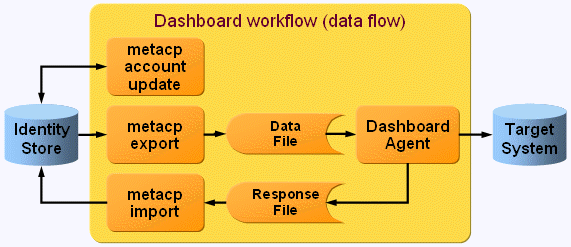
As illustrated in the figure:
-
The first activity - the meta controller (metacp) account update - collects the account information from all associated target systems and writes it at the corresponding Dashboard account.
-
The next activity operates like workflows for other target systems. The metacp export activity reads all necessary information from the Identity Store and writes it to the data file. The target system agent (the Dashboard agent) writes this information to the target system.
-
Depending on the result of the corresponding target system interface (API) action, the Dashboard agent writes a response file that contains the distinguished names (DNs) of all accounts where the operation was successful. Other results are only documented in the trace file.
-
An additional meta controller activity - metacp import - uses this response file to update the relevant status information in the Identity Store.
The entire procedure assumes that the target system interface (API) reports correctly whether an operation was successful or not. On success, the target system agent writes the corresponding entry into the response file.
Prerequisites and Limitations
Before you can use the Dashboard workflow, you must extend the DirX Identity Store schema with Dashboard target system-specific attributes and object classes so that the workflows can store Dashboard-specific information in the Identity Store. For instructions, see the section "Extending the Schema for the Target System Workflows".
Dashboard Workflow: Operational Features
In order to understand the Dashboard workflow, you need to understand the relevant features of the Dashboard system:
-
Each user must have a corresponding account in the Dashboard system. The account name is necessary to authenticate to the Dashboard system.
-
The Dashboard account has a category attribute that defines the authorization to the external applications that are configured in Dashboard. A category can enable access to one or more applications. It is not possible to refine the access to specific functionality within an application.
-
One physical target system can be represented by several applications within Dashboard that model a part of the available functionality.
-
Dashboard can handle single sign-on to the external applications. To provide this feature, Dashboard keeps, for each user, the relevant account information of the external applications (username and password). Three facets exist:
-
Common account: The external application uses the same username and password that Dashboard itself uses. In this case, the account information is set to "username=" and "password=".
-
Common password: The external application uses a different username but the same password that Dashboard uses. In this case, the account information is set to "username=TSusername" and "password=*".
-
Diverse account: The external application uses a username and password that are different from the ones that Dashboard uses. In this case, the account information is set to "username=TSusername" and "password=TSpassword".
In a DirX Identity Connectivity scenario, it only makes sense to support the first two facets. The third one is not supported.
-
The Dashboard system also supports several authentication types:
-
Simple type: The password is kept during the Dashboard session. If an external application entry of a Dashboard account contains an asterisk ('*'), the session password is used to log into the external application; otherwise, the stored value is used as the password for login.
-
Password-less type: Other authentication types, for example, reuse of the Windows login, cannot provide the password. Therefore the "asterisk" solution does not work. In this case, the password of the Dashboard account and all passwords of the external application entries must be set to the same value.
Dashboard’s category feature is a type of role model (with hierarchies and so on.). Users are assigned categories (for example, Physician or Nurse) to enable them to access several specific Web pages that may in turn be bound to external applications. Dashboard only handles the access to the application. It cannot handle fine granular access within the external applications.
The next figure shows the Dashboard privilege model and its relationship to external applications.
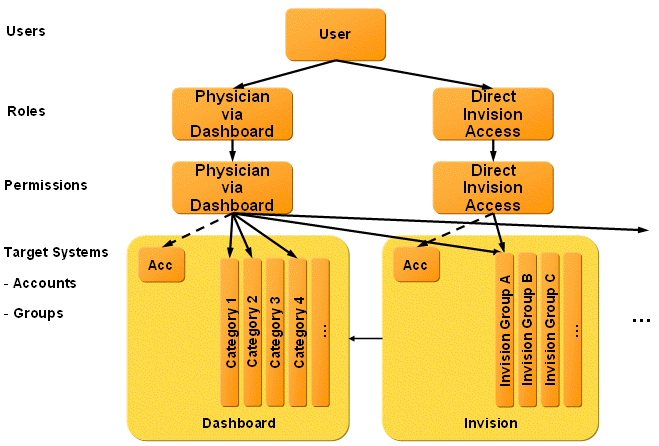
Assume a physician needs to work with the external applications Invision and Pharmacy. This access can be modeled as a Physician role that uses a Physician permission that has the following groups assigned to it:
-
One or more categories in the Dashboard target system to obtain basic access to the Dashboard system (to ensure Dashboard account creation and enabling).
-
One or more groups in the Invision target system for fine granular access to Invision. This assignment creates the necessary Invision account.
-
One or more groups in any additional target systems (for example, Pharmacy) for fine granular access to these additional systems. This assignment creates the necessary target system account.
-
The target systems must be marked as Dashboard-relevant systems (The Peer Target System property must point to a Dashboard target system within DirX IdentityTS).
With this approach, inconsistencies might occur. If a user gets an account in a target system that is not enabled (on the portal of the user) by one of the assigned Dashboard categories, the user cannot enter the application via Dashboard (but he can via the application’s native access). To ensure that the target system is accessible, you must create an "access category" for each target system that is assigned to the user via a permission if one of the groups of the target system is assigned. The advantage of this approach is that the whole access control model is visible within DirX Identity (that is, DirX Identity can ensure correct access to the target system).
To summarize the model within DirX Identity: DirX Identity contains a Dashboard target system with all necessary Dashboard accounts. The groups represent the Dashboard categories. A special attribute at the Dashboard target system object defines whether simple or password-less authentication is used.
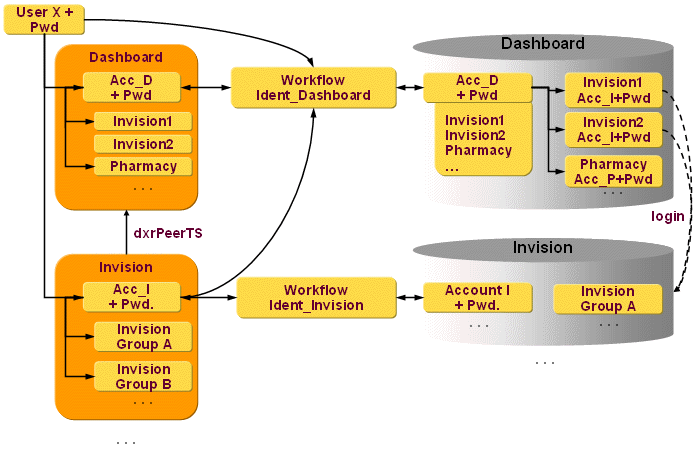
DirX Identity also contains a set of Dashboard-managed target systems. These target systems have their own accounts for these users and target system-specific groups and group memberships. Such a target system can be represented as several external applications in the Dashboard system (e.g., Invision can be represented as Invision1 as Invision2). Because the name of the target system might be different from the names of the external applications which are represented by this target system in Dashboard, you can set the external application names in the Portal External Application property of each of the associated target system. The user can log in to one of the available Invision applications (Invision1 or Invision2).
The workflow works as follows:
-
To get the active relevant accounts and its names (dxmDshExternalApp) for one of the Dashboard accounts, the first workflow activity retrieves all non-deleted accounts (active or inactive) for this user from all target systems that have the Dashboard target system set as Peer Target System property. If such a target system has set several names in the Portal External Application property, each name is used as a separate external application for the Dashboard account. The external application account name is then equal to the value of the dxrName attribute of the account in the external application (target system). If the dxrName attribute is empty the attribute cn is used instead. Just one account per target system is selected (the primary one in case of multiple accounts) and is configured for all the names listed in Portal External Application property. The inactive external applications are evaluated as a complement of the currently resolved list of external applications to the list of external applications in a previous run of the workflow and are written to the dxmDshExternalAppDel attribute.
Note that this activity needs to know the location of the Dashboard target system account base. This information is retrieved from the Identity Store’s account base attribute that is set automatically from the target system wizard. This concept restricts the number of Dashboard target systems per configured identity store to exactly one. -
The second activity reads the user’s Dashboard account and all necessary account attributes. Additionally it fetches the related user’s password from the identity store as initial password (specified by the dxrUserLink attribute of the account). This assures that the actual password is taken. If the dxrUserLink attribute of the account is missing or no password for the user exists, a default value is used (configured in the post join mapping script of the second job).
-
The assigned group memberships are transferred as categories to Dashboard.
-
The workflow adds external application attributes (retrieved from the dxmDshExternalApp and dxmDshExternalAppDel attributes) to each Dashboard account entry with account name and password information.
-
If the attribute Prevent Password Synchronization of a Dashboard relevant target system is set, the workflow sets empty passwords for all the related external applications accounts. Otherwise the workflow uses the star ('*') or the value of the user’s password (according to the simple or password-less authentication type setting of the Dashboard target system).
-
All the information is transferred via the Dashboard agent to the Dashboard target system.
-
Dashboard response is joined with the Dashboard user data stored in the identity store. The relevant target system state is set.
Dashboard Password Synchronization
The Dashboard password synchronization workflow that uses the Dashboard connector synchronizes the Dashboard password and all the Dashboard-related target systems that do not use empty passwords. The external applications for a Dashboard account are taken from the actual values of the attribute dxmDshExternalApp. The password for external applications is then set according to the authentication type of the Dashboard target system.
DirX Access Workflows
| These workflows are no longer usable. Read the information in the chapter DirX Access Workflows to understand how DirX Identity and DirX Access can interact. |
The DirX Access provisioning workflows work between a target system of type SPMLv1 in the Identity Store and the corresponding connected DirX Access server with configured Provisioning Web Service.
The workflows use the SPML connector (SpmlV1SoapConnector2TS) for provisioning. This connector communicates with the DirX Access Provisioning Web Service. The following figure illustrates the DirX Access provisioning workflow architecture.
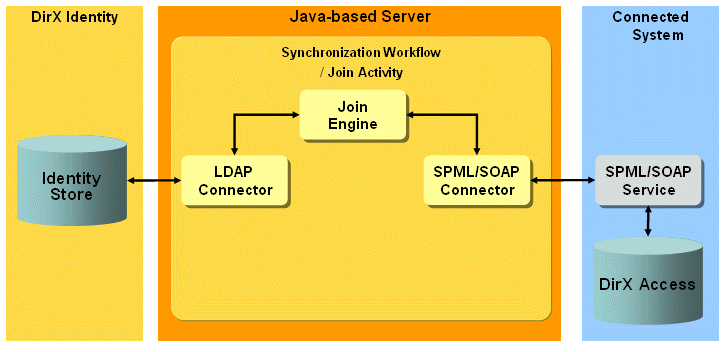
The workflows handle the following objects:
User - the common DirX Access user.
Role - the common DirX Access business role.
The delivered workflows are:
-
Ident_DXA_Realtime - the synchronization workflow exports detected changes for user (account) and business role (group) objects from Identity Store to the DirX Access server in the first step. The second step is to validate the processed changes in the DirX Access server to the Identity Store.
-
Validate_DXA_Realtime - the validation workflow imports existing DirX Access users and business roles with role assignment from the DirX Access server to the Identity Store.
DirX Access Prerequisites and Limitations
The DirX Access workflows support only DirX Access user and business role objects. They do not support password synchronization for DirX Access.
Configuring DirX Access Workflows
To configure the connection to DirX Access:
-
Specify the IP address and the Data Port of the DirX Access SPML v1 Provisioning Web Service. Use the corresponding DirX Access service object which is the part of the connected DirX Access system.
-
You can configure the URL Path and Socket Timeout at the target system port of the appropriate workflow object. (See the DirX Access provisioning workflows configuration in the Expert View in the Connectivity part in the DirX Manager.) You can change the URL Path according to real deployment of the DirX Access Provisioning Web Service. You can increase the timeout value (in seconds) in the Socket Timeout if necessary.
-
Set up the bind credentials of the connected DirX Access system. Use the correct credentials with sufficient rights.
-
Check the provisioning settings used by the connected DirX Access system. Specify them according to real values for your provisioned DirX Access target system.
Configuring the DirX Access Target System
The DirX Access target system requires the following layout:
-
Accounts - all DirX Access users are located in a subfolder Accounts.
-
Groups - all DirX Access business role objects are located in a subfolder Groups.
The attribute dxrPrimaryKey of accounts and groups contains the PSO Identifier of these objects in the connected DirX Access system. (See the SPMLv2 specification for more details about PSO Identifiers.)
The business role (group) membership is stored at the user (account) object and references the dxrPrimaryKey attribute of business role (group) objects.
DirX Access Workflows and Activities
The following figure shows the layout of the channels that are used by the UNIX-PAM workflow’s join activity:
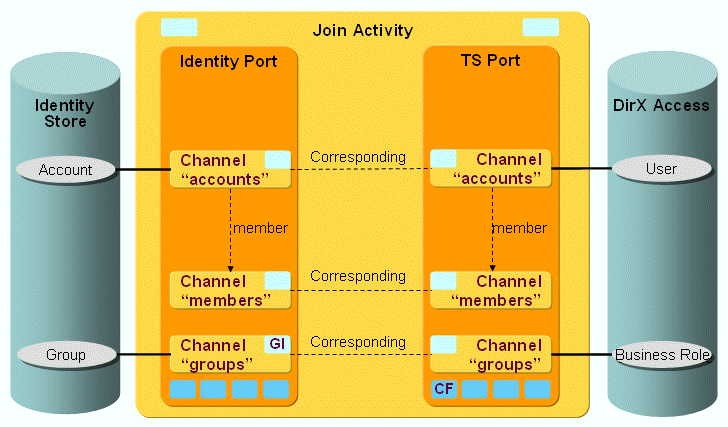
The DirX Access users (with membership) and business roles are synchronized via a pair of channels (one channel per direction).
DirX Access Ports
This section describes the DirX Access ports.
TS Port
-
CF - Crypt Filter
A DirX Access filter is configured implicitly. It is used to send the decrypted password attribute password to DirX Access.
DirX Access Channels
This section provides information about DirX Access channels.
Common Aspects
Direction: Identity Store → DirX Access
-
enabled - the attribute used for disabling of the user object in DirX Access. The correct value is derived from the dxrState attribute of the corresponding account object in the Identity Store.
Direction: DirX Access → Identity Store
-
CommonProcsDxa.calculateIdInIdentity - calculates the ID.
Accounts
Direction: Identity Store → DirX Access
-
ID: dxrPrimaryKey
-
Join: ${source.dxrPrimaryKey} or ${source.dxrName} identical to loginName
-
DirX Access requires some mandatory attributes. Mandatory attributes are mapped mostly in a common way, some are mapped as constants.
-
The roles attribute holds the business group membership.
Direction: DirX Access → Identity Store
-
Join via the dxrName attribute that is mapped identically to the loginName attribute.
Groups
Direction: Identity Store → DirX Access
-
ID: dxrPrimaryKey
-
Join: ${source.dxrPrimaryKey}
-
DirX Access requires some mandatory attributes. Mandatory attributes are mapped mostly in a common way, and some are mapped as constants.
-
The mode attribute must be set to 1 for business roles.
Direction: DirX Access → Identity Store
-
Join via the dxrName attribute that is mapped identically to the name attribute.
-
Post-mapping removes all administrative roles from the imported DirX Access roles (it simply omits the roles with the mode attribute set to 0).
JDBC Provisioning Workflows
The DirX Identity JDBC workflows provision a JDBC target system. The following workflows are available:
-
JDBC2Ident_Validation - performs initial loads or validations from the JDBC target system
-
Ident_JDBC_Sync - synchronizes between the JDBC target system within DirX Identity and the real JDBC target system.
The next sections provide information about JDBC workflow implementation.
General Information about the JDBC Workflows
Because the JDBC workflows assume the same database structure as the ODBC workflows, the workflow structure is also the same. They also use the ODBC Tcl scripts, especially the ODBC profile script.
Because JDBC workflows use the JDBC agent, joins are configured here in a special view section. The join feature is not needed in all JDBC jobs, but all jobs are configured the same way.
The JDBC agent is always run in full mode (a delta filter feature is not yet available). As a result, deleted records in the JDBC database are never exported. As a result, the TSState attribute in the identity store cannot be updated for deleted accounts or groups. Use the validation workflow to perform this task.
JDBC System Table Layout
The JDBC workflows assume the following table layout in the JDBC target system:
-
A table of groups, where each row represents one group
-
A table of accounts, where each row represents one account
-
A table of memberships, where each row represents a membership of one account in one group
JDBC Workflow Configuration
The JDBC agent’s import and export configuration files are stored under the JDBC connected directory. As in the attribute configuration, the database schema is described here. Each JDBC export job uses this configuration.
For searchRequest for exports, the JDBC2Ident_SyncGroup_JDBCExport and JDBC2Ident_SyncGroup_JDBCExport jobs use their own searchRequest files because they use special anchor values to find the selected attributes. All other JDBC export jobs use the standard searchRequest file.
JDBC Agent Operations
For JDBC agent import:
An LDIF change file is generated by the preceding metacp job:
Dn: consists of: identifying attribute(s), table=tablename
A specific group:
dn:DxrGroupName=verynew,table=Groups
or a specific membership:
dn:MembershipGroupID=1,MembershipAccountID=26,table=Memberships
For JDBC agent export:
An LDIF content file is generated:
A specific group with its memberships:
dn: groupid=1,view=members

groupdesc: xx

groupdxrname: ODBCall

groupid: 1

groupodbcname: all

accountdxrname: bj099999
Add/Delete Membership Lists
Because the JDBC agent cannot currently run in delta mode, the JDBC workflow (JDBC2Ident_SyncGroup_MetaCP job) cannot generate "add" and "delete" member lists. Instead, the workflow accumulates all memberships in the accountDxrName attribute and synchronizes back the complete member list with the common modGroupInRole routine. This operation is different from the ODBC workflow and will be changed when the delta feature is available.
LDAP Provisioning Workflows
The following LDAP workflows to provision any LDAP directory are available:
-
LDAP2_Ident_Validation - performs initial load or validation from an LDAP directory
-
Ident_LDAP_Sync - synchronizes between the Identity Store and an LDAP directory
LDAP Provisioning Workflow Concepts
This chapter defines concepts that are necessary to understand the operation of the LDAP workflows. Per default the workflow assumes groupOfNames at the target system side.
Empty Groups
LDAP groups contain a member or uniqueMember attribute that cannot be empty (it is mandatory and must have a value). This is handled differently on the DirX Identity and the target system side:
-
In the DirX Identity target system the group is empty. Note that the uniqueMember attribute contains the domain name to fulfill the LDAP requirement that empty groups cannot exist (cn=domainName). The dxrGroupMemberOK, dxrGroupMemberAdd and dxrGroupMember attributes are empty.
-
To overcome the problem on the target system side, the LDAP workflow fills empty groups with a customizable value (default is 'cn=no_member'). For configuration of this feature see the next chapter.
LDAP Provisioning Workflow Configuration
This chapter explains how you can customize specific issues of the LDAP workflows.
Empty Groups
Open the User Hooks script of the Identity_LDAP_Sync activity for group synchronization. Adapt the default statement in the Preprocessing section:
set fixGroupMember "cn=no_members"This distinguished name is entered into empty groups on the target system side. If your directory or your applications cannot handle a value that points to nowhere, create an entry in an area that is not synchronized by DirX Identity (to overcome the problem that this entry is synchronized) and set the fixGroupMember value to point to this entry.
Enable / Disable of Accounts
To change the default attribute employeeType to another attribute, perform these steps:
-
Open the User Hooks script for the account activity of the Identity_LDAP_Sync workflow.
-
Select the attribute in the output channel’s Selected Attributes.
-
Edit the statement in the Preprocessing section:
set dxrTSStateAttr "employeeType" -
Open the User Hooks script for the account activity of the Ident2LDAP_Validation workflow.
-
Select the attribute in the input channel’s Selected Attributes.
-
Edit the statement in the Preprocessing section:
set dxrTSStateAttr "employeeType"
LDAP XXL Provisioning Workflows
Group-side storage of memberships in DirX Identity can cause performance problems when large groups (hundred thousands to millions of members) must be handled. One solution is to store the membership at the account instead of at the groups because the number of memberships for accounts typically does not exceed 1000. If the real target system needs group-side membership storage, DirX Identity can nevertheless store the memberships account-side, which significantly improves all internal service handling. DirX Identity’s LDAP XXL workflows support LDAP target systems with this model.
The following LDAP XXL workflows are available:
-
LDAPXXL2_Ident_Validation - performs initial load or validation from an LDAP directory
-
Ident_LDAPXXL_Sync - synchronizes between the Identity Store and an LDAP directory
LDAP XXL General Information
The LDAP XXL workflows operate differently from the standard LDAP workflow, as follows:
-
The validation workflow’s account job reads memberships from the target system and merges them to the identity store accounts. Its group job does not handle memberships.
-
The synchronization workflow’s group job reads memberships from the Identity Store via extra searches and merges them with the groups in the target system. Its account job reads memberships in the target system via extra searches and synchronizes the membership back to the accounts in the Identity Store.
Unlike the standard LDAP workflow, the synchronization workflow’s group job uses the following optimizations:
-
It does not read the member attribute in the LDAP target system into memory (avoids large memory lists)
-
It does not use the Tcl lappend command for large lists (slow function)
-
It does not use the rh arrays (slow Tcl behavior). Instead they build obj modify/create strings
-
It appends/creates members in portions (blocks)
LDAPXXL Workflow Concepts
This section explains LDAPXXL workflow implementation concepts.
New Common Procedures
The two new common procedures are:
-
modGroupStatesInRole
-
addGroupStatesInRole
These procedures handle the states but do not handle the memberships as in the mod/addGroupInRole procedures.
Workflow Integration
Uniquemember is no longer in the target selected attribute list, which prevents it from being read during the join operation.
PostmappingAdd:
The PostmappingAdd: routine:
-
Creates the group via the obj create command. It generates an attribute string for the command from the mapped tgt attributes, and assumes that Abbreviation and Name are identical.
-
Searches the "add" members and appends the first portion of members to the command.
-
Adds all other add members in portions via an obj modify -addattr command.
-
Sets the action to none (because add is already done) and sets a special switch restore_action.
-
Restores the action in loopextraFunction so that backward synchronization of the states can be performed for ADD.
PostmappingMod:
The PostmappingMod: routine:
-
Searches for the members to be deleted.
-
For every member, searches the target system to determine whether or not a delete attribute operation needs to be performed. If it does, the routine builds the list of attributes to be deleted.
-
If a given block size is reached, performs an obj modify -delattr with block_size members.
-
Handles add members analog. Block size is configured at the job (specific attribute block_size defaults to 100).
-
Instead of having a large Tcl (result) list of members, uses the target system as the list. Every search in the list results in an LDAP search.
-
Modifies the other attributes with the standard script operation.
-
Creates a namespace search to handle the searches for add/delete members. It consists of a search and a get(getNextMembers) procedure. The search result is held in this namespace.
-
The get procedure returns the next number of attributes separated by “;”.
LoopExtraFunction
This routine restores the action if the restore_action switch is set.
Additional Statistics
The LDAP XXL workflows offer additional statistics. For example:
#

# Additional statistics:

#==========================

# Nr of groups created: 0

# Nr of modifies to append members for new groups: 0

# Nr of modifies to change memberships: 3

# Nr of groups for which memberships have changed: 1
Specific Attribute block_size (Job)
The job’s block_size attribute is used for creates and modifies. A single create/modify operation handles max block_size members.
Paged-Read Integration
The following sections provide information about paged-read integration in the LDAPXXL workflows.
Group Synchronization
Searches for the add/delete memberships in role may return large results. These searches should use paged read to avoid memory problems. All search functionality is extracted in a Tcl file called “Post Join Search Tcl Script”. It contains three namespaces:
-
A namespace searchType to determine what kind of searches are supported
-
A namespace for simple paging (searchPaged) and
-
A namespace for "simple" searches (search) are provided
| Virtual list view (VLV) may be supported in a future release. |
Simple Paging (paged read)
The searchPaged namespace contains procedures for paged read.
Paged read requires an extra bind with a -bindid option; for users of the search functionality, this is the only difference in the interface between the several search types. As a result, searchPaged offers a bind procedure. The caller passes the bind ID and the connection parameters. The first time bind is called for the given bind ID, it performs the bind. Subsequent calls with the same bind ID do not result in another bind; the existing bind is used.
The page size can be configured at the job object:
variable PAGESIZE <?job@SpecificAttributes(page_size,$default="100")/>Uh:: Prolog:
set st(paged) 0
set rc [searchType::determineSearchType src_bind_id st]
set usePagedResult $st(paged)
The variable of uh namespace usePagedResult is set. Here if “simple paging” is possible, usePagedResult is set to 1 (it means true or yes). Otherwise, simple searches are used. If you never want to use simple paging you can hard-code it here.
A second index vlv of the st array indicates whether VLV is supported.
Post-Join Mapping
In postMappingAdd/Mod, the variable usePagedResult is used to determine if search procedures need to be called from search or searchPaged namespace. For usePagedResult, the bind procedure is also called:
if {$usePagedResult == 1} {
    set rc [searchPaged::bind paged_bind_id src_conn_param]
}
...
if {$usePagedResult == 0} {
    search::SearchMembers $src_conn_param(bind_id) $role_ts_account_base ..
} else {
    searchPaged::SearchMembers paged_bind_id $role_ts_account_base ..
}
Account Synchronization
The search for the changed accounts in the Identity Store might return a large result. To avoid memory problems, the standard script’s paged read functionality is now used. Paged read is switched on and the page size is set in the account synchronization job’s input channel. Sorting is now disabled (because sorting DDN and paged read is not supported).
Detailed Customization
Perform the following steps to change the Role LDAPXXL workflows from GroupOfUniqueNames to GroupOfNames.
For the validation workflow/validate accounts:
-
Go to the wizard step "Attribute Mapping for Accounts".
-
Edit PostJoin Mapping.
-
In PostJoinMapping Procedure GetCurrentTSMembers, replace
set rc [SearchMembers $bind_id $base_obj GroupOfUniqueNames uniquemember $accountdn locMembs]
with
set rc [SearchMembers $bind_id $base_obj GroupOfNames member $accountdn locMembs]
For the validation workflow/validate groups
-
Wizard step "Attribute Mapping for Groups"
-
Select InputChannel
-
Press show button in Export Properties Tab
-
Update the "Search Filter" of export properties to objectClass="groupOfNames"
For the synchronization workflow/synchronize accounts:
-
In DirX Manager’s expert view: UserHook under the Role_LDAPXXL_SyncAccount_MetaCP job
uh: ModifyRoleEntry procedure:
replace
set rc [SearchMembers $bind_id $base_obj GroupOfUniqueNames uniquemember $accountdn DDN currTSMembs]
with
set rc [SearchMembers $bind_id $base_obj GroupOfNames member $accountdn DDN currTSMembs]
For the synchronization workflow/synchronize groups:
-
Go to the wizard step "Target Selected Attributes for Groups": Replace
uniqueMember replace-all
with
member replace-all -
Go to the wizard step "Import Properties for Groups". In Join Expression,
change GroupOfUniqueNames to GroupOfNames -
Go to the wizard step "Attribute Mapping for Groups": Edit PostJoin Mapping:
postMappingAdd:
Change
set tgt(objectClass) "GroupOfUniqueNames top"
to
set tgt(objectClass) "GroupOfNames top"
Change
set tgt(uniqueMember) $add_member
to
set tgt(member) $add_member
postMappingMod:
Change
set members $found_entry(uniqueMember)
to
set members $found_entry(member)
Change
set tgt(uniqueMember) $members
to
set tgt(member) $members
In the connected directory LDAPXXL:
Configure LDAP TS in Hub:
-
Go to the wizard step "Operational Attributes".
In ObjectClasses Groups, change GroupOfUniqueNames to GroupOfNames
Lotus Notes Provisioning Workflows
This section comprises all Lotus Notes-specific information for Tcl-based workflows.
Tcl-based Lotus Notes Provisioning Workflows
The DirX Identity Tcl-based Lotus Notes workflows provision a Lotus Notes target system. Two workflows are available:
-
Notes2Ident_Validation - performs initial load or validation from a Lotus Notes target system
-
Ident_Notes_Sync - synchronizes between the Identity Store and a Lotus Notes target system
Configuration notes:
-
The parameter "Account Root in TS" of the target system object (in the Provisioning view) must contain a structure element like '/o=mycompany' which must match with the one contained in the cert.id file, because the Notes Server creates the fullname of the user by concatenating givenName, surname and this structure part contained in the cert.id file. This fullname also is used in the member attributes of groups in Notes. As a consequence the cn of a Notes target system account in Provisioning is generated like the fullname in Notes to be able to assign group members to accounts in the Provisioning view.
-
The parameter "Group Root in TS" must be left empty, because groups are kept flat in Notes and not in the kind of structure like users.
Deletion of accounts in Lotus Notes is a specific procedure:
-
The workflow cannot delete accounts directly. Instead it marks an account for deletion in the Lotus Notes system.
-
You can define in the Notes server the time after which an account is physically deleted from the address book (for example, two minutes) and the time after which the mail file is deleted.
-
This feature implies that the dxrTSstate is not set correctly during this run of the synchronization workflow. As a result, the next synchronization workflow will try to delete the same entries again. This action does not result in a warning state. Instead, one of the next synchronization workflows or a validation workflow will set the dxrTS flag accordingly.
UNIX PAM Provisioning Workflows
A Pluggable Authentication Module (PAM) is a method that allows you to provide the authentication for system and other services (login, su, sshd…) using other services (LDAP…). Today the support for PAM is included in most of the common UNIX distributions. PAM was originally developed by Sun Microsystems. The topics in this section describe how PAM works and how to set up PAM Provisioning workflows.
How PAM Works
The basic idea of the PAM system are pluggable authentication modules - shared object files that are typically located in the /lib/security directory. Applications use for access to these modules two interfaces. The first is a system library attached to the application that allows the application to access the application authentication services directly. The second layer is the system configuration - the administrator specifies here the authentication rules for an application as desired.
PAM is used in four areas: user authentication, account control, session management and password change. The PAM modules process control or executive functions:
-
User authentication checks the identity of the user: password check, Kerberos authentication etc.
-
Account control processes some verification which is not directly related to user identity: limited access time for a user, limited number of concurrently logged users etc.
-
Session management is activated before and after service execution: sets the environment variables, execution of chroot, enables network disk connections etc.
-
The control flag describes how to work with the PAM module. The possible values are required, requisite, sufficient and optional.
Setting Up PAM Provisioning Workflows
Provisioning of PAM requires the following setup steps:
-
Install an LDAP directory that you can use for PAM. See the specific vender documentation how to perform this task.
-
Install and configure PAM for your UNIX system. See the specific vendor documentation. This includes a setup of the PAM LDAP schema. Important part of the schema are the object classes posixAccount and posixGroup.
-
Check that PAM is working. Create for example an account and a group that allows access to read a file and check that this account can read the file.
-
Create a UNIX PAM target system in the Provisioning view group with Identity Manager. This includes creation of a UNIX PAM LDAP connected directory and the related workflows.
-
Note: the target system wizard copies only the Tcl-based workflows. If you want to use real-time provisioning, copy the relevant workflows in the Connectivity view group as is described in the DirX Identity Connectivity Administration Guide.
-
Test your scenario thoroughly.
UNIX-PAM Workflows
The UNIX-PAM Provisioning workflows operate between a target system of type LDAP in the Identity Store and the corresponding connected LDAP server that is configured for use with UNIX-PAM (see RFC 2307).
The workflows use the standard LDAP connector (LdapConnector) for provisioning. This connector communicates with the LDAP server across the native LDAP protocol. (See the section "LDAP Workflows" for more information). The following figure illustrates the UNIX-PAM Provisioning workflow architecture.
The workflows handle the following UNIX objects:
Account - the common UNIX accounts (object classes posixUser and shadowUser according to RFC 2307).
Group - the common UNIX groups (object classes posixGroup according to RFC 2307).
The delivered workflows are:
-
Ident_UNIX-PAM_Realtime - the synchronization workflow that exports detected changes for account and group objects from Identity Store to the LDAP server and then validates the processed changes in the LDAP server to the Identity Store.
-
Validate_UNIX-PAM_Realtime - the validation workflow that imports existing UNIX accounts and groups with group assignment from the LDAP server to the Identity Store.
UNIX-PAM Workflow Prerequisites and Limitations
The UNIX-PAM workflows have the following prerequisites and limitations:
-
Before you can use the workflows, you must extend the DirX Identity Store schema with UNIX-PAM target system-specific attributes and object classes so that the workflows can store UNIX-PAM-specific information in the Identity Store. For instructions, see the section "Extending the Schema for the Target System Workflows".
-
The workflows support only the object classes posixAccount, shadowAccount and posixGroup defined by RFC 2307.
-
The workflows as delivered do not support password synchronization for UNIX-PAM. (See the section "LDAP Workflows" for an example of a password synchronization workflow for a UNIX-PAM (LDAP-based) connected directory.)
Configuring UNIX-PAM Workflows
To configure the connection to UNIX-PAM:
-
Specify the IP address and the data port of the LDAP server that is configured for use with UNIX-PAM. Use the corresponding UNIX-PAM service object that is the part of the connected UNIX-PAM LDAP directory. Use correct port numbers according to your LDAP server settings. You can also set the usage of secure connection (SSL) or enable client authentication.
-
Set up the bind credentials of the connected LDAP directory representing UNIX-PAM. Use the correct credentials (with sufficient rights). These are the credentials used for administration of the LDAP server. Use the valid DN syntax for the user name.
-
Check the provisioning settings used by the connected UNIX-PAM system. Specify them according to real values for your provisioned UNIX-PAM target system.
Configuring the UNIX-PAM Target System
The UNIX-PAM target system requires the following layout:
-
Accounts - all UNIX accounts are located in a subfolder Accounts.
-
Groups - all UNIX groups are located in a subfolder Groups.
The attribute dxrPrimaryKey of accounts and groups contains the DN of these objects in the connected system.
The standard JavaScript dxrNameForAccounts.js generates the attribute uid for the UNIX account.
The UNIX-PAM specific JavaScript uniqueNumber.js generates the attributes uidNumber and gidNumber for the UNIX account.
The attribute gidNumber for the UNIX account (refers to the primary UNIX group of the account) is by default automatically chosen as one of the assigned UNIX groups. It uses the obligation mechanism (see group objects) and the UNIX-PAM specific JavaScript AccountGidNumber.js. The JavaScript updates the gidNumber when necessary. You can change the primary group manually at the account object.
The group object stores the group membership and references the uid attribute of the account objects.
UNIX-PAM Workflow and Activities
The following figure shows the layout of the channels that are used by the UNIX-PAM workflow’s join activity:
The UNIX objects account and group (and membership) are synchronized via a pair of channels (one channel per direction).
UNIX-PAM Ports
This section describes the UNIX-PAM ports.
TS Port
-
CF - Crypt Filter
A UNIX-PAM filter is implicitly configured. It is used to send the decrypted password attribute userPassword to the LDAP server.
UNIX-PAM Channels
This section provides information about UNIX-PAM channels.
Common Aspects
Direction: Identity Store → UNIX-PAM
-
shadowFlag - the attribute used for disabling of the account object in the connected LDAP directory (used for UNIX-PAM). The correct value is derived from the dxrState attribute of the corresponding account object in the Identity Store. This is an experimental setting and must be supported by the relevant UNIX-PAM implementation.
Direction: UNIX PAM → Identity Store
-
CommonProcsUnixPam.calculateIdInIdentity - calculates the Id.
Accounts
Direction: Identity Store → UNIX-PAM
-
ID: dxrPrimaryKey
-
Join: ${source.dxrPrimaryKey} or ${source.uidNumber}
-
UNIX-PAM requires some mandatory attributes. (See RFC 2307 for details.) Mandatory attributes are mapped in a common way.
-
The gidNumber attribute holds the primary group membership.
Direction: UNIX-PAM → Identity Store
-
Join via the dxrName attribute that is mapped identically to the uidNumber attribute.
Groups
Direction: Identity Store → UNIX-PAM
-
ID: dxrPrimaryKey
-
Join: ${source.dxrPrimaryKey} or {source.gidNumber}
-
UNIX-PAM requires some mandatory attributes. (See RFC 2307 for details.) Mandatory attributes are mapped in a common way.
Direction: UNIX-PAM → Identity Store
-
Join via the dxrName attribute that is mapped identically to the gidNumber attribute.
HiPath Workflow
The HiPath Workflow Ident_HiPath handles bi-directional synchronization between a Siemens Hicom Domain Management System (HiPath 4000) and the Identity Store (user area, not target system area!). The workflow communicates with the HiPath database using the Hicom XIE import/export interface.
The following HiPath systems are supported:
-
HDMS 3.1
-
HDMS 3.6
-
HDMS-US 5.2
-
HiPath 4000 Manager V1.0
-
HiPath 4000 Manager V3.1
The basic assumptions and prerequisites for the HiPath workflow are:
-
MetaStore is entry master for the HiPath database.
-
The HiPath database is attribute master for telephoneNumber and facsimileTelephoneNumber (hardcoded).
-
The person entry in the LDAP directory must contain the attribute dxmOprOriginator. In the DirX Identity default scenario this is guaranteed via the objectClass dxrUser.
The workflow performs the following steps in sequence:
-
Activity Meta2HiPath_HiPath
-
Activity HiPath2Meta_HiPath
Prerequisites and Limitations
Before you can use the HiPath workflow, you must extend the DirX Identity Store schema with HDMS target system-specific attributes and object classes so that the workflow can store HDMS-specific information in the Identity Store. For instructions, see the section "Extending the Schema for the Target System Workflows".
Configuring the Ident_HiPath Workflow
The default scenario HiPath workflow is:
-
Ident_HiPath
To complete the configuration for this workflow, you must set up the environment and then adapt some values in the Connectivity configuration.
-
Set and test the environment as described in the "Environment Setup" topic in "Default Application Reference".
Use the configuration wizard in the Identity Manager Global View as follows:
-
Go to the Default scenario and double-click the connected directory icon HiPath.
-
In the wizard window, click the icon to the right of the Service field.
-
Set the Server Name and IP Address fields.
-
Click OK.
-
Click Hicom DMS Parameters.
-
Select the HiPath Version and set the correct Remote Mode parameters (see the context- sensitive help in the DirX Identity Connectivity Administration Guide).
-
Click OK, and then click Finish.
Next, set the parameters of the workflow as follows, but only if you selected HDMS 5.2 as the version:
-
Right-click the workflow line between the connected directory icons Identity Store and HiPath.
-
In the pop-up menu, select the workflow Ident_HiPath and then click Configure.
-
Click Ident2HiPath Attribute Mapping, then:
-
Change the output attribute text3 (this one is not supported by the US version) to another unused attribute, for example info3.
-
Change the output attribute longname (this one is not supported by the US version) to another unused attribute, for example room.
-
Click HiPath2Ident Attribute Mapping, then:
-
Change the input attribute text3 (this one is not supported by the US version) to another unused attribute, for example info3 (use the same one you selected for Ident2HiPath Attribute Mapping).
-
Click Finish to close the wizard and save your changes.
Now the workflow should run.
The workflow transfers some information back to the Identity Store (for example, the telephoneNumber and facsimileTelephoneNumber). This workflow does not create or delete any entries (it assumes that the Identity Store is the master for entries).
For details, see the next sections.
Activity Ident2HiPath_HiPath (meta directory export)
This section describes the operation and the prerequisites of the Ident2HiPath_HiPath activity.
General Features and Prerequisites
-
Delta operation at the LDAP side.
-
Filter: Status = ENABLED or TBDEL.
-
Updates HiPath in merge mode (ADD operations are converted to INSERT operations in HiPath, MODIFY operations are converted to UPDATE operations in HiPath and DELETE operations are converted to DELETE operations in HiPath).
-
The workflow handles referential integrity for HDMS 3.X: If the Workflow detects that entries in HDMS tables COMPIMP, ORGIMP, BUILDIMP, LOCIMP are required before creating a Person in HDMS, it will create these entries implicitly.
The basic assumptions and prerequisites for this activity are:
-
The attributes dxrState, dxmOprOriginator and createTimeStamp should be selected at the source side. If you intend to use an attribute other than dxrState as the status attribute, you need to customize the export post mapping and the export search filter.
Basic Operation
This activity performs a full or delta export of meta directory entries into a CSV file, which it then imports into an HiPath database. It has the following phases:
-
Initialization - This phase reads the relevant directory data and the complete HiPath database into a data file. This phase also creates a metacp index list handle that represents the database sorted by DMSIDs and a handle that represents the database sorted by join criteria (for example, employee Number) which is created in full mode only.
-
Comparison - This phase compares the directory and HiPath and derives the required HiPath update actions, including creation of the related HiPath update request file.
-
Update - This phase updates the HiPath database using the request file created in the comparison phase.
In full mode, export works as follows: it selects entries from the Identity Store (filter dxmOprStatus = ENABLED or TBDEL) and transfers them to the HiPath directory. For each entry in the directory search result, it considers the following cases:
-
Directory entry has related HiPath entries. In this case, perform these steps for each related DMSID:
-
Find related HiPath entry by DMSID.
-
If there is no match, this is considered as an inconsistency to be resolved by the administrator. The entry will be documented in the trace file as missing in HiPath.
-
If there is one match, update the related HiPath entry if directory entry is in state ENABLED (in particular, trace HiPath entry as up-to-date if no changes have been detected), and delete the related HiPath entry if the directory entry is in state TBDEL
-
Directory entry does not have related HiPath entries. Try to find the related HiPath-entry via best-guess-match and distinguish the following cases:
-
No HiPath-entry matches. If the Directory entry is in state TBDEL, nothing is to be done for that entry. Otherwise INSERT entry into HiPath.
-
More than one HiPath-entry matches. This ambiguity will be documented in the trace file.
-
Exactly one HiPath-entry matches. Consider the following subcases:
-
Directory entry is in state ENABLED. If the match is unique also in the directory. perform an UPDATE operation for updating the related HiPath-entry where the attributes to be synchronized are taken from the directory. The directory entry will also be updated with the related DMS-Identifier (if not yet present in the directory entry).
-
Directory entry is in state TBDEL If the match is unique also in the directory, then DELETE the related entry in HiPath.
In delta mode, there is a slight difference: for directory entries without related HiPath entries:
-
The creationTimestamp of the Directory entry is evaluated (no best-guess-match).
-
Entries with a creationTimestamp that is more recent than export-last-update-time will lead to an INSERT in HiPath.
-
Entries with a creationTimestamp that is less recent than export-last-update-time are assumed to have related HiPath entries from previous synchronization cycles. Therefore, such an entry (old creationTimestamp and no related HiPath entry) will be discarded and documented in the trace file.
Control of the Remote HiPath System
The HDMSAgent uses a remote copy command in order to transfer files to the remote host, and a remote shell command to execute the HDMS request on the remote host:
-
The related remote copy command is rcp (remote copy) if the value of the remote_secure_interaction parameter is FALSE, and the command scp (secure shell), if the parameter value is TRUE.
-
The related remote shell command is rsh (remote shell) if the value of the remote_secure_interaction parameter is FALSE, and the command ssh (secure shell), if the parameter value is TRUE.
The meta controller script controls the remote HiPath system as follows:
-
Creation of a request file, for example, x.req.
-
Copy request file to remote host, using the remote copy command.
-
Invoke the script remote_hdms on remote host, using said remote shell command.
-
The script remote_hdms calls dmsieproc with request file (for example, x.req), the response file (for example, x.rsp) contains the result of each request specified in request file.
-
Copy response file from remote host using the remote copy command.
To make this work correctly, you must set up the environment. See the section "Setting Up the HiPath Environment" for details.
Activity HiPath2Ident_HiPath (meta directory import)
This section describes the operation and the prerequisites of the HiPath2Ident_HiPath activity.
General Features and Prerequisites
-
Updates Directory in merge mode.
-
Performs MODIFY operations only.
-
A DELETEd HiPath-Entry is propagated as Directory MODIFY operation (it removes those attribute values which are correlated with the HiPath-Entry).
-
A INSERTed/UPDATEd HiPath-Entry is propagated as Directory MODIFY operation (it updates those Attribute values which are correlated with the HiPath-Entry).
-
It links multiple HiPath entries to one Directory Entry.
The basic assumptions and prerequisites for this activity are:
-
The attributes objectClass, dxmOprOriginator and all attributes necessary for the join operation must be selected at the target side.
Basic Operation
This step performs a full or delta export of HiPath Person (PERS) entries into a CSV file, which it then imports into a meta directory database. The performed steps are:
-
Getting updated/deleted PERS-table entries from HiPath. In delta-mode, an appropriate SQL-like filter regarding creation/modification time is passed to HiPath.
-
Connecting to the directory.
-
For each record in the result obtained in step 1, try to find the related Directory entry first by a join operation with employeeNumber, then with DMS-Identifier in the dxmOprOriginator attribute.
-
If the number of matches is different from one, document this fact in trace file.
-
If the match is unique, perform a MODIFY operation as follows:
-
For a deleted HiPath entry, remove the corresponding phone and fax numbers from the directory entry.
-
For an inserted/updated HiPath entry, update the corresponding phone and fax numbers from the directory entry.
-
Notes:
The parameter Multi Master Attribute List (from HiPath2Ident Entry Handling) specifies the list of attributes being subject to the special handling in import as described in this section above. The default setting defines the special handling (including maintenance of attribute dxmOprOriginator) to be applied for attributes telephoneNumber and facsimileTelephoneNumber only.
The parameter Keep Unmastered Attributes (from HiPath2Ident Entry Handling, default “TRUE”) controls whether or not unmastered (for example, manually entered attribute values) will be preserved.
Multiple Entry Handling
The agent can handle LDAP directory entries and HiPath PERS table entries. Each LDAP directory entry that corresponds one-to-one with a HiPath entry will be extended by the objectClass value dxrUser.
This concept is a general concept for multi mastering of attribute values. Currently it is only implemented for the HiPath workflow. The method should be used sparingly because it decreases performance when used with a high number of entries.
The relevant attributes of this objectClass for the HiPath workflow are:
-
dxrState (status) - Only Directory Entries with status ENABLED and TBDEL are subject to synchronization into HiPath.
-
dxmOprOriginator - A multivalued attribute in the form “value x of attribute y originates from entry of target system system”. The purpose of this attribute is storage of attribute mastership information. The attribute structure is:
masterkeyattribute_name#attribute_value
with
master - Name of the master system. The Master Name operational attribute of the connected directory is taken to define this value.
key - unique identifier for an entry in related target system (for the HiPath workflow the DMSID is used)
attribute_name - the mastered LDAP attribute name (for example telephoneNumber)
attribute_value - the mastered LDAP attribute value (for example +49 89 722 12345)
Sample Attribute values are:
HDMS#12345#telephoneNumber#+49 89 123 12345
HDMS#23456#facsimileTelephoneNumber#+49 89 987 65432
HDMS#34567##
The first line represents the assertion “Attribute value #+49 89 123 12345 of attribute telephoneNumber originates from entry with DMSID=12345 of the master system with Master Name HDMS".
The last line represents just a link to a HiPath entry.
Setting up the HiPath Environment
This section provides instructions on how to set up the HiPath environment and then test it.
To set up the environment:
-
Copy (using ftp, for example) the remote_hdms shell script from the install_path\*agents\HDMS* to the subdirectory specified in the remote_subdir parameter relative to the remote account specified by the remote_account parameter.
-
Edit the copied remote_hdms script to ensure that:
-
The DMS_DIR variable setting specified in the script matches the full pathname of the HDMS XIE import/export program on the remote HiPath installation.
-
The DATA_DIR variable setting specified in the script matches the setting in the remote_subdir parameter.
-
Ensure that the account that runs HDMSAgent on the local system has the rights to run rcp and rsh (or scp and ssh, respectively) to access the remote system.
-
Enable the HiPath environment for remote operation, depending on the remote_secure_interaction parameter. Enable the HiPath environment for rsh and rcp (see the section "Enable HiPath Environment for rsh and rcp"), if the parameter value is FALSE. Enable the HiPath environment for ssh and scp (see the section "Enable HiPath environment for ssh and scp"), if the parameter value is TRUE.
User Creation Directives for HiPath 4000 Manager V3.1
Connectivity to a HiPath system requires a UNIX account that has read and write access over the HiPath XIE interface. UNIX accounts created with HiPath 4000 Manager V3.1 do not have these access rights. To create an account with the required access rights:
-
Log in as user engr. This is the root user of the HiPath 4000 system.
-
Run the UNIX command useradd to create the account hdmsuser.
-
In the dmsie subdirectory of your HiPath installation, copy the file root and rename it to hdmsuser.
-
If you want to grant read and write access only for the PERSDAT table, delete all lines that are different from PERSDAT from the hdmsuser file.
-
Allow read access for all users to the file hdmsuser.
-
Add a line:*
hdmsuser*
to the .users file in the dmsie subdirectory of your HiPath installation.
If the .users file does not exist, create this file with owner root, group sys, and access rights 644. -
Run the following procadmin commands:*
procadmin -t -g XIEAPI
procadmin -s -g XIEAPI
procadmin -l -g XIEAPI*
See your HiPath system documentation for details about the procadmin command.
Enable HiPath Environment for rsh and rcp
Suppose that HDMSAgent runs on system host1 from the account metauser and host1 has the network address ip1. Suppose you want to configure HDMSAgent for interaction with HDMS V3.1 on host2, network address ip2.
First, perform the following steps on host2:
-
Create the account hdmsuser as described in the section "User creation directives for HiPath 4000 Manager V3.1" above. With XIE, grant full access rights to this account to manage the related tables PERS, COMPIMP, LOCIMP, BUILDIMP, ORGIMP. If you use another user account, be aware of the correct access rights.
-
Log in as hdmsuser.
-
Edit the .rhosts file in the hdmsuser home directory to grant metauser on host1 rsh, rcp and ftp access (by creating an entry ip1 metauser in the .rhosts file). Be sure that the spelling of the metauser account is correct (this field is case-sensitive).
-
Create the subdirectories req and bin.
For the actions required on host1, always use the correct (case-sensitive) account name in the login dialog (in our example, metauser instead of Metauser).
We recommend that you test your setup by running rcp, rsh, and remote_hdms by hand, as shown in the following example:
-
On host1, remote copy (rcp) a file on the remote host into the req subdirectory of hdmsuser’s home directory:
rcp xxx hdmsuser@<ip2>:req (if host1 is a UNIX host)
rcp xxx <ip2>.hdmsuser:req (if host1 is Windows NT host)
-
On host1, remote copy (rcp) a file from host2 that exists in the req subdirectory of hdmsuser's home directory but that does not exist in your current working directory:
rcp hdmsuser@<host2>:req/xxx . (if host1 is a UNIX host)
rcp hdmsuser@<host2>:req/xxx . (if host1 is a Windows NT host) -
On host1, run a remote execution (rsh) of a simple command. For example:
rsh ip2 -l hdmsuser ls -l req -
On host2:
-
Log in as hdmsuser and create an HiPath request file $HOME/req/xxx.req with the following contents and no leading white spaces:
# HDMS Call: xxx.req
1;SELECT * FROM COMPIMP
#@*
Note*: For HDMS-US 5.2, HiPath 4000 Manager V1.0 and V3.0, the COMIMP table does not exist. Please use any other valid table (e.g. PERSDAT) instead of COMPIMP. -
Change directory to the hdmsuser home directory.
-
On the command line, type bin/remote_hdms xxx.req.
-
On the command line, type echo$? to check the exit code. On success, the exit code is 0 and the file $HOME/req/xxx.rsp should exist with content that indicates successful execution of the request, such as:
# HDMS Call: xxx.req; 2000-03-22 14:00:13.00
#1;1
38500|DE|PQR||||
#@
or (if the HDMS database is empty):
# HDMS Call: xxx.req; 2000-03-22 14:00:13.00
#1;0
#@
-
Define a user account, say some_user_account, that is to run HiPath Workflow. We recommend the DirX Identity installation account for this purpose wherever possible. Deviation from this recommendation will imply some extra work when configuring the workflow. Ensure that some_user_account has the permissions to call the HDMS XIE import/export program and has the permissions to manage the related tables using the XIE program, namely
-
PERS, COMPIMP, LOCIMP, BUILDIMP, ORGIMP for HDMS 3.X
-
PERSDAT for HDMS-US 5.2, HiPath 4000 Manager V1.0 and V3.0
You can also test your setup by running the HiPath Workflow in trial mode.
HiPath Environment Setup for ssh and scp
For example, suppose that HDMSAgent runs on system host1 from the account metauser and host1 has the network address ip1. Suppose you want to configure HDMSAgent for interaction with HDMS V3.1 on host2, network address ip2.
First, perform the following steps on host1:
-
Login as metauser.
-
Create public/private key with the ssh-keygen command, as shown in the following sample dialog:
$ cd
$ ssh-keygen -t rsa
Enter <RETURN> for all input requests and wait until the generation is finished.
Now, perform the following steps on host2:
-
Create the account hdmsuser as described in section "User creation directives for HiPath 4000 Manager V3.0" above. With XIE, grant full access rights to this account to manage the related tables PERS, COMPIMP, LOCIMP, BUILDIMP, ORGIMP. If you use another user account, pay attention to the correct access rights.
-
Log in as hdmsuser.
-
Transfer the public key (which you created for account metauser on host host1) to host2, for example scp metauser@host1:.ssh/id_rsa.pub ./metapublickey.txt. Be sure that the spelling of the metauser account is correct (this field is case sensitive).
-
Create the directory $HOME/.ssh if it does not yet exist.
-
Append the public key to the authorized keys file of the user hdmsuser, for example type cat $HOME/metapublickey.txt >> $HOME/.ssh/authorized_keys. Verify the permissions of the file authorized_keys. They should be 644.
-
Create the subdirectories req and bin.
For the actions required on host1, always use the correct (case-sensitive) account name in the login dialog (in our example, metauser instead of Metauser).
We recommend that you test your setup by running scp, ssh, and the remote_hdms by hand. It is essential that the commands scp and ssh execute without requesting a password. The commands can be tested as shown in the following example:
-
On host1, remote copy (scp) a file on the remote host into the req subdirectory of hdmsuser's home directory.
scp xxx hdmsuser@<ip2>:req
-
On host1, remote copy (scp) a file from host2 that exists in the req subdirectory of hdmsuser's home directory but that does not exist in your current working directory:
scp hdmsuser@<host2>:req/xxx . -
On host1, run a remote execution (ssh) of a simple command. For example:
ssh hdmsuser@<ip2> ls -l req -
On host2:
-
Log in as hdmsuser and create an HDMS request file $HOME/req/xxx.req with the following contents and no leading white spaces:
# HDMS Call: xxx.req
1;SELECT * FROM COMPIMP
#@*
Note*: For HDMS-US 5.2, HiPath 4000 Manager V1.0 and V3.0, the COMIMP table does not exist. Please use any other valid table (e.g. PERSDAT) instead of COMPIMP. -
Change directory to the hdmsuser home directory.
-
On the command line, type bin/remote_hdms xxx.req.
-
On the command line, type echo $? to check the exit code. On success, the exit code is 0 and the file $HOME/req/xxx.rsp should exist with content that indicates successful execution of the request, for example:
# HDMS Call: xxx.req; 2000-03-22 14:00:13.00
#1;1
38500|DE|PQR||||
#@
or (if the HDMS database is empty):
# HDMS Call: xxx.req; 2000-03-22 14:00:13.00
#1;0
#@
-
Define a user account, say some_user_account, that is to run the HiPath workflow. We recommend the DirX Identity installation account for this purpose wherever possible; deviating from this recommendation will require some extra work when configuring the workflow. Ensure that some_user_account has the permissions to call the HDMS XIE import/export program and has the permissions to manage the related tables using the XIE program, namely
-
PERS, COMPIMP, LOCIMP, BUILDIMP, ORGIMP for HDMS 3.X
-
PERSDAT for HDMS-US 5.2, HiPath 4000 Manager V1.0 and V3.0
You can also test your setup by running the HiPath workflow in trial mode.
Export Traces
The export trace file records the progress of the export task and statistical information about the operations being performed. This section describes the format of the generated information, which consists of these sections:
-
Meta directory entries
-
HiPath entries
-
Derived HiPath updates
-
Derived Directory updates
-
HiPath update statistics
-
DMS identifier update statistics
Meta Directory Entry Section
-
Directory entries: Number of meta directory entries to be synchronized into HiPath.
-
Discarded: Number of "invalid" meta directory entries to be discarded. By default (that is, default definition of the export user hook uh::LoopExtraFilter), an entry will be discarded in delta mode if it does not have any related HiPath entry but is older than the "last export" time. In this case, HiPath Workflow assumes that a previous synchronization attempt of the entry into the HiPath database failed and discards the entry. The meta controller trace file contains notices about such entries.
-
Missing in HiPath: Number of meta directory entries with DMS identifier that are not marked as to be deleted in HiPath, but do not exist in HiPath. The meta controller trace file contains notices about such entries.
-
Deleted in Directory and HiPath: Number of meta directory entries with flag deleted in HiPath set to TRUE. The trace file will contain notices about such entries.
-
To-Be-Deleted, missing in HiPath: Number of meta directory entries with a DMS identifier that are marked as to be deleted in HiPath, but do not exist in HiPath. The trace-file will contain notices about such entries.
-
Ambiguous in Directory: Number of meta directory entries where the related HiPath entry has been found by best-guess match, but where multiple entries have the same related HiPath entry. The meta controller trace file will contain notices about such entries.
-
Ambiguous in HiPath: Number of meta directory entries where the related HiPath entry cannot be determined uniquely by best-guess match. The meta controller trace file will contain notices about such entries.
-
Up-to-date in HiPath: Number of meta directory entries where the related HiPath entry is already up-to-date with respect to the attributes to be synchronized.
Example:
# Directory entries: 9
# Discarded: 0
# Missing in HDMS: 0
# Deleted in Directory and HDMS : 0
# To-Be-Deleted, missing in HDMS: 0
# Ambiguous in Directory: 0
# Ambiguous in HDMS: 0
# Up-to-date in HDMS: 3
In this example, 9 meta directory entries have been detected to be synchronized into HiPath, 3 of them are already up-to-date.
HiPath Entry Section
If HiPath workflow has loaded the PERS table and one or more of its dependent tables (COMPIMP, ORGIMP, LOCIMP, and BUILDIMP) were examined for referential integrity, this section shows the number of entries in each table.
For example:
# HDMS PERS-table entries: 6
# HDMS COMPIMP-table entries: 1
# HDMS ORGIMP-table entries: 5
# HDMS LOCIMP-table entries: 4
# HDMS BUILDIMP-table entries: 4
If HiPath workflow does not need to load one or more of these tables (for example, if it detects only up-to-date entries) the section contains a message that the table has not been loaded. For example:
# HDMS ORGIMP-table not loaded.
Derived HiPath Updates Section
The derived HiPath Updates section shows the HiPath database update actions that the HiPath workflow export comparison phase has determined. A counter exists for each action to be performed in the HiPath database. For example:
# HDMS-Update-Actions derived in Comparision phase
# PERS-table INSERTs: 3
# PERS-table UPDATEs: 1
# PERS-table DELETEs: 2
# COMPIMP-table INSERTS: 0
# ORGIMP-table INSERTS: 2
# LOCIMP-table INSERTS: 0
# BUILDIMP-table INSERTS: 0
In this example, HiPath workflow requests INSERT of 3 PERS-table entries, UPDATE of 1 PERS-table entry, and DELETE of 2 PERS-TABLE entries. In addition, two organizations (ORGIMP table entries) will be created for support of referential integrity.
HiPath Update Statistics
This section shows a counter for each HiPath update action that HiPath workflow can perform and whether or not it succeeded or failed for this synchronization task. The INSERTs are not counted per-table.
For example:
# HDMS update statistics:
# Successful INSERTs: 4
# Unsuccessful INSERTs: 1
# Successful UPDATEs: 1
# Unsuccessful UPDATEs: 0
# Successful DELETEs: 2
Customizing the HiPath Workflow
You can customize the HiPath workflow in many areas, but it requires Tcl know-how.
Job Authentication
You must make sure that the HiPath workflow uses the authentication that has been used when testing the remote copy and remote shell command in previous setup steps. Check the Authentication tab of both Jobs of the HiPath Workflow. There are 2 possibilities:
-
If your Identity IdS-C service already runs with the appropriate account (i.e. because in our example above), the authentication tab should not contain any data.
-
If your Identity IdS-C service runs as local system account (on Windows platforms) or another accounts being privileged to launch jobs with different user authentication, you must enter authentication information (i.e. User Name = metauser in our example above and password and domain as appropriate).
Ident2HiPath Target Selected Attributes and HiPath2Ident Source Selected Attributes
The correct attribute set is chosen implicitly by the HiPath Workflow itself in dependency of the HDMS Version defined in the related HiPath connected directory. This approach is much more comfortable than selecting dozens of attributes one-by-one and putting them into the appropriate order. There is a drawback of this approach:
-
The Identity Manager will not be able to detect and visualize invalid HiPath attribute mapping rules and select boxes for HiPath join expression
-
The administrator must use the appropriate HiPath attribute abbreviations (when using attributes in customized TCL code) and HiPath attribute names (when using Identity Manager)
See section HiPath Tables for valid attribute abbreviations and names for your HDMS/HiPath version.
Note: If the HiPath workflow shall support a customer extended HiPath dataschema, you need to customize the file_attr_list variables:
-
Change the statement set src_conn_param(attr_list) "$file_attr_list_tpl($hdms_version)" for computation of variable file_attr_list in the script Import HDMS Var Tcl Script of the import task
-
Change the statement set tgt_conn_param(attr_list) "$file_attr_list_tpl($hdms_version)" for computation of variable file_attr_list in the script “Export HDMS Var Tcl Script” of the Export Task
Ident2HiPath Attribute Mapping
The default attribute mapping is suitable for a synchronization where entries are joined by a unique identifier (e.g. dxmGUID) which is stored in an unused HiPath attribute (e.g. text3). Moreover, this mapping computes all attributes which are required for creation of person entries and - for HDMS 3.X - implicit creation of additional entries (in tables COMPIMP, ORGIMP, BUILDIMP, LOCIMP).
Please note that target attribute text3 is not appropriate for HDMS US 5.2. For this HDMS release, another attribute must be used (e.g. info3). Please note that target attribute longname is not suitable for HDMS-US 5.2. For this HDMS release, another attribute must be used (e.g. room)
In general, appropriate mappings must be defined for your attributes constituting your join criteria (HDMS Join expression and Joinback expression). The postmapping section updates the ChangeType based on the status attribute which is dxrState by default. If your status attribute is other than dxrState, then you must customize this section and to cross-check your customization with the source selected attributes and the export filter.
Please note some special mapping rules:
Special meaning of empty value - An empty string value (“”) for a HiPath attribute denotes, that the related attribute will be left unchanged when modifying a HiPath entry.
Special meaning of blank value - If you intend to delete an attribute in HiPath in order to synchronize deletion of related attribute in the Directory, then your mapping must result into a blank value.
Example: Suppose you intend to synchronize the ldap attribute description onto HiPath attribute text1. Then you need:
-
A mapping rule mapping description onto text1
-
A statement in the postmapping section like:
if \{ $rh_dms(TEXT1) == } then \{
set rh_dms(TEXT1) [llist “ “ ];# list containing non-empty string with a blank}
Ident2HiPath Export Properties
The HDMS Join Expression / Joinback expression parameters define the best-guess-match policy that HiPath Workflow is to use to join meta directory and HiPath entries. Each Attribute in Joinback Expression must correspond one-to-one with an attribute in HiPath Join Expression. For example:
Joinback Expression: surname and givenname
HDMS Join Expression: name and christianname
In this example, HiPath workflow is to match meta directory entries with HiPath entries using a combination of surname and given name. The meta directory sn (surname) attribute maps to the HiPath attribute “name” and the meta directory gn (given name) attribute maps to the HiPath attribute “christianname”. There must be related mapping rules.
These settings assume that each meta directory entry can be identified by a unique identifier which is stored in the attribute “text3” of an HiPath entry. Please note that attribute text3 is not appropriate for HDMS US 5.2. For this HiPath release, another attribute must be used (e.g., info3).
HiPath2Ident Attribute Mapping
The postmapping computes a filter value to be used on the attribute dxmOprOriginator in the form:
<master name>#dmsidval#*
The dmsidval variable was computed in the mapping table.
This filter works on the dxmOprAttribute that contains values of the form:
mastername#dmsidval#attributename#attributevalue
The specific handling of this attribute is done in the workflow-specific user hook uh::LoopPostJoin.
HiPath Tables
These tables define the relationship between the abbreviation names used in the DirX Identity workflows and the HDMS/HiPath name.
The first column contains the field number in the interface file, the second column the DirX Identity abbreviation name and the third the related HDMS/HiPath name.
HDMS 3.1 Conversion Table
See the Hicom DMS 3.1 SA4, Service Manual, Section "Import/Export interface API" for full details about XIE interface request/response format and the meaning of the attributes.
1 - CMD - identifier
2 - C - country
3 - O - company
4 - ORG1 - org1
5 - ORG2 - org2
6 - ORG3 - org3
7 - NAME - name
8 - SRTNAME - sortname
9 - CHN - christianname
10 - TIT - title
11 - SAL - salutation
12 - LOC - location
13 - BUILD - building
14 - LNAME - longname
15 - EXT - extension
16 - SWITCH - switch
17 - POS - position
18 - TIENUM - tienum
19 - EXTAREA - ext_areacode
20 - EXTNET - ext_netcode
21 - EXTEXT - ext_ext
22 - FTN - faxnumber
23 - OWNGROUP - owner_group
24 - DIRTRACC - direct_trunc_acc
25 - TEXT1 - text1
26 - TEXT2 - text2
27 - TEXT3 - text3
HDMS 3.6 Conversion Table
See the Hicom DMS 3.6, Service Manual, Section "Import/Export interface API" for full details about XIE interface request/response format and the meaning of the attributes.
1 - CMD - Command
2 - C - country
3 - O - company
4 - ORG1 - org1
5 - ORG2 - org2
6 - ORG3 - org3
7 - NAME - name
8 - SRTNAME - sortname
9 - CHN - christianname
10 - TIT - title
11 - SAL - salutation
12 - LOC - location
13 - BUILD - building
14 - LNAME - longname
15 - EXT - extension
16 - SWITCH - switch
17 - POS - position
18 - TIENUM - tienum
19 - EXTAREA - ext_areacode
20 - EXTNET - ext_netcode
21 - EXTEXT - ext_ext
22 - FTN - faxnumber
23 - OWNGROUP - owner_group
24 - DIRTRACC - direct_trunc_acc
25 - TEXT1 - text1
26 - TEXT2 - text2
27 - TEXT3 - text3
28 - TEXT4 - text4
29 - IMPDATA - import_dat
30 - ACCCTRL - access_control
31 - MODDATE - modify_date
32 - EQ - equipment
33-52 - L1-L20 - l1-l20
53 - LPREFIX - l_prefix
54 - EXTCC - ext_cc
55 - COSTCENTRE - costcentre
56 - CHARGEID - charge_id
57 - BANKCODE - bankcode
58 - ACCNUM - accnum
HDMS 5.2 Conversion Table
See the Hicom DMS-US 5.2, Service Manual, Section "Import/Export interface API" for full details about XIE interface request/response format and the meaning of the attributes.
1 - CMD - Command
2 - SWITCH - switch
3 - DOMAIN - domain
4 - C - country
5 - O - company
6 - ORG1 - org1
7 - ORG2 - org2
8 - ORG3 - org3
9 - NAME - name
10 - SRTNAME - sortname
11 - CHN - christianname
12 - TIT - title
13 - ADDR - address
14 - LOC - location
15 - BUILD - building
16 - ROOM - room
17 - STATION - station
18 - POS - position
19 - TIENUM - tienum
20 - EXTAREA - ext_areacode
21 - EXTNET - ext_netcode
22 - EXTEXT - ext_ext
23 - FTN - faxnumber
24 - IMPDATA - import_dat
25 - OWNGROUP - owner_group
26 - MODDATE - modify_date
27 - ACCCTRL - access_control
28 - INFO1 - info1
29 - INFO2 - info2
30 - INFO3 - info3
31 - INFO4 - info4
32 - DIRTRACC - direct_trunc_acc
33 - EQ - equipment
34-53 - L1-L20 - l1-l20
54 - LPREFIX - l_prefix
55 - IDF - idf
56 - IDFCABLEPAIR - Idf_cable_pair
57-71 - INFO5-INFO19 - info5-info19
HiPath 4000 Manager V1.0 Conversion Table
See the HiPath Manager V1.0, Service Manual, Section "Import/Export interface API" for full details about XIE interface request/response format and the meaning, syntax, format and maximum length of the attributes.
1 - CMD - cmd
2 - C - country
3 - O - company
4 - ORG1 - org1
5 - ORG2 - org2
6 - ORG3 - org3
7 - ORG4 - org4
8 - ORG5 - org5
9 - ORG6 - org6
10 - NAME - name
11 - SRTNAME - srtname
12 - CHN - christianname
13 - TIT - title
14 - SAL - salutation
15 - LOC - location
16 - BUILD - building
17 - LNAME - longname
18 - EXT - extension
19 - SWITCH - switch
20 - SEQNUM - seq_num
21 - TIENUM - tienum
22 - EXTAREA - ext_areacode
23 - EXTNET - ext_netcode
24 - EXTEXT - ext_ext
25 - FTN - faxnumber
26 - IMPDATA - import_dat
27 - OWNGROUP - owner_group
28 - MODDATE - modify_date
29 - ACCCTRL - access_control
30 - TEXT1 - text1
31 - TEXT2 - text2
32 - TEXT3 - text3
33 - DIRTRACC - direct_trunc_acc
34 - EQ - equipment
35-54 - L1-L20 - l1-l20
55 - LPREFIX - l_prefix
56 - TEXT4 - text4
57 - EXTCC - ext_cc
58 - CHARGEID - chargeid
59 - BASCHCLASS - basic_charge_class
60 - BANKCODE - bankcode
61 - ACCNUM - accnum
62 - XPREXISTS - xpr_exists
63 - XPRKEY - xpr_key
64 - XPRPIN - xpr_pin
65 - XPRSERVER - xpr_server
66 - XPRVMSADMIN - xpr_vmsadmin
67 - XPRBROADCAST - xpr_broadcast
68 - XPRDCTSEND - xpr_dctsend
69 - XPRDCTRCV - xpr_dctrcv
70 - XPRPWD - xpr_password
71 - XPRNAME - xpr_name
72 - XPRFLAG1 - xpr_flag1
73 - XPRFLAG2 - xpr_flag2
74 - XPRCONNECT - xpr_connect
75 - XPRQUOTA - xpr_quota
76 - XPRRESERVE1 - xpr_reserve1
77 - XPRRESERVE2 - xpr_reserve2
78 - PERSNUM - persnum
79 - DOMAIN - domain
80 - IDF - idf
81 - IDFCABLEPAIR - idf_cable_pair
82-96 - INFO5-INFO19 - info5-info19
97 – VSW – v_switch
98 – HUSID – usid
99 – UMUI – umuid
100 – UMUS – um_user
101 – UMM - um_marked
102 – UMOP - um_operation_id
HiPath 4000 Manager V3.1 Conversion Table
See the HiPath 4000 Manager V3.1, section "Import/Export interface API" in the Service Documentation for details about the XIE interface request/response format and the meaning, syntax, format and maximum length of the attributes.
1 through 102 - See the section "HiPath 4000 Manager V1.0 Conversion Table" above
103 - APEGRNO apg_group_no
104 - XPRDELPW - xpr_delpwd
105 - XPRDELPWTMP - xpr_delpwd_tmp
ODBC Workflows
The DirX Identity ODBC workflows provision an ODBC target system. Two workflows are available:
-
ODBC2Ident_Validation - performs initial load or validation from an ODBC target system
-
Ident_ODBC_Sync - synchronizes the DirX Identity target system and the real ODBC target system
The workflows' implementation assumes the following table layout in the ODBC target system:
-
A table of groups, where each row represents one group
-
A table of accounts, where each row represents one account
-
A table of memberships where each row represents a membership of one account in one group
The next sections provide conceptual and configuration information about the ODBC Provisioning workflows.
Prerequisites and Limitations
Before you can use the ODBC workflows, you must extend the DirX Identity Store schema with ODBC target system-specific attributes and object classes so that the workflows can store ODBC-specific information in the Identity Store. For instructions, see the section "Extending the Schema for the Target System Workflows".
ODBC Workflow Concepts
This section explains the concepts of the workflow implementation.
Attribute Correlation
The ODBC Tcl-based workflow assumes the same database structure as the JDBC Java-based workflow. For details, see the section "Target System Configuration" in "JDBC Provisioning Workflows".
Attribute Configuration
Note that the attribute configuration contains two additional pseudo-attributes addMember and delMember that do not exist in the database. These attributes are used to transform multiple joined database records to the DirX Identity multi-valued attributes dxrGroupMemberAdd and dxrGroupMemberDelete and vice-versa.
Identity Multi-Valued Attribute to ODBC Multi-Record Transformation
This section provides information about the transformation of DirX Identity multi-valued attributes to ODBC multi-records, from the ODBC-to-Identity direction and vice-versa.
From ODBC to DirX Identity:
The reading of group memberships in ODBC is performed by special join operations. For every membership, one result record is retrieved. In DirX Identity, each member is stored in a multi-valued attribute (dxrGroupMemberImported, dxrGroupMemberaAdd and dxrGroupMemberDelete).
A special profile script ODBC2Role is used for the transformation operation. The script assumes that the ODBC records are sorted by groups. As long as records of the same group are read, only the membership attributes are accumulated. At the end, or when reading a different group record, the accumulated record is written.
The following procedure accumulates members:
proc appendMV \{ source_data
rec_data
first} \{
#
# appends the members to the multi-valued attributes delmember/addmember
# depending on the changetype
#
# Parameters:
# src_data name of source handle (if 'src_dir_type' is 'File')
# rec_data handle of currently read data record
# first TRUE first record of group (use set else lappend)
#
# Return Values:
This default appendMV procedure works well for the synchronization workflow because it handles change types.
The ODBC profile script in the validation workflow requires a special appendMV procedure, which is defined in the user hook script of the ODBC2Ident_ValGroup_MetaCP job. Here the members are accumulated in the field AccountDxrName of the source record. The attribute that is used to determine records that belong to same group is hard-coded into GroupDxrName.
From Identity to ODBC:
DirX Identity uses the multi-valued attributes dxrGroupMemberAdd and dxrGroupMemberDelete to store memberships. For every member to be added, an ODBC add operation to the memberships tables is generated. For every member to be deleted, an ODBC delete operation to the memberships table is generated.
This procedure is part of the user hook script of the Role2ODBC_SyncGroupMembers_MetaCP job (LoopExtraFunction). For every member a rh_file_tgt handle is created. The data is mapped to it and the appropriate changetype is set. Afterwards it is written with write_record and then released. Because the DB keys are used for ODBC operation, the DB key for the account is read from the account’s dxrPrimary key Attribute, which results in one extra search per membership.
As all mapping is performed in the user hooks routine, the mapping routine itself is very small. In postJoinMapping, the action is set to "none", so no extra record is written for this dummy mapped record.
ODBC Validation Workflow
The entries from the ODBC database are loaded into DirX Identity. The ODBC database is treated as the entry master. In validation mode, the workflow writes ToDo Messages to the DirX Identity objects that are not synchronized with the ODBC database.
Workflow Activities
The validation workflow uses the following activities:
ODBC2Ident_ODBCExport - exports groups with their memberships from the ODBC database.
ODBC2Ident_ValGroup_metaCP - handles groups and memberships in DirX Identity.
ODBC2Ident_ValAccount_ODBCExport - exports accounts from the ODBC database.
ODBC2Ident_ValAccount_metaCP - handles accounts in DirX Identity.
DirX Identity-Groups/Memberships Handling
The following select statement exports groups and their members:
Keys=GroupDxrName,MembershipGroupID,MembershipAccountID
Select=AccountDxrName,GroupDxrName,MembershipAccountID,MembershipGroupID,GroupID
From=(Groups LEFT JOIN Memberships ON Memberships.GroupID=Groups.ID) LEFT JOIN Accounts ON Accounts.ID=Memberships.AccountID
Where=1=1 ORDER BY Groups.dxrGroupname
The statement generates one record into the export file for each membership. Groups without members are also exported (LEFT JOIN, one record for each empty group).
As described in the section "Identity Multi-Valued Attribute to ODBC Multi Record Transformation", all records for a specific group are accumulated to one record, where dxrAccountName contains all members as a multi-valued attribute. The ORDER BY clause is necessary for accumulation.
Every group is mapped to a group in the DirX Identity ODBC target system.
dxrGroupName → Name (cn) of Group
GroupID → dxrPrimaryKey of group
Every dxrAccountName is seen as group member.
DirX Identity Account Handling
Accounts are selected from the ODBC database with the statement:
Select= AccountDesc,AccountDxrName,AccountID,AccountOdbcName
From=Accounts
One record is exported for each account.
The dxrAccountName attribute is used as the cn for the DirX Identity account. The database key maps to the dxrPrimaryKeyAttribute.
ODBC Synchronization Workflow
First we’ll look at some ODBC-specific issues. Synchronization enforces changes of groups/accounts and memberships in the ODBC database and synchronizes back these changes to DirX Identity (set the appropriate status attributes, group membership states). Because we don’t want to violate the referential integrity in the ODBC database, the membership should be deleted first, and then the referenced object can be deleted. On the other hand, we need the DB keys to add a new membership. So for newly created accounts/groups, we need to synchronize back the DB key before inserting memberships.
Workflow Activities
The ODBC synchronization workflow uses the following activities and workflows:
Ident2ODBC_SyncAccount_MetaCP - an activity that exports Identity accounts with dxrTSState=NONE from the Identity Store. These are accounts that are to be inserted into the ODBC database.
Ident2ODBC_ SyncAccount_ODBCImport - an activity that imports new accounts into the ODBC database.
ODBC2Ident_SyncNewAccWF - a workflow that exports the delta accounts back to the Identity Store. In addition to the accounts created in the previous step, the workflow handles deleted or modified accounts (initiated by a previous workflow run or by changing the database).
Ident2ODBC_SyncGroup_MetaCP - an activity that exports new DirX Identity groups (dxrTSState=NONE) from the Identity Store.
IdentODBC_SyncGroup_ODBCImport - an activity that imports these new groups into the ODBC database
ODBC2Ident_SyncNewGroupWF - a workflow that exports the delta groups back to the Identity Store. In addition to the groups created in the previous step, the workflow handles deleted or modified accounts (initiated by a previous workflow run or by changing the database). For example, a group in the Identity Store deleted by the last run of the synchronization workflow is produced as delta information and is then "deleted" in the Identity Store.
Ident2ODBC_SyncGroupMembers_MetaCP - an activity that exports all GroupMembers that are either in status Add or Delete. For each member, one record with a changetype add or delete is exported.
Ident2ODBC_SyncGroupMembers_ODBCImport - an activity that adds or deletes memberships in the Memberships table in the ODBC database.
Ident2ODBC_SyncAccountDel - a workflow that exports accounts to be deleted from the Identity Store and deletes them in the ODBC database.
Ident2ODBC_SyncGroupDel - a workflow that exports groups to be deleted from the Identity Store and deletes them in the ODBC database.
ODBC2Ident_SyncGroup_ODBCExport - an activity that exports changed groups with their memberships from the ODBC database.
ODBC2Ident_SyncGroup_MetaCP - an activity that imports the changed groups and the related membership changes. Only memberships are updated. Groups are not deleted here. The next synchronization or validation workflow will delete these groups if necessary.
ODBC2Ident_SyncAcc_ODBCExport - an activity that exports changed accounts from the ODBC database.
ODBC2Ident_SyncAcc_MetaCP - an activity that imports the changed account to the Identity Store.
Workflow Tasks without Stored Procedures
The workflow consists of the following tasks:
-
Handling new accounts in DirX Identity - create in ODBC and synchronize back the dbKey to dxrPrimary key
-
Handling new groups in DirX Identity - create in ODBC and synchronize back the dbKey to dxrPrimary key
-
Handling new/deleted memberships in DirX Identity - the membership table in ODBC is updated
-
Handling accounts in state deleted in the Identity Store - accounts are deleted in ODBC
-
Handling groups deleted in identity store - groups are deleted in ODBC
-
Synchronizing back groups/memberships - only memberships are handled at the moment. Groups are not deleted in Role (use the validation workflow for this task)
-
Synchronize back accounts
Workflow Tasks with Stored Procedures
The ODBC workflow implementation delivered with DirX Identity assumes that all ODBC import tasks do not use stored procedures. Using stored procedures may simplify these tasks. Stored procedures can handle referential integrity - For adds to the membership table, only account/group name is necessary, because stored procedures may get the database keys through selects. So, we don’t need to synchronize back new objects before handling memberships. Instead, the stored procedure handles these issues.
Using a stored procedure, the remaining tasks are:
-
Handling all changed accounts in the Identity Store - performs add or delete operations in the Accounts table (implicitly also some memberships might be deleted if a referenced account is deleted).
-
Handling all changed groups in the Identity Store - performs add or delete operations in the Accounts table (implicitly also some memberships might be deleted if a referenced group is deleted).
-
Handling all changed group memberships - performs add or delete operations in the Membership table.
Note: One stored procedure can handle these tasks.
-
Synchronize back accounts.
-
Synchronize back groups/memberships.
Customizing the ODBC Workflows
This section describes how to change the workflows when other database structures exist.
Using Additional Attributes
To change the ODBC synchronization workflow to use additional ODBC attributes:
-
Specify your attributes in the attribute configuration
-
Add the mapping of your attributes as a user hook
-
Extend the selected attributes/mapping with your attributes.
-
Add the correct values to the ODBC export/import properties.
The next sections provide details.
Attribute Configuration
Specify the attributes of your database tables that are not included yet.
The following attributes should not be changed:
changetype
DDN
addMember
delMember
The abbreviations of the following attributes (abbreviations) should not be changed. You can change the Name (table.column) and optionally the prefix:
AccountDxrName
AccountID
GroupDxrName
GroupID
MembershipAccountID
MembershipGroupID
MembershipID
User Hook in Job Ident2ODBC_SyncGroupMembers_MetaCP
In this job, the mapping is performed in the LoopExtraFunction user hook. See the corresponding section in the existing workflow:
# mapping
set rh_file_tgt(changetype) "add"
set rh_file_tgt(AccountDxrName) $memb
set rh_file_tgt(MembershipGroupID) $src(dxrPrimaryKey)
set rh_file_tgt(GroupDxrName) $src(cn)
and a similar section with changetype delete.
You can add the mapping of your additional attributes here.
Selected Attributes / Mapping
The existing workflow already contains the minimum set of attributes needed. So in most cases, you just need to extend it with your additional attributes.
ODBC Export / Import Properties
You will find these properties in the channels under the ODBC connected directory. You do not need to change fields where abbreviations are used. Enter the correct values for your database in the other fields.
Using Structurally Different ODBC Databases
If your database schema differs from the expected three table structure, no general statements can be made. You can try to change the ODBC Selects so that they produce a similar result as with the given schema. On the other hand, if you have fewer tables, you may simplify the whole workflow by packing some activities into one..
SiPass Workflows
The DirX Identity SiPass workflows provision a SiPass target system. Two workflows are available:
-
SiPass2Ident_Validation - performs initial load or validation from a SiPass target system
-
Ident_SiPass_Sync - synchronizes the DirX Identity target system and the SiPass target system
The following restrictions and hints apply to the SiPass standard workflows:
-
The workflows' SiPass agent step runs only on Windows systems.
-
The SiPass agent must run on the machine where the SiPass server is installed. To achieve this you can setup a C++-based secondary server on this machine. We recommend to run the metacp jobs also on this machine to avoid file transfers.
-
The SiPass standard workflow only handles work group objects. It does not handle access groups.
-
Scrambled and encrypted bind passwords and data attributes are not supported. As a result, the "disable encryption" flag in the bind profile must be set.
-
SiPass workflows are pre-configured with Regional and Language Options set in Regional Options to standard English (United States). If SiPass is installed on a machine with other regional settings, you must adapt the format strings in SiPass agent jobs (see the Date Formats tab).
-
The SiPass attribute CardNumber is mandatory for each SiPass cardholder. The synchronization workflow is pre-configured to get this attribute from the attribute dxrName that stores the reference number. For a real provisioning application, the CardNumber attribute should be mapped to the dxrCardNumber attribute, which is empty by default. It is necessary to supply this attribute (for example, as a copy from the corresponding user).
-
The dxrName attribute is used as identifier at the SiPass side (CardNumber). Therefore it must be of type integer and it must be unique.
-
Groups must exist in the SiPass system. The agent cannot create groups due to a restriction of the SiPass interface.
-
During initial load a group is loaded that indicates accounts that are not members of another group. The group name is either <none> or <keine> depending on the language used.
-
Trying to load accounts with no group membership into SiPass causes an error. The dxrState attribute at the Identity Store stays in state 'None'.
-
SiPass can only assign exactly one group to an account. Build your role structure so that only one group is assigned to an account. DirX Identity does not check this restriction. If an account is assigned to more than one group, the import into SiPass fails.
Imprivata Workflows
The Imprivata OneSign Provisioning workflows are used to synchronize data between a target system of type SPMLv1 in the Identity Store and the corresponding connected Imprivata OneSign system. The Imprivata OneSign is provisioned via the SPMLv1 messages sent to an enabled Provisioning System Adaptor in the Imprivata OneSign appliance.
The workflows handle the following Imprivata OneSign objects:
Subscriber - the subscriber represents the physical user. It holds the demographical data and can be used for accessing Imprivata OneSign.
Account - each user can have one or more application accounts to log into an application managed via Imprivata OneSign. It stores the application credentials.
The delivered workflows are:
-
Ident_Imprivata_Realtime - the synchronization one-way workflow that exports detected changes for a subscriber object from Identity to the Imprivata OneSign and updates the state of the affected entry in Identity.
-
SetPassword in Imprivata - the workflow that sets the password for the subscriber object in Imprivata OneSign.
-
Ident_ImprivataExtranetPortal_Realtime - the synchronization one-way workflow that exports detected changes of application credentials for an application account object from Identity to Imprivata OneSign. The workflow does not update the state of the account entry in the Identity target system. This workflow is a sample that works by default from the Extranet Portal target system in the My-Company sample domain.
-
SetPassword in ImprivataExtranetPortal - the workflow that sets the password for the application account object in Imprivata OneSign. This workflow is a sample that works by default from the Extranet Portal target system in the My-Company sample domain.
The subscriber object is directly mapped to the single account object of the corresponding Imprivata target system in the Provisioning configuration. The application account object is mapped to a real account of a target system in DirX Identity, which is configured in Imprivata OneSign as an application for single sign-on (SSO). The following figure illustrates this object mapping.
As shown in the figure:
-
The Imprivata OneSign Domain is mapped to the DirX Identity target system
-
The Imprivata OneSign Subscriber is mapped to the DirX Identity account in the Imprivata target system
-
The Imprivata OneSign Application is mapped to any DirX Identity target system that allows setting passwords
-
The Imprivata OneSign Account is mapped to the DirX Identity account of any target system that permits passwords to be set
At each event, the Imprivata application target systems real-time provisioning triggers two different workflows. One workflow synchronizes the entries for the real application (for example, actualizes an account in an LDAP connected directory) and the other workflow synchronizes the credentials of the user for the LDAP application configured in Imprivata OneSign for SSO. Both workflows handle the events with the same topic. The following figure illustrates these workflows.
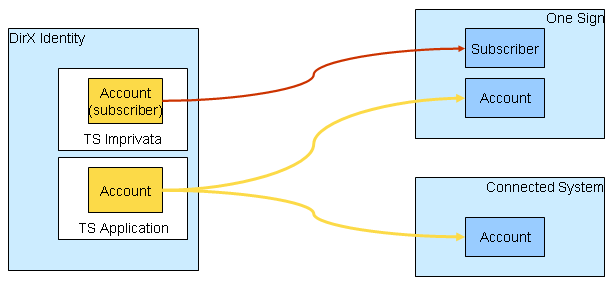
The subscriber and account objects in an Imprivata OneSign target system and in a target system managed via Imprivata OneSign must be created, modified and deleted in the same time. It is necessary to build a privilege structure that supports the concurrent handling of the Imprivata OneSign subscriber and account objects (use permissions that are linked to the corresponding groups to accomplish this task).
Imprivata Workflow Prerequisites and Limitations
The Imprivata Provisioning workflows support:
-
Imprivata OneSign 4.1 SP1 or newer.
-
One-to-one relationship between a subscriber object and an application account object in an application. More accounts for a subscriber in an application are not supported.
The Imprivata Provisioning workflows do not support:
-
Disable operation for subscriber objects. Only the delete operation is supported.
-
Reconciliation of the subscriber or account objects due to search operation limitations of the Imprivata OneSign Provisioning System Adaptor.
Connecting to Imprivata
To configure the connection to Imprivata:
-
Specify the IP Address of the Imprivata OneSign host. Imprivata OneSign is typically configured to accept SPMLv1 requests on the pre-configured secure port 443 and forces the use of the secured transport layer (HTTPS). Use the corresponding Imprivata service object which is the part of the connected directory that represents Imprivata OneSign.
-
URL Path and Socket Timeout can be configured at the target system port of the appropriate workflow object. The URL Path of the Imprivata OneSign SPMLv1 provisioning service is pre-configured to the default value sso/provision/spmlrouter, Do not change this setting. Use Socket Timeout to increase the timeout value (in seconds) if necessary.
-
The Imprivata OneSign provisioning service does not use the bind credentials of the connected directory. Use the pre-configured values.
-
The HTTPS protocol requires the Imprivata OneSign certificate used for the secured connection to be trusted by the Java Runtime Environment for DirX Identity which is located in dxi_java_home. Perform trust store administration with Java keytool and import the Imprivata OneSign certificate. (See the chapter "Using OneSign Provisioning Features" in the Imprivata OneSign documentation for more details.)
-
Imprivata OneSign workflows use a specially implemented SPMLv1 based connector. Each SPMLv1 request sent to Imprivata OneSign must be identified by a External System Name which is part of the target system port of the appropriate workflow object. It is also pre-configured in the mapping for the channels that synchronize subscriber and account objects. This name is equivalent to the name of the configured Provisioning System Adaptor in the Imprivata OneSign appliance. Set these values in channel mappings and in the connector port according to the values configured in the Imprivata OneSign system.
Configuring the Imprivata Target System
The Imprivata target system requires the following layout:
-
Accounts - one account object exists in the Identity target system for each Imprivata OneSign subscriber object in the connected system. All accounts are located in the subfolder Accounts.
-
Groups - Imprivata OneSign does not use any type of group. Use a pre-configured "virtual" group for the creation of the Imprivata OneSign subscribers.
The dxrPrimaryKey attribute has a special meaning: it stores the generated Imprivata ID for subscriber objects. The dxrName attribute is a single copy of the employeeNumber attribute by default and is used as the username in Imprivata OneSign.
An application target system managed via Imprivata OneSign requires the following layout:
-
Accounts - one account object exists in Identity for every Imprivata OneSign account object in the connected system. All accounts can be located in an Accounts subfolder.
-
Groups - Imprivata OneSign does not require any type of group from the application target system. To assign accounts, use existing groups of the managed application.
-
Accounts and groups - an application can also work with the single common subtree containing both accounts and groups.
The dxmGUID attribute has a special meaning for Imprivata OneSign application accounts: it stores the generated Imprivata ID for account objects. The uid attribute is a single copy of the employeeNumber attribute by default. It must be generated in the same way as the dxrName attribute for the subscriber objects since it is used to identify the corresponding subscriber for the account object. The dxrName attribute for the application account objects is mapped to the application username. To keep the mapping from subscriber to account consistent, you may need to update the object descriptions for the target system accounts that are used as accounts for the Imprivata OneSign application (typically, you must define an additional configuration of the uid attribute).
Imprivata Workflow and Activities
The following figures show the layout of the channels that are used by the join activity.
As this figure shows, the Imprivata OneSign subscriber objects are synchronized via a pair of channels. The group channels are only present to handle incoming events for groups. Such events are ignored.
As this figure shows, the Imprivata OneSign account objects are also synchronized via a pair of channels. The group channels are only present to handle incoming events for groups and are also ignored.
Imprivata Ports
This section provides information about the Imprivata workflow ports.
TS Port
-
Crypt Filter
An Imprivata Filter is configured implicitly. It is used to send the password and applicationPassword subscriber and account application password attributes in the SOAP request decrypted to Imprivata OneSign via SPMLv1. This filter is used only for the password synchronization workflow. The initial password is pre-configured (see the mapping for the channel account on the Identity side for both workflows).
Imprivata Channels
This section provides information about Imprivata workflow channels.
Common Aspects
Direction: Identity Store → Imprivata OneSign
-
userDisabled - the attribute used for disabling of the subscriber object in Imprivata. The value is derived from dxrState attribute of the corresponding account object in DirX Identity. The subscriber cannot be disabled in the default configuration, but it can be deleted.
Direction: Imprivata → Identity Store
-
The workflow only uses the one-way synchronization controller, so updates can only be made via a user hook.
Subscriber
Direction: Identity Store → Imprivata OneSign
-
ID: dxrPrimaryKey
-
Join: ${target.externalSystemName}, ${target.externalDomainName} and ${target.username}
-
Username: dxrName
-
User hook stores the subscriber ID generated by Imprivata OneSign to the dxrPrimaryKey attribute. It also updates the state of the entry returned by the Imprivata OneSign.
Account
Direction: Identity Store → Imprivata OneSign
-
ID: dxmGUID
-
Join: ${target.externalSystemName}, ${target.externalDomainName}, ${target.externalApplicationName} and ${target.username}
-
Username: uid
-
Application username: dxrName
-
User hook stores the account ID generated by Imprivata OneSign to the dxmGUID attribute.
-
PostMapping script changes the type of the request to delete if necessary.
Group
Direction: Identity Store → Imprivata OneSign
-
User hook ignores all incoming event to update the group objects to Imprivata OneSign.
Password Channel
A password channel updates the subscriber and account passwords.
A password channel can also be configured backwards from the connected system to the Identity Store to be able to update some attributes in Identity after a password change or reset has taken place in the connected system. The join engine then synchronizes the attributes specified in the corresponding password channel mapping to the Identity Store as usual after the account with its password-relevant attributes is updated in the connected system.