Context-Sensitive Help
This chapter presents the context-sensitive help topics that are provided with DirX Identity.
To display the help topic associated with the current dialog or menu, press F1.
General
Content
The actual content of a file, which may be a Tcl script, mapping function, INI file, XML file and so on.Use the Export button to export a file’s contents from the configuration database into a file in the file system.Use the Import button to import the contents of a file in the file system into a contents object in the configuration database.
Related Topics
Data File
Data files contain bulk data to be uploaded to or already downloaded from a connected directory.The respective configuration object holds all data necessary to identify and access the file.
Use this tab to assign the data file properties.The items shown in this tab are:
- Name
-
the name of the data file configuration object.
- Description
-
a description of the data file.
- Version
-
the version of the data file.
- File Name
-
the relative (short) name of the data file. This field can contain wildcards (specifically, regular expressions) which allows to handle a collection of files. You can also define a directory. Then all files in the directory are handled. Examples are:
trace*.trc - all trace files that contain a generated date.
*.rep - all report files with the extension 'rep'.
??data.dat - all files that start with two characters and end with 'data.dat'.
C:\myDataDirectory\ - all files that are contained in this directory.Wildcard support depends on the specific agent that uses this file name specification. For example, the meta controller does not support wildcards. Check the corresponding agent documentation for more information. - File Format
-
the format of the data contained in an LDIF content file. This item is only used in connection with content type LDIF. It can take one of the following values:
- UNKNOWN
-
a default value used for all files with a content different from LDIF.
- TAGGED
-
the content of the file is tagged; that is, each item is in a separate row and written as <name><separator char><value>, for example Name:Miller.
- NON-TAGGED
-
in an untagged data file, an individual attribute is identified based on its position in an entry. Attributes are separated by an attribute separator or a field width for the attribute can be defined. Example: …|John|4375|Senior Developer|…
- LDIF-CHANGE
-
a data file in LDIF change format, containing a list of directory modifications. Each entry in the change file contains a special LDIF "changetype" attribute that indicates the type of directory modification to be made. Example:
dn: cn=Joe Isuzu, ou=sales, o=Isuzu, c=us
changetype: delete - FLAT-XML
-
a simple XML format that contains objects and their attributes.
- DSML
-
directory Service Markup Language (DSML) V1 format.
- Content Type
-
the content type of the data file. This could be one of the following items:
- UNKNOWN
-
an unknown or unspecified content.
- INI
-
the data file contains configuration data in an INI file format.
- LDIF
-
the content is structured in an LDAP directory interchange format.
- TCL
-
the data file contains a Tcl script.
- XML
-
the content of the data file is structured in XML format.
- Encoding
-
the character encoding of the file. You can use any valid code set. See the DirX Identity Meta Controller Reference for details about code sets.
Note: By default, we use UTF-8 for all meta controller files and ISO-8859-1 for all other files (most agents cannot currently handle UTF-8). - *Keep Spaces
-
by default, leading and trailing spaces are removed from all attributes. Setting this flag allows for keeping spaces.
- Save Mode
-
the save mode of the data file within the workspace.It can take one of the following values:
- PERMANENT
-
the file is stored permanently in the work area, which means it will exist even after the synchronization activity is finished.
- TEMPORARY
-
the file will exist for as long as the synchronization activity is running.
Files that are needed as input for succeeding steps (activities) must be set to PERMANENT. - Copy to Status Area
-
whether or not the file is copied to the status area after the activity is finished.
Related Topics
INI File
Tcl Script
XML File
Files
The Files tab lists all of the data files that comprise a connected directory.Use this tab to add files to or delete files from the connected directory.
- Data File
-
the list of data files that comprise the connected directory.To insert or delete a file, use the respective button on the right.To display the properties of a data file, clicking on it, then click the Details button on the right.
| If you create a new connected directory in the Global View, the Files tab will be empty during the copy procedure.The tab is filled in when you copy a workflow that uses this connected directory.The workflow copy procedure automatically creates all necessary data files in the connected directory and links the newly created channels to it.Do not create data files by hand during the connected directory copy procedure. |
If DirX Identity were to copy all data files during the creation of the connected directory, a lot of unnecessary data files would be created that workflows would never use.
Related Topics
File Item
The properties of the indicated file, which may be a data file, a trace file, and so on.
- Name
-
the name of the data file configuration object.
- Description
-
the description of the data file.
- Version
-
the version of the data file object.
- File Name
-
the name or (optionally) path name of the file that must be recognized for status handling or generated before an agent is run by the agent controller.This field can contain wildcards (specifically, regular expressions) which allows handling a collection of files.You can also define a directory.Then all files in the directory are handled.Examples are:
trace*.trc - All trace files that contain a generated date.
*.rep - All report files with the extension 'rep'.
??data.dat - All files that start with two characters and end with 'data.dat'.
C:\myDataDirectory\ - All files that are contained in this directory. - Content Type
-
the content type of the data file. This could be one of the following items:
- UNKNOWN
-
An unknown or unspecified content.
- INI
-
the data file contains configuration data in an INI file format.
- LDIF
-
the content is structured in an LDAP directory interchange format.
- TCL
-
the data file contains a Tcl script.
- XML
-
the content of the data file is structured in XML format.
- Encoding
-
the character encoding of the file. Use any of the valid code sets. See the DirX Identity Meta Controller Reference for details.
By default, we use UTF-8 for all meta controller files and ISO-8859-1 for all other files (most agents cannot currently handle UTF-8). - Save Mode
-
the save mode of the data file within the workspace. It can take one of the following values:
- PERMANENT
-
the file is stored permanently in the work area, which means it will exist even after the synchronization activity is finished.
- TEMPORARY
-
the file will exist for as long as the synchronization workflow is running.
- Copy to Status Area
-
whether (checked) or not (unchecked) the file is copied to the status area after the activity is finished.
Related Topics
Query Folder
A query folder is a stored query that is used to filter a set of objects out of a much larger one. Use this tab to specify the filter criterion.
- Name
-
the name of the folder.
- Description
-
the description of the folder.
- Version
-
the version number of the folder.
- Search Scope
-
the scope for the search operation. Specify one of the following values:
- 0-BASE OBJECT
-
the search operation is performed on its start point only.
- 1-ONE LEVEL
-
the search operation extends to the start point and all objects that have the start point as their parent.
- 2-SUBTREE
-
the search operation extends to the whole subtree below its start point.
- Search Filter
-
the search criterion in LDAP syntax; for example:
"(&(dxmResult=closed.completed.ok)(objectclass=dxmWorkflowStatusData))"
The following expression types can be used in the filter for time attributes:
-
$base or $(base) - represents the current time, depending on base. base can be:
NOW or gmtime or time - the current time in GMT.
localtime - the current time in local time zone.
date - the time of this day start in GMT.
localdate - the time of this day start in the local time zone.
Examples:
dxrExpirationDate>=$NOW- retrieves all entries that will expire in future.
&(dxrStartDate>=$(date))(dxrStartDate⇐$(time))- retrieves all entries that were activated today up to now. -
$base operation constant or $(base operation constant) - the time plus or minus a constant. The format of constant is:
nynMndnhnmns
where n is the number of time units. The time units are:
y years
M months
d days
h hours
m minutes
s seconds.
The order of time units is fixed, but each unit is optional. For example:
(dxrStartDate>=$(NOW-3h))- retrieves all entries that were created within the last three hours.
(dxrExpirationDate⇐$(gmtime+1y6M))- retrieves all entries that expire in one and a half year.
A number without a time unit indicates days. -
$base operation $variable or $(base operation $variable) - the current time plus or minus a variable.The values of these variables are the values described above for constants; for example:
(dxrStartDate>=$(NOW-$Delta))- each time the filter is evaluated (select it or use the refresh button to start the evaluation) the variable is displayed with the previously entered value.Change the value if necessary and click OK. -
$variable - the specified value is used in the filter, for example:
cn=$StartsWith*- selects all objects where cn starts with the specified value.Each time the filter is evaluated (select it or use the refresh button to start the evaluation) the variable is displayed with the previously entered value.Change the value if necessary and then click OK.
- Max Result
-
the maximum number of entries to be returned.
Specific Attributes
DirX Identity can extend objects with virtual or specific attributes.
You can find specific attributes in any tab of an object.The display of these attributes does not differ from that of regular LDAP attributes.
All specific attributes that are not displayed in any of the other tabs are visible in the Specific Attributes tab.You can use the Specific Attributes Editor to add, modify or delete specific attributes in that tab.
Attributes visible in the Specific Attributes tab are extensions of the object that are not yet described by the XML object description.
Please note that references can either refer to regular LDAP attributes or to specific attributes.Examples are:
-
<?Job@dxmDisplayName/> for a regular LDAP attribute.
-
<?Job@dxmSpecificAttributes(Trace)/> for a specific attribute either visible directly in the specific attributes tab or in one of the other tabs.
To learn more about references, see the chapter "Customizing Object References" in the DirX Identity Customization Guide.
Related Topics
"Using the Specific Attributes Editor" in the DirX Identity User Interfaces Guide
Tcl Content
Use this tab to edit the content of a Tcl script file or a mapping function.A special editor is provided to make the creation or modification of the script or the function as simple as possible.However, basic knowledge about the Tcl language is necessary for all modifications.For usage information on the Tcl editor, see the help topic in the DirX Identity Manager online help.
| There are Tcl content windows that allow viewing but not editing.This is the case for the mapping script, where the content is created automatically when you edit the Mapping Item tab.Therefore you should not change this created content (all your changes would be lost after each change of the Mapping Item tab). |
| Another reason for a non-editable content tab is that this script is located in the DirX Identity installation area.Therefore you can only see a copy for informational viewing at the user interface level.This content also cannot be edited because this would not be reflected in the script that is really used by the workflows.Never change these scripts, because they might be changed during each update of the DirX Identity software (installation or patch).If you want to change a piece of this information, copy the routine from the script and put it into your local user_hooks script.Modify it accordingly and it will replace the original function. |
Related Topics
XML Content
Use this tab to edit the content of an XML file.XML files have pure text content and can therefore be edited with any text editor.DirX Identity Manager provides a simple editor control for this purpose.The two buttons below the editor enable the user to either export or import XML files.
- Import text…
-
click to import a text file which will then replace the current content of the XML file.A file browser dialog is shown to select the file to be imported.
- Export text…
-
click to export the current content of the XML file into an external text file.A file browser dialog is shown to select the desired directory and to type in the name of the text file.
Related Topics
XML File
XML files are used in DirX Identity to define the extensions to any configuration object by Extensible Markup Language (XML) items.Extensions are especially needed for connected directory and job descriptions as well as for wizard configurations.
Use this tab mainly to assign a name to the XML file object.The properties shown in this tab are:
- Name
-
the name of the XML file.
- Description
-
the description of the object.
- Version
-
the version number of the XML file.
| If the XML file defines a wizard, we recommend that the wizard name specify the types of directories at the endpoints of the workflow (for example, LDAP and FILE).Between these endpoint values, you can include other information (for example, LDAP-3step-FILE) to identify a more specific wizard. |
Related Topics
Object Descriptions
A folder for DirX Identity Manager object extension design.Use this tab to assign a name to this folder.
- Name
-
the name of the folder.
- Description
-
the description of the folder content.
Related Topics
Wizards
A folder for DirX Identity Manager wizard design.Use this tab mainly to assign a name to this folder.
- Name
-
the name of the folder.
- Description
-
the description of the folder.
Related Topics
Agent
An agent configuration object describes the configuration data associated with a particular agent.Use the agent configuration object to describe each agent that is present in your Identity environment.Agent configuration objects can describe customer-supplied agents and agents developed by other companies in addition to the agents supplied with DirX Identity.
An agent typically synchronizes only one type of connected directory, but the meta controller is an example of an agent that synchronizes multiple directory types (LDAP and file-based).
The path to the agent’s executable can be an absolute pathname or simply the name of the agent’s executable file.When the path is the file name, the operating system facilities based on the path variable are used to find the executable.
DirX Identity supports any type of executable; for example *.exe, *.cmd or *.bat executable files on Windows systems.
The path property can also specify a "wrapping" batch file that the DirX Identity runtime is to call to perform pre- or post-processing functions in addition to the agent’s execution.Adding a wrapping batch file allows you to extend an agent’s capabilities to work with all of DirX Identity’s features (for example, to prepare delta handling or to provide a more meaningful exit code that is derived by examining the trace file result).Be careful when using batch files to extend an agent’s functionality, because batch files are operating system-dependent.
Use this tab to establish an agent’s properties.
- Name
-
the name of the agent.
- Description
-
the description of the agent.
- Version
-
the version number of the agent.
- Wrapper required
-
whether the agent needs an agent wrapper (checked) or not (unchecked).
- Executable
-
the path of the agent executable. You can specify either a relative or absolute path.
As a rule, you should specify only the file name of the executable (for example, metacp.exe). This will start the agent in the work area and allow easy reconfiguration when changing the C++-based server or the work path. If you specify the executable without the extension (for example, metacp), the agent can run on both Windows and UNIX.
Using an absolute path starts the agent in the specified directory, making reconfiguration more error-prone.
- OK Status
-
the agent exit codes that indicate error-free execution. DirX Identity assumes that all exit codes in this list represent an error-free run. You can use the OK Status property in the job configuration object that uses this agent to override the exit codes defined here. Use a semicolon (;) to separate multiple values in the list.
- Warning Status
-
the agent exit codes that indicate execution with warnings. DirX Identity assumes that all exit codes in this list represent runs with warnings. DirX Identity reports the warnings indicated by these exit codes but does not abort the workflow. You can use the Warning Status property in the job configuration object that uses this agent to override the exit codes defined here. Several values in this list must be separated by a ';' character.
DirX Identity considers all other agent exit codes to represent an erroneous run and stops the workflow’s execution.
If the OK Status and Warning Status properties of a job and the agent have no values, DirX Identity treats each exit code as error. Hence you must at least specify one of the agent’s success exit codes - usually exit code 0 - to make DirX Identity treat it as success.
- Abort Execution Allowed
-
whether or not DirX Identity should stop the agent’s execution when an exception occurs (typically as the result of manually aborting a workflow or shutting down the C++ server). By default, DirX Identity does not stop agent execution because the operation kills the related agent process, which can destroy parts of the information or make it inconsistent. Check this field to stop the agent’s execution on exception.
- Agent Type
-
the agent’s type (for example, NT, Exchange, Notes, and so on).The agent type corresponds to an agent type configuration object.You can select another agent type here.Perform Reload Object Descriptors afterwards or restart the DirX Identity Manager.This will change the display behavior of all related Job objects.
- Directory Types
-
the connected directory types that the agent can handle.
- Download AttrConf
-
whether (checked) or not (unchecked) to download attribute configuration files.The meta controller needs attribute configuration files to control its operation.Check this field if your agent is based on the meta controller or needs a download of these files for other reasons.
Related Topics
Agents
A folder for the agent configuration objects in the Connectivity configuration database.Use this tab to assign a name to the agent folder.
- Name
-
the name of the folder.
- Description
-
the description of the folder.
Related Topic
Agent
Collection
A collection consists of a set of objects, subtrees, rule-based and sub-collections objects to be exported to an LDIF file. A collection is a powerful method for exchanging data between different instances of Connectivity databases.Typically, you use it to export object sets into your software configuration system or to transfer them from the development system to an integration or production system.The data is stored in LDIF file format.
| The LDIF file format depends on the collection properties in the dxi.cfg file.See the DirX Identity User Interfaces Guide for more information about this file. |
For more information about transporting data with collections, see the chapter "Transporting Data" in the DirX Identity User Interfaces Guide.
| The objects covered by a collection can be also deleted from the LDAP store. Use this functionality very carefully. |
Use this tab to define a set of objects, subtrees or rule-based object collections to be exported.
- Name
-
the name of the object.
- Description
-
the description of the object.
- Version
-
the version number of this object.
- Path
-
the path to which the LDIF file is to be written. Use the file selector box to define the path.
- Objects
-
the objects to be exported. During the export operation, this list of objects is exported to the LDIF file. Only the defined object is exported, no subtrees or linked objects. You can define the objects with an object selector box.
- Subtrees
-
the subtrees to be exported. After the export of the object list, the listed subtrees are exported to the LDIF file. You can define the subtrees with an object selector box.
- Rule-based
-
the rule specification to use when exporting objects. After the export of the subtree list, the listed objects are exported based on a rule specification. Set the rule link to a rule definition.
- Collections
-
the collections to be exported. After the export of the rule-based list, the defined list of collections is exported into the defined file of this collection (see the Path specification).
Related Topics
"Using Collections" in the DirX Identity User Interfaces Guide.
Collections
A folder for collection configuration objects. Use this tab to assign a name and a meaningful description to the collection folder.
- Name
-
the name of the folder.
- Description
-
the description of the folder.
Related Topics
"Using Collections" in the DirX Identity User Interfaces Guide.
Collection Rule
A collection rule is an XML-based rule that defines the export rule for the rule-based tab in the collection object.
Use this tab to define a set of objects and subtrees to be exported.
- Name
-
the name of the object.
- Description
-
the description of the object.
- Version
-
the version number of this object.
- Content
-
the rule definition in XML format.
A collection rule is to be defined in XML format, for example:
<rule>
<entry classes="dxmWorkflow" childLevel="1">
<link attribute="dxmActivity-DN" />
</entry>
<entry classes="dxmActivity" childLevel="1">
<link attribute="dxmRunObject-DN" />
</entry>
...
</rule>
This example exports a Tcl-based workflow object, follows the links to the activities, exports these items and then follows the links to the run objects (typically jobs or other workflow definitions).
The full syntax is:
<rule>
<entry classes="objectclasses" [filter="filter"] [childLevel="childLevel"] [parentLevel="parentLevel"] [action="action"] >
 [<matchFilter ...> ... </matchFilter>]
 [<childFilter ... > ... </childFilter>]
 [<parentFilter ...> ... </parentFilter>]
 [<link attribute="linkAttribute"/>]
 [<link attribute="linkAttribute">
    <entry classes="objectclass" [filter="filter"] [childLevel="childLevel"] [parentLevel="parentLevel"] [action="action"] >
      [<matchFilter ...> ... </matchFilter>]
      [<childFilter ... > ... </childFilter>]
      [<parentFilter ...> ... </parentFilter>]
    </entry>
    ...
 </link>]
...
</entry>
...
<!-- use this default entry to process objects that are not yet matched by previous rules -->
</entry classes="*">
</rule>
with these sub elements:
- objectclasses
-
a space or comma separated list of object classes that is used in the LDAP search to retrieve this type of objects.
- filter (optional)
-
if an LDAP filter is defined, only the objects that match the filter condition are exported.
Filter definitions must be enclosed in brackets, for example use "(cn=RoleCatalogue)" instead of "cn=RoleCatalogue".
Alternatively you can specify a matchFilter DSML filter clause. - childLevel (optional)
-
the depth of the sub tree to be exported. Possible values are:*
ignore* - ignore this entry completely
none - ignore this entry but follow the links
all or 0 - the whole subtree
1 - just this entry and no sub objects (default value).
2 - this entry and one level of sub objects
3 - this entry and two levels of sub objects
… - ldapFilter
-
exports all children down to the level where the LDAP filter condition is valid (this object and lower level objects are not exported).
Note that filter definitions must be enclosed in brackets, for example use "(cn=RoleCatalogue)" instead of "cn=RoleCatalogue".
Alternatively you can specify a childFilter DSML filter clause. - parentLevel (optional)
-
the level of parent objects to be exported. Possible values are:*
none -* no parents (default)
all or 0 - all parents
1 - one level of parents above the given entry
2 - two levels of parents above the given entry-
+
-
- ldapFilter
-
exports all parents up to the level where the LDAP filter condition is valid (this object and higher level objects are not exported).
Note that filter definitions must be enclosed in brackets, for example use "(cn=RoleCatalogue)" instead of "cn=RoleCatalogue".
Alternatively you can specify a parentFilter DSML filter clause. - action (optional)
-
an action that defines how the entry is processed:
default - processes the entry (export or delete). This is the default.
skip - this entry is not exported or deleted but its child and parent definitions are processed. - linkAttribute (optional)
-
the name of the attribute to be followed to other objects.
Use this syntax to define a specific attribute: "dxmSpecificAttributes:channelparent".
When processing an LDAP object (for example a user), then the entry elements are processed sequentially from top to bottom and the first matching element is used to process the object.
| Entries can contain link definitions. Link definitions can itself contain entry definitions and so on. This allows defining a different behavior for the same object at different levels. It is also a means to control endless loops effectively. The inner elements have higher priority than the root elements of the same type. |
Collection Rules
A folder for collection rule objects. Use this tab to assign a name and a meaningful description to the collection folder.
Name - the name of the folder.
Description - the description of the folder.
Related Topics
"Using Collections" in the DirX Identity User Interfaces Guide.
Collection Rule Syntax
This section describes the collection rule syntax, which is based on the XML Schema Definition (XSD).
Element rule - the root element of the collection rule. A collection rule is XML-based content that defines the export strategy for an LDAP object.
- Child elements
-
-
entry
-
occurrence: 0-unbounded
-
-
Element entry - the object exporting strategy.
- Attributes
-
-
classes - comma- or space-separated object class names. An entry matches an object if all values in classes are contained in the objectClass attribute of the object. It provides a basic entry filter. The value * matches any object class, which enables you to specify a "default" entry.
-
type: string
-
use: required
-
-
childLevel - the scope to use to export from the current object; that is, the depth of the subtree to be exported. Values can be all (all children), none (no children), 1 (the object only), 2..n (object and 1 or n direct children). See levelValues for details.
-
type: levelValues
-
use: optional
-
default: 1
-
-
parentLevel - the level to use to export parent objects. Values can be all (all parents), none (no parents), ignore (ignore entry), 1 (direct parent), 2..n (level of parents). See levelValues for details.
-
type: levelValues
-
use: optional
-
default: none
-
-
action - actions that are applied to the processed object. See actionValues for details.
-
type: actionValues
-
use: optional
-
default: default
-
-
filter - obsolete. Use the matchFilter element instead. The LDAP filter definition must be enclosed in brackets, for example, use "(cn=RoleCatalogue)" instead of "cn=RoleCatalogue".
-
type: ldapFilter
-
use: optional
-
-
- Child elements
-
-
link - the object attribute that must be followed if an object related to this entry is exported.
-
occurrence: 0-unbounded
-
-
matchFilter - an entry matches an object (object will be processed by the entry) if the object matches the filter. The filter provides finer object-matching. The filter is specified in DSML format. The dsml namespace declaration is necessary.
-
occurrence: 0-1
-
-
childFilter - stop exporting the children subtree if the filter is not matched.
-
occurrence: 0-1
-
-
parentFilter - stop exporting the parents subtree if the filter is not matched.
-
occurrence: 0-1
-
-
- Parent elements
-
-
rule
-
link
-
Element link - the attr link-following strategy.
- Attributes
-
-
attribute - the name of the attribute to be followed to other objects. To define a specific attribute, use, for example, "dxmSpecificAttributes:channelparent".
-
type: string
-
use: required
-
-
- Child elements
-
-
entry - the export configuration of the object to which this link points. That is, that link definitions can themselves contain entry definitions and so on. This configuration allows defining a different behavior for the same object at different levels and allows for effective control of endless loops. The inner "entry" elements are considered with higher priority compared to root "entry" elements of the same type.
-
occurrence: 0-unbounded
-
-
- Parent elements
-
-
entry
-
Element childFilter - the DSMLv2 syntax filter used to find the matching entry for the processed object.
- Parent elements
-
-
entry
-
Element parentFilter - the DSMLv2 syntax filter that stops exporting of parents if the filter is matched.
- Parent elements
-
-
entry
-
Element matchFilter - the DSMLv2 syntax filter used to define the condition for children nodes that are exported.
- Parent elements
-
-
entry
-
Simple type ldapFilter - obsolete. Use DSML filters instead. Restricts the parents / children nesting level.
- Patterns
-
-
[!&|]{0,1}(.*) - the filter is specified in LDAP format, for example, (objectclass=dxrContainer).
-
Simple type levelValues - export parents / children nesting level.
- Patterns
-
-
none - do not export parents / children, but do export links.
-
all - export all parents / children of the entry.
-
[1-9][0-9]* - export parents / children up to the given level specified by a positive number.
-
ignore - obsolete. Use the action attribute to skip objects. Do not export any direct parents / children and links.
-
inherit - For the childLevel attribute, adopt the nesting level from the superior entry. This pattern has no meaning for the parentLevel attribute (it is the same as none).
-
[!&|]{0,1}(.*) - obsolete. Use the childFilter / parentFilter elements to define the DSML filter. Specifies the LDAP filter. Stop processing at first parent / child that does not meet the filter. The filter is specified in LDAP format, for example (objectclass=dxrContainer).
-
Simple type actionValues - actions to be applied on the processed object.
- Patterns
-
-
default - perform the normal processing of the object (export or delete).
-
skip - skip exporting / deleting of the matched object itself, but continue processing on parents / children / links. Ignoring parents / children is driven by parentLevel and childLevel.
-
Related Topics
"Using Collections" in the DirX Identity User Interfaces Guide.
|
Hints for filter definitions You can specify filter definitions in LDAP or DSML syntax.
See also the delivered sample rules for sequentially more complex examples. |
Related Topics
"Using Collections" in the DirX Identity User Interfaces Guide.
(Central) Configuration
The (central) configuration folder object contains a number of global parameters that control the operations of the C++-based Server, workflow engine, agent controller, scheduler and status tracker components.Be careful when changing these parameters, because the changes you make can have a tremendous impact on DirX Identity runtime operation.
The subtree under the Central Configuration object contains other important objects for global configuration.
| All of these objects are marked with a red border and the text "This object might be shared because it belongs to the Configuration folder".Be careful when editing such objects because this could affect other objects, too. |
Use these tabs to set up the central configuration data.See the section "Basic Rules for Central Configuration Object Parameters" for correct setting of the following properties:
- Global Configuration
-
- Name
-
the name of the central configuration definition.
- Description
-
descriptive text for this object.
- Version
-
the version of this configuration entry.
- HA enabled
-
whether (checked) or not (unchecked) high availability is enabled for this domain. Before checking this flag, make sure you set the other high availability parameters correctly, especially those for defining the monitoring circle and the ports for backup adaptors.
- SSL
-
whether (checked) or not (unchecked) to secure connections between the Message Brokers in this domain and their JMS clients with SSL/TLS.
- Proposals
-
central configuration lists that can be used in mapping functions or other Tcl scripts. Note: presently not in use.
- Server
-
- Polling Time
-
the time between the checks for urgent requests such as aborts and keep-alives. The checks can be made by the C++-based Server or other components. The syntax format is hh*:*mm*:*ss. The default is 5 seconds.
- Keep Alive Time
-
the time between the C++-based Server’s checks on whether static threads like the scheduler and the status tracker are still running. If not, these components are automatically restarted. The default is 5 minutes. The wait time until a new component is started is calculated as 10 times the timeout defined in the dxmmsssvr.ini file (per default 30 seconds) plus the polling time (see above) which results per default to 10 x 30 +5 = 305 seconds (about 5 minutes). The syntax format is hh*:*mm*:*ss.
- Latency Factor
-
the latency factor, expressed as a percentage. DirX Identity uses this value when calculating timeout values for workflows and jobs. Specifically, it multiplies a given timeout value with this factor. The default is 20%. Workflow timeout values are calculated as the sum of all job timeout values.
- Thread Life Time
-
the time a thread can run in the C++-based Server. The default is 24 hours. Increase this value if you have workflows that run longer than 24 hours. The syntax format is hh*:*mm*:*ss.
- Thread Cleaner Interval
-
the time between executions of the thread cleaner (part of the C++-based Server). The syntax format is hh:mm:ss. The default is 30 minutes.
- Encryption Mode
-
the attributes to be encrypted:
- None
-
No encryption
- AdminPW
-
Administrative passwords are encrypted (passwords of DirX Identity’s bind profiles that are needed to connect to the connected directories).
- Attributes&AdminPW
-
Attributes and administrative passwords are encrypted.
- Status Tracker
-
- Status Life Time
-
the default maximum time that status entries and related files will be retained following execution of a workflow. The syntax format is hh:mm:ss. The default is 1 month (720 hours). You can use the Status Life Time property of a workflow configuration object to set a workflow-specific status lifetime.
- Status Compression Mode
-
Allows influencing the detail level and amount of status messages for all workflows (default configuration). This switch can help reducing load on the status tracker or simply avoid uninteresting status entries. These levels are available:
- 0 - Detailed
-
Detailed messages are sent during the workflow lifetime (compatibility mode, default)
- 1 - Compressed
-
Status messages are collected during the workflow run as far as possible and sent at the very end of a workflow. This reduces the number of status messages by 50 % or more.
- 2 - Minimized if OK
-
Only a workflow status entry is generated at the very end of a workflow if the workflow ends with status OK. No activity status entries are generated and no data is copied to the status area.
- 3 - Suppressed if OK
-
No status information is created at all and no data is copied to the status area if the workflow ends with status OK.
-
You can use this default switch and you can set this feature at each workflow entry individually.
- Start Time
-
the start time for running the status tracker to delete status entries that have expired.
- Time Interval
-
the time between executions of the status tracker to delete status entries. The syntax format is hh:mm:ss. The default is 24 hours.
- Deviation
-
the maximum allowed deviation for running the status tracker to delete status entries. This is a plus range around the Start Time. The syntax format is hh:mm:ss. The default is 2 hours.
- Monitor only Provisioning Errors
-
whether (checked) not (unchecked) monitor entries from the Java-based Provisioning workflows contain only error messages or other types of messages as well. By default, monitor entries for Java-based Provisioning workflows contain messages like “INF(JOIN208): Object "cn=Alexander Gerber 5217,ou=accounts and groups,ou=Intranet,o=sample-ts" successfully modified.” in addition to potential error messages. Check this flag to suppress these types of messages and capture only error messages in monitor entries. As this flag is evaluated inside the Java-based Server, changing the flag does not immediately affect running Java-based Servers. A Load IdS-J configuration will propagate this change to the running Java-based Server. Internally the server periodically rereads/refreshes this flag every 30 minutes.
- Scheduler
-
- Schedule Sync Interval
-
the interval between the scheduler’s checking of its schedule configuration objects. Changing a schedule object in the DirX Identity Manager forces the scheduler to reread the new schedule information. If this trigger mechanism does not work correctly, the scheduler rereads all schedules regularly at the interval specified here. The syntax format is hh*:*mm*:*ss. The default is 1 hour.
- Disable Scheduling
-
enables/disables scheduling at all connected C++-based servers. You can also switch this flag with the Disable/Enable Scheduling menu at the Schedules folder.
- Specific Attributes
-
This tab allows you to set global parameters that are valid for all scenarios.
- Sub-Folders
-
The central configuration object contains the following subfolders:
Agent Types
Connected Directory Types
Connector Types
DirX Identity Servers
GUI
JavaScripts
Messaging Services
Notifications
Resource Families
Services
Standard Files
Supervisors
Systems
TCL
Topics
Related Topics
Agent Types
A folder for agent type configuration objects.Use this tab to assign a name to the agent type folder.
- Name
-
the name of the folder.
- Description
-
the description of the folder.
Related Topics
Agent Type
The Agent Types selection is a folder for the property descriptions of all the standard agent types supplied with DirX Identity.It allows for the extension of DirX Identity with new agents.The details of these types are described by a corresponding XML file (for example, the tabs and properties of the object) that is located in the folder Object Descriptions.
When you create a new agent type, it inherits the properties of one of the standard agent types.Consequently, you only need to describe in the XML file the differences between your new agent type and the standard one on which it is based.See chapter "Customizing Objects" in the DirX Identity Customization Guide for details.
The Wizards folder contains all wizards defined for this agent type.You can define additional wizards.
Because agents can have typical configuration files (for example, for import or export) you can place these files underneath the corresponding agent type configuration object.These central configuration files can then be referenced from any job, and edits to a central configuration file object apply to all jobs that reference the object.If your environment does not require this kind of centralization, you can keep the configuration files directly underneath the corresponding job configuration object.In this case, the files are set up as job-specific configuration files.
Use this tab to assign a name for the agent type.The properties shown in this tab are:
- Name
-
the name of the agent type. This name must match the corresponding tag in the XML file.
- Description
-
the description of the agent type.
An agent type configuration object can be refined by an optional XML file configuration object. If an agent type does not have an associated XML file, it is represented as a generic agent type.
Agent type configuration objects can contain sub-objects; for example, Tcl script or "ini" file templates.
Related Topics
Connected Directory Types
The Connected Directory Types selection is a folder for the property descriptions of all the standard directory types supplied with DirX Identity. It allows you to extend DirX Identity with new connected directory types. The details of these types are described by a corresponding XML file (for example, the tabs and properties of the object) that is located in the folder Configuration Objects.
Use this tab to assign a name to the connected directory type folder.
- Name
-
the name of the folder.
- Description
-
the description of the folder.
Related Topics
Connected Directory Type
The connected directory type configuration object defines a particular type of connected directory.The connected directory type object helps you to define new customer-specific directory types and integrate already existing synchronization solutions into a DirX Identity scenario with full control by the DirX Identity Manager.
When you create a new connected directory type, it inherits the properties of one of the standard connected directory types.Consequently, you only need to describe in the XML file the differences between your new connected directory type and the standard one on which it is based.See chapter "Customizing Objects" in the DirX Identity Customization Guide for details.
The Wizards folder contains all defined wizards for this connected directory type.Additional wizards can be defined by the customer.
Because connected directories can have typical information (for example, the attribute configuration information of a standard schema), you can place this information underneath the corresponding connected directory type configuration object.These central files can then be referenced from any connected directory, and edits to this central object apply to all of these connected directories that reference the object.If this centralization is not necessary, you can keep the files directly underneath the corresponding connected directory configuration object.In this case, the files are set up as directory-specific attribute configuration files.
Use this tab mainly to assign a name to the connected directory type.
- Name
-
the name of the connected directory type. This name determines the display behavior of all objects based on this type. For the related XML description see the Object Descriptions folder beyond this object.
- Description
-
the description of the connected directory type.
- Type
-
the type of the connected directory. This field is used by the meta controller to determine the channel type to be handled (see the conn_param(dir_type) references in the control.tcl script). Typical values the standard script can handle are File and LDAP.
A connected directory type configuration object can be refined by an optional XML configuration object. If a connected directory type does not have an associated XML file, it is represented as a generic connected directory object.
Related Topics
Connector Types
The Connector Types folder collects the set of all connector types known to DirX Identity. There is a subfolder for each connector type. This allows you to extend DirX Identity with new connectors. Currently, the only object you need to supply for a new connector is an object description for the Set Password workflow. It is located in the folder Object Descriptions and contains the list of modifiable properties for the workflow configuration and the description how to present them in the Manager.
The Wizards folder contains all wizards defined for this connector type. This folder is currently not used and is reserved for future extensions.
Use this tab to assign a name to the connector type folder.
- Name
-
the name of the folder.
- Description
-
the description of the folder.
Related Topics
Connector Type
A connector type object defines a particular type of connector.With the help of the connector type configuration object, the user is able to define new customer-specific connector types and can thus integrate new custom connectors built with the Identity Integration Framework into DirX Identity.
Use this tab to assign the parameters for the connector type.The properties shown in this tab are:
- Name
-
the name of the connector type.
- Description
-
the description of the connector type.
- Version
-
the version of the connector type.
- Programming Language
-
the programming language used. This value restricts the servers where this connector can be deployed; C++ and C# type connectors can run within IdS-C, Java type connectors can only run within IdS-J.
Available values are:- C++
-
standard object-oriented C++ language
- C#
-
Microsoft’s C# language (not yet available)
- Java
-
Oracle’s Java programming language
- Shared Library
-
the shared library that implements this type of connector.
- Connected Directory Type
-
the type of connected directory the connector can handle.
Connector type configuration objects can contain sub-objects; for example an "ini" file template.
Related Topics
DirX Identity Servers
A folder for the DirX Identity server configuration objects in the configuration database under (Central) Configuration.
- Name
-
the name of the folder.
- Description
-
descriptive text for this object.
The folder contains all configured Java-based and C++-based Servers as sub-objects.
Related Topics
Adaptor - General
Adaptor entries reside below Java-based Server (IdS-J) entries and represent an adaptor that reads events from an event source.
Use this tab to specify the following adaptor properties:
- Name
-
the name of the adaptor.
- Description
-
a description of the adaptor.
- Active (read-only)
-
whether or not the adaptor is active.If set, it indicates that this adaptor is loaded into the Java-based Server.
- Subscription ID (read-only)
-
the name of the adaptor. It must be unique within all the adaptors of the same Java-based Server. When subscribing to JMS topics, it helps to build a unique client identification together with the domain and IdS-J name.
- Wait before retry (ms)
-
the wait time before a retry after a connection problem to the Java Messaging Service (JMS) has occurred (default: 30 seconds).
- Encoding (read-only)
-
the encoding of the XML configuration.
- Topic
-
the name of the queue from which the adaptor reads or the topic to which the adaptor subscribes. If it subscribes to a topic, this is the part that identifies the type of messages. The topic is built as follows: domain*.prefix.*cluster
- Broadcast interval (ConfigurationHandler only)
-
the interval in minutes at which the JMS list is broadcast to all subscribers (PasswordListener).
Related Topics
Adaptor - Limits
Use this tab to specify the following properties:
- Purger
-
removes already deleted events from the adaptor queue.
- Interval (ms)
-
the interval between purger runs (default: 60 seconds).
- Time Limit (ms)
-
the maximum time for a purger run (default: 15 seconds).
- Priority
-
thread priority (default: 8).Value range is 1 (low) to 10 (high).
- Pending Requests
-
defines upper and lower limits for the number of pending requests.
- High Water
-
the maximum number of pending requests stored in this adaptor’s workspace.If this limit is reached, the adaptor stops reading events from the JMS queue.
- Low Water
-
the number of pending requests stored in this adaptor’s workspace when the server starts reading events from the JMS queue again.
- Repository
-
parameters for the adaptor-specific repository most-recently-used cache in memory.
- MRU Cache Capacity (read-only)
-
units (requests) held in memory (default: 1500). The rest is kept in the file-based repository.
- MRU Segment Cache Capacity (read-only)
-
cache for faster access to the segment files (default: 50).
Related Topics
Adaptor - Configuration
This tab displays the complete XML definition for this adaptor configuration that is read as part of the Java-based Server configuration during server startup.
You can see that many values in the XML definition are expressed as variables, for example:
<technicalDomain>$\{DN4ID(THIS)@dxmTechnicalDomain}</technicalDomain>
or
<interval>$\{DN4ID(THIS)@dxmSpecificAttributes(purgerinterval)}</interval>
These variables are replaced by its values when the configuration is loaded. You can see the resolved XML definition in the server.xml file in the logs directory of the Java-based Server.
Related Topics
Java-Based Server - General
The Java-based Server (IdS-J) provides a runtime environment for Java-based workflows running in a distributed environment.An instance of a Java-based Server must run on each machine in the Connectivity domain where activities and connectors shall run.
The DirX Identity Java-based Server configuration object describes the configuration information for one instance.The DirX Identity installation procedure automatically creates a Java-based Server configuration object when selected during installation and configuration on a machine.
Use the Java-based Server tab to specify the following properties:
- Name
-
the name of the server.For the naming scheme, see the section "Naming Schemes".
- Description
-
a description of the server.
- State
-
the state of the server (read-only). Possible values are:
- STARTED
-
the server was successfully started.
- STOPPED
-
the server was intentionally stopped.
- Service
-
the service object that specifies the IP address and port number of the DirX Identity server performed at runtime. To display its properties, click the Properties icon on the right.
- Scheduler
-
whether (checked) or not (unchecked) the scheduler runs on this server. For each domain, exactly one server must host the scheduler for Java-based workflows.
When you select design mode  , you can display the server’s XML configuration in a Configuration tab. Changing the configuration requires extensive knowledge of the Java-based Server configuration. The configuration contains references to LDAP attributes that are resolved during server startup (Load IdS-J Configuration does not reload this configuration!). The resolved XML configuration can be found and checked in install_path\ids-j-domain-Sn\log\server.xml. , you can display the server’s XML configuration in a Configuration tab. Changing the configuration requires extensive knowledge of the Java-based Server configuration. The configuration contains references to LDAP attributes that are resolved during server startup (Load IdS-J Configuration does not reload this configuration!). The resolved XML configuration can be found and checked in install_path\ids-j-domain-Sn\log\server.xml.
|
| If you change attributes in this tab, you must restart the Java-based Server. Running the "Load IdS-J Configuration' command is not sufficient because it only loads the workflow definitions. Server restart is also necessary if attributes of a related object (service, system or messaging service) are changed. |
Related Topics
Java-based Server - Domain
Use this tab to define domain-specific parameters, including:
- Domain
-
the name of the Provisioning domain on which this server operates.
- Request Workflow Timeout Check (read-only)
-
whether (checked) or not (unchecked) this server hosts the Request Workflow Timeout Check job for the Provisioning domain.The Request Workflow Timeout Check (previously named Full Check) is a special job that regularly checks timeouts of request workflows and their activities.If it detects a timeout, it sends a request so that the workflow engine updates the workflow state and, for example, terminates the activity or workflow.The Request Workflow Timeout Check job must run on exactly one server per domain.
Related Topics
Java-based Server - Connectors
Use this tab to display a list of connectors and the following information about them:
- Name
-
the name of the connector.
- Version
-
the version of the connector.
- Shared Library
-
the shared library that implements this connector.
Select a connector and click the Properties button on the right to display the properties of this connector.
| The list is populated and updated automatically during the DirX Identity configuration procedure. If you want to install your own connectors, you should create a corresponding Connector Type and include it into the table to document this fact. |
| Changing attributes in this tab requires a restart of the IdS-J server. Using the command "Load IdS-J Configuration" is not sufficient because it only loads the workflow definitions. Server restart is also necessary if attributes of a related object (service, system or messaging service) are changed. |
Related Topics
Java-based Server - Repository
Use this tab to display and edit parameters for repository control and backup.
Repository Control
- Repository Folder
-
the folder of the persistent Java-based Server repository.All persistent information (for example the dead letter queue and the adaptor repositories) are written to this folder.The default is install_path/ids-j/repository.Specify a full path name.
Backup
You can define a regular synchronized backup for the Java-based Server and the DirX LDAP server.The repository content is saved to a configurable location in a consistent state (recoverable).To enable backup operation:
-
Set the parameters in this tab that enable backup.
-
Activate the real-time Joint Backup workflow.
-
Specify a schedule.
Backup parameters include:
- Active
-
enables/disables backup.
- Backup Folder
-
the folder where the backups are stored. The default value is install_path/ids-j/backup. The result is one zip file named account-nnnn-YYYYMMDD-HHMMSS-JavaRepository.zip for all Java-based Server repositories. Specify a fully-qualified existing path name. On Windows, you can use a shared network drive; but then the IdS-J service must run under a different account from the system account.
Note that during the backup procedure, all server activities are stopped.
| Changing attributes in this tab requires a restart of the IdS-J server. Using the command "Load IdS-J Configuration" is not sufficient because it only loads the workflow definitions. Server restart is also necessary if attributes of a related object (service, system or messaging service) are changed. |
Related Topics
Java-based Server - Limits
Use this tab to display and edit parameters for tuning and optimization.
Pending Requests
The server reads external events via the configured adaptors and stores them in its persistent workspace.Worker tasks can produce additional internal events.This section allows you to specify a limit for the maximum number of events stored in the workspace.
- High Water
-
the maximum number of events stored in the workspace after which the server should stop reading external events.
- Low Water
-
the number of events stored in the workspace at which the server should start reading external events again.
| the server checks this limit and the memory limit below. The first limit reached stops reading external events. |
Memory
The Java-based Server is configured to use a specific amount of memory. On the other hand, it reads external events and produces internal ones. Use the fields in this section to specify when the Java-based Server should stop reading external events and when it should start reading them again.
- High Water
-
the limit in % at which the Java-based Server stops reading external events.
- Low Water
-
the limit in % at which the Java-based Server starts reading external events again.
- GC Delay
-
the wait time in seconds after a garbage collection call. The garbage collector is called if an adaptor was suspended after reaching the high water limit. The garbage collector tries to free memory. If the low water mark is reached, the adaptor is re-activated.
| the server checks this limit and the pending request limit. The first limit reached stops the server from reading external events. |
Disk Usage
The Java-based Server is configured to check disk usage through logging and repository files. On the other hand, it reads external events and produces internal ones. Use the fields in this section to specify when the Java-based Server should stop reading external events and when it should start reading them again.
- High Water
-
the limit (as a percentage (%)) at which the Java-based Server stops reading external events.
- Low Water
-
the limit (as a percentage (%)) at which the Java-based Server starts reading external events again. At this point, warning messages are written to the server log file.
| set both values to 100 if you do not want to run the disk usage check |
Batch Queue
For better performance, the Java-based Server combines incoming requests to batch jobs that are processed by worker threads together. This procedure significantly reduces initialization per event.
- Queue Size (default 200)
-
the maximum number of events per batch job. When this limit is reached, the batch job is closed for further processing.
- Timeout (default 1000)
-
the maximum time in milliseconds to wait between incoming events unless the batch job is closed for further processing.
Tomcat
This part of the tab contains parameters of the embedded Apache Tomcat that you may need to adapt to your environment. Tomcat is used by the Web Admin and for request workflow handling.
- Maximum No. of Threads
-
the maximum number of threads that are used by the embedded Tomcat container in the server (default: 14).
Server-Specific Threads
This part of the tab contains some parameters that are related to specific server threads.
- No. of WorkflowengineThreads
-
the number of threads that are used for the workflow engine itself which starts and controls workflow activities (default: 2).
- No. of ResultEntriesThreads
-
the number of threads that are used for processing the end result of realtime events (default: 2). If you have a high amount of realtime events in your Identity environment, then it would make sense to increase the number of result entries threads.
| Changing attributes in this tab requires restarting the Java-based Server. Using the command "Load IdS-J Configuration" is not sufficient because it only loads the workflow definitions. Restarting the server is also necessary if attributes of a related object (service, system, or messaging service) are changed. |
Related Topics
Java-based Server - Resource Families
Use this tab to configure the resource families for each Java-based Server (IdS-J).This mechanism allows for controlling the number of threads for specific purposes in this server.As for load balancing, a subset of the messages is forwarded from one IdS-J to another, a message can be processed on every IdS-J in the same domain.As a result, make sure that all the resource families needed for running provisioning and request workflows are available on every IdS-J. The number of threads per server and resource family will indirectly influence the message load a server receives: the more slowly it processes messages, the fewer messages it will receive.
- Available
-
the list of available resource families that have not been assigned.
Note: You can change or extend this list under Configuration → Resource Families - Selected
-
the list of assigned resource families.For each resource family, you can define the number of threads that shall run within this server.
Use the up- and down-arrow buttons between the two panes to add or remove resource families.
Related Topics
Java-based Server - HA (High Availability)
Use this tab to display and edit parameters for High Availability:
- Automatic Monitoring (supervisor only)
-
whether (checked) or not (unchecked) the supervisor is running.
- Monitor C++-based servers (supervisor only)
-
whether (checked) or not (unchecked) the supervisor hosted by this Java-based server (running as a Java-based Server component) is responsible for automatically monitoring all the C++-based Servers.If one of these servers is not available, the monitoring supervisor moves its workflows, activities and the Status Tracker to another C++-based Server.Note that this flag is evaluated only if Automatic Monitoring is checked.Set this flag for only one Java-based Server.
- Monitored Java-based Server (supervisor only)
-
the Java-based Server to be monitored.When High Availability is enabled, the adaptor repositories of a monitored Java-based Server are backed up in real-time from the backup adaptor in a monitoring supervisor, which runs as a component in a Java-based Server.If the monitored server fails, the monitoring supervisor automatically restores the messages from the repository backups and sends them to the Message Broker.
- Supervisor Configuration (supervisor only)
-
the reference to the configuration entry for the supervisor.
Java-based Server - Status and Auditing
Use this tab to display and edit parameters for status handling and auditing.
Auditing - General
- Status Life Time
-
the lifetime of status entries of statistic entries of successful performed workflows in the monitoring area of the Connectivity database.
- Status Life Time Error
-
the lifetime of status entries of statistic entries of workflows that failed in the monitoring area of the Connectivity database.Usually this life time is longer than the life time of successfully performed workflows.
- Synchronous
-
whether or not synchronous auditing is enforced.When set, the initiating workflow waits until the status entry / audit information is written to the status area or audit queue.When clear, auditing occurs asynchronously later on.If a lot of audit information is produced, it is possible that audit information is delayed for hours.Thus we recommend to run the server in synchronous mode.
- JMS-based Auditing
-
whether or not audit XML files are generated. When clear, you need to provide the DirX Audit JMS plug-in that delivers audit messages via JMS directly to DirX Audit.
Auditing - File-based
- Audit Trail Folder
-
the path where the audit trail information for real-time workflows is written. By default, the path is install_path*\ids-j\logs*.
- Maximum No. of Records Per File
-
the maximum number of messages an audit file can contain (default: 10000). If this number is reached, the file is closed and a new file is opened.
Auditing - JMS-based
- Bind Profile
-
a link to a bind profile holding a user name and password. We recommend creating a JMS bind profile at the corresponding Identity Store connected directory and setting the anchor to JMS. The specified user should have access rights sufficient for writing into the queue specified in JMS Queue Name.
- URL Message Broker
-
the URL of the message broker that you have configured in the DirX Audit Configuration Wizard.
- JMS Queue Name
-
the name of the message queue that you have configured in the DirX Audit Configuration Wizard for the DirX Identity JMS collector.
- Audit Trail Folder
-
the directory in which the JMS plug-in stores the audit messages as temporary files when the JMS message broker is not available (one message per file).By default, the directory is local to the server.This is indicated by the placeholder ${IDM_HOME} which represents the home folder of the Java-based Server.If you specify a relative path, keep in mind that it is generated relative to the working folder of IdS-J (dxi_install_path/ids-j-domain-Sn/bin).
Logging
This section defines parameters for the logging files (server-.txt or warning-.txt). These parameters include:
- Logging Files Folder
-
the fully-qualified path where the IdS-J writes its warning and server logging files. By default, the path is install_path\ids-j\logs.
- Maximum No. of Records Per File
-
the maximum number of messages a logging file can contain (default: 10000). If this number is reached the file is closed and a new file is opened.
- Maximum No. of Files
-
the maximum number of logging files in the logging directory (default: 100). If this number is reached, the oldest file is deleted before a new one is opened.
- server.xml Dump Interval (sec)
-
the interval at which the server writes to the server.xml file (default: 3600 seconds = 1 h). This file contains the complete configuration information updated at the selected interval. This information is important for analysis if the server encounters problems.
- Maximum No. of Overview Files
-
the maximum number of overview files (default: 500) written by the Web Admin into the path install_path\ids-j\logs\overview.
Eventlog Configuration
- Enable (default: true)
-
enables/disables logging to the Windows event viewer.
- Level (default: Warning)
-
the level of logging from Info to All.
Syslog Configuration
- Enable (default: true)
-
enables/disables syslog information generation on UNIX platforms.
- Host
-
the host where to send the syslog information.
- Port
-
the port where to send the syslog information.
- Level (default: Warning)
-
the level of logging from Info to All.
| Changing attributes in this tab requires a restart of the IdS-J server. Using the command "Load IdS-J Configuration" is not sufficient because it only loads the workflow definitions. Server restart is also necessary if attributes of a related object (service, system or messaging service) are changed. |
Related Topics
Java-based Server - Configuration
This tab displays the complete XML definition for this adaptor configuration that is read as part of the Java-based Server configuration during server startup.
You can see that many values in the XML definition are expressed as variables, for example:
<technicalDomain>$\{DN4ID(THIS)@dxmTechnicalDomain}</technicalDomain>
or
<interval>$\{DN4ID(THIS)@dxmSpecificAttributes(purgerinterval)}</interval>
These variables are replaced by their values when the configuration is load. You can see the resolved XML definition in the server.xml file in the logs directory of the Java-based Server.
|
This tab is only visible if design mode is selected in the Identity Manager toolbar.
|
Related Topics
Domain for Identity Servers
This tab displays all common properties for the Java-based Servers of a domain.These properties include:
- Domain
-
the domain name.
Related Topics
Manage Servers - Adaptors
Some of the JMS adaptors - called the permanent adaptors - can run in parallel on each Java-based Server.Others - the topic subscribers - must run on exactly one server per domain.You can disable a permanent adaptor on one or more Java-based Servers; for example, if you want to reduce load from one server.For the subscriber adaptors, you can select the server on which they should run.
-
On the left side, you can see all installed Java-based Servers for the selected domain.
-
On the top, you find the names of all available adaptors.
-
In the middle, you can assign an adaptor to a specific Java-based Server or you can disable it.
| If you assign an adaptor to a specific server, be sure that the corresponding workflows are active and loaded and that all necessary resource families are assigned to that server. |
Related Topics
Manage Servers - Request Workflow Timeout Check
The Request Workflow Timeout Check component runs on exactly one Java-based Server per domain.This tab allows you to select this server.The left side of the tab displays the installed Java-based Servers.
Related Topics
Manage Servers - Supervision
Each Java-based Server can monitor another Java-based Server in the same domain.
-
The left side of the tab displays the installed Java-based Servers.
-
The column "Automatic Supervision" shows whether supervision is active.
-
The column "Supervised Server Name" shows the display name of the server to be monitored (an empty field means monitoring is not configured)
Related Topics
Manage Servers - Schedule
The scheduler for Java workflows runs on exactly one Java-based Server per domain. This tab allows you to select this server. The left side of the tab displays the installed Java-based Servers.
Related Topics
C++-based Server
C++-based Server - General
The C++-based Server provides a runtime environment for the meta controller and the DirX Identity agents on distributed machines. An instance of a C++-based Server must run on each machine in the meta directory environment on which an agent is to run.
The C++-based Server configuration object describes the configuration information for one instance of a C++-based Server. The DirX Identity installation procedure automatically creates a C++-based Server configuration object when it installs a C++-based Server on a machine.
Use this tab to view and set the properties of a C++-based server:
- Name
-
the display name of the server.
- Description
-
a description of the server.
- Version
-
the version number of the server.
- Server Type
-
type of this server. Possible values are:
- Primary
-
each DirX Identity Connectivity domain must have a primary server (this is the first one that was installed). The primary server runs the Status Tracker by default.
- Secondary
-
additional servers in a domain are marked with this value.
- Status Tracker
-
enables/disables the Status Tracker component for this server. There should only be one server in with the Status Tracker is running. If you change this flag, you must restart the service.
During startup, the server checks whether the registered flag is set. If not, it simply registers. If it is set, checks are performed. The parameters in the INI file are checked against the parameters in the configuration database. If the parameters are correct, the server is registered. If not, the startup process is aborted. This mechanism prevents two different servers from registering at the same C++-based Server object (which could result in a lot of confusion).
C++-based Server startup is controlled by the dxmmsssvr.ini file in the path install_path\DirX Identity\server. All necessary startup parameters are defined there.
Related Topics
C++-based Server - SOAP Listener
Use this tab to view and edit the parameters of the C++-based SOAP listener.
- Soap Service
-
the name of the related SOAP service. To display its properties, click the Properties icon to the right.
- Socket Accept Timeout
-
the C++-based Server communication parameter that controls how quickly the server reacts to control events like configuration changes or requests to shut down. The value should be in the interval between approximately 100 and 1000 milliseconds.
- Socket Receive Timeout
-
the C++-based Server communication parameter that defines how long the C++-based Server should wait for data sent to it via the SOAP interface. This value depends on the workload of the communicating partner, mostly the Java-based Server. If you experience "Receive timeout" errors, you should increase the value.
- Thread Check Interval
-
the interval in milliseconds that controls how often the C++-based Server adjusts the number of threads. This value should be approximately 1 to 3 seconds. In highly dynamic environments (where work load is changing quickly), set it to a lower value.
- Accept / Retry number
-
the number of times the C++-based Server should try to accept a connection before it generates a fatal error.
Related Topics
C++-based Server - SPML Receiver
Use this tab to view and edit the parameters of the C++-based SPML receiver.
- URL Prefix
-
the prefix of the URL of the SOAP service (default: dxm.idsc).
- Min. Number Receiver Threads
-
the minimum number of threads in the C++-based Server that receive SOAP connections and interpret its data.
- Max. Number Receiver Threads
-
the maximum number of threads in the C++-based Server that receive SOAP connections and interpret its data. For ideal server performance, there should be one receiver thread for every configured connector thread. You only set the minimum and maximum values here; the actual number of threads is controlled automatically by the server depending on the current workload.
- Low Water Mark
-
the low-water mark of the SPML receiver ICOM queue (currently not used).
- High Water Mark
-
the maximum number of requests that the C++-based server can accept without pushing them to the connectors. If some connectors do not work, the server accepts up to this number of requests and then refuses further requests. When the connectors start working again, they process the queued requests. The queue is deleted when the server is restarted.
- ICOM Timeout
-
the interval at which the C++-based Server checks its internal queues. This value should be approximately 150 milliseconds.
Related Topics
C++-based Server - Configuration
Use this tab to manage services and their limits.
Services:
- Service
-
the service object that contains the IP address and port number of the DirX Identity server. To display its properties, click the Properties icon on the right.
File Service:
- Buffer Size
-
the buffer size used by the file service queue (in bytes). The configured size can be anything between 32 KB (32768) and 1 GB (1073741824), the default value is 1 MB (1048576). The size must be higher than the size of the biggest file transferred between two different C++-based Server instances.
- Encryption Mode
-
the encryption mode for the transferred files. Select from the following values:
- NONE
-
transfer in clear text
- Scrambled
-
transfer in scrambled format (not readable but no high security)
- Encrypted
-
transfer in encrypted format (not readable with high security)
Limits:
- Max number of threads
-
the maximum number of threads that can be running in parallel in the server. The default value is 512, and you can only decrease this number because it is the maximum.
| The required number of threads for a workflow can be calculated as: 1 + number_of_activities. Thus a workflow with 2 activities needs 3 threads during runtime. If a workflow runs distributed, the threads are distributed accordingly as defined. |
- KeyGet Timeout
-
the wait time for the agent to get the decryption key from the DirX Identity server during startup (in seconds; the default value is 100). Set this time to a slightly higher value if the agent runs on a slow machine.
Related Topics:
C++-based Server - Paths
Use this tab to manage C++-based Server paths.
Path Definitions
- Installation Path
-
the pathname of the server’s installation directory. Do not change this field because it is handled automatically by the installation routine.
- Work Path
-
the pathname of the server’s current working directory. All agents run with relative paths use the server’s current working directory.
- Status Path
-
the pathname for the directory where status entry files produced by workflow runs are stored. On Windows, a UNC path can also be used.
Shared Paths
If you have set up shared file systems to connect your machines in the DirX Identity domain with high performance, you must configure the information here. This information is used by both the C++-based server and the DirX Identity Manager (if it resides on a machine where a C++-based Server exists - otherwise you must set up the information in the bindprofile.xml file).
Use this part of the tab to define mapping information between the local file path and the remote file path. For each shared file definition, set one line in the table:
- Server
-
the server to which you have access via the shared file system.
- Shared Path
-
the path through which the remote server file system is accessible.
- Target Path
-
the path on the remote server that needs to be mapped.
A shared file system exists between the local machine and the remote machine with the C++-based Identity Server name MyRemoteOne. You can access the shared files via the path G:\ from your local machine. The path on the remote machine is C:\Program Files\Atos\DirX Identity\work. Then the parameters are:
Server = MyRemoteOne
SharedPath = G:\
TargetPath = C:\Program Files\Atos\DirX Identity\work
Let’s assume the file C:\Program Files\Atos\DirX Identity\work\wf1\act1\data.ldif shall be accessed via workflow wf1 and activity act1. Then DirX Identity checks whether one of the target paths fits with the first part of the file name. If it does, the file name is changed to G:\wf1\act1\data.ldif. If no hit is found, the file is transferred to the work directory on the local machine …\work\wf1\act2\data.ldif via the file service.
Related Topics
C++-based Server - Agents
Use this tab to list all agents that are installed on the same machine as the respective C++-based Server. The tab shows two tables:
- Agents
-
lists all agents that are installed on the machine where this C++-based Server resides (these entries are links to the corresponding agent object). Use the buttons to the right of the table to add and delete entries.
- Versions
-
lists all agents and their version numbers that are installed where this C++-based server resides. You should use this information for reference during debugging or when errors are encountered. Use the buttons to the right of the table to add and delete entries.
| Both lists are filled and updated automatically during the DirX Identity installation procedure. If you want to install your own agents, you should edit both tables to document this action. |
Related Topic
C++-based Server - Agent Server State
Use this tab to view the status of the C++-based Server and set its state.
- Registered
-
whether the server is running. Registered is checked and not registered is unchecked.
- Start Time
-
the time stamp for the last activation of the server.
- End Time
-
the time stamp for the last termination of the server. If this field is empty, the server is currently running.
- Disable Scheduling
-
enables/disables scheduling of this server. You can disables scheduling of all C++-based Servers with the Disable Scheduling flag at the central configuration object.
Related Topics
C++-based Server - JMX Access
Use this tab to view and edit the parameters of the C++-based server JMX access.
- JMX Service
-
the name of the JMX access service. Click the Properties icon to display additional properties.
- JMX URL Prefix
-
the prefix of the JMX Access URL.
- JMX Accept Timeout (ms)
-
the C++-based Server communication parameter that specifies how fast the server reacts to control events like configuration changes or requests to shut down. Specify a value between 100 and 1000 milliseconds.
- JMX Receive Timeout (ms)
-
C++-based Server communication parameter that specifies how long the C++-based Server waits for receiving data over JMX. This value depends on the workload of the communication partner. Increase this value if "receive timeout" errors occur.
Related Topics
C++-based Server - Connector
A connector object defines a connector. It is a sub-object of a C++-based Identity Server object (IdS-C). A connector represents an instance of a connector type definition.
Use this tab to assign the parameters for the connector. The properties shown in this tab are:
- Name
-
the name of the connector.
- Description
-
the description of the connector type.
- Version
-
the version of this definition.
- Connector Type
-
the corresponding connector type object. Allows running several connectors for one connected directory.
- Is Active
-
activates/deactivates the connector. Changing this parameter requires restarting the corresponding server.
- Connected Directory
-
the connected directory with which this connector works.
- Bind Profile
-
the relevant bind profile of the linked connected directory to login.
- Minimum Number of Threads
-
the minimum number of threads of this connector type that run on this C++-based Server to process the corresponding requests.
- Maximum Number of Threads
-
the maximum number of threads of this connector type that can run on this C++-based Server to process the corresponding requests. Set this number higher when you await a high workload for the connector. Set maximum to 1 when you have some connector whose implementation is not thread-safe
- Low Water Mark
-
low-water mark of the connector’s internal queue.
- High Water Mark
-
high-water mark of the connector’s internal queue.
- ICOM Timeout
-
the ICOM timeout in milliseconds.
- Logging Number
-
the number of the serviceability logging component. The range can be between 1 and 10. Higher numbers define more detailed logging.
Related Topics
Get Server State
You can request server state information by opening any of the C++-based Server objects (located in the Expert View). Right-click on the object and then select Get Server State.
A window opens that shows all objects and their state in this server (click Details to see all of the information). The window is refreshed automatically every 15 seconds. This window can stay open while you work with DirX Identity Manager in parallel (for example, you can start workflows and then watch the objects appear and disappear in the server state window).
To abort a workflow, right-click it in the list and then select Abort workflow. Note: aborting a workflow does not kill running agent processes when the Abort Execution Allowed flag is not set in the corresponding agent object.
- StartUpTime
-
start time of the server and time the server is on-line (local time, difference to GMT is indicated).
The meaning of the columns in the window for each component is:
- Name
-
the component name (for non-standard components, the DN).
- Type
-
the component type (scheduler, status tracker, workflow engine, agent, and so on).
- InstID
-
the unique instance ID.
- Start time
-
the start time of the component (local time).
- Disabled
-
whether or not the scheduler component is disabled.
- LastMsgType
-
the last received message type (create, execute, …).
- Ack
-
the number of acknowledge messages sent.
- IdleTime
-
the amount of time that the component has been waiting for requests.
- ActiveTime
-
the amount of time that the component has been processing a request.
- LastMsgReturn
-
the last acknowledge return code sent.
GUI
A folder for extensions to DirX Identity Manager’s graphical user interface.Use this tab mainly to assign a name to the folder.
- Name
-
the name of the folder.
- Description
-
the description of the folder.
Related Topics
Extensions
A folder for DirX Identity Manager user interface extensions (virtual object extensions).
The properties shown in this tab are:
- Name
-
the name of the folder.
- Description
-
the description of the folder.
The files from the folder extensions are automatically downloaded only during startup of the DirX Identity Manager (file system folder: install_path\Gui\conf\extensions).So don’t forget to restart the DirX Identity Manager when you change any of the files in this folder.
Related Topics
Report
The report dialog shows in the upper list all reports that can be used for the selected object.Only one object can be selected at a time.The pre-configured reports are:
-
Generic - outputs the report information in a generic format.All attributes of all contained objects are displayed.This report in XML format is especially useful for further processing.
-
object - reports the objects in a similar format as shown at the user interface level.This report type in HTML format is targeted for documentation.You can include the result easily into your documents.
You can also define your own reports.For information about how to set up your own reports, see the section "Customizing Status Reports" in the chapter "Customizing Auditing" in the DirX Identity Customization Guide.
The options in the report dialog are:
-
Report List - show the list of available pre-configured reports.
-
Search Base - display the selected object. You can change it here.
-
Search Scope - choose the search scope. Available options are:
BASE OBJECT - the report will only contain the selected object.
ONE LEVEL - the report will only contain the children of the selected object (the selected object is not contained!)
SUBTREE - the report will contain the selected object and the whole set of children at any depth.some reports cannot work with all options. -
Type - select the output format. Available options are:
XML - pure XML format. Best suited for further processing with XSLT processors or report tools with XML interface.
HTML - standard HTML format. Can be included easily into your documentation. -
Output to Viewer - whether (checked) or not (unchecked) the report result is displayed in a new window with a simple HTML or XML viewer.
-
Output File - when Output to Viewer is not checked, you can select the output file name and location here.
Select Run Report to start the report or Cancel to exit the report dialog.
| If you try to report a huge amount of data (for example you selected a lot of entries or you use very detailed reports) Java could run out of memory. Be sure to have enough memory (or increase the Java memory accordingly). |
Here are some recommendations for running reports on objects:
-
Reporting a job or connected directory object should not be a problem.
-
Do not report a very complex object (like the complete default application scenario or a folder with a lot of workflows). Report only one workflow at a time.
-
Do not use the internal viewer for a large amount of data. Use for example the Internet Explorer instead (but this tool also has restrictions regarding the maximum size of HTML files).
Report Definition
The Report Definition object contains the following items:
- Name
-
the display name of the report definition object
- Description
-
a text description of the report definition object
- Version
-
the version of this object
- Content Type
-
restricts the usage of this report definition. For example, selecting Workflow in this field means that this report can only be used for objects of type workflow.
- Content tab
-
the producer and consumer definitions in XML format. See the section "Customizing Status Reports" in the chapter "Customizing Auditing" in the DirX Identity Customization Guide for details.
- Format tab
-
the XSLT conversion rules. See the section "Customizing Status Reports" in the chapter "Customizing Auditing" in the DirX Identity Customization Guide for details.
Report Properties
Report properties specify the behavior of the report agent.
- Search Base
-
the distinguished name at which to start the search.
- Report Name
-
the name of the report file.
- Report Output Format
-
the format of the output. Possible values are:
XML - XML format
HTML - HTML format
Related Topics
JavaScripts
The JavaScripts folder stores Java scripts that can be called from all Java-based workflows. Create your own folders if you need to extend DirX Identity with your script extensions.
The scripts provided here are used to define the mapping for password change workflows. The statistics script defines the calculation of the statistics information for status entries.
Use this tab mainly to assign a name for the JavaScript folder. The properties shown in this tab are:
- Name
-
the name of the folder.
- Description
-
the description of the folder.
Related Topics
JavaScript Content
Use this tab to edit the content of a JavaScript file.JavaScript files have pure text content and can therefore be edited with any text editor.DirX Identity Manager provides a simple editor control for this purpose.The two buttons below the editor allow you to export or import JavaScript files.
- Import text…
-
click to import a text file which will then replace the current content of the JavaScript file.A file browser dialog is shown to select the file to be imported.
- Export text…
-
click to export the current content of the JavaScript file into an external text file.A file browser dialog is shown to selected the desired directory and to type in the name of the text file.
Related Topics
JavaScript File
JavaScript files are used in DirX Identity to define JavaScript user hooks and programs.
Use this tab mainly to assign a name to the JavaScript file object.The properties shown in this tab are:
- Name
-
the name of the JavaScript file.
- Description
-
the description of this object.
- Version
-
the version number of this object.
Related Topics
Messaging Services
A folder for the messaging service configuration objects in the configuration database under the folder configuration.Use this tab to name the folder.
- Name
-
the name of the folder.
- Description
-
the description of the folder.
For messaging, the Apache Active MQ is used.A list of all installed message brokers is given in this folder.
There are two installation options:
-
Multiple message brokers sharing one database for persistent messages. Only one broker at a time is accessing the database and accepts client connections. The shared database has to be located on a sheared network drive.
-
Single message broker installation. The database can either be located on local drive or shared network drive.
The clients get their connection information from LDAP, where the installation procedure has stored the necessary data. Therefore, only message brokers installed by the DirX Identity installation procedure can be accessed by the clients. They use a static list of brokers.
For High Availability and failover, the ActiveMQ operations are used. If the accessed broker fails, the next broker takes over. The decision of which broker is the next is determined by the fastest exclusive access to the database.
Related Topics
Messaging Service - Failover Transport Options
By default, this field is empty and the default failover configuration is used. We strongly recommend that you do not change the configuration, as it affects broker-to-broker and client-to-broker communication. This field can be used for project-specific changes.
If you use the failover transport options, the syntax is as follows:
type value
where type and value are separated by a space character. Keep in mind that ActiveMQ requires this option to be specified in case-sensitive format.
Example:
maxReconnectAttempts 5
For details on the failover options see the Active MQ documentation:
Related Topics
Message Broker
The message broker object represents an ActiveMQ message broker. Use this tab to view and change the parameters of a message broker. Parameters include:
- Name
-
the name of the message broker used internally and as the operating system service name.
- Description
-
a description of the message broker.
- Message repository
-
the location of the database for persistent messages. In case of multiple brokers, this database has to be located and accessible on a shared network drive
- Service
-
the name of the service, including connection parameters like port number, SSL usage and client authentication
Related Topics
Message Broker - Transport Options
By default, this field is empty and the default failover configuration is used. We strongly recommend that you do not change the configuration, as it affects broker-to-broker and client-to-broker communication. This field can be used for project-specific changes.
If you use the transport options, the syntax is as follows:
type value
where type and value are separated by a space character. Keep in mind that ActiveMQ requires the option to be specified in case-sensitive format.
Example:
wireFormat.maxInactivityDurationInitalDelay 30000
For details on the transport options see the Active MQ documentation:
Status Tracker (Topic)
Messages covering monitoring information on Tcl-based workflows are published to the Status Tracker topic. The status tracker runs on exactly one C++-based Server, subscribes to this topic and stores the message information into the Monitor area of the Connectivity database.
| This tab may not be visible depending on the messaging service in use. |
The tab shows all the properties of the status tracker message topic. It is strongly recommended that you do not edit any of the fields shown here since this could damage the current installation!
- Prefix
-
the prefix for the status tracker queue (for example, Dxm.statustracker).
- Subscriber Queue
-
the subscriber queue for the status tracker queue (for example, Dxm.statustracker.subscription).
- Stream
-
the stream for the status tracker queue (for example, Dxm.statustracker.STREAM).
Related Topics
Resource Families
A folder for DirX Identity resource family definitions.
Use this tab to assign a name to this folder.
- Name
-
the name of the folder.
- Description
-
the description of the folder content.
Related Topics
Resource Family
Resource families control the deployment of activities on Java-based Servers.You can use resource families to control the load distribution of certain workflow types between Java-based Servers.However, because Java workflows can be distributed over all Java-based Servers of one domain, you should make sure that you assign each relevant resource family to each Java-based Server.
On one side, activities must be associated with resource families - each activity requires a certain resource family.On the other side, Java-based Servers provide resource families.An activity can only be processed on servers that host the required resource family.
A resource family is an abstract entity and represents a set of inter-changeable resources of some type.Typically these are connected directories of some type (LDAP or ADS or …).If you need to access several connected directories of the same type, use different instance-specific resource families (for example LDAP1, LDAP2, …).Another example can be a specialized system that can be used for encryption or other time-consuming tasks.
Use this tab to enter the properties of a resource family object.The items shown in this tab are:
- Name
-
the name of the resource family.
do not use blank spaces in the name! - Description
-
the description of the object.
When you assign a specific resource family to a Java-based Server, you can configure the number of threads that will be created for this resource family on this server.
Related Topics
Services
Service
The service configuration object describes the configuration information for a particular service.Use the service configuration object to describe the different services in use in the Identity domain.A service configuration object can provide full or partial information about the service, such as its location within the network (IP address and/or server name), port numbers and a link to the corresponding system object on which it runs.
- Name
-
the display name of the service object.
- Description
-
A description of the service.
- Version
-
the version number of the service object.
- Server Name
-
the server name, if the service name is not sufficient or needs to be different when several access methods to the service are necessary (for example, per LDAP, which requires the IP address and port, or per native API, which requires a specific server name).
- IP Address
-
the TCP/IP address of the server. This can be a number such as 218.34.52.12 or a DNS name. Use of DNS names is recommended.
Note: Due to compatibility reasons, the batch type workflows use this field. This field is not used by the IdS-J server and its components (workflows etc.). Instead they use the corresponding field in the system object. - Data Port
-
the data port number of the service for connections that do not use SSL.
- SSL
-
whether (checked) or not (unchecked) the service requires SSL. Set this flag if this service requires a secure SSL connection (in this case, the Secure Port field is used instead of the data port).
- Client Authentication
-
whether (checked) or not (unchecked) the service requires client authentication.
- Secure Port
-
the secure port number of the service. Use this field to set up SSL connections.
- User Name
-
the user name used for authentication when connecting to the mail server. This field is only shown when a mail service is configured (the attribute dxmSpecificAttributes(ismailservice) is set to true).
- User Password
-
the user password used for authentication when connecting to the mail server. This field is only shown when a mail service is configured (the attribute dxmSpecificAttributes(ismailservice) is set to true).
- System
-
the system on which the service runs. To display its properties, click the Properties button on the right.
Related Topics
Services
A folder for the service configuration objects in the configuration database under the folder configuration.
- Name
-
the name of the folder.
- Description
-
descriptive text for this object.
Within a property page, the content of this folder is shown as a pop-up list of a combo box:
- Service
-
the service object currently used by the object whose properties are displayed.Use the arrow button to pop up the list of all available service objects in the service folder.Use the Properties button to display the properties of the currently selected service object.
| Service folders can be used to reflect customer-specific structures.The connected directory copy mechanism will keep these structures for copied objects. |
Related Topic
Standard Files
This folder allows defining standard files that are handled by the IdS-C server by default.If an agent writes such a file (defined by its file name), the server handles it as if it were an individual definition for this agent.
- Name
-
the name of the folder.
- Description
-
descriptive text for this object.
You can define all types of files here, for example Notification files, INI files or Tcl scripts.
Related Topics
Supervisors
Supervisor
The supervisor controls other DirX Identity components in a high-availability environment to detect problems and to inform administrators or perform an automatic fail-over procedure.The properties of a supervisor object are:
- Name
-
the name of the object.
- Description
-
the description of the object.
- Version
-
the version number of the object.
- *Notification
-
the link to a notification object that allows sending e-mail to an administrator if problems occur.
- Mode
-
the mode the supervisor performs currently. Switch the mode to influence the supervisor operation.
- Stop
-
the supervisor performs a controlled stop as soon as possible and ends the supervisor program.
- Suspend
-
the supervisor performs a controlled stop as soon as possible and waits in a loop for further commands. Use this value if you intend to reconfigure parts of the active configuration. Switch to operate after re-configuration.
- Operate
-
the supervisor performs normal operation.
- Active Configuration
-
reference to the active configuration entry under the supervisor parent node. If Mode is set to Operate, this configuration is active and the supervisor controls its elements. Choose another configuration to reconfigure this one as active configuration.
- Automatic Failover
-
enables/disables automatic fail-over. If set, the supervisor performs automatic fail-over. If clear, the supervisor informs the administrator via e-mail about the problem.
- Initial Delay
-
the amount of time the supervisor is to wait after startup or re-configuration before checking the components. This delay allows the components to start up and run correctly before the supervisor checks them.
- Sleep Time
-
the interval to sleep after all checks.
- Wait Tolerance
-
the time period to wait before failure is assumed.If a component does not respond within the wait tolerance, a failure is assumed.The supervisor informs the administrator via notification (it also starts to perform the automatic fail-over routine if Automatic Failover is activated).
Related Topics
Supervisor - Configuration
Each subentry below the supervisor entry can contain a complete (possible) configuration in a high availability environment.It can contain several high availability server objects.Use this tab to set up a Tcl-based supervisor configuration or a Java-based supervisor configuration.
The properties of a supervisor configuration object are:
- Name
-
the name of the object.
- Description
-
the description of the object.
- Version
-
the version number of the object.
- Status (Tcl-based supervisor configuration only)
-
the status of this configuration entry. Possible values are:
- INACTIVE
-
this configuration is currently not used
- ACTIVE
-
this is the active configuration entry
- Monitoring Interval (Java-based supervisor configuration only)
-
the time (in minutes) between consecutive monitoring.
- Retry count (Java-based supervisor configuration only)
-
the number of retries after which a monitored server is considered to be down.
Related Topics
Java Supervisor Mail
The supervisor runs as a component of a Java-based Server. Use this tab to configure the properties of supervisor e-mails.
- Service
-
the link to the service object that contains the mail host address.
- Subject
-
the external text file to which to export the current content of the JavaScript file.Clicking this button opens a file browser dialog.Select the desired directory and enter the name of the text file.
- From
-
an e-mail address.
- To
-
one or more e-mail addresses.
- CC
-
zero or more e-mail addresses.
- Body
-
the e-mail text.
Supervisor - Server
The supervisor configuration server objects link a C++-based server object with workflows to be run on it (when the configuration is active).They may also contain a link to the corresponding fail-over configuration if this server fails.The properties of a supervisor configuration server object are:
- Name
-
the name of the object.
- Description
-
the description of the object.
- Version
-
the version number of the object.
- C++-based Server
-
the C++-based Server that is used as a high availability server in this configuration.
- Workflows
-
the list of workflows that are re-configured to this C++-based Server when this configuration is active.Note: The re-configuration does not support distribution of the workflows and activities to distributed servers.
- Fail-over Configuration
-
the configuration to be used by the supervisor during automatic fail-over when this server fails.If no server link is present, the supervisor informs the administrator and goes to suspend mode.
Related Topics
Systems
System
The system configuration object describes the configuration information for a particular host system.Use the system configuration object to describe the different hardware platforms in use in the Identity environment.
A system configuration object can provide the location within the network (IP address and/or server name) and it can keep additional information about the system’s hardware characteristics (CPU type, hard drive and RAM sizes) and the operating system it runs for documentation purposes.
The system configuration object has the following tabs:
- System
-
Mostly informational data.Use this tab to record in the Connectivity Configuration database the information about the systems in use at your site.Once you have created a system configuration object, you must maintain it yourself (DirX Identity does not maintain it for you).
- Resources
-
Contains the resource families this system can handle.
- Security
-
Defines security-relevant information; for example, the trust store and key store on this system.
The properties of the system object are:
- Name
-
the name of the system.
- Description
-
the description of the system.
- Version
-
the version number of the system.
- IP Address
-
the TCP/IP address of the server. This can be a number such as 218.34.52.12 or a DNS name. Use of DNS names is recommended.
Note: This field is only used by the IdS-J server and its components (workflows etc.). For compatibility reasons, the batch type workflows use the corresponding field in the service object. - Operating System
-
the system’s operating system (for example, Windows 2022 Server).
- CPU Type
-
the system’s CPU type (for example, Intel Pentium IV).
- HD Size [MB]
-
the size of the system’s hard disk (in megabytes).
- RAM Size [MB]
-
the size of the system’s RAM (in megabytes).
- Resource Families
-
the resources this system can handle. See the resource family object for more information.
- Key Store Path
-
the path to the key store on this system. The default is:_
install_path_*/security/java/keystore*. - Key Store Password
-
the password to access key store defined in Key Store Path.
- Trust Store Path
-
the path to the trust store on this system. The default is:
install_path/security/java/truststore. - Trust Store Password
-
the password to access the trust store specified in Trust Store Path.
Related Topic
Resource Family
Service
Systems
A folder for the system configuration objects in the configuration database under the folder configuration.
- Name
-
the name of the folder.
- Description
-
the description of the folder.
Within a property page, the content of this folder is shown as a pop-up list of a combo box:
- Service
-
the system object currently used by the object whose properties are shown.Use the arrow button to pop up the list of all available system objects in the service folder.Use the properties button to display the properties of the currently selected system object.
Related Topic
(Central) Configuration
System
Tcl
Mapping Function
A mapping function is used to convert an attribute or a set of attributes of a source directory entry into an attribute of a target directory entry.Usually, such mapping functions perform just simple operations like character escaping (removal or replacement of non-alphanumerical characters.However, more complex functions construct distinguished names or superior directory tree nodes.
Use this tab mainly to assign a name to a mapping function.
- Name
-
the name of the mapping function.Note that this name will be used by the mapping editor to construct the mapping item.This name must match the name used in the Tcl proc header.
- Description
-
the description of the mapping function.
- Version
-
the version number of the mapping function.
- Argument Count
-
the number of arguments this mapping function will take (at least the minimum number for a Variable Argument Count). The mapping editor uses this value to insert as many rows as needed when the mapping function is selected for use in a particular mapping item.
- Variable Argument Count
-
whether (checked) or not (unchecked) the argument count of the mapping function is variable. The mapping editor uses this flag to allow the user to add additional rows to the respective mapping item where this mapping function is used, or to delete superfluous rows down to the number given in Argument Count.
Related Topics
(Central) Configuration
Control Scripts
Mapping Function
Mapping Scripts
Other Scripts
Profile Scripts
Tcl Folder
"Using the Mapping Functions" in the DirX Identity User Interfaces Guide
"Using the Mapping Editor" in the DirX Identity User Interfaces Guide
Mapping Functions
The Mapping Functions folder contains the pre-defined list of mapping functions delivered with DirX Identity in the Default folder.The mapping editor uses the contents of this folder to provide a set of predefined mapping functions when you use the Mapping Function column in the mapping editor provided with DirX Identity Manager.These functions can also be extended with customer-supplied functions in a parallel folder.
Use this tab to assign general properties to the mapping function folder.
- Name
-
the name of the folder.
- Description
-
the description of the folder.
Related Topics
Tcl Folder
The Tcl folder stores Tcl files and procedures that are common to all meta controller jobs. Create your own folders if you need to extend DirX Identity with your script extensions.
Use this tab mainly to assign a name for the Tcl script folder. The properties shown in this tab are:
- Name
-
the name of the folder.
- Description
-
the description of the folder.
Related Topics
Topics
The folder that contains the topic and queue names used for DirX Identity messaging.
- Name
-
the name of the folder.
Description - descriptive text for this folder.
Related Topics
Topic
This configuration object describes a topic or queue used for DirX Identity messaging.
- Name
-
the name of the topic or queue specification.This name is only for documentation.It is not used by the software.
- Description
-
descriptive text for this topic.
- Topic Alias
-
the alias name of the topic or queue exchanged with the Java-based Server.This is the name that is used by software components to look up the topic value.
- Topic Value
-
the name of the topic or queue.JMS clients use this value to identify the topic or queue to which they are sending message or from which they are receiving messages.
For more information about topics, see the section "Understanding the Java Messaging Service" in the "Managing DirX Identity Servers" chapter.
Related Topics
Understanding the Java Messaging Service
Connected Directories
Attribute Configuration - Details
Use this tab to view and edit information about the attribute configuration associated with a connected directory. This is the information the meta controller needs to handle connected directories. For details, see the DirX Identity Meta Controller Reference.
The Details tab consists of two tabs - Attribute List and Global Info - and the following buttons for importing and exporting attribute configurations:
- Import CFG File
-
click to select and import an attribute configuration file to replace the current configuration.
- Export CFG File
-
click to export the current attribute configuration to a selected attribute configuration file.
Attribute List
Lists the name, abbreviation, prefix, suffix, encryption flag, multi-value separator, length, and match rule for each attribute. Only the abbreviation is needed for LDAP directories. The other parameters are needed for other directory types, such as the File type.
- S
-
whether or not the attribute is to be deleted during a schema update. This feature is helpful if you use one attribute configuration for both the connected directory and the intermediate connected directory (most DirX Identity default applications are configured this way). Check this field for all attributes that are only available in the intermediate file connected directory but not in the target connected directory. A schema update in the target connected directory will then preserve these attributes (example: ADS). For schema update details see "Using the Schema Displayer" in the chapter "Using DirX Identity Manager" in the DirX Identity User Interfaces Guide.
- Name
-
the name of the attribute (normally set equal to the Abbreviation). In some cases, you can define a name mapping here. For example in the ODBC workflows the Table.Attribute name in the ODBC database is mapped to the attribute name in the intermediate file (for example HR.Department=DEP).
- Abbreviation
-
the abbreviation of the attribute. For LDAP directories, this field is the LDAP name.
- Prefix
-
the value that precedes the attribute value in the file.
Note: For XML files the prefix must be followed by a colon (for example: "telephoneNumber:") - Suffix
-
the value that follows the attribute value in the file.
- E
-
whether or not the attribute is transferred in encrypted mode (for example, a password attribute) and must be decrypted by the agent before use.
- MV Separator
-
the separator used for multi-valued attributes.
- Length
-
the maximum length of the attribute. Zero stands for an infinite length.
- Match rule
-
the match rule for this attribute.
Global Info
Displays global information that applies to all the attributes in the current configuration:
- Record separator
-
one or more characters (or the octal representation of one or more characters) enclosed in single quotation marks (' ') that the meta controller is to use to distinguish between entries in a connected directory data file.
- Field separator
-
one or more characters (or the octal representation of one or more characters) enclosed in single quotation marks (' ') that the meta controller is to use to distinguish between attribute values in entries within a connected directory data file that uses a tagged format.
- Comment
-
one or more characters (or the octal representation of one or more characters) enclosed in single quotation marks (' ') that the meta controller is to use to identify comment lines in an LDIF-formatted connected directory data file or any other connected directory data file.
- Skip lines
-
an integer value that is greater than or equal to 0 that specifies the number of lines from the beginning of the file that the meta controller is to ignore when processing an import file.
- Continuation line
-
one or more characters (or the octal representation of one or more characters) enclosed in single quotation marks (' ') that the meta controller is to use to identify continued lines in an LDIF-formatted connected directory data file or any other data file with continuation lines.
- Enclosing seq
-
one or more characters (or the octal representation of one or more characters) enclosed in single quotation marks (' ') that the meta controller is to use to identify the start and end of an entry in a connected directory data file.
- Op code field
-
the attribute within an LDIF change file that holds the LDIF change file operation code for an entry in the change file.
- Add mod field
-
the attribute in an LDIF change file that represents the "add" attribute modification operation of an LDIF "modify object" change operation.
- Replace mod field
-
the attribute in an LDIF change file that represents the "replace" attribute modification operation of an LDIF "modify object" change operation.
- Delete mod field
-
the attribute within an LDIF change file that represents the "delete" attribute modification operation of an "LDIF "modify object" change operation.
- Prefix (Base-64)
-
the prefix Base 64 field defines information that the meta controller is to use to identify a base64-encoded LDIF attribute using the attribute’s private prefix followed by this global prefix information. Enter one or more characters (or the octal representation of one or more characters). If this field is not set, the meta controller uses only each attribute’s private prefix when it parses the data file.
- New superior field
-
the attribute within an LDIF change file that represents the "new superior" parameter in an LDIF "modify DN" change operation.
- New RDN field
-
the attribute within an LDIF change file that represents the "new RDN" parameter in an LDIF "modify DN" change operation.
- Mod RDN op code
-
the keyword in an LDIF change file that represents the LDIF "modify RDN" operation.
- Del old RDN field
-
the attribute within an LDIF change file that represents the "delete old RDN" parameter in an LDIF "modify DN" change operation.
- Mod DN op code
-
the keyword in an LDIF change file that represents the LDIF "modify DN" operation.
- Add op code
-
the keyword in an LDIF change file that represents an "add object" LDIF change operation.
- Mod op code
-
the keyword in an LDIF change file that represents the LDIF "modify object" operation code.
- Delete op code
-
the keyword in an LDIF change file that represents the LDIF "delete object" operation code.
- Mod separator
-
the attribute in an LDIF change file that identifies the end of an attribute modification in an LDIF "modify object" change operation.
- Ignore empty value
-
whether or not the meta controller returns empty attributes (attributes with no value) in the results of an obj search operation on a connected directory.
LDIF files can contain the string version:1 at the beginning. DirX Identity determines LDIF files when all these fields are set to these values:
Add op code:add
Delete op code:delete
Mod op code:modify
Mod DN op code:moddn
Mod RDN op code:modrdn
When all fields are set correctly, the string version:1 is generated as first line into the LDIF file.
Related Topics
"Using the Attribute Configuration Editor" in the chapter "Using DirX Identity Manager" in the DirX Identity User Interfaces Guide
Schema - Object Classes and Attributes
"Attribute Configuration File Format" in DirX Identity Meta Controller Reference
Attribute Configuration - General
When synchronization between two connected directories is performed, the data of the source directory is downloaded by the respective directory agent into an exchange file and imported into the target directory by another agent. One of these agents is the meta controller program, which performs additional tasks to convert the data by applying appropriate mapping rules and ensuring consistency of the exchanged data. These tasks require the understanding of the data semantics which in turn makes it necessary to have a description of the downloaded data. This description is provided by the attribute configuration. For more information about the content of an attribute configuration, see the Attribute Configuration - Details help topic, which describes the structure in detail.
Use this tab mainly to enter a name for the attribute configuration. The properties shown in this tab are:
- Name
-
the name of the attribute configuration.
- Description
-
the description of the attribute configuration.
- Version
-
the version number of the attribute configuration.
Related Topic
Attribute Configuration - Details
File Item
Attribute Configuration Template
Use this tab to enter the attribute configuration information according to the given parameters.
See "Using the Schema Displayer" and "Using the Attribute Configuration Editor" in the chapter "Using DirX Identity Manager" in the DirX Identity User Interfaces Guide for more information.
Bind Profile
A bind profile is needed to authenticate during setup of a connection to a connected directory.Bind profiles keep the administrative passwords that can be encrypted.
Use this tab to enter the required data for authentication.The properties shown in this tab are:
- Name
-
the name of the bind profile.
- Description
-
the description of the bind profile.
- Version
-
the version number of the bind profile.
Bind Parameters
- User
-
the user name for accessing a connected directory.
For IBM Notes, the value for the field User must be the path and file name of the User’s ID file. For example:
C:\IBM\Notes\admin.id - Password
-
the user password for accessing a connected directory. To change the password, click the icon on the right. A password dialog opens that requires you to enter the new password twice.
Alternatively, you can reset the password to the default value dirx with the right-most button.
|
the password is set in two fields in the directory:
|
- Authentication
-
(for LDAP Connected Directories only) the type of authentication:
-
SIMPLE authentication with user name and password
-
ANONYMOUS authentication without user name and password
-
- Protocol
-
(for LDAP Connected Directories only) the LDAP protocol version:
-
LDAPv2
-
LDAPv3
-
- Security Token
-
(for Salesforce Connected Directories only) the automatically generated key that is added to the end of the password in order to log into Salesforce from an untrusted network.
Security Parameters
- Disable Encryption
-
whether (checked) or not (unchecked) encrypted passwords are automatically unscrambled. Set this flag if DirX Identity is to unscramble the dxmPassword value automatically before it is written into a configuration file (a Tcl or an INI file) because the agent cannot unscramble the value itself. If Encryption Mode is not set to None, setting or resetting Disable Encryption requires you to re-enter the correct password.
- Use Encryption (SSL) (relevant only for Tcl-based ADS workflow types)
-
whether (checked) or not (unchecked) to use SSL. Note: for realtime ADS workflows, the SSL flag setting in the workflow’s join → ts port controls whether or not to use SSL.
- SSL Connection (relevant only for certain workflow types; for example, LDAP workflow types
-
whether (checked) or not (unchecked) to use SSL.
Client Authentication
For LDAP workflow types, additional parameters for client-side SSL can be set. (Note that the flag SSL Connection must be set, too):
- Client Authentication
-
whether (checked) or not (unchecked) to use client-side SSL.
- Path to Key Store File
-
the file name of the file-based key store containing the public certificate/private key pair and the relevant CA certificates for this client certificate.
- Key Store Password
-
the password for accessing the key store.
- Key Store Alias
-
the alias name of the key store entry (optional).
- Path to Trust Store File
-
the file name of the file-based trust store containing the LDAP server CA certificate.
- Trust Store Password
-
the password for accessing the trust store.
- Anchor
-
the text value that helps to select the correct bind profile during reference resolution. See Reference Descriptions for details.
There may be additional bind profile properties associated with a specific connected directory type. See the DirX Identity Connectivity Reference for details about these connected directory-specific properties.
Related Topics
Bind Profile Container
A folder for the bind profiles associated with the connected directory. Use this tab to assign a name to the folder.
- Name
-
the name of the folder.
- Description
-
descriptive text for this object.
Related Topic
Bind Profiles
A list of the bind profiles associated with the connected directory. Use this tab to add, delete, or modify a bind profile.
- Bind Profiles
-
the associated bind profiles.
To edit a bind profile, select it in the list and click the Properties button on the right.
To add a new bind profile, click the first button on the right.
To delete a bind profile, select it and click the second button on the right.
Click the third button to display the distinguished names of the table entries in text format.
For an HCL Notes connected directory, you need to define a separate bind profile for each certifier ID file (see the DirX Identity Connectivity Reference for details).
Related Topic
Channels
A folder for the channel configuration objects in the configuration database.Use this tab to assign a name to the channel folder.
- Name
-
the name of the folder.
- Description
-
the description of this folder.
Related Topics
Connected Directories
A folder for the connected directory configuration objects in the configuration database. Use this tab to assign a name to the folder.
- Name
-
the name of the folder.
- Description
-
descriptive text for this folder.
Related Topics
Connected Directory
A connected directory is a single data store in an Identity environment that exchanges data with the directory service.The connected directory object describes the configuration information for a particular connected directory.
Connected directories can either be located in the connected directories folder or under a job configuration object in the jobs folder for a Tcl-based workflow (these are called intermediate connected directories because they are only used in the middle of a workflow to exchange data via files).
Connected directories can have other properties assigned to them, for example, a set of login accounts (bind profiles) that the workflows use to gain access to the connected directories.
The connected directory configuration object can also have additional properties that depend on its type (for example, an Active Directory domain name or the ODBC data source name).
The connected directories also contain the data to be synchronized.You can use the DirX Identity Manager to view the contents of LDAP and file-type directories.
Use the Connected Directory tab to enter general properties of the connected directory. The items shown in this tab are:
- Name
-
the name of the connected directory.
- Description
-
the description of the connected directory.
- Version
-
the version number of the connected directory.
- Service
-
the link to the logical or physical access parameters (TCP/IP addresses etc.).
- Directory Type
-
the connected directory’s type (for example, LDAP, Notes, and so on). To display its properties, click the Properties button on the right. You can select another connected directory type here. Perform Reload Object Descriptors afterwards or restart the DirX Identity Manager. This action will change the display behavior of the connected directory object itself and all related Channel objects.
- Subtype
-
the subtype that can be used, for example, by scripts to modify the behavior accordingly (example: RACF).
- Attribute Configuration
-
The related schema description in a format that DirX Identity can use. To display its properties, click the Properties button to the right.
- Viewer Command
-
the command for viewing the content of the connected directory (for example, setting Notepad for a file or MS Access for an .mdb database). This command is used by the open command for the connected directory. For configuration hints, see description below.
- Wizard
-
the wizard that can configure the connected directory. DirX Identity calls the wizard by building the name conndir-*wizard.xml*. This file must be located in the wizard folder under Configuration → GUI.
- Associated Server
-
the Java-based Server(s) on which to run Provisioning workflows for this connected directory. For more details on this topic and how to activate this setting, see the section "Managing DirX Identity Servers" → "Distributed Deployments and Scalability" → "Separating Traffic for Selected Connected Systems" in this guide.
- Listeners per Target System
-
the number of JMS listeners (threads) per Java-based Server that should process Provisioning workflows for a target system associated with this connected directory. By default, each Java-based Server registers one listener for the corresponding queue. Note that only one listener is created for password changes.
There may be additional properties associated with a specific connected directory (depending on the Directory Type property). For example:
-
Bind profiles, when the connected directory uses authentication
-
File information, when the directory is a file-type directory.
-
Schema information, when the directory’s schema can be read automatically by DirX Identity.
-
Channels, which are links between jobs or activities in the connected directory
Configuring the Viewer Command
You can associate a viewer command with most of the connected directories. This viewer command is used when you perform the open command from the context menu.
Different configuration methods exist:
-
Connected directories of type LDAP - define the server and base node that shall be opened in the Data View. Two formats are possible:
-
server
-
server:base_node
-
Set the server name to the name field of the server (open a top-level node in the Data View with the Server command to view this field).
For example:
PQR:ou=development
|
The connected directory type definition must support this type of viewer command. Go to the Connected Directory Type (for example, by clicking the respective link in the Connected Directory property page), expand the subfolder "Object Descriptions" and then edit the XML object (for example, ads-conndir.xml) below. Select the "Content" property page and replace the action
with
|
-
Connected directories of type File - define the relevant file viewer program and a fixed or variable parameter:
viewer path_and_filename
viewer $(reference)
where reference is a relative reference starting from the connected directory.
For example:
-
notepad C:\MetahubData\data.ldif
-
notepad $(dxmFile-DN@dxmFileName)
| If the connected directory contains more than one file, one of the files is opened by random method. |
-
Special connected directories - check the documentation of the relevant vendor for the correct viewer command.
Example:
Related Topics
Operational Attributes
A connected directory’s operational attributes control its runtime behavior.The operational attributes used by a particular connected directory depend on its type:
- Use Operational Attributes
-
whether the scripts handle operational attributes (by default: dxmOprMaster, dxrStartDate, dxEndDate, dxrState) for directory entries (True) or whether custom routines must be created (False).Supply one of the following values:
-
TRUE - operational attributes shall be handled.
-
FALSE - operational attributes shall not be handled (define custom routines instead).
You can define other operational attributes in the Initialize user hook function.Set the opr(master) to opr(enddate) field values accordingly.
-
- Master Name
-
the master name of this directory. It can be used to set the dxmOprMaster attribute of directory entries.
- Creation/Search Base
-
the base node that can be referenced by the scripts as a starting point for all operations. DirX Identity works with 'ou=mthb,o=PQR' as the default.
Note: This field can contain references. See section "Customizing Object References" in the DirX Identity Customization Guide for more information. - Tombstone Base
-
the node to which deleted entries will be moved when Deletion Mode in the Entry Handling tab is set to "MOVE".
Note: This field can contain references. See the section "Customizing Object References" in the DirX Identity Customization Guide for more information. - GUID Prefix
-
the short prefix used to generate a local GUID together with the unique identifier (Local GUID Attribute) from this entry master. This value is used by the workflow that exports from this directory.
- Local GUID Attribute
-
the attribute name that holds the unique identifier in this connected directory. This value is used to compose the local GUID together with the GUID prefix. Is used by workflow that exports from this directory.
- GUID Attribute
-
the attribute that should be filled with the generated GUID value in this connected directory. This attribute is used by a workflow that imports into this directory.
- Object Classes
-
the list of object classes that must be added when an entry is created in this connected directory. All workflows that import into this directory can use this list. The specific set to take is defined by the Object Class Collection attribute of the appropriate channel.
- Physical Deletion
-
the delta time after which an entry must be physically deleted in this connected directory (only used if Deletion Mode in the Entry Handling tab is set to "MARK"). A purify workflow can use this value to calculate the physical deletion time (expiration date + physical deletion).
Related Topics
Provisioning Attributes
A connected directory’s provisioning attributes control its provisioning behavior. The provisioning attributes used by a particular connected directory depend on its type.
Central Definitions
- Domain
-
the distinguished name of the Provisioning domain (for example, "cn=My-Company"). Only used at the Identity Store.
- User Base in Identity Store
-
the location where the user tree resides (for example, "cn=Users,cn=My-Company"). Only used at the Identity Store.
in Identity
- Account Base
-
the location of the account tree in the Identity Store. Specify the full distinguished name, for example
cn=Accounts,CN=MyAD,CN=TargetSystems,CN=My-Company - Group Base
-
the location of the group tree in the Identity Store. Specify the full distinguished name, for example
cn=Groups,CN=MyAD,CN=TargetSystems,CN=My-Companythese two values are specified at the connected system’s connected directory because they reference different target systems.
in Connected Systems
- User Base
-
the location of the accounts in the connected system, for example
ou=Accounts,ou=Extranet Portal,o=MySampleDomain
Note: the term "Account" is not always used in connected systems. Examples of synonyms are "Users", "Staff", "Login" etc. - Group Base
-
the location of the groups in the connected system, for example
ou=Groups,ou=Extranet Portal,o=MySampleDomain
Note: the term "Group" is not always used in connected systems. Examples of synonyms are "Roles", "Profiles" etc.
for ADS
- Relative User Base
-
the domain-relative location of the accounts in the Active Directory, for example
OU=USusers - Relative Group Base
-
the domain-relative location of the groups in the Active Directory, for example
OU=USgroup - Domain
-
the domain path that defines the base point for the Relative User Base and the Relative Group Base
DC=mcha,DC=sis,DC=munich,DC=atos,DC=de - UPN Extension
-
the suffix of the User Principle Logon Name consisting of all domain name components.
@mcha.sis.mcha.atos.de
for Notes
- Admin Request Database
-
the name of the administration request database used by "AdminP" process of the IBM Domino Server installation. The administration request database contains requests that are asynchronously processed by "AdminP"; for example, moving/deleting mail files or moving users from one organizational unit to another.
- Admin Request Author
-
the administrator who has access rights to the Administration Requests database. Each administrator who uses the Administration Process to perform tasks must have the appropriate access rights and roles in the IBM® Domino® Directory (NAMES.NSF), secondary directories - if applicable, Administration Requests database (ADMIN4.NSF), and the Certification Log database (CERTLOG.NSF).
For the Administration Requests database, administrators must have "Author" access to admin4.nsf. Therefore "Admin Request Author" defines the administrator who has the appropriate rights to access "admin4.nsf". - Group Member Limit
-
the number of members that are stored in a group.
- Unique Org Unit Attribute
-
the attribute type that should be used in the IBM Domino Directory to hold the unique organizational unit (the organizational unit is not part of the full name and is therefore not retrievable. Therefore, DirX Identity uses an additional attribute in the IBM Domino Directory so that a lookup for persons with a specific organizational unit can be done).
- Notes Attribute Syntaxes
-
the predefined definitions for IBM Domino Server attribute syntaxes. The IBM Domino Server supports a lot of different attribute syntaxes in its databases. The IBM Notes connector is not able to handle all of them and therefore supports only a subset. It can handle the following types: TEXT (strings), NUMBER (numbers), DATE (date definitions).
Normally the IBM Notes Connector can independently determine the attribute syntax of the fields. As a fall-back solution (if that calculation fails), the IBM Notes Connector uses predefined definitions:-
Text fields - specifies all attributes that are of type TEXT
-
Number fields - specifies all attributes that are of type NUMBER
-
Date fields - specifies all attributes that are of type DATE
-
for SAP EP UM
- Synchronize Service Users
-
whether or not to synchronize Service Users to/from SAP EP UM. By default, these users are not synchronized.
for SharePoint
- Account Name Attribute
-
the LDAP attribute containing the Windows Account Name in the Active Directory Peer TS Account.
- Domain Name Attribute
-
the LDAP attribute containing the Windows Domain Name in the Active Directory Peer TS Account.
- Delete Group Enabled
-
whether or not a SharePoint group is deleted when deleted in DirX Identity. If set to true, deleting a SharePoint group in DirX Identity results in deleting the corresponding group in SharePoint.
- Filter Block Size
-
the maximum number of members that are combined in one search filter. Searching the accounts in DirX Identity is done in combined searches for multiple members. The Filter Block Size parameter defines the maximum number of members that are combined to one search filter. If there are more members to be processed, additional searches are performed.
SAP ECC UM Parameters
The SAP ECC UM connected directory defines the following additional parameters:
- CUA enabled
-
whether (checked) or not (unchecked) Central User Administration (CUA) is enabled on the SAP application system.
- Logon Variant with
-
how to connect to the connected SAP application depending on the SAP application system type. Possible values are:
0 = No load balancing - single application server.
1 = No load balancing but via gateway - over a gateway server.
2 = With load balancing - via a message server:- System Number
-
the system number to be used for connecting to the ECC system (logon variant 0 or 1).
- Server
-
the host name or the IP address of the application server (logon variant 0 or 1) or the host name/ IP address of the message server (logon variant 2).
The host name and the service name of the application or message server must be defined in the hosts and services files:
Logon variant 0 or 1: service name = sapdpsystem_number
Logon variant 2: service name = sapmsECC_system_name - Gateway Host
-
the host name or the IP address of the SAP gateway server (logon variant 1).
- Gateway Service Number
-
the gateway service number (logon variant 1). For example: sapgw00.
- R/3 System Name
-
the name (system ID) of the ECC system (logon variant 2).
- Group Name
-
the name of the group of application servers (logon variant 2).
If a Secure Network Connection (SNC) should be used, the following parameters are necessary:
- Mode
-
whether (checked) or not (unchecked) an SNC connection is used.
- Library
-
the full path and file name of the SAP Cryptographic library.
- Partner Name
-
the application server’s SNC name.
Proxy Server
A connected directory’s proxy server settings are used for central HTTP/HTTPS proxy configuration for Java-based Provisioning workflows.
- Proxy Server
-
a link to the Proxy Server Connected Directory, where the host name of the Proxy Server must be specified in the linked service object.
- Proxy Server Bind Profile
-
a link to the bind profile of the Proxy Server.The authenticated access to the Proxy Server is currently not supported.
Schema - Object Classes and Attribute Types
The Schema configuration object shows the properties of a schema associated with a connected directory.It presents two tabs: Object Classes and Attribute Types.
Object Classes
This tab displays the names, IDs, and kinds of object classes after a schema read.
The first column allows you to define whether or not the object class should be used to update the attribute configuration.If this column is flagged, then all attributes of this object class are transferred to the corresponding attribute configuration object; if not, nothing is transferred.DirX Identity does not allow you to specify this information at an attribute level because you can do it with the Selected Attributes feature for each individual channel.For schema update details, see "Using the Schema Displayer" in the chapter "Using DirX Identity Manager" in the DirX Identity User Interfaces Guide.
| The schema information is not stored in the configuration database.It is only kept in DirX Identity Manager’s cache for the current session and therefore no longer available after a restart of the Manager. |
To display the properties of a selected object class in the list, click the Properties button on the right. A dialog is opened showing the following properties:
- Name
-
the name of the object class.
- Description
-
the description for the object class.
- ID
-
the unique identifier for the object class.
- Kind
-
the type kind of the object class.
- Superior class
-
the superior class of the object class.
- Obsolete
-
whether (checked) or not (unchecked) the object class is obsolete.
May and must attributes - the list of optional and required attribute types. The meaning of the property items for an attribute type is described below. For a required attribute, the check box Mandatory is marked.
Attribute Types
This tab displays the properties of object attribute types in the schema. For each object attribute selected from the list, the tab displays its name, ID and length in a table and the remaining properties as fields in the tab. If you cannot see the table on a small screen, try to resize the vertical border of the pane upwards. The available fields are:
- Name
-
the name of the attribute type.
- ID
-
the unique identifier for the attribute type.
- Length
-
the maximum value length for the attribute type.
- Description
-
the description of the object attribute.
- Derived from
-
the attribute from which this attribute is derived.
- Syntax
-
the syntax for using this attribute.
- Usage
-
how to use this attribute type.
- Match Rules
-
the Equality, Ordering, and Substring match rules for the attribute.
- Options
-
the selectable options for the attribute: Collective, Modifiable, Single value, and Obsolete.
- Include Orphaned Attributes
-
whether (checked) or not (unchecked) to transfer all attributes that do not belong to any object class.
Related Topic
"Using the Schema Displayer" in the chapter "Using DirX Identity Manager" in the DirX Identity User Interfaces Guide
Attribute Configuration - Details
Schema - General Properties
The schema describes the structure of data in a connected directory. A schema consists mainly of a set of object classes and a set of attribute types. Use this tab to assign a name for the schema object.
- Name
-
the name of the schema object.
- Version
-
the version of the schema object.
Related Topic
Specific
JDBC - Configuration
Use this tab to set the following configuration attributes for the JDBC connected directory:
- JDBC Driver
-
the class of the JDBC driver that you are using to access a database (the type attribute of the Connection element)
- Driver Type
-
the driver database customizer (the driverDBType attribute of Connection element). This Java class represents the data type capabilities and conversions for the combination of the selected database and the JDBC driver.
- URL
-
the URL of the specific database to be accessed (the url attribute of Connection element). The URL format is described in the documentation for the JDBC drivers.
GoogleApps - Google API
Use this tab to set the following configuration attributes needed by GoogleApps in order to authenticate the user and authorize access to the Google API:
- Private Key
-
the P12 file generated by Google for your service account (Google developer console).
- Service Account Email
-
the email generated by Google for your service account (Google developer console).
- Application Name
-
the name of the client application accessing the Google service. The name will be used by Google servers to monitor the source of authentication. The name can be anything you chose but the name cannot be blank.
- Domain Name
-
must contain the name of your company domain. (If the domain is not configured, it will be determined from the bind profile user ID).
Office 365 - Graph API
Use this tab to set the following configuration attributes needed by the Office 365 connector to authenticate and authorize access to the Office 365 Graph API:
Graph API tab:
- OAuth Path
-
The part of the authEndpoint for the OAuth server to get a token. For example:
https://login.microsoftonline.com/TenantID*/oauth2/token* - API Version
-
The version of the Graph RESTful API used by the Office 365 connector. The default value is v1.0. Any change might cause incompatibility of the connector with the Graph API. This value is also used for creating the endpoint URL. For example: https://graph.microsoft.com/v1.0/groups.
Bind Profile tab:
- Application ID
-
(client_id) A unique identifier assigned by the Microsoft identity platform that identifies DirX Identity as a client of the Office 365 Graph API.
- Application Secret
-
(client_secret) A password or a public/private key pair that your app uses to authenticate with the Microsoft identity platform. (Not needed for native or mobile apps.). Encoded in base64 as generated by PowerShell for client access to the Graph API.
- Tenant
-
The tenant value in the path of the request controls who can sign into the application. Possible values are common for both Microsoft accounts and work or school accounts, organizations for work or school accounts only, consumers for Microsoft accounts only, and tenant identifiers such as the tenant ID or domain name. The domain name for the Office 365 tenant as configured in the Office 365 admin center or its tenant ID unique identifier.
Salesforce - Salesforce
Use this tab to set the following configuration attributes needed by Salesforce Connector to connect to the Salesforce system.
URL suffixes
- for OAuth authentication
-
the part of the URL used to authenticate, for example "/services/oauth2/token". Usually there is no need to change this value. This value is combined with the Salesforce’s server address, for example "https://login.salesforce.com/services/oauth2/token". After successfully connecting to Salesforce an instance URL is received by the Sales connector, for example "https://na15.salesforce.com" which is used for real service requests (add, delete, modify) later on.
- for Service Requests
-
the part of the URL that is sent for real service requests, for example "/services/data/v30.0". Note that the URL contains the (Rest-)API version that is going to be used by the Salesforce connector, so you should not use a version < "V30.0".
Other parameters:
The Salesforce Connector is running as a remote application and uses OAuth for authentication. Therefore, it must be defined as a new connected app within the Salesforce organization that informs Salesforce of this new authentication entry point. When creating / registering such an app, two new values are created:
- Consumer Key
-
a value used by the consumer to identify itself to Salesforce. Referred to as client_id in OAuth 2.0
- Consumer Secret
-
a secret used by the consumer to establish ownership of the consumer key. Referred to as client_secret in OAuth 2.0
OICF - OpenICF Connector Server
Use this tab to set the following configuration attributes to connect and authenticate to the OpenICF connector server:
- OpenICF Server
-
a link to the OpenICF connector server’s connected directory, where the name of the OpenICF connector server must be specified in the linked service object.
- OpenICF Server Bind Profile
-
a link to the bind profile of the OpenICF connector server. In the bind profile, specify only the shared secret in the password field. The shared secret key is used to get access to the OpenICF connector server. The same key must be configured at the OpenICF connector server side.
- Response Timeout
-
the timeout value in seconds. Set a value that is sufficient for the selected bundle type. The default value is 30.
- Configuration Attribute Name Mappings
-
for OpenICF connector bundles that use non-standard connection property names; for example, "host" instead of "server". Used for building up the connection from the OpenICF connector server to the target machines to be managed. A mapping of these properties can be specified here according to the names the OpenICF connector bundle expects.
Jobs
Authentication
Authentication is necessary to allow the agent to access the related connected directory.Use this tab to set up the authentication data.
- User Name
-
the user name for the account that is to run the job.A job can be run under a specific account (the default is the System account).Use this field and the Domain and Password fields to define this account.
- Domain
-
the domain where the account must be started.
- Password
-
the password of the account.
If the C++-based Server is running under a special account (you cannot use the System account) and an agent shall be run with another account (Authentication tab in the job object), the account of the C++-based sever must have the advanced user rights on the local machine Act as part of the operating system and Replace a process level token, or the agent cannot run.The steps to set up advanced user rights depend on the type of operating system you are using.
For a Windows server, perform these steps:
-
Start Control Panel → Administrative Tools → Local Security Policy
-
Select User Rights Assignment under Local Policies
-
Double-click the user rights Act as part of the operating system and Replace a process level token and add the account as Local Policy Setting.
-
Reboot the machine.
This account must also be defined as Standard User. Perform these steps:
-
Start the Control Panel.
-
Start User Accounts.
-
Select Add...
-
Enter the User name and Domain of the account.
-
Click Next.
-
Select Standard User.
-
Click Finish.
-
Click OK.
The account under which the agent can be run after the C++-based Server account has obtained the advanced user rights must satisfy the following requirements:
-
The account can be one of the local domain (the domain to which the machine where the agent is started belongs) or it can be an account of any other domain that is trusted by the local domain. If there is only a trust in the direction that the remote domain trusts the local domain but not the other way, the account of the remote domain is not known on the local machine and will produce an error message when used in the Authentication tab.
-
In addition to having the right trust relationships between the domains, the account to be used in the authentication tab must also have the appropriate rights on the local machine to be able to run the agent.
Related Topic
Job
Attribute Mapping
Use this tab to edit the items of a Tcl mapping script.A special editor is provided to make the creation or modification of the script as simple as possible.However, basic knowledge about the Tcl language is necessary for all modifications.For usage information on the Tcl Mapping Editor, see the section "Using the Mapping Editor" in the chapter "Using DirX Identity Manager" in the DirX Identity User Interfaces Guide.
Related Topics
Control Scripts
A folder for control scripts that any job configuration object can use.
- Name
-
The name of the folder.
- Description
-
A description of the folder.
Related Topics
Default Values
This tab allows you to specify default values that NTAgent is to assign to account attributes in the NT system that have no value in the import data file.
See the "Default Values Section" in the chapter "Import Configuration File Format" in the DirX Identity Connectivity Reference to learn more about the possible default values.
Delta Handling
The delta handling information is necessary to control a synchronization of updated entries.Use this tab to set up a delta handling for the job.Available properties are:
- Delta synchronization
-
whether (checked) or not (unchecked) a synchronization of updates is required.After you check the box, the other items in the tab can also be edited.
- Delta type
-
the calculation base for the update interval.The following types can be used:
- DATE
-
the delta is calculated on the basis of a creation or modification date in the connected directory (default value).
- USN
-
the delta is calculated using the mechanism of unique serial numbers (for example, as used by iPlanet, Active Directory or OID).
- FILE
-
the delta is calculated by some DirX Identity agents (for example, ODBC) that keep the last connected directory state in an external file to compare against the new state.
| if you change the Delta type property after the job has run an initial delta operation, DirX Identity resets the list of delta runs. You cannot recover this list and you must start with a full synchronization. |
- Changes since
-
the update interval, which is either:
- (RECENT)
-
the synchronization uses the update information of the most recent synchronization procedure.
- (FULL)
-
a full data synchronization is performed instead of an update.
If the Delta type is DATE and at least one delta synchronization has already been performed, you can also choose a date for the interval. The job will synchronize all entries updated between that date and now. If the Delta type is USN, you can select a USN number for defining the update interval. If the Delta type is FILE, a file can be selected which contains the update information.
- Elements in list
-
the maximum number of delta results that are kept in the data base.
- Clear List
-
resets the Changes since list. In this case, all delta items are deleted and the next workflow run will perform a full update.
This tab can have additional properties depending on the Agent running the job. For the ODBC agents, there is the property:
- Data Hash
-
a number between 4 and 16 that denotes the octet count used for entry attributes. This hash value is used to find differences between the current value and the value during the synchronization procedure corresponding to the selected delta file.
Related Topics
"Microsoft Active Directory Agent" in DirX Identity Connectivity Reference
"Novell NDS Agent" in DirX Identity Connectivity Reference
"Windows NT Agent" in DirX Identity Connectivity Reference
"ODBC Agent" in DirX Identity Connectivity Reference
"Hicom DMS Agent" in DirX Identity Connectivity Reference
"IBM Notes Agent" in DirX Identity Connectivity Reference
"Microsoft Exchange Agent" in DirX Identity Connectivity Reference
"SAP ECC Agent" in DirX Identity Connectivity Reference
DirX Identity Application Development Guide → Understanding the Default Application Workflow Technology → Understanding Tcl-based Workflow → Delta Handling
Tcl-based Event Manager - Operation
| the Tcl-based event manager is only supported for compatibility reasons. Use the Java-based password synchronization instead. It provides more functionality, works on an event-based basis, and uses fewer system resources. |
Properties that control the operation of the Tcl-based event manager:
- Notify if not OK
-
the notification to make if job problems occur. The item can take one of the following values:
-
0 - no notification.
-
1 - notification if warnings occurred.
-
2 - notification if errors occurred.
-
3 - notification if errors or warnings occurred.
-
- Notifications
-
the definitions of how to perform notifications. The entry NotifyNotOK keeps the information for the Notify if not OK feature. See the section "Understanding Notifications" in the chapter "Managing Provisioning Workflows" for more information.
- Event Messaging Server
-
the WebSphere MQ server that is used for event messages. You need to define a dummy C++-based Server object that uses this messaging service if it resides on a machine that does not contain a real C++-based Server representation (installation of this C++-based Server is not necessary!).
- Event Topic
-
the events the event manager handles (it listens for this topic at the messaging service). It must be consistent with the definitions in the listeners (for example the Windows Password Listener) and triggers (for example the Web Event Trigger). Use only lower case characters to define the topic. The default topic is dxm.command.event.pwd.changed.*
- Event Mode
-
the types of events on which the event manager listens:
- Events only
-
the event manager does not interpret data information contained in the events.
- Events with optional data
-
the event manager assumes that the events can contain data (but must not), for example passwords. This data is assumed to be encrypted.
- *Must Change Attribute
-
the attribute name where to write the "User must change password during next login" from Active Directory. This information can be used at the web application that changes the password, too. It can also be used by workflows to other target systems.
If no attribute name is defined, the update operation is not performed and no error or warning is generated. By default, the DirX Identity default applications set the dxmADsResetPassword attribute. - Maximum Events
-
the number of events the event manager waits for before starting the workflows (default: 5).
- Maximum Wait Time
-
the amount of time to wait for Maximum Events to occur. If the number of Maximum Events does not arrive by the time this limit is reached, the workflows are started anyway (default: 20 seconds). This action occurs only when Maximum Events is greater than 1.
- Certificate Retrieval Interval
-
the interval at which to check for certificate requests (default 15 minutes) from event listeners.
- Check for System Events
-
the interval (in seconds) that advises the event manager to listen for keep alive or shut down requests (delivered as JMS messages via the command queue from the messaging service). The event manager listens to these messages only if the Server Event Support flag of the corresponding workflow object is set. Be sure that this interval is smaller than the Wait Interval of the supervisor.
- Delta Time
-
the maximum time differential allowed before automatic correction occurs. DirX Identity can run in a distributed environment, where clocks on the different machines can diverge. Setting the dxmPwdLastChange attribute from a client or the event manager might result in timing differences that can confuse the delta mechanism of the workflows that transport the passwords to the target systems. DirX Identity uses an algorithm that detects these time differences and corrects it automatically. The Delta Time parameter allows you to define the maximum difference allowed before automatic correction takes place. This attribute must be set to a smaller value than the Password Delta Time attribute of all corresponding password synchronization workflows.
- Filter Attribute
-
the attribute the event manager uses for filtering events (must be one of the target selected attributes). This field allows for setting up several event managers that distribute load.
There is no built-in consistency check between these event managers. Be sure that the filters are set up correctly in all event managers to handle all events and check that there is no overlap in filters to avoid duplicate processing of events. - Regular Expression
-
the filter expression, in regular expression syntax. See the section re_syntax in the Tcl command reference for details about regular expressions.
- Error Wait Time
-
the amount of time that the event manager waits before re-starting a workflow that incurred an error condition (for example, the network was temporarily unavailable). This feature is similar to the retry interval feature of the DirX Identity scheduler.
- Error Repeat Time
-
the amount of time the event manager will wait before re-trying to write entries from an in-memory error list to the Identity Store. If events arrive from the Windows Password Listener, the event manager tries to write the attached entries into the Identity Store. If this is not possible (because the entry does not yet exist in the directory), the events are stored in memory in an error list. After Error Repeat Time arrives, the event manager attempts to write the entries from the error list into the Identity Store again.
- Error Repeat Number
-
the number of times to retry writing the entries from the error list into the directory. The Error Repeat Time defines the interval between these retries. When the defined number of retries is reached, a notification is sent to the administrator if error notification is enabled. The event is deleted from the error list and from the message queue (which means that the administrator is responsible for solving the problem). If notification is not enabled, the event is removed from the error list but not from the message queue (this means that during the next start of the event manager the event is processed again). To avoid an endless error list, we recommend switching on error notification.
- Check Keep Alive Requester
-
the interval at which to check the keep-alive requester. If the event manager listens to system events (see also the Check for System Events flag), it checks that these events arrive regularly. If this is not the case, the event manager assumes a problem at the requester side after the defined time and notifies the administrator about this problem. Note that this feature is only supported when the Server Event Support flag at the corresponding workflow object is set.
Related Topic
Event Manager Tracing
Event Manager Workflows
Tcl-based Event Manager - Tracing
| the Tcl-based event manager is only supported for compatibility reasons. Use the Java-based password synchronization instead. It provides more functionality, works on an event-based basis, and uses fewer system resources. |
To debug the Tcl-based event manager job, traces are used which are written during operation. Usually, the user can choose a particular trace level to adjust tracing according to the specific needs.
Use this tab so set up trace information of a job. The properties shown in this tab are:
- Debug Trace
-
the mode of trace output by the meta controller program. Four different switches can be set in any combination:
- Vars (variable trace)
-
traces the variable fields used by the script.
- Cmds (command trace)
-
traces all meta controller commands.
- Msgs (message client debug messages)
-
debug information from the message client interface.
- Debug (other debug messages)
-
other debug messages.
- Trace Level
-
the trace level; that is, the granularity of trace output. Supply one of the following values:
-
1 - ERROR TRACE - only failed operations are traced.
-
2 - FULL TRACE - all operations are traced.
-
3 - SHORT TRACE - only operations that access the Identity Store are traced.
-
- Trace file
-
the trace file associated with the job. To display the properties of the selected trace file, click the Properties button on the right.
- Auditing
-
whether (checked) or not (unchecked) message auditing is enabled. When checked, the event manager writes log files that report the result of all received messages.
- Report File
-
the link to the log file definition. Note that the file name must be in this format:
prefix*.csv
If prefix is set to 'audit', the event manager will create two files: audit_ok.csv for all messages where processing succeeded and audit_err.csv for all messages that failed. Note that there might be messages that were first written into the audit_err.csv file. Later on they could be resolved which resulted in an entry in the audit_ok.file.
You can use an tool that is able to read CSV files to examine the resulting audit files (for example Microsoft Excel or Access). - Statistics
-
enables/disables statistics display at the end of the trace file and at the activity and workflow status entries.
-
OFF - no standard statistics output is generated. In this case, the script can optionally output its own statistic information.
-
ON - statistics output is generated (default).
-
Related Topic
Event Manager Operation
Event Manager Workflows
Tcl-based Event Manager - Workflows
| the Tcl-based event manager is only supported for compatibility reasons. Use the Java-based password synchronization instead. It provides more functionality, works on an event-based basis, and uses fewer system resources. |
This tab allows you to define the workflows that the event manager is to handle. Use it to assign workflows to this job:
- Workflows
-
the list of workflows that the event manager controls. To display the properties of a selected workflow, click the Properties button on the right. Use Add/Remove buttons on the right of the table to add and remove new channels.
Related Topic
Event Manager Operation
Event Manager Tracing
HDMS Parameters
Use this tab to set the properties that control a remote HDMS system.
- HDMS Version
-
the HDMS system version. Possible selections are:
-
HDMS 3.1
-
HDMS 3.6
-
HDMS 5.2 (US version)
-
HiPath 4000 Manager V1.0 *HiPath 4000 Manager V3.1
-
- Remote Account
-
the account on the machine running the remote HDMS database that HDMSAgent is to use to access the HDMS database. Please specify the name of a Reliant UNIX account that has the appropriate permissions for managing the related tables using the XIE import/export program. The default value is “hdmstest”.
Refer to the Hicom DMS documentation for information about how to grant the correct permissions and/or access rights to the HDMS database. The relevant tables are
-
PERS, COMPIMP, LOCIMP, BUILDIMP, and ORGIMP for HDMS 3.X
-
PERSDAT for HDMS-US 5.2, HiPath 4000 Manager V1.0, and HiPath 4000 Manager V3.1
- Remote XIE program name
-
the location of the "remote_hdms" script on the machine that is running the remote HDMS database. HDMSAgent runs the "remote_hdms" script to access the remote HDMS database through the XIE program interface. Please specify the path to the "remote_hdms" script relative to the home directory of the remote account. The default is "bin/remote_hdms".
- Remote XIE data subdirectory
-
the subdirectory on the machine running the remote HDMS database that the "remote_hdms" script specified in Remote XIE program name is to use for exchanging HDMS XIE request and response files. Please specify the subdirectory path relative to the home directory of the remote account. The default is "req".
For correct setup of the HDMS environment, see the section "HiPath Environment Setup" in the DirX Identity Application Development Guide.
INI Content
Use this tab to edit the content of an INI file.INI files have pure text content and can therefore be edited with any text editor.DirX Identity Manager provides a simple editor for this purpose.The two buttons below the editor enable the user to either export or import INI files.
- Import text…
-
click to import a text file which will then replace the current content of the INI file.A file browser dialog is shown to select the file to be imported.
- Export text…
-
click to export the current content of the INI file into an external text file.A file browser dialog is shown to select the desired directory and to type in the name of the text file.
Related Topics
INI File
An INI file is needed to control the operations of a connected directory agent.It contains all necessary parameters needed for a particular synchronization task.The INI file configuration object stores all data needed to create the respective INI file.
Use this tab to set the parameters of the INI file configuration object.The following parameters are available:
- Name
-
the name of the INI file.
- Description
-
the description of the INI file.
- Version
-
the version number of the INI file.
- Content Type
-
the content type of the data file. Possible values are:
- UNKNOWN
-
an unknown or unspecified content.
- INI
-
the data file contains configuration data in an INI file format.
- LDIF
-
the content is structured in an LDAP directory interchange format.
- TCL
-
the data file contains a Tcl script.
- XML
-
the content of the data file is structured in XML format.
- Encoding
-
the character encoding of the file.Use any of the valid code sets.See the DirX Identity Meta Controller Reference for details.
Note: By default, we use UTF-8 for all meta controller files and ISO-8859-1 for all other files (most agents cannot currently handle UTF-8). - Anchor
-
the text value that helps to select the correct file during reference resolution.See the chapter "Customizing Object References" in the DirX Identity Customization Guide for details.
Related Topics
Job
A job is a single executable step in a Tcl-based synchronization procedure used by an activity.The job configuration object holds all necessary properties for the definition of the job, mainly the DirX Identity agent that will carry out this step and the input and output channels that describe the data flow from and to the involved connected directories.A job configuration object describes the configuration information for a particular synchronization job.Use the job configuration object to describe each job that you want to establish for directory synchronization in your Identity environment.
In most cases, the synchronization must be split into two steps:
-
A step that exports the data from source directories and maps it into files
-
A step that maps the content of the files into the data structures of the target directories and imports it into these systems
Since DirX Identity Connectivity considers a file to be a connected directory, every job is treated as a data transfer from source to target connected directories.
The job configuration object can have additional properties depending on the type of agent to which it is connected.
Use this tab to set the general properties of a job. The items shown in this tab are:
- Name
-
the name of the job.
- Description
-
a description of the job.
- Version
-
the version number of the job.
- Agent
-
the agent used to run this job. To display the properties of a selected agent, click the properties icon
 on the right.
 - Operation
-
the operation performed by the job (this field is not used by the standard scripts).
- Command Line
-
the command line arguments for running the agent associated with the job. Note that this information can contain dynamic references that are resolved before each run of the job.
- OK Status
-
the list of all numeric exit code values the job delivers that must be treated as OK. This field allows you to redefine the values defined in the corresponding agent. Several values in this list must be separated by a ';' character.
- Warning Status
-
the list of all numeric exit code values the job delivers that must be treated as warnings. This field allows you to redefine the values defined in the corresponding agent. Several values in this list must be separated by a ';' character.
DirX Identity considers all other agent exit codes to represent an erroneous run and stops the workflow’s execution.
If the OK Status and Warning Status properties of a job and the agent have no values, DirX Identity treats each exit code as an error. As a result, you must at least specify one of the agents success exit codes - usually exit code 0 - to make DirX Identity treat it as success.
- Timeout
-
the time for the job to run before timing out. The syntax format is hh:mm:ss. The default value is 2 hours.
There may be additional properties depending on the Agent used for this job.
For the ODBC agents, there are the following properties:
- Record Separator
-
the string that separates succeeding entries.
- 8bit
-
only valid for ODBC export. If checked, the agent accepts characters with more than 7 bits without escaping them to hex notation (\x…).
Related Topics
Jobs
A folder for the job configuration objects in the configuration database.
- Name
-
the name of the folder.
- Description
-
a description of the folder.
Within a property page, the content of this folder is shown as a pop-up list of a combo box:
Job - the job object currently used by the object for which the properties are shown.Use the arrow button to pop up the list of all available job objects in the job folder.Use the properties button to display the properties of the currently selected job object.
Related Topic
Mapping Item
The properties of a mapping item that represents one line of the mapping editor table.We recommend that you do not edit these items directly!Use the mapping editor instead.
- Name
-
The name of the mapping item.
- Input
-
The input to the mapping function.
- Mapping Function
-
The mapping function to use.
- Output
-
The output from the mapping function.
Related Topics
"Using the Mapping Editor" in the DirX Identity User Interfaces Guide
Mapping Script
A mapping script is a special kind of Tcl script that describes the mapping between the source and target selected attributes. It consists of a set of mapping items, each containing one or more source or target attributes and a mapping function which transforms these attributes by appropriate operations into a single target attribute.
The source attributes available for mapping are the selected attributes of the contributing input channel(s) and the selected attributes of the contributing output channel(s). This allows combining source and target attributes with one mapping function. The target attributes into which these source attributes can be converted are the selected attributes of the contributing output channel(s).
DirX Identity provides a mapping editor to create mapping scripts. However, you can also use a standard Tcl editor for the creation or modification of a mapping script.
- Name
-
the name of the mapping script.
- Description
-
a description of the mapping script.
- Version
-
the version number of the mapping script.
- Anchor
-
the text value that helps to select the correct script during reference resolution.See Reference Descriptions for details.
| Central use of mapping scripts is only possible for Tcl mapping scripts.Table-based mapping scripts must be located directly under the job object and cannot be centralized. |
Related Topic
Attribute Mapping
Mapping Scripts
A folder for mapping script configuration objects that any job can use (when the mapping is not controlled by the mapping editor).
| Central use of mapping scripts is only possible for Tcl mapping scripts.Table-based mapping scripts must be located directly under the job object and cannot be centralized. |
- Name
-
the name of the folder.
- Description
-
a description of the folder.
Related Topics
Notification (Object)
A notification object defines an e-mail notification.Notification configuration objects can either exist at a central location (Configuration folder) or under a job object.You create a notification object with the Notification entry in the context menu of either a job object or the notification folder under the Configuration object.The job configuration object provides links to the corresponding notification objects.
A notification object allows you to set up exactly one notification to be used by a job.A notification object consists of the following tabs:
- Notification
-
to set the type, the service to be used, all addresses and the attachments to be sent.
- File
-
to set the filename of the XML configuration file and some of the other typical parameters for file objects.
- Content
-
to handle the XML content of the notification object, including the references.
Notification Tab
The Notification tab contains the following items:
- Name
-
the display name of the notification object
- Description
-
a text description of the notification object
- Version
-
the version of the notification object
- Type
-
the type of notification (only eMail is supported)
- Service
-
the link to the service object that contains the mail host address.
- From
-
the e-mail address in the form *mail=*emailaddress or the direct link (distinguished name) to the person to be informed when the notification returns because of a bad To or CC address or other problems.
- To
-
the e-mail address in the form *mail=*emailaddress or a link (distinguished name) to the person who is to perform the task.
- CC
-
zero or more e-mail addresses in the form *mail=*emailaddress or links (distinguished names) to the people to be informed about the notification.
- Attachments
-
links to files to be sent as attachments with an e-mail notification.
- Anchor
-
Sets durable references (for example, use Data for data notification; use NotOK for notification if not OK).
A prerequisite for all persons whose distinguished names are used in the From, To and CC fields is that an e-mail or another attribute exists which can be used.
Content Tab
The Content tab allows you to view or edit the XML configuration file, which contains all of the parameters for a notification in an XML structure. Most of these parameters are referenced to the fields in the Notification tab for easier use. Only the subject and the body fields must be edited in the XML text directly.
| If you want to use person links instead of e-mail addresses, make the following changes directly to the XML configuration file: |
-
Enter the distinguished name into the fields that are to point to a person, for example, 'cn=Smith John,o=My-Company'. Be sure that the person entry contains an e-mail address.
-
In the content tab of the notification object, change the references from
"<?Job@dxmNotification-DN@dxmNotifyFrom-DN[5:]/>"
to
"<?Job@dxmNotification-DN@dxmNotifyFrom-DN@mail/>". If the e-mail address is contained in another attribute, change the last part to this other attribute (for example @my_mail_attribute).
| This method works only for user entries that are located in the Connectivity configuration database. It does not work for user entries that are part of another LDAP server. |
Notification (Tab)
The notification tab is part of a job object. Use this tab to set up all notifications for the job. The items shown in this tab are:
- Notifications
-
sets the links to all of the notification objects that this job uses. These objects can be local objects under the job objects or central objects in the folder Configuration → Notifications.
The next three items control whether the add, modify, and delete data change operations are performed automatically (option is not selected) or by a target system administrator who is notified via e-mail.
- Notify to add
-
controls all add operations.
- Notify to modify
-
controls all modify operations.
- Notify to delete
-
controls all delete operations.
When all three items are set, nothing is performed automatically and the target system administrator must perform all operations by hand. A typical scenario is that modifications are done automatically and add and delete operations are done by hand.
- Notify if not OK
-
controls notification when a meta controller job encounters an error or warning situation. Possible values are:
-
0 - no notification at all
-
1 - sends a notification when warnings occur
-
2 - sends a notification when errors occur
-
3 - sends a notification when warnings or errors occur
-
Notifications
A folder for notification objects that any (metacp) job can use. Use this folder to define central notification objects.
- Name
-
the name of the folder.
- Description
-
a description of the folder.
Related Topics
Operation
This tab contains most of the attributes that control the operation of a meta controller job that is based on the standard script architecture.
-
Delta Handling
Use these parameters to set up a delta handling for the job.The items shown here are:
- Delta synchronization
-
whether (checked) or not (unchecked) a synchronization of updates is required.Once the field is checked, the other items can also be edited.
- Delta type
-
the calculation base for the update interval. The following types can be used:
- DATE
-
the delta is calculated on the basis of a creation or modification date in the connected directory (default value).
- USN
-
the delta is calculated using the mechanism of unique serial numbers (for example, as used by iPlanet, Active Directory or OID).
- FILE
-
the delta is calculated by some DirX Identity agents (for example, ODBC) that keep the last connected directory state in an external file to compare against the new state.
if you change the Delta type property after the job has run an initial delta operation, DirX Identity resets the list of delta runs. You cannot recover this list, and you must start with a full synchronization. - Changes since
-
the update interval. Select one of the following values:
- (RECENT)
-
the synchronization uses the update information of the most recent synchronization procedure.
- (FULL)
-
a full data synchronization is performed instead of an update.
If the Delta type is DATE and at least one delta synchronization has already been performed, you can also choose a date for the interval. The job will synchronize all entries updated between that date and now. If the Delta type is USN, you can select a USN number for defining the update interval. If the Delta type is FILE, a file can be selected which contains the update information.
- Elements in list
-
the maximum number of delta results that are kept in the database.
- Clear List
-
resets the Changes since list. All delta items are deleted and the next workflow run will perform a full update.
- Delta Time Attribute
-
the attribute to use as an additional filter condition. By default, DirX Identity uses the operational directory attributes createTimestamp and modifyTimestamp for delta handling when Delta Type is set to Date. You can choose any other time attribute (for example dxmPwdLastChange for password synchronization workflows) to use this attribute as an additional filter condition for delta handling. Note that in a distributed environment time differences can influence the mechanism!
- Password Synchronization
-
enables/disables special password synchronization. Setting this flag activates a special mechanism in the standard script that compensates clock differences between the machine where the directory server is running and where clients reside that set the password at user entries in the directory.
- Password Delta Time
-
the overlap time used by the special mechanism that is activated by the Password Synchronization flag. It must be greater than the Delta Time parameter of all clients that set the password at user entries.
- Password Sort Key
-
the attribute used as the unique ID in the delta files when the special mechanism for password synchronization is used (Password Synchronization flag is on).
Other Operation Parameters
- Checkpointing Enabled
-
enables/disables checkpointing. if this flag is set, the job writes checkpoints regularly.
Note: you must also set the Enabled flag at the workflow to enable checkpointing. - Checkpoint Frequency
-
the number of processed records after which a checkpoint is written. After a serious agent problem, this activity can start at the last checkpoint (and not from the beginning again).
- Notify if not OK
-
the notification to use if job problems occur. Possible values are:
-
0 - no notification.
-
1 - notification if warnings occurred.
-
2 - notification if errors occurred.
-
3 - notification if errors or warnings occurred.
-
- Notifications
-
the definitions of how to perform notifications. The entry NotifyNotOK keeps the information for the Notify if not OK feature. NotifyData stands for a definition for data notification. See the "Understanding Notifications" section in the chapter "Synchronization Procedures" for more information.
- GUID Generation Type
-
the type of GUID generation:
- None
-
GUID generation is not enabled.
- Local
-
generates a GUID composed of the proprietary GUID value from the source connected directory and the GUID prefix.
- Central
-
generates a GUID based on the Actual GUID value in the central configuration object.
- User
-
- uses user hooks to define your GUID generation algorithm.
- GUID Generation Block Size
-
the block of GUIDs that will be handled together if central GUID generation is enabled. This setup minimizes read accesses to the directory server.
- Minimum Source Entries
-
the minimum number of entries that must be available for the workflow to run. This variable helps to avoid situations where, during subsequent runs of a full update or export, the number of source entries differs a lot. Use this parameter to specify a minimum amount of entries that must be available or the workflow terminates with error. (Exit code 12 is generated if the number of entries is not sufficient.)
This parameter is not evaluated for import workflows running in MERGE mode. It is evaluated for import workflows running in REPLACE mode, where it helps to avoid deletion of objects if only a small number of source entries is provided (by mistake).
- Exact Action
-
controls the automatic correction features of the algorithm.
- TRUE
-
prohibits soft change of action from add to modify or no action when the entry is already deleted (if set to TRUE). Reports an error instead.
- FALSE
-
allows soft change of action.
This parameter is only used for import operation.
- Compare with Spaces
-
controls whether or not leading, spaces, trailing spaces and any other spaces in the RDNs of a DN should be ignored when comparing DNs.
- TRUE
-
take care of spaces when comparing DNs. (This flag should be set if the spaces in the DNs should be taken as they are. RDN values may have been mapped using attributes from a source system where these spaces are very important to be present.)
- FALSE
-
ignore spaces when comparing DNs.
This parameter is only used for import operation.
- Init Mode
-
the run mode of the job:
- REAL
-
the job runs in normal mode and will perform the synchronization step as specified.
- TRIAL
-
the job runs just in a trial mode. No update operations will be performed. This mode can be especially used to test the mapping between source and target attributes and to check the shape of the resulting target entries in the trace file.
This parameter is only used for import operation.
- Test Mapping Only
-
whether (checked) or not (unchecked) test mapping is used. This field is useful for checking whether the mapping routine works properly. Check the box and then use the Debug Trace switch 2-FILE OUTPUT and the Trace Level 2-FULL TRACE in the Tracing tab to check the mapping output by viewing the trace file in the Monitor View after running the respective workflow.
- Test Max Entries
-
the number of source entries to be mapped.This parameter is used with Test Mapping Only when this item is enabled.Specify the number of source entries to be mapped and use -1 to map all source entries.
Related Topics
Other Scripts
A folder for Tcl scripts that any job can use (these are Tcl scripts that cannot be classified as control, mapping, or profile Tcl scripts).
- Name
-
the name of the folder.
- Description
-
a description of the folder.
| The load sequence of these scripts is not defined.Thus you cannot define dependencies between these scripts (for example, you cannot overload procedures). |
Related Topics
Profile Scripts
A folder for profile scripts that any job can use.
- Name
-
the name of the folder.
- Description
-
a description of the folder.
Related Topics
Tcl Script
The Tcl Script object describes the properties of a Tcl script file, which contains program statements to be run by the DirX Identity controller program metacp for synchronization operations.For DirX Identity, there are three main script types:
- Control Scripts
-
scripts that contain just definitions and settings of variables later used for the proper synchronization program.Normally all references that relate to fields in various configuration objects are located in this script.
- Mapping Scripts
-
scripts that hold a set of items describing the mapping between source and target attributes.See the respective help page for more details.
- Profile Scripts
-
scripts that contain the main program.Usually, this is a block of statements to open connections to the source and target connected directory, followed by one or more (nested) loop(s) that are executed for each source directory entry.Such a loop maps the attributes of the entry into target attributes and then tries to join with an existing entry, add a new entry or delete the corresponding target entry depending on which action is requested.
A special editor is provided to create or modify a Tcl script.See the section "Using the Code Editor" in the chapter on DirX Identity Manager in the DirX Identity User Interfaces Guide for more details.You may also create or change a Tcl script with a simple text editor, but you will then need to export and import the content.
The attributes shown on this tab are
- Name
-
the name of the Tcl script.
- Description
-
a description of the Tcl script.
- Version
-
the version number of the Tcl script.
- Anchor
-
a text value that helps to select the correct script during reference resolution.See Reference Descriptions for details.
Related Topic
Tcl Scripts
The Tcl scripts used by the job.This tab is only shown when the job is run by the DirX Identity controller program metacp.
Use this tab to access the configuration objects of the Tcl scripts used by the job.The properties shown here are:
- Control
-
the Tcl script that contains the Tcl control logic.This script is typically the first script that is called from the command line of the job.It calls the profile script, which itself calls other scripts.To display its properties, click the properties icon
on the right. - Profile
-
the Tcl script that contains the Tcl profile logic.To display its properties, click the properties icon on the right.
- Mapping
-
the Tcl script that contains the Tcl mapping logic.To display its properties, click the properties icon on the right.
- Miscellaneous
-
the Tcl scripts that contain additional Tcl procedures.To display the properties of a selected additional script, click the properties icon on the right.
Related Topics
"Synchronization Profiles and Templates" in DirX Identity Meta Controller Reference
Tracing
You can use traces written during job operation to debug job configurations.In general, you can choose a particular trace level to adjust tracing according to your requirements.
Use this tab so set up trace information for a job.The main field shown in this tab is:
- Trace file
-
the trace file associated with the job.To display the properties of the selected trace file, click the Properties button to the right.
This tab can contain other fields depending on the type of the related agent.
The following fields are displayed for the DirX Identity meta controller metacp:
- Debug Trace
-
metacp trace output mode. Select one of the following values:
- 0 - No Trace
-
metacp will not write any trace output.
- 2 - File Output
-
metacp writes the trace output to the trace file specified in Trace file (this level is provided for compatibility reasons).
- 4 - Variable trace to screen
-
traces the variable fields used by the script.
- 5 - Variable trace to file
-
traces the variable fields used by the script.
- 8 - Command trace to screen
-
traces all metacp commands.
- 9 - Command trace to file
-
traces all metacp commands.
- 12 - Variable and command trace to screen
-
combines levels 4 and 8
- 13 - Variable and command trace to screen
-
combines levels 5 and 9
- Trace Level
-
the granularity of trace output to be generated if Debug Trace is set to 2 (File Output). Select one of the following values:
- 1 - ERROR TRACE
-
only failed operations are traced.
- 2 - FULL TRACE
-
all operations are traced.
- 3 - SHORT TRACE
-
only operations that access the identity store are traced.
- Max Trace Records
-
by default, the meta controller writes only a single trace file (max trace records = 0). Use this counter if you expect to generate very large trace files (more than 2 GB). Set a trace record count, for example 10,000 records, to separate the trace information into multiple trace files. . Don’t forget to set up the file name for the trace file with a wildcard (for example, trace*.trc).
- Max Entries
-
the maximum number of join hits displayed in the trace file.
- Statistics
-
whether or not standard statistics are displayed at the end of the trace file and in the activity and workflow status entries. Select one of the following values:
- OFF
-
standard statistics output is not generated. In this case, the script can optionally output its own statistics information.
- ON
-
standard statistics output is generated (default).
| Trace files from metacp are always generated in UTF-8 encoding. As a result, you need a viewer that allows you to view UTF-8 characters. Otherwise the characters are not displayed correctly. |
For the ADS and Exchange agents, the only field displayed is:
- Trace
-
whether tracing is on (checked) or off (unchecked).
For the IBM Notes agent, the following additional fields are displayed:
- Trace
-
whether tracing is on (checked) or off (unchecked).
- Trace Level 1
-
whether Trace Level 1 is on (checked) or off (unchecked). Trace level 1 tracing information includes a dump of the configuration file, number of documents, and other program flow variables.
- Trace Level 2
-
whether Trace Level 2 is on (checked) or off (unchecked). Trace level 2 provides more detailed information than trace level 1.
- Trace Level 3
-
whether Trace Level 3 is on (checked) or off (unchecked). Trace level 3 provides more detailed information than trace level 2.
- Trace Item Types
-
whether (checked) or not (unchecked) additional trace information about the types of the Notes database items should be generated; for example:
PhoneNumber = TEXT
PasswordChangeTime = TIME
For the ODBC agent, the following additional fields are displayed:
- Trace
-
whether tracing is on (checked) or off (unchecked).
- Trace Level
-
a string that contains a combination of the following items or abbreviations separated by spaces:
- ConnectAttributes (CA)
-
include connection "attributes" (fields).
- FailSummary (FS)
-
include a summary of failed entries sent to the error file.
- ODBC
-
report ODBC versions.
- SQL
-
include SQL statements that are to be executed.
- Summary (S)
-
include a summary of all entries imported or exported (mark failed entries with a trailing # character.
- Warnings (W)
-
include ODBC warnings (ODBC errors are always written to the trace file).
- Columns (Cols)
-
include information on columns stored as part of the database schema.
- RefData (Ref)
-
include information on the reference data used for delta export.
- Statistics (Stats)
-
include statistics about the import operation, such as the number of creates, updates, and deletes, the number of entries unprocessed because of errors, the total of all entries handled with or without error but not skipped, and skipped entries.
- Max Trace Files
-
the number of trace files that the ODBC agents are permitted to create in rotation.
- Max Trace File Size
-
the maximum size of a trace file.
- Trace Flow
-
the level of tracing information to be written to the trace file. Trace flow is an integer from 0 to 9. The higher the number, the more tracing information is written. Currently, only trace level 1 is implemented; at this level, the ODBC agents give an indication of entrance and exit for main functions.
For the Report agent, the following additional fields are displayed:
- Trace
-
the trace level. Select one of the following values:
- NO TRACE
-
no trace information is written
- STATISTICS ONLY
-
only statistic information is written
- FULL TRACE
-
all available trace information is written
For SPML-based agents (for example SAP EP UM agent), the following additional fields are displayed:
- Controller Trace Level
-
the trace level for the controller component. Select one of the following values:
-
0 - No Trace
-
1 - Errors only
-
2 - Additional warnings
-
5 - Additional informational messages
-
6 - Additional debug information
-
- Connector Trace Level
-
the trace level for the connector component. Select one of the following values:
-
0 - No Trace
-
1 - Errors only
-
2 - Additional warnings
-
5 - Additional informational messages
-
6 - Additional debug information
-
- Connector Trace Tail
-
the number of trace messages to be transferred from the connector to the trace file (default: 20).
Related Topics
Monitoring
Activity Status Data
Activity status data are created during and after execution of the associated job for Tcl-based workflows.Use this tab to view the returned status data.
Note that some tabs may be empty if the workflow status entry belongs to a nested workflow.In this case, you must select the link to the child workflow to see the details.
The items shown in this tab are:
- Name
-
the name of the entry.
- Activity
-
the name of the activity.
- C++-based Server
-
the name of the C++-based Server that ran the activity.
- Child Workflow
-
the link to the workflow that this activity starts. Click the icon on the right to open this object.
- Start Time
-
the activation time for the activity.
- End Time
-
the termination time for the activity.
- Status
-
the result message returned for the activity (see the topic "Activity Execution Status").
- Remark
-
additional activity status information. This field can contain an unlimited number of lines that provide detailed information if the activity did not run correctly. Note that this field can contain warnings even if the run was successful. If there are warnings, you should determine the reason and fix the problem.
- Exit Code
-
the exit code for the activity’s execution. This is the exit code returned by the running agent.
DirX Identity captures the exit code of an agent and saves it in the corresponding status entry. By default, DirX Identity considers an activity run to be erroneous when the exit code is not equal to zero.
You can use the OK Status and Warning Status properties of the agent or job configuration objects to assign specific exit code handling. DirX Identity evaluates all codes that are not specified in these fields as indicating an erroneous run and aborts the workflow.
- Status Path
-
the location at which all files defined for this workflow are stored in the file system area. Use the Copy to Status Area and Save Mode flags in the file item objects to control the status handling.
Related Topics
Monitor Folder
DirX Identity uses this folder to structure the Monitor View in the same way as it is structured in the Workflows folder of the Expert View.Monitor folders hold other folders or status data for all runs of a particular workflow.
The Monitor Folder tab contains a single item:
- Name
-
the name of the monitor folder, usually the name of the workflow.
- Description
-
(not used)
Although you can edit this tab, we recommend that you leave the Name field as it is, because it is automatically created by the Monitor View.
Process Table
The process table allows you to monitor running Tcl-based workflows.It contains an entry that can be enabled or disabled for each C++-based Server.When enabled, workflow status entries are displayed as child entries under the corresponding server entry.After the DirX Identity Manager starts, all process table entries are disabled by default.
Related Topics
Process Table Server
All existing C++-based Servers of a DirX Identity domain are shown as entries under the Process table folder in the Monitor View.
The Monitor tab shows the server state and is refreshed regularly.The other tabs are identical to the tabs of the C++-based server object.
Each C++-based Server entry in the process table has three menu options:
-
Enable Monitoring - enables monitoring for this server entry.Running workflows will be visible under the corresponding server entry.These entries are marked with a clock icon to indicate that they are still running.This view is automatically refreshed every 30 seconds.Use Disable Monitoring to disable it at any time.
-
Refresh - requests an immediate update of this server entry.
-
Remove Finished Workflows - enables manual removal of completed workflow status entries.When a workflow monitored in the process table completes, a normal status entry with its icon remains as a child object.You must remove these completed workflow status entries by hand using this option.
Right-clicking on a running workflow aborts the workflow with the option Abort Workflow (note: aborting a workflow does not kill running agent processes if the Abort Execution Allowed flag is not set in the corresponding agent object before the workflow is started).
Related Topics
Workflow Status - Data
A workflow returns status data during and after its execution.You can view this information in the workflow’s Workflow Status Data tab in the Monitor View or in the workflow’s Structure tab.
Note that for Tcl-based workflows, information during execution is only supported if the workflow’s Status Compression Mode runtime parameter is set to Detailed.All other modes deliver status information only after completion of a workflow run.This mode of operation is also valid for the process table: workflow status entries appear only after the run has completed.
Special status entries (with an extension of -E or -En) are used to show conflicts or special situations.See the DirX Identity Manager help topic Special Error Status Entries for details.
The following items are shown in the tab:
- Name
-
the name of the file that contains the workflow status data.
- Workflow
-
the name of the workflow that has generated the status data.
- Server Name
-
the name of the C++-based Server or Java-based Server that ran the workflow.
- Parent Activity
-
the link to the activity that started this workflow (for nested Tcl-based workflows). Click the icon on the right to open this object.
- Initiator
-
the initiator of the workflow. For real-time workflows running in the Java-based Server, this field displays either scheduled (if activated by an active schedule) or by event (if real-time events were sent internally). For workflows running in the C++-based Server, this field displays the name of the relevant schedule or the value defined by the runwf tool’s initiator switch; if it is empty, the workflow was started interactively from the DirX Identity Manager.
- Start Time
-
the activation time for the workflow.
- End Time
-
the termination time for the workflow.
- Expiration Time
-
the expiration time of the workflow status data. This is the time after which the Status Tracker automatically deletes the data.
- Status
-
the result status returned for the workflow.
- Remark
-
additional workflow status information.This field can contain an unlimited number of lines that provide detailed information if the activity did not run correctly.Note that this field can contain warnings even if the run was successful.If there are warnings, you should determine the reason and fix the problem.
Related Topics
Workflow Status - Structure
Use this tab to view the control flow of the Tcl-based workflow.The tab displays the sequence of steps (activities), where the colors indicate the following status:
-
Yellow - the step has not yet run (this is the default color for all steps at the beginning).
Corresponding status value: open.notStarted -
Blue - the step is currently running.
Corresponding status value: open.running -
Green - the step ran successfully.
Corresponding status value: closed.completed.ok -
Red - the step did not run correctly (Error).
Corresponding status value: closed.completed.error -
Light red - the step ran correctly but some warnings are reported. You should check what the problems were.
Corresponding status value: closed.completed.warning -
Gray - the step status cannot be evaluated correctly by DirX Identity (and represents an undefined condition).
Clicking on one of the displayed activities either opens the activity definition (before it runs) or opens the status entry in a new window. This action is especially useful when using the Structure tab in the Global View (you need not switch to the Monitor View).
| If the workflow’s Status Compression Mode runtime parameter is set to Minimized if OK, no structure information is present. |
Related Topics
Workflow Status - Statistics
Use this tab to view statistical information from the complete workflow run.The tab shows summarized information from all related activities (even over nested Tcl-based workflows) as long as the Disable Statistics flag is not set.It contains:
- Operation overview
-
the type of operation (Add, Modify, Delete) (in rows) and the result (in columns):
- OK
-
the number of entries for this operation that were successfully processed.
- Failed
-
the number of entries for this operation that failed.
- Ignored
-
the number of entries for this operation that were ignored.
The Total row and column total the individual results of the operations.The upper left field displays the total number of entries processed.
- Complete Info
-
the complete statistical info from the activity run in XML format. This field presents additional information that cannot be displayed in the table format.
| Customized scripts for the meta controller may influence the displayed numbers. |
| If the workflow’s Status Compression mode runtime parameter is set to Minimized if OK, no statistics information is present. |
A workflow exports 20 entries from the directory and writes it into a file. In this case, these fields are filled:
Total/Total: 20 (entries read from the source directory)
Add/OK: 20 (correctly processed to the file).
If 3 entries could not be written into the file, the result would be:
Total/Total: 20 (entries read from the source directory)
Add/OK: 17 (correctly processed to the file)
Add/Failed: 3 (not correctly processed to the file)
A workflow imports 50 entries from a file and 20 were added, 15 were modified and 5 were physically deleted.
Total/Total: 50
Add/OK: 20
Modified/OK: 15
Deleted/OK: 5
A workflow transfers 30 entries from an LDAP directory to another one and 10 were added (plus 2 upper nodes), 15 were modified and 5 were physically deleted.
Total/Total: 30
Add/OK: 12
Modified/OK: 15
Deleted/OK: 5
Related Topics
Activity Status - Config
Use this tab to display the agent configuration files used during operation of a Tcl-based workflow:
Configuration Files - the configuration files associated with the activity.To display the contents of configuration file in the list, click it and then click .Use the Copy to Status Area flag of a file configuration object to control how it is stored in the status area.
Related Topics
Status Data
This folder is the top-level node for all collected status data in the Monitor View.It contains three types of objects:
-
Monitor folders, which keep structured information about running or completed workflows.
-
Query folders, which allow for filtering workflow status information.
-
The process table, which allows for monitoring running workflows.
Activity Status - Input/Output
Use this tab to view the data files created during operation of a Tcl-based workflow:
- Input
-
the input files associated with the activity. To display an input file, click it and then click
. - Output
-
the output files associated with the activity.To display an output file, click it and then click
.
Related Topics
Activity Status - Statistics
This tab displays statistical information from the activity run (currently this feature is only supported by the meta controller in Tcl-based workflows).It contains:
- Operation overview
-
displays the type of operation in rows (Add, Modify, Delete) and the result in columns.Result values are:
- OK
-
the number of entries for this operation that were successfully processed.
- Failed
-
the number of entries for this operation that failed.
- Ignored
-
the number of entries for this operation that were ignored.
The Total row and column sum the individual results of the operations.
the left upper field displays the total number of file entries processed (this field may be empty for LDAP to LDAP workflows). - Complete Info
-
displays the complete statistical info from the activity run in XML format. This allows defining additional information that cannot be displayed in the Operation Overview table.
| Customized scripts for the meta controller may influence the displayed numbers. |
A workflow exports 20 entries from the directory and writes them into a file. The following fields are populated:
Total/Total: 20 (entries read from the source directory)
Add/OK: 20 (correctly processed to the file).
If 3 entries cannot be written into the file, the result is:
Total/Total: 20 (entries read from the source directory)
Add/OK: 17 (correctly processed to the file)
Add/Failed: 3 (not correctly processed to the file)
A workflow imports 50 entries from a file and 20 were added, 15 were modified and 5 were physically deleted.
Total/Total: 50
Add/OK: 20
Modified/OK: 15
Deleted/OK: 5
A workflow transfers 30 entries from an LDAP directory to another one and 10 were added (plus 2 upper nodes), 15 were modified and 5 were physically deleted.
Total/Total: 30
Add/OK: 12
Modified/OK: 15
Deleted/OK: 5
Related Topics
Activity Status Trace
Use this tab to view the trace, report and process data files created during a workflow run:
- Trace
-
the trace file associated with the activity.To display the trace file contents, click it and then click
. - Report
-
the report file associated with the activity.To display the report file contents, click it and then click
. - Process Data
-
the process data file associated with the activity.The process data file contains system internal information traced by the agent controller, including the name of the called executable, the command line parameters, and transferred delta information.To display the process data file, click it and then click
.
Related Topics
Password Change
Password Change Event Manager - Workflow
This workflow reads password change events from an event source, processes them in the LDAP directory and then generates subsequent real-time orders for password change applications to connected directories.
Use this tab to assign properties to the workflow.The items shown in this tab are:
- Name
-
the name of the workflow.
- Description
-
a description of the workflow.
- Version
-
the version number of the workflow.
- Is Active
-
whether (checked) or not (unchecked) to enforce running this workflow permanently in the Java-based Server.
- Sending Application
-
the application whose events are to be processed. This field allows filtering events based on the event source: the sending application. The asterisk () is a wildcard that indicates all senders, *ADS selects the Windows Password Listener and Identity selects the Web Center.
- Type
-
the workflow type; in this case, EventManager.
- Cluster
-
the event source cluster. This field allows filtering events based on the cluster name of the event source. The asterisk (*) is a wildcard that accepts all servers. Note: for Windows sources, this field contains the forest name.
- Domain
-
the event source domain. This field allows filtering events based on the domain name of the event source. Enter the appropriate Identity domain; for example, My Company for the sample domain.
- Workflow Timeout
-
the time after which the workflow stops working if it has not yet completed correctly.
- Edit via content only
-
whether (checked) or not (unchecked) you can edit the XML content directly for debugging purposes. When set, the attributes from the various tabs of this object no longer influence the XML content. Do not set this flag for normal operation.
Related Topics
Password Change Event Manager - Activity
This tab of a password change event manager workflow defines the corresponding activity.
Use this tab to assign properties to the activity.The items shown in this tab are:
- Identity Store
-
the Identity Store with which this workflow operates.
- Bind Profile
-
the bind profile to bind to the Identity Store.
- Secured via SSL
-
whether (checked) or not (unchecked) the workflow uses secure socket layer (SSL) protocol to the Identity Store.
- Write Audit Log
-
whether (checked) or not (unchecked) the workflow writes an audit log.
- Number of Retries
-
the number of times a password change is automatically repeated after a failure.
- Wait before Retry
-
the time to wait between retries.
- Resource Family
-
the type of resource the activity needs to run.It runs only on servers that are associated with the same resource family or families.
Related Topics
Password Change Application - Workflow
This workflow is triggered by password change orders created by the password change event manager.It processes them correctly to the corresponding connected directory.
Use this tab to assign properties to the workflow.The items shown in this tab are:
- Name
-
the name of the workflow.
- Description
-
a description of the workflow.
- Version
-
the version number of the workflow.
- Is Active
-
whether (checked) or not (unchecked) to enforce running this workflow permanently in the Java-based Server.
- Type
-
the type of the workflow. Identical to the type of target system this workflow handles.
- Cluster
-
the cluster name of the target system. This value must be exactly the same as the value in the Cluster field of the associated target system entry in the DirX Identity domain (Advanced tab). Use the asterisk (*) as a wildcard to accept any server name. Note: for Windows target systems, this field contains the forest name.
- Domain
-
the domain name of the target system. This value must be exactly the same as the value in the Domain field of the associated target system entry in the DirX Identity domain (Advanced tab). Use the asterisk (*) as a wildcard to accept any domain name.
- Workflow Timeout
-
the time after which the workflow stops working if it has not yet completed correctly.
- Edit via content only
-
whether (checked) or not (unchecked) you can edit the XML content directly for debugging purposes.When set, the attributes from the various tabs of this object no longer influence the XML content.Do not set this flag for normal operation.
Related Topics
Password Change Application - Activity
This tab of a password change application defines the corresponding activity.
Use this tab to assign properties to the activity.The items shown in this tab are
for Java Connectors:
- Connected Directory
-
the connected directory where the password change is to be performed.
- Bind Profile
-
the bind profile to use to connect to the connected directory.
- SSL
-
whether (checked) or not (unchecked) secure socket layer (SSL) protocol is used to the connected directories.
for C Connectors:
- Related IdS-C Server
-
the relevant C++-based Server. This activity communicates via SOAP with a C++-based Server. The connector running in this server performs the password change action at the connected directory (the API of this connected directory is only accessible via a C or C++ interface).
- Connector
-
the relevant connector running in the IdS-C server.
- SSL for SOAP
-
whether (checked) or not (unchecked) SSL protocol is used for the SOAP connection.
Common Attributes:
- Write Audit Log
-
whether (checked) or not (unchecked) the activity writes an audit log.
- Number of Retries
-
the number of times the activity repeats the operation if a password change fails.
- Wait before Retry
-
the time between retries.
- Password Reset Attribute
-
the attribute used in some of the connected directories to indicate a password reset (requires the user to change the password during next login at this connected directory).
- Mapping Script
-
the JavaScript that defines the mapping between the attributes in the Identity Store and in the connected directory.
- Resource Family
-
the type of resource this activity needs to run.It runs only on servers that are associated with the same resource family or families.
Related Topics
Error Activity
This activity only receives requests that have permanently failed.It is optional.When it is not enabled, the failed requests are placed in the Java-based Server’s dead letter queue.
The activity sends notifications to the affected users.It builds the notification and optional attachments by reading attributes from the request such as user’s e-mail or name.
Use this tab to assign properties to a workflow.The items shown in this tab are:
- Enabled
-
whether (checked) or not (unchecked) an error activity is included into the workflow that sends notifications.
- Error Script
-
the JavaScript that generates the attributes of the SPML AddRequest passed to the mail connector.The mail connector uses these attributes to build the e-mail and the attachments.
- Resource Family
-
the type of resource this activity needs to run. It runs only on servers that are associated with the same resource family or families.
Related Topics
Error Notification
This activity only receives requests that have permanently failed. It is optional. When it is not enabled, the failed requests are placed in the Java-based Server’s dead letter queue.
The activity sends notifications to the affected users. It builds the notification and optional attachments by reading attributes from the request such as the user’s e-mail or name.
Use this tab to assign properties to a workflow. The items shown in this tab are:
- SMTP Server
-
the mail server to use for sending notifications.
- Bind Profile
-
the bind profile for this mail server (optional).
- From
-
the "From" field of the mail to be sent.
- To
-
the "To" field of the mail to be sent.
- Subject
-
the "Subject" field of the mail to be sent.
- Body
-
the "Body" field of the mail to be sent. You can use these variables:
- ${response(errormessage)}
-
the error message.
- ${IDATTR(id)}
-
the identification of the user (either the DN or the username).
Related Topics
Java-based Workflows
Combined Java-based Workflow
A "combined" Java-based workflow is a workflow that is composed of multiple individual Java-based workflows. You can build a combined workflow to include existing Java-based workflows and define the sequence in which they should run. You can also specify how each workflow is to operate when a WARNING status is returned by a preceding workflow or activity in the sequence. Note that you cannot use entry change workflows, cluster workflows or other combined workflows in a combined Java-based workflow definition.
Use the Workflow Sequence tab of a combined Java-based workflow configuration object to create and manage a combined Java-based workflow. This tab consists of a table on the left and a toolbar for operating on the table on the right.
The Workflow Table
The workflow table consists of two columns:
-
Workflows - the workflows that comprise the combined workflow. Each row in the table specifies one Java-based workflow. The order of the workflows in the table determines the sequence in which each workflow is run. Click in a row to select it. Click
 in a workflow row to view the workflow’s properties. Click
  to browse to and select a workflow.
 -
StopOnWarning - whether (true) or not (false) this workflow or activity is not started if its predecessor (the workflow in the row above it) finishes with a WARNING status. A value of true means that the entire combined workflow stops on a WARNING returned from the preceding workflow or activity in the sequence. A value of false (the default) means that this workflow or activity starts after its predecessor finishes regardless of whether it finished with WARNING or SUCCESS. Click in the row to toggle between true/false value selection.
The Toolbar
The actions for operating on a selected row in the workflow table are:
 Add new workflow - inserts a new row below the current selection. In the Workflow column of the new row, click to browse to the workflow you want to add.
 Delete - deletes the selected row.
 Duplicate - duplicates the first selected row.
 Move up - moves the selected row up.
 Move Down - moves the selected row down.
 Copy - copies the selected row to the clipboard.
 Paste - pastes the selected row from the clipboard.
Related Topics
Java-based Workflow
A Java-based workflow consists of one or more activities that carry out part of a real-time or scheduled data synchronization operation.A workflow configuration object describes the configuration information for a particular workflow including the configuration information for all included objects like activities.Use the workflow configuration object to define Java-based workflows.
You can find all relevant activities of Provisioning Synchronization workflows as sub-objects of the workflow configuration object.
Password Synchronization workflow objects written in JavaScript technology also contain the information about the included activities, such as:
-
The productive setPasswordActivity, which implements the task that the workflow performs.It contains information about the connected directory to work with, operation information and the resource family to which it belongs.
-
The Error Activity, which defines actions that occur when the productive activity fails.This information includes operation information and the notification definition.
| If you have changed a workflow configuration, inform the server to reload it! Select the workflow configuration object and choose "Load IdS-J Configuration" from the context menu. |
Use this tab to enter the properties of a workflow object (note that not all items are present for a specific workflow). The items shown in this tab are:
General
- Name
-
the name of the object. The name is limited to 45 characters. This limit avoids a monitor entry cn with more than 64 characters. The cn for the monitor entry is:
name_of_workflow 16_char_timestamp 2_optional_characters-C - Description
-
a description of the object.
- Workflow Type
-
the type of the workflow (only visible if design mode is enabled). This field is handled as a comment (there is currently no functionality associated with it).
- Is Active
-
whether (checked) or not (unchecked) to enforce running this workflow permanently in the Java-based Server.
- Associated TS
-
the DN of the "real" target system for retrieving user data. This field is only required for connected systems such as portals that implement single sign-on (SSO) for a number of other applications. If synchronization to the portal system requires user data stored in the entries of the "real" system, the DN of the corresponding target system needs to be entered here.
- Is applicable for
-
the application of this workflow:
- Topic Prefix (read-only)
-
the topic prefix for the event that is used to trigger this Java-based workflow. To determine whether the prefix is appropriate, compare it with the topics listed in the Topic entries in folder Configuration → Topics.
- Type
-
the type of workflow. This value is identical to the type of target system this workflow handles.
- Cluster
-
the cluster name of the target system. This value MUST be exactly the same as the Cluster field of the associated target system entry in the DirX Identity domain (Advanced tab). Wildcard "*" accepts any server name. This field must be empty if the workflow runs only in scheduled mode.
Note: in some target systems, this field is named differently (for example 'Forest Name' for the Windows target systems). - Domain
-
the domain name of the target system. This value MUST be exactly the same as the Domain field of the associated target system entry in the DirX Identity domain (Advanced tab). Wildcard "*" accepts any domain name. This field must be empty if the workflow runs only in scheduled mode.
- Timeout
-
the workflow timeout. The workflow engine moves the workflow to the dead letter queue if the timeout is reached.
Note: be sure to set all activity timeouts correctly. Activity and workflow timeouts are completely independent. The first timeout that is reached forces the server to abort the workflow. - Endpoints
-
the connected directory types supported by this workflow. This information allows DirX Identity to determine which workflows fit between the source and target connected directories that are connected with a workflow line in the Global View. Set the value to the correct connected directory types with a "-" in between, for example "LDAP-ADS". If set correctly, this workflow appears in the dialog of the Assign or New (copy) action at a workflow line.
Note: If your workflow does not appear at the desired line, check the types of the connected directories and simply change the Endpoint field accordingly. Now you can assign or copy the workflow. Do not forget to change the Endpoints field to the previous value.
For example, suppose you want to assign a consistency workflow that handles the assocAccount2User rule to a workflow line that connects the Identity Store and an ADS. The consistency workflow is defined as "LDAP-LDAP". To add it to the workflow line, change the value to "LDAP-ADS", and then you can assign the workflow to the line. After this step, reset the Endpoints field to "LDAP-LDAP". This method allows you to build more intuitive user interfaces. - Wizard
-
the wizard used for configuring the most important parts of this real-time workflow.
Related Topics
Real-time Activity
Real-time Channel
Content Tabs
Real-time Filter
Real-time Java Mapping
Real-time Port
See also "Managing the Java-based Server".
Real-time Activity
A real-time activity is a single step in a real-time workflow.The activity configuration object maintains all data needed for the activity’s execution within the running workflow.The configuration data associated with an activity includes:
-
The activity’s name, description and version number
-
Information about type, implementation, error handling and auditing
Activity objects contain port objects that define how to access the connected directories and their information.
Use this tab to enter the properties of an activity object.The items shown in this tab are:
General
- Name
-
the name of the object.
- Description
-
a description of the object.
- Version
-
the version number of the object.
- Job Type
-
the naming attribute from the component description (only visible if Design Mode
is enabled). The values are:
errorActivity - error job for an activity
provisioningActivity - provisioning job for an activity
pwdHandlingActivity - job for password expiration handling
resolutionActivity - job in an event maintenance workflow
transportActivity - job of a collection export / import activity - Resource Family
-
the type of resource this activity needs to run. It runs only on servers that are associated with the same resource family or families.
- Timeout
-
the workflow timeout. The workflow engine moves the workflow to the dead letter queue if the timeout is reached.
Be sure to set all activity and workflow timeouts correctly. Activity and workflow timeouts are completely independent. The first timeout that is reached forces the server to abort the workflow. Activity timeouts can accumulate regarding the Retry limit and Wait before retry settings. - Retry Limit
-
the number of retries if the activity ran on a recoverable error.
- Wait before retry
-
the time between retries.
Controller
- Join Engine Type
-
the type of join engine used in this job. Read the DirX Identity Application Development Guide for an explanation of the available controller types.
- Class Name (Controller)
-
the class name of the controller to be used.
- Write Audit Log
-
whether (checked) or not (unchecked) auditing is enabled for this activity.
- Userhook Class Name
-
the class name of the user hook to be used.The user hook class must implement the interface com.siemens.dxm.join.api.IGlobalUserHook and must be deployed to ${DIRXIDENTITY_INST_PATH}/ids-j-domain-Sn/confdb/common/lib.
- Error Script (optional)
-
the link to the error script to be used.
- Implementation Language (optional)
-
the implementation language of the error script.
- Send E-mail (optional)
-
whether (checked) or not (unchecked) a notification is sent when a user changes his own password. This field is used in the User Password Event Manager workflow. If set and the user changes his own password, a notification is sent (note that if an administrator resets a user’s password, a notification is always sent).
Filter for Accounts (optional):
- Search Base
-
the node at which to start the search.
- Scope
-
the scope of the search.
- Filter
-
the LDAP filter to use to restrict the search.
Other optional fields:
- Days before Expiration (optional)
-
the number of days before the password expires.
- Keep Password History at the Account (optional)
-
a flag whether (checked) or not (unchecked) a password history should be kept at the account (the default is false unless it is a privileged account).
- Number of Notifications (optional)
-
the number of notifications that should be sent.
| Some of these properties are only visible for specific controller implementations. |
Notification (optional)
- From
-
the e-mail address of the sender.
- To
-
the e-mail address of the receiver.
- Subject
-
the title (subject) of the e-mail.
- Body
-
the body of the e-mail.
Related Topics
Real-time Channel
Content Tabs
Real-time Filter
Real-time Java Mapping
Real-time Port
Java-based Workflow
See also "Managing the Java-based Server".
Real-time Port
A port configuration object defines the access to a connected directory that is used by the corresponding activity.
The configuration data associated with a port includes:
-
The port’s name, description and version number
-
Information about type, authentication data as well as links to the related channels.
Port objects contain references to channel objects that define more information about joining and mapping.
A real-time port defines the connection to a connected directory for several object types (for example, accounts, groups, memberships). The port configuration object defines bind parameters and keeps channel references. Object type-specific information (for example, the mapping) is defined in channels. A port can reference several channels.
Use this tab to enter the properties of a port object. The items shown in this tab are:
General
- Name
-
the name of the object.
- Description
-
a description of the object.
- Version
-
the version number of the object.
- Port Type
-
the type of port. Possible values are:
errorPort - port for error notification
notificationPort - port for normal notification (for example, to notify adds and deletes to an administrator)
provisioningPort - synchronization ports to a target system or the Identity Store
Target System
- Port Name
-
the name of the port. Only a fixed list of names is supported:
TS - the port that connects to the connected system.
IdentityDomain - the port that connects to the Identity Store.
event - the port that sends change events to the DirX Identity message broker.
notify - the port that sends e-mail notifications.
(Message - the port that sends e-mail notifications (deprecated - used only in older workflows)). - Connector
-
the type of connector for this port.
- Channel Parent
-
the channel parent folder (a subfolder under the channel folder of a connected directory). It contains all related channels for this port.
- Attributes to Decrypt
-
the attributes to be decrypted.
- Connector Class Name
-
this field is automatically set when the connector type is selected.
- Connected Directory / Mail Server
-
the connected directory this port allows you to access.
- Bind Profile
-
the bind parameters to access the connected directory.
- SSL
-
whether (checked) or not (unchecked) to use SSL. This field is valid only for certain workflow types like those of type ADS. The SSL flag is set here at the port because it is workflow specific. Validation workflows must not be run with SSL, but synchronization workflows, which need SSL to be able to set passwords in the connected system, must be run with SSL.
- Message Server
-
the messaging service to which events should be sent. JMS connectors - such as the one sending change events - need to know to which messaging service they should send events. This is typically the DirX Identity message broker.
- Publisher ID
-
the publisher ID. JMS connectors typically need a publisher ID that distinguishes them from other JMS publishers.
OpenICF Connector Bundle (only for workflows of type OpenICF)
- Bundle Specification
-
- Bundle Name
-
the name of the OpenICF Connector bundle running inside the OpenICF Connector Server.
- Bundle Version
-
the version of the OpenICF Connector bundle.
- Class Name
-
the class name of the OpenICF Connector bundle to be called by the OpenICF Connector Server.
Request Workflows (optional)
- URL Path
-
this field is pre-configured to the default value workflowService/services/WorkflowService. Do not change this setting.
- Socket Timeout (optional)
-
the timeout (in seconds) if necessary.
- Domain (optional)
-
the domain for which this Java server is responsible. this field helps to verify whether the HTTP request to the workflow service goes to the correct Java server that is responsible for this domain. If this field is empty, no check is performed. We recommend to set the domain here.
- Primary Request Workflow (optional)
-
the request workflow to be used. It will be used for account objects if configured. If no Secondary Request Workflow is set, it will be used for group objects, too. If the field is empty
- Secondary Request Workflow
-
the request workflow to be used for group objects.
| if both primary and secondary workflow fields are empty, the workflow service tries to find a suitable request workflow definition according to the When Applicable settings. It is recommended to configure at least a primary workflow. Be aware that usage of a single request workflow definition requires an implementation that is able to handle both object types. |
Notification (optional)
For Java-based real-time workflows (other than Set Password workflows), notifications are defined as follows:
- Subject
-
the title (subject) of the e-mail.
- From
-
the e-mail address of the sender.
- To
-
the e-mail address of the receiver.
- CC
-
the e-mail address of the copy recipient.
- BCC
-
the e-mail address of the blind copy recipient.
- Subject
-
the title (subject) of the e-mail.
- Body
-
the body of the e-mail.
- Batch Size
-
number of e-mails that are collected before e-mails are sent.
|
Notification (optional)
For Java-based Set Password workflows (when the user has changed his own password using self service), the notifications are defined as follows: (the recipients are defined in the Recipients tab):
- Subject
-
the title (subject) of the e-mail.
- Body
-
the body of the e-mail.
- Batch Size
-
the number of e-mails that are collected before e-mails are sent.
|
In the Subject and Body fields, the following expressions can be used:
In error notifications, the following expression can be used in the Body field:
|
Notification on Reset (optional)
For Java-based Set Password workflows (when an administrator has reset a user’s password), the notifications are defined the following way: (the recipients are defined in the Recipients tab)
- Subject
-
the title (subject) of the e-mail.
- Body
-
the body of the e-mail.
- Batch Size
-
the number of e-mails that are collected before e-mails are sent.
| The same expressions as listed above (when a user changes his own password) can be used. |
Recipients (optional)
For Java-based Set Password workflows, the recipients used in the notification e-mails are defined in the following way:
- From
-
the e-mail address of the sender.
- To
-
the e-mail address of the receiver.
- CC
-
the e-mail address of the copy recipient.
- BCC
-
the e-mail address of the blind copy recipient.
-
The same expressions as listed above can be used; the only expression for recipients that makes sense is "$\{IDATTR(mail)}". Of course one could define expressions like
"$\{IDATTR(givenName)}.$\{IDATTR(sn)}@My-Company.com"
but due to hard coded domain suffix this is not so useful. -
When using expressions for recipients, make sure that the expressions will not resolve to "" (for example, the attribute "mail" should be present); so that e-mails are not sent if no recipient fields are present.
-
| Some of these fields are optional for some port types. |
Related Topics
Real-time Activity
Real-time Channel
Content Tabs
Real-time Filter
Real-time Java Mapping
Java-based Workflow
See also "Managing the Java-based Server".
Real-time Filter
A real-time connector filter can be configured to be injected into a filter pipe between the join engine and the connector.DirX Identity supports some specialized filters and a generic filter to be used for custom implementations.
Specialized filters are:
- CryptFilter
-
encrypts / decrypts attributes in requests and responses.
- JDBCFilter
-
(for JDBC-type connected systems) - transforms multi-value membership attributes in Identity to multiple records in the JDBC membership table.See the JDBC workflow for more details.
Use this tab to enter the properties of a filter object.The items shown in this tab are:
General
- Name
-
the display name of the filter.
- Description
-
the description of the filter.
- Sequence number
-
the location of this filter, if more than one filter is configured. This value must be a unique positive integer. The first filter is the first to receive the request from the join engine.
Filter
- Name
-
the name of the filter. Stored only in XML content (no further use).
- Class Name
-
the fully qualified class name of the filter implementation.
- Use PSE
-
whether (checked) or not (unchecked) the filter is allowed to read the Crypto PSE for decryption.
- Properties
-
the list of custom attributes to be entered with their name and String values.
The specialized filters require additional attributes:
-
Attributes for the JDBCFilter:
- Member Table
-
the database table in which to store the account-group memberships; that is, the values of the member attribute.
- Member Source Attribute
-
the column name of the database table that identifies the entry holding the list of account-group memberships. Typically this is the account.
- Member Attribute
-
the column name of the database table that identifies the member. Typically this is the group.
- Match Type
-
the column name of the database table that identifies the entry holding the multi-value attribute. Typically this is the account.
- Multivalue Attributes
-
the column name of the database table that holds the values of the multi-value attributes. They should be accumulated and returned as one multi-value attribute in the SPML search response entry.
-
Attributes for the CryptFilter:
- Decrypt Request
-
whether (checked) or not (unchecked) the filter evaluates each request for attribute values to decrypt.
- Decrypt Attributes
-
the (comma separated) list of attributes whose values are decrypted. Typically this field contains an expression that references the specific attribute "decrypt.attribute" of the port entry: $\{DN4ID(port)@dxmSpecificAttributes(decrypt.attribute)}. The values are entered at the port.
- Encrypt Attribute
-
the attribute to decrypt/encrypt.
Related Topics
Real-time Channel
A real-time channel configuration object is a sub-object of a connected directory that defines the attributes, the attribute mapping, the export and the join filter for a certain type of objects (for example, users or groups) stored in this connected directory.
Java mapping objects can be sub-objects of channel objects if the Java Source mapping type is used.
Note that for secondary channels such as the password or member channel, you don’t need to specify export criteria, join conditions or import options.They are taken from the corresponding primary channel, typically the channel for accounts (for the password channel you define the primary channel with the Password Primary Channel link, for the member channel you define the secondary channel with the Member Channel link form the primary channel).In the secondary channels, you only need to define the mappings for the appropriate attribute(s); that is, the member attributes for group memberships or the password attribute for the password channel.
Use this tab to enter the properties of a real-time channel.The items shown in this tab are:
General
- Name
-
the name of the object.
- Description
-
a description of the object.
- Version
-
the version number of the object.
- Export Sequence Number
-
the processing sequence of the channels during runtime. Use 0 for a member channel.
- Connected Directory
-
the link to the relevant connected directory.
- Corresponding Channel
-
the corresponding channel in the other direction.
- Member Channel
-
the relevant member channel. Set this value only for those channels (the primary channels) that hold the members. In LDAP based systems, these are the groups.
- Object Description Name
-
the object description name of the provisioned object to use to find the associated audit policy to determine whether audit messages must be written. It is also used for finding the associated change event policy if change events need to be sent.
- Password Primary Channel
-
the primary channel that keeps the export criteria, join conditions or import options which are reused by the set password channel. Entering a value this field is only necessary for a set password channel.
- Userhook Class Name
-
the class name of the user hook definition.The user hook class must implement the interface com.siemens.dxm.join.api.IUserHook or com.siemens.dxm.join.api.IUserHookExt and must be deployed to ${DIRXIDENTITY_INST_PATH}/ids-j--domain-Sn/confdb/common/lib.
Import Property
- Include ID in Add Request
-
whether (checked) or not (unchecked) to include the ID in the add request. Some target systems require the ID as part of the add request.
- Create Despite Multiple Joined Entries
-
whether (checked) or not (unchecked) to create the entry even when multiple joined entries are found during the join operation. If you deselect this option, the workflow reports an error and does not create the entry.
- Notify on Add
-
whether (checked) or not (unchecked) to send a notification message in addition to the add operation. See the notify port for configuration of the message.
- Notify on Delete
-
whether (checked) or not (unchecked) to send a notification message in addition to the delete operation. See the notify port for configuration of the message.
- Notify on Modify
-
whether (checked) or not (unchecked) to send a notification message in addition to the modify operation. See the notify port for configuration of the message.
|
The Set Password workflows are the only workflows that evaluate this flag. The other real-time workflows are not normally interested in each modification. If an administrator resets a user’s password, the notification is always sent. If the user changes his own password, the notification will only be sent if Notify on Modify is set. |
Export Property
This section describes the search parameters needed to export the objects for this channel. When the workflow runs triggered from the scheduler, it uses them to search all relevant objects. When triggered from a single event, the join engine uses them to associate the matching channel for the changed object.
- Scope
-
the scope of the search.
- Search Base Type
-
the identifier type for the search base definition below according to the SPML definition (OASIS). Valid types are:
- DN
-
the identifier is of type distinguished name.
- EMailAddress
-
the identifier is of type e-mail address.
- GUID
-
the identifier is of type global unique the identifier.
- GenericString
-
the identifier is of type generic string.
- LibertyUniqueID
-
the identifier is of type unique ID according to the Liberty definition.
- OID
-
the identifier is of type object the identifier.
- PassportUniqueID
-
the identifier is of type unique ID according to the Passport definition.
- SAMLSubject
-
the identifier is of type subject according to the SAML definition.
- URN
-
the identifier is of type unique resource notation.
- UserIDAndOrDomainName
-
the identifier is either a user ID or a domain name.
- Search base
-
the identifier of the base node for the search. Its definition is very similar to simple mapping expressions. You can define one or more expressions, where each is a concatenation of strings:
-
expr [+ expr]
where expr stands either for a variable or a string constant.
+ Variable can be:
-
${env.name} - variables taken from the environment, where name defines the attribute name.
-
A string constant is enclosed in double quotes (for example, "constant").
Examples:
${env.user_base}
"ou=sales" + $\{env.user_base}
"cn=Accounts,cn=Extranet Portal,cn=TargetSystems,cn=My-Company"
- Filter
-
the filter of the search. Note that only attributes used or mentioned in the mapping definition on the right side of the mapping table (Map to) should be used in a filter expression. (See "Java Mapping Editor" for details.) Otherwise, filtered attributes will not be available during the filter evaluation and the filter may deliver incorrect results. If you do not intend to use the filtered attribute in the workflow at all, use the following special mapping. If the attribute attributeName should be used in a filter expression but does not occur on the right side of any of the existing lines in the mapping editor, specify a new Direct mapping with null value mapped to attributeName. Then set the flags retrievable and readOnly for it. Such an attribute can be then correctly evaluated in a filter expression.
The value of a filter conditions can be either a plain string (no $\{ and } contained) or expression. The expression is a concatenation of sub-expressions:
-
expr [+ expr]
where expr stands either for a variable or a string constant.
+ Variable can be:
-
${env.name} - variables taken from the environment, where name defines the attribute name.
-
A string constant is enclosed in quotes (for example, "constant"). In the GUI editor, the quotes must be doubled due to LDAP escaping (""constant"").
Examples:
${env.my_value}
"ou=sales" + ${env.my_sales}
- Filter (Office 365 Connector)
-
This filter can only be used in a limited way.
The filter is only available for accounts, groups, and roles channels.
Not all AD objects own the attributes defined in Attr-Conf-File.- Operators
-
The following filter operators are not supported: “not”, “is present”, “contains”, “ends with”. The roles channel filter only supports the operator “equals”.
- Attributes
-
Not every Azure AD Object (user, group) property supports filter query. Check the Microsoft documentation for the resource to see which property is filterable. Only the properties marked with “Supports $filter” are supported in Microsoft Graph API.
- Values (Escaping single quotes)
-
For requests that use single quotes, if any parameter values also contain single quotes, they must be double escaped; otherwise, the request will fail due to invalid syntax.
-
These limitations are all Microsoft Graph API limitations. Please refer to the Microsoft documentation for details:
-
https://docs.microsoft.com/en-us/graph/api/overview?view=graph-rest-1.0
- Paged Read
-
- Is Active
-
whether (checked) or not (unchecked) paged read mode is used.
- Time Limit
-
the time-out value in paged read mode.
- Page Size
-
the page size for paged read mode.
- Sorting
-
- Sort Attribute
-
the sort attribute to be used for paged read mode.
- Sort Order
-
the sort order to be used for paged read mode. Valid values are:
- ASCENDING
-
sort in ascending order (low values first)
- DESCENDING
-
sort in descending order (high values first)
In validation workflows, you should configure a Sort Attribute if you configure Paged Read. This configuration permits the validation controller to process the entries page by page instead of having to read all pages first into memory before it can start the comparison algorithm.
Delta
This section describes the parameters needed for delta handling. They either extend the export search filter or set additional operational attributes that are used in the export search request. Both variations are used to retrieve the relevant objects since the last synchronization cycle and produce a delta search result.
- Sort Type
-
the method for comparing the relevant attributes. This field is only relevant when Delta Type is SearchAttributes or ExpertFilter. For delta handling, the highest value needs to be calculated by comparing every search result entry with the current highest value, and thus a comparison mode needs to be specified here.
- String
-
the relevant attributes (for example, createTimeStamp) are compared as strings.
- Numeric
-
the relevant attributes (for example, uSNchanged) are compared as numeric strings.
- Delta Type
-
the method for extending the export search.
- SearchAttributes
-
the list of attributes to be used; for example, for LDAP:
createTimeStamp
modifyTimeStamp
| The export search filter is extended internally with the same definition as listed for ExpertFilter. |
- ExpertFilter
-
an additional SPML filter extension that is combined with export search filter. Example for LDAP:
<FilterExtension>
    <dsml:or>
         <dsml:greaterOrEqual name="createTimestamp">
              <dsml:value>${LastDeltaValue}</dsml:value>
         </dsml:greaterOrEqual>
         <dsml:greaterOrEqual name="modifyTimestamp">
              <dsml:value>${LastDeltaValue}</dsml:value>
         </dsml:greaterOrEqual>
    </dsml:or>
</FilterExtension>
The notation ${LastDeltaValue} is mandatory and will be replaced with the highest value calculated by last synchronization cycle. The filter listed above will also return all the objects starting with the given last delta date.Because "greaterOrEqual" is used, it will return all the objects again that are created or modified within that very last second.Therefore a few updates will be repeated in the next synchronization cycle.If you want to avoid the duplicate entries, you need to use the following filter:
<filterExtension> <dsml:or> <dsml:not> <dsml:lessOrEqual name="createTimestamp"> <dsml:value>${LastDeltaValue}</dsml:value> </dsml:lessOrEqual> </dsml:not> <dsml:not> <dsml:lessOrEqual name="modifyTimestamp"> <dsml:value>${LastDeltaValue}</dsml:value> </dsml:lessOrEqual> </dsml:not> </dsml:or> </filterExtension> - ExpertOpAttributes
-
the additional export operational attributes that the connector can use directly for delta handling.Example for ActiveDirectory:
<operationalAttributes
         xmlns:dsml="urn:oasis:names:tc:DSML:2:0:core">
     <dsml:attr name="dxm.delta">
              <dsml:valuee type="xsd:base64Binary">
                 ${LastDeltaValue}
              </dsml:value>
     </dsml:attr>
</operationalAttributes>
The notation ${LastDeltaValue} is mandatory and will be replaced with the highest value calculated by last synchronization cycle.Note the notation dxm.delta is also mandatory.
Mapping
This section defines the mapping for this channel.
- Package Name
-
the name of the package, if Java mapping is used. It contains part or all of the Java mapping methods.
- Mapping Table
-
the mapping definition. See the "Java Mapping Editor" help topic for more information.
Operational Mapping
This section allows you to define SPML operational attributes that are passed to the connector with every request. They must be defined in correct XML format that is similar to the format for normal attribute mapping, except that the XML element is named "<operationalAttrMapping>" instead of "<attributeMapping>". Please make sure to include your mapping definitions in a dummy XML root node (just to get well-formed XML) as in the following sample snippet:
<?xml version="1.0" encoding="UTF-8"?>
<mappingDefinition>
	<operationalAttrMapping mappingType="constant" name="opx">
		<value>valx</value>
	</operationalAttrMapping>
	<operationalAttrMapping mappingType="constant" name="opy">
		<value>valy</value>
	</operationalAttrMapping>
</mappingDefinition>
Join
This section defines the join definition in XML format. It allows finding the correct entry on the target side. You can define several join expressions that are evaluated in sequence. The join works in these steps:
Evaluate the first join expression.
If the result is exactly one entry, this is the join result.
If the result is zero or more than one entry, use the next join expression (go to 2.).
If there are no more join expressions and the result is zero entries, this is the result.
If more than one entry is found in one of the join expressions and the switch 'Create Despite Multiple Joined Entries' is set, this is the result. Otherwise an error is the result (the join failed).
| The join condition for password channels is automatically inherited from the corresponding account channel (specifically, from the channel the Password Primary Channel points to. |
For more information about join expressions, see the section about joining.
Primary Channel
The fields in this tab need to be entered only if secondary channels are to be used. For details on primary and secondary channels, see the chapter "Channels and Mapping" in "Understanding Java-based Workflows" of the DirX Identity Application Development Guide. In this case, these fields have to be entered in the secondary channel, which is the one that reflects the database table holding multi-value attributes.
- Primary Channel
-
the name of the primary channel representing the entries holding the multi-value attributes.
- Reference Type
-
the type of relationship between the primary and the secondary channel. Available options are:
OneToOne - a 1:1 relationship.
ManyToOne - a n:1 relationship. - Reference from Secondary
-
whether (checked) or not (unchecked) the reference in the database is from the table holding the multi-value attributes.
- Join Attributes
-
the column name(s) in the database table used for joining the values from the secondary to the primary table.
Related Topics
Real-time Activity
Content Tabs
Real-time Filter
Real-time Java Mapping
Java Mapping Editor
Real-time Port
Java-based Workflow
See also "Managing the Java-based Server".
Content Tabs
These tabs displays the content of this object in XML format, which is the representation used by the Java-based Server as input format.The content definition may contain references that are resolved before the information is loaded into the Java-based Server.Content definitions can also contain other content definitions, which means that they can be structured in a hierarchy.The top-level Content tab contains the complete content after reference resolution.
- Content
-
the configuration in XML format.It may contain references to properties of other objects and include statements that reference other content definitions.
- Content (resolved)
-
the resolved XML configuration.All references are resolved and all referenced content definitions are contained.
Note: this tab is only visible if design mode is enabled.In some cases - if the content has no references - the Content (resolved) tab is not available.
Related Topics
Real-time Java Mapping
A real-time Java source mapping configuration object defines the mapping Java source code.It is a sub-object of a channel configuration object.The configuration data associated with a Java source mapping object includes:
-
The object’s name, description and version number
-
The Java source code and the resulting byte code
Use this tab to enter the properties of a Java source mapping object.The items shown in this tab are:
- Name
-
the name of the object.
- Description
-
a description of the object.
- Version
-
the version number of the workflow.
- Java Source
-
the complete Java code for this Java mapping definition. Changing this code and clicking Save updates the byte code.
- Byte Code
-
the byte code that was calculated from the Java code. This tab is only visible if design mode is enabled.
|
If you use any third-party libraries in your Java source, be aware that they need to be available both at design time and at runtime, and so they must be deployed in the following locations:
|
Related Topics
See also "Managing the Java-based Server".
Java Mapping Editor
The Java Mapping Editor is a powerful tool for defining the relationship between source and target attributes.It consists of the mapping table on the left and a tool bar for operating on the table on the right.Use the Package Name field above the table to define the package name, if Java mapping is used.It contains all or part of the Java mapping methods.
The Mapping Table
Each row in the mapping table defines the mapping to a target-side attribute.The table provides the following columns:
- Mapping Source
-
the mapping input.The handling of this field depends on the type of mapping (see the next column and the individual mapping types in the tool bar descriptions).
- T(ype)
-
the mapping type.This type is defined during the creation of a new line.Click in the field to change the type from the drop-down list.
- Map to
-
the target system attribute. This field can contain two special values:
- Identifier:value
-
the first line is reserved for the ID mapping. In this case, a "type" attribute denotes the type of identifier as requested in SPML V1. Open the drop-down list to see the allowed values.
- PostMapping
-
the last line is reserved for the post mapping. This is always a Java mapping (only Java Source or Java Class mapping makes sense). The post mapping is optional and performed after all the attribute mappings. Its Java implementation can work on the entire mapped entry and is especially intended to process dependencies on the target attributes.
- R(ead only)
-
whether (checked) or not (unchecked) the attribute can be read but not written.
- A(dd)
-
whether (checked) or not (unchecked) the attribute is only written during add operations. It is not used during modify operations.
- C(heck modification)
-
whether (unchecked) or not (checked) the attribute is updated even if it cannot be read at the joined entry because of the amount of data; for example, large groups. Not checking the modification guarantees that the update is always made without comparing existing values. Not checking also means that if an attribute was deleted on the source side and is therefore not contained in the source list of attributes any more, it is not deleted on the target side.
- r(etrievable)
-
whether the attribute is readable (checked) or not (unchecked). A good example is a password attribute. You can write it but you can’t read it. Uncheck this flag for all attributes that are not retrievable to ensure that they are not passed to the requested attribute list of search and read operations used, for example, during join operations.
- M(odify always)
-
whether (checked) or not (unchecked) to add the attribute to the list of modifications if other attributes were changed. If no other attribute was changed, attributes with this flag set are ignored. You can use this mechanism to set, for example, a change status flag if any other attribute was changed. Of course the change status flag should not be set if nothing changes.
- S (notInSchema)
-
whether (unchecked) or not (checked) the attribute exists in the schema of the target system in the Identity Store. When this field is checked, the attribute is mapped to the dxrOptions attribute when synchronizing data from the target system to the Identity domain.
- e (xact)
-
whether (checked) or not (unchecked) the attribute is handled with case-exact matching.
Places where an attribute must be specified:
If you specify a source attribute on the left side of the mapping to map it to a target attribute on the right side, be aware that you must also specify this source attribute in the other direction on the right side to make it readable for the join engine and by that, to be available as a source attribute. For example, if you need an attribute only in one direction - for example, dxmPassword as the source attribute in the target system mapping direction - you must also specify it in the DirX Identity mapping direction. If you only want to read it and not write it to DirX Identity - as in the dxmPassword case - you could insert a direct mapping specifying null on the left side to make it noticeable that it is not filled there and dxmPassword on the right side with the readOnly flag set.
In addition, be aware that if you need an attribute only for specifying it in the export filter, you must also insert a mapping line with this attribute on the right side checked as readOnly.
|
Notes on binary attributes:
To map binary attributes correctly between DirX Identity and a connected system (including a file system), specify the ;binary suffix only for attributes that contain an ASN.1 prefix in their binary data. These attributes have the schema syntax certificate, like the attribute userCertificate, or the schema syntax CrossCertPair or CRL or similar. For attributes that contain only raw binary data without an ASN.1 prefix, which are attributes of schema syntax Octet String, specify the attribute name with the suffix ;raw in the mapping if the attribute does not belong to the standard LDAP attribute schema. If the attribute does belong to the standard LDAP schema - for example, jpegPhoto – a suffix is not required but does not do any harm if specified. If you are unsure whether or not the attribute belongs to the standard LDAP schema, you should specify the ;raw suffix. The suffix - if required - must always be specified in both realtime mapping directions. |
The Tool Bar
The tool bar on the right defines the actions you can perform on the table. The actions you can take depend on the current cursor position in the table. Move the cursor over one of the icons to see tool-tip information.
The actions for insertion of new lines above the cursor line are:
 Constant
-
inserts a constant mapping definition. Click in the Mapping Source field to open a small window. For single-value attributes, enter the value. Enter each of the required constants for a multi-value attribute into a separate line.
 Direct
-
inserts a direct mapping definition. Applies both to single- and multi-value attributes. Double-click in the Mapping Source field to enter a source attribute value either directly or via the attribute browser icon at the end of the field. If you use the attribute browser, either use the scroll bar to view the complete list of values or use the text field to enter character by character. Select one of the values in the list and then click Save to use this value or click Cancel to discard the attribute browser.
 Expression
-
inserts a simple expression mapping only for single-value attributes. This field lets you compose strings using simple bean (placeholder) notations. The attribute mapper evaluates the expression at runtime.
You can define several simple expression lines. They are evaluated in sequence during runtime. If a mapping succeeds (that is, it produces a non-null value), it is taken. If not, the join engine tries the next one.
For a more detailed description, see the help topic "Simple Expression Mapping".  Java Source
-
inserts a mapping that is defined via Java source code. Click the New Window button to open a larger window. Enter or edit the source code there. If you click Apply, the source code is updated in the small window. If you click Save, the window is closed and the source code is updated in the small window. If you click Cancel, your edit session is cancelled and all your changes are discarded.
If you save the channel object, all currently uncompiled source code definitions are compiled. Errors are displayed in a separate window. Evaluate the error messages and correct the errors. Click Save again to re-check the changed source(s).
The Java class name is built from the attribute name. The first character is converted to uppercase. Illegal characters for a Java class name are replaced with a dollar ($) sign. So the classname to map an attribute snc.pname must be Snc$pname.
For more details on Java source code mappings see the chapter "Realtime Workflows" in the DirX Identity Customization Guide. For sample sources, see also the delivered default workflows.  Java Class
-
inserts a Java class mapping. Double-click in the Mapping Source field to enter or edit the class name.
The class name contains the full name of a Java class that is to perform the mapping for the attribute. It must implement the mapping interface applicable for identifier, attribute or post mapping. See the chapter "Realtime Workflows" in the DirX Identity Customization Guide for more details.  Comment
-
inserts a comment line. Comment lines are shown as gray lines. Double-click in the Mapping Source field to enter or edit the comment. You can enter several lines of comment. Only the first line is visible when the Mapping Source field is not selected. If you move the cursor onto a comment line, the complete comment text is shown as a tool tip.
You can select several lines in a mapping table. Use SHIFT to select a range of lines and CTRL to add or remove individual lines to the selection. Note that it is best to select lines in the Map to field. The actions for edit operations on the selected lines are:
- Delete
-
deletes the selected line(s).
- Duplicate
-
duplicates the first selected line.
- Move up
-
moves the selected line(s) up one line.
- Move Down
-
moves the selected line(s) down one line.
- Copy
-
copies the selected line(s) into the clipboard.
- Paste
-
pastes the selected line(s) from the clipboard. This works either in the same Manager instance between different mapping tables or between different Manager instances.
Simple Expression Mapping
This section explains the syntax of simple mapping expressions. You can define one or more expressions, where each is a concatenation of strings:
-
expr [+ expr]
expr stands either for a variable or a string constant.
Variable can be:
-
${source.name} - source attributes, where name defines the attribute name.
-
${target.name} - an attribute from the target side (after the attribute is mapped), where name defines the attribute name.
-
${joinedEntry.name} - attributes from the joined entry in the target system, where name defines the attribute name.
-
${env.name} - variables taken from the environment, where name defines the attribute name.
Note that the following global context environment variables can also be used in simple expression mappings and in user hooks by specifying ${env.global_var}, where global_var is evaluated at workflow runtime and can be one of the following:
-
dxm.uh.wfName - the name of the workflow.
-
dxm.uh.wfInstID - the instance ID of the workflow.
-
dxm.uh.workDir - the working directory of the workflow.
-
scripts - the scripts home directory of the Java-based Server.
A string constant is enclosed by double hyphens (for example "constant").
The following limitations apply:
-
At least two elements should be defined otherwise the mapping types Direct or Constant could be used.
-
Only single valued attributes are handled.
-
If several expressions are concatenated to one string and one of the expressions is empty, the complete expression delivers an empty value.
Several expression lines:
You can define several simple expression lines. They are evaluated in sequence during runtime. If a mapping succeeds (that is, it produces a non-empty value), it is taken. If not, the join engine tries the next one.
${source.dxrName} + ${env.ads_upn_extension}
Concatenates the source attribute dxrName and the variable ads_upn_extension from the environment section.
${source.sn} + “,” + ${source.initials} + “-” + ${source.givenName}
Concatenates the source attribute sn, a comma, the source attribute initials, a dash and the source attribute givenName.
${source.validity}
${env.validity}
Uses the source attribute validity if not empty. Otherwise it uses the variable validity from the environment section.
${joinedEntry.id}
"cn=" + ${source.ListName} + "," + ${env.role_ts_denygroup_base}
If the first line does not retrieve a value (the id of the joined entry is empty, that means there is no joined entry), the second line is evaluated and a new DN is calculated.
${source.givenName} + "." + ${source.initials} + "." + ${source.sn}
${source.givenName} + "." + ${source.sn}
${source.sn}
If givenName, initials and sn exist, the first line delivers a non-empty result. If one of the values is empty, the second line is evaluated. If the givenName is empty, this line evaluates to an empty result and the last line is evaluated from the sn field. This example assumes that the sn is a mandatory field, thus this multiple definition expression always delivers a value.
Joining
This section explains how to build join expressions. You can define several join expressions that are evaluated in sequence (from top to bottom). The first expression that delivers a valid result is taken.
You can define lookups (read) or searches.
-
Specify lookups via the <searchBase> tag.
-
Define searches via the <filterExtension> tag. The search base is taken from the Export tab. The <filterExtension> is combined (by logical AND) with the filter from the Export tab.
Use these definitions to define parameters:
- ${source.attribute}
-
an attribute from the source side.If you transfer data from the Identity Store to a connected system, then the read entries from the Identity Store are the source entries.If you want to use the identifier of the source entry, then use ${source.id}.
- ${target.attribute} or ${attribute}
-
an attribute from the target side (after mapping of this attribute).If you transfer data from the Identity Store to a connected system, then the mapped entries composed from the source information (read from the Identity Store) and the joined entries from the target along with any mapping conversion build the target entries.If you want to use the identifier of the target entry, then use ${target.id}.If you define an attribute without prefix as ${attribute}, then the join expression is interpreted as ${target.attribute}.
- simpleExpression
-
an expression that is composed of constants and variables.
- <![CDATA[simpleExpression]]>
-
an expression that is defined by a simple expression, for example "<GUID=" + ${source.dxmADsGuid} + ">". Use the CDATA construct when you need to escape XML characters like '<' or '>'.
Joining with IDs (lookup)
You can use the defined SPML ID for a lookup of exactly this entry:
<searchBase type="urn:oasis:names:tc:SPML:1:0#DN">
<spml:id>${source.id}</spml:id>
</searchBase>
Alternatively, you can use any source attribute. For a search into an LDAP-based system (such as DirX Identity itself) the value must be of type DN. For a search into another type of connected system, the type depends on the system and the connector:
<searchBase type="urn:oasis:names:tc:SPML:1:0#DN">
<spml:id>${source.dxrPrimaryKey}</spml:id>
</searchBase>
Joining with Filter Expressions (Searches)
Use any attribute (here the sAMAccountName) to search for entries:
<filterExtension>
<dsml:equalityMatch name="sAMAccountName">
<dsml:value>${target.sAMAccountName}</dsml:value>
</dsml:equalityMatch>
</filterExtension>
The corresponding search base might be defined in the Export tab as:
-
${env.user_base_rel} + "," + ${env.domain}
You can define AND or OR conditions as defined by the DSML standard:
<filterExtension>
<dsml:and>
<dsml:equalityMatch name='externalSystemName'>
   <dsml:value>${target.externalSystemName}</dsml:value>
</dsml:equalityMatch>
<dsml:equalityMatch name='externalDomainName'>
   <dsml:value>${target.externalDomainName}</dsml:value>
</dsml:equalityMatch>
<dsml:equalityMatch name='externalApplicationName'>
   <dsml:value>${target.externalApplicationName}</dsml:value>
</dsml:equalityMatch>
<dsml:equalityMatch name='username'>
   <dsml:value>${target.username}</dsml:value>
</dsml:equalityMatch>
</dsml:and>
</filterExtension>
You can use all expressions that are defined in the FilterSet of the DSMLv2 specification as filter conditions, especially equalityMatch, substrings, greaterOrEqual, lessOrEqual and present. The only pre-requisite is that the associated connector must be able to evaluate them.
| Every attribute you use in the filter must have been read with the entry, which means that you need to list it in the mappings even if it will not be updated. In this case, define it as read-only and retrievable and provide an empty mapping expression. |
The following examples show more complex join definitions that are used in the delivered default workflows.
<joins xmlns:dsml="urn:oasis:names:tc:DSML:2:0:core" xmlns:spml="urn:oasis:names:tc:SPML:1:0" >
<join>
<searchBase type="urn:oasis:names:tc:SPML:1:0#GUID">
  <spml:id><![CDATA["<GUID=" + ${source.dxmADsGuid} + ">"]]></spml:id>
</searchBase>
</join>
<join>
<filterExtension>
  <dsml:equalityMatch name="sAMAccountName">
      <dsml:value>${target.sAMAccountName}</dsml:value>
  </dsml:equalityMatch>
</filterExtension>
</join>
<join>
<searchBase type="urn:oasis:names:tc:SPML:1:0#DN">
   <spml:id>${source.dxrPrimaryKey}</spml:id>
</searchBase>
</join>
</joins>
The join process consists of three conditions:
-
The first join tries to find the entry via the ADsGuid. This is a special feature of Active Directory.
-
Alternatively we use the sAMAccountName of the mapped entry to find the entry.
-
If that does not work, we use the primary key (a DN). Note that this definition finds the entry only if it did not move. The first two join definitions find the entry within the whole specified scope.
<joins xmlns:dsml="urn:oasis:names:tc:DSML:2:0:core" xmlns:spml="urn:oasis:names:tc:SPML:1:0" >
<join>
<filterExtension>
    <dsml:and>
        <dsml:equalityMatch name='externalSystemName'>
            <dsml:value>${target.externalSystemName}</dsml:value>
        </dsml:equalityMatch>
        <dsml:equalityMatch name='externalDomainName'>
            <dsml:value>${target.externalDomainName}</dsml:value>
        </dsml:equalityMatch>
        <dsml:equalityMatch name='username'>
            <dsml:value>${target.username}</dsml:value>
        </dsml:equalityMatch>
    </dsml:and>
</filterExtension>
</join>
</joins>
The join process consists of one condition:
-
It is a combined search of three attributes on the target side: externalSystemName, externalDomainName, username.
Service-Specific Pages
Policy - Job Parameters
Use this tab allows to specify the job parameters when working with provisioning rules.It is not relevant for consistency or validation rules.
- Process Type
-
how to process the provisioning rules.Valid options are:
- Process Rules
-
evaluate and process the rules.
- Simulate Rules
-
evaluate and simulate the rules.
- Provisioning Mode
-
the mode in which the rule engine works when resolving privileges.Valid options are:
- Assign Privilege and Resolve
-
assigns all privileges of the current rule to each user and resolves the user afterwards immediately.
- Assign Privilege Only
-
assigns all privileges of the current rule to each user but does not resolve it; instead, the TBA flag is set and you must run a privilege resolution after this run of the policy execution.Note this option does not work if separation of duties (SoD) is enabled because SoD evaluation requires an immediate privilege resolution for each user.
- Suppress Change Events
-
whether (unchecked) or not (checked) to initiate user change events.
- Synchronous Resolution
-
if checked, the controller will resolve a user immediately (synchronous). Otherwise (unchecked), it will send a resolve message so that a resolution adapter in a Java server will resolve the user later (asynchronous)
- Enabling prefetching privileges into cache
-
whether (checked) or not (unchecked) privileges should be loaded into the cache before finding the matching groups during resolution. It can only be checked if Synchronous Resolution is checked. This is useful for performance reasons, but be aware that it can cause issues if the system does not have enough configured memory to store the prefetched objects.
Related Topics
Policy - Rule Search Parameters
Use this tab to define which rules to process and set some optimization parameters.
- Base Object
-
the base node at which to start the search for rules.
- Subset
-
the method used to perform the search.Allowed values are:
- BASEOBJECT
-
retrieve only the base object where the search started.
- ONELEVEL
-
retrieve all objects from the next level below the base object.
- SUBTREE
-
retrieve the complete set of objects from the subtree.
- Filter
-
an optional filter that retrieves specific object types. Typical filters are:
- (&(objectClass=dxrPolicy)(dxrType=ProvisioningRule))
-
retrieves provisioning and validation rules.
- (&(objectClass=dxrPolicy)(dxrType=ConsistencyRule))
-
retrieves only consistency rules.
- (&(objectClass=dxrPolicy)(dxrType=ValidationRule))
-
retrieves only validation rules.
- Sort Key
-
the sort criteria (default is cn). This parameter allows you to define a sequence of how the consistency and validation rules are processed. It is not used for provisioning rules.
The next two parameters allow for rule processing optimization. All rules and operations are loaded into a storage layer cache.
- Rule LDAP Page Size
-
size of a result page for paged searches (number of rules; default: 300).
- Rule Cache MRU Size
-
the size of the most recently used cache for objects being read via LDAP (default: 500).The Rule Cache MRU Size defines the size of the most recently used cache in the storage layer that holds the objects that are not affected by the garbage collector.If the Rule Cache MRU Size is too low, the objects are removed by the garbage collector and thus must be restored from LDAP when they are accessed the next time, which slows down the agent significantly.We recommend that you set this value to twice the number of rules that are read (the corresponding operations are also cached).
For more information on how to use these optimization parameters, see the section "Using the Maintenance Workflows → Understanding the Tcl-based Maintenance Workflows → Privilege Resolution Workflow → Privilege Resolution Workflow Optimization" in the DirX Identity Application Development Guide.
Related Topics
Policy - Object Search Parameters
Use this tab to define all parameters to search the set of users and the related objects (accounts, groups, roles, permissions, assignments, target systems).These parameters include:
- Object LDAP Page Size
-
the size of a result page for paged searches (default: 50).
- Object Cache
-
whether (checked) or not (unchecked) the object cache is enabled (default: TRUE).
- Object Cache MRU Size
-
the objects being read via LDAP are stored in a cache in the storage layer.The Object Cache MRU Size defines the size of the most recently used cache, holding the objects that are not affected by the garbage collector.So if we have 300 Users in the prefetch cache where each of them has 10 accounts and 10 groups assigned, this results in 6300 objects being stored in the cache (roles, permissions, …).If the Object Cache MRU Size is too low, the the garbage collector removes the objects and they must subsequently be restored from LDAP when they are accessed the next time.This action slows down the agent considerably.
- Object Accumulator Size
-
controls the algorithm that calculates the affected users from the privileges to be analyzed.Increasing this value reduces the number of LDAP searches but increases the length of the search filters.
For more information on how to use these parameters, see the section "Using the Maintenance Workflows → Understanding the Tcl-based Maintenance Workflows → Privilege Resolution Workflow → Privilege Resolution Workflow Optimization" in the DirX Identity Application Development Guide.
Related Topics
Service - Job Parameters
Use this tab to define the mode in which the service agent runs.
- Request Type
-
the mode in which the service agent runs.Possible values are:
- Check Consistency
-
run in consistency mode.This comprises a set of hard programmed consistency rules.For details, see the section "Using the Maintenance Workflows → Understanding the Tcl-based Maintenance Workflows → Consistency Check Workflow → Consistency Check Workflow Operation" in the DirX Identity Application Development Guide.You can also set up consistency rules that run in the policy execution workflow.
- Resolution
-
run a set of consistency checks and then resolves the defined user set.For details, see the section "Using the Maintenance Workflows → Understanding the Tcl-based Maintenance Workflows → Privilege Resolution Workflow → Privilege Resolution Workflow Operation" in the DirX Identity Application Development Guide.
- User Resolution
-
resolve the defined user set only.For details, see the section "Using the Maintenance Workflows → Understanding the Tcl-based Maintenance Workflows → Privilege Resolution Workflow → Privilege Resolution Workflow Operation" in the DirX Identity Application Development Guide.
- Generate Report
-
run in report generation mode. Set the report size limit field accordingly.
- Suppress Change Events
-
whether (unchecked) or not (checked) to initiate user change events.
- Synchronous Resolution
-
if checked, the controller will resolve a user immediately (synchronous). Otherwise (unchecked), it will send a resolve message so that a resolution adapter in a Java server will resolve the user later (asynchronous)
- Enabling prefetching privileges into cache
-
whether (checked) or not (unchecked) privileges should be loaded into the cache before finding the matching groups during resolution. It can only be checked if Synchronous Resolution is checked. This is useful for performance reasons, but be aware that it can cause issues if the system does not have enough configured memory to store the prefetched objects.
- Report Size Limit
-
the maximum number of records to process in a report.
Related Topics
Service - Import Properties
Use this tab to define the import properties for the service agent (used for consistency checking, privilege resolution and report generation):
- Subject Filter
-
the filter for user entries to be processed.The default filter is:
(objectClass="dxrUser" and dxrTBA="True")
You can define with this filter whether the agent shall process all users, only the flagged ones (dxrTBA=TRUE) or a subset that is specified with other attributes (for example, (ou="Finance")).
Related Topics
Service - Requested Attributes
Use this tab to define the attributes to read for rules.
- Attribute Configuration
-
the attributes that are available.Select an attribute and then use the buttons in the middle of the display to add it to the selected attributes.
- Selected Attributes
-
the attributes that are currently selected.Select an attribute and then use the buttons in the middle of the display to remove it from the selected attributes.
Related Topics
Service - Limits
Use this tab to define the optimization parameters for the service agent (which is used for consistency checking, privilege resolution and report generation).
The service agent uses an object cache that handles users, accounts, groups, roles, permissions, assignments and target systems.
- Object LDAP Page Size
-
the size of a result page for paged searches.
- Object Cache MRU Size
-
the size of the most recently used object cache.Objects read via LDAP are stored in a cache in the storage layer.The Object Cache MRU Size defines the size of the most recently used cache that holds the objects that are not affected by the garbage collector.If the Object Cache MRU Size is too low, the garbage collector removes the objects and they subsequently must be restored from LDAP when they are accessed the next time, which slows down the agent considerably.
- Object Accumulator Size
-
controls the algorithm that calculates the affected users from the privileges to be analyzed.Increasing this value reduces the number of LDAP searches but increases the length of the search filters.
Related Topics
Transport Workflows
Transport - Connection
Use this tab to define the connection parameters for the directory server.
- Connected Directory
-
the directory where the information is to be retrieved or stored.
- Bind Profile
-
the bind information, typically user and password.
For more information, see the section "Using Utilities → Transporting Data" in the DirX Identity User Interfaces Guide.
Related Topics
Transport - Export
Use this tab to define the parameters for the object collection export.It allows you to export a collection list, a filter with a search base or a combination of both.
Filter
- Search Base
-
the node at which to start the search for collections.
- Filter
-
the filter to use to restrict the search.This filter must define objects of type dxmCollection.
| you can use the Filter condition or the Collections definition, but not both! |
Collections
- List of Collections
-
the list of object collections.
| you can use the Filter condition or the Collections definition, but not both! |
Format
- Base64 Enabled
-
whether (checked) or not (unchecked) the output of special characters is performed in Base64 format (standard LDIF format). If the flag is not set, a readable format is generated, which is especially useful if you want to store the files in a configuration management system that calculates differences.
- Max. Line Length
-
the maximum line length after which the lines are wrapped around. If set to 0 (the default), the lines are not wrapped.
- Page Size
-
the page size for internal LDAP searches.If set to 0 (the default), paging is not performed.
For more information, see the section "Using Utilities → Transporting Data" in the DirX Identity User Interfaces Guide.
Related Topics
Transport - Delete
Use this tab to define the parameters for an optional object collection deletion that is performed before the import operation.Note that the collection definitions are taken from the target, which means that they reflect the set of previously imported entries.
Delete entries before importing new ones
- Is active
-
whether (checked) or not (unchecked) to delete all entries defined by the list of collections specified in Collections.
- Collections
-
a list of collection definitions in the target directory.These collection definitions typically reflect the set of entries that were imported during the last run of this workflow.
Related Topics
Transport - Import
Use this tab to define the parameters for the object collection import.Import handles previously exported collection files defined as a file list and provides custom mapping of attributes.
Import
- Files
-
the list of files to import.
SPML
- Enabled
-
whether (checked) or not (unchecked) to define SPML format for the input files.
- Validate
-
whether (checked) or not (unchecked) to check for correct SPML format. Using this option requires some extra time.
LDIF
- Binary Attributes (comma separated)
-
the list of attributes with binary format.
- Input Filter
-
the filter condition for the import operation. For example, you can import only objects of a specific object class.
- Simulation Mode
-
- none (default)
-
modifies the target.
- loggerLDIF
-
records LDIF requests and responses and modifies the target.
- loggerSPML
-
records SPML request and responses and modifies the target.
- simulateLDIF
-
records LDIF requests and responses but does not modify the target.
- simulateSPML
-
records SPML request and responses but does not modify the target.
- Log Filename
-
the location (path and filename) to which the log file is written.
You can also specify one or more domain mappings and a set of transport attribute mappings that influence the import operation.
For more information, see the chapter/section "Using Utilities → Transporting Data" in the DirX Identity User Interfaces Guide.
Related Topics
Transport - Domain Mapping
Use this tab to define domain mappings for easy conversion of domain specifications.
Domain Mapping
- Domain Mappings
-
a list of domain mapping specifications.Define the source and target domain for each mapping.
Example 12. Domain MappingSource: cn=My-Company Target: cn=AnyDomain
Source: cn=* Target: cn=DefaultDomainThis definition converts data exported from the My-Company domain to a Provisioning domain with the name "AnyDomain".Data exported from all other domains are imported to the "DefaultDomain".Without the cn=* line for data from other domains no domain mapping takes place.
For more information, see the chapter/section "Using Utilities → Transporting Data" in the DirX Identity User Interfaces Guide.
Related Topics
Transport - Attribute Configuration New
Use this tab to enter the properties of a transport attribute configuration.The items shown in this tab are:
- Name
-
the name of the object.
- Description
-
a description of the object.
- Type of Definition
-
the mapping definition type.
- Attribute Match
-
the pattern to use to match the mapped attribute name.
| You need to create some mapping choices by selecting New Mapping Choice from the context menu of the attribute configuration node. |
Related Topics
Transport - Attribute Configuration Old
Use this tab to modify the properties of an old-style transport attribute configuration and mapping.The items shown in this tab are:
- Name
-
the name of the object.
- Description
-
a description of the object.
- Type of Definition
-
the mapping definition type.
- Attribute Match
-
the pattern to use to match the mapped attribute name.
- Operation
-
the mapping type to be used
- Has one of these
-
objects that have one of the listed object classes match. Define the classes as a blank-separated list.
- Has all of these
-
only objects that have all of the listed object classes match. Define the class list as a blank-separated list.
You can modify existing old-style attribute configurations that influence the import data stream. Note that it is no longer possible to create old-style Transport Attribute Configuration elements below the import workflow’s "perform" activity. The first field defines the type of definition. Select from the list. The following definition types exist:
ConstantAttributeDefinition
Use this definition type to set attributes to a constant value.
Constant Values - a single value for single value attributes, multiple values for multi-value attributes.
ExpressionAttributeDefinition
Use this definition type to set attributes to a value that is calculated via a simple expression.
- Expression Value
-
the expression value as a simple expression. See the topic "Simple Expression Mapping" for more information.
JavaClassAttributeDefinition
Use this definition type to set attributes to a value that is calculated via a Java class.
- Java Class
-
the Java class that defines the transformation. See the topic "Java Mapping" for more information.
ReplacementAttributeDefinition
Use this definition type to replace parts of an attribute value.
- Replace Pattern
-
a replacement pattern in the format:
-
flags/pattern/replacement
where:
-
flags - flags in the form [afmi] {0,2}:
-
a - replace all (default)
-
f - replace first
-
m - match case (default)
-
i - ignore case
-
-
pattern - Java regular expression pattern syntax.
-
replacement - the replacement string.
-
| Replacements do not work on the distinguished name attribute (DN). Use the domain mapping to replace the domain part of the DN. |
Examples:
This definition replaces the first occurrence of the exact string "here" to "in this field".
f/here/in this field/
The following specification replaces all occurrences of "Add" or "add" or "ADD" etc. to "Put".
i/Add/Put/
StandardAttributeDefinition
Use this definition type to define an operation to be applied to this attribute type.
- Operation
-
the operation to perform. The following operations are available:
- delete
-
delete this attribute.
- direct
-
set the attribute value to the value of the attribute in the input file. This is the default operation if no mapping is defined for an attribute.
- exclude
-
do not modify this attribute.
- onaddonly
-
set this attribute only during add operations (the first time the object is transferred).
- onemptyonly
-
set this attribute only if its value is empty and if the entry already exists.
For more information, see the chapter/section "Using Utilities → Transporting Data" in the DirX Identity User Interfaces Guide.
Related Topics
Transport - Attribute Mapping Choice
Use this tab to specify attribute mappings that influence the import data stream.Create Transport Attribute Mapping Choice elements below the Transport Attribute Config element of the import workflow’s "perform" activity.After creation, you can specify the mapping in detail.
General
This section provides general information about the mapping choice.Available fields are:
- Name
-
the name of the mapping choice.
- Description
-
a description of the mapping choice.
- Type of Mapping
-
the mapping type to be used. It determines the available configuration fields. The mapping types are described in the Mapping section.
When Applicable
This section defines the matching conditions that must be met in order to perform a given mapping on the imported entry. Available fields are:
- Mapping flags
-
flags that restrict the use of a given mapping.
- onaddonly
-
the imported entry is matched only for add operations (the first time the object is transferred).
- onemptyonly
-
the imported entry is matched only if its existing value is empty and the target entry already exists.
- DN patterns
-
the list of patterns to be matched with the imported entry DN. At least one must match.
- Filter
-
the LDAP filter to be matched with imported entry attributes.
Mapping
The available mapping types are:
-
ConstantAttributeDefinition
Use this definition type to set attributes to a constant value.
- Constant Values
-
a single value for single value attributes, multiple values for multi-value attributes.
-
ExpressionAttributeDefinition
Use this definition type to set attributes to a value that is calculated via a simple expression.
- Expression Value
-
the expression value as a simple expression. See the topic "Simple Expression Mapping" for more information.
-
JavaClassAttributeDefinition
Use this definition type to set attributes to a value that is calculated via a Java class.
- Java Class
-
the Java class that defines the transformation. See the topic "Java Mapping" for more information.
-
ReplacementAttributeDefinition
Use this definition type to replace parts of an attribute value.
- Replace Pattern
-
a replacement pattern in the format:
flags/pattern/replacement
where:
-
flags - flags in the form [afmi]\{0,2}:
-
a - replace all (default)
-
f - replace first
-
m - match case (default)
-
i - ignore case
-
-
pattern - Java regular expression pattern syntax.
-
replacement - the replacement string.
-
| Replacements do not work on the distinguished name attribute (DN). Use the domain mapping to replace the domain part of the DN. |
Examples:
The following definition replaces the first occurrence of the string "Here" to "in this field":
f/Here/in this field/
The following specification replaces all occurrences of "Add" or "add" or "ADD" and son on to "Put":
ai/Add/Put/
DeleteAttributeDefinition
Delete the attribute value in target entry.
ExcludeAttributeDefinition
Do not modify this attribute value.
DirectAttributeDefinition
Set the attribute value to the value of the attribute in the imported entry. This is the default mapping operation if no mapping is defined or matched for an attribute.
For more information, see the chapter/section "Using Utilities → Transporting Data" in the DirX Identity User Interfaces Guide.
Related Topics
Ldap to Filesystem (Ldap2Fs) Workflows
Ldap2Fs - Connection
Use this tab to define the connection parameters for the directory server.
- Connected Directory
-
the directory where the information is to be retrieved or stored.
- Bind Profile
-
the bind information, typically user and password.
For more information, see the section "Configuration → LDAP2FS Tool" in the DirX Identity Installation Guide.
Related Topics
Ldap2Fs - Ldap to FileSystem
Use this tab to define the parameters for the export or import of a directory information tree, or a set subtrees or even single entries.
Options
- Action
-
the action to perform. The following actions are available:
- export (default)
-
export the directory information to files.
- import
-
import the directory information from files.
- FileSystem Path
-
the file system path to which the directory information is exported or from which it is imported.
Settings
- Mode
-
the export mode. The following modes are available:
- full (default)
-
export the whole directory information tree defined in Root DN.
- selective
-
export only the entries and subtrees defined by the Selective Mode settings.
- Root DN
-
the root DN of the directory information tree to be exported. This is the base for the export operation. Only entries that are located in this subtree can be exported.
- Selective Mode
- Selected Entries
-
a list of entries to be exported.
- Selected Subtrees
-
a list of subtrees to be exported. All entries located in these subtrees are exported.
| In selective mode, the export operation is performed in a breadth-first way. This means that the entries are exported level by level, starting with the root entry defined in Root DN. You have to ensure that a path to the root dn is exported for all selected entries and subtrees (e.g. by choosing single entries or a subtree down the path). Otherwise, the workflow cannot build the file system structure and fails. |
- Subtrees to be excluded
-
a list of subtrees to be excluded from the export operation. All entries located in these subtrees are not exported. Allows wildcard '*' (e.g. "ou=*,dc=example,dc=com" to exclude all subtrees located under "dc=example,dc=com").
- Subtrees where group memberships are masked
-
a list of subtrees where group memberships are masked. All entries located in these subtrees are exported without group membership information. Allows wildcard '*' (e.g. "ou=*,dc=example,dc=com" to mask group memberships for all subtrees located under "dc=example,dc=com").
- List of attribute masking rules
-
a list of attribute masking rules. Each rule consists of an attribute name and a regular expression. If the value of the attribute matches the regular expression, the value is masked in the export operation.
- Identity Domain
-
the identity domain to which the entries are exported. Overrides the identity domain defined in the connection settings.
- Context Prefix
-
the context prefix to be used for the exported entries. Overrides the context prefix defined in the connection settings.
- Verbose
-
if enabled, the workflow logs detailed information about the export or import operation.
- Detach embedded content into separate files
-
if enabled, the workflow detaches embedded content (e.g. XML content) into separate files. The file names are generated based on the entry DN or the attribute name.
- Use display name for naming folders
-
if enabled, the workflow uses the display name of the entries for naming the folders in the file system. Otherwise, the RDN of the entries is used.
- Keeping placeholders in LDIF templates
-
if enabled, the workflow keeps placeholders in LDIF templates. This allows you to use the exported LDIF files as templates for future exports or imports. The placeholders are replaced with actual values during the export or import operation.
For more information, see the section "Configuration → LDAP2FS Tool" in the DirX Identity Installation Guide.
Logging
- Filename
-
the filename of the log file. The log file is created in the same directory as the exported files.
- Log level
-
the log level. The following log levels are available:
- none (default)
-
no messages are logged.
- Errors
-
only error messages are logged.
- Errors and warnings
-
warning messages and error messages are logged.
- Errors warnings and infos
-
informational messages, warning messages and error messages are logged.
- Errors warnings info and debug
-
debug messages, informational messages, warning messages and error messages are logged.
Related Topics
Workflow-Specific Pages
Campaign Generator Workflows
Campaign Generator - Initiator
Use this tab to define initiators (responsible persons) for multiple campaign generator jobs.The available parameters are:
- Initiator
-
the distinguished name of a user that acts as the initiator of the campaign generator workflow.This value is also used to start the certification workflows and is included in audit messages if audit is enabled.If you do not enter a user here, the technical user (the DomainAdmin) is used as the initiator.
- Password
-
the password of the initiator.This field is optional.If you enter a password, the campaign generator authenticates with this user / password combination.If the field is empty, it simply sets the initiator value.
- Group Users by Attribute
-
Enter the name of a special "grouping" attribute here if you want to start a separate certification workflow for each of the groups.For example if you enter manager here, all users in a certification workflow will have the same manager.
- Initiator from Grouping Attribute
-
If checked, each workflow is started with the user referenced by the grouping attribute as initiator.Note that it only makes sense to check this flag if the attribute is a DN reference to a user.By this mechanism, it is easy to define for example the user’s manager as the approver of the workflow.
Users with an empty grouping attribute are gathered in a separate group having the person entered as Initiator in the Campaign Initiator step as the certification workflow’s initiator.
- Maximum Number of Users per Workflow
-
Entering a number here limits the number of users per certification workflow. This setting must be used to assure certification workflows can be handled by the system. A setting of 100 is suitable, with 1000 users per workflow the IdS-J is likely to run into a timeout when preparing the approval data for Web Center.
The initiator is used for authentication and auditing.
Related Topics
Campaign Generator - Roles
Use this tab to specify the roles for this access certification campaign.For more information about possible scenarios for access certification, see the corresponding use case document.
The available parameters are:
- Process Roles
-
whether (checked) or not (unchecked) role processing is enabled.You can set up all of the parameters in this tab and then use this flag to control whether or not they’re used.
- Process Indirect Assignments
-
whether (checked) or not (unchecked) to process indirect assignments; that is, assignments by rules or business object inheritance.By default, the campaign generator creates certification workflows that contain for each privilege all users that have this privilege manually assigned.If you set this flag, the workflow also contains all users that have this privilege assigned by rules or business object inheritance.Note that only the manually-assigned users can be certified; the ones who are automatically assigned are only shown for information.If a privilege has no manually-assigned roles, no certification workflow is started.
Defaults
- Certification Workflow
-
the workflow to start for certification. If nothing is specified in the corresponding field at the privilege, this workflow is used by default.
- Certification Period
-
the time period between certifications if nothing is specified in the corresponding field at the privilege. For example, suppose a certification takes place on the 1st of June. When the certification period is set to 6 months, the next certification will take place on the 1st of November.
Role Search
The roles for which an access certification is to be started. The available fields are:
- Role Search Base
-
the search base at which to start the role search. If nothing is specified, the entire role catalog is used.
- Role Filter
-
the filter to use to search for roles. If nothing is specified, the following default filter is used:
(objectClass="dxrRole" and dxrNeedsCertification="true" and (dxrCertificationPending="FALSE" or not (dxrCertificationPending=))
and (not (dxrState="DELETED") or not (dxrState=)) and dxrCertificationDate ⇐"$(gmtime)")
It searches for all roles that have the certification flag set, where the certification date is passed and where no certification workflow is already running. Furthermore deleted roles are ignored. - Page Size
-
the page size for the role search. Because the creation of certification workflows can be time-consuming (especially when there are many users are to certify) you should set low values in this field. If the paging time-out of the LDAP server is reached, use a smaller value.
User Search
The users to be certified by this campaign. You can use these parameters to divide the campaign; for example, to run campaigns for each country or to run campaigns for specific organizational parts. The available fields are:
- User Search Base
-
the search base at which to start the user search. You can separate the campaign into a set of trees with different persons to approve. If nothing is specified, the entire user tree is searched for affected users.
- Additional User Filter
-
an additional filter to define the set of users for this campaign.If empty, all users are considered.
- Page Size
-
the page size for the user search.
Related Topics
Campaign Generator - Permissions
Use this tab to specify the permissions for this access certification campaign.For more information about possible scenarios for access certification, see the corresponding use case document.
The available parameters are:
- Process Permissions
-
whether (checked) or not (unchecked) permission processing is enabled.You can set up all of the parameters in this tab and then use this flag to control whether or not they are used.
- Process Indirect Assignments
-
whether (checked) or not (unchecked) to process indirect assignments; that is, assignments by rules or business object inheritance.By default, the campaign generator creates certification workflows that contain for each privilege all users that have this privilege manually assigned.If you set this flag, the workflow also contains all users that have this privilege assigned by rules or business object inheritance.Note that only the manually-assigned users can be certified; the ones who are automatically assigned are only shown for information.If a privilege has no manually-assigned permissions, no certification workflow is started.
Defaults
- Certification Workflow
-
the workflow to start for certification. If nothing is specified in the corresponding field at the privilege, this workflow is used by default.
- Certification Duration
-
the default time period for the approver(s) to certify the permissions, if nothing is specified in the corresponding field at the privilege. Typically you should set this period to about 4 weeks to give the approvers enough time to complete the certification.
- Certification Period
-
the time period between certifications, if nothing is specified in the corresponding field at the privilege. For example, suppose a certification takes place on the 1st of June. When the certification period is set to 6 months, the next certification will take place on the 1st of November.
Permission Search
The permissions for which an access certification is to be started. Available fields are:
- Permission Search Base
-
the search base where to start the permission search. If nothing is specified, the whole set of permissions is used.
- Permission Filter
-
the filter to search for permissions. If nothing is specified, the default filter is used:
(objectClass="dxrPermission" and dxrNeedsCertification="true" and (dxrCertificationPending="FALSE" or not (dxrCertificationPending=))
and (not (dxrState="DELETED") or not (dxrState=)) and dxrCertificationDate ⇐"$(gmtime)")
It searches for all permissions that have the certification flag set, where the certification date is passed and where no certification workflow is already running. Furthermore deleted permissions are ignored. - Page Size
-
the page size for the permission search. Because the creation of certification workflows can be time-consuming (especially when there are many users are to certify) you should set low values. If the paging time-out of the LDAP server is reached, use a smaller value.
User Search
The users to be certified by this campaign. You can use these parameters to divide the campaign; for example, to run campaigns for each country or to run campaigns for specific organizational parts. Available parameters are:
- User Search Base
-
the search base at which to start the user search. You can separate the campaign into a set of trees with different persons to approve. If nothing is specified, the entire user tree is searched for affected users.
- Additional User Filter
-
an additional filter to define the set of users for this campaign.If empty, all users are considered.
- Page Size
-
the page size for the user search.
Related Topics
Campaign Generator - Groups
Use this tab to specify the groups for this access certification campaign.For more information about possible scenarios for access certification, see the corresponding use case document.
The available parameters are:
- Process groups
-
whether (checked) or not (unchecked) group processing is enabled.You can set up all parameters in this tab and then use this flag to control whether or not they’re used.
- Process Indirect Assignments
-
whether (checked) or not (unchecked) to process indirect assignments; that is, assignments by rules or business object inheritance.By default, the campaign generator creates certification workflows that contain for each privilege all users that have this privilege manually assigned.If you set this flag, the workflow also contains all users that have this privilege assigned by rules or business object inheritance.Note that only the manually-assigned users can be certified; the ones who are automatically assigned are only shown for information.If a privilege has no manually-assigned groups, no certification workflow is started.
Defaults
- Certification Workflow
-
the workflow to start for certification. If nothing is specified in the corresponding field at the privilege, this workflow is used by default.
- Certification Duration
-
the default time period for the approver(s) to certify the groups if nothing is specified in the corresponding field at the privilege. Typically you should set this period to about 4 weeks to give the approvers enough time to complete the certification.
- Certification Period
-
the period between certifications if nothing is specified in the corresponding field at the privilege. For example, suppose a certification takes place on the 1st of June. When the certification period is set to 6 months, the next certification will take place on the 1st of November.
Group Search
The groups for which an access certification is to be started. Available parameters are:
- Group Search Base
-
the search base at which to start the group search. If nothing is specified, the entire set of groups is used.
- Group Filter
-
the filter to use to search for groups. If nothing is specified, the following default filter is used:
(objectClass="dxrTargetSystemGroup" and dxrNeedsCertification="true" and (dxrCertificationPending="FALSE" or not (dxrCertificationPending=))
and (not (dxrState="DELETED") or not (dxrState=)) and dxrCertificationDate ⇐"$(gmtime)")
It searches for all groups that have the certification flag set, where the certification date is passed and where no certification workflow is already running. Deleted groups are ignored. - Page Size
-
the page size for the group search. Because the creation of certification workflows can be time-consuming (especially when there are many users are to certify) you should set low values. If the paging time-out of the LDAP server is reached, use a smaller value.
User Search
The users to be certified by this campaign. You can use these parameters to divide the campaign; for example, to run campaigns for each country or to run campaigns for specific organizational parts. Available parameters are:
- User Search Base
-
the search base at which to start the user search. You can separate the campaign into a set of trees with different persons to approve. If nothing is specified, the entire user tree is searched for affected users
- Additional User Filter
-
an additional filter to define the set of users for this campaign. If empty, all users are considered.
- Page Size
-
the page size for the user search.
Related Topics
Consistency Check Workflows
This tab is displayed with the main activity of a consistency check workflow. The available fields depend on the workflow (UserResolution, MarkAffectedUsers, CheckConsistency).
User Resolution Workflow
Use this tab to set up Consistency Check User Resolution workflow processing.
The following field defines the Provisioning rules to be evaluated.
- Search Base for Provisioning Rules
-
evaluate all Provisioning rules in the specified subtree.
The following fields allow you to define the users to be processed:
- Search Base for Users
-
process only those users in the specified subtree.
- Filter for Users
-
process only those users that match the specified filter and are in the specified sub tree. When this field is empty, the workflow checks all users in the specified subtree.
- Use Filter for Users directly (don’t ‘AND’ with dxrtba=true)
-
whether (true) or not (false) the defined user filter is used as it is or modified if dxrtba is set. For example, you can define a filter that processes all users regardless of whether or not dxrtba is set. If not set or false, the defined user filter is implicitly anded with (&(objectClass=dxrUser)(dxrTBA=TRUE)(dxrState=*). This feature was introduced in DirX Identity V8.9. If you have workflows created in older versions, this feature may not work out of the box because the stored XML content does not contain this property. In this case, you can update the content by clicking Edit, switching the controller to the MarkAffectedUserController, switching back to the PrivilegeResolutionController and then clicking Save. This action updates the XML content and after a "Load IdS-J Configuration" command, you can use this new field.
Optimization Parameters
There are two sets of optimization parameters: the first set controls the application of provisioning rules and the second set controls the user resolution process.
Use the following parameters to optimize the application of Provisioning rules:
- LDAP Page Size for Provisioning Rules
-
the size of a result page for paged searches (number of rules; default: 300).
- Cache MRU Size for Provisioning Rules
-
the size of the most recently used cache for objects read via LDAP (default: 500). The Rule Cache MRU Size defines the size of the most recently used cache in the storage layer that holds the objects that are not affected by the garbage collector. If the Rule Cache MRU Size is too low, the garbage collector removes the objects and they must subsequently be restored from LDAP when they are accessed the next time, which slows down the agent significantly. We recommend that you set this value to twice the number of rules that are read (the corresponding operations are also cached).
- Batch Accumulator Size for Provisioning Rules
-
controls the algorithm that calculates the affected users from the privileges to be analyzed. Increasing this value reduces the number of LDAP searches but increases the length of the search filters.
- Use User Cache
-
whether or not to enable the object cache (default: TRUE).
Use the following parameters to optimize the user resolution process:
- LDAP Page Size for User Resolution
-
the size of a result page for paged searches.
- Cache MRU Size for User Resolution
-
the size of the most recently used object cache. Objects that are read via LDAP are stored in a cache in the storage layer. The Object Cache MRU Size defines the size of the most recently used cache that holds the objects that are not affected by the garbage collector. If the Object Cache MRU Size is too low, the garbage collector removes the objects and they must subsequently be restored from LDAP when they are accessed the next time, which slows down the workflow considerably.
- Batch Accumulator Size for User Resolution
-
controls the algorithm that calculates the affected users from the privileges to be analyzed. Increasing this value reduces the number of LDAP searches but increases the length of the search filters.
Mark Affected Users Workflow
Use this tab to optimize the Consistency Check Mark Affected Users workflow. Optimization parameters include:
- LDAP Page Size
-
the size of a result page for paged searches (default: 300).
- Cache MRUS ize
-
the size of the most recently used cache for objects read via LDAP (default: 500). The Rule Cache MRU Size defines the size of the most recently used cache in the storage layer that holds the objects that are not affected by the garbage collector. If the Rule Cache MRU Size is too low, the garbage collector removes the objects and they must subsequently be restored from LDAP when they are accessed the next time, which slows down the agent significantly. We recommend that you set this value to twice the number of rules that are read (the corresponding operations are also cached).
- Batch Accumulator Size
-
controls the algorithm that calculates the affected users from the privileges to be analyzed. Increasing this value reduces the number of LDAP searches but increases the length of the search filters.
Consistency Check Workflow
Use this tab to set Consistency Check workflow (CheckConsistency) attributes.
Optimization Parameters
- LDAP Page Size
-
the size of a result page for paged searches (default: 300).
- Cache MRU Size
-
the size of the most recently used cache for objects read via LDAP (default: 500). The Rule Cache MRU Size defines the size of the most recently used cache in the storage layer that holds the objects that are not affected by the garbage collector. If the Rule Cache MRU Size is too low, the garbage collector removes the objects and they must subsequently be restored from LDAP when they are accessed the next time, which slows down the agent significantly. We recommend that you set this value to twice the number of rules that are read (the corresponding operations are also cached).
- Batch Accumulator Size
-
controls the algorithm that calculates the affected users from the privileges to be analyzed. Increasing this value reduces the number of LDAP searches but increases the length of the search filters.
- Check for Privileges To Be Deleted
-
whether (checked) or not (unchecked) privileges to be deleted are checked. When checked, the workflow performs the following actions:
-
Searches for roles, permissions, and groups in the state TBDEL.
-
For each privilege in the state TBDEL, the workflow:
-
Removes the incoming assignments from users and/or senior privileges and sets the To Be Analyzed (TBA) flag for the affected objects.
-
Deletes roles/permissions or sets their state to DELETED if history is configured.
-
Sets the state of groups to DELETED.
-
-
Check Users
- Check Users
-
whether (checked) or not (unchecked) a set of specified users should be checked. When checked, the following parameters define the users to be checked:
- Search Base
-
the search base for users to be checked.
- Filter
-
the filter for users to be checked.
Check Roles/Permissions
- Check Roles and Permissions
-
whether (checked) or not (unchecked) a specified set of roles and permissions should be checked. When checked, the following parameters define the roles and permissions to be checked:
- Search Base for Roles
-
the search base for roles to be checked.
- Filter for Roles
-
the filter for roles to be checked.
- Search Base for Permissions
-
the search base for permissions to be checked.
- Filter for Permissions
-
the filter for permissions to be checked.
Check Accounts/Groups
- Check Accounts and Groups
-
whether (checked) or not (unchecked) the accounts and groups in a set of specified target systems should be checked. When checked, the following parameters define the target systems to be checked:
- Search Base for Target Systems
-
the search base for the target systems.
- Filter for Target Systems
-
the filter for the target systems.
Apply Consistency Rules
- Apply Consistency Rules
-
- whether (checked) or not (unchecked) to apply a specified set of consistency rules. When checked, the following parameters specify the consistency rules to be applied and provide optimization options for them:
- Search Base
-
the search base for consistency rules.
- Filter
-
the filter for consistency rules.
- Sort Key
-
Use this optional field to change the search attribute with which the workflow searches rules. The default attribute is cn.
- Sort Ascending
-
Use this optional field to change the search order in which the workflow searches rules. The default is ascending TRUE.
- LDAP Page Size
-
the size of a result page for paged searches (applies only to the specified consistency rules) (default: 300).
- Cache MRU Size
-
the size of the most recently used cache for objects read via LDAP (applies only to the specified consistency rules) (default: 500). The Rule Cache MRU Size defines the size of the most recently used cache in the storage layer that holds the objects that are not affected by the garbage collector. If the Rule Cache MRU Size is too low, the garbage collector removes the objects and they must subsequently be restored from LDAP when they are accessed the next time, which slows down the agent significantly. We recommend that you set this value to twice the number of rules that are read (the corresponding operations are also cached).
Event-based Maintenance Workflows - Event Attributes
This tab is displayed with the main activity of an event-based maintenance workflow. The available fields depend on the workflow; that is, on the object type the workflow manages.
Event-based User Resolution Workflow
Depending on the changed user attributes, the workflow assigns privileges and resolves the user, only updates the user’s accounts or simply ignores the change event.
This tab allows you to define:
-
The user attributes that result in an update of the user’s accounts when one of them is changed.
-
The search base for finding consistency rules.
-
The search base for finding provisioning rules.
Attributes That Trigger Account Update
| The accounts are always updated when a permission parameter is changed. This list of attributes is only evaluated if no permission parameter is changed. |
You can define "include" and "ignore" attributes. If an "include" attribute was modified, the accounts are updated. If only "ignore" attributes were modified, the accounts are not updated.
You can provide a list of "include" and "ignore" attributes and you can also provide prefix values for them. As an example: Configuring an "include" prefix "dxrSec" means that whenever an attribute beginning with "dxrSec" is changed, the accounts are updated. The configuration items are evaluated in the following sequence:
-
If the changed attribute is in the "include" list, accounts are updated.
-
If the attribute is in the "ignore" list, the event is ignored.
-
If the attribute name matches an "include" prefix, accounts are updated.
-
If the attribute name matches an "ignore" prefix, the event is ignored.
-
By default, accounts are updated, which means that if all lists are empty, accounts are always updated.
If one condition matches, the succeeding ones are ignored.
- Search Base for Consistency Rules
-
Use this optional field to change the search base below which the workflow searches consistency rules. By default, it searches for them in the Policies subtree of the domain.
- Search Base for Provisioning Rules
-
Use this optional field to change the search base below which the workflow searches provisioning rules. Leaving it empty means no execution of any provisioning rules, the workflow will ignore applying any provisioning rules.
| Privileges assigned by provisioning rules are continuously recalculated during User Resolution. A privilege is retained only if at least one applicable grant rule exists for that privilege during the current execution. If a privilege was previously assigned by a provisioning rule but no matching grant rule is found in the configured search base, the assignment is considered no longer justified and may be revoked. Therefore, all provisioning rules that can grant a given privilege should be included within the configured search base to avoid unintended privilege removals. |
- Sort Key
-
Use this optional field to change the search attribute with which the workflow searches rules. The default attribute is cn.
- Sort Ascending
-
Use this optional field to change the search order in which the workflow searches rules. The default is ascending TRUE.
Event-based Persona Resolution Workflow
Depending on the changed persona attributes, the workflow assigns privileges and resolves the persona, only updates the persona’s accounts or simply ignores the change event.
This tab allows you to define:
-
The persona attributes that result in an update of the persona‘s accounts when one of them is changed.
-
The search base for finding consistency rules.
-
The search base for finding provisioning rules.
-
The name of the link attribute for the persona’s owner. This value must be "owner".
Attributes That Trigger Persona Update
If the state changes or an attribute changes that is mastered from the user via the "link attribute for the persona’s owner (owner)", the persona is saved. Thus, the persona’s state is recalculated, taking into account the user’s state changes and changes to the attributes changed at the user that are passed to the persona via the master mechanism.
Attributes That Trigger Account Update
| The accounts are always updated when a permission parameter is changed. This list of attributes is only evaluated if no permission parameter is changed. |
You can define "include" and "ignore" attributes. If an "include" attribute is modified, the accounts are updated. If only "ignore" attributes are modified, the accounts are not updated.
You can provide a list of "include" and "ignore" attributes and you can also provide prefix values for them. As an example: Configuring an "include" prefix "dxrSec" means that whenever an attribute beginning with "dxrSec" is changed, the accounts are updated. The configuration items are evaluated in the following sequence:
-
If the changed attribute is in the "include" list, accounts are updated.
-
If the attribute is in the "ignore" list, the event is ignored.
-
If the attribute name matches an "include" prefix, accounts are updated.
-
If the attribute name matches an "ignore" prefix, the event is ignored.
-
By default, accounts are updated, which means that if all lists are empty, accounts are always updated.
If one condition matches, the succeeding ones are ignored.
- Search Base for Consistency Rules
-
Use this optional field to change the search base below which the workflow searches consistency rules. By default, it searches for them under the Personas subfolder of the Policies subtree of the domain.
- Search Base for Provisioning Rules
-
Use this optional field to change the search base below which the workflow searches provisioning rules. By default, it searches for them under the Personas subfolder of the Policies subtree of the domain. Leaving it empty means no execution of any provisioning rules, the workflow will ignore applying any provisioning rules.
Event-Based Functional User Resolution Workflow
Depending on the changed functional user attributes, the workflow assigns privileges and resolves the functional user, only updates the functional user’s accounts or simply ignores the change event.
This tab allows you to define:
-
The functional user attributes that result in an update of the functional user‘s accounts when one of them is changed.
-
The search base for finding consistency rules.
-
The search base for finding provisioning rules.
-
The name of the link attribute for the functional user’s sponsor. This value must be "dxrSponsor".
Attributes That Trigger Functional User Update
If the state changes or an attribute changes that is mastered from the user via the "link attribute for the functional user’s sponsor (dxrSponsor)", the functional user is saved. Thus, the functional user’s state is recalculated, and attributes changed at the user that are passed to the functional user via the master mechanism are updated.
Attributes That Trigger Account Update
| The accounts are always updated when a permission parameter is changed. This list of attributes is only evaluated if no permission parameter is changed. |
You can define "include" and "ignore" attributes. If an "include" attribute is modified, the accounts are updated. If only "ignore" attributes are modified, the accounts are not updated.
You can provide a list of "include" and "ignore" attributes and you can also provide prefix values for them. As an example: Configuring an "include" prefix "dxrSec" means that whenever an attribute beginning with "dxrSec" is changed, the accounts are updated. The configuration items are evaluated in the following sequence:
-
If the changed attribute is in the "include" list, accounts are updated.
-
If the attribute is in the "ignore" list, the event is ignored.
-
If the attribute name matches an "include" prefix, accounts are updated.
-
If the attribute name matches an "ignore" prefix, the event is ignored.
-
By default, accounts are updated, which means that if all lists are empty, accounts are always updated.
If one condition matches, the succeeding ones are ignored.
- Search Base for Consistency Rules
-
Use this optional field to change the search base below which the workflow searches consistency rules. By default, it searches for them under the Functional Users subfolder of the Policies subtree of the domain.
- Search Base for Provisioning Rules
-
Use this optional field to change the search base below which the workflow searches provisioning rules. By default, it searches for them under the Functional Users subfolder of the Policies subtree of the domain. Leaving it empty means no execution of any provisioning rules, the workflow will ignore applying any provisioning rules.
Maintenance Workflows for Business Objects
Attributes for User Update
Among other tasks, these workflows update associated users. Some attributes of users are mastered by the business objects to which they are linked. If one of these attributes is modified at the business object, the corresponding maintenance workflow updates these attributes at all associated users.
The field "Attributes for User Update" contains the comma-separated list of these attributes.
- Search Base for Consistency Rules
-
Use this optional field to change the search base below which the workflow searches consistency rules. By default, it searches for them in the Policies subtree of the domain.
Maintenance Workflows for Accounts
Attributes for finding User
Among other tasks, this workflow tries to find the associated user for an account. It searches for users whose attributes match those of the account. Use Attributes for finding User to configure a sequence of attribute lists.
The processing is similar to finding a joined entry in provisioning workflows: the workflow applies the sequence of attribute lists sequentially until it finds exactly one user. For a search, it takes all attributes from the list of one line and generates a filter to find a user where these attributes match exactly those of the given account. If the search result contains exactly one entry, this is considered to be the associated user. Otherwise, the workflow takes the next list of attributes.
- Search Base for Consistency Rules
-
Use this optional field to change the search base below which the workflow searches consistency rules. By default, it searches for consistency rules in the Policies subtree of the domain.
- Search Base for Validation Rules
-
Use this optional field to change the search base below which the workflow searches validation rules. By default, it searches for them in the Policies subtree of the domain.
Generic Maintenance Workflows
The generic event-based maintenance workflow can be used for objects of any type. If it receives an event, it
-
Executes consistency rules for the object
-
Applies the user hook (if configured).
Use this tab to configure the following items:
Search Base for Consistency Rules
Use this optional field to change the search base below which the workflow searches consistency rules. By default, it searches for consistency rules in the Policies subtree of the domain.
Event-based Maintenance - User Hook
This tab is displayed with the main activity of each event-based maintenance workflow. Use it to set a user hook and its configuration options. Available parameters are:
- User Hook Classname
-
the full Java class name of the user hook class.
- Options
-
a table of name / value pairs:
- Property Name
-
the name of a configuration option that is evaluated by the user hook.
- Value
-
the appropriate value.
See the chapter "Customizing Event-based Maintenance Workflows" in the DirX Identity Application Development Guide for information on how a user hook reads these options.
Joint Backup - Parameters
Use this tab to specify the parameters used for a joint backup of the server content.The Java-based Server triggers the backup to the other components.Available parameters are:
Message Server
Leave these fields empty.As of DirX Identity V8.3, each Java-based Server hosts an Apache ActiveMQ Message Broker.Its repository files are no longer backed up.
Connectivity Configuration
- Backup Path
-
the path and file name where the directory server backup file is stored.The path must exist and should not be below the DirX installation tree.
- Windows Platform
-
whether (checked) or not (unchecked) the Connectivity configuration directory server runs on a Windows platform.
Provisioning Configuration
- Backup Path
-
the path and file name where the directory server backup file is stored. This field is only necessary if you have Connectivity and Provisioning separated onto two DirX LDAP servers. The path must exist and should not be below the DirX installation tree.
- Windows Platform
-
whether (checked) or not (unchecked) the Provisioning configuration directory server runs on a Windows platform.
Related Topics
Joint Backup - Post Operation
Use this tab to specify the parameters used for post operation configuration of the joint backup. Available parameters are:
- Target Backup System Path
-
the path and file name where the backup files are stored after the backup operation.This will only work if the IdS-J server can access all paths (the Connectivity and the Provisioning backup paths specified in Joint Backup - Parameters).You must use a different path from the paths specified for Connectivity and Provisioning.
- Windows Platform
-
whether (checked) or not (unchecked) the messaging service runs on a Windows platform.
- Userhook Class Name
-
(not used).
Related Topics
Schedules
A folder for the schedule configuration objects in the configuration database.
- Name
-
the name of the folder.
- Description
-
descriptive text for this object.
The icon of this folder turns to red when any of the contained schedules is active and when scheduling is not disabled.
If you use the DirX Identity Manager menu entry Disable Scheduling, all schedulers on all servers stop scheduling immediately.You can enable scheduling again with the menu entry Enable Scheduling.See the DirX Identity Manager online help for details.
| that disable scheduling does not interrupt or abort running workflows. Only the new start of workflows is prevented. |
For Java-based workflows, note that the Java-based Server scheduler looks for schedules only in a domain-specific subfolder (with the name of the domain).
Within a property page, the content of this folder is shown as a pop-up list of a combo box:
- Schedule
-
the schedule object currently used by the object of which the properties are shown. Use the arrow button to pop up the list of all available schedule objects in the schedule folder. Use the properties button to display the properties of the currently selected schedule object.
Related Topic
Schedule
Ranges
Target System Cluster
+ Workflow Design Rules
Schedule
A schedule links to a workflow and determines when and how often it runs.The schedule configuration object describes a particular schedule.Use the schedule configuration object to define a schedule for a workflow and associate it with the workflow.You can set up schedules for Tcl-based and Java-based workflows.
A schedule configuration object defines the time controls for the workflow.For example, the workflow starts first at midnight on 21 December 2000 and is to run every 24 hours (the interval).You can define an expiration time after which this workflow should not run again.
A schedule configuration object can also specify a range after the scheduled start time where it’s okay to start the workflow (the deviation).Use this workflow run range to account for possible system or network failures that can postpone the workflow’s execution.
Additionally you can define, for Tcl-based workflows, a retry interval for each schedule.This feature triggers automatic restart when a workflow ran into a temporary error situation (for example the network was temporarily not available).Note that this feature is not available for real-time workflows.
For example, suppose you have a workflow that generally runs for three hours.You schedule it to start at midnight (the start time) plus four hours (the deviation), after which it cannot run until midnight the next day.If a system crash or network failure occurs and postpones your workflow run past 4 AM, it will not run, and will therefore not interfere with interactive accesses in the morning when people start to work again.
You can switch off scheduling completely with the option Disable/Enable Scheduling at the Schedules configuration object in the DirX Identity Manager Expert View. See the chapter on the DirX Identity Manager in the DirX Identity User Interfaces Guide for more information about the Expert View.
For Java-based workflows, note that the Java-based Server scheduler looks for schedules only in a domain-specific subfolder (with the name of the domain).
Use this tab to set the properties of a schedule. The available parameters are:
- Name
-
the name of the schedule.
- Description
-
a description of the schedule.
- Version
-
the version number of the schedule object.
- Active
-
whether the schedule is active (checked) or not (unchecked). Only active schedules are executed by the Scheduler.
- Workflow
-
the workflow associated with the schedule. To display its properties, click the Properties button
on the right. - Start Time
-
the time and date at which the schedule starts. This is the time at which the workflow is started the first time.
- Time Interval
-
the interval at which the schedule will run the workflow.
- Expiration Time
-
the expiration time and date, if any, for the schedule. This is the last time when the workflow will be executed. If no expiration time is defined, the schedule is active forever.
- Deviation
-
the maximum allowed deviation for the schedule. This is a plus range around the Start Time. It allows you to suppress workflow runs that would start too late (for example, because of a network problem).
- Retry Interval
-
the frequency of retries when the workflow encounters an error condition. The workflow is repeated after this time as long as the deviation time has not passed. This feature allows overcoming sporadic errors (for example, network errors).
Warnings do not enforce a retry. This property is not evaluated for Java-based workflows. Instead, the "wait before retry" and "retry limit" properties at the workflow activities are used.
Active schedules show a red icon to indicate this state. Nevertheless, you can deactivate scheduling centrally (see Schedules). See the topic "Workflow Design Rules" for information about setting scheduling parameters.
| All parameters that contain a date are stored in GMT format, which means that a workflow runs at a fixed world time. However, the display of these parameters is in local time. This setup allows for consistent handling of workflow starts in a worldwide distributed meta directory scenario. |
|
Working in a country that switches between summer and winter time (daylight savings time) may require adjusting the schedules so that they start in relation to fixed local time. We recommend that you:
|
Related Topics
Ranges
Schedules are used to start the execution of a workflow at a predefined date and time.Use this tab to set the ranges properties of a schedule.The available fields are:
- Ranges
-
the daily or weekly restrictions defined for workflow runs.Define ranges graphically in half-hour steps.White areas indicate disabled, gray areas indicate enabled.You can choose either GMT or Local time.Select a range with the left mouse button and then select Enable or Disable from the context menu. Enable All or Disable All allows activating or deactivating the whole range.
Active schedules show a red icon to indicate this state.Nevertheless, you can deactivate scheduling centrally (see the topic "Schedules").See the topic "Workflow Design Rules" for information about setting scheduling parameters.
| All parameters that contain a date are stored in GMT format, which means that a workflow runs at a fixed world time.However, the display of these parameters is in local time.This setup allows for consistent handling of workflow starts in a worldwide distributed meta directory scenario. |
|
Working in a country that switches between summer and winter time may require adjusting the schedules so that they start in relation to fixed local time.We recommend that you:
|
Related Topics
Target System Cluster
Use this tab to define a set of target systems that this schedule handles (this feature is only available for real-time workflows).Available parameters are:
- Search base
-
the search base for the LDAP search.The default is the cluster container for the relevant target systems.
- Filter
-
the LDAP filter condition.This field allows you to separate sets of workflow runs.
See the section "Using Cluster Workflows" to understand the concept in detail.
Related Topics
Scenarios
Workflow Line
Use this tab to set the properties of a workflow line.Available properties are:
- Name
-
the name of the workflow line.
- Version
-
the version number of the workflow line.
- Source
-
the source connected directory for the workflow line.To display its properties, click the Properties button
on the right. - Target
-
the target connected directory for the workflow line.To display its properties, click the Properties button on the right.
- Workflow
-
the workflows represented by the workflow line. To display the properties of one of these objects, click the Properties button on the right.
Related Topics
Connected Directory Icon
A connected directory icon is the graphical representation of a connected directory in a meta directory scenario.
Use this tab to set the properties of the connected directory icon by hand.The available properties are:
- Name
-
the name of the connected directory icon.
- Version
-
the version number of the connected directory icon.
- X
-
the horizontal (X) position of the icon in the scenario map.
- Y
-
the vertical (Y) position of the icon in the scenario map.
- Moveable
-
whether (checked) or not (unchecked) the connected directory can be moved over the map.
- Connected Directory
-
the connected directory that the icon represents.To display its properties, click the Properties button
on the right.
Related Topics
Scenario
A synchronization scenario is a specific set of connected directories and synchronization workflows that comprises your complete meta directory environment.For example, the elements of a scenario can include:
-
A human resources database that is the master for names and addresses
-
A PBX database that is the master for telephone numbers
-
Windows Active Directory domains that are the masters of accounts and email addresses
-
The Identity store that is the central manager for this data and is also the central repository for user-related data (white book)
Workflows connect and synchronize all of these directories.
You can set up different scenarios in one configuration database either to separate independent parts of your directory environment or to distinguish between a production environment and a test environment.
The scenario configuration object describes a synchronization scenario. Each scenario configuration object describes the configuration information for a particular synchronization scenario. Scenario configuration objects are associated with connected directory objects and workflow objects.
A scenario is usually displayed in the Global View as a map in the with "tin" icons for connected directories and lines between them representing synchronizations workflows. Scenario properties are usually set from the Global View. Use this tab to set the properties of a scenario by hand.
- Name
-
The name of the scenario.
- Description
-
descriptive text for this scenario.
- Version
-
the version number of the scenario.
- Icons
-
lists the connected directory icons contained in the scenario. To display the properties of a selected icon, click the Properties button to the right.
- Lines
-
lists the workflow lines contained in the scenario. To display the properties of a selected workflow line, click the Properties button to the right.
The following properties can also be accessed by invoking the "Properties…" item of the pop-up menu displayed when you right-click on the Global View’s map:
- Use Grid
-
whether the grid is on (checked) or off (unchecked).
- Grid-X
-
the grid cell width.
- Grid-Y
-
the grid cell height.
Related Topics
Scenarios
A folder for the scenario configuration objects in the configuration database. Use this tab to name the folder.
- Name
-
the name of the folder.
- Description
-
a description of the folder content.
| Scenarios can be structured in folders. This structure is also shown in the tree pane of the Connectivity Global View. |
Related Topic
Tcl-based Workflows
Tcl-based Activities
Use this tab to view the activities associated with a Tcl-based workflow.
- Activities
-
the associated activities, displayed in a table.
To display the properties of an activity, click it and then click
.To insert a new activity, click
 on the right side of the table.
To delete an activity, click it and then click
 .
.To display the distinguished names of the associated activities in text format, click
 on the right side of the table.
Related Topics
Tcl-based Activity
An activity is an instance of a job and a single step in a Tcl-based workflow.An activity configuration object describes the configuration information for a particular step in the workflow and maintains all data needed for execution within the running workflow.Use the activity configuration object to describe each activity and the required sequence of activities that you want to establish for a workflow in your Identity environment.
The configuration data associated with an activity includes:
-
The activity’s name, description and version number
-
The job or workflow to which the activity is linked
-
The activity’s position in the workflow’s control flow
Use this tab to enter the properties of an activity object.The items shown in this tab are:
- Name
-
the name of the activity.
- Description
-
the description of the activity.
- Version
-
the version number of the activity.
- Run Object
-
the object to be run that is associated with the activity. Run objects can be jobs or workflows. To display the properties of a run object, click it and then click
. - C++-based Server
-
the C++-based Server associated with the activity. To display its properties, click it and then click
. - Ignore Errors
-
whether (checked) or not (unchecked) this activity is prevented from stopping the workflow if the activity encounters an error condition. This flag is especially useful for workflow run objects. Nested workflows should normally not be interrupted if one of their child workflows is not successful.
| Do not use this flag for jobs that use delta handling. This could result in serious data loss! (For details on delta handling see the Application Development Guide → Understanding the Default Application Workflow Technology → Understanding Tcl-based Workflows → Delta Handling.) |
- Disable Statistics
-
whether (checked) or not (unchecked) to prevent propagation of the statistics information from the activity to the workflow object.
- Is Start Activity
-
whether (checked) or not (unchecked) the activity is the starting activity.
- Predecessor
-
the predecessor activity for this activity. To display the properties of an activity, click it and then click
. Note that the start activity cannot have a predecessor. - Is End Activity
-
whether (checked) or not (unchecked) the activity is the terminating activity.
You can set this flag to abort a workflow at this point for test purposes.If this activity is referenced by another activity as Predecessor, a warning is created during the run of this workflow (only visible in the event viewer / logging). - Anchor
-
the text value that helps to select the correct activity during reference resolution.See the chapter "Customizing Object References" in the DirX Identity Customization Guide for details.
Related Topics
Tcl-based Channel
Channels link jobs to connected directories and describe bulk data input from and output to the connected directory.A channel configuration object describes the configuration information for a particular channel.
Channels are always located under a connected directory object.Thus they can either reside in the connected directories folder or in the jobs folder as sub-objects of connected directory objects.A channel is the connector between a connected directory and a job and therefore holds all data necessary for a particular download or upload operation of bulk data.
The configuration information associated with a channel includes:
-
The channel’s name, description and version number
-
The connected directory to which the channel is linked
-
The channel’s role.This role can be used for different purposes; for example, the meta controller uses it to define the handles in the Tcl scripts.In most simple cases, a single input and output channel are sufficient.However, more complex cases can exist where input from different channels is needed to build an output entry.In this case, the role property can be used to distinguish between the different channels.
Depending on the type of connected directory with which the channel is associated, it can also store information about:
-
Export parameters, also called search parameters (the vertical or "y" axis selection criteria) to define the export operation from a connected directory. Export parameters define the set of entries retrieved from a source connected directory (for example, a base object or a filter).
-
The set of attributes to be synchronized (the horizontal or "x" axis selection criteria), which is also called "selected attributes". A channel’s selected attributes list is used to define appropriate mapping procedures between one or more input attributes and one or more output attributes.
-
Import parameters to define how objects are handled during import operations into a connected directory. Import parameters define the modes for entry input in the target connected directory. They also define the rules for the treatment of new objects (is it permitted to add new entries?), for renaming objects (is it permitted to rename entries?) or for the deletion of objects (perhaps some entries must not be removed; for example, the login account for unattended operation must be kept in all cases).
The channel configuration object can have additional properties depending on the type of connected directory. Channels are bound to a specific instance of a connected directory and therefore inherit the properties of the corresponding type.
Use this tab to assign general properties to a channel configuration object. The properties shown in this tab are:
- Name
-
the name of the channel.
- Description
-
the description of the channel.
- Version
-
the version number of the channel.
- Connected Directory
-
the connected directory associated with the channel. To display its properties, click the Properties button on the right.
- Channel Type
-
the channel type. Each connected directory can have different types of channels, which is reflected by this property. If you choose another type of channel, the display behavior of this channel object will change after restarting the DirX Identity Manager or after performing Reload Object Descriptors in the DirX Identity Manager Expert View.
- Role Name
-
the role name of the channel. For an LDAP directory, the default is "ldap". For a file, the default is "file". This parameter is used in mapping Tcl files to define the handles for the meta controller. Be sure to set correct references in the Tcl files or adapt the Tcl files by hand if you change this parameter.
- Anchor
-
the unique easily readable identifier for the channel to be used in references. See the chapter "Customizing Object References" in the DirX Identity Customization Guide for details.
- Bind Profile
-
the bind profile in the connected directory to be used for the bind operation. (Channels define how to access the connected directory.)
- Dereference Alias
-
whether aliases are always de-referenced (select Always) or never de-referenced (select Never). LDAP channels can use this parameter.
- Referral Handling
-
whether or not the LDAP library is to follow the referrals provided by the LDAP server. LDAP channels can use this parameter. Possible values are:
- Follow Referral
-
the LDAP library evaluates referrals returned by the LDAP server. If it is unable to evaluate the referral, the referral is returned in the search result and the Tcl workflow terminates with errors due to an incomplete search result.
- Don’t Follow Referral
-
the LDAP library ignores referrals returned by the LDAP server. The Tcl workflow doesn’t terminate due to an incomplete search result. It is the responsibility of the user /administrator to decide whether the behavior is acceptable or not.
There may be additional channel properties associated with a specific channel, depending on the respective agent and connected directory type.
File-type connected directories (for example, CSV or LDIF) display the following additional property:
- Internal
-
whether (checked) or not (unchecked) the channel is job-internal.A job-internal channel is not used outside the job and is not shown in the list of usable input or output channels for the job.
Related Topics
Data Flow Viewer
The Data Flow Viewer allows you to display and maintain the data flow in and out of a connected directory for Tcl-based workflows. It works on existing workflows, especially the selected attributes of a channel. You access the Data Flow Viewer from a scenario in the Global View by right-clicking on a connected directory icon and then selecting Data Flow…
The Data Flow Viewer window comprises four sub-windows:
- Available attributes
-
the attributes of the attribute configuration of the connected directory. Click an attribute in this list to select it. Use the SHIFT key to select a range and the CTRL key to add or remove single attributes to or from the selection. Use CTRL-A to select all attributes.
- Display Data Flow for
-
the attributes for which the data flow is displayed.Use the up arrow
 to add attributes from the Available attributes list, use the down arrow
  to remove attributes from this list.
 - (attribute columns)
-
a column for each selected attribute.The column header displays the name of the attribute.The rest of the column contains direction indicators that show the data flow for this attribute.These indicators are:

-
the attribute is exported from the connected directory listed in the Connected Directories column and is imported into the connected directory where the Data Flow Viewer was started.

-
the attribute is exported from the connected directory where the Data Flow Viewer was started and imported into the connected directory listed in the Connected Directories column.
- Connected Directories
-
the target system (connected directory) to which the attribute is imported or from which it is exported.
Envision the connected directory where the Data Flow Viewer was started on the left side and all the other connected directories on the right side. Then the arrows show the direction of the data flow. The following figure shows an example for the attributes c and l.
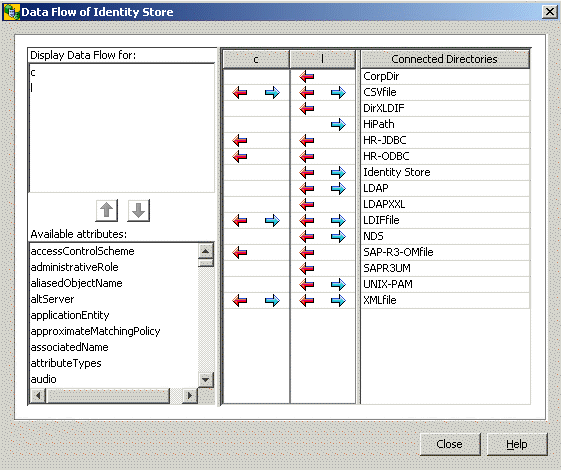
The arrows in the second column in the figure show the data flow for the c attribute. This attribute is exported to the CSVfile, LDIFfile and XMLfile connected directories and imported from these directories and also from the SAP-R3-OMfile.
To analyze the details of an arrow, right-click it and then select Modify Data Flow. You can also just double-click the arrow. See the Data Flow Editor for an explanation of the resulting display.
|
Related Topics
Data Flow Editor
The Data Flow Editor is opened from the Data Flow Viewer when you right-click on an arrow in a selected attribute column and then select Modify Data Flow.The Data Flow Editor displays all workflows and activities that caused the import or export arrows for the selected attribute displayed in the Viewer.It also shows the Selected Attributes tabs of the related channels and the mapping between them.You can edit all of this information.After you close the Editor window, the Data Flow Viewer window is updated with your changes.The following figure shows the Data Flow Editor dialog.
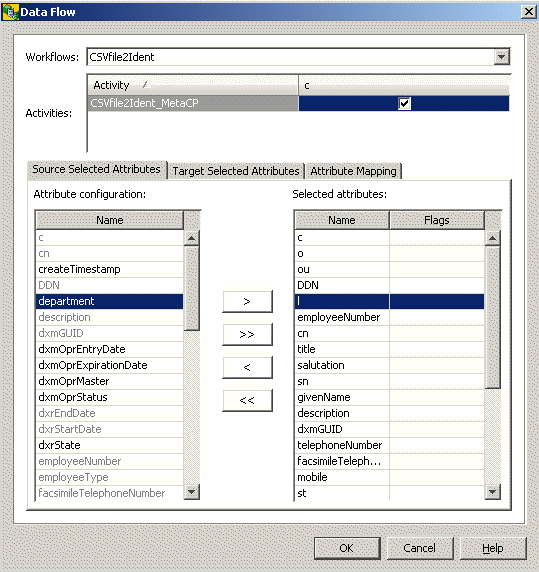
The Data Flow Editor consists of the following items:
- Workflows
-
the workflows that handle the requested attribute.Select one from the list.
- Activities
-
the activities of the selected workflow. All activities that contain the requested attribute in the source selected attributes are marked in the right-hand column (the column header shows the name of the requested attribute).
- Source Selected Attributes
-
the Selected Attributes tab of the input channel of the selected activity. It contains the requested attribute.
- Target Selected Attributes
-
the Selected Attributes tab of the input channel of the selected activity. This table must not contain the requested attribute.
- Attribute Mapping
-
the mapping of the selected activity. This table must not contain the requested attribute, but it often does. Note that the mapping can also be done in the pre-, post- and post-join mapping parts (the buttons below the mapping table).
You can edit the information in the Source and Target Selected Attributes tabs and also in the Attribute Mapping tab. Changing the Source Selected Attributes results in an updated Data Flow Viewer window when you click OK. Cancel aborts the editing procedure.
|
Related Topics
"Using the Mapping Editor" in the DirX Identity User Interfaces Guide
Entry Handling
Entry-handling parameters specified in the output channel definitions of Tcl-based workflows define the entry-handling behavior at the target connected directory side.The parameters displayed depend on the workflow.Use this tab to specify these parameters.
Use the Add Properties section of this tab to control how the addition of entries is handled:
- Add Entries
-
whether or not entry additions are allowed and whether or not notification is performed.Possible values are:
-
NONE - No addition
-
ADD - Addition only
-
NTF - Notification only
-
ADDNTF - Addition and notification
-
- Superior Info
-
information for building higher-level nodes in the target system if not already present. Use the superior info editor to customize this information (click the button to the right of the text field to enter the editor).
- Source Add Marking Attribute
-
the attribute type that is used as a status attribute in the source connected directory.
- Source Add Marking Value
-
the attribute value that indicates an addition in the source connected directory.
- Target Add Marking Attribute
-
the attribute type that is used as status attribute in the target connected directory and that must be set if the Source Add Marking Attribute has the Source Add Marking Value.
- Target Add Marking Value
-
the attribute value that indicates an addition (for example, NEW) in the target connected directory.
Use the Modification Properties section of this tab to control how the modification of entries is handled:
- Modify Entries
-
whether or not modifications are allowed and whether or not notification is performed. Possible values are:
-
NONE - No modification
-
MOD - Modification only
-
NTF - Notification only
-
MODNTF - Modification and notification
-
- Modify Marking Attribute
-
the attribute type that is used as a status attribute in the target connected directory when the entry is modified.
- Modify Marking Value
-
the attribute value that indicates a modification (for example, MOD) in the target connected directory.
- Rename Entries
-
whether a modification of the distinguished name (DN) is allowed (True) or not (False). Possible values are:
-
FALSE - move DN not allowed
-
TRUE - move DN allowed
-
Use the Deletion Properties section of this tab to control how the deletion of entries is handled:
- Delete Entries
-
whether or not deletions are allowed and whether or not notification is performed. Possible values are:
-
NONE - No deletion
-
DEL - Deletion only
-
NTF - Notification only
-
DELNTF - Deletion and notification
-
- Deletion Mode
-
how the deletion is performed. Possible values are:
-
PHYSICAL = the entry is physically removed
-
MARK = the entry is marked
-
MOVE = the entry is moved to a tombstone area
-
USER = a user hook defines the deletion mechanism
-
- Source Delete Marking Attribute
-
the attribute type that is used as a status attribute in the source connected directory.
- Source Delete Marking Value
-
the attribute value that indicates a deletion in the source connected directory.
- Target Delete Marking Attribute
-
the attribute type that is used as a status attribute (if Deletion Mode = MARK) in the target connected directory and which must be set if the Source Delete Marking Attribute has the Source Delete Marking Value.
- Target Delete Marking Value
-
the attribute value that indicates a deletion (if Deletion Mode = MARK), for example DEL.
- Keep Objects
-
the list of objects that cannot be deleted.
DirX Identity automatically ensures that it does not delete the object that was used for the directory bind operation. As a result, you don’t need any additional protection for this object.
For the HiPath workflow, the following properties are displayed:
- Keep unmastered attributes
-
whether (checked) or not (unchecked) values for attributes in the Multi Master Attribute List are to be kept if they are not managed by an attribute master (for example, manually entered by an administrator).
- Multi Master Attribute List
-
the list of attributes that are mastered by multiple entries from possibly multiple connected directories that are attribute masters for these attributes.Using the dxmOprOriginator attribute, the HDMS workflow is able to update exactly those attribute values related to a particular HDMS entry.By default, these attributes are telephoneNumber and facsimileTelephoneNumber.This enables the HDMS workflow to link multiple telephone numbers and facsimileTelephoneNumbers of a person to one single meta directory entry.
Related Topics
Export Properties
Export properties are necessary for setting up the specific options for exporting data from a connected directory.Usually these parameters describe the subset of entries and the attribute set to be downloaded.
Use this tab to specify these export properties.The parameters displayed depend on the type of connected directory and the type of agent.
For the ADS and Exchange connected directories, the following parameters are displayed:
- Search base
-
the base node within the connected directory from which to export entries.
This field can contain references.See the chapter "Customizing Object References" in the DirX Identity Customization Guide for more information. - Search scope
-
the scope of the search operation. Possible values are:
- 0-BASE OBJECT
-
check that the Base Object matches the search criteria but nothing else.
- 1-ONE LEVEL
-
search for results in the given Base Object node and one level deeper.
- 2-SUBTREE
-
find results in the entire subtree below the given Base Object.
- Search filter
-
the collection of entries to locate and export. This value must be an LDAP-conformant expression.
This field can contain references. See the chapter "Customizing Object References" in the DirX Identity Customization Guide for more information. - Page size
-
the page size for the search results. This parameter controls how the connected directory will return search results for a single search operation. If the value is 0, the entire search result is processed before returning to the agent. If the given number is n, the result is split into pages with n entries at the maximum.
- Paged time limit
-
the length of time the connected directory is allowed to search for a single page.
- Asynchronous search
-
whether synchronous (unchecked) or asynchronous (checked) search operations are performed.
- Cache results
-
whether (checked) or not (unchecked) the connected directory agent caches search results in its local memory.
- Time Limit
-
whether the connected directory imposes a time limit for search results to be returned from connected directory server.
- Select Attributes
-
whether or not the ADSAgent retrieves all entry attributes with a value or only those attributes set to 1 in the Attributes section.
- Multi-value separator
-
the value to be used to separate the individual attribute values of a multi-valued attribute.
For the HDMS connected directory, the following parameters can appear in addition to the items in the Identity Store section:
- Joinback expression
-
The joinback expression that enables the HDMS HiPath workflow to detect n:1 relationships between Identity store entries and HDMS entries. This parameter and the HDMS join expression define the best-guess-match policy that the HDMS HiPath workflow is to use to join Identity store and HDMS entries. Each attribute in the joinback expression must correspond one-to-one with an attribute in the HDMS join expression. For example:
Joinback Expression: surname and givenname
HDMS Join Expression: name and christianname
In this example, HDMSAgent is to match Identity store entries with HDMS entries using a combination of surname and given name. The Identity store sn (surname) attribute maps to the HDMS attribute “name” and the Identity store gn (given name) attribute maps to the HDMS attribute “christianname”.
We strongly recommend using attribute combinations that make a connected directory unique (similar to our default setting). The workflow is able to detect ambiguities, but these ambiguities must be resolved manually by administrators.
For the Identity Store connected directory, the following parameters are displayed:
- Base Object
-
the node at which the search operation starts for entries to be exported.
- Subset
-
the scope of the search operation. Supply one of the following values:
- BASE OBJECT
-
check that the Base Object matches the search criteria but nothing else.
- ONE LEVEL
-
search for results in the given Base Object node and one level deeper.
- SUBTREE
-
find results in the entire subtree below the given Base Object.
- Object Class Collection
-
the set of object classes to use to create new objects. These sets are defined in the Operational Attributes tab of the connected directory (attribute Object Classes).
- Search Filter
-
the matching criteria. This value can be any logical expression in LDAP notation. Use "&" for "AND", "|" for "OR", and "!" for "NOT", as well as "=" for equality check, "-=" for phonetic equality check, and "⇐" for less, ">=" for greater.
When delta mode is on, this filter is combined to &(search_filter)(delta_filter) where delta_filter selects all entries that have been created or modified since the last successful run.
Note: This field can contain references. See the chapter "Customizing Object References" in the DirX Identity Customization Guide for more information. - OR Filter
-
an additional OR condition (for possible expression,s see Search Filter ). The complete filter to be used is composed of:
|(&(search_filter)(delta_filter))(or_filter)
The Delta Filter is used to retrieve delta data if Delta Mode is checked. The OR filter can be used if the delta filter and the search filter does not retrieve all necessary data. An additional set of entries can be searched this way.
Note: This field can contain references. See the chapter "Customizing Object References" in the DirX Identity Customization Guide for more information. - Sorted list
-
whether (checked) or not (unchecked) the resulting entry list should be sorted.
- Sort key
-
the sort key to use. Select an attribute name from the combo box that is used for sorting.
- Sort order
-
whether the results are sorted in ASCENDING or DESCENDING order.
- Read DN only
-
enables (True) or disables (False) the optimization for lower memory consumption. Note: This flag was previously named Perform Read.
- False
-
searches complete entries with all attributes during the first search. No additional search operations are necessary later on. This requires a lot of memory but results in maximum speed.
- True
-
searches only DNs during the first search and later on all other attributes for each entry by an additional search operation. This lowers memory consumption enormously but decreases performance by more than 50 %.
- Paged Read
-
whether (checked) or not (unchecked) the script works in paged mode if supported by the LDAP server.
- Page Size
-
the size of the pages. Default is 1000 bytes.
For the IBM Notes connected directory, the following parameters are displayed:
- (Addr)ess Book
-
the name of the Notes address book from which entries are to be exported.
- Form Name
-
the Notes document type to be extracted from the Notes address book.
- Search Documents
-
whether or not the Notes agent searches for and exports specific entries ("documents", in Notes terminology) of the document type specified in the Form Name field of the channel’s property tab.
- Search Item Name
-
the attribute within an entry to search for.
- Search Item Value
-
the value to search for (case-exact match), given an attribute name to search for that is specified in the Search Item Name field.
- Update Export File
-
(for delta exports only) whether or not the full export data file created by the agent can be updated.
- Copy Deleted Addresses in Modification File
-
whether or not the agent retrieves the contents of entries of the document type selected with the Form Name field of the channel’s property tab sheet that have been deleted since a full export data file was last generated.
- File for Modified Addresses
-
the path name of the file to which the agent is to write modified (and deleted) entries during a delta export operation.
- First Delta is Full
-
whether NTAgent also writes all entries into the “modify” file.
- Export All Items
-
whether all of the attributes ("items", in Notes terminology) of entries of the document type selected with the FormName field are exported, or whether a specified subset of attributes is exported.
- Multi-Value Separator
-
the value to be used to separate the individual attribute values of a multi-valued attribute.
- SMTP Host Domain
-
whether or not Internet addresses for Person entries exported from a Notes address book are generated.
For the NT connected directory, the following parameters are displayed:
- Data Type
-
the type of exported data. Supply one of the following values:
- 1-ACCOUNTS
-
Account data will be exported.
- 2-GLOBAL GROUPS
-
Global groups will be exported
- 3-LOCAL GROUPS
-
Local groups will be exported
- 4-ACCOUNTS AND GLOBAL GROUPS
-
Accounts and global groups will be exported
- 5-ACCOUNTS AND LOCAL GROUPS
-
Accounts and local groups will be exported
- 6-ALL GROUPS
-
Global and local groups will be exported
- 7-ACCOUNTS AND ALL GROUPS
-
Accounts, local and global groups will be exported
- User Data
-
the attributes of the exported data. Supply one of the following values:
- 1-STANDARD
-
The data are exported with a standard attribute set (UserName, Comment, FullName, UserID).
- 2-EXTENDED
-
The data are exported with the STANDARD attribute set extended by resource and account attributes.
- 3-STANDARD WITH DIALIN
-
The data are exported with the STANDARD attribute set extended by the dial-in attributes (DialInPrivlege and DialInPhoneNumber).
- 4-EXTENDED WITH DIALIN
-
The data exported with the EXTENDED attribute set extended by the dial-in attributes (DialInPrivilege and DialInPhoneNumber).
- User Group Data
-
Selects the exported group data. The field can take one of the following values:
- 0-NONE
-
Do not export group names of which the account is a member
- 1-GLOBAL GROUPS
-
Export any global group names of which the account is a member
- 2-LOCAL GROUPS
-
Export any local group names of which the account is a member
- 3-ALL GROUPS
-
Export any global and local group names of which the account is a member
- First Delta is Full
-
whether NTAgent also writes during the first full export all entries into the “modify” file.
- Multi-Value Separator
-
the value to be used to separate the individual attribute values of a multi-valued attribute. It has the same syntax as the Separator field in the export configuration file.
- Date Format
-
the format of date values.
- Date Separator
-
the separator character of date items.
For the ODBC connected directory, the following parameters are displayed:
- From
-
the table or tables in the ODBC database from which agent is to extract entries. If the data will be exported from more than one table, the table names must be separated by a comma.
This is multi line field. Each line must end with '\' as last character! - Where
-
whether or not the agent searches for and exports specific entries ("rows" in ODBC terminology). This must be an expression in SQL syntax.
Note: This is a multi-line field. Each line must end with a backslash (\) as the last character. - Keys
-
the set of attributes that the agent is to use to uniquely identify each entry to be exported from the ODBC database.
- Sort Control
-
enables/disables sorting optimization. When the agent creates a reference file for delta export, it sorts the records in the file by ordering the key fields. This ordering then permits fast analysis of changes between the previous state of the database and the present one, and allows the modified information to be selected. The process of sorting and extraction is much faster if the sorting of the reference file information corresponds to the order in which the ODBC database is sorted. The Sort Control parameter enables the sorting to be optimized where necessary. In many cases, the sorting will be correct anyway.
- Reference Path
-
the path to the directory in which the agent will store delta export reference files.
- Save Attributes
-
enables the delta reference information to be related to information in the target database. For example, if an entry is removed from the ODBC database, it may be required to remove the corresponding entry in the target database; the Save Attributes parameter is used to specify any additional attributes that can be used to identify the entry in the target database that is to be removed. Otherwise, removal is impossible.
For the SAP EP UM connected directory, the following parameters are displayed:
- Search Parameters
-
the search base in the SAP Enterprise Portal.
- Scope
-
the search scope. Enter one of the following values:
- BASE OBJECT
-
check that the Base Object matches the search criteria, but nothing else.
- ONE LEVEL
-
search for results in the given Base Object node and one level deeper.
- SUBTREE
-
find results in the entire subtree below the given Base Object.
- Filter Attribute Name
-
the attribute name that is to be used as filter property.
- Filter Attribute Value
-
the attribute value that is to be used as filter criteria.
See the "Export Configuration File Format" sections in each agent chapter in the DirX Identity Connectivity Reference for complete details of each DirX Identity agent’s export parameters.
Related Topic
Channel
Import Properties
Import properties are needed to set up the specific options for importing data into a connected directory.Usually, these parameters describe the restrictions during data import.Use this tab to specify these import properties.The actual parameters are determined by the type of connected directory and the type of agent.
For the ADS connected directory, the following fields appear (see the ADS agent chapter in the DirX Identity Connectivity Reference for details and examples for allowed values of these fields):
- Search Base
-
the base within the Active Directory from which to search for matching entries using the search criteria specified in the ldapFilter attribute of each entry in the import data file.
- Ignore Object Class
-
whether ADSAgent evaluates (checked) or ignores (unchecked) the objectClass attribute of entries for which the modify LDIF changetype operation has been specified.
- Reject Special Characters
-
whether ADSAgent evaluates (checked) the ADsPath attribute of entries in the import data file for special characters or not (unchecked).
- Rejected Characters
-
the characters in the import entries' AdsPath attribute for which ADSAgent is to scan; ADSAgent is to reject the entry for import if it contains one of these characters.
- Multi-value Separator
-
the value to be used to separate the individual attribute values of a multi-valued attribute.
For the Exchange connected directory, following fields appear (see the Exchange agent chapter in the DirX Identity Connectivity Reference for details and examples for allowed values of these fields):
- Search Base
-
the base within the Exchange Directory from which to search for matching entries using the search criteria specified in the ldapFilter attribute of each entry in the import data file.
- Ignore Object Class
-
whether ExchangeAgent evaluates (checked) or ignores (unchecked) the objectClass attribute of entries for which the modify LDIF changetype operation has been specified.
- Reject Special Characters
-
whether ExchangeAgent evaluates (checked) the ADsPath attribute of entries in the import data file for special characters or not (unchecked).
- Rejected Characters
-
the characters in the import entries' AdsPath attribute for which ExchangeAgent is to search; ExhangeAgent is to reject the entry for import if it contains one of these characters.
- Multi-value Separator
-
the value to be used to separate the individual attribute values of a multi-valued attribute.
For the Notes connected directory, the following fields appear (see the Notes agent chapter in the DirX Identity Connectivity Reference for details and examples for allowed values of these fields):
- (Addr)ess Book
-
the name of the Notes address book from which entries are to be exported.
- Form Name
-
the IBM Notes document type to be extracted from the Notes address book.
- Item Identity Name1,2,3
-
how NotesAgent matches entries in the target Notes address book with entries to be imported into the address book.
- Search Node ID
-
whether (checked) or not (unchecked) NotesAgent uses the Notes identifier to match entries to be updated in the target Notes address book with entries to be imported into the address book.
- View Folder
-
whether (checked) or not (unchecked) NotesAgent uses a Notes view sorted by the Notes attribute specified in the ItemIdentityName1 field to match entries to be updated in the target Notes address book with the entries to be imported into the address book.
- Case Sensitive
-
whether (checked) or not (unchecked) NotesAgent uses case-exact match when using a sorted IBM Notes view to match entries in the target Notes address book with entries to be imported.
- Replace Item
-
whether (checked) or not (unchecked) existing attribute values of Notes entries in the address book are overwritten with imported values.
- Update
-
whether (checked) or not (unchecked) existing Notes entries are modified with imported information or whether a new entry with the imported information is created, even if a matching entry already exists in the address book.
- Delete Entries
-
whether (checked) or not (unchecked) entries that exist in the Notes address book are to be deleted if matching entries exist in the import data file.
- Multi-value Separator
-
the value to be used to separate the individual attribute values of a multi-valued attribute.
- Save Org DB
-
whether (checked) or not (unchecked) NotesAgent backs up the target Notes address book before performing the import operation.
- Save Server Name
-
the name of a Notes server that NotesAgent is to use as a storage target when backing up a Notes address book before an import operation.
- Save DB Name
-
the name of the file to which NotesAgent is to write the contents of a target Notes address book before an import operation.
- Register User
-
how NotesAgent registers imported entries as IBM Notes users. Select one of the following values:
- 0-DO NOT REGISTER
-
do not register imported entries as IBM Notes users (default).
- 1-REGISTER AND CREATE MAIL FILES
-
register imported entries as IBM Notes users and create corresponding mail files immediately. Additional properties should be specified in the Register User tab sheet.
- 2-REGISTER AND CREATE REQUESTS
-
register imported entries as IBM Notes users and create requests for the IBM Administration Process to create corresponding mail files.
- Admin Request DB
-
the name of the IBM Notes Administration Process (adminp) request database to which NotesAgent is to send request documents during DeleteUser changetype processing.
- Admin Request Author
-
the author name of the IBM Notes Administration Process (adminp) request database to which NotesAgent is to send request documents during DeleteUser changetype processing.
- Path File Target Cert ID
-
the pathname to the certificate ID file of a target organizational unit. The file contains the certificate that grants NotesAgent the right to create registered users for the organizational unit.
For the NT connected directory, the following fields appear (see the NT agent chapter in the DirX Identity Connectivity Reference for details and examples for allowed values of these fields):
- Data Type
-
the type of imported data. Supply one of the following values:
- 1-ACCOUNTS
-
account data will be imported.
- 2-LOCAL GROUPS
-
local groups will be imported.
- 3-GLOBAL GROUPS
-
global groups will be imported.
- Insert RAS Info
-
whether the NT account’s DialinPrivilege attribute value is imported.
- Replace All Attributes
-
whether NTAgent modifies only the attributes for an account delivered in the data file (unchecked), or whether it uses the defined default values for all other account attributes (checked).
- Replace All Attribute Values
-
whether NTAgent can modify the attribute values of a multi-valued NT account attribute as a whole (check box marked) or not (check box unmarked).
- Replace All Group Members
-
whether NTAgent adds new members to a global or local group entry (unchecked) or replaces all members in a global or local group entry (checked).
- Initial Password Only
-
whether (checked) the password is only set during an add operation or whether modification is also possible (unchecked).
- Delete Entries
-
whether (checked) or not (unchecked) account or group entries that exist in a WindowsNT system are to be deleted if matching entries exist in the import data file.
- Delete Group Members
-
whether (checked) or not (unchecked) NTAgent deletes members from a group entry in the NT system.
- Multi-Value Separator
-
the value to be used to separate the individual attribute values of a multi-valued attribute.
- Date Format
-
the format of date values.
- Date Separator
-
the separator character of date items.
For the ODBC connected directory, the following fields appear (see the ODBC agent chapter in the DirX Identity Connectivity Reference for details and examples for allowed values of these fields):
- Table
-
the ODBC name of the table (or joined set of tables) into which entries are to be imported.
- Select By
-
one or more naming attributes that the agent is to use as selection criteria during the import procedure.
- Modify Anyway
-
whether the agent performs a comparison operation before modifying an ODBC entry.
- Change Type
-
the alphanumeric string used in the import data file to indicate the "changetype" for ODBC entries.
- Create If Absent
-
whether or not ODBCAgentImp creates a new ODBC entry ("row" in ODBC terminology) in the ODBC database if it does not find a matching entry using the naming attributes supplied in SelectBy.
- Insert Only
-
whether or not existing entries in the ODBC database are updated with attribute values from the import data file.
- Modify
-
the entry attributes in the ODBC database that the agent is to modify. Use ',' to separate multiple values.
- Relationships
-
references from one table to another for which referential integrity enforcement can be handled by nullifying the reference.Use the Relationships field to permit entries ("rows" in ODBC terminology) to be deleted when entries in other tables affected by referential integrity point to them, or when it is unacceptable for the reference to a deleted entry to continue to exist.
- Always Follow References
-
whether the agent follows the references defined in the Relationship field if referential integrity enforcement has not been configured in the database for the specific relationships specified.
For a detailed description of these items see the "Import Configuration File Format" sections in each DirX Identity agent chapter in the DirX Identity Connectivity Reference.
Related Topics
Input/Output Channels
The input/output channels define the properties of the data download from the source (input) and the upload to the target directory (output).While the connected directory and the job objects hold static information, the channels contain dynamic information for the synchronization procedure.
Use this tab to assign input and output channels to a job.
- Input Channel
-
the job’s input channels and their related attributes.To display the properties of a selected channel, click the Properties button on the right.Use the buttons to the right of the table to add and remove new channels.
- Output Channel
-
the job’s output channels and their related attributes.To display the properties of a selected channel, click the Properties button on the right.Use the buttons to the right of the table to add and remove new channels.
Unless the job’s agent is metacp, the tab also shows these properties:
- Report file
-
the report file produced by the job, along with its related attributes.To display the properties of the report file, click the Properties button to the right.
- Ini file
-
the configuration (*.ini) file used by the job along with its related attributes.To display the properties of this configuration file, click the Properties button on the right.
Related Topics
Import to Identity Store Properties
The import tab depends on the script technology in use.
Standard Scripts
Use this tab to define the parameters required to specify import and join options:
- Base Object
-
the node at which the search operation that checks the attribute values of target entries starts.
- Subset
-
the scope of the search operation.Supply one of the following values:
- BASE OBJECT
-
check if the base object matches the search criteria, but nothing else.
- ONE LEVEL
-
search for results in the given base object node and one level deeper.
- SUBTREE
-
find results in the entire subtree below the given base object.
- Object Class Collection
-
the set of object classes to use to create new objects. These sets are defined in the Operational Attributes tab of the connected directory (attribute Object Classes).
- Import Mode
-
whether the script runs in merge or replace mode. In merge mode, the entries from the source are simply merged into the target (new entries are added, already existing ones are modified and if an operation code is contained in the source entries, these entries are deleted). In replace mode, all entries that are not contained in the source but are contained in the target will be deleted. This is done in a separate loop after the main loop. Thus replace mode makes only sense with a full result from the source!
For details about the algorithm of the script, see the section "Tcl-based Connectivity Standard Script" in the DirX Identity Application Development Guide. Select one of the following values: - MERGE
-
adds and modifies records in the target connected directory. Only performs deletions if an operation code is contained in the source. Can work in full and delta mode. The join filter is used for the join operation.*
REPLACE* - adds, modifies and deletes entries in the target connected directory. Requires a full result from the source (delta operation not allowed!). The Replace Filter and the Sorting parameters are used in this case. - Change Notification:
-
If the following fields are filled, the meta controller creates notification messages about the performed changes. Set up Java-based workflows that interpret and process these messages. The generated message contains all change information and a topic with the following fields (for more information, see the topic "Understanding Notifications"):
- Object Type
-
the changed object type
- Server Address
-
the server’s physical address
- Identity Domain
-
the domain to use
- Join Expression
-
the logical attribute conditions used for the identification of entries to be joined in this table. See the "Join Expressions and Filtering" section for details.
Note: only used if Import Mode is set to Merge (see also the information below). - Replace Filter (Delete Filter)
-
the filter that searches for all entries provided from this master in the target directory. The list is compared with the current list of entries to be imported into the target directory. If Delete Entries is set, no longer available entries will be deleted (thus the new list of entries replaces the previous one).
You can specify a pure LDAP search filter like \{sn=a*} here, which selects all entries with an sn attribute that begins with the letter a, or \{dxmMasterName=MyMasterName, which selects all entries for which this master is responsible.
An expression like \{dxmOprMaster=<?$src_master_name/>} uses a shortcut reference previously defined in the control script of the workflow. This generic expression retrieves the dxmMasterName property from the source directory and searches for all entries with dxmOprMaster set to this value.
Note: As described, this field can contain references. See the chapter "Customizing Object References" in the DirX Identity Customization Guide for more information.Only used if Import Mode is set to Replace. - Sorted list
-
whether (checked) or not (unchecked) the resulting entry list should be sorted. This function is only used if Import Mode is set to Replace (to sort the list retrieved by the Replace Filter).
- Sort/Join key
-
the attribute used for sorting and comparison criteria (join criteria). Specify a unique field.
- Sort/Join order
-
whether the results are sorted in ASCENDING or DESCENDING order.
- Read DN only
-
whether (True) or not (False) to enable optimization for lower memory consumption. Note: This switch was previously named Perform Read.
- FALSE
-
searches complete entries with all attributes during the first search. No additional search operations are necessary later on. This requires a lot of memory but results in maximum speed.
- TRUE
-
searches only DNs during the first search and later on all other attributes for each entry by an additional search operation. This lowers memory consumption enormously but decreases performance by more than 50 %.
- Paged Read
-
whether (checked) or not (unchecked) the script works in paged mode, if the mode is supported by the LDAP server.
- Page Size
-
the size of the pages. Default is 1000 bytes.
Join Expressions and Filtering
The Join Expression field is only used when Import Mode is set to Merge. This control allows you to set simple combinations of filters with a table-like structure (simple mode). Alternatively, you can set a collection of expert filters (expert mode). Use the right-most upper button to switch between the two modes.
In simple mode, the control allows you to define join conditions in the following way (a cell grid is shown):
-
You can enter attributes into each cell of the table.
-
Each line defines a separate join expression where the attributes are combined by an and condition (for example: Surname & GivenName & TelephoneNumber).
-
The expressions (lines) are evaluated from top to bottom. Each expression is used as a filter condition for a search in the directory.
-
When no hit or more than one hit occurs, then the next expression (line) is used.
-
Exactly one hit stops the evaluation. The found entry is used to join the information to be imported into it.
-
When all lines have been evaluated and no single entry can be identified, the DN is used. If this search also fails, a new entry must be created in the directory (only if Exact Action = FALSE).
In expert mode, the control allows you to define join conditions in the following way (several rows with only one cell are shown):
-
You can enter an expert filter condition into each row of the table. Set the filter expression like
{(employeeNumber=[lindex $rh_ldap(dxmNTuserName) 0])}
which means that the first item of the mapped rh_ldap(dxmNTuserName) field is compared with the employeeNumber field in the LDAP directory. Of course you can define more complex join criteria. -
Each line defines a separate join expression.
-
The expressions (lines) are evaluated from top to bottom. Each expression is used as a filter condition for a search in the directory.
-
When no hit or more than one hit occurs, the next expression (line) is used.
-
Exactly one hit stops the evaluation. The found entry is used to join the information to be imported into it.
-
When all lines have been evaluated and no single entry can be identified, the DN is used. If this search also fails, a new entry must be created in the directory (only if Exact Action = FALSE).
-
Note: These fields can contain references. See the chapter "Customizing Object References" in the DirX Identity Customization Guide for more information.
Related Topics
Previously Used Scripts
Previous scripts used two different tabs for join and import properties.
Join and import properties are needed to set up the specific options for importing data into the Identity store. The join parameters describe how to identify a target entry by the given source entry data. Other import parameters specify search operations for the relevant target entries to be updated. Another subset of parameters describes the restrictions during data import.
Use this tab to define all parameters needed to specify import options.
The subsequent items define import parameters:
- Use DN
-
whether (checked) or not (unchecked) the distinguished name is used for joining a source and a target entry.
- Superior info
-
information that permits the necessary superior nodes for an entry to be constructed if they do not exist when the entry is added to the Identity Store.
- Base Object
-
the node at which the search operation that checks the attribute values of target entries starts.
- Subset
-
the scope of the search operation. Supply one of the following values:
- BASE OBJECT
-
check if the base object matches the search criteria but nothing else.
- ONE LEVEL
-
search for results in the given base object node and one level deeper.
- SUBTREE
-
Find results in the entire subtree below the given base object.
- Filter
-
the matching criteria. This can be any logical expression in LDAP notation. Use "&" for "AND", "|" for "OR", and "!" for "NOT", as well as "=" for equality check, "~=" for phonetic equality check, and "⇐" for less, ">=" for greater.
- Filter check
-
the expression used in the Tcl program to check the validity of the given filter.
- Sorted list
-
whether (checked) or not (unchecked) the resulting entry list should be sorted.
- Sort key
-
the attribute that is used for sorting.
- Sort order
-
whether the results are sorted in ASCENDING or DESCENDING order.
- Remove objects
-
whether (checked) or not (unchecked) entries which are no longer valid can be deleted immediately.
- Marking attribute
-
the attribute name used to indicate that an entry can be deleted. It allows another connected directory to check the data before the entry is really deleted.
- Marking value
-
the value for the Marking attribute.
- Keep objects
-
the list of distinguished names of entries which must not be deleted in any case.
- Allow rename
-
whether (checked) or not (unchecked) the distinguished name of the object can be modified.
- Create new entries
-
whether (checked) or not (unchecked) creation of new entries is allowed.
- Perform read
-
whether (checked) or not (unchecked) the system will read all attributes during a search operation.It may however be sufficient just to read the distinguished name for the first, and later query for further attributes, if necessary.
- Process all attributes
-
whether (checked) or not (unchecked) all attributes of the attribute configuration should be processed, not just the selected ones (not yet implemented).
Related Topics
Join to Identity Store Properties
Join and import properties are needed to set up the specific options for importing data into the Identity store.The join parameters describe how to identify a target entry by the given source entry data.Other import parameters specify search operations for the relevant target entries to be updated.Another subset of parameters describes the restrictions during data import.
Use this tab to define all parameters needed for performing a join operation.
The following items are necessary for join operations:
- Join Expression
-
the logical attribute conditions used for the identification of entries to be joined in this table.See the following sections for details.
- Join object class
-
the connected-directory specific object class used to identify an attribute set of a particular connected directory.During the join operation, this object class can be assigned to the target entry, which enables the synchronization of the attributes associated with this class.
- Matching attribute
-
the attribute to be used as an identifier for the master directory of the current (sub-)set of attribute values assigned to the target entry. The provider of the value (sub-)set can store its name into this attribute. Other connected directories providing the same data types can check to see if their name is stored in this attribute, and then write their attribute values to the Identity store only in this case.
- Matching value
-
the value of Matching attribute.
The join table Join Expression in the Join Properties tab allows you to define join conditions in the following way:
-
You can enter attributes into each cell of the table.
-
Each line defines a separate join expression where the attributes are combined by an and condition (for example: Surname & GivenName & TelephoneNumber).
-
The expressions (lines) are evaluated from top to bottom. Each expression is used as a filter condition for a search in the directory.
-
When no hit or more than one hit occurs, the next expression (line) is used.
-
Exactly one hit stops the evaluation. The found entry is used to join the information to be imported into it.
-
When all lines have been evaluated, the DN is used. If this search fails also, a new entry must be created in the directory.
| When the schema has not been read from the LDAP directory, two questions marks are appended to the value of the object type field. You simply must synchronize the schema to solve this problem. |
Related Topics
Other Properties of a Channel
Use this tab to display additional properties of a channel configuration object. These properties are mainly file-related and correspond to the file assigned to the connected directory to which the channel is connected.
- Selected File
-
the file item object that describes the data file to be accessed for bulk data read or write operations. Use the Properties button to view the properties of the file item or the Delete button to delete the value or the Browse button to change the value.
- File Mode
-
the mode in which the file is opened. Select one of the following values:
- READ
-
the file will be opened for read access (this means that the channel is an input channel).
- WRITE
-
the file will be opened for write access (this means that the channel is an output channel).
- APPEND
-
same as WRITE, but the previous content of the file is kept and the new data are just appended to the end of the file.
- Sorted List
-
whether (checked) or not (unchecked) the result of this channel is to be sorted.
For output channels: the system produces a bulk data file with a sorted list of entry items.
For input channels: the entries are read into an internal sorted list. Use the Sort/Join Key and Sort/Join Order fields to specify the details. - Sort/Join Key
-
the attribute used for sorting.
- Sort/Join Order
-
the sequence to sort (ascending or descending order).
- To Upper
-
whether (checked) or not (unchecked) to convert all input and output field values to uppercase.
- Target Entry Exists
-
the attribute name that is used to determine whether an entry in the target system already exists. This field is only necessary for two-step workflows, where the meta controller cannot check directly whether an entry exists in the target system. See the "Calculate Action" section in the DirX Identity Application Development Guide for details.
Example:Your target system is a mail system. Your workflows create entries (mail boxes) in the target system and then transfer the generated mail address back to the directory and populate the mail attribute there. In this case, a populated mail attribute (an existing mail attribute) indicates that the entry already exists at the target system side. The scripts can use this value to determine whether an entry must be created or only modified.
Related Topics
Register User
The Register User properties are additional properties for the import of user entries in an IBM Notes administration database.
Use this tab to specify these properties. The following items appear:
- Item Mailbox Name
-
the attribute to use as the mailbox name.
- Item User ID
-
the attribute to use as the User ID.
- Path File Cert ID
-
the path to the certificate ID file cert.id, which is a binary file that is supplied with the IBM Notes Server installation software. This file contains the certificate that grants NotesAgent the right to create registered users.
- Path User ID
-
the directory in which NotesAgent is to store IBM Notes user IDs created during the user registration process.
- Registration Server
-
the name of the Notes registration server that is to register the users in the Notes server address book.
- Mail Server
-
the name of a Notes server on which NotesAgent is to create user mailboxes during the user registration process.
- Min(imal) Password Length
-
the minimum number of characters that a user password must have.
- Create Address Book Entry
-
whether or not NotesAgent creates Notes entries in the target Notes address book for IBM Notes users that it registers during the import process.
- Create Mail Database
-
whether or not NotesAgent creates user mailboxes for IBM Notes users that it registers during the import process.
- Create ID File
-
whether or not NotesAgent creates a user ID file for IBM Notes users that it registers during the import process.
- Save ID in Address Book
-
whether or not NotesAgent saves the user ID files it creates as attachments of the Notes entries for the registered users.
- Save ID in File
-
whether or not NotesAgent saves the user ID files it creates in individual files.
- Create North American ID
-
whether or not NotesAgent creates United States security encrypted User ID files.
- Client Type
-
the type of IBM Notes client that NotesAgent is to associate with the registered users it creates during the import process.
For a detailed description of the items, see the DirX Identity Connectivity Reference.
Related Topic
Import Properties
Selected Attributes
This tab displays the Selected Attributes Editor, which you use to define the set of attributes to be synchronized between the source and target connected directories.The Selected Attributes Editor is accessible through the workflow configuration wizard in the Global View and through the channel configuration object in the Expert View.
The Selected Attributes Editor consists of two tables:
- Attribute configuration
-
the attributes in the attribute configuration that represents the schema
- Selected attributes
-
the attributes to be synchronized and their respective synchronization flags
Use the arrow buttons to move attributes between the attribute configuration list and the selected attributes list.To move an attribute, select it in the list and then click the appropriate button.To add synchronization flags to a selected attribute, click in the row the Flags column and then click the ellipsis (…) button to open the Synchronization Flags dialog.Check or uncheck a synchronization flag to enable or disable it.For a description of the possible synchronization flags, see the section "Using the Selected Attribute Editor" in the chapter "Using the DirX Identity Manager" in the DirX Identity User Interfaces Guide.
| Only selected attributes can be used for a mapping operation. If you remove an attribute in the Selected Attribute Editor, it is marked red in the Mapping Editor to indicate that it is no longer available. |
|
Notes for specific workflows:
|
Superior Info
DirX Identity sometimes needs to create new entries where the higher-level nodes in the target directory do not exist.The Superior Info Editor allow you to specify all of the required information for creating these objects in a Superior Info definition.DirX Identity will then create the higher-level nodes before it adds the entry.
The Superior Info Editor provides three table columns: Naming attribute, Mandatory attribute and Default value.To add a table row, click the button on the right and then enter the information.To delete a row, click .For more information on a Superior Info definition and how to use the editor, see the section "Using the Superior Info Editor" in the chapter "Using DirX Identity" in the DirX Identity User Interfaces Guide.
Tcl-based Workflow
A Tcl-based workflow consists of one or more activities that carry out a data synchronization operation between two connected directories.A workflow configuration object describes the configuration information for a particular workflow.Use the workflow configuration object to define synchronization workflows.
DirX Identity currently supports any number of sequential or parallel activities.Activities can represent jobs or workflows.Linking an activity to a workflow allows you to build nested workflow structures.Activity structures within one workflow can be either pure sequential or in the form of a tree structure (an activity can have 1 to n successors but only one predecessor).A combination of nested workflows and parallel activities allows you to build almost any required workflow structure:
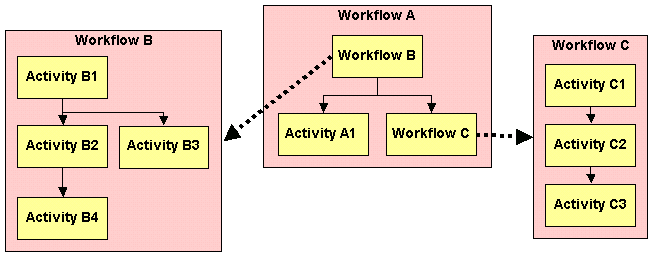
When workflow A starts, it starts as first activity workflow B. After running activity B1, activities B2 and B3 are started in parallel.When activity B2 ends, activity B4 is started.Workflow B ends when activities B3 and B4 are completed.Now activity A1 and workflow C are started.Workflow C runs three activities (C1 to C3) in sequence.When activity A1 and workflow C are both completed, workflow A is finished.
| when nested workflows or parallel activities are not configured correctly, no status entry is written. The errors are written to the log files or the event log (on Windows). |
| you can use a specific job instance only once in a workflow definition. It is not allowed to use the same job from two different activities. |
In DirX Identity, data is always transferred through connected directories. For example, if you want to establish a workflow that contains two activities-one for export from the source connected directory and one for import to the target connected directory-and these activities exchange data through a file, you must set up a connected directory that represents the file.
As you can see from the previous example, connected directories can reside at the end points of a workflow or between the workflow’s activities. Connected directories that reside between activities are "intermediate" connected directories and are usually file-based. An intermediate connected directory contains the name of a file generated by a particular synchronization activity.
A workflow has a control flow (the sequence of activities) and a data flow (the connection of data inputs with data outputs) and these two flows can be different. For example, if a workflow has three activities that run in sequence, the last one could use data from the first one, which is not visible from the control flow.
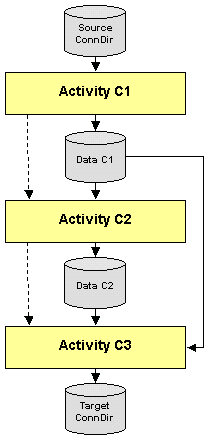
Activity C3 uses data from activity C2 and activity C1, which is not visible from the control flow (dotted lines).
You can start configured workflows in different ways. See the section "Starting Tcl-based Workflows" for details. The workflow engine (WFE) component of the C++-based Server runs workflows and the activities it contains.
Use this tab to assign properties to a workflow. The items shown in this tab are:
- Name
-
the name of the workflow.
- Description
-
the description of the workflow.
- Version
-
the version number of the workflow.
- C++-based Server
-
the C++-based Server associated with the workflow. To display its properties, click the Properties button on the right.
- Status Life Time
-
the maximum time that status entries and related files will be retained after a run of the workflow. This field allows you to redefine the default value set in the Configuration object to a specific value for this workflow. An empty field means that the default value of the Configuration object is used.
- Status Compression Mode
-
the detail level and number of status messages generated. This switch can help to reduce the load on the status tracker or simply to avoid uninteresting status entries. The following levels are available:
- (None)
-
the default behavior of this feature is inherited from the central configuration object.
- 0 - Detailed
-
detailed messages are sent during the workflow lifetime (compatibility mode, default)
- 1 - Compressed
-
status messages are collected during the workflow run as far as possible and sent at the very end of a workflow. This reduces the number of status messages by 50 % or more.
- 2 - Minimized if OK
-
only a workflow status entry is generated at the very end of a workflow if the workflow ended with status OK. No activity status entries are generated and no data is copied to the status area.
- 3 - Suppressed if OK
-
no status information is created at all and no data is copied to the status area if the workflow ended with status OK.
- Server Event Support
-
whether (checked) or not (unchecked) the workflow contains an activity that can react to server events; for example, to "keep alive" requests or shutdown requests. As an example, the supervisor uses these messages to control the event manager workflow.
- Wizard
-
the link to the wizard associated with the workflow, or an empty field if no wizard exists for the workflow.
We recommend that the name of the wizard shall contain the types of directories at the endpoints of the workflow (for example, LDAP and FILE). You can include other information between these endpoint values (for example, LDAP-3step-FILE) to identify a more specific wizard. - Source Directory
-
the link to the source connected directory to indicate the start of the workflow. This field allows for evaluating the direction arrow if both connected directories at the endpoints are of the same type (for example, the value of Endpoints is LDAP-LDAP).
- Endpoints
-
the directory type endpoint (for example, LDAP and FILE). This information allows DirX Identity to determine which workflows fit between the source and target connected directories that are connected with a workflow line. Calculation is performed automatically whenever the workflow object is changed, but you can enforce it at any time by clicking the Refresh button on the right if it is not correct (for example, if you changed the channel of a job to point to another type of connected directory).
- Bidirectional
-
whether (checked) or not (unchecked) both arrows on a workflow line in the Global View are set when this workflow is part of a workflow line.
Related Topics
Workflow - Operation
Use this tab to set the checkpointing parameters.The items shown in this tab are:
- Enabled
-
the workflow works in checkpoint mode.One or more jobs must also be enabled for checkpointing.
- Retry Limit (default is 3)
-
the maximum number of retries.If the limit is reached, the workflow runs again in complete full or delta mode (as defined).
Workflow parameters that display the checkpoint status are:
- Retry Count
-
the number of retries already performed.
- Restart Activity
-
one or more activities that are started in parallel during a retry operation. This field is read-only.
Related Topics
Workflow - General Properties
Use this selection in the workflow wizard to supply the workflow data that is common to all workflow objects.
- Name
-
the name of the workflow.
- Description
-
a description for the workflow.
- Version
-
the version number of the workflow.
If you have copied the workflow from a default application, you can enter new values into these fields.
Related Topics
Workflows
A folder for the workflow configuration objects in the configuration database.
- Name
-
the name of the folder.
- Description
-
descriptive text for this object.
Within a property page, the content of this folder is shown as a pop-up list of a combo box:
- Workflow
-
the workflow object currently used by the object whose properties are displayed.Use the arrow button to display the list of all available workflow objects in the workflow folder.Use the Properties button to display the properties of the currently selected workflow object.
Related Topic