Multiple Tenants / Single Provisioning Domain
The preceding use cases described in this document demonstrate how to model DirX Identity’s multi-tenant capability using separate one-domain/one-machine configurations for each tenant or separate Provisioning domains for each tenant.
This use case demonstrates how to model multi-tenancy within a single Provisioning domain, a requirement that has emerged with cloud computing.
About this Use Case
This use case is an extension to the My-Company sample domain provided with DirX Identity. It demonstrates how to host multiple tenants within a single Provisioning domain, which is the My-Company domain for this use case. In the use case, each tenant in the My-Company domain is modeled as a separate company – CompanyA, CompanyB, and Company C.
Each company has the following characteristics:
-
Each company is managed by an administrator called a “company admin”.
-
Each company admin has access to the DirX Identity Web Center for user and privilege management.
-
Each company admin can create, read, modify and delete users of his company. Users of other companies are not visible to him.
-
Each company admin grants privileges of his company to users of his company. Privileges of other companies are not visible to him.
-
Each company admin can maintain the privilege structure (role, permissions, and groups) of his company. Privileges of other companies are not visible to him.
-
Each company admin can manage groups of shared target systems. The shared target systems can be accessed by multiple company admins.
-
Each company admin can maintain the business object structure (company, departments, countries, and locations) of his company. Business objects of other companies are not visible to him.
The use case achieves multi-tenancy in a single Provisioning domain by using special structures for users and privileges, special creation workflows and special access policies. The extension requires the DirX Identity Professional Suite license and installation because it requires the creation workflows that are part of this package.
The next sections describe these objects and how they are structured and configured. This description represents the configuration steps to be performed for each tenant in a multi-tenant Provisioning domain.
Access Policies
The use case is designed to use a small number of generic access policies whenever possible. For this purpose, the group CompanyAdmins is created in the DirXmetaRole target system. All users who are members of this group are allowed to manage users of their company.
The access policies provided with the use case are located under the following subtrees:
-
cn=Generic,cn=Company Specific,cn=AccessPolicies,cn=Policies - holds generic access policies that apply to all companies.
-
cn=*company,cn=Company Specific,cn=AccessPolicies,cn=Policies* – holds each company’s access policies.
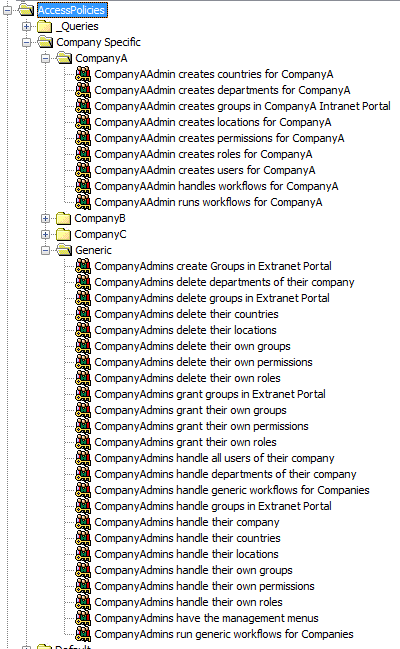
The following figure shows the company-specific policies for CompanyA and the generic policies that are common to all three companies:
Menu Policies
All company admins need access to the Web Center menus for user and privilege management, which is enabled by the generic menu policy CompanyAdmins have the management menus. The result of this access policy is that all company admins can use the Users, Roles, Permissions, Groups, Companies, Departments, Countries and Localities menus in Web Center.
Create Policies
The create policy holds the path where the object is to be created. Thus, each company and each object type needs its own company-specific create policy configured. The figure shows the create policies that exist for CompanyA.
Read and Modify Policies
The use case models read and modify policies in a generic way using the following rules:
-
$(subject.o)="$(resource.o)" – for users
-
$(subject.dn)="$(resource.owner)" - for privileges and business objects
Note that you need to disable some domain-wide read and modify policies to avoid access to information between different companies inside the single Provisioning domain. For instructions, see the "Setup and Configuraton" section of this use case.
User Management
Each company has its own subtree o=*company,cn=Users,cn=$(domain), where company is a placeholder for the company’s name (for example, CompanyA) and *$(domain) stands for the Provisioning domain name (My-Company in this use case).
For each company, a company admin is created: cn=companyAdmin,o=company,cn=Users,cn=$(domain)
The following figure shows the users provided with the use case:

Each company sample consists of a company admin (for example, CompanyAAdmin), and a handful of test users.
User Creation
The new users must be created under separate subtrees:
o=company,cn=Users,cn=$(domain)
Each company admin needs a company-specific access policy:
CompanyAdmin creates users for company
This access policy must be configured to hold the path for user creation o=company,cn=Users,cn=$(domain).
Request workflows (under the Professional License) carry out user creation.
Each company needs its own user creation workflow configured because the new user’s parent folder must be configured in the workflow’s enter attributes activity (User Base), which is different for different companies.
Two company-specific access policies are required to make sure that the correct creation workflow is started for the company admin:
-
CompanyAdmin handles workflows for Company
-
CompanyAdmin runs workflows for Company
Both of these policies reference the folder that holds the company-specific workflows:
cn=Company,cn=Company Specific,cn=Definitions,cn=wfRoot,cn=$(domain)
Note that the user creation workflow has an activity AddCompany. In this activity, the dxrOrganizationLink is set, and points to the company object that is related to the new user’s company. This configuration ensures that the new user’s organization attribute o is correctly populated when the user is saved so that the generic access policies for read/modify will operate correctly.
Read and Modify Users
Reading and modifying users is controlled by the generic access policy CompanyAdmins handle all users of their company.
The policy grants the read and modify right for a company admin for all users of his company. Using the rule $(subject.o)="$(resource.o)", which means that the subject (the company admin) and the resource (the considered user) must be in the same organization.
Assign Privileges to Users
In this sample use case, the following generic access policies configure the assignment of roles and/or groups to a user:
-
CompanyAdmins grant their own roles
-
CompanyAdmins grant their own groups
The policies grant the assign right for a company admin for all privileges he owns using the rule $(subject.dn)="$(resource.owner)", which means that the subject’s (the company admin’s) dn and the resource’s (the considered privilege’s) owner must match. To make sure that this rule applies to all privileges the company admin creates, he is assigned as owner to the new privileges in an AddOwner activity of the creation workflow.
Role Management
The company’s roles are located under the following subtrees:
-
cn=*company,cn=Company Specific,cn=RoleCatalogue,cn=$(domain)*
-
cn=Generic,cn=Company Specific,cn=RoleCatalogue,cn=$(domain)
The generic folder contains the role CompanyAdmin, which gives the right to administer the company to which the user belongs. This role must be assigned to the company admin during the company’s initial setup.
Since no grant policy for this role is configured, a company admin cannot grant the administration right to another user of his company.
The company-specific role CompanyIntranet is part of the sample. It gives a user of the company access to the company’s intranet portal.
Role Creation
Each company‘s new roles must be created under separate subtrees:
cn=company,cn=Company Specific,cn=RoleCatalogue,cn=$(domain)
The company admin needs a company-specific access policy:
CompanyAdmin creates roles for company
The path for role creation (cn=*company,cn=Company Specific,cn=RoleCatalogue,cn=$(domain)*) is configured in this access policy.
Request workflows (under professional license) carry out role creation. Each company must have its own role creation workflow configured, because the new role’s parent folder must be configured in the workflow’s enter attributes activity (User Base) and is different for different companies.
To make sure that the correct creation workflow is started for the company admin, the following company-specific access policies are required:
-
CompanyAdmin handles workflows for Company
-
CompanyAdmin runs workflows for Company
Both policies reference the folder that holds the company-specific workflows:
cn=Company,cn=Company Specific,cn=Definitions,cn=wfRoot,cn=$(domain)
Note that the role creation workflow has an activity AddOwner. In this activity, the company admin that starts the workflow is set as the role, which ensures that the generic access policies for read/modify will operate correctly.
Read and Modify Roles
Reading and modifying roles is controlled by the generic access policy CompanyAdmins handle their own roles.
The policy grants the read and modify right for a company admin for all roles he owns with the rule $(subject.dn)="$(resource.owner)" , which means that the subject (the company admin) must be the owner of the resource (the considered role).
Delete Roles
Deleting roles is controlled by the generic access policy CompanyAdmins delete their own roles.
The policy grants the delete right for a company admin for all roles he owns with the rule $(subject.dn)="$(resource.owner)", which means that the subject (the company admin) must be the owner of the resource (the considered role) he wants to delete.
Assign Junior Roles and Permissions
The company admin can assign junior roles and permissions to a role.
First, he needs to read the role he wants to process. This access is controlled by the policy:
CompanyAdmins handle their own roles
Next, he needs to assign a role or a permission to the selected role. This access is controlled by the policies :
-
CompanyAdmins grant their own roles
-
CompanyAdmins grant their own permissions
These policies ensure that the company admin can only assign roles and permissions of his company. He cannot view or assign privileges that belong to another company.
Permission Management
Each company’s permissions are located under the following subtrees:
-
cn=*company,cn=Company Specific,cn=Permissions,cn=$(domain)*
-
cn=Generic,cn=Company Specific,cn=Permissions,cn=$(domain)
The generic folder contains the permission CompanyAdmin, which gives the right to administer the company to which the user belongs. This permission is assigned to the role with the same name.
Since no grant policy for this role is configured, a company admin cannot grant the administration right to another user of his company.
The company-specific permission CompanyIntranet is part of the sample. It is assigned to the role with the same name.
Permission Creation
Permission creation is governed by the same mechanisms as role creation, as described in “Role Management/Role Creation”.
Read and Modify Permissions
Permission handling is governed by the same mechanisms as role handling, which is described in “Role Management/Read and Modify Roles”.
Delete Permissions
Permission deletion is governed by the same mechanisms as role deletion, which is described in “Role Management/Delete Roles”.
Assign Groups
The company admin can assign groups to a permission.
First, he needs to read the permission he wants to process, which is controlled by the policy:
CompanyAdmins handle their own permissions.
Next, he needs to assign the group to the selected permission, which is controlled by the policy:
CompanyAdmins grant their own groups.
In the sample, this policy grants all groups of the target system company Intranet Portal.
This use case requires a shared target system, which means that all company admins can create, handle and grant groups of this target system. In the sample, the My-Company sample‘s Extranet Portal target system is configured as a shared target system.
This setup requires the generic access policies:
-
CompanyAdmins create groups in Extranet Portal
-
CompanyAdmins handle groups in Extranet Portal
-
CompanyAdmins grant groups in Extranet Portal
Group Management
The company’s groups are located in the target system:
company Intranet Portal.
In addition, each company admin has access to the groups of the shared Extranet Portal target system.
Group Creation
Group creation is governed by the same mechanisms as role creation, which is described in the section “Role Management/Role Creation”.
In addition to creating groups in the company-specific target system company Intranet Portal, it is requested to create groups in the shared target system Extranet Portal, too.
Consequently, the generic workflow Create Group in Extranet Portal has been configured.
The following execute policies are required to enable the company admin to start the workflows:
-
CompanyAdmins handle generic workflows for companies
-
CompanyAdmins run generic workflows for companies.
Read and Modify Groups
Handling of groups is governed by the same mechanisms as role handling, as described in “Role Management/Read and Modify Roles”.
In addition to handling groups in the company-specific target system company Intranet Portal, it is requested to handle groups in the shared target system Extranet Portal, too.
The generic policy:
CompanyAdmins handle groups in Extranet Portal
grants all company admins the read and modify right for the groups.
Companies
The companies are located under the subtree:
cn=Companies,cn=BusinessObjects,cn=$(domain)
Read and Modify Companies
A company admin can read and modify his company, but he cannot create a new company. Thus, one generic access policy is sufficient, which is:
CompanyAdmins handle their company
The policy uses the rule $(subject.o)="$(resource.o)", which also applies to handling users.
Assign Privileges
A company admin can assign privileges to his company. This access is governed by the access policies:
-
CompanyAdmins grant their own roles
-
CompanyAdmins grant their own permissions
-
CompanyAdmins grant their own groups
-
CompanyAdmins grant groups in Extranet Portal
Note that all privileges assigned to a company are propagated to all users of the company by the business object inheritance mechanism.
Departments
The departments are located under the subtree:
O=*company,cn=Companies,cn=BusinessObjects,cn=$(domain)*
Department Creation
Department creation is governed by the same mechanisms as role creation, which is described in “Role Management/Role Creation”.
Read and Modify Departments
Department handling is governed by the same mechanisms as role handling, which is described in “Role Management/Read and Modify Roles”.
Assign Privileges
A company admin can assign privileges to a department. This access is governed by the access policies:
-
CompanyAdmins grant their own roles
-
CompanyAdmins grant their own permissions
-
CompanyAdmins grant their own groups
-
CompanyAdmins grant groups in Extranet Portal
Note that all privileges assigned to a department are propagated to all users of the department by the business object inheritance mechanism.
Countries
The countries are located under the subtree:
cn=*company,cn=Countries,cn=BusinessObjects,cn=$(domain)*
In this structure, each company has its own country objects to group the locations of the company.
Locations
The locations are located under the subtree:
c=country,cn=company,cn=Countries,cn=BusinessObjects,cn=$(domain)
Request Workflows
This use case extension to the My-Company sample domain requires the DirX Identity Professional Suite, because it requires the request workflows that are part of this license package in order to create users, roles, permissions and groups.
Locating Request Workflows
The request workflow definitions for a company are located under the subtree:
cn=company,cn=Company Specific,cn=Definitions,cn=wfRoot
The following figure shows the company-specific workflows of CompanyA and the generic group creation workflow:

User Creation Workflows
The user creation workflows are derived from the sample workflow Create User Without Approval. This workflow has been modified to:
-
Create the users in the correct company subfolder.
-
Automatically add the dxrOrganizationLink, which points to the user’s company object, to the new user.
The first task is achieved by changing the User Base parameter of the Enter Attributes activity to the value o=*company,cn=Users,cn=$(domain)*.
The second task is achieved by adding a calculate activity Add company to the workflow. In this activity, the value:
o=company,cn=Companies,cn=BusinessObjects,cn=$(domain)
is assigned to the user’s dxrOrganizationLink attribute.
Role Creation Workflows
The role creation workflows are derived from the sample workflow Create Role. This workflow has been modified to
-
Create the roles in the correct company subfolder.
-
Automatically add the owner to the new role.
The first task is achieved by changing the User Base parameter of the Enter General Attributes activity to the value:
o=company,cn=Company Specific,cn=RoleCatalogue,cn=$(domain).
The second task is achieved by adding a calculate activity Add Owner to the workflow. In this activity, the value:
${initiator}
is assigned to the role’s owner attribute. Since the workflow is started (initiated) by the company admin, he will be the owner of the newly created role.
The role creation workflow has an approval step, where a person outside the company must approve role creation. This step demonstrates that an administrator of the entire system can control object creation.
You can remove the approval step or change the participants according to your needs.
Permission Creation Workflows
The permission creation workflows are derived from the role creation workflows and simplified by removing the approval step. The workflows have been modified to:
-
Create the permissions in the correct company subfolder.
-
Automatically add the owner to the new permission.
The modifications are the same as those described in the "Role Creation Workflows" section.
Group Creation Workflows
The group create workflows are derived from the permission creation workflows. The workflows have been modified to:
-
Create the groups in the correct target system.
-
Automatically add the owner to the new group.
The modifications are the same as those described in the "Role Creation Workflows" section.
Two types of group creation workflows exist:
-
The company-specific workflows Create Group in Intranet Portal for creating a group in the target system company Intranet Portal.
-
The generic workflow Create Group in Extranet Portal for creating groups in the shared target system Extranet Portal.
Department Creation Workflows
The department create workflows are derived from the permission creation workflows. The workflows have been modified to:
-
Create the department in the correct company subfolder.
-
Automatically add the owner to the new department.
The modifications are the same as those described in the "Role Creation Workflows" section.
Country Creation Workflows
The country creation workflows are derived from the permission creation workflows. The workflows have been modified to:
-
Create the country in the correct company subfolder
-
Automatically add the owner to the new country.
The modifications are the same as those described in the "Role Creation Workflows" section.
Location Creation Workflows
The location creation workflows are derived from the permission creation workflows. The workflows have been modified to:
-
Create the location in the correct country subfolder.
-
Automatically add the owner to the new location.
The modifications are the same as those described in the "Role Creation Workflows" section.
Setup and Configuration
You can find the extension data for this use case in the path:
install_path\data\extension\SimpleTenancySample.ldif.
You can import the extension into the My-Company Provisioning domain. Only CompanyA has the complete set of objects and policies built for the use case. After you import the LDIF file into the My-Company Provisioning domain, you will have the following items:
-
The Company-Specific folder and its sub folders
-
The set of sample objects described in "About this Use Case".
-
Configure the CompanyA sample according to your requirements.
-
Customize Web Center (optional).
-
Test and debug your Company A configuration.
-
Set up your additional tenants using CompanyA as a template.
Configure the Company A Sample
The first step is to configure the Company A sample according to your requirements. This step includes:
-
Configuring the sample creation workflows. See the section "Understanding the Creation Workflows" in the DirX Identity Application Development Guide for details.
-
Making the customizations you would normally make to a Provisioning domain that you set up to run a single tenant, such as:
-
Customizing the sample privilege structure: the roles, permissions and groups.
-
Adding any target systems to be separated from or shared by your planned tenants. See the chapter "Managing Target Systems" in the DirX Identity Provisioning Administraton Guide for details.
See the DirX Identity Provisioning Administration Guide for details.
Customize Web Center
Although you can use the default Web Center configuration with this use case, you may have customizations that you want to make to Web Center. See the DirX Identity Web Center Customization Guide for details.
Test the Company A Sample
Now you should test and adjust the function of CompanyA so that it operates according to the configuration described in "About this Use Case".
Set up a New Company from CompanyA
When you have successfully customized and configured the CompanyA sample, you can use it as a template to set up your other tenants. This section describes how to create a new tenant named NewCompany using the CompanyA template provided with this use case.
Create a Company-Specific User Folder
To create the company-specific user folder:
-
Create folder o=NewCompany,cn=Users,cn=$(domain). This folder will contain the users of NewCompany.
-
Use CopyObject in the Identity Manager to copy CompanyAAdmin from CompanyA to the new user folder, and then rename it to NewCompanyAdmin. Uncheck the “Use as Template” checkbox in the “Operational” tab and then add this new user to the group CompanyAdmins in the DirXmetaRole target system.
-
Set a password for NewCompanyAdmin in the Data View.
Create the Company-Specific Access Policies
To create the company-specific access policies:
-
Create a folder cn=NewCompany,cn=Company Specific,cn=AccessPolicies,cn=Policies,cn=$(domain)
-
Use CopyObject in the Identity Manager to copy the policies to the new folder step by step. In each policy, replace the strings CompanyA with NewCompany, yielding, for example, NewCompanyAdmin creates countries for NewCompany.
-
In the Subjects tab of each policy, replace person CompanyAAdmin with NewCompanyAdmin.
-
In the Resources tab of each policy, replace CompanyA with NewCompany.
Create the Company-Specific Role and Permission Subfolders
Create the folders:
cn=NewCompany,cn=Company Specific,cn=RoleCatalogue,cn=$(domain)
and
cn=NewCompany,cn=Company Specific,cn=Permissions,cn=$(domain).
Create the Company-Specific Target System(s)
Create the target system:
cn=NewCompany Intranet Portal,cn=TargetSystems,cn=$(domain)
(or any other target system required for the NewCompany).
Create the Company NewCompany
Create the company object:
o=NewCompany,cn=Companies,cn=BusinessObjects,cn=$(domain)
Create the Parent Folder for Countries
Create the folder for the countries of the NewCompany:
cn=NewCompany,cn=Countries,cn=BusinessObjects,cn=$(domain).
Create the Request Workflows for NewCompany
Create a folder for the request workflow definitions of NewCompany:
cn=NewCompany,cn=Company Specific,cn=Definitions,cn=wfRoot,cn=$(domain)
Use CopyObject in the Identity Manager to copy the request workflows of CompanyA to the new folder.
In each workflow’s “Enter [General] Attributes” activity, adapt the User Base parameter for NewCompany.
Deactivate Domain-Wide Read and Modify Policies
You need to disable the domain-wide read and modify policies that may cause information sharing between the different companies in the one Provisioning domain.
Deactivate the following policies:
cn=Users can read locations,cn=Read and Modify Policies,cn=My-Company,cn=AccessPolicies,cn=Policies,cn=My-Company
cn=Users can read Organizations,cn=Read and Modify Policies,cn=My-Company,cn=AccessPolicies,cn=Policies,cn=My-Company
cn=Users can read OUs,cn=Read and Modify Policies,cn=My-Company,cn=AccessPolicies,cn=Policies,cn=My-Company
cn=Anyone can read locations,cn=Read and Modify Policies,cn=My-Company,cn=AccessPolicies,cn=Policies,cn=My-Company
Remove the Search Base Option in Web Center
To avoid displaying the structures of all companies inside the single Provisioning domain (for example, OUs, locations, users and so on), remove the search base used in Web Center and then set it to a search base that points directly to the company structure.