Managing the Privilege Structure
Privilege structure management is the process of setting up the initial privilege structure; that is, creating the roles, the permissions, and the role-permission-group relationships, and then maintaining that structure. First, you follow the planning tasks outlined in the topic "Identify the Roles and Permissions" in "Planning for Provisioning". Then, you can use DirX Identity Manager to set up the privilege structure by hand.
The topics in this section describe how to use DirX Identity Manager to create and manage the Provisioning objects associated with a privilege structure.
| The role structure is only visible when the optional Role Package is installed (requires an extra license). |
Working with Privilege Structure Objects
When you log into DirX Identity Provisioning and select Privileges from the view bar, DirX Identity displays hierarchical trees of the roles, permissions, and the target system groups that you are allowed to manage in the left-hand pane.The tree displays the following privilege objects:
-
Roles, ordered by role folders (only available if the optional Pro Suite is installed - requires an extra license).
-
Permissions, ordered by permission folders (only available if the optional Pro Suite is installed - requires an extra license).
-
Groups, ordered by target systems.
To view the properties of a privilege structure object, click its entry in the tree. DirX Identity also provides a search dialog that you can use to select and display a subset of these objects. When you select a privilege structure object, DirX Identity displays a property dialog for the object. The dialog typically consists of a set of tabs that you can use to view the object’s properties.Click the tabs in the property dialog to move between the different property categories. The following figure shows the Privileges view.
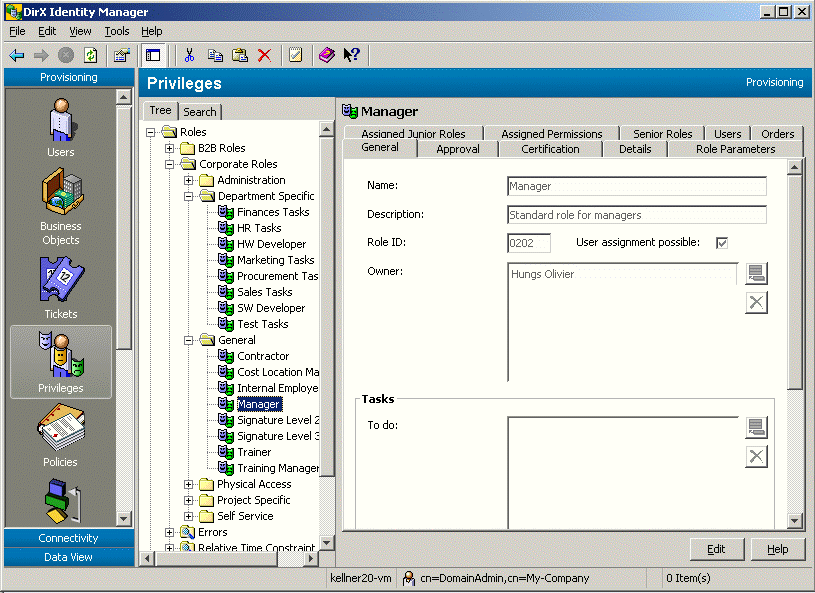
To change the value or one or more of the properties displayed in a tab, click Edit. Manager keeps the changes you make to the object in its internal cache until you click Save. As long as you do not use Save, you can use the Manager’s Reset function to restore the settings to their old values (the values that are stored in the Identity Store (Provisioning Configuration)).
When you click Save or change to another tab, Manager analyzes the changes you’ve made to the object for privilege resolution problems and other consistency problems. You can click Offline to interrupt the interactive privilege resolution process for later off-line processing (the topic "Managing the Privilege Resolution Process" provides further details). If you have clicked Save, Manager stores the changes in the Provisioning Configuration; if you have changed tabs, it stores the changes in its internal cache.Manager may return warnings and errors; the type and content depend upon the object you’re changing and the type of changes you’ve made. If you receive warnings or errors, you can use Cancel to cancel your changes.You can also choose Save; in this case, DirX Identity Manager will mark the object as "inconsistent".Manager then saves the changes in the Provisioning Configuration. In the event that it is unable to save the data because of network failure or an LDAP server error or timeout, Manager notifies you of the error.
Managing Roles
Role management consists of the following tasks:
-
Creating and maintaining a role hierarchy (junior and senior roles)
-
Changing the attributes of existing roles
-
Deleting roles
-
Organizing the role subtree
| The Roles tree is only available when the optional Roles Package is installed (requires an extra license). |
Adding a Role
To add a new role:
-
Click a role folder in the role subtree or click the top-level Role folder.
-
Select New → Role in the context menu.
-
Enter a name for the role (common name (cn)) and any other general role attributes; for example, a role type.
Once you have added a role to the role subtree, you can copy it, move it, or rename it. To copy a role, click it, then select Copy Object from the context menu or menu bar. To move a role, click it, then select Move Object from the context menu or menu bar. To rename a role, click it, then select Rename from the context menu or menu bar.
Assigning Role Parameters
Each role can be associated with one or more role parameters. Role parameters help to reduce the number of roles in a domain.
For example, suppose your organization manages a number of projects and wants to assign a project manager for each of them with project-specific access rights. Instead of defining a role (or permission) for each of the projects, you define one role, let’s say Projectleader, and associate a role parameter project with it. When a user is assigned to this role, a value for the project parameter must be provided. The privilege resolution process grants only those groups that are needed for managing this project.
Another alternative is to use permission match rules. Since permission match rules apply to user attributes, our scenario also needs in this case a special attribute such as projectleader. This solution tends to require a growing number of user attributes as the number of permission match rule scenarios increases.
Each role parameter requires a matching rule that acts as a filter for calculating user-group relationships during the privilege resolution process. When a user is assigned to such a role, for each role parameter at least one value must be provided. The subsequent privilege resolution process grants the user only those groups whose attributes match with the provided role parameter values. The matching is defined by the matching rule: it compares the role parameter values with the selected group attributes.
| Attributes to be used as group attributes must be defined as permissions parameters (see the Domain Configuration object). |
Before you can associate a role with a role parameter, you must specify role parameter names - and optionally also the values - that are allowed for the domain. Navigate to the domain configuration folder and select the RoleParams sub-folder in Customer Extensions to add new role parameter definitions.
DirX Identity Provisioning applies the matching rule to all groups that this role grants, even those that are inherited by junior roles. Suppose a role Role1 has a junior role Junior1 with a permission PermissionForJunior1 and an attached group GroupJunior1. This group is only granted if its attributes comply with the role parameter values given for the Role1 assignment. If there are permission match rules defined for the permission PermissionForJunior1, they act as an additional filter; that is, they are "and-ed" with the matching rules of the role parameters. However, if the same group is granted by another role without any role parameters, it is granted independently of the Role1 matching rules.
If more than one role parameter has been defined for a role, groups are only granted if they comply with all match rules. If more than one value has been provided for one role parameter, a group is granted if it complies with at least one of the values.
A matching rule can have the following formats, where "UTRA" stands for "User-to-role assignment":
-
UTRA.attribute operator Group.attribute | "string"
-
UTRA.attribute startsWith "string"
-
UTRA.attribute contains Group.attribute | "string"
-
UTRA.attribute endsWith "string"
-
UTRA.attribute isContained Group.attribute
These operators are available: =, >, <, >=, ⇐.
Explicit String operators are: eq, gt, lt, ge, le.
Here are some examples:
-
UTRA.l = Group.l
-
UTRA.ou contains Group.ou
-
UTRA.project isContained Group.project
-
UTRA.l = "Mch-P"
-
UTRA.l startsWith "Mch"
| Using the asterisk (*) as a wildcard in a group attribute used for a match rule always results in a match. |
To assign or change a matching rule with DirX Identity Manager (Provisioning):
-
Click the role in the role subtree to display its properties.
-
Click the Role Parameters tab, and then click Edit. Now you can edit the values of the matching rule rows.
Creating a Role Hierarchy
DirX Identity Provisioning supports a role hierarchy consisting of senior and junior roles. A senior role contains one or more other roles, while a junior role is contained within another role.
For example, if the role “R&D department manager” contains the role “R&D software engineer”, then “R&D department manager” is the senior role and “R&D software engineer” is the junior role.
In general, a role becomes a senior role when another role is assigned to it, and a role becomes a junior role when it is assigned to another role. Assigning “R&D software engineer” to “R&D department manager” therefore establishes this senior–junior relationship.
The easiest way to create a role hierarchy is to build it from the bottom up: first, create an initial set of roles that have no junior roles assigned to them. Next, create another set of roles, and assign the first set you created as junior roles of the new set.
To assign a junior role to a role or delete a junior role assignment:
-
Select the role to display its properties.
-
Click the Junior Roles tab to display the roles that have been assigned as junior roles to the role.
-
Click Edit, and then use the role assignment function to add or remove assigned roles.
| You cannot assign a senior role to a role (a senior role is at the top of the hierarchy and is assigned one or more junior roles). |
| The settings at the assigned role object control whether the assignment is immediately valid or valid only after approval. |
Assigning Permissions to Roles
To manage role-to-permission assignment with DirX Identity Manager (Provisioning views group):
-
Select a role, either by browsing the role subtree or using the Manager’s search dialog.
-
Click the Permissions tab. Manager displays the role’s assigned permissions in one pane and the available roles in another pane.
-
Click Edit.
Now you can use the Manager’s permission assignment function to:
-
Select a permission and add it to the role’s assigned permissions. You should use the search dialog to reduce the number of assignable permissions that are displayed.
-
Select an assigned permission and remove it from the list of assigned permissions.
| The settings at the assigned permission object control whether the assignment is immediately valid or valid only after approval. |
Saving Changes to a Role
When you click Save or change to another tab, the DirX Identity Provisioning system validates the changes you make to the role, and returns the following information depending on the type of changes you make:
-
The role name is missing
-
The role has no permission assigned to it and/or no junior role assigned to it. The role can be created and a message is written to the ERROR section of the general role property page indicating that no junior roles or permissions have been assigned.
-
The role is directly or indirectly assigned to itself (a role circle). Manager removes the new role assignments.
-
The user-to-group resolution process results in an error for one or more users. Manager returns the number and type of errors for these users. At this point, you can cancel the operation or proceed. If you proceed, DirX Identity Provisioning marks these users as incurring an error in privilege resolution, causing them to be identified as "inconsistent users". Here are some reasons why you might want to keep users in an inconsistent state:
-
The user can continue to work as he has in the past. The previously assigned permissions are assumed to be correct and remain valid, while the new, incorrect permissions are not assigned.
-
You (the role administrator) do not have the rights to change the user role assignment (you are not the user administrator and thus do not have the required access rights).
If you have clicked Save, Manager saves the changes in the Identity Store (Provisioning Configuration) (otherwise, it saves the changes in its internal cache until you click Save). In the event that it is unable to save the data because of network failure or an LDAP server error or timeout, Manager notifies you of the error.
| You can click Offline during Manager’s privilege resolution process to stop interactive privilege resolution and defer it for off-line execution. See the topic "Managing the Privilege Resolution Process" for further details. |
Deleting a Role
To delete a role, click it, and then select Delete in the menu bar or context menu. DirX Identity Manager (Provisioning) checks that:
-
All the role’s senior roles have at least one assigned permission and junior role
-
All the role’s assigned permissions are assigned to at least one other role
Manager then reports all senior roles that do not have an assigned permission or an assigned junior role, and/or all permissions that do not have a role assignment, and asks you to confirm the delete. At this point, you can:
-
Confirm the delete
-
Cancel the operation
Once you confirm the delete operation, the DirX Identity Provisioning system:
-
Resolves the user-group relationships for all users assigned to the role or to its senior role and identifies those users (if any) that will no longer have any group assignment after the role is deleted. At this point, you can choose to cancel the operation or proceed with the delete.
-
Deletes all assignments of senior roles or users to the role
-
Deletes the role in the DirX Identity store (Provisioning Configuration)
-
Stores the changes in users, groups, and accounts in the Identity Store (Provisioning Configuration)
| You can click Offline during Manager’s role resolution process to stop interactive privilege resolution and defer it for off-line execution. See the topic "Managing the privilege resolution Process". |
Organizing the Role Subtree
A role folder is a DirX Identity Provisioning object that the role administrator can use to organize the role subtree (the tree view of the defined roles that is displayed when "Roles" is selected in the Manager). Placing a role in a role folder does not affect the role’s place in the defined role hierarchy (the role’s junior and senior role assignments); the purpose of the role folder is to make it easy for the administrator to manage the viewable role subtree.
You can make the following changes to the hierarchical tree view of the DirX Identity Provisioning role structure:
-
Add a new role folder
-
Copy a role folder
-
Move a role folder
-
Delete a role folder
-
Rename a role folder or change its description
To add a new folder, click the root role folder or one of the folders below it, and then select New → Folder from the context menu. Manager prompts you to enter the unique name for the folder.
To copy an existing folder, click it, then select Copy Object from the context menu or menu bar.
To move an existing folder, click it, then select Move Object from the context menu or menu bar.
To change an existing folder, click it, and then click Edit.
To delete an existing folder, click the folder, and then select Delete from the context menu or menu bar.The folder to be deleted must not contain any role objects.
To rename a role or a role folder, click it, then select Rename from the context menu or menu bar.
| You cannot put permissions or groups into role folders. |
Managing Permissions
Permission management consists of the following tasks:
-
Adding permissions
-
Assigning a matching rule to a permission
-
Managing a permission’s group assignments
-
Saving changes to a permission
-
Deleting permissions
-
Organizing the permissions subtree
Adding a Permission
To add a new permission:
-
Click a permission folder in the subtree or click the top-level Permission folder.
-
Select New → Permission in the context menu. Supply a name (common name (cn)) for the permission and any other general permission attributes; for example, a description.
Manager returns an error if the name you supply for the permission is not unique.
Once you have added a permission to the privilege structure subtree, you can copy it, move it, or rename it. To copy a permission, click it, then select Copy Object from the context menu or menu bar. To move a permission, click it, then select Move Object from the context menu or menu bar. To rename a permission, click it, then select Rename from the context menu or menu bar.
Assigning a Matching Rule
Each permission can be assigned a matching rule that acts as a filter for calculating user-group relationships during the privilege resolution process. The matching rule operates as a comparison on user and group attributes that have been defined as permission parameters. The matching rule references these user and group attributes.
| Attributes that shall be used as group attributes must be defined as permissions parameters (see the Domain Configuration object). |
When DirX Identity Provisioning is resolving user rights for a given user-role assignment that aggregates the permission or a direct user-permission assignment, it performs the matching rule on every group assigned to the permission and assigns to the user only those groups that match the rule. If there is no matching rule defined for a permission, the privilege resolution process takes all of the groups that are assigned to the permission and assigns them to the user who is assigned to the role.
A matching rule can have the following formats:
-
User.attribute operator Group.attribute | "string"
-
User.attribute startsWith "string"
-
User.attribute contains Group.attribute | "string"
-
User.attribute endsWith "string"
-
User.attribute isContained Group.attribute
These operators are available: '=', '>', '<', '>=', '⇐'.
Here are some examples:
-
User.l = Group.l
-
User.ou contains Group.ou
-
User.project isContained Group.project
-
User.l = "Mch-P"
-
User.l startsWith "Mch"
You can specify a list of matching rules and concatenate them with the AND logical operator or the OR logical operator. However, you cannot use the AND and OR logical operators in the same matching rule specification. For example, the following specification is allowed:
User.l = Group.l OR User.l startsWith "Mch" OR User.l isContained Group.l
While the following specification is not allowed:
User.l = Group.l AND User.l startsWith "Mch" OR User.l isContained Group.l
| Using the asterisk (*) as a wildcard in a group attribute used for a match rule always results in a match. |
To assign or change a matching rule with DirX Identity Manager (Provisioning):
-
Click the permission in the permission subtree to display its properties.
-
Click the Matching Rule tab, then click Edit. Now you can edit the value of the matching rule field.
Managing a Permission’s Group Assignments
To manage permission-to-group assignment with DirX Identity Manager (Provisioning):
-
Select a permission, either by browsing the permission subtree or using the Manager’s search dialog.
-
Click the Assigned Groups tab. Manager displays the permission’s assigned groups in one pane and the available groups in another pane.
-
Click Edit.
Now you can use the Manager’s group assignment function to:
-
Select a group and add it to the permission’s assigned groups. You can use the search dialog to reduce the number of assignable groups that are displayed.
-
Select an assigned group and remove it from the list of assigned groups.
| The settings at the assigned group object control whether the assignment is immediately valid or valid only after approval. |
Saving Changes to a Permission
When you click Save or change to another tab, the DirX Identity Provisioning system validates the changes you make to the permission. Manager returns any errors or warnings that result from the resolution process (these messages are described in the topic "Saving Changes to a Role"). If you have clicked Save, DirX Identity Provisioning then stores in the Identity Store (Provisioning Configuration) the changes to the permission and also stores any changes to user-group relationships. If you have just changed tabs, DirX Identity Provisioning stores the changes in its internal cache.
| You can click Offline during Manager’s privilege resolution process to stop interactive privilege resolution and defer it for off-line execution. See the topic "Managing the Privilege Resolution Process" for further details. |
Deleting a Permission
To delete a permission, click it, and then select Delete in the menu bar or context menu. DirX Identity Manager (Provisioning) checks that:
-
The permission you are deleting is not the only assigned permission of a role
-
The deletion of the permission does not result in users with no group assignments
Manager then requests that you confirm the delete, after which it:
-
Resolves all users assigned to this permission and stores in the Identity Store (Provisioning Configuration) the user-group relations of all users that are assigned to a parental role of the permission
-
Deletes all assignments of roles to the permission from the Identity Store (Provisioning Configuration)
-
Deletes the permission from the DirX Identity store (Provisioning Configuration)
| You can click Offline during Manager’s role resolution process to stop interactive privilege resolution and defer it for off-line execution. See the topic "Managing the privilege resolution Process" for further details. |
Organizing the Permission Subtree
You can use permission folders to organize the permission subtree (the tree view of the defined permissions that is displayed when the "Privileges" view is selected in the Manager). You can make the following changes to the hierarchical tree view of the permissions subtree:
-
Add a new permission folder
-
Copy a permission folder
-
Move a permission folder
-
Delete a permission folder
-
Rename a permission folder or change its description
To add a new folder, click the root permission folder or one of the folders below it, and then select New → Folder from the context menu. Manager prompts you to enter the unique name for the folder.
To copy an existing folder, click it, and then select Copy Object from the context menu or menu bar.
To move an existing folder, click it, and then select Move Object from the context menu or menu bar.
To change an existing folder, click it, and then click Edit.
To delete an existing folder, click the folder, and then select Delete from the context menu or menu bar.The folder to be deleted must not contain any permission objects.
To rename a permission folder, click it, and then select Rename from the context menu or menu bar.
Managing Groups
Managing groups in the privilege structure consists of these tasks:
Adding a Group
To add a new group:
-
Click a target system folder in the group subtree.
-
Select New → Group in the context menu. Supply a name (common name (cn)) for the group and any other general group attributes; for example, a description.
Manager returns an error if the name you supply for the group is not unique.
For hierarchical target systems you can structure your groups with containers:
-
Select New → Container from the context menu to create a new container.
You can use this feature, for example, to exclude a set of groups (virtual groups) from the target system synchronization or define several subtrees that are synchronized separately into special areas in your target system.
Assigning Permission Parameters
To assign permission parameters and their values to a group:
-
Select the group to display its properties.
-
Click the General tab to display the group’s attributes. The permission parameters and values are displayed in this tab.
-
Click Edit. Now you can modify the permission parameter attributes.
Viewing a Group’s Permission Assignments
To view the permissions to which a group is assigned:
-
Select the group to display its properties.
-
Click the Permissions tab. Manager displays the permissions to which the group has been assigned.
Saving Changes to a Group
When you click Save or change to another tab, the DirX Identity Provisioning system validates the changes you make to the group. If you have clicked Save, DirX Identity Provisioning stores in the Provisioning Configuration the changes to the group and also stores:
-
Any changes to user-group relationships (caused by changes to permission parameter values)
-
Any changes to permission parameter values and other attributes
If you have not clicked Save, but have only changed tabs, DirX Identity Provisioning stores the changes in its internal cache.
| You can click Offline during Manager’s privilege resolution process to stop interactive privilege resolution and defer it for off-line execution. See the topic "Managing the Privilege Resolution Process" for further details. |
Deleting a Group
To delete a group, click it, and then select Delete from the menu bar or context menu. DirX Identity Manager (Provisioning) checks that you are authorized to delete the group, and then requests that you confirm the delete. The DirX Identity Provisioning system then validates that:
-
The deletion of the group does not result in users with no group assignments
Manager then requests that you confirm the delete, after which it:
-
Resolves and stores in the DirX Identity store (Provisioning Configuration) the user-group relations of all users that are assigned to a parental role of a permission with an assignment to the group to be deleted
-
Deletes all the assignments of permissions to the group from the Identity Store (Provisioning Configuration)
-
Marks all direct assignments of users to the group as "to be deleted" (DELETED)
-
Sets the group’s state to "to be deleted" (DELETED) and sets a timeout value for the deletion of the group in the Identity Store (Provisioning Configuration)
The target system integrator performs the actual deletion of the group in the target system when it synchronizes the information in the Identity Store (Provisioning Configuration) with the target system.At this time, the group in the Identity Store (Provisioning Configuration) is deleted.If the target system integrator is unable to delete the group in the target system, the group remains in the Identity Store (Provisioning Configuration) until its deletion timeout value is reached, at which point it is deleted from the Identity Store (Provisioning Configuration) regardless of whether or not it has been deleted from the target system.
| You can click Offline during Manager’s privilege resolution process to stop interactive privilege resolution and defer it for off-line execution.See the topic "Managing the Privilege Resolution Process" for further details. |
Working with Privilege Structure Query Folders
Query folders provide a tool that you can use to search for and identify privilege structure objects with similar properties or to search for and identify privilege structure objects that need administrator action; for example, roles that do not have any permissions assigned to them.When you open a query folder, it performs a search on the DirX Identity store (Provisioning Configuration) according to the values in its Filter tab and displays the results as objects underneath the query folder.In the DirX Identity Provisioning privilege structure view, you can:
-
Add a new role, permission, or group query folder
-
Copy a role permission or groups query folder (and then change it to your requirements)
-
Delete a role, permission, or group query folder
-
Rename a role, permission, or group query folder
DirX Identity Provisioning provides the following default query folders in the DirX Identity Provisioning role view, one for each privilege structure object type:
-
Error - identifies all roles, permissions, or groups that have messages in their Error field
-
To Do - identifies all roles, permissions, or groups that have messages in their To do field
The topic "Using Query Folders to Detect Inconsistencies" provides more information about detecting inconsistencies with query folders.
Managing the Privilege Resolution Process
When you make an access-relevant change to a role, permission, or group or delete a role, a permission, or a group, DirX Identity Manager searches the Identity Store (Provisioning Configuration) for all of the users affected by the update and resolves their user-group relationships.This process can be very time-consuming, depending on the levels of the privilege hierarchy through which DirX Identity Manager must search and the number of users that are directly or indirectly assigned to the updated privilege structure object.
Manager performs privilege resolution in three phases:
-
It searches for the roles or permissions affected by the change.
-
It searches for the users affected by the change.
-
It resolves the user-group relationships for the affected users.
For objects to be deleted, Manager removes all references to them by other objects - for example, references from all users assigned a role or permission that is to be deleted - and marks the referencing objects (in this case, the users assigned the role or permission) as "to be analyzed". The user object will not be resolved by the Manager but the resolution will be triggered by a change event or resolve message sent by the Manager.
Manager displays a progress bar as it executes these phases. You can click Cancel at any one of these phases to interrupt it. Manager marks the remaining affected DirX Identity Provisioning objects as "to be analyzed", and resolution takes place at the next run of the workflow that maintains the consistency of the Identity Store (Provisioning Configuration).
| Marking the objects as "to be analyzed" can take some time dependent on the number of objects. |
The next sections describe details of the privilege resolution process, including:
-
Role parameter handling
-
Permission parameter handling
Handling Role Parameters
Role parameters can be used to reduce the number of roles in the DirX Identity domain. The following figure illustrates this concept:
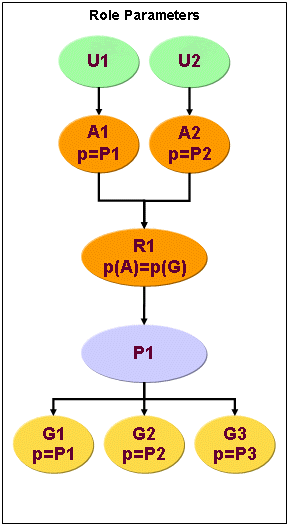
This figure shows two users U1 and U2 that use the same role R1 but with different parameters. Let’s assume that the parameter p stands for "Projectname". User U1 uses role R1 with parameter p set to P1 (project 1) and user U2 uses role R1 with parameter p set to P2 (project 2).
Role R1 uses one permission P1 that itself uses three groups, one for project 1 (P1), one for project 2 (P2) and one group for project 3 (P3).
The match rule of the role defines that the user gets a group assigned dependent on the project (p) attribute of the user-to-role assignment (A1 or A2). If the project attribute of the assignment matches the project (p) attribute of the group, the group is assigned to them.
In this case, the user U1 with p set to P1 gets the group G1 assigned. User U2 with p set to P2 gets the group G2 assigned.
You set up role parameters as separate objects in the Domain view beneath the Customer Extensions → Role Parameters folder. DirX Identity supports several types of role parameter value definition. See the topic "Setting up Role Parameters" in the chapter "Managing Domains" for more information.
You can also define hierarchical role parameters that are typically modeled as an object tree (for example, as a group tree in a target system). Access to these role parameters can be restricted, which results in a special type of delegation. See the section "Policies for Hierarchical Role Parameters" in the chapter "Managing Access Policies" for more information.
Handling Permission Parameters
Permission parameters can be used to reduce the number of permissions in the DirX Identity domain. The following figure illustrates this concept:
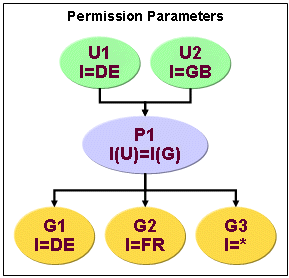
The figure shows two users U1 and U2 that use the same permission P1. This permission uses three groups, one for German users (G1), one for French (G2) and one group for all users (G3).
The match rule of the permission defines that the user gets a group assigned depending on the locality (l) attribute. If the user’s locality attribute matches the locality attribute of the group, the group is assigned to him.
In this case, the user U1 with l set to DE gets the groups G1 and G3 assigned. User U2 with l set to GB gets only the group G3 assigned.